1
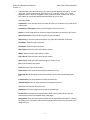
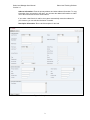
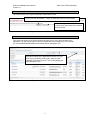
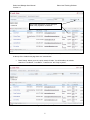
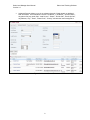
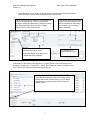
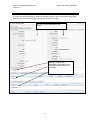
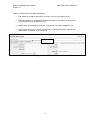
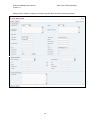
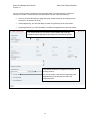
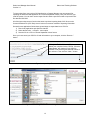
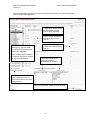
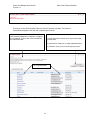
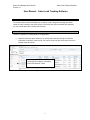
Sales Lead Manager User Manual
Version 1.0
Sales Lead Tracking Software
User Manual - Sales Lead Tracking Software
Overview
The Leads module of MVI SLM allows you to import, create, assign and manage their leads.
Leads are early contacts in the sales process. Once they have been evaluated and assessed,
you can convert them into Contacts and Accounts.
Leads – Create Lead
There are 2 options for creating leads in the application.
•
Shortcut insert: this option allows you to quickly add a lead by entering the minimum
information required to create a lead. This can be done from the “New Lead” quick form
located in the left column.
Use this quick form to create a lead by
entering the First Name, Last Name,
Phone and Email of a lead.
Figure 1 – Create Lead Quick Form
1
Sales Lead Manager User Manual
Version 1.0
•
Sales Lead Tracking Software
Complete insert: this option allows you to insert a lead with detailed information. You will
either click “Create Lead” from the “MVI Quick Links” in the left column or the “Leads”
dropdown menu in the main navigation. Once you have click the “Create Lead” link you
will be taken to a page with detailed lead information for you to enter.
The fields include:
Lead Source: From the drop-down list, select the origins of the lead such as Trade Show
or Direct Mail.
Lead Source Description: Enter a brief description of the lead source.
Status: From the drop-down list, select the status of the lead such as New or In Process.
Status Description. Enter a brief description for the lead status.
Referred by: If someone referred the lead to you, enter the information in this field.
First Name: Enter the lead’s first name.
Last Name: Enter the lead’s last name.
Office Phone: Enter the lead’s office phone number.
Mobile: Enter the lead’s mobile phone number.
Home Phone: Enter the lead’s home phone number.
Other Phone: Enter the lead’s alternative phone number, if any.
Fax: Enter the lead’s fax number.
Email: Enter the lead’s email address.
Other Email: Enter the lead’s alternative email address, if any.
Email Opt Out: Select this box if the lead opted to not share their email address with
you.
Invalid Email: If an email address is invalid, select this box.
Account Name: Enter the name of the account related to the lead.
Title: Enter the business title of the lead.
Department: Enter the department to which the lead belongs.
Do Not Call: Check this box to add the lead’s name to the Do Not Call list. This is to
ensure that the lead is not targeted during campaigns.
Assigned to: Enter the name of the individual who is responsible for the lead. To choose
an existing user, click Select, and choose the person from the User List. By default, this is
assigned to you.
2
Sales Lead Manager User Manual
Version 1.0
Sales Lead Tracking Software
Address Information: Enter the primary address and other address information. To copy
information from one section to the other, you can enter the address information on either
one of the sections and click the arrow buttons.
If you select a lead from the Lead list, the system automatically enters the address for
you. However, you can edit this information if needed.
Description Information: Enter a brief description for the lead.
Figure 2 – Complete Lead Insert
3
Sales Lead Manager User Manual
Version 1.0
Sales Lead Tracking Software
Leads – Create From vCard
This feature allows you to import a lead from a MS Outlook vCard.
First you will click the “Browse...” button to select the vCard from your system.
After selecting the vCard file, click
“Import vCard” and a lead will be created
from the vCard.
Figure 1 – Create Lead From vCard Screen
Leads – Leads
This is the main section of the Leads module and allows you to view a list of all leads in the
application. You will only be able to view/convert leads that are not assigned to you. However,
you can view/edit/duplicate/delete/convert leads that are assigned to you.
By default all leads in the application are listed. You can
view only your leads by checking the “Only my items”
checkbox and clicking “Search”. This will only display the
leads assigned to you.
Figure 1 – Leads Home View (All Leads)
4
Sales Lead Manager User Manual
Version 1.0
Sales Lead Tracking Software
Only leads assigned to you are displayed
when “Only my items” is checked.
Figure 2 – Leads Home View (Only Your Leads)
At the top of the Leads home page there are 3 search tabs:
•
Basic Search: allows you to do a quick search of leads. You will be able to do a basic
search on “First Name”, “Last Name”, “Lead Source” and “Only my items”.
Figure 3 – Quick Search Tab
5
Sales Lead Manager User Manual
Version 1.0
•
Sales Lead Tracking Software
Advanced Search: allows you to do an advanced search of leads based on additional
lead information. This information includes “First Name”, “Last Name”, “Account Name”,
any phone field, any email field, “Lead Source”, “Status”, “Do Not Call”, “Email Opt Out”,
any address, “City”, “State”, “Postal Code”, “Country” and who the lead is assigned to.
Figure 4 – Advanced Search Tab
6
Sales Lead Manager User Manual
Version 1.0
•
Sales Lead Tracking Software
Saved Search & Layout: allows you to save criteria currently set in the Advanced Search
tab and modify the columns that are displayed in the lead list view.
The top section of this tab allows you to customize the
layout of the lead list view. You can choose which
columns to display and hide here by selecting a column
and clicking the arrows to move it to the “Display
Columns” box or “Hide Columns” box.
You can type in a search name to save
the advanced search criteria.
This section allows you to set the
default “order by” field and if you
want it ascending or descending.
For example, you could select
name, ascending.
You can also run a
saved search from here.
It will then display as an option in the
“Saved Searches” dropdown.
Figure 5 – Saved Search & Layout Tab
At the bottom of the Leads home page there is a “Mass Update” section that allows you to
change the “Assigned to”, “Lead Source”, “Status” and “Reports to” fields for multiple leads at
once. This will only work for leads that are assigned to you.
You first check off the leads you want to update. Then
you modify the appropriate fields in the “Mass Update”
section and click the “Update” button. You can delete
multiple leads by checking them off and clicking the
“Delete” button.
Figure 6 – Mass Update
7
Sales Lead Manager User Manual
Version 1.0
Sales Lead Tracking Software
Leads – Lead Detail Page
You get to the lead detail page by clicking on the lead’s name or view icon from the lead list page.
Once you are on the lead detail page you will see the lead information.
You can view the lead details in this
section.
“Activities”, “History” and
“Campaigns” items related to the
lead will be displayed below the
lead details.
Figure 1 – Lead Detail Page
8
Sales Lead Manager User Manual
Version 1.0
Sales Lead Tracking Software
There are 4 buttons above the lead detail section:
•
Edit: allows you to edit the lead (this is only active if the lead is assigned to you)
•
Duplicate: allows you to duplicate the lead and change any information you need to (this
is only active if the lead is assigned to you)
•
Delete: allows you to delete the lead (this is only active if the lead is assigned to you)
•
Convert Lead: allows you to convert the lead into a contact/account (this is used when a
lead becomes a customer of your company)
Lead buttons
Figure 2 – Lead Buttons
9
Sales Lead Manager User Manual
Version 1.0
Sales Lead Tracking Software
Editing a lead is similar to creating a new lead except that the information is already populated.
Figure 3 – Edit Lead Screen
10
Sales Lead Manager User Manual
Version 1.0
Sales Lead Tracking Software
You can convert a lead by clicking the “Convert Lead” button. You will be taken to a page that
allows you to create a contact from the lead information and also create the following:
•
Account: you have the option to assign the newly created contact to an existing account
or create a new account on the fly
•
Create Opportunity: you have the ability to create an opportunity for the new contact
•
Create Appointment: you have the ability to schedule an appointment for the new contact
This section allows you to enter the contact details and will be prepopulated with the appropriate information from the lead information.
This section allows you to assign the contact to an
existing account.
Or you can create a new account, opportunity and
appointment by checking the box next to the
appropriate item.
Figure 4 – Convert Lead Screen
11
Sales Lead Manager User Manual
Version 1.0
Sales Lead Tracking Software
You will then be given a summary page displaying what has been converted.
This shows that a contact and account was
created from the lead.
Figure 5 – Convert Lead Summary
Leads – Lead Import
The Leads module allows you to import leads in 4 ways:
•
Salesforce.com: this allows you to import leads from your existing salesforce.com
software
•
Comma Delimited File: allows you to import leads from a CSV file (comma separated
values)
•
Tab Delimited File: allows you to import leads from a TSV or TAB file (tab separated
values)
•
Custom Delimited File: allows you to import a file with a custom value delimiter (e.g. a
pipe |)
Choose the data source of the import.
Then click the “Next >” button.
Figure 1 – Import Step One
12
Sales Lead Manager User Manual
Version 1.0
Sales Lead Tracking Software
To import data from your previous SLM application or Contact Manager, we recommend first
exporting the data from that application in a Comma Separated Values (.CSV) file format to your
local file system. You can then use the import function within a specific module to import the CSV
file data into MVI SLM.
All of the import data sources function the same way when importing leads. We’ll focus on the
Comma Delimited File (CSV files) since it is the most common method of importing information.
Generally most applications follow these general steps to export data into a CSV file:
1) Launch the application and Open the data file
2) Select the Save As... or Export... menu option
3) Save the file in a CSV or Comma Separated Values format
Once you have saved your CSV file of lead information to your computer, click the “Browse...”
button.
Clicking the “Browse...” button will allow you to
search your computer for the CSV file. Leave the
“Had Header” box checked if your CSV file
contains a first row that gives the field names of
your columns. Then click the “Next >” button.
Figure 2 – Import Step Two
Figure 3 – Searching for CSV file after clicking “Browse...”
13
Sales Lead Manager User Manual
Version 1.0
Sales Lead Tracking Software
The next step of the import process allows you to map the fields from your CSV file to existing
fields in the MVI SLM application.
“Header Row” column shows
the field names from the
CSV file being imported.
“Row 1” column shows the
first row of data from the
CSV file.
The “Database Field” column
allows you to map your fields
from the CSV file to the existing
fields in the application.
In this example we are mapping
“id” from the CSV file to “Contact
ID” field in the application.
“Row 2” column shows the
second row of data from the
CSV file.
This section allows you to
check your data for
duplications upon import.
This allows you to save the
import mapping so you can
reuse it the next time you need
to do an import.
Click the “Import Now” button to import the leads.
Figure 4 – Data Mapping Screen
14
Sales Lead Manager User Manual
Version 1.0
Sales Lead Tracking Software
Figure 5 – Import Progress Screen
A summary screen will be displayed after the CSV file has been uploaded. The leads are
automatically assigned to the user that is uploading the CSV file.
3 buttons:
Import summary shows the number of leads that:
were imported, skipped b/c of bad info or skipped
b/c of duplicate. There is also a link to download
the duplicated leads.
1) Undo Last Import: allows you to remove the leads
just imported
2) Import More: allows you to import additional leads
3) Finished: move you on from the import process
List of imported leads
Figure 6 – Import Results Screen
15