1
Self Handbook Documentation
Release 2 for Self 4.4
Russell Allen (Ed.)
August 02, 2011
CONTENTS
1
Introduction
1.1 System Overview . . . . . . . . . . . . . . . . . . . . . . . . . . . . . . . . . . . . . . . . . . . . .
2
Language Reference
2.1 Objects . . . . .
2.2 Slot descriptors .
2.3 Expressions . . .
2.4 Lexical elements
3
4
5
3
3
.
.
.
.
.
.
.
.
.
.
.
.
.
.
.
.
.
.
.
.
.
.
.
.
.
.
.
.
.
.
.
.
.
.
.
.
.
.
.
.
.
.
.
.
.
.
.
.
.
.
.
.
.
.
.
.
.
.
.
.
.
.
.
.
.
.
.
.
.
.
.
.
.
.
.
.
.
.
.
.
.
.
.
.
.
.
.
.
.
.
.
.
.
.
.
.
.
.
.
.
.
.
.
.
.
.
.
.
.
.
.
.
.
.
.
.
.
.
.
.
.
.
.
.
.
.
.
.
5
5
9
13
19
The Self World
3.1 World Organization . . . . . . . . . . . .
3.2 The Roots of Behavior . . . . . . . . . . .
3.3 Blocks, Booleans, and Control Structures .
3.4 Numbers and Time . . . . . . . . . . . . .
3.5 Collections . . . . . . . . . . . . . . . . .
3.6 Pairs . . . . . . . . . . . . . . . . . . . .
3.7 Mirrors . . . . . . . . . . . . . . . . . . .
3.8 Messages . . . . . . . . . . . . . . . . . .
3.9 Processes and the Prompt . . . . . . . . .
3.10 Foreign Objects . . . . . . . . . . . . . .
3.11 I/O and Unix . . . . . . . . . . . . . . . .
3.12 Other Objects . . . . . . . . . . . . . . . .
3.13 How to build the world . . . . . . . . . . .
3.14 How to use the low-level interrupt facilities
3.15 Using the textual debugger . . . . . . . . .
.
.
.
.
.
.
.
.
.
.
.
.
.
.
.
.
.
.
.
.
.
.
.
.
.
.
.
.
.
.
.
.
.
.
.
.
.
.
.
.
.
.
.
.
.
.
.
.
.
.
.
.
.
.
.
.
.
.
.
.
.
.
.
.
.
.
.
.
.
.
.
.
.
.
.
.
.
.
.
.
.
.
.
.
.
.
.
.
.
.
.
.
.
.
.
.
.
.
.
.
.
.
.
.
.
.
.
.
.
.
.
.
.
.
.
.
.
.
.
.
.
.
.
.
.
.
.
.
.
.
.
.
.
.
.
.
.
.
.
.
.
.
.
.
.
.
.
.
.
.
.
.
.
.
.
.
.
.
.
.
.
.
.
.
.
.
.
.
.
.
.
.
.
.
.
.
.
.
.
.
.
.
.
.
.
.
.
.
.
.
.
.
.
.
.
.
.
.
.
.
.
.
.
.
.
.
.
.
.
.
.
.
.
.
.
.
.
.
.
.
.
.
.
.
.
.
.
.
.
.
.
.
.
.
.
.
.
.
.
.
.
.
.
.
.
.
.
.
.
.
.
.
.
.
.
.
.
.
.
.
.
.
.
.
.
.
.
.
.
.
.
.
.
.
.
.
.
.
.
.
.
.
.
.
.
.
.
.
.
.
.
.
.
.
.
.
.
.
.
.
.
.
.
.
.
.
.
.
.
.
.
.
.
.
.
.
.
.
.
.
.
.
.
.
.
.
.
.
.
.
.
.
.
.
.
.
.
.
.
.
.
.
.
.
.
.
.
.
.
.
.
.
.
.
.
.
.
.
.
.
.
.
.
.
.
.
.
.
.
.
.
.
.
.
.
.
.
.
.
.
.
.
.
.
.
.
.
.
.
.
.
.
.
.
.
.
.
.
.
.
.
.
.
.
.
.
.
.
.
.
.
.
.
.
.
.
.
.
.
.
.
.
.
.
.
.
.
.
.
.
.
.
.
.
.
.
.
.
.
.
.
.
.
.
.
.
.
.
.
.
.
.
.
.
.
.
.
.
.
.
.
.
.
.
.
23
23
24
25
27
28
31
32
32
33
33
34
34
35
36
37
A Guide to Programming Style
4.1 Behaviorism versus Reflection . . . . . .
4.2 Objects Have Many Roles . . . . . . . .
4.3 Naming and Printing . . . . . . . . . . .
4.4 How to Return Multiple Values . . . . .
4.5 Substituting Values for Blocks . . . . . .
4.6 nil Considered Naughty . . . . . . . .
4.7 Hash and = . . . . . . . . . . . . . . . .
4.8 Equality, Identity, and Indistinguishability
.
.
.
.
.
.
.
.
.
.
.
.
.
.
.
.
.
.
.
.
.
.
.
.
.
.
.
.
.
.
.
.
.
.
.
.
.
.
.
.
.
.
.
.
.
.
.
.
.
.
.
.
.
.
.
.
.
.
.
.
.
.
.
.
.
.
.
.
.
.
.
.
.
.
.
.
.
.
.
.
.
.
.
.
.
.
.
.
.
.
.
.
.
.
.
.
.
.
.
.
.
.
.
.
.
.
.
.
.
.
.
.
.
.
.
.
.
.
.
.
.
.
.
.
.
.
.
.
.
.
.
.
.
.
.
.
.
.
.
.
.
.
.
.
.
.
.
.
.
.
.
.
.
.
.
.
.
.
.
.
.
.
.
.
.
.
.
.
.
.
.
.
.
.
.
.
.
.
.
.
.
.
.
.
.
.
.
.
.
.
.
.
.
.
.
.
.
.
.
.
.
.
.
.
.
.
.
.
.
.
.
.
.
.
.
.
.
.
.
.
.
.
.
.
.
.
.
.
.
.
.
.
.
.
.
.
.
.
.
.
.
.
.
.
.
.
.
.
39
39
40
41
42
43
43
44
44
How to Program in Self
5.1 Introduction . . . . . . . . . . . . . . . . . . . . . . . . . . . . . . . . . . . . . . . . . . . . . . .
5.2 Browsing Concepts . . . . . . . . . . . . . . . . . . . . . . . . . . . . . . . . . . . . . . . . . . . .
45
45
45
.
.
.
.
.
.
.
.
.
.
.
.
.
.
.
.
.
.
.
.
.
.
.
.
.
.
.
.
.
.
.
.
.
.
.
.
.
.
.
.
.
.
.
.
.
.
.
.
.
.
.
.
.
.
.
.
.
.
.
.
i
5.3
5.4
Hacking Objects . . . . . . . . . . . . . . . . . . . . . . . . . . . . . . . . . . . . . . . . . . . . .
The Transporter . . . . . . . . . . . . . . . . . . . . . . . . . . . . . . . . . . . . . . . . . . . . .
65
68
6
Glossary of Useful Selectors
7
Morphic: The Self User Interface Framework
7.1 Overview . . . . . . . . . . . . . . . . . .
7.2 Composite Morphs . . . . . . . . . . . . .
7.3 Morph Traits and Prototypes . . . . . . . .
7.4 Saving a Composite Morph . . . . . . . .
7.5 Handling User Input . . . . . . . . . . . .
7.6 Drag and Drop . . . . . . . . . . . . . . .
7.7 Automatic Layout . . . . . . . . . . . . .
7.8 Animation . . . . . . . . . . . . . . . . .
7.9 Other Issues . . . . . . . . . . . . . . . .
7.10 Morph Responsibilities . . . . . . . . . . .
7.11 Some Useful Morphs . . . . . . . . . . . .
7.12 The Graphical Environment . . . . . . . .
.
.
.
.
.
.
.
.
.
.
.
.
.
.
.
.
.
.
.
.
.
.
.
.
.
.
.
.
.
.
.
.
.
.
.
.
.
.
.
.
.
.
.
.
.
.
.
.
.
.
.
.
.
.
.
.
.
.
.
.
.
.
.
.
.
.
.
.
.
.
.
.
.
.
.
.
.
.
.
.
.
.
.
.
.
.
.
.
.
.
.
.
.
.
.
.
.
.
.
.
.
.
.
.
.
.
.
.
.
.
.
.
.
.
.
.
.
.
.
.
.
.
.
.
.
.
.
.
.
.
.
.
.
.
.
.
.
.
.
.
.
.
.
.
.
.
.
.
.
.
.
.
.
.
.
.
.
.
.
.
.
.
.
.
.
.
.
.
.
.
.
.
.
.
.
.
.
.
.
.
.
.
.
.
.
.
.
.
.
.
.
.
.
.
.
.
.
.
.
.
.
.
.
.
.
.
.
.
.
.
.
.
.
.
.
.
.
.
.
.
.
.
.
.
.
.
.
.
.
.
.
.
.
.
.
.
.
.
.
.
.
.
.
.
.
.
.
.
.
.
.
.
.
.
.
.
.
.
.
.
.
.
.
.
.
.
.
.
.
.
.
.
.
.
.
.
.
.
.
.
.
.
.
.
.
.
.
.
.
.
.
.
.
.
.
.
.
.
.
.
.
.
.
.
.
.
.
.
.
.
.
.
.
.
.
.
.
.
.
.
.
.
.
.
.
.
.
.
.
.
.
.
.
.
.
.
.
.
.
.
.
.
.
.
.
.
.
.
.
.
.
.
.
.
.
.
.
.
.
.
.
.
.
.
.
.
.
.
.
.
.
.
81
81
82
83
95
95
97
97
99
101
102
104
105
Virtual Machine Reference
8.1 Startup options . . . . . . . . .
8.2 System-triggered messages . .
8.3 Run-time message lookup errors
8.4 Low-level error messages . . .
8.5 An example . . . . . . . . . . .
8.6 Lookup errors . . . . . . . . .
8.7 Programmer defined errors . . .
8.8 Primitive errors . . . . . . . . .
8.9 Nonrecoverable process errors .
8.10 Fatal errors . . . . . . . . . . .
8.11 The initial Self world . . . . . .
8.12 Option Primitives . . . . . . . .
8.13 Interfacing with other languages
.
.
.
.
.
.
.
.
.
.
.
.
.
.
.
.
.
.
.
.
.
.
.
.
.
.
.
.
.
.
.
.
.
.
.
.
.
.
.
.
.
.
.
.
.
.
.
.
.
.
.
.
.
.
.
.
.
.
.
.
.
.
.
.
.
.
.
.
.
.
.
.
.
.
.
.
.
.
.
.
.
.
.
.
.
.
.
.
.
.
.
.
.
.
.
.
.
.
.
.
.
.
.
.
.
.
.
.
.
.
.
.
.
.
.
.
.
.
.
.
.
.
.
.
.
.
.
.
.
.
.
.
.
.
.
.
.
.
.
.
.
.
.
.
.
.
.
.
.
.
.
.
.
.
.
.
.
.
.
.
.
.
.
.
.
.
.
.
.
.
.
.
.
.
.
.
.
.
.
.
.
.
.
.
.
.
.
.
.
.
.
.
.
.
.
.
.
.
.
.
.
.
.
.
.
.
.
.
.
.
.
.
.
.
.
.
.
.
.
.
.
.
.
.
.
.
.
.
.
.
.
.
.
.
.
.
.
.
.
.
.
.
.
.
.
.
.
.
.
.
.
.
.
.
.
.
.
.
.
.
.
.
.
.
.
.
.
.
.
.
.
.
.
.
.
.
.
.
.
.
.
.
.
.
.
.
.
.
.
.
.
.
.
.
.
.
.
.
.
.
.
.
.
.
.
.
.
.
.
.
.
.
.
.
.
.
.
.
.
.
.
.
.
.
.
.
.
.
.
.
.
.
.
.
.
.
.
.
.
.
.
.
.
.
.
.
.
.
.
.
.
.
.
.
.
.
.
.
.
.
.
.
.
.
.
.
.
.
.
.
.
.
.
.
.
.
.
.
.
.
.
.
.
.
.
.
.
.
.
.
.
.
.
.
.
.
.
.
.
.
.
.
.
109
109
109
109
110
110
111
111
111
112
112
112
116
117
8
9
73
.
.
.
.
.
.
.
.
.
.
.
.
.
.
.
.
.
.
.
.
.
.
.
.
.
.
.
.
.
.
.
.
.
.
.
.
.
.
.
.
.
.
.
.
.
.
.
.
.
.
.
.
.
.
.
.
.
.
.
.
.
.
.
.
.
.
.
.
.
.
.
.
.
.
.
.
.
.
References
10 Appendices
10.1 Glossary . . . . . . . . . . . . . . . . . . . . . . .
10.2 Lexical overview . . . . . . . . . . . . . . . . . . .
10.3 Syntax overview . . . . . . . . . . . . . . . . . . .
10.4 Built-in types . . . . . . . . . . . . . . . . . . . . .
10.5 Glossary of Useful Selectors . . . . . . . . . . . . .
10.6 Every Menu Item in the Programming Environment
10.7 The system monitor . . . . . . . . . . . . . . . . .
10.8 Primitives . . . . . . . . . . . . . . . . . . . . . . .
ii
133
.
.
.
.
.
.
.
.
.
.
.
.
.
.
.
.
.
.
.
.
.
.
.
.
.
.
.
.
.
.
.
.
.
.
.
.
.
.
.
.
.
.
.
.
.
.
.
.
.
.
.
.
.
.
.
.
.
.
.
.
.
.
.
.
.
.
.
.
.
.
.
.
.
.
.
.
.
.
.
.
.
.
.
.
.
.
.
.
.
.
.
.
.
.
.
.
.
.
.
.
.
.
.
.
.
.
.
.
.
.
.
.
.
.
.
.
.
.
.
.
.
.
.
.
.
.
.
.
.
.
.
.
.
.
.
.
.
.
.
.
.
.
.
.
.
.
.
.
.
.
.
.
.
.
.
.
.
.
.
.
.
.
.
.
.
.
.
.
.
.
.
.
.
.
.
.
.
.
.
.
.
.
.
.
.
.
.
.
.
.
.
.
.
.
.
.
.
.
.
.
.
.
.
.
.
.
.
.
135
135
137
138
138
138
144
146
148
Self Handbook Documentation, Release 2 for Self 4.4
Release 2 for Self 4.4
Date August 02, 2011
Edited by Russell Allen.
Authors (in alphabetical order): Ole Agesen, Lars Bak, Craig Chambers, Bay-Wei Chang, Urs Hölzle, John Maloney,
Randall B. Smith, David Ungar and Mario Wolczko.
Thanks to Ganesh R for his transcription services.
CONTENTS
1
Self Handbook Documentation, Release 2 for Self 4.4
2
CONTENTS
CHAPTER
ONE
INTRODUCTION
Self is a prototype-based dynamic object-oriented programming language, environment, and virtual machine centered
around the principles of simplicity, uniformity, concreteness, and liveness.
Self includes a programming language, a collection of objects defined in the Self language, and a programming
environment built in Self for writing Self programs. The language and environment attempt to present objects to
the programmer and user in as direct and physical a way as possible. The system uses the prototype-based style of
object construction.
The first version of the Self language was designed in 1986 by David Ungar and Randall B. Smith at Xerox PARC. A
series of Self implementations and a graphical programming environment were built at Stanford University by Craig
Chambers, Urs Hölzle, Ole Agesen, Elgin Lee, Bay-Wei Chang, and David Ungar. The project continued at Sun
MIcrosystems Laboratories, where it benefited from the efforts of Randall B. Smith, Mario Wolczko, John Maloney,
and Lars Bak. Smith and Ungar jointly led it there. Work on the project officially ceased in 1995
Release 4.0 contained an entirely new user interface and programming environment designed for “serious” programming, enabling the programmer to create and modify objects entirely within the environment, and then save the object
into files for distribution purposes. The metaphor used to present an object to the user is that of an outliner, allowing
the user to view varying levels of detail. Also included in the environment is a graphical debugger, and tools for
navigation through the system.
Self is available for Solaris, Linux and natively on MacOS X under a BSD-like licence; we would be very interested
in anyone prepared to make a Windows port.
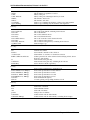
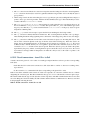
1.1 System Overview
This section contains an overview of the system and its implementation; it can be skipped if you wish to get started as
quickly as possible.
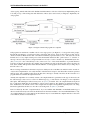
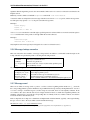
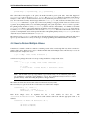
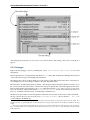
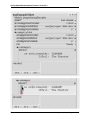
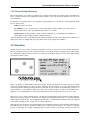
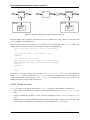
Although Self runs as a single UNIX 1 process, or a single Macintosh application, it really has two parts: the virtual
machine (VM) and the Self world, the collection of Self objects that are the Self prototypes and programs:
Figure 1.1: Figure 1: The Self system
The VM executes Self programs specified by objects in the Self world and provides a set of primitives (which are
methods written in C++) that can be invoked by Self methods to carry out basic operations like integer arithmetic,
1
UNIX is a trademark of AT&T Bell Laboratories.
3
Self Handbook Documentation, Release 2 for Self 4.4
object copying, and I/O. The Self world distributed with the VM is a collection of Self objects implementing various
traits and prototypes like cloning traits and dictionaries. These objects can be used (or changed) to implement your
own programs.
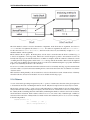
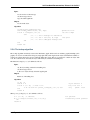
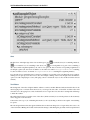
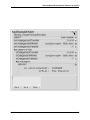
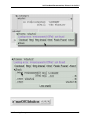
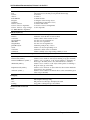
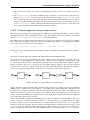
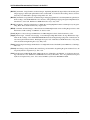
Figure 1.2: Figure 2: How Self programs are compiled.
Self programs are translated to machine code in a two-stage process (see Figure 2). Code typed in at the prompt,
through the user interface, or read in from a file is parsed into Self objects. Some of these objects are data objects;
others are methods. Methods have their own behavior which they represent with bytecodes. The bytecodes are the
instructions for a very simple virtual processor that understands instructions like “push receiver” or “send the ‘x’
message.” In fact, Self bytecodes correspond much more closely to source code than, say, Smalltalk-80 bytecodes.
(See [CUL89] for a list of the Self byte codes.) The raison d’être of the virtual machine is to pretend that these
bytecodes are directly executed by the computer; the programmer can explore the Self world down to the bytecode
level, but no further. This pretense ensures that the behavior of a Self program can be understood by looking only at
the Self source code.
The second stage of translation is the actual compilation of the bytecodes to machine code. This is how the “execution”
of bytecodes is implemented—it is totally invisible on the Self level except for side effects like execution speed and
memory usage. The compilation takes place the first time a message is actually sent; thus, the first execution of a
program will be slower than subsequent executions.
Actually, this explanation is not entirely accurate: the compiled method is specialized on the type of the receiver. If
the same message is later sent to a receiver of different type (e.g., a float instead of an integer), a new compilation
takes place. This technique is called customization; see [CU89] for details. Also, the compiled methods are placed
into a cache from which they can be flushed for various reasons; therefore, they might be recompiled from time to
time. Furthermore, the current version of the compiler will recompile and reoptimize frequently used code, using
information gathered at run-time as to how the code is being used; see [HCU91] for details.
Don’t be misled by the term “compiled method” if you are familiar with Smalltalk: in Smalltalk terminology it
denotes a method in its bytecode form, but in Self it denotes the native machine code form. In Smalltalk there is only
one compiled method per source method, but in Self there may be several different compiled methods for the same
source method (because of customization).
4
Chapter 1. Introduction
CHAPTER
TWO
LANGUAGE REFERENCE
This chapter specifies Self’s syntax and semantics. An early version of the syntax was presented in the original Self
paper by Ungar and Smith [US87] ; this chapter incorporates subsequent changes to the language. The presentation
assumes a basic understanding of object-oriented concepts.
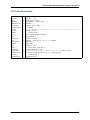
The syntax is described using Extended Backus-Naur Form (EBNF). Terminal symbols appear in Courier and are
enclosed in single quotes; they should appear in code as written (not including the single quotes). Non-terminal
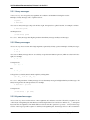
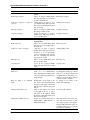
symbols are italicized. The following table describes the metasymbols:
META-SYMBOL
( and )
[ and ]
{ and }
|
→
FUNCTION
grouping
option
repetition
alternative
production
DESCRIPTION
used to group syntactic constructions
encloses an optional construction
encloses a construction that may be repeated zero or more times
separates alternative constructions
separates the left and right hand sides of a production
A glossary of terms used in this document can be found in Appendix A.
2.1 Objects
Objects are the fundamental entities in Self; every entity in a Self program is represented by one or more objects. Even
control is handled by objects: blocks (§2.1.7) are Self closures used to implement user-defined control structures. An
object is composed of a (possibly empty) set of slots and, optionally, code (§2.1.5). A slot is a name-value pair; slots
contain references to other objects. When a slot is found during a message lookup (§2.3.6) the object in the slot is
evaluated.
Although everything is an object in Self, not all objects serve the same purpose; certain kinds of objects occur frequently enough in specialized roles to merit distinct terminology and syntax. This chapter introduces two kinds of
objects, namely data objects (“plain” objects) and the two kinds of objects with code, ordinary methods and block
methods.
2.1.1 Syntax
Object literals are delimited by parentheses. Within the parentheses, an object description consists of a list of slots
delimited by vertical bars (‘|’), followed by the code to be executed when the object is evaluated. For example:
( | slot1. slot2 | ’here is some code’ printLine )
Both the slot list and code are optional: ‘( | | )’ and ‘()’ each denote an empty object.
1
1
If you wish to use the empty vertical bar notation to create an empty object, note that the parser currently requires a space between the vertical
bars.
5
Self Handbook Documentation, Release 2 for Self 4.4
Block objects are written like other objects, except that square brackets (‘[’ and ‘]’) are used in place of parentheses:
[ | slot1. slot2 | ’here is some code in a block’ printLine ]
A slot list consists of a (possibly empty) sequence of slot descriptors (§2.2) separated by periods. A period at the end
of the slot list is optional. 2
The code for an object is a sequence of expressions (§2.3) separated by periods. A trailing period is optional. Each
expression consists of a series of message sends and literals. The last expression in the code for an object may be
preceded by the ‘^’ operator (§2.1.8).
2.1.2 Data objects
Data objects are objects without code. Data objects can have any number of slots. For example, the object () has no
slots (i.e., it’s empty) while the object ( | x = 17. y = 18 | ) has two slots, x and y.
A data object returns itself when evaluated.
2.1.3 The assignment primitive
A slot containing the assignment primitive is called an assignment slot (§2.2.2). When an assignment slot is evaluated,
the argument to the message is stored in the corresponding data slot (§2.2) in the same object (the slot whose name is
the assignment slot’s name minus the trailing colon), and the receiver (§2.3) is returned as the result. (Note: this means
that the value of an assignment statement is the left-hand side of the assignment statement, not the right-hand side as
it is in Smalltalk, C, and many other languages. This is a potential source of confusion for new Self programmers.)
2.1.4 Objects with code
The feature that distinguishes a method object from a data object is that it has code, whereas a data object does not.
Evaluating a method object does not simply return the object itself, as with simple data objects; rather, its code is
executed and the resulting value is returned.
2.1.5 Code
Code is a sequence of expressions (§2.3). These expressions are evaluated in order, and the resulting values are
discarded except for that of the final expression, whose value determines the result of evaluating the code.
The actual arguments in a message send are evaluated from left to right before the message is sent. For instance, in
the expression:
2
6
But in that case make sure you put a space after the period, otherwise you will get an obscure error message from the parser.
Chapter 2. Language Reference
Self Handbook Documentation, Release 2 for Self 4.4
1 to: 5 \* i By: 2 \* j Do: [\|:k \| k print ]
1 is evaluated first, then 5 * i, then 2 * j, and then [|:k | k print]. Finally, the to:By:Do: message is sent. The associativity
and precedence of messages is discussed in section 4.
2.1.6 Methods
Ordinary methods (or simply “methods”) are methods that are not embedded in other code. A method can have
argument slots (§2.2.3) and/or local slots. An ordinary method always has an implicit parent (§2.2.4) argument slot
named self. Ordinary methods are Self’s equivalent of Smalltalk’s methods.
If a slot contains a method, the following steps are performed when the slot is evaluated as the result of a message
send:
• The method object is cloned, creating a new method activation object containing slots for the method’s arguments and locals.
• The clone’s self parent slot is initialized to the receiver of the message.
• The clone’s argument slots, if any, are initialized to the values of the corresponding actual arguments.
• The code of the method is executed in the context of this new activation object.
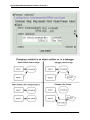
For example, consider the method ( | :arg | arg * arg ):
This method has an argument slot arg and returns the square of its argument.
2.1.7 Blocks
Blocks are Self closures; they are used to implement user-defined control structures. A block literal (delimited by
square brackets) defines two objects: the block method object, containing the block’s code, and an enclosing block
data object. The block data object contains a parent pointer (pointing to the object containing the shared behavior for
block objects) and a slot containing the block method object. Unlike an ordinary method object, the block method
object does not contain a self slot. Instead, it has an anonymous parent slot that is initialized to point to the activation
object for the lexically enclosing block or method. As a result, implicit-receiver messages (§2.3.4) sent within a block
method are lexically scoped. The block method object’s anonymous parent slot is invisible at the Self level and cannot
be accessed explicitly.
For example, the block [ 3 + 4 ] looks like:
3
3
All block objects have the same parent, an object containing the shared behavior for blocks
2.1. Objects
7
Self Handbook Documentation, Release 2 for Self 4.4
The block method’s selector is based on the number of arguments. If the block takes no arguments, the selector is
value. If it takes one argument, the selector is value:. If it takes two arguments, the selector is value:With:,
for three the selector is value:With:With:, and for more the selector is just extended by enough With:’s to
match the number of block arguments.
Block evaluation has two phases. In the first phase, a block object is created because the block is evaluated (e.g., it
is used as an argument to a message send). The block is cloned and given a pointer to the activation record for its
lexically enclosing scope, the current activation record. In the second phase, the block’s method is evaluated as a result
of sending the block the appropriate variant of the value message. The block method is then cloned, the argument
slots of the clone are filled in, the anonymous parent slot of the clone is initialized using the scope pointer determined
in phase one, and, finally, the block’s code is executed.
It is an error to evaluate a block method after the activation record for its lexically enclosing scope has returned. Such
a block is called a non-lifo block because returning from it would violate the last-in, first-out semantics of activation
object invocation.
This restriction is made primarily to allow activation records to be allocated from a stack. A future release of Self may
relax this restriction, at least for blocks that do not access variables in enclosing scopes.
2.1.8 Returns
A return is denoted by preceding an expression by the ‘^’ operator. A return causes the value of the given expression
to be returned as the result of evaluating the method or block. Only the last expression in an object may be a return.
The presence or absence of the ‘^’ operator does not effect the behavior of ordinary methods, since an ordinary method
always returns the value of its final expression anyway. In a block, however, a return causes control to be returned from
the ordinary method containing that block, immediately terminating that method’s activation, the block’s activation,
and all activations in between. Such a return is called a non-local return, since it may “return through” a number of
activations. The result of the ordinary method’s evaluation is the value returned by the non-local return. For example,
in the following method:
assertPositive: x = (
x > 0 ifTrue: [ ^ ’ok’ ].
error: ’non-positive x’ )
8
Chapter 2. Language Reference
Self Handbook Documentation, Release 2 for Self 4.4
the error: message will not be sent if x is positive because the non-local return of ‘ok’ causes the
assertPositive: method to return immediately.
2.1.9 Construction of object literals
Object literals are constructed during parsing—the parser converts objects in textual form into real Self objects. An
object literal is constructed as follows:
• First, the slot initializers of every slot are evaluated from left to right. If a slot initializer contains another object
literal, this literal is constructed before the initializer containing it is evaluated. If the initializer is an expression,
it is evaluated in the context of the lobby.
• Second, the object is created, and its slots are initialized with the results of the evaluations performed in the first
step.
Slot initializers are not evaluated in the lexical context, since none exists at parse time; they are evaluated in the context
of an object known as the lobby. That is, the initializers are evaluated as if they were the code of a method in a slot
of the lobby. This two-phase object construction process implies that slot initializers may not refer to any other slots
within the constructed object (as with Scheme’s let* and letrec forms) and, more generally, that a slot initializer
may not refer to any textually enclosing object literal.
2.2 Slot descriptors
An object can have any number of slots. Slots can contain data (data slots) or methods. Some slots have special
roles: argument slots are filled in with the actual arguments during a message send (§2.3.3), and parent slots specify
inheritance relationships (§2.3.8).
A slot descriptor consists of an optional privacy specification, followed by the slot name and an optional initializer.
2.2.1 Read-only slots
A slot name followed by an equals sign (‘=’) and an expression represents a read-only slot initialized to the result of
evaluating the expression in the root context.
For example, a constant point might be defined as:
( |
parent* = traits point.
x = 3 + 4.
y = 5.
| )
The resulting point contains three initialized read-only slots:
2.2.2 Read/write slots
There is no separate assignment operation in Self. Instead, assignments to data slots are message sends that invoke
the assignment primitive. For example, a data slot x is assignable if and only if there is a slot in the same object with
the same name appended with a colon (in this case, x:), containing the assignment primitive. Therefore, assigning 17
to slot x consists of sending the message x: 17. Since this is indistinguishable from a message send that invokes a
method, clients do not need to know if x and x: comprise data slot accesses or method invocations.
An identifier followed by a left arrow (the characters ‘<’ and ‘-’ concatenated to form ‘<-’) and an expression represents
an initialized read/write variable (assignable data slot). The object will contain both a data slot of that name and a
2.2. Slot descriptors
9
Self Handbook Documentation, Release 2 for Self 4.4
corresponding assignment slot whose name is obtained by appending a colon to the data slot name. The initializing
expression is evaluated in the root context and the result stored into the data slot at parse time.
For example, an initialized mutable point might be defined as:
( |
parent* = traits point.
x <- 3 + 4.
y <- 5.
| )
producing an object with two data slots (xand y) and two assignment slots (x:and y:) containing the assignment
primitive (depicted with ←): 4
An identifier by itself specifies an assignable data slot initialized to nil .
notation for x <- nil.
5
Thus, the slot declaration x is a shorthand
For example, a simple mutable point might be defined as:
( | x. y. | )
producing:
2.2.3 Slots containing methods
If the initializing expression is an object literal with code, that object is stored into the slot without evaluating the
code. This allows a slot to be initialized to a method by storing the method itself, rather than its result, in the slot. 6
Methods may only be stored in read-only slots. A method automatically receives a parent argument slot named self.
For example, a point addition method can be written as:
( |
+ = ( | :arg | (clone x: x + arg x) y: y + arg y ).
| )
4 In the user interface a read/write slot is depicted as a single slot with a colon labelling the button used to access the value of the slot; the
assignment slot is not shown, to save screen space. In contrast, a read-only slot has an equals sign on the button.
5 Nil is a predefined object provided by the implementation. It is intended to indicate “not a useful object.”
6 Although a block may be assigned to a slot at any time, it is often not useful to do so: evaluating the slot may result in an error because the
activation record for the block’s lexically enclosing scope will have returned; see §2.1.7.
10
Chapter 2. Language Reference
Self Handbook Documentation, Release 2 for Self 4.4
2.2. Slot descriptors
11
Self Handbook Documentation, Release 2 for Self 4.4
producing:
A slot name beginning with a colon indicates an argument slot. The prefixed colon is not part of the slot name and
is ignored when matching the name against a message. Argument slots are always read-only, and no initializer may
be specified for them. As a syntactic convenience, the argument name may also be written immediately after the slot
name (without the prefixed colon), thereby implicitly declaring the argument slot. Thus, the following yields exactly
the same object as above:
( |
+ arg = ( (clone x: x + arg x) y: y + arg y ).
| )
The + slot above is a binary slot (§2.3.2), taking one argument and having a name that consists of operator symbols.
Slots like x or y in a point object are unary slots (§2.3.1), which take no arguments and have simple identifiers for
names. In addition, there are keyword slots (§2.3.3), which handle messages that require one or more arguments. A
keyword slot name is a sequence of identifiers, each followed by a colon.
The arguments in keyword methods are handled analogously to those in binary methods: each colon-terminated identifier in a keyword slot name requires a corresponding argument slot in the keyword method object, and the argument
slots may be specified either all in the method or all interspersed with the selector parts.
For example:
( |
ifTrue: False: = ( | :trueBlock. :falseBlock |
trueBlock value ).
| )
and
( |
ifTrue: trueBlock False: falseBlock =
( trueBlock value ).
| )
produce identical objects.
2.2.4 Parent slots
A unary slot name followed by an asterisk denotes a parent slot. The trailing asterisk is not part of the slot name and
is ignored when matching the name against a message. Except for their special meaning during the message lookup
process (§2.3.8), parent slots are exactly like normal unary slots; in particular, they may be assignable, allowing
dynamic inheritance. Argument slots cannot be parent slots.
12
Chapter 2. Language Reference
Self Handbook Documentation, Release 2 for Self 4.4
2.2.5 Annotations
In order to provide extra information for the programming environment, Self supports annotations on either whole objects or individual slots. Although any object can be an annotation, the Self syntax only supports the textual definition
of string annotations. In order to annotate an object, use this syntax:
( | {} = ’this object has one slot’ snort = 17. | ) }
In order to annotate a group of slots, surround them with braces and insert the annotation after the opening brace:
( |
{ ’Category: accessing’
getOne = (...).
getAnother = (...).
}
anUnannotatedSlot.
| )
Annotations may nest; if so the Virtual Machine concatenates the annotations strings and inserts a separator character
(16r7f). 7
2.3 Expressions
Expressions in Self are messages sent to some object, the receiver. Self message syntax is similar to Smalltalk’s. Self
provides three basic kinds of messages: unary messages, binary messages, and keyword messages. Each has its own
syntax, associativity, and precedence. Each type of message can be sent either to an explicit or implicit receiver.
Productions:
8
expression
constant
unary-message
unary-send
binary-message
binary-send
keyword-message
keyword-send
receiver
resend
→
→
→
→
→
→
→
→
→
→
constant | unary-message | binary-message | keyword-message | ‘(’ expression ‘)’
self | number | string | object
receiver unary-send | resend ‘.’ unary-send
identifier
receiver binary-send | resend ‘.’ binary-send
operator expression
receiver keyword-send | resend ‘.’ keyword-send
small-keyword expression { cap-keyword expression }
[ expression ]
resend | identifier
The table below summarizes Self’s message syntax rules:
MESSAGE
Unary
binary
ARGUMENTS
0
1
PRECEDENCE
highest
medium
keyword
1
lowest
ASSOCIATIVITY
none
none or
left-to-right*
right-to-left
SYNTAX
[receiver] identifier
[receiver] operator expression
[receiver] small-keyword expression {
cap-keyword expression }
* Heterogeneous binary messages have no associativity; homogeneous binary messages associate left-to-right.
Parentheses can be used to explicitly specify order of evaluation.
7 The current programming environment expects a slot annotation to start with one of a number of keywords, including “Category: ”, “Comment:
”, and “ModuleInfo:”. See the programming environment manual for more details.
8 In order to simplify the presentation, this grammar is ambiguous; precedence and associativity rules are used to resolve the ambiguities.
2.3. Expressions
13
Self Handbook Documentation, Release 2 for Self 4.4
2.3.1 Unary messages
A unary message does not specify any arguments. It is written as an identifier following the receiver.
Examples of unary messages sent to explicit receivers:
17 print
5 factorial
Associativity. Unary messages compose from left to right. An expression to print 5 factorial, for example, is written:
5 factorial print
and interpreted as:
(5 factorial) print
Precedence. Unary messages have higher precedence than binary messages and keyword messages.
2.3.2 Binary messages
A binary message has a receiver and a single argument, separated by a binary operator. Examples of binary messages:
3 + 4
7 <-> 8
Associativity. Binary messages have no associativity, except between identical operators (which associate from left to
right). For example,
3 + 4 + 7
is interpreted as
(3 + 4) + 7
But
3 + 4 * 7
is illegal: the associativity must be made explicit by writing either
(3 + 4) * 7 or 3 + (4 * 7).
Precedence. The precedence of binary messages is lower than unary messages but higher than keyword messages. All
binary messages have the same precedence. For example,
3 factorial + pi sine
is interpreted as
(3 factorial) + (pi sine)
2.3.3 Keyword messages
A keyword message has a receiver and one or more arguments. It is written as a receiver followed by a sequence of one
or more keyword-argument pairs. The first keyword must begin with a lower case letter or underscore (‘_’); subsequent
keywords must be capitalized. An initial underscore denotes that the operation is a primitive. A keyword message
consists of the longest possible sequence of such keyword-argument pairs; the message selector is the concatenation
14
Chapter 2. Language Reference
Self Handbook Documentation, Release 2 for Self 4.4
of the keywords forming the message. Message selectors beginning with an underscore are reserved for primitives
(§2.3.7).
Example:
5 min: 4 Max: 7
is the single message min:Max: sent to 5 with arguments 4 and 7, whereas
5 min: 4 max: 7
involves two messages: first the message max:sent to 4 and taking 7 as its argument, and then the message min: sent
to 5, taking the result of (4 max: 7) as its argument.
Associativity. Keyword messages associate from right to left, so
5 min: 6 min: 7 Max: 8 Max: 9 min: 10 Max: 11
is interpreted as
5 min: (6 min: 7 Max: 8 Max: (9 min: 10 Max: 11))
The association order and capitalization requirements are intended to reduce the number of parentheses necessary in
Self code. For example, taking the minimum of two slots mand nand storing the result into a data slot i may be written
as
i: m min: n
Precedence. Keyword messages have the lowest precedence. For example,
i: 5 factorial + pi sine
is interpreted as
i: ((5 factorial) + (pi sine))
2.3.4 Implicit-receiver messages
Unary, binary, and keyword messages are frequently written without an explicit receiver. Such messages use the
current receiver (self) as the implied receiver. The method lookup, however, begins at the current activation object
rather than the current receiver (see §2.1.4 for details on activation objects). Thus, a message sent explicitly to self
is not equivalent to an implicit-receiver send because the former won’t search local slots before searching the receiver.
Explicitly sending messages to self is considered bad style.
Examples:
factorial
+ 3
max: 5
1 + power: 3
(implicit-receiver unary message)
(implicit-receiver binary message)
(implicit-receiver keyword message)
(parsed as 1 + (power: 3))
Accesses to slots of the receiver (local or inherited) are also achieved by implicit message sends to self. For an
assignable data slot named t, the message t returns the contents, and t: 17 puts 17 into the slot.
2.3.5 Resending messages
A resend allows an overridding method to invoke the overridden method. Directed resends allow ambiguities among
overridden methods to be resolved by constraining the lookup to search a single parent slot. Both resends and directed
resends may change the name of the message being sent from the name of the current method, and may pass different
2.3. Expressions
15
Self Handbook Documentation, Release 2 for Self 4.4
arguments than the arguments passed to the current method. The receiver of a resend or a directed resend must be the
implicit receiver.
Intuitively, resend is similar to Smalltalk’s supersend and CLOS’ call-next-method.
A resend is written as an implicit-receiver message with the reserved word resend, a period, and the message name.
No whitespace may separate resend, the period, and the message name.
Examples:
resend.display
resend.+ 5
resend.min: 17 Max: 23
A directed resend constrains the resend through a specified parent. It is written similar to a normal resend, but replaces
resend with the name of the parent slot through which the resend is directed.
Examples:
listParent.height
intParent.min: 17 Max: 23
Only implicit-receiver messages may be delegated via a resend or a directed resend.
9
2.3.6 Message lookup semantics
This section describes the semantics of message lookups in Self. In addition to an informal textual description, the
lookup semantics are presented in pseudo-code using the following notation:
s.name
s.contents
s.isParent
{s obj | pred(s)}
|S|
The name of slot s.
The object contained in slot s.
True iff s is a parent slot.
The set of all slots of object obj that satisfy predicate pred.
The cardinality of set S.
The message sending semantics are decomposed into the following functions:
send(rec, sel, args)
lookup(obj, rec, sel, V)
undirected_resend(...)
directed_resend(...)
eval(rec, M, args)
The message send function (§2.3.7).
The lookup algorithm (§2.3.8).
The undirected message resend function (§2.3.9).
The directed message resend function (§2.3.9).
The slot evaluation function as described informally throughout §2.1.
2.3.7 Message send
There are two kinds of message sends: a primitive send has a selector beginning with an underscore (‘_’) and calls
the corresponding primitive operation. Primitives are predefined functions provided by the implementation. A normal
send does a lookup to obtain the target slot; if the lookup was successful, the slot is subsequently evaluated. If the
slot contains a data object, then the data object is simply returned. If the slot contains the assignment primitive, the
argument of the message is stored in the corresponding data slot. Finally, if the slot contains a method, an activation
is created and run as described in §2.1.6.
If the lookup fails, the lookup error is handled in an implementation-defined manner; typically, a message indicating
the type of error is sent to the object which could not handle the message.
The function send(rec, sel, args) is defined as follows:
9
16
General delegation for explicit receiver messages is supported through primitives in the implementation (see Appendix 9.8).
Chapter 2. Language Reference
Self Handbook Documentation, Release 2 for Self 4.4
Input:
rec, the receiver of the message
sel, the message selector
args, the actual arguments
Output:
res, the result object
Algorithm
if begins_with_underscore(sel)
then invoke_primitive(rec, sel, args)
“primitive call”
else M ← lookup(rec, sel, Ø)
“do the lookup”
case
| M | = 0: error: message not understood
| M | = 1: res ← eval(rec, M, args)
“see §2.1”
| M | > 1: error: ambiguous message send
end
end
return res
2.3.8 The lookup algorithm
The lookup algorithm recursively traverses the inheritance graph, which can be an arbitrary graph (including cyclic
graphs). No object is searched twice along any single path. The search begins in the object itself and then continues to
search every parent. Parent slots are not evaluated during the lookup. That is, if a parent slot contains an object with
code, the code will not be executed; the object will merely be searched for matching slots.
The function lookup(obj, sel, V) is defined as follows:
Input:
obj, the object being searched for matching slots
sel, the message selector
V, the set of objects already visited along this path
Output:
M, the set of matching slots
Algorithm:
if obj V
then M ← Ø
else M ← {s obj | s.name = sel}
if M = Ø then M ← parent_lookup(obj, sel, V) end
end
return M
“cycle detection”
“try local slots”
“try
parent slots”
Where parent_lookup(obj, sel, V) is defined as follows:
P ← {s obj | s.isParent}
M ← υ lookup(s.contents, sel, V υ {obj})
sP
return M
2.3. Expressions
“all parents”
“recursively search parents”
17
Self Handbook Documentation, Release 2 for Self 4.4
2.3.9 Undirected Resend
An undirected resend ignores the sending method holder (the object containing the currently running method) and
continues with its parents.
The function undirected_resend(rec, smh, sel, args) is defined as follows:
Input:
rec, the receiver of the message
smh, the sending method holder
sel, the message selector args, the actual arguments
Output:
res, the result object
Algorithm:
M ← parent_lookup(smh, sel, Ø)
case
| M | = 0: error: message not understood
| M | = 1: res ← eval(rec, M, args)
| M | > 1: error: ambiguous message send
end
return res
“do the lookup”
“see §2.1”
2.3.10 Directed Resend
A directed resend looks only in one slot in the sending method holder.
The function directed_resend(rec, smh, del, sel, args) is defined as follows:
Input:
rec, the receiver of the message
smh, the sending method holder
del, the name of the delegatee
sel, the message selector
args, the actual arguments
Output:
res, the result object
Algorithm:
D ← {s smh | s.name = del}
if | D | = 0 then error: missing delegatee
M ← lookup(smh.del, sel, Ø)
case
| M | = 0: error: message not understood
| M | = 1: res ← eval(rec, M, args)
| M | > 1: error: ambiguous message send
end
return res
18
“find delegatee”
“one or none”
“do the lookup”
“see §2.1”
Chapter 2. Language Reference
Self Handbook Documentation, Release 2 for Self 4.4
2.4 Lexical elements
This chapter describes the lexical structure of Self programs—how sequences of characters in Self source code are
grouped into lexical tokens. In contrast to syntactic elements described by productions in the rest of this document, the
elements of lexical EBNF productions may not be separated by whitespace, i.e. there may not be whitespace within a
lexical token. Tokens are formed from the longest sequence of characters possible. Whitespace may separate any two
tokens and must separate tokens that would be treated as one token otherwise.
2.4.1 Character set
Self programs are written using the following characters:
• Letters. The fifty-two upper and lower case letters: ABCDEFGHIJKLMNOPQRSTUVWXYZabcdefghijklmnopqrstuvwxyz
• Digits. The ten numeric digits: 0123456789
• Whitespace. The formatting characters: space, horizontal tab (ASCII HT), newline (NL), carriage return (CR),
vertical tab (VT), backspace (BS), and form feed (FF). (Comments are also treated as whitespace.)
• Graphic characters. The 32 non-alphanumeric characters: !@#$%^&*()_-+=|\~‘{}[]:;”’<>,.?/
2.4.2 Identifiers
An identifier is a sequence of letters, digits, and underscores (‘_’) beginning with a lowercase letter or an underscore.
Case is significant: apoint is not the same as aPoint.
Productions:
→
→
→
→
small-letter
cap-letter
letter
identifier
‘a’ | ‘b’ | ... | ‘z’
‘A’ | ‘B’ | ... | ‘Z’
small-letter | cap-letter
(small-letter | ‘_’) {letter | digit | ‘_’}
Examples: i _IntAdd cloud9 m a_point
The two identifiers self and resend are reserved. Identifiers beginning with underscores are reserved for primitives.
2.4.3 Keywords
Keywords are used as slot names and as message names. They consist of an identifier or a capitalized identifier
followed by a colon (‘:’).
Productions:
small-keyword
cap-keyword
→
→
identifier ‘:’
cap-letter {letter | digit | ‘_’} ‘:’
Examples: at: Put: _IntAdd:
2.4.4 Arguments
A colon followed by an identifier denotes an argument slot name.
Productions:
arg-name
→
2.4. Lexical elements
‘:’ identifier
19
Self Handbook Documentation, Release 2 for Self 4.4
Example: :name
2.4.5 Operators
An operator consists of a sequence of one or more of the following characters:
!@#$%^&*-+=~/?<>,;|‘\
Two sequences are reserved and are not operators:
|^
Productions:
op-char
operator
→
→
‘!’ | ‘@’ | ‘#’ | ‘$’ | ‘%’ | ‘^’ | ‘&’ | ‘*’ | ‘-’ | ‘+’ | ‘=’ | ‘~’ | ‘/’ | ‘?’ |‘<’ | ‘>’ | ‘,’ | ‘;’ | ‘|’ | “’ | ‘’
op-char {op-char}
Examples: + - && || <-> % # @ ^
2.4.6 Numbers
Integer literals are written as a sequence of digits, optionally prefixed with a minus sign and/or a base. 10 No whitespace
is allowed between a minus sign and the digit sequence. 11 Real constants may be either written in fixed-point or
exponential form.
Integers may be written using bases from 2 to 36. For bases greater than ten, the characters ‘a’ through ‘z’ (case
insensitive) represent digit values 10 through 35. The default base is decimal. A non-decimal number is prefixed by
its base value, specified as a decimal number followed by either ‘r’ or ‘R’.
Real numbers may be written in decimal only. The exponent of a floating-point format number indicates multiplication
of the mantissa by 10 raised to the exponent power; i.e.,
nnnnEddd = nnnn × 10 ddd
A number with a digit that is not appropriate for the base will cause a lexical error, as will an integer constant that is
too large to be represented. If the absolute value of a real constant is too large or too small to be represented, the value
of the constant will be ± infinity or zero, respectively.
Productions:
number
integer
real
fixed-point
float
general-digit
decimal
base
→
→
→
→
→
→
→
→
[ ‘-’ ] (integer | real)
[base] general-digit {general-digit}
fixed-point | float
decimal ‘.’ decimal
decimal [ ‘.’ decimal ] (‘e’ | ‘E’) [ ‘+’ | ‘-’ ] decimal
digit | letter
digit {digit}
decimal (‘r’ | ‘R’)
Examples: 123 16r27fe 1272.34e+15 1e10
10
Unlike Smalltalk, integer literals are limited in range to smallInts.
In situations where parsing the minus sign as part of the number would cause a parse error (for example, in the expression a-1), the minus is
interpreted as a binary message (a - 1).
11
20
Chapter 2. Language Reference
Self Handbook Documentation, Release 2 for Self 4.4
2.4.7 Strings
String constants are enclosed in single quotes (‘”). With the exception of single quotes and escape sequences introduced by a backslash (‘\’), all characters (including formatting characters like newline and carriage return) lying
between the delimiting single quotes are included in the string. 12
To allow single quotes to appear in a string and to allow non-printing control characters in a string to be indicated
more visibly, Self provides C-like escape sequences:
\t
\f
\a
\’
tab
form feed
alert (bell)
single quote
\b
\r
\0
\”
backspace
carriage return
null character
double quote
\n
\v
\\
\?
newline
vertical tab
backslash
question mark
A backslash followed by an ‘x’, ‘d’, or ‘o’ specifies the character with the corresponding numeric encoding in the
ASCII character set:
\xnn
\dnnn
\onnn
hexadecimal escape
decimal escape
octal escape
There must be exactly two hexadecimal digits for hexadecimal character escapes, and exactly three digits for decimal
and octal character escapes. Illegal hexadecimal, decimal, and octal numbers, as well as character escapes specifying
ASCII values greater than 255 will cause a lexical error.
For example, the following characters all denote the carriage return character (ASCII code 13):
\r
\x0d
\d013
\o015
A long string may be broken into multiple lines by preceding each newline with a backslash. Such escaped newlines
are ignored during formation of the string constant.
A backslash followed by any other character than those listed above will cause a lexical error.
Productions:
→
→
→
→
string
normal-char
escape-char
numeric-escape
‘” { normal-char | escape-char } ‘”
any character except ‘\’ and ‘”
‘\t’ | ‘\b’ | ‘\n’ | ‘\f’ | ‘\r’ | ‘\v’ | ‘\a’ | ‘\0’ | ‘\ \’ | ‘\” | ‘\”’ | ‘\?’ | numeric-escape
‘\x’ general-digit general-digit | ( ‘\d’ | ‘\o’ ) digit digit digit
2.4.8 Comments
Comments are delimited by double quotes (‘”’). Double quotes may not themselves be embedded in the body of a
comment. All characters (including formatting characters like newline and carriage return) are part of the body of a
comment.
Productions:
comment
comment-char
→
→
‘”’ { comment-char } ‘”’
any character except ‘”’
Example: “this is a comment”
12
When typing strings in, the graphical user interface accepts multi-line strings, but the character-based read-evalprint loop does not.
2.4. Lexical elements
21
Self Handbook Documentation, Release 2 for Self 4.4
22
Chapter 2. Language Reference
CHAPTER
THREE
THE SELF WORLD
The default Self world is a set of useful objects, including objects that can be used in application programs (e.g.,
integers, strings, and collections), objects that support the programming environment (e.g., the debugger), and objects
that simply are used to organize the other objects. This document describes how this world is organized, focusing
primarily on those objects meant for use in Self programs. It does not discuss the objects used to implement system
facilities—for example, there is no discussion of the objects used to implement the graphical user interface—nor does
it discuss how to use programming support objects such as the command history object; such tools are described in
The Self User’s Manual.
The reader is assumed to be acquainted with the Self language, the use of multiple inheritance, the use of traits objects
and prototype objects, and the organizing principles of the Self world as discussed in [UCC91].
3.1 World Organization
3.1.1 The Lobby
The lobby object is thus named because it is where objects enter the Self world. For example, when a script that creates
a new object is read into the system, all expressions in that script are evaluated in the context of the lobby. That is, the
lobby is the receiver of all messages sent to “self” by expressions in the script. To refer to some existing object in a
script, the object must be accessible by sending a message to the lobby. For example, the expression:
_AddSlots: ( | newObject = ( | entries <- list copy ... | ) | )
requires that the message list be understood by the lobby (the implicit receiver of the message) so that the entries
slot of the new object can be initialized. The lobby slots traits, globals, and mixins are the roots of the object
namespaces accessible from the lobby. The organization of these namespaces is described in the next section. The slot
lobby allows the lobby itself to be referred by name.
The lobby also has a number of other functions: it is the location of the default behavior inherited by most objects in
the system (slot defaultBehavior).
3.1.2 Names and Paths
For convenience, the lobby’s namespace is broken into three pieces, implemented as separate objects rooted at the
lobby:
traits objects that encapsulate shared behavior. Typically, each prototype object has an associated traits
object of the same name that describes the shared part of its behavior.
globals prototypical objects and one-of-a-kind objects (“oddballs”)
23
Self Handbook Documentation, Release 2 for Self 4.4
mixins small, parentless bundles of behavior designed to be “mixed into” some other object
Each of these namespace objects is categorized to aid navigation.
For example, to find the parent of the prototype list object, one could start with the globals slot of the lobby, then
get the list slot of that object, and then the parent slot of the list. The sequence of slot names, globals list
parent is called a path and constitutes the list parent’s full name. Parent slots can be omitted from an object’s full
name, since the slots in a parent are visible in the child via inheritance. A path with parent slots omitted forms the
short name for an object. For example, the short name for the list parent is simply list parent.
Non-parent slots are used when it is desirable to keep a part of the name space distinct. For example, the traits
slot of the lobby is not a parent slot. This allows a convention that gives prototypes and their associated traits objects
similar names: a prototype and its associated traits object have the same local name, but the prototype is placed in a
slot in the globals object, whereas the traits of the prototype is placed in a slot in the traits object. Since the
traits slot of the lobby is not a parent slot, the name of the traits object must start with the prefix traits. The
globals slot, on the other hand, is a parent slot, so the name of a prototype object needs no prefix. Thus, list
refers to the prototype list while traits list refers to its traits object for lists.
As a matter of style, programs should refer to objects by the shortest possible name. This makes it easier to re-organize
the global namespace as the system evolves. (If programs used full path names, then many more names would have to
be updated to reflect changes to the namespace organization, a tedious chore.)
3.2 The Roots of Behavior
3.2.1 Default Behavior
Certain common behavior is shared by nearly all objects in the Self world. This basic behavior is defined in the
defaultBehavior slot of the lobby and includes:
• identity comparisons (== and !==)
• inequality (!=)
• default behavior for printing (reimplement printString in descendants)
• mirror creation (reflect:)
• support for point, and list construction (@ and &)
• behavior that allows blocks to ignore extra arguments
• behavior that allows an object to behave like a block that evaluates to that object (this permits a non-block object
to be passed to a method that expects a block)
• behavior that allows an object to be its own key in a collection (key)
• default behavior for doubly-dispatched messages
• behavior for printing error messages and stack dumps (error: and halt)
It is important to note that not all objects in the system inherit this default behavior. It is entirely permissible to
construct objects that do not inherit from the lobby, and the Self world contains quite a few such objects. For example,
the objects used to break a namespace into separate categories typically do not inherit from the lobby. Any program
intended to operate on arbitrary objects, such as a debugger, must therefore assume that the objects it manipulates do
not understand even the messages in defaultBehavior.
Modules: defaultBehavior, errorHandling
24
Chapter 3. The Self World
Self Handbook Documentation, Release 2 for Self 4.4
3.2.2 The Root Traits: Traits Clonable and Traits Oddball
Most concrete objects in the Self world are descendants of one of two top-level traits objects: traits clonable
and traits oddball. The distinction between the two is based on whether or not the object is unique. For
example, true is a unique object. There is only one true object in the entire system, although there are many
references to it. On the other hand, a list object is not unique. There may be many lists in the system, each containing
different elements. A unique object responds to the message copy by returning itself and uses identity to test for
equality. The general rule is:
• unique objects usually inherit from traits oddball
• non-unique objects usually inherit from traits clonable
Module: rootTraits
3.2.3 Mixins
Like traits objects, mixin objects encapsulate a bundle of shared behavior. Unlike traits objects, however, mixin objects
are generally parentless to allow their behavior to be added to an object without necessarily also adding unwanted
behavior (such as access to the lobby namespace). Mixins are generally used in objects that also have other parents.
An example is mixins identity.
3.2.4 The Identity Mixin
Two objects are usually tested for equality based on whether they have “the same value” within a common domain.
For example, 3.0 = 3 within the domain of numbers, even though they are not the same object or even the same
kind of object. In some domains, however, two objects are equal if and only if they are the exact same object. For
example, even two process objects with the same state are not considered equal unless they are identical. In such cases,
identity comparison is used to implement equality tests, and mixins identity can be mixed in to get the desired
behavior.
Module: rootTraits
3.3 Blocks, Booleans, and Control Structures
A block is a special kind of object containing a sequence of statements. When a block is evaluated by being sent
an acceptable value message, its statements are executed in the context of the current activation of the method in
which the block is declared. This allows the statements in the block to access variables local to the block’s enclosing
method and any enclosing blocks in that method. (This set of variables comprises the lexical scope of the block.) It
also means that within the block, self refers to the receiver of the message that activated the method, not to the block
object itself. A return statement in a block causes a return from the block’s enclosing method. (See the Self Language
Reference for a more thorough discussion of block semantics.) A block can take an arbitrary number of arguments and
can have its own local variables, as well as having access to the local variables of its enclosing method. The statements
in the block are executed when the block is sent a message of the form “value[:{With:}]”, where the number
of colons in the message is at least the same as the number of arguments the block takes (extra arguments are ignored,
but it is an error to provide too few). For example, the following block takes two arguments:
[| :arg1. :arg2 | arg1 + arg2 ]
and can be evaluated by sending it the message value:With: to produce the sum of its arguments. Blocks are
used to implement all control structures in Self and allow the programmer to easily extend the system with customized
control structures. In fact, all control stuctures in Self except message sends, returns, and VM error handling are
implemented using blocks.
3.3. Blocks, Booleans, and Control Structures
25
Self Handbook Documentation, Release 2 for Self 4.4
3.3.1 Booleans and Conditionals
The fundamental control structure is the conditional. In Self, the behavior of conditionals is defined by two
unique boolean objects, true and false. Boolean objects respond to the messages ifTrue:, ifFalse:,
ifTrue:False:, and ifFalse:True: by evaluating the appropriate argument block. For example, true implements ifTrue:False: as:
ifTrue: b1 False: b2 = ( b1 value )
That is, when true is sent ifTrue:False:, it evaluates the first block and ignores the second. For example, the
following expression evaluates to the absolute value of x:
x < 0 ifTrue: [ x negate ] False: [ x ]
The booleans also define behavior for the logical operations AND (&&), OR (||), EXCLUSIVE-OR (^^),
and NOT (not). Because the binary boolean operators all send value to their argument when necessary, they can
also be used for “short-circuit” evaluation by supplying a block, e.g.:
(0 <= i) && [i < maxByte pred] ifTrue: [...
Module: boolean
3.3.2 Loops
The various idioms for constructing loops in Self are best illustrated by example. Here is an endless loop:
[ ... ] loop
Here are two loops that test for their termination condition at the beginning of the loop:
[ proceed ] whileTrue: [ ... ]
[ quit ] whileFalse: [ ... ]
In each case, the block that receives the message repeatedly evaluates itself and, if the termination condition is not yet
met, evaluates the argument block. The value returned by both loop expressions is nil.
It is also possible to put the termination test at the end of the loop, ensuring that the loop body is executed at least
once:
[ ... ] untilTrue: [ quit ]
[ ... ] untilFalse: [ proceed ]
Here is a loop that exits from the middle when quit becomes true:
[| :exit | ... quit ifTrue: exit ... ] loopExit
For the incurably curious: the parameter to the user’s block, supplied by the loopExit method, is simply a block
that does a return from the loopExit method. Thus, the loop terminates when exit value is evaluated. The
constructs loopExitValue, exit, and exitValue are implemented in a similar manner.
The value returned by the overall “[...] loopExit” expression is nil. Here is a loop expression that exits and evaluates
to a value determined by the programmer when quit becomes true:
[| :exit | ... quit ifTrue: [ exit value: expr ] ] loopExitValue
Module: block
26
Chapter 3. The Self World
Self Handbook Documentation, Release 2 for Self 4.4
3.3.3 Block Exits
It is sometimes convenient to exit a block early, without executing its remaining statements. The following constructs
support this behavior:
[| :exit | ... quit ifTrue: exit ... ] exit
[| :exit | ... quit ifTrue: [ exit value: expr ] ... ] exitValue
The first expression evaluates to nil if the block exits early; the second allows the programmer to define the expression’s
value when the block exits early. Note: These constructs should not be confused with their looping counterparts
loopExit and loopExitValue.
Module: block
3.3.4 Other Block Behavior
Blocks have some other useful behavior:
• One can determine the time in milliseconds required to execute a block using various ways of measuring time
using the messages userTime, systemTime, cpuTime, and real-Time.
• One can profile the execution of a block using the messages profile and flatProfile. profile prints
out the source level call graph annotated with call site and timing information whereas flatProfile prints
out a flat profile sorted by module.
• The message countSends will collect lookup statistics during a block execution.
Any object that inherits from the lobby can be passed to a method that expects a block; behavior in‘‘defaultBehavior‘‘
makes the object behave like a block that evaluates to that object.
Module: block
3.4 Numbers and Time
The SELF number traits form the hierarchy shown below. (In this and subsequent hierarchy descriptions, indentation
indicates that one traits object is a child of another. The prefix “traits” is omitted since these hierarchy descriptions always describe the interrelationship between traits objects. In most cases, leaf traits are concrete and have an associated
prototype with the same name.)
orderedOddball
number
float
integer
smallInt
bigInt
traits number defines behavior common to all numbers, such as successor, succ, predecessor, pred,
absoluteValue, negate, double, half, max:, and min:. traits number inherits from traits
orderedOddball, so sending copy or clone to a number returns the number itself. traits integer defines behavior common to all integers such as even, odd, and factorial. There are four division operators for
integers that allow the programmer to control how the result is truncated or rounded. Integers also include behavior
for iterating through a subrange, including:
to:Do:
to:By:Do:
to:ByNegative:Do:
3.4. Numbers and Time
27
Self Handbook Documentation, Release 2 for Self 4.4
upTo:Do:
upTo:By:Do:
downTo:Do:
downTo:By:Do:
Relevant oddballs:
• infinity IEEE floating-point infinity
• minSmallInt smallest smallInt in this implementation
• maxSmallInt biggest smallInt in this implementation
Modules: number, float, integer, smallInt, bigInt
3.4.1 Random Numbers
clonable
random
randomLC
prototypes random
Traits random defines the abstract behavior of random number generators. A random number generator can be
used to generate random booleans, integers, floats, characters or strings. traits randomLC defines a concrete
specialization based on a simple linear congruence algorithm. For convenience, the prototype for randomLC is
“random,” not “randomLC”.
Modules: random
3.4.2 Time
clonable
time
A time object represents a date and time (to the nearest millisecond) since midnight GMT on January 1, 1970. The
message current returns a new time object containing the current time. Two times can be compared using the
standard comparison operators. One time can be subtracted from another to produce a value in milliseconds. An offset
in milliseconds can be added or subtracted from a time object to produce a new time object. However, it is an error to
add two time objects together.
Modules: time
3.5 Collections
clonable
collection
... collection hierarchy ...
Collections are containers that hold zero or more other objects. In Self, collections behave as if they have a key
associated with each value in the collection. Collections without an obvious key, such as lists, use each element as
both key and value. Iterations over collections always pass both the value and the key of each element (in that order)
to the iteration block. Since Self blocks ignore extra arguments, this allows applications that don’t care about keys to
simply provide a block that takes only one argument.
28
Chapter 3. The Self World
Self Handbook Documentation, Release 2 for Self 4.4
Collections have a rich protocol. Additions are made with at:Put:, or with add: or addAll: for implicitly keyed
collections. Iteration can be done with do: or with variations that allow the programmer to specify special handling
of the first and/or last element. with:Do: allows pairwise iteration through two collections. The includes:,
occurrencesOf:, and findFirst: IfPresent:IfAbsent: messages test for the presence of particular
values in the collection. filterBy:Into: creates a new collection including only those elements that satisfy
a predicate block, while mapBy:Into: creates a new collection whose elements are the result of applying the
argument block to each element of the original collection.
Abstract collection behavior is defined in traits collection. Only a small handful of operations need be implemented to create a new type of collection; the rest can be inherited from traits collection. (See the
descendantResponsibility slot of traits collection.) The following sections discuss various kinds
of collection in more detail.
Modules: collection (abstract collection behavior)
3.5.1 Indexable Collections
collection
indexable
mutableIndexable
byteVector
...the string hierarchy
sequence
sortedSequence
vector
Indexable collections allow random access to their elements via keys that are integers. All sequences and vectors are
indexable. The message at: is used to retrieve an element of an indexable collection while at:Put: is used to
update an element of a mutableIndexable collection (other than a sortedSequence).
Modules: indexable, abstractString, vector, sequence, sortedSequence
3.5.2 Strings, Characters, and Paragraphs
collection
...
byteVector
string
mutableString
immutableString
canonicalString
A string is a vector whose elements are character objects. There are three kinds of concrete string: immutable strings,
mutable strings and canonical strings. traits string defines the behavior shared by all strings. A character is a
string of length one that references itself in its sole indexable slot.
Mutable strings can be changed using the message at:Put:, which takes a character argument, or at:PutByte:,
which takes an integer argument. An immutable string cannot be modified, but sending it the copyMutable message
returns a mutable string containing the same characters.
Canonical strings are registered in an table inside the virtual machine, like Symbol objects in Smalltalk or atoms in
LISP. The VM guarantees that there is at most one canonical string for any given sequence of bytes, so two canonical
strings are equal (have the same contents) if and only if they are identical (are the same object). This allows efficient
equality checks between canonical strings. All message selectors and string literals are canonical strings, and some
primitives require canonical strings as arguments. Sending canonicalize to any string returns the corresponding
canonical string.
3.5. Collections
29
Self Handbook Documentation, Release 2 for Self 4.4
Character objects behave like immutable strings of length one. There are 256 well-known character objects in the
Self universe. They are stored in a 256-element vector named ascii, with each character stored at the location
corresponding to its ASCII value. Characters respond to the message asByte by returning their ASCII value (that
is, their index in ascii). The inverse of asByte, asCharacter, can be sent to an integer between 0 and 255 to
obtain the corresponding character object.
Module: string
3.5.3 Unordered Sets and Dictionaries
collection
setOrDictionary
set
sharedSet
dictionary
sharedDictionary
There are two implementations of sets and dictionaries in the system. The one described in this section is based on
hash tables. The one discussed in the following section is based on sorted binary trees. The hash table implementation
has better performance over a wide range of conditions. (An unfortunate ordering of element addtions can cause the
unbalanced trees used in the tree version to degenerate into an ordered lists, resulting in linear access times.)
A set behaves like a mathematical set. It contains elements without duplication in no particular order. A dictionary
implements a mapping from keys to values, where both keys and values are arbitrary objects. Dictionaries implement
the usual collection behavior plus keyed access using at: and at:Put: and the dictionary-specific operations
includesKey: and removeKey:. In order to store an object in a set or use it as a dictionary key, the object must
understand the messages hash and =, the latter applying to any pair of items in the collection. This is because sets
and dictionaries are implemented as hash tables.
Derived from set and dictionary are sharedSet and sharedDictionary. These provide locking to maintain
internal consistency in the presence of concurrency.
Modules: setAndDictionary, sharedSetAndDictionary
3.5.4 Tree-Based Sets and Dictionaries
collection
tree
treeNodes abstract
treeNodes bag
treeNodes set
emptyTrees abstract
emptyTrees bag
emptyTrees set
treeSet and treeBag implement sorted collections using binary trees. The set variant ignores duplicates, while
the bag variant does not. Tree sets and bags allow both explicit and implicit keys (that is, adding elements can be done
with either at:Put: or add:), where a tree set that uses explicit keys behaves like a dictionary. Sorting is done on
explicit keys if present, values otherwise, and the objects sorted must be mutually comparable. Comparisons between
keys are made using compare:IfLess:Equal:Greater:.
The implementation of trees uses dynamic inheritance to distinguish the differing behavior of empty and non-empty
subtrees. The prototype treeSet represents an empty (sub)tree; when an element is added to it, its parent is switched
from traits emptyTrees set, which holds behavior for empty (sub)trees, to a new copy of treeSetNode,
which represents a tree node holding an element. Thus, the treeSet object now behaves as a treeSetNode object,
30
Chapter 3. The Self World
Self Handbook Documentation, Release 2 for Self 4.4
with right and left subtrees (initially copies of the empty subtree treeSet). Dynamic inheritance allows one object
to behave modally without using clumsy if-tests throughout every method.
One caveat: since these trees are not balanced, they can degenerate into lists if their elements are added in sorted
order. However, a more complex tree data structure might obscure the main point of this implementation: to provide a
canonical example of the use of dynamic inheritance.
Modules: tree
3.5.5 Lists and PriorityQueues
collection
list
priorityQueue
A list is an unkeyed, circular, doubly-linked list of objects. Additions and removals at either end are efficient, but
removing an object in the middle is less so, as a linear search is involved.
A priorityQueue is an unkeyed, unordered collection with the property that the element with the highest priority
is always at the front of the queue. Priority queues are useful for sorting (heapsort) and scheduling. The default
comparison uses <, but this can be changed.
Modules: list. priorityQueue
3.5.6 Constructing and Concatenating Collections
clonable
collector
Two kinds of objects play supporting roles for collections. A collector object is created using the & operator
(inherited from defaultBehavior), and represents a collection under construction. The & operator provides a
concise syntax for constructing small collections. For example:
(1 & ’abc’ & x) asList
constructs a list containing an integer, a string, and the object x. A collector object is not itself a collection; it is
converted into one using a conversion message such as asList, asVector, or asString.
Modules: collector
3.6 Pairs
pair
point
rectangle
traits pair describes the general behavior for pairs of arithmetic quantities. A point is a pair of numbers representing a location on the cartesian plane. A rectangle is a pair of points representing the opposing corners of a
rectangle whose sides are parallel with the x and y axes.
Modules: pair, point, rectangle
3.6. Pairs
31
Self Handbook Documentation, Release 2 for Self 4.4
3.7 Mirrors
collection
mirror
mirrors smallInt
mirrors float
mirrors vectorish
mirrors vector
mirrors byteVector
mirrors canonicalString
mirrors mirror
mirrors block
mirrors method
mirrors blockMethod
mirrors activation liveOnes
mirrors activation
mirrors deadActivation
mirrors methodActivation
mirrors blockMethodActivation
mirrors process
mirrors assignment
mirrors slots
mirrors profiler
Mirrors allow programs to examine and manipulate objects. (Mirrors get their name from the fact that a program can
use a mirror to examine—that is, reflect upon—itself.) A mirror on an object x is obtained by sending the message
reflect: x to any object that inherits defaultBehavior. The object x is called the mirror’s reflectee. A mirror
behaves like a keyed collection whose keys are slot names and whose values are mirrors on the contents of slots of
the reflectee. A mirror can be queried to discover the number and names of the slots in its reflectee, and which slots
are parent slots. A mirror can be used to add and remove slots of its reflectee. Iterating through a mirror enumerates
objects representing slots of the reflected object (such facets are called “fake” slots). For example, a method mirror
includes fake slots for the method’s byte code and literal vectors and elements of vectors and byteVectors.
There is one kind of mirror for each kind of object known to the virtual machine: small integers, floats, canonical
strings, object and byte vectors, mirrors, blocks, ordinary and block methods, ordinary and block method activations,
processes, profilers, the assignment primitive, and ordinary objects (called “slots” because an ordinary object is just a
set of slots). The prototypes for these mirrors are part of the initial Self world that exists before reading in any script
files. The file init.self moves these prototypes to the mirrors subcategory of the prototypes category of
the lobby namespace. Because mirrors is not a parent slot, the names of the mirror prototypes always include the
“mirrors” prefix.
Modules: mirror, slot, init
3.8 Messages
Self allows messages to be manipulated as objects when convenient. For example, if an object fails to understand a
message, the object is notified of the problem via a message whose arguments include the selector of the message that
was not understood. While most objects inherit default behavior for handling this situation (by halting with an error),
it is sometimes convenient for an object to handle the situation itself, perhaps by resending the message to some other
object. Objects that do this are called transparent forwarders. An example is given in interceptor.
A string has the basic ability to use itself as a message selector using the messages sendTo: (normal message sends),
resendTo: (resends), or sendTo:DelegatingTo: (delegated sends). Each of these messages has a number of
variations based on the number of arguments the message has. For example, one would used sendTo:With:With:
to send a message with at:Put: as the selector and two arguments:
32
Chapter 3. The Self World
Self Handbook Documentation, Release 2 for Self 4.4
’at:Put:’ sendTo: aDict With: k With: v
Note: Primitives such as _Print cannot be sent in the current system.
A selector, receiver, delegatee, methodHolder, and arguments can be bundled together in a message object. The
message gets sent when the message object receives the send message. Message objects are used to describe delayed
actions, such as the actions that should occur just before or after a snapshot is read. They are also used as an argument
to new process creation (you can create a new process to execute the message by sending it fork).
Modules: sending, message, selector, interceptor
3.9 Processes and the Prompt
Self processes are managed by a simple preemptive round-robin scheduler. Processes can be stepped, suspended,
resumed, terminated, or put to sleep for a specified amount of time. Also, the stack of a suspended process can be
examined and the CPU use of a process can be determined. A process can be created by sending fork to a message.
The prompt object takes input from stdin and spawns a process to evaluate the message. Input to the prompt is
kept in a history list so that past input can be replayed, similar to the history mechanism in many Unix shells.
Modules: process, scheduler, semaphore, prompt, history
3.10 Foreign Objects
clonable
proxy
fctProxy
foreignFct
foreignCode
The low level aspects of interfacing with code written in other languages (via C or C++ glue code) are described in
the VM Reference Manual. A number of objects in the Self world are used to interface to foreign data objects and
functions. These objects are found in the name spaces traits foreign, and globals foreign.
One difficulty in interfacing between Self and external data and functions is that references to foreign data and functions from within Self can become obsolete when the Self world is saved as a snapshot and then read in later, possibly
on some other workstation. Using an obsolete reference (i.e., memory address) would be disastrous. Thus, Self
encapsulates such references within the special objects proxy (for data references) and fctProxy (for function
references). Such objects are known collectively as proxies. A proxy object bundles some extra information along
with the memory address of the referenced object and uses this extra information to detect (with high probability) any
attempt to use an obsolete proxy. An obsolete proxy is called a dead proxy.
To make it possible to rapidly develop foreign code, the virtual machine supports dynamic linking of this code. This
makes it unnecessary to rebuild the virtual machine each time a small change is made to the foreign code. Dynamic
linking facilities vary from platform to platform, but the Self interface to the linking facilities is largely system independent. The SunOS/Solaris dynamic link interface is defined in the sunLinker object. However, clients should
always refer to the dynamic linking facilities by the name linker, which will be initialized to point to the dynamic
linker interface appropriate for the current platform.
The linker, proxy and fctProxy objects are rather low level and have only limited functionality. For example, a
fctProxy does not know which code file it is dependent on. The objects foreignFct and foreignCode establish
a higher level and easier to use interface. A foreign-Code object represents an “object file” (a file with executable
code). It defines methods for loading and unloading the object file it represents. A foreignFct object represents a
3.9. Processes and the Prompt
33
Self Handbook Documentation, Release 2 for Self 4.4
foreign routine. It understands messages for calling the foreign routine and has associated with it a foreignCode
object. The foreignFct and foreignCode objects cooperate with the linker, to ensure that object files are
transparently loaded when necessary and that fctProxies depending on an object file are killed when the object
file is unloaded, etc.
The foreignCodeDB object ensures that foreignCode objects are unique, given a path. It also allows for specifying initializers and finalizers on foreignCode objects. An initializer is a foreign routine that is called whenever
the object file is loaded. Initializers take no arguments and do not return values. Typically, they initialize global data
structures. Finalizers are called when an object file is unloaded. When debugging foreign routines, foreignCodeDB
printStatus outputs a useful overview.
Normal use of a foreign routine simply involves cloning a foreignFct object to represent the foreign routine. When
cloning it, the name of the function and the path of the object file is specified. It is then not necessary to worry about
proxy, fctProxy and linker objects, etc. In fact, it is recommended not to send messages directly to these
objects, since this may break the higher level invariants that foreignFct objects rely on.
Relevant oddballs:
linker
sunLinker
foreignCodeDB
dynamic linker for current platform
dynamic linker implementation for SunOS/Solaris
registry for foreignCode objects
Modules: foreign
3.11 I/O and Unix
oddball
unix
clonable
proxy
unixFile (mixes in traits unixFile currentOsVariant)
The oddball object unix provides access to selected Unix system calls.
The most common calls are
the file operations: creat(), open(), close(), read(), write(), lseek() and unlink().
tcpConnectToHost:Port:IfFail: opens a TCP connection. The select() call and the indirect system
call are also supported (taking a variable number of integer, float or byte vector arguments, the latter being passed
as C pointers). unixFile provides a higher level interface to the Unix file operations. The oddball object tty
implements terminal control facilities such as cursor positioning and highlighting.
Relevant oddballs:
stdin, stdout, stderr
tty
standard Unix streams
console terminal capabilities
Modules: unix, stdin, tty, ttySupport, termcap
3.12 Other Objects
Here are some interesting oddball objects not discussed elsewhere:
34
Chapter 3. The Self World
Self Handbook Documentation, Release 2 for Self 4.4
comparator
compilerProfiling
desktop
history
memory
monitor
nil
platforms
preferences
profiling, flatProfiling
prompt
scheduler
snapshotAction
thisHost
times
typeSizes
vmProfiling
an object that can compute “diffs” between sequences
compiler profiling
The controlling object for the graphical user interface
A history of commands typed at the prompt, and their results
memory system interface (GC, snapshot, low space, etc.)
system monitor (spy) control
indicates an uninitialized value
possible hardware platforms
user configuration preferences
controls Self code profiling
interactive read-eval-print loop
Self process scheduler
actions to do before/after a snapshot
describes the current host platform
reports user, system, cpu, or real time
bit/byte sizes for primitive types
virtual machine profiling
3.13 How to build the world
Should you need to reconstruct a world from the source files, here’s how to do it. This section describes
how to create a default object world by reading in the Self source code provided with your distribution (in
Optional.SelfSource.tar.Z). You can also do this after writing the world out using the transporter
(transporter fileOut fileOutAll).
To create the default object world:
1. Start the Self VM:
% Self
Self Virtual Machine Version 4.0.2, Thu 09 Feb 95 19:41:30
Copyright 1989-95: The Self Group (type _Credits for credits)
VM#
2. (Optional, but recommended.) Start the spy so you can watch the world fill up with objects:
VM# _Spy: true
Note: that because the world is empty, you must use the primitive to do this.
3. Read in the default world. To do this, ask Self to read expressions from a file:
VM# ’all2.self’ _RunScript
Various configurations are possible: all2 is the released system; smallUI2 is the same but without
the various example applications; and all contains the old (release 3.0) experimental user interface.
Unless you have asked Self not to print script names, you should see something like:
reading all2.self
reading init.self
. . .
4. After all the files have been read in, Self will start the process scheduler, initialize its module cache, and print:
3.13. How to build the world
35
Self Handbook Documentation, Release 2 for Self 4.4
“Self 0”
That last line is the Self prompt indicating that the system is ready to read and evaluate expressions.
3.14 How to use the low-level interrupt facilities
There are two low-level ways to interrupt a running Self program 1 , Control-C and Control-\. The second way works
even if the Self process scheduler is not running. In response to the interrupt, you will see one of two things. If the
Self scheduler is not running, you will be returned directly to the VM# prompt. If the scheduler is running, you will be
presented with a list of Self processes (the process menu):
Self 9> 100000 * 100000 do: []
^C
----------------Interrupt----------------Ready:
<25> scheduling process 100000 * 100000 do: []
-----------------------------------------Select a process (or q to quit scheduler): 25
Select <return> for no action
p to print the stack
k to kill the process
b to resume execution of the process in the background
s to suspend execution of the process
for process 25: k
Process 25 killed.
-----------------------------------------Self 10>
In this example, the loop was interrupted by typing Control-C, and the process menu was used to abort the process. If
the user had typed “q” to quit the scheduler, all current processes would have been aborted along with the scheduler
itself:
...
-----------------------------------------Select a process (or q to quit scheduler): q
Scheduler shut down.
-----------------------------------------prompt
VM#
The scheduler has been stopped, returning the user to the VM# prompt. The command prompt start restarts the
scheduler:
VM# prompt start
Self 11>
Although the VM# prompt can be used to evaluate expressions directly, the scheduler supports much nicer error
messages and debugging, so it is usually best to run the scheduler. (The scheduler is started automatically when the
default world is created.)
Certain virtual machine operations like garbage collection, reading a snapshot, and compilation cannot be interrupted;
interrupts during these operations will be deferred until the operation is complete. As a last resort (e.g., if the system
appears to be “hung”), you can force an abort by pressing Control-\ five times in a row.
1
36
Normally, you would use debugging facilities provided in the programming environment.
Chapter 3. The Self World
Self Handbook Documentation, Release 2 for Self 4.4
3.15 Using the textual debugger
If you are modifying the core of the programming environment or working without the environment you may need to
use the textual debugger. After attaching the aborted process to the debugger using the shell command attach, these
commands are available:
Command
attach: n
detach
step[:n]
stepi[:n]
next[:n]
nexti[:n]
finish
cont
trace
show
show: n
status
up[: n]
upLex
down[: n]
lookup: <name>
Description
attach the process with object reference number n
detach the debugged process
execute (n) non trivial bytecodes *
execute (n) bytecodes
execute (n) non trivial bytecodes in the current activation
execute (n) bytecodes in the current activation
finish executing the current activation
continue execution
print out a stack trace of the process
display the current activation
go to and display the nth activation on the stack
display the status of the debugged process
go up (n) activation(s)
go up to the lexical enclosing scope of this activation
go down (n) activation(s)
lookup the given name in the context of the current activation
* A bytecode is trivial if it is a push of a literal or a send to a slot residing in the lexical scope of the
current activation.
3.15. Using the textual debugger
37
Self Handbook Documentation, Release 2 for Self 4.4
38
Chapter 3. The Self World
CHAPTER
FOUR
A GUIDE TO PROGRAMMING STYLE
This section discusses some programming idioms and stylistic conventions that have evolved in the Self group. Rather
than simply presenting a set of rules, an attempt has been made to explain the reasons for each stylistic convention.
While these conventions have proven useful to the Self group, they should be taken as guidelines, not commandments.
Self is still a young language, and it is likely that its users will continue to discover new and better ways to use it
effectively.
4.1 Behaviorism versus Reflection
One of the central principles of Self is that an object is completely defined by its behavior: that is, how it responds to
messages. This idea, which is sometimes called behaviorism, allows one object to be substituted for another without ill
effect—provided, of course, that the new object’s behavior is similar enough to the old object’s behavior. For example,
a program that plots points in a plane should not care whether the points being plotted are represented internally
in cartesian or polar coordinates as long as their external behavior is the same. Another example arises in program
animation. One way to animate a sorting algorithm is to replace the collection being sorted with an object that behaves
like the original collection but, as a side effect, updates a picture of itself on the screen each time two elements are
swapped. behaviorism makes it easier to extend and reuse programs, perhaps even in ways that were not anticipated
by the program’s author.
It is possible, however, to write non-behavioral programs in Self. For example, a program that examines and manipulates the slots of an object directly, rather than via messages, is not behavioral since it is sensitive to the internal
representation of the object. Such programs are called reflective, because they are reflecting on the objects and using
them as data, rather than using the objects to represent something else in the world. Reflection is used to talk about
an object rather that talking to it. In Self, this is done with objects called mirrors. There are times when reflection is
unavoidable. For example, the Self programming environment is reflective, since its purpose is to let the programmer
examine the structure of objects, an inherently reflective activity. Whenever possible„ however, reflective techniques
should be avoided as a matter of style, since a reflective program may fail if the internal structure of its objects changes.
This places constraints on the situations in which the reflective program can be reused, limiting opportunities for reuse
and making program evolution more difficult. Furthermore, reflective programs are not as amenable to automatic
analysis tools such as application extractors or type inferencers.
Programs that depend on object identity are also reflective, although this may not be entirely obvious. For example, a
program that tests to see if an object is identical to the object true may not behave as expected if the system is later
extended to include fuzzy logic objects. Thus, like reflection, it is best to avoid using object identity. One exception to
this guideline is worth mentioning. When testing to see if two collections are equal, observing that the collections are
actually the same object can save a tedious element-by-element comparison. This trick is used in several places in the
Self world. Note, however, that object identity is used only as a hint; the correct result will still be computed, albeit
more slowly, if the collections are equal but not identical.
Sometimes the implementation of a program requires reflection. Suppose one wanted to write a program to count
the number of unique objects in an arbitrary collection. The collection could, in general, contain objects of different,
39
Self Handbook Documentation, Release 2 for Self 4.4
possibly incomparable, types. In Smalltalk, one would use an IdentitySet to ensure that each object was counted
exactly once. IdentitySets are reflective, since they use identity comparisons. In Self, the preferred way to solve this
problem is to make the reflection explicit by using mirrors. Rather than adding objects to an IdentitySet, mirrors on
the objects would be added to an ordinary set. This substitution works because two mirrors are equal if and only if
their reflectees are identical.
In short, to maximize the opportunities for code reuse, the programmer should:
• avoid reflection when possible,
• avoid depending on object identity except as a hint, and
• use mirrors to make reflection explicit when it is necessary.
4.2 Objects Have Many Roles
Objects in Self have many roles. Primarily, of course, they are the elements of data and behavior in programs. But
objects are also used to factor out shared behavior, to represent unique objects, to organize objects and behavior, and
to implement elegant control structures. Each of these uses are described below.
4.2.1 Shared Behavior
Sometimes a set of objects should have the same behavior for a set of messages. The slots defining this shared behavior
could be replicated in each object but this makes it difficult to ensure the objects continue to share the behavior as the
program evolves, since the programmer must remember to apply the same changes to all the objects sharing the
behavior. Factoring out the shared behavior into a separate object allows the programmer to change the behavior of
the entire set of objects simply by changing the one object that implements the shared behavior. The objects that share
the behavior inherit it via parent slots containing (references to) the shared behavior object.
By convention, two kinds of objects are used to hold shared behavior: traits and mixins. A traits object typically has a
chain of ancestors rooted in the lobby. A mixin object typically has no parents, and is meant to be used as an additional
parent for some object that already inherits from the lobby.
4.2.2 One-of-a-kind Objects (Oddballs)
Some objects, such as the object true, are unique; it is only necessary to have one of them in the system. (It may even
be important that the system contain exactly one of some kind of object.) Objects playing the role of unique objects
are called oddballs. Because there is no need to share the behavior of an oddball among many instances, there is no
need for an oddball to have separate traits and prototype objects. Many oddballs inherit a copy method from traits
oddball that returns the object itself rather than a new copy, and most oddballs inherit the global namespace and
default behavior from the lobby.
4.2.3 Inline Objects
An inline object is an object that is nested in the code of a method object. The inline object is usually intended for
localized use within a program. For example, in a finite state machine implementation, the state of the machine might
be encoded in a selector that would be sent to an inline object to select the behavior for the next state transition:
state sendTo: (|
inComment: c = ( c = ’"’ ifTrue: [state: ’inCode’]. self ).
inCode: c = ( c = ’"’ ifTrue: [state: ’inComment’]
False: ... )
40
Chapter 4. A Guide to Programming Style
Self Handbook Documentation, Release 2 for Self 4.4
|)
With: nextChar
In this case, the inline object is playing the role of a case statement.
Another use of inline objects is to return multiple values from a method, as discussed in section 4.4. Yet another use
of inline objects is to parameterize the behavior of some other object. For example, the predicate used to order objects
in a priorityQueue can be specified using an inline object:
queue: priorityQueue copyRemoveAll.
queue sorter: (| element: e1 Precedes: e2 = ( e1 > e2 ) |).
(A block cannot be used here because the current implementation of Self does not support non- LIFO blocks, and the
sorter object may outlive the method that creates it). There are undoubtedly other uses of inline objects. Inline objects
do not generally inherit from the lobby.
4.3 Naming and Printing
When debugging or exploring in the Self world, one often wants to answer the question: “what is that object?” The Self
environment provides two ways to answer that question. First, many objects respond to the printString message
with a textual description of themselves. This string is called the object’s printString. An object’s printString can be
quite detailed; standard protocol allows the desired amount of detail to be specified by the requestor. For example,
the printString for a collection might include the printStrings of all elements or just the first few. Not all objects have
printStrings, only those that satisfy the criteria discussed in section 4.3.2 below.
The second way to describe an object is to give its path name. A path name is a sequence of unary selectors that
describes a path from the lobby to the object. For example, the full path name of the prototype list is “globals list.”
A path name is also an expression that can be evaluated (in the context of the lobby) to produce the object. Because
“globals” is a parent slots, it can be omitted from this path name expression. Doing this yields the short path name
“list.” Not all objects have path names, only those that can be reached from the lobby. Such objects are called wellknown.
4.3.1 How objects are printed
When an expression is typed at the prompt, it is evaluated to produce a result object. The prompt then creates a
mirror on this result object and asks the mirror to produce a name for the object. (A mirror is used because naming is
reflective.) The object’s creator path annotation provides a hint about the path from the lobby to either the object itself
or its prototype. If the object is a clone “a” or “an” is prepended to its prototype’s creator path. In addition to its path,
the mirror also tries to compute a printString for the object if it is annotated as isComplete. Then, the two
pieces of information are merged. For example, the name of the prototype list is “list” but the name of list copy
add: 17 is “a list(17).” See the naming category in mirror traits for the details of this process.
4.3.2 How to make an object print
The distinction between objects that hold shared behavior (traits and mixin objects) and concrete objects (prototypes,
copies of prototypes, and oddballs) is purely a matter of convention; the Self language makes no such distinction.
While this property (not having special kinds of objects) gives Self great flexibility and expressive power, it leads to
an interesting problem: the inability to distinguish behavior that is ready for immediate use from that which is defined
only for the benefit of descendant objects. Put another way: Self cannot distinguish those objects playing the role of
classes from those playing the role of instances.
The most prominent manifestation of this problem crops up in object printing. Suppose one wishes to provide the
following printString method for all point objects:
4.3. Naming and Printing
41
Self Handbook Documentation, Release 2 for Self 4.4
printString = ( x printString, ’@’, y printString )
Like other behavior that applies to all points, the method should be put in point traits. But what happens if
printString is sent to the object traits point? The printString method is found but it fails when it
attempts to send x and y to itself because these slots are only defined in point objects (not the traits point object). Of course there are many other messages defined in traits point that would also fail if they were sent to
traits point rather than to a point object. The reason printing is a bigger problem is that it is useful to have
a general object printing facility to be used during debugging and system exploration. To be as robust as possible,
this printing facility should not send printString when it will fail. Unfortunately, it is difficult to tell when
printString is likely to fail. Using reflection, the facility can avoid sending printString to objects that do
not define printString. But that is not the case with traits point. The solution taken in this version of the
system is to mark printable objects with a special annotation. The printing facility sends printString to the object
only if the object contains an annotation IsComplete.
The existence of an isComplete annotation in an object means that the object is prepared to print itself. The object
agrees to provide behavior for a variety of messages; see the programming environment manual for more details.
4.4 How to Return Multiple Values
Sometimes it is natural to think of a method as returning several values, even though Self only allows a method to
return a single object. There are two ways to simulate methods that return multiple values. The first way is to use an
inlined object. For example, the object:
(| p* = lobby. lines. words. characters |)
could be used to package the results of a text processing method into a single result object:
count = (
| r = (| p* = lobby. lines. words. characters |) ... |
...
r: r copy.
r lines: lCount. r words: wCount. r characters: cCount.
r )
Note: that the inline object prototype inherits copy from the lobby. If one omitted its parent slot p,
one would have to send it the _Clone primitive to copy it. It is considered bad style, however, to send a
primitive directly, rather than calling the primitive’s wrapper method.
The sender can extract the various return values from the result object by name.
The second way is to pass in one block for each value to be returned. For example:
countLines:[| :n | lines: n ]
Words:[| :n | words: n ]
Characters:[| :n | characters: n ]
Each block simply stores its argument into the a local variable for later use.
The
countLines:Words:Characters: method would evaluate each block with the appropriate value to be
returned:
countLines: lb Words: wb Characters: cb = (
...
lb value: lineCount.
wb value: wordCount.
42
Chapter 4. A Guide to Programming Style
Self Handbook Documentation, Release 2 for Self 4.4
cb value: charCount.
...
4.5 Substituting Values for Blocks
The lobby includes behavior for the block evaluation messages. Thus, any object that inherits from the lobby can be
passed as a parameter to a method that expects a block—the object behaves like a block that evaluates that object. For
example, one may write:
x >= 0 ifTrue: x False: x negate
rather than:
x >= 0 ifTrue: [ x ] False: [ x negate ]
Note: however, that Self evaluates all arguments before sending a message. Thus, in the first case “x
negate” will be evaluated regardless of the value of x, even though that argument will not be used if x is
nonnegative. In this case, it doesn’t matter, but if “x negate” had side effects, or if it were very expensive,
it would be better to use the second form.
In a similar vein, blocks inherit default behavior that allows one to provide a block taking fewer arguments than
expected. For example, the collection iteration message do: expects a block taking two arguments: a collection
element and the key at which that element is stored. If one is only interested in the elements, not the keys, one can
provide a block taking only one argument and the second block argument will simply be ignored. That is, you can
write:
myCollection do: [| :el | el printLine]
instead of:
myCollection do: [| :el. :key | el printLine]
4.6 nil Considered Naughty
As in Lisp, Self has an object called nil, which denotes an undefined value. The virtual machine initializes any
uninitialized slots to this value. In Lisp, many programs test for nil to find the end of a list, or an empty slot in a hash
table, or any other undefined value. There is a better way in Self. Instead of testing an object’s identity against nil,
define a new object with the appropriate behavior and simply send messages to this object; Self’s dynamic binding
will do the rest. For example, in a graphical user interface, the following object might be used instead of nil:
nullGlyph = (|
display = ( self ).
boundingBox = (0@0) # (0@0).
mouseSensitive = false.
|)
To make it easier to avoid nil, the methods that create new vectors allow you to supply an alternative to nil as the
initial value for the new vector’s elements (e.g., copySize:FillingWith:).
4.5. Substituting Values for Blocks
43
Self Handbook Documentation, Release 2 for Self 4.4
4.7 Hash and =
Sets and dictionaries are implemented using hash tables. In order for an object to be eligible for inclusion in a set or
used as a key in a dictionary, it must implement both = and hash. (hash maps an object to a smallInt.) Further,
hash must be implemented in such a way that for objects a and b, (a = b) implies (a hash = b hash). The
behavior that sets disallow duplicates and dictionaries disallow multiple entries with the same key is dependent upon
the correct implementation of hash for their elements and keys. Finally, the implementation of sets (and dictionaries)
will only work if the hash value of the objects in the set do not change while the objects are in the set (dictionary). This
may complicate managing sets of mutable objects, since if the hash value depends on the mutable state, the objects
can not be allowed to mutate while in the set.
Of course, a trivial hash function would simply return a constant regardless of the contents of the object. However, for
good hash table performance, the hash function should map different objects to different values, ideally distributing
possible object values as uniformly as possible across the range of small integers.
4.8 Equality, Identity, and Indistinguishability
Equality, identity, and indistinguishability are three related concepts that are often confused. Two objects are equal
if they “mean the same thing”. For example, 3 = 3.0 even though they are different objects and have different representations. Two objects are identical if and only if they are the same object. (Or, more precisely, two references
are identical if they refer to the same object.) The primitive _Eq: tests if two objects are identical. Finally, two objects
are indistinguishable if they have exactly the same behavior for every possible sequence of non-reflective
messages. The binary operator “==” tests for indistinguishability. Identity implies indistinguishability which implies
equality.
It is actually not possible to guarantee that two different objects are indistinguishable, since reflection could be used
to modify one of the objects to behave differently after the indistinguisability test was made. Thus, == is defined to
mean identity by default. Mirrors, however, override this default behavior; (m1 == m2) if (m1 reflectee _Eq:
m2 reflectee). This makes it appear that there is at most one mirror object for each object in the system. This
illusion would break down, however, if one added mutable state to mirror objects.
44
Chapter 4. A Guide to Programming Style
CHAPTER
FIVE
HOW TO PROGRAM IN SELF
5.1 Introduction
The Self programming environment provides facilities for writing programs, and the transporter provides a way to save
them as source files. Of all the parts of Self, the programming environment probably has the least research ambition
in it. We simply needed to concentrate the innovation in other areas: language design, compiler technology, user
interface. The Self programming environment strives to meet the high standard set by Smalltalk’s, but with a more
concrete feels. The transporter, on the other hand, is somewhere in-between completely innovative research and dull
development. It attempts to pull off a novel feat—programming live objects instead of text—and partially succeeds. Its
novelty lies in its view of programs as collections of slots, not objects or classes, and its extraction of the programmer’s
intentions from a web of live objects.
Since Self 4.0, the environment has evolved a little—mostly in the form of new affordances. On the Macintosh, Self
4.1 uses option-click for a middle-mouse click, and uses command- (the apple key) click for the right button click. So
wherever the text says “left-button-click” just click with the mouse, where it says “middle-button click” hold down
the option key and click with the mouse, and where it says “right button click” hold down the command key and click
with the mouse. I use a Kensington Turbo Mouse with the buttons mapped appropriately. These mappings are defined
in Self, so you can change them by editing the whichButton: method in the initialization category in traits
ui2MacEvent.
5.2 Browsing Concepts
5.2.1 Introducing the Outliner
Objects in the Self 4.1 environment are represented as outliners, which can expand to show increasing levels of detail.
One of these objects has been designed to provide a convenient context for typed-in commands, and so it is called the
shell. If the shell is not already present on your screen, you can summon it by pressing the middle mouse button on
the background and selecting shell.
In Self 4.1, outliners now sport three small buttons in the top-right-hand corner labeled “/\”, “E”, and “X”. These
buttons summon the object’s parents, add an evaluator text region to the bottom of the outliner, and dismiss the
45
Self Handbook Documentation, Release 2 for Self 4.4
outliner. Press the “E” button to get an evaluator.Type anExampleObject into the evaluator (it will already be
selected) and hit the Get it button (or type metareturn on UNIX, or command-return on MacOS X):
The result object appears in your “hand” raised above the screen as if you were dragging it with the left button. Just
click the button to set it down.
As with most other things on the Self screen, the left button picks it up and moves it. (For buttons and other things that
use left-button for other purposes, you can grab them with marquee selection (really the carpet morph in Self) or with
the “Grab” item on the right-button menu.)
Expand and Collapse
Left-click on the triangle 1 to expand the object and see more information:
Now it shows a summary of modules containing the slots in this object (just programmingExamples here), four
slots, and a category containing more slots, although those slots are not shown yet.
Categories
Clicking the top triangle now would collapse this object outliner, but instead look inside the category by clicking its
triangle:
And, one more click expands the subcategory:
1
46
Double-clicking on the triangle will expand (or contract) all levels instead of just a single level. (This feature was added in Self 4.1.2.)
Chapter 5. How to Program in Self
Self Handbook Documentation, Release 2 for Self 4.4
5.2. Browsing Concepts
47
Self Handbook Documentation, Release 2 for Self 4.4
Slots
The little icons on the right edges of the slots reveal the type of slot:
for a method slot (a slot containing a method),
for a constant slot (a slot containing a data object), and
for an assignable slot (a pair of slots containing a
data object and the assignment primitive). In order to save space, the data slot and its corresponding assignment slot
are lumped together. (In other words in addition to the visible slot named aCategorizedVariable containing
17, there is another, invisible slot named aCategorizedVariable: containing the assignment primitive.)
To look at the object contained in a data (constant or assignable) slot, just click on its icon. But if the slot is a method,
clicking its icon opens up a text editor on its source. For example, clicking on the icon at the right of the whoAmI box
opens a text editor displaying its source (and typing control- L widens the object to show all the text in the selected
window):
Text Editors
The background of the editor is lighter than the outliner as a whole, and this difference indicates that this editor is the
current typing focus: no matter where the mouse is you can type into this editor. A left-click on another editor will
select that one as the typing focus, and to indicate that it is no longer the focus, this editor’s background will change
to match the outliner:
The white triangle in the lower-right corner of the editor (which can barely be seen in the printout of this document)
can be dragged to resize the editor.
Someone has done a poor job of indenting this method, so fix it by clicking to the left of the capital– I and deleting
two spaces:
The red and green buttons that just appeared indicate the text has been changed; it no longer reflects the source code
of the real method. Hitting the red button will cancel the changes, while hitting the green button will accept them and
48
Chapter 5. How to Program in Self
Self Handbook Documentation, Release 2 for Self 4.4
5.2. Browsing Concepts
49
Self Handbook Documentation, Release 2 for Self 4.4
change the method:
Self text editors will honor the cursor arrow keys, the copy, paste, and cut Sun keys, and many emacs-style control
characters:
Table 1 Partial list of control characters in Self text editors
Character
control-a
control-b
control-d
control-e
control-f
control-k
control-l
control-n
control-o
control-p
control-t
control-w
control-y
delete, backspace, or control-h
meta-return (command-return on Mac)
escape (also command-period on Mac)
meta-s (command-s on Mac)
meta-x (command-x on Mac)
meta-c (command-c on Mac)
meta-v (command-v on Mac)
meta-d (command-d on Mac)
50
Effect
move to start of line
back one character
delete next character
go to end of line
forward one character
kill to end of line
expand the text editor to show the whole text
go to next line
open a new line after the cursor
go to previous line
transpose characters
erase previous word
yank text from past-buffer to editor
erase-last-character
accept
cancel
save a snapshot
cut
copy
paste
dismiss morph containing typing focus
Chapter 5. How to Program in Self
Self Handbook Documentation, Release 2 for Self 4.4
Dismissing Objects
There are four separate ways of dismissing an outliner (or for that matter, anything) from the Self desktop:
• Object outliners: Push the “X” button at the top-right-hand corner.
• Drag it to the trash: left-drag on the outliner till the mouse is over the trash can,
then
release the mouse-button.
• Dismiss it via the right-button menu: hold down the right button over the outliner, move to the Dismiss button,
then release.
• The Carpet Morph: start above (or below) and to the left (or to the right) of the outliner, over the background.
Hold down the left button and sweep out an area that completely contains the outliner, then release the left
button. The outliner should now be surrounded by a rectangle. Use the middle mouse button inside the rectangle
to select Dismiss.
The last two methods, dismissing from the right-button menu, and marquee selection with the carpet morph, come in
especially handy with things like buttons and menus because such morphs cannot be grabbed with the left-button.
5.2.2 Menus in the Outliner
Many other operations are available on the outliner by using the middle-button menu on the part of the outliner to be
affected. For example anExampleObject has many regions and here are some of them:
Click on the desired part of the object, be it object, category, slot, text editor, or annotation (annotations will be
explained later).
The Evaluator
Try out the whoAmI method. Push the “E” button in the top-right of the outliner:
The receiver of any messages sent from an evaluator, or indeed any text editor (via Do It and Get It in the editor’s
middle-button menu) in an object outliner is the object itself. 2 Type whoAmI into the evaluator and hit the Get it
button (or select the Get It from the text editor menu), to send the message and get back the result:
Move the result 3 out of the way and left-click to set it down.
Adding a slot
Try one more change: adding a slot to the category “a category of slots.” Hold the cursor over the words a
category of slots and select Add Slot from the middle-button menu.
After selecting Add Slot a space for a new slot will appear in the object:
Each line shows the syntax for a different kind of slot. Create a simple variable by typing me<-’Gumby’ 4 and hitting
the green button to accept the change:
2
3
4
However, in a stack frame in the debugger (described below), the receiver of a message is the same as the receiver for the stack frame.
I am revising this for Self 4.1 on my trusty Mac, and Self does not implement environment variables here.
Since all that stuff in the text editor was initially selected, your typing conveniently replaced it all.
5.2. Browsing Concepts
51
Self Handbook Documentation, Release 2 for Self 4.4
After releasing the green button, it stays down to let you know that it is still working. After a few seconds the slot
appears: 5
5.2.3 Debugger
Explore the Self debugger. Start by scrambling the send to environmentVariable:IfFail as if you had
misspelled it.
Press the green button to accept the change, then hit the Get it button. This should break something! In fact, instead
of the result of the message, a Self debugger will materialize:
The debugger has a label to indicate which process ran aground, a status indication shown in blue, some buttons for
controlling the process, and a collapsed outliner for the stack. Expand the stack:
The stack filters out uninteresting frames by default. 6 The debugger assumes that the first method you want to see is
the one based on the text in the evaluator, and since the stack grows upwards this oldest frame appears at the bottom.
It has no method name, and contains the code whoAmI. That method called whoAmI, whose code is too long to show
next to the slot button, and that method called evnironmentAt:IfFail: because we just sabotaged it! Of course
there is no such method, but Self creates one dynamically to handle the error.
The little boxes represent the receiver and arguments of the methods on the stack. Get the receiver of the evnironment...
message. Click on the box to the left of the word evnironmentVariable: (the one labelled “...bal os” if
you are running on the Macintosh):
5 If you examine the slot’s annotation (available via the slot menu) it will show that the system has guessed that the new slot (named “me”)
should be saved in the “programmingExamples” module, and that instead of saving its actual contents, the slot should just be initialized to the string
‘Gumby’.
6 Since the Self compiler inlines calls automatically, Self code tends to be written in a highly-factored, deeply-nested style. Thus, the debugger
filters out stack frames that seem to be unimportant. If it ever filters out the frame you need to see, there is a “Don’t filter frames” entry in the stack’s
middle-button menu.
52
Chapter 5. How to Program in Self
Self Handbook Documentation, Release 2 for Self 4.4
5.2. Browsing Concepts
53
Self Handbook Documentation, Release 2 for Self 4.4
54
Chapter 5. How to Program in Self
Self Handbook Documentation, Release 2 for Self 4.4
5.2. Browsing Concepts
55
Self Handbook Documentation, Release 2 for Self 4.4
56
Chapter 5. How to Program in Self
Self Handbook Documentation, Release 2 for Self 4.4
5.2. Browsing Concepts
57
Self Handbook Documentation, Release 2 for Self 4.4
58
Chapter 5. How to Program in Self
Self Handbook Documentation, Release 2 for Self 4.4
5.2. Browsing Concepts
59
Self Handbook Documentation, Release 2 for Self 4.4
This object represents the interface to the Macintosh operating system. The little button with the apostrophe in the
top-left-hand corner indicates that this object has a comment. Push the button to show (or hide) the comment:
(To automatically resize the outliner to show all the text, press control-L.) To see one of Self’s scroll bars, grab the
comment’s resize triangle (with the left-button) and move it up a bit:
The affordance that appears on the right of the text is the scroll bar, and you can either drag on the little black line or
just click in the bar to scroll the text up or down.
Push the little apostrophe button again to hide the comment. Now, you could expand this object to find the correct
spelling of the evnironment... message. But instead, pretend that all you remember is that it has the word “Variable” in
it somewhere. So, use a facility called Find Slot that takes a pattern and an object, and finds any matching slots in
that object or its parents. Use the middlebutton on the outliner’s title (macOSGlobals os) to get the object menu
and select Find slot...
Double-click on the word “foo” to select that field for editing. (The same trick works on slot names)
60
Chapter 5. How to Program in Self
Self Handbook Documentation, Release 2 for Self 4.4
Since we are searching for a method with “Variable” in its name, backspace (the delete key on the Mac) three times
7
to erase the “foo” type in *‘‘Variable‘‘*, hit the green button, and then hit the triangle to start the search (if you
make a typing mistake, you can double click the text to make it editable again). The triangle will blink a bit while
it is searching (one could do other things in the meantime during a long search), then the enumerator will show the
match(es):
Clicking on the little square button(s) would show the exact method(s). But, for our purposes, just knowing the name
is enough and now you have to fix it. So back to the debugger and click on the method button on the right in the
whoAmI slot to expand the stack frame for the whoAmI method:
Now the debugger shows the source of the method, with the actual message being sent highlighted. (In this case it
is just the whole thing.) One of the conveniences in the Self programming environment is that you do not have to
go back to the original method to fix it, but can just fix it here (following the grand tradition of Lisp and Smalltalk
programming environments). So use the left button to select the “vn” and type “nv” instead, then hit the green button
to accept the change. The green button will stay in a bit longer because when a method is changed from the debugger,
every slot pointing to that same method is made to feel the change—the method is changed in place (see the figure
below). This feature lets you change a method in a clone and simultaneously affect the
prototype, if you are putting your methods in prototypes instead of traits. Changing a method in an ordinary outliner
would just affect that one object, even if other objects had been cloned from it. This rule avoids unintentional changes.
The more global kind of change performed by the debugger takes a little longer. When it is accomplished, the red and
green buttons will disappear:
Now os is highlighted to show that the process is about to send “os” to implicit-self. Try the Step button, which
performs a single message send. After hitting the Step button twice (and a control- L to widen the debugger), the
process will have entered the environmentVariable:IfFail: method:
7 One rough edge remaining in the Self user interface is the existence of two test editors, and this one does not implement multi-character
selection, sigh. Or, you could type control-A to go the start, and control-K to delete the whole field, sigh.
5.2. Browsing Concepts
61
Self Handbook Documentation, Release 2 for Self 4.4
62
Chapter 5. How to Program in Self
Self Handbook Documentation, Release 2 for Self 4.4
5.2. Browsing Concepts
63
Self Handbook Documentation, Release 2 for Self 4.4
This method is not too interesting (especially on the Macintosh), so leave the debugger by hitting Continue and
letting the process finish.
Congratulations on making through the interactive tutorial. In the remainder of this manual, we will dive deeper into
the programming environment for readers who want to write real programs in Self.
Here is more information on the debugger for future reference:
Table 2 The Debugger Buttons
What it
says
Continue
Step
Step
Lexical
Next
Finish
Frame
Abort
What it does
Resumes running the process
Perform one message send (skipping over trivial accesses and assignments); Steps into
the called method.
Execute messages until control returns to the same lexical method, or until this method
exits. Very useful for methods with blocks.
Performs a message send and any messages in the called method; Steps over the called
method.
Finishes running the topmost method.
Kills off the process and dismisses the debugger.
In addition to the buttons, each frame in the debugger has some items to control the process in its middle-button menu:
Table 3 Process control items in the activation middle-button menu
What it says
Step
Next
Retry
Revert
Finish
What it does
Top frame: same as step button, not top frame: Finish any called methods.
Same as next button.
Cut back the stack to this frame, then continue the process.
Cut back the stack to this frame.
Finish this frame.
5.2.4 Enumerators
In addition to the Find Slot enumerator, Self has other ways to find things:
Table 4 Enumerators
64
Chapter 5. How to Program in Self
Self Handbook Documentation, Release 2 for Self 4.4
Name
Implementors
Implementors of :
Senders
Senders of :
Senders in family
(Senders of : in
family)
Find Slot
Methods Containing
Copied-down
Children
References
Slots in Module
Added or Changed
Slots in Module
Removed Slots in
Module
Expatriate Slots
Function
Finds all the slots with a given name.
Finds all the slots with the given name that take an argument (for read/write slots only).
Finds all the methods that send a message with a given name.
Finds all the methods that send the corresponding assignment message (read/write slots
only).
Finds all the methods in this object, its ancestors, and descendants that send a message
with a given name (or the corresponding assignment message).
Starting from a designated object, finds all slots in that object and its ancestors whose
name matches a given pattern. Case is ignored, “?” matches any character, “*” matches
any series of zero or more characters. Also comes in “of :” and “in family” flavors.
Finds methods containing the specified string. Similar to grep without wildcards.
Finds objects copied-down (see below) from this one.
Finds slots that contain references to the selected object.
On the module menu (see below); shows all slots in a given module.
On the module menu (see below); shows all slots added or changed in the module since it
was filed out.
On the module menu (see below); shows the names of the slots removed from the
mod-ule since it was last filed out.
On the changed module menu (see below); shows all slots in filed-out objects that do not
themselves specify a module. These slots will not be filed out.
The copy-down and module enumerators will be covered later.
The other enumerators can be summoned from several places: the outliner menu, the slot menu, and the text
editor menu. As a shortcut, selecting a whole expression in the text editor and then asking for an enumerator will bring up the enumerator to search for the outermost message send in the expression. So if you select
the following expression: aSet findFirst: elem IfPresent: [snort] IfAbsent: [sludge] and
choose implementors from the text editor menu, you will get an Implementors enumerator ready to search for
findFirst:IfPresent:IfAbsent:. Of course, you can always change the search target by double-clicking
and editing the text. The text editors also implement a host of handy double-clicking shortcuts.
Finally there is one last detail about enumerations: many contain a check-box to choose Wellknown only. This is
always checked by default to speed things up. When checked, only wellknown (i.e. filed-out, see below) objects are
searched, which is much faster.
5.3 Hacking Objects
Hacking—the discipline of making fine furniture from trees using an axe.
In going through this document, you have already added a slot and edited methods in both object outliners and debuggers. In addition Self 4.1 has many other ways to change an object:
Table 5 Ways to change an object
Removing, Moving, Copying Categories
5.3. Hacking Objects
65
Self Handbook Documentation, Release 2 for Self 4.4
Ways to change an object
Removing a category.
Add slot or category to object or
category.
Moving a category.
Copying a category.
Removing a slot.
Add slot to object or category
Moving a slot.
Copying a slot.
Edit a slot
Edit slot name or its argument
names
Change a method in a slot.
Change the visibility of a slot
66
How
Removing, Moving, Copying Categories
“Move” in category middle menu,
then drag the category to the background or the trash can.
“Add Category” in object or category middle menu, then type in the
new category name, then hit green
button to accept.
“Move” in category middle menu,
then drag to another object.
“Copy” in category or category
middle menu, then drag the category to another object.
Removing, Adding, Moving,
Copying Slots
“Move” in slot middle menu, then
drag the slot to the background or
the trash can.
“Add Slot” in object or category
middle menu, then type in the new
slot name, “=” or “<-”, and contents
of slot (or just name alone for variable slot containing nil), then hit
green button to accept.
“Move” in slot middle menu, then
drag to another object.
“Copy” in slot or category middle
menu, then drag the slot to another
object
Changing a slot
“Edit” on a slot middle-button
menu, then make any changes in the
text editor, then hit green button to
accept changes.
Double-click on the name of the
slot, wait for red and green buttons
to appear on the right of the name,
edit the name, then hit the green
button.
Click on the method icon button
on the right of the slot to open a
text editor on the method. Make
the changes, then click on the green
button to accept them.
On the slot’s middle menu choose
“Make Public,” “Make Private,” or
“Make Undeclared.”
Why
Removing a category
Adding a new category.
Copying a category.
Copying a category.
Removing a slot
Adding adding a new
Moving a slot.
Copying a slot.
To change the contents of a constant
data slot, or to change contents and
set initial value at same time, or to
change a slot from data to method
or from constant to variable.
To change a slot’s name or the
names of its arguments.
To fix a bug in a method.
The Self interface uses bold, normal, and sans-serif fonts to indicate public, private, and unspecified slots.This distinction carries no
semantics, but serves to record the
programmer’s intentions.
Chapter 5. How to Program in Self
Self Handbook Documentation, Release 2 for Self 4.4
Add a comment to an object or slot
Change creator annotation of an object
Set creator of contents of a slot to
that slot
Change copy-down information
Change the object’s “isComplete”
flag
Set the module memmbership of a
slot, the slots in a category, or the
slots in an object.
Type in or examine the module for
a single slot
Change slot initial contents
5.3. Hacking Objects
Adding a Comment
“Show Comment” in the object or
slot middle menu to open up a comment text editor, then typing in the
comment, then hit the green button
to accept it. If an object or slot
already has a comment, it can be
shown/hidden by hitting the small
button labeled with a single quote.
Annotating an Object
“Show Annotation” in object middle menu to expose object annotation information, then click on creator path field and typing in desired
creator path., then hit green button
to accept annotation.
“Set Creator” in slot middle menu.
“Show Annotation” in object middle menu to expose object annotation information, then click on
copy-down-parent field and type
in desired copy-down-path., copydown selector and slots to omit)
then hit green button to accept annotation.
“Show Annotation” in object middle menu to expose object annotation information, then push one of
the isComplete radio buttons, then
hit green button to accept the annotation change.
Annotate a slot
Select “Set Module” from the middle menu of a slot, category, or object, then (for object or category)
indicate which slots you want to
change by choosing which module
they currently belong to, finally select a new module to put the slots
in
“Show Annotation” on the slot middle menu to expose the annotation,
then click on the module editor,
type in the module name, then click
the green accept button.
“Show Annotation” on the slot middle menu to expose the annotation,
then click on the “Follow Slot” button, or type the desired initial value
expression into the ‘Initial Contents” editor, then hit the green accept button.
To amuse and intrigue those who
follow
Setting creator path tells transporter
which slot “owns” this object, and
tells environment what to name the
object.
See above.
Simulates subclassing by allowing
an object to contain copies of the
slots in another object.
When
copy-down-parent has slots added/
changed/removed, the change propagates to the copied-down children.
After building a new prototype, set
isComplete to get the environment
to show its printString, and to get
the transporter to use its storeString.
To ensure that slots are filled out in
the correct source file
Save as above.
To have the transporter record the
current contents of a slot, choose
“Follow Slot.” To have it ignore the
current value and just record a given
expression for the slot’s initial value
use the “Initial Contents” option.
67
Self Handbook Documentation, Release 2 for Self 4.4
5.4 The Transporter
The transporter has been built in order to move programs from one world of objects to another. so, you can ignore it
as long as you work with just one snapshot. However, if you want to give your program to someone else, or save it as
source, or read it in to a newer snapshot, you will need to learn about the transporter.
5.4.1 The Traditional Schism between Program and Data
What is a program? In most systems it is a piece of text, although in more advanced environments it may have
structure. It is a description that can be used to create an activity, a running program, that can then operate on data. In
the conventional view:
Table 6 The Schism between Program and Data
Who can change it
When can it change
How is it changed
Program
The programmer
At programming time
With a text editor
Data
The user
At execution time
By running a program
This model grew up in an era where computers were too small to host both compilers and applications at the same
time. Although it has some virtues it makes other operations very hard: it is hard to include data, such as hand-drawn
icons, directly into a program, and it is hard to write applications whose data domain is really programs.
5.4.2 Data = Program
For Self, we have gone a different way, following in the footsteps of Smalltalk and Lisp:
A Self program consists of live objects.
Self has no edit/run mode. To change an object, you do not retreat to a source file, or even to a class, you just change
the object itself. This immediacy and concreteness lessens the cognitive burden on the programmer, smooths the
learning curve, and hastens gratification.
However, this stance creates a big problem the moment you need to move a program from one world of objects to
another; it is very hard to pin down what to do. For example, suppose an object contains a slot with 1024 in it. Should
that value be copied literally? Perhaps it is the result of some computation (such as the width of the current screen)
and should be recomputed instead. There simply is not enough information in a Self object to extract programs from
Snapshots.
5.4.3 Changes vs. Pieces
Earlier in the project we considered constructing a calculus of changes that could be used to represent programs, and
then moving programs by reapplying the changes to the new snapshot. But, we had enough on our plate and rejected
this approach as too ambitious to tackle without a dedicated graduate student.
Instead, we decided to represent programs as pieces that could be filed out of a snapshot and filed in to another. To
allow us to merge changes to the same program, we decided to represent its pieces as Unix source files amenable to
RCS. The Self Transporter was built to save programs as source files.
5.4.4 Objects vs. Slots
But what is a program? Although a new program frequently involves creating new objects, it also can mean added
slots to existing objects. For example, a program to find palindromes might add a slot to traits string called
68
Chapter 5. How to Program in Self
Self Handbook Documentation, Release 2 for Self 4.4
isPalindrome. So we decided to refine the granularity of the Transporter to the slot level; each slot has an annotation 8 (its module) which gives the name of the source file containing that slot. This hair- or rather object-splitting
implies that one object may be built incrementally as the result of reading several files, and so the transporter endeavors
to keep the order that the files are read in as independent as possible. Since each object can possess slots in different
modules, the outliner shows a summary of the modules of an object, sorted by frequency.
Turned around, a module can be viewed as a collection of slots, plus some other information: each module also
includes a directory, a list of submodules to be read in whenever it is read, and post-FileIn method to be run
whenever the module is read. These data allow modules to be organized hierarchically by subsystem, for example the
allUI2 module includes all the modules in the ui2 system.
Now here comes the nice part: the Self environment incrementally maintains a mapping from modules to slots, and a
list of changed modules, which can be obtained from the background menu. When you make a change the appropriate
module will be added to the list, and can be written as a source file by clicking its w button. The middle-button menu
on the changed modules and individual modules contains a host of useful entries for understanding what has been
changed.
5.4.5 What to Save for the Contents of a Slot
At this point, the reader may be thinking “So modules know which slots they include, but how do they know which
objects to include?” After all, when the transporter saves a slot in a file what can it put for the contents of the slot?
Here is where the transporter runs smack into the problem of not enough information, and a variety of means have to
be used. As shown in the flowchart below:
• Sometimes the programmer does not want to store the actual contents of a slot, but instead wants to store an
initialization expression. This intention is captured with another annotation on a slot: each slot can either
be annotated Follow Slot or Initialize To Expression In the latter case, an initializer is also
supplied.
• Even though the transporter is supposed to follow the slot, it may contain an object that is created by another
slot. For example, the parent slot in a point should just refer to traits point rather than recreating the
traits object. This information is captured by a Creator annotation on each object that gives the path from
the lobby to the slot intended to create the object. In this case, the transporter just files out a reference to the
object’s creator, cleverly enough so that the actual creator slot does not need to have been already filed in. On the
other hand, if an object is immutable, its identity is not important. If an object is annotated as is-Complete
9
the transporter sends it isImmutableForFilingOut and if that message returns true, the transporter
never files out a reference. For example, integers would answer true to this message.
• If the contents of the slot is a simple (usually immutable) object like 17, 3@4, or ‘foo’ (the string) the transporter should just ask the object for a string to store. It does this by checking to see if the object is annotated as
isComplete to see if it is safe to send the object messages, checks to see if this object is itself needed for the
string (it would be a mistake to file out the prototypical point as 0@0, because the x slot would never be defined),
then asks the object for a store string.To see if the object must itself be filed out, it sends storeStringNeeds
and if this message does not return the object itself it sends storeStringIfFail:. If this succeeds, the transporter can save a data-type specific string for the object. This fairly elaborate mechanism allows programmers
to add new kinds of objects that transport out with type-specific creation strings.
• Finally, if it can do nothing else, the transporter creates a new object for the contents of the slot. The object is
created in a clever way so that a file that adds slots to an object can be read before the file that officially creates
the object without loss of information.
8 The Self Virtual Machine provides for annotations on slots or whole objects. While the annotations do not influence program execution, they
can be accessed and modified by Self’s reflective facility, mirrors. Annotations are used to hold many things, including comments on objects and
slots.
9 isComplete is used by the environment to decide when it is safe to send messages like printString.
5.4. The Transporter
69
Self Handbook Documentation, Release 2 for Self 4.4
70
Chapter 5. How to Program in Self
Self Handbook Documentation, Release 2 for Self 4.4
Filing out objects is too complicated, and over the past two years we have repeatedly tried simpler schemes. However,
all of the capabilities in the current scheme seem to be essential in some case. This issue remains as a question for
future work.
5.4.6 Copy Down
Because Self eschews classes and because the current compiler cannot optimize dynamic inheritance, it is necessary
to copy-down slots when refining an object. For example, the prototypical morph object contains many slots that
every morph should have, and some mechanism is needed to ensure that their presence is propagated down to more
specialized morphs like the circleMorph. In a class-based language, this need is met by a rule ensuring that subclasses
include any instance variables defined in their superclasses. In Self, this inheritance of structure is separated from
the inheritance of information performed by the normal hierarchy of parent slots. Instead of including a facility for
inheriting structure in the language, Self 4.1 implements a facility in the environment, called “copy-down.” An object’s
annotation can contain a copy-down parent, copy-down selector, and set of slots to omit. The copy-down parent is
sent the message given by the copy-down selector, and (except for the slots-to-omit), the slots in the result are added
to the object. Copied-down slots are shown in pink in the outliner. For example, here are the prototypical morph and
the prototypical circleMorph:
5.4. The Transporter
71
Self Handbook Documentation, Release 2 for Self 4.4
The Basic Morph State category of slots has been copied from those in morph by first copying the morph and
removing all its submorphs (i.e. by sending it copyRemoveAllMorphs) and then copying the resultant slots, omitting
parent, prototype, rawBox and rawColor. The first three of these slots were omitted because their contents
had to be different; copied-down slots are copied, they cannot be specially initialized in Self 4.1. The omitted slot
rawBox is more interesting; circle morphs do not need this slot at all and so omit it. Most other object-oriented
programming systems would not allow a subclass to avoid inheriting an instance variable.
The Self 4.1 programming environment uses the copy-down information to allow the programmer to use a class-based
style when appropriate. For example, if the programmer adds a slot to morph the environment will offer to add it
to circleMorph, too. If the programmer should use a text editor to edit the definition of morph, the circleMorph
object will be changed after rereading both object’s text files. The least convenient aspect of using copy-downs is that
to do the moral equivalent of creating a subclass, the programmer has to create two objects: a new traits object, and a
new prototype, and then set the object annotation of the new prototype. Perhaps someday there will be a button to do
this, or perhaps other styles of programming will emerge.
This concludes a brief tour of the Self 4.1 programming environment. Although we strove for simplicity in the design
of Self, its programming environment includes a fair amount of functionality which may take a while to learn. We
hope that you find the investment worth the reward.
Footnotes:
72
Chapter 5. How to Program in Self
CHAPTER
SIX
USEFUL SELECTORS
This is a list of selectors which Selfers should find useful as a starting point.
Copying
clone
copy
shallow copy (for use within an object; clients should use copy)
copy the receiver, possibly with embedded copies or initialization
Comparing
Equality
=
!=
hash
==
!==
equal
not equal
hash value
identical (the same object; this is reflective and should be avoided)
not identical
Ordered
<
>
<=
>=
compare: IfLess: Equal: Greater:
compare: IfLess: Equal: Greater:
Incomparable:
less than
greater than
less than or equal
greater than or equal
three way comparison
three way comparison with failure
Numeric operations
+
*
/
/=
/~
/+
/-%
absoluteValue
inverse
negate
ceil
floor
truncate
add
subtract
multiply
divide
divide exactly (returns float)
divide and round to integer (tends to round up)
divide and round up to integer
divide and round down to integer modulus
absolute value
multiplicative inverse
additive inverse
round towards positive infinity
round towards negative infinity
truncate towards zero
Continued on next page
73
Self Handbook Documentation, Release 2 for Self 4.4
round
asFloat
asInteger
double
quadruple
half
quarter
min:
max:
mean:
pred
predecessor
succ
successor
power:
log:
square
squareRoot
factorial
fibonacci
sign
even
odd
Table 6.1 – continued from previous page
round
coerce to float
coerce to integer
multiply by two
multiply by four
divide by two
divide by four
minimum of receiver and argument
maximum of receiver and argument
mean of receiver and argument
predecessor
predecessor
successor
successor
raise receiver to integer power
logarithm of argument base receiver, rounded down to integer
square
square root
factorial
fibonacci
signum (-1, 0, 1)
true if receiver is even
true if receiver is odd
Bitwise operations (integers)
&&
||
^^
complement
<<
>>
<+
+>
and
or
xor
bitwise complement
logical left shift
logical right shift
arithmetic left shift
arithmetic right shift
Logical operations (booleans)
&&
||
^^
not
and
or
xor
logical complement
Constructing
@
#
##
&
,
point construction (receiver and argument are integers)
rectangle construction (receiver and argument are points)
rectangle construction (receiver is a point, argument is an extent)
collection construction (result can be converted into collection)
concatenation
Printing
74
Chapter 6. Useful Selectors
Self Handbook Documentation, Release 2 for Self 4.4
print
printLine
printString
printStringDepth:
printStringSize:
printStringSize: Depth:
print object on stdout
print object on stdout with trailing newline
return a string label
return a string label with depth limitation request
return a string label with number of characters limitation request
return a string label with depth and size limitation request
Control
Block evaluation
value[: {With: }]
evaluate a block, passing arguments
Selection
ifTrue:
ifFalse:
ifTrue: False:
ifFalse: True:
evaluate argument if receiver is true
evaluate argument if receiver is false
evaluate first arg if true, second arg if false
evaluate first arg if false, second arg if true
Local exiting
exit
exitValue
exit block and return nil if block’s argument is evaluated
exit block and return a value if block’s argument is evaluated
Basic looping
loop
loopExit
loopExitValue
repeat the block forever
repeat the block until argument is evaluated; then exit and return nil
repeat the block until argument is evaluated; then exit and return a value
Pre-test looping
whileTrue
whileFalse
whileTrue:
whileFalse:
repeat the receiver until it evaluates to true
repeat the receiver until it evaluates to false
repeat the receiver and argument until receiver evaluates to true
repeat the receiver and argument until receiver evaluates to false
Post-test looping
untilTrue:
untilFalse:
repeat the receiver and argument until argument evaluates to true
repeat the receiver and argument until argument evaluates to false
Iterators
do:
to: By: Do:
to: Do:
upTo: By: Do:
upTo: Do:
downTo: By: Do:
downTo: Do:
iterate, passing each element to the argument block
iterate, with stepping
iterate forward
iterate forward, without last element, with stepping
iterate forward, without last element
reverse iterate, with stepping
reverse iterate
Collections
Sizing
isEmpty test
size
if collection is empty
return number of elements in collection
Adding
75
Self Handbook Documentation, Release 2 for Self 4.4
add:
addAll:
at: Put:
at: Put: IfAbsent:
addFirst:
addLast:
copyAddAll:
copyContaining:
add argument element to collection receiver
add all elements of argument to receiver
add key-value pair
add key-value pair, evaluating block if key is absent
add element to head of list
add element to tail of list
return a copy containing the elements of both receiver and argument
return a copy containing only the elements of the argument
Removing
remove:
remove: IfAbsent:
removeAll
removeFirst
removeLast
removeAllOccurences:
removeKey:
removeKey: IfAbsent:
copyRemoveAll
remove the given element
remove the given element, evaluating block if absent
remove all elements
remove first element from list
remove last element from list
remove all occurrences of this element from list
remove element at the given key
remove element at the given key, evaluating block if absent
return an empty copy
Accessing
first
last
includes:
occurrencesOf:
findFirst: IfPresent: IfAbsent:
at:
at: IfAbsent:
includesKey:
return the first element
return the last element
test if element is member of the collection
return number of occurences of element in collection
evaluate present block on first element found satisfying criteria, absent
block if no such element
return element at the given key
return element at the given key, evaluating block if absent
test if collection contains a given key
Iterating
do:
doFirst: Middle: Last: IfEmpty:
doFirst: MiddleLast: IfEmpty:
doFirstLast: Middle: IfEmpty:
doFirstMiddle: Last: IfEmpty:
reverseDo:
with: Do:
iterate, passing each element to argument block
iterate, with special behavior for first and last
iterate, with special behavior for first
iterate, with special behavior for ends
iterate, with special behavior for last
iterate backwards through list
co-iterate, passing corresponding elements to block
Reducing
max
mean
min
sum
product
reduceWith:
reduceWith: IfEmpty:
return maximum element
return mean of elements
return minimum element
return sum of elements
return product of elements
evaluate reduction block with elements
evaluate reduction block with elements, evaluating block if empty
Transforming
76
Chapter 6. Useful Selectors
Self Handbook Documentation, Release 2 for Self 4.4
asByteVector
asString
asVector
asList
filterBy: Into:
mapBy:
mapBy: Into:
return a byte vector with same elements
return a string with same elements
return a vector with same elements
return a list with the same elements
add elements that satisfy filter block to a collection
add result of evaluating map block with each element to this collection
add result of evaluating map block with each element to a collection
Sorting
sort
copySorted
copyReverseSorted
copySortedBy:
sortedDo:
reverseSortedDo:
sortedBy: Do:
sort receiver in place
copy sorted in ascending order
copy sorted in descending order
copy sorted by custom sort criteria
iterate in ascending order
iterate in descending order
iterate in order of custom sort criteria
Indexable-specific
firstKey
lastKey
loopFrom: Do:
copyAddFirst:
copyAddLast:
copyFrom:
copyFrom: UpTo:
copyWithoutLast
copySize:
copySize: FillingWith:
return the first key
return the last key
circularly iterate, starting from element n
return a copy of this collection with element added to beginning
return a copy of this collection with element added to end
return a copy of this collection from element n
return a copy of this collection from element n up to element m
return a copy of this collection without the last element
copy with size n
copy with size n, filling in any extra elements with second arg
Timing
realTime
cpuTime
userTime
systemTime
totalTime
elapsed real time to execute a block
CPU time to execute a block
CPU time in user process to execute a block
CPU time in system kernel to execute a block
system + user time to execute a block
Message Sending
Sending (like Smalltalk perform; receiver is a string)
sendTo: {With: }
sendTo: WithArguments:
sendTo: DelegatingTo: {With: }
sendTo: DelegatingTo: WithArguments:
resendTo: {With: }
resendTo: WithArguments:
send receiver string as a message
indirect send with arguments in a vector
indirect delegated send
indirect delegated send with arg vector
indirect resend
indirect resend with arguments in a vector
Message object protocol
77
Self Handbook Documentation, Release 2 for Self 4.4
send
fork
receiver:
selector:
methodHolder:
delegatee:
arguments:
receiver: Selector:
receiver: Selector: Arguments:
receiver: Selector: Type: Delegatee: MethodHolder: Arguments:
perform the send described by a message object
start a new process; the new process performs the message
set receiver
set selector
set method holder
set delegatee of the message object
set arguments (packaged in a vector)
set receiver and selector
set receiver, selector, and arguments
set all components
Reflection (mirrors)
reflect:
reflectee
contentsAt:
isAssignableAt:
isParentAt:
isArgumentAt:
parentPriorityAt:
slotAt:
contentsAt:
visibilityAt:
returns a mirror on the argument
returns the object the mirror receiver reflects
returns a mirror on the contents of slot n
tests if slot n is an assignable slot
tests if slot n is a parent slot
tests if slot n is an argument slot
returns the parent priority of slot n
returns a slot object representing slot n
returns the contents of the slot named n
returns a visibility object representing visibility of slot n
System-wide Enumerations (messages sent to the oddball object browse)
all[Limit: ]
referencesOf: [Limit: ]
referencesOfReflectee: [Limit: ]
childrenOf: [Limit: ]
implementorsOf: [Limit: ]
sendersOf: [Limit: ]
returns a vector of mirrors on all objects in the system (up to the limit)
returns a vector of mirrors on all objects referring to arg (up to the limit)
returns a vector of mirrors on all objects referring to argument’s reflectee (up to the limit); allows one to find references to a method
returns a vector of mirrors on all objects with a parent slot referring to
the given object (up to the limit)
returns a vector of mirrors on objects with slots whose names match the
given selector (up to the limit)
returns a vector of mirrors on methods whose selectors match the given
selector (up to the limit)
Debugging
halt
halt:
error:
warning:
halt the current process
halt and print a message string
halt, print an error message, and display the stack
beep, print a warning message, and continue
Virtual Machine-Generated
Errors
78
Chapter 6. Useful Selectors
Self Handbook Documentation, Release 2 for Self 4.4
undefinedSelector: Type: Delegatee: MethodHolder: Arguments:
ambiguousSelector: Type: Delegatee: MethodHolder: Arguments:
missingParentSelector: Type: Delegatee: MethodHolder: Arguments:
performTypeErrorSelector: Type:
Delegatee: MethodHolder: Arguments:
mismatchedArgumentCountSelector:
Type: Delegatee: MethodHolder:
Arguments:
primitiveFailedError: Name:
lookup found no matching slot
lookup found more than one matching slot
parent slot through which resend was delegated was not found
first argument to the _Perform primitive was not a canonical string
number of args supplied to _Perform primitive does not match selector
the named primitive failed with given error string
Other system-triggered messages
postRead
slot to evaluate after reading a snapshot
79
Self Handbook Documentation, Release 2 for Self 4.4
80
Chapter 6. Useful Selectors
CHAPTER
SEVEN
MORPHIC: THE SELF USER
INTERFACE FRAMEWORK
7.1 Overview
Morphic is a user interface framework that supports composable graphical objects, along with the machinery required
to display and animate these objects, handle user inputs, and manage underlying system resources such as X displays,
fonts, and color maps. A primary goal of morphic is to make it easy to construct and edit interactive graphical objects,
both by direct manipulation and from within programs.
A Morphic window shows just one portion of a large, two-dimensional world. The window can be panned around
in this world, allowing different areas to be used for different activities. Multiple users can be active in this world
simultaneously, working either in the same area (for collaborative work) or in disjoint areas (for independent work).
Every user can see the screen boundaries, cursors, and actions of the other users. The sharing is implemented via the
X protocol, so the other users can be physically remote as long as there is sufficient network bandwidth to support
the X traffic. (Preliminary tests suggest that 30-50 KBytes/sec is required between the host machine and each remote
user. The system has been tested with up to five users active simultaneously.) A given user can have several Morphic
windows open, either on the same world or on different worlds, and can drag objects among these windows (assuming
they all belong to the same Self Unix process).
Figure 7.1: Figure 1: Three users working in the same space. Two of the other users are collaborating, so they have
made their windows overlap (right). The third user is working independently in a separate area (left). The radarView in
the third user’s area shows the surrounding vicinity in miniature, allowing offscreen objects and the screen boundaries
of other users to be seen. The radarView is updated open enough to see where activity is occurring.
81
Self Handbook Documentation, Release 2 for Self 4.4
The central abstraction of morphic is the graphical object or morph (from the Greek for “shape” or “form”). A morph
has a visual representation that can be picked up and moved. In addition, a morph may:
1. perform actions in response to user inputs,
2. perform an action when a morph is dropped onto it or when it is dropped onto another morph,
3. perform an action at regular intervals, and
4. control the placement and size of its submorphs.
Any morph can have component morphs (called submorphs). A morph with submorphs is called a composite morph.
A composite morph is treated as a unit; moving, copying, or deleting a composite morph causes all its submorphs to
be moved, copied, or deleted as well. By convention, all morphs are visible; morphic does not use invisible structural
morphs for aggregation. This means that if a composite morph is disassembled, all its component morphs can be seen
and manipulated.
The remainder of this document discusses the graphics interface that morphs use to draw themselves, the structure of
composite morphs, how to create new kinds of morphs, and how to change a morph’s behavior with respect to user
inputs, drag-and-drop, and animation.
7.2 Composite Morphs
A composite morph is a morph that contains other morphs known as submorphs. Note that the terms “composite”
and “submorph” refer to roles that can be played by any morph. Submorphs can be added to any kind of morph-even
morphs such as circleMorphs or labelMorphs that are atomic in some other systems. Copying, deleting, moving,
drawing, and layout operations are applied to the composite morph as a whole.
The structure of a composite morph forms a tree. When morph B is a submorph of morph A, B’s owner is A and B
appears in A’s submorphs list. A morph can only be a submorph of at most one morph at a time, so its owner is a single
value, not a collection. A window containing a collection of morphs is itself just a morph known as a worldMorph.
Each user’s cursor is represented by a handMorph. Grabbing a morph with the mouse is implemented by removing the
target morph from the worldMorph and adding it to the handMorph. Dropping a morph when the mouse is released is
implemented by reversing this process. A handMorph is itself a submorph of its world. The message root can be sent
to a morph to get the top-most owner of a composite morph (stopping just short of the worldMorph or handMorph that
contains it). If a morph is not a submorph of any morph, its owner is nil.
Figure 7.2: Figure 2: A composite morph consisting of a row with two buttons. Each button has submorph to indicate
its function; one is a piece of text, the other is an icon consisting of two concentric circles. The diagram on the right
shows its submorph structure.
82
Chapter 7. Morphic: The Self User Interface Framework
Self Handbook Documentation, Release 2 for Self 4.4
A morph can be made a submorph of some other morph using the addMorph: operation. This operation updates both
the owner slot of the submorph and the submorphs list of the owner to reflect the desired configuration. For example,
adding morph B to morph A adds B to A submorph list, removes B from its old owner (if any), and sets B’s owner
to A. The addMorph: operation also updates the layout of both B’s old and new owners. The global position of a
morph is held invariant by addMorph: (although some morphs may perform an automatic layout as a side-effect of
addMorph:, immediately changing the position of the newly-added morph.).
Figure 7.3: Figure 3: Using the core sampler to probe the submorphs at the point below its cross-hairs.
The programming environment includes a tool called the core sampler (available via the right-button menu of any
morph) that can be used to explore the submorph structure of a composite morph. The core sampler shows the set of
submorphs below a given point, the way a core sample of rock allows geologists to study the strata of rock at a given
point. The core sampler allows one to use the middle button menu to operate on morphs below the surface and can
be used to insert or remove morphs from a composite morph. Holding the left mouse button over the squares along
the left side of the core sampler highlights the associated morph. As a shortcut, holding down the shift key while
pressing the left mouse button over one of these squares will extract the associated submorph (and all its submorphs)
from the composite morph. Holding the shift key while dropping a morph onto one of these squares will insert the
morph as a submorph of the associated morph. The iconic buttons on the right show the current resizing attributes of
the associated morph, and allow them to be changed. (Resizing attributes are discussed in section 7.)
7.3 Morph Traits and Prototypes
Morphic organizes morphs into a hierarchy much like a class hierarchy. The behavior for all “instances” of a given
morph “class” is defined in a shared traits object which is a parent of all the instances. The structure of an instance is
defined by the slots of its prototype. The root of the morph hierarchy is traits morph. All morphs inherit from traits
morph, either directly or via one or more intermediate traits objects. (Note: to see the entire morph hierarchy, invoke
the “Show Traits Family” menu command on an outliner on traits morph in the user interface. Be patient; the morph
hierarchy is quite large.)
Usually, the prototype of a given morph contains all the slots of the morph from which it is derived (the “instance variable of its superclass” in a class-based system) plus, possibly, a few additions. To simplify the life of the programmer,
the programming environment supports an idiom known as “copying down.” The derived prototype is described differentially. That is, it is “just like its copy-down parent except with particular slots added, deleted, or changed.” Typical
class-based languages also describe the structure of subclasses differentially: a subclass may extend its superclass
with additional instance variables. However, the copy-down idiom also allows the derived prototype to selectively
omit slots of its copy-down parent or change their contents. For example, the circleMorph prototype is derived from
7.3. Morph Traits and Prototypes
83
Self Handbook Documentation, Release 2 for Self 4.4
the morph prototype, but it replaces the “rawBox” slot of the morph prototype with the slots “radius” and “center”.
This would not be possible in most class-based languages.
Note that the class-like organization of the morph hierarchy—with its parallel traits and prototype hierarchies and
its use of the copy-down mechanism to propagate slot information down the prototype hierarchy—is only one way
that Self programs can be organized. Other parts of the system, such as the world-wide-web browser, are organized
differently.
7.3.1 Implementing a New Kind of Morph
It is easy to make a new kind of morph. One typically starts with a copy of some existing morph and adds or overrides
state and behavior to create the new morph. Often, the most appropriate starting point is a copy of morph, the root of
the morph object hierarchy. Morph has default behavior for everything from drawing to handling user inputs; one thus
starts with a working morph and modifies its behavior incrementally to create the new type of morph.
The programming aspect of creating a new morph is straightforward. However, four other things must be done to make
the new morph into a first-class citizen. First, its behavior should be factored into a shared parent (called a traits object)
to allow the behavior of all instances to be changed by changing the shared parent. Second, the shared traits object and
a prototypical instance of the new morph should be embedded in the global namespace. Third, the copy-down parent
of the prototype should be set so that changes to the structure of the parent are propagated correctly. Finally, the new
prototype and traits objects should be assigned to a module to allow the code for the new morph to be saved in a file.
Of course, if one just wants to do a quick experiment, none of these housekeeping chores are necessary. However,
sometimes one decides to make an experimental morph into a first-class morph (the bottom-up approach). In other
cases, one sets out from the beginning to create a new first-class morph (the top-down approach). The next two sections
will describe how to create a new kind of first-class morph using each of these approaches.
7.3.2 Morph Creation: The Bottom-up Approach
In the bottom-up approach, one is initially interested in getting a morph with the desired behavior as quickly as
possible. Thus, an appropriate morph is copied and modified by adding slots directly to the morph itself. Suppose one
wished to create a morph that displayed as an oval and that toggled between two colors when the middle mouse button
was pressed. To get a morph to modify, evaluate:
morph copy
This will make an outliner on a new morph. Use the “Show Morph” command on this outliner’s middle-button menu
to make the graphic representation of the copy appear.
The “Add Slot” command on the outliner’s middle-button menu can be used to add a data slot to hold the alternate
color. Enter the following expression and accept it by clicking on the green (top) button:
otherColor <- paint named: ’leaf’
The morph’s drawing behavior can be customized by adding the method:
baseDrawOn: aCanvas = (
aCanvas fillArcWithin: baseBounds
From: 0
Spanning: 360
Color: color.
self)
Morphic optimizes shadow drawing for rectangular morphs such as prototypical morph, which draws as simple rectangle. However, this morph is not rectangular. To make its shadow reflect its true shape, the isRectangular behavior
must be overridden by adding the constant slot:
84
Chapter 7. Morphic: The Self User Interface Framework
Self Handbook Documentation, Release 2 for Self 4.4
isRectangular = false
Figure 7.4: Figure 4: A new kind of morph has been created by modifying a copy of the standard morph. The slots
baseDrawOn:, isRectangular, middleMouseDown:, and otherColor have been added to the morph to obtain the new
behavior. The morph itself appears on the left; an outliner showing its slots appears on the right.
The new morph’s input behavior can be customized by adding the method:
middleMouseDown: evt = (| tmp |
tmp: color.
color: otherColor.
otherColor: tmp).
The morph now draws itself as a filled oval. Clicking the middle mouse button on it causes its color to toggle between
its original color and leaf-green. This new morph can used as a prototype; any copies will get the state and behavior
of the prototype at the time of copying. However, later changes to the prototype will not be reflected in the copies.
For example, even if the prototype’s middle-mouse behavior were changed to cycle through three colors, copies made
before this change would still only toggle between two colors.
To allow the behavior of all copies to be changed at once, one can move shared behavior and state into a shared traits
object. Self’s object literal syntax can be used to create a new object to be used as the shared traits. As a shortcut,
rather than creating an empty traits object and then adding a parent slot to it, an object containing an initialized parent
slot can be created in a single operation. Evaluate the expression in an evaluator on the outliner (use the middle-button
7.3. Morph Traits and Prototypes
85
Self Handbook Documentation, Release 2 for Self 4.4
menu command “Evaluator” to open an evaluator on the outliner if necessary):
(| parent* = traits morph |)
This creates a new object whose parent is traits morph. To make the new morph inherit through the new traits object,
invoke the “Grab pointer” command by pressing the middle-button menu on the button on the right side of the parent
slot of the morph. Drop the end of the pointer onto the new traits object to make the parent slot of the morph point to
the new morph. This technique is called “arrow-dragging”.
Figure 7.5: Figure 5: A new traits object has been created to hold behavior to be shared by all instances of the morph.
Arrow dragging is being used to make the parent slot of the new morph point to the new traits object.
Now, the behavior to be shared can be moved from the prototype into the new traits object. Invoke the “Move”
command on the middle-button menu for the isRectangular slot. This causes the slot to be plucked out of the object.
Drop the slot onto the shared traits object. This causes it to be added to the that object. Repeat this process for the
baseDrawOn: and middleMouseDown: slots.
86
Chapter 7. Morphic: The Self User Interface Framework
Self Handbook Documentation, Release 2 for Self 4.4
The Self language uses slot inheritance to share both data (isRectangular) and behavior (baseDrawOn: and middleMouseDown:). The programming environment supports a similar kind of uniformity by allowing any slot to be
moved or copied by via drag-and-drop. A entire category can also be copied or moved by dragging.
Note that when moving a slot between an object and its parent there is an interval during which the slot is not in
either object. If a message matching the slot name is sent to the object during this interval, the object’s response is
be determined by a slot inherited from a parent higher in the inheritance chain, if any. If it is important to avoid this
transient state, one can move the each slot by first copying it from the prototype into the parent and then remove it
from the prototype. A slot is removed simply by moving it and dropping it onto the trash can morph (or by dropping
it on the background and then dismissing it).
Figure 7.6: Figure 6: Using slot-dragging to move a slot into the new traits object. Using direct manipulation to move
and copy slots makes programming feel like manipulating concrete objects. This narrows the gap between composition
of graphical objects (building and modifying composite morphs) and programming.
Now, changing the traits object changes the behavior of all instances. For example, the draw method in the traits can
be changed to draw an unfilled oval. To demonstrate the power of shared behavior, first make several copies of the
protypical oval using the “Duplicate” command on its right-mouse menu. Then modify the baseDrawOn: method in
the shared traits as follows (note the change from “fillArcWithin:” to just “arcWithin:”):
baseDrawOn: aCanvas = (
aCanvas arcWithin: (baseBounds indent: 3)
From: 0
Spanning: 360
Width: 3
Color: color.
self)
The oval is drawn with a pen three-pixels wide. To accommodate the extra width, the rectangle passed to the canvas is
indented by three pixels. Note: A morph should never draw outside its baseBounds. When this method is accepted, all
copies of the prototype reflect the change. However, Morphic doesn’t automatically redraw instances when the draw
method is changed. To see the change, drag some large object over the ovals to make them redraw.
At this point, the prototype for a new kind of morph has been created and the behavior common to all its instances has
been factored into a separate traits object to facilitate later changes. The next step is to install the prototype and its
traits in the global and traits namespace objects. Doing this allows the morph prototype and its traits to be referred to
by name.
7.3. Morph Traits and Prototypes
87
Self Handbook Documentation, Release 2 for Self 4.4
Figure 7.7: Figure 7: Changing the shared traits object changes the behavior of copies of the prototype (instances). In
this case, the draw method has been changed to draw unfilled ovals.
First, summon outliners for the globals and traits namespace objects by evaluating the expressions “globals” and
“traits” in any text editor. (That is, type the expression, select it, and invoke the “Get Expression” command in the
middle-button menu of the editor.) Then, open an appropriate category for the new morph or create a new category.
Within the chosen category of “globals,” create a slot to hold the new morph’s prototype by invoking the “Add Slot”
command and accepting the following expression:
ovalMorph = nil
Next, invoke the “Grab pointer” command by pressing the middle-button menu on the button on the right side of the
new ovalMorph slot. Drop the end of the pointer over the new morph prototype and release the mouse. This makes
the new slot point to the new morph prototype. Repeat the procedure just described to create an “ovalMorph” slot in
the traits namespace and point it to the traits object for the new morph.
Finally, invoke the “Make creator” middle-button menu command on each new “ovalMorph” slot to designate it as
that morph’s creator. This informs the system that the given slot is the given object’s home in the global namespace.
(An object may be reachable via several global slots; setting its creator path distinguishes one of these slots as the
object’s official “home address.” This information is used to determine the object’s name, as well as which the module
in which to record information about the object as a whole, such as the object comment.) In a few seconds (if outliner
updating is on), the outliner titles of the ovalMorph prototype and its traits object will be updated to show the new
names for these objects.
To allow a composite morph containing ovalMorphs to be saved in a file, the prototype method in the prototype (not
the traits!) must return the prototype ovalMorph. The ovalMorph prototype already has a prototype method that was
copied from the original morph prototype. Change the body of the prototype method in the “filing out” category to:
ovalMorph
Many Smalltalk programming environments allow an instance variable to be added to a class at runtime. The new
instance variable is propagated down to all subclasses and added to all existing instances of the class and its subclasses
with an initial value of nil. The Morphic programming environment can provide a similar service for the copied-down
slots of prototypes, with two significant differences: (1) changes to the values of a copied down slots are propagated, as
well as slot additions and removals and (2) changes are propagated only to objects registered in the global namespace
88
Chapter 7. Morphic: The Self User Interface Framework
Self Handbook Documentation, Release 2 for Self 4.4
Figure 7.8: Figure 8: Installing the new morph prototype and traits object in the globals and traits namespace objects.
In each case, a new constant slot is created in the appropriate category, then arrow-dragging is used to make the new
slot point to the desired object.
7.3. Morph Traits and Prototypes
89
Self Handbook Documentation, Release 2 for Self 4.4
Figure 7.9: Figure 9: Setting the creator slot of the new traits object. The system uses this information to name objects,
among other things. Note that the title of the prototype (on the left) has already been updated to reflect its new name.
90
Chapter 7. Morphic: The Self User Interface Framework
Self Handbook Documentation, Release 2 for Self 4.4
(other prototypes), not to clones of those objects (instances).
The system can be told to maintain the copied-down slots of the ovalMorph prototype automatically by setting its
copy-down parent (Figure 10). Select the “Show Annotation” command in the middle-button menu on the title of
the ovalMorph’s outliner. Set the copy-down parent field to “morph”, the copy-down selector to “copyRemoveAllMorphs”, and press the green (top) button to accept this change. (The copy-down selector is sent to the copy-down
parent to create a fresh copy from which to copy slots.) The system will ask if the slots “parent” and “prototype”
should be omitted from the copy-down operation, since their contents differ from that of that of the copy-down parent.
They should be.
Finally, it would be nice to be able to save the prototype and traits for the new ovalMorph in a file so that it can be
archived or read into another Self world. Several steps are required. First, the module itself must be created. The
system will create a new module (after getting confirmation from the user) the first time its name is used. Then, the
slots in the globals and traits namespace object must be assigned to the new module. Finally, the non-copied-down
slots in the prototype and traits objects are assigned to the module. This may sound tedious, but the system provide
several shortcuts to accelerate the process.
To set the module for the new morphs home slot, invoke “Show annotation” on the ovalMorph slot in the globals object,
type “ovalMorph” in the module field, and accept the change (Figure 11). Since this is a new module, the system will
ask whether a new module should be created (yes), whether it should be a submodule of an existing module (no), and
what subdirectory it should be stored into (“applications”). Set the module of the ovalMorph slot in the traits object
the same way.
All the slots in an object (or within one category of that object) can be assigned to a module in a single operation. To
assign the slots of the new traits object to the new module, invoke the “Set module...” command on the header of its
outliner. The system will ask which slots should be assigned to the module (all) and which module to put them into
(ovalModule). After a few seconds, the module summary at the top of the outliner should update to indicate that all
slots of the traits object are in ovalModule. Repeat this procedure to assign all the slots of the ovalMorph prototype to
ovalModule.
Now that all the slots of the new morph and its prototype have been assigned to the new module, the module can be
filed out. Invoke the “Changed modules...” command on the background menu to get the changed modules morph.
Then press the little button marked “w” to the right of “ovalModule”. The system will save the code for the module
in a file named “ovalModule” in the “applications” subdirectory of the current working directory. (If this directory
doesn’t exist, the system will complain. Create the directory and try the fileout operation again.) The oval morphs
module can later be loaded into a snapshot by evaluating the expression:
bootstrap read: ’ovalModule’ From: ’applications’
7.3.3 Morph Creation: The Top-down Approach
The top down approach to creating a new morph is similar to the approach just described, except that one plans to
make a first-class citizen from the beginning. Thus, the order of steps is slightly different. Here is a brief outline of
the procedure:
1. Add a slot to the traits namespace object (using “Add Slot”):
ovalMorph = (| parent* = traits morph |)
2. Add a slot to the globals namespace object:
ovalMorph = (| parent* = traits ovalMorph |)
3. Make each new slot be the creator of its contents (using “Make creator”).
4. Set the copy-down parent of the prototype to morph (via “Show annotation” on its outliner).
5. Set the module of the two namespace slots to ovalModule (creating the new module in the process).
7.3. Morph Traits and Prototypes
91
Self Handbook Documentation, Release 2 for Self 4.4
Figure 7.10: Figure 10: Setting the copydown parent for the new prototype.
Figure 7.11: Figure 11: Setting the modules for the namespace slots. The module will be created if it doesn’t already
exist; the system asks the user several questions about where the new module should live and whether it is a submodule
of some existing module.
92
Chapter 7. Morphic: The Self User Interface Framework
Self Handbook Documentation, Release 2 for Self 4.4
Figure 7.12: Figure 12: Assigning all the slots of the new traits object to the new module.
7.3. Morph Traits and Prototypes
93
Self Handbook Documentation, Release 2 for Self 4.4
Figure 7.13: Figure 13: Saving the code for the new morph in a module file.
94
Chapter 7. Morphic: The Self User Interface Framework
Self Handbook Documentation, Release 2 for Self 4.4
6. Assign all slots of the new traits and prototype objects to ovalModule.
7. Start programming the new behavior.
This procedure does all the housekeeping chores up front, so the module can be filed out at any time. As the programmer works, the system will deduce that any slots added to ovalMorph’s traits or prototype should be placed in the same
module as the other slots in that object (ovalModule). In a future release of the system, the initial housekeeping may
be automated. This would make creating a new kind of morph a one-step operation.
7.4 Saving a Composite Morph
The system includes an experimental facility for store the structure of a composite morph to a file. This allows a
morph constructed by direct manipulation to be saved into a file that can be read later to reconstruct the morph. This is
how the “factory” was created. The morph saving facility requires that every morph and submorph to be saved supply
implementations of the messages slotsToNotFileOut, appendOtherSlotsOnto:, storeStringNeeds, and prototype.
Unfortunately, because morph saving was added later as an experiment, not all morphs have been retro-fitted with
implementations of these messages. The enterprising user could easily infer how to add the required support to
morphs that do not yet have it.
Suppose one has created a column of useful buttons that one wishes to save. (Fortunately, buttons, columns, rows,
frames, and labels are among the morphs that do support saving.) To save this morph, create an outliner for it and then
evaluate in that outliner:
saveMorphInFile
The system will prompt for a file name and will give graphical feedback as each component morph is stored. The file
can later be read by evaluating:
worldMorph loadMorphFromFile
Again, the system will prompt for the file name. A copy of the morph that was saved will be added to the hand. The
return value of the expression will also be added to the hand, which may temporarily hide the new morph. Click any
mouse button to put down the two objects, then move the top one out of the way.
7.5 Handling User Input
7.5.1 Handling Events
Morphic represents user actions such as pressing a key or mouse button using ui2Event objects. A ui2Event actually
carries two kinds of information: its type, such as “leftMouseDown”, and the state of the mouse buttons and certain
keyboard keys when the event occurred. This allows a program to tell, for example, if the shift key was held down
when the left mouse button was pressed. As events occur, they are placed into a buffer. Morphic removes and processes
events from this buffer in order. Thus, even if a user occasionally gets ahead of the system, the system will eventually
catch up.
A morph can handle a given kind of event simply by implementing one of the following messages:
keyDown: evt
keyUp: evt
mouseMove: evt
leftMouseDown: evt
leftDoubleClick: evt
leftMouseUp: evt
middleMouseDown: evt
7.4. Saving a Composite Morph
95
Self Handbook Documentation, Release 2 for Self 4.4
middleDoubleClick: evt
middleMouseUp: evt
rightMouseDown: evt
rightDoubleClick: evt
rightMouseUp: evt
The event is always supplied so that its state can be examined. The default behavior of the leftMouseDown: message
is to pick up the composite morph containing the morph that gets the event. (That is, the left mouse button generally
means “move”.) The default behavior of the rightMouseDown: message is to pop up the morph menu (the “blue”
menu). The default behavior of the other messages is to return the special dropThroughMarker object, indicating
that the event is not processed by this morph.
Submorphs of a morph are displayed in front of their owning morph. By default, submorphs are usually given the first
opportunity to handle incoming events. If a submorph does not handle an event, it returns the dropThroughMarker
object, and Morphic gives the submorph behind it a chance to handle the event. Each user generates events at the
current location of their cursor. One can visualize an event as “falling down through” the submorphs of the composite
morph at that location until either the event lands on a submorph that handles it or until all the submorphs of the
composite at that point are exhausted. However, events do not fall between top-level morphs. For example, if an
outliner is covered by a morph that does not handle middleMouseDown events, one cannot invoke the middle button
menu of the outliner through the intervening morph.
In some cases, a morph may wish to handle certain events before its submorphs. For example, a ui2Menu morph
handles leftMouseDown events itself rather than letting its component buttons get them in order to highlight the button
under the cursor and to pop down the menu when a selection is made. A morph can arrange to handle certain kinds of
events before its submorphs by overriding the allowSubmorphsToGetEvent: message.
There are actually two classes of events. KeyDown events, the three mouseDown events, and the three doubleClick
events are dispatched using the “falling through the submorphs” technique just described. The other events—keyUp,
mouseMove, and the three mouseUp events are dispatched only to interested subscribers. The rationale is that some
morphs are interested in discrete events, such as mouseDown transitions, while others need to track the mouse or
keyboard over an extended period of time. Dispatching high-frequency events such as mouseMove to uninterested
morphs would be inefficient. Futhermore, some morphs need to get events even when the cursor is no longer over the
morph. For example, a click-to-type editor should continue to get keyDown events until another editor is clicked. In
short, Morphic supports both spatial and subscription-based event dispatching because both are useful.
The events generated by a particular user are dispatched from the handMorph associated with that user. Each handMorph keeps a list of subscribers interested in various kinds of events. A morph asks the appropriate handMorph
to start or stop its subscription to a particular kind of event. Every event has a reference to the hand that generated
that even. Thus, a morph that wishes to track the mouse until the button is released (e.g., sliderMorph) would do the
following:
1. on leftMouseDown, execute “evt sourceHand subscribeUntilAllUp: self”
2. on mouseMove, update the slider position from the current mouse position (which is in global coordinates)
7.5.2 Mapping special characters to actions
When a morph receives the keyDown: message, the next step is the interpretation of any control-, metaor command- keystrokes.
For example, on the Macintosh, a command-X should perform a cut operation. A morph wishing to respect these conventions should do two things: it should inherit from traits
ui2Event ignoreSpecialCharactersMixin, and it should, upon receiving the keyDown: message, send
sendMessageToHandleKeyboardEventTo: the event, passing itself as the argument. The latter message tells
the event to decode any special characters and send an apprpropriate message back to its argument. The mixin provides
default behavior.
96
Chapter 7. Morphic: The Self User Interface Framework
Self Handbook Documentation, Release 2 for Self 4.4
7.6 Drag and Drop
A morph can perform some action when another morph is dropped onto it and can decide which dropped morphs it
will accept. In addition, the dropped morph can perform some action in response to being dropped.
To accept dropped morphs, a morph must respond affirmatively to the message:
wantsMorph: m Event: evt
The morph to be dropped is supplied as an argument to allow the receiving morph to decide if it wishes to accept the
drop. For example, a printer icon morph might accept only document morphs. If the target morph agrees to accept the
dropped morph, the target is then sent the message:
addDroppingMorph: m Event: evt
to actually perform the drop action. Part of this action should be to put the dropping morph somewhere or delete it.
For example, the printer icon morph might queue a print request, then add the document morph to a folder morph
representing the printed documents.
Finally, the dropped morph is informed of the drop (post facto) by sending it the message:
justDroppedInto: m Event: evt
The event is provided in these messages to allow the morph to examine the state of the mouse buttons or modifier keys
at the time of the drop.
7.7 Automatic Layout
7.7.1 Packing
Automatic layout relieves the programmer from much of the burden of laying out the components of a composite
morph such as a dialog box. By allowing morphic to handle the details of placing and resizing the components, the
programmer can focus on the topology of the layout, without worrying about the exact positions and sizes. Automatic
layout also allows composite morphs to adapt gracefully to size changes, including font size changes.
Layout morphs manage the placement and sizing of their submorphs. Layout morphs currently include rowMorphs,
columnMorphs, frameMorphs and their descendents. All other morphs leave the size and placement of their submorphs
alone. The current set of layout morphs all use the same layout strategy: linear, non-overlapping packing. Rows pack
horizontally from left-to-right. Columns, frames, and their descendents pack vertically from top-to-bottom. This
simple approach, while it does not handle every conceivable layout problem (e.g., tables whose rows and columns
adjust to the size of their contents), is surprisingly powerful. All automatic layout in morphic is based on nested
combinations of rows and columns.
Linear packing is best explained procedurally. Consider a rowMorph. Its task is to arrange its submorphs into a row
such that the left edge of each morph just touches the right edge of the next morph. The submorphs are processed in
order; that is, the first submorph will be placed at the left end of the row, then the next submorph will be placed to
the right of the first, and so on. The last submorph will be placed at right-most end of the row. Notice that the order
of the submorphs is not affected by the packing process. Also notice that the packing is done only in one primary
dimension—the horizontal dimension in this case. The other dimension is also considered during packing, and is
controlled by the justification parameter of the row. Depending on this parameter, the tops, bottoms, or centers of the
submorphs can be aligned with the top, bottom, or center of the row.
7.6. Drag and Drop
97
Self Handbook Documentation, Release 2 for Self 4.4
7.7.2 Space-filling
For simplicity, the packing strategy was described as if the submorphs to be packed were all rigid. In order to support
“stretchy” layouts, morphs can be designated as space-filling. (Note: The source code uses the older term, flexible.)
When there is extra space, a space-filling morph expands to fill this space. If there is no extra space, a space-filling
morph shrinks to its minimum size. When there are several space-filling morphs in a single row or column, any extra
space is divided evenly among them.
Space-filling morphs can be used to control the placement of submorphs within the primary dimension when a row or
column is stretched. For example, suppose one wanted a row with three buttons, one at the left end, one at the right
end, and one in the middle. This can be accomplished by inserting space-filling morphs between the buttons:
<button1><spacer><button2><spacer><button3>
When the row is stretched, the extra space is divided evenly between the two spacers, button2 stays in the center,
and button3 stays at the far right. By making the color of the spacers match that of the underlying row, they become
effectively invisible. This is a common technique.
Figure 7.14: Figure 14: Using flexible spacer morphs to space buttons evenly within a row. Normally these spacers
would be made the same color as the row, making them effectively invisible
7.7.3 Shrink-Wrapping
It is sometimes desirable for the size of a morph to depend on the sizes of its submorphs. For example, the size of
a button should depend on the size of its label. (It would be annoying if it didn’t; the programmer would have to
manually resize the button after changing the label.) A morph designated as shrink-wrap shrinks (or grows) to the
smallest size that accommodates the size requirements of its submorphs.
7.7.4 Minimum Sizes
Morphs have a minimum size in each dimension (minWidth and minHeight). These sizes determine the minimum
amount of space that will be allocated to a morph during layout. The minimum size of a morph takes into account the
minimum sizes of its submorphs. For example, the minimum width of a row is the sum of the minimum widths of its
submorphs (plus a little bit for a border, if it has one).
The absolute minimum width and height of a morph, even when it has no submorphs, is specified by its baseMinWidth
and baseMinHeight. For some kinds of morph, these values are stored in assignable slots in the morph. For others,
these values are defined by inherited constant slots to save space. One can use these attributes to give a space-filling
morph a minimum size.
98
Chapter 7. Morphic: The Self User Interface Framework
Self Handbook Documentation, Release 2 for Self 4.4
7.7.5 Resize Attribute Summary
The resizing behavior of a morph in one dimension is completely independent of its behavior in the other dimension;
that is, a morph actually has two independent resizing attributes, one for the horizontal dimension and one for the
vertical dimension.
To summarize, the resizing behavior of a morph along a given dimension is controlled by its resizing attribute, which
has one of three values:
rigid The morph is not resized.
space-filling In a row or column, the size of the morph adapts to fill the available space. Extra space is
shared evenly with any other space-filling morphs in that row or column.
shrink-wrap The morph is shrunk to just fit around its submorphs, or to its minimum size, whichever is
smaller. Enclosed space-filling morphs are shrunk if necessary.
A morph’s minimum size in a given dimension determines the smallest amount of space that should be allocated to it
during layout. The core sampler and/or properties sheet can be used to change these attributes.
7.8 Animation
Animation can be used to make an interactive application seem more alive and can convey valuable information.
However, animation can become annoying if the user has to wait until the animation completes before doing anything
else. In Morphic, animation and user actions are concurrent, and multiple animations can be active while multiple
users interact with the system.
Figure 7.15: Figure 15: Three simultaneously active morphs: an ideal gas simulation, a digital clock, and an outliner
on the Self object underlying one of the atoms in the simulation. The clock updates every second, the simulation runs
continuously, and the outliner periodically updates its center and velocity slot values as the underlying atom moves. A
morph continues to operate while it is being moved (the clock is being moved here) or while an external animation is
applied to it. Note that multiple users can be active simultaneously; this example shows the cursors of two users.
There are two ways to achieve animation. First, a morph can have lightweight autonomous behavior which typically,
although not necessarily, appears as animation. For example, a clock might advance the time or a discrete simulation
might compute simulation steps. Second, Morphic includes a kit of external animation behaviors that can be applied
to any morph, including motion, scaling, and color change animations.
Although autonomous behavior and external animations are implemented using the same underlying mechanism, they
have different purposes and are specified in different ways. The autonomous behavior of a morph is an intrinsic
property of that morph. For example, updating the time is central to being a clock morph. Autonomous behavior is
7.8. Animation
99
Self Handbook Documentation, Release 2 for Self 4.4
defined in the morph itself. External animation behaviors, on the other hand, are typically transient and imposed from
outside. For example, the Self programming environment gives feedback for certain actions by “wiggling” the relevant
morph. An external animation is specified by creating a separate animation activity object and applying it to the morph
to be animated. Animation is orthogonal to autonomous behavior; for example, a clock morph would continue to run
even while a motion animation whisked it across the screen.
7.8.1 Stepping
The autonomous behavior of a morph is defined by its step method. For example, to make a simple digital clock, one
could add the following slot to a copy of labelMorph:
step = ( label: time current timeString )
The clock is activated by asking the system to send the “step” message to it either continuously (every display update
cycle) or at periodic intervals (e.g., once per second). Make sure the labelMorph is visible in the world (use the “Show
Morph” menu command if necessary), then, in an evaluator on its outliner, evaluate:
getSteppedEveryMSecs: 1000
This will cause the step message to be sent to the morph once per second (i.e., every 1000 milliseconds), causing it
to display a formatted string representing the current time. Step messages are sent synchronously during the display
update cycle. This has the advantage of simplifying synchronization but requires that step methods complete quickly
to avoid delaying user interactions.
The message stopGettingStepped can be sent to the morph to turn off stepping for that morph. Morphic automatically
stops stepping when the target morph is removed from the world. To make the clock morph reactivate itself when
dropped back into the world, add the following slot:
justDroppedInto: m Event: evt = (
isInWorld ifTrue: [ getSteppedEveryMSecs: 1000 ]).
7.8.2 External Animation
External animation of a morph is achieved by scheduling an animation activity with that morph as its target. An
animation activity changes some property of its target gradually over the course of a number of display cycles (frames).
For example, a positionAnimator animates a change in its target morph’s location. The programmer specifies the
initial and final values of the property to be changed (e.g., the starting and ending position) and the duration over
which the change should occur. The duration can be defined in two ways. Frame-based animation lets the programmer
control animation smoothness by specifying that the animation should take a given number of frames regardless of the
time per frame. Time-based animation lets the programmer specify the desired amount of time the animation should
take, but the number of intermediate frames depends on the time per frame, which may vary with system load, scene
complexity, and other factors. Animations can be paced linearly or slow-in-slow-out. A slow-in-slow-out animation
starts slowly, builds to a maximum pace, then decelerates. There are activities that animate the position, size, and color
of morphs, activities that send arbitrary messages, and compound activities that combine a set of other activities either
sequentially or concurrently. In fact, this activity architecture is the basis of all animation in Morphic: an activity
called a periodicStepActivity is used to implement the stepping facility.
100
Chapter 7. Morphic: The Self User Interface Framework
Self Handbook Documentation, Release 2 for Self 4.4
7.9 Other Issues
7.9.1 Local versus Global Coordinates
The position of a morph is defined relative to the position of its owner. This makes it unnecessary to update the
positions of all the submorphs when moving a composite morph. However, it also means that morphs with different
owners have positions in different coordinate systems. In order to compare the positions of morphs having different
owners, it is necessary to use their positions in the world’s coordinate system, which are computed by sending the
globalPosition message to each morph.
7.9.2 Synchronization
Animation, stepping, and other activities are handled synchronously, as part of the basic user interface loop. Thus, a
sequence of actions done by an activity or a step method appear to happen atomically; the user never sees the morph
in an intermediate state in which some but not all of the actions have taken place. For example, if a morph is removed
from one morph and added to another, the user never sees the transient state in which the morph is not in the world at
all. Likewise, any layout modifications resulting from user actions—such as adding a new morph to a row—appear to
happen atomically; one never sees a partially complete layout.
Often, however, an independent Self thread wishes to manipulate morphs in the user interface. In order to make such
actions appear atomic, they should be done under the protection of the UI synchronization semaphore. The preferred
way to do this is to wrap the action or actions in a block to be executed between display cycles of the morph’s world:
aMorph safelyDo: [ ... ]
Synchronization errors usually appear as intermittent graphical glitches, although in rare cases the submorph structure
may be corrupted (e.g., a morph appearing in the submorph lists of multiple morphs).
7.9.3 Display Updating
Morphic uses a double-buffered, incremental algorithm to keep the screen updated. This algorithm is efficient (it tries
to do as little work as possible to update the screen after a change) and high-quality (the user does not see the screen
being repainted). It is also mostly automatic; many applications can be built without the programmer ever being aware
of how the display is maintained. The description here is mostly for the benefit of those curious about how the system
works.
Each morphic screen window displays the contents of some worldMorph. A worldMorph keeps a list of rectangular
“damaged” regions of the screen. Every morph can compute a rectangle that encloses its entire visible representation.
When a morph changes its appearance (for example, its color), it sends itself the message changed. This causes
its bounding rectangle to be translated into global coordinates and added to the damage list of the worldMorph that
contains it. (This worldMorph is found by starting at the morph and following the owner chain; the worldMorph is
the last morph in this chain.) On the next display update cycle, the worldMorph redraws the portions of all morphs
that intersect rectangles in the damage list (via an off-screen buffer), including the morph that was changed. The
world-Morph then clears its damage list to prepare for future damage reports.
When a morph changes size or position, damage is reported both before and after the change. This causes the screen
to be updated at both the old and new size or position.
Typically, the implementor of a morph writes code to send the changed message automatically after updating any
slot that affects the morph’s appearance. For example, the color: message defined in traits morph sends changed
automatically. Likewise, external animation activities report appropriate changes. Thus, the client of a morph usually
need not send changed explicitly.
7.9. Other Issues
101
Self Handbook Documentation, Release 2 for Self 4.4
7.9.4 Layout Updating
Morphic also maintains morph layout incrementally. When a morph is changed in a way that could influence layout
(e.g., when a new submorph is added to it), the message layoutChanged is sent to the morph. This triggers a chain of
activity. First, the layout of the changed morph is updated. This may change the amount of space apportioned to some
of its submorphs, causing their layouts to be updated. Then, if the space requirements of the changed morph have
changed (e.g., if it needs more space to accommodate the newly added submorph), the layout of its owner is updated,
and possibly its owner’s owner, and so on. In some cases, the layout of every submorph in a deeply-nested composite
morph may need to be updated. Fortunately, there are many cases where the layout updates can be localized. Morphic
detects these cases, thus saving a great deal of unnecessary work.
As with changed messages, morph clients usually need not send layoutChanged explicitly since the most common
operations that affect the layout of a morph—such as adding and removing submorphs or changing its size—take care
of this already.
Normally, layout is performed incrementally after every morph add or remove operation. However, when a large
composite morph is to be constructed, the cost of the repeated layout operations can be significant. The programmer can ameliorate this problem by using the batch operation addAllMorphs: rather than a sequence of individual
addMorph: operations.
If a morph is not in a worldMorph, however, all layout is deferred. This is done partly to optimize creating large
composite morphs (which are often constructed “off-line” and then added to the world) and partly because the exact
size of labelMorphs depends on font metrics that may vary from one X server to another. Thus, the layout of a morph
containing labels would have to be recomputed in the context of a particular world anyway. Occasionally, one needs
to know the exact size of a newly created morph (for example, to ensure that a menu does not pop up partially off
the edge of the screen). In such cases it may be necessary to temporarily add the morph to the world in some remote
location (such as -1000000 @ -1000000) to force it to be laid out.
7.9.5 Morph Copying
When a composite morph is copied, its entire submorph tree is traversed and copied to produce a duplicate with the
same structure. However, simply copying the structure is not quite enough because some of the morphs within a
composite morph may refer to other morphs within the composite. For example, the buttons of a radarView refer to
the radarDisplay morph. When a radarView morph is copied, the buttons of the copy must be updated to point to the
radarDisplay morph in the copy, not that in the original radarView. A simplified diagram of this process is shown in
Figure 16.
Sometimes a morph may need to do something special when it is copied. In this case, the message baseCopy should
be overridden rather than copy. See traits ui2Button for an example of how this is done.
7.10 Morph Responsibilities
There are two messages that each type of morph is expected to implement: morphTypeName and prototype. The
first returns a string used to show the type of a morph in the user interface (e.g., in the core sampler) while the second,
which should return the prototype for the morph, is used by the morph filing out code.
Two other messages may need to be overridden. These are:
isRectangular This message is used to optimize the drawing of shadows for morphs whose display completely fills their bounding rectangle. The default implementation returns true, so non-rectangular morphs
such as circleMorphs must provide an implementation that returns false. (Hint: If a non-rectangular morph
casts a rectangular shadow, someone probably forgot to override this message.)
mapReferencesUsing: This message is sent during copying to update any references between the submorphs of a composite morph. Its argument is a dictionary mapping submorphs in the old composite
102
Chapter 7. Morphic: The Self User Interface Framework
Self Handbook Documentation, Release 2 for Self 4.4
Figure 7.16: Figure 16: Copying a composite morph. First, the submorph structure of the original morph is copied (a).
Then, references among the submorphs of the composite updated to mirror those of the original (b).
7.10. Morph Responsibilities
103
Self Handbook Documentation, Release 2 for Self 4.4
morph to the corresponding submorphs in the copy. Morphs whose slots may contain references to other
morphs within a composite should override this message to update these slots during copying. For example, a ui2ButtonMorph overrides this message in order to update its “target” slot. That way, if the button
and its target are both embedded in some composite morph that is copied, the button in the copy will refer
to the target in the copy. See traits colorChangerMorph for an example.
7.11 Some Useful Morphs
The Self system comes with a large library of morphs. While some morphs exist solely to supporting the programming
environment, many are general-purpose and can be reused to construct new applications. This section mentions some
of the most useful and reusable morphs. To find out more about a given morph, use the programming environment to
examine its prototype and traits objects. Useful comments are sometimes buried in the bodies of methods.
Widget morphs are interactive, allowing the user to invoke an action or input some data.
sliderMorph Allows the user to specify a numerical value in some range. When the slider is manipulated,
its target object is sent a user-specified message with the new slider value as an argument.
ui2Button Executes a user-specified script when the button is pressed. The script can refer to the button’s
target. The target of a button or slider morph can be set by using the middle-mouse menu “Set Target”
command. This sets the target slot of the button or slider to the morph directly below it. Buttons are often
decorated with a textual label, but a button can contain arbitrary morphs instead of, or in addition to, this
label.
ui2Menu A column full of buttons. A menu can be “pinned down” using the unlabeled button at its top.
It can then be manipulated or disassembled like any other morph. Menus support a rich set of messages
for adding normal or grayed out buttons and for inserting dividing lines.
Structural morphs are typically used to bind morphs together and arrange them into a pleasing layout.
rowMorph and columnMorph Pack their submorphs into a row or column. These morphs offer several
justification options and can also provide a border of empty space around their contents.
frameMorph Like a columnMorph, except that it can display various kinds of borders around its contents.
Bezeled frameMorphs are used heavily in the programming environment to provide a three-dimensional
look.
spacerMorph While many types of morph (such as an empty rowMorph) could be used to fill a space
between morphs, it is preferable to use a spacerMorph to make it clear that the only purpose of the
morph is to control spacing. (Morphic allows users to customize the user interface by directly manipulating morphs. Thus, just as is it important to write readable programs, it is important to build composite
morphs with “readable structure.”) Often, a spacerMorph is used to provide a fixed amount of space between submorphs in a rowMorph (or columnMorph). To accomplish this, the spacerMorph should be
of the desired width, be rigid horizontally and space-filling vertically, and be the same color as the rowMorph. The message copyH:Color: (or copyV:Color: to creating a vertical spacer for use in a column)
can be sent to spacerMorph to create a new spacerMorph with these properties. The other common use of
spacerMorphs is to provide a stretchy space between morphs; the expression “spacerMorph copy beFlexible” makes a spacerMorph that does the job. Setting the baseMinWidth: or baseMinHeight: of such a
spacer ensures that at least the given amount of space will be provided.
Other morphs supply decorative or information content for user interfaces.
labelMorph displays a single-line string in a single font style, size, and color.
circleMorph displays a filled circle.
pixmapMorph displays an image (currently, at most 8 bits deep).
movieMorph cycles through a sequence of images as it is stepped.
104
Chapter 7. Morphic: The Self User Interface Framework
Self Handbook Documentation, Release 2 for Self 4.4
The library includes two kinds of text editors.
editorMorph a general editor that allows arbitrary morphs to be embedding in the text.
uglyTextEditor a simple, text-only editor that is a bit faster for editing larger amounts of text.
Many applications implement specialized content morphs. For example, the Self programming environment defines
morphs that represent Self objects, slots, and categories.
7.12 The Graphical Environment
Morphic hides many details of the underlying graphics system. This both simplifies programming and provides portability: the layer of abstraction between the programmer and the underlying graphics system allows the implementation
of the low-level graphics to be changed without affecting programs written by clients. While the current version of the
system is built on the X window system, it could be ported to other window systems fairly easily (although the target
window system should support color or grayscale for good results). One might even create a Postscript implementation
of the morphic graphics interface to allow morphs to render themselves on paper.
The graphics interface is implemented by canvas objects. There may eventually be many kinds of canvases for rendering onto displays of differing resolutions, color properties, or bit-depths. The current system provides four types
of canvas. WindowCanvas and pixmapCanvas draw onto a window or an offscreen buffer via the X protocol. A
NullCanvas has the same interface but does not actually draw anything; it can be used to factor out the cost of graphics during performance analysis. ColorRecordingCanvas is used internally by the colormap manager. All canvases
implement the following messages for drawing geometric shapes:
draw a single pixel
point: p Color: c
outline or fill a rectangle or fill the entire canvas
rectangle: r Color: c
rectangle: r Width: w Color: c
fillRectangle: r Color: c
fillColor: c
draw a solid or dashed line or a connected sequence of line segments
line: pt1 To: pt2 Color: c
line: pt1 To: pt2 Width: w Color: c
dashedLine: pt1 To: pt2 DashSize: d Offset: o Color: c
dashedLine: pt1 To: pt2 Width: w DashSize: d Offset: o Color: c
lines: pointList Color: c
lines: pointList Width: w Color: c
outline or fill a polygon
polygon: pointList Color: c
polygon: pointList Width: w Color: c
fillPolygon: pointList Color: c
outline or fill a circle
circleCenteredAt: pt Diameter: d Color: c
circleCenteredAt: pt Diameter: d Width: w Color: c
fillCircleCenteredAt: pt Diameter: d Color: c
outline or fill a wedge cut by the given angles from an ellipse bounded by the given rectangle
7.12. The Graphical Environment
105
Self Handbook Documentation, Release 2 for Self 4.4
arcWithin: r From: startAngle Spanning: spanAngle Color: c
arcWithin: r From: startAngle Spanning: spanAngle Width: w Color: c
fillArcWithin: r From: startAngle Spanning: spanAngle Color: c
draw a simple or compound curve
bezier: pt1 Control: c1 Control: c2 To: pt2 Width: w Color: c
bSpline: controlPoints Width: w Color: c
catmullRomSpline: controlPoints Width: w Color: c
draw text in the given font and size
text: s At: pt Font: fName Size: fSize Color: c
display a portable pixel-based image (a ui2Image)
image: i At: pt
Canvases maintain an offset, allowing graphic operations to be automatically translated. (Canvases also maintain a
scale factor, but scaling is not currently used and is probably buggy. Furthermore, image scaling is not implemented.)
In morphic, unlike many graphics packages, the graphics context is hidden from the programmer; all the common
parameters that control the behavior of a given drawing command—such as color and line width—are passed as
explicit parameters. A few infrequently changed parameters, such as the fill pattern and the clipping rectangle, can be
changed temporarily via messages such as withPattern:Do: and withClip:Do:. The canvas handles these messages
by changing the state of the underlying graphics context, executing the block provided (which presumably issues
some drawing commands to that canvas), and restoring the original state of the graphics context. Nested invocations
of withClip:Do: are handled sensibly: a stack of clipping rectangles is maintained and drawing operations are clipped
to the intersection of all rectangles currently on the stack.
7.12.1 Specifying Colors
Colors in morphic are represented by paint objects. A paint can be manipulated as either a red-green-blue triplet or as
a hue-saturation-brightness triplet. Red, green, blue, saturation, and brightness are specified as numbers in the range
[0.0..1.0], where zero means black or unsaturated and one means full-brightness or saturated. Hue, which corresponds
to the angular location of the hue on the color-wheel, is specified as a number in the range [0.0..360.0], where zero
corresponds to red. Colors with zero saturation (i.e., black, white, and shades of gray) have no hue; if you increase the
saturation of such an achromatic color, its hue is arbitrarily chosen to be zero (red).
Paints provide transformations to:
change the red, green, or blue component, change the hue, saturation, or brightness component, and
interpolate between two colors.
Since paint objects are immutable, all these transformations are functional. That is, they return a new paint object,
leaving the original paint object unchanged.
Paint objects describe colors in a device-independent and persistent manner. They can be saved in snapshots and filed
out, and used with any kind of display (or printer, if printing were supported). The details of color map management
are handled by each kind of canvas in a way appropriate for the underlying medium. For example, a canvas for a
gray-scale display might map colors to shades of gray according to brightness.
7.12.2 Specifying Fonts
When drawing text in morphic, the font’s name and size are specified independently. The size parameter specifies the
font height in pixels, and typically ranges from 6 to 72 or more. (The capital letters of a 72 pixel font are about an inch
106
Chapter 7. Morphic: The Self User Interface Framework
Self Handbook Documentation, Release 2 for Self 4.4
high on a typical display.) This interface suggests that the underlying graphics system fonts can be scaled arbitrarily
and, indeed, many modern X servers do support scalable fonts.
The scheme that was implemented for Self 4.0 has not survived the Macintosh port. 1 In order to allow portable
specification of fonts, we have introduced a fontSpec prototype that holds a font’s family name (e.g. times),
a font style (e.g. bold), and a font size (e.g. 12). This object uses an immutable public protocol; it responds to
copy-Name:, copyName:Style:, copyName:Style:Size,etc. Once you have created a fontSpec object
you can then pass it to, for example, a label morph:
myLabel fontSpec:
fontSpec copyName: ’helvetica’ Style: ’bold’ Size: 14
FontSpec’s encapsulate some attributes of a font and in the future should perhaps encapsulate the color as well.
1 The rest of this section has been written in 1999 under time pressure to get Self 4.1 out so I can get back to other things. John bears no
responsibility for its shortcomings. You can send questions about this to me, David Ungar, at [email protected].
7.12. The Graphical Environment
107
Self Handbook Documentation, Release 2 for Self 4.4
108
Chapter 7. Morphic: The Self User Interface Framework
CHAPTER
EIGHT
VIRTUAL MACHINE REFERENCE
8.1 Startup options
The following command-line options are recognised by the Virtual Machine:
-f
-h
-p
-s
w
filename Reads filename (which should contain Self source) immediately after startup (after reading the
snapshot) and evaluates the contents. Useful for setting options, installing personal shortcuts, etc.
Prints a message describing the options
Suppresses execution of the expression snapshotAction postRead after reading a snapshot. Useful if
something in the startup sequence causes the system to break.
snapshot Reads initial world from snapshot. A snapshot begins with the line exec Self -s $0 $@ which causes
the Virtual Machine to begin execution with the snapshot.
Don’t print warnings about object code
These options are provided for use by Self VM implementors:
-F
-l
-r
-t
Discards any machine code saved in the snapshot. If the code in a snapshot is for some reason corrupted, but
the objects are not, this option can be used to recover the snapshot.
logfile Writes a log of events generated by the spy to logfile.
Disables real timer interrupts
Disables all timers
Other command-line options are ignored by the Virtual Machine but are available at Self level via the primitive
_CommandLine.
8.2 System-triggered messages
Certain events cause the system to automatically send a message to the lobby. After reading a snapshot the expression
snapshotAction postRead is evaluated. This allows the Self world to reinitialize itself—for example, to reopen
windows.
There are other situations in which the system sends messages; see section 5.3.
8.3 Run-time message lookup errors
If an error occurs during a message send, the system sends a message to the receiver of the message. Any object can handle these errors by defining (or inheriting) a slot with the corresponding selector. All messages sent by
the system in response to a message lookup error have the same arguments. The first argument is the offending
109
Self Handbook Documentation, Release 2 for Self 4.4
message’s selector; the additional arguments specify the message send type (one of ’normal’, ’implicitSelf’,
’undirectedResend’, ’directedResend’, or ’delegated’), the directed resend parent name or the delegatee (0 if not applicable), the sending method holder, and a vector containing the arguments to the message, if any.
undefinedSelector:Type:Delegatee:MethodHolder:Arguments: The receiver does
not understand the message: no slot matching the selector can be found in the receiver or its ancestors.
ambiguousSelector:Type:Delegatee:MethodHolder:Arguments: There is more than
one slot matching the selector.
missingParentSelector:Type:Delegatee:MethodHolder:Arguments: The
parent
slot through which the resend should have been directed was not found in the sending method
holder.
mismatchedArgumentCountSelector:Type:Delegatee:MethodHolder:Arguments:
The number of arguments supplied to the _Perform primitive does not match the number of arguments required by the selector.
performTypeErrorSelector:Type:Delegatee:MethodHolder:Arguments: The first
argument to the _Perform primitive (the selector) wasn’t a canonical string.
These error messages are just like any other message. Therefore, it is possible that the object P causing the error
(which is being sent the appropriate error message) does not understand the error message M either. If this happens,
the system sends the first message (undefinedSelector..) to the current process, with the error message M as
argument. If this is not understood, then the system suspends the process. If the scheduler is running, it is notified of
the failure.
The system will also suspend a process if it runs out of stack space (too much recursion) or if a block is evaluated
whose lexically-enclosing scope has already returned. Since these errors are nonrecoverable they cannot be caught by
the same Self process; the scheduler, if running, is notified.
8.4 Low-level error messages
Five kinds of errors can occur during the execution of a Self program: lookup errors, primitive errors, programmer
defined errors, non-recoverable errors, and fatal VM errors. All but the last of these are usually caught and handled
by mechanisms in the programming environment, resulting in a debugger being presented to the user. However, if
programs are run without the programming environment, or the error-handling mechanisms themselves are broken,
low-level error facilities are used.
This section describes the various error messages presented by the low-level facilities. For each category or error, the
general layout of error messages in that category will be explained along with the format of the stack trace. Then a
“rogue’s gallery” of the errors in that category will be shown.
By default, errors are handled by a set of methods defined in module errorHandling. For all errors except nonrecoverable and fatal VM errors, an object can handle errors in its own way by defining its own error handling methods.
If the object in which an error occurs neither inherits nor defines error handling behavior, the VM prints out a lowlevel error message and a stack trace. The system will also resort to this low-level message and trace if an error is
encountered while trying to handle an error.
8.5 An example
Here is an expression that produces an error in the current system:
110
Chapter 8. Virtual Machine Reference
Self Handbook Documentation, Release 2 for Self 4.4
“Self 7” 100000 factorial
The stack has grown too big.
(Self limits stack sizes, and cannot resume processes with stack overflows.)
To debug type “attach” or to show stack type “zombies first printError”.
The error arose because the recursive method factorial exceeded the size allocated for the process stack which resulted
in a stack overflow.
The virtual machine currently allocates a fixed-size stack to each process and does not extend the stack on demand.
8.6 Lookup errors
Lookup errors occur when an object does not understand a message that is sent to it. How the actual message lookup
is done is described in the Language Reference Manual.
No ’foo’ slot found in shell <0>. The lookup found no slot matching the selector foo.
More than one ’system’ slot was found in shell <0>.
The matching slots are: oddballs <6> and prototypes <7>.
The lookup found two matching system slots which means the message is ambiguous. The
error message also says where the matching slots were found. Ambiguities can often be resolved by changing parent priorities.
No ’fish’ delegatee slot was found in <a child of lobby> <12>. The
lookup found no parent slot fish, which was explicitly specified as the delegatee of the message.
8.7 Programmer defined errors
These are explicitly raised in the Self program to report errors, e.g. sending the message first to an empty list will
cause such an error.
Error: first is absent.
Receiver is: list <7>.
Use the selectors error: and error:Arguments: to raise a programmer defined error.
8.8 Primitive errors
Primitive failures occur when a primitive cannot perform the requested operation, for example, because of a missing
or invalid argument.
badTypeError: the ’_IntAdd:’
Its receiver was shell <6>.
primitive failed.
The primitive failed with badTypeError because the shell in not an integer.
The selector 12 could not be sent to shell because it is not a string.
The primitive _Perform expects a string as its first argument.
The selector ’add:’ could not be sent to shell <0> because it does not take 2 argument
The primitive _Perform received the wrong number of arguments.
8.6. Lookup errors
111
Self Handbook Documentation, Release 2 for Self 4.4
There are many other kinds of possible primitive errors.
8.9 Nonrecoverable process errors
Errors that stop a process from continuing execution are referred to as nonrecoverable errors.
The stack has grown too big.
(Self 4.0 limits stack sizes, and cannot resume processes with stack
overflows.)
A stack overflow error occurs because the current version of Self allocates a fixed size stack
for each process, and the stack cannot be expanded.
Self 4.0 cannot run a block after its enclosing method has returned.
(Self cannot resume this process, either.)
This error occurs if a block is executed after its lexically enclosing method has returned. This
is called a “non-LIFO” block. Non-LIFO blocks are not supported by the current version of
Self.
8.10 Fatal errors
In rare cases, the virtual machine may encounter a fatal error (e.g., a resource limit is exceeded or an internal error is
discovered). When this happens, a short menu is displayed:
VM Version: 4.0.5, Tue 27 Jun 95 13:35:49 Solaris 2.x (svr4)
Internal error: signal 11 code 3 addr 4 pc 0x1ac768.
Do you want to:
1) Quit Self (optionally attempting to write a snapshot)
2) Try to print the Self stack
3) Try to return to the Self prompt
4) Force a core dump
Your choice:
The first two lines help the Self implementors locate the problem. Printing the Self stack may provide more information
about the problem but does not always work. Returning to the Self prompt may be successful, but the system integrity
may have been compromised as a result of the error. The safest course is to attempt to write a snapshot (if there are
unsaved changes), and then check the integrity of the snapshot by executing the primitive _Verify after starting it.
If there are any error messages from the primitive, do not attempt to continue using the snapshot.
Since fatal errors usually arise from a bug in the virtual machine, please send the Self group a bug report, and include
a copy of the error message if possible. If the error is reproducible please describe how to reproduce it (including a
snapshot or source files may be helpful).
8.11 The initial Self world
The diagram on the following pages shows all objects in the “bare” Self world. In addition, literals like integers, floats,
and strings are conceptually part of the initial Self world; block and object literals are created by the programmer as
needed. All the objects in the system are created by adding slots to these objects or by cloning them. Table 1 lists all
112
Chapter 8. Virtual Machine Reference
Self Handbook Documentation, Release 2 for Self 4.4
the initial objects and provides a short description for each. Reading in the world rearranges the structure of the “bare”
Self world (see The Self World)
Table 1 Objects in the initial Self world
Object
lobby
Description
The center of the Self object hierarchy, and the context in which expressions typed in at the VM prompt, read in via _RunScript, or used as the
initializers of slots, are evaluated.
Objects in the lobby
shell
snapshotAction
systemObjects
After reading in the world, shell is the context in which expressions
typed in at the prompt are evaluated.
An object with slot for the startup action (see section 5.2), postRead.
This slot initially contains nil.
This object contains slots containing the general system objects, including nil, true, false, and the prototypical vectors and mirrors.
Objects in systemObjects
nil
true
false
vector
byteVector
proxy
fctProxy
vector parent
byteVector parent
slotAnnotation
objectAnnotation
profiler
mirrors
The initializer for slots that are not explicitly initialized. Indicates “not
a useful object.”
Boolean true. Argument to and returned by some primitives.
Boolean false. Argument to and returned by some primitives.
The prototype for (normal) vectors.
The prototype for byte vectors.
The prototype for proxy objects.
The prototype for fctProxy objects.
The object that vector inherits from. Since all object vectors will inherit
from this object (because they are cloned from vector), this object will
be the repository for shared behavior (a traits object) for vectors.
Similar to vector parent: the byteVector traits object.
The default slot annotation object.
The default object annotation object
The prototype for profilers.
See below.
Literals and their parents
integers
0 parent
floats
0.0 parent
canonical strings
‘’parent
blocks
[ ] parent
Integers have one slot, a parent slot called parent. All integers have the
same parent: see 0 parent, below.
All integers share this parent, the integer traits object.
Floats have one slot, a parent slot called parent. All floats have the same
parent: see 0.0 parent, below.
All floats share this parent, the float traits object.
In addition to a byte vector part, a canonical string has one slot, parent,
a parent slot containing the same object for all canonical strings (see
”parent below).
All canonical strings share this parent, the string traits object.
Blocks have two slots: parent, a parent slot containing the same object
for all blocks (see [] parent, below), and value (or value:, or value:With:,
etc., depending on the number of arguments the block takes) which contains the block’s deferred method.
All blocks share this parent, the block traits object.
Prototypical mirrors
8.11. The initial Self world
113
Self Handbook Documentation, Release 2 for Self 4.4
Figure 8.1: Figure 3: The initial Self world (part 1)
114
Chapter 8. Virtual Machine Reference
Self Handbook Documentation, Release 2 for Self 4.4
Figure 8.2: Figure 4: The initial Self world (part 2)
8.11. The initial Self world
115
Self Handbook Documentation, Release 2 for Self 4.4
All of the prototypical mirrors consist of one slot, a parent slot named parent. Each of these parent slots points to an
empty object (denoted in Figure 5 by “( )”).
smiMirror
floatMirror
stringMirror
processMirror
byteVectorMirror
objVectorMirror
assignmentMirror
mirrorMirror
slotsMirror
blockMirror
methodMirror
blockMethodMirror
methodActivationMirror
blockMethodActivationMirror
proxyMirror
fctProxyMirror
profilerMirror
Prototypical mirror on a small integer; the reflectee is 0.
Prototypical mirror on a float; the reflectee is 0.0.
Prototypical mirror on a canonical string; the reflectee is the empty
canonical string (”).
Prototypical mirror on a process; the reflectee is the initial process.
Prototypical mirror on a byte vector; the reflectee is the prototypical
byte vector.
Prototypical mirror on object vectors; the reflectee is the prototypical
object vector.
Mirror on the assignment primitive; the actual reflectee is an empty
object.
Prototypical mirror on a mirror; the reflectee is slotsMirror.
Prototypical mirror on a plain object without code; the reflectee is an
empty object.
Prototypical mirror on a block.
Prototypical mirror on a normal method.
Prototypical mirror on a block method.
Prototypical mirror on a method activation.
Prototypical mirror on a block activation.
Prototypical mirror on a proxy.
Prototypical mirror on a fctProxy.
Prototypical mirror on a profiler.
8.12 Option Primitives
This section has not been updated to include all options present in Self 4.0.
Option primitives control various aspects of the Self system and its inner workings. Many of them are used to debug
or instrument the Self system and are probably of little interest to users. The options most useful for users are listed
in Table 2; other option primitives can be found in Appendix 5.B, and a list of all option primitives and their current
settings can be printed with the primitive _PrintOptionPrimitives.
Table 2 Some useful option primitives
Name
_PrintPeriod[:] 1
_PrintScriptName[:]
_Spy[:]
_StackPrintLimit[:]
_DirPath[:]
Description
Print a period when reading a script file with _RunScript. Default: false.
Print the file name when reading a script file. Default: false.
Start the system monitor (see Appendix 5.A for details). Default: false.
Controls the number of stack frames printed by _PrintProcessStack. Default:20.
The default directory path for script files.
Each option primitive controls a variable within the virtual machine containing a boolean, integer, or string (in fact, the
option primitives can be thought of as “primitive variables”). Invoking the version of the primitive that doesn’t take
an argument returns the current setting; invoking it with an argument sets the variable to the new value and returns the
old value.
Try running the system monitor with _Spy: true. The system monitor will continuously display various information
about the system’s activities and your memory usage.
1 The bracketed colon indicates that the argument is optional (i.e., there are two versions of the primitive, one taking an argument and one not
taking an argument). The bracket is not part of the primitive name. See text for details.
116
Chapter 8. Virtual Machine Reference
Self Handbook Documentation, Release 2 for Self 4.4
8.13 Interfacing with other languages
This chapter describes how to access objects and call routines that are written in other languages than Self. We will
refer to such entities as foreign objects and foreign routines. A typical use would be to make a function found in a C
library accessible in Self. Three steps are necessary to accomplish this:
• Write and compile a piece of “glue” code that specifies argument and result types for the foreign routine and
how to convert between these types and Self objects.
• Link the resulting object code to the Self virtual machine.
• Create a function proxy object (actually a foreignFct object) that represents the routine in the Self world.
Each of these steps is described in detail in the following sections.
8.13.1 Proxy and fctProxy objects
A foreign object is represented by a proxy object in the Self world. A proxy object is an object that encapsulates a
pointer to the foreign object it represents. In addition to the pointer to the foreign object, the proxy object contains a
type seal. A type seal is an immutable value that is assigned to the proxy object, when it is created. The type seal is
intended to capture type information about the pointer encapsulated in the proxy. For example, proxies representing
window objects should have a different type seal than proxies representing event objects. By checking the type seal
against an expected value whenever a proxy is “opened”, many type errors can be caught. The last property of proxy
objects is that they can be dead or live. If an attempt is made to use the pointer in a dead proxy object, an error results
(deadProxyError). Proxy objects may be explicitly killed, by sending the primitive message _Kill to them.
Furthermore, they are automatically killed after reading in a snapshot. This way problems with dangling references to
foreign objects that were not included in the snapshot are avoided.
FctProxy objects are similar to proxy objects: they have a type seal and are either live or dead. However, they
represent a foreign routine, rather than a foreign object. A foreign routine can be invoked by sending the primitive messages _Call, _Call:{With:}, _CallAndConvert{With:And:} to the fctProxy representing it.
Note that fctProxy objects are low-level. Most, if not all, uses of foreign routines should use the interface provided
by foreignFct objects.
Proxies (and fctProxies) can be freely cloned. However a cloned proxy will be dead. A dead proxy is revived
when it is used by a foreign function to, e.g., return a pointer. The return value of the foreign function together with a
type seal is stored into the dead proxy, which is then revived and returned as the result of the foreign routine call. The
motivation for this somewhat complicated approach is that there will be several different kinds of proxies in a typical
Self system. Different kinds of proxies may have different slots added, so rather than having the foreign routine figure
out which kind of proxy to clone for the result, the Self code calling the foreign routine must construct and pass down
an “empty” (dead) proxy to hold the result. This proxy is called a result proxy and it is the last argument supplied to
the foreign function.
8.13.2 Glue code
Glue code is responsible for the transition from Self to foreign routines. It forms wrappers around foreign routines.
There is one wrapper per foreign routine. A wrapper takes a number of arguments of type oop, and returns an oop
(oop is the C++ type for “reference to Self object”). When a wrapper is executed, it performs the following steps:
1. Check that the arguments supplied have the correct types.
2. Convert the arguments from Self representation to the representation that the foreign routine needs.
3. Invoke the foreign routine on the converted arguments.
4. Convert the return value of the foreign routine to a Self object and return this as the Self level result.
8.13. Interfacing with other languages
117
Self Handbook Documentation, Release 2 for Self 4.4
To make it easier to write glue code, a special purpose language has been designed for this. The result is that glue for a
foreign routine will often consist of only a single line. The glue language is implemented as a set of C++ preprocessor
macros. Therefore, glue code is just a (rather peculiar) kind of C++. Glue code can be in a file of its own, or – if it is
glue for calling C++ routines – it can be in the same file as the foreign routines, and compiled with them.
To make the definition of the glue language available, the file containing glue code must contain:
# include "_glueDefs.c.incl"
The file “_glueDefs.c.incl” includes a bunch of C++ header files that contain all the definitions necessary for the glue.
Of the included files, “glueDefs.h” is probably the most interesting in this context. It defines the glue language and
also contains some comments explaining it.
Since different foreign languages have different type systems and calling conventions the glue language is actually not
a single language, but one for each supported foreign language. Presently C and C++ are supported. Section 5.13.5
describes C glue and section 5.13.9 describes C++ glue.
8.13.3 Compiling and linking glue code
Since glue code is a special form of C++ code, a C++ compiler is needed to translate it. The way this is done may depend on the computer system and the available C++ compiler. The following description applies to Sun SPARCstations
using the GNU g++ compiler.
A specific example of how to compile glue code can be found in the directory containing the toself demo (see section
5.13.16 for further details). The makefile in that directory describes how to translate a .c file containing glue into
something that can be invoked from Self. This is a two stage process: first the .c file is compiled into a .o file which
is then linked (perhaps with other .o files and libraries that the glue code depends on)† into a .so file (a so-called
dynamic library). While the compilation is straightforward, several issues concerning the linking must be explained.
Linking. Before a foreign routine can be called it must be linked to the Self virtual machine. The linking can be
done either statically, i.e. before Self is started, or dynamically, i.e. while Self is running. The Self system
employs both dynamic and static linking, but users should only use dynamic linking, as static linking requires
more understanding of the structure of the Virtual Machine. The choice between dynamic and static linking
involves a trade-off between safety and flexibility as outlined in the following.
Dynamic linking Dynamic linking has the advantage that it is done on demand, so only foreign routines that are
actually used in a particular session will be loaded and take up space. Debugging foreign routines is also easier,
especially if the dynamic linker supports unlinking. The main disadvantages with dynamic linking is that more
things can go wrong at run time. For example, if an object file containing a foreign routine can not be found,
a run time error occurs. The Sun OS dynamic linker, ld.so, only handles dynamic libraries which explains why
the second stage of glue translation is necessary.
Static linking Static linking, the alternative that was not chosen for Self, has the advantage that it needs to be done
only once. The statically linked-in files will then be available for ever after. The main disadvantages are that
the linked-in files will always take up space whether used or not in a given Self session, that the VM must be
completely relinked every time new code is added, and that debugging is harder because there is no way to
unlink code with bugs in. For these reasons the following examples all use dynamic linking.
8.13.4 A simple glue example: calling a C function
Suppose we have a C function that encrypts text strings in some fancy way. It takes two arguments, a string to encrypt
and a key, and returns a string which is the result of the encryption. To use this function from Self, we write a line of
C glue. Here is the entire file, “encrypt.c”, containing both the encryption function and the glue:†
118
Chapter 8. Virtual Machine Reference
Self Handbook Documentation, Release 2 for Self 4.4
/* Make glue available by including it. */
# include "incls/_glueDefs.c.incl"
/* Naive encryption function. */
char *encrypt(char *str, int key) {
static char res[1000];
int i;
for (i = 0; str[i]; ++i)
res[i] = str[i] + key;
res[i] = ’\0’;
return res;
}
/* Make glue expand to full functions, not just prototypes. */
# define WHAT_GLUE FUNCTIONS
C_func_2(string,, encrypt, encrypt_glue,, string,, int,)
# undef WHAT_GLUE
A few words of explanation: the last three lines of this file contain the glue code. First defining WHAT_GLUE
to be FUNCTIONS, makes the following line expand into a full wrapper function (defining WHAT_GLUE to be
PROTOTYPES instead, will cause the C_func_2 line to produce a function prototype only). The line containing
the macro C_func_2 is the actual wrapper for encrypt. The “2” designates that encrypt takes 2 arguments. The
meaning of the arguments, from left to right are:
• “string,”: specifies that encrypt returns a string argument.
• “encrypt”: name of function we are constructing wrapper for.
• “encrypt_glue”: name that we want the wrapper function to have.
• An empty argument signifying that encrypt is not to be passed a failure handle (explained later).
• “string,”: specifies that the first argument to encrypt is a string.
• “int,”: specifies that the second argument to encrypt is an int.
Having written this file, we now prepare a makefile to compile and link it. To do this, we can extend the makefile in
objects/glue/{sun4,svr4} (depending on OS in use) and then run make. This results in the shared library
file encrypt.so. Finally, to try it out, we can type these commands (at the Self prompt or in the UI):
> _AddSlotsIfAbsent: ( | encrypt | )
lobby
> encrypt: ( foreignFct copyName: ’encrypt_glue’ Path: ’encrypt.so’ )
lobby
> encrypt
<C++ function(encrypt_glue)>
> encrypt value: ’Hello Self’ With: 3
’Khoor#Vhoi’
> encrypt value: ’Khoor#Vhoi’ With: -3
’Hello Self’
Comparing the signature for the function encrypt with the arguments to the C_func_2 macro it is clear that there is
a straightforward mapping between the two. One day we hope to find the time to write a Self program that can parse
a C or C++ header file and generate glue code corresponding to the definitions in it. In the meantime, glue code must
be handwritten.
8.13. Interfacing with other languages
119
Self Handbook Documentation, Release 2 for Self 4.4
8.13.5 C glue
C glue supports accessing C functions and data from Self. There are three main parts of C glue:
• Calling functions.
• Reading/assigning global variables.
• Reading/assigning a component in a struct that is represented by a proxy object in Self.
In addition, C++ glue for creating objects can be used to create C structs (see section 5.13.9). The following sections
describe each of these parts of C glue.
8.13.6 Calling C functions
The macro C_func_N where N is 0, 1, 2, ... is used to “glue in” a C function. The number N denotes the number
of arguments that should be given at the Self level, when calling the function. This number may be different from
the number of arguments that the C function takes since, e.g., some argument conversions (see below) produce two C
arguments from one Self object. Here is the general syntax for C_func_N:
C_func_N(res_cnv,res_aux, fexp, gfname, fail_opt, c0,a0, ... cN,aN)
Compare this with the glue that was used in the encrypt example in section 5.13.4:
C_func_2(string,, encrypt, encrypt_glue,, string,, int,)
The meaning of each argument to C_func_N is as follows:
• res_cnv,res_aux: these two arguments form a “conversion pair” that specifies how the result that the
function returns is converted to a Self object. In the encrypt example, where the function returns a null
terminated string, res_cnv has the value string, and res_aux is empty. Table 3 lists all the possible
values for the res_cnv,res_aux pair.
• fexp is a C expression which evaluates to the function that is being glued in. In the simplest case, such as in
the encrypt example, the expression is the name of a function, but in general it may be any C expression,
involving function pointers etc., which in a global context evaluates to a function.
• gfname: the name of the function which the C_func_N macro expands into. In the encrypt example, the
convention of appending _glue to the C function’s name was used. When accessing a glued-in function from
Self, the value of gfname is the name that must be used.
• fail_opt: there are two possible values for this argument. It can be empty (as in the example) or it can
be fail. In the latter case, the C function being called is passed an additional argument that will be the last
argument and have type “void *”. Using this argument, the C function may abort its execution and raise an
exception. The result is that the “IfFail block” in Self will be invoked.
• ci,ai: each of these pairs describes how to convert a Self level argument to one or more C level arguments.†
For example, in the glue for encrypt, c0,‘‘a0‘‘ specifies that the first argument to encrypt is a string.
Likewise c1,‘‘a1‘‘ specifies that the second argument is an integer. Note that in both these cases, the a-part of
the conversion is empty. Table 3 lists all the possible values for the ci,‘‘ai‘‘ pair.
Handling failures. Here is a slight modification of the encryption example to illustrate how the C function can raise
an exception that causes the “IfFail block” to be invoked at the Self level:
/* Make glue available by including it. */
# include "incls/_glueDefs.c.incl"
/* Naive encryption function. */
char *encrypt(char *str, int key, void *FH) {
static char res[1000];
int i;
120
Chapter 8. Virtual Machine Reference
Self Handbook Documentation, Release 2 for Self 4.4
if (key == 0) {
failure(FH, "key == 0 is identity map");
return NULL;
}
for (i = 0; str[i]; i++)
res[i] = str[i] + key;
res[i] = ’\0’;
return res;
}
/* Make glue expand to full functions, not just prototypes. */
# define WHAT_GLUE FUNCTIONS
C_func_2(string,, encrypt, encrypt_glue, fail, string,, int,)
# undef WHAT_GLUE
Observe that the fail_opt argument now has the value fail and that the encrypt function raises an exception,
using failure, if the key is 0. There are two ways to raise exceptions:
extern "C" void failure(void *FH, char *msg);
extern "C" void unix_failure(void *FH, int err = -1);
In both cases, the FH argument is the “failure handle” that was passed by the C_func_N macro. The second argument
to failure is a string. It will be passed to the “IfFail block” in Self. unix_failure takes an optional integer as
its second argument. If this integer has the value -1, or is missing, the value of errno is used instead. The integer
is interpreted as a UNIX error number, from which a corresponding string is constructed. The string is then, as for
failure, passed to the “IfFail block” at the call site in Self.
Warning: After calling failure or unix_failure a normal return must be done. The value
returned (in the example NULL) is ignored.
8.13.7 Reading and assigning global variables
Reading the value of a global variable is done using the C_get_var macro. Assigning a value to a global variable is
done using C_set_var. Both macros expand into a C++ function that converts between Self and C representation,
and reads or assigns the variable. Here is the general syntax:
C_get_var(cnvt_res,aux_res, expr, gfname)
C_set_var(var, expr_c0,expr_a0, gfname)
A concrete example is reading the value of the variable errno, which can be done using:
C_get_var(int,, errno, get_errno_glue)
The meaning of the each argument is:
• cnvt_res,‘‘aux_res‘‘: how to convert the value of the global variable that is being read to a Self object.
In the errno example, cnvt_res is int and aux_res is empty, since the type of errno is int. The
cnvt_res,‘‘aux_res‘‘ can be any one of the result conversions found in Table 3.
• expr is the variable whose value is being read. In the errno example, it is simply errno, but in general, it
may actually be any expression that is valid in a global context, even an expression involving function calls.
• gfname: the name of the C++ function that C_get_var or C_set_var expands into.
• var is the name of a global variable that a value is assigned to. In general, var, may be any expression that in
a global context evaluates to an l-value.
8.13. Interfacing with other languages
121
Self Handbook Documentation, Release 2 for Self 4.4
• expr_c0,‘‘expr_a0‘‘: when assigning to a variable, the value it is assigned is obtained by converting a Self
object to a C value. The expr_c0,‘‘expr_a0‘‘ pair, which can be any one of the argument conversions listed in
Table 3, specifies how to do this conversion.
8.13.8 Reading and assigning struct components
Reading the value of a struct component or assigning a value to it is similar to doing the same operations on a
global variable. The difference is that the struct must somehow be specified. This is taken care of by the macros
C_get_comp and C_set_comp. The general syntax is:
C_get_comp(cnvt_res,aux_res, cnvt_strc,aux_strc, comp, gfname)
C_set_comp(cnvt_strc,aux_strc, comp, expr_c0,expr_a0, gfname)
Here is an example, assigning to the sin_port field of a struct sockaddr_in (this struct is defined in
/usr/include/netinet/in.h):
struct sockaddr_in {
short
u_short
struct in_addr
char
};
sin_family;
sin_port;
sin_addr;
sin_zero[8];
The struct is represented by a proxy object:
char *socks = "type seal for sockaddr_in proxies";
C_set_comp(proxy,(sockaddr_in *,socks), .sin_port, short,,set_sin_port_glue)
The sockaddr_in example defines a function, set_sin_port_glue, which can be called from Self. The
function takes two arguments, the first being a proxy representing a sockaddr_in struct, the second being a short
integer. After converting types, set_sin_port_glue performs the assignment
(*first_converted_arg).sin_port = second_converted_arg.
In general the meaning of the C_get_comp and C_set_comp arguments is:
• cnvt_res, aux_res: how to convert the value of the component that is being read to a Self object. Any of
the result conversions found in Table 3 may be applied.
• cnvt_strc, aux_strc: the conversion that is applied to produce a struct upon which the operation is performed. In the sin_port example, this conversion is a proxy conversion, implying that in Self, the struct
whose sin_port component is assigned is represented by a proxy object. In general, any of the argument
conversions from Table 3 that results in a pointer, may be used.
• comp is the name of the component to be read or assigned. In the sin_port example, this name is
“.sin_port”. Note that it includes a “.”. This, e.g., allows handling pointers to int’s by pretending that
it is a pointer to a struct and operating on a component with an empty name.
• gfname: the name of the C++ function that C_get_comp or C_set_comp expands into.
• expr_co, expr_a0: when assigning to a component, the value it is assigned is obtained by converting a Self
object to a C value. The expr_co, expr_a0 pair, which can be any one of the argument conversions listed in
Table 3, specifies how to do this conversion.
8.13.9 C++ glue
Since C++ is a superset of C, all of C glue can be used with C++. In addition, C++ glue provides support for:
122
Chapter 8. Virtual Machine Reference
Self Handbook Documentation, Release 2 for Self 4.4
• Constructing objects using the new operator.
• Deleting objects using the delete operator.
• Calling member functions on objects.
Each of these parts will be explained in the following sections.
8.13.10 Constructing objects
In C++, objects are constructed using the new operator. Constructors may take arguments. The macros CC_new_N
where N is a small integer, support calling constructors with or without arguments. Calling a constructor is similar
to calling a function, so for additional explanation, please refer to section 5.13.6. Here is the general syntax for
constructing objects using C++ glue:
CC_new_N(cnvt_res,aux_res, class, gfname, c0,a0, c1,a1, ... cN,aN)
For example, to construct a sockaddr_in† object, the following glue statement could be used:
CC_new_0(proxy,(sockaddr_in *,socks), sockaddr_in, new_sockaddr_in)
The meanings of the CC_new_N arguments are as follows:
• cnvt_res, aux_res: the result of calling the constructor is an object pointer. The result conversion pair
cnvt_res, aux_res (see Table 3), specifies how this pointer is converted to a Self object before being
returned. In the sockaddr example, the proxy result conversion is used.
• class is the name of the class (or struct) that is being instantiated.
• gfname: the name of the C++ function that the CC_new_N macro expands into.
• ci, ai: if the constructor takes arguments, these arguments must be converted from Self representation to C++
representation. The arguments conversion pairs ci, ai specify how each argument is converted. See Table 3
for a description of all argument conversions. In the sockaddr example, there are no arguments.
8.13.11 Deleting objects
C++ objects can have destructors that are executed when the objects are deleted. To ensure that the destructor is
called properly, the delete operator must know the type of the object being deleted. This is ensured by using the
CC_delete macro, which has the following form:
CC_delete(cnvt_obj,aux_obj, gfname)
For example, to delete sockaddr_in objects (constructed as in the previous section), the CC_delete macro should
be used in this manner:
CC_delete(proxy,(sockaddr_in *,socks), delete_sockaddr_in)
In general, the meaning of the arguments given to CC_delete is:
• cnvt_obj,aux_obj: this pair can be any of the argument conversions found in Table 3 that produces a pointer to
the object that will be deleted.
• gfname: the name of the C++ function that this invocation of CC_delete expands into.
8.13. Interfacing with other languages
123
Self Handbook Documentation, Release 2 for Self 4.4
8.13.12 Calling member functions
Table 3 lists all the available argument conversions. Each row represents one conversion, with the first two columns
designating the conversion pair. The third column lists the types of Self objects that the conversion pair accepts. The
fourth column lists the C types that it produces. The fifth column lists the kind of errors that can occur during the
conversion. Finally, the sixth column contains references to numbered notes. The notes are found in the paragraphs
following the table.
Calling member functions is similar to calling “plain” functions, so please also refer to section 5.13.6. The difference
is that an additional object must be specified: the object upon which the member function is invoked (the receiver in
Self terms). Calling a member function is accomplished using one of the macros
CC_mber_N(cnvt_res,aux_res, cnvt_rec,aux_rec, mname, gfname,
fail_opt, c0,a0, c1,a1, ..., cN,aN)
For example here is how to call the member function zock on a sockaddr_in object given by a proxy:†
CC_mber_0(bool,, proxy,(sockaddr_in *,socks), zock, zock_glue,)
The arguments to CC_mber_N are:
• cnvt_res, aux_res: this pair, which can be any of the result conversions from Table 3, specifies how to
convert the result of the member function before returning it to Self. For example, the zock member function
returns a boolean.
• cnvt_rec, aux_rec: the object on which the member function is invoked. Often this will be a proxy
conversion as in the zock example.
• mname is the name of the member function.
receiver->mname evaluates to a function.
In general, it may be any expression, such that
• gfname is the name of the C++ function that the CC_mber_N macro expands into.
• fail_opt: whether or not to pass a failure handle to the member function (refer to section 5.13.6 for details).
• ci, ai: these are argument conversion pairs specifying how to obtain the arguments for the member function.
Any conversion pair found in Table 3 may be used.
8.13.13 Conversion pairs
A major function of glue code is to convert between Self objects and C/C++ values. This conversion is guarded by
so-called conversion pairs. A conversion pair is a pair of arguments given to a glue macro. It handles converting
one or at most a few types of objects/values. There are different conversion pairs for converting from Self objects to
C/C++ values (called argument conversion pairs) and for converting from C/C++ values to Self objects (called result
conversion pairs).
8.13.14 Argument conversions – from Self to C/C++
An argument conversion is given a Self object and performs these actions to produce a corresponding C or C++ value:
• check that the Self object† it has been given is among the allowed types. If not, report badTypeError (invoke
the failure block (if present) with the argument ’badTypeError’).
• check that the object can be converted to a C/C++ value without overflow or any other error. If not, report the
relevant error.
• do the conversion, i.e., construct the C/C++ value corresponding to the given Self object.
124
Chapter 8. Virtual Machine Reference
Self Handbook Documentation, Release 2 for Self 4.4
Table 3 : Argument conversions - from Self to C/C++
Conversion
bool
char
Second part
Self type
boolean
smallInt
C/C++ type
int (0 or 1)
char
signed_char
smallInt
signed char
unsigned_char
smallInt
unsigned char
short
smallInt
short
signed_short
smallInt
signed short
unsigned_short
smallInt
unsigned
short
int
signed_int
unsigned_int
smallInt
smallInt
smallInt
int
signed int
unsigned int
long
signed_long
unsigned_long
smi
unsigned_smi
smallInt
smallInt
smallInt
smallInt
smallInt
long
signed long
unsigned long
smi
smi
8.13. Interfacing with other languages
Errors
badTypeError
badTypeError overflowError
badTypeError overflowError
badSignError badTypeError overflowError
badTypeError overflowError
badTypeError overflowError
badSignError badTypeError overflowError
badTypeError
badTypeError
badSignError badTypeError
badTypeError
badTypeError
badSignError
badTypeError
badSignError badTypeError
Notes
1
2
2
125
Self Handbook Documentation, Release 2 for Self 4.4
Conversion
float
double
long_double
bv
bv_len
Second part
ptr_type
ptr_type
Self type
float
float
float
byte vector
byte vector
C/C++ type
float
double
long double
ptr_type
ptr_type, int
bv_null
bv_len_null
ptr_type
ptr_type
byte vector/0
byte vector/0
ptr_type
ptr_type, int
cbv
cbv_len
ptr_type
ptr_type
byte vector
byte vector
ptr_type
ptr_type, int
cbv_null
cbv_len_null
ptr_type
ptr_type
byte vector/0
byte vector/0
ptr_type
ptr_type, int
string
byte vector
char *
string_len
byte vector
char *, int
string_null
byte vector/0
char *
string_len_null
byte vector/0
char *, int
proxy
(ptr_type,
type_seal)
proxy
ptr_type,
NULL
proxy_null
(ptr_type,
type_seal)
proxy
ptr_type
any_oop
oop
oop subtype
any
C/C++ type
!=
any object
oop
corresponding oop (subtype)
object
int/float/proxy/byteint/float/ptr/ptr
vector, int
Errors
badTypeError
badTypeError
badTypeError
badTypeError
badSizeError badTypeError
badTypeError
badSizeError badTypeError
badTypeError
badSizeError badTypeError
badTypeError
badSizeError badTypeError
badTypeError
nullCharError
badTypeError
nullCharError
badTypeError
nullCharError
badTypeError
nullCharError
badTypeError badTypeSealError,
deadProxyError,nullPointerError
badTypeError badTypeSealError
deadProxyError
badTypeError
badIndexError
badTypeError deadProxyError
Notes
3
3
3
4
4, 5
4, 6
4, 5, 6
7
7
7
7
8
5, 8
6, 8
5, 6, 8
9
9
10
11
12
1. The C type char has a system dependent range. Either 0..255 or -128..127.
2. The type smi is used internally in the virtual machine (a 30 bit integer).
3. Precision may be lost in the conversion.
4. The second part of the conversion is a C pointer type. The address of the first byte in the byte vector, cast to
this pointer type, is passed to the foreign routine. It is the responsibility of the foreign routine not to go past
the end of the byte vector. The foreign routine should not retain pointers into the byte vector after the call has
terminated. Note: canonical strings can not be passed through a bv conversion (badTypeError will result).
This is to ensure that they are not accidentally modified by a foreign function.
5. This conversion passes two values to the foreign routine: a pointer to the first byte in the byte vector, and an
integer which is the length of the byte vector divided by sizeof(*ptr_type). If the size of the byte vector
is not a multiple of sizeof(*ptr_type), badSizeError results.
6. In addition to accepting a byte vector, this conversion accepts the integer 0, in which case a NULL pointer is
passed to the foreign routine.
126
Chapter 8. Virtual Machine Reference
Self Handbook Documentation, Release 2 for Self 4.4
7. The cbv conversions are like the bv conversions except that canonical strings are allowed as actual arguments.
A cbv conversion should only be used if it is guaranteed that the foreign routine does not modify the bytes it
gets a pointer to.
8. All the string conversions take an incoming byte vector, copy the bytes part, add a trailing null char, and pass a
pointer to this copy to the foreign routine. After the call has terminated, the copy is discarded. If the byte vector
contains a null char, nullCharError results.
9. The type_seal is an int or char * expression that is tested against the type seal value in the proxy. If
the two are different, badTypeSealError results. The special value ANY_SEAL will match the type seal in
any proxy. Note that the proxy conversion will fail with nullPointerError if the proxy object it is given
encapsulates a NULL pointer.
10. The any_oop conversion is an escape: it passes the Self object unchanged to the foreign routine.
11. The oop conversion is mainly intended for internal use. The second argument is the name of an oop subtype.
After checking that the incoming argument points to an instance of the subtype, the pointer is cast to the subtype.
12. The any conversion is different from all other conversions in that it expects two incoming Self objects. The
actions of the conversion depends on the type of the first object in the following way. If the first object is an
integer, the second argument must also be an integer; the two integers are converted to C int’s, the second
is shifted 16 bits to the left and they are or’ed together to produce the result. If the first object is a float, it is
converted to a C float and the second object is ignored. If the first object is a proxy, the result is the pointer
represented by the proxy, and the second argument is ignored. If the first object is a byte vector, the second
object must be an integer which is interpreted as an index into the byte vector; the result is a pointer to the
indexed byte.
8.13.15 Result conversions - from C/C++ to Self
A result conversion is given a C or C++ value of a certain type and performs these actions to produce a corresponding
Self object:
• check that the C/C++ value can be converted to a Self object with no overflow or other error occurring. If not,
report the error.
• do the conversion, i.e., construct the Self object corresponding to the given C/C++ value.
Table 4 lists all the available result conversions. Each row represents one conversion, with the first two columns
designating the conversion pair. The third column lists the type of C or C++ value that the conversion pair accepts.
The fourth column lists the type of Self object the conversion produces. The fifth column lists the kind of errors that
can occur during the conversion. Finally, the sixth column contains references to numbered notes. The notes are found
in the paragraphs following the table.
Table 4 : Result conversions - from C/C++ to Self
8.13. Interfacing with other languages
127
Self Handbook Documentation, Release 2 for Self 4.4
Conversion
void
bool
char
signed_char
unsigned_char
short
signed_short
unsigned_short
int
signed_int
unsigned_int
long
signed_long
unsigned_long
smi
int_or_errno
float
double
long_double
string
proxy
Second part
n
(ptr_type,
type_seal)
proxy_null
(ptr_type,
type_seal)
proxy_or_errno (ptr_type,
type_seal, n)
fct_proxy
(ptr_type,
type_seal,
arg_count)
fct_proxy_null (ptr_type,
type_seal,
arg_count)
oop
C/C++ type
void
int
char
signed char
unsigned char
short
signed short
unsigned
short
int
signed int
unsigned int
long
signed long
unsigned long
smi
int
float
double
long double
char *
ptr_type
Self type
smallInt (0)
boolean
smallInt
smallInt
smallInt
smallInt
smallInt
smallInt
Errors
Notes
smallInt
smallInt
smallInt
smallInt
smallInt
smallInt
smallInt
int
float
float
float
byte vector
proxy
overflowError
overflowError
overflowError
overflowError
overflowError
overflowError
overflowError
a UNIX error
ptr_type
proxy
ptr_type
proxy
a UNIX error
ptr_type
fctProxy
nullPointerError 3, 6, 8
ptr_type
fctProxy
6, 8
oop
corresponding
object
7, 8
1
2
2
2
nullPointerError 3
nullPointerError 3, 4, 8
4, 8
4, 5, 8
1. This conversion returns an integer value, unless the integer has the value n (the second part of the conversion;
often -1). If the integer is n, the conversion interprets the return value as a UNIX error indicator. It then
constructs a string describing the error (by looking at errno) and invokes the “IfFail block” with this string.
2. Precision may be lost.
3. This conversion fails with nullPointerError if attempting to convert a NULL pointer.
4. The ptr_type is the C/C++ type of the pointer. The type_seal is an expression of type int or char *.The
conversion constructs a new proxy object, stores the C/C++ pointer in it and sets its type seal to be the value of
type_seal.
5. If the pointer is n (often n is NULL), the conversion fails with a UNIX error, similar to the way int_or_errno
may fail.
6. The fct_proxy, fct_proxy_null and fct_proxy_or_errno conversions are similar to the corresponding proxy conversions. The difference is that they produce a fctProxy object rather than a proxy object.
Also, their second part is a triple rather than a pair. The extra component specifies how many arguments the
function takes, if called. The special keyword unknownNoOfArgs or any nonnegative integer expression can
be used here.
128
Chapter 8. Virtual Machine Reference
Self Handbook Documentation, Release 2 for Self 4.4
7. This conversion is an escape: it passes the C value unchanged to Self. It is an error to use it if the C value is not
an oop.
8. The proxy (fctProxy) object that is returned by these conversions is not being created by the glue code.
Rather a proxy (fctProxy) must be passed down from the Self level. This proxy (fctProxy), a result
proxy, will then be side effected by the glue: the value that the foreign function returns will be stored in the
result proxy together with the requested type seal. It is required that the result proxy is dead when passed down
(else a liveProxyError results). After being side-effected and returned, the result proxy is live. The result
proxy is the last argument of the function that the glue macro expands to.
8.13.16 A complete application using foreign functions
This section gives a description of a complete application which uses foreign functions. The aim is to present a realistic
and complete example of how foreign functions may be used. The complete source for the example is found in the
directory objects/applications/serverDemo in the Self distribution.
The example used is an application that allows Self expressions to be easily evaluated by non- Self processes. Having
this, it then becomes possible to start Self processes from a UNIX prompt (shell) or to specify pipe lines in which
some of the processes are Self processes. For example in
proto% cat someFile | tokenize | sort -r | capitalize | tee lst
it may be the case that the filters tokenize and capitalize perform most of their work in Self. Likewise, the command
proto% mail
may invoke some fancy mail reader written in Self rather than the standard UNIX mail reader.
To see how the above can be accomplished, please refer to Figure 5 below. The left side of the figure shows the
external view of a typical UNIX process. It has two files: stdin and stdout (for simplicity we ignore stderr). Stdin
is often connected to the keyboard so that characters typed here can be read from the file stdin. Likewise, stdout is
typically connected to the console so that the process can display output by writing it to the file stdout. Stdin and
stdout can also be connected to “regular” files, if the process was started with redirection. The right side of Figure 5
shows a two stage pipe line. Here stdout of the first process is connected to stdin of the second process.
Figure 8.3: Figure 5: A single UNIX process and an pipe line.
Figure 5 illustrates a simple trick that in many situations allows Self processes to behave as if they are full-fledged
UNIX processes. A Self process is represented by a “real” UNIX process which transparently communicates with
the Self process over a pair of connected sockets. The communication is bidirectional: input to the UNIX process is
relayed to the Self process over the socket connection, and output produced by the Self process is sent over the same
socket connection to the UNIX process which relays it to stdout. The right part of Figure 5 shows how the UNIX/Self
process pair can fit seamlessly into a pipe line.
Source code that facilitates setting up such UNIX/Self process pairs is included in the Self distribution. The source
consists of two parts: one being a Self program (called server), the other being a C++ program (called toself ). When
the server is started, it creates a socket, binds a name to it and then listens for connections on it. toself establishes
connections to the server program. The first line that is transmitted when a connection has been set up goes from
toself to the server. The line contains a Self expression. Upon receiving it, the server forks a new process to
evaluate the expression in the context of the lobby augmented with a slot, stdio, that contains a unixFile-like object
8.13. Interfacing with other languages
129
Self Handbook Documentation, Release 2 for Self 4.4
Figure 8.4: Figure 6: A Self process and how it fits into a pipe line.
that represents the socket connection. When the forked process terminates, the socket connection is shut down. The
toself UNIX process then terminates.
The Self expression that forms the Self process is specified on the command line when toself is started. For
example, if the server has been started, the following can be typed at the UNIX prompt:
proto% toself stdio writeLine: 5 factorial printString
120
proto% echo something | toself capitalize: stdio
SOMETHING
proto% toself capitalize: stdio
Write some text that goes to stdin of the toself program
WRITE SOME TEXT THAT GOES TO STDIN OF THE TOSelf PROGRAM
More text
MORE TEXT
^D
proto%
If you want to try out these examples, locate the files server.self, socks.so and toself. The path name of
the file socks.so is hardwired in the file server.self so please make sure that it has been set correctly for your
system. Then file in the world and type [server start] fork at the Self prompt. Now you can go back to the
UNIX prompt and try out the examples shown above.
8.13.17 Outline of toself
toself is a small C++ program found in the file toself.c. It operates in the three phases outlined above:
1. Try to connect to a well-known port number on a given machine (the function establishConnection does
this).
2. Send the command line arguments over the connection established in 1 (the safeWrite call in main does
this).
3. While there is more input and the Self process has not shut down the socket connection, relay from stdin to the
socket connection and from the socket connection to stdout (the function relay does this).
130
Chapter 8. Virtual Machine Reference
Self Handbook Documentation, Release 2 for Self 4.4
8.13.18 Outline of server
The server is a Self program. It is found in the file server.self. When the server is started, the following happens:
1. Create a socket, bind a name to it and start listening.
2. Loop: accept a connection and fork a new process (both step 1 and 2 are performed by the method server start). The
(a) Reads a line from the connection.
(b) Sets up a context with a slot stdio referring to the connection.
(c) Evaluates the line read in step (a) in this context.
(d) Closes the connection.
8.13.19 Foreign functions and glue needed to implement server
The server program needs to do a number of UNIX calls to create sockets and bind names to them etc. The calls
needed are socket, bind, listen, accept and shutdown. The first three of these are only called in a fixed
sequence, so to make things easier, a small C++ function socket_bind_listen, that bundles them up in the right
sequence, has been written. The accept function is more general than what is needed for this application, so a
wrapper function, simple_accept, has been written. The result is that the server needs to call only three foreign
functions: socket_bind_listen, simple_accept and shutdown. Glue for these three functions and the
source for the first two is found in the file socks.c. This file is compiled and linked using the Makefile. The
result is a shared object file, socks.so.
8.13.20 Use of foreign functions in server.self
The server program is implemented using foreignFct objects. There is only a few lines of code directly involved
in setting this up. First the foreignFct prototype is cloned to obtain a “local prototype”, called socksFct, which
contains the path for the socks.so file. socksFct is then cloned each time a foreignFct object for a function
defined in socks.so is needed. For example, in traits socket, the following method is found:
copyPort: portNumber = ( "Create a socket, do bind, then listen."
| sbl = socksFct copyName: ’socket_bind_listen_glue’. |
sbl value: portNumber With: deadCopy.
).
This method copies a socket object and returns the copy. The local slot sbl is initialized to a foreignFct
object. The body of the method simply sends value:With: to the foreignFct object. The first argument is the
port number to request for the socket, the second argument is a deadCopy of self (socket objects are proxies and
socket_bind_listen returns a proxy, so it must be passed a dead proxy to revive and store the result in; see
section 5.13.1).
There are only three uses of foreignFct objects in the server and in all three cases, the foreignFct object is
encapsulated in a method as illustrated above.
In general the design of foreignFct objects has been aimed at making the use of them light weight. When cloning
them, it is only necessary to specify the minimal information: the name of the foreign function. They can be encapsulated in a method thus localizing the impact of redesigns. The complications of dynamic loading and linking are
handled automatically, as is the recovery of dead fctProxies.
8.13. Interfacing with other languages
131
Self Handbook Documentation, Release 2 for Self 4.4
132
Chapter 8. Virtual Machine Reference
CHAPTER
NINE
REFERENCES
[APS93] Ole Agesen, Jens Palsberg and Michael I. Schwartzbach. Type Inference of SELF. In ECOOP ‘93 Conference Proceedings, Kaiserslautern, Germany, July 1993. Published as Springer-Verlag LNCS 707, 1993.
[Age94a] Ole Agesen. Mango: A Parser Generator for SELF. Sun Microsystems Labs TR SMLI TR-94-27, 1994.
[Age94b] Ole Agesen. Constraint Based Type Inference and Parametric Polymorphism. In Proc. International Static
Analysis Symposium, Sep 28-30, 1994.
[CU89] Craig Chambers and David Ungar. Customization: Optimizing Compiler Technology for SELF, a
Dynamically-Typed Object-Oriented Programming Language. In Proceedings of the SIGPLAN ’89 Conference
on Programming Language Design and Implementation, Portland, OR, June, 1989. Published as SIGPLAN
Notices 24(7), July, 1989.
[CU90] Craig Chambers and David Ungar. Iterative Type Analysis and Extended Message Splitting: Optimizing
Dynamically-Typed Object-Oriented Programs. In Proceedings of the SIGPLAN ’90 Conference on Programming Language Design and Implementation, White Plains, NY, June, 1990. Published as SIGPLAN Notices
25(6), June, 1990. Also published in Lisp and Symbolic Computation 4(3), June, 1991.
[CU91] Craig Chambers and David Ungar. Making Pure Object-Oriented Languages Practical. In OOPSLA ’91
Conference Proceedings, Phoenix, AZ, October, 1991. Published as SIGPLAN Notices 26(11), November,
1991.
[CUC91] Craig Chambers, David Ungar, Bay-Wei Chang, and Urs Hölzle. Parents are Shared Parts of Objects:
Inheritance and Encapsulation in SELF. In Lisp and Symbolic Computation 4(3), June, 1991.
[CUL89] Craig Chambers, David Ungar, and Elgin Lee. An Efficient Implementation of SELF, a Dynamically-Typed
Object-Oriented Language Based on Prototypes. In OOPSLA ’89 Conference Proceedings, New Orleans, LA,
October, 1989. Published as SIGPLAN Notices 24(10), October, 1989. Also published in Lisp and Symbolic
Computation 4(3), June, 1991.
[Cha92] Craig Chambers. The Design and Implementation of the SELF Compiler, an Optimizing Compiler for
Object-Oriented Programming Languages. Ph. D. dissertation, Computer Science Department, Stanford University, March 1992.
[CU93] Bay-Wei Chang and David Ungar. Animation: From Cartoons to the User Interface. In UIST ‘93 Conference
Proceedings, 1993.
[DS84] L Peter Deutsch and Allan M. Schiffman. Efficient Implementation of the Smalltalk-80 System. In Proceedings of the 11th Annual ACM Symposium on the Principles of Programming Languages, Salt Lake City, UT,
1984.
[GR83] Adele Goldberg and David Robson. Smalltalk-80: The Language and Its Implementation. Addison-Wesley,
Reading, MA, 1983.
133
Self Handbook Documentation, Release 2 for Self 4.4
[HCU91] Urs Hölzle, Craig Chambers, and David Ungar. Optimizing Dynamically-Typed Object-Oriented Programming Languages with Polymorphic Inline Caches. In ECOOP ’91 Conference Proceedings, Geneva, Switzerland, July, 1991. Published as Springer-Verlag LNCS 512, 1991.
[HCU92] Urs Hölzle, Craig Chambers, and David Ungar. Debugging Optimized Code with Dynamic Deoptimization.
In Proceedings of the ACM SIGPLAN ‘92 Conference on Programming Language Design and Implementation,
San Francisco, June 1992. Published as SIGPLAN Notices 27(7), July, 1992.
[Hoe94] Urs Hölzle. Adaptive Optimization for SELF: Reconciling High Performance with Exploratory Programming. Ph.D. Thesis, Stanford University, August 1994.
[HU94] Urs Hölzle and David Ungar. A Third-Generation SELF Implementation: Reconciling Responsiveness with
Performance. In Proceedings of OOPSLA ‘94, October 1994.
[Lee88] Elgin Lee. Object Storage and Inheritance for SELF. Engineer’s thesis, Stanford University, 1988.
[Ung84] David Ungar. Generation Scavenging: A Non-Disruptive High Performance Storage Reclamation Algorithm. In Proceedings of the ACM SIGSOFT/SIGPLAN Software Engineering Symposium on Practical Software Development Environments, Pittsburgh, PA, April, 1984. Published as SIGPLAN Notices 19(5), May,
1984 and Software Engineering Notes 9(3), May, 1984.
[Ung86] David Ungar. The Design and Evaluation of a High Performance Smalltalk System. MIT Press, Cambridge,
MA, 1987.
[UCC91] David Ungar, Craig Chambers, Bay-Wei Chang, and Urs Hölzle. Organizing Programs without Classes. In
Lisp and Symbolic Computation 4(3), June, 1991.
[US87] David Ungar and Randall B. Smith. SELF: The Power of Simplicity. In OOPSLA ’87 Conference Proceedings, Orlando, FL, 1987. Published as SIGPLAN Notices 22(12), December, 1987. Also published in Lisp and
Symbolic Computation 4(3), June, 1991, and as Sun Microsystems Labs TR SMLI 94-0320.
134
Chapter 9. References
CHAPTER
TEN
APPENDICES
10.1 Glossary
• A slot is a name-value pair. The value of a slot is often called its contents.
• An object is composed of a (possibly empty) set of slots and, optionally, a series of expressions called code. The
Self implementation provides objects with indexable slots (vectors) via a set of primitives.
• A data object is an object without code.
• A data slot is a slot holding a data object. An assignment slot is a slot containing the assignment primitive. An
assignable data slot is a data slot for which there is a corresponding assignment slot whose name consists of
the data slot’s name followed by a colon. When an assignment slot is evaluated its argument is stored in the
corresponding data slot.
• An ordinary method (or simply method) is an object with code and is stored as the contents of a slot. The
method’s name (also called its selector) is the name of the slot in which it is stored.
• A block is an object representing a lexically-scoped closure (similar to a Smalltalk block).
• A block method is the method that is executed when a block is evaluated by sending it value, value:,
value:With:, etc. A block method is a special kind of method that is evaluated within the scope of its
method and any lexically enclosing blocks.
• An activation object records the state of an executing method or block method. It is a clone of the
method prototype used to store the method’s arguments and local slots during execution. There are two kinds of
activation objects: ordinary method activation objects (or simply method activation objects)
and block method activation objects.
• A non-lifo block is a block that is evaluated after the activation of its lexically enclosing block or method
has returned. This results in an error in the current implementation.
• A non-local return is a return from a method activation resulting from performing a return (i.e., evaluating an expression preceded by the ‘^’ operator) from within a lexically enclosed block. A non-local return
forces returns from all activations between the method activation and the activation of the block performing the
return.
• The method holder of a method is the object containing the slot holding that method.
• The sending method holder of a message is the method holder of the method that sent it.
• A message is a request to an object to perform some operation. The object to which the request is sent is
called the receiver. A message send is the action of sending a message to a receiver.
• A primitive send is a message handled by invoking a primitive, a predefined function provided by the Self
implementation.
135
Self Handbook Documentation, Release 2 for Self 4.4
• Messages that do not have an explicit receiver are known as implicit-receiver messages. The receiver is bound
to self.
• A unary message is a message consisting of a single identifier sent to a receiver. A binary message is a message
consisting of an operator and a single argument sent to a receiver. A keyword message is a message consisting
of one or more identifiers with trailing colons, each followed by an argument, sent to a receiver.
• Unary, binary, and keyword slots are slots with selectors that match unary, binary, and keyword messages,
respectively.
• An argument slot is a slot in a method filled in with a value when the method is invoked.
• Message lookup is the process by which objects determine how to respond to a message (which slot to evaluate),
by searching objects for slots matching the message.
• Inheritance is the mechanism by which message lookup searches objects for slots when the receiver’s slots are
exhausted. An object’s parent slots contain objects that it inherits from.
• Dynamic inheritance is the modification of object behavior by setting an assignable parent slot.
• A resend allows a method to invoke the method that the first method (the one that invokes the resend) is overriding. A directed resend constrains the lookup to search a single parent slot.
• Cloning is the primitive operation returning an exact shallow copy (a clone) of an object, i.e. a new object
containing exactly the same slots and code as the original object.
• A prototype is an object that is used as a template from which new objects are cloned.
• A traits object is a parent object containing shared behavior, playing a role somewhat similar to a class in a
class-based system. Any Self implementation is required to provide traits objects for integers, floats, strings,
and blocks (i.e. one object which is the parent of all integers, another object for floats, etc.).
• The root context is the object that provides the context (i.e., set of bindings) in which slot initializers are evaluated. This object is known as the lobby. During slot initialization, self is bound to the lobby. The lobby is also
the sending method holder for any sends in the initializing expression.
• Nil is the object used to initialize slots without explicit initializers. It is intended to indicate “not a useful object.”
This object is provided by the Self implementation.
136
Chapter 10. Appendices
Self Handbook Documentation, Release 2 for Self 4.4
10.2 Lexical overview
small-letter
cap-letter
letter
identifier
small-keyword
cap-keyword
argument-name
op-char
operator
number
integer
real
fixed-point
float
general-digit
decimal
base
string
normal-char
escape-char
numeric-escape
comment
comment-char
→
→
→
→
→
→
→
→
→
→
→
→
→
→
→
→
→
→
→
→
→
→
→
‘a’ | ‘b’ | ... | ‘z’
‘A’ | ‘B’ | ... | ‘Z’
small-letter | cap-letter
(small-letter | ‘_’) {letter | digit | ‘_’}
identifier ‘:’
cap-letter {letter | digit | ‘_’} ‘:’
‘:’ identifier
‘!’ | ‘@’ | ‘#’ | ‘$’ | ‘%’ | ‘^’ | ‘&’ | ‘*’ | ‘-’ | ‘+’ | ‘=’ | ‘~’ | ‘/’ | ‘?’ | ‘<’ | ‘>’ | ‘,’ | ‘;’ | ‘|’ | “’ | ‘\’
op-char {op-char}
[ ‘-’ ] (integer | real)
[base] general-digit {general-digit}
fixed-point | float
decimal ‘.’ decimal
decimal [ ‘.’ decimal ] (‘e’ | ‘E’) [ ‘+’ | ‘-’ ] decimal
digit | letter
digit {digit}
decimal (‘r’ | ‘R’)
‘” { normal-char | escape-char } ‘”
any character except ‘\’ and ‘”
‘\t’ | ‘\b’ | ‘\n’ | ‘\f’ | ‘\r’ | ‘\v’ | ‘\a’ | ‘\0’ | ‘\\’ | ‘\” | ‘\”’ | ‘\?’ | numeric-escape
‘\x’ general-digit general-digit | ( ‘\d’ | ‘\o’ ) digit digit digit
‘”’ { comment-char } ‘”’
any character but ‘”’
10.2. Lexical overview
137
Self Handbook Documentation, Release 2 for Self 4.4
10.3 Syntax overview
expression
constant
unary-message
unary-send
binarymessage
binary-send
keywordmessage
keyword-send
receiver
resend
object
regular-object
block
slot-list
annotated-slotlist
unannotatedslot-list
code
slot
arg-slot
data-slot
unary-slot
binary-slot
keyword-slot
→
→
→
→
→
constant | unary-message | binary-message | keyword-message | ‘(’ expression ‘)’
self | number | string | object
receiver unary-send | resend ‘.’ unary-send
identifier
receiver binary-send | resend ‘.’ binary-send
→
→
operator expression
receiver keyword-send | resend ‘.’ keyword-send
→
→
→
→
→
→
→
→
small-keyword expression { cap-keyword expression }
[ expression ]
resend | identifier
regular-object | block
‘(’ [ ‘|’ [ ‘{’ ‘}’ ‘=’ string ] slot-list ‘|’ ] [ code ] ‘)’
‘[’ [ ‘|’ slot-list ‘|’ ] [ code ] ‘]’
{ unannotated-slot-list | annotated-slot-list }
‘{’ string slot-list ‘}’
→
{ slot ‘.’} slot [ ‘.’ ]
→
→
→
→
→
→
→
slot-name
parent-name
→
→
{ expression ‘.’} [ ‘^’ ] expression [ ‘.’ ]
arg-slot | data-slot | binary-slot | keyword-slot
argument-name
slot-name | slot-name ‘<-’ expression | slot-name ‘=’ expression
slot-name ‘=’ regular-object
operator ‘=’ regular-object | operator [identifier] ‘=’ regular-object
small-keyword {cap-keyword} ‘=’ regular-object | small-keyword identifier
{cap-keyword identifier} ‘=’ regular-object
identifier | parent-name
identifier ‘*’
10.4 Built-in types
There are a small number of built-in types that are directly supported through primitives and syntax:
Integers and floats are provided with primitives for performing arithmetic operations, comparisons etc.
Strings have a byte vector part for storing the characters. Special string primitives are provided.
Blocks are objects which combine code with an environment link. Used for control structures, they are
described in section [2.1.7].
In addition, there are a number of VM-supported types described in the sections on the Self World and the VM
reference manual, such as mirrors, processes, vectors, proxies and profilers.
10.5 Useful Selectors
This is a list of selectors which Selfers should find useful as a starting point.
Copying
138
Chapter 10. Appendices
Self Handbook Documentation, Release 2 for Self 4.4
clone
copy
shallow copy (for use within an object; clients should use copy)
copy the receiver, possibly with embedded copies or initialization
Comparing
Equality
=
!=
hash
==
!==
equal
not equal
hash value
identical (the same object; this is reflective and should be avoided)
not identical
Ordered
<
>
<=
>=
compare: IfLess: Equal: Greater:
compare: IfLess: Equal: Greater:
Incomparable:
less than
greater than
less than or equal
greater than or equal
three way comparison
three way comparison with failure
Numeric operations
+
*
/
/=
/~
/+
/-%
absoluteValue
inverse
negate
ceil
floor
truncate
round
asFloat
asInteger
double
quadruple
half
quarter
min:
max:
mean:
pred
predecessor
succ
successor
power:
log:
square
10.5. Useful Selectors
add
subtract
multiply
divide
divide exactly (returns float)
divide and round to integer (tends to round up)
divide and round up to integer
divide and round down to integer modulus
absolute value
multiplicative inverse
additive inverse
round towards positive infinity
round towards negative infinity
truncate towards zero
round
coerce to float
coerce to integer
multiply by two
multiply by four
divide by two
divide by four
minimum of receiver and argument
maximum of receiver and argument
mean of receiver and argument
predecessor
predecessor
successor
successor
raise receiver to integer power
logarithm of argument base receiver, rounded down to integer
square
Continued on next page
139
Self Handbook Documentation, Release 2 for Self 4.4
squareRoot
factorial
fibonacci
sign
even
odd
Table 10.1 – continued from previous page
square root
factorial
fibonacci
signum (-1, 0, 1)
true if receiver is even
true if receiver is odd
Bitwise operations (integers)
&&
||
^^
complement
<<
>>
<+
+>
and
or
xor
bitwise complement
logical left shift
logical right shift
arithmetic left shift
arithmetic right shift
Logical operations (booleans)
&&
||
^^
not
and
or
xor
logical complement
Constructing
@
#
##
&
,
point construction (receiver and argument are integers)
rectangle construction (receiver and argument are points)
rectangle construction (receiver is a point, argument is an extent)
collection construction (result can be converted into collection)
concatenation
Printing
print
printLine
printString
printStringDepth:
printStringSize:
printStringSize: Depth:
print object on stdout
print object on stdout with trailing newline
return a string label
return a string label with depth limitation request
return a string label with number of characters limitation request
return a string label with depth and size limitation request
Control
Block evaluation
value[: {With: }]
evaluate a block, passing arguments
Selection
ifTrue:
ifFalse:
ifTrue: False:
ifFalse: True:
evaluate argument if receiver is true
evaluate argument if receiver is false
evaluate first arg if true, second arg if false
evaluate first arg if false, second arg if true
Local exiting
exit
exitValue
140
exit block and return nil if block’s argument is evaluated
exit block and return a value if block’s argument is evaluated
Chapter 10. Appendices
Self Handbook Documentation, Release 2 for Self 4.4
Basic looping
loop
loopExit
loopExitValue
repeat the block forever
repeat the block until argument is evaluated; then exit and return nil
repeat the block until argument is evaluated; then exit and return a value
Pre-test looping
whileTrue
whileFalse
whileTrue:
whileFalse:
repeat the receiver until it evaluates to true
repeat the receiver until it evaluates to false
repeat the receiver and argument until receiver evaluates to true
repeat the receiver and argument until receiver evaluates to false
Post-test looping
untilTrue:
untilFalse:
repeat the receiver and argument until argument evaluates to true
repeat the receiver and argument until argument evaluates to false
Iterators
do:
to: By: Do:
to: Do:
upTo: By: Do:
upTo: Do:
downTo: By: Do:
downTo: Do:
iterate, passing each element to the argument block
iterate, with stepping
iterate forward
iterate forward, without last element, with stepping
iterate forward, without last element
reverse iterate, with stepping
reverse iterate
Collections
Sizing
isEmpty test
size
if collection is empty
return number of elements in collection
Adding
add:
addAll:
at: Put:
at: Put: IfAbsent:
addFirst:
addLast:
copyAddAll:
copyContaining:
add argument element to collection receiver
add all elements of argument to receiver
add key-value pair
add key-value pair, evaluating block if key is absent
add element to head of list
add element to tail of list
return a copy containing the elements of both receiver and argument
return a copy containing only the elements of the argument
Removing
remove:
remove: IfAbsent:
removeAll
removeFirst
removeLast
removeAllOccurences:
removeKey:
removeKey: IfAbsent:
copyRemoveAll
remove the given element
remove the given element, evaluating block if absent
remove all elements
remove first element from list
remove last element from list
remove all occurrences of this element from list
remove element at the given key
remove element at the given key, evaluating block if absent
return an empty copy
Accessing
10.5. Useful Selectors
141
Self Handbook Documentation, Release 2 for Self 4.4
first
last
includes:
occurrencesOf:
findFirst: IfPresent: IfAbsent:
at:
at: IfAbsent:
includesKey:
return the first element
return the last element
test if element is member of the collection
return number of occurences of element in collection
evaluate present block on first element found satisfying criteria, absent
block if no such element
return element at the given key
return element at the given key, evaluating block if absent
test if collection contains a given key
Iterating
do:
doFirst: Middle: Last: IfEmpty:
doFirst: MiddleLast: IfEmpty:
doFirstLast: Middle: IfEmpty:
doFirstMiddle: Last: IfEmpty:
reverseDo:
with: Do:
iterate, passing each element to argument block
iterate, with special behavior for first and last
iterate, with special behavior for first
iterate, with special behavior for ends
iterate, with special behavior for last
iterate backwards through list
co-iterate, passing corresponding elements to block
Reducing
max
mean
min
sum
product
reduceWith:
reduceWith: IfEmpty:
return maximum element
return mean of elements
return minimum element
return sum of elements
return product of elements
evaluate reduction block with elements
evaluate reduction block with elements, evaluating block if empty
Transforming
asByteVector
asString
asVector
asList
filterBy: Into:
mapBy:
mapBy: Into:
return a byte vector with same elements
return a string with same elements
return a vector with same elements
return a list with the same elements
add elements that satisfy filter block to a collection
add result of evaluating map block with each element to this collection
add result of evaluating map block with each element to a collection
Sorting
sort
copySorted
copyReverseSorted
copySortedBy:
sortedDo:
reverseSortedDo:
sortedBy: Do:
sort receiver in place
copy sorted in ascending order
copy sorted in descending order
copy sorted by custom sort criteria
iterate in ascending order
iterate in descending order
iterate in order of custom sort criteria
Indexable-specific
142
Chapter 10. Appendices
Self Handbook Documentation, Release 2 for Self 4.4
firstKey
lastKey
loopFrom: Do:
copyAddFirst:
copyAddLast:
copyFrom:
copyFrom: UpTo:
copyWithoutLast
copySize:
copySize: FillingWith:
return the first key
return the last key
circularly iterate, starting from element n
return a copy of this collection with element added to beginning
return a copy of this collection with element added to end
return a copy of this collection from element n
return a copy of this collection from element n up to element m
return a copy of this collection without the last element
copy with size n
copy with size n, filling in any extra elements with second arg
Timing
realTime
cpuTime
userTime
systemTime
totalTime
elapsed real time to execute a block
CPU time to execute a block
CPU time in user process to execute a block
CPU time in system kernel to execute a block
system + user time to execute a block
Message Sending
Sending (like Smalltalk perform; receiver is a string)
sendTo: {With: }
sendTo: WithArguments:
sendTo: DelegatingTo: {With: }
sendTo: DelegatingTo: WithArguments:
resendTo: {With: }
resendTo: WithArguments:
send receiver string as a message
indirect send with arguments in a vector
indirect delegated send
indirect delegated send with arg vector
indirect resend
indirect resend with arguments in a vector
Message object protocol
send
fork
receiver:
selector:
methodHolder:
delegatee:
arguments:
receiver: Selector:
receiver: Selector: Arguments:
receiver: Selector: Type: Delegatee: MethodHolder: Arguments:
perform the send described by a message object
start a new process; the new process performs the message
set receiver
set selector
set method holder
set delegatee of the message object
set arguments (packaged in a vector)
set receiver and selector
set receiver, selector, and arguments
set all components
Reflection (mirrors)
reflect:
reflectee
contentsAt:
isAssignableAt:
isParentAt:
isArgumentAt:
parentPriorityAt:
slotAt:
contentsAt:
visibilityAt:
returns a mirror on the argument
returns the object the mirror receiver reflects
returns a mirror on the contents of slot n
tests if slot n is an assignable slot
tests if slot n is a parent slot
tests if slot n is an argument slot
returns the parent priority of slot n
returns a slot object representing slot n
returns the contents of the slot named n
returns a visibility object representing visibility of slot n
System-wide Enumerations (messages sent to the oddball object browse)
10.5. Useful Selectors
143
Self Handbook Documentation, Release 2 for Self 4.4
all[Limit: ]
referencesOf: [Limit: ]
referencesOfReflectee: [Limit: ]
childrenOf: [Limit: ]
implementorsOf: [Limit: ]
sendersOf: [Limit: ]
returns a vector of mirrors on all objects in the system (up to the limit)
returns a vector of mirrors on all objects referring to arg (up to the limit)
returns a vector of mirrors on all objects referring to argument’s reflectee (up to the limit); allows one to find references to a method
returns a vector of mirrors on all objects with a parent slot referring to
the given object (up to the limit)
returns a vector of mirrors on objects with slots whose names match the
given selector (up to the limit)
returns a vector of mirrors on methods whose selectors match the given
selector (up to the limit)
Debugging
halt
halt:
error:
warning:
halt the current process
halt and print a message string
halt, print an error message, and display the stack
beep, print a warning message, and continue
Virtual Machine-Generated
Errors
undefinedSelector: Type: Delegatee: MethodHolder: Arguments:
ambiguousSelector: Type: Delegatee: MethodHolder: Arguments:
missingParentSelector: Type: Delegatee: MethodHolder: Arguments:
performTypeErrorSelector: Type:
Delegatee: MethodHolder: Arguments:
mismatchedArgumentCountSelector:
Type: Delegatee: MethodHolder:
Arguments:
primitiveFailedError: Name:
lookup found no matching slot
lookup found more than one matching slot
parent slot through which resend was delegated was not found
first argument to the _Perform primitive was not a canonical string
number of args supplied to _Perform primitive does not match selector
the named primitive failed with given error string
Other system-triggered messages
postRead
slot to evaluate after reading a snapshot
10.6 Every Menu Item in the Programming Environment
This table only covers the middle-button menus, the right-button (morph) menu is described elsewhere. It merges
items from several menus: the background menu, the outliner whole-object menu, the outliner category menu, the
outliner slot menu, the text editor menu, the debugger stack menu, the iterator object menus, and the changed module
morph menu.
Table 7: Menu Items
Label
Add Category
Add Slot
Added or Changed Slots
All Modules
144
Function
Adds a category to an object or category.
Adds a slot to an object or category.
On a module morph, enumerates slots added/changed since last save.
Summons a hierarchical list of all modules from the changed modules
morph.
Continued on next page
Chapter 10. Appendices
Self Handbook Documentation, Release 2 for Self 4.4
All Slots
Changed Modules
Children
Clean Up
Clean Up Memory
Collapse All
Copy Down Children
Copy Down Parent
Copy
Core Sampler
Create Button
Cut
Do Selection
Do it
Edit
Evaluator
Expand All
Expatriate Slots
(Don’t) Filter Frames
Find Slot
Find Slot of :
Flush
Forget I was changed
Get Module Object
Get Selection
Get it
Hide Annotation
Hide Comment
Implementors
Implementors of :
Load Morph From File
Make Creator
Make Private
Make Public
Make Undeclared
Methods Containing
Move
New Shell
Table 10.2 – continued from previous page
On a module morph, enumerates its slots.
Summons a list of changed modules.
Enumerate an object’s children.
Clean up the screen: collapse outliners and stack them on the left of the
window.
Manually initiate a garbage collection. Can help when you know you
have just freed up a bunch of space. Self also does this automatically.
Collapses all outliners, or all categories within an outliner or category.
Enumerate an object’s copy-down children.
Show an object’s copy-down parent.
Copies slots, categories or text.
Summons an object for manipulating morphs.
For a slot, create a button to send the message to the object. The receiver
may be set by carrying the button on top of the receiver and using the
middle-button on the button. (The button is grabbed with either the
car-pet-morph or with the grab right-menu item. Bug: buttons do not
mani-fest their results.)
Copies text to the text buffer.
Evaluate the selected text, do not show the result.
Evaluate the text in the editor, do not show the result.
On a slot, open an editor to change its name, slot type, or contents.
Adds an evaluator window to an object outliner.
Expand all subcategories.
On the changed module morph; shows a list of slots not included in any
module.
On a debugger stack, enable (or disable) filtering.
Searches an object and its ancestors for slot names matching a pattern.
For an assignable slot x, show all slots named x: in the object and its
ancestors.
Discards cached state, e.g. the result of an enumeration.
On a module morph, removes it from the list of changed modules and
clears out its record of added, changed & removed slots.
On a module morph summons the object outliner for the module. Useful
for editing its postFileIn method, or its revision.
Evaluate the selected text & show the result.
Evaluate the text in the editor, show the result.
Hides the object or slot annotation.
Hides the object or slot comment.
Searches for slots of a given name.
For an assignable slot x, show all implementors of x:.
Reads in a file created with the right-menu item “Save Morph to File”
On a slot, set the creator annotation of its contents to be the slot.
Change the style of the slot to show that it is intended to be private (not
enforced).
Change the style of the slot to show that it is intended to be public (not
enforced). Adds a comment for posterity.
Change the style of the slot to show that no clear intention exists as to
its visibility. (A Self exclusive!)
Searches for all methods containing a string.
Moves slots or categories.
Summon a new shell object.
Continued on next page
10.6. Every Menu Item in the Programming Environment
145
Self Handbook Documentation, Release 2 for Self 4.4
Open Factory Win-dow
Palette
Paste
Quit
Radar View
Read Module
References
Removed Slots
Restore Window State
Save snapshot
Save snapshot as ...
Save Window State
Send
Senders
Senders of :
Senders in family
Senders of : in family
Set Module
Shell
Show All Frame
Show Annotation
Show Comment
Show Morph
“Subclass” Me
The box at the top.
Toggle Spy
Traits Family
Write Snapshot
Table 10.2 – continued from previous page
Open a new window containing handy morphs (such as a radar-view)
you can tear-off and drag to other Self windows.
Summons an object for obtaining morphs for building.
Pastes text from the buffer.
Leave job and ride boxcars.
Summons an object for moving the current viewport around in space.
On a module morph, rereads the source file.
Enumerate references to an object.
On a module morph, lists removed slot paths.
Restores the saved state of the screen.
Saves an image of all objects in a snapshot file. Overwrites the snapshot
file that was opened originally. Saves the previous version with a ”.old”
suffix.
Lets you set the file name and other parameters of the saved snapshot.
For example, if you have a lot of memory, you can increase the code
cache size.
Saves the state of the screen.
For a method in a concrete object, send the message to the object.
Searches for methods sending a given message.
For an assignable slot x, show all senders of x:, i.e. methods that might
assign to x.
Searches for methods sending a given message in the selected object,
its ancestors, and it descendants.
For an assignable slot x, show all senders of x:, i.e. methods that might
assign to x in the selected object, its ancestors, and it descendants.
Sets the module of a slot or group of slots.
Summons an outliner on the shell. Used for evaluating expressions.
On a debugger stack, disable filtering.
Shows the object or slot annotation.
Shows the object or slot comment.
For morph object outliners, summons the morph that the object implements.
Appears on the object menu. Automates several steps equivalent to
sub-classing in Smalltalk: Creates a copy-down child of the selected
object and makes a new parent object for the new child that inherits
from the selected object’s parents. It also sets some of the annotations
for transport.
Pins up the menu.
Toggles an X Window spying on the Virtual Machine. A nice source of
reassurance.
Show an inheritance hierarchy textually. Only works on certain objects
on alternate Thursdays.
Saves all the objects in the Self world to a (fairly large) file.
10.7 The system monitor
The Self system contains a system monitor to display information about the internal workings of the system such as
memory management and compilation. It is invoked with _Spy: true (there is are shortcuts in the shell, spyOn
and spyOff). When it is active, the system monitor takes over a portion of your screen with a window that looks like
this:
146
Chapter 10. Appendices
Self Handbook Documentation, Release 2 for Self 4.4
The indicators in the left part of the display correspond to various internal activities and events. On the very left are the
CPU bars which show how much CPU is used in various parts of the system. The following table lists the individual
indicators:
Table 5 The system monitor display: indicators
CPU
VM
Lkup
Comp
Self
CPU
Dot
Indicator
X-compiling Y
scavenge
GC
flushing
compacting
reclaiming
sec reclaim
ic flush
LRU sweep
page N N
read
write
disk in/out
UNIX
idle
10.7. The system monitor
Bar What It Means
CPU time spent executing in the VM, i.e. for primitives, garbage collection etc.
CPU time used by compile-time and run-time lookups.
CPU time spent by the Self compilers. The black part stands for time
consumed by the non-inling compiler (NIC), the gray part for the simple
inlining compiler (SIC).
CPU time spent executing compiled Self code. The black part stands for
time consumed by unoptimized (NIC) code, the gray part for optimized
(SIC) code.
This bar displays the percentage of the CPU that the Self process is
getting (a completely filled bar equals 100% CPU utilization by Self).
Black stands for user time, gray for system time.
Below the CPU bar is a small dot which moves whenever a process
switch takes place.
What It Means
The X compiler (where X is either “nic” or “sic”) is compiling the
method named Y into machine code.
The Self object memory is being scavenged. A scavenge is a fast, partial
garbage collection (see [Ung84] , [Ung86] , [Lee88] ).
The Self object memory is being fully garbage-collected.
Self is flushing the code cache.
Self is compacting the code cache.
Self is reclaiming space in the code cache to make room for a new
method.
Self is flushing some methods in the code cache because there is not
enough room in one of the secondary caches (the caches holding the
debugging and dependency information).
Self is flushing all inline caches.
Self is examining methods in the code cache to determine whether they
have been used recently.
page faults occurred during the last time interval (N is not displayed if
N=1). The time interval currently is 1/25 of a second.
Self is blocked reading from a “slow” device, e.g., the keyboard or
mouse.
Self is blocked writing to a “slow” device, e.g., the screen.
Self is doing disk I/O.
Self is blocked in some UNIX system call other than read or write.
Self has nothing to do. (shows up only when using processes.)
147
Self Handbook Documentation, Release 2 for Self 4.4
The middle part of the display contains some information on VM memory usage displayed in textual form, as described
below:
Table 6 VM memory status information
Name
RSRC
C-Heap
Description
Size and utilization of the resource area (an area of memory used for
temporary storage by the compiler and by primitives).
Number of bytes allocated on the C heap by Self (excluding the memory
and code spaces and the resource area).
The memory status portion of the system monitor consists of bars representing memory spaces and their utilization; all
bars are drawn to scale relative to one another, their areas being proportional to the actual sizes of the memory spaces.
The next table explains the details of this part of the system monitor’s display.
Table 7 The system monitor display: memory status
Space
object memory
code cache
Color
black
gray
white
Description
The four (or more) bars represent (from top to bottom) eden, the two
survivor spaces, and subsequent bars are segments of old space. The left
and right parts of each bar represent the space used by “plain” objects
and byte vectors, respectively.† The above picture shows a situation in
which about half of old space is filled with plain objects and about 25%
is filled with byte vectors. A fraction of old space’s used portions is
currently paged out (gray areas). Below the old space is a ruler, marked
in 1Mb intervals, showing the total allocated in old space (extending
line at the left). To the right is a red bar representing how much of
old space is reserved for use by the Virtual Machine, and a yellow bar
representing the low space threshold (when crossed, the scheduler is
notified and a garbage colelction may take place).
These four bars represent the cache holding compiled methods with
their associated debugging and dependency information. The bar labelled ‘code’ represents the cache containing the actual machine code
for methods (including some headers and relocation information); it is
divided into code generated by the primary (non-inlining) compiler, or
NIC, and code generated by the secondary, smarter compiler (SIC). The
cache represented by the bar labelled ‘deps’ contains dependency information for the compiled methods, and the cache represented by the bar
labelled ‘debug’ contains the debugging information. The three-way
split reduces the working set size of the code cache. The cache represented by the bar labelled ‘PICs’ contains polymorphic inline caches.
Meaning
Allocated, residing in real memory.
Allocated, paged out.†
Unallocated memory.
10.8 Primitives
Primitives are Self methods implemented by the virtual machine. The first character of a primitive’s selector is an
underscore (‘_’). You cannot define primitives yourself (unless you modify the Virtual Machine), nor can you define
slots beginning with an underscore.
148
Chapter 10. Appendices
Self Handbook Documentation, Release 2 for Self 4.4
10.8.1 Primitive failures
Every primitive call can take an optional argument defining how errors should be handled for this call. To do this, the
primitive is extended with an IfFail: argument. For example, _AsObject becomes _AsObjectIfFail:, and
_IntAdd: becomes _IntAdd:IfFail:.
> *3 _IntAdd: ’a’ IfFail: [ | :error. :name |
(name, ’ failed with ’, error, ’.’) printLine. 0 ]*
_IntAdd: failed with badTypeError.
0
The primitive returns the result of evaluating the failure block.
>
When a primitive fails, if the primitive call has an IfFail: part, the message value:With: is sent to the IfFail:
argument, passing two strings: the name of the primitive and an error string indicating the reason for failure. If the
failing primitive call does not have an IfFail: part, the message primitive:FailedWith: is sent to the
receiver of the primitive call with the same two strings as arguments.
The result returned by the error handler becomes the result of the primitive operation (0 in our example); execution
then continues normally. If you want the program to be aborted, you have to do this explicitly within the error handler,
for example by calling the standard error: method defined in the default world.
The following table lists the error string prefixes passed by the VM to indicate the reason of the primitive failure. If
the error string consists of more than the prefix it will reveal more details about the error.
Table 8 Primitive failures
Prefix
primitiveNotDefinedError
primitiveFailedError
badTypeError
badTypeSealError
divisionByZeroError
overflowError
badSignError
alignmentError
badIndexError
badSizeError
reflectTypeError
outOfMemoryError
stackOverflowError
slotNameError
argumentCountError
unassignableSlotError
lonelyAssignmentSlotError
parallelTWAINSError
noProcessError
noActivationError
noReceiverError
noParentSlot
noSenderSlot
10.8. Primitives
Description
Primitive not defined.
General primitive failure (for example, an argument has an invalid
value).
The receiver or an argument has the wrong type.
Proxy’s type seal did not match expected type seal.
Division by zero.
Integer overflow. This can occur in integer arithmetic primitives or in
UNIX (when the result is too large to be represented as an integer).
Integer receiver or argument has wrong sign.
Bad word alignment in memory.
The vector index (e.g. in _At:) is out of bounds (too large or negative).
An invalid size of a vector was specified, e.g. attempting to clone a
vector with a negative size (see _Clone:Filler:and _CloneBytes:Filler:
below).
A mirror primitive was applied to the wrong kind of slot, e.g. _MirrorParentGroupAt: to a slot that isn’t a parent slot.
A primitive could not complete because its results would not fit in the
existing space
The stack overflowed during execution of the primitive or program.
Illegal slot name.
Wrong number of arguments.
This slot is not assignable.
Assignment slot must have a corresponding data slot.
Can not invoke TWAINS primitive (another process is already using it).
This process does not exist.
This method activation does not exist.
This activation has no receiver.
This activation has no lexical parent.
This activation has no sender slot.
Continued on next page
149
Self Handbook Documentation, Release 2 for Self 4.4
deadProxyError
liveProxyError
wrongNoOfArgsError
nullPointerError
nullCharError
prematureEndOfInputError
noDynamicLinkerError
EPERM, ENOENT, ...
Table 10.3 – continued from previous page
This proxy is dead and can not be used.
This proxy is live and can not be used to hold a proxy result.
Wrong number of arguments was supplied with call of foreign function.
Foreign function returned null pointer.
Can not pass byte vector containing null char to foreign function expecting a string.
Premature end of input during parsing.
Primitive depends on dynamic linker which is not available in this system.
These errors are returned by a UNIX primitive if a UNIX system call
executed by the primitive fails. The UNIX error codes are defined in
/usr/include/sys/ errno.h; see this file for details on the roughly 90 different UNIX error codes.
The _ErrorMessage primitive, sent to an error string returned by any primitive, returns a more descriptive version
of the error message; this is especially useful for UNIX errors.
10.8.2 Available primitives
A complete list of primitives can be obtained by sending primitiveList to primitives. Documentation for a
primitive (such as _Clone), can be obtained using at:, thus:
primitives at: ’_Clone’
A list of primitive names matching a pattern can be obtained thus:
primitives match: ’_Memory*’
Some points to note when browsing primitives:
• Since strings are special kinds of byte vectors, primitives taking byte vectors as arguments can usually take
strings. The exception is that canonical strings cannot be passed to primitives that modify the object.
• Integer arithmetic primitives take integer receivers and arguments; floating-point arithmetic primitives take
floating-point receivers and arguments.
• All comparison primitives return either true or false. Integer comparison primitives take integer receivers and
arguments; floating-point comparison primitives take floating-point receivers and arguments.
• The receiver of a mirror primitive must be a mirror (unless otherwise noted)
150
Chapter 10. Appendices