1
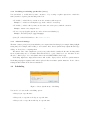
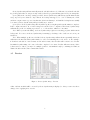
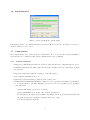
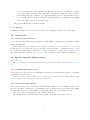
Help!
Contents
1 Preliminary note
1
2 Installing and uninstalling
1
3 Using Create Synchronicity to backup / synchronize your files
3.1 Selecting a language . . . . . . . . . . . . . . . . . . . . . . . . . . . . .
3.2 Main window . . . . . . . . . . . . . . . . . . . . . . . . . . . . . . . . .
3.3 Settings window . . . . . . . . . . . . . . . . . . . . . . . . . . . . . . .
3.3.1 Selecting a synchronization method . . . . . . . . . . . . . . . . .
3.3.2 Selecting files and folders. . . . . . . . . . . . . . . . . . . . . . .
3.3.3 Supported path formats (v3.5+) . . . . . . . . . . . . . . . . . .
3.3.4 Including or excluding specific files (v3.0+) . . . . . . . . . . . .
3.3.5 Advanced Settings . . . . . . . . . . . . . . . . . . . . . . . . . .
3.4 Scheduling . . . . . . . . . . . . . . . . . . . . . . . . . . . . . . . . . . .
3.5 Preview . . . . . . . . . . . . . . . . . . . . . . . . . . . . . . . . . . . .
3.6 Synchronization . . . . . . . . . . . . . . . . . . . . . . . . . . . . . . . .
3.7 Command line . . . . . . . . . . . . . . . . . . . . . . . . . . . . . . . .
3.7.1 Available commands . . . . . . . . . . . . . . . . . . . . . . . . .
3.7.2 Warning . . . . . . . . . . . . . . . . . . . . . . . . . . . . . . . .
3.8 Advanced use . . . . . . . . . . . . . . . . . . . . . . . . . . . . . . . . .
3.8.1 Syncing to network drives . . . . . . . . . . . . . . . . . . . . . .
3.9 Special commands, hidden settings . . . . . . . . . . . . . . . . . . . . .
3.9.1 Enabling expert mode (v5.1+) . . . . . . . . . . . . . . . . . . .
3.9.2 Note about hidden settings . . . . . . . . . . . . . . . . . . . . .
3.9.3 Dealing with messy DST settings . . . . . . . . . . . . . . . . . .
3.9.4 Grouping profiles . . . . . . . . . . . . . . . . . . . . . . . . . . .
3.9.5 Auto-creating root destination directory (Expert mode only) . .
3.9.6 (v6.0+) Excluding hidden files and folders . . . . . . . . . . . . .
3.9.7 Using regular expressions to exclude specific folders . . . . . . .
3.9.8 Auto-including newly created folders (in some edge cases) . . . .
3.9.9 Forcing stronger checks while scanning for modified files (v5.2+)
3.9.10 Diff / File comparison (v5.2+) . . . . . . . . . . . . . . . . . . .
3.9.11 On-the-fly compression (gzip and bzip2) (v5.2+) . . . . . . . . .
3.9.12 Md5 Validation (v5.2+) . . . . . . . . . . . . . . . . . . . . . . .
3.9.13 Text-only logs (v5.2+) . . . . . . . . . . . . . . . . . . . . . . . .
3.9.14 Specifying how many log entries should be archived (v5.2+) . . .
3.9.15 Wake-up actions, post-sync actions (v6.0+) . . . . . . . . . . . .
3.9.16 Forecasts . . . . . . . . . . . . . . . . . . . . . . . . . . . . . . .
3.10 Server builds / System admins (v5.0+) . . . . . . . . . . . . . . . . . . .
1
.
.
.
.
.
.
.
.
.
.
.
.
.
.
.
.
.
.
.
.
.
.
.
.
.
.
.
.
.
.
.
.
.
.
.
.
.
.
.
.
.
.
.
.
.
.
.
.
.
.
.
.
.
.
.
.
.
.
.
.
.
.
.
.
.
.
.
.
.
.
.
.
.
.
.
.
.
.
.
.
.
.
.
.
.
.
.
.
.
.
.
.
.
.
.
.
.
.
.
.
.
.
.
.
.
.
.
.
.
.
.
.
.
.
.
.
.
.
.
.
.
.
.
.
.
.
.
.
.
.
.
.
.
.
.
.
.
.
.
.
.
.
.
.
.
.
.
.
.
.
.
.
.
.
.
.
.
.
.
.
.
.
.
.
.
.
.
.
.
.
.
.
.
.
.
.
.
.
.
.
.
.
.
.
.
.
.
.
.
.
.
.
.
.
.
.
.
.
.
.
.
.
.
.
.
.
.
.
.
.
.
.
.
.
.
.
.
.
.
.
.
.
.
.
.
.
.
.
.
.
.
.
.
.
.
.
.
.
.
.
.
.
.
.
.
.
.
.
.
.
.
.
.
.
.
.
.
.
.
.
.
.
.
.
.
.
.
.
.
.
.
.
.
.
.
.
.
.
.
.
.
.
.
.
.
.
.
.
.
.
.
.
.
.
.
.
.
.
.
.
.
.
.
.
.
.
.
.
.
.
.
.
.
.
.
.
.
.
.
.
.
.
.
.
.
.
.
.
.
.
.
.
.
.
.
.
.
.
.
.
.
.
.
.
.
.
.
.
.
.
.
.
.
.
.
.
.
.
.
.
.
.
.
.
.
.
.
.
.
.
.
.
.
.
.
.
.
.
.
.
.
.
.
.
.
.
.
.
.
.
.
.
.
.
.
.
.
.
.
.
.
.
.
.
.
.
.
.
1
1
2
3
4
4
4
5
5
5
6
7
7
7
8
8
8
8
8
8
9
9
9
9
9
9
10
10
10
10
10
10
10
11
11
3.11 Running Create Synchronicity under Linux . . . . . . . . . . . . . . . . . . . . . . . . . . . .
11
4 Appendix: keyboard shortcuts.
4.1 Main window . . . . . . . . . . . . . . . . . . . . . . . . . . . . . . . . . . . . . . . . . . . . .
4.2 Preview window . . . . . . . . . . . . . . . . . . . . . . . . . . . . . . . . . . . . . . . . . . .
12
12
12
5 Legal notes
12
6 Further help
6.1 Bugs . . . . . . . . . . . . . . . . . . . . . . . . . . . . . . . . . . . . . . . . . . . . . . . . . .
6.2 Feature requests . . . . . . . . . . . . . . . . . . . . . . . . . . . . . . . . . . . . . . . . . . .
6.3 Questions/Contact . . . . . . . . . . . . . . . . . . . . . . . . . . . . . . . . . . . . . . . . . .
12
12
12
12
7 Mailing lists
13
1
Preliminary note
Create Synchronicity is open source! This means that it is developped by volunteers only, and
thus developers thankfully accept donations, which are a very nice way to show you support to
an open source project.
2
Installing and uninstalling
Create Synchronicity can either be installed to your hard drive, or launched without installing from a Zip
archive.
Tip: Uninstalling Create Synchronicity prior to updating is not needed.
3
Using Create Synchronicity to backup / synchronize your files
Create Synchronicity has been designed to backup and synchronize your files and folders in a fast and simple
way, through a light and yet powerful interface. It is fully portable, and weights about 180 kB zipped.
Windows 2000, Windows XP, Windows Vista, and Windows Seven are supported. To run Create Synchronicity, you must install the .Net Framework, version 2.0 or later.
3.1
Selecting a language
To change Create Synchronicity language, go to the “About/Settings” menu, select your language, and restart
the program. If your language is not included, why not translate Create Synchronicity by yourself?
2
3.2
Main window
Figure 1: Create Synchronicity - Main (Win7)
Figure 2: Create Synchronicity - Main
Create Synchronicity’s main window displays all existing configurations, illustrated by an icon showing what
they are intended to do. Details about the selected configuration (“profile”) are displayed in the bottom of
the window when you click the name of a profile.
To create a new profile, click the “New Profile” icon.
To rename a profile, right-click it or use the F2 key.
To display available actions for an item, just click it.
Multiple actions are displayed:
3
• Preview: loads a preview of the actions to apply to the file system to synchronize the folders that you
have selected.
• Synchronize: starts synchronizing directly, without displaying a preview.
• Change Settings: displays the configuration window.
• Delete: deletes the profile.
• Rename: renames the profile.
• View log: displays a log of all backups done.
• Clear log: clears the profile log.
• Scheduling: displays more option about scheduling your backup profile.
Note: You can change views, or change font size, using keyboard shortcuts.
3.3
Settings window
Figure 3: Create Synchronicity - Settings (Win7)
Figure 4: Create Synchronicity - Settings
4
3.3.1
Selecting a synchronization method
Create Synchronicity features three synchronization methods, which define how the program will deal with
newly created and deleted files.
• Left to right (Mirror): New and modified files are copied from left to right. Deletions that occurred on
the left are replicated (“mirrored”) on the right. In this case, the right folder becomes an exact copy
of the left one, except that files updated on the right side are not reverted to their original state1.
• Left to right (Incremental): New and modified files are copied from left to right, but deletions are not.
In this case, the right folder somehow keeps an incremental history of changes that occurred on the
left.
• Two ways (Incremental): New and modified files are copied from left to right, and from right to left. No
deletions occur. This is especially useful if changes occur also in the destination (eg. your documents
on a USB stick)
1 Unless “strict mirror” is selected.
The Strict mirror option ensures that the right side remains an exact copy of the left one: when
enabled, if Create Synchronicity detects changes in the destination, then it reverts the file to its original
state; that is, it removes the modifications and resets the files contents to match that of the original file.
3.3.2
Selecting files and folders.
The tutorial has plenty of extra information.
• (v4.0+) The default action when selecting a folder is to include all its subfolders.
• A tick before the name of a folder means that the files in this folder will be synchronized.
– Subfolders won’t be backed up, unless they are checked too.
• Right-clicking a folder will give you a list of options to finetune your selection.
Note: By right-clicking a node, you’ll be able to synchronize a folder’s contents without synchronizing
its subfolders, a feature specific to Create Synchronicity.
Note: Create Synchronicity does not recreate the source root folder (ie. if you’re syncing from C:\A to
C:\B, then you won’t get a C:\B\A folder).
3.3.3
Supported path formats (v3.5+)
You can use the following path formats:
• Absolute (C:\MyFolder)
• Relative (..\..\MyFolder)
• UNC (\\192.168.0.150\MyFolder)
• By Volume Name (Enclose volume name in quotes : "MyDrive"\MyFolder)
Environment variables such as %UserProfile% are automatically expanded. Expert users can use dynamic
variables such as %DAY%, %YEAR%, etc. See further.
5
3.3.4
Including or excluding specific files (v3.0+)
You can include or exclude files by name, extension, or by creating a regular expression to match the
name/extension. Separate patterns using semicolons.
• To include / exclude files by extension, use the extension, without quotes.
Example: to exclude tar and zip files, type in the exclude box tar;zip.
• To include / exclude a file by name, use the name enclosed in quotes, with the extension.
Example: "Hello.exe";"Report.doc".
• To use a regexp (regular expression), enclose it in forward slashes (/).
Example: /Picture[0-9]+\.(jpg|raw|png)/.
(v6.0+) To exclude hidden files, see the Advanced section.
3.3.5
Advanced Settings
The Time offset option (v2.2+) is useful when your computer time has changed (for example during daylight
saving time). For example, when adding a one hour time offset, Create Synchronicity adjusts file times (by
adding one hour) before comparing them.
The Strict file time comparison option (v3.0+), when disabled, makes the file time checking which
Create Synchronicity uses to determine which files should be copied a little bit looser: file times are the
allowed to differ by up to 4 seconds (disable this to fix weird FAT/NTFS related bugs).
Unchecking Replicate empty directories will exclude empty folders from the synchronization.
Unchecking Propagate updates will exclude updated files from future synchronizations. Both of these
settings should remain checked in most situations.
3.4
Scheduling
Figure 5: Create Synchronicity - Scheduling
You can choose between three scheduling options:
• Every day at a specific time.
• Every week on a specific week day, at a specific time.
• Every month on a specific month day, at a specific time.
6
Create Synchronicity will automatically start the scheduler when needed. Likewise, if you disable scheduling for all profiles where it was previously enabled, then the program will unregister from your startup list.
(v5.1+) When the “catch up” setting is enabled, Create Synchronicity will run any synchronization that
was postponed by more than two days. That is, if a backup was supposed to occur on January 1st, 5 PM,
and then computer was not powered at that time, then from January 7, and until the backup has successfully
been started, Create Synchronicity will periodically try to start it.
(v5.2+)Note: Create Synchronicity will only mark a profile as caught up if the synchronization completes.
If the computer is turned off, or if the backup is is cancelled before completion, then Create Synchronicity
will mark the profile for catching up at next boot, or 4 hours later, whichever comes first.
Note: When you turn scheduling on, Create Synchronicity registers as a startup program, which runs in
background. You can see if Create Synchronicity is running by checking for the double arrow icon in your
status bar.
Note: When multiple profiles are scheduled, Create Synchronicity will run them sequentially; that is, it
will wait for the first scheduled synchronization to end before launching the second, and so on. For example,
if Profile1 is scheduled to run at 10:00, and Profile2 at 10:05, then Profile2 will not start before Profile1
has finished synchronizing. Of course, if Profile1 completes before 10:05, Profile2 will run at 10:05. If the
behaviour is not desired, you may force multiple profiles to run simultaneously by combining the Windows
Tasks Scheduler and the /run command line switch.
3.5
Preview
Figure 6: Create Synchronicity - Preview
A list of all actions which will be executed by Create Synchronicity is displayed, so that you can review these
changes before applying these actions.
7
3.6
Synchronization
Figure 7: Create Synchronicity - Synchronizing
It is always possible to stop synchronizing after you started. However, already copied files are not deleted,
and deleted files are not recovered.
3.7
Command line
Create Synchronicity can be started from the command line. To do so, head to the program’s installation
folder and type in a command prompt "Create Synchronicity.exe" [command].
3.7.1
Available commands
• /help (v5.0+) will display information about the program, and where the configuration files are stored.
• /scheduler will run the scheduling engine in background. Useful if you need to immediately (re)start
the scheduler.
• /log (v5.0+) will enable application logging, to a file called app.log
in the application installation directory.
• [/preview] [/quiet|/silent] [/nostop] /run [/all] "ProfileName1|ProfileName2|ProfileName3" will queue (v3.5+) profiles ProfileName1, ProfileName2,
etc. for synchronization, optionally displaying a preview for each. Use /all instead of profile names
to sync all profiles.
– /preview will display a preview before syncing.
– /quiet will minimize the program to an icon in the system tray.
– /silent (supersedes /quiet; system admins only) will prevent the program from interacting with
the desktop in any way. Application logging is enabled (see /log).
– /all (v6.0+) will sync all profiles.
8
– Note on queuing profiles: Create Synchronicity will wait 5 seconds before moving from one profile
on to the next. When queuing profiles, ensure that you use quotation marks, and that you separate
profile names with a pipe character (eg. Create Synchronicity.exe /run "One|Two"). If you
do not use the /quiet switch, Create Synchronicity will wait for a confirmation after running
each profile, unless you add the /nostop switch.
The program will exit after completing its tasks.
3.7.2
Warning
It’s highly recommended to test your backup settings before running profiles from the command line.
3.8
3.8.1
Advanced use
Syncing to network drives
(v3.5+) Create Synchronicity has native support for UNC paths, ie. paths such as \\192.168.0.25\MyRootFolder\MyFolder.
Create Synchronicity can easily be used to backup or sync files to a network drive: to do so, you can
directly use (v3.5+) a UNC path. You can also map your network drive to a particular letter for easier
access: right-click “My Computer” and use the “connect a network drive” option. Choose a letter for your
drive, and synchronize to this drive. A more detailed help on this procedure is available from Microsoft.
3.9
Special commands, hidden settings
See also the FAQ.
This section may describe unreleased features. Should you need such features, please download an updated
build.
3.9.1
Enabling expert mode (v5.1+)
You can enable a few extra options by adding Expert mode:True to your mainconfig.ini file, or by pressing
Ctrl+Alt+E in the main window.
Starting from revision 1130, enabling expert mode adds an extra menu to the basic settings window, which
lets you configure some of the settings mentioned in this section.
3.9.2
Note about hidden settings
Most of the following sections of this guide describe manual modification of your configuration files. These
files are located in the config folder of your installation directory, and follow a profilename.sync naming
convention. Modifications are usually limited to appending a line to the corresponding config file.
Note: Some of the following tweaks require enabling expert mode.
Tip: Pressing Ctrl+O in the main window will open the folder where your profiles are stored.
9
3.9.3
Dealing with messy DST settings
Create Synchronicity has a DST compensation setting. You might however - especially if many of your files
differ by +/-1 hour from the source - want to use the “fuzzy DST” setting, enabled by adding Fuzzy DST
compensation:True on a separate line to the corresponding profilename.sync file.
3.9.4
Grouping profiles
You can reorganize profiles and group them by adding Group:(GroupName) on a separate line to the corresponding profilename.sync file, or by using the expert menu in the profile configuration window.
3.9.5
Auto-creating root destination directory (Expert mode only)
In Create Synchronicity, the %DATE% environment variable is mapped to the current date, with - as date
separator. If you want to backup to a dynamic destination, based on current date, you can use this constant
in your destination path. You must, however, tell Create Synchronicity to automatically create the root
directory when starting a sync; the corresponding setting is available in the profile settings dialog, in expert
mode only. Other variables include %MMMYYYY%, %DAY%, %MONTH%, and %YEAR%.
3.9.6
(v6.0+) Excluding hidden files and folders
To exclude hidden files and folders, add Exclude hidden entries:True on a separate line of your profilename.sync file.
3.9.7
Using regular expressions to exclude specific folders
Using the same syntax as described in the regular expressions section of this manual (.Net regular expressions), you can force Create Synchronicity to exclude some specific folders. To do so, simply add the following
line to your profile configuration file: Excluded folder patterns:"\a";"\SVN";. In the previous example,
any directory ending with\a or \SVN will not be synced.
Note: Although source directories matching the exclusion pattern will not be created or updated in the
destination, existing ones will not be removed. You can hence safely exclude system folders (e.g. System
Volume Information).
3.9.8
Auto-including newly created folders (in some edge cases)
Suppose you are syncing from C: to D:, and you don’t want certain folders, say C:\a and C:\b to be
copied to D:. You should first create a profile where you uncheck C:\a and C:\b. But then, if you create
a folder at C:\c, Create Synchronicity won’t be able to guess if it should be synced, and will default to
not syncing it. On the opposite, if you had included all subfolders of C:, Create Synchronicity would
include it as well. If you want newly created folders to be included anyway, you should take a different
approach: select all C: subfolders, and then add the following line to your configuration file: Excluded
folder patterns:"\a";"\b". Then Create Synchronicity will know that it should ignore folders C:\a and
C:\b. You can even use regular expressions (using the same syntax as the one defined for including and
excluding files). Please note that, if they exist, D:\a and D:\b won’t be deleted.
10
3.9.9
Forcing stronger checks while scanning for modified files (v5.2+)
Create Synchronicity uses last modification date to compare files and determine which should be synchronized. If you want file size too be scrutinized as well, then add Check file size:True to your sync profile.
3.9.10
Diff / File comparison (v5.2+)
Create Synchronicity can show a diff of modified files. For this, you’ll need to set two hidden settings, Diff
program and Diff arguments in you mainconfig.ini file. The first should point to your diff program ; the
second should list both %o (expands to the path to the original file), and %n (expands to the path to the new
file.
Example: you can add the following to your mainconfig.ini file: Diff program: C:\Program
Files\TortoiseSVN\bin\TortoiseMerge.exe;Diff arguments:"%o" "%n".
Press Ctrl+D in the preview window to launch your diff program.
3.9.11
On-the-fly compression (gzip and bzip2) (v5.2+)
You can use Create Synchronicity to create compressed backups – that is, save gzipped, or bzip2’ed copies
of your files instead of the files themselves – by adding Compress:.gz, or Compress:.bz2 on a new line of
the corresponding profile configuration file. You’ll need to extract the extension pack downloadable from the
latest builds page to the root of your installation directory prior to using this feature.
Note:This feature is still experimental, and should not be used but by experts.
3.9.12
Md5 Validation (v5.2+)
For extra safety, you can force Create Synchronicity to validate files after copying. The algorithm used is
md5.
To enable this feature for a profile, add Checksum:True on a new line of the corresponding profile
configuration file.
Enabling this option will actually enable two tests: one while scanning for modified files (preview phase),
to ensure absolute backup integrity, and one after copying your files. In case a verification fails, a message
will be added to the log file.
3.9.13
Text-only logs (v5.2+)
Should you prefer your logs to be saved as text instead of html, append Text logs:True; to your main
configuration file.
3.9.14
Specifying how many log entries should be archived (v5.2+)
The default in Create Synchronicity is to keep 7 entries in the log files. You can customize this behaviour
by appending Archived log entries:n; in your main configuration file.
3.9.15
Wake-up actions, post-sync actions (v6.0+)
Create Synchronicity can run scripts when starting or completing a synchronization, provided that
expert mode is enabled. These scripts are profile-specific, and are enabled by adding Wakeup ac-
11
tion:path-to-script or Post-sync action:path-to-script to the corresponding profile configuration
file (profilename.sync). Wake-up scripts are called in a blocking way, while post-sync scripts are called
in a non-blocking way. In both cases, the script receives only one parameter, the absolute path to the
destination.
3.9.16
Forecasts
For performance reasons, Create Synchronicity doesn’t read file size information when scanning for new, modified, or deleted folders. This yields a substantial improvement, but does have a cost: Create Synchronicity
doesn’t estimate how long a backup will take.
3.10
Server builds / System admins (v5.0+)
A special command-line switch is available, /silent, that slightly changes the behaviour of the /quiet command, and enables application logging, so that no interaction happens at all (message boxes and balloons
are disabled). This switch is mainly designed to ease the work of system administrators, who want to schedule Create Synchronicity with the default Windows tasks scheduler, thus bypassing Create Synchronicity’s
custom scheduling engine.
Important note: This switch has been designed to minimize the interaction required. System administrators are strongly advised to have a look every now and then to the app.log file, in order to make sure
that nothing is preventing the backups from happening.
Note to Windows 7 users: You may need to run this software in Administrator Mode for the synchronization to work perfectly.
3.11
Running Create Synchronicity under Linux
Support for Linux-based operating systems was added in revision 1127, using the Mono stack.
A special, up-to-date Linux build is available from the latest builds page. This version is purely experimental; extensive testing is required before it can be safely used by everyone.
For now, this version is restricted to early testers: it notably lacks scheduling, proxy support (due to
mono limitation), and doesn’t integrate well in the Gnome desktop.
12
4
4.1
Appendix: keyboard shortcuts.
Main window
Shortcut
Enter
F1
F2
F5
Ctrl+N
Ctrl+L
Ctrl++
Ctrl+Ctrl+O
Ctrl+Alt+E
4.2
Preview window
Shortcut
Ctrl+L
Ctrl+D
5
Action
Launches a preview for the profile currently selected
Opens this manual
Starts renaming the current profile
Reload profiles
Creates a new profile
Cycles through display modes
Zooms in
Zooms out
Opens the config folder.
Toggles expert mode
Action
Opens the log file
Opens a diff between the current and previous version of the selected file (see advanced settings).
Legal notes
This program is free software: you can redistribute it and/or modify it under the terms of the GNU General
Public License as published by the Free Software Foundation, either version 3 of the License, or (at your
option) any later version.
6
6.1
Further help
Bugs
As much as I try to avoid it, there may still be bugs in Create Synchronicity. If you think you found one,
please to take the time to send me a bug report, at sourceforge tracker. If you don’t want to create an
account, you can e-mail me directly.
6.2
Feature requests
There is a feature requests tracker on SourceForge. You can also e-mail me, of course.
6.3
Questions/Contact
If you have any questions regarding Create Synchronicity, you can send me an e-mail ([email protected]). In case of problems, I’ve set up an alternate e-mail address: createsoftware.proxy AT gmail.com .
13
7
Mailing lists
Two mailing lists have been created, which are designed for announcements only: synchronicity-updates,
announcing major updates, and synchronicity-commits, listing commits.
14