Transcript
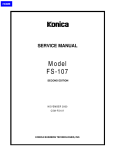
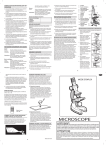
MICROSCOPE
USER MANUAL
INTRODUCTION OF MICROSCOPE
1. Eyepiece
2. Focusing Knob
3. Body Tube
4. Revolving Turret
5. Objective Lens
6. Arm
6
7. Stage
8. Clip
9. Mirror
10. Illuminator Lamp
(Light Source Lamp)
11. Base
1
1. Eyepiece
2. Focusing Knob
3. Body Tube
4. Revolving Turret
5. Objective Lens
6. Arm
7. Stage
8. Clip
9. Mirror
10. Illuminator Lamp
(Light Source Lamp)
11. Base
1
2
3
4
5
7
8
INSTRUCTIONS FOR USE OF MICROSCOPE
9
10
1. First tilt the arm and adjust the position of the
reflector so that the light is fully caught by the mirror.
3
2
2. When the light is fully reflected by the mirror, as can
be seen through the eyepiece, the microscope will
be ready for observation.
6
4
5
8
3. Next, put the prepared slide on the stage and fix it in
place with the clips.
7
9
10
11
11
Ref. MS002 / MS007 / MS601 /
MS903 / MS907 / MS908 / MS911 /
MS916 / MS925
For MS002 / MS006 / MS007 / MS008 / MS020 / MS112 / MS601 /
MS701 / MS901 / MS903 / MS907 / MS908 / MS911 / MS916 / MS925
INTRODUCTION TO A MICROSCOPIC WORLD
In this world there are an abundance of living things. Some are large and easily seen with
our own eyes but others are so minute that millions could be placed on the head of a pin.
These can only be seen through a microscope.
The microscope was invented many years ago and since then has opened a field of
research, as fascinating and beautiful as anything you can imagine. Now, all science from
the most elementary study of biology to the highly specialised fields of astro-physiology
use some form of microscope to enable the students of these sciences to better
understand the intricate, complicated forms of living organisms or static materials that
make up this world in which we live.
Your microscope will be a source of many hours of pleasure as a hobby or open the door to
advanced knowledge in the varied fields of science. We hope you enjoy your experience.
1. Eyepiece
2. Focusing Knob
3. Body Tube
4. Revolving Turret
5. Objective Lens
6. Arm
7. Stage
8. Clip
9. Mirror
10. Illuminator Lamp
(Light Source Lamp)
11. Base
Ref. MS701
11
1. Eyepiece
2. Focusing Knob
3. Body Tube
4. Revolving Turret
5. Objective Lens
6. Stage
12
7. Clip
3
8. Mirror
9. Illuminator Lamp
2
10. Base
(Light Source Lamp)
11. Viewer
12. Viewer/Microscope Knob
1
3
4
6
5
8
7
2
9
10
11
Ref. MS020 / MS901
4. Now decide what magnification to use. The greater
the length of the objective lens the greater the
magnification. Observation is generally made
starting at a low setting.
5. In order to change the magnification turn the
revolving turret until you feel a click.
4
5
7
6
9
6. Using the focusing knob, lower the lens as close as
possible to the prepared slide without actually
making contact. Then, while looking through the
eyepiece, turn the knob in the opposite direction
until the image comes into focus.
8
10
Ref. MS008
7. When the room is dark with low intensity of natural
or lamp light, or when the sight is not clear at a high
magnification, turn the reflector. Then the light
source lights automatically to enable observation.
1
1. Eyepiece
2. Focusing Knob
3. Body Tube
4. Revolving Turret
5. Objective Lens
6. Arm
7. Stage
8. Clip
9. Mirror
10. Illuminator Lamp
(Light Source Lamp)
11. Base
8. The light source lamp is used with 1 “CR2032” battery
put in the illuminator lamp.
3
2
4
5
6
7
8
9
10
11
Ref. MS006 / MS112
1
2
FRONT - 210 x 443.5 mm
BATTERY INSTALLATION
HOW TO USE AS A PROJECTION DEVICE
1
1. Unscrew the lamp cover with
a screwdriver to take off.
3.0 VOLTS
0.06 WATTS
Remove the eyepiece and tilt the microscope so that the
body tube is pointing at a white surface not more than one
meter away. For best results view in a darkened room.
HOW TO MAKE A PREPARED SLIDE
L14
2
2. Insert 1 “CR2032” battery into
the battery compartment
carefully the correct (+) and (-)
positions.
3
3. Replace the lamp cover and
screw it back into place.
FOR ADJUSTABLE ZOOM MODELS
The figure 12X or 18X is indicated on the opposite side of
the eyepiece tube.
If the given sample is not thin and transparent, it cannot be observed by the microscope
as the light from the reflector or the light source does not pass through it. Fibres, pollen,
wool, or salt will be easy to observe and do not need a cover glass. Clear samples are stain
first with a drop or two drops of methylene blue, Eosin or other dyeing solutions available
on the market.
(Note: These are dyeing solutions and therefore could cause staining of clothing,
carpets and fabrics. Special care should be taken when handling these solutions.)
1 Temporary mount
Wipe the slide and cover glass clean. Thin the
sample with a razor blade (Note: The blade is
very sharp so handle with extreme caution) or
similar, then pick it up with tweezers and put it on
the centre part of the glass slide. Put one drop of
water on the sample with a dissecting needle, or
if the sample is clear, use on drop of the above mentioned dyeing solutions (Note: The
needle has a sharp point so handle with extreme caution) and then gently put the
cover glass on it, taking care not to trap any air bubbles.
Remove any excess water or dyeing solution with blotting paper. Now it is ready for
observation. (Remember to wash your hands after doing the preparation and
remember to dispose the dyeing solutions.)
2 Permanent mount
Wipe the slide and cover glass clean as above (Temporary mount). Proceed as above
but before covering the slide with the cover glass, add a few drops of gum media (or
Canada balsam) solution or transparent adhesive glue with a dissecting needle to the
slide. Push down on the cover glass with tweezers or the like to fix it in place and leave
to dry for about a day.
By rotating the silver knurled ring in counter / clockwise
direction the eyepiece power will zoom to 18X.
Assuming that you are using an objective turret of 12X,
and with the eyepiece at 12X, then the magnification
power of the combination is 12x12=144.
HOW TO USE THE MICRO-SLICER
The object you see is enlarged 144 times.
By just using the zoom eyepiece, and rotating it to 18X,
you now have a combination of 12x18=216.
3
BACK - 210 x 443.5 mm
Zoom Eyepiece
12x-18x
Put the specimen which you want to cut for study into the holes of the micro-slicer
(Note: the mico-slicer contains a sharp edge so handle with extreme caution).
Revolve the blade. Then you can get thin slices of the specimen.
4
ADVICE FOR SUPERVISING ADULTS
a) Read and follow the instructions and safety rules. Keep them for reference.
b) This Microscope set is for use only by children over 8 years old.
c) Because children’s abilities vary so much, even within age groups, supervising adults
should exercise discretion as to which preparations are suitable and safe for them. The
instructions should enable supervisors to assess any preparation to establish its
suitability for a particular child.
d) The supervising adult should discuss the warnings and safety information with the
children before commencing the preparations. Particular attention should be paid to
the functionally sharp point on the needle and the functionally sharp edges on the
scalpel and slicer.
SAFETY RULES
a) Do read these instruction before use, follow them and keep them for reference.
b) Do keep young children and animals, and those who are not wearing eye protection
away from the experimental area.
c) Do always wear eye protection.
d) Do store microscope sets out of reach of young children.
e) Do clean all equipment aftr use.
f ) Do wash hands after carrying out preparations.
g) Do not use any equipment which has not been supplied with the set.
h) Do not eat, drink or smoke in the experimental area.
i) Do not put foodstuffs in original container. Dispose of immediately.
j) Do make sure that all containers are fully closed and properly stored after use.
CAUTION FOR HANDLING
1) The vital part of the microscope is the lens. Therefore, sufficient care must be taken in
handling the lens.
2) If the lens gets dirty or dusty; wipe the lens surface with a clean lens tissue or soft
cotton cloth. Do not rub the lens with a finger or dirty cloth, etc.
3) After it is used, put a cover on the microscope or put it back into the box for screening
from dust.
4) Microscope should be stored in a moisture free place. Moisture build up on the light
causes a reduction in light intensity.
5) When a microscope is not used for a long period of time, remove the light source
battery.
5
P38-MS911-81021000