1
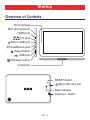
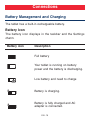
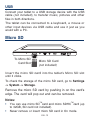
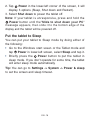
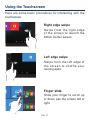
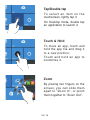
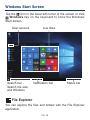
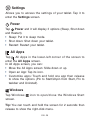
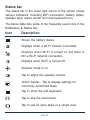
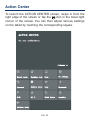
W101 V2
Windows 10
2-in-1 Tablet with detachable keyboard
User Manual
Need Help? Visit support.rcatablets.com
Safety Precautions
W101 V2
Equipment tested for
compliance as a
complete unit
FCC Information
This device complies with Part 15 of the FCC Rules.
Operation is subject to the following two conditions: (1) This
device may not cause harmful interference, and (2) this
device must accept any interference received, including
interference that may cause undesired operation.
This equipment has been tested and found to comply
with the limits for a Class B digital device, pursuant to
Par t 15 of FCC Rules. These limits are designed to
provide reasonable protection against harmful interference
in a residential installation. This equipment generates,
uses, and can radiate radio frequency energy and, if not
installed and used in accordance with the instructions,
may cause harmful interference to radio communications.
However, there is no guarantee that interference will
not occur in a particular installation. If this equipment
does cause harmful interference to radio or television
reception, which can be deter mined by tur ning the
equipment off and on, the user is encouraged to try to
correct the interference by one or more of the following
measures:
EN - 1
• Reorient or relocate the receiving antenna.
• Increase the separation between the equipment and
receiver.
• Connect the equipment into an outlet on a circuit
different from that to which the receiver is connected.
• Consult the dealer or an exper ienced radio/TV
technician for help.
Warning: Changes or modifications not expressly
approved by the party responsible for compliance (MLB
International Inc., PO Box 1214, Lockport, NY, 14095, Tel:
716-240-0902) could void the user’s authority to operate
the equipment.
CAN ICES-3(B) / NMB-3(B)
Caution: Use of controls or adjustments or performance
of procedures other than those specified may result in
hazardous radiation exposure.
Warning: the AC adapter is used as disconnect device
and it should remain readily operable during intended
use. In order to disconnect the mains plug from mains
completely, the ac adapter should be disconnected from
the mains socket outlet completely.
Service Information
This product should be serviced only by those specially
trained in appropriate servicing techniques. For instructions
on how to obtain service, refer to the warranty included in
this guide.
EN - 2
IMPORTANT SAFETY INSTRUCTIONS
PLEASE READ AND
SAVE THIS FOR FUTURE REFERENCE
Some of the following information may not apply to your
particular product; however, as with any electronic product,
precautions should be observed during handling and use.
• Read these instructions.
• Keep these instructions.
• Heed all warnings.
• Follow all instructions.
• Do not use this apparatus near water.
• Clean only with dry cloth.
• Do not block any ventilation openings. Install in
accordance with the manufacturer’s instructions.
• D o n o t i n s t a l l n e a r a n y h e a t s o u r c e s s u c h a s
radiators, heat registers, stoves, or other apparatus
(including amplifiers) that produce heat.
• P r o t e c t t h e p o w e r c o r d f r o m b e i n g w a l k e d o n
or pinched particularly at plugs, convenience
receptacles, and the point where they exit from the
apparatus.
• Only use attachments / accessories specified by the
manufacturer.
• Unplug this apparatus during lightning storms or
when unused for long periods of time.
EN - 3
• Refer all servicing to qualified service personnel.
Servicing is required when the apparatus has been
damaged in any way, such as power-supply cord or
plug is damaged, liquid has been spilled or objects
have fallen into the apparatus, the apparatus has
been exposed to rain or moisture, does not operate
normally, or has been dropped.
ADDITIONAL SAFETY INFORMATION
• The AC adapter and apparatus shall not be exposed
to dripping or splashing and no objects filled with
l i q u i d s, s u c h a s va s e s, s h a l l b e p l a c e d o n t h e
apparatus.
• Always leave sufficient space around the product for
ventilation. Do not place product in or on a bed, rug,
in a bookcase or cabinet that may prevent air flow
through vent openings.
• Do not place lighted candles, cigarettes, cigars, etc.
on the product.
• Care should be taken so that objects do not fall into the
product.
• Do not attempt to disassemble the cabinet. This product
does not contain customer serviceable components.
• To prevent the risk of fire or electric shock, do not
expose this apparatus to rain or moisture.
• Do not play your headset at high volume. Hearing
experts warn against extended high-volume play.
EN - 4
Contents
Safety Precautions .....................................................1
Important Safety Instructions ................................... 3
Startup ..................................................................... 6
Overview of Controls ........................................................ 6
Buttons ........................................................................ 7
Keyboard ................................................................ 8
Accessory ................................................................... 9
Connections ............................................................. 10
Battery Management and Charging ............................... 10
USB ..............................................................................12
Micro SD ........................................................................12
HDMI .............................................................................. 13
Headphone ..................................................................... 13
Using your Tablet ....................................................... 14
Turning your Tablet on ....................................................... 14
Turning your Tablet off ...................................................... 15
Using the Touchscreen...................................................... 16
Windows Start Screen ............................................... 19
Action Center .................................................................. 22
Tablet Mode Screen .......................................................... 25
Customizing Apps ............................................................ 27
Connecting to a Wi-Fi Network ............................... 28
Bluetooth ............................................................ 29
Synchronizing your Tablet .................................................. 29
Recovery your Tablet ......................................................... 30
Additional Information ............................................ 31
Trouble Shooting .............................................................. 31
Copyright and Trademark Notices .................................... 32
Specifications .................................................................. 33
Limited Warranty ..................................................... 34
EN - 5
Startup
Overview of Controls
Front camera
MIC (microphone)
HDMI port
DC jack
Micro-USB port
Headphone jack
Power button
USB port
Windows button
Connector
Reset button
Micro SD card slot
Rear camera
Volume+/- button
EN - 6
Item
Description
Microphone
HDMI port
DC jack
Micro-USB port
Headphone jack
For voice input.
Connect to a TV or a display device.
Connect with 5V DC charger.
Use to charge the tablet's battery.
Headphone connection for personal
listening.
Power button Press to enter standby/wake up mode,
press and hold to switch On/Off the unit.
USB port
Connect to a USB storage device or a
mouse or a wired keyboard.
Connector
Use to connect the keyboard.
Reset button
Press to reset the tablet.
Micro SD card slot Accepts micro SD card (up to 32G).
Volume +/- button Press to increase/decrease the volume.
Windows button Press to open/close the Windows Start
screen.
EN - 7
Keyboard
Overview
Connector
Use to connect the tablet
to keyboard.
Keys
Windows key
Press to open/close
the Windows Star t
screen.
Touch pad
Remove tablet from keyboard
EN - 8
Tablet docking
There are two ways to dock the tablet onto the keyboard.
or
Note
The keyboard connects to the tablet via the Connector. When
the connection is successful:
• If the tablet is in PC mode, it will automatically adjust its
settings to use the keyboard.
• If the tablet is in Tablet mode, the message box "Do you
want to exit tablet mode?" will display on the bottom of
the screen. Choose "Yes" or "No" to proceed.
Accessory
The following accessory is included.
AC Adapter ....................................................................................................x1
EN - 9
Connections
Battery Management and Charging
The tablet has a built-in rechargeable battery.
Battery Icon
The battery icon displays in the taskbar and the Settings
charm.
Battery icon
Description
Full battery
Your tablet is running on battery
power and the battery is discharging.
Low battery and need to charge
Battery is charging.
Battery is fully charged and AC
adapter is connected.
EN - 10
Charging the Battery
Use the AC Adapter or the Micro-USB port to charge the
battery.
To Wall
Outlet
To
(Micro USB
port)
To DC jack
To USB
charger
USB cable
(not included)
AC Adapter
(included)
Note: In order to keep the battery working in best condition,
please pay attention to the following:
• The included AC adapter is for use with this unit only.
Do not use it with other equipment.
• Please do not charge the battery in high temperatures.
• Do not wait for the battery to be fully depleted before
charging again. Keep the battery charged as needed.
• If tablet has not been used for a long period of time, the
battery might be in over discharge protection mode and
may take longer to charge.
IMPORTANT!
If your tablet’s battery contains less than 5% charge,
it will not power on. Charge your tablet with the
provided AC adapter for several minutes before
attempting to power on again.
EN - 11
USB
Connect your tablet to a USB storage device with the USB
cable (not included), to transfer music, pictures and other
files in both directions.
The tablet can be connected to a keyboard, a mouse or
other input devices via USB cable and use it just as you
would with a PC.
Micro SD
To Micro SD
Card Slot
Micro SD Card
(not included)
Insert the micro SD card into the tablet’s Micro SD slot
until it clicks.
To check the storage of the micro SD card, go to Settings
-> System -> Storage.
Remove the micro SD card by pushing in on the card's
edge. The card will pop out and can be removed.
Notes:
• You can use micro SDTMcard and micro SDHCTMcard (up
to 32GB, SD card not included).
• Never remove or insert micro SD card in On mode.
EN - 12
HDMI
You can connect the unit to a TV or other display device
using an HDMI cable through the HDMI port.
TV
To HDMI port
HDMI cable
(not included)
T h e s y s t e m i n t e r fa c e o n t h e u n i t i s a u t o m a t i c a l l y
synchronized with your TV screen.
Headphones
Headphones can be connected to the tablet’s Headphone
jack.
To headphone jack
Headphone
(not included)
EN - 13
Using your Tablet
Turning your Tablet on
Turning your Tablet on for the first time
When using the tablet for the first time, you will be required
to setup the following:
1. Press and hold the
Power button for 3 seconds to
turn on the unit.
2. Select the region and language, then tap
.
3. Carefully read the License terms, and tap Accept.
4. Follow the onscreen instructions to setup your tablet.
Turning your Tablet on in standby mode
1. Press the
Power button to turn on the tablet screen.
2. Swipe up the lock screen from the bottom edge of the
display.
The tablet is ready for use after the Windows desktop
screen displays.
EN - 14
Turning your Tablet off
Power the tablet Off
1.a: Tap the
icon in the lower-left corner of the screen
Windows key on the keyboard to show the
or click
Windows Start screen.
b: Go to the Tablet mode (swipe in from the right edge of
icon in the lower-right corner of
the screen or tap the
the screen to launch the Action Center screen, tap Tablet
mode to turn it on).
EN - 15
2. Tap
Power in the lower-left corner of the screen, it will
display 3 options (Sleep, Shut down and Restart).
3.Select Shut down to power the tablet off.
Note: If your tablet is unresponsive, press and hold the
Power button until the"Slide to shut down your PC"
message appears, then slide it to the bottom edge of the
display and the tablet will be powered off.
Put the tablet to Sleep
You can put your tablet to Sleep mode by doing either of
the following:
• Go to the Windows start sceen or the Tablet mode and
Power in lower-left screen, select Sleep and tap it.
tap
Power button to put the tablet in
• Briefly press the
sleep mode. If you don’t operate for some time, the tablet
will enter sleep mode automatically.
Tip: You can go to Settings -> System -> Power & sleep
to set the screen and sleep timeout.
EN - 16
Using the Touchscreen
Here are some basic procedures for interacting with the
touchscreen.
Right edge swipe
Swipe from the right edge
of the screen to launch the
Action Center screen.
Left edge swipe
Swipe from the left edge of
t h e s c r e e n t o s h u f f l e yo u r
running apps.
Finger slide
Slide your finger to scroll up
or down; pan the screen left or
right.
EN - 17
Tap/Double tap
To s e l e c t a n i t e m o n t h e
touchscreen, lightly tap it.
On Desktop mode, double tap
an application to launch it.
Touch & Hold
To move an app, touch and
hold the app tile and drag it
to a new position;
To u c h a n d h o l d a n a p p t o
customize it.
Zoom
By placing two fingers on the
screen, you can slide them
apar t to "Zoom In", or pinch
them together to "Zoom Out".
EN - 18
Windows Start Screen
Tap the
icon in the lower-left corner of the screen or click
Windows key on the keyboard to show the Windows
Start screen.
User account
Search bar Search the web
and Windows
Live titles
Notification bar
Status bar
File Explorer
You can explore the files and folders with the File Explorer
application.
EN - 19
Settings
Allows you to access the settings of your tablet. Tap it to
enter the Settings screen.
Power
Tap
Power and it will display 3 options (Sleep, Shut down
and Restart).
• Sleep: Put it to sleep mode.
• Shut down: Shut down your tablet.
• Restart: Restart your tablet.
All Apps
Tap
All Apps in the lower-left corner of the screen to
enter the All Apps screen.
In All Apps screen, you can:
• Move the All Apps screen: Slide down or up.
• Open an App: Tap its icon.
• Customize apps: Touch and hold one app then release
to show the options (Pin to Start/Unpin from Start, Pin to
taskbar and Uninstall).
Windows
Tap Windows
screen.
icon to open/close the Windows Star t
Tip: You can touch and hold the screen for 2 seconds then
release to show the right-click menu.
EN - 20
Status bar
The status bar in the lower-right corner of the screen shows
various indicators, including WiFi connection, battery status,
speaker level, action center icon and keyboard icon.
The below table lists some of the frequently used icons in the
Notification & Status bar:
Icon
Description
Shows the battery status.
Displays when a Wi-Fi network connected.
Displays when Wi-Fi is turned on but there is
NO a Wi-Fi network connection.
Displays when Wi-Fi is turned off.
Airplane mode is on.
Tap to adjust the speaker volume.
Action Center - Tap to display settings for
commonly performed tasks.
Tap to show the soft keyboard.
Tap to see the recent task.
Tap to see all open tasks in a single view.
EN - 21
Action Center
To launch the ACTION CENTER screen, swipe in from the
right edge of the screen or tap the
icon in the lower-right
corner of the screen. You can then adjust various settings
on the tablet by touching the corresponding square.
EN - 22
Tablet mode
Tap it to open/close the Tablet mode.
Rotation lock
Tap it to lock/unlock the screen orientation.
Note
Tap it to open the Office OneNote app.
All settings
This tool allows you to access the settings of your tablet.
Connect
Searching for wireless display and audio devices.
Battery saver
Tap it to turn on/off Battery saver.
VPN
Add a VPN connection.
Bluetooth
Enable or disable Bluetooth.
Brightness level
It allows you to set the brightness level of the screen.
EN - 23
Wi-Fi
Enable or disable Wi-Fi, and connect to a wireless network
so that you can check email, search the Web, of access
social media websites.
Quiet hours
Tap it to turn on/off Quiet hours.
Location
Enable or disable Location. If this setting is on, each person
who signs in to this device can change their own location
settings.
Airplane mode
Enable or disable Airplane mode. Turn this on to stop all
wireless communication.
EN - 24
Tablet Mode Screen
The tablet mode displays the Life at a glance and Play
and explore, which act as a shor tcut to Mail, Weather
app, Windows Store, Microsoft Edge, and other installed
applications.
You need to log on your Microsoft account before the
application program completely runs.
Live titles
Status bar
Live Tiles on the screen change and update in real time so
you can get real-time updates about news or sports, check
what your friends are up to, and get the latest weather
forecast.
EN - 25
Screen Icons
Most used
Tap this icon
in the upper-left corner of the screen to
enter the Most used screen.
All Apps
Tap this icon
on the lower-left corner of the screen to
enter the All Apps screen.
Back
Tap Back icon
to return to the previous screen.
• Once you go back to the home screen, you can’t go
back any further in your history.
Windows
Tap Windows
icon to switch between the Tablet Start
screen and the last app you opened.
Search
Tap Search
icon to search the web and Windows.
EN - 26
Customizing Apps
You can resize and unpin the apps from the start screen.
Select one app and hold it until the Customize icon appears.
Unpin from Start
Tap to unpin the app tile from Start screen.
More options
Tap to select other options for customizing the app
(Small, Medium, Wide, Large, Turn live tile off, Pin to
taskbar or Uninstall).
EN - 27
Connecting to a Wi-Fi Network
1. Go to Settings -> Network & Internet -> Wi-Fi, slide it to
the On position.
2. The device will scan Wi-Fi networks automatically and
display those available.
3. Select an access point from the list of available Wi-Fi
connections, than tap Connect.
4. W h e n yo u a r e p r o m p t e d fo r a p a s swo r d , e n t e r yo u r
password and tap Next.
• If the device finds a network that you connected to
previously, it will connect to it automatically.
• If the Wi-Fi network does not appear in the list,
it maybe a hidden network, please tap "Hidden
Network" and input SSID name of network along with
password for a connection.
Tip: You can touch and hold the
Wi-Fi icon in Action
Center screen until the Go to Settings appears and then
tap it to enter the Wi-Fi setting screen.
Airplane mode
The Airplane mode disables the wireless connection, allowing
you to use your tablet safely while in-flight.
If you see
icon displayed in the lower-right corner of
the screen, the Airplane mode is on. You should turn off the
Airplane mode to enable the wireless network.
EN - 28
Go to Settings -> Network & Internet -> Airplane mode, slide
it to the Off position.
Airplane mode icon in
Tip: You can touch and hold the
Action Center screen until the Go to Settings appears and
then tap it to enter the Airplane mode setting screen.
Bluetooth
You can use Bluetooth to communicate between the unit
and other Bluetooth devices, such as a smartphone.
1. Go to Settings -> Devices -> Bluetooth, slide it to the On
position.
2. It will scan automatically and display the available
bluetooth devices.
3. Tap an available bluetooth device name to pair with it
and follow the instructions to complete the pairing.
Synchronizing your Tablet
Using a Microsoft account
If your computer has Microsoft Windows 8.1 or 10 installed,
you can synchronize user settings of your tablet with your
computer using a Microsoft account.
1. Go to Settings -> Accounts -> Your account to sign in
with a Microsoft account.
2. Go to Settings -> Accounts -> Sync your settings, slide
Sync settings to the On position .
EN - 29
Copying music, photos, and videos
1. Connect a USB storage device or a Micro-SD card to
your tablet and copy the required files.
2. After the copy is complete, use the Safely Remove
Hardware wizard to remove your tablet from USB storage
device.
Recovery your Tablet
Go to Settings -> Update & security -> Recovery to recover
your tablet.
Reset this PC
This lets you choose to keep your files or remove them, and
then reinstalls Windows. Tap Get started and then choose
an option.
Keep my files
Removes apps and settings, but keeps your personal files.
Remove everything
Removes all of your personal files, apps, and settings.
Advanced startup
This option enables you to start up from a device or compact
disc (such as DVD or USB drive) and change your tablet’s
firmware settings, change Windows startup settings, or restore
Windows from the system image. If you want to perform this
action, click Restart Now.
NOTE: Third-party applications will be removed.
EN - 30
Additional Information
Trouble Shooting
Windows is not active automatically
Windows will be active automatically once you connect your
tablet to a Wi-Fi network.
• Make sure that you have a Wi-Fi network connection.
• Please contact our Customer Support Center at support.
rcatablets.com
Tablet displays network or service error message
• When you are located in places with poor signal, your
tablet may lose its Wi-Fi connection. Try moving closer to
the Wi-Fi router.
Touch screen response is slow or incorrect
If the tablet’s touch screen response is incorrect, please try
the following:
• Remove any protective film on the touch screen. The
protective film may prevent the device recognition input.
• Make sure that your fingers are dry and clean before you
tap the touch screen.
• Restart the tablet to clear any temporary software bugs.
Tablet is frozen or a serious error appears
• If the tablet is frozen or suspended, you may need to close
the application or refresh your tablet.
• If the tablet is frozen or slow to respond, press and hold the
power button for 8 seconds to perform a hard shut down
and restart your tablet.
EN - 31
• If that doesn't work, press the RESET button at the back of
the tablet.
Tablet gets warm
• When using for a long time, the tablet may be warm. This is
normal and will not affect the life or performance of the unit.
Tablet can not show video of opposite side during skype
call
• The Wi-Fi signal is poor. Please move closer to your
wireless router, or disconnect other devices from your
wireless router, or increase bandwidth of inter net
connection.
• Please check the Wi-Fi setting. It's recommended to use
an IEEE 802.11 b/g/n. certified Wi-Fi network.
Copyright and Trademark Notices
Intel Inside, Intel Inside logo and Atom are trademarks of Intel
Corporation in the U.S. and /or other countries.
The Wi-Fi CERTIFIED Logo is a certification mark of the Wi-Fi
Alliance.
The Wi-Fi Protected Setup Mark is a mark of the Wi-Fi
Alliance
The Bluetooth® word mark and logos are registered trademarks
owned by the Bluetooth SIG Inc. Other trademarks and trade
names are those of their respective owners.
EN - 32
The terms HDMI and HDMI High-Definition Multimedia
Interface, and the HDMI Logo are trademarks or registered
trademarks of HDMI Licensing LLC in the United States and
other countries.
About HDMI
High-Definition Multimedia Interface (HDMI) is a high-speed
digital interface that can transmit uncompressed high definition
video and digital multichannel audio. It delivers high quality
picture and sound quality. HDMI is fully backward compatible
with DVI. As required by the HDMI standard, connecting to
HDMI or DVI products without HDCP (High bandwidth Digital
Content Protection) will result in no Video or Audio output.
Specification
Power: DC IN 5V (operate with AC adapter)
Specifications and external appearance are subject to
change without notice.
EN - 33
Limited Warranty
AVC MULTIMEDIA (“AVC”) makes the following limited
warranty. This limited warranty extend to the original consumer
purchaser and is limited to non-commercial use of the
product.
One Year Parts & Labor Warranty
AVC products purchased in the United States or Canada are
warranted to be free from defects in materials or workmanship
for a period of one year from the date of their original retail
purchase. If the unit fails to conform to this warranty, we will
service the product using new or refurbished parts and products,
at AVC’s sole discretion.
During a period of one year from the effective warranty date,
AVC will provide, when needed, service labor to repair a
manufacturing defect at its designated Service Center. To
obtain warranty service in the United States or Canada, you
must first contact our Customer Support Center at support.
rcatablets.com. The determination of service will be made by
AVC Customer Support. PLEASE DO NOT RETURN YOUR
UNIT TO AVC WITHOUT PRIOR AUTHORIZATION. New or
remanufactured replacements for defective parts or products
will be used for repairs by AVC at its designated Service Center
for one year from the effective warranty date. Such replacement
parts or products are warranted for an additional one year from
the date of repair or replacement. The Customer will be required
to ship the unit to the Service Center indicated at the time
Customer Support is contacted to make the necessary repairs.
The customer is responsible for all transportation charges to
the service facility.
EN - 34
Packaging and Shipping Instruction
When you send the product to the AVC service facility you must
use the original carton box and packing material or an equivalent
as designated by AVC.
Your Responsibility
(1)You must retain the original sale receipt to provide proof of
purchase.
(2)These warranties are effective only if the product is
purchased and operated in the United States or Canada.
(3)W a r r a n t i e s e x t e n d o n l y t o d e f e c t s i n m a t e r i a l o r
workmanship, and do not extend to any product or parts
which have been lost or discarded, or damage to product
or parts caused by misuse, accident, improper operation
or maintenance, or use in violation of instructions provided
with the product, or to product which has been altered or
modified without authorization of AVC, or to products or
parts thereof which have had the serial number removed
or changed.
Out of Warranty
In the event your product requires repair after the limited
warranty period has expired, please contact our Customer
Support Center at support.rcatablets.com
Important: You are responsible for any transportation,
shipping or insurance relative to the return of product to
our Product Returns Center.
All warranties implied by state law, including the implied
warranties of merchantability and fitness for a particular
pur pose, are expressly limited to the duration of the
limited warranties set forth above. With the exception of
any warranties implied by state law as hereby limited,
EN - 35
the foregoing warranty is exclusive and in lieu of all other
warranties, guarantees, agreements and similar obligations
of manufacturer or seller with respect to the repair or
replacement of any parts. In no event shall AVC be liable for
consequential or incidental damages.
No person, agent, distributor, dealer or company is authorized
to change, modify or extend the terms of these warranties
in any manner whatsoever. The time within action must be
commenced to enforce any obligation of AVC arising under
the warranty or under any statute, or law of the United States
or Canada or any state thereof, is hereby limited to one year
from the date of purchase. This limitation does not apply to
implied warranties arising under state law.
This warranty gives you specific legal rights and you may also
have other rights, which may vary, from state to state. Some
states do not allow limitation on how long an implied warranty
lasts, when an action may be brought, or the exclusion or
limitation of incidental or consequential damages, so the above
provisions may not apply to you.
For more information on other products and services, please
visit our web site at: support.rcatablets.com
Important: Also keep your “Bill of Sale” as proof of purchase.
FOR SUPPORT AND SERVICE, PLEASE CONTACT US
support.rcatablets.com
© 2015 AVC MULTIMEDIA
EN - 36