1
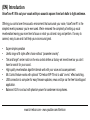
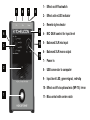
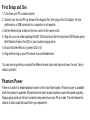
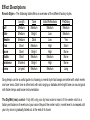
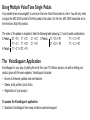
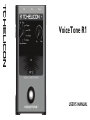
VoiceTone R1
USER’S MANUAL
Important Safety Instructions
1
2
3
4
5
6
7
Read these instructions.
Keep these instructions.
Heed all warnings.
Follow all instructions.
Do not use this apparatus near water.
Clean only with dry cloth.
Do not block any ventilation openings. Install in accordance with the manufacturer’s instructions.
8 Do not install near heat sources such as radiators, heat
registers, stoves, or other apparatus (including amplifiers) that produce heat.
9 Only use attachments/accessories specified by the manufacturer.
10Refer all servicing to qualified service personnel.
Servicing is required when the apparatus has been
damaged in any way, such as power-supply cord or
plug is damaged, liquid has been spilled or objects
have fallen into the apparatus, the apparatus has been exposed to rain or moisture, does not operate normally,
or has been dropped.
Warning!
• To reduce the risk of fire or electrical shock, do not
expose this equipment to dripping or splashing and
ensure that no objects filled with liquids, such as vases,
are placed on the equipment.
• Do not install in a confined space.
Service
• All service must be performed by qualified personnel.
Caution:
You are cautioned that any change or modifications
not expressly approved in this manual could void your
authority to operate this equipment.
EMC/EMI
This equipment has been tested and found to comply with
the limits for a Class B Digital device, pursuant to part 15
of the FCC rules.
These limits are designed to provide reasonable protection
against harmful interference in residential installations.
This equipment generates, uses and can radiate radio
frequency energy and – if not installed and used in
accordance with the instructions – may cause harmful
interference to radio communications. However, there
is no guarantee that interference will not occur in a
particular installation. If this equipment does cause harmful
interference to radio or television reception – which can be
determined by turning the equipment off and on –, the user
is encouraged to try correcting the interference by one or
more of the following measures:
•
•
•
•
Reorient or relocate the receiving antenna.
Increase the separation between the equipment and
the receiver.
Connect the equipment to an outlet on a circuit
different from the one to which the receiver is
connected.
Consult the dealer or an experienced radio/TV
technician for help.
For the customers in Canada:
This Class B digital apparatus complies with Canadian
ICES-003. Cet appareil numérique de la classe B est
conforme à la norme NMB-003 du Canada.
(EN) Introduction
VoiceTone R1 fills out your vocals with pro acoustic spaces from lush halls to tight ambience.
Offering you control over the acoustic environment that surrounds your voice, VoiceTone R1 is the
simplest reverb processor you’ve ever used. We’ve removed the complexity of setting up vocal
reverberation leaving you more time to focus on what you do best: sing and perform. It’s easy to
connect, easy to use and it will help your voice sound great.
•
•
•
•
•
•
•
Super-simple operation
Useful range of 8 styles offer choice without “parameter anxiety”.
”Set and forget” center notch on the mix control defines a factory-set reverb level so you don’t
have to search for your sound.
High quality reverberation algorithm blends well with your voice and accompaniment.
Mic Control feature works with optional TC-Helicon MP-75 mic to add “on-mic” effect switching.
USB connection to computer for easy firmware updates, news and tips via the free VoiceSupport
application.
Balanced XLR in and out with phantom power for condenser microphones.
www.tc-helicon.com - www.youtube.com/tchelicon
5
6
7
1 - Effect on/off footswitch
2 - Effect active LED indicator
8
3 - Reverb style selector
4
3
2
9
4 - MIC GAIN control for input level
10
5 - Balanced XLR mic input
11
6 - Balanced XLR mono output
7 - Power in
8 - USB connector to computer
9 - Input level LED; green=signal, red=clip
10 -Effect on/off via optional mic (MP-75): in=on
1
11 -Mix control with center notch
Connecting
MIC jack - Connect your mic here using a balanced XLR cable.
Phantom power is always on.
OUT jack - Connect to your PA mixer, another VoiceTone pedal
or powered speaker.
Power in - Connect the supplied 12VDC power supply.
USB - Connect to a computer running the TC-Helicon
VoiceSupport application for registration, latest version and tips.
• Turn down your PA when making all connections
• The latest version of VoiceSupport is available free from www.tc-helicon.com/voicesupport
• The USB connection does not provide power to the unit
First Setup and Use
1. Turn down your PA’s master volume.
2. Connect your mic and PA as shown in the diagram first, then plug in the AC adaptor. For live
performance, a USB connection to a computer is not required.
3. Set the Reverb style to Hall and the mix control to the center notch.
4. Sing into your mic while adjusting the MIC GAIN control so that the input level LED flashes green.
Brief flashes of red on the LED on your loudest singing are ok.
5. Ensure that the effect is on (center LED is lit).
6. Sing while turning up your PA volume to a comfortable level.
You can now sing while you sample the different reverb styles and raise and lower the mix. You’re
ready to perform!
Phantom Power
There is no switch to enable phantom power on the VoiceTone singles. Phantom power is available
when the product is powered. Microphones that don’t require phantom power will operate properly.
Always apply power as the last connection step and ensure your PA is muted. This will reduce the
chance of audio pops that could harm your equipment.
Effect Descriptions
Reverb Styles - The following table offers an overview of the different factory styles.
Hall
Plate
Theatre
Club
Room
Studio
Ambience
Arena
Length
Medium
Medium
Medium
Short
Short
Short
Shortest
Longest
Tone
Medium
Bright
Dark
Medium
Bright
Medium
Bright
Medium
Initial Reflections
Medium
Low
Low
High
High
Medium
High
Medium
PreDelay
Medium
Medium
Yes
Short
None
None
None
Long
Song tempo can be a useful guide to choosing a reverb style: fast songs are better with short reverb
and vice versa. Dark tone is often best with solo singing or ballads while bright tone can sound good
with faster tempo and busier instrumentation.
The Dry/Wet (mix) control - Fully left, only your dry lead voice is heard. At the center notch is a
factory-set balance of reverb and your voice. Beyond the center notch, reverb level is increased until
your dry voice is gradually faded out at the end of its travel.
Using Multiple VoiceTone Single Pedals
It is possible (even encouraged!) to use more than one VoiceTone pedal at a time. You will only need
to adjust the MIC GAIN control of the first pedal in the chain. On the rest, MIC GAIN should be set to
the minimum (fully left) position.
The order
2 Pedals
4 Pedals
of the pedals is important. See the following table showing 2, 3 and 4 pedal combinations.
D1 > R1 T1 > D1 C1 > D1 3 Pedals T1 > D1 > R1
T1 > C1 > R1
T1 > C1 T1 > R1 C1 > R1 C1 > D1 > R1
T1 > C1 > R1
T1 > C1 > D1 > R1
The VoiceSupport Application
VoiceSupport is your way of getting the most from your TC-Helicon product, as well as letting your
product grow with firmware updates. VoiceSupport includes:
• Access to firmware updates and new features
• Videos, artist profiles, tips & tricks
• Registration of your product
To access the VoiceSupport application:
1. Download VoiceSupport from www.tc-helicon.com/voicesupport.
2. Install VoiceSupport on your computer.
3. Connect your product via USB to your computer.
3. Run VoiceSupport.
4.Read the news, click on tabs and browse the features of the application.
Using the Mic Control Feature
Mic Control allows you to turn effects on and off from the optional TC-Helicon MP-75 microphone.
Push the MIC CONTROL switch in to allow remote on/off control on any or all pedals in a chain. When
Mic Control is not desired, ensure the switch is out. Using multiple pedals requires the control signal
pass through feature to be enabled on all but the last pedal. To enable or disable this feature, hold the
effect footswitch and the switch on the mic for 3 seconds.
Tips for Avoiding Feedback
•
•
•
• Ensure your monitor and/or PA speakers don’t aim directly at the front of your mic
• Sing close to the mic, even touching the grill with your lips
Try a super-cardioid dynamic mic such as TC-Helicon’s MP-70 and MP-75
Set your PA channel EQ and graphic EQ flat
Have your band play quieter on stage.
FAQ
Why am I hearing distortion?
Likely the MIC GAIN knob is set too high. Ensure that the Input LED is green most of the time with only
brief and rare peaks of red.
Can I use the product on an auxiliary send/return?
Yes. You will need balanced XLR to TRS cables to do so. Ensure that the MIC GAIN knob is set to
minimum to accept the line level signal from your mixer.
Will I need a DI box to connect to a mixer?
No.
Why is the product turning the effect on and off by itself?
This can happen when you have the MIC CONTROL knob pushed in and you are connected to a mixer
with “pseudo balanced” outputs. Unless you are using only the specific TC-Helicon mic with the Mic
Control feature, the MIC CONTROL knob should be out.
(EN) Technical Specifications
Input Output Power
Requirements
Size & Weight
Warranty
Mic Input Impedance: Balanced: 2.68 kOhm
Mic Input Level @ 0 dBFS:
-42dBu to +1dBu
EIN @ Max Mic Gain Rg = 150 Ohm: -126 dBu
Mic input SNR: >104 dB
Output Impedance, Bal./Unbal.:
200/100 Ohm
Output Full Scale: +1 dBu
Dynamic Range: >104 dB, 20 Hz to 20 kHz
Frequency Response: +0/-0.3 dB, 20 Hz to 20 kHz
Power Supply (Supplied):
12V .4A
Power Consumption: 5.6W
Operating Temperature: 32°F to 122°F(0°C to 50°C)
Storage Temperature: -22°F to 167°F(-30°C to 70°C)
Humidity Max.: 90 % non-condensing
Dimensions: 5.4” x 3.5” x 2.3” (140 x 90 x 60) Weight: 0.92 lb. (420 g)
See www.tc-helicon.com\support for warranty information
Due to continuous development, these specifications are subject to change without notice