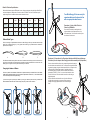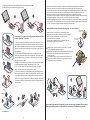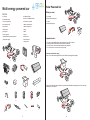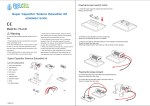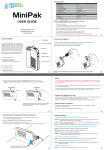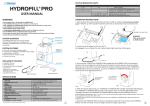
1
Horizon Energy Box
User Manual
300001246
www.fuelcellstore.com
Model No.: FCJJ-40
Warning
Safety Information
Before you start working with the Horizon Energy Box take notice of the following.
Under certain circumstances, hydrogen can create an explosive gas mixture.
Though these devices in this box are designed such that they can be used as described without danger, the
advice below must be followed at all times:
• The fuel cell and hydrogen storage may not be operated without supervision.
• Hydrogen (H2) is much lighter than air and thus rises rapidly. In conjunction with oxygen, a gas mixture capable
of explosion can form. A potentially explosive mixture arises for hydrogen concentrations from 4.0 to 77.0% in air.
Therefore, it holds that:
• The fuel cell must only be operated either outside or in sufficiently ventilated rooms.
• Oxygen (O2) is a strongly oxidizing gas. When this gas gets in contact with organic substances (e.g. oil,
grease) spontaneous combustion may occur at room temperature.
• Do not insert the cables into an electrical outlet.
• Do not connect the fuel cell or motor to other power sources.
• The removing and inserting of batteries is to be conducted by the adults only. Ensure to respect the polarity.
• Non-rechargeable batteries are not to be recharged.
• Different types of batteries such as rechargable, alkline and standard batteries or new and used batteries are
not to be mixed and should be used separately.
• The battery pack cables are not to be inserted into an AC socket.
• The supply terminals of the battery pack are not to be short-circuited.
• The two spare red & black cables are not to be inserted into an AC socket.
• Exhausted batteries are to be removed from the battery pack.
• Dispose of dead batteries properly and without delay.
• Do not attach the battery wires directly to each other.
Safe Experimentation
Here are some important instructions for parents, teachers, and students. All activities described in this manual
can be conducted without risk if you follow instructions and rules conscientiously.
To avoid the risk of property damage, serious injury or death:
1. Read carefully and fully understand the instructions before assembling this kit.
2. This product is intended only for use by persons 14 years old and up, and only under the supervision of
adults who have read and understood the instructions in this user manual.
3. Pay special attention to the indications of quantity and to the sequence of the individual steps.
4. Some parts are small and fragile: please be careful when handling and connecting parts to avoid breakage.
Handle all parts and components with care.
5. Do not attempt to use any part, item, or component provided in this kit for any other purpose than what is
instructed in this manual. Do not attempt to disassemble any part, item or component in this kit.
6. Keep small children away, because this kit contains small parts that could be swallowed.
7. Wires are not to be inserted into socket-outlets.
8. Save these instructions and review frequently during use.
9. Do not use any other parts or devices than those delivered with the kit.
10. Do not eat, drink, or smoke near the fuel cell device and hydrogen storage.
11. Use fuel cell and hydrogen storage only at a site with good ventilation and keep all sources of ignition away.
12. Clean your hands after use.
Horizon Energy Box
User Manual
Table of Contents
Safe Information....................... Inside front cover
Parts List............................................. 1
Hydrogen Energy ..................................... 3
Wind Energy . . . . . . . . . . . . . . . . ...................... . . 9
Solar Energy . . . . . . . . . . . . . . . . . . . ..................... 20
Bio-Energy . . . . . . . . . . . . . . . . . . ....................... 24
Mechanical Energy . . . . . . . . . . . . . . . . . ................. 30
Thermanl Energy . . . . . . . . . . . . . . . . . . . . . . . ............. 36
Salt Water Energy . . . . . . . . . . . . . .. . ................... 42
Multi Energy Powered Car. . . . . . . . . . . . . . . . ............. 47
REM User Guide . . . . . . . . . . . . . . . . . ................... 63
Parts List:
1. Hand crank generator
19. Assembly lock
37. Solar panel support
2. Ethanol fuel cell module
20. Main body assembly
38. Heavy fan module
3. Reversible fuel cell
21. Variable resister module
39. Fan module
4. Salt water fuel cell
22. Base assembly
40. Fan blade
5. Multi car chassis
23. Blade A (3pcs)
41. Ethanol fuel tank with lid
6. Battery pack
24. Blade B (3pcs)
42. Wires
7. LED module
25. Blade C (3pcs)
43. Wheel
8. Mini fuel cell base
26. Windpitch post assembly
44. Purging valve
9. Potentiometer
27. Spanner
45. Clamp
10. Super capacitor
28. Screwdriver
46. PH paper
11. Water tank base
29. Water & oxygen tank
47. Silicon tubes
12. Solar panel
30. Water & hydrogen tank
48. Red & black pins
13. HYDROSTIK PRO
31. Fuel solution container
49. Fan blade & wheel adapter
14. Pressure regulator
32. U locker for HYDROSTIK PRO
50. Windpitch post screws
15. Mini fuel cell
33. HYDROSTIK PRO suport
51. Reversible fuel cell
16. Thermoelectrical system
34. Syringe
52. Thermometers
17. Rotor Base
35. Fuel cell base
53. REM USB cable
18. Blade holder
36. Multi connection base
54. REM
17
18
2
3
4
20
21
23
29
30
31
32
22
24
26
16
37
1
19
25
27
33
28
34
38
35
40
39
36
42
41
5
43
44
45
46
47
48
49
50
51
6
6
7
8
9
10
52
53
11
12
13
1
14
15
2
54
Step 1. Preparing the micro-fuel cell module
Hydrogen Energy
a. Insert the PEM fuel cell (a) into its slot on the base (g).
Make sure the fuel cell fits well in its base.
What you need:
a. Micro-fuel cell
b. HYDROSTIK PRO (hydrogen storage)*
c. Pressure regulator
a
b
c
d. Heavy fan module
e. Fan blade
f. HYDROSTIK PRO base
g. Micro-fuel cell base
h. Wires
i. Fan blade adapter
j. HYDROSTIK PRO support
e
f
d
b. Use the short black & red wires to connect the fuel cell to its base as shown below. Make sure
you respect the color code when you plug each wire into the corresponding socket.
k. Clamp
l. Silicon tubes
g
You will also need the following items
(not included in this box):
- HYDROFILL PRO for charging the HYDROSTIK PRO
- Scissors
h
j
k
i
l
*Note: The HYDROSTIK PRO contains no hydrogen when you get it for the first time, you have to fully charge the
HYDROSTIK PRO with the refilling station HYDROFILL PRO (not provided) or hydrogen charging tube (not provided).
Or please contact your local dealer for detailed information.
HYDROSTIK PRO SAFETY INFORMATION
● DO NOT try to disassemble, open or repair the cartridges when broken or worn out!
● DO NOT store cartridges under direct sunlight.
Step 2. Preparing the fan module
● Keep it away from fire. Fire Hazard!
● Keep in a safe, dry and cool place.
● Keep away from temperatures above 50˚C while filling, storage and using.
a. Connect the adapter (i) to the motor axis. Insert the fan blade (e) onto the adapter.
Make sure the connection is tight.
● Provide adequate ventilation and refrain from placing items on or around the appliance
during operation. Refrain from placing the appliance in enclosures or causing the appliance to not vent freely.
● Keep away from alkaline and acidic environment.
● This is not toy – keep away from children.
● The HYDROSTIK PRO must be placed horizontally when it is being charged otherwise the cartridge can crack!
● HYDROSTIK PRO contents are flammable. Do not disassemble. Avoid contact with HYDROSTIK PRO contents.
● Remove the HYDROSTIK PRO from the pressure regulator immediately after use.
● Hydrogen shall be stored, handled and used with caution so life and health are not jeopardized and the risk
of property damage is minimized.
● This appliance is not tested for use with medical devices.
● Save these instructions and review frequently during use.
3
4
Step 5. Power the fan with the hydrogen energy
Step 3. Connect the fan to the fuel cell
a. Cut a 6cm long silicon tube. Let the tube go through the clamp. Connect one end of the tube to the inlet of the
fuel cell (lower nozzle). Keep the clamp closed.
a. Screw the HYDROSTIK PRO to the pressure regulator tightly.
b. Open the clamp to purge some amount of hydrogen out and then quickly close. The fan will immediately
start to run.
Note:
1. If the fan does not run at this time, it may need to be flicked with your finger to start.
2. After every 10 minutes, it is suggested open the clamp to release some amount of hydrogen out to
ensure the good performance of the fuel cell.
3. Remove the HYDROSTIK PRO from the pressure regulator immediately after use.
b. Use the black & red wires to connect the fan module to the fuel cell module.
Make sure you respect the color code when you plug each wire into the corresponding socket.
Now you may use a multi-meter (not provided) or Horizon’s REM to measure the output voltage & current
produced by the fuel cell or do various experiments.
Why Fuel Cells and Hydrogen?
Step 4. Preparing the hydrogen source
a. Cut a 15cm long silicon tube. Unscrew the pressure regulator and put the bolt around the tube. Connect the
tube to the pressure regulator.
b. Connect the other end of the tube from the pressure regulator to the remaining nozzle of the fuel cell.
Make sure the connection is tight.
c. Place the HYDROSTIK PRO support (j) onto its base (f).
d. Place the HYDROSTIK PRO onto its support.
Fuel cells can be thought of as alternative energy devices that unlock the power of hydrogen. They convert
chemical energy into electrical energy. Hydrogen fuel cells do this very cleanly, with no toxic emissions, and
with a high efficiency. Hydrogen and fuel cell technologies have many potential clean energy applications –
from running our vehicles, to powering our cellular phones and laptops, to heating our hospitals and homes.
Fuel cells do not generate energy out of thin air. They use hydrogen. Hydrogen is an outstanding carrier of
energy. Hydrogen is non-toxic, renewable, easily obtained, and packed with energy. When it combusts with
oxygen, it turns into water. This water can again be split into hydrogen and oxygen via electrolysis. The
generated hydrogen can be combusted once again, thus undergoing a limitless cycle without toxic emissions.
With a fuel cell, you can convert hydrogen into electric current without combustion.
Fossil fuels are converted into usable energy through combustion. The energy released during combustion is
inherently difficult to capture and inefficient. It also produces carbon dioxide, which cannot easily be converted
back into a usable fuel. A fossil fuel combustion engine at a power plant is only about 30 to 40% efficient. This
means it coverts only 30 to 40% of the energy in the fossil fuels to usable energy (electricity). Engines in a car
are even less efficient, and reach the level of 15 to 20% of efficiency. Where does the rest of the energy go? It
escapes as heat, vibration, and noise.
On the other hand, fuel cells can operate at 40 to 65% efficiency. This means that they can convert 40 to 65%
of the energy contained in hydrogen into electricity.
The development of hydrogen and fuel cell technologies and products around the world will improve the air we
breathe, ensure secure and reliable energy, reduce the emissions that cause climate change and create
highly skilled jobs.
5
6
8. How can I monitor how much gas is left in a cylinder?
This can be measured by weight, measuring the empty weight gives you the benchmark level and then you can
work out the total amount of hydrogen by that 11Liters of Hydrogen =1gram so make sure your scales can
work in 1/10th of 1/100th of a gram to get accurate readings. Pressure cannot be used as a measurement of the
amount of Hydrogen in the canister as the pressure is almost the same between 10%-90% full.
70
60
Efficiency (%)
PEM Fuel Cell
50
9. Can I store HYDROSTIK PRO in cars parked in full sun?
HYDROSTIK PRO is advised to be stored in maximum 50C temperatures, but cars parked in full sun can reach
inside temperatures which exceed 60C. HYDROSTIK PRO is still safe at these temperatures; however we do
not recommend storing HYDROSTIK PRO in such conditions.
40
Diesel Engine
30
Gas Turbine
20
10. Where do I recycle a spent or damaged HYDROSTIK PRO?
Contact your local consumer waste recycling center or return the HYDROSTIK PRO to a Horizon Fuel Cell
Technologies vendor. Typically, HYDROSTIK PRO can be recycled where rechargeable batteries are recycled.
Auto Engine
10
0
0
10
100
1,000
100,00
100,000
Power (KW)
Recycle Procedures The materials in the HYDROSTIK PRO are 100% recyclable, and so in order to get the
HYDROSTIK PRO metal hydride cartridges recycled properly, return the cartridges to your local outlet or
distributer.
Normal Disposal Procedures
The HYDROSTIK PRO metal hydride cartridges do not contain any dangerous substances for the environment,
we would recommend that they still be disposed of in a similar way you would dispose of a standard battery.
FAQ
1. What are the refill options for HYDROSTIK PRO cartridges?
a. HYDROSTIK PRO can be recharged using Horizon’s HYDROFILL cartridge refilling solution.
b. You may contact your local Horizon service provider for HYDROSTIK PRO refill support at
[email protected]
c. If needed HYDROSTIK PRO can be disposed after use, they are fully recyclable and do not contain any harmful
materials.
2. I want to purchase more HYDROSTIK PRO Metal Hydride Cartridges, should I have received a (gas pressure)
regulator of any kind with it?
No, pressure regulators are not included as standard you will need to order those as well. You can purchase
one online visiting the Horizon Online Store or contact [email protected]
3. I would like to exchange my cartridge for a different size, can we do this at any Horizon related outlet?
No, for now we only distribute a single size HYDROSTIK PRO Metal Hydride Cartridge.
4. Can I take Metal Hydride cartridge HYDROSTIK PRO abroad?
No more than two spare metal hydride cartridges may be carried by a passenger in carry on baggage, in checked
baggage, or on the person.
5. Does the HYDROSTIK PRO lose its energy content over time, if I don’ t use it?
Hydrogen remains stored as a hydride in the HYDROSTIK PRO. The cartridge will not lose its energy or latent
hydrogen content if the cartridge is not being used.
Troubleshooting
1. The fan does not run after the HYDROSTIK PRO supplies hydrogen to the fuel cell.
a. The fan may need to be flicked with your finger to start.
b. Recharge the HYDROSTIK PRO fully.
c. Open the clamp to purge a little bit amount of hydrogen out of the system.
d. Make sure the HYDROSTIK PRO is connected to the pressure regulator tightly.
2. The fan runs slower than before.
a. Recharge the HYDROSTIK PRO fully.
b. Open the clamp to purge a little bit amount of hydrogen out of the system.
If none of these tips helped solve the problem, go through the instructions from the beginning and
make sure you followw each step completely.
If the fan still does not work, contact Horizon technical support at [email protected].
6. Can we refill HYDROSTIK PRO with our own electrolyzer?
No, the HYDROSTIK PRO can only be recharged using the HYDROFILL or Horizon approved refilling stations.
7. How many hours of electricity are provided by a HYDROSTIK PRO Metal Hydride Cartridge?
The HYDROSTIK PRO Metal Hydride Cartridges contain up to 11Wh of electricity. So if drawing 1W from the
fuel cell, it will run for 11hours.
7
8
4
Step 1. Blade Unit Assembly
Wind Energy
Profiled Blade:
What you need:
1. Blade holder
2. Rotor Base
3. Assembly lock
4. Main body assembly
5. Heavy fan or wheel module
6. Blade A (3pcs)
7. Blade B (3pcs)
8. Blade C (3pcs)
9. Windpitch post assembly
10. Spanner
11. Screwdriver
12. Windpitch base assembly
13. LED module
14. Electrolyzer fuel cell base
15. Mini fiuel cell base
16. Electrolyzer fuel cell
17. Water & O2 tank
18. Water & H2 tank
19. Battery pack
20. Silicon tubes
21. Post secure screws
22. Red & black pins
23. Mini fuel cell
24.Clamp
25. Purging valve
26. Fan blade
27. Fan & wheel adapter
28. Water tank base
29. Variable resister module
30. Wires
31. Wheel
32. Circuit board
33. REM
34. REMUSB cable
2
1
3
11
14
13
12
18
25
You will also need the following items
(not included in this box):
- Purified or distilled water
- AA batteries
- Scissors, screwdriver & spanner
1. Left Housing
2. Right Housing
3. Generator
4. Printed Circuit Board Assembly
5. Polypropylene Vane
6. Screw, M2.5 x 8 mm
7. Hex Nut, M2.5
8. Rotor Base
9. Molded Profile Blade
10. Profile Blade Holder
11. Blade Assembly Lock
12. Polypropylene Sheet Blade
13. Aluminium Post
14. Screw, M3 x 2 mm
15. Output Wire
16. Support Base Assembly
17. Output Socket
18. Post Secure Screw
22
27
26
*Do not over tighten the Blade Assembly
Lock otherwise you may have a difficult time
in unlocking the Blade Unit Assembly.
16
23
30
33
31
Sheet Blade:
34
Place the Rotor Base (8) onto the flat surface of
a table. Install 3 pcs of the same type of Sheet
blades (12) (marked A) evenly on the Rotor
Base. Pay attention that the snap joint must be
pushed into the Rotor Base. Place the Blade
Holder (10) on top of the installed blades. Pay
attention to the direction of the Blade Holder.
Screw the Blade Assembly Lock (11) onto the
top of the Blade Assembly.
2
*Do not over tighten the Blade Assembly
Lock otherwise you may have a difficult time
in unlocking the Blade Unit Assembly.
9
Place the Rotor Base (8) onto the flat surface
of a table. Install 3 pcs of the same type of
profiled blades (marked B or C) evenly on
the Rotor Base. Pay attention that the snap
joint must be pushed into the Rotor Base.
Place the Blade Holder (10) on top of the
installed blades. Pay attention to the
direction of the Blade Holder. Screw the
Blade Assembly Lock (11) onto the top of the
Blade Assembly.
28
29
32
Main Body Assembly
Part List
15
21
20
19
2
8
10
9
24
5
7
6
17
4
10
Step 2. Blade Unit Installation
Enable Yawing:
Push the rotor shaft to the rotor base to ensure the main body
and rotor head are properly connected. Make sure you press
the Blade Unit all the way onto the shaft. Check that the Blade
Unit is securely connected onto the shaft of the turbine. If not
properly installed, the rotor may not effectively turn the rotor
shaft and will not generate electricity.
Yaw- To turn about on vertical axis.To move unsteadily or weave.
The wire connector hole should be located on the same side of the tube (13) with two vertically aligned holes. Insert
the Aluminium Tube into the Support Base. Install the Body Assembly onto the top of the Aluminium Tube and secure it with
the screw (14). The screw should be secured from the back side of the wind turbine body into the groove of the plastic
stud to enable yawing and movement of the turbine body.
Disable Yawing (Not shown in the Assembly Drawing):
The wire connector hole should be located on the opposite side of the tube (13) with two vertically aligned holes.
Insert the Aluminium Tube into the Support Base. Install the Body Assembly onto the top of the Aluminium Tube and
secure it with the screw (14). The screw should be secured from the front side of the wind turbine body through the
hole on aluminum tube into the solid plastic stud to disable yawing and movement of the turbine body.
3
*
Step 4. Blade Pitch Setting
5
o
o
8
62
o
50
3
V
Step 3. Post and Support Base Assembly
To adjust and set the pitch of the blades,
carefully pull out the blade and rotate it to adjust
the pitch. Totally you have 3 pitches, which can
be adjusted.
18
The Pitch Angle
The blades themselves have different set angles at different sections to enhance the performance. This setting is
to compensate the rotating speed of the blade at different radius (sections) so that the blades will not stall at a
particular section. You may have to learn more about a parameter called Tip Speed Ratio to understand more
thoroughly. This Ratio defines how fast the turbine is rotating under a wind speed environment. By changing the
blade pitch, this ratio will be changed. Thus the output power of the turbine is changed. Each adjustment
represents a change of 22 degrees. Therefore, the pitch is allowed to be adjusted from 6 to 50 degrees.
4
At smaller pitch value settings, the start up wind speed has to be very high. Maximum output power occurs at a
pitch of around 28 degrees. The start up wind speed is higher at a lower pitch setting. If the wind speed is low you
should increase the pitch so that you can achieve a higher power output.
11
12
Wind Kit Technical Specifications:
Below table indicates expected RPM speed, current, voltage, and power when placing the WindPitch in
constant windspeed of 10mph when connected to load of 50 Ohms. This level of resistance may be
applied using Horizon’s variable resister module included in this box.
Blade Type
No. of Blade Wind Speed
(mph)
Load
(Ohm)
Output Voltage Output Current Output Power Rotor Speed
(V)
(mA)
(W)
(RPM)
Blade A
3
10
50
1.15
28
0.03
400
Blade B
3
10
50
1.35
30
0.04
490
Blade C
3
10
50
2.50
50
0.125
705
Your Wind Energy Kit is now ready for
experimentation and be placed in line
with an appropriate wind source.
Experiment 1. Using a Wind Turbine to
Power the LED Module
Power the LED module by attaching the wind
turbines cables to their respective slots on the
LED module base. Position turbine to directly face
the direction of wind source.
Different Blade Types
There are three types of profiled blades included in the Wind Energy kit. After you obtain the maximum output
power with a particular blade type, you may replace with another type of profiled blade and evaluate it's
performance in comparison.
A
B
C
The difference between these 3 profiles is the amount of material on the side facing the wind. All of them have a
much more curved profile on the Rear side (down wind side) to increase the distance for the wind to travel. The
Blade Type no. is engraved on the root part of the Blade for your reference.
Changing the Number of Blades
There are 6 positions for the installation of blades and it is possible to install up to 6 blades. However, with 6 blades
installed the pitch adjustment is limited. It is recommended to experiment with numbers of 2, 3, 4, and 6 blades installed
under various wind speeds and blade pitch settings.
If you have enough wind try reducing to 2 blades as you may get a little more power than using 3 blades. More
blades installed will allow the turbine to start rotating more quickly under low wind conditions.
Experiment 2. Preparation of the Electrolyzer Module and Wind Powered Hydrogen
Production (See next chapter Solar Energy for detailed assembly for H2 preparation)
Connect the red and black cables to the corresponding terminals located on
the wind turbine and reversible fuel cell. For best results using the WindPitch
to generate hydrogen using the included reversible fuel cell, setup the wind
turbine hub with 3 profiled blades marked C supplied with the kit.
Set the blade pitch to 6 degrees. Make sure that the wind turbine is
generating AT LEAST 2.5 volts. If not, move the wind turbine closer
to the fan until it does. The wind turbine is sensitive to this setting at
high wind speeds.
Allow the table fan and wind turbine to run for about 60 minutes
on high wind speed setting to generate sufficient amounts of
hydrogen and oxygen gases that are stored in the water/gas
tanks.
Battery
Pack
13
14
Experiment 3: Using a PEM Fuel Cell to Power the LED Module
If the wind is sufficient the system will now start to produce hydrogen and oxygen in the
respective cylinders. When bubbles begin to surface in the hydrogen cylinder the cycle is complete.
Disconnect the reversible fuel cell from the Wind Turbine.
Connect the fuel cell to the fuel cell base using the red and black wires. Make sure to connect the black
wire with the black terminals and red with red terminals. Now connect the LED module to the base in the
same manner.
You should see the LED lights begin flashing. If not, purge a very small amount out of the valve to allow
some of the gas to move into the fuel cell. As the LED light consumes electricity the fuel cell will
consume hydrogen from the cylinder and you will see the water level reflect the changes in amount of
gases consumed.
Procedure for repeated gas production: Disconnect the small plugs from the tubes connected to the
nozzles on the reversible fuel cell. This will allow water into the inner cylinders to replace the gasses and
reset water levels to “0” line. Re-insert the plugs into the tubes and repeat electrolysis again.
Note: You may also use the battery pack to perform electrolysis (In the case of no wind source)
Push and slide
open the cover
(alternative): Using the Battery Pack to Perform Electrolysis (in the case of
no wind)
Please remove the screw from cover of battery box using a screw driver.
Push and slide the cover and open the battery box.
Try NOT to touch the cables when you open the cover.
Place two AA batteries as indicated.
Push and slide the battery box cover to closed position and screw fightly
into place using screw driver.
Remove the screw
from the cover
Make sure the switch on the battery box is in the "off" position before you
place the batteries into the box.
WARNING: If the cable is short circuited the batteries inside could
become hot and potentially cause burns, melting of parts, or create
risk of fire.
EXPERIMENT 3
AA
r
tte
y
Ba
AA
r
tte
y
1. Assembly of the small electric fan:
Connect small round white adapter to the motor axis. Connect the fan blade to the adapter.
2. Assembly of the car wheel:
Firmly connect the other (tapered) white adapter to the motor axis. Attach the small wheel to the adapter.
Ba
USING FUEL CELLS TO CONVERT HYDROGEN TO ELECTRICITY
Preparation of the Fuel Cell System
Insert the fuel cell into the base with the red terminal on the same side as the red terminals on the base.
Connect a green purging valve to one end of a 2cm tube and the other end to the upper nozzle on the hydrogen
side of the fuel cell.
Experiment 4: Using a PEM Fuel Cell to Power the Small Electric Fan Module
Repeat the hydrogen production and fuel cell
preparation steps.
Next, connect the small fan/wheel motor base to
the fuel cell base to generate power to the motor.
Clench the tube connected to the electrolyzer and
hydrogen cylinder so that none of the hydrogen in the
cylinder from the last experiment can escape. Next
disconnect the tube from the electrolyzer and connect it
to the lower nozzle on the fuel cell.
EXPERIMENT 4
15
16
Experiment 5: Using a PEM Fuel Cell to Power the Small Car Wheel Module
Repeat the hydrogen production and fuel cell
preparation steps. Next, connect the small
fan/wheel motor base to the fuel cell base to
generate power to the motor.
Take your Wind Kit experimentation to the next level !
Listed below are additional wind experiments that can be performed with the Wind Kit wind turbine
using a multimeter or with Horizon’s Renewable Energy Monitor Lab and your computer.
● Using Different Blade Shapes Create Power
This experiment demonstrates how blades with different curvatures produce different
degrees of power output. Wind turbine blades are shaped like airplane wings, and
one size does not fit all requirements. You will measure and understand how using
the right blade shape can produce optimum power for different wind conditions.
EXPERIMENT 5
Experiment 6: Using a PEM Fuel Cell to Power the Small Fan/Wheel Motor Module and the
LED Module in Parallel
Repeat the hydrogen production and fuel cell preparation steps. Next, connect the small fan/wheel motor base
and the LED module base to the circuit board. Then connect the circuit board to the fuel cell module base to
generate power to both modules in parallel.
● How Many Blades Are Best? 1, 2, 3, 4…
Using the right number of blades for a given wind condition is important in extracting
the maximum electrical power from a wind turbine. You will measure and understand
the choices between the numbers of blades that are necessary to produce best results.
● Adjusting Blade Pitch for Best Performance
Angling the blades into and away from the wind are important elements in creating
maximum power – or slowing the speed of rotation. This experiment will show you
the techniques for stalling and furling as well as adjusting the blade pitch to extract
the maximum degree of power from the wind.
● How Much Power Can Be Extracted from the Wind
While power from the wind is free as long as it blows, it is still limited to certain physical
laws. This experiment will show you how to measure wind speed versus extracted wind power.
● Using Wind Power to Generate Hydrogen
One important use of wind power is to generate hydrogen in a clean, non-polluting
manner. This experiment shows you exactly how to do it.
EXPERIMENT 6
Most commonly a floor or basic desk fan is the source of wind used for experimentation with the Wind Kit. A larger fan
allows you to test the performance of the turbine at higher wind speeds. You can switch the fan to a lower setting or
increase the distance between the fan and the turbine to achieve low wind speeds. It is difficult to achieve high wind
speeds with a small fan. A fan of 16” diameter is suitable for doing most wind power experiments.
For optimum performance, align the centre of the fan with that of the nacelle of the turbine. Therefore, it will be better
if the height of the fan is adjustable.
Wind from a natural source is never steady. Therefore, the output power of the turbine is always varying. This may
lead to uncertainty in taking readings and measurements in the experiments. In order to reduce the variation of wind
speed due to turbulence, operate the setup at the middle of a hall or use a wind tunnel. The wind speed will be more
stable under these conditions.
● Measure Wind Turbine Performance Using RPM
Using our electronic measurement tool you can measure the voltage, current, power
and RPM (revolutions per minute) rotational speed of the wind turbine and see it
displayed on the measurement tool as well as your computer. Watch the RPM as it
changes with wind speed and resistor loading and witness how to slow down and even
stop the wind turbine spinning without even touching it – just by adding the right resistor
combinations. Make measurements for wind power and turbine efficiency to really
understand how this remarkable device works.
● Build a Wind Farm
Arrange multiple Wind Kit turbines in series and parallel configurations in order to
study the voltage, current, and power generated. Design a simulation of a commercial
wind farm in model scale and learn the potential of wind power as a mass energy source.
Purchase additional Wind Energy Kits and Circuit Board Module Base and red/black
hookup leads needed to connect multiple turbines in series and parallel at
www.fuelcellstore.com
With the included LED Module, wheel and fan blade module you can demonstrate the output power created by the
Wind Kit and use this power to illuminate the LED Lights on the Module. You can use the Renewable Energy Monitor
provided to measure the LED.
This LED Module, wheel and fan blade module is intended as a basic demonstration device. To perform much more
detailed experiments and explore the full educational value of your Wind Kit refer to the educational CD. With the
device and in combination with Horizon’s PEM electrolyzers you can perform a multitude of experiments including:
17
18
Solar Energy
Safety
Before you proceed to perform experiments with the turbine, please note that the rotor can rotate at a few
thousand RPM’s (Rotations per Minute), especially when no load is connected. When the wind speed is
high and the turbine is set to output high power, the rotating speed of the rotor can also be very fast.
Bodily injury may result if struck by the rotating blades. Wearing goggles is suggested in the case that
your head will be close to the rotating blades. You should also install the turbine properly so that it will not
“walk” or topple over. The weight of the base has been increased from previous versions to prevent the
turbine from “walking”. Placing a rubber mat, polyfoam, or a thin book under the base helps stabilize the
turbine if the surface of the table is too hard. In the case that the turbine topples at high rotational speed,
to avoid being hurt, do not try to catch it. Arranging the wires from the turbine to run inside the aluminium
tube through the opening on the post and base prevents the wires from tangling by the rotating blades.
All of the above measures help to reduce accidents during operation of the turbine. However, you have
to make sure that the environment is safe for doing experiments. Adult supervision is required. This wind
turbine is not suitable for children under 14 years old.
Troubleshooting
1. The water levels do not drop when the gas outlet tubes on both sides of the fuel cell are unplugged.
Solution:
Check whether the holes on the wall of the inner container are blocked. If so, turn the inner container until
water enters the holes and fills up the inner container.
2. The electrolyzer does not produce hydrogen and/or oxygen.
Solution 1:
Check whether the wires are appropriately connected, and whether there are any loose connections. The
fuel cell could be completely destroyed if the red wire of the battery pack is connected to the black jack of
the fuel cell.
Solution 2:
Replace the old batteries with new one in the battery pack.
3. The load cannot work while there is hydrogen left in the inner container.
Solution:
Push the green purging valve to release tiny amount of hydrogen. You can then observe the load working
well again.
What you need:
a. Electrolyzer fuel cell
b. Mini fuel cell
c. Battery pack
d. Solar panel
e. LED module
f. Water & Hydrogen tank
g. Water & Oxygen tank
h. Clamp
i. Wheel
j. Purging valve
k. Heavy fan module
l. Fan blade
m. Water tank base
n. Reversible fuel cell base
o. wires
p. Syringe
q. Silicon tubes
r. Mini fuel cell base
s. Red & black pins
t. Fan & wheel adapter
u. Circuit board
6. The fuel cell can not generate electricity while there is hydrogen still left in the hydrogen container.
Solution 1:
Push the purging valve to release remaining amounts of hydrogen.
Solution 2:
Use the syringe to clear the water out of the fuel cell.
19
g
f
q
p
j
i
n
m
l
k
d
h
s
r
You will also need the following items (not included in this kit):
- Purified or distilled water
- AA batteries
- Scissors
u
Experiment 1: Use a Solar Panel to Power
the LED Module
4. The water electrolysis process slows down.
Solution:
Inject water to the oxygen side of the fuel cell by using the syringe and wait for about 3 minutes before
using the electrolyzer again.
5. No hydrogen is produced using the windturbine outdoors.
Solution:
If the wind speed is not sufficient electricity will not be created. Use a common desk fan with faster wind
speed to perform the electrolysis using the electrolyzer, or conduct the experiment under stronger wind
conditions.
e
o
c
b
a
Connect the cables to the solar cell/panel and
circuit board to power LED module as shown. Make
sure black and red cables are used with the red
and black terminals respectively.
EXPERIMENT 1
Experiment 2: Use a Solar Panel to Power the Small Fan/Wheel
Motor Module
1. Assembly of the small electric fan:
Connect small round white adapter to the motor axis. Connect the fan blade
to the adapter.
2. Assembly of the car wheel:
Firmly connect the other (tapered) white adapter to the motor axis. Attach the
small wheel to the adapter.
20
EXPERIMENT 2
t
3. Connect the solar panel to the circuit board then to the motor base as shown.
The fan may need to be flicked with your finger to start.
6. Connect the other end of the tube to the bottom end of the black hydrogen side of the electrolyzer.
Connect the other end of the tube to the bottom end of the red oxygen side of the electrolyzer.
7. Connect the electrolyzer to the solar panel using the corresponding cables and expose to direct sunlight.
Or connect the battery pack (with battery in) to the electrolyzer and turn it on (Important: make sure
connections are correct or permanent damage can occur. Make sure the clincher is OPEN.)
The system will now start to produce oxygen and hydrogen in the respective cylinders. When bubbles begin
to surface in the hydrogen cylinder the cycle is complete. Disconnect the electrolyzer.
Procedure for repeated gas production: Disconnect the small plugs from the tubes connected to the nozzles
on the electrolyzer. This will allow water into the inner cylinders to replace the gasses and reset water levels
to “0” line. Re-insert the plugs into the tubes and repeat electrolysis again.
Using the Battery Pack to Perform Electrolysis (in the case of no sun)
Experiment 3: Preparation of the Electrolyzer Module and Solar
Powered Hydrogen Production
1. Insert the electrolyzer, terminals on top, into the slot on the base. Cut 2 x
4cm length pieces of rubber tube and insert a black pin into the end of one
tube. Place the tube with the black pin into the top pin on the hydrogen side
(with black terminal). Place the other tube firmly onto the top input nozzle on
the oxygen side.
2. Fill the syringe with DISTILED water. On the red oxygen side of the
electrolyzer, connect the syringe to the uncapped tube. Fill the electrolyzer
until water begins to flow out of the tube. Attach a red plug to the Oxygen
side tube. Let settle for 3 min.
3. Attach the round cylinders to the cylinder base by pressing downward into
round slots and twisting into place. Then add water up to the "0" line.
4. Cut out a 20cm length tube. Place it through the holes on the white
clincher, with the clincher 4 cm from the end of the tube.
5. Place inner containers into outer cylinders minding that the gaps are not
blocked by inner plastic rims. Make sure the water is still level to the “0” line.
If not, remove some water with the syringe so that water level is at “0” line.
Connect the tubings to the top nozzles on the inner containers. If the tubing
is connected to the inner cylinders last there will be no air trapped inside the
inner containers.
Please remove the screw from cover of battery box using a
screw driver. Push and slide the cover and open the battery box.
Try NOT to touch the cables when you open the cover.
Place two AA batteries as indicated.
Push and slide the battery box cover to closed position and
screw fightly into place using screw driver.
Make sure the switch on the battery box is in the "off" position
before you place the batteries into the box.
WARNING: If the cable is short circuited the batteries inside could
become hot and potentially cause burns, melting of parts, or
create risk of fire.
Note: Battery’s energy may be consumed after 4-5 times of use.
Make sure to connect the black cable to the black plug, the red
cable to the red plug on the fuel cell.
Distilled water
Push and slide
open the cover
Remove the screw
from the cover
AA
ry
tte
Ba
AA
ry
tte
Ba
Battery
Pack
As sson as the electrolysis is completed, you can use the energy contained in the hydrogen
tank to power other systems. Please refer to the experiment 3-6 in Wind Energy chapter.
EXPERIMENT 3
21
22
Troubleshooting
1. The water levels do not drop when the gas outlet tubes on both sides of the reversible fuel cell are
unplugged.
Solution:
Check whether the holes on the wall of the inner cylinder are blocked. If so, turn the inner cylinder until
water enters the holes and fills up the inner cylinder.
2. The reversible fuel cell does not produce hydrogen and/or oxygen.
Solution 1:
Check whether the wires are appropriately connected, and whether there are any loose connections. The
reversible fuel cell could be completely destroyed if the red wire of the battery pack is connected to the
black jack of the reversible fuel cell.
Solution 2:
Make sure the batteries are inserted with the correct polarity.
Solution 3:
Replace the old batteries with new one in the battery pack.
3. The water electrolysis process slows down.
Solution 1:
Inject water to the oxygen side of the reversible fuel cell by using the syringe and wait for about 3 minutes.
Solution 2:
Replace the old batteries with new one in the battery pack.
4. The motor does not run while there is hydrogen left in the inner container.
Solution:
Unplug the black pin of the short tube on the reversible fuel cell and quickly attach the pin back to the tube
to purge out impure gases. You should then see the motor begin to turn again.
5. No hydrogen is produced under the sunlight.
Solution:
If the sunlight is not strong enough electricity will not be created. Use the battery pack provided to perform
the electrolysis using the reversible fuel cell.
23
Preparing a 10% ethanol solution:
WARNING:
DO NOT mix the fuel solution in the fuel tank (c), otherwise the fuel tank could be easily damaged.
Bio-Energy
Do not pour pure ethanol in the fuel container (b). The DEFC creates power using 5-15% alcohol only. A
concentration higher than 15% could damage the fuel cell and make it stop working. In order to obtain the best
performance please use a mixture of 10% ethanol and 90% purified or distilled water. Keep ethanol away from
the fire or flame source while you are mixing the solution. Igniting the ethanol and the ethanol solution is
strongly forbidden.
Step 1: Fill the solution container (b) with 10ml of pure ethanol (fill container to the 10ml level).
Step 2: Fill the remainder of the container with water to the 60ml level.
Step 3: Stir the liquid in the container thoroughly.
What you need:
a. Fuel cell module
b. Fuel solution container
c. Fuel tank with lid
Experiment 1: Create electricity from ethanol and water
a
d. Fan module
b
c
Step1: Cut one 15cm long tube and put it
through the plastic clamp,
e. Fan blade
Step 2: Connect the tube to the fuel tank (c) and close the
clamp.
f. Silicon tubes
g. Clamp
h. Wires
i. PH paper
e
j. Syringe
f
d
i
h
You will also need the following items (not included in this kit):
- Purified or distilled water
- Ethanol
- Scissors
g
j
Step 4: Pour the fuel solution into the fuel tank (c).
Put the lid back to the tank.
Step 3: Connect the other end of the tube to the fuel
cell lower fuel inlet. Make sure the connection is tight.
Cut a 10cm long tube and connect it to the other
outlet of the fuel cell (the remaining nozzle).
24
25
Step 5: Remove the fan blade from the box.
Push the blade onto the axis of the motor slowly
and carefully.
Step 6: Use the wires to connect the fuel cell module
to the fan module. Make sure you respect the color
code when you plug wires into the sockets.
Experiment 3: Ethanol fuel consumption
When the fan begins to run slower or stops running
completely, this means the ethanol present in the fuel
cell chamber is mostly consumed. In normal
temperature conditions, the majority of the ethanol
inside the fuel cell chamber turns into acetic acid,
which is the main component of vinegar.
Let’s investigate the consumed fuel (acetic acid) when
the fan begins to run slowly.
Step 1: Place a piece of PH paper under the outlet of
the outlet tube.
Step 2: Open the clamp slowly , and release drops of
the solution onto the pH paper, and then close the
clamp. You can see the paper color changing to a
reddish color quickly.
Step 7: Open the clamp. You can notice the liquid flows out of the tube through the fuel cell. Once you see the
liquid flows out of the tube, close the clamp.
Wait for 5-10 minutes, you will notice the fan starts to rotate.
Notes: Once the fan stops rotating, open the clamp to purge
some solution out of the fuel cell and close the clamp. Wait for
5-10 minutes, the fan should start rotating by itself once
connected. If the fan does not run at this time, it may need to be
flicked with your finger to start.
Make sure you repeat the waiting period of 5-10 minutes after
each purging. Since the reaction is slow, the fan can run for up
to several hours without purging.
Step 3: Dip a new pH paper into the solution container. You will notice that the color of the PH paper
changes very little.
The difference in pH paper coloring indicates the change of the acidity level. Ethanol turns into acetic
acid during the reaction taking place at anode side of the fuel cell, and the pH of the solution noticeably
changes from pH level 6 to pH level 2 showing a red color. The chemical reactions taking place at the
anode showing that acetic acid is formed as hydrogen protons depart from the ethanol molecule and
the water molecule. These hydrogen protons cross the fuel cell membrane, and the liberated electrons
form the electricity that is able to propel the fan.
Conclusion: The Direct Ethanol Fuel Cell creates electricity by chemically converting the ethanol
solution into an acid solution, which is close to common vinegar. In order to obtain a continuous
functioning of the fan, “spent” fuel must be replaced with new fuel regularly.
Experiment 4: Exploring the effect of varying fuel concentrations
IMPORTANT NOTES:
You can make the different concentrations of ethanol fuel in the initial mix. For a 15% solution, add 9 ml
of pure ethanol and fill water to the level of 60 ml. You can use a multi-meter or Horizon’s REM product
ref. FCJJ-24 to measure the voltage difference produced by the fuel cell. Through experimentation, you
will find that increasing or decreasing the concentration of the Ethanol does not noticeably make the fan
run faster.
After the first use of the fuel cell, you have to cut a 2 cm long
tube on the remaining tube and to connect this one to the
syringe. You will use it to clean the system after every use of the
product.
After each usage, you have to fill the syringe with purified water.
Then, remove the fuel inlet tube and replace it by the syringe
tube. Inject the water into the fuel chamber to flush out the
methanol solution out of the system. Disconnect the syringe and
fill it with some air. Make the connection again and inject the air
into the system in order to completely purge the remaining water
out. The fuel cell then could be stored until the next use.
The reason for this is that the capability of the catalyst used on proton exchange membrane in the fuel
cell is limited. Similarly to many people going through a narrow door, the speed of people going through
the door is determined by the width of the door, but not by the amount of people.
Warning: The safe experimentation range for the this Kit is within ethanol concentrations ranging from
5-15%. Please note that the concentration cannot be higher than 15-20% otherwise it will permanently
damage the fuel cell.
Experiment 2: Exploring polarity
Step 1: Connect the red cable to the red socket of fuel cell and the
fan module.
You will notice the fan will turn clockwise.
Step 2: Now repeat the process, this time however connect the red
socket of the fan module into the fuel cell black one. You will notice
the fan will turn counter-clockwise.
Tip: If the device will not be used for more than one day, first open the clamp to purge out all solution in
the fuel cell and pour purified or distilled water in the fuel tank. Make sure all of the purified or distilled
water flows out of the fuel tank. Do not let the solution stay in the fuel cell otherwise it will damage the
fuel cell.
Conclusion: The current flows from positive to negative, creating a
clockwise spin of the fan. By inverting the polarity connections, the
current flow reverses and makes the fan spin in the opposite
direction.
26
27
Troubleshooting
Experiment 5: Create electricity from wine or beer
WARNING:
1. Alcohols used should stay within the range of 5-15% alcohol. If you are using an alcohol that has a
higher concentration than 20% please mix the adequate amount of water into the alcohol to keep the
required concentration range of 5-15%.
2. Using impure ethanol can damage the performance of the fuel cell. You may want to conduct
experiments using impure ethanol once all other experiments using pure ethanol are completed.
A. The fan begins to run slower or stops running completely
Solution:
a. Disconnect the fuel celll module from any load. Place the outlet tube above a container or suitable
receptacle. Open the clamp to let a few drops of acetic acid flow out, allowing the mixture of the fresh
ethanol solution to re-enter the fuel cell.
b. If the solution level is too low in the fuel tank and it can not flow into the fuel cell chamber, mix new
solution and pour it into the tank to reach proper level. Or you can lift the fuel tank up to make the
solution level in the tank higher than the inlet nozzle on the fuel cell.
d. Wait for 5-10 minutes before reconnecting the loads to the fuel cell. Once reconnected, watch the fan
start rotating again at constant speed. The fuel cell is able to start the reaction once more (and more
hydrogen protons can permeate through the membrane).
When you have finished all the steps as in experiment 1, you may notice the fan may run very slowly, or
may not run. When using different alcohol types, this can affect performance. This has to do with the
purity of the solution, since some alcohols such as wine contain elements that can clog the membrane
on the fuel cell, limiting its permeability. Use a multi-meter or Horizon’s REM ref. FCJJ-24 to measure
the voltage or current produced by the fuel cell under various conditions and slowing the speed of the
chemical reaction.
B. After all the wires and tubes have been connected, the fan still cannot run.
Solution:
a. Make sure that the red and black wires are connected correctly.
b. Make sure that the tube from the fuel tank is well connected to the fuel cell inlet.
c. Make sure there is enough ethanol solution to circulate into the fuel cell and that the tubing is not
blocked.
See experiment 6: You will be able to prove that at different temperature conditions, different voltages
are produced, and you can plot these results into a chart to determine the optimal temperature
conditions for the fuel cell to generate the best results for each kind of alcohol you use.
C. I opened the clamp, but no soluiton flows out of the tube.
Solution:
a. Add fresh fuel solution to the fuel tank.
b. Lift the fuel tank up to make the solution level in the tank higher than the inlet nozzle on the fuel cell.
Try using different types of alcohol such as wines made from grapes or rice instead of the ethanol/water
solution.
Follow up the steps in the experiment 1: create electricity from ethanol and water to create electricity.
Experiment 6: Exploring the effects of temperature.
Note: Before you blow warm air towards the fuel cell, feel the air temperature with your hand first to
make sure the air is not too hot (temperature under 60℃ are preferred).
Step 1: Use a hair drier to blow warm air towards each side of the fuel cell or place a warmer
ethanol/water solution into the fuel tank. You will observe that the motor and fan will be operating at a
faster speed.
Step 2: Use a multi-meter or Horizon’s fuel cell software adaptor product ref. FCJJ-24 to measure the
voltage produced by the fuel cell. You will be able to test that at different temperature conditions,
different voltages are produced, and you can plot these results into a chart to determine the optimal
temperature conditions for the fuel cell.
At higher temperatures, atoms tend to move faster and are more likely to interact with the catalysts
located on the surface of the membrane. With more interactions, the reaction accelerates and more
electricity can be produced, which means the fan starts to turn faster.
Conclusions:
(1) Higher temperature will make it more likely for ethanol molecules to interact with the catalysts
located on the surface of the membrane, which accelerates the speed of the chemical reaction.
(2) High temperature can also make the membrane more active, so it will demonstrate an increased
ability of proton exchange within the membrane and an increase the speed of the fan motor. Increasing
the power capability of ethanol fuel cells can be done by increasing their operating temperature, or the
temperature of their fuel.
28
29
Step 1. Preparing the super capacitor module
Mechanical Energy
a. Insert the super capacitor support (g) into the base (f).
Make sure they fit well.
What do you need:
a. Hand crank generator
b. Potentiometer
c. Super capacitor
a
d. Heavy fan module
b
c
e. Fan blade
f. Capacitor base
g. Capacitor support
h. Wires
i. Fan blade adapter
d
b. Place the super capacitor (c) onto its support (g).
Make sure the capacitor fits well in its support.
f
e
c. Plug the red cable (h) and black cable (h) in the capacitor red and black socket.
Ensure to respect the color code.
Otherwise energy from the hand crank can not be stored into the capacitor.
g
h
i
Step 2. Preparing the energy storing kit
a. Connect the other end of the cable to the potentiometer (b).
Ensure to respect the color code.
b. Connect the red and black cable to the hand crank (a).
Ensure to respect the color code.
30
31
c. Connect the other end of the cable from the hand crank generator to the potentiometer.
Ensure to respect the color code.
Step 5. Power the electrical fan directly with the hand crank generator
After connecting the wires, rotate the arm in a circular motion to generate power. You should crank the
arm to reach a speed of two revolutions per second, fast is better. Initially you will feel some
resistance, which will become smaller after a few seconds. If you feel the resistance increase again, it
means you’ve slowed down and need to speed back up.
WARNING: DO NOT crank the arm too fast otherwise the hand crank generator could be easily broken
by the strong force.
Step 3. Energy generating and storing
a. Firmly grasp the rotary handle of the hand crank generator with one hand and grip the main handle with
the other hand.
b. Rotate the arm clockwise to generate power for charging the capacitor. You should crank the arm to
reach a speed of two revolutions per second. Initially you will feel some resistance, which will become
smaller after a few seconds. If you feel the resistance increase again, it means you’ve slowed down and
need to speed back up.
Note: At the same time you can notice the potentiometer is moving towards green part, which means you
are generating energy and the energy is being stored in the super capacitor.
WARNING: You are not allowed to rotate the arm anti-clockwise to charge the super capacitor.
Otherwise the super capacitor will be damaged by the countercurrent.
Note:
Finding the appropriate speed and technique will take a little practice. After you have spent a little time
acclimating yourself to the hand crank generator, you should develop an easy rhythm that is not strenuous
to sustain.
Although the generator is easy to crank, you may eventually tire. When you find yourself slowing down,
stop and take a rest, cranking slower is harder and may not generate enough power to charge the
capacitor or power the load.
The generator can be cranked in either direction, with either hand.
Step 4. Power the electrical fan with the energy stored in the capacitor
Try to rotate your hands around each other instead of trying to hold the generator still and moving one
hand in a circle. This prevents one arm from tiring faster than the other.
Experiment with what works best for you. As long as the handle is cranked at approximately 2 revolutions
per second the generator it will produce enough power to power the device provided.
a. Connect the adapter (i) to the motor axis. Put the fan blade (e) onto the adapter.
Make sure the fan blade is connected tightly to the motor shaft.
ADVANTAGES of a Hand Crank Generator:
b. Use a cable to connect the fan module to the capacitor module.
Ensure to respect the color code.
Once they are connected, the fan moves fast immediately.
32
- Does not require solar, wind, or fuel to charge. Charge it anytime, anywhere!
- Does not require additional purchases of fuel during an emergency, when gasoline is scarce.
- Can be operated indoors without deadly fumes or threat of theft while outdoors.
- Easy to operate. Even children can safely operate the hand crank generator.
- Silent operation. No loud generator noise!
- Easy to set up. No confusing mounting or home alterations needed.
33
Conduct dozens of exciting, hands-on experiments with the science kit
Ideal as a battery replacement for a wide variety of basic electricity experiments, the hand crank generator
is a low voltage power source that lets you create electrical current by simply turning a crank. This
ingenious device generates student interest producing electrical energy through hands-on student effort.
Student's enthusiasm is immediate, whether they are third graders lighting a bulb or college students
reviewing sophisticated principles such as Ohm's Law or the electromagnetic properties of light.
Made from a sturdy, see-through ABS resin with nylon-plastic gears and handle, the kit is designed to
shrug off use and abuse. It produces approximately 200mA of usable current. It is capable of producing up
to 6 volts. You can reverse polarity by simply cranking the handle in the opposite direction. And, when
powered by another kit or low voltage power source, it acts as a motor.
Activities and uses
Some of the activities require accessories sold separately. You can study electron flow, parallel and series
circuits, Ohm's Law, motors and generators, energy transformations, and more.
Below is an activity for the kit:
Using a cellophane tap, wrap two wires onto a compass. Ensure you wrap the wires in the compass
needle axis. Connect the other end of the wires to the hand crank generator. Turn the handle clockwise
with different velocities. Do the same counter-clockwise. Does the defection angle is linked to the handle
angular velocity? Does the deflection angle is linked with the handle sense of rotation? Explain.
Repeat the above experiment exactly, but rotate the generator counterclockwise. What is the result?
Elementary and Middle School
Electricity in circuits can produce light, heat, sound, and magnetic effects. Electrical circuits require a
complete loop through which current can pass.
Use electric currents to create magnetic fields.
Students know the role of electromagnets in the construction of electric motors, electric generators, and
simple devices, such as doorbells and earphones.
Describe electron flow in simple circuits.
Students know how to design and build simple series and parallel circuits by using components such as
wires, batteries, and bulbs.
FAQ
What is a capacitor, how does it work ?
A capacitor is an electrical component which is composed of two plates separated by an electrical
insulation. This component could function in two modes, the charge and the discharge. The charge
occurs when there is a difference of potential across the conductors. It permit to store energy inside the
generated electric field. In general, this kind of component is used for blocking the direct current and for
letting pass the alternative one. They could be used to stabilize the voltage and the power flow in an
electric power transmission.
What is a hand crank generator:
A hand crank generator is an engine which is used as a generator. It turns a mechanical energy into an
electrical current. It is composed of three principal components which are the stator, the rotor and a
rotary handle. The user will turn the rotary handle which will make turn a magnet inside a coil. Due to
the rotation of the magnet, the electrical field turn and an electrical current will appear in the coil.
What will happen if I turn the hand crank handle in the wrong sense.
The hand crank generator could function in both senses as a lot of engine. The sense of rotation will
just impact the sense of the current which is generated. However, you should be careful with the
components which are connected to the generator. In fact, some components are polarized and they
couldn’t works in both sense.
What will happen if I connect the hand crank generator to the fan in the wrong sense?
Nothing bad, the fan is composed of a small engine which work in the same way than the generator but
in the other sense (it turns an electrical current into a mechanical motion). If you pug the generator
wires in the wrong sense, the fan will turn in the other sense than previously.
Do there is a special position to plug the generator to the potentiometer?
There is just one thing to know when you use a potentiometer, it should be wired in parallel with the
component you want to measure the voltage.
What will happen if I connect the hand crank generator to the capacitor in the wrong sense?
You will damage seriously the capacitor if you turn the handle when the wires are incorrectly plugged
into the capacitor. In this way, you risk to break or crack the capacitor. Warning, if you connect the
capacitor in the good way but you turn the hand crank generator handle in the wrong sense, you also
risk to break the capacitor.
Troubleshooting
High School
Energy is a property of many substances and is associated with heat, light, electricity, mechanical
motion, sound, nuclei, and the nature of a chemical. Energy is transferred in many ways. The total
energy of the universe is constant. Energy can be transferred by collisions in chemical and nuclear
reactions, by light waves and other radiations, and in many other ways. however, it can never be
destroyed. As these transfers occur, the matter involved becomes steadily less ordered.
Electricity and magnetism are two aspects of a single electromagnetic force. Moving electric charges
produce magnetic forces, and moving magnets produce electric forces. These effects help students to
understand electric motors and generators. Measure the thermal and electrical conductivity of various
materials and explain results.
Analyze the relationship between an electric current and the strength of its magnetic field using simple
electromagnets. Investigate and compare series and parallel circuits.
34
1. The bulb light on the hand crank generator does not work when I rotate the arm.
Replace the bulb light. It could have been damaged by long time using.
2. The fan does not run when I rotate the arm and all the connections are correct.
Please tap the fan blade with your finger to help it start.
35
IMPORTANT NOTES:
1. Take care with the hot water to not hurt yourself.
2. Wearing waterproof gloves and glasses are highly recommended
3. There is a risk of being burned by the hot water.
4. Thermometers are fragile and if you break them, there is a risk of personal serious injury.
Thermal Energy
Prepare the water
In the first container, put water and ice cube. Use the boiler to obtain very hot water and pour it inside the
second containers. Add one thermometer in each containers and wait until the temperature reach the
appropriate level as required. Hot water should be above 85℃ and cold water should be below 10℃.
What you need:
a. LED module
b. Water tank base
Experiment 1 : Create electricity from two different heat sources
c
c. Water tank seals
d. Fan module
Preparing the thermo-electrical module
a. Insert the thermoelectrical module into the slot on its basis.
b. Put the seals insides the holes you can see on the top of each tanks of the thermoelectrical module. Ensure
you place the blue seal in the red socket side hole and the red one into the hole of the black plug side.
c. Pour the water in each water tank in the thermoelectric system and ensure to fill the tank in the appropriate
sense e.g. the cold water in the tank which shows the blue seal (red socket side), and the hot water on the
opposite side (red seal and black socket). Ensure the central component is completely recovered by the water
and the hot and cold water reaches the water level line marked on the water tank.
d
a
e. Fan blade
f. Thermoelectrical system
g. Thermometers
h. Wires
i. REM
j. REM USB cable
b
e
f
g
i
h
You will also need the following items for various experiments (not
included in this kit):
- Purified or distillated hot (above 85°C) and cold ( below 10° C) water
- Water containers
- Boiler
- Ice cubes
- 0 - 2 A ; 0 - 4 V electrical generator
- Two K-type thermocouple
36
j
d. Insert the thermometers in the holes of the seals carefully and slowly until it almost reaches the bottom of
the tank.
Note: Thermometers are fragile and if you break them, there is risk of personal serious injury.
37
Preparing the fan module:
Remove the fan module from its box and
insert the fan blade onto the motor axis.
Ensure the connection is tight.
Power the fan with two heat sources:
Connect the wires into the fan plugs and into the
thermoelectric system sockets. Ensure to respect the color
code. You will see that the fan start to rotate immediately. It
is due to the Seebeck’s effect which turns heat into
electricity.
Experiment 2:
Do the same as in experiment 1, but this time connect the renewable energy monitor in order to be able to
see the generated power. After connecting the wire and the fan, write every 2 minutes the temperature of
each heat sources and the corresponding value of power which is generated.
Time [minutes]
Thot [°C]
Tcold [°C]
Temperature difference [°C]
0
90
10
80
Generated power
[W]
2
4
6
8
10
Note: At this moment, the temperature difference between the two sides should be more than 70℃.
The temperature difference is proportional to the generated power. A 70℃ difference of temperature is
enough to power the fan for a long time. The power is generated due to Seebeck’s effect which turns
heat into electricity. There is a heat exchange between the two heat sources due to temperature
difference. The hot water will progressively cool down and the cold one ill be heat up. After a long
time, both sides will reach the same temperature.
12
14
16
18
20
22
24
26
28
30
Power the LED module with two heat sources
Connect the wires into the LED module plugs and into
the thermoelectric system sockets. Ensure to respect
the color code. You will see that the LED starts to flash
immediately.
Note: The temperature difference between the two water tanks will be narrowed with the time going, the
electricity produced will also be reduced. The fan or LED light will operate in a weak way gradually until it
stops.
Experiment 3:
a. Do the same as in experiment 1 but connect the wires on the fan basis on the opposite sense than
the one showed by the color code. You will see the fan start to rotate on the opposite sense. It is due to
the motor ability to run when it is crossed by a current, no matter which direction it came from.
b. Disconnect the fan and connect the LED module to the thermoelectrical generator. Ensure to respect
the color code. You will see the LED light on then disconnect wires and plug them in the other sense.
The LED will not light on because the current generated by the Peltier’s module (central component of
the thermal generator) goes only in one direction and LED only allow the current to pass in the other
sense.
Experiment 4:
a. Connect one thermocouple on each side of the Peltiers module, on the middle of the walls inside the
tanks.
b. Connect the electrical generator into the plugs of the thermoelectrical system. Input different current
and write the value of the wall temperature. Wait 5 minutes between the time you increase the current
and the moment when you write the temperatures.
38
39
Current [A]
Cold face temperature
FAQ
Hot face temperature
[°C]
1. What is a Peltier Module? What is SEEBECK effect ?
Peltier module is an electrical component wade with semiconductor. It is used to create heat when you
input electricity inside. SEEBECK effect is a physical phenomenon which could be described by the
appearance of a current in the junction between two materials when it is crossed by a heat flow.
[°C]
0
0,25
2. What is a dipole? Do there is different types of dipoles? If yes, classify the dipoles contained
in this kit.
Dipole is an electrical component which is made with 2 terminals. There is two kinds of dipole, the active
ones and the passive ones. The first type of dipole is able to generate an electrical current and the
second one can just receive current.
0,5
0,75
1
Dipole name
Type
1,25
Peltier module
Active
1,5
Fan motor
Passive
1,75
LED
Passive
2
You will see that temperatures start to vary as soon as you power the system. It is due to the reverse
effect of Seebeck’s one: Peltier’s effect with occurs in the junction between two materials with are
submitted to an electrical current. You will notice also that one side became colder and the other
become warmer. It is absolutely normal with this kind of module. The last point to notice is the cold
temperature decrease in first and after start to increase again even if it stay lower than the other side
one. It is mainly due to thermal effect (conduction) inside the material and electrical effect due to the
passing current (joules effect). In fact heat exchange start as soon as there is a difference of
temperatures, and joules effect occurs every time a current pass through a resistive material. You can
see a model which sum up all the heat exchange during the experiment (except radiation).
Heat flow due to Joules
Convection heat flow effect
Convection heat flow
4. What is the central component of the generator? With what physical effect does it function?
Quote another thermoelectric effect.
The central component is a Peltier Module. It works due to SEEBECK effect, which is the
complementary effect of PELTIER effect.
Plastic walls
Air flow which is
responsible of the
convection heat flow
Air flow which is
responsible of the
convection
Conduction heat flow
due to difference of
temperature inside the
material
Peltier Module
Aluminum walls
3. What is a semiconductor? What is a PN Junction?
A semiconductor is a specific material which shows a special ability to react with its environment. This
kind of material has a specific atomic structure with a lack or an excess of electrons. When this kind of
material receive some energy (light, magnetism, thermal energy…), the electrons on the valance band
(highest layer which could be completely filled with electrons) goes on the external layer called
conduction band. When electrons reach this position, they could flows inside the material. In other
words, the material becomes more conductors when the electrons reach valence band. Some
semiconductors are made with several elements which have not the same number of electrons. If the
added element shows a higher number of electrons, there is a local excess of electrons and the material
is called n-type doped material. On the opposite side, the p-type doped semiconductor shows a lack of
electron around the added element because this one has a lower number of electrons. A PN junction is
composed of two semiconductors fixed together. When there is some energy which goes into the
junction, both materials react becomes conductor. Due to the difference of electrical potential between
the Positive (p-type) and the negative (n-type) part of the junction, a current appears.
Conduction heat flow
due to difference of
temperature inside the
material
Troubleshooting
After the hot water and cold water was poured into its water tank, the fan load does not work.
Solution: 1. Make sure all connections are correct.
2. Make sure the hot water is poured into the water tank with red seal and cold water into the water tank
with blue seal.
3. Make sure the temperature difference is higher than 70℃.
4. Tap the fan blade with your finger to move it.
Electrical current
40
41
IMPORTANT NOTES:
1. Take care with the hot water to not hurt yourself.
2. Wearing waterproof gloves and glasses are highly recommended.
3. Take care with the fan to not hurt yourself.
4. After each use clean the anode plate to keep its best performance for later use.
5. Store the anode plate in a dry place.
Salt Water Energy
What you need:
List of Components
a. Salt water fuel cell
b. Salt water fuel cell anode plate
c. Fan module
a
b
d. Salt water fuel cell base
c
Prepare the water salted solution:
1. Weight 15 mg of salt using a balance. In the gradual container, put the salt and add 25ml of hot water. The
water temperature should be around 90°C (363 K).
2. With a spoon, mix the container contents until the salt have been entirely melted into the water. Sometimes a
small part of the salt stays in the solid state.
e. Fan blade
Experiment 1 : Create electricity from water salted solution
f. Gradual container
Preparing the fuel cell:
a. Take the salt water fuel cell out of the packaging.
b. In the same time press the lower part of the blue components you can see on each side of the fuel cell.
By this way you can remove the fuel cell anode from the fuel cell tank.
c. Insert the fuel cell cathode into the slot on its basis.
g. Wires
h. Fan blades adapter
d
e
f
i. Syringe and its tube
j. REM USB cable
k. REM
h
g
You will also need the following items (not included in this kit):
- Purified or distilled hot water above 90C
- Salt (food grade) 50g
- Electronic balance
i
j
k
d. With the syringe, suck up some salted solution
and pour it into the cathode tank in order to fill ¾
of the maximum tank level (above 15mL).
42
e. Take the metal made anode and clips
it into the cathode as show below.
43
Connecting the wires into the cell:
a. Place the fuel cell in front of you in order to see three plugs.
b. Connect the short wire into left red plug and its other end into the left plug behind the cell.
c. Connect the black long wire in the central plug and the red one in the front red plug.
Preparing the fan module:
Insert the adapter around the fan motor axis. Put the fan blade onto the adapter and ensure the connection is
tight.
Experiment 2 : Using different salt concentrations
Do the same as in experiment one, but connect the REM to the fuel cell. Measure the output current and
voltage of the fuel cell for the different salt concentrations you could find in the table below. Remember to
clean the fuel tank between every time you change the salted water fuel. You will see that the salt
concentration impact the fuel cell efficiency.
mass [g]
Salt concentration [%]
2
4%
5
9%
10
19%
15
28%
20
38%
Current [A] / Voltage [V]
Experiment 3 : Using different water temperature.
Do the same as experiment 2 but this time, add 15g of salt in hot water (90°C) and let the mixture refreshen
up. After that, heat it in order to reach the different temperatures shown below and measure the output
current with the REM. Remember to clean the fuel tank between every time you change the salted water
fuel. You will notice that the temperature is directly linked with the reaction efficiency and so to the provided
energy.
Solution temperature [°C]
Current [A] / Voltage [V]
25
45
65
Power the fan with the salted water fuel cell:
a. Connect the remaining end of the long wires into the fan module, and ensure to respect the polarity
shown by the color code.
b. You will notice that the fan will start to rotate as soon as the wires are connected into the fan module.
The power generated by the solution is provided for minimum 4 hours.
80
90
Experiment 4 : Using different fuel volume
Prepare the mixture like in experiment 1 and this time use a chronometer (not provided) to measure the
running time with different concentrations. You will see that the most important running time is reached when
the tank is not fully filled.
Volume poured in the fuel tank [mL] % of fuel tank volume Current [A] / Voltage [V]
44
5
25%
7
35%
10
50%
12
60%
15
75%
45
FAQ
1. What is a salt water fuel cell? How does it work?
This kind of fuel cell works with air and with a plate made with magnesium. The electricity is made by
two chemical reactions which occur in two different point of the cell. The first sight of the reaction is on
the plate which is called anode. On this side, the water reacts with the magnesium and creates
hydrogen ions (protons) and magnesium hydroxide and generates two free electrons. On the other part
of the cell (cathode), the oxygen contained in the air which pass through the cell walls react with the
water in order to constitute hydroxide ions. This reaction is possible only if there are additional electrons
which are provided. So during the reaction, the free protons generated on the anode are attracted by
the cathode because of the difference of potential. If the cell is linked to an electrical circuit, the free
electrons will pass inside it in order to reach the cathode and let the second reaction happen. You can
find the two half redox equations below.
Mg + 2H2O → Mg(OH)2 + 2H + + 2e1/2 O2 + H2O + 2e- → 2OH 2Mg + O2 + H2O → Mg(OH)2
The salt in the water is used as a catalyst. In other words, it means that salt accelerate the reaction
between Mg and water.
2. Is that possible to increase the output of salt water fuel cell? And how?
Yes. It is possible to increase the output of salt water fuel cell. You could increase the anode and
cathode size to increase the output power. You could try to increase the salt solution temperature or you
could increase the salt solution concentration to get high fuel cell output.
3. What is the best salt solution concentration?
You can do experiment 2: Using different salt concentrations to find the answer.
4. What is anode metal plate made of?
The metal plate is made of magnesium (Mg).
5. What are the specifications for the fuel cell?
Normally the output voltage is 1.2V and the current is 200mA.
6. Where can I buy the anode metal plate?
We can provide the anode metal plate. Please contact [email protected] for more information.
7. Are there any other energy related educational products? Where can I buy them?
We provide many types of energy educational products. They are related to solar power, hydrogen
power, chemical power, mechanical power, wind power, thermal power etc. For more sales
information, please contact [email protected]
8. How to maintain the fuel cell in good performances?
After each use, clean the fuel cell using fresh water. Ensure there is no remaining salt inside. Store the
anode plate and fuel cell separately in a dry place.
9. What are the white particles on the anode metal plate?
They are the magnesium hydroxide and sodium chloride, as a result of reaction between salt water and
metal plate.
Troubleshooting
I put the anode plate into the tank, but there is no electricity which is generated.
Solution: 1. Make sure the connections are correctly done.
2. Try to clean the anode plate, if it still does not work polish the metal parts.
3. Change the anode plate.
4. Ensure you have poured the salted solution into the tank.
46
Solar Powered Car
Multi energy powered car
What you need :
Part List
a. Car frame
k. HYDROSTIK PRO
a. Car frame
b. Reversible fuel cell
l. U fixator for HYDROSTIK PRO
b. Photovoltaic solar panel
c. Hand crank generator
m. Fuel solution container
c. Wires
d. Salt water fuel cell
n. Water & Hydrogen tank
d. Solar panel support
e. Mini fuel cell
o. Water & Oxygen tank
f. Battery pack
p. Clamp
g. Solar panel
q. Wires
h. Super capacitor
r. Syringe
i. HYDROSTIK PRO pressure regulator
s. Silicon tubes
j. Solar panel support
t. Red & black pins
a
b
c
Important notes :
u. Purging valve
d
1. You can set the wheels position using the steering on the front of the car
2. Ensure that the electrical connections under the car are tight.
3. For the first use, remove the shrink-wrap from the solar panel.
4. The car should be run under direct strong sunlight.
Power the car with solar energy
Step 1. Fit the solar panel support onto the car. Ensure they strongly meet together.
b
a
c
f
g
e
d
i
h
l
j
n
m
q
r
p
o
s
47
Step 2. Place the solar panel as shown in the picture below. Remind that the plugs have to be on the right
side when you face the car.
k
t
u
48
Step 3. Connect the engine wires which exceed the bottom of the car, to the closest red and black plugs.
Hydrogen powered car
what you need:
a. Water & hydrogen tank
b. Water & oxygen tank
c. Battery pack
d. Car frame
e. Silicon tubes
f. Reversible fuel cell
g. Syringe
h. Red & black pins for tubes
i. Wires
b
a
c
e
d
f
Step 4. Connect the solar panel and the car using the two remaining wires. Ensure to respect
the polarity shown by the color code.
You will also need the following items
(not included in this kit):
- AA batteries
- Purified or distilled water
g
h
i
Important notes :
1. The O2 tube have to be moist inside before use. On the contrary, the H2 inlet have to be dry.
2. Ensure that the electrical connections under the car are tight.
3. Avoid any contact between the battery and water.
4. Use only distilled or purified water to humidify the fuel cell with the syringe.
5. You can set the wheels position using the steering on the front of the car.
6. Keep the reversilbe fuel cell in a sealing bag for storage.
Preparing the fuel Cell
Step 1. Put one 5 cm long tube on the end of the syringe as shown below.
Step 5. Place the car under direct strong sunbeams to make it run.
Step 2. Suck up some distilled or purified water and push it into the fuel cell by the nozzle which is the
closest from the red plug of oxygen side of the fuel cell. As soon as the water flows out of the cell,
disconnect the syringe from the tube and let this one connected with the fuel cell.
WARNING: The polymer membrane on the oxygen side is an important part of the proton exchange
membrane (PEM) fuel cell, it should be prevented from drying out.
49
50
Step 3. Connect the other 5 cm long tube to the opposite nozzle (closest to the black plug) and add the
red and black seals on each remaining end. Place the seal in function of the plug color.
Step 6. Fit the reversible fuel cell onto the car frame, just in front of the containers and make sure the red
plug is located on the O2 container side.
Step 7. Connect the two 20cm long tubes onto the top nozzles of the inner gas tanks, connect the tubes
opposite end to the lower nozzles located on the lower positions of both “H2” and “O2” side of fuel cell
shown below. Make sure the tubes are connected correctly to the corresponding sides of the fuel cell.
Step 4. Attach the water tank to the tank base on the car frame by pressing downward into round slots and
twisting into place. Place inner gas tanks into outer water tanks minding that the gaps are not blocked by
inner plastic rims.
Create you fuel with water electrolysis and power the car.
Step 1. Open the battery pack and insert 2 AA batteries with the correct polarity.
Step 2. Connect the battery pack to the fuel cell and turn on the battery. Ensure to respect the polarity
shown by the color code. You will see the inner gas tank will be filled by gas. You will also notice that the
O2 volume will be two times lower than the hydrogen one. It is absolutely normal, because water
molecule is made with one atom of oxygen and two of hydrogen. When you bubbles are coming out from
the inner tank, it means the inner gas tank is fully filled with gas. Turn off the battery pack and disconnect
it.
Step 5. Fill the containers with 40ml distilled water.
Note: You may use the syringe to suck up the air which could be trapped inside the inner gas tanks in
each water tank. Ensure there is just water and no remaining air under the gas tanks.
51
52
Step 3. Connect the engine wires which exceed the bottom of the car, to the closest red and black plugs.
Step 4. Using the two remaining wires, connect the fuel cell to the car frame. Make sure you respect the
polarity shown by the color code. The car will run until there is no more hydrogen in the inner gas tank.
Super capacitor powered car
What you need:
a. Car Frame
b. Capacitor (energy storage)
c. Wires
d. Battery pack
e. Hand generator (dynamo)
a
b
c
You will also need the following items
(not included in this kit):
- AA batteries
d
e
Important notes :
Troubleshooting
1. The water levels do not drop when the gas outlet tubes on both sides of the fuel cell are unplugged.
Solution:
Check whether the holes on the wall of the inner cylinder are blocked. If so, turn the inner cylinder until water
enters the holes and fills up the inner cylinder.
2. The reversible fuel cell does not produce hydrogen and/or oxygen.
Solution:
a. Check whether the wires are appropriately connected, and whether there are any loose connections. The
fuel cell could be completely destroyed if the red wire of the battery pack is connected to the black socket of
the fuel cell.
b. Check whether the switch of the battery pack is in the “on” position.
3. The water electrolysis process slows down.
Solution:
a. Add water to the oxygen side of the fuel cell and wait for about 5 minutes.
b. Replace old AA batteries with new AA batteries inside the battery pack.
4. The car stops moving while there is still hydrogen left inside the tanks.
Solution:
a. Purge the gases and perform water electrolysis for 4-5 minutes. Unplug the hydrogen gas outlet tube and
oxygen gas tubes to purge the gases. Perform water electrolysis again until the hydrogen tank is filled, and
connect the motor to the fuel cell. If the problem persists, go to the next step.
b. Let the water electrolysis process last about 10 minutes to consume the residual water. To push water out
of the fuel cell, purge the gases. Perform water electrolysis once more until the hydrogen tank is filled, then
connect the motor to the fuel cell.
53
1. You can set the wheels position using the steering on the front of the car.
2. Ensure that the electrical connections under the car are tight.
3. Do not load the capacitor if wires are connected in the wrong sense, otherwise you will broke the
capacitor.
4. The power stored is consequent, the car will start really fast so ensure there is free space in front of the
car before connecting it.
Load the capacitor
Step 1. Open the battery pack and insert 2 AA batteries with the correct polarity.
Step 2. Using the wires, connect the capacitor to the battery pack and ensure to respect the polarity shown
by the color code. Let the capacitor load during 1 min and then disconnect the capacitor. You can also use
the hand generator to realize this operation. Connect it and ensure to respect the color code, turn the
handle clockwise during 1 min with the velocity of two revolutions per second.
WARNING: 1. You are NOT allowed to rotate the arm anti-clockwise to charge the super capacitor.
Otherwise the super capacitor will be damaged by the countercurrent.
2. DO NOT crank the arm too fast otherwise the hand crank generator could be easily broken by the
strong force.
OR
54
Power the car with the electricity stored in the capacitor
Step 1. Fit the capacitor onto the car frame.
Salt water fuel cell powered car
What you need:
a. Car Frame
b. Salt water fuel cell
c. Gradual container
d. Syringe and its tube
e. Wires
a
b
Step 2. Connect the engine wires which exceed the bottom of the car, to the closest red and black plugs.
You will also need the following items
(not included in this kit):
- Purified or distilled hot water above 90°C (363 K)
- Salt (food grade) 50g
- Electronic balance
c
d
e
Important notes :
1. Read carefully and clearly understand the instructions before assembling this kit.
2. You can set the wheels position using the steering on the front of the car.
3. Ensure that the electrical connections under the car are tight.
4. The temperature of the purified or distilled hot water should be above 90C.
5. Take care with the hot water to not hurt yourself.
6. Wearing waterproof gloves and glasses are highly recommended.
7. After each use clean the anode plate to keep its best performance for later use.
8. Store the anode plate and cathode tank in a dry place.
Step 3. Connect the capacitor and the car using the two remaining wires. Ensure to respect the polarity
shown by the color code. The car will start to move immediately. If you connect wires in the wrong sense,
the car will go back.
Prepare the water salted solution :
Step 1. Weight 15 mg of salt using a balance. In the gradual container, put the salt and add 25ml of hot
purified or distilled water. The water temperature should be above 90°C (363 K).
Step 2. With a spoon, mix the container contents until the salt have been entirely melted into the water.
Sometime a small part of the salt stay in the solid state.
Preparing the fuel cell
Step 1. Insert the fuel cell into the slot on the car frame. Press the lower part of the blue components you
can see on each side of the fuel cell. By this way you can remove the fuel cell anode from the fuel cell
tank.
Troubleshooting
1. The bulb light on the hand crank generator does not work when I rotate the arm.
Solution: Replace the bulb light. It could have been damaged by long time using.
2. The car does not run when I connect the capacitor to it.
Solution: Charge the capacitor by using the battery pack or the hand crank generator.
55
56
Step 2. With the syringe, suck up some water salted solution and pour it into the cathode tank in
order to fill ¾ of the maximum tank level (about 15ml).
Step 3. Connect the car engine wires to the plugs on the car.
Step 4. Connect the black long wire in the central plug and the red on in the front red plug. Connect the
other end of these wires into the car right plugs. The car starts to move. Ensure that you have
connected the wires in the good sense. On the contrary, the car will go back.
Step 2. Take the metal made anode and clips it into the cathode as show below
Connecting the wires into the cell.
Step 1. Place the fuel cell in front of you in order to see three plugs.
Step 2. Connect the small 10cm wire into left red plug and its other end into the right plug
behind the cell.
Note: After long time running, the car speed will slow or stop. If you want to continue to run the car, you
should pull out the anode metal plate to clean it up with the running water. Replenish some salt solution to
the fuel cell tank. Place back the anode metal plate to the cathode fuel cell tank, the car will continue to run.
After use, you should pull out the anode metal plate and clean up the fuel cell tank with the running water.
Keep them dry for storage.
Troubleshooting
The car does not run.
Solution: 1. Make sure the connections are correctly done.
2. Try to clean the anode plate, if it still does not work polish the metal parts.
3. Change the anode plate.
4. Ensure you have replenished the salted solution into the tank.
57
58
Preparing the hydrogen supply and the fuel cell
Power a car using a fuel cell and a hydrogen
Step 1. Pass the tube throught the clamp and close this one as shown below.
storage
What you need:
a. Car Frame
b. Mini fuel cell
c. Wires
d. Tubes
e. Clamp
f. HYDROSTIK PRO
g. Purging valve
h. HYDROSTIK PRO pressure regulator
i. U fixator for HYDROSTIK PRO
Step 2. Unscrew the bolt on the pressure regulator, and put it around the tube. Connect the end of the
tube to the pressure regulator. Ensure the connection is tight, and then screw the bolt to the pressure
regulator.
a
c
b
You will also need the following items
(not included in this kit):
- HYDROFILL PRO for charging
the HYDROSTIK PRO
- Scissors
f
g
d
h
e
i
Note: The HYDROSTIK PRO contains no hydrogen when you get it for the first time, you have to fully charge the
HYDROSTIK PRO with the refilling station HYDROFILL PRO (not provided) or hydrogen charging tube (not provided).
Or please contact your local dealer for detailed information.
Step 3. Put the purging valve on the 5 cm long tube and ensure the connection is thight. Then, connect
it to the nozzle you can see on bottom of the mini fuel cell.
HYDROSTIK PRO SAFETY INFORMATION
● DO NOT try to disassemble, open or repair the cartridges when broken or worn out!
● DO NOT store cartridges under direct sunlight.
● Keep it away from fire. Fire Hazard!
● Keep in a safe, dry and cool place.
● Keep away from temperatures above 50˚C while filling, storage and using.
● Provide adequate ventilation and refrain from placing items on or around the appliance
during operation. Refrain from placing the appliance in enclosures or causing the appliance to not vent freely.
Step 4. Place the U fixator on the back of the car frame. Then put under the HYDROSTIK PRO in order
to be sure that it is correctly blocked.
● Keep away from alkaline and acidic environment.
● This is not toy – keep away from children.
● The HYDROSTIK PRO must be placed horizontally when it is being charged otherwise the cartridge can crack!
● HYDROSTIK PRO contents are flammable. Do not disassemble. Avoid contact with HYDROSTIK PRO contents.
● Remove the HYDROSTIK PRO from the pressure regulator immediately after use.
● Hydrogen shall be stored, handled and used with caution so life and health are not jeopardized and the risk
of property damage is minimized.
● This appliance is not tested for use with medical devices.
● Save these instructions and review frequently during use.
59
60
Step 5. Connect the other end of the pressure regulator tube to the fuel cell higher nozzle (close to the red
plug). Then lightly screw the pressure regulator to the HYDROSTIK PRO. Stop to screw as soon as both
parts fit together.
Step 6. After this place the mini fuel cell on the slot located on the car frame top. Ensure they fit well.
Then connect the car engine wires into its plugs.
Hydrogen: Fuel of the Future
Hydrogen offers the promise of a sustainable energ source for the future of transportation, and the
potential to greatly reduce CO2 emissions. Hydrogen is the most commonly occurring element in the
universe. It is a colorless, odorless, non-poisonous gas that is lighter than air. Hydrogen is one of the
most important alternative fuels for the future, because it has the ability to replace all the fossil fuels
used on the road today, and thus to reduce greenhouse gas emissions. The governments of
countries around the world see the promise of hydrogen and are investing billions of dollars in
research and development for hydrogen energy technologies. The U.S. Department of Energy has a
Hydrogen Program that is working with industry, schools, laboratories, and other government
agencies to overcome the obstacles standing in the way of widespread fuel cell adoption. They are
addressing issues in hydrogen production, delivery, storage, safety, and fuel cell technology itself.
According to HyWays, a research project funded by the European Union, building ahydrogen
infrastructure in Europe would allow for a reduction in CO2 emissions from automobile transportation
of over 50 percent by 2050, and it could be done in an economically acceptable manner. A critical
hurdle for the use of this innovative fuel that must be overcome is the distribution of hydrogen to
individual automobiles. A large network of hydrogen fueling stations would need to be installed, just
like our current network of gasoline fueling stations. This is only economically viable and feasible as a
large-scale effort. Strong joint efforts from all of the stakeholders in both the public and private
sectors is crucial to the successful adoption of hydrogen technology.
The Significance of the Fuel Cell
The fuel cell can play an important role as we change the way we meet our energy needs. It has a
range of advantages:
1. It provides electricity in a more efficient manner than conventional power plants, which obtain
electricity on a “detour” from chemically-produced heat energy through mechanical
to electrical energy. The fuel cell, by contrast, creates electricity directly from chemical reaction
energy (by “cold” combustion). So it has a significantly greater degree of efficiency
than conventional types of energy conversion (with the exception of gas turbine power plants).
2. The fuel, which is hydrogen or other gases, can be obtained from renewable energy sources.
3. It is clean, since instead of climate-harmful CO2, the only “waste” it releases is water vapor. Also, it
is quiet.
4. Special fuel cells can be conveniently used in the cellar of a house as miniature off-grid residential
heating and power units. In addition to electricity, they also give off plenty of heat from their gaseous
fuel and the surrounding
Step 7. Connect the two wires to the red and black plugs on the car frame. Connect the other end to the
fuel cell.
Step 8. Open the clamp and finish to screw the pressure regulator to the mini fuel cell. Press the purging
valve for two seconds and let a small amount of hydrogen pass through the mini fuel cell.
The car will start to run.
Troubleshooting
1. The car does not run after the HYDROSTIK PRO supplies hydrogen to the fuel cell.
Solution: a. The car may need to be flicked with your finger to start.
b. Recharge the HYDROSTIK PRO fully.
c. Press the purging valve to purge a little bit amount of hydrogen out of the system.
d. Make sure the HYDROSTIK PRO is connected to the pressure regulator tightly.
2. The car runs slower than before.
Solution: a. Recharge the HYDROSTIK PRO fully.
b. Press the purging valve to purge a little bit amount of hydrogen out of the system.
61
62
Renewable Energy Monitor
User Manual
And
Software Reference Guide
Introducing the Horizon
Renewable Energy Monitor
The Renewable Energy Monitor is an
educational evaluation monitoring device with
PC measurement software for graphical display
of performance characteristics on its own 2 line
LCD screen or your Windows computer. It has a
2 line LCD screen for viewing measurements that
you cycle through just by pushing a button.
And the Renewable Energy Monitor is battery
operated and comes with a USB port so it can
also be used with or without a computer –
indoors or outdoors – where you can make direct
solar and wind measurements.
And its power is in its simplicity!
Horizon developed the Renewable Energy
Monitor to allow you to avoid using the
multimeters confusing setup and cumbersome
computations in order to provide an immediate,
graphical way for recording data directly with no
formulas and nothing to calculate. Numerous
experiments and evaluation activities for
hydrogen fuel cells, miniature wind turbine kits,
and solar panels are now quantifiable in real time
for voltage, current, power, joules, resistance,
and even wind turbine RPM speed – all viewable
and recordable at the same time!
The Renewable Energy Monitor is fully
compatible with any of Horizon’s educational kits.
63
64
Units of Measurements
Switches
The Renewable Energy Monitor measures
There are only two switches to operate:
Input and Output Terminals
Common Equations
standard electrical units like voltage, current,
• Battery – OFF - Computer
power, energy and resistance.
• Select
measures the RPM speed of the WindPitch
The Renewable Energy Monitor uses the
It also
following common equations internally to
measure
wind turbine.
Set it to Battery when you want to make your
measurements outside or without using a
Voltage is measured in volts or millivolts
computer, or set it to Computer when it’s
(mV). A millivolts is 1/1000 of a volt but when
plugged into your computer using the supplied
seen on the LCD screen it can provide a
USB cable. And set it to OFF when it’s not in
more accurate measure of the voltage. For
use.
example…
Push the Select button to cycle through the
1.23 volts = 1230 mV
four main LCD screens. You can even hold
10.456 volts = 10456 mV
the Select button to “freeze” the display if the
Current is measured in amps or milliamps
numbers are changing too fast.
(mA). A milliamp is 1/1000 of an amp. For
example…
USB Connection
A USB “type B” connector on the back of the unit
1.256 amps = 1256 mA
(MAC computers are not supported at this time).
Power for the Renewable Energy Monitor is
Power is measured in watts or milliwatts
supplied by the PC via the USB cable.
(mW). A milliwatt is 1/1000 of a watt. For
example…
Battery Requirements
0.034 watts = 34 mW
The Renewable Energy Monitor uses a
2.987 watts = 2987 mW
standard 9 volt radio battery that is easily
replaced when necessary. The LCD screen will
indicate when
V = I * R where V = voltage
I = current
R = Resistance
There are two sets of Input and Output
P = V * I where P = power
terminals. The Input terminals are on the
V = voltage
left side and the Output terminals are on the
I = current
right side of the unit. The Red terminal is +
or positive while the Black terminal is – or
J = P * T where J = Joules
negative. You must observe the correct polarity
T = time in sec
when hooking up batteries, solar panels, wind
turbines or fuel cells to the terminals.
Operating Tips
0.003 amps = 3 mA
allows connection to a Windows PC computer
Energy is measured in Joules. Energy is
indicate when the
basically power x time and one Joule is equal
battery is low and
to one watt-second. For example.
needs replacement.
Be sure to set the
21 Joules = 21 watt-seconds or the amount of
switch to OFF to
power used in 21 seconds.
extend the battery life
when not in use.
RPM is a measure of the rotational speed
of the wind turbines blades. RPM is used
in experiments to show how the above
parameters are affected by higher or lower
Specifications
Electrical Fundamentals – Refer to the REES
Experiment Manual for an explanation of the
The Renewable Energy Monitor will measure
fundamental electrical parameters such as
electrical parameters up to the following limits:
voltage, current, power, resistance and more.
Voltage:
0 - 28 VDC
Measuring Resistance – A voltage must be
Current:
0 - 1 amp DC
applied across the Input terminals in order to
Power:
0 - 28 watts
measure the resistance attached to the Output
Resistance: 0 - 999 ohms
Energy:
0 - 65535 Joules
RPM:
200 - 2500
terminals.
Also, the resistance will vary depending on the
voltage and current produced in the circuit. The
Note: very low and very high RPM speeds
Renewable Energy Monitor uses Ohm’s Law
cannot be accurately measured. Even though
to compute resistance, so any small variations
the wind turbine may be spinning the electronic
in voltage and current will affect the resistance
circuitry is only capable of measuring a certain
reading.
range of RPM speeds. Low voltage outputs
from the WindPitch wind turbine may also affect
RPM accuracy.
RPM rates.
65
and compute voltage, current,
resistance and power.
66
Software
Connecting
Software for Windows PCs (XP, Vista and
Once the software is displayed on your
Windows 7) is provided to expand the
computer screen, click the Connect icon on
operational capabilities of the Renewable
the bottom-right of the screen. It will turn from
Energy Monitor. MACs are currently not
red to green to show that it is connected to the
supported. Connect the USB cable between
Renewable Energy Monitor.
the Monitor and your computer for vivid
graphical displays of data.
Color-Coded Plotting Lines
Joules and RPM Display
Each data plot is in a different color in order to
Joules is a measure of energy (power x
make it easy to see what is being measured.
time). It is equivalent to a watt-second
or the number of watts generated in one
Green -
Voltage in volts
second and shows how much energy the
Blue
-
Current in amps
experiment is generating.
Red
-
Power in watts
Black -
Resistance in ohms
RPM is displayed as RPM x 100 in order to
Pink
RPM x 100
better fit in the plot area. For example an
-
RPM reading of 1436 is shown as 14.36.
Installing the Software
Adjusting the Plot Scale
Insert the supplied CDROM disc into your
computer and follow the directions in order to
load the software.
Tip:
Nothing will happen unless you
click the Connect icon and the number
below it represents the com port attached
Running the Software
to the Renewable Energy Monitor.
Refer
to the “More Details” section for a further
After the software is installed
explanation.
on your computer a Desktop
icon like the one here is
Plot Area
displayed. Double-click the
icon to launch the software.
You can change the plot
scale to match the incoming
data from the Renewable
Screen Snapshots
Energy Monitor by using the
Plot Scale icon. The vertical
Yo u c a n c a p t u r e
+ and – control the vertical
scale while the horizontal +
and – control the time scale. Clicking the reverse
arrow icon (bottom-left) clears the screen and
allows a fresh plot of data to be displayed.
Always attach the USB cable between
the Renewable Energy Monitor and the
computer BEFORE you click on the REM
icon to start the software. Then click on the
Connect icon once the software is visible on
your computer.
you captured.
a second from the Renewable Energy Monitor
Meters and LED On-Off buttons
Four vertical meters display the voltage, current,
power and resistance along with corresponding
numbers at the bottom.
Clicking any of the LED
buttons at the bottom of each meter turns the
corresponding plot line ON or OFF. The LEDs are
color coded to match the plot lines to make it easier
to understand.
67
Screen Capture
below it to see what
same time. This data is updated five (5) times
coming from your experiments.
by clicking the top
Screen View icon
current, power, resistance and RPM – all at the
so it always represents the latest information
screen at anytime
icon. Then click the
The plot area displays the line plots of voltage,
Tip:
a snapshot of the
68
Data Recording and Playback Play and Pause
The built in recording feature is like recording
Click the (triangle) Play icon to begin
a TV show for later playback except that you’re
replaying the recorded data. The Play
using data coming from the Renewable Energy
icon will change from white to green during
Monitor instead. The Recording and Playback
playback.
Sample Rate
You can control the rate at which you sample
data by clicking the + or – icons on the Sample
While plotting data in real time or replaying
Rate indicator.
data after recording, you can zoom in on
a portion of the data at anytime. Simply
position the mouse cursor over the area
controls are shown here.
you want to zoom in to and click the left
You can Pause the playback by clicking again
on the (triangle) Play icon. It will change from
a green triangle to a green double line. Click
The default is ALL which means that all
mouse button.
data from the Renewable Energy Monitor is
mouse button to execute the zoom feature.
recorded. Clicking the minus icon will slow
the sample rate to the following:
the Pause icon again to resume playback.
The top three controls are…
Recording Counter
Record
Play – Pause
The Recording Counter indicates the number
Stop
of data samples that are (or have been)
recorded for later playback. It can range from
Recording Data
1 to 999.
Click the (round) Record icon to start recording
data. The icon will change to a brighter red
color.
Stop Recording
The Trash Icon
Click the (square) Stop icon when you’re done
recording.
Zooming
The Stop icon will momentarily
change color from white to green – then back to
white again. The red Recording icon will also
turn off and the plot will go back to real time.
Click the Trash icon to erase all the recorded
data. This will also reset the time on the plot
area back to 0.0 minutes. You can push the
Trash icon anytime; just make sure you really
want to erase all the recorded data.
69
70
Then release the left
Renewable Energy
Monitor Excel ® Interface
Addendum
4. To locate the CSV text file go to
C:/Desktop/ Documents/Horizon folder
where you will find the file mixed in with
other previously saved screen capture
images. If your folders are set to view files
In addition to its already powerful real
as icons you should see something like
time graphical plotting and data logging
this.
software, the latest version of Horizon’s
5. The file with the Excel ® logo is the
Renewable Energy Monitor comes with
one(s) you want to use to import into Excel
the ability to transfer the logged data to an
®.
Excel ® spreadsheet.
Example
Here’s how it works….
1. To start a Recording, click the red REC
By using the software’s Recording and
button. It will change from dull to bright red
P l ay bac k f e a t u r e s , e a ch t ime a new
indicating that data is being recorded.
Record – Stop or Record –Play sequence
is performed, an Excel ® compatible CSV
6. To import the file into Excel ® you can 1)
simply double-click on it or 2) launch Excel
® manually, find the folder and open the file
normally. The data should look something
like this →
7. You can then proceed to manipulate
(comma separated variable) file t is written
the data in anyway you choose including
to the hard disk. The file name begins with
generating plots directly from it.
the letters REM and contains the date and
time the recording was begun.
Refer to Horizon’s
Example:
2. At the same time a new CSV text file is
Renewable Energy Monitor User
REM_05_31_11_at_15_44_03
opened and the incoming voltage, current,
Manual and Software
power, resistance, RPM and Joule data are
Reference Guide
saved in the file.
By simply importing this file into your Excel
for a complete description of all
the software features.
® spreadsheet you can do further analysis
on the recorded data including plotting the
3. To end the recording, click the triangular
variables in any order or style that suits
Play or square Stop button. The REC
your application.
button will turn dull red again and the Play
or Stop button will turn green. This will
The CSV files can be found on your hard
also close the CSV text file where it can be
disk in the same folder as the captured
imported into Excel ®.
The new Excel ®feature is
available in software version
1.10 and above.
screen .jpg files. Just look under
C:/Desktop/ Documents/Horizon/file
73
74
For more information
contact [email protected]
75
FCJJ-40_HEB_V1.0