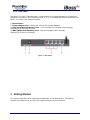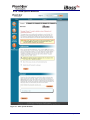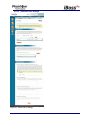
1
Note: Please refer to the User Manual online for the latest updates at www.iphantom.com.
Copyright © by Phantom Technologies LLC. All rights reserved. No part of this publication
may be reproduced, transmitted, transcribed, stored in a retrieval system, or translated into
any language or computer language, in chemical, manual or otherwise, without the prior
written permission of Phantom Technologies LLC.
Phantom Technologies LLC makes no representations or warranties, either expressed or
implied, with respect to the contents hereof and specifically disclaims any warranties,
merchantability or fitness for any particular purpose. Any software described in this manual
is sold or licensed "as is". Should the programs prove defective following their purchase, the
buyer (and not this company, its distributor, or its dealer) assumes the entire cost of all
necessary servicing, repair, and any incidental or consequential damages resulting from any
defects. Further, this company reserves the right to revise this publication and make
changes from time to time in the contents hereof without obligation to notify any person of
such revision of changes.
All brand and product names mentioned in this manual are trademarks and/or registered
trademarks of their respective holders.
www.iPhantom.com
Open Source Code
This product may include software code subject to the GNU General Public License (“GPL”),
GNU Lesser General Public License (“LGPL”), or other open-source software licenses. Copies
of the GPL and LGPL licenses are available upon request. You may also visit www.gnu.org
to view more information regarding open-source licensing.
The GPL, LGPL and other open-source code used in Phantom Technologies LLC products are
distributed without any warranty and are subject to the copyrights of their authors. Upon
request, open-source software source code is available from Phantom Technologies LLC via
electronic download or shipment on a physical storage medium at cost. For further details
and information please visit www.iphantom.com/opensource.
Rev 3.0.1.105: August 20, 2008
Page 2 of 73
Table of Contents
TABLE OF FIGURES ................................................................................................................................................4
1
IBOSS PRO CONTENT FILTER ....................................................................................................................6
1.1
1.2
1.3
1.4
2
OVERVIEW ..................................................................................................................................................6
KEY FEATURES............................................................................................................................................6
MANUAL STRUCTURE..................................................................................................................................6
SYSTEM REQUIREMENTS .............................................................................................................................7
SPECIFICATIONS............................................................................................................................................7
2.1
IBOSS PRO MODEL SPECIFICATIONS ............................................................................................................7
2.2
FRONT AND REAR PANELS ..........................................................................................................................7
2.2.1
Front Panel............................................................................................................................................7
2.2.2
Rear Panel .............................................................................................................................................8
3
GETTING STARTED .......................................................................................................................................8
3.1
HARDWARE INSTALLATION .........................................................................................................................9
3.2
COMPUTER LAN IP CONFIGURATION .........................................................................................................9
3.2.1
Computer Automatic IP Configuration................................................................................................10
3.2.1.1
iBoss Pro User Interface ............................................................................................................................ 11
3.3
CHOOSING AN OPERATION MODE .............................................................................................................14
3.3.1
Operation Mode Configuration ...........................................................................................................15
4
INTERFACE ....................................................................................................................................................16
4.1
HOME PAGE ..............................................................................................................................................16
4.1.1
Filtering Status ....................................................................................................................................17
4.1.2
Main Menu...........................................................................................................................................17
4.1.3
Shortcut Bar.........................................................................................................................................18
4.2
REPORTS ...................................................................................................................................................19
4.3
CONFIGURE INTERNET CONTROLS.............................................................................................................21
4.3.1
Block Specific Website Categories.......................................................................................................23
4.3.1.1
4.3.1.2
4.3.2
4.3.3
4.3.4
4.3.5
4.3.6
4.3.7
4.3.8
4.3.9
Advanced Scheduling ................................................................................................................................ 26
Identify Theft (Phishing)/ IP Address Blocking Page ................................................................................ 27
Block Specific Web Programs..............................................................................................................28
Block Specific Websites .......................................................................................................................31
Block Specific Keywords......................................................................................................................32
Block Specific Ports .............................................................................................................................34
File Extension Blocking .......................................................................................................................35
Domain Extension Restrictions............................................................................................................36
Allow Specific Websites .......................................................................................................................37
Configure Sleep Schedule ....................................................................................................................39
4.3.9.1
Sleep Mode Page ....................................................................................................................................... 41
4.4
EDIT MY PREFERENCES .............................................................................................................................42
4.4.1
Set or Change My Password................................................................................................................43
4.4.2
Setup E-mail Reports ...........................................................................................................................44
4.4.3
Customize Block Pages........................................................................................................................45
4.4.3.1
Blocked Page ............................................................................................................................................. 47
4.4.4
Change My Time Zone.........................................................................................................................48
4.4.5
Edit System Settings .............................................................................................................................49
4.4.6
Remote Management............................................................................................................................50
4.5
IDENTIFY COMPUTERS & USERS ...............................................................................................................51
4.5.1
Identify Computers...............................................................................................................................51
4.5.1.1
4.5.2
Identifying a Computer .............................................................................................................................. 53
Identify Users.......................................................................................................................................54
4.5.2.1
Adding a User ............................................................................................................................................ 55
Rev 3.0.1.105: August 20, 2008
Page 3 of 73
4.5.2.2
4.5.2.3
4.5.3
Advanced User Settings ............................................................................................................................. 56
User Internet Access Window.................................................................................................................... 58
Filtering Groups ..................................................................................................................................59
4.5.3.1
Filtering Group Tabs.................................................................................................................................. 59
4.6
SETUP NETWORK CONNECTION.................................................................................................................60
4.6.1
Configure Local Area Network............................................................................................................61
4.6.2
Configure Wireless Settings.................................................................................................................62
4.6.3
Setup Port Forwarding ........................................................................................................................65
4.6.4
Add Additional Local Subnets..............................................................................................................66
4.6.5
Edit Advanced Settings ........................................................................................................................67
4.7
FIRMWARE UPDATES .................................................................................................................................68
5
SUBSCRIPTION MANAGEMENT...............................................................................................................69
5.1
6
ADDING A SUBSCRIPTION KEY ..................................................................................................................69
TROUBLESHOOTING ..................................................................................................................................70
6.1
PASSWORD RECOVERY ..............................................................................................................................70
6.2
RESETTING TO FACTORY DEFAULTS .........................................................................................................70
6.2.1
Through the iBoss User Interface ........................................................................................................70
6.2.2
Using the Reset Button on the back of device ......................................................................................70
6.3
TECHNICAL SUPPORT ................................................................................................................................70
7
APPENDIX .......................................................................................................................................................71
7.1
WARRANTY INFORMATION........................................................................................................................71
8
GLOSSARY......................................................................................................................................................72
9
REGULATORY STATEMENT .....................................................................................................................73
Table of Figures
Figure 1 - Front Panel ..................................................................................................................... 7
Figure 2 - Rear Panel ...................................................................................................................... 8
Figure 3 - Hardware Installation 1 .................................................................................................. 9
Figure 4 - Hardware Installation 2 .................................................................................................. 9
Figure 5 - iBoss User Interface ..................................................................................................... 11
Figure 6 - Operation Modes.......................................................................................................... 14
Figure 7 - Home Page ................................................................................................................... 16
Figure 8 - Reports ......................................................................................................................... 19
Figure 9 - Configure Internet Controls ......................................................................................... 21
Figure 10 - Block Specific Website Categories............................................................................ 23
Figure 11 - Advanced Scheduling................................................................................................. 26
Figure 12 - Identity Theft Detection Page .................................................................................... 27
Figure 13 - Block Specific Web Programs ................................................................................... 28
Figure 14 - Block Specific Websites ............................................................................................ 31
Figure 15 - Block Specific Keywords........................................................................................... 32
Figure 16 - Port Blocking ............................................................................................................. 34
Figure 17 - File Extension Blocking............................................................................................. 35
Figure 18 - Domain Extension Restrictions.................................................................................. 36
Figure 19 - Allow Specific Websites ............................................................................................ 37
Figure 20 - Configure Sleep Schedule .......................................................................................... 39
Figure 21 - Internet Sleep Mode Page .......................................................................................... 41
Rev 3.0.1.105: August 20, 2008
Page 4 of 73
Figure 22 - Edit My Preferences................................................................................................... 42
Figure 23 - Set or Change My Password ...................................................................................... 43
Figure 24 - Configure Report Settings.......................................................................................... 44
Figure 25 - Customize Block Pages.............................................................................................. 45
Figure 26 - iBoss Blocked Page.................................................................................................... 47
Figure 27 - Set Time Zone ............................................................................................................ 48
Figure 28 - Edit System Settings .................................................................................................. 49
Figure 29 - Setup Remote Management ....................................................................................... 50
Figure 30 - Identify Computers & Users ...................................................................................... 51
Figure 31 - Identify Computers..................................................................................................... 51
Figure 32 - Identifying a Computer .............................................................................................. 53
Figure 33 - Identify Users ............................................................................................................. 54
Figure 34 - Adding a User ............................................................................................................ 55
Figure 35 – Advanced User Settings ............................................................................................ 56
Figure 36 - Internet Access Window Login.................................................................................. 58
Figure 37 - Internet Access Window Session ............................................................................... 58
Figure 38 - Edit Filtering Groups.................................................................................................. 59
Figure 39 - Filtering Group Tabs .................................................................................................. 59
Figure 40 - Setup Network Connection ........................................................................................ 60
Figure 41 - Configure Local Area Network.................................................................................. 61
Figure 42 - Configure Wireless Settings....................................................................................... 62
Figure 43 - Setup Port Forwarding ............................................................................................... 65
Figure 44 - Add Additional Local Subnets ................................................................................... 66
Figure 45 - Advanced Network Settings....................................................................................... 67
Figure 46 - Firmware Updates ...................................................................................................... 68
Figure 47 - Manage Subscription.................................................................................................. 69
Figure 48 - Enter Subscription Key .............................................................................................. 69
Rev 3.0.1.105: August 20, 2008
Page 5 of 73
1 iBoss Pro Content Filter
1.1
Overview
The iBoss™ Pro is a revolutionary Internet content filter with an optional Wireless-G
router/firewall that is powerful and extremely easy to use. It was designed to protect entire
computer networks at offices, classrooms, libraries, churches as well as stores. Its fast
processor is ideal for managing large networks with high throughput demands to help
increase productivity. The iBoss™ Pro blocks access to specific categories of Internet
destinations, online applications, and manages time spent using specific online programs
(i.e. online chat and messenger programs, file sharing, web browsing). The iBoss™ Pro
generates reports on Internet activity which can be viewed and automatically E-mailed.
Unlike software solutions, one device guards an entire network and makes tampering
difficult. Little computer experience is needed!
1.2
•
•
•
•
•
•
•
•
•
•
•
•
•
•
•
1.3
Key Features
Comprehensive Web Filtering Through Categories
Wireless G Router
Detailed Reports
Remote Monitoring and Administration
Works Transparently with Existing Firewall
Live Monitoring
Keyword Search Blocking
IM/Application Policies and Blocking
Policy Scheduling
Policies Users/Groups
Real-Time URL Updates
Strong Firewall Protection
Simple & User-Friendly Interface
Plug & Play with No Software to Install
Compatible with any Operating System
Manual Structure
This manual includes detailed information and instructions for installing and configuring the
iBoss. The “Getting Started” section of this manual will guide you through the initial
hardware installation and setup process. The “Configuration” section of the manual
contains detailed instructions for configuring specific settings and customizing preferences.
Note: For quick installation instructions, you may also reference the iBoss Quick Installation
Guide included with the product.
Rev 3.0.1.105: August 20, 2008
Page 6 of 73
1.4
•
•
•
•
•
System Requirements
Broadband (Cable, DSL, T1, FiOS, etc.) Internet service
Network Adapter for each computer
Any Major Operating System running a TCP/IP network (i.e. Mac, Windows, Linux,
etc.)
Standard Web Browser
Active iBoss Subscription
2 Specifications
2.1
iBoss Pro Model Specifications
The iBoss Pro has the following specifications:
Recommended Concurrent Users
Max # of Identifiable Computers
Max # of Identifiable Users
Max # of Filtering Groups
2.2
1-25
50
50
5
Front and Rear Panels
2.2.1 Front Panel
The iBoss™ Pro has the following LEDs on the front panel to inform you of the current
status. Below is a description of each LED:
Figure 1 - Front Panel
LED
1. PWR
2. WAN 10/100M
3. WAN LNK/ACT
4. LAN 10/100M
(Ports 1-4)
5. LAN LNK/ACT
(Ports 1-4)
6. WLAN-G
Light Status
Solid Green
Off
Flashing Green
Solid Green
Off
Solid Green
Off
Flashing Green
Solid Green
Off
Solid Green
Off
Flashing Green
Solid Yellow
Off
Flashing Yellow
Description
iBoss™ Pro is on/ready
iBoss™ Pro is powered off
iBoss™ Pro is booting up
WAN 100Mbps is connected
WAN 10Mbps is connected
WAN is connected
No WAN connection
WAN port has activity
LAN 100Mbps is connected
LAN 10Mbps is connected
LAN is connected
No LAN connection
LAN port has activity
Wireless LAN is activated
Wireless LAN is disabled
Wireless LAN has activity
Rev 3.0.1.105: August 20, 2008
Page 7 of 73
2.2.2 Rear Panel
The iBoss™ Pro has 5 Ethernet ports, a reset button and 1 power adapter port located on
the back of the device. The 5 Ethernet ports, 4, 3, 2, 1 and WAN are used to implement the
iBoss™ Pro within your network scheme.
1. Reset Button
2. Power Adapter Port - Power Port 12V 1A DC External Adapter
3. LAN (Local Area Network) Ports - Four Switched 10/100 Mbps (auto-sensing)
Ethernet RJ-45 Ports for the LAN
4. WAN (Wide Area Network) Port - One 10/100 Mbps (auto-sensing)
Ethernet RJ-45 Port for the WAN
Figure 2 - Rear Panel
3 Getting Started
This section describes initial setup and configuration of the iBoss device. This section
contains information that will help you install the iBoss onto your network.
Rev 3.0.1.105: August 20, 2008
Page 8 of 73
3.1
Hardware Installation
Below are instructions for configuring the iBoss™ Pro to work with your network.
1. Power on the modem, iBoss™ Pro, and computer.
2. Wait for the iBoss™ Pro Power (PWR) LED to turn solid green.
3. Connect an Ethernet cable from the iBoss™ Pro's WAN port to the LAN/Ethernet port of
the modem.
Figure 3 - Hardware Installation 1
4. Connect another Ethernet cable from any of the LAN ports (1 - 4) on the iBoss™ Pro to
the Ethernet socket on the computer.
Figure 4 - Hardware Installation 2
5. Check to make sure the iBoss™ Pro's LAN LNK/ACT LED corresponding to your connected
computer (1-4) is lit solid green to confirm the cable connections are made correctly.
If your computer is already setup to receive an IP address automatically, you may
skip the following “Computer LAN IP Configuration” section.
3.2
Computer LAN IP Configuration
By default the iBoss™ Pro has a local (LAN) gateway of “192.168.1.1” with a subnet mask
of “255.255.255.0” and a DHCP server so that your computer can obtain an IP address
automatically. Most computers have their network connection setup to receive an IP address
automatically from a DHCP server.
Rev 3.0.1.105: August 20, 2008
Page 9 of 73
3.2.1 Computer Automatic IP Configuration
Below are instructions for configuring both Windows and Mac computers to obtain an IP
address automatically.
Windows
1. Configure the computer LAN setting to automatically obtain an IP address from the
iBoss™ Pro by following the steps below.
· Click “Start” in the task bar then select “Control Panel” to open it.
· Find the icon “Network Connections” then Double-Click to open the network connection
settings.
· You will see an icon “Local Area Connection”, Right-Click the mouse to open the sub-menu and select
“Properties” for setting the IP address.
Select “Internet Protocol (TCP/IP)” then click the “Properties” button.
· Ensure that the “Obtain an IP address automatically” and “Obtain DNS server
address automatically” options are checked and then press “OK” to close.
Rev 3.0.1.105: August 20, 2008
Page 10 of 73
Mac OS X
Please refer to the following to set your Mac computer to automatically obtain and IP address:
· Choose “System Preferences” from the Apple menu. Once the application is started, select “Network”.
Click on the “TCP/IP” tab.
· Make sure that the “Configure” menu in the “TCP/IP” tab is set to “Using DHCP”.
· Click the “Apply Now” button at the bottom of the panel to save the changes you just made and quit the
System Preferences application.
Note: You may need to restart your computer for the network connection settings to take effect.
3.2.1.1 iBoss Pro User Interface
The iBoss does not require any software installation. Instead, its user interface can be
accessed directly using a standard Internet web browser. The web-based user interface
allows you to configure your iBoss.
1. Verify that your computer has an IP address that is on the same subnet as the iBoss IP
address, as stated above.
2. Open a standard Internet web browser application (Internet Explorer®, Firefox®, etc.).
3. In the URL address bar, enter the domain http://myiBoss.com and press <enter>. This
will take you to the iBoss interface. If the iBoss interface does not load, enter the configured
IP address of the iBoss (default: http://192.168.1.1) and press <enter>.
Note: The http://myiBoss.com webpage is built into the iBoss, so it is always accessible
even though the Internet may not be. http://myiBoss.com is the configuration portal for the
iBoss. You may access the user interface from any computer connected behind the iBoss.
Figure 5 - iBoss User Interface
3.2.1.1.1 Setup Network Connection
If your ISP connection is dynamic (DHCP), you may skip the following “WAN
Configuration” Section
WAN Configuration
In order to connect to the Internet, you will first need to setup your iBoss™ Pro WAN connection.
Rev 3.0.1.105: August 20, 2008
Page 11 of 73
By default the iBoss™ Pro WAN Internet connection is set to use DHCP (obtain an IP address
automatically), which is a common configuration. If you need to change the WAN connection type follow
the directions below.
1. Log into your iBoss™ Pro and click on "Setup Network Connection" from the main menu.
(Please refer to the iBoss™ Pro User Interface section on how to log into the iBoss™ Pro)
· Click "Configure Internet Connection".
· Select which connection type you will be using to connect your iBoss™ Pro's WAN port to
your ISP (see screen below).
Note: Different ISP's require different methods of connecting to the Internet, please check
with your ISP as to the type of connection it requires.
1.1 DHCP (Automatic IP Configuration) - Your ISP will automatically give you and IP
address.
1.2 Static IP Address - Your ISP has given you and IP address already.
1.3 PPPoE - Your ISP requires you to use a Point-to-Point Protocol over Ethernet (PPPoE)
connection.
· Select one of the WAN connection types and then proceed to the manual's relevant subsection.
1.1
DHCP (Automatic IP Configuration)
1.2
· Choose "DHCP (Automatic IP configuration)" if your ISP will automatically give you an
IP address. Click "Save" when you have finished the configuration. You have completed the
WAN configuration for the DHCP (Automatic IP configuration) connection type.
1.2 Static IP Address
· Choose "Static IP Address" if your ISP has given you a specific IP address for you to use. Your
ISP should provide all the information required in this section.
Note: Secondary DNS is not required.
Rev 3.0.1.105: August 20, 2008
Page 12 of 73
· Click "Save" when you have finished the configuration above. You have completed the WAN
configuration for the Static IP Address connection type.
1.3 PPPoE
· Choose "PPPoE" if your ISP requires the PPPoE protocol to connect you to the Internet. Your ISP
should provide all the information required in this section.
· Click "Save" when you have finished the configuration above. You have completed the WAN
configuration for the PPPoE connection type.
Congratulations! You have completed the WAN configuration for the iBoss™ Pro. After reboot, your
iBoss™ Pro is now ready for the Internet connection.
Rev 3.0.1.105: August 20, 2008
Page 13 of 73
3.3
Choosing an Operation Mode
The iBoss™ Pro has two different modes that it can operate in. You may choose between
“Transparent Mode” and “Firewall/Router Mode”. The mode you choose depends on how you
intend to use the iBoss™ Pro on your network.
Note: By default the iBoss™ Pro Operation Mode is set to “Firewall/Router Mode”.
Transparent Mode (Figure A) - You currently have a firewall/router setup and are using the
iBoss ™ Pro on the local side of your network between your firewall and a switch/hub. The
iBoss™ Pro filters transparently on your network without affecting your existing network
topology.
Firewall/Router Mode (Figure B) - You would like the iBoss™ Pro to act as a network sharing
firewall/router (with optional DHCP server) and apply filtering for all traffic passing through
the firewall (including wireless clients). Pictured is the iBoss Pro80 model.
Figure 6 - Operation Modes
Rev 3.0.1.105: August 20, 2008
Page 14 of 73
3.3.1 Operation Mode Configuration
The Operation Mode configuration can be found on the Internet Connection page.
· Log into your iBoss™ Pro and click on "Setup Network Connection" from the main menu.
(Please refer to the Logging In section on how to log into the iBoss™ Pro)
· Click "Configure Internet Connection".
· Choose an Operation Mode for the iBoss™ Pro to operate in. Please refer to previous page
for Operation Mode information.
· Click "Save" to save your Operation Mode settings.
WAN Connection
In order to connect to the Internet, you will need to setup your iBoss™ Pro WAN connection.
Transparent Mode - The WAN connection can be configured to obtain an IP address
automatically from a DHCP server on your local (LAN) network. Alternatively, you may also
configure the iBoss™ Pro to use a static IP address on your local (LAN) network.
Firewall/Router Mode - The WAN connection can be configured to obtain an IP address
automatically, configured manually (static IP address), or configured for a PPPoE connection
from the ISP (Internet Service Provider).
Note: Different ISPs require different methods of connecting to the Internet, please check
with your ISP as to the type of connection that is required.
Rev 3.0.1.105: August 20, 2008
Page 15 of 73
4 INTERFACE
4.1
Home Page
Figure 7 - Home Page
Rev 3.0.1.105: August 20, 2008
Page 16 of 73
4.1.1 Filtering Status
This indicates the filtering status of your iBoss. The following values may be displayed:
Enabled - Indicates that your iBoss is Enabled and Active.
Disabled - Indicates that your iBoss is not enabled.
Connecting - When the iBoss is enabled, it must first establish a connection to the gateway.
This indicates that the iBoss is attempting to establish a connection.
Must Activate or Subscription Expired - If you have a new iBoss and need to activate your
subscription, or if your iBoss subscription has expired, the “Activate” button will appear next
to the filtering status field. Click the “Activate” button to proceed with your iBoss activation.
Current Date & Time - Indicates the current date and time. The date and time are
synchronized when the iBoss establishes a connection to the gateway, and are important for
performing Internet scheduling and report logging. The local time zone settings may be set
from the “Edit My Time Zone” page under “My Preferences”.
Note: The date & time will only be displayed when the iBoss status is “Enabled”.
Enable/Disable Button - The “Enable/Disable” button is located next to the Filtering Status
field. It is useful for quickly enabling and disabling your iBoss filtering. If your status reads
“Not Enabled”, clicking the “Enable” button will enabled the iBoss filtering.
4.1.2 Main Menu
The “Home” menu allows you to choose options for configuring the current iBoss settings.
There are six options to choose from: View Log Reports, Configure Internet Controls, Edit My
Preferences, Identify Computers & Users, Setup Network Connection, and Update Firmware.
View Log Reports - This option allows you to view your iBoss report logs.
Configure Internet Controls - This option allows you to configure different iBoss filtering
controls.
Edit My Preferences - This option allows you to edit preferences including E-mail options,
password, time zone and custom block messages.
Identify Computers & Users - This option allows you to identify computers and individual user
login on your network for computer specific management control.
Setup Network Connection - This option allows you to configure your iBoss network settings.
Update Firmware - This option allows you to update the firmware for your iBoss whenever
updates are available.
Manage Subscription - This option allows you to update the subscription for your iBoss.
Rev 3.0.1.105: August 20, 2008
Page 17 of 73
4.1.3 Shortcut Bar
Use this shortcut bar to quickly navigate through the iBoss interface. The shortcut bar has 4
options to choose: Home, Reports, Internet Controls, and My Preferences. Once you set a
password for the iBoss, a Logout button will also appear.
Rev 3.0.1.105: August 20, 2008
Page 18 of 73
4.2
Reports
Figure 8 - Reports
Rev 3.0.1.105: August 20, 2008
Page 19 of 73
This page displays the log reports for your iBoss™ Pro. Reports include Web Usage,
Violations, and Tamper logs. You may have these reports automatically sent to your E-mail
account by enabling "E-mail Log Sending" on the E-mail Reports page.
Web Usage Report
This is a report of Internet web usage. The report shows entire web usage as well as the
number of violations listed by category. The log may be cleared by clicking the "Clear Log"
button at the bottom of the report. It shows the Total Number of Web hits and Total
Number of Violations. This log is based on all web hits and not just violations.
Violation Log (Last 150 Violations)
This is a report that contains the last 150 attempted violations to the current iBoss™ Pro
Internet rules. The log may be cleared by clicking the "Clear Log" button at the bottom of
the report. Websites and online applications will not be blocked while the iBoss™ Pro is in
"Stealth Mode" but do show up in the violation log (if enabled). This log contains the Date,
Time, Computer, URL address, and Category.
Tamper Log (Last 10 Violations)
This is a report containing events that may indicate tampering with the iBoss™ Pro. Logged
events include: powering on, Internet control enabling/disabling, clearing of logs, failed
login attempts, and disconnections from our gateways. This log cannot be cleared. This log
contains the Date, Time, and Message containing the violation error.
Live Monitoring
This page displays a real-time running log of web activity through the iBoss™ Pro. This log
allows you to monitor current web activity on your network. The last 150 websites visited
will be listed. To begin monitoring, click the "Enable" option below. When you are finished
monitoring, click the "Disable" option. You may refresh the log by clicking the "Refresh"
button at the bottom of the list.
Send Email Now
This button will show up if you have an E-mail address set within the iBoss™ Pro. Use this
Button to quickly send the current report log.
Save To File
Use this button to save the current report log to an .html file.
Export As CSV
Use this button to export the current report as a .csv file to import to a database that you
may have set up.
Rev 3.0.1.105: August 20, 2008
Page 20 of 73
4.3
Configure Internet Controls
Figure 9 - Configure Internet Controls
The "Configure Internet Controls" menu lets you choose options for configuring the current
iBoss Internet controls. There are nine options to choose from: Block Specific Website
Categories, Block Specific Web Programs, Block Specific Websites, Block Specific Keywords,
Block Specific Ports, Block Specific File Extensions, Restrict Domain Extensions, Allow
Specific Websites, and Configure Sleep Schedule.
Block Specific Website Categories - This option allows you to block or allow website content
based on categories.
Block Specific Web Programs - This option allows you to configure access to web applications
that the iBoss can manage. You may choose to block Chat (Instant messenger) programs,
File Sharing programs, and FTP.
Rev 3.0.1.105: August 20, 2008
Page 21 of 73
Block Specific Websites - This option allows you to block access to specific websites by
adding them to the Block List.
Block Specific Keywords - This option allows you to block specific keywords from searches or
full URL's by adding them to the Keyword list.
Block Specific Ports - This option allows you to block specific ports or port ranges with
Protocol and Direction.
Block Specific File Extensions - This option allows you to block specific file extensions.
Restrict Domain Extensions - This option allows you to restrict domain extensions allowing to
your either block specific domain extensions or only allow specific domain extensions.
Allow Specific Websites - This option allows you to permit access to specific websites by
adding them to the Allow List.
Configure Sleep Schedule - This option allows you to schedule access to the Internet on a
schedule.
Rev 3.0.1.105: August 20, 2008
Page 22 of 73
4.3.1 Block Specific Website Categories
Figure 10 - Block Specific Website Categories
Rev 3.0.1.105: August 20, 2008
Page 23 of 73
The "Internet Category Blocking" page allows you to configure the current iBoss Internet
website category blocking settings, log settings, Stealth Mode, and Identity Theft Detection
options.
Categories - These are categories from which Internet websites are grouped. You may
choose categories from this list that you wish to block on your network. In addition to
blocking access to these website categories, the iBoss will also log attempted access
violations if logging is enabled.
Examples of website categories are:
Ads
Adult
Audio & Video
Dating & Personals
Dictionary
Drugs
Education
Entertainment
File Sharing
Finance & Investment
Forums
Friendship
Gambling
Games
Government
Image/Video Search
Guns & Weapons
Jobs
Mobile Phones
News
Private Websites
Web Proxies
Religion
Search Engines
Shopping
Sports
Toolbars
Travel
Violence & Hate
Warez & Hacking
Web-Based E-mail
Category Scheduling - Allows you to choose whether you want the categories above that
are selected to be always blocked or blocked based on a custom Advanced Day/Time
Schedule.
Note: The Advanced Category Scheduling feature will only take effect on categories that
are currently selected to be blocked in the category block list above.
Logging - Allows you to enable and disable logging of violation attempts for the current set
of blocked website categories. Log reports may be viewed on the iBoss Reports page. The
report information includes date, time, user, website address, and category of the violation.
Stealth Mode - Allows you to stealthily monitor Internet activity without blocking access to
forbidden sites. With both Logging and Stealth Mode enabled, you can monitor Internet web
surfing activity by viewing the log reports on the iBoss Reports page while remaining
unnoticed to Internet users on the network.
Note: Websites and online applications will not be blocked while the iBoss is in "Stealth
Mode".
Strict SafeSearch Enforcement - Allows you to enforce strict safe search on the Google
and Yahoo search engines. This includes image searching. If this option is enabled and the
user does not have search engine preferences set to strict safe searching, the search will be
blocked. This allows an extra layer of enforcement to prevent unwanted adult and explicit
content from being search on these search engines.
Note: This setting only applies to Yahoo and Google search engines. For Yahoo, the search
preference for "SafeSearch" Filter must be set to "Filter out adult Web, video, and image
search results" if this option is enabled. For Google, the SafeSearch filtering preference
must be set to "Use strict filtering (Filter both explicit text and explicit images)" when this
option is enabled.
Rev 3.0.1.105: August 20, 2008
Page 24 of 73
Identity Theft (Phishing)/ IP Address URL Blocking - Protects against potential
identity theft attempts by notifying you when someone is trying to steal your personal
information through Internet Phishing. Enabling this feature will also block users from
navigating to websites using IP address URL's.
Rev 3.0.1.105: August 20, 2008
Page 25 of 73
4.3.1.1 Advanced Scheduling
Figure 11 - Advanced Scheduling
You may use advanced scheduling to create custom allow and block times for Filtering
Categories, Web Programs, and the Sleep Schedule. You may use different schedules for the
different days of the week, simply select the day and set the schedule. For Filtering
Categories you will have to select a Category to Schedule:
Green (or checked) indicates access is allowed during the time block specified.
Red (or unchecked) indicates access is blocked during the time block specified.
Note: For the Advanced Category Scheduling to function, the category to be scheduled must
be currently blocked on the "Internet Category Blocking" setup page.
Rev 3.0.1.105: August 20, 2008
Page 26 of 73
4.3.1.2 Identify Theft (Phishing)/ IP Address Blocking Page
Figure 12 - Identity Theft Detection Page
When a page is blocked from of the iBoss due to detection of Identity Theft (Phishing)/IP
Address URL Blocking, this page will show up in the web browser to the user. You may
manually login and add the blocked Identity theft page (IP address) to the allowlist if you
feel that you have received the Identity Theft Detection in error by typing in the password
and pressing Login.
Rev 3.0.1.105: August 20, 2008
Page 27 of 73
4.3.2 Block Specific Web Programs
Figure 13 - Block Specific Web Programs
Rev 3.0.1.105: August 20, 2008
Page 28 of 73
The "Internet Program Blocking" section allows you to configure the current iBoss program
blocking settings.
Chat - This category contains applications used for online messaging and chat. The iBoss can
block the selected program(s) and log attempted violations. Examples of applications in this
category are:
AIM (AOL Instant Messenger)
Yahoo Messenger
ICQ
MSN Messenger
IRC (Internet Relay Chat)
Jabber
Chat Schedule - Allows you to schedule daily access for schedulable chat programs. This
option will bypass blocking for chat and instant messenger programs during the specified
time.
Gaming
This category contains online gaming applications. The iBoss can block the selected
program(s) and log attempted access violations. Examples of applications in this category
are:
World of Warcraft
StarCraft
Everquest/Everquest II
XBox
Gaming Schedule - Allows you to schedule daily access for selected online gaming programs.
This option will bypass blocking for online gaming programs during the specified time.
File Sharing Programs - This category contains online file sharing applications. The iBoss can
block the selected program(s) and log attempted access violations. Examples of applications
in this category are:
Limewire
XoloX
ZP2P
BearShare
Acquisition
BitTorrent
EDonkey
Manolito
Ares
Direct Connect
File Sharing Schedule - Allows you to schedule daily access for schedulable file sharing
programs. This option will bypass blocking for file sharing programs during the specified
time.
FTP (File Sharing Protocol)
You may choose to enable blocking for incoming and outgoing FTP Traffic. Enabling this
feature will allow you to block incoming, outgoing, or all FTP Traffic.
Block Ping (ICMP)
You may choose to enable blocking for outgoing ping Traffic.
Block SSL on Non-Standard Ports
You may choose to enable blocking for SSL over any non-standard ports. Use this feature to
help block file sharing programs such as Limewire, etc.
Block Newsgroups
Rev 3.0.1.105: August 20, 2008
Page 29 of 73
You may choose to enable blocking for newsgroups. Some newsgroups allow file sharing to
be used which you can block with this feature.
Block Internal Servers
You may choose to enable blocking for internal servers. This feature allows you to block
internal servers and programs that run that act as servers such as BitTorrent. You may
choose either to block and log these violations or use the silent block to block the traffic but
not log the violation.
Logging - Allows you to enable or disable logging of attempted program access violations.
This log is found on the Reports page. The logging includes date, time, and category.
Logging can be enabled while in stealth mode. This is useful for monitoring your Internet
usage while remaining unnoticed on the network. Without logging, the iBoss program
blocking will still work however violations will not be logged.
Rev 3.0.1.105: August 20, 2008
Page 30 of 73
4.3.3 Block Specific Websites
Figure 14 - Block Specific Websites
This page allows you to block specific website domains from being accessed on your
network. Enter the URL domain name of the website you would like to block in the text box
below and click the "Add URL" button. You may enter a maximum of 200 website URL
domains. To remove a website URL domain from the Blocklist, select the URL to remove and
click the "Remove" button located at the bottom of the page. Click the "Done" button when
you are finished.
Rev 3.0.1.105: August 20, 2008
Page 31 of 73
4.3.4 Block Specific Keywords
Figure 15 - Block Specific Keywords
Rev 3.0.1.105: August 20, 2008
Page 32 of 73
This feature allows you to create keyword Blocklists. The iBoss will block Internet sites that
contain these specific keywords in the URL. In addition, web searches using the keywords in
the list(s) will also be blocked.
Pre-Defined Lists
You may select from pre-defined keyword category lists. Each category contains its own
keyword list. To enable a keyword list, select the checkbox next to the category. You may
view and edit the list by clicking on the category link. When you are finished, click the
"Apply" button.
Custom List
Enter the custom keyword that you would like to block in the text box below and click the
"Add Keyword" button. Each keyword may be a maximum of 19 characters in length (letters
and digits only). To remove a keyword from the list, select the keyword and click the
"Remove" button located at the bottom of the page. When you are finished, click the "Done"
button.
If you want a keyword to be blocked globally across all profiles, select the "Apply this entry
to all profiles" option before clicking the "Add Keyword" button. The letter "G" will appear
next to the entry which indicates that it is a global entry and applies to all profiles. When
removing a global entry, it will remove the entry from all profiles. When you are finished,
click the "Done" button.
Rev 3.0.1.105: August 20, 2008
Page 33 of 73
4.3.5 Block Specific Ports
Figure 16 - Port Blocking
Port blocking allows Internet traffic on specified ports or ranges of ports to be blocked from
accessing the Internet. Traffic using the specified ports will be blocked completely. This
allows you to enter the name, port start, port end, protocol, and direction. Once you enter
in the information click Enable and save.
Rev 3.0.1.105: August 20, 2008
Page 34 of 73
4.3.6 File Extension Blocking
Figure 17 - File Extension Blocking
This page allows you to block specific file extensions from being downloaded on your
network.
Enter the file extension of files you would like to block in the text box below and click the
"Add" button. You may enter a maximum of 200 file extensions across all profiles. Each
extension may be a maximum of 15 characters in length. To remove an extension from the
Blocklist, select the extension to remove and click the "Remove" button located at the
bottom of the page. Click the "Done" button when you are finished.
Rev 3.0.1.105: August 20, 2008
Page 35 of 73
4.3.7 Domain Extension Restrictions
Figure 18 - Domain Extension Restrictions
This page allows you to block or allow specific domain extensions from being accessed. You
may choose to only allow the domain extensions in the list or to block the extensions in the
list. If you choose to only allow the domain extensions in the list, then any domain access
whose base is not in the list will not be allowed. Alternatively, if you choose the block the
extensions in the list, then accesses to domains with the listed domain bases will be
blocked. For example, you may choose to allow only domains that end in ".com" and ".net".
Any domain that does not end with those extensions will be blocked.
Enter the domain extensions in the text box below and click the "Add" button. You may
enter a maximum of 200 domain extensions across all profiles. Each extension may be a
maximum of 15 characters in length. To remove an extension from the list, select the
extension to remove and click the "Remove" button located at the bottom of the page. Click
the "Done" button when you are finished.
Note: Changing the option to Only allow below will only allow the domains in the list. These
settings do not apply to web access to direct IP addresses. You can block direct IP address
access by going to Internet Controls> Block Specific Web Categories> IP Address blocking.
Rev 3.0.1.105: August 20, 2008
Page 36 of 73
4.3.8 Allow Specific Websites
Figure 19 - Allow Specific Websites
Rev 3.0.1.105: August 20, 2008
Page 37 of 73
This page allows you to add specific websites to your Allowlist. The Allowlist is a list of
specific Internet website domains that you want to allow on your network. Website domains
added to this list will be allowed even if they are currently blocked in the Internet Category
Blocking settings. Enter the domain name of the website you would like to allow in the text
box below and click the "Add URL" button. To remove a website URL domain from the
Allowlist, select the URL and click the "Remove" button located at the bottom of the page. If
you want to allow only these website URL domains on your network, select the "Allow These
Sites ONLY" checkbox and click the "Apply" button. When you are finished, click the "Done"
button.
You may select "Allow These Sites ONLY" and check "Apply" to only allow the sites that are
on the allowlist. To disable this option, uncheck this option and click "Apply".
Note: If the "Allow These Sites ONLY" option is selected, only the website domains in the
Allowlist below will be allowed. All other website domains will be blocked.
Rev 3.0.1.105: August 20, 2008
Page 38 of 73
4.3.9 Configure Sleep Schedule
Figure 20 - Configure Sleep Schedule
Rev 3.0.1.105: August 20, 2008
Page 39 of 73
Internet Sleep Mode allows you to put your Internet connection to sleep (disabling all
Internet traffic to and from your network). This is beneficial for when the Internet doesn't
need to be on or accessed.
You may manually force the Internet to sleep by selecting a time period under the “Force
Internet To Sleep For:” section and pressing the "Sleep Now" button. You may also bypass the
sleep schedule by selecting a time period under the “Bypass Internet Sleep Schedule For:”
section and pressing the “Bypass Now” button.
When manually forcing the Internet to sleep or bypassing the sleep schedule, a countdown
timer will show that will allow you to cancel the forced sleep or cancel the bypass.
You may setup a daily schedule or an Advanced Schedule by which to put the Internet to
sleep under the “Sleep Schedule” section.
When the Internet is in Sleep Mode, the "Internet Sleep Mode" page will be displayed in the
web browser if Internet access is attempted. To customize the message that appears on the
"Internet Sleep Mode" page, go the custom block page messages under preferences. You may
override Internet Sleep Mode and wake up your Internet connection by entering the iBoss
login password into the "Internet Sleep Mode" page if it is displayed.
Rev 3.0.1.105: August 20, 2008
Page 40 of 73
4.3.9.1 Sleep Mode Page
Figure 21 - Internet Sleep Mode Page
When a page is blocked from violation of the iBoss sleep mode schedule, this page will show
up in the web browser to the user. You may manually login and turn off Internet Sleep Mode
by typing in the password and pressing Login. The Sleep Mode will continue at the next
scheduled time.
If a custom message is set, this will show up above the sleeping computer.
Rev 3.0.1.105: August 20, 2008
Page 41 of 73
4.4
Edit My Preferences
Figure 22 - Edit My Preferences
The "My Preferences" menu allows you to choose options for configuring the current
preferences of the iBoss. There are six options to choose from: Set or Change My Password,
Setup E-mail Reports, Customize Blocked Pages, Change My Time Zone, Edit System
Settings, and Setup Remote Management.
Set or Change My Password - This option allows you to set or change the password used for
logging into your iBoss device.
Setup E-mail Reports - This option allows you to setup an E-mail address for receiving report
logs automatically through E-mail.
Customize Blocked Pages - This option allows you to customize the blocked pages.
Change My Time Zone - This option allows you to change your current time zone. This option
is important for your logs and schedules to work accurately.
Edit System Settings - This option allows you to change system settings.
Setup Remote Management - This option allows you to setup Remote Management features.
Rev 3.0.1.105: August 20, 2008
Page 42 of 73
4.4.1 Set or Change My Password
Figure 23 - Set or Change My Password
You may set or change the password used for managing the iBoss. The password may be a
maximum of 24 characters in length. The password recovery option is if your password
becomes lost, you will be able to recover it through e-mail if this option is selected.
Note: Be very careful with this password. It is used for configuration for your iBoss and for
override functions.
Rev 3.0.1.105: August 20, 2008
Page 43 of 73
4.4.2 Setup E-mail Reports
Figure 24 - Configure Report Settings
These report settings are for the Enterprise Report Manager.
If you would like to have reports sent to you via E-mail, you may enable E-mail Report Log
sending and specify an E-mail address below. To enter more than one E-mail address,
separate each address with a semicolon (example: [email protected];[email protected]).
E-mail reports will automatically be sent when the Violation Log becomes full. You may
select to have the Violation Log cleared after E-mail reports are sent. In addition, you may
also select to have
E-mail notifications sent when an iBoss™ Pro tampering event occurs.
Schedule
E-mail reports will automatically be sent when the Violation Log becomes full. In addition,
you may also set a daily or weekly schedule for the E-mail reports to be sent.
Rev 3.0.1.105: August 20, 2008
Page 44 of 73
4.4.3 Customize Block Pages
Figure 25 - Customize Block Pages
Rev 3.0.1.105: August 20, 2008
Page 45 of 73
You may customize the pages that are displayed when a website is blocked due to its
content or when the Internet is in Sleep Mode.
Blocked Page Custom Message - This option allows you to insert a custom message into
the Blocked Page. The custom message may be up to 299 characters in length. You may
also enable or disable the Password Override feature that appears at the bottom of the
page.
Blocked Page Custom Page - This option allows you to replace the entire Blocked Page
with your own custom web page. This option is for advanced users only. You may enter your
own HTML-based web page into the form below. The webpage may be up to 299 characters
in length.
Blocked Page Redirect Page - This option allows you specify your own URL to use as the
Blocked Page. Users will be redirected to this URL instead of the default Block Page. The
URL may be up to 255 characters in length.
Sleep Mode Custom Message - This option allows you to insert a custom message into
the Sleep Mode Page. The custom message may be up to 299 characters in length. You may
also enable or disable the Password Override feature that appears at the bottom of the
page.
Sleep Mode Custom Page - This option allows you to replace the entire Sleep Mode Page
with your own custom web page. This option is for advanced users only. You may enter your
own HTML-based web page into the form below. The webpage may be up to 299 characters
in length.
Sleep Mode Redirect Page - This option allows you specify your own URL to use as the
Sleep Mode Page. Users will be redirected to this URL instead of the default Sleep Mode
Page. The URL may be up to 255 characters in length.
Rev 3.0.1.105: August 20, 2008
Page 46 of 73
4.4.3.1 Blocked Page
Figure 26 - iBoss Blocked Page
When a page is blocked from violation of the iBoss settings, this page will show up in the
web browser to the user. You may manually login and add sites to the allowlist if you feel
that you have received the blocked page in error by typing in the password and pressing
Login. If a custom message is set, this will show up above the exclamation point.
Rev 3.0.1.105: August 20, 2008
Page 47 of 73
4.4.4 Change My Time Zone
Figure 27 - Set Time Zone
The "Time Zone" page allows you to edit your current time zone settings and enable
daylight savings.
Time Zone - This option allows you to set your local time zone. This is important for the
logging and scheduling to work accurately.
Daylight Savings - This option allows you to setup daylight savings time for your local
time zone setting.
Rev 3.0.1.105: August 20, 2008
Page 48 of 73
4.4.5 Edit System Settings
Figure 28 - Edit System Settings
The "Edit System Settings" page allows you to edit your device name of your iBoss.
Restore Factory Defaults - This option allows you to set your iBoss settings back to
factory defaults.
Reboot - This option allows you to reboot your iBoss. These will not affect any settings.
Rev 3.0.1.105: August 20, 2008
Page 49 of 73
4.4.6 Remote Management
Figure 29 - Setup Remote Management
You may enable "Remote Management" which will allow you to access and manage the
iBoss through the web from any remote location. To enable "Remote Management", select
the enable option below.
Register Unit with Remote Management
Click the "Register Unit Now" button below to assign this unit to an Remote Management
Account. If you do not have an account created, you will have to create one. Registration
information for this unit will automatically be transferred to simplify the registration process.
Registration Key
Each iBoss holds a unique registration key used in the Remote Management registration
process. This key provides security when using the Remote Management features through
the web. You will be prompted for this key during the online registration process.
Rev 3.0.1.105: August 20, 2008
Page 50 of 73
4.5
Identify Computers & Users
Figure 30 - Identify Computers & Users
The Identify Computers & Users has tabs at the top to switch from identified computers,
added user accounts, and groups.
4.5.1 Identify Computers
Figure 31 - Identify Computers
Rev 3.0.1.105: August 20, 2008
Page 51 of 73
To identify the computer you are using now, click the "Identify/Edit this computer" button.
Advanced users may click the "Advanced Add" button to manually identify a computer. For
the "Advanced Add", you will need to know the MAC address of the computer you wish to
identify. You may click on Import to import computers to the identified list. Please see the
Computer Import section for more information.
Unidentified Computers - This is a list of computers on the network that have not been
identified. To identify one of these computers, click Add on the computer in the list that you
wish to identify. You may refresh the list by clicking on the "Refresh" button at the bottom
of the list.
Default Filtering Policy - These settings apply to computers that are unidentified on your
network. You can choose to apply the rules set by the "default" filtering group, block all
unidentified computers from accessing the Internet, or set unidentified computers to require
user login.
Note: If you choose to "Require user login on all unidentified computers", you must add
users under the Users tab to be able to login and browse the web.
Rev 3.0.1.105: August 20, 2008
Page 52 of 73
4.5.1.1 Identifying a Computer
Figure 32 - Identifying a Computer
To identify a computer, you may enter a Computer Nickname for the computer. When
clicking on the button "Identify/Edit This Computer", the ID/MAC address is automatically
entered for you. When clicking on "Advanced Add" you may enter in the ID/MAC address for
the computer you are identifying.
You may either set the Apply Filtering to "Yes, Use Group 1* Rules" with one of the filtering
groups, "No, Bypass Filtering Rules" or “Require user login for this computer” for the
computer you are identifying. When finished click the "Save" button. If you want to cancel
your changes click the "Cancel" button.
*The "Yes, Use Group 1 Rules" will show the assigned name of the filtering group.
Note: Computers with filtering rules applied will be filtered by the iBoss. Computers with
filtering rules bypassed will bypass the iBoss.
Rev 3.0.1.105: August 20, 2008
Page 53 of 73
4.5.2 Identify Users
Figure 33 - Identify Users
This is a list of users that can log onto computers who have their filtering policy set to
"Requires User Login". This allows you to share a single computer with multiple users. If the
computer is set to a default filtering group, user login does not apply. To create a new user,
click the "Add New User" button.
Note: These users will not have access to the iBoss settings and cannot log onto the iBoss
to change settings.
You may choose to Import Users using a list. Please see the Importing Users section for
more information.
You may click the Advanced User Settings for more advanced options when using user login.
Rev 3.0.1.105: August 20, 2008
Page 54 of 73
4.5.2.1 Adding a User
Figure 34 - Adding a User
To identify a user, you may enter a Username, Password, First Name, and Last Name. You
may either set the Apply Filtering to "Yes, Use Group 1* Rules" using one of the filtering
groups or "No, Bypass Filtering Rules" for the user you are identifying.
Daily Time Limits - This will allow you to set daily time limits for each day of the week for a
user. You can set a time between 15 minutes to 23 hours that a user can be logged in from
throughout the day. This means that when a user has the allocated time throughout the day
to use the time limit. When finished click the "Save" button. If you want to cancel your
changes click the "Cancel" button.
Rev 3.0.1.105: August 20, 2008
Page 55 of 73
4.5.2.2 Advanced User Settings
Figure 35 – Advanced User Settings
Rev 3.0.1.105: August 20, 2008
Page 56 of 73
This page allows you to configure settings for computers that require user login.
Note: These settings are global across all computers that require user login and only apply
to computers which require user login. These settings do not apply to identified computers
which have bypass filtering rules or have a filtering group set for it.
Port Bypassing - This will allow you to bypass ports on computers that require user login.
When a computer is set to require user login, Internet access is disabled when no user is
logged into the computer. If you would like to allow access to certain ports even when a
user is not logged in, you can configure them here. This is useful for programs that require
port access at all times (for example, remote computer management).
Domain Bypassing - This will allow you to bypass domains on computers that require user
login. When a computer is set to require user login, Internet access is disabled when no
user is logged into the computer. If you would like to allow access to certain domains even
when a user is not logged in, you can configure them here. This is useful for sites that
supply updates that require access at all times (for example, Operating System & Anti-virus
updates or Email access).
Custom Internet Access Window Company Name Logo - This allows you to add your company
name or logo easily on the "Internet Access Window" when a user is logged in. The
company name in text can be 50 characters and the length for the URL can be 256
characters. If you are using an image of your company logo, you can enter in the URL of
where the image is hosted. The image must be in a web viewable format (ex: .gif or .jpg)
and the width of "300" pixels and height of "70" pixels. If you are using the company name
text, please select "Text" and enter in the company name. If you are using an image for the
company logo, please select "Image" and enter in the full URL of the image.
Note: If the image that you use is not at the size of 300 x 70 it will be stretched to this size
Custom Login Message - This allows you to add a custom login message. This will be
displayed on the user login page before they have logged in. You may type in 300
characters for the custom message.
Custom Successful Login Message - This allows you to add a custom successful login
message after a user has logged in. This will be displayed on the user login page after they
have successfully logged in for the first time. You may type in 300 characters for the custom
message.
Custom User Homepage - This allows you to add a homepage that the users are directed to
after logging in.
Rev 3.0.1.105: August 20, 2008
Page 57 of 73
4.5.2.3 User Internet Access Window
Figure 36 - Internet Access Window Login
Figure 37 - Internet Access Window Session
The iBoss Internet Access Window is the session window for the user that is logged in. This
window must be kept open to remain logged in. This window will show you the Name of the
user logged in, how long they have been logged in (Session Time), and Time
Remaining/Daily time limit. The iBoss user login feature also allows you to put your own
Company Name in text or put a URL for a Company Logo Image. The user login feature
allows you to put custom messages before a user logs in and after they log in. This allows
you to post company policies and rules before using the Internet to protect your company
from liability conflicts.
Rev 3.0.1.105: August 20, 2008
Page 58 of 73
4.5.3 Filtering Groups
Figure 38 - Edit Filtering Groups
You may customize the different filtering group names to easily remember the different
settings of the filtering groups. These filtering groups are used for setting the rules for
identified computers and users
Note: The filtering group "Group 1" is used by default as rules of filtering for all unidentified
computers if you have this option set.
4.5.3.1 Filtering Group Tabs
Figure 39 - Filtering Group Tabs
When configuring the rules for your iBoss, you will notice the Group tabs at the top of each
configuration page. These pages allow you to set different filtering rules for the different
filtering groups. The selected group will appear to have the tab in front of the other tabs. To
switch configuration for different groups, select the group tab at the top of the page or from
the drop down menu to quickly jump to a filtering group. You may use the arrows to go to
the next or previous set of filtering groups.
Rev 3.0.1.105: August 20, 2008
Page 59 of 73
4.6
Setup Network Connection
Figure 40 - Setup Network Connection
The "Setup Network Connection" menu lets you choose options for configuring the current
iBoss Network Connections. There are five options to choose from: Configure Internet
Connection, Configure Local Area Network, Configure Wireless Settings, Setup Port
Forwarding, and Edit Advanced Settings.
Configure Internet Connection - This option allows you to configure the Internet (WAN)
connection of the iBoss.
Configure Local Area Network - This option allows you to configure the local area network
(LAN) address and DHCP server of the iBoss.
Configure Wireless Settings - This option allows you to configure the wireless settings of the
iBoss.
Setup Port Forwarding - This option allows you to configure any port forwarding rules for the
iBoss.
Add Additional Local Subnets - This option allows you to add additional local subnets if
needed.
Edit Advanced Settings - This option allows you to edit advanced settings like device name
and port used by the iBoss.
Rev 3.0.1.105: August 20, 2008
Page 60 of 73
4.6.1 Configure Local Area Network
Figure 41 - Configure Local Area Network
This section allows you to configure the LAN settings for the iBoss™ Pro. You can set the
following settings:
LAN IP Address - This is the IP address of the iBoss™ Pro on the LAN network. This will be
your LAN clients default gateway IP address and the IP address for the iBoss™ Pro local
interface.
LAN Subnet Mask - This is the subnet mask segment associated with the LAN IP Address.
DHCP Server - You can enable or disable the DHCP server within the iBoss™ Pro. By
enabling the DHCP server the router will automatically give your LAN clients an IP address.
If the DHCP is not enabled then you’ll have to manually set your LAN client’s IP addresses;
make sure the LAN client is in the same subnet as this broadband router if you want the
router to be your LAN client’s default gateway
DHCP Start IP Address - You can select a particular IP address range for your DHCP
server to issue IP addresses to your LAN Clients. This is the start of the DHCP IP address
range for the LAN.
DHCP End IP Address - This is the end of the DHCP IP address range for the LAN.
Note: By default the IP range is from: Start IP 192.168.1.100 to End IP 192.168.1.200.
If you want your PC to have a static/fixed IP address then you’ll have to choose an IP
address outside this IP address range.
Rev 3.0.1.105: August 20, 2008
Page 61 of 73
4.6.2 Configure Wireless Settings
Figure 42 - Configure Wireless Settings
The iBoss™ Pro has an 802.11g wireless signal and can support computers with an IEEE
802.11b or 802.11g wireless adapter. You can connect wirelessly from your computers
through its signal. By default, the wireless signal does not have a passkey and is not
encrypted.
Note: The default wireless signal coming from the iBoss™ Pro has an ESSID of "phantomxxxx".
You can choose whether to enable or disable the wireless access. You may change the
ESSID to one that you prefer and choose whether to enable the broadcast for the signal.
The wireless access point provides wireless LAN security functions, include WEP, and WPA
with pre-shared key. With these security functions, you can prevent your wireless LAN from
illegal access.
Please make sure your wireless stations use the same security function.
Choose whether to disabled encryption or use WPA with pre-shared key or WEP.
WEP
When you select 64-bit or128-bit WEP key, you have to enter WEP keys to encrypt data.
You can generate the key by yourself and enter it. You can enter four WEP keys and select
Rev 3.0.1.105: August 20, 2008
Page 62 of 73
one of them as default key. Then the iBoss™ Pro can receive any packets encrypted by one
of the four keys.
Key Length - 64-bit (default) - You can select the WEP key length for encryption, 64-bit or
128-bit. Larger WEP key length will provide higher level of security, but the throughput will
be lower.
Key Format - You may select to select ASCII Characters (alphanumeric format) or
Hexadecimal Digits (in the "A-F", "a-f" and "0-9" range) to be the WEP Key. (For example:
ASCII Characters: guest; Hexadecimal Digits: 12345abcde)
Default Key - Select one of the four keys to encrypt your data. Only the key you select in
the "Default key" will take effect. Key 1 - Key 4 - The WEP keys are used to encrypt data
transmitted in the wireless network. Fill the text box by following the rules below.
64-bit WEP: input 10-digit Hex values (in the "A-F", "a-f" and "0-9" range) or 5-digit ASCII
character as the encryption keys.
128-bit WEP: input 26-digit Hex values (in the "A-F", "a-f" and "0-9" range) or 13-digit
ASCII characters as the encryption keys.
WPA Pre-shared key
Wi-Fi Protected Access (WPA) is an advanced security standard. You can use a pre-shared
key to authenticate wireless stations and encrypt data during communication. It uses TKIP
or CCMP(AES) to change the encryption key frequently. So the encryption key is not easy to
be broken by hackers.
This can improve security very much.
WPA (TKIP) - TKIP can change the encryption key frequently to enhance the wireless LAN
security.
WPA2 (AES) - This use CCMP protocol to change encryption key frequently. AES can
provide high level encryption to enhance the wireless LAN security.
WPA2 Mixed - This will use TKIP or AES based on the other communication peer
automatically.
Rev 3.0.1.105: August 20, 2008
Page 63 of 73
Pre-shared Key Format - You may select to select Passphrase (alphanumeric format) or
Hexadecimal Digits (in the “A-F”, “a-f” and “0-9” range) to be the Pre-shared Key. For
example: Passphrase: iamguest; Hexadecimal Digits: 12345abcde
Pre-shared Key - The Pre-shared key is used to authenticate and encrypt data transmitted
in the wireless network. Fill the text box by following the rules below.
Hex WEP: input 64-digit Hex values (in the “A-F”, “a-f” and “0-9” range) or at least 8
character pass phrase as the pre-shared keys.
Rev 3.0.1.105: August 20, 2008
Page 64 of 73
4.6.3 Setup Port Forwarding
Figure 43 - Setup Port Forwarding
The iBoss™ Pro has a port forwarding feature that will enable you to open ports to a local IP
address. You can have different services (e.g. email, FTP, Web etc.) going to different
service servers/clients in your LAN. The Port Forwarding allows you to re-direct a particular
range of service port numbers (from the Internet/WAN Ports) to a particular LAN IP
address. Since the iBoss™ Pro can act as your firewall/router, you are able to set port
forwarding rules to allow outside access to your network on a specified port range. It will
help you to host some servers behind the iBoss™ Pro’s NAT firewall.
You may set whether to disable or enable your port forwarding rules. The fields are
Name - The description of the port forwarding setting.
Local IP address - This is the private IP of the server behind the NAT firewall. You need to
give your LAN PC clients a fixed/static IP address for Port Forwarding to work properly
Port Start/Port End - The range of ports to be forwarded to the private IP.
Protocol - This is the protocol type to be forwarded. You can choose to forward “TCP” or
“UDP” packets only or select “Both” to forward both “TCP” and “UDP” packets.
Enter in the port forwarding rules which you would like to add and click the “Add” button.
Click “Done” when finished.
Rev 3.0.1.105: August 20, 2008
Page 65 of 73
4.6.4 Add Additional Local Subnets
Figure 44 - Add Additional Local Subnets
This page allows you to add additional local subnets. Traffic between local subnets is not
filtered by the iBoss.
Enter the additional local subnets below and click the "Add" button. To remove a subnet
from the list, select the subnet to remove and click the "Remove" button located at the
bottom of the page. You can add up to 500 additional local subnets. Click the "Done" button
when you are finished.
Note: If your network is using VLANs or multiple networks, try to enter a larger subnet that
encompasses all of the smaller subnets instead of entering the individual smaller subnets
separately.
Rev 3.0.1.105: August 20, 2008
Page 66 of 73
4.6.5 Edit Advanced Settings
Figure 45 - Advanced Network Settings
The iBoss™ Pro connects to the Phantom servers via UDP. You may select which ports it connects
through. The default destination port is 8000 and default source port is 8001.
Always On Connection - This option allows you to still have Internet access even if it loses connection
with our servers. This function will work after the first time that it has established a connection.
Rev 3.0.1.105: August 20, 2008
Page 67 of 73
4.7
Firmware Updates
Figure 46 - Firmware Updates
Firmware updates may be available from time to time. These updates include feature
enhancements. The updates are downloaded over the Internet directly into the device.
Firmware updates include feature enhancements only and are not related to the iBoss
Internet filtering functionality. The iBoss will always be up-to-date with the latest web
category URLs and online application definitions used with filtering rules. You must have an
active subscription and a live Internet connection in order to download firmware updates.
Model - Indicates the model of your iBoss device.
Device Name - Indicates the name given to the iBoss.
Current Firmware Version - Indicates the firmware version installed on your iBoss.
Available Firmware Version - Indicates the latest firmware version available for
download. If this version number matches the number in the "Current Version" field, then
your iBoss firmware is up to date.
Current Signature Version - Indicates the signature version installed on your iBoss
Export Settings File - This option allows you to export the iBoss settings to a log file.
Download/Install - The "Download/Install" button will appear when new firmware is
available. Click this button to begin downloading and installing the new firmware. The
"Install" button will appear when new firmware has been downloaded and is ready to install.
Click this button to begin installing the new firmware. Once this process begins, do not
power down the iBoss until installation is complete. When the installation is complete, you
will be redirected back to the iBoss Pro home page.
Download Progress - Indicates the download progress of the firmware updates.
Rev 3.0.1.105: August 20, 2008
Page 68 of 73
5 SUBSCRIPTION MANAGEMENT
The iBoss requires an active subscription to function. The unit may already be pre-activated
when you receive it, or you may need to obtain and/or activate a subscription key and
register the active subscription key with your iBoss.
To view and manage your subscription information, login to the iBoss interface home page
and click the “Manage Subscription” button.
Figure 47 - Manage Subscription
This page will allow you to view your current subscription status. The following are values
that may appear in the “Status” field:
Active – The iBoss has an active subscription.
Must Activate – An active subscription key has not been registered with the iBoss.
Not Available – The iBoss is not connected to the Internet.
Expired – The iBoss subscription has expired and is no longer active.
Cancelled – The iBoss subscription has been cancelled and is no longer active.
5.1
Adding a Subscription Key
The iBoss needs an active Subscription Key entered into the device before it can start
functioning.
1. Confirm that your Subscription Key has been activated.
2. Enter the active Subscription Key for the iBoss.
· Log into your iBoss and click on "Manage Subscription" button on the main page.
(Please refer to the User Interface section on how to log into the iBoss)
· Enter in the active Subscription Key in the boxes provided.
Figure 48 - Enter Subscription Key
· Click on "Apply" and "Confirm" on the next page.
3. If you do not have a Subscription Key, you may press the “Purchase Subscription Key
Now” button to purchase one. This will guide you through the process of activating and
registering your Subscription Key with your iBoss.
Rev 3.0.1.105: August 20, 2008
Page 69 of 73
6 TROUBLESHOOTING
6.1
Password Recovery
In the event that the iBoss administration password becomes lost, there is a way by which it
can be recovered. If you checked the “Password Recovery” option on the iBoss when the
password was initially setup, you will be prompted to have the password E-mailed to you
upon a failed login attempt. Follow the link provided on the login page to have your
password E-mailed to the address specified during the “Password Recovery” setup.
If you did not enable the password recovery option, you can contact the Phantom
Technologies support department to have the password E-mailed to a specific address. Note
that you will be prompted for account authentication information before a password
recovery request is fulfilled.
The password may be reset by performing a factory reset on the iBoss, however this action
is typically reserved as a last resort due to the fact that ALL of your settings will be erased
back to factory defaults.
6.2
Resetting to Factory Defaults
The iBoss can be reset back to factory default settings through two different methods. After
performing the factory reset, all of the iBoss settings will be set back to default values
(including Internet connection, Internet filtering and password settings.
Note: The tamper log cannot be erased by a factory reset. This is by design for security
reasons.
6.2.1 Through the iBoss User Interface
- Login to iBoss Interface (http://myiboss.com).
- From the “Home” page, go to “My Preferences” and “System Settings”.
- Click the “Restore Factory Defaults” button. You will be prompted to confirm before
continuing.
6.2.2 Using the Reset Button on the back of device
- Power down and power on the unit. Once the PWR light is solid, hold the Reset button for
15 seconds until the light starts blinking (this has to be done in the first 30 seconds of when
the PWR goes solid). Wait 3 minutes after you release the reset button.
6.3
Technical Support
Phantom Technologies LLC prides itself on supporting our products and services. Please use
the information below if you are in need of assistance.
Website Support: http://support.iphantom.com
Telephone Support: 1.877.PHANTECH (742.6832)
E-mail Support: [email protected]
Rev 3.0.1.105: August 20, 2008
Page 70 of 73
7 APPENDIX
7.1
Warranty Information
For warranty information please visit:
https://www.iBossWebFilters.com/warranty.html
BY PROCEEDING TO USE THE PRODUCTS AND SERVICES PROVIDED BY PHANTOM
TECHNOLOGIES LLC, YOU ACKNOWLEDGE YOUR AGREEMENT TO BE BOUND BY THE
FOLLOWING TERMS AND CONDITIONS AVAILABLE AT:
http://www.iBossWebFilters.com/productAndServiceAgreement.html
IF YOU DO NOT AGREE WITH THESE TERMS AND CONDITIONS, YOU MAY NOT USE THE
PRODUCTS AND SERVICES PROVIDED BY PHANTOM TECHNOLOGIES LLC.
For the latest news, features, documentation and other information regarding the iBoss
please visit:
http://www.iBossWebFilters.com
Rev 3.0.1.105: August 20, 2008
Page 71 of 73
8 GLOSSARY
Default Gateway: Every non-router IP device needs to configure a default gateway’s IP
address. When the device sends out an IP packet, if the destination is not on the same
network, the device has to send the packet to its default gateway, which will then send it
out towards the destination.
DHCP: Dynamic Host Configuration Protocol. This protocol automatically gives every
computer on your home network an IP address.
DNS Server IP Address: DNS stands for Domain Name System, which allows Internet
servers to have a domain name (such as www.iPhantom.com) and one or more IP
addresses (such as 208.70.74.14). A DNS server keeps a database of Internet servers and
their respective domain names and IP addresses, so that when a domain name is requested
(as in typing "iphantom.com" into your Internet browser), the user is sent to the proper IP
address. The DNS server IP address used by the computers on your home network is the
location of the DNS server your ISP has assigned to you.
DSL Modem: DSL stands for Digital Subscriber Line. A DSL modem uses your existing
phone lines to transmit data at high speeds.
Ethernet: A standard for computer networks. Ethernet networks are connected by special
cables and hubs, and move data around at up to 10/100 million bits per second (Mbps).
IP Address and Network (Subnet) Mask: IP stands for Internet Protocol. An IP address
consists of a series of four numbers separated by periods that identifies a single, unique
Internet computer host in an IP network. Example: 192.168.2.1. It consists of 2 portions:
the IP network address, and the host identifier. The IP address is a 32-bit binary pattern,
which can be represented as four cascaded decimal numbers separated by “.”:
aaa.aaa.aaa.aaa, where each “aaa” can be anything from 000 to 255, or as four cascaded
binary numbers separated by “.”: bbbbbbbb.bbbbbbbb.bbbbbbbb.bbbbbbbb, where each “b”
can either be 0 or 1. A network mask is also a 32-bit binary pattern, and consists of
consecutive leading 1’s followed by consecutive trailing 0’s, such as
11111111.11111111.11111111.00000000. Therefore sometimes a network mask can also
be described simply as “x” number of leading 1’s. When both are represented side by side in
their binary forms, all bits in the IP address that correspond to 1’s in the network mask
become part of the IP network address, and the remaining bits correspond to the host ID.
For example, if the IP address for a device is, in its binary form,
11011001.10110000.10010000.00000111, and if its network mask is,
11111111.11111111.11110000.00000000, it means the device’s network address is
11011001.10110000.10010000.00000000, and its host ID is,
00000000.00000000.00000000.00000111. This is a convenient and efficient method for
routers to route IP packets to their destination.
ISP: Internet Service Provider. An ISP is a business that provides connectivity to the
Internet for individuals and other businesses or organizations.
Web-based management Graphical User Interface (GUI): Many devices support a
graphical user interface that is based on the web browser. This means the user can use the
familiar Netscape or Microsoft Internet Explorer to Control/configure or monitor the device
being managed.
Rev 3.0.1.105: August 20, 2008
Page 72 of 73
9 REGULATORY STATEMENT
FCC
This equipment has been tested and found to comply with the limits for a Class B digital
device, pursuant to Part 15 of FCC rules.
CE
This equipment has been tested and found to comply with the limits of the European Council
Directive on the approximation of the law of the member states relating to electromagnetic
compatibility (89/336/EEC) according to EN 55022 Class B.
FCC and CE Compliance Statement
This device complies with Part 15 of the FCC Rules. Operation is subject to the following two
conditions: (1) this device may not cause harmful interference, and (2) this device must
accept any interference received, including interference that may cause undesired
operation.
Any changes or modifications not expressly approved by the party responsible for
compliance could void the authority to operate equipment.
Safety
This equipment is designed with the utmost care for the safety of those who install and use
it. However, special attention must be paid to the dangers of electric shock and static
electricity when working with electrical equipment.
Rev 3.0.1.105: August 20, 2008
Page 73 of 73