1
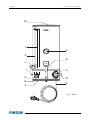
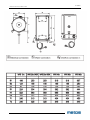
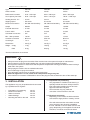
WATER BOILER
METOS MARINE WKI
MG4164349MW, 4164349, 4164354, 4164356
User manual
WKI10n
27.10.2015
27.10.2015
Water boiler Metos Marine WKI
M
L
A
K
J
B
I
C
H
G
D
F
E
fig. 1 / Abb. 1
2
Water boiler Metos Marine WKI
27.10.2015
3
27.10.2015
Water boiler Metos Marine WKI
This appliance is in accordance with the EMC-Directive 89/336/EEC,
92/31/EEC and the low voltage directive 73/23/EEC.
Animo has the right to change parts of the machine at any time without advice or direct announcements to the client. The contents of this manual
can also be changed without any announcements. This manual is to be used for the standard model/type of the machine. Thus Animo cannot be
held responsible for any damage resulting from the application of this manual to the version delivered to you. For extra information on adjustments
maintenance and repair, contact the technical department of your supplier. This manual has been written very carefully. However, Animo cannot be
held responsible neither for mistakes in the book nor for their consequences.
4
27.10.2015
Water boiler Metos Marine WKI
TABLE OF CONTENTS
1.
GENERAL DESCRIPTION . . . . . . . . . . . . . . . . . . . . . . . . . . . . . . . . . . . . . . . . . . . . . . . . . . . . . 6 11
2.
TECHNICAL DETAILS . . . . . . . . . . . . . . . . . . . . . . . . . . . . . . . . . . . . . . . . . . . . . . . . . . . . . . . . . 6 11
3.
INSTALLATION . . . . . . . . . . . . . . . . . . . . . . . . . . . . . . . . . . . . . . . . . . . . . . . . . . . . . . . . . . . . . . 7 12
3.1
Preparation for positioning . . . . . . . . . . . . . . . . . . . . . . . . . . . . . . . . . . . . . . . . . . . . . . . 7 12
3.2
Electrical connection . . . . . . . . . . . . . . . . . . . . . . . . . . . . . . . . . . . . . . . . . . . . . . . . . . . 7 12
3.3
Water connection . . . . . . . . . . . . . . . . . . . . . . . . . . . . . . . . . . . . . . . . . . . . . . . . . . . . . . 8 13
3.4
Water drainage . . . . . . . . . . . . . . . . . . . . . . . . . . . . . . . . . . . . . . . . . . . . . . . . . . . . . . . . 8 13
Mounting the WKI on the wall . . . . . . . . . . . . . . . . . . . . . . . . . . . . . . . . . . . . . . . . . . . . 8 13
3.5
4.
CONTROL PANEL . . . . . . . . . . . . . . . . . . . . . . . . . . . . . . . . . . . . . . . . . . . . . . . . . . . . . . . . . . . . 9 14
5.
PREPARATIONS BEFORE USE . . . . . . . . . . . . . . . . . . . . . . . . . . . . . . . . . . . . . . . . . . . . . . . . . 9 14
6.
USE
. . . . . . . . . . . . . . . . . . . . . . . . . . . . . . . . . . . . . . . . . . . . . . . . . . . . . . . . . . . . . . . . . . . . 1015
6.1
Brewing coffee . . . . . . . . . . . . . . . . . . . . . . . . . . . . . . . . . . . . . . . . . . . . . . . . . . . . . . . . 1015
6.2
Brewing tea . . . . . . . . . . . . . . . . . . . . . . . . . . . . . . . . . . . . . . . . . . . . . . . . . . . . . . . . . . 1116
7.
MAINTENANCE . . . . . . . . . . . . . . . . . . . . . . . . . . . . . . . . . . . . . . . . . . . . . . . . . . . . . . . . . . . . . . 1116
7.1
Cleaning . . . . . . . . . . . . . . . . . . . . . . . . . . . . . . . . . . . . . . . . . . . . . . . . . . . . . . . . . . . . 1116
7.2
Descaling . . . . . . . . . . . . . . . . . . . . . . . . . . . . . . . . . . . . . . . . . . . . . . . . . . . . . . . . . . . . 1217
8.
DRY-BOIL PROTECTION . . . . . . . . . . . . . . . . . . . . . . . . . . . . . . . . . . . . . . . . . . . . . . . . . . . . . . 1217
9.
TRANSPORTATION . . . . . . . . . . . . . . . . . . . . . . . . . . . . . . . . . . . . . . . . . . . . . . . . . . . . . . . . . . 1318
General sign for: IMPORTANT, WARNING OR REMARK.
Warning for possible damage and/or injury to machine or operator.
Warning for electricity and/or steam hazard.
5
WKI n
10
06/2008
27.10.2015
Water boiler Metos Marine WKI
These operating instructions are intended for the user of the ANIMO storage water boilers type WKI.
Read these operating instructions carefully to ensure that appliance is used properly and safely.
1. GENERAL DESCRIPTION
A storage water boiler of the WKI range makes constant hot water always available.
All WKI boilers are mains connected. An adjustable thermostat keeps water at a constant, pre-set temperature.
It refills automatically when water is drawn off.
In figure 1 the main parts are indicated.
Figure 1:
A - Thermometer
H - Filling switch
B - Tap with swivel arm
I - Dry-boil protection
C - Adjustable thermostat
J - Gauge glass tap
D - Cold water connection
K - Gauge glass
E - Electrical connection
L - Litre index
F - Overflow connection
M - Desaeration
G - On / off switch
The storage water boiler is supplied with the following accessories:
- Operating instructions
- Swivel arm
- Water tube 1.5 m
- 1 sachet descaling agent (48 sachets for 50 grams art.nr. 49007)
2. TECHNICAL DETAILS
Type
: WKI 10n
WKI 20n 3kW
WKI 20n 6kW
Article number
: 30110
30115
30120
Buffer stock hot water
: 10 ltr. / 80 cups
20 lLtr. / 160 cups
20 ltr. / 160 cups
Hour capacity hot water
: 30 ltr. / 240 cups
30 ltr. / 240 cups
60 ltr. / 480 kopjes
Heating time 20 - 97°
: 24 min
45 min.
23 min.
Tapping speed
: 6-9 sec/ltr.
6-9 sec/ltr.
6-9 sec/ltr.
Electrical connection
: 1N~220-240V/50-60Cy
1N~220-240V/50-60Cy
3N~380-415V/50-60Cy
Output
: 3200W
3200W
6600W
Fuse 1N~220-240V
: 16A
16A
-
Fuse 3N~380-415V
: -
-
3x10A
Fuse N~230V
: -
3x20A
3x20A
Cold water connection
: 3/4"
3/4"
3/4"
Min. - Max. pressure
: 1-8 bar
1-8 bar
1-8 bar
Overflow connection
: Ø15 mm
Ø15 mm
Ø15 mm
Cord length
: 1.3 m
1.3 m
1.5 m
Dimensions
: see fig. 2
see fig. 2
see fig. 2
Weight
empty
: 8 kg
11 kg
11 kg
filled
: 19 kg
33 kg
33 kg
6
06/2008
11
WKI n
27.10.2015
Water boiler Metos Marine WKI
Type
: WKI 40n
WKI 60n
WKI 80n
Article number
: 30125
30130
30135
Buffer stock hot water
: 40 ltr. / 320 cups
60 ltr. / 480 cups
80 ltr. / 640 cups
Hour capacity hot water
: 90 ltr. / 720 cups
90 ltr. / 720 cups
180 ltr. / 1440 cups
Heating time 20 - 97°
: 23 min.
35 min.
25 min.
Tapping speed
: 6-9 sec/ltr.
6-9 sec/ltr.
6-9 sec/ltr.
Electrical connection
: 3N~380-415V/50-60Cy
3N~380-415V/50-60Cy
3N~380-415V/50-60Cy
Output
: 9600W
9600W
19,2kW
Fuse 3N~380-415V
: 3x 16A
3x 16A
3x 16A
Fuse 3~230V
: 3x 35A
3x 35A
3x 35A
Cold water connection
: 3/4"
3/4"
3/4"
Min. - Max. pressure
: 1-8 bar
1-8 bar
1-8 bar
Overflow connection
: Ø15 mm
Ø15 mm
Ø15 mm
Cord length
: 1.5 m
1.5 m
1.5 m
Dimensions
: see fig. 2
see fig. 2
see fig. 2
Weight
empty
: 17 kg
19,5 kg
24 kg
filled
: 61 kg
82,5 kg
107 kg
Technical alterations are reserved
WARNING
* Always remove the plug from the socket if the machine has to be opened for repair or maintenance.
* Always observe local rules while installing the unit and use approved materials and parts.
* Do not put the machine in areas where the temperature drops below freezing point because there is always
water left in the system.
* Always plug the machine into an earthed wall socket.
* Do not submerge or spray the machine.
* Have all repairs carried out by a specially trained technician.
* When the appliance is in use, some of the components will get very hot.
* If the machine is not used it is advisable to remove the plug from the socket and to turn off the water tap.
3. INSTALLATION
3.1 Preparation for positioning
•
The preparation to install must be done by a
specially trained technician. Always observe
local rules while installing the unit and use
approved materials and parts.
•
The technician may only make the
connection of the machine to the wall.
This appliance may only be positioned and connected
by a qualified sevice engineer.
•
•
•
•
•
Preparation for positioning
Electrical connection
Water connection
Water drainage
Mounting the WKI on the wall
see 3.1
see 3.2
see 3.3
see 3.4
see 3.5
3.2 Electrical connection
Depending on the model, the WKI should be
connected to single phase or rotatory current.
The wall socket and the main switch secured
group are part of the electricity installation.
It is not allowed to connect other users to that
group. Depending on the appliance’s electrical
execution, it must be connected as below.
7
WKI n
12
06/2008
27.10.2015
3.3 Water connection
(fig. 3) In case of 3N~ 380-415V (5-core cable).
(fig. 4) In case of 3~ 230V (4-core cable).
(fig. 5) In case of 1N~ 220-230V (3-core cable).
The system must be a stopcock, a drain, a
non-return valve and must end with an easily
accessible aeration tap with a 3/4" connector.
The minimum water pressure must not fall
below 1 bar (with 5 l./min. flow pressure).
The following points should be observed when wiring
a new plug:
1.
3.4 Water drainage
The green/yellow-coloured wire (“EARTH”)
should be connected to the terminal which is
either marked with the letter “E”, the “earth”
symbol ( ) or coloured green or green/yellow.
The blue-coloured wire (“NEUTRAL”) should be
connected to the terminal which is either marked
with the letter "N" or coloured black.
The brown and black-coloured wires (“LIVE”)
should be connected to the terminals which is
either marked with the letter "L1, L2 and L3" or
coloured red.
2.
3.
The overflow connection (Ø15 mm) of the WKI
must be connected to the water drainage.
3.5 Mounting the WKI on the wall
Mount the appliance on the wall using plugs suitable
for the purpose. In case of cellular concrete,
plasterboard or similar walls of other materials screw
right through them or apply extra wall reinforcement.
1.
Green/yellow - Earth (E)
Blue
- Neutral (N)
Brown
- Live
(L1)
Black
- Live
(L2)
Grey
- Live
(L3)
2.
Green/yellow - Earth
Brown
- Live
Black
- Live
Grey
- Live
5.
3.
4.
fig. 3
(E)
(L1)
(L2)
(L3)
The local voltage should correspond with the
specifications indicated on the type plate.
Determine the complete setup of the serving
trolley(s) with the storage water boiler (WKI).
Determine where the storage water boiler
should be mounted with the help of fig. 2 + 6.
Mount the storage water boiler on the wall
and connect electricity, water supply and
water drain.
Place the combination of the serving trolley,
container/combi filter under the tap with
swivel arm.
D1
fig. 4
B2
H2
Green/yellow - Earth (E)
Blue
- Neutral (N)
Brown
- Live
(L1)
H1
•
•
•
Water boiler Metos Marine WKI
B3
5
fig. 5
Ø15
~
X
Volt
fig. 6
8
06/2008
13
WKI n
27.10.2015
Water boiler Metos Marine WKI
4. CONTROL PANEL (FIG. 1)
5.
50
40
30
A - Thermometer
°C
20
60
6.
70
80
10
The thermostat can be used to heat the water to
any temperature between 30°C and 97°C.
The ideal water temperature when making coffee
is approx. 97°C.
The water boiler is now ready for use.
90
100
•
30
•
70
C - Adjustable thermostat
60
50
40
•
90
80
•
G - On / off switch
H - Filling switch
verwarming
Beheizung
heating
•
toevoer
Zulauf
inlet
•
K - Gauge glass
When drawing off hot water, the orange filling
switch must be turned off, so that cold water can
no longer flow into the boiler.
The quantity of water to be added to and/or
drawn off can be checked using the volume
scale next to the gauge glass.
In the event of breakage or repair work, the
gauge glass can be shut off by closing the gauge
glass tap (fig. 1J).
The water temperature is easy to read from
the thermometer.
When drawing off water using the swivel-arm
tap, open the tap as far as possible, allowing it to
vent properly. Afterwards, the flow can be
reduced to a level that can be processed by the
water distributor on the filter.
After use, both switches must be turned off,
shutting off the water supply and electricity. It is
possible to keep water at a temperature of
at least 60°C overnight, but it is important to
make sure that the orange filling switch has been
turned off.
5. PREPARATIONS BEFORE USE
When placing and connecting the appliance,
the following instructions should be followed.
1.
2.
3.
4.
Open the manual stopcock (part of the water
connection) and check if the connections do not
leak.
Plug in the water boiler and press the orange
filling switch (fig. 1H). The water boiler will now
start to fill.
As soon as the water becomes visible in the
gauge glass, the heating system can be
switched on; press the green on/off switch (fig.
1G). The water boiler will now start to heat up.
Allow the water boiler to reach the required level
in the gauge glass (fig. 1K) and then stop the
water supply by pressing the orange filling switch
again. If the water supply is not turned off on
time. The built-in floating mechanism will
automatically shut off the water supply when the
maximum capacity has been achieved.
9
WKI n
14
06/2008
.10.2015
6. 27USE
•
•
USE coffee, see section 6.1
•6. Brewing
•
Brewing tea, see section 6.2
•
•
1.
Use regular ground coffee (± 50 gram/litre).
Keepinner
the containers
and the filters
The
pot of the container
mustclean.
always be
fresh and clean.
2.
loss during
thealways
brewing
1. To
Theavoid
innertemperature
pot of the container
must
be
process
we
recommed
you
to
pre
heat
the
fresh and clean.
by putting the
cable
intothe
a power
2. container,
To avoid temperature
loss
during
brewing
socket.
Fil
the
container
with
approx.
2 litres
process we recommed you to pre heat
the of
hot
water and
switch the
on the
container
for at least
container,
by putting
cable
into a power
10
minutes
before
the
brew
starts.
The
socket. Fil the container with approx. 2 indication
litres of
lamp
on the
container
willthe
light
up.
hot water
and
switch on
container
for at least
3. Tap
the water
from the
thebrew
container
and
place
the
10 minutes
before
starts.
The
indication
blender
into
the
container.
lamp on the container will light up.
4.
a basket
filterthe
paper
into theand
filter
withthe
the
3. Place
Tap the
water from
container
place
appropriate
of coffee (normal/medium
blender into amount
the container.
The coffee
evenly
spread
4. ground).
Place a basket
filter must
paperbe
into
the filter
withover
the
the
filter.
Generally
speaking
you
will
need
about
appropriate amount of coffee (normal/medium
45-50
grams
litre.must be evenly spread over
ground).
The per
coffee
5. Place
theGenerally
filter lid onspeaking
the filter,you
put will
the need
filter on
the
the filter.
about
container
andper
position
45-50 grams
litre. the swivel arm over the
of the
filter
lid.the filter, put the filter on the
5. centre
Place the
filter
lid on
6. Fill
the
water
boiler
withthe
theswivel
required
container and position
armquantity
over theof
water
(fig.
1H),
switch
on
the
heating
system
centre of the filter lid.
1G)water
and wait
until
the
water
has reached
6. (fig.
Fill the
boiler
with
the
required
quantity the
of
temperature
set.switch
Open on
thethe
tapheating
as far as
possible,
water (fig. 1H),
system
enabling
it to wait
vent until
properly.
Afterwards,
the flow
(fig. 1G) and
the water
has reached
the
can
be
reduced
to
a
normal
level.
Adjust
the
flow
temperature set. Open the tap as far as possible,
so
that the
water
not run
over the the flow
enabling
it to
ventdoes
properly.
Afterwards,
distributor
tray
in
the
filter
lid.
Doing
this will
can be reduced to a normal level. Adjust
the flow
ensure
the right
filtering
speed
so that that
the water
does
not run
over has
the been set.
7. The
brewingtray
process
starting,
the blender
distributor
in the is
filter
lid. Doing
this will in
the
container
guarantees
a
uniform
quality
of the
ensure that the right filtering speed has been
set.
coffee,
which
makes
stirring
the
coffee
(with
7. The brewing process is starting, the blender loss
in
of
temperature
and aroma)
unnecessary.
thetime,
container
guarantees
a uniform
quality of the
The
temperature
of
the
coffee
is
kept
a loss
coffee, which makes stirring the coffeeat(with
temperature
of 80 - 85°C.
of time, temperature
and aroma) unnecessary.
The
time of
of the
the coffee
coffee is
is kept
determined
The storage
temperature
at a by
the
blend
of
coffee
and
is
usually
1
1,5
hours.
temperature of 80 - 85°C.
8. Once
the
water
level
in
the
water
boiler
has
The storage time of the coffee is determined by
reached
tap can
closed and
thehours.
water
the blend0,ofthe
coffee
andbe
is usually
1 - 1,5
be refilled
heated
the next
8. boiler
Once can
the water
level and
in the
waterfor
boiler
has
brew.
reached 0, the tap can be closed and the water
9. After
has been
made and
the next
filter
boilerthe
cancoffee
be refilled
and heated
for the
has
leaked
out,
the
latter
can
be
removed
and
brew.
the
lid
can
be
placed
on
the
container.
9. After the coffee has been made and the filter
10. Rinse
the filter
use. can be removed and
has leaked
out,after
the latter
•
Brewing coffee, see section 6.1
Always
apply tea,
the following
safety
•
Brewing
see section
6.2 precautions with a
WKI when making use of a serving trolley setup;
Always apply the following safety precautions with a
•WKI Always
park the
serving
trolley trolley
straightsetup;
between
when making
use
of a serving
the parking rails.
••
After
parking
the serving
serving trolley
trolley straight
always put
the
Always
park the
between
brake
on therails.
right-hand swivel wheel.
the parking
••
Plug
the cable
the inlet
socket
on the
After in
parking
the in
serving
trolley
always
putback
the
of
the
container,
put
the
plug
in
the
power
socket
brake on the right-hand swivel wheel.
and
container
on. socket
The container
now
•
Plugswitch
in the the
cable
in the inlet
on the back
starts
heating.
of the container, put the plug in the power socket
•
After
the filter
been drained
the swivel
and switch
thehas
container
on. Theturn,
container
now
arm
away
from the filter, remove the filter and
starts
heating.
immediately
the liddrained
on the container.
•
After the filterplace
has been
turn, the swivel
•
Before
transporting
the
serving
trolley
always
arm away from the filter, remove the filter
and
remove
the
cable
with
plug
between
immediately place the lid on the container.
the
power
socket and
container.
•
Before
transporting
thethe
serving
trolley always
remove the cable with plug between
the power socket and the container.
6.1 Brewing coffee
6.1 Brewing
A coffee
A
B
B
C
C
D
D
the lid can be placed on the container.
Attention!
Always
the blender / transport disk
10. Rinse the
filter place
after use.
and the lid when transporting the container (by hand
or
serving trolley),
prevents
spilling
from the disk
Attention!
Alwaysthis
place
the blender
/ transport
container.
and the lid when transporting the container (by hand
Fig. 7
Fig. 7
Basic rules for brewing
Watercoffee
boiler Metos Marine WKI
Use regular ground coffee (± 50 gram/litre).
Keep
containers
andcoffee
the filters clean.
Basic the
rules
for brewing
Fig. 7
Fig.
A
- 7Filter lid with water distributor
or serving trolley), this prevents spilling from the
container.
B - Combi-filter with basket filter insert
A -- Blender
Filter lid /with
water disk
distributor
C
transport
B -- Container
Combi-filter
with
D
and
lidbasket filter insert
C - Blender / transport disk
D - Container and lid
06/2008
10
15
WKI n
06/2008
15
WKI n
27.10.2015
Water boiler Metos Marine WKI
6.2 Brewing tea
6.
Fill the water boiler with the required quantity of
water and wait until the water has reached the
temperature set. Open the tap as far as possible,
allowing it to vent properly. Afterwards, the flow
can be reduced to a level that can be processed
by the water distributor on the filter. Adjust the
flow rate so that the container fills up in approx. 5
to 6 minutes.
7. Once the water level in the water boiler has
reached 0, the tap can be closed and the water
boiler can be refilled and heated for the next
brew.
8. Remove the pipe and the tea filter after
the tea has been made.
9. ATTENTION: After brewing put the lid on the
container to avoid loss of temperature and taste.
The optimum extraction time is minimally 4
minutes and maximally 15 minutes. After more
than 15 minutes the flavour of the tea
decreases.
10. Rinse the tea filter immediately after use.
A tea filter with disk and a filling pipe is needed to
brew tea in a container (optional) in combination with
WKI.
A
B
D
C
Attention! Always place the blender / transport disk
and the lid when transporting the container (by hand
or serving trolley), this prevents spilling from the
container.
Fig. 8
Fig. 8
A B C D 1.
2.
3.
4.
5.
7. MAINTENANCE
WARNING
Filling pipe
Tea filter with disk
Blender / transport disk
Container and lid
*
*
*
The inner pot of the container must always be
fresh and clean.
To avoid temperature loss during the brewing
process we recommed you to pre heat the
container, by putting the cable into a power
socket. Filling the container with approx. 2
litres of hot water and switch on the container for
at least 10 minutes before the brew starts.
The indication lamp on the container will light up.
Put the tea, loose or in bags, in the tea filter,
approximately 6 grams per litre.
Insert the tea filter into the disk already placed in
the container.
Tap the water from the container.
Place the filling pipe on the tea filter and the disk.
Then position the swivel arm over the pipe.
*
*
*
*
•
•
Do not leave the unit during maintenance.
Always follow the instructions, which are
supplied with the used scale remover.
It is advisable to wear safety glasses and gloves
during descaling.
After descaling, run the appliance through at
least three cycles.
Wash your hands after descaling.
Do not submerge or spray the unit.
Have all repairs carried out by a qualified
technican.
Cleaning (daily)
Descaling
See section 7.1
See section 7.2
7.1 Cleaning (daily)
•
•
Clean the outside of the appliance with a clean
damp cloth, if necessary using a mild (nonabrasive) cleaning agent.
Do not use an abrasive, as this will leave
scratches and dull spots.
11
WKI n
16
06/2008
27.10.2015
Water boiler Metos Marine WKI
8.
Add the scale remover to the heated water.
Please note:
once the scale remover has been added, the
water will start to foam. In extreme cases, where
too much scale remover has been used, the
foam may flow over the edge of the water boiler!
9. When no more scale remover is required
(no foaming occurs when more scale remover is
added), drain the water boiler via the tap.
In the event of obstinate boiler scale, repeat
steps 5-9.
10. Repeat steps 1-4 in order to drain the water
boiler.
11. Once all boiler scale has been removed, rinse
the water boiler thoroughly with clean water, not
forgetting to also rinse the tap.
12. The water boiler is now ready for use again.
WARNING
• To descale the WKI the appliance needs to be
opened and partly disassembled. As a result
components are opened up that have a high
voltage and are not covered. Always disconnect
before opening the appliance!
7.2 Descaling
During operation scale will form in the machine.
Therefore the machine needs to be descaled
regularly to guarantee the lowest energy
consumption and proper functioning.
WARNING
• Since the drain tap is located in the electrical
part of the water boiler, users are advised (for
safety reasons) not to descale the hot water
boiler themselves!
8. Dry-boil protection
This appliance is equipped with a dry-boil protection.
This protection triggers if the heating element
overheats owing to a fault. Once the fault has been
resolved, the dry-boil protection can be reset at the
left side of the appliance (fig 1I). The most common
cause of the dry-boil protection being triggered is not
descaling the heating system in time.
When to descale?
Depending on the use and hardness of the water, we
advise you to have the WKI descaled by a service
technician every 5 or 6 months.
Depending on the frequency of usage and the
hardness of the water, we advise you to inspect the
appliance regularly for scale formation.
Remove the cover of the water boiler regularly;
If there is loose scale grit on the bottom, or if there
is severe scale formation on the walls, then the unit
needs to be descaled.
If the heating system does not switch back on,
proceed as follows:
1.
2.
3.
Descaling procedure for the service engineer:
1. Switch off the appliance and remove the plug
from the socket.
2. Remove the bottom plate by unscrewing the
fastening bolt in the middle of the plate.
3. Once the hexagonal plug has been removed
from the red drain tap, the drain tap can be used
to completely drain the water boiler.
Any loose boiler scale will then be removed.
4. Close the red drain tap, replace the hexagonal
plug and bottom plate (for safety reasons).
5. Switch the water boiler on again, allow it to
fill until all scale deposit has been completely
submerged.
6. Switch on the heating system and heat the water
to a temperature of approx. 60°C.
7. Read the warnings and other instructions
indicated on the Animo scale remover.
Allow the appliance to cool down.
Unscrew the protective cap.
Press the button which is now visible and firmly
screw the protective cap back on.
If the dry-boil protection triggers owing to increased
scale deposits, descale the appliance.
See chapter 7.2. Consult your dealer if the fault was
caused by a problem other than the dry-boil
protection being triggered.
12
06/2008
17
WKI n
27.10.2015
Water boiler Metos Marine WKI
9. TRANSPORTATION
Before transporting the WKS, carry out the following
actions:
1.
2.
3.
4.
5.
6.
7.
8.
Switch off the WKI and remove the plug fitting
from the wall socket.
Close the water supply tap and disconnect the
connection hose.
Remove the bottom plate by unscrewing the
fastening bolt in the middle of the plate.
Once the hexagonal plug has been removed
from the red drain tap, the drain tap can be used
to completely drain the water boiler.
Remove the water boiler from the wall.
Replace the parts mentioned in points 3 and 4.
The WKI is now ready for transportation.
When reinstalling the water boiler, carefully
follow the instructions indicated in the
"Installation" chapter.
13
WKI n
18
06/2008