1
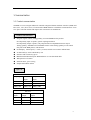
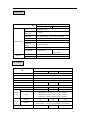
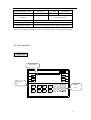
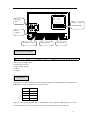
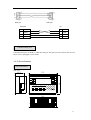
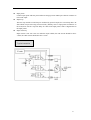
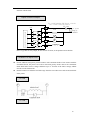
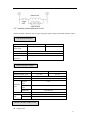
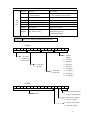
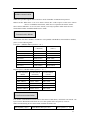
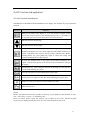
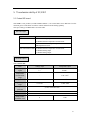
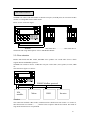
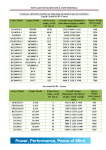
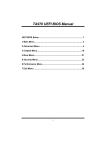
XINJE
XP/XMP-18 series
Integral industrial controller
Operating manual
Xinje Electronic Co.,Ltd
Data No.
PHC01 20080730 3.0
Xinje
Catalog
Preface
XP/XMP-18
Ser
ies
Safety Notes
————————————————————
1
Summarization
Op
er
at
in
gma
nu
al
————————————————————
Input/output
specification
and 2
exterior layout
————————————————————
PLC Function and Application
————————————————————
HMI Function and Application
Extension Ability
V1.0
3
4
5
This manual includes some basic precautions which you should follow to keep you safe and protect the
products. These precautions are underlined with warning triangles in the manual. About other manuals that
we do not mention, please follow basic electric operating rules.
Precautions
Correct
Application
Please follow the precautions. If not, it may lead the controlsystem
incorrect or abnormal, even cause fortune lose.
The models could only be used according to the manual, and an only be
used along with the peripheral equipments recognized or recommended
by Xinje Electronic. They could only work normally in the condition of
be transported, kept and installed correctly, also please operate and
maintain them according to the recommendation.
Xinje Electronic Co., Ltd. Copyright reserved
Without exact paper file allowance, copy, translate or using the manual is not allowed. Disobey this,
people should take the responsibility of loss. We reserve all the right of expansions and their design
patent.
Duty Declare
We have checked the manual, its content fits the hardware and software of the products.As mistakes are
unavoidable, we couldn’t promise all correct. However, we would check the data in the manual frequently,
and in the next edition, we will correct the necessary information. Your recommendation would be highly
appreciated
Catalog
SAFETY NOTICE ............................................................................................................................8
1. SUMMARIZATION .....................................................................................................................9
1-1. Product summarization ......................................................................................................9
1-2. Specs ................................................................................................................................11
1-3. Parts explanation..............................................................................................................13
1-4. Outline dimension............................................................................................................15
2. IN-OUT SPECS AND EXTERIOR LAYOUT ...........................................................................17
2-1. Input specs .......................................................................................................................17
2-2. Relay output specs and circuit .........................................................................................19
2-3. Transistor output specs and circuit...................................................................................21
3. PLC FUNCTION AND APPLICATION ....................................................................................23
3-1. PLC instruction................................................................................................................23
3-2. soft component range.......................................................................................................24
3-3. Set up a project ................................................................................................................28
3-4. communication function ..................................................................................................31
4. HMI FUNCTION AND APPLICATION ....................................................................................35
4-1. HMI function introduction...............................................................................................35
4-2. Build a project..................................................................................................................36
5.
THE EXTENSION ABILITY OF XP/XMP ...........................................................................39
5-1. extend BD board ..............................................................................................................39
5-2. extend MA model ............................................................................................................42
5-3. Other extension................................................................................................................45
5
6
Preface
Thank you for purchasing Xinje XP/XMP series integral industrial controller, please read the
manual before operating.
Manual purpose
n
This manual provides user with the guide of using and operating our product, it
includes the product characteristics, spec explanation, using method, etc.
n
This manual contains product summarization, exterior layout, PLC program,
and exterior extension.
Ø Summarization: introduce the product characteristics, specs, dimension,
installation.
Ø Exterior layout: introduce the product power spec, in-out layout.
Ø PLC program: introduce how to program in PLC.
Ø HMI picture: introduce how to edit picture in OP.
Ø Exterior extension: introduce extension ability of the product.
Suitable people
This manual aims to below users:
n
n
n
Terminal user
Debugging person
Technology support person
Make sure you have read the safety notice before operating.
Scope
This manual applies to the XP/XMP series integral industrial controller.
Tele-document
Xinje provides user with press document and tele-document:
n User CD
Contained software, manual and application examples
n Xinje website
Welcome to www.xinje.com download center to find electronic
document.
Contact us
If you have any questions, please contact us.
Tel: 86-0510-85134136
Fax: 86-0510-85111290
Addr: 4th Floor, Building 7, Originality Industrial Park, Liyuan
Development Zone, Wuxi City, Jiangsu province, China
7
Safety notice
Read the manual carefully before operating. Be aware of the safety and correct operation. The
content below is focus on XP/XMP series products only.
Please safekeeping the manual, put in somewhere easy to get and read and give the manual to final
user.
◎
Notice items
◎
ATTENTION
● Do not put the wire close to cable, keep 10cm distance at least.
● Do not change the inside module of product or it may cause fault, error action, loss,
fire.
● When it smelly or noisy, cut the power immediately ( short tweet after power on is
normal ).
● Do not press the screen with pen, screwdriver or other sharp tools, it may cause
screen break or error.
● For installing the product, tighten the screws to avoid loosing.
● Transport, install, store, assemble and maintain the product accurately to avoid
breaking.
DANGEROUSNESS
● Confirm the power voltage and wire connection before turn on the power in order to
avoid breaking
● Do not touch the connection point to avoid getting an electric shock
● Do not open the back cover board
● Cut all the power before installation and take-down to avoid error and fault
● Please use in the surrounding the manual stated to avoid accident
● Do not use the product under the condition of high frequency radiation, strong
magnetic field to avoid interference
8
1. Summarization
1-1. Product summarization
XP/XMP-18 series integral industrial controller integrated human machine interface (HMI) and
PLC (XC1, XC2, XC3 series). It can instead of HMI and PLC to fulfill the control function. It can
save space with slim outline and improve the convenience of maintenance.
Product characteristics
u
u
u
u
u
u
u
u
Integrate logical control, analog quantity in-out and HMI into the product
On-off quantity input: 10 points, optical coupling insulation
On-off quantity output: 8 points, relay output/transistor output/R&T mixture output
Analog quantity: XP/XMP can extend BD board to realize analog quantity in-out control
Easy edit of the HMI picture, rich function
LCD display: 192×64 pixel ( 3.7 inch ), LCD useful life can reach 0.5 million hours
26 function keys can be redefined by user
Sensitive and accurate key-press
Multifunctional download port: HMI and PLC use one download cable
Waterproof level is IP20
Small structure, space saving
Simple and modern outline
Type List
XMP series
Relay output
Transistor
output
Relay&Transistor
output
XMP1-18R
XMP1-18T
XMP1-18RT
XMP2-18R
XMP2-18T
XMP2-18RT
XMP3-18R
XMP3-18T
XMP3-18RT
XP series
Relay
output
Transistor
output
Relay&Transistor
output
XP1-18R
XP1-18T
XP1-18RT
XP2-18R
XP2-18T
XP2-18RT
XP3-18R
XP3-18T
XP3-18RT
9
Type Name
1
1: Name
2: PLC Type
3: In-out points
4: Output Type
2
3
4
XP, XMP series
1: XC1 series
2: XC2 series
3: XC3 series
18: Input 10 points, output 8 points
R: Relay output
T: Transistor output
RT: Relay&Transistor output
Notice: XMP series exclude XMP2-32 series products in this manual. About these products,
please refer to Integral Controller Manual XMP2-32.
10
1-2. Specs
General Specs
Item
Power
voltage
Electric
Surrounding
Configuration
Port
Specs
supply
DC12V~DC24V
Power
Less than 10W(TYP2.0W)
Power
cut
moment permit
Less than 20ms
Endurable
voltage
AC1000V/10MA for 1minute ( between signal
and ground )
Insulated
impedance
About 10MΩ,DC500V ( between signal and
ground )
Operating
temperature
0~50℃
Storage
temperature
–10~60℃
Environment
temperature
20~85% ( No dew )
Endurable
quiver
10~25Hz ( X, Y, Z direction for 30 minutes )
Anti-jamming
Voltage Noise: 1000Vp-p
Air
No causticity gas
Protection
According to IP20
Cooling mode
Natural wind
Dimension
172.0*121.0*56.5
Panel open
aperture
dimension
164.0*113.0
Download port
RS-232
Com port
RS-485
11
HMI Specs
Item
Specs
XP series
Characteristic
Register
XMP series
Type
Kelly/Blue LCD
Screen
dimension
3.7 inch
Useful life
Over 20000 hours, 25℃, 24hours operating
Display area
192*64
Contrast
Regulation resistance available
Character
setting
Chinese, English
Character size
Lattice font, vector font
Touch mode
Touch unable
Picture
64KB Flash ROM
Data
4KB
Matrix or resistance
touch mode
SRAM
PLC Specs
Specs
Item
XP1/XMP1
XP2/XMP2
XP3/XMP3
Program executing format
Loop scan format, time scan format
Program format
Instruction, C language and ladder chart
Processing speed
0.5us
Power cut retaining
Use Flash ROM and Li battery
User program’s capacity
32KB
I/O points
Interior coil’s points (M)
Points
Timer
(T)
Specs
Points
Counter
(C)
Specs
Data Register(D)
128KB
128KB
Input 10 points, output 8 points
448
8768
8768
80
640
640
100mS timer:Set time 0.1~3276.7 seconds
10mS timer:Set time 0.01~327.67 seconds
1mS timer:Set time 0.001~32.767 seconds
48
640
640
16 bits counter:set value K0~32767
32 bits counter:set value -2147483648~2147483647
288 words
2612 words
9024 words
12
Flash ROM Register(FD)
510 words
512 words
2048 words
Extension D register (ED)
-
-
16383
High speed processing
function
-
High speed count, pulse output,
external interrupt
Setting of time scan space
0~99mS
Password protection
6 bits ASCII
Self diagnose function
Power on self-diagnose, Monitor timer, grammar check
Note: The user program capacity is referred to the capacity under “secret downloading mode”.
1-3. Parts explanation
Configuration
Screen area
Function
key
1
2
3
4
5
6
7
8
6
7
8
9
2
3
4
5
1
0
Number
key
13
MODE:
SN:
DATE:
Program
port
XP3-18
R
2
006
050
21
18
2
006
051
0
无锡市信捷科技电子有限公司
Points connect
with BD board
Power
supply
RS-485 Com port
Output points
Input points
In-out points arrangement
24V, 0V: power supply input
A, B: RS-485 com port
COM: common ground
X: Input
Y: Output
Program port
Program port is a RS-232 com port which has double functions of downloading PLC program and
HMI pictures. The pins function of the port is as below:
Pin
Function
Pin2
RXD
Pin3
TXD
Pin5
GND
Pin7
RTS
Xinje provides special program cable to download the PLC program or HMI program. You also
can make the cable by yourself. Please see the pin connection between PC and the port.
14
DB9 pins
DB9 pins
XP/XMP
PC
2
RXD
2
RXD
3
TXD
3
TXD
5
GND
5
GND
7
RTS
7
CTS
Communication port
Communication port ( A and B ) is a RS-485 com port. This port is used to connect other devices.
Please refer to paragraph 3-4 for details.
1-4. Outline dimension
Outline dimension
Unit: mm
56.5
1
2
3
4
5
6
7
8
6
7
8
9
2
3
4
5
1
0
1
21
1
11
1
72
1
62
15
Installation dimension
Unit: mm
1
13
1
6
4
16
2. In-out specs and exterior layout
2-1. Input specs
Basic unit
Input signal’s
voltage
DC24V±10%
Input signal’s
current
7mA/DC24V
Input ON current
Above 4.5mA
Input OFF current
Below 1.5mA
Input response time
About 10ms
Input signal’s
format
Contact input or
NPN open collector
transistor
Circuit insulation
Photo-electricity
coupling insulation
Input action’s
display
LED light when
input ON
D
Cp
o
we
r
s
up
p
l
y
CO
M
R2
R1
X*
0
R4
R3
X*
7
Input connection
Because there is no 24V power supply inside XP/XMP, it needs an outside supplier to drive the
photo-electricity switch sensor. The supplier should be DC 24V±4V. The output transistor of
sensor should be NPN open collector.
DCpower
supply
+5
V
CO
M
R2
R1
R
6
R5
X*
0
L
ED
I=7
mA
R4
R3
pow
ersu
pp
ly
D
C24
V
X*
7
s
ens
or
17
l
l
l
Input points
Connect input point and com point with non-voltage point or NPN open collector transistor to
turn on the input.
Input loop
The first loop and the second loop are insulated by optical coupler, the second loop has C-R
filter which can prevent wrong action caused by industry noise or input points oscillation. As
the result, there will be a response delay for 10ms to the input points. There is digital filter in
the input points.
Input sensitivity
Input current is DC 24V 7mA. To make the input reliable, the ON current should be above
3.5mA, the OFF current should be below 1.5mA.
Typical connection
18
2-2. Relay output specs and circuit
Relay output specs
Type
R /RT output
Relay output
R:Y0~Y7
RT:Y4~Y7
Power supply
Below AC250V、DC30V
Circuit insulation
Machinery insulation
Action indication
Produce close sound
Maximum
load
Resistor
load
3A
Inductance
load
80VA
LED load
100W
Minimum load
Response
time
T output
NO
DC5V 2mA
OFF→ON
10ms
ON→OFF
10ms
Relay output circuit
l
l
l
l
l
l
l
Output points
Relay output has two common points. Different units can drive the loader of different
power-voltage systems.
Loop insulation
It is electric insulated between relay output point and outside load circuit.
Action indication
Relay output coil produces close sound when it is on.
Response time
The response time is about 10ms transferring the ON or OFF signal from relay output coil to
the output connection.
Output current
Output current is 3A per point to drive resistor load for voltage below AC250V.
Inductor load is below 80VA ( AC100V or AC200V ) and light load is below 100W
( AC100V or AC200V ).
Open leakage current
There is no leakage current when output point is OFF, it can drive neon light.
Use life of relay output point
The standard life of inductor load such as contactor, solenoid valve: according to our
experiment results, 20VA load is about 3 million times, 35VA load is about 1 million times,
80VA load is about 0.2 million times. However, the life will extend if parallel connect surge
19
absorber with the load.
Output connection example
+
2
4
V
re
la
y dr
iveci
rcu
it
Toav
o
i
db
ur
n
i
ngP
LCb
a
si
cc
i
rc
u
i
t
s
etafu
s
ee
v
e
ry4p
o
i
nt
s
5
A
~10
A
ACp
ow
e
r
L
o
ad
~ supply
Y
*
0
<A
C
2
5
0V
Y
*
1
Y
*
2
M
Y
*
3
R
e
l
a
yo
u
t
p
u
t
Note: T type has no relay output, do not connect AC220V, or the product will be broken.
Constitution of output circuit
l
l
For DC inductor load, please parallel connect with commutate diode. If not connect with the
commutate diode, the point’s life will be decreased greatly. Please choose the commutate
diode which allow inverse voltage endurance up to 5~10 times of the load’s voltage, ordinal
current exceeds load current.
Parallel connect AC inductor load with surge absorber can reduce noise and extend useful life
of the points.
DC load
AC load
20
2-3. Transistor output specs and circuit
Transistor output can divide into two types: high speed pulse output and normal transistor output.
High speed pulse output
Type
RT output
T output
High speed pulse
output point
Y0~Y1
Y0~Y1
Power supply
Below DC5~30V
Maximum current
Maximum
frequency
50mA
pulse
200KHZ
Normal transistor output
Type
RT output
T output
Transistor output point
Y2~Y3
Y2~Y7
Power supply
Circuit insulation
Maximum
load
Below DC5~30V
Optical coupling insulation
Resistor
load
0.4A
Inductor
load
12W/DC24V
Light load
1.5W/DC24V
Minimum load
DC5V 2mA
Repose
time
OFF→ON
Below 0.2ms
ON→OFF
Below 0.2ms
Normal transistor output circuit
l
Output point
21
l
l
l
l
l
l
There is one common point for basic unit transistor output
Power supply
The load circuit power supply should be steady voltage of DC5~30V.
Circuit insulation
The inside circuit of XP/XMP is insulated with output transistor by optical coupler.
Action indication
When driving optical coupling,LED lights,output transistor is ON.
Response time
From optical coupler driving (or cut) to transistor ON (or OFF), the time is below 0.2ms.
Output current
The current is 0.4A per point. But due to restriction of temperature going up, the total current
is 0.8A every four points.
Open current
Less than 0.1mA.
ToavoidburningPLCbasiccircuit
usesuitablefusefortheload
1A
DCpower
Load
supply
Y*4
DC5~30V
p
h
o
t
o
e
l
e
c
t
r
i
c
i
t
y
d
r
i
v
e c
i
r
c
u
i
t
Load
Y*5
Load
Y*6
Load
Y*7
22
3. PLC function and application
3-1. PLC instruction
The XP/XMP integrated with XC series PLC. The function of PLC is the same as XC series.
XP/XMP Type
Integrated PLC type
XP1/XMP1 series
XC1 series
XP2/XMP2 series
XC2 series
XP3/XMP3 series
XC3 series
Instruction
1. XP1/XMP1 series include SFC instructions and applied instructions, exclude special function
instructions.
2. XP2/XMP2 series and XP3/XMP3 series have the same instructions. They include SFC
instructions, applied instructions and special function instructions.
Please refer to XC Series PLC Manual: paragraph 4, 5, 6.
Special function instructions
XP2/XMP2 and XP3/XMP3 have special function instructions, please refer to XC Series PLC
Operating Manual: paragraph 6. Here we only give the port definition and distribution.
1. High speed count
XP2/XMP2/XP3/XMP3 series
Increase mode
Pulse+direction mode
AB phase mode
C600C602 C604 C606 C608 C610 C612 C614 C616 C618 C620 C622 C624 C626 C628 C630 C632 C634
Highest
frequency
80K 80K 10K 10K 10K
80K 10K 10K
4 times
80K 5K
√
5K
√
frequency
Count
√
√
√
√
√
√
√
U
A
Dir
B
interruption
X000
X001
U
U
X002
X003
U
X004
U
A
Dir
B
X005
X006
X007
U
U
A
Dir
B
23
X010
X011
U
X012
2. High speed pulse output
u T type: Y0, Y1 available, the highest frequency is 200KHz
u RT type: Y0, Y1 available, the highest frequency is 200KHz
u R type: unavailable
3. Interrupt function
Channel
Pointer tag
Input
Rising interruption
Falling interruption
Disable
instruction
CHL1
X2
I0000
I0001
M8050
CHL2
X5
I0100
I0101
M8051
CHL3
X10
I0200
I0201
M8052
interruption
4. Frequency measurement
The point is X1, X11, X12.
5. Pulse width modulation
The point is Y0, Y1.
u T type: Y0, Y1 available
u RT type: Y0, Y1 available
u R type: unavailable
6. Precise timer
32 bit precise timer, the timer range is T600 to T618, match with 10 interruption tag.
3-2. soft component range
XP/XMP series soft component ID distribution list is as below:
If extending BD board, the in-out point definition, please refer to XP Series Extended BD Board
Manual.
24
XP1/XMP1 series:
Soft
component
Name
Range
Points
X
Input points
X000~X011(octal)
10
Y
Output points
Y000~Y007(octal)
8
M0~ M199
【M200~M319 】
320
For special using M8000~M8079
M
Auxiliary relay
For special using M8120~M8139
128
For special using M8170~M8172
For special using M8238~M8242
For special using M8350~ M8370
S
Process
S0~S31
32
T0~T23:100ms not accumulation
T100~T115:100ms accumulation
T
Timer
T200~T223:10ms not accumulation
80
T300~T307:10ms accumulation
T400~T403:1ms not accumulation
T500~T503:1ms accumulation
C0~C23:16 bits plus counter
C300~C315:32bits plus/minus counter
C
Counter
【C600~C603】: vacant
48
【C620~C621】: vacant
【C630~C631】: vacant
D0 ~D99
【D100~D149】
150
For special using D8000~D8029
D
Data register
For special using D8060~D8079
For special using D8120~D8179
138
For special using D8240~D8249
For special using D8306~D8313
For special using D8460~D8469
FD0~FD411
412
For special using FD8000~FD8011
FD
Flash ROM
register
For special using FD8202~FD8229
98
For special using FD8306~FD8315
For special using FD8323~FD8335
For special using FD8350~ FD 8384
25
XP2/XMP2 and XP3/XMP3 series:
Soft
component
Name
X
Input point
X000~X011(octal)
10
Y
Output
point
Y000~Y007(octal)
8
M0~ M2999
【M3000~M7999 】
8000
M
Auxiliary
relay
M8000~M8767
768
S0~ S511
【S512~M1023 】
1024
S
Range
XP2/XMP2
Status
Point
XP3/XMP3
XP2/XMP2 XP3/XMP3
T0~T99:100ms not accumulation
T100~T199:100ms accumulation
T200~T299:10ms not accumulation
T
Timer
T300~T399:10ms accumulation
640
T400~T499:1ms not accumulation
T500~T599:1ms accumulation
T600~T618:1ms with interruption precise time
T620~T639:vacant
C0~C299:16 bits forth counter
C300~C318:32 bits forth/back counter
【C320~C598】:32 bits forth/back counter
C
Counter
【C600~C619】:one phase high speed counter
640
【C620~C629】:Pulse + direction high speed
counter
【C630~C639】:AB phase high speed counter
D
FD
ED
Data
register
FlashROM
register
Extend data
register
D0~D999
【D4000~D4999】
D0~ D3999
【D4000~D7999】
2000
8000
For special using
D8000~D8511
D8630~D8729
For special using
D8000~D9023
612
1024
FD0~FD127
FD0~FD1535
128
1536
For special using
FD8000~FD8383
For special using
FD8000~FD8511
384
512
-
【ED0~ED16383】
-
16384
NOTE:
※1. The memorizer area in 【
】 is the defaulted power failure retentive area, the power
failure retentive area of soft components D, M, S, T, C can be set via FD register. For
the details, please see the following table.
※2. Flash ROM register needn’t set power failure retentive area, its data won’t lose when
26
power is cut (No battery).
※3. The serial number of input coil and output relay are octal data, other memorizers’
number are all decimal data.
※4. There is no I/O point connected with exterior device can be used as interior relay.
Soft component power failure area setting:
XP1/XMP1:
Soft
component
Area
Function
Default value
Power failure
memory area
D
FD8202
First address of the power
failure memory area of D
100
D100~D149
M
FD8203
First address of the power
failure memory area of M
200
M200~M319
T
FD8204
First address of the power
failure memory area of T
640
No set
C
FD8205
First address of the power
failure memory area of C
320
C320~C631
S
FD8206
First address of the power
failure memory area of S
512
S0~S31
Default value
Power failure
memory area
XP2/XMP2:
Soft
component
Area
D
FD8202
First address of the power
failure memory area of D
4000
D4000~D4999
M
FD8203
First address of the power
failure memory area of M
3000
M3000~M7999
T
FD8204
First address of the power
failure memory area of T
640
No set
C
FD8205
First address of the power
failure memory area of C
320
C320~C639
S
FD8206
First address of the power
failure memory area of S
512
S512~S1023
Default value
Power failure
memory area
Function
XP3/XMP3:
Soft
component
Area
D
FD8202
First address of the power
failure memory area of D
4000
D4000~D7999
M
FD8203
First address of the power
failure memory area of M
3000
M3000~M7999
T
FD8204
First address of the power
failure memory area of T
640
No set
Function
27
C
FD8205
First address of the power
failure memory area of C
320
C320~C639
S
FD8206
First address of the power
failure memory area of S
512
S512~S1023
ED
FD8207
First address of the power
failure memory area of ED
0
ED0~ED16383
NOTE:
Users can set the power failure memory area, but the area can not over the soft component area.
3-3. Set up a project
About the software
The PLC program editing software is the same as Xinje XC series. Software name is XCPPro.
The interface of software is as below:
Set up a project
We take XP3-18R as a example to explain how to set up a project.
1. Modify the type
Open the software, click file---change PLC model:
28
Choose “ XP3-18/XMP3-18”:
XP1/XMP1series choose
XP1-18/XMP1-18;
XP2/XMP2 series choose
XP2-18/XMP2-18;
XP3/XMP3 series choose
XP3-18/XMP3-18
2. Compile the program
For program compiling and software operating please refer to XC Series Edit Tool XCP Pro User
Manual.
29
Download the program
1. Connection
Before downloading the program, please ensure the XP/XMP has connected with PC successfully.
( The cable connection please refer to paragraph 1-3 ).
Click
to open software serial port configuration:
Choose the correct serial port, baudrate and parity or click “check” to choose these parameters
automatically.
When below window shows “ connect to PLC succeeded ”, it means the connecting is successful.
Click OK to continue.
If the connecting is not successful, the window will show “ communication error ”. Please check
the serial port and the cable.
2
Download the program
After connecting successfully, click
to download the PLC program. If the PLC is running, it
will pop up the stop running window, click OK to continue downloading.
30
After downloading, click
3
to run the PLC program.
Upload the program
If you want to check the PLC program in XP/XMP, click
to save the program.
Then click
to upload the program to the PC.
3-4. communication function
XP/XMP series support Modbus and free format communication protocol. The instructions please
refer to XC Series PLC Operating Manual paragraph 6-4-1 and 6-4-2.
Communication port
XP/XMP series product have program port ( DB9 pins port ) and RS-485 com port ( A, B point ).
Program port can only be used to download PLC program and HMI pictures. However, RS-485
port can be used to communicate with other devices.
RS-485 port can be connected with varied devices, the communication parameters ( baud rate,
data bit, etc ) can be set via software.
31
MODE:
SN:
DATE:
XP3-18
R
2
006
050
21
18
2
006
051
0
无锡市信捷科技电子有限公司
RS-485
com port
RS-485 com port: Point A means “ + ” signal, point B means “ – ” signal.
Attention:
XP1/XMP1 series product can only be used as slaver station while using their RS-485 port to
communicate with other devices.
Communication parameter
Station No.
Modbus station No. : 1-254, 255(FF) is for free format communication
Baud rate
300bps~115.2Kbps
Data bit
8 or 7 bits
Stop bit
2 or 1 bits
Check
Even, odd, no check
The defaulted parameters of the port:
Station number is 1, baud rate is 19200bps, 8 data bit, 1 stop bit, even check
Parameter setting
User can set com port parameters. Please see below list for details.
Attention:
After changing the parameters in Flash register, it is need to reboot the XP/XMP to make the
setting become effective.
32
AB
com
port
Number
Function
Description
FD8220
Communication mode
( station number )
255 is free format,
1~254 is modbus station number
FD8221
Communication format
Baud rate, data bit, stop bit, check
FD8222
ASC timeout judgment time
Unit: ms, 0 means no timeout waiting
FD8223
Reply timeout judgment time
Unit: ms, 0 means no timeout waiting
FD8224
Start symbol
High 8 bits invalid
FD8225
End symbol
High 8 bits invalid
Free format setting
8/16 bits cushion,
with/without start bit,
with/without stop bit
FD8226
The way of setting communication parameters:
FD8221:
15
14
13
12
11
10
9
8
7
6
5
4
3
2
1
0
0:300bps
1:600bps
2:1200 bps
3:2400 bps
4:4800 bps
5:9600 bps
6:19.2K bps
7:38.4K bps
8:57.6K bps
9:115.2K bps
0:No check
1:Odd check
2:Even check
0:2 stop bits
2:1stop bit
0:8bits data
1:7bits data
FD8226:
15
14
13
12
11
10
9
8
Reserved
7
6
5
4
3
2
1
0
0:8 bits communication
1:16 bits communication
0: without start symbol
1: with start symbol
0:without end symbol
1:with end symbol
33
Modbus communication
XMP series product support master and slave mode of Modbus communication protocol.
Master format: When PLC is set to be master station, PLC sends request to other slave station
devices via Modbus instructions, other devices respond to the master station.
Slave format: When PLC is set to be slave station, it can only respond to other master devices.
The defaulted status of XMP is Modbus slave mode.
Communication address
The internal soft unit’s numbers of XMP are corresponded with Modbus station address numbers,
please see the following table:
Coil space: ( Modbus address prefix is “ 0x ” )
Bit component address
Modbus address
Modbus address
( decimal K )
( hex H )
M0~M7999
0~7999
0~1F3F
X0~X1037(octal)
16384~16927
4000~421F
Y0~Y1037(octal)
18432~18975
4800~4A1F
S0~S1023
20480~21503
5000~53FF
M8000~M8511
24576~25087
6000~61FF
T0~T618
25600~26218
6400~666A
C0~C634
27648~28282
6C00~6E7A
Register space: ( Modbus address prefix is “ 4x ” )
Word component
Modbus address
Modbus address
address
( decimal K )
( hex H )
D0~D7999
0~7999
0~1F3F
TD0~TD618
12288~12906
3000~326A
CD0~CD634
14336~14970
3800~3A7A
D8000~D8511
16384~16895
4000~41FF
FD0~FD5000
18432~23432
4800~5B88
FD8000~FD8511 26624~27135
6800~69FF
Free format communication
Free format communication transfer data in the format of data block, each block can transfer 128
bytes at most. Meanwhile each block can set a start symbol and a end symbol, or not set.
When communicating in free format mode, FD8220 should be 255.
Start Symbol (1 byte)
Data Block (max bytes 128 )
End Symbol (1 byte)
34
4. HMI function and application
4-1. HMI function introduction
The HMI part of XP/XMP used OP330/MP330 series display. The faceplate key-press function is
as below:
Key-press
Function
Whatever the mode of the display is in, it will return to original system
screen once you press the key ( the defaulted screen is No.1 ). Generally, set
the original system screen to be main menu or most used screen.
Turn the screen to the last page
Turn the screen to the next page
Press the key to modify the register value. The register which is being
modified will display in reverse colour and the bit will twinkle. If there is no
register component in the screen it will do vacancy operation once. Before
pressing [ENT] key, press [SET] key again to cancel the setting and
continue modifying the next data register.
To write the modified value in the register and continue modifying next
register. After the last register in the screen has been modified, it will quit
the setting.
Alarming list key. After setting the function of alarming list, press this key
to jump to the alarming list screen.
Clear the selected area when modifying the register data.
Set the positive or negative of the data when modifying the register data.
Number key 0-9, press the key to set the number you want
Function key F1-F8
NOTE:
Besides the function listed in the up table, all the keys can be defined as the function of “force
ON”, “force OFF”, “reverse” or “momentary ON”.
Please see below picture. Open OP software, put a button in the screen. All the faceplate
key-presses are displayed in the key menu, user can set the function as they need.
35
4-2. Build a project
About the software
XP/XMP series product integrated the function of HMI and PLC, when editing the HMI screen,
use HMI software OP20.
The interface of OP20 is shown as below:
36
Build a project
We take XMP3-18R as an example to explain how to build a project.
1. build a new project
Open the OP software, click “file”-“new project” or click “ ” to build a new project.
2. choose the display type
In the “select model” window, choose the correct type of XP/XMP. For this example we select
“MP330(XMP)”.
This window shows all the display type
supported by OP software.
We can select the correct type according to the
content in the bracket.
XP series should select OP330
XMP series should select MP330
3. select PLC type
As the XP/XMP is a integrated product of OP and XC, the OP will communicate with XC inside
the product, the communication parameters are defaulted.
4. edit the screen
After these three steps, we can enter screen editing mode. For the editing details, please refer to
OP Series Display User Manual chapter 2.
37
Screen download
1. Select com port
Before downloading the screen, select the correct com port. The port is DB9 pins serial port of PC.
The computer will select the port automatically, user only need to know the port number. If user
can not confirm which port to use, try each port in file. If the com port is wrong, it will prompt
you with the note “can not open”:
Click “file”-“comm port…” to select the correct com port:
2. download
Connect the XP/XMP DB9 pins com port and PC serial port using download cable. Power on the
XP/XMP, click
to start downloading:
If the downloading is completed, it will pop up below window:
Attention:
(1) Do not cut the power when downloading, or you have to download again
(2) The downloading cable of downloading OP screen is the same as downloading PLC program
(3) Do not download when XCPPro and OP software are both opened
38
5. The extension ability of XP/XMP
5-1. Extend BD board
XP3/XMP3 series product (exclude XMP2-32R/T-E ) can extend XP3 series BD board via the
insertion groove at the back in order to control and measure the analog quantity.
The specs and type of BD board is as below table:
BD board type
Type
Function
XP3-2AD2PT-BD
2 channels analog input
2 channels PT100 temperature measurement
XP3-2TC-P-BD
2 channels K thermocouple temperature measurement
PID adjustment inside
XP3-2PT2AD1DA-BD
2 channels PT100 temperature measurement
2 channels analog input
1 channel analog output
BD board specs
XP3-2AD2PT-BD:
Item
Voltage input
Temperature input
Analog input
signal
DC0~5V、0~10V(Input resistor 300k
Ω)
Platinum resistor Pt100(2-line
format)
Temperature
measurement
range
-
-100~350℃
Distinguish ratio
0.15mV(10/16383)
0.1℃
Digital output
range
0~16383
-1000~3500
Integrated
precision
±0.8% of the full-scale
Convert time
15ms×4 channels
PID output value
0~K4095
Empty loader
defaulted value
0
3500
39
Input
characteristic
Insulation
No insulation among each channel of PLC
I/O point
0 point (As it is operated via data register, it is not restricted by master
PLC’s standard max control points)
XP3-2TC-P-BD:
Items
Content
Analog input signal
K type thermocouple
Input points
2 points
Temperature
measurement range
0℃~970℃
Digital output range
0~9700, 16 bits binary
Output points
2 points
Output format
NPN collector open transistor output
Control precision
0.4℃
Distinguish ratio
0.1℃
Integrated precision
±0.8% ( relative max value)
Convert speed
45ms×2 channels
Analog using power
DC24V±10%,50mA
XP3-2PT2AD1DA-BD:
Item
Voltage input
Temperature input
D/A output
DC0~5V,
0~10V(input
resistor 300kΩ)
Platinum resistor Pt100 (2
lines format)
-
-
-
10 bits binary (0-1023)
Analog output
range
-
-
0~20mA, 4~20mA
Temperature
measurement
range
-
-100~350℃
-
Distinguish
rate
0.15mV(10/16383)
0.1℃
1/1023
Digital output
0~16383
-1000~3500
-
Analog
signal
input
Digital
range
input
40
range
Integrated
precision
±0.8% of the full-scale
Convert time
15ms×4 channels
PID output
0~K4095
Empty loader
defaulted value
0
-
3500
In-out
characteristics
insulation
There is no insulation among each channel of PLC
I/O point
0 point (As it is operated via data register, it is not restricted by master PLC’s standard
max control points)
Installation position of BD board
The installation position of BD board on XP3/XMP3 is as below:
MODE:
SN:
DATE :
XP3-1
8R
2
0
0
6
05
0
2
1
1
8
2
00
6
0
5
1
0
Install here
无锡市信捷科技电子有限公司
The configuration method and using details please refer to BD Board Manual.
41
5-2. Extend MA model
XP/XMP can extend MA model via RS-485 com port (A and B point) in order to control and
measure analog quantity.
The type and specs of MA model are as below:
MA model type
Type
Function
MA-8X8YR
8 channels digital input, 8 channels digital output
MA-16X
16 channels digital input
MA-16YR/T
16 channels digital output
MA-4DA
MA-4AD
4 channels analog output
4 channels analog input
MA-8AD-A/V
8 channels analog input
MA-4AD2DA
4 channels analog input, 2 channels analog output
MA-6TC-P
MA-6PT-P
6 channels type K thermocouple temperature control
6 channels PT100 temperature control
MA model specs
Type
Description
MA-8X8YR
8 channels digital input,8 channels
digital relay output
MA-16X
16 channels digital input
MA-16YR
16 channels digital relay output
MA-16YT
16 channels digital transistor output
MA-4DA
Item
Analog output range
Voltage output
Current output
DC0~5V、0~10V
DC0~20mA、4~20mA
(
exterior
load
2KΩ~1MΩ)
resistor
(exterior load resistor less than
500Ω)
Digital input range
10 bits binary numbers
Resolution ratio
1/1023(10Bit)
Integrated precision
0.8%
Conversion speed
3ms/1 channel
Power of analog quantity
DC24V±10%,100mA
Installation
Use M3 screw or fix on DIN46277 rail ( width 35mm )
42
Profile dimension
63mm×102mm×73.3mm
MA-8AD-A/V
Item
Analog input range
Voltage
Current
DC0~5V、0~10V
DC0~20mA、4~20mA
(
exterior
load
resistor
( exterior load resistor less than
2KΩ~1MΩ)
500Ω)
Maximum input range
±18V
0~40mA
Digital output range
12 bits binary numbers
Resolution
1/4095(12Bit)
Integrated precision
0.8%
Conversion speed
20ms per channel
Power supply for analog
DC24V±10%,100mA
Installation
Use M3 screw or fix on DIN46277 rail ( width 35mm )
Profile dimension
63mm×102mm×73.3mm
MA-4AD
Item
Analog input (4AD)
Analog input type
Voltage input
Current input
Analog input range
0~5V,0~10V
0~20mA,4~20mA
DC±18V
0~40mA
Maximum input range
Digital output range
12 bits binary value (0~4095)
Resolution
1/4095(12Bit)
PID output range
0~K4095
Integrated precision
0.8%
Converting speed
20ms per channel
Power for analog
DC24V±10%,100mA
Installation
Fix up the module with M3 screw or put on DIN46277 rail (width 35mm)
Profile dimension
63mm×102mm×73.3mm
MA-4AD2DA
Item
Analog input range
Max input range
Analog output range
Analog input ( 4AD )
Analog output ( 2DA )
Voltage input
Current input
0~5V,0~10V
0~20mA,4~20mA
-
DC±18V
0~40mA
-
-
Voltage output
Current output
0~5V、0~10V,
0~20mA、4~20mA
( exterior load
(exterior load resistor
resistor 2KΩ~1MΩ)
less than 500Ω)
43
Digital input range
-
10 bits binary number (0~1023)
Digital output range
12 bits binary number (0~4095)
-
1/4095(12Bit)
1/1023(10Bit)
Resolution
PID output value
0~K4095
Integrated precision
0.8%
Conversion speed
Power
supply
20ms/1 channel
3ms/1 channel
for
DC24V±10%,100mA
analog quantity
Installation
Use M3 screw or fix on the DIN46277 ( width 35mm ) rail
Profile dimension
63mm×102mm×73.3mm
MA-6TC-P
Item
Specs
Using environment
0℃~60℃
Measure temperature range
0℃~1000℃
Digital output range
0~4095, 12 bits with sign, binary
Precision
1℃
Integrated precision
1℃
Conversion speed
20ms/1 channel
Power supply for analog
DC24V±10%, 50mA
Installation
Use M3 screw or fix on DIN46277 ( width 35mm ) rail
Profile dimension
63mm×102mm×73.3mm
MA-6PT-P
Item
Description
Analog input signal
Pt100 Pt hot resistance
Measure temperature range
-100℃~350℃
Digital output range
Full-scale 4095, 12 bits with sign, binary
Control precision
±0.1℃
Resolution
0.1℃
Integrated precision
0.8% ( related maximum )
Conversion speed
20ms/1 channel
Power supply for analog
DC24V±10%,50mA
Installation
Use M3 screw or fix on DIN46277 rail ( width 35mm )
Profile dimension
63mm×102mm×73.3mm
44
MA model connection
XP/XMP can connect with MA model via RS-485 com port (A and B point). It can extend 16 MA
models via setting DIP switch of MA model.
Please see the connection figure:
0
V
2
4
V
B
A
0V
2
4
V
V
O
1 VO
2
G
N
D
IO
1
GN
D
I
O
2
O
2
GN
D
V
O1 V
G
N
D
I
O
1
I
O
2
MA-4AD2DA
MA-4AD2DA
AO
B
A
A
O
PW
R
1
2
3
4
5
6
7
8
6
7
8
9
2
3
4
5
1
0
V
I
1
P
WR
R
UN
RU
N
E
RR
ER
R
A
I
AI
G
N
D
A
I
3
V
I4 G
N
D
A
I
1
VI
2
V
I
3
A
I
4
G
N
D
A
I
2
G
N
D
V
I
1
GN
D
A
I
3
V
I
4 G
ND
AI
1
V
I
2
VI
3
A
I
4
GN
D
AI
2
G
N
D
XP/XMP
MA station No.1…………….MA station No.16
The details and using method please refer to MA Model Manual.
5-3. Other extension
Besides BD board and MA model, XP/XMP series product can extend other devices which
support RS-485 and Modbus protocol.
XP/XMP can extend 32 devices via RS-485 com port such as PLC, meter, printer, inverter, HMI
etc.
The connection figure is as below:
1
2
3
4
5
6
7
8
6
7
8
9
2
3
4
5
1
0
RS485 Modbus protocol
MA
module
Meter
HMI
Inverter
Attention:
The connection method is Bus mode, transmission line should start from station 1 to station 2,
then from station 2 to station 3…….., connect as this sequence until the last station. Star mode or
ring mode connections are not permitted.
45