1
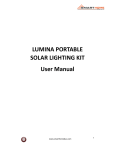
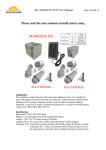
-User Manual SL-10A Congratulations on your purchase of the SL-10A solar home lighting system. The Solar Home Lighting System is an innovative, eco-friendly solar powered lantern designed to stand up to the harshest environments and perfectly suited to light up homes, for outdoor activities and any emergency lighting. The combination of its solar-charging battery and bright energy-efficient and long-lasting LED bulbs ensure an environmentally friendly and economical home, travel and camping light. Internal battery: 12V 7AH maintenance free lead acid battery. Solar panel: 18V 10W waterproof solar panel(of efficiency 17%) . Lamp: 3PCS DC12V 2W super bright LED bulb. Mobile Chargers: ten charging pins available to charge different phones. Note: You only can charge one phone per time. Charging time: About 8-9 hours efficient sunshine time to fully charge the internal battery by solar panel. (Note: different latitude and different area has different effective sunshine time each day. The charging time will be changeable with it too. Better sunshine energy area, get a better charging effect). SL-10A makes use of state-of-the-art LED-technology and provides you with light as well as the possibility of charging your mobile phone, camera, MP3, MP4, PSP, iPod all at a very favorable price. The robust housing of the product and high quality of the components provide for the long service of your product. Lighting time: About 12-13 hours when the internal battery is fully charged. About 5-6 hours when the internal battery is charged for one day. Up to 3 days at 4hours per night, when the battery is fully charged. Remark: The charging hours are the Peak Sun Hours when solar irradiance averages 1 kW/m2. Keep the solar panel in direct sunlight from morning to evening for best results. Please read these instructions carefully 3. Usage: 1. Contents of the package: 1. 2. 3. 4. 5. 6. 7. 1pc 10W solar panel. 1pc controller with built in sealed lead acid battery 12V7Ah. 3pc lamp cables with switch & holder. 3pc 2W LED lamps. 1pc mobile phone charger. 1pc user manual. 2pc FUSE. Attention: Before using solar home lighting system for the first time, insert the “FUSE” on the battery kit firstly. After inserting fuse, make sure you charge the battery using the solar panel until fully charged. Note: This may take 2-3 days. Proceed as follows: Install the solar panel on the roof or any suitable place that is exposed to direct sunlight, then fix it. There must be no obstacle/shadow over or around the solar panel for best results. Plug the DC tip of the solar panel wire into the port “solar panel” on the battery kit. The battery indicator on battery kit will “Flash” when charging; and all 5 indicators will light together, when fully charged 100%. Place the solar battery kit in a room or under a shade. DO NOT PUT 2. Specifications: THE BATTERY UNDER THE SUN, OTHERWISE IT WILL BE DAMAGED. Fix the lamp wire and lamp holder and then screw the LED bulb into the lamp holder. Plug the DC tip of the light wire into the port “light” on the battery kit. Turn on the “switch” on the battery kit and turn on the switch on the LED lamp cable and the LED lamp will light up. Charging a mobile phone: Charge the battery everyday for to ensure battery power is sufficient. Never leave the battery in a fully discharged state to avoid the battery over discharging. Protect the product from exposure to water/heavy rainfall. Do not use this battery for any other products or from any other use. When replacing the battery, ONLY USE 12V7AH battery. Please OFF the switch on the lamp cable, when charging the battery or when the solar system is not in use. This will increase speedy charging of the solar product. Ensure to recharge the battery at least once every 1 month, to avoid the battery over discharging by static power consumption. If the system is not in use for one or two weeks, it will start the sleep function. When you use it again, please ON/OFF the switch of the battery kit again to wake it up. Note: You can only charge one phone per time. Turn on the “switch” on the battery kit and plug the USB cable into the “USB” port on battery kit. Choose the correct mobile charger pin for your phone and charge. Please Note: Even if the lamp has not been used and no mobile phone has been charged, the battery will nevertheless discharge, so it is better to charge the battery everyday to ensure battery power is sufficient. 7. Functional block diagram: 4. Troubleshooting: If the LED bulb does not light up after installation, please check and confirm the installation is correct and ensure the LED bulbs are well screwed to the holders. If the connection is correct and the LED bulb do not still light up, battery could possibly be flat, therefore charge battery. If the connection is correct and the battery is fully charged and the LED bulbs still not lighting up, check if the “FUSE” has burnt out and change the “FUSE”. 5. Caution: · · · · · · Protect the product from drastic crash or drop. Keep the battery kit away from water and fire. Do not disassemble the battery kit or other components. Clean the surface of solar panel often with soft and dry cloth, keep it neat. Do not drag the cable of the solar panel carelessly to retain its efficiency. Please take time to read the user manual for correct use of the product. 6. Battery care & maintenance: Solar Power & Electronics