Transcript
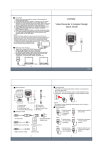
4. Charging
5.4 Access setting menu: Main Menu > Recorder Setting
5.5 Two different recording modes:
(a) Normal
(b) Motion Detection
5.6 Unplug adaptor from wall outlet after setting is completed.
DVR saves the setting.
5.7 Plug DVR to a wall outlet again to activate last saved setting.
5.8 DVR starts recording automatically when the DVR is plugged
into a wall outlet. Recording mode is set according to last
change made on the Main Menu.
4.1. Charging iPhone by placing it downwards until
properly connected.
4.2 Slide the back holder towards the object.
4.3 To disconnect the object from the charging dock
slide the back holder backward.
4.4 Slide Charge switch to place. (Default setting is off)
4.5 Plug the adaptor to a wall outlet.
6. Retrieving Video Footage
6.1 Video file is stored in the memory card.
6.2 There are two methods to retrieve video files.
(a) Using USB Cable to connect to computer
(b) Using SD card reader to read and write folder directory
6.3 Computer detects the storage and user may browse and
operate the storage as typical folder directory.
i.e.Rename, copy and paste, delete, duplicate, etc.
※NOTE
Normal Recording is defined as continuously recording until
memory card is full. Motion Detect recording is defined as
being triggered by any detected movement. Each video file is
limited to 30 minutes in Normal Recording mode and
1min/3min/5min recording in Motion Detection mode.
Selection can be made via user interface shown on display.
i.e. Main Menu>Recorder Setting>Motion Detect> Time.
File overwrite function is compatible to both Normal and Motion
Detection mode.
On
5. Using DVR
5.1 Plug the adaptor into a wall outlet.
5.2 Connect adaptor to a monitor by the supplied AV cable.
5.3 Operate IR remote controller to access Main Menu and
submenu via user interface shown on display.
※IR remote control is required to aim at the IR sensor on
the A/V cable.
(4)
(5)
(6)
1. Name and parts
DVR251
Hidden Camera in iPhone
Charging Dock Design
Quick Guide
(7)
3. Installation
2. Package content
NTT DoCoMo
3.1 Slide the back cover towards the bottom of the
adaptor DVR to remove it from the device.
Charging dock camera
Adaptor DVR
8
3.2 Insert the memory card and connect the video cable
to adaptor. Then close the back cover by sliding it
towards the top of adaptor.
SD
Card
AV cable
Video cable
5. Memory card slot
6. Mini USB port
7. Back cover
8. Microphone(Optional)
Lock
※For USA market, microphone will be removed from
the device.
Adapter
Memory card
(1)
V1.0
3.3 Connect the other end of the video cable from the
adaptor to the iPhone charging dock.
USB cable
4GB
1. Camera lens
2. Slide-lid
3. Charge on/off
4. Two-prong outlet
IR remote control
(2)
European
adaptor
(3)