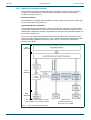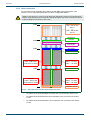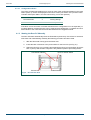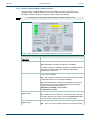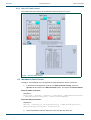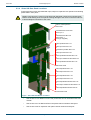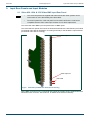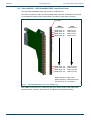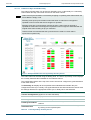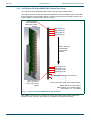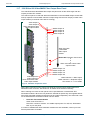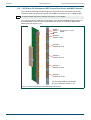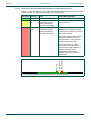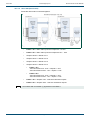
1
User Manual Sirius 800 Router Range Sirius 830, 840 and 850 routers snellgroup.com Sirius 800 Issue 5 Rev 2 www.snellgroup.com Page 2 © 2014 Snell Limited Sirius 800 www.snellgroup.com Contents Contents 1. About this Manual . . . . . . . . . . . . . . . . . . . . . . . . . . . . . . . . . . . . . . . . . . . . . . . . . . 11 1.1 Software and Firmware Release Details . . . . . . . . . . . . . . . . . . . . . . . . . . . . . . . .11 1.1.1 Export System Information (Nucleus2 2463). . . . . . . . . . . . . . . . . . . . . . . . .11 1.2 Contact Details . . . . . . . . . . . . . . . . . . . . . . . . . . . . . . . . . . . . . . . . . . . . . . . . . . 12 1.3 Copyright and Disclaimer . . . . . . . . . . . . . . . . . . . . . . . . . . . . . . . . . . . . . . . . . . 12 Issue 5 Rev 2 2. Warnings and Precautions . . . . . . . . . . . . . . . . . . . . . . . . . . . . . . . . . . . . . . . . . . . 2.1 Explanation of Safety Symbols . . . . . . . . . . . . . . . . . . . . . . . . . . . . . . . . . . . . . . 2.2 Safety Warnings . . . . . . . . . . . . . . . . . . . . . . . . . . . . . . . . . . . . . . . . . . . . . . . . . 2.3 Lithium Batteries . . . . . . . . . . . . . . . . . . . . . . . . . . . . . . . . . . . . . . . . . . . . . . . . . 2.4 Fiber Output Modules Warning . . . . . . . . . . . . . . . . . . . . . . . . . . . . . . . . . . . . . . 2.5 Cable Management . . . . . . . . . . . . . . . . . . . . . . . . . . . . . . . . . . . . . . . . . . . . . . . 2.6 Power Supplies . . . . . . . . . . . . . . . . . . . . . . . . . . . . . . . . . . . . . . . . . . . . . . . . . . 2.7 Earth Cables . . . . . . . . . . . . . . . . . . . . . . . . . . . . . . . . . . . . . . . . . . . . . . . . . . . . 2.7.1 Important Protective Earth Information . . . . . . . . . . . . . . . . . . . . . . . . . . . . 2.7.2 Important Functional Earth Information . . . . . . . . . . . . . . . . . . . . . . . . . . . . 2.8 Ventilation . . . . . . . . . . . . . . . . . . . . . . . . . . . . . . . . . . . . . . . . . . . . . . . . . . . . . . 2.9 Safety Standards . . . . . . . . . . . . . . . . . . . . . . . . . . . . . . . . . . . . . . . . . . . . . . . . . 13 15 15 15 16 16 16 17 17 17 18 19 3. Product Overview . . . . . . . . . . . . . . . . . . . . . . . . . . . . . . . . . . . . . . . . . . . . . . . . . . . 3.1 Signal Flow . . . . . . . . . . . . . . . . . . . . . . . . . . . . . . . . . . . . . . . . . . . . . . . . . . . . . 3.1.1 Input Modules . . . . . . . . . . . . . . . . . . . . . . . . . . . . . . . . . . . . . . . . . . . . . . . 3.1.2 Video Crosspoints . . . . . . . . . . . . . . . . . . . . . . . . . . . . . . . . . . . . . . . . . . . . 3.1.3 Audio Crosspoints . . . . . . . . . . . . . . . . . . . . . . . . . . . . . . . . . . . . . . . . . . . . 3.1.4 Output Modules . . . . . . . . . . . . . . . . . . . . . . . . . . . . . . . . . . . . . . . . . . . . . . 3.1.5 Audio Processing . . . . . . . . . . . . . . . . . . . . . . . . . . . . . . . . . . . . . . . . . . . . 3.1.6 Audio Phasing . . . . . . . . . . . . . . . . . . . . . . . . . . . . . . . . . . . . . . . . . . . . . . . 3.1.7 Video Processing . . . . . . . . . . . . . . . . . . . . . . . . . . . . . . . . . . . . . . . . . . . . 3.2 Router Configuration and Control . . . . . . . . . . . . . . . . . . . . . . . . . . . . . . . . . . . . 3.2.1 Overview . . . . . . . . . . . . . . . . . . . . . . . . . . . . . . . . . . . . . . . . . . . . . . . . . . . 3.2.2 Router System Configuration . . . . . . . . . . . . . . . . . . . . . . . . . . . . . . . . . . . 3.2.3 Routing Control . . . . . . . . . . . . . . . . . . . . . . . . . . . . . . . . . . . . . . . . . . . . . . 3.3 Sirius 800 Input/Output Modules . . . . . . . . . . . . . . . . . . . . . . . . . . . . . . . . . . . . . 3.3.1 Input Modules . . . . . . . . . . . . . . . . . . . . . . . . . . . . . . . . . . . . . . . . . . . . . . . 3.3.2 Output Modules . . . . . . . . . . . . . . . . . . . . . . . . . . . . . . . . . . . . . . . . . . . . . . 3.4 Sirius 800 Features . . . . . . . . . . . . . . . . . . . . . . . . . . . . . . . . . . . . . . . . . . . . . . . 3.4.1 Sirius 830 Router . . . . . . . . . . . . . . . . . . . . . . . . . . . . . . . . . . . . . . . . . . . . 3.4.2 Sirius 840 Router . . . . . . . . . . . . . . . . . . . . . . . . . . . . . . . . . . . . . . . . . . . . 3.4.3 Sirius 850 Router . . . . . . . . . . . . . . . . . . . . . . . . . . . . . . . . . . . . . . . . . . . . 3.4.4 All Sirius 800 Routers . . . . . . . . . . . . . . . . . . . . . . . . . . . . . . . . . . . . . . . . . 3.5 AHP Licensing. . . . . . . . . . . . . . . . . . . . . . . . . . . . . . . . . . . . . . . . . . . . . . . . . . . 3.5.1 Video Module Licensing Options. . . . . . . . . . . . . . . . . . . . . . . . . . . . . . . . . 3.5.2 Audio Module Licensing Options. . . . . . . . . . . . . . . . . . . . . . . . . . . . . . . . . 3.6 Sirius 830 Frame Overview . . . . . . . . . . . . . . . . . . . . . . . . . . . . . . . . . . . . . . . . . 3.6.1 Frame Architecture . . . . . . . . . . . . . . . . . . . . . . . . . . . . . . . . . . . . . . . . . . . 3.6.2 Signal Flow Through the Router . . . . . . . . . . . . . . . . . . . . . . . . . . . . . . . . . 3.6.3 Rear Connectors . . . . . . . . . . . . . . . . . . . . . . . . . . . . . . . . . . . . . . . . . . . . . 3.7 Sirius 840 Frame Overview . . . . . . . . . . . . . . . . . . . . . . . . . . . . . . . . . . . . . . . . . 3.7.1 Frame Architecture . . . . . . . . . . . . . . . . . . . . . . . . . . . . . . . . . . . . . . . . . . . 3.7.2 Signal Flow Through the Router . . . . . . . . . . . . . . . . . . . . . . . . . . . . . . . . . 3.7.3 Rear Connectors . . . . . . . . . . . . . . . . . . . . . . . . . . . . . . . . . . . . . . . . . . . . . 3.8 Sirius 850 Frame Overview . . . . . . . . . . . . . . . . . . . . . . . . . . . . . . . . . . . . . . . . . 3.8.1 Frame Architecture . . . . . . . . . . . . . . . . . . . . . . . . . . . . . . . . . . . . . . . . . . . 3.8.2 Signal Flow Through the Router . . . . . . . . . . . . . . . . . . . . . . . . . . . . . . . . . 3.8.3 Rear Connectors . . . . . . . . . . . . . . . . . . . . . . . . . . . . . . . . . . . . . . . . . . . . . 3.9 Video Reference Inputs . . . . . . . . . . . . . . . . . . . . . . . . . . . . . . . . . . . . . . . . . . . . 3.9.1 Derived Video References (Nucleus2 Controllers Only) . . . . . . . . . . . . . . . 3.9.2 Video Switching Point References . . . . . . . . . . . . . . . . . . . . . . . . . . . . . . . 21 22 22 22 23 23 23 24 24 25 25 25 27 27 27 27 28 28 28 28 29 31 31 32 33 33 34 35 36 36 37 38 39 39 40 41 42 42 43 Page 3 © 2014 Snell Limited Sirius 800 www.snellgroup.com Contents 3.9.3 Reference Offset (Nucleus2 Controllers Only) . . . . . . . . . . . . . . . . . . . . . . 3.9.4 RefAuto Selected . . . . . . . . . . . . . . . . . . . . . . . . . . . . . . . . . . . . . . . . . . . . 3.9.5 Manual Reference Standard Selected. . . . . . . . . . . . . . . . . . . . . . . . . . . . . 3.9.6 Reference Input (Physical or Derived) Selected . . . . . . . . . . . . . . . . . . . . . 3.10 Audio Reference Input. . . . . . . . . . . . . . . . . . . . . . . . . . . . . . . . . . . . . . . . . . . . 3.11 Audio Routing and AHP Router Modifications . . . . . . . . . . . . . . . . . . . . . . . . . . 3.11.1 Frame Configuration and Module Compatibility . . . . . . . . . . . . . . . . . . . . 44 44 44 45 45 46 47 4. Powering the Sirius 800 Routers . . . . . . . . . . . . . . . . . . . . . . . . . . . . . . . . . . . . . . 4.1 Powering Up the Sirius 800. . . . . . . . . . . . . . . . . . . . . . . . . . . . . . . . . . . . . . . . . 4.1.1 Power Sequencing . . . . . . . . . . . . . . . . . . . . . . . . . . . . . . . . . . . . . . . . . . . 4.1.2 Power Up and Initialization . . . . . . . . . . . . . . . . . . . . . . . . . . . . . . . . . . . . . 49 49 49 50 4.1.2.1 Configuration Errors. . . . . . . . . . . . . . . . . . . . . . . . . . . . . . . . . . . . . . . . . . . . . . 51 4.1.3 Starting the Door PC Manually . . . . . . . . . . . . . . . . . . . . . . . . . . . . . . . . . . 51 4.2 Powering Down the Sirius 800 . . . . . . . . . . . . . . . . . . . . . . . . . . . . . . . . . . . . . . 52 5. Door PC . . . . . . . . . . . . . . . . . . . . . . . . . . . . . . . . . . . . . . . . . . . . . . . . . . . . . . . . . . . 5.1 Main Menu. . . . . . . . . . . . . . . . . . . . . . . . . . . . . . . . . . . . . . . . . . . . . . . . . . . . . . 5.2 Status . . . . . . . . . . . . . . . . . . . . . . . . . . . . . . . . . . . . . . . . . . . . . . . . . . . . . . . . . 5.2.1 Alarms . . . . . . . . . . . . . . . . . . . . . . . . . . . . . . . . . . . . . . . . . . . . . . . . . . . . . 5.2.2 Modules. . . . . . . . . . . . . . . . . . . . . . . . . . . . . . . . . . . . . . . . . . . . . . . . . . . . 5.2.3 Temperature . . . . . . . . . . . . . . . . . . . . . . . . . . . . . . . . . . . . . . . . . . . . . . . . 5.3 Signals. . . . . . . . . . . . . . . . . . . . . . . . . . . . . . . . . . . . . . . . . . . . . . . . . . . . . . . . . 5.3.1 Video Inputs . . . . . . . . . . . . . . . . . . . . . . . . . . . . . . . . . . . . . . . . . . . . . . . . 5.3.2 MADI Inputs. . . . . . . . . . . . . . . . . . . . . . . . . . . . . . . . . . . . . . . . . . . . . . . . . 5.3.3 References . . . . . . . . . . . . . . . . . . . . . . . . . . . . . . . . . . . . . . . . . . . . . . . . . 5.4 Redundant Crosspoint Control . . . . . . . . . . . . . . . . . . . . . . . . . . . . . . . . . . . . . . 5.4.1 Video Crosspoint Matrix Status Screens . . . . . . . . . . . . . . . . . . . . . . . . . . . 53 53 54 54 55 57 58 58 59 60 64 64 5.4.1.1 Video Crosspoint Failure . . . . . . . . . . . . . . . . . . . . . . . . . . . . . . . . . . . . . . . . . . 68 5.4.2 Audio Crosspoint Matrix Status Screens . . . . . . . . . . . . . . . . . . . . . . . . . . . 69 5.4.2.1 Audio Crosspoint Failure . . . . . . . . . . . . . . . . . . . . . . . . . . . . . . . . . . . . . . . . . . 71 Issue 5 Rev 2 5.5 Nucleus Info . . . . . . . . . . . . . . . . . . . . . . . . . . . . . . . . . . . . . . . . . . . . . . . . . . . . 5.6 Miscellaneous . . . . . . . . . . . . . . . . . . . . . . . . . . . . . . . . . . . . . . . . . . . . . . . . . . . 5.6.1 Catsii . . . . . . . . . . . . . . . . . . . . . . . . . . . . . . . . . . . . . . . . . . . . . . . . . . . . . . 5.6.2 Dial Up Routing (Video). . . . . . . . . . . . . . . . . . . . . . . . . . . . . . . . . . . . . . . . 5.6.3 Dial Up Monitor . . . . . . . . . . . . . . . . . . . . . . . . . . . . . . . . . . . . . . . . . . . . . . 72 73 73 75 77 6. Catsii Functionality . . . . . . . . . . . . . . . . . . . . . . . . . . . . . . . . . . . . . . . . . . . . . . . . . 6.1 Signal Status . . . . . . . . . . . . . . . . . . . . . . . . . . . . . . . . . . . . . . . . . . . . . . . . . . . . 6.1.1 Video Signal Catsii Colors. . . . . . . . . . . . . . . . . . . . . . . . . . . . . . . . . . . . . . 6.1.2 MADI Audio Catsii Colors . . . . . . . . . . . . . . . . . . . . . . . . . . . . . . . . . . . . . . 6.2 I/O Connector Identification. . . . . . . . . . . . . . . . . . . . . . . . . . . . . . . . . . . . . . . . . 6.2.1 Door PC Catsii Control . . . . . . . . . . . . . . . . . . . . . . . . . . . . . . . . . . . . . . . . 6.3 Workbench Catsii Control . . . . . . . . . . . . . . . . . . . . . . . . . . . . . . . . . . . . . . . . . . 79 80 80 81 81 82 82 7. External Control . . . . . . . . . . . . . . . . . . . . . . . . . . . . . . . . . . . . . . . . . . . . . . . . . . . . 7.1 Control Panels. . . . . . . . . . . . . . . . . . . . . . . . . . . . . . . . . . . . . . . . . . . . . . . . . . . 7.1.1 High Density Button Panels. . . . . . . . . . . . . . . . . . . . . . . . . . . . . . . . . . . . . 7.1.2 Standard Density Panels . . . . . . . . . . . . . . . . . . . . . . . . . . . . . . . . . . . . . . . 7.1.3 2RU Dial-up XY Panel. . . . . . . . . . . . . . . . . . . . . . . . . . . . . . . . . . . . . . . . . 7.1.4 2RU Dial-up Multibus (8 Bus) Panels . . . . . . . . . . . . . . . . . . . . . . . . . . . . . 7.1.5 2RU Dial-up Multibus (4 Bus) Panels . . . . . . . . . . . . . . . . . . . . . . . . . . . . . 7.2 Older Control Panels . . . . . . . . . . . . . . . . . . . . . . . . . . . . . . . . . . . . . . . . . . . . . . 7.2.1 6700 series 1RU . . . . . . . . . . . . . . . . . . . . . . . . . . . . . . . . . . . . . . . . . . . . . 7.2.2 6276 2RU . . . . . . . . . . . . . . . . . . . . . . . . . . . . . . . . . . . . . . . . . . . . . . . . . . 7.2.3 6277 2RU . . . . . . . . . . . . . . . . . . . . . . . . . . . . . . . . . . . . . . . . . . . . . . . . . . 7.3 Default Serial Port Configuration: . . . . . . . . . . . . . . . . . . . . . . . . . . . . . . . . . . . . 83 83 83 83 83 83 84 84 84 84 85 86 Page 4 © 2014 Snell Limited Sirius 800 www.snellgroup.com Contents 8. Module Locations . . . . . . . . . . . . . . . . . . . . . . . . . . . . . . . . . . . . . . . . . . . . . . . . . . . 8.1 Front Module and Rear Panel Compatibility . . . . . . . . . . . . . . . . . . . . . . . . . . . . 8.2 Sirius 830 . . . . . . . . . . . . . . . . . . . . . . . . . . . . . . . . . . . . . . . . . . . . . . . . . . . . . . 8.2.1 Sirius 830 Module Locations . . . . . . . . . . . . . . . . . . . . . . . . . . . . . . . . . . . . 8.2.2 Sirius 830 Rear Panel Locations . . . . . . . . . . . . . . . . . . . . . . . . . . . . . . . . . 8.2.3 Sirius 830: Input and Output Module Locations . . . . . . . . . . . . . . . . . . . . . 8.2.4 Sirius 830: Rear Input/Output Connector Configuration . . . . . . . . . . . . . . . 87 87 90 90 91 92 93 8.2.4.1 Input, Output and Expansion Connections by Slot . . . . . . . . . . . . . . . . . . . . . . 94 8.3 Sirius 840/850 . . . . . . . . . . . . . . . . . . . . . . . . . . . . . . . . . . . . . . . . . . . . . . . . . . . 95 8.3.1 Sirius 840 Module Locations . . . . . . . . . . . . . . . . . . . . . . . . . . . . . . . . . . . . 95 8.3.2 Sirius 840 Rear Panel Locations . . . . . . . . . . . . . . . . . . . . . . . . . . . . . . . . . 96 8.3.3 Sirius 850 Module Locations . . . . . . . . . . . . . . . . . . . . . . . . . . . . . . . . . . . . 97 8.3.4 Sirius 850 Rear Panel Locations . . . . . . . . . . . . . . . . . . . . . . . . . . . . . . . . . 98 8.3.5 Sirius 840/850: Input Module Locations . . . . . . . . . . . . . . . . . . . . . . . . . . . 99 8.3.6 Sirius 840/850: Output Module Locations . . . . . . . . . . . . . . . . . . . . . . . . . . 99 8.3.7 Sirius 840/850: Rear Input/Output Connector Configuration. . . . . . . . . . . 100 8.3.7.1 Inputs . . . . . . . . . . . . . . . . . . . . . . . . . . . . . . . . . . . . . . . . . . . . . . . . . . . . . . . . 100 8.3.7.2 Outputs . . . . . . . . . . . . . . . . . . . . . . . . . . . . . . . . . . . . . . . . . . . . . . . . . . . . . . 101 8.3.7.3 Input, Output and Expansion Connections by Slot . . . . . . . . . . . . . . . . . . . . . 102 8.3.8 Sirius 850: Rear Expansion Output Connectors . . . . . . . . . . . . . . . . . . . . 103 8.3.8.1 1290 Expansion Output Rear Panel Configuration . . . . . . . . . . . . . . . . . . . . . 103 8.3.8.2 1293 Expansion Output Rear Panel Configuration . . . . . . . . . . . . . . . . . . . . . 104 8.4 Inserting and Removing Vertical Modules . . . . . . . . . . . . . . . . . . . . . . . . . . . . . 104 8.5 Inserting and Removing Horizontal Modules. . . . . . . . . . . . . . . . . . . . . . . . . . . 106 9. Input Rear Panels and Input Modules . . . . . . . . . . . . . . . . . . . . . . . . . . . . . . . . . 107 9.1 Sirius 830: 1234 & 1235 Video BNC Input Rear Panel . . . . . . . . . . . . . . . . . . . 107 9.2 Sirius 830: 1236 Video Fiber Input Rear Panel . . . . . . . . . . . . . . . . . . . . . . . . . 108 9.3 Sirius 830: 1303 MADI BNC Input Rear Panel . . . . . . . . . . . . . . . . . . . . . . . . . 109 9.4 Sirius 830: 1304 MADI Fiber Input Rear Panel . . . . . . . . . . . . . . . . . . . . . . . . . .110 9.5 Sirius 840/850: 1285 Video/MADI BNC Input Rear Panel. . . . . . . . . . . . . . . . . . 111 9.6 Sirius 840/850: 1286 Video/MADI Fiber Input Rear Panel . . . . . . . . . . . . . . . . .112 9.7 Sirius 840/850: 1349 & 1289 Video BNC Input Rear Panel . . . . . . . . . . . . . . . .113 9.8 Sirius 840/850: 1305 Video Fiber Input Rear Panel . . . . . . . . . . . . . . . . . . . . . .114 9.9 Balanced AES Input Rear Panels with MADI Inputs . . . . . . . . . . . . . . . . . . . . . .115 9.9.1 Sirius 830: 1354 Balanced AES Input Rear Panel with MADI Inputs . . . . .115 9.9.2 Sirius 840/850: 1352 Balanced AES Input Rear Panel with MADI Inputs . .116 9.9.3 62 Way High Density Balanced AES Socket Pin Outs . . . . . . . . . . . . . . . .117 9.10 Unbalanced AES Input Rear Panels with MADI Inputs . . . . . . . . . . . . . . . . . . 120 9.10.1 Sirius 830: 1357 Unbalanced AES Input Rear Panel with MADI Inputs . 120 9.10.2 Sirius 840/850: 1355 Unbalanced AES Input Rear Panel with MADI Inputs . . . . . . . . . . . . . . . . . . . . . . . . . . . . . . . . . . . . . . . . . . . . . . . . . . . . 121 9.10.3 62 Way High Density Unbalanced AES Socket Pin Outs . . . . . . . . . . . . 122 9.10.4 FGAEY 2502910A: Unbalanced 62 Way AES to BNC Breakout Cable . 124 9.11 HD BNC MADI Input Connectors . . . . . . . . . . . . . . . . . . . . . . . . . . . . . . . . . . 124 9.11.1 Example 1:. . . . . . . . . . . . . . . . . . . . . . . . . . . . . . . . . . . . . . . . . . . . . . . . 125 9.11.2 Example 2:. . . . . . . . . . . . . . . . . . . . . . . . . . . . . . . . . . . . . . . . . . . . . . . . 125 9.11.3 Example 3:. . . . . . . . . . . . . . . . . . . . . . . . . . . . . . . . . . . . . . . . . . . . . . . . 125 9.12 4915 Sirius 800 AES/MADI Input Module . . . . . . . . . . . . . . . . . . . . . . . . . . . . 126 9.12.1 MADI Main and Redundant Inputs . . . . . . . . . . . . . . . . . . . . . . . . . . . . . 127 9.12.2 AES Audio Functions . . . . . . . . . . . . . . . . . . . . . . . . . . . . . . . . . . . . . . . 128 9.12.3 MADI Audio Functions. . . . . . . . . . . . . . . . . . . . . . . . . . . . . . . . . . . . . . . 128 9.12.4 Audio Processing on the Input Module . . . . . . . . . . . . . . . . . . . . . . . . . . 129 9.12.4.1 Gain Control and Phase Invert . . . . . . . . . . . . . . . . . . . . . . . . . . . . . . . . . . . 130 9.12.4.2 Stereo Mode . . . . . . . . . . . . . . . . . . . . . . . . . . . . . . . . . . . . . . . . . . . . . . . . . 130 9.12.5 4915 Connections to the Audio Crosspoints . . . . . . . . . . . . . . . . . . . . . . 9.12.6 4915 Input Module LED Information . . . . . . . . . . . . . . . . . . . . . . . . . . . . 9.13 5917 Sirius 800 Standard Video BNC/Fiber Input Module . . . . . . . . . . . . . . . 9.13.1 5917 Input Module LED Information . . . . . . . . . . . . . . . . . . . . . . . . . . . . 9.14 5919 Sirius 800 Video AHP Input Module with Delay and Sync Capability. . . 9.14.1 Advanced Hybrid Processing on the 5919 Input Module . . . . . . . . . . . . Issue 5 Rev 2 Page 5 130 131 133 134 136 137 © 2014 Snell Limited Sirius 800 www.snellgroup.com Contents 9.14.1.1 Frame/Line Sync and Video Delay . . . . . . . . . . . . . . . . . . . . . . . . . . . . . . . . 9.14.1.2 Embedded Audio Delay . . . . . . . . . . . . . . . . . . . . . . . . . . . . . . . . . . . . . . . . . 9.14.1.3 Gain Control and Phase Invert . . . . . . . . . . . . . . . . . . . . . . . . . . . . . . . . . . . 9.14.1.4 16 Channel Mixer. . . . . . . . . . . . . . . . . . . . . . . . . . . . . . . . . . . . . . . . . . . . . . 9.14.1.5 Channel Swap (Shuffle). . . . . . . . . . . . . . . . . . . . . . . . . . . . . . . . . . . . . . . . . 138 141 141 141 141 9.14.2 5919 Connections to the Audio Crosspoints . . . . . . . . . . . . . . . . . . . . . . 141 9.14.3 5919 Input Module LED Information . . . . . . . . . . . . . . . . . . . . . . . . . . . . 142 10. Crosspoint Modules . . . . . . . . . . . . . . . . . . . . . . . . . . . . . . . . . . . . . . . . . . . . . . . 10.1 Video Crosspoint Modules . . . . . . . . . . . . . . . . . . . . . . . . . . . . . . . . . . . . . . . 10.1.1 5901 Sirius 800 Series Video Crosspoint Module . . . . . . . . . . . . . . . . . . 10.1.2 5905 Sirius 800 Series Video Crosspoint Module . . . . . . . . . . . . . . . . . . 10.1.3 Video Crosspoint Module LED Information . . . . . . . . . . . . . . . . . . . . . . . 10.2 Sirius 830: Video Crosspoint Arrangement . . . . . . . . . . . . . . . . . . . . . . . . . . . 10.2.1 Sirius 830: Redundant Video Crosspoint Operation . . . . . . . . . . . . . . . . 10.3 Sirius 840/850: Video Crosspoint Arrangement . . . . . . . . . . . . . . . . . . . . . . . 10.3.1 Sirius 840/850: Redundant Crosspoint Operation. . . . . . . . . . . . . . . . . . 10.4 Video Crosspoint Failure . . . . . . . . . . . . . . . . . . . . . . . . . . . . . . . . . . . . . . . . . 10.4.1 Replacing a Failed Video Crosspoint Module using the Door PC . . . . . . 10.5 5903 Sirius 800 Audio Crosspoint Module . . . . . . . . . . . . . . . . . . . . . . . . . . . 10.5.1 5903 Audio Crosspoint Module LED Information . . . . . . . . . . . . . . . . . . 10.5.2 Sirius 800 Audio Crosspoint Arrangement . . . . . . . . . . . . . . . . . . . . . . . 10.5.3 Audio Crosspoint Operation . . . . . . . . . . . . . . . . . . . . . . . . . . . . . . . . . . 10.5.4 Redundant Audio Crosspoint Operation . . . . . . . . . . . . . . . . . . . . . . . . . 10.5.5 Replacing a Failed Audio Crosspoint Module . . . . . . . . . . . . . . . . . . . . . 145 145 145 146 147 149 149 150 151 152 152 154 155 156 156 156 157 10.5.5.1 Replacing an Audio Crosspoint Module using the Door PC . . . . . . . . . . . . . 157 10.5.5.2 Replacing an Audio Crosspoint Module without using the Door PC . . . . . . . 158 10.6 Enabling/Disabling Video/Audio Redundancy . . . . . . . . . . . . . . . . . . . . . . . . . 10.6.1 Video Redundancy . . . . . . . . . . . . . . . . . . . . . . . . . . . . . . . . . . . . . . . . . 10.6.2 Audio Redundancy - Nucleus2 2463 Controller Only . . . . . . . . . . . . . . . 10.7 Configuring Video/Audio Crosspoint Failure Action . . . . . . . . . . . . . . . . . . . . 159 159 160 161 11. Output Modules and Output Rear Panels . . . . . . . . . . . . . . . . . . . . . . . . . . . . . 11.1 4929 Sirius 800 Audio AES/MADI Output Module with Audio Delay . . . . . . . . 11.1.1 Duplicate MADI Outputs . . . . . . . . . . . . . . . . . . . . . . . . . . . . . . . . . . . . . 11.1.2 Configuring MADI to 56 or 64 Channels . . . . . . . . . . . . . . . . . . . . . . . . . 11.1.3 AES Audio Outputs . . . . . . . . . . . . . . . . . . . . . . . . . . . . . . . . . . . . . . . . . 11.1.4 MADI Audio Outputs . . . . . . . . . . . . . . . . . . . . . . . . . . . . . . . . . . . . . . . . 11.1.5 Audio Processing on the Output Module . . . . . . . . . . . . . . . . . . . . . . . . . 163 163 164 164 165 165 166 11.1.5.1 Audio Delay . . . . . . . . . . . . . . . . . . . . . . . . . . . . . . . . . . . . . . . . . . . . . . . . . . 11.1.5.2 Sample Rate Conversion . . . . . . . . . . . . . . . . . . . . . . . . . . . . . . . . . . . . . . . . 11.1.5.3 Gain Control and Phase Invert. . . . . . . . . . . . . . . . . . . . . . . . . . . . . . . . . . . . 11.1.5.4 Stereo Mode. . . . . . . . . . . . . . . . . . . . . . . . . . . . . . . . . . . . . . . . . . . . . . . . . . 11.1.6 4929 Connections to the Audio Crosspoints . . . . . . . . . . . . . . . . . . . . . . 11.1.7 4929 Output Module LED Information . . . . . . . . . . . . . . . . . . . . . . . . . . . 11.2 5926 Sirius 800 Standard Video Output Module (Non Expandable) . . . . . . . . 11.2.1 5926 Output Module LED Information . . . . . . . . . . . . . . . . . . . . . . . . . . . 11.3 5949 Sirius 800 Video Embedding & AHP Output Module with Delay and Sync Capability . . . . . . . . . . . . . . . . . . . . . . . . . . . . . . . . . . . . . . . . . . . 11.3.1 Processing on the Output Module . . . . . . . . . . . . . . . . . . . . . . . . . . . . . . 11.3.1.1 Frame/Line Sync and Video Delay. . . . . . . . . . . . . . . . . . . . . . . . . . . . . . . . . 11.3.1.2 16 Channel Mixer. . . . . . . . . . . . . . . . . . . . . . . . . . . . . . . . . . . . . . . . . . . . . . 11.3.1.3 Channel Swap (Shuffle) . . . . . . . . . . . . . . . . . . . . . . . . . . . . . . . . . . . . . . . . . 11.3.1.4 Gain control and Phase Invert . . . . . . . . . . . . . . . . . . . . . . . . . . . . . . . . . . . . 11.3.1.5 Embedded Audio Delay . . . . . . . . . . . . . . . . . . . . . . . . . . . . . . . . . . . . . . . . . 11.3.2 5949 Connections to the Audio Crosspoints . . . . . . . . . . . . . . . . . . . . . . 11.3.3 5949 Output Module LED Information . . . . . . . . . . . . . . . . . . . . . . . . . . . 11.4 1294 Sirius 800 Video BNC Output Rear Panel . . . . . . . . . . . . . . . . . . . . . . . 11.5 1302 Sirius 800 Video Fiber Output rear panel . . . . . . . . . . . . . . . . . . . . . . . . 11.6 1295 Sirius 800 Video/MADI BNC Output Rear Panel . . . . . . . . . . . . . . . . . . 11.7 1296 Sirius 800 Video/MADI Fiber Output Rear Panel . . . . . . . . . . . . . . . . . . 11.8 1353 Sirius 800 Balanced AES Output Rear Panel with MADI Outputs . . . . . Issue 5 Rev 2 Page 6 167 167 171 171 171 172 174 175 177 178 179 182 182 182 182 183 183 186 187 188 189 190 © 2014 Snell Limited Sirius 800 www.snellgroup.com Contents 11.8.1 62 Way High Density Balanced AES Socket Pin Outs . . . . . . . . . . . . . . 11.9 1356 Sirius 800 Unbalanced AES Output Rear Panel with MADI Outputs . . . 11.9.1 62 Way High Density Unbalanced AES Socket Pin Outs . . . . . . . . . . . . 11.9.2 FGAEY 2502910A: Unbalanced 62 Way AES to BNC Breakout Cable . 11.10 HD BNC MADI Output Connectors . . . . . . . . . . . . . . . . . . . . . . . . . . . . . . . . 11.10.1 Example 1:. . . . . . . . . . . . . . . . . . . . . . . . . . . . . . . . . . . . . . . . . . . . . . . 11.10.2 Example 2:. . . . . . . . . . . . . . . . . . . . . . . . . . . . . . . . . . . . . . . . . . . . . . . 11.10.3 Example 3:. . . . . . . . . . . . . . . . . . . . . . . . . . . . . . . . . . . . . . . . . . . . . . . 191 194 195 197 197 198 198 198 12. Sirius 850: Video Expansion . . . . . . . . . . . . . . . . . . . . . . . . . . . . . . . . . . . . . . . . 12.1 Single Sirius 850 Frame up to 576 x 1152 Video . . . . . . . . . . . . . . . . . . . . . . 12.2 Dual Sirius 850 Frames up to 1152 x 1152 Video . . . . . . . . . . . . . . . . . . . . . . 12.2.1 Control of a Dual Frame System . . . . . . . . . . . . . . . . . . . . . . . . . . . . . . . 12.2.2 Signal Flow Between Frames . . . . . . . . . . . . . . . . . . . . . . . . . . . . . . . . . 12.3 5938 Sirius 850 Standard Video Output Module (Expandable) . . . . . . . . . . . . 12.3.1 5938 Output Module LED Information. . . . . . . . . . . . . . . . . . . . . . . . . . . 12.4 5928 Sirius 850 Standard Video Expansion Output Module . . . . . . . . . . . . . . 12.4.1 5928 Sirius 850 Standard Video Expansion Output Module LEDs . . . . . 12.5 1290 Sirius 850 Video Expansion Output Rear Panel. . . . . . . . . . . . . . . . . . . 12.6 1293 Sirius 850 Video DIN 1.0/2.3 (mini Coax) Output Rear Panel . . . . . . . . 199 199 200 201 202 204 205 206 207 208 209 13. Multiviewer and Input/Output Monitoring Modules. . . . . . . . . . . . . . . . . . . . . . 211 13.1 Monitoring and Multiviewer Overview . . . . . . . . . . . . . . . . . . . . . . . . . . . . . . . .211 13.2 Sirius 830 Monitoring and Multiviewer. . . . . . . . . . . . . . . . . . . . . . . . . . . . . . . 212 13.2.1 Sirius 830: Multiviewer Outputs Only (no monitoring) . . . . . . . . . . . . . . . 212 13.2.2 Sirius 830: Input/output Monitoring Only (no multiviewer outputs) . . . . . 212 13.3 Sirius 840 Monitoring and Multiviewer. . . . . . . . . . . . . . . . . . . . . . . . . . . . . . . 213 13.3.1 Sirius 840: Multiviewer Outputs Only (no monitoring) . . . . . . . . . . . . . . . 213 13.3.2 Sirius 840: Multiviewer Outputs and Input/Output Monitoring . . . . . . . . . 214 13.3.3 Sirius 840: Output Monitoring Only (no multiviewer outputs) . . . . . . . . . 215 13.3.4 Sirius 840: Input/Output Monitoring Only (no multiviewer outputs) . . . . . 215 13.4 Sirius 850 Monitoring and Multiviewer. . . . . . . . . . . . . . . . . . . . . . . . . . . . . . . 216 13.4.1 Sirius 850: Multiviewer Outputs Only (no monitoring) . . . . . . . . . . . . . . . 216 13.4.2 Sirius 850: Multiviewer Outputs and Input/Output Monitoring . . . . . . . . . 217 13.4.3 Sirius 850: Output Monitoring Only (no multiviewer outputs) . . . . . . . . . 218 13.4.4 Sirius 850: Input/Output Monitoring Only (no multiviewer outputs) . . . . . 218 13.5 5902 Sirius 800 Series Multiviewer Crosspoint Module . . . . . . . . . . . . . . . . . 219 13.5.1 Sirius 840/850 only . . . . . . . . . . . . . . . . . . . . . . . . . . . . . . . . . . . . . . . . . 219 13.5.2 5902 Sirius 800 Multiviewer Crosspoint Module LED Information . . . . . 220 13.6 5931 Sirius 800 Multiviewer Output Module . . . . . . . . . . . . . . . . . . . . . . . . . . 221 13.6.1 5931 Sirius 800 Multiviewer Output Module LED Information. . . . . . . . . 222 13.7 5939 Sirius 830 Video & Audio, Input & Output Monitoring Module . . . . . . . . 223 13.7.1 5939 Sirius 830 Video & Audio, Input & Output Monitoring Module LEDs . . . . . . . . . . . . . . . . . . . . . . . . . . . . . . . . . . . . . . . . . . . . . . . . . . . 224 13.8 5930 Sirius 840/850 Input and 5933 Output Monitoring Modules . . . . . . . . . . 225 13.8.1 5930 Sirius 840/850 Input Monitoring Crosspoint Module. . . . . . . . . . . . 225 13.8.1.1 5930 Sirius 840/850 Input Monitoring Crosspoint Module LEDs . . . . . . . . . . 226 13.8.2 5933 Sirius 840/850 Output Monitoring Module . . . . . . . . . . . . . . . . . . . 227 13.8.2.1 5933 Sirius 840/850 Output Monitoring Module LEDs. . . . . . . . . . . . . . . . . . 228 13.9 1237 Sirius 830 Monitoring Rear Panel. . . . . . . . . . . . . . . . . . . . . . . . . . . . . . 229 13.10 1309 Sirius 830/840 Multiviewer Coax Rear Panel . . . . . . . . . . . . . . . . . . . . 230 13.11 1291 Sirius 850 Multiviewer Coax Rear Panel . . . . . . . . . . . . . . . . . . . . . . . 231 Issue 5 Rev 2 Page 7 © 2014 Snell Limited Sirius 800 www.snellgroup.com Contents 14. Nucleus Router Control Modules . . . . . . . . . . . . . . . . . . . . . . . . . . . . . . . . . . . . 14.1 Workbench . . . . . . . . . . . . . . . . . . . . . . . . . . . . . . . . . . . . . . . . . . . . . . . . . . . 14.1.1 Initial Connection and Configuration Steps . . . . . . . . . . . . . . . . . . . . . . . 14.2 Nucleus Router Controller Compatibility . . . . . . . . . . . . . . . . . . . . . . . . . . . . . 14.3 2463 Nucleus2 Router Control Module . . . . . . . . . . . . . . . . . . . . . . . . . . . . . . 14.3.1 Reset Button . . . . . . . . . . . . . . . . . . . . . . . . . . . . . . . . . . . . . . . . . . . . . . 14.3.2 2463 Nucleus2 Router Control Module LEDs . . . . . . . . . . . . . . . . . . . . . 14.3.3 2463 Nucleus2 Router Control Module LEDs at Startup/Reset. . . . . . . . 14.3.4 2463 Nucleus2 Router Control Module LEDs on Database Push. . . . . . 14.3.5 Nucleus2 2463: Sirius 800 Input and Output Port Mapping . . . . . . . . . . 233 234 234 235 237 237 238 240 240 241 14.3.5.1 Sirius 830: Input and Output Port Mapping . . . . . . . . . . . . . . . . . . . . . . . . . . 241 14.3.5.2 Sirius 840: Input and Output Port Mapping . . . . . . . . . . . . . . . . . . . . . . . . . . 241 14.3.5.3 Sirius 850: Input and Output Port Mapping . . . . . . . . . . . . . . . . . . . . . . . . . . 242 14.3.6 Configuring Nucleus2 2463 Controller Replication . . . . . . . . . . . . . . . . . 14.3.7 Changing the IP Address of a Nucleus2 Controller. . . . . . . . . . . . . . . . . 14.3.8 Setting the Network Communication Speed of a Nucleus2 Controller . . 14.3.9 Enable/Disable RollCall on a Nucleus2 Controller Using the Online Editor . . . . . . . . . . . . . . . . . . . . . . . . . . . . . . . . . . . . . . . . . . . . . . . . . . . 14.3.10 Enable/Disable Auto Change Over of Controller Ethernet Connection . 14.3.11 Further Information . . . . . . . . . . . . . . . . . . . . . . . . . . . . . . . . . . . . . . . . 14.4 Nucleus 2450 Router Controller Card . . . . . . . . . . . . . . . . . . . . . . . . . . . . . . . 14.4.1 Nucleus 2450 Controller LEDs . . . . . . . . . . . . . . . . . . . . . . . . . . . . . . . . 14.4.2 Nucleus 2450: Sirius 800 Input and Output Port Mapping . . . . . . . . . . . 243 244 245 246 247 247 248 248 250 14.4.2.1 Sirius 830 Input and Output Port Mapping. . . . . . . . . . . . . . . . . . . . . . . . . . . 250 14.4.2.2 Sirius 840 Input and Output Port Mapping. . . . . . . . . . . . . . . . . . . . . . . . . . . 250 14.4.2.3 Sirius 850: Input Output Port Mapping. . . . . . . . . . . . . . . . . . . . . . . . . . . . . . 251 14.4.3 Nucleus 2450: Config.ini File. . . . . . . . . . . . . . . . . . . . . . . . . . . . . . . . . . 252 14.4.4 Nucleus 2450: Network.ini File . . . . . . . . . . . . . . . . . . . . . . . . . . . . . . . . 254 14.4.5 Nucleus 2450: Viewing/Modifying Config.ini and Network.ini Files . . . . . 257 14.4.5.1 Modify an ini File Using FTP . . . . . . . . . . . . . . . . . . . . . . . . . . . . . . . . . . . . . 257 14.4.5.2 Modify an ini File Using Copy . . . . . . . . . . . . . . . . . . . . . . . . . . . . . . . . . . . . 258 14.4.6 Nucleus 2450: Changing the IP Address . . . . . . . . . . . . . . . . . . . . . . . . 14.4.7 Nucleus 2450: Setting the Network Communication Speed . . . . . . . . . . 14.4.8 Nucleus 2450: Enabling RollCall . . . . . . . . . . . . . . . . . . . . . . . . . . . . . . . 14.4.9 Nucleus 2450: Setting Parity for SW-P-02 & SW-P-08 Protocols . . . . . . 14.4.10 Further Information . . . . . . . . . . . . . . . . . . . . . . . . . . . . . . . . . . . . . . . . 14.5 Multi-Drop Panel Communications Protocol (SW-P-06) . . . . . . . . . . . . . . . . . 14.6 General Switcher Protocol (SW-P-02). . . . . . . . . . . . . . . . . . . . . . . . . . . . . . . 14.6.1 SW-P-02 Routing, Monitoring O/Ps & MV Destination Control . . . . . . . . 14.6.1.1 Sirius 830. . . . . . . . . . . . . . . . . . . . . . . . . . . . . . . . . . . . . . . . . . . . . . . . . . . . 14.6.1.2 Sirius 840. . . . . . . . . . . . . . . . . . . . . . . . . . . . . . . . . . . . . . . . . . . . . . . . . . . . 14.6.1.3 Sirius 850 (Single Frame with Optional Expansion Outputs) . . . . . . . . . . . . . 14.6.1.4 Sirius 850 (Dual Frame). . . . . . . . . . . . . . . . . . . . . . . . . . . . . . . . . . . . . . . . . Issue 5 Rev 2 258 259 259 259 259 260 260 260 261 262 263 264 15. Control/Fan Interface Module . . . . . . . . . . . . . . . . . . . . . . . . . . . . . . . . . . . . . . . 15.1 Control/Fan Interface Module Compatibility . . . . . . . . . . . . . . . . . . . . . . . . . . 15.1.1 Fan-Out . . . . . . . . . . . . . . . . . . . . . . . . . . . . . . . . . . . . . . . . . . . . . . . . . . 15.1.2 Sirius 850: Control/Fan Interface Module in a Two Frame System . . . . . 15.1.3 Control/Fan Interface Module LEDs . . . . . . . . . . . . . . . . . . . . . . . . . . . . 265 266 268 268 269 16. Control and Alarm Rear Panel Connections . . . . . . . . . . . . . . . . . . . . . . . . . . . 16.1 Sirius 830: Control Connections . . . . . . . . . . . . . . . . . . . . . . . . . . . . . . . . . . . 16.2 Sirius 840/850: Control Connections. . . . . . . . . . . . . . . . . . . . . . . . . . . . . . . . 16.3 Sirius 840/850: Alarm Rear Panel Connections . . . . . . . . . . . . . . . . . . . . . . . 16.3.1 Sirius 840/850: Frame ID Rotary Switch on the Alarm Rear Panel. . . . . 16.4 Control I/O and Alarm Pin-outs . . . . . . . . . . . . . . . . . . . . . . . . . . . . . . . . . . . . 16.4.1 RS485 9 Way D-Type Socket . . . . . . . . . . . . . . . . . . . . . . . . . . . . . . . . . 16.4.2 LTC & AES Reference 9 Way D-Type Socket . . . . . . . . . . . . . . . . . . . . . 16.4.3 Alarm Relay Output 25 Way D-Type Socket . . . . . . . . . . . . . . . . . . . . . . 271 271 272 273 274 274 274 275 275 Page 8 © 2014 Snell Limited Sirius 800 www.snellgroup.com Contents Appendix A. Router and Power Supply Shelf Dimensions. . . . . . . . . . . . . . . . . . . A.1 Sirius 830 Frame Dimensions. . . . . . . . . . . . . . . . . . . . . . . . . . . . . . . . . . . . . . A.2 Sirius 840 Frame Dimensions. . . . . . . . . . . . . . . . . . . . . . . . . . . . . . . . . . . . . . A.3 Sirius 850 Frame Dimensions. . . . . . . . . . . . . . . . . . . . . . . . . . . . . . . . . . . . . . A.4 Power Supply Shelf Dimensions. . . . . . . . . . . . . . . . . . . . . . . . . . . . . . . . . . . . 277 277 278 279 280 Appendix B. Modules No Longer Supplied With New Systems. . . . . . . . . . . . . . . B.1 Input Rear Panels . . . . . . . . . . . . . . . . . . . . . . . . . . . . . . . . . . . . . . . . . . . . . . . B.1.1 Sirius 830: 1299 Balanced AES Input Rear Panel . . . . . . . . . . . . . . . . . . B.1.2 Sirius 840/850: 1297 Balanced AES Input Rear Panel. . . . . . . . . . . . . . . B.2 Input Modules . . . . . . . . . . . . . . . . . . . . . . . . . . . . . . . . . . . . . . . . . . . . . . . . . . B.2.1 5913/4 Sirius 840/850 Standard Video Input Module . . . . . . . . . . . . . . . . 281 281 281 282 283 283 B.2.1.1 5913/5914 Input Module LED Information. . . . . . . . . . . . . . . . . . . . . . . . . . . . 284 B.2.2 5915 Sirius 800 Video AHP Input Module. . . . . . . . . . . . . . . . . . . . . . . . . 286 B.2.2.1 Processing on the Input Module . . . . . . . . . . . . . . . . . . . . . . . . . . . . . . . . . . . B.2.2.2 Gain Control and Phase Invert . . . . . . . . . . . . . . . . . . . . . . . . . . . . . . . . . . . . B.2.2.3 16 Channel Mixer . . . . . . . . . . . . . . . . . . . . . . . . . . . . . . . . . . . . . . . . . . . . . . B.2.2.4 Channel Swap (Shuffle) . . . . . . . . . . . . . . . . . . . . . . . . . . . . . . . . . . . . . . . . . B.2.2.5 5915 Connections to the Audio Crosspoints . . . . . . . . . . . . . . . . . . . . . . . . . . B.2.2.6 5915 Input Module LED Information . . . . . . . . . . . . . . . . . . . . . . . . . . . . . . . . 287 288 288 288 288 289 B.2.3 5916 Sirius 830 Standard Video BNC/Fiber Input Module . . . . . . . . . . . . 292 B.2.3.1 5916 Input Module LED Information . . . . . . . . . . . . . . . . . . . . . . . . . . . . . . . . 293 B.3 Output Modules. . . . . . . . . . . . . . . . . . . . . . . . . . . . . . . . . . . . . . . . . . . . . . . . . 295 B.3.1 4925 Sirius 800 AES/MADI Output Module (no audio delay) . . . . . . . . . . 295 B.3.1.1 Duplicate MADI Outputs . . . . . . . . . . . . . . . . . . . . . . . . . . . . . . . . . . . . . . . . . B.3.1.2 Configuring MADI to 56 or 64 Channels . . . . . . . . . . . . . . . . . . . . . . . . . . . . . B.3.1.3 AES Audio Outputs . . . . . . . . . . . . . . . . . . . . . . . . . . . . . . . . . . . . . . . . . . . . . B.3.1.4 MADI Audio Outputs . . . . . . . . . . . . . . . . . . . . . . . . . . . . . . . . . . . . . . . . . . . . B.3.1.5 Audio Processing on the Output Module. . . . . . . . . . . . . . . . . . . . . . . . . . . . . B.3.1.6 Gain Control and Phase Invert . . . . . . . . . . . . . . . . . . . . . . . . . . . . . . . . . . . . B.3.1.7 Stereo Mode . . . . . . . . . . . . . . . . . . . . . . . . . . . . . . . . . . . . . . . . . . . . . . . . . . B.3.1.8 4925 Connections from the Audio Crosspoints . . . . . . . . . . . . . . . . . . . . . . . . B.3.1.9 4925 Output Module LED Information. . . . . . . . . . . . . . . . . . . . . . . . . . . . . . . 296 296 297 297 298 299 299 299 300 B.3.2 5923/4 Sirius 840/850 Standard Video Output Module. . . . . . . . . . . . . . . 302 B.3.2.1 5923/5924 Output Module LED Information . . . . . . . . . . . . . . . . . . . . . . . . . . 303 B.3.3 5925 Sirius 800 Video AHP Output Module . . . . . . . . . . . . . . . . . . . . . . . 305 B.3.3.1 Processing on the Output Module . . . . . . . . . . . . . . . . . . . . . . . . . . . . . . . . . . B.3.3.2 16 Channel Mixer . . . . . . . . . . . . . . . . . . . . . . . . . . . . . . . . . . . . . . . . . . . . . . B.3.3.3 Channel Swap (Shuffle) . . . . . . . . . . . . . . . . . . . . . . . . . . . . . . . . . . . . . . . . . B.3.3.4 Gain control . . . . . . . . . . . . . . . . . . . . . . . . . . . . . . . . . . . . . . . . . . . . . . . . . . . B.3.3.5 Phase Invert . . . . . . . . . . . . . . . . . . . . . . . . . . . . . . . . . . . . . . . . . . . . . . . . . . B.3.3.6 5925 Connections to the Audio Crosspoints . . . . . . . . . . . . . . . . . . . . . . . . . . B.3.3.7 5925 Output Module LED Information. . . . . . . . . . . . . . . . . . . . . . . . . . . . . . . 306 306 306 307 307 307 308 B.3.4 5937 Sirius 830 Standard Video BNC/Fiber Output Module. . . . . . . . . . . 311 B.3.4.1 5937 Output Module LED Information. . . . . . . . . . . . . . . . . . . . . . . . . . . . . . . 312 B.4 Output Rear Panel . . . . . . . . . . . . . . . . . . . . . . . . . . . . . . . . . . . . . . . . . . . . . . B.4.1 1298 Sirius 800 Balanced AES Output Rear Panel . . . . . . . . . . . . . . . . . B.5 Multiviewer Modules . . . . . . . . . . . . . . . . . . . . . . . . . . . . . . . . . . . . . . . . . . . . . B.5.1 5932 Sirius 850 Multiviewer Output Module . . . . . . . . . . . . . . . . . . . . . . . 313 313 314 314 B.5.1.1 5932 Multiviewer Output Module LED Information . . . . . . . . . . . . . . . . . . . . . 315 B.5.2 Sirius 850: 1292 MV-Link Rear Panel. . . . . . . . . . . . . . . . . . . . . . . . . . . . 316 B.5.2.1 Sirius 850: Multiview Link Outputs . . . . . . . . . . . . . . . . . . . . . . . . . . . . . . . . . 317 Issue 5 Rev 2 Page 9 © 2014 Snell Limited Sirius 800 www.snellgroup.com Contents Appendix C. Specifications . . . . . . . . . . . . . . . . . . . . . . . . . . . . . . . . . . . . . . . . . . . . C.1 Inputs . . . . . . . . . . . . . . . . . . . . . . . . . . . . . . . . . . . . . . . . . . . . . . . . . . . . . . . . C.1.1 Video Inputs . . . . . . . . . . . . . . . . . . . . . . . . . . . . . . . . . . . . . . . . . . . . . . . C.1.2 Video AHP Inputs . . . . . . . . . . . . . . . . . . . . . . . . . . . . . . . . . . . . . . . . . . . C.1.3 AHP Audio Inputs . . . . . . . . . . . . . . . . . . . . . . . . . . . . . . . . . . . . . . . . . . . C.2 Outputs . . . . . . . . . . . . . . . . . . . . . . . . . . . . . . . . . . . . . . . . . . . . . . . . . . . . . . . C.2.1 Video Outputs . . . . . . . . . . . . . . . . . . . . . . . . . . . . . . . . . . . . . . . . . . . . . . C.2.2 Video AHP Outputs . . . . . . . . . . . . . . . . . . . . . . . . . . . . . . . . . . . . . . . . . C.2.3 AHP Audio Outputs . . . . . . . . . . . . . . . . . . . . . . . . . . . . . . . . . . . . . . . . . C.2.4 Multiviewer and Additional Coax Outputs 577 to 1152 . . . . . . . . . . . . . . . C.3 Control . . . . . . . . . . . . . . . . . . . . . . . . . . . . . . . . . . . . . . . . . . . . . . . . . . . . . . . C.4 Physical . . . . . . . . . . . . . . . . . . . . . . . . . . . . . . . . . . . . . . . . . . . . . . . . . . . . . . Issue 5 Rev 2 Page 10 319 319 319 320 323 324 324 325 327 330 331 332 © 2014 Snell Limited Sirius 800 www.snellgroup.com About this Manual 1. About this Manual This manual describes the Sirius 800 router range, and the configuration of the various modules that can be added to the range. Refer to the individual Installation and Quick Start manuals for details on how to unpack, install and test the Sirius 800 routers and the Sirius 800 Maintenance & Upgrade manual for maintenance information. Refer to the Workbench manual for details on configuring hardware and software panels. If you have any questions regarding the installation and setup of your product, please refer to the Customer Service contact details (see section 1.2). 1.1 Software and Firmware Release Details This version of the Sirius 800 user manual documents the features and functions available with Workbench version 3.15.x and firmware release PA1250x. These features are shown in summary in Table 1. Firmware Release Version Module 3.0.x 2463 AHP control (software/firmware supplied with the Workbench release). PA1250x 4915 Gain, Phase Invert, Left/Right Swap, Left Both, Right Both, Mono Mix. PA1250x 5919 Audio De-embedding, Gain, Phase Invert, 16 Channel Mix and Channel Swap (Shuffle), Video Frame/Line Sync, Video Delay. PA1250x 4929 Gain, Phase Invert, Left/Right Swap, Left Both, Right Both, Mono Mix, Audio Delay, Sample Rate Convert. PA1250x 5949 16 Channel Mix, Channel Swap (Shuffle), Gain, Phase Invert and Audio Embedding, Video Frame/Line Sync, Video Delay. AHP Features Supported Crosspoint Modules Crosspoint Modules PA1250x 5903 Audio crosspoint operation. PA1250x 5905 Video crosspoint operation. Modules no longer supplied with new systems PA1250x 5915 Audio De-embedding, Gain, Phase Invert, 16 Channel Mix and Channel Swap (Shuffle). PA1250x 4925 Gain, Phase Invert, Left/Right Swap, Left Both, Right Both, Mono Mix. PA1250x 5925 16 Channel Mix, Channel Swap (Shuffle), Gain, Phase Invert and Audio Embedding. Table 1. Firmware Release History Firmware release notes are included with the firmware and are available on request from Snell Customer Service, see section 1.2 for contact details. 1.1.1 Export System Information (Nucleus2 2463) Router system information can be exported to a CSV file by right clicking on the controller in the configuration screen of Workbench. System information saved includes; hardware module types, hardware versions, firmware versions, software versions, Workbench details and database location information. See the Workbench manual for information on using Workbench. Issue 5 Rev 2 Page 11 © 2014 Snell Limited Sirius 800 www.snellgroup.com About this Manual 1.2 Contact Details Customer Support For details of our Regional Customer Support Offices please visit the Snell web site and navigate to Support/Customer Support Contacts. http://www.snellgroup.com/support/customer-support/ Customers with a support contract should call their personalized number, which can be found in their contract, and be ready to provide their contract number and details. 1.3 Copyright and Disclaimer Copyright protection claimed includes all forms and matters of copyrightable material and information now allowed by statutory or judicial law or hereinafter granted, including without limitation, material generated from the software programs which are displayed on the screen such as icons, screen display looks etc. Information in this manual and software are subject to change without notice and does not represent a commitment on the part of Snell Limited. The software described in this manual is furnished under a license agreement and can not be reproduced or copied in any manner without prior agreement with Snell Limited. or their authorized agents. Reproduction or disassembly of embedded computer programs or algorithms prohibited. No part of this publication can be transmitted or reproduced in any form or by any means, electronic or mechanical, including photocopy, recording or any information storage and retrieval system, without permission being granted, in writing, by the publishers or their authorized agents. Snell operates a policy of continuous improvement and development. Snell reserves the right to make changes and improvements to any of the products described in this document without prior notice. Issue 5 Rev 2 Page 12 © 2014 Snell Limited Sirius 800 www.snellgroup.com Warnings and Precautions 2. Warnings and Precautions E xp la na tio n o f S afe ty S y m bo ls Erk lä ru n g d er S ic h e rh e its s y m b ole GB T his sym bo l refe rs th e u ser to imp ortan t in fo rm atio n c ontain ed in th e a cco mp anying litera tur e. Re fe r to ma nua l. ! ! D ie s es Symb o l z eig t a n , d a ss ge fäh rlich e Sp an nu n g vo rha n de n ist. E s b efin de n s ich ke ine vo m Be n utze r zu wa rten d en Te ile im G erä tein ne ren . D ie s es Ge rät sollte n ur vo n g eschu ltem Pe rso na l ge wa rtet we rde n T his sym bo l ind ica tes tha t ha zar dou s voltage s a re p res ent ins ide. N o u ser ser v icea ble p arts ins ide. T his unit sh ould on ly b e s ervic ed by tra ined pe rso nne l. S ic h e rh e its-W a rn hin w e is e S a fety W a rn in g s ! C A U T IO N RI SK O F E L E C T R IC S HO C K D O N O T R E M O V E C O V E RS N O U S E R S E R V ICE A BL E PA RT S R E F E R S E RV IC IN G TO Q U AL IF IE D P E RS O N NE L O NLY D D ie s es Symb o l w eist d e n B en utzer au f wichtig e In for ma tio n en h in, die in de r be g le iten d en Do ku m en tation e nth alte n sin d . S er vicing instruc tion s w here g iven, are fo r u se by qu alified service p ers on nel only. To red uce risk o f e lectr ic sho ck d o no t pe rfor m a ny se rvicing o the r th an that con tained in the ope ratin g in str uctions un less you are qu alified to d o so. R efer a ll s ervicing to q ualified per son ne l. ! ACH TU NG G efa hr vo n Elektro sc hocks. Abde ckungen nic ht e ntferne n Ke ine vom Benutzer z u w artende Teile We nd en Sie sic h ausschließlich an qua lifiz ie rtes Pe rson al Die an g efü hr ten Se rvice -/R e pa ra tu r-A nw eisun g en sin d a us sch lie ß lich v on qu a lifizier te m S er vice-Pe rso na l a us zu fü hre n. Um da s R isiko ein e s le ktroscho cks zu red u zie re n , fü hre n S ie a ussch ließ lich die im Be n utze rha n db uch e s ch rieb e ne n A n we isu ng e n a us, e s s ei d en n , S ie h ab en d ie en ts pre ch e nd e Q ua lifika tio n. Wenden Sie sich in allen Service-Fragen an qualifiziertes Personal. · To r edu ce the ris k o f ele ctr ic s hoc k, do n ot exp os e th is a pp lian ce to rain or m o isture . · U m da s Risik o e ine s Elekt ros cho ck s zu re duz ier en, set zen Sie da s Ger ät w ed er R eg en noc h F euc htigke it a us. · Alw ay s e nsu re that the un it is pr ope rly ear the d a nd pow er con ne ctio ns cor rec tly m a de. · S tellen Sie im m er sic her, da ss da s G erä t or dnu ng sge m ä ß g eer det und ve rka belt ist . · Th is e quipm ent m u st b e s upp lie d fr om a p owe r s yst em pro vid ing a PR OT EC TIV E E AR TH con ne ctio n a nd hav ing a n eu tral con ne ctio n wh ich ca n b e re liab ly ide ntified. · D ie ses Eq uip m e nt m us s a n e ine Ne tzsteck do se m it S ch utz leit er angeschlossen werden und einen zuverlässig identifizierbaren Nullleiter haben. · Th e po we r o utle t su pp lyin g p ow er to th e u nit sho uld be clo se to the un it a nd eas ily acc ess ible · D ie Ne tzsteck dos e s ollte n ahe be im Ge rät und einfa ch z ug äng lich se in. L ég e nd e : Explicación de los Símbolos de Seguridad F C e s ymb ole ind iqu e q u'il faut prê ter atte ntion e t s e ré fére r a u m anu el. ! ! Éste símbolo indica que voltajes peligrosos están presentes en el interior. No hay elementos accesibles al usuario dentro. Esta unidad sólo debería ser tratada por personal cualificado. C e s ymb ole ind iqu e q u'il pe ut y avoir de s te nsions éle ctr iqu es à l'inté rie ur d e l'ap par eil. Ne pas intervenir sa ns l'a grém en t d u se rvice qu alifié. Advertencias de Seguridad P réc a u tio n d 'e m p loi : ! ATTENTION RI SQ U E D E C HO C ELE CTRIQ U E N E P AS RETIRER LE C O UV ERCL E N E P AS IN TE RVEN IR S ANS L 'AG RE M ENT D U SERVI CE Q UALIFIE ESP Éste símbolo refiere al usuario información importante contenida en la literatura incluida. Referirse al manual. Les procédures de m ain tena nce ne concernent que le service agréé. Afin de réduire le risqu e d e choc électrique, il est recomm andé de se lim iter aux procédures d'utilisation, à m oins d'en être qualifié. Pour toute maintenance, contacter le service compétent. RIESGO DE CHOQUE ELECTRICO NO QUITAR LAS PROTECCIONNES ELEMENTOS NO ACCESIBLES AL USUARIO. SERVICIO SOLAMENTE A PERSONAL CUALIFICADO Las instrucciones de servicio cuando sean dadas, son sólo para uso de personal cualificado. Para reducir el riesgo de choque eléctrico no llevar a cabo ninguna operación de servicio aparte de las contenidas en las instrucciones de operación, a menos que se esté cualificado para realizarlas. Referir todo el trabajo de servicio a personal cualificado. · Po ur réd uire le ris que de ch oc éle ctrique , n e pas ex po ser l'a ppar eil dan s u n m ilieu hum id e. · Para reducir el riesgo de choque eléctrico, no exponer este equipo a la lluvia o humedad. · Tou jou rs s 'a ssu re r qu e l'un ité est co rre ctem en t a lim entée, en particuliers à la liais on à la te rre. · Siempre asegurarse de que la unidad está propiamente conectada a tierra y que las conexiones de alimentación están hechas correctamente. · La so urc e é lec triq ue de cet équ ipe m e nt doit po ss éde r u ne con ne xion à la te rre , ainsi qu 'un e liais on « n eut re » id entifia ble . · Este equipo debe ser alimentado desde un sistema de alimentación con conexión a TIERRA y teniendo una conexión neutra fácilmente identificable. · La toma de alimentación para la unidad debe ser cercana y fácilmente accesible. · La prise éle ctrique qu i a lim e nt e l'appa reil do it ê tre pro ch e de ce lle-c i e t ac ces sib le. Simboli di sicurezza: ! Forklaring på sikkerhedssymboler I Questo simbolo indica l'informazione importante contenuta nei manuali appartenenti all'apparecchiatura. Consultare il manuale. ! Questo simbolo indica che all'interno dell'apparato sono presenti tensioni pericolose. Non cercare di smontare l'unità. Per qualsiasi tipo di intervento rivolgersi al personale qualificato. Dette symbol indikerer farlig spænding inden i apparatet. Ingen bruger servicerbare dele i apparatet på brugerniveau. Dette apparat må kun serviceres af faglærte personer.. Attenzione: ! ATTENZIONE RISCHIO DI SHOCK ELETTRICO NON CERCARE DI SMONTARE L'UNITA PER QUALSIASI TIPO DI INTERVENTO RIVOLGERSI AL PERSONALE QUALIFICATO DK Dette symbol gør brugeren opmærksom på vigtig information i den medfølgende manual. Sikkerhedsadvarsler Le istruzioni relative alla manutenzione sono ad uso esclusivo del personale qualificato. E' proibito all'utente eseguire qualsiasi operazione non esplicitamente consentita nelle istruzioni. Per qualsiasi informazione rivolgersi al personale qualificato. ! FORSIGTIG ! RISIKO FOR ELEKTRISK STØD DÆKPLADER MÅ IKKE FJERNES INGEN BRUGER SERVICERBARE DELE SERVICE MÅ KUN UDFØRES AF FAGLÆRTE PERSONER Serviceinstruktioner er kun til brug for faglærte servicefolk. For at reducere risikoen for elektrisk stød må bruger kun udføre anvisninger i betjeningsmanualen. Al service skal udføres af faglærte personer. · Per prevenire il pericolo di scosse elettriche è necessario non esporre mai l'apparecchiatura alla pioggia o a qualsiasi tipo di umidità. · For at reducere risikoen for elektrisk stød må apparatet ikke udsættes for regn eller fugt. · Assicurarsi sempre, che l'unità sia propriamente messa a terra e che le connessioni elettriche siano eseguite correttamente. · Sørg altid for at apparatet er korrekt tilsluttet og jordet. · Dette apparat skal forbindes til en nettilslutning, der yder BESKYTTENDE JORD og 0 forbindelse skal være tydeligt markeret. · Stikkontakten, som forsyner apparatet, skal være tæt på apparatet og let tilgængelig. · Questo dispositivo deve essere collegato ad un impianto elettrico dotato di un sistema di messa a terra efficace. · La presa di corrente deve essere vicina all'apparecchio e facilmente accessibile. Issue 5 Rev 2 Page 13 © 2014 Snell Limited Sirius 800 www.snellgroup.com Förklaring av Säkerhetssymboler ! Turvamerkkien selitys S Denna symbol hänvisar användaren till viktig information som återfinns i litteraturen som medföljer. Se manualen. ! Säkerhetsvarningar CAUTION RISK OF ELECTRIC SHOCK DO NOT REMOVE COVERS NO USER SERVICEABLE PARTS REFER SERVICING TO QUALIFIED PERSONNEL ONLY FI Tämä merkki tarkoittaa, että laitteen mukana toimitettu kirjallinen materiaali sisältää tärkeitä tietoja. Lue käyttöohje. Tämä merkki ilmoittaa, että laitteen sisällä on vaarallisen voimakas jännite. Sisäpuolella ei ole mitään osia, joita käyttäjä voisi itse huoltaa. Huollon saa suorittaa vain alan ammattilainen. Denna symbol indikerar att livsfarlig spänning finns på insidan. Det finns inga servicevänliga delar inne i apparaten. Denna apparat få endast repareras av utbildad personal. ! Warnings and Precautions Turvaohjeita Serviceinstruktioner som anges avser endast kvalificerad och utbildad servicepersonal. För att minska risken för elektrisk stöt, utför ingen annan service än den som återfinns i medföljande driftinstruktionerna, om du ej är behörig. Överlåt all service till kvalificerad personal. ! VAROITUS SÄHKÖISKUN VAARA ÄLÄ AVAA LAITTEEN KANSIA EI SISÄLLÄ KÄYTTÄJÄLLE HUOLLETTAVIA OSIA HUOLTO AINOASTAAN AMMATTILAISEN SUORITTAMANA Huolto-ohjeet on tarkoitettu ainoastaan alan ammattilaisille. Älä suorita laitteelle muita toimenpiteitä, kuin mitä käyttöohjeissa on neuvottu, ellet ole asiantuntija. Voit saada sähköiskun. Jätä kaikki huoltotoimet ammattilaiselle. · För att reducera risken för elektrisk stöt, utsätt inte apparaten för regn eller fukt. · Sähköiskujen välttämiseksi suojaa laite sateelta ja kosteudelta. · Se alltid till att apparaten är ordentligt jordad samt att strömtillförseln är korrekt utförd. · Varmistu, että laite on asianmukaisesti maadoitettu ja että sähkökytkennät on tehty oikein. · Denna apparat måste bli försörjd från ett strömsystem som är försedd med jordadanslutning samt ha en neutral anslutning som lätt identifierbar. · Laitteelle tehoa syöttävässä järjestelmässä tulee olla SUOJAMAALIITÄNTÄ ja nollaliitännän on oltava luotettavasti tunnistettavissa. · Vägguttaget som strömförsörjer apparaten bör finnas i närheten samt vara lätttillgänglig. · Sähköpistorasian tulee olla laitteen lähellä ja helposti tavoitettavissa. Símbolos de Segurança ! P O símbolo triangular adverte para a necessidade de consultar o manual antes de utilizar o equipamento ou efectuar qualquer ajuste. Este símbolo indica a presença de voltagens perigosas no interior do equipamento. As peças ou partes existentes no interior do equipamento não necessitam de intervenção, manutenção ou manuseamento por parte do utilizador. Reparações ou outras intervenções devem ser efectuadas apenas por técnicos devidamente habilitados. Avisos de Segurança As instruções de manutenção fornecidas são para utilização de técnicos qualificados. Para reduzir o risco de choque eléctrico, não devem ser realizadas intervenções no equipamento não especificadas no manual de instalações a menos que seja efectuadas por técnicos habilitados. · Para reduzir o risco de choque eléctrico, não expor este equipamento à chuva ou humidade. · Assegurar que a unidade está sempre devidamente ligada à terra e que as ligações à alimentação estão correctas. · O sistema de alimentação do equipamento deve, por razões de segurança, possuir ligação a terra de protecção e ligação ao NEUTRO devidamente identificada. · A tomada de energia à qual a unidade está ligada deve situar-se na sua proximidade e facilmente acessível. Issue 5 Rev 2 Page 14 © 2014 Snell Limited Sirius 800 www.snellgroup.com Warnings and Precautions 2.1 Explanation of Safety Symbols This symbol refers the user to important information contained in the accompanying literature. This symbol indicates that hazardous voltages are present inside. No user serviceable parts inside. This system should only be serviced by trained personnel. 2.2 Safety Warnings CAUTION RISK OF ELECTRIC SHOCK DO NOT REMOVE COVERS NO USER SERVICABLE PARTS REFER SERVICING TO QUALIFIED PERSONNEL ONLY Servicing instructions, where given, are for use by qualified personnel only. To reduce the risk of electric shock, do not perform any actions on this equipment other than contained in the operating instructions, unless you are qualified to do so. Refer all servicing to qualified personnel. To reduce the risk of electric shock, do not expose this appliance to rain or moisture. Always ensure that the unit is properly earthed and power connections correctly made. This equipment must be supplied from a power system providing a PROTECTIVE EARTH connection and having a neutral connection which can be reliably identified. The power circuit breakers or switches supplying power to the unit should be close to the unit and easily accessible. 2.3 Lithium Batteries CAUTION This equipment contains a lithium battery There is a danger of explosion if this is replaced incorrectly Replace only with the same or equivalent type. Dispose of used batteries according to the manufacturers instructions. Batteries should only be replaced by trained service technicians The Sirius 800 door PC and router control module(s) each contain a Lithium battery to provide non-volatile memory. Note: Used batteries should be disposed of in accordance with the manufacturers instruction and any specific local legislation regarding the recycling of waste batteries and accumulators Ensure that the same make and model of battery is used if replacement is required (a manufacturer recommended equivalent can be used if the original type is not available) Issue 5 Rev 2 Page 15 © 2014 Snell Limited Sirius 800 www.snellgroup.com Warnings and Precautions 2.4 Fiber Output Modules Warning LASER SAFETY The average optical output power does not exceed 0 dBm (1mW) under normal operating conditions. Unused optical outputs should be covered to prevent direct exposure to the laser beam. Even though the power of these lasers is low, the beam should be treated with caution and common sense because it is intense and concentrated. Laser radiation can cause irreversible and permanent damage of eyesight. Please read the following guidelines carefully: • Make sure that a fiber is connected to the board's fiber outputs before power is applied. If a fiber cable (e.g. patchcord) is already connected to an output, make sure that the cable's other end is connected, too, before powering up the board. • Do not look in the end of a fiber to see if light is coming out. The laser wavelengths being used are totally invisible to the human eye and can cause permanent damage. Always use optical instrumentation, such as an optical power meter, to verify light output. 2.5 Cable Management It is important that the cabling to and from the router is correctly labelled and routed. This will simplify the work required if the installation needs to be changed or added to at a future date. • Cables connected to the router must be fitted with adequate vertical and horizontal strain relief to avoid twisting of the rear panels causing damage to the router connectors and loss of electrical/signal connection to the router. • Cables connected to the router should be routed so they do not cover any of the frame fan exhausts as this can restrict airflow through the router. 2.6 Power Supplies The power supply shelves are separate 2RU modules. Power supply shelves are rack mountable and can be placed above, below or remote from the Sirius frame. • Ensure that the power supply shelves are correctly earthed see section 2.7 for details. • The power supply units are sealed and do not contain any serviceable items • Power supply shelves are heavy so it is advised that two people are needed to support the weight of the power supply shelves during installation. • To prevent damage, power supply shelves should not be mounted using just the front ears, and should have support at the rear of the shelves. The power supply alarm cable(s) and 48 V DC cables are supplied by Snell and can be ordered as either 2.5 meter cables or 8 meter cables. Issue 5 Rev 2 Page 16 © 2014 Snell Limited Sirius 800 www.snellgroup.com Warnings and Precautions 2.7 Earth Cables Functional Earth Point, see section 2.7.2 48 V DC power connectors PowerCon AC Input Connectors x4 Fig 1. Protective Earth Point, see section 2.7.1 25 Way D Type Alarms Connector Power Supply Shelf Rear Panel 2.7.1 Important Protective Earth Information Due to the high leakage current, ensure that all of the power supply shelves are grounded to the protective earth. Earth studs are provided on the rear of each power supply shelf for this purpose. These studs have M6 size nuts, and are suitable to take an eyelet crimp. Note: • The Protective earth is indicated on the power supply shelf by this symbol: (located on the right side of the power supply shelf, see Fig 1.). • Protective Earthing is a conductor in the building installation wiring, or in the power supply cord, connecting a main protective earthing terminal to an earth point in the building installation. PROTECTIVE EARTH • The building installation must provide a means for connection to the protective earth and the equipment must be connected to that means. • A service person must check that the socket outlets that the equipment is to be powered from provide a connection to the protective earth. If not the service person must arrange for the installation of the protective earth wire in the building. Warning High leakage current; the Protective Earth connection is essential before connecting the supply. 2.7.2 Important Functional Earth Information Up to three earth cables (636027) are supplied with the Sirius 800 depending on how many power supply shelves are fitted. One should be fitted from each power supply shelf to the Sirius 800 router frame, this is called a Functional Earth. Note: • The Functional Earth on the power supply shelf is indicated by this symbol: (located on the left side of the power supply shelf, see Fig 1.). • Functional Earthing is the earthing of a point on the equipment or system, which is necessary for purposes other than safety. Warning The Functional Earth cable from the power supply shelf to the Sirius frame must be fitted. Issue 5 Rev 2 Page 17 © 2014 Snell Limited Sirius 800 www.snellgroup.com Warnings and Precautions 2.8 Ventilation A fully populated Sirius 800 is ventilated by groups of fan modules mounted in the front and rear of the router. The vents in the front, sides and rear must not be obstructed and should be periodically cleaned and kept free from the build-up of dust. All the fan modules are monitored for failure. Air is pulled in through the ventilation slots in the front door and circulated through the router, passing over the modules, and then expelled by the rear fans, air is also expelled out at points on each side of the frame, where the crosspoint modules are situated. The power supply shelves have their own integral cooling system. Issue 5 Rev 2 • Ensure the flow of air is not restricted through the vents and fan exhausts. • Do not obstruct the air vents situated on both sides of the frame, and allow a minimum of 50 mm (2 inches) clearance to allow air flow. The air that is exhausted from the sides must be able to flow past the rear of the router frame without being obstructed. This also applies to the PSU shelves. • The fan assemblies should be placed back into the closed position as soon as possible after opening, as this ensures correct ventilation of the frame. Failure to do this will result in failure. • In practice the maximum time that a fan assembly can be left open will depend on a number of factors such as; ambient temperature, frame loading, crosspoint routings, etc. To ensure correct operation under all conditions the fan assemblies should be left open for no more than 4 minutes at a time. Page 18 © 2014 Snell Limited Sirius 800 www.snellgroup.com Warnings and Precautions 2.9 Safety Standards This equipment complies with the following standards: EN60950-1 2006 Safety of information Technology Equipment Including Electrical Business Equipment. UL1419 (3rd Edition) - UL File E193966 Standard for Safety - Professional Video and Audio equipment EMC Standards This unit conforms to the following standards: EN55103-1:1996 (Environment E4) Electromagnetic Compatibility, Product family standard for audio, video, audio-visual and entertainment lighting control apparatus for professional use. Part 1. Emission EN55103-2:1996 (Environment E2) Electromagnetic Compatibility, Product family standard for audio, video, audio-visual and entertainment lighting control apparatus for professional use. Part 2. Immunity Federal Communications Commission Rules, 47 CFR: 2009, Part 15, Subpart B (Class A) EMC Performance of Cables and Connectors Snell products are designed to meet or exceed the requirements of the appropriate European EMC standards. In order to achieve this performance in real installations it is essential to use cables and connectors with good EMC characteristics. All signal connections (including remote control connections) shall be made with screened cables terminated in connectors having a metal shell. The cable screen shall have a large-area contact with the metal shell. COAXIAL CABLES Coaxial cables connections (particularly serial digital video connections) shall be made with high-quality double-screened coaxial cables such as Belden 1694A or Belden 1505A. D-TYPE CONNECTORS D-type connectors shall have metal shells making good RF contact with the cable screen. Connectors having “dimples” which improve the contact between the plug and socket shells, are recommended. Issue 5 Rev 2 Page 19 © 2014 Snell Limited Sirius 800 Issue 5 Rev 2 www.snellgroup.com Page 20 Warnings and Precautions © 2014 Snell Limited Sirius 800 www.snellgroup.com Product Overview 3. Product Overview Snell continues to lead the way in video and audio signal routing with its innovative Sirius 800 router range. The large-scale, multi-format routers incorporate many technological firsts, the Sirius 800 routers offer multi-format operation up to 3 Gb/s in one frame. Sirius 830 15U* non- expandable router Fig 2. Note: Sirius 840 27U* non- expandable router Sirius 850 34U* expandable router Sirius 800 Router Range *The router height in Fig 2. does not include the power supply shelves which are a further 2U each in height. Between one and three power supply shelves are used with the Sirius router depending on the router configuration and local mains voltage. The Sirius 800 routers support a range of different configurations based on a common module format. The router range is made up of the non-expandable Sirius 830 and Sirius 840 routers and the field expandable Sirius 850 router. The Sirius 850 can be equipped as 576 x 1152 in a single frame or is field expandable up to 1152 x 1152 video (dependant on input/output card configuration) by linking two Sirius 850 routers together using multi-way cables. No other external splitters or combiners are required. Issue 5 Rev 2 Page 21 © 2014 Snell Limited Sirius 800 www.snellgroup.com Product Overview 3.1 Signal Flow The Sirius 800 routers are large scale multi-format video and audio routers. The Sirius 800 routers enable you to mix and match different signal formats - 3 Gb/s and 1.5 Gb/s HD and SD video, and embedded, AES and MADI audio - in the same frame. Different video signal formats can also be freely mixed within individual video input/output modules. BNC and Fiber connections are available for video and MADI signals and high density 62 way D-type sockets for AES. In addition to video and audio Advanced Hybrid Processing (AHP) modules allow adjustment and processing of input and output signals. Fig 3. Audio and Video Signal Routing 3.1.1 Input Modules The standard (non AHP) video input modules (5917, 5913, 5914 & 5916) route the video and embedded audio through to the video crosspoint cards. The AHP video input modules (5919 & 5915) de-embed up to 16 mono audio channels per video input. Both the embedded and de-embedded audio channels can be manipulated directly on the input module before being routed through the video and audio crosspoint cards respectively. The audio input module (4915) accepts either MADI only or a combination of AES and MADI depending on the rear panel that is fitted. In either case the individual audio channels can then be routed through the audio crosspoint cards. 3.1.2 Video Crosspoints The video signals are routed through the video crosspoints to one or more destinations on the video output modules as instructed by the router control system. Any embedded audio is routed along with the video. The video routing is completely non blocking and an optional video crosspoint card gives the router video crosspoint redundancy. Optionally the Sirius 850 has a second set of video crosspoint cards in the top of the router that are used to route signals to the expansion outputs (577 to 1152). As with the other crosspoint cards an optional video crosspoint can be fitted for video redundancy. Issue 5 Rev 2 Page 22 © 2014 Snell Limited Sirius 800 www.snellgroup.com Product Overview 3.1.3 Audio Crosspoints The audio crosspoint card routes the mono audio channels in the Sirius 800 routers and the audio routing is completely non blocking. An optional, audio crosspoint card can be added for audio crosspoint redundancy. The de-embedded and discrete audio signals are routed through the audio crosspoint to one or more destinations (main, non expansion outputs only) as instructed by the router control system. The audio can be routed to the audio output modules, re-embedded on the video AHP output modules or a combination of both. Failed crosspoints and audio transport streams are detected by the output module(s) which automatically switch to the alternate audio crosspoint module if fitted. 3.1.4 Output Modules The standard video output modules (5926, 5938, 5923, 5924 & 5937) receive the video and embedded audio signals and transmit them to the router outputs. The AHP video output modules (5949 & 5925) can embed up to 16 mono audio channels per video output if required. These audio channels are routed from the audio crosspoint card and can originate from discrete audio inputs, de-embedded audio or a combination of both. The audio replaces the original embedded audio that was routed with the video. The audio channels can be manipulated directly on the video output module before being output from the router. The audio output modules (4929 & 4925) output either MADI only or a combination of AES and MADI depending on the rear panel that is fitted. The audio channels are routed from the audio crosspoint card and can originate from discrete audio inputs, de-embedded audio or a combination of both. 3.1.5 Audio Processing Each of the AHP video input (5919 & 5915) and output (5949 & 5925) modules contains a powerful processing engine that can manipulate the individual audio channels passing through them. The 5919, 5915, 5949 and 5925 audio processing tools include gain control, phase invert, 16 channel mixer and channel swap (shuffle). The audio processing tools are a licensed feature which must be purchased for each module they are needed on (see section 3.5 for details). The audio input (4915) and output (4929 & 4925) modules include gain control, phase invert and stereo mode (left/right swap, left both, right both or mono mix). The 4915, 4929 and 4925 audio processing tools are supplied free of charge for each audio module. In addition to the standard processing tools described above the 4929 audio output module offers Audio Delay and Sample Rate Conversion (SRC) which are licensed features that must be purchased for each module they are needed on (see section 3.5 for details). Issue 5 Rev 2 Page 23 © 2014 Snell Limited Sirius 800 www.snellgroup.com Product Overview 3.1.6 Audio Phasing In a synchronous system multi-channel audio passing through the router remains co-timed on all channels of like signal format across the entire router. There are three signal formats; embedded audio, MADI and AES. Embedded audio is further broken down into sub formats of; SD, HD and 3G. Router and processing delays are managed by the router so that co-timed audio entering the router from any like format will remain co-timed on the output of the router. The example below shows audio from various router inputs embedded on a video channel of a video output module. The audio inputs could equally have been routed to an audio output module and the signals would remain co-timed as shown. Audio Source Embedded (HD) MADI Embedded (HD) AES MADI AES Fig 4. Output Module Track Mix 1 2 3 4 5 6 7 8 9 10 11 12 13 14 15 16 Stereo Stereo Co-timed Surround Co-timed Stereo Stereo Co-timed Dolby E Example: Audio from Various Sources Embedded on a Video Output Module 3.1.7 Video Processing Each of the AHP video input (5919) and AHP video output (5949) modules contain frame/line synchronizers allowing video signals to be synchronised with router references. Frame or line syncs can be offset to allow for delays later in the system. The frame/line synchronizer is a licensed feature which must be purchased (see section 3.5 for details). Issue 5 Rev 2 Page 24 © 2014 Snell Limited Sirius 800 www.snellgroup.com Product Overview 3.2 Router Configuration and Control 3.2.1 Overview The Workbench control system is flexible and scalable, providing a range of interfaces from a single router control panel running on a PC, through to large and powerful installations using dual redundant control across many sites. System configuration details are stored in a Workbench database which is written (pushed) to the router controllers to configure them. Once the router controllers have been configured in this way they store the database locally allowing the router to work independently after a power off even if the connection to the Workbench database PC/server is not available. Workbench operates in a client-server configuration using standard TCP/IP network protocols, that makes it easy to integrate into existing network infrastructures. Snell and third-party protocols are also used when interconnecting different equipment types. If required, device drivers can use an embedded controller with dual redundant power, and run a real-time operating system. This combination offers the ultimate in resilient design. 3.2.2 Router System Configuration The router system is configured using Workbench software running on a computer with a network connection to the router. Workbench is also used to create PC based Softpanels for router control. Router configuration details are stored in the Workbench SQL database. Once configuration is complete the configuration is pushed to the router controllers allowing them to work without a database connection. The Workbench database can be created from scratch, custom built by Snell (chargeable) or it can be based on one of the sample/default databases supplied with Workbench. Workbench comes with two default databases for each Sirius 800 router type (830, 840 and 850), one for video only routing and one for AHP routing. Additionally the Sirius 850 has default video only and AHP databases for single and both dual frame configurations (frame 1 of 2 and frame 2 of 2). Microsoft SQL Management Studio is used for database administration functions including database backup and restore. Database redundancy is available when setup using standard MS-SQL configuration. See the Sirius Installation and Quick Start manual for details on how to link Workbench to a database. For details on using the configuration software see the Workbench user manual. Fig 5. and Fig 6. show two typical installation scenarios: Note: Issue 5 Rev 2 • Both installation scenarios include an optional RollCall PC that can be used to control the router. Changes made by RollCall are reflected in Workbench and vice versa. • The RollCall PC cannot be used to configure the router and this must be carried out using Workbench. • Both scenarios show a single Sirius 800 series router for clarity however systems may well contain multiple routers, control panels and other devices. See the Workbench User Manual for details on device support. Page 25 © 2014 Snell Limited Sirius 800 www.snellgroup.com Product Overview Fig 5. shows an example of a distributed installation where the database and SQL server are installed on the server PC. Client PCs are loaded with individual components that connect through the network to the database. The Workbench and/or RollCall PC can be used for router control. Client PC running RollCall for router control (optional) Server PC RollCall SQL Server Database Network Workbench Management Studio Client PC running Workbench for router control and configuration Client PC running Microsoft SQL Management Studio for database administration Fig 5. Sirius 800 Router Router control module(s) and Door screen running LiveRunner Example: Standalone Database Server with Multiple Client PCs and Router(s) Fig 6. shows an example a stand-alone installation where everything resides on a single Client/Server PC. The Workbench and/or RollCall PC can be used for router control. Router control module(s) and Door screen running LiveRunner Client/Server PC Workbench Fig 6. Issue 5 Rev 2 SQL Server Management Studio Network Database Sirius 800 Router Client PC running RollCall for router control. (optional) RollCall Example: Single Client/Server PC with Router(s) and a RollCall Client Page 26 © 2014 Snell Limited Sirius 800 www.snellgroup.com Product Overview 3.2.3 Routing Control The router can be controlled from Workbench Softpanels, RollCall, Panels and third party control systems. Softpanels are usually used from a PC running Liverunner which is a client only version of Workbench. The client only version can’t be used for router configuration. When Workbench Softpanel control is used the Softpanels need to connect to the Workbench database on power-up after which they talk to the router directly. Hardware panels and RollCall clients talk to the router directly. Video and audio routing is achieved by the use of matrices, levels and associations. Inhibits can be set up to prevent unwanted routes from being set and routes can be automatically or manually protected if required. Salvos or Snapshot can be configured to bring the router back to a known state. The Workbench configuration tools allow you to design one or more audio mapping templates to quickly group and name the channel order/signal types and these can then be applied to the input and output channels as required. This method simplifies the configuration process which makes setting up new input and output feeds quicker and less prone to errors. 3.3 Sirius 800 Input/Output Modules 3.3.1 Input Modules The following input modules are available for the Sirius 800 routers (input modules fitted to earlier routers are listed in Appendix B.2): Video Input Modules • 5917 - Sirius 800 Standard Video BNC/Fiber Input Module Input connector type dependant on rear panel fitted. • 5919 - Sirius 800 Video AHP Input Module with delay and Sync Capability Input connector type dependant on rear panel fitted. Audio Input Module • 4915 - Sirius 800 AES/MADI Input Module - 120 AES Pairs and 3 MADI Input Channels or 12 MADI (Main & Redundant) input connector type and inputs dependant on rear panel fitted. 3.3.2 Output Modules The following output modules are available for the Sirius 800 routers (output modules fitted to earlier routers are listed in Appendix B.3): Video Output Modules • 5926 - Sirius 800 Standard Video Output Module (Non Expandable) Output connector type dependant on rear panel fitted. • 5938 - Sirius 850 Standard Video Output Module (Expandable) Output connector type dependant on rear panel fitted. • 5949 - Sirius 800 Video Embedding & AHP Output Module with delay and sync capability Output connector type dependant on rear panel fitted. Audio Output Module • Issue 5 Rev 2 4929 - Sirius 800 AES/MADI Output Module with audio delay - 120 AES Pairs and 3 MADI Output Channels or 12 MADI (Main & Redundant) Output connector and outputs type dependant on rear panel fitted. Page 27 © 2014 Snell Limited Sirius 800 www.snellgroup.com Product Overview 3.4 Sirius 800 Features 3.4.1 Sirius 830 Router • Up to 288 x 288 video and up to 9216 x 9216 mono audio (depending on input/output card configuration) in a non-expandable 15U* frame with full video and audio crosspoint redundancy. *Not including power supply height. A typical Sirius 830 router might be: 240 x 240 Video router with a 240 x 240 AES. 3.4.2 Sirius 840 Router • Up to 576 x 576 video and up to 18432 x 18432 mono audio (depending on input/output card configuration) in a non-expandable 27U* frame with full video and audio crosspoint redundancy. *Not including power supply height. A typical Sirius 840 router might be: 480 x 480 Video router with a 480 x 480 AES. 3.4.3 Sirius 850 Router • Up to 576 x 576 video and up to 18432 x 18432 mono audio (dependant on input/output card configuration) in an expandable 34U* frame with full video and audio crosspoint redundancy. *Not including power supply height. • Field expandable to 1152 x 1152 video (dependant on input/output card configuration) by the addition of a further single Sirius 850 34U frame. Signal cabling between frames is supplied with the 1290 expansion rear panels. The control bus cables between frames are standard Category 5e Ethernet cables (see section 12.2.1 for details). or • Field expandable to 576 x 1152 video by the use of 5928 Expansion Output modules and 1293 DIN 1.0/2.3 Expansion Output rear panels (processing is not available on the expansion outputs and the maximum audio matrix size remains as 18432 x 18432 mono audio channels) A typical Sirius 850 router might be: 480 x 600 Video router with a 480 x 480 AES and 12 x 12 MADI router. Issue 5 Rev 2 Page 28 © 2014 Snell Limited Sirius 800 www.snellgroup.com Product Overview 3.4.4 All Sirius 800 Routers Mix and match different signal formats in the same frame: • BNC Video - 3 Gb/s & 1.5 Gb/s HD, SD, DVB-ASI • Fiber Video - 3 Gb/s & 1.5 Gb/s HD, SD, DVB-ASI • 5 x 62 way female high density D Type connectors for balanced or unbalanced AES Audio (dependant on rear panel fitted) - AES up to 48 kHz and 3 x HD BNC (dependant on rear panel fitted) - MADI up to 48 kHz • BNC Audio - MADI up to 48 kHz • Fiber Audio - MADI up to 48 kHz Crosspoints • Video - each crosspoint module has 2882 crosspoints Sirius 830 up to 288 x 288: Up to two crosspoint modules can be fitted sending signals to the output modules. One crosspoint module is used as the main crosspoint module and the second is optional for redundancy. Sirius 840 and Sirius 850 up to 576 x 576: Up to five crosspoint modules can be fitted sending signals to the output modules. Four crosspoint modules are used as the main crosspoint modules and the fifth is optional for redundancy. Sirius 850 Expanded up to 576 x 1152 (1152 x 1152 for a two frame system): Up to five additional crosspoint modules can be fitted in the top of an expanded frame. These send signals to the expansion output modules in the top of the router. Four crosspoint modules are used as the main crosspoint modules and the fifth is optional for redundancy. In a two frame system each frame must be fitted with expansion crosspoints. • Audio - each crosspoint module has 18,4322 crosspoints Sirius 830 up to 9,216 x 9,216 Up to two crosspoint modules can be fitted sending signals to the output cards. One crosspoint module is used as the main crosspoint module and the second is optional for redundancy. Sirius 840 up to 18,432 x 18,432 Up to two crosspoint modules can be fitted sending signals to the output cards. One crosspoint module is used as the main crosspoint module and the second is optional for redundancy. Sirius 850 up to 18,432 x 18,432: Up to two crosspoint modules can be fitted sending signals to the output cards. One crosspoint module is used as the main crosspoint module and the second is optional for redundancy. Issue 5 Rev 2 Page 29 © 2014 Snell Limited Sirius 800 www.snellgroup.com Product Overview Nucleus router controller • Dual redundant with auto fail-over • Provides redundant control connections on RS422/485 and Ethernet. • Status monitoring to external controller and door PC • Nucleus2 2463 support several protocols: SW-P-02 (serial), SW-P-02 (IP), SW-P-06 (RS 485 multi-drop panel protocol), SW-P-08 (serial), SW-P-08 IN (IP), RollCall, SNMP Control and SNMP Monitoring • Earlier Sirius 800 routers were supplied with Nucleus 2450 controllers and these support several protocols: SW-P-02 (serial), SW-P-02 IN (IP), SW-P-02 IN (time stamped crosspoint set), SW-P-06 (RS 485 multi-drop panel protocol), SW-P-08 (serial), RollCall, SNMP Control, SNMP Monitoring, GVG ES-Control and Harris Passthrough Control Options The Sirius 800 routers can be controlled using the following control systems: • Workbench • RollCall • Hardware Panels • Soft Panels (Workbench or RollCall/RollMap) • External control systems using SW-P-02 or SW-P-08 • Third party control systems using SW-P-02 or SW-P-08 Miscellaneous Issue 5 Rev 2 • Dual redundant Power Supplies are fitted for maximum resilience depending on configuration • A unique feature to the Sirius 800 range is the Catsii status indication and connector location functions • Multiviewer outputs • Sirius 830: 288 x 48 to 288 x 140 • Sirius840: 576 x 48 to 576 x 140 • Sirius 850: 576 x 48 to 576 x 96 • Input/Output Monitoring Outputs • Sirius 830: Four outputs for input/output monitoring (cannot be used if Multiviewer outputs are fitted) • Sirius 840 and 850: Four independent outputs for input/output monitoring • Extensive status reporting from Workbench control, via the touch screen panel in the front door, further Workbench status and control using an external PC running Workbench V3 Page 30 © 2014 Snell Limited Sirius 800 www.snellgroup.com Product Overview 3.5 AHP Licensing The Advanced Hybrid Processing (AHP) features are enabled by the Snell Licensing system. Licenses are enabled on a module by module basis allowing you to choose which input and output modules are enabled for audio and video processing. See section 3.5.1 and 3.5.2 for details of the licenses available. The licensing can be enabled on a module at any point without changing module hardware or removing the module from the router frame. Table 2. and Table 3. show the licensed options that are available for each of the Advanced Hybrid Processing (AHP) input and output modules. 3.5.1 Video Module Licensing Options License Order Code: Embedded Audio Processing Embedded Audio Processing Video Processing Gain, Phase Invert, 16 Channel Mix, Channel Swap (Shuffle) Delay SD/HD Frame/Line Sync, Video Delay S8AHP-VA S8AHP-VD S8AHP-VF 1 license per module 1 license per module 1 license, 8 Note: also requires assignable channels S8AHP-VA on the (assigned to any input module or output channels) 5919 Video AHP Input Module Purchasable License Purchasable License Purchasable License 5949 Video AHP Output Module Purchasable License Purchasable License Purchasable License Module Modules no longer supplied with new systems: 5915 Video AHP Input Module Purchasable License Not Applicable Not Applicable 5925 Video AHP Output Module Purchasable License Not Applicable Not Applicable Table 2. Important: Licensed Options for Video Input and Output Modules If the SD card is removed from a module for more than 30 minutes the licensed options will cease to function on that module. Routing will not be affected but remember that if any processing functions such as; mixing, shuffle, gain, Frame Sync, Delay, etc are in use they will be reset to their default values. Replacing the licensing SD card will re-instate the licensed options. See the Sirius 800 Maintenance & Upgrade manual for details on updating the module licenses. Issue 5 Rev 2 Page 31 © 2014 Snell Limited Sirius 800 www.snellgroup.com Product Overview 3.5.2 Audio Module Licensing Options Audio Processing License Order Code: Gain, Phase Invert, Left/Right Swap, Left Both, Right Both, Mono Mix Audio Delay Sample Rate Convert (SRC) Not Applicable Not Applicable S8A-SRC Module 1 license per module 4915 Audio AHP Input Module Free License with each module Not Applicable Not Applicable 4929 Audio AHP Output Module with Delay Free License with each module Free License with each module Purchasable License Not Applicable Not Applicable Module (no longer supplied with new systems): 4925 Audio AHP Output Module Table 3. Important: Free License with each module Licensed Options for Audio Input and Output Modules If the SD card is removed from a module for more than 30 minutes the licensed options will cease to function on that module. Routing will not be affected but remember that if any processing functions such as; shuffle, gain, delay, SRC, etc are in use they will be reset to their default values. Replacing the licensing SD card will re-instate the licensed options. See the Sirius 800 Maintenance & Upgrade manual for details on updating the module licenses. Issue 5 Rev 2 Page 32 © 2014 Snell Limited Sirius 800 www.snellgroup.com Product Overview 3.6 Sirius 830 Frame Overview 3.6.1 Frame Architecture Fig 11. shows the main features of a non-expandable Sirius 830 Router frame. Multiviewer Outputs or Monitoring Outputs 48, 96 or 140 Multiviewer Outputs (DIN 1.0/2.3) or Up to 4 Input/Output Monitoring Outputs (BNC & DIN 1.0/2.3) 2882 Redundant Video Crosspoint Matrix 1 x Main Video Crosspoint Module 1 x Redundant Video Crosspoint Module (Optional) 92162 Redundant Audio Crosspoint Matrix 1 x Main Audio Crosspoint Module 1 x Redundant Audio Crosspoint Module (Optional) Up to 288 video inputs and 288 video outputs and up to 9216 audio inputs and 9216 audio outputs depending on configuration Video Inputs and Outputs and Audio Inputs and Outputs Fig 7. Issue 5 Rev 2 Sirius 830 Router Frame Architecture Page 33 © 2014 Snell Limited Sirius 800 www.snellgroup.com Product Overview 3.6.2 Signal Flow Through the Router The Sirius 830 routes video and/or audio signals by using the video and audio crosspoint modules. The Sirius 830 can be fitted with either Multiviewer outputs or Input/Output monitoring as required (Fig 8.). Multiviewer Outputs If the Multiviewer Crosspoint Module is fitted it receives signals from the input modules after any processing has been carried out. Input/Output Monitoring Outputs If an Input/Output Monitoring Module is fitted each monitoring output can be independently configured to display either an input or an output signal. Each monitoring output can also be independently configured to display a signal before or after processing has been applied to it (processing modules only). Up to four monitor signals are passed to both the BNC and DIN 1.0/2.3 connectors on the 1237 rear monitor module (see section 13.2.2). The BNC connectors are optimized for video signals (including embedded audio) and the DIN 1.0/2.3. connectors are optimized for discrete audio signals. Rear Mounted Front Mounted Rear Mounted ** The “before or after processing” option is only available for processing modules Fig 8. Issue 5 Rev 2 *Multiviewer or Input/Output Monitoring, see section 13. for details Sirius 830 Signal Flow Diagram Page 34 © 2014 Snell Limited Sirius 800 www.snellgroup.com Product Overview 3.6.3 Rear Connectors Fig 9. shows a fully populated Sirius 830 frame with BNC Inputs and Outputs. See section 8.2 for rear panel input/output connector configuration details. Multiviewer crosspoint cards and rear panels cannot be installed the same frame as a 1237 Monitoring module (for details see section 13.). Cables connected to the router must be fitted with adequate vertical and horizontal strain relief to avoid twisting of the rear panels causing damage to the router connectors and loss of electrical/signal connection to the router. *Multiviewer, see section 13.10 *1237 Monitoring Module, see Fig 10. 48Vdc Power Connectors Fans Inputs and Outputs, see section 8.2 Not used *It is not possible to mix Multiviewers and the 1237 Monitoring module in the same frame (see section 13.). Fig 9. Control Rear Panel, see section 16.1 Sirius 830 frame with BNC Input/Output, Rear View Ethernet (Not Used) Video Monitor 4 3 2 1 4321 Audio Monitor Fig 10. Sirius 830 1237 Monitoring Outputs Issue 5 Rev 2 • For details of the 1237 monitoring outputs see section 13.9. • For details of the Sirius 830 BNC rear connectors see section 8.3. • For details of the Sirius 830 Fiber rear connectors see section 8.3. Page 35 © 2014 Snell Limited Sirius 800 www.snellgroup.com Product Overview 3.7 Sirius 840 Frame Overview 3.7.1 Frame Architecture Fig 11. shows the main features of a non-expandable Sirius 840 router frame. Multiviewer Outputs and Monitoring Outputs 48, 96 or 140 Multiviewer Outputs (DIN 1.0/2.3) and Up to 4 Input/Output Monitoring Outputs (BNC) Video Inputs and Audio Inputs Up to 576 video and up to 18432 audio inputs depending on configuration. 5762 Redundant Video Crosspoint Matrix 4 x Main Video Crosspoint Modules 1 x Redundant Video Crosspoint Module (Optional) 184322 Redundant Audio Crosspoint Matrix 1 x Main Audio Crosspoint Module 1 x Redundant Audio Crosspoint Module (Optional) Up to 576 video and up to 18432 audio outputs depending on configuration. Video Outputs and Audio Outputs Fig 11. Sirius 840 Router Frame Architecture Issue 5 Rev 2 Page 36 © 2014 Snell Limited Sirius 800 www.snellgroup.com Product Overview 3.7.2 Signal Flow Through the Router The Sirius 840 routes video and/or audio signals by using the video and audio crosspoint modules. The Sirius 840 can be fitted with Multiviewer outputs and Input/Output monitoring as required (Fig 12.). Full details of the options are shown sections 13.3.1, 13.4.2, 13.4.3 and 13.4.4 Multiviewer Outputs If the Multiviewer Crosspoint Module is fitted it receives signals from the input modules after any processing has been carried out. Input/Output Monitoring Outputs If an Input/Output Monitoring Module is fitted each monitoring output can be independently configured to display either an input or an output signal. Each monitoring output can also be independently configured to display a signal before or after processing has been applied to it (processing modules only). Up to four monitor signals are passed to the BNC connectors on the 1287 Control rear panel (see section 16.2). Rear Mounted Front Mounted Rear Mounted ** The “before or after processing” option is only available for processing modules *Monitor Input Module (5930) only required if the Multiviewer Crosspoint Module (5902) is not fitted. Fig 12. Sirius 840 Signal Flow Diagram Issue 5 Rev 2 Page 37 © 2014 Snell Limited Sirius 800 www.snellgroup.com Product Overview 3.7.3 Rear Connectors Fig 13. shows a fully populated Sirius 840 frame with BNC Inputs and Outputs. See section 8.3 for rear panel input/output connector configuration details. Cables connected to the router must be fitted with adequate vertical and horizontal strain relief to avoid twisting of the rear panels causing damage to the router connectors and loss of electrical/signal connection to the router. Multiviewer Outputs see section 13.10 27RU 48Vdc Power Connectors 22RU Not Used Alarm Rear Panel see section 16.3 Inputs Video - 289 to 576 Audio 9217 to 18432 Inputs Video - 1 to 288 Audio - 1 to 9216 10RU Control Rear Panel see section 16.2 Outputs Video - 289 to 576 Audio 9217 to 18432 Outputs Video - 1 to 288 Audio - 1 to 9216 Not used Fig 13. Sirius 840 frame with BNC Input/Output, Rear View • Issue 5 Rev 2 For details of the Sirius 840 BNC and Fiber rear connectors see section 8.3.7. Page 38 © 2014 Snell Limited Sirius 800 www.snellgroup.com Product Overview 3.8 Sirius 850 Frame Overview 3.8.1 Frame Architecture Fig 11. shows the main features of an expandable Sirius 850 router frame. Up to 576 video signals to a second frame by using a 1290 rear panel (see section 12.5) or DIN 1.0/2.3 using a 1293 rear panel (see section 12.6) Video Outputs Expanded frame size 5762 Redundant Video Crosspoint Matrix Multiviewer Outputs and Monitoring Outputs Video Inputs and Audio Inputs Non Expanded frame size 4 x Main Video Crosspoint Modules 1 x Redundant Video Crosspoint Module (Optional) 48 or 96 Multiviewer Outputs (DIN 1.0/2.3) and Up to 4 Input/Output Monitoring Outputs (BNC) Up to 576 video and up to 18432 audio inputs depending on configuration. 5762 Redundant Video Crosspoint Matrix 184322 Redundant Audio Crosspoint Matrix Video Outputs and Audio Outputs 4 x Main Video Crosspoint Modules 1 x Redundant Video Crosspoint Module (Optional) 1 x Main Audio Crosspoint Module 1 x Redundant Audio Crosspoint Module (Optional) Up to 576 video and up to 18432 audio outputs depending on configuration. Fig 14. Single Sirius 850 Router Frame Architecture Issue 5 Rev 2 Page 39 © 2014 Snell Limited Sirius 800 www.snellgroup.com Product Overview 3.8.2 Signal Flow Through the Router The Sirius 850 routes video and/or audio signals by using the video and audio crosspoint modules. The Sirius 850 can be fitted with Multiviewer outputs and Input/Output monitoring as required (Fig 15.). Full details of the options are shown sections 13.4.1, 13.4.2, 13.4.3 and 13.4.4 Multiviewer Outputs If the Multiviewer Crosspoint Module is fitted it receives signals from the input modules after any processing has been carried out. Input/Output Monitoring Outputs If an Input/Output Monitoring Module is fitted each monitoring output can be independently configured to display either an input or an output signal. Each monitoring output can also be independently configured to display a signal before or after processing has been applied to it (processing modules only). Rear Mounted Front Mounted Rear Mounted Up to four monitor signals are passed to the BNC connectors on the 1287 Control rear panel (see section 16.2). ** The “before or after processing” option is only available for processing modules *Monitor Input Module (5930) only required if the Multiviewer Crosspoint Module (5902) is not fitted. Fig 15. Sirius 850 Signal Flow Diagram Issue 5 Rev 2 Page 40 © 2014 Snell Limited Sirius 800 www.snellgroup.com Product Overview 3.8.3 Rear Connectors Fig 16. shows a fully populated Sirius 850 frame with BNC Inputs and Outputs. See section 8.3.3 for rear panel input/output connector configuration details. Cables connected to the router must be fitted with adequate vertical and horizontal strain relief to avoid twisting of the rear panels causing damage to the router connectors and loss of electrical/signal connection to the router. Expansion Outputs: 1290 - see section 8.3.8.1 or 1293 - see section 8.3.8.2 34RU Multiviewer Outputs 26RU 48Vdc Power Connectors 22RU Not Used Alarm Rear Panel Inputs Video - 1 to 288 Audio - 1 to 9216 Inputs Video - 289 to 576 Audio 9217 to 18432 Control Rear Panel 10RU Outputs Video - 289 to 576 Audio 9217 to 18432 Outputs Video - 1 to 288 Audio - 1 to 9216 Expansion Inputs Fig 16. Sirius 850 frame with BNC Input/Output, Rear View Issue 5 Rev 2 • For details of the Sirius 850 BNC and Fiber rear connectors see section 8.3.7. • For details of the Sirius 850 inter-frame expansion rear connectors see section 8.3.8.1. • For details of the Sirius 850 DIN 1.0/2.3 expansion rear connectors see section 8.3.8.2. Page 41 © 2014 Snell Limited Sirius 800 www.snellgroup.com Product Overview 3.9 Video Reference Inputs The video reference signal inputs are used to ensure that the router crosspoint switch is compliant to SMTPE RP168-2009 for that video standard. The Nucleus controller automatically detects the incoming signal and therefore it can be configured to switch on a specific standard. The Workbench Switch Point Editor specifies which reference type the signal can switch from. Set from Edit Configuration, Routers, Advanced Configuration, References.... See the Workbench user manual for details on how to configure the switching points. Important: If there is no reference signal, the router will crash switch on receiving the switch command. The Sirius 800 router has four analogue BNC video reference inputs: • 4 x analogue video, all auto sensing to 525 and 625 B&B, or HD tri-level reference See section 16.2 for the video reference connector locations. 3.9.1 Derived Video References (Nucleus2 Controllers Only) Derived video references enable the router to use a reference signal standard that is not available from outside of the router frame as if it is a standard physical video reference input. Important: Ensure module address 279 is configured as “ReferenceControl”. If the module address isn’t configured correctly derived references will not work. Configured in Workbench: Edit Configuration, Local Router Hardware, Advanced Configuration, Edit Module Configurations... See the Workbench user manual for full setting details. Video reference signals are derived (created) from the BNC video reference inputs on the rear of the router. These derived video references can be a different format than the signal on the BNC reference input but they must share the same frame rate as the original reference signal they are created from. Each router has a maximum of four references in total in any mix of BNC and Derived references. See section 5.3.3 for details on setting references for the router using the Door screen. Alternatively Derived references can be configured in Workbench from: Edit Configuration, Local Router Hardware, Advanced Configuration, Edit Derived References.... See the Workbench user manual for full setting details. Example (also shown in Fig 17.) Note: Issue 5 Rev 2 • 525 59 Hz BNC Video Ref 1 used directly as a video reference. This uses up one of the four available references. • 625 50 Hz BNC Video Ref 2 used to produce a 720P 50 Hz derived reference and a 1080i 50 Hz derived reference. This uses up two of the four available references. • 1080P 60 Hz BNC Video Ref 3 used to produce a 720P 60 Hz derived reference. This uses up one of the four available references. • BNC Video Ref 4 not available as the maximum of four references are already in use. • A BNC video reference input can be used to create between one and four derived video reference signals for use in the router. • Each router has a maximum of four video references in total in any mix of BNC and derived references. Page 42 © 2014 Snell Limited Sirius 800 www.snellgroup.com Product Overview External Video References on the BNC Connectors Video Reference Signals available in the Router BNC Ref 1 525 59 Hz Signal BNC RefInput1 525 59 Hz Signal BNC Ref 2 625 50 Hz Signal Derived RefInput2 720P 50 Hz Signal BNC Ref 3 1080P 60 Hz Signal Derived RefInput3 1080i 50 Hz Signal BNC Ref 4 Not available as the maximum of four references are already in use Derived RefInput4 720P 60 Hz Signal Fig 17. References Example (Nucleus2 2463 Controller Only) 3.9.2 Video Switching Point References Table 4. lists the video switching point references: Video Reference Video Signal RefAuto Sets the reference type based on the signal type detected on the input. All inputs are set to RefAuto in the default database. Ref525i59 525 interlaced 59 Hz Ref625i50 625 interlaced 50 Hz Ref720p60 720 progressive 60 Hz Ref720p59 720 progressive 59 Hz Ref720p50 720 progressive 50 Hz Ref1080i60 1080 interlaced 60 Hz Ref1080i59 1080 interlaced 59 Hz Ref1080i50 1080 interlaced 50 Hz Ref1080p60 1080 progressive 60 Hz Ref1080p59 1080 progressive 59 Hz Ref1080p50 1080 progressive 50 Hz RefInput1 to RefInput4 Overrides the Auto detection by using one of the fixed reference inputs which allows the same standard but offset for timing issues to be resolved (see section 3.9.3). There can be a mix of the physical reference inputs and the derived reference inputs depending on which Nucleus controller type is fitted and how it is configured (see the following notes). Notes: Table 4. Issue 5 Rev 2 • If Nucleus 2450 controllers are fitted only the physical reference inputs are available. • If Nucleus2 2463 controllers are fitted then a mix of physical and derived reference inputs are available for use depending on router configuration. see section 3.9.1 for details on derived references. Switching Point Video References Page 43 © 2014 Snell Limited Sirius 800 www.snellgroup.com Video Reference SDIInput1 and SDIInput2 Table 4. Product Overview Video Signal Not Available Switching Point Video References 3.9.3 Reference Offset (Nucleus2 Controllers Only) In some circumstances it is necessary to set an offset on a reference signal to accommodate system timing and to make sure the video signal switches at the correct point. see section 3.9.5 and section 3.9.6 for examples of when this may be required. Reference offsets can be set from Door screen (see section 5.3.3) or from Workbench (see section 3.9.1). 3.9.4 RefAuto Selected RefAuto is set for all signals when the default database is being used. When RefAuto is selected for a signal the Nucleus controller will look for a derived reference (2463) or a physical reference (2450) that exactly matches the signal. Note: • Derived references are only available when Nucleus2 2463 controllers are fitted. see section 3.9.1 for details. • If RefAuto is selected for a Dual Link 1080p input signal the Nucleus controller will look for a 1080i reference with the same frame rate as the input signal. • If a matching reference signal (physical or derived) is present the controller will switch in accordance with SMPTE RP168. • If a matching reference signal (physical or derived) is not present the router will crash switch. 3.9.5 Manual Reference Standard Selected When a reference standard, such as Ref720p60, is selected manually the Nucleus controller will look for a derived reference (2463) or a physical reference (2450) that exactly matches the selected standard. Note: Issue 5 Rev 2 Derived references are only available when Nucleus2 2463 controllers are fitted. see section 3.9.1 for details. • If the selected standard reference signal (physical or derived) is present then the controller will switch in accordance with SMPTE RP168. • If the selected standard reference signal (physical or derived) is not present the router will crash switch. • If the selected standard reference signal (physical or derived) is present but different to the actual signal being switched, for example Ref1080i50 for a 1080p50 signal, then the timing must be adjusted to make sure the switch happens at the correct point. Page 44 © 2014 Snell Limited Sirius 800 www.snellgroup.com Product Overview 3.9.6 Reference Input (Physical or Derived) Selected When a reference input is selected manually (a physical or derived reference) the Nucleus controller will use the specified reference input. Note: Derived references are only available when Nucleus2 2463 controllers are fitted. see section 3.9.1 for details. • If the signal on the specified reference input (physical or derived) exactly matches the signal to be switched then the router will switch in accordance with SMPTE RP168. • If the signal on the specified reference input (physical or derived) does not exactly match the signal being switched the router will switch according to the specified reference. The timing must be adjusted to make sure the switch happens at the correct point. • If the signal on the specified reference input (physical or derived) is not valid the router will crash switch. 3.10 Audio Reference Input The Sirius 800 routers have two AES (48 kHz only) audio reference inputs on the rear of the router (see section 16.2 for connection details): Important: • 1 x BNC unbalanced AES input, 75 termination. • 1 x 9-Way D Type balanced AES input, 110 termination. Only one audio reference (balanced or unbalanced) should be connected to the router. Connecting both audio references will stop the audio routing from functioning correctly. A controller can be configured to distribute an AES reference around the router so that the audio output modules can lock to it. The AES reference generated is either a free-running clock set to an AES clock rate of 48 kHz, or it can be locked to a physical input reference on the router (either the AES reference, or one of the video references). The audio reference is configured in Workbench from: Controller Configuration, Local Router Hardware, Advanced Configuration, Edit Derived References.... See the Workbench user manual for full setting details. These values are part of the database configuration so will need to be pushed to the controller along with the rest of the configuration data. Issue 5 Rev 2 Page 45 © 2014 Snell Limited Sirius 800 www.snellgroup.com Product Overview 3.11 Audio Routing and AHP Router Modifications Early Sirius 800 routers must be modified by Snell before they can be used for audio routing/processing and video processing (see Table 5. to identify your current frame configuration and the level of routing and processing it is capable of). Modifications to the router frame are carried out by Snell and include: Note: Issue 5 Rev 2 • Front and Rear Fans upgraded (blue fan casings) • Output Module fan door replaced with new door (Sirius 840/850 only) • Input Module fan door replaced with new door (Sirius 840/850 only) • Input/Output Module fan door replaced with new door (Sirius 830 only) • New Control rear panel assembly fitted (Sirius 830 only) • New Alarm rear panel assembly fitted (Sirius 840/850 only) • New rating plate fitted • Nucleus 2450 controllers replaced by Nucleus2 2463 controllers • Control/fan interface modules replaced by 2457 control/fan interface modules (Sirius 830 only). 2457 Control/fan interface module boards are blue • Control/fan interface modules replaced by 2458 control/fan interface modules (Sirius 840/850 only). 2458 control/fan interface module boards are blue • The modifications must be carried out with the router powered down. • The original shipping bars must not be refitted to a modified frame. The shipping bars are no longer required as the new fan doors perform the same function. Page 46 © 2014 Snell Limited Sirius 800 www.snellgroup.com Product Overview 3.11.1 Frame Configuration and Module Compatibility There are three possible configurations for each Sirius 800 router model in the field. These configurations are listed in Table 5. Each configuration enables the router to work with particular input/output modules and controllers. Table 5. can be used to check if a router frame has been modified and identify which configuration it is. This can then be used to confirm what level of routing and processing the frame configuration supports. Frame Configuration Mark 1 Frame Configuration Mark 2 Frame Configuration Mark 3 Frame Configuration Description Standard Unmodified Frame Original Modified Frame Standard & Modified Blue Fan Frame Supported by Frame Configuration Video Routing Only (no Video or Audio Processing) Video & Audio Routing, Audio Processing (no Video Processing) Video & Audio Routing, Video & Audio Processing Router Controller(s) Nucleus 2450 Nucleus2 2463 Nucleus2 2463 Fan-Out Controller(s) Sirius 830: 2453 Sirius 840/850: 2452 Sirius 830: 2455 Sirius 840/850: 2456 Sirius 830: 2457 (blue boards) Sirius 840/850: 2458 (blue boards) Silver fan casings (front and rear) with no letters stamped on them Silver fan casings, rear fan casings stamped with “HF” Front and rear fans with blue fan casings Fans Table 5. Important: Issue 5 Rev 2 Router Frame Configuration • DO NOT fit Blue Control/Fan Interface modules (2457/2458) in a router equipped with fans with Silver casings as this will damage the router and the router will stop working. • DO NOT fit Green Control/Fan Interface modules (2455/2456/2452/2453) in a router equipped with fans with Blue casings as this will damage the router and the router will stop working. Page 47 © 2014 Snell Limited Sirius 800 Issue 5 Rev 2 www.snellgroup.com Page 48 Product Overview © 2014 Snell Limited Sirius 800 www.snellgroup.com Powering the Sirius 800 Routers 4. Powering the Sirius 800 Routers Before powering the router on ensure that the router has been installed in accordance with the appropriate Sirius 800 Installation and Quick Start guide and local safety regulations. 4.1 Powering Up the Sirius 800 When power is connected to the Sirius 800, the controllers and fans switch on immediately. The main signal modules within the Sirius 800 start to power up one second after the 48 V DC supply has been switched on. Important: To avoid overloading the individual external power supply units, make sure that you power them all up as quickly as possible and at least half of the power supply units within one second of each other. 4.1.1 Power Sequencing To reduce the inrush current when the whole unit is powered up the modules in the router power up over a period of six seconds starting with the controllers and fans, and ending with the audio crosspoints. Note: Issue 5 Rev 2 When hot plugging in a module to the Sirius 800, there is a delay before the module powers up. Page 49 © 2014 Snell Limited Sirius 800 www.snellgroup.com Powering the Sirius 800 Routers 4.1.2 Power Up and Initialization Once the controller has booted (see Fig 18. for LED states when the controller is running), it is ready to setup. Router Configuration is carried out using Workbench. If the system has already been configured, it returns to the state it was in (all signal routing and monitor settings) when it was last powered. Nucleus2 2463 Controller Steady Green - Power OK Flashing Green = Controller Active, Flashing Blue = Controller Idle - 1 Steady Green = Master Controller, Flashing Blue = Slave Controller - 2 Flashing Green or Orange - 3 Pulsing Orange = Controller Mismatch - 4 Off or Flashing - 5 Not used - Off - 6 Not used - Off - 7 Nucleus 2450 Controller Blue = Controller Active, Purple (Blue + Red) = Controller Idle - D4 Green or Off - D5 Flashing Green or Off - D6 Blue or Off - D9 Not used - Off - D10 Not used - Off - D11 Not used - Off - D12 Green or Off - D13 Flashing Green, Steady Blue or Off - D14 Steady Red = Controller Mismatch - D15 Flashing Green = Controller Active, Flashing Red = Controller Idle - D16 Fig 18. Nucleus2 2463 & Nucleus 2450 Controller LED State when Running Note: Issue 5 Rev 2 • For full details of the Nucleus2 2463 Controller LED colors see section 14.3.2. • For full details of the Nucleus 2450 Controller LED colors see section 14.4.1. Page 50 © 2014 Snell Limited Sirius 800 www.snellgroup.com 4.1.2.1 Powering the Sirius 800 Routers Configuration Errors The router controller generates an error if one or more of the configured modules in the router fails to power up. Errors are displayed on the Door screen (see section 5.2.2) and the router controller LEDs (see Table 6. for LED color and Fig 18. for LED position). Router Controller LED LED Color Nucleus2 2463 4 Pulsing Orange Nucleus 2450 D15 Steady Red Table 6. Controller Mismatch Notification If the Door screen and router controller indicate that the configuration is not as expected (i.e. modules added or missing) then this can be resolved using Workbench. For details of how to add modules to the router see the Sirius 800 Maintenance & Upgrade manual. 4.1.3 Starting the Door PC Manually The Door PC starts automatically when the Sirius 800 is powered up. If the Door PC has been shut down and needs starting manually the following procedure should be used. 1. With the Sirius 800 running open the frame door. 2. Inside the back of the door is the power switch for the Door PC (see Fig 19.). 3. Switch the Door PC on by pressing and releasing the Door PC power switch (it will not latch in place). Wait until the computer is fully booted up before proceeding further. LED Power Indicator Door PC Power Switch Power Connector Exhaust Fan Fig 19. Door PC Rear View Issue 5 Rev 2 Page 51 © 2014 Snell Limited Sirius 800 www.snellgroup.com Powering the Sirius 800 Routers 4.2 Powering Down the Sirius 800 Before powering down the Sirius 800 router switch the Door PC off using one of the following methods: Method 1 1. Navigate to the Door PC main menu and touch the Exit button on the screen. 2. A new screen will be displayed with a Shutdown button. 3. Touch the Shutdown button and the Door PC will shutdown. 4. Wait until Windows closes and the screen goes black, then power down the Sirius 800. Make sure that all the external power supply shelves are switched off as soon as possible. Method 2 1. Alternatively open the door and press and release the Door PC power switch (see Fig 19.). The power switch does not latch in place. 2. This causes LiveRunner to close and Windows to shut down. 3. Wait until Windows closes and the screen goes black, then power down the Sirius 800. Make sure that all the external power supply shelves are switched off as soon as possible. Once the Door PC has shutdown the Sirius 800 can be powered down. Make sure that all of the external power supply shelves are switched off as quickly as possible to avoid individual power supply units having to supply excessive power to the Sirius 800. Important: Issue 5 Rev 2 To avoid overloading the individual external power supply units, make sure that all the external power supply shelves are switched off as quickly as possible. Page 52 © 2014 Snell Limited Sirius 800 www.snellgroup.com Door PC 5. Door PC The Workbench LiveRunner program runs on the Door PC screen and monitors the status of the Sirius 800. The Door screen can also be used to control some aspects of the router. There are numerous default screens that provide easy control of the Sirius 800 router. This section shows examples of the default door screens for the Sirius 800 range of routers. Note: • The Door PC and controllers must be connected to an Ethernet hub/switch using Ethernet cables and the Ethernet connectors on the rear of the router (see section 16. for connector positions). If the hub/switch is on a network the IP addresses of the controllers and Door PC must be changed to match the host network requirements (see the Sirius 800 Maintenance & Upgrade manual for details). • The actual Door PC screens available on your system depends on the version of LiveRunner installed and the actual Sirius 800 router the door PC is on. Although it is not recommended the door screens can be created, deleted and modified by the user so the actual Door screens on your system may differ. 5.1 Main Menu The Door screen gives quick access to the monitoring and control functions of the router. All sub screens have a Menu button, touching this will return you to this main menu screen. Signals see section 5.3 Alarms see section 5.2.1 Status see section 5.2 Redundant Crosspoint Video (Main) and (Expansion) see section 5.4 Redundant Crosspoint Control see section 5.4 Miscellaneous see section 5.6 Exit see below Nucleus Info see section 5.5 Fig 20. Main Menu (Sirius 850 shown) Important: • If LiveRunner is closed or the door PC is shut down the door screen cannot notify the user of the status of the router or any router alarms. Status and alarm monitoring on the door screen will not resume until the door PC and LiveRunner have been restarted. See section 4.1.3 for details on starting the door PC manually. • Router status and alarm notifications are still available to external control and monitoring systems while the door screen is off. The Exit button on the main menu screen is used to access the following options: Close button- Closes LiveRunner and displays the Door PC desktop. Shutdown button - Closes LiveRunner and shuts down the Door PC. Menu button - Displays the door screen main menu. Issue 5 Rev 2 Page 53 © 2014 Snell Limited Sirius 800 www.snellgroup.com Door PC 5.2 Status The Status box on the main menu screen contains the Alarms, Modules and Temperature buttons. 5.2.1 Alarms Touch the Alarms button on the main menu screen to view the router alarm status (see section 5.1). Alternatively touch either the Fans or Power Supplies status boxes on the main menu screen (see section 5.1). Fig 21. Alarms (Sirius 840 Router shown) Issue 5 Rev 2 Page 54 © 2014 Snell Limited Sirius 800 www.snellgroup.com Door PC 5.2.2 Modules Touch the Modules button on the main menu screen to view details of the modules mounted in the router (see section 5.1). The most recently viewed module screen will be displayed. Touch the buttons at the bottom of the screen to navigate to the module screen you want to display. Modules Present This screen displays the configuration status of each module slot. See the on screen Key for details. Note: • Modules are configured from the Local Router hardware tab | Advanced Configuration | Edit Module Configurations... in Workbench. See the Workbench manual for full details. • See the Sirius 800 Maintenance & Upgrade manual for an example of adding one or more modules to the router. Fig 22. Modules Present (Sirius 840 Router shown) Module Power Status This screen displays the power status for each module. See the on screen Key for details. Note: Unpopulated slots (configured or unconfigured) are displayed as “Power Status Not Available”, this is not a fault. Fig 23. Modules Power Status (Sirius 840 Router shown) Issue 5 Rev 2 Page 55 © 2014 Snell Limited Sirius 800 www.snellgroup.com Door PC Module Licensing Status This screen displays the License status of each AHP module fitted in the router. See the on screen Key for details. Note: Non AHP modules are displayed as “Licensing Status Not Available”, this is not a fault. Fig 24. Modules License Status (Sirius 840 Router shown) Module Firmware This screen displays the firmware version of each AHP module fitted in the router. Use the Inputs, Outputs and Audio Xpts buttons to select the modules to be viewed. Use the Next and Previous buttons to move through the modules. See the firmware release note for details of the Module Firmware screen content of each module type. Note: The number of Firmware Pages containing information varies depending on the AHP module being viewed. The number of pages that should contain information is shown in Firmware pages line (see Fig 25.). Firmware pages that are not used will be empty. Touch the Modules button to return to the modules screen. Number of Firmware pages for this module type Fig 25. Module Firmware Issue 5 Rev 2 Page 56 © 2014 Snell Limited Sirius 800 www.snellgroup.com Door PC 5.2.3 Temperature This screen displays the temperature of each module fitted in the router. Slot color indicates module presence and does not change with temperature, see the on screen Key for details. Fig 26. Module Temperatures (Sirius 840 Router shown) Issue 5 Rev 2 Page 57 © 2014 Snell Limited Sirius 800 www.snellgroup.com Door PC 5.3 Signals The Signals box on the main menu screen contains the Video Inputs, MADI Inputs and References buttons. Note: • Modules are configured from the Local Router hardware tab | Advanced Configuration | Edit Module Configurations... in Workbench. See the Workbench manual for full details. 5.3.1 Video Inputs Video Inputs This screen displays details of the video input signals for each module fitted in the router. Use the Next and Previous buttons to move through the modules. Touch the Switch References button to view the switching point references used by the incoming video signals for the selected module (see Fig 28.). Fig 27. Video Inputs (Slot 1) Video Input Switching Point References This screen displays the switch point reference configured for each video input of the selected module. For details on using switch point references see section 3.9. Use the Next and Previous buttons to move through the modules. Touch the Signal Formats button to view the incoming video signals for the selected module (see Fig 27.). Fig 28. Video Input Reference Switching Points (Slot 1) Issue 5 Rev 2 Page 58 © 2014 Snell Limited Sirius 800 www.snellgroup.com Door PC 5.3.2 MADI Inputs This screen displays details of the main and redundant MADI input signals for each audio input module fitted in the router. See the on screen Key for details. The main and redundant inputs are detailed on the rear panel drawings detailed in Table 7. MADI channel a = Main input MADI channel b = Duplicate input Router Sirius 830 Sirius 840/850 MADI Input Rear Panels 1303 BNC Input Rear Panel (see section 9.3) 1304 Fiber Input Rear Panel (see section 9.4) 1285 BNC Input Rear Panel (see section 9.5) 1286 Fiber Input Rear Panel (see section 9.6) Table 7. The drop down box to the right of each pair of MADI signals is used to set the MADI input signal used by the router. Options are: Important: • AutoInputSelector - Select for automatic changeover between the main and redundant MADI inputs in the event of a MADI input failure. Operation: If the main MADI input fails the input module will automatically switch to the redundant input for that feed. Once it has switched the input module will continue to use the redundant input even if the main input is restored. If, subsequently, the redundant input fails the input module will automatically switch back to the main MADI input. • Main - Overrides automatic input selection and selects the Main MADI input as the input used by the router. This is an override and will prevent the router automatically switching to the redundant input if the main input stops working. • Important: Redundant - Overrides automatic input selection and selects the Redundant MADI input as the input used by the router. This is an override and will prevent the router automatically switching to the main input if the redundant input stops working. • EnableOverride - Not Used. Use the Next and Previous buttons to move through the modules. Fig 29. MADI Inputs (Slot 20) Issue 5 Rev 2 Page 59 © 2014 Snell Limited Sirius 800 www.snellgroup.com Door PC 5.3.3 References The reference screens are used to view the status of the references and also to configure the derived references and offsets. If the router is fitted with Nucleus 2450 controllers only the Reference Status screen will be displayed (see Fig 30.). For details on video references see section 3.9 and for the audio reference see section 3.10. Reference Status Screen (Nucleus 2450 only) This screen displays the status of the router reference inputs. See the on screen Key for details. Fig 30. Reference Status (Nucleus 2450 only) Issue 5 Rev 2 Page 60 © 2014 Snell Limited Sirius 800 www.snellgroup.com Door PC Derived References (Nucleus2 2463 only) This screen displays the status of the external references, offsets and derived references. See the on screen Key for details. Derived video references enable the router to use a reference signal standard that is not available from outside of the router frame as if it is a standard physical video reference input. Video reference signals are derived (created) from the BNC video reference inputs on the rear of the router. These derived video references can be at a higher or lower resolution than the signal on the BNC reference input but they must share the same frame rate as the original reference signal they are created from. For further details on derived video references see section 3.9. The pictorial status screen displays the video standard of each of the external BNC reference inputs. The screen also shows whether the external references are passed straight to one of the four internal references or are used to create one or more derived references. Any of the references can have an offset applied if required. The audio reference input status is also displayed. Touch the Configure References button to make configuration changes to the video references (see Fig 32.). Note: If the Configure References button is not displayed on the door screen it is not possible to configure the references from the door screen. This will be the case when the screen has been edited by the system administrator to stop references being modified from the router door screen. Alternatively references can be configured from Workbench and pushed to the controllers, see the Workbench manual for information. For details on configuring the audio reference see section 3.10. Fig 31. Reference Status (Nucleus2 2463 only) Issue 5 Rev 2 Page 61 © 2014 Snell Limited Sirius 800 www.snellgroup.com Door PC Derived Reference Control (Nucleus2 2463 only) This screen is used to configure the router video references, the configuration is displayed dynamically so that you have a pictorial representation of the reference setup. Before making any configuration changes please see section 3.9. Fig 32. Reference Configuration (Nucleus2 2463 only) The router has up to four derived references that can be configured to be used by the router when switching video signals. Each of the four derived reference configurations work in the same way and are described below: From External Ref drop down menus: • Select one of the four external BNC references (BNC Ref 1 to BNC Ref 4) to be used for the derived reference. BNC external references can be used for one or more derived references. Derived Format: drop down menus: • None - The selected BNC external reference signal is passed straight through to the derived reference. • SD - the selected external reference signal will be used to create a derived SD reference of the same frame rate as the external reference signal. • 720P - the selected external reference signal will be used to create a derived 720p reference of the same frame rate as the external reference signal. • 1080i - the selected external reference signal will be used to create a derived 1080i reference of the same frame rate as the external reference signal. • 1080p - the selected external reference signal will be used to create a derived 1080p reference of the same frame rate as the external reference signal. If an offset is required for one or more derived references touch the Reference Offset button (see Fig 33.). To return to the Derived Reference status screen touch the Back button. Issue 5 Rev 2 Page 62 © 2014 Snell Limited Sirius 800 www.snellgroup.com Door PC Reference Offset Configuration (Nucleus2 2463 only) This screen is used to configure offsets for the derived references if they are required. Offsets are set in milliseconds, lines or frames. An offset can be set on a reference signal to negate timing issues to make sure the video signal switches at the correct point, see section 3.9.5 and section 3.9.6 for examples of when this may be required. Important: Before making any configuration changes please see section 3.9. Fig 33. Reference Offset Configuration (Nucleus2 2463 only) The offset is set by using the Up and Down arrows or dragging the slider. To set the offset back to zero touch the Zero button. The maximum offset that can be set for all video standards is one frame. Note: If the derived reference standard is altered after an offset has been set then the previous offset time will remain as the offset. This will probably need to be changed for the new reference standard. To return to the Derived Reference Control screen touch the Reference Crosspoint button (see Fig 32.). To return to the Derived Reference status screen touch the Back button. Issue 5 Rev 2 Page 63 © 2014 Snell Limited Sirius 800 www.snellgroup.com Door PC 5.4 Redundant Crosspoint Control 5.4.1 Video Crosspoint Matrix Status Screens The Main Video Crosspoint Matrix Status screen displays the status of the main and redundant video crosspoint modules. The Expansion Video Crosspoint Status screen displays the same information for the expansion video crosspoints (Sirius 850 only). The screens are also used to switch between video crosspoint modules if a video crosspoint module needs to be replaced. Note: • The Main Video Crosspoint Matrix Status screen for the Sirius 830 differs from the Sirius 840 and 850 screen because the Sirius 830 has a maximum of two crosspoint cards compared with the maximum of five crosspoint modules that can be fitted to the 840 and 850 routers. • The Expansion Video Crosspoint Matrix Status screen displays the expansion video crosspoint modules in the remote frame (expansion frame) when a dual frame Sirius 850 system is being used. • The operation of the screen is essentially the same for all of the Sirius 800 routers and is described in this section. • For information on replacing a failed crosspoint card see section 10.4.1. Fig 34. Sirius 830 Crosspoint Matrix Status and Crosspoint Switching Issue 5 Rev 2 Page 64 © 2014 Snell Limited Sirius 800 www.snellgroup.com Door PC Fig 35. Sirius 840/850 Crosspoint Matrix Status and Crosspoint Switching Screen Item Description Indicators Redundancy Enabled Green = Redundant crosspoint checking enabled. Red = Redundant crosspoint checking is not enabled. The video crosspoint redundancy algorithm is disabled by default. For details on enabling the video crosspoint redundancy algorithm see section 10.6. Redundancy Available Green = A full set of crosspoint modules is configured for the matrix. Sirius 830 - 1 main and 1 redundant Sirius 840/850 - 4 main and 1 redundant) Red = A full set of crosspoint modules is not configured for the matrix and therefore there is no crosspoint redundancy. Note: If the Sirius 800 is configured for redundancy and, when powered up, one or more crosspoint modules are missing or faulty the indications displayed will be: Redundancy Available displays Green Fail Found displays Red Fail Found (green = ok) Green = A failure has not occurred in the crosspoint matrix. Fault Present (green = ok) Green = The crosspoint matrix is currently working correctly. Table 8. Issue 5 Rev 2 Red = A failure has occurred in the crosspoint matrix. This may be a failure that has now cleared, check the Fault Present status to see if the fault is still present in the crosspoint matrix. Red = There is currently a fault present in the crosspoint matrix. Video Crosspoint Matrix Status Screen Page 65 © 2014 Snell Limited Sirius 800 www.snellgroup.com Screen Item Door PC Description First Failure Detected Failed Source Failed Destination The Failed Source and Failed Destination parameters show the first failed route through the crosspoint that was detected. If both display zero and the Fail Found status is red then an entire crosspoint card has failed. Check the Crosspoint Status of each crosspoint card to determine which card has failed. If both display zero and the Fail Found and Fail Present LEDs are green then no fault has been found. Total Routes Main Crosspoint Displays the total number of routes passing through the Main crosspoint module(s). Redundant Crosspoint Displays the total number of routes passing through the Redundant crosspoint module. Failed Action Displays the action that will be carried out by the router when a crosspoint fails. This is configured in Workbench, see section 10.7 for configuration details. Configuration options available are: • Move the failed route to the redundant crosspoint (default when shipped). • Move all routes from the crosspoint module with the failure to the redundant crosspoint module • Notify the user and leave them to take appropriate action. Crosspoint Status XpntCardNone Yellow = Main and redundant crosspoint modules working correctly. Grey = A fault has occurred or a crosspoint has been by-passed. Fault Fixed button Switches the routes back to the main crosspoint module once it has been replaced. Presence Green = Crosspoint module present Red = Crosspoint module not present Power Green = Crosspoint module is powered Red = Crosspoint module is not powered More button Displays the Modules screen, see section 5.2.2 for details. Free Failed Crosspoint button Moves all of the routes from the failed crosspoint module to the redundant crosspoint module allowing the failed crosspoint module to be replaced. The “Active” LED on the failed crosspoint module will go off. The failed crosspoint card can be replaced without interrupting any crosspoint routing once the routes have been switched to the redundant crosspoint module. Table 8. Issue 5 Rev 2 Video Crosspoint Matrix Status Screen Page 66 © 2014 Snell Limited Sirius 800 www.snellgroup.com Screen Item Door PC Description Sirius 830 Crosspoint Card Status Buttons XpntCardRedundant830 Touch the button to bypass the redundant crosspoint card. button Grey = Redundant crosspoint card is working correctly. Yellow = Redundant crosspoint card has failed or been bypassed. XpntCardMain830 button Touch the button to bypass the main crosspoint card. Grey = Main crosspoint card is working correctly. Yellow = Main crosspoint card has failed or been bypassed. Sirius 840/850 Crosspoint Card Status Buttons XpntCardOddToOdd_1 button Touch the button to bypass crosspoint card 1. Grey = Crosspoint card 1 is working correctly. Yellow = Crosspoint card 1 has failed or been bypassed. XpntCardEvenToOdd_2 button Touch the button to bypass crosspoint card 2. Grey = Crosspoint card 2 is working correctly. Yellow = Crosspoint card 2 has failed or been bypassed. XpntCardRedundant_R button Touch the button to bypass the redundant crosspoint card. Grey = Redundant crosspoint card is working correctly. Yellow = Redundant crosspoint card has failed or been bypassed. XpntCardOddToEven_3 button Touch the button to bypass crosspoint card 3. Grey = Crosspoint card 3 is working correctly. Yellow = Crosspoint card 3 has failed or been bypassed. XpntCardEvenToEven_4 Touch the button to bypass crosspoint card 4. button Grey = Crosspoint card 4 is working correctly. Yellow = Crosspoint card 4 has failed or been bypassed. Table 8. Issue 5 Rev 2 Video Crosspoint Matrix Status Screen Page 67 © 2014 Snell Limited Sirius 800 www.snellgroup.com 5.4.1.1 Door PC Video Crosspoint Failure When a video crosspoint routing failure is detected by the redundant crosspoint checking algorithm the Nucleus router controller performs one of the following actions based on the configuration in Workbench: • Move the failed route to the redundant crosspoint (default when shipped). • Move all routes from the crosspoint module with the failure to the redundant crosspoint module • Just notify the user and leave them to take appropriate action. Note: • See section 10.6 for details on enabling/disabling video redundancy and section 10.7 for details on setting the redundancy action on crosspoint failure. • For information on replacing a failed crosspoint card see section 10.4.1. If one or more routes fail on a video crosspoint module this will be displayed on the Main or Expansion Video Crosspoint Matrix Status screen. A typical example of how the buttons will look is listed below (see Fig 34. on page 64 or Fig 35. on page 65 for button and parameter locations): • • Fail Found indicator - Red • Fault Present indicator - Red • First Failure Detected - Failed Source and Destinations will display the first failed route • XpntCardNone - Grey • Failed Action: - text as configured in Workbench Sirius 830 • • Sirius 840/850 • Issue 5 Rev 2 XpntCardMain830 Yellow (indicates the crosspoint has failed) XpntCardxxxToxxx_x - Yellow (where xxx is the failed crosspoint module) Page 68 © 2014 Snell Limited Sirius 800 www.snellgroup.com Door PC 5.4.2 Audio Crosspoint Matrix Status Screens The Main Audio Crosspoint Matrix Status screen displays the status of the main and redundant audio crosspoint modules. The screen is also used to switch between audio crosspoint modules if an audio crosspoint module needs to be replaced. Note: • For information on replacing a failed crosspoint card see section 10.5.5. Fig 36. Sirius 800 Audio Crosspoint Matrix Status and Crosspoint Switching Screen Item Description Indicators Redundancy Enabled Green = Redundant crosspoint checking enabled. Red = Redundant crosspoint checking is not enabled. The audio crosspoint redundancy algorithm is enabled by default. For details on disabling the audio crosspoint redundancy algorithm see section 10.6. Redundancy Available Green = The crosspoint modules are configured for the matrix. 1 main and 1 redundant Red = The crosspoint modules are not configured for the matrix and therefore there is no crosspoint redundancy. Note: If the Sirius 800 is configured for redundancy and, when powered up, one or more crosspoint modules are missing or faulty the indications displayed will be: Redundancy Available displays Green Fail Found displays Red Issue 5 Rev 2 Fail Found (green = ok) Green = A failure has not occurred in the crosspoint matrix. Fault Present (green = ok) Green = The crosspoint matrix is currently working correctly. Red = A failure has occurred in the crosspoint matrix. This may be a failure that has now cleared, check the Fault Present status to see if the fault is still present in the crosspoint matrix. Red = There is currently a fault present in the crosspoint matrix. Page 69 © 2014 Snell Limited Sirius 800 www.snellgroup.com Screen Item Clock Master Door PC Description Displays the Audio Crosspoint module that is supplying the audio system clock (Left or Right). The Audio Crosspoint module either generates the audio system clock (Clock Master) or uses the clock generated on the other crosspoint (if fitted). In normal operation the main crosspoint module generates the audio system clock and the redundant crosspoint module is slaved to that. Failed Action Displays the action that will be carried out by the router when a crosspoint fails. This is configured in Workbench, see section 10.7 for configuration details. Configuration options available are: • Move the failed stream to the redundant crosspoint (default when shipped). • Move all streams from the crosspoint module with the failure to the redundant crosspoint module First Failure Detected (shown for Left and Right Audio Crosspoint Modules) Failed Incoming Stream Displays the first incoming and first outgoing streams to fail on Failed Outgoing Stream each Audio Crosspoint module. If all display zero and the Fail Found status is red then an entire crosspoint module has failed. Check the Crosspoint Status of crosspoint modules to determine which card has failed. If both display zero and the Fail Found and Fail Present LEDs are green then no fault has been found. Totals (shown for Left and Right Audio Crosspoint Modules) Issue 5 Rev 2 Input Syncs OK Displays the total number of successful input syncs for the audio crosspoint module. Input Sync Faults Displays the total number of failed input syncs for the audio crosspoint module. 0 = No input sync faults (good) Input Syncs in Use Displays the total number of input syncs in use on the audio crosspoint module. Input Stream OK Displays the total number of input streams without faults on the audio crosspoint module. Input Stream Faults Displays the total number of input stream faults for the audio crosspoint module. 0 = No failed input streams (good) Output Stream OK Displays the total number of output streams without faults on the audio crosspoint module. Output Stream Fault Displays the total number of output stream faults for the audio crosspoint module. 0 = No failed output streams (good) Output Stream in Use Displays the total number of output streams in use on the audio crosspoint module. Page 70 © 2014 Snell Limited Sirius 800 www.snellgroup.com Screen Item Door PC Description Crosspoint Status XpntCardNone Yellow = Main and redundant crosspoint modules working correctly. Grey = A fault has occurred or a crosspoint has been by-passed. XpntCardRedundant button Touch the button to bypass the redundant crosspoint card. Grey = Redundant crosspoint card is working correctly. Yellow = Redundant crosspoint card has failed or been bypassed. XpntCardMain button Touch the button to bypass the main crosspoint card. Grey = Main crosspoint card is working correctly Yellow = Main crosspoint card has failed or been bypassed. Presence Green = Crosspoint module present Red = Crosspoint module not present Power Green = Crosspoint module is powered Red = Crosspoint module is not powered More button Displays the Modules screen, see the S800 User Manual for details. Fault Fixed button Switches the routes back to the main crosspoint module once it has been replaced. Free Failed Crosspoint button Moves all of the routes from the failed crosspoint module to the redundant crosspoint module. Also makes the redundant crosspoint module the Clock Master allowing the failed crosspoint module to be replaced. The “Route Active” LED on the failed crosspoint module will go off. The failed crosspoint card can be replaced without interrupting any crosspoint routing once the routes have been switched to the redundant crosspoint module. 5.4.2.1 Audio Crosspoint Failure If an output module detects an error in the audio transport stream from the main audio crosspoint module or if the stream is not present it will use the transport stream from the redundant audio crosspoint module (if fitted). The Route Fail LED on the audio crosspoint module with the failure will flash red, see section 10.5.1 for the location of the status LEDs. Note: • For information on replacing a failed crosspoint card see section 10.5.5. A typical example of how the buttons will look is listed below, for button and parameter locations see Fig 36. on page 69. Issue 5 Rev 2 • Fail Found indicator - Red • Fault Present indicator - Red • First Fail Detected - Failed Incoming Stream and/or Failed Outgoing Stream will display the first failed stream(s) • Failed Action: - as configured in Workbench • XpntCardNone - Grey • XpntCardMain Yellow (indicates the crosspoint has failed) Page 71 © 2014 Snell Limited Sirius 800 www.snellgroup.com Door PC 5.5 Nucleus Info This screen displays summary information for the Nucleus controllers fitted in the router. Touch the Nucleus Info button on the main menu screen to display this screen. Fig 37. Nucleus Information Issue 5 Rev 2 Page 72 © 2014 Snell Limited Sirius 800 www.snellgroup.com Door PC 5.6 Miscellaneous The Miscellaneous box on the main menu screen contains the Catsii, Dial-Up Routing (Video) and Dial Up Monitor buttons. 5.6.1 Catsii Touch the Catsii button on the main menu screen to display the Catsii Control screen. This screen is used to switch Global Catsii On and to locate input/output connectors on the rear of the router. For detailed information on Catsii functionality see section 6. Catsii LEDs are fitted to the video and MADI rear panels for the main Inputs and outputs. The expansion output rear panels are not fitted with Catsii LEDs. Fig 38. Catsii Control Dial Up Screen Global Catsii On/Off: • On button - enables Catsii signal status on the rear of the router. The Catsii colors used on your system can be viewed by touching the Catsii Colours button on the Catsii Control screen. This displays the Catsii configuration screen shown in Fig 40. • Off button - disables Catsii signal status display. Catsii Colours button Touch the Catsii Colours button on the Catsii Control screen to display the Catsii configuration screen, see Fig 40. Input/Output location: The Catsii LEDs can be used to locate a specific router input or output connector. When Catsii is used in this way the Catsii LEDs are lit in the form of a cross hair with the specified input or output connector is at the centre of that cross hair (see Fig 39.). Fig 39. Example of Catsii LEDs being used to locate a specific BNC connector Issue 5 Rev 2 Page 73 © 2014 Snell Limited Sirius 800 www.snellgroup.com Door PC Connector Location Example: Locating video input channel 35. Note: 1. If there is already a number entered in the left Dial-Up keypad touch the Clear button on left Dial-Up keypad to delete it. 2. Touch button 3 and then button 5 on the left Dial-Up keypad so 35 is displayed. 3. Touch the Take button on the left Dial-Up keypad. 4. The connector for channel 35 will be in the centre of the cross hair on the rear of the router. 5. Once you have located the connector touch the Clear button on the left Dial-Up keypad to remove the cross hair. The Clear button must also be touched before entering a new source or destination. 6. Touch the Normal button on the left Dial-Up keypad to return the Catsii LEDs to their previous state. Catsii Color Configuration This screen shows the Catsii colors used on your system. Touch the Catsii Colours button on the Catsii Control screen (see Fig 38.). The Catsii colors can be changed from Workbench, see section 6.3 for details. Fig 40. Catsii Color Configuration Issue 5 Rev 2 Page 74 © 2014 Snell Limited Sirius 800 www.snellgroup.com Door PC 5.6.2 Dial Up Routing (Video) The Dial Up screen shown in Fig 41. is used to route single signals in the video matrix and cannot be used to route signals in the audio matrix. Touch the Dial-Up Routing (Video) button from the main menu screen and then touch the Continue buttons as they are displayed. Finally touch the Dial-Up button when it is displayed to access the screen. This procedure avoids the dial-up panel being enabled accidentally in a live environment. Fig 41. Dial Up Routing (Video) Issue 5 Rev 2 • DST/SRC button - Touch the DST/SRC button to toggle between the Destination and Source text boxes. The text boxes have a red border to indicate when they are selected for data entry. • Destination text box - enter the video destination here. A red border indicates the text box is selected for data entry. • Source text box - enter the video source here. A red border indicates the text box is selected for data entry. • Current Source text box (read only) - displays the source currently being routed to the destination entered in the Destination text box. • Clear button - deletes the contents of the selected text box (destination or source). • Dial Up keypad number buttons - used to enter the destination and source numbers. • Take button - touch to complete the routing once the destination and source have been entered in the text boxes. • Undo button - touch the Undo button to undo a Take and go back to the previously selected source. Page 75 © 2014 Snell Limited Sirius 800 www.snellgroup.com Door PC Dial Up Routing Operation Example: Routing video input 1 to video output 2. Note: Issue 5 Rev 2 1. If the Dial Up screen is not already displayed touch the Dial-Up Routing (Video) button from the main menu screen and then touch the Continue buttons as they are displayed. Finally touch the Dial-Up button when it is displayed to access the screen. 2. Select the Destination text box using the DST/SCR button and enter 2 using the numeric keypad and the configured destination name is displayed in the Destination text box. The source for the currently selected destination is displayed in the Current Source text box. 3. Select the Source text box using the DST/SCR button and enter 1 using the numeric keypad and the configured source name is displayed in the Source text box. 4. To set the route, touch the Take button. 5. If you have routed the wrong source to the destination touch the Undo button. This will undo the Take and go back to the previously selected source. Page 76 © 2014 Snell Limited Sirius 800 www.snellgroup.com Door PC 5.6.3 Dial Up Monitor Touch the Dial Up Monitor button on the main menu screen to display the Monitor Dial Up panel. The monitor dial up panel is used to route any video or audio signal to any one of the four monitor outputs on the Input/Output monitoring rear panel (see Section 13.). Fig 42. Monitor Dial Up Panel Routing a signal to a monitoring output: Note: Issue 5 Rev 2 Each monitoring output must be configured to output either a video signal (including embedded audio) or discrete audio signal (see Table 48. on page 211 for details). This means that you must know how each monitoring output is configured so that you route the correct signal type to each monitoring output. 1. Touch the button for the monitoring output that the signal will be routed to (button M1 to M4 on the door PC screen). The monitor output button will change to red to indicate that it has been selected. 2. If the selected monitor output is already set to output a signal the current settings for that output are displayed as red buttons on the door PC (see Fig 42.). 3. These settings can now be changed if required (see steps 7. or 8.) or a new input/output signal can be selected (see step 4.). 4. From the Matrix Selection box touch the Video or Audio button to set the signal type to be routed to the output monitor (see the note on page 77). 5. Touch the DST/SRC button to toggle between the Destination and Source text boxes as required (highlighted with a Red box around the selected text box). 6. Enter the signal channel number in the selected text box (Destination or Source) by touching keypad numbers and then touch the Take button to route the signal to the selected monitor output. If you make a mistake touch the Clear button and then enter the channel number correctly. Page 77 © 2014 Snell Limited Sirius 800 www.snellgroup.com 7. Note: Issue 5 Rev 2 If the signal to be monitored is an Input signal touch the appropriate button from the Input Position box: • Real Input button - selects the actual input received by the router before any processing is applied to the signal. • Post audio processing button (Video AHP modules only) - selects the input signal after audio processing has been applied to the signal. The Post audio processing button is present for all input modules but is only used for video AHP modules. The button setting is ignored for all other input modules. 8. Note: Door PC If the signal to be monitored is an Output signal touch the appropriate button from the Output Position box: • Pre audio processing button (Video AHP modules only) - selects the output signal before audio processing has been applied to the signal by the output module. • Real Output button - selects the actual output from the router after any processing has been applied to the signal by the output module. The Pre audio processing button is present for all output modules but is only used for video AHP modules. The button setting is ignored for all other output modules. Page 78 © 2014 Snell Limited Sirius 800 www.snellgroup.com Catsii Functionality 6. Catsii Functionality Catsii LED's are a unique feature to the Sirius 800 router range and allow easy identification of the status of an input or output. They can be lit in different color states depending on the signal type, and can be used in a “Cross Hair” formation to highlight and pinpoint a specific input or output. Catsii LEDs are fitted to the Video and MADI rear panels for the main inputs and outputs. The expansion output rear panels are not fitted with Catsii LEDs. The Catsii LEDs have two functions: • To indicate signal status • To identify a specific BNC or Fiber connector The Catsii LED's switch between these two functions, so they never operate at the same time. If any port identification is active, the port identification function is operational. If all the port identifications are inactive, the signal status function is operational. Fig 43. Examples of Catsii BNC LEDs Issue 5 Rev 2 Page 79 © 2014 Snell Limited Sirius 800 www.snellgroup.com Catsii Functionality 6.1 Signal Status Catsii LED signal status is driven directly from the input and output modules, and changes quickly when a Fiber or BNC cable is connected to the Sirius 800. 6.1.1 Video Signal Catsii Colors Note: Pulsed means 75% solid color, 25% pulsed color at ~ 1Hz. Signal Condition - Video Input (5913/5914/5916/5917) & Output (5923/5924/5926/5937/5938) Default color [1] No valid signal Red Valid SD signal Yellow DVB-ASI Signal Yellow - pulsed off Valid 1080i or 1080p (30 Hz or lower) signal Green Valid 720p signal Green - pulsed off Valid 3G signal Blue Table 9. [1] Default Video Catsii Configuration The current default Catsii colors are shown on the Door PC (see section 6.2.1) and can be changed through Workbench (see section 6.3). Signal Condition - Video Input (5919/5915) & Output (5949/5925) Default color [1] No valid signal Red Valid SD signal with no embedded audio Yellow Valid SD signal with embedded audio Yellow - pulsed White DVB-ASI Signal Yellow - pulsed off Valid 1080i or 1080p (30 Hz or lower) signal with no embedded audio Green Valid 1080i or 1080p (30 Hz or lower) signal with embedded audio Green - pulsed White Valid 720p signal with no embedded audio Green - pulsed off Valid 720p signal with embedded audio Green - pulsed White Valid 3G signal with no embedded audio Blue Valid 3G signal with embedded audio Blue - pulsed White Table 10. [1] Issue 5 Rev 2 Default Video with Embedded Audio Catsii Configuration The current default Catsii colors are shown on the Door PC (see section 6.2.1) and can be changed through Workbench (see section 6.3). Page 80 © 2014 Snell Limited Sirius 800 www.snellgroup.com Catsii Functionality 6.1.2 MADI Audio Catsii Colors Signal Condition - MADI Input (4915) & Output (4929/4925) Default color [1] No valid MADI signal Red 56 Channel MADI @ 48 kHz Yellow - pulsed Off 56 Channel MADI @ 44.1 kHz Yellow - pulsed Blue 56 Channel MADI @ other sample rates Yellow - pulsed Red Valid 56 Channel MADI Redundant signal (input only) Yellow 64 Channel MADI @ 48 kHz Green - pulsed Off 64 Channel MADI @ 44.1 kHz Green - pulsed Blue 64 Channel MADI @ other sample rates Green - pulsed Red Valid 64 Channel MADI Redundant signal (input only) Green Table 11. [1] Default Audio Catsii Configurations The current default Catsii colors are shown on the Door PC (see section 6.2.1) and can be changed through Workbench (see section 6.3). 6.2 I/O Connector Identification For connector identification, when an input or output is selected from Workbench, the following happens: All LEDs turn off except: Issue 5 Rev 2 • Yellow - The column of the selected connector • Yellow - The row of the selected connector • Flashing Red/Yellow - The selected connector Page 81 © 2014 Snell Limited Sirius 800 www.snellgroup.com Catsii Functionality 6.2.1 Door PC Catsii Control The Catsii inputs and outputs can be identified using the door PC, Fig 44. Fig 44. Door PC Catsii Control 6.3 Workbench Catsii Control To apply a user-assigned color configuration through Workbench from a remote PC: 1. In Workbench Configuration mode click on Edit Controller Config, select the Generic tab and click on the Edit Controller button. This opens the Generic Editor. Nucleus (2450) Controllers Navigate to: Controller | Devices | Devices | Config2450 | ModuleConfigurations | ModuleConfigurations[280]: TCatsiiControlModule Nucleus2 (2463) Controllers Navigate to: Devices | Devices[1]: LocalRouterConfig | ModuleConfigurations | ModuleConfigurations[280]: CatsiiControl 2. Issue 5 Rev 2 Select a parameter and then select the color from the drop down list. Page 82 © 2014 Snell Limited Sirius 800 www.snellgroup.com External Control 7. External Control 7.1 Control Panels The Nucleus controller supports the following control panels: 7.1.1 High Density Button Panels The high density button panels are configurable as BPX or XY panels and are available as: • 78 key High density button panel • 60 key High density panel Fig 45. High Density Button Panel 7.1.2 Standard Density Panels The standard density panels are configurable as BPX or XY panels and are available as: • 42 key Standard density button panel • 24 key Standard density panel Fig 46. Standard Density Panel 7.1.3 2RU Dial-up XY Panel Dial-up XY panel. Fig 47. 2RU Dial-up XY Panel 7.1.4 2RU Dial-up Multibus (8 Bus) Panels Range of Dial-up Multibus (8 bus) panels. Fig 48. 2RU Dial-up Multibus (8 bus) Panel Issue 5 Rev 2 Page 83 © 2014 Snell Limited Sirius 800 www.snellgroup.com External Control 7.1.5 2RU Dial-up Multibus (4 Bus) Panels Range of Dial-up Multibus (4 bus) panels. Fig 49. 2RU Dial-up Multibus (4 bus) Panel These panels can be controlled serially through RS485. When controlled through RS485 the 1U panels can mimic 6700 series Nucleus control panels and the 2U panels can mimic the 6276 and 6277 series Nucleus control panels. See the 1U Panels User Manual and 2U Panels User Manual respectively for details. For more flexibility, they can be controlled over ethernet, see the Workbench User Manual. The Sirius 800 routers are supplied with a default database. Serial port 3 (COM 5) is configured, in the default database, to use the control panels for BPX and XY control. 7.2 Older Control Panels Note: The control panels below are no longer manufactured or supplied and are shown here for users that already have them fitted. The Nucleus controller supports the following external control panels: 7.2.1 6700 series 1RU BPX and XY Panels. Fig 50. 6700 series 1RU BPX and XY panels 7.2.2 6276 2RU Dial-up XY panel. Fig 51. 6276 2RU Dial-up XY Panel Issue 5 Rev 2 Page 84 © 2014 Snell Limited Sirius 800 www.snellgroup.com External Control 7.2.3 6277 2RU Range of Dial-up Multibus panels. Fig 52. 6277 2RU Dial-up Multibus Panel To connect these panels to a Sirius 800, use a multi-drop pin to pin RS485 cable and connect to one of the four RS485 connectors on the Control Rear Panel. For configuration details refer to the Workbench manual. These RS485 connectors correspond to COM 3 to COM 6 in Workbench. For details on switch settings refer to the User Manuals supplied with the control panel. Each serial port can be configured to connect to up to 16 panels. Issue 5 Rev 2 Page 85 © 2014 Snell Limited Sirius 800 www.snellgroup.com External Control 7.3 Default Serial Port Configuration: When the sample/default database is loaded on the router control module(s) the four RS485 serial communications ports on the rear of the router (see section 16.) are configured as shown in Table 12. If a custom database is loaded on the router control module(s) the ports may be configured differently. Port configuration can be checked and modified using the Workbench software, see the Workbench User Manual for details. • RS485 1 (COM 3) = General Switcher In (SW-P-02) for Centra or Aurora control • RS485 2 (COM 4) = General Switcher In (SW-P-02) for Centra or Aurora control • RS485 3 (COM 5) = Panel Protocol for up to 16 controllers on addresses 1 to 16 as shown in the table below: Address Controller Sources Destinations 1 Dial-up X-Y panel All All 2 Dial-up Multibus (8 Bus) panel All 1 to 8 3 Dial-up Multibus (6 Bus) panel All 1 to 6 4 Dial-up Multibus (4 Bus) panel All 1 to 4 5 Dial-up Multibus (2 Bus) panel All 1 and 2 6 16 x 1 BPX panel 1 to 16 1 7 32 x 1 BPX panel 1 to 32 2 8 48 x 1 BPX panel 1 to 48 3 9 Dual 16 x 1 BPX panel 1 to 16 1 and 2 10 16 x 4 X-Y panel 1 to 16 1 to 4 11 32 x 4 X-Y panel 1 to 32 1 to 4 12 48 x 4 X-Y panel 1 to 48 1 to 4 13 32 x 16 X-Y panel 1 to 32 1 to 16 14 24 x 12 X-Y panel 1 to 24 1 to 12 15 Not Used 1 to 16 1 to 16 16 Table 12. • 16 x 16 X-Y panel Controllers and Addresses in the Default Database RS485 4 (COM 6) = General Switcher In (SW-P-02) for Centra or Aurora control “Auto” mode has been configured in the default database as the primary reference source for all inputs (see section 3.9 for information on video and audio reference inputs). Issue 5 Rev 2 Page 86 © 2014 Snell Limited Sirius 800 www.snellgroup.com Module Locations 8. Module Locations 8.1 Front Module and Rear Panel Compatibility Table 13. shows the front module and rear panel numbers that are currently ordered and shipped for new Sirius 800 router systems. Table 13. also shows which front modules and rear panels can be used together. Table 14. shows the front module and rear panel numbers that were shipped with earlier Sirius 800 router systems. These can still be supplied for use when expanding the router or as replacements if required. Note: • A Sirius 800 router can contain a mix of front modules from Table 13. and Table 14. as long as the correct rear panels are used for each front module. • All modules in Table 13. and Table 14. will work with any of the crosspoint modules. • The 5901 and 5905 video crosspoint module variants can be mixed in a frame, for details see section 10. Front Module Rear Panel Sirius 800 AES/MADI input module 120 AES Pairs and up to 3 MADI Inputs (MADI inputs not supported by 1299 and 1297 rear panels) 4915* (Section 9.12) or 12 MADI (Main & Redundant) Sirius 830: 1354 Balanced AES, see section 9.9.1 1357 Unbalanced AES, see section 9.10.1 1299 Balanced AES, see Appendix B.1.1 Sirius 840/850: 1352 Balanced AES, see section 9.9.2 1355 Unbalanced AES, see section 9.10.2 1297 Balanced AES, see Appendix B.1.2 Sirius 830: 1303 BNC, See section 9.3 1304 Fiber, See section 9.4 Sirius 840/850: 1285 BNC, See section 9.5 1286 Fiber, See section 9.6 Sirius 800 AES/MADI output module with audio delay 1353 Balanced AES, see section 11.8 120 AES Pairs and up to 3 MADI outputs 1356 Unbalanced AES, (MADI outputs not supported by 1298 rear see section 11.9 panel) 4929* 1298 Balanced AES, see (Section 11.1) Appendix B.4.1 or 12 MADI (Main & Redundant) Table 13. Issue 5 Rev 2 1295 BNC, See section 11.6 1296 Fiber, See section 11.7 New Router Systems - Front Module and Rear Panel Compatibility Page 87 © 2014 Snell Limited Sirius 800 www.snellgroup.com Front Module 5917 (Section ) Module Locations Rear Panel Sirius 830: 1234/1235 BNC, See section 9.1 Sirius 800 Standard Video BNC/Fibre input 1236 Fiber, See section 9.2 module Sirius 840/850: 1349/1289 BNC, See section 9.7 1305 Fiber, See section 9.8 Sirius 800 Video AHP input module with 5919* (Section 9.14) delay and sync capability Sirius 800 Standard Video output module 5926 (Section 11.2) (non-expandable) Sirius 850 Standard Video Expansion 5928 output module (Section 12.4) Only fitted if expansion of a Sirius 850 frame is required Sirius 850 Standard Video output module (expandable) 5938 (Section 12.3) Only fitted if expansion is required between two Sirius 850 frames Sirius 830: 1234/1235 BNC, See section 9.1 1236 Fiber, See section 9.2 Sirius 840/850: 1349/1289 BNC, See section 9.7 1305 Fiber, See section 9.8 1294 BNC, See section 11.4 1302 Fiber, See section 11.5 1290 Expansion Output to a second Sirius 850 frame, See section 12.5 1293 DIN 1.0/2.3 Coax, See section 12.6 1294 BNC, See section 11.4 1302 Fiber, See section 11.5 Sirius 800 Video embedding & AHP output 1294 BNC, See section 11.4 5949* (Section 11.3) module with delay and sync capability 1302 Fiber, See section 11.5 Sirius 830/840 Multiviewer output module 5931 (Section 13.6) Sirius 830/840: up to 3 Modules, Sirius 850: up to 2 modules Table 13. Important: Issue 5 Rev 2 Sirius 830/840: 1309 MV DIN 1.0/2.3 Coax, See section 13.10 Sirius 850: 1291 MV DIN 1.0/2.3 Coax, See section 13.11 New Router Systems - Front Module and Rear Panel Compatibility *Early Sirius 800 routers must be modified by Snell before they can be used for audio routing and processing (4915, 5919, 4929, 5949, 4925, 5915, 5925 or 5903 modules in use). See section 3.11 to check if the router needs modifying. Page 88 © 2014 Snell Limited Sirius 800 www.snellgroup.com Module Locations Table 14. shows which front modules and rear panels can be used together on earlier Sirius 800 router systems. Front Module Rear Panel Sirius 800 AES/MADI output module (no audio delay) 4925* (Section B.3.1) 1353 Balanced AES, see section 11.8 120 AES Pairs and up to 3 MADI outputs 1356 Unbalanced AES, (MADI outputs not supported by 1298 rear see section 11.9 panel) 1298 Balanced AES, see Appendix B.4.1 or 12 MADI (Main & Redundant) Issue 5 Rev 2 1296 Fiber, See section 11.7 5913 (Section B.2.1) Sirius 840/850 Standard Video BNC Input 1285 BNC, See section 9.5 module 5914 (Section B.2.1) Sirius 840/850 Standard Video Fiber input 1286 Fiber, See section 9.6 module Sirius 830: 1234/1235 BNC, See section 9.1 1236 Fiber, See section 9.2 5915* (Section B.2.2) Sirius 800 Video AHP input module 5916 (Section B.2.3) Sirius 830 Standard Video BNC/Fiber input module 1234/1235 BNC, See section 9.1 5923 (Section B.3.2) Sirius 840/850 Standard Video BNC output module 1295 BNC, See section 11.6 5924 (Section B.3.2) Sirius 840/850 Standard Video Fiber output module 1296 Fiber, See section 11.7 5925* (Section B.3.3) Sirius 800 Video AHP output module 1302 Fiber, See section 11.5 5937 (Section B.3.4) Sirius 830 Standard Video BNC/Fiber output module 1294 BNC, See section 11.4 Table 14. Important: 1295 BNC, See section 11.6 Sirius 840/850: 1349/1289 BNC, See section 9.7 1305 Fiber, See section 9.8 1236 Fiber, See section 9.2 1294 BNC, See section 11.4 1302 Fiber, See section 11.5 Early Router Systems - Front Module and Rear Panel Compatibility *Early Sirius 800 routers must be modified by Snell before they can be used for audio routing and processing (4915, 5919, 4929, 5949, 4925, 5915, 5925 or 5903 modules in use). See section 3.11 to check if the router needs modifying. Page 89 © 2014 Snell Limited Sirius 800 www.snellgroup.com Module Locations 8.2 Sirius 830 8.2.1 Sirius 830 Module Locations The Sirius 830 architecture allows different formats to be configured, up to 288 x 288 video channels and up to 9216 x 9216 audio channels (depending on configuration) in a single 15RU frame. 5931 Multiviewer Output Modules, see section 13.10 5902 Multiviewer Crosspoint Module, see section 13.2.1 or 5939 Input/Output Monitoring Module, see section 13.2.2 5901/5 Video Crosspoint Modules, see section 10.1 *5903 Audio Crosspoint Modules, see section 10.5 2453, 2455* or 2457* (blue) Fan-out Control Modules x 1 or 2, see section 15. 2450 (Nucleus) or 2463* (Nucleus2) Control Modules x 1 or 2, see section 14. 12 Input slots, populated with any combination of the following modules: *4915/5917/5919/5915/5916 see section 9. 12 Output slots, populated with any combination of the following modules: *4929/5926/5949/4925/5925/5937 see section 11. Fig 53. Sirius 830 Front Module Locations See section 8.1 for details on which rear panels that can be used with which front module. Important: Issue 5 Rev 2 *Early Sirius 830 routers must be modified by Snell before they can be used for audio routing and processing (4915, 5919, 4929, 5949, 4925, 5915, 5925 or 5903 modules in use). See section 3.11 to check if the router needs modifying. Page 90 © 2014 Snell Limited Sirius 800 www.snellgroup.com Module Locations 8.2.2 Sirius 830 Rear Panel Locations Frames that are not fully populated with input or output rear panels have blanking plates fitted in their place. Cables connected to the router must be fitted with adequate vertical and horizontal strain relief to avoid twisting of the rear panels causing damage to the router connectors and loss of electrical/signal connection to the router. 1309 Multiviewer Coax Rear Panel up to 3 or 1237 Monitor Output Rear Panel x 1 Control Rear Panel (standard fit non user replaceable part) 1234/1235 Input BNC Rear x 12 or 1236 Input Fiber Rear x 12 or 1303 Input BNC Rear x 12 or 1304 Input Fiber Rear x 12 or 1354 Input Balanced AES Rear x 12 or 1357 Input Unbalanced AES Rear x 12 or 1299 Input Balanced AES Rear x 12 1294 Output BNC Rear x 12 or 1302 Output Fiber Rear x 12 or 1295 Output BNC Rear x 12 or 1296 Output Fiber Rear x 12 or 1353 Output Balanced AES Rear x 12 or 1356 Output Unbalanced AES Rear x 12 or 1298 Output Balanced AES Rear x 12 Fig 54. Sirius 830 Rear Module Locations Issue 5 Rev 2 • See section 8.1 for details on which rear panels that can be used with which front module. • See section 8.2.4 for BNC and Fiber rear panel channel numbers and layout. Page 91 © 2014 Snell Limited Important: Issue 5 Rev 2 Page 92 Video Input 145 to 168, Audio 4609 to 5376 Video Output 145 to 168, Audio 4609 to 5376 Video Input 169 to 192, Audio 5377 to 6144 Video Output 169 to 192, Audio 5377 to 6144 Video Input 193 to 216, Audio 6145 to 6912 Video Output 193 to 216, Audio 6145 to 6912 Video Input 217 to 240, Audio 6913 to 7680 Video Output 217 to 240, Audio 6913 to 7680 Video Input 241 to 264, Audio 7681 to 8448 Video Output 241 to 264, Audio 7681 to 8448 Video Input 265 to 288, Audio 8449 to 9216 Video Output 265 to 288, Audio 8449 to 9216 Video Input 1 to 24, Audio 1 to 768 Video Output 1 to 24, Audio 1 to 768 Video Input 25 to 48, Audio 769 to 1536 Video Output 25 to 48, Audio 769 to 1536 Video Input 49 to 72, Audio 1537 to 2304 Video Output 49 to 72, Audio 1537 to 2304 Video Input 73 to 96, Audio 2305 to 3072 Video Output 73 to 96, Audio 2305 to 3072 Video Input 97 to 120, Audio 3073 to 3840 Video Output 97 to 120, Audio 3073 to 3840 Video Input 121 to 144, Audio 3841 to 4608 Video Output 121 to 144, Audio 3841 to 4608 Sirius 800 www.snellgroup.com Module Locations 8.2.3 Sirius 830: Input and Output Module Locations Before adding modules to a Sirius 830 router check that the power supplies fitted can supply sufficient power to the router. The router power requirements are described in Appendix B.1.1. Fig 55. shows the Input and Output Modules as they are located in the Sirius 830 frame. Fig 55. Sirius 830 Input and Output Module Locations (Front View) © 2014 Snell Limited Sirius 800 www.snellgroup.com Module Locations 8.2.4 Sirius 830: Rear Input/Output Connector Configuration Frames that are not fully populated with input or output rear panels have blanking plates fitted in their place. Fig 56. shows a mix of fiber and BNC input and output rear panel connectors on the rear of a Sirius 830 router. Note: • The columns count down from top to bottom then back to top again and from right to left. The video and embedded audio channel numbers for input and output rear panel slots 1 and 12 are shown in Fig 56. The channel numbers for all of the rear panel connectors are listed in Table 15. • If MADI rear panels are fitted each input or output contains up to 64 mono audio channels. Fiber Input Slot 2 Input Slot 3 Input Slot 1 Output Slot 1 Output Slot 2 Input Slot 5 Input Slot 6 Input Slot 4 Output Slot 3 Output Slot 4 Output Slot 5 Output Slot 6 Input Slot 7 Output Slot 7 Output Slot 8 Output Slot 9 Input Slot 11 Output Slot 10 Output Slot 11 Video - 288 Audio - 9216 Output Slot 12 Video - 265 Audio - 8449 Input Slot 8 The main/redundant MADI streams alternate between the fiber SFP modules meaning that if one SFP module fails either the main or redundant MADI stream will still be available. See sections 9.4 and 9.12.1 (inputs) or sections 11.1.1 and 11.7 (outputs) for details. Input Slot 9 • Input Slot 10 Each fiber input and output rear panel has 12 SFP cages with two inputs or outputs per fiber SFP module. Input Slot 12 • Video - 1 Audio - 1 Video - 24 Audio - 768 The channel numbers for all of the rear panel connectors are listed in Table 15. Fig 56. Example: Mixed BNC/Fiber Input/Output Rear Panel Connectors Issue 5 Rev 2 Page 93 © 2014 Snell Limited Sirius 800 www.snellgroup.com 8.2.4.1 Input, Output and Expansion Connections by Slot Input/Output Rear Panel Slot Number Input/Output Channels Video Channels Embedded Audio Channels Rear Panel Slot 1 1 to 24 1 to 768 Rear Panel Slot 2 25 to 48 769 to 1536 Rear Panel Slot 3 49 to 72 1537 to 2304 Rear Panel Slot 4 73 to 96 2305 to 3072 Rear Panel Slot 5 97 to 120 3073 to 3840 Rear Panel Slot 6 121 to 144 3841 to 4608 Rear Panel Slot 7 145 to 168 4609 to 5376 Rear Panel Slot 8 169 to 192 5377 to 6144 Rear Panel Slot 9 193 to 216 6145 to 6912 Rear Panel Slot 10 217 to 240 6913 to 7680 Rear Panel Slot 11 241 to 264 7681 to 8448 Rear Panel Slot 12 265 to 288 8449 to 9216 Table 15. Issue 5 Rev 2 Module Locations Connector Video and Embedded Audio Channels by Rear Panel Slot Page 94 © 2014 Snell Limited Sirius 800 www.snellgroup.com Module Locations 8.3 Sirius 840/850 8.3.1 Sirius 840 Module Locations The Sirius 840 architecture allows different formats to be configured, up to 576 x 576 video channels and up to 18432 x 18432 audio channels (depending on configuration) in a single 27U frame. 5931 Multiviewer Output Modules up to 3 5902 Multiviewer Crosspoint Module x 1 or 5930 Input Monitor Module x1 24 Input slots, populated with any combination of the following modules: 4915* Audio Input Modules, 5917 Video Re-clocking Input Modules 5919* Video Re-clocking, De-embedder Input Modules, 5913 (BNC), 5914 (Fiber) Video Re-clocking Input Modules, 5915* Video Re-clocking, De-embedder Input Modules 2452, 2456* or 2458* (blue) Fan-out Control Modules x 1 or 2 5903* Audio Crosspoint Modules x1 or 2 5901/5 Video Crosspoint Modules x4 or 5 24 Output slots, populated with any combination of the following modules: 4929* Audio Output Modules, 5926 Video Re-clocking Output Modules, 5949* Video Re-clocking, Embedder Output Modules, 4925* Audio Output Modules, 5923 (BNC), 5924 (Fiber) Video Re-clocking Output Modules, 5925* Video Re-clocking, Embedder Output Modules 5933 O/P Monitor Module x 1 2450 (Nucleus) or 2463* (Nucleus2) Control Modules x 1 or 2 Fig 57. Sirius 840 Front Module Locations See section 8.1 for details on which rear panels that can be used with which front module. Important: Issue 5 Rev 2 *Early Sirius 840 routers must be modified by Snell before they can be used for audio routing and processing (4915, 5919, 4929, 5949, 4925, 5915, 5925 or 5903 modules in use). See section 3.11 to check if the router needs modifying. Page 95 © 2014 Snell Limited Sirius 800 www.snellgroup.com Module Locations 8.3.2 Sirius 840 Rear Panel Locations Frames that are not fully populated with input or output rear panels have blanking plates fitted in their place. Cables connected to the router must be fitted with adequate vertical and horizontal strain relief to avoid twisting of the rear panels causing damage to the router connectors and loss of electrical/signal connection to the router. 1309 Multiviewer Coax Rear Panel up to 3 1285 Input BNC Rear x 24 or 1286 Input Fiber Rear x 24 or 1349/1289 Input BNC Rear x 24 or 1305 Input Fiber Rear x 24 or 1352 Input Balanced AES Rear x 24 or 1355 Input Unbalanced AES Rear x 24 or 1297 Input Balanced AES Rear x 24 Alarm Rear Panel 1295 Output BNC Rear x 24 or 1296 Output Fiber Rear x 24 or 1294 Output BNC Rear x 24 or 1302 Output Fiber Rear x 24 or 1353 Output Balanced AES Rear x 24 or 1356 Output Unbalanced AES Rear x 24 or 1298 Output Balanced AES Rear 24 Control Rear Panel Fig 58. Sirius 840 Rear Module Locations Issue 5 Rev 2 • See section 8.1 for details on which rear panels that can be used with which front module. • See section 8.3.7 for BNC and Fiber rear panel channel numbers and layout. Page 96 © 2014 Snell Limited Sirius 800 www.snellgroup.com Module Locations 8.3.3 Sirius 850 Module Locations The Sirius 850 architecture allows different formats to be configured, up to 576 x 576 video channels and up to 18432 x 18432 audio channels (depending on configuration) in a single 34U frame. 5928 Expansion O/P Modules x 24 5901/5905 Video Crosspoint Modules up to 5 5931/5932 Multiviewer Output Modules up to 2 5902 Multiviewer Crosspoint Module x1 or 5930 Input Monitor Module x 1 24 Input slots, populated with any combination of the following modules: 4915* Audio Input Modules, 5917 Video Re-clocking Input Modules 5919* Video Re-clocking, De-embedder Input Modules, 5913 (BNC), 5914 (Fiber) Video Re-clocking Input Modules, 5915* Video Re-clocking, De-embedder Input Modules 2452, 2456* or 2458* (blue) Fan-out Control Modules x 1 or 2 5903* Audio Crosspoint Modules up to 2 5901/5905 Video Crosspoint Modules up to 5 24 Output slots, populated with any combination of the following modules: 4929* Audio Output Modules, 5926 Video Re-clocking Output Modules, 5949* Video Re-clocking, Embedder Output Modules, 4925* Audio Output Modules, 5923 (BNC), 5924 (Fiber) Video Re-clocking Output Modules, 5925* Video Re-clocking, Embedder Output Modules 5933 O/P Monitor Module 2450 (Nucleus) or 2463* (Nucleus2) Control Modules x 1 or 2 Fig 59. Sirius 850 Front Module Locations See section 8.1 for details on which rear panels that can be used with which front module. Important: Issue 5 Rev 2 *Early Sirius 850 routers must be modified by Snell before they can be used for audio routing and processing (4915, 5919, 4929, 5949, 4925, 5915, 5925 or 5903 modules in use). See section 3.11 to check if the router needs modifying. Page 97 © 2014 Snell Limited Sirius 800 www.snellgroup.com Module Locations 8.3.4 Sirius 850 Rear Panel Locations Frames that are not fully populated with input, output or expansion rear panels have blanking plates fitted in their place. Cables connected to the router must be fitted with adequate vertical and horizontal strain relief to avoid twisting of the rear panels causing damage to the router connectors and loss of electrical/signal connection to the router. 1290 or 1293 Expansion Rear Panel 1291 Multiviewer Coax Rear Panel up to 2 or 1292 Multiviewer MV-Link Rear Panel x 1 (no longer supplied) 1285 Input BNC Rear x 24 or 1286 Input Fiber Rear x 24 or 1349/1289 Input BNC Rear x 24 or 1305 Input Fiber Rear x 24 or 1352 Input Balanced AES Rear x 24 or 1355 Input Unbalanced AES Rear x 24 or 1297 Input Balanced AES Rear x 24 Alarm Rear Panel 1295 Output BNC Rear x 24 or 1296 Output Fiber Rear x 24 or 1294 Output BNC Rear x 24 or 1302 Output Fiber Rear x 24 or 1353 Output Balanced AES Rear x 24 or 1356 Output Unbalanced AES Rear x 24 or 1298 Output Balanced AES Rear 24 Control Rear Panel Fig 60. Sirius 850 Rear Module Locations Issue 5 Rev 2 • See section 8.1 for details on which rear panels that can be used with which front module. • See section 8.3.7 for BNC and Fiber rear panel channel numbers and layout. • See section 8.3.8 for expansion rear panel channel numbers and layout. Page 98 © 2014 Snell Limited Issue 5 Rev 2 Page 99 Video 553 to 576, Audio 17665 to 18432 Video 529 to 552, Audio 16897 to 17664 Video 505 to 528, Audio 16129 to 16896 Video 553 to 576, Audio 17665 to 18432 Video 529 to 552, Audio 16897 to 17664 Video 505 to 528, Audio 16129 to 16896 Video 481 to 504, Audio 15361 to 16128 Video 457 to 480, Audio 14593 to 15360 Video 433 to 456, Audio 13825 to 14592 Video 409 to 432, Audio 13507 to 13824 Video 385 to 408, Audio 12289 to 13506 Video 361 to 384, Audio 11521 to 12288 Video 337 to 360, Audio 10753 to 11520 Video 313 to 336, Audio 9984 to 10752 Video 289 to 312, Audio 9217 to 9984 Video 265 to 288, Audio 8449 to 9216 Video 241 to 264, Audio 7681 to 8448 Video 217 to 240, Audio 6913 to 7680 Video 193 to 216, Audio 6145 to 6912 Video 169 to 192, Audio 5377 to 6144 Video 145 to 168, Audio 4609 to 5376 Video 121 to 144, Audio 3841 to 4608 Video 97 to 120, Audio 3073 to 3840 Video 73 to 96, Audio 2305 to 3072 Video 49 to 72, Audio 1537 to 2304 www.snellgroup.com Video 481 to 504, Audio 15361 to 16128 Video 457 to 480, Audio 14593 to 15360 Video 433 to 456, Audio 13825 to 14592 Video 409 to 432, Audio 13507 to 13824 Video 385 to 408, Audio 12289 to 13506 Video 361 to 384, Audio 11521 to 12288 Video 337 to 360, Audio 10753 to 11520 Video 313 to 336, Audio 9984 to 10752 Video 289 to 312, Audio 9217 to 9984 Video 265 to 288, Audio 8449 to 9216 Video 241 to 264, Audio 7681 to 8448 Video 217 to 240, Audio 6913 to 7680 Video 193 to 216, Audio 6145 to 6912 Video 169 to 192, Audio 5377 to 6144 Video 145 to 168, Audio 4609 to 5376 Video 121 to 144, Audio 3841 to 4608 Video 97 to 120, Audio 3073 to 3840 Video 73 to 96, Audio 2305 to 3072 Video 49 to 72, Audio 1537 to 2304 Important: Video 25 to 48, Audio 769 to 1536 Video 1 to 24, Audio 1 to 768 Important: Video 25 to 48, Audio 769 to 1536 Video 1 to 24, Audio 1 to 768 Sirius 800 Module Locations 8.3.5 Sirius 840/850: Input Module Locations Before adding modules to a Sirius 840/850 router check that the power supplies fitted can supply sufficient power to the router. The router power requirements are described in Appendix B.1.2 (Sirius 840) and Appendix B.1.3 (Sirius 850). Fig 61. shows the Input Module locations as they are situated in the Sirius 840/850 frame. Fig 61. Sirius 840/850 Input Module Location (Front View) 8.3.6 Sirius 840/850: Output Module Locations Before adding modules to a Sirius 840/850 router check that the power supplies fitted can supply sufficient power to the router. The router power requirements are described in Appendix B.1.2 (Sirius 840) and Appendix B.1.3 (Sirius 850). Fig 61. shows the Output Module locations as they are situated in the Sirius 840/850 frame. Fig 62. Sirius 840/850 Output Module Locations (Front View) © 2014 Snell Limited Sirius 800 www.snellgroup.com Module Locations 8.3.7 Sirius 840/850: Rear Input/Output Connector Configuration Frames that are not fully populated with input or output rear panels have blanking plates fitted in their place. Note: • The columns count down from top to bottom then back to top again and from right to left. The video and embedded audio channel numbers for input and output rear panel slots 1 and 24 are shown in Fig 63. and Fig 64. respectively. The channel numbers for all of the rear panel connectors are listed on page 102 in Table 16. • If MADI rear panels are fitted each input or output contains up to 64 mono audio channels. Fiber 8.3.7.1 • Each fiber input and output rear panel has 12 SFP cages with two inputs or outputs per fiber SFP module. • The main/redundant MADI streams alternate between the fiber SFP modules meaning that if one SFP module fails either the main or redundant MADI stream will still be available. See sections 9.6 and 9.12.1 (inputs) or sections 11.1.1 and 11.7 (outputs) for details. Inputs Input Slot 1 Input Slot 3 Input Slot 5 Input Slot 7 Input Slot 9 Input Slot 11 Input Slot 19 Input Slot 17 Input Slot 15 Input Slot 13 Input Slot 21 Input Slot 23 Fig 63. shows a mix of fiber and BNC input rear panel connectors on the rear of a Sirius 840/850 router. Not Used Video - 553 Audio - 17665 Video -1 Audio - 1 Inputs Input Slot 2 Input Slot 4 Input Slot 6 Input Slot 8 Input Slot 10 Input Slot 12 Input Slot 14 Input Slot 18 Input Slot 16 Input Slot 20 Video - 24 Audio - 768 Input Slot 24 Input Slot 22 Video - 576 Audio 18432 The channel numbers for all of the rear panel connectors are listed in Table 16. Fig 63. Example: Mixed BNC/Fiber Input Rear Panel Connectors Issue 5 Rev 2 Page 100 © 2014 Snell Limited Sirius 800 www.snellgroup.com 8.3.7.2 Module Locations Outputs Input Slot 1 Input Slot 3 Input Slot 5 Input Slot 7 Input Slot 9 Input Slot 11 Input Slot 19 Input Slot 17 Input Slot 15 Input Slot 13 Video - 553 Audio - 17665 Input Slot 23 Input Slot 21 Fig 64. shows a mix of fiber and BNC output rear panel connectors on the rear of a Sirius 840/850 router. Video -1 Audio - 1 Input Slot 2 Input Slot 8 Input Slot 6 Input Slot 4 Input Slot 10 Input Slot 12 1129 to 1152 Input Slot 14 Video - 24 Audio - 768 Input Slot 20 Input Slot 18 Input Slot 16 Video - 576 Audio 18432 Input Slot 24 Input Slot 22 Outputs Sirius 850 only: Fiber Rear Panel Expansion Inputs a b c a b c Sirius 850 only: BNC Rear Panel Expansion Inputs 577 to 600 The channel numbers for all of the rear panel connectors are listed in Table 16. Fig 64. Example Sirius 840/850: Mixed BNC/Fiber Output Rear Panel Connectors Issue 5 Rev 2 Page 101 © 2014 Snell Limited Sirius 800 www.snellgroup.com 8.3.7.3 Input, Output and Expansion Connections by Slot Input/Output Channels Input/Output Rear Panel Slot Number Video Channels Embedded Audio Channels Sirius 850 only, Video Expansion Inputs (a, b, c) Rear Panel Slot 1 1 to 24 1 to 768 577 to 600 Rear Panel Slot 2 25 to 48 769 to 1536 601 to 624 Rear Panel Slot 3 49 to 72 1537 to 2304 625 to 648 Rear Panel Slot 4 73 to 96 2305 to 3072 649 to 672 Rear Panel Slot 5 97 to 120 3073 to 3840 673 to 696 Rear Panel Slot 6 121 to 144 3841 to 4608 697 to 720 Rear Panel Slot 7 145 to 168 4609 to 5376 721 to 744 Rear Panel Slot 8 169 to 192 5377 to 6144 745 to 768 Rear Panel Slot 9 193 to 216 6145 to 6912 769 to 792 Rear Panel Slot 10 217 to 240 6913 to 7680 793 to 816 Rear Panel Slot 11 241 to 264 7681 to 8448 817 to 840 Rear Panel Slot 12 265 to 288 8449 to 9216 841 to 864 Rear Panel Slot 13 289 to 312 9217 to 9984 865 to 888 Rear Panel Slot 14 313 to 336 9985 to 10752 889 to 912 Rear Panel Slot 15 337 to 360 10753 to 11520 913 to 936 Rear Panel Slot 16 361 to 384 11521 to 12288 937 to 960 Rear Panel Slot 17 385 to 408 12289 to 13056 961 to 984 Rear Panel Slot 18 409 to 432 13057 to 13824 985 to 1008 Rear Panel Slot 19 433 to 456 13825 to 14592 1009 to 1032 Rear Panel Slot 20 457 to 480 14593 to 15360 1033 to 1056 Rear Panel Slot 21 481 to 504 15361 to 16128 1057 to 1080 Rear Panel Slot 22 505 to 528 16129 to 16896 1081 to 1104 Rear Panel Slot 23 529 to 552 16897 to 17664 1105 to 1128 Rear Panel Slot 24 553 to 576 17665 to 18432 1129 to 1152 Table 16. Issue 5 Rev 2 Module Locations Sirius 840/850: Connector Channels by Rear Panel Slot Page 102 © 2014 Snell Limited Sirius 800 www.snellgroup.com Module Locations 8.3.8 Sirius 850: Rear Expansion Output Connectors The Expansion section at the top of the Sirius 850 frame can be fitted with either 1290 or 1293 Expansion rear panels. The 1290s are used to distribute expansion outputs to a second Sirius 850 frame and the 1293s provide expansion outputs directly from a single Sirius 850 frame. The 1290 and 1293 output rear panels cannot be mixed in a router frame. Note: • It is not possible to mix the 1290 and 1293 Output Rear Panels in a frame. • It is not possible to monitor the 1293 expansion outputs. • The 1293 expansion output rear panels are not fitted with Catsii LEDs. • A second Sirius 850 frame cannot be used if one or more 1293 Output Rear Panels are fitted in a frame. s 8.3.8.1 1290 Expansion Output Rear Panel Configuration The output from the 5928 Expansion Output Module is via the 1290 Expansion Output Rear Panel. 1129 to 1152 577 to 600 A B C Fig 65. Sirius 850 Expansion 1290 Output Rear Panel Configuration The panel has three (DS-Link) output connectors and connects to the equivalent placed input connectors that are at the bottom of the Output Rear Panel of the second Sirius 850 frame. Three 6 meter (19.5 foot) DS-Link cables are supplied with each 1290 expansion rear panel ordered. See section 12.2.2 for details of the DS-Link connections between the Sirius 850 frames. Issue 5 Rev 2 Page 103 © 2014 Snell Limited Sirius 800 www.snellgroup.com 8.3.8.2 Module Locations 1293 Expansion Output Rear Panel Configuration The output from the 5928 Expansion Output Module is via the 1293 24 Channel Expansion Output Rear Panel. 1129 577 1152 600 Fig 66. Sirius 850 Expansion 1293 Output Rear Panel Configuration The 1293 Expansion Output Rear panel has 24 x DIN 1.0/2.3Coax connectors. 8.4 Inserting and Removing Vertical Modules The rear panel fastening screws are supplied fitted to the rear panels and the rear panel blanking plates. • Important: Replacement screw details: Pozidriv Pan head M3 x 6 mm Zinc plated screw • Before adding modules to a Sirius 800 router check that the power supplies fitted can supply sufficient power to the router. See Appendix B. for router power requirements. • Rear panels must be fitted and fastened securely to the router frame before inserting the front modules. • The rear panel fastening screws should not require any pressure when screwing them into the router frame. They should screw in without any resistance until the screw head secures the rear panel to the frame. If a rear panel fastening screw binds up then it should be removed and the screw alignment should be checked before the screw is refitted. • Do not overtighten the rear panel fastening screws. Electrostatic Damage Static precautions must be observed when inserting and removing all system modules Issue 5 Rev 2 Page 104 © 2014 Snell Limited Sirius 800 www.snellgroup.com Remove Module Locations Insert Fig 67. Inserting and Removing Vertical Modules The vertical module levers locate into the metalwork of the Sirius 800 frame allowing easy insertion and removal. 1. Note: Issue 5 Rev 2 To access the modules the associated front fan assembly must be opened first. • The fan assembly should be placed back into the closed position as soon as possible after opening, as this ensures correct ventilation of the frame. Failure to do this will result in failure. • In practice the maximum time that a fan assembly can be left open will depend on a number of factors such as; ambient temperature, frame loading, crosspoint routings, etc. To ensure correct operation under all conditions the fan assemblies should be left open for no more than 4 minutes at a time. • Sirius 840/850: the crosspoint fan assembly must also be opened to access the input modules. 2. To remove the module from its socket, pull on the two levers, and slide the module out of the frame. 3. To insert the module, lift the levers and locate in the frame. 4. Push the levers to fully lock the module. 5. Close the front fan frame assembly making sure not to trap any wires. Page 105 © 2014 Snell Limited Sirius 800 www.snellgroup.com Module Locations 8.5 Inserting and Removing Horizontal Modules Electrostatic Damage Static precautions must be observed when inserting and removing all system modules Remove Insert Fig 68. Inserting and Removing Horizontal Modules The horizontal module levers locate into the metalwork of the Sirius 800 frame allowing easy insertion and removal. Note: Issue 5 Rev 2 1. To access the modules the associated module front fan assembly must be opened first. • The fan assembly should be placed back into the closed position as soon as possible after opening, as this ensures correct ventilation of the frame. Failure to do this will result in failure. • In practice the maximum time that a fan assembly can be left open will depend on a number of factors such as; ambient temperature, frame loading, crosspoint routings, etc. To ensure correct operation under all conditions the fan assemblies should be left open for no more than 4 minutes at a time. 2. To remove the module from its socket, pull on the two levers, and slide the module out of the frame. 3. To insert the module, lift the levers and locate in the frame. 4. Push the levers to fully lock the module. 5. Close the front fan frame assembly making sure not to trap any wires. Page 106 © 2014 Snell Limited Sirius 800 www.snellgroup.com Input Rear Panels and Input Modules 9. Input Rear Panels and Input Modules 9.1 Sirius 830: 1234 & 1235 Video BNC Input Rear Panel Note: • The 1235 rear panel was supplied with earlier Sirius 830 router systems and is shown here for users that already have them fitted. • On newer systems the 1234 rear panel can be used instead of the 1235 and is compatible with the same video input modules so is a direct replacement. The 1234/1235 video BNC input rear panels have 24 BNC inputs. The 1234/1235 rear panels are used in the Sirius 830 with either the 5919/5915 input module (24 channel video with de-embedder, re-clocking and AHP) or the 5916/5917 input modules (24 channel video with re-clocking). Video Input 1 Video Input 24 Not Used Fig 69. 1234/1235 Input BNC Rear Panel (Sirius 830 only) All the BNC connectors on the 1234/1235 rear panels have Snell's unique Catsii feature that illuminates each connector. See section 6. for details of the Catsii functionality. Issue 5 Rev 2 Page 107 © 2014 Snell Limited Sirius 800 www.snellgroup.com Input Rear Panels and Input Modules 9.2 Sirius 830: 1236 Video Fiber Input Rear Panel The 1236 video fiber input rear panel has 12 fiber SFP cages with two inputs per fiber SFP module. The 1236 rear panel is used in the Sirius 830 with either the 5919/5915 input module (24 channel video with de-embedder, re-clocking and AHP) or the 5916/5917 input modules (24 channel video with re-clocking). Video Input 1 Video Input 2 Not Used Video Input 23 Video Input 24 Fig 70. 1236 Fiber Input Rear Panel (Sirius 830 only) All the Fiber connectors on the 1236 rear panel have Snell's unique Catsii feature that illuminates each connector. See section 6. for details of the Catsii functionality. When ordering the router the rear panels can be specified with or without fiber SFP receiver modules. When the rear panels are ordered as spares they are supplied without Fiber SFP receiver modules and these must be ordered separately. The Snell order code is shown below. • Issue 5 Rev 2 Fiber SFP Receiver Module Order Code SRR-3 Fiber SFP 2 channel 1260-1620nm receiver. 3G, HD, SD, MADI Capable. Max 12 per rear panel Page 108 © 2014 Snell Limited Sirius 800 www.snellgroup.com Input Rear Panels and Input Modules 9.3 Sirius 830: 1303 MADI BNC Input Rear Panel The 1303 MADI BNC input rear panel has 24 BNC connectors. The 1303 rear panel is used in the Sirius 830 with the 4915 audio input module (12 channel MADI). MADI Input 1a MADI Input 2a MADI Input 1b MADI Input 2b MADI Input 11a MADI Input 12a MADI Input 11b MADI Input 12b Not Used MADI channel a = Main input MADI channel b = Redundant input See section 9.12 for details Fig 71. 1303 Input BNC Rear Panel (Sirius 830 only) All the BNC connectors on the 1303 rear panel have Snell's unique Catsii feature that illuminates each connector. See section 6. for details of the Catsii functionality. Issue 5 Rev 2 Page 109 © 2014 Snell Limited Sirius 800 www.snellgroup.com Input Rear Panels and Input Modules 9.4 Sirius 830: 1304 MADI Fiber Input Rear Panel The 1304 MADI fiber input rear panel has 12 fiber SFP cages with two inputs per fiber SFP module. The 1304 rear panel is used in the Sirius 830 with the 4915 audio input module (12 channel MADI). MADI Input 1a MADI Input 2a MADI Input 1b MADI Input 2b Not Used MADI Input 11a MADI Input 12a MADI Input 11b MADI Input 12b MADI channel a = Main input MADI channel b = Redundant input See section 9.12 for details Fig 72. 1304 Fiber Input Rear Panel (Sirius 830 only) All the Fiber connectors on the 1304 rear panel have Snell's unique Catsii feature that illuminates each connector. See section 6. for details of the Catsii functionality. When ordering the router the rear panels can be specified with or without fiber SFP receiver modules. When the rear panels are ordered as spares they are supplied without Fiber SFP receiver modules and these must be ordered separately. The Snell order code is shown below. • Issue 5 Rev 2 Fiber SFP Receiver Module Order Code SRR-3 Fiber SFP 2 channel 1260-1620nm receiver. 3G, HD, SD, MADI Capable. Max 12 per rear panel Page 110 © 2014 Snell Limited Sirius 800 www.snellgroup.com Input Rear Panels and Input Modules 9.5 Sirius 840/850: 1285 Video/MADI BNC Input Rear Panel The 1285 video/MADI BNC input rear panel has 24 BNC inputs. The 1285 rear panel is used in the Sirius 840/850 with either the 4915 audio input module (12 Ch MADI) or the 5913 video input module (24 channel video with re-clocking). Not Used MADI 4915 module Video 5913 Module MADI Input 1a MADI Input 2a MADI Input 1b MADI Input 2b Video Input 1 Video input 2 Video Input 3 Video Input 4 MADI Input 11a MADI Input 12a MADI Input 11b MADI Input 12b Video Input 21 Video Input 22 Video Input 23 Video Input 24 MADI channel a = Main input MADI channel b = Redundant input See section 9.12.1 for details Fig 73. 1285 Input BNC Rear Panel (sirius 840/850 only) All the BNC connectors on the 1285 rear panel have Snell's unique Catsii feature that illuminates each connector. See section 6. for details of the Catsii functionality. Issue 5 Rev 2 Page 111 © 2014 Snell Limited Sirius 800 www.snellgroup.com Input Rear Panels and Input Modules 9.6 Sirius 840/850: 1286 Video/MADI Fiber Input Rear Panel The 1286 video/MADI fiber input rear panel has 12 fiber SFP cages with two inputs per fiber SFP module. The 1286 rear panel is used in the Sirius 840/850 with either the 4915 audio input module (12 Channel MADI) or the 5914 video input module (24 channel video with re-clocking). Not Used MADI 4915 module MADI Input 1a MADI Input 2a MADI Input 1b MADI Input 2b Video 5914 Module Video Input 1 Video Input 2 Video Input 3 Video Input 4 MADI Input 11a MADI Input 12a MADI Input 11b MADI Input 12b Video Input 21 Video Input 22 Video Input 23 Video Input 24 MADI channel a = Main input MADI channel b = Redundant input See section 9.12.1 for details Fig 74. 1286 Fiber Input Rear Panel (Sirius 840/850 only) All the Fiber connectors on the 1286 rear panel have Snell's unique Catsii feature that illuminates each connector. See section 6. for details of the Catsii functionality. When ordering the router the rear panels can be specified with or without fiber SFP receiver modules. When the rear panels are ordered as spares they are supplied without Fiber SFP receiver modules and these must be ordered separately. The Snell order code is shown below. • Issue 5 Rev 2 Fiber SFP Receiver Module Order Code SRR-3 Fiber SFP 2 channel 1260-1620nm receiver. 3G, HD, SD, MADI Capable. Max 12 per rear panel Page 112 © 2014 Snell Limited Sirius 800 www.snellgroup.com Input Rear Panels and Input Modules 9.7 Sirius 840/850: 1349 & 1289 Video BNC Input Rear Panel Note: • The 1289 rear panel was supplied with earlier Sirius 840/850 router systems and is shown here for users that already have them fitted. • On newer systems the 1349 rear panel can be used instead of the 1289 and is compatible with the same video input modules so is a direct replacement. The 1349/1289 video BNC input rear panels have 24 BNC inputs. The 1349/1289 rear panels are used in the Sirius 840/850 with the 5919/5915 video input module (24 channel video with de-embedder, re-clocking and AHP) and the 5917 video input module (24 channel video with re-clocking). Not Used Video Input 1 Video Input 24 Fig 75. 1349/1289 Input BNC Rear Panel (Sirius 840/850 only) All the BNC connectors on the 1349/1289 rear panels have Snell's unique Catsii feature that illuminates each connector. See section 6. for details of the Catsii functionality. . Issue 5 Rev 2 Page 113 © 2014 Snell Limited Sirius 800 www.snellgroup.com Input Rear Panels and Input Modules 9.8 Sirius 840/850: 1305 Video Fiber Input Rear Panel The 1305 video fiber input rear panel has 12 fiber SFP cages with two inputs per fiber SFP module. The 1305 rear panel is used in the Sirius 840/850 with the 5919/5915 video input module (24 channel video with de-embedder, re-clocking and AHP) and the 5917 video input module (24 channel with re-clocking). Not Used Video Input 1 Video Input 2 Video Input 23 Video Input 24 Fig 76. 1305 Fiber Input Rear Panel (Sirius 840/850 only) All the Fiber connectors on the 1305 rear panel have Snell's unique Catsii feature that illuminates each connector. See section 6. for details of the Catsii functionality. When ordering the router the rear panels can be specified with or without fiber SFP receiver modules. When the rear panels are ordered as spares they are supplied without Fiber SFP receiver modules and these must be ordered separately. The Snell order code is shown below. • Issue 5 Rev 2 Fiber SFP Receiver Module Order Code SRR-3 Fiber SFP 2 channel 1260-1620nm receiver. 3G, HD, SD, MADI Capable. Max 12 per rear panel Page 114 © 2014 Snell Limited Sirius 800 www.snellgroup.com Input Rear Panels and Input Modules 9.9 Balanced AES Input Rear Panels with MADI Inputs 9.9.1 Sirius 830: 1354 Balanced AES Input Rear Panel with MADI Inputs The 1354 balanced AES input rear panel has 5 x 62 way female high density sockets for balanced AES audio inputs and HD BNC connectors for up to 3 MADI inputs. Note: If unbalanced AES inputs are required see section 9.10 for details. The 1354 rear panel is used in the Sirius 830 with the 4915 120 channel AES/MADI input module. For the wiring details for the 62 way D-Type sockets see section 9.9.3 and for details of the MADI inputs see section 9.11. MADI 3 MADI 2 MADI 1 See section 9.11 for details Socket 1 Inputs 1 to 24 Socket 2 Inputs 25 to 48 Socket 3 Inputs 49 to 72 Socket 4 Inputs 73 to 96 Socket 5 Inputs 97 to 120 For the wiring details for the 62 way D-Type sockets see section 9.9.3 Fig 77. 1354 Balanced AES Input Rear Panel (Sirius 830 only) Issue 5 Rev 2 Page 115 © 2014 Snell Limited Sirius 800 www.snellgroup.com Input Rear Panels and Input Modules 9.9.2 Sirius 840/850: 1352 Balanced AES Input Rear Panel with MADI Inputs The 1352 balanced AES input rear panel has 5 x 62 way female high density sockets for balanced AES audio inputs and HD BNC connectors for up to 3 MADI inputs. Note: If unbalanced AES inputs are required see section 9.10.2 for details. The 1352 rear panel is used in the Sirius 840/850 with the 4915 120 channel AES/MADI input module. For the wiring details for the 62 way D-Type sockets see section 9.9.3 and for details of the MADI inputs see section 9.11. MADI 3 MADI 2 MADI 1 See section 9.11 for details Socket 1 Inputs 1 to 24 Socket 2 Inputs 25 to 48 Socket 3 Inputs 49 to 72 Socket 4 Inputs 73 to 96 Socket 5 Inputs 97 to 120 For the wiring details for the 62 way D-Type sockets see section 9.9.3 Fig 78. 1352 Balanced AES Input Rear Panel (Sirius 840/850 only) Issue 5 Rev 2 Page 116 © 2014 Snell Limited Sirius 800 www.snellgroup.com Input Rear Panels and Input Modules 9.9.3 62 Way High Density Balanced AES Socket Pin Outs 22 1 43 AES Balanced Input 1, 25, 49, 73 or 97 AES Balanced Input 2, 26, 50, 74 or 98 AES Balanced Input 3, 27, 51, 75 or 99 AES Balanced Input 4, 28, 52, 76 or 100 AES Balanced Input 5, 29, 53, 77 or 101 AES Balanced Input 6, 30, 54, 78 or 102 AES Balanced Input 7, 31, 55, 79 or 103 AES Balanced Input 8, 32, 56, 80 or 104 AES Balanced Input 9, 33, 57, 81 or 105 AES Balanced Input 10, 34, 58, 82 or 106 AES Balanced Input 11, 35, 59, 83 or 107 AES Balanced Input 12, 36, 60, 84 or 108 AES Balanced Input 13, 37, 61, 85 or 109 AES Balanced Input 14, 38, 62, 86 or 110 AES Balanced Input 15, 39, 63, 87 or 111 AES Balanced Input 16, 40, 64, 88 or 112 AES Balanced Input 17, 41, 65, 89 or 113 AES Balanced Input 18, 42, 66, 90 or 114 AES Balanced Input 19,43, 67, 91 or 115 AES Balanced Input 20, 44, 68, 92 or 116 AES Balanced Input 21, 45, 69, 93 or 117 AES Balanced Input 22, 46, 70, 94 or 118 AES Balanced Input 23,47, 71, 95 or 119 AES Balanced Input 24, 48, 72, 96 or 120 21 62 AES stereo pair Groupings + - 42 ALL other pins (GND/Chassis) Not Connected Fig 79. Balanced AES Rear Panel 62 Way High Density Socket (Viewed from the Rear of the Router) Issue 5 Rev 2 Page 117 © 2014 Snell Limited Sirius 800 www.snellgroup.com Pin Number Socket 1 AES Socket 2 AES Socket 3 AES Socket 4 AES Socket 5 AES Balanced Balanced Balanced Balanced Balanced Input Input Input Input Input 24 1+ 25+ 49+ 73+ 97+ 25 1- 25- 49- 73- 97- 22 2+ 26+ 50+ 74+ 98+ 23 2- 26- 50- 74- 98- 1 3+ 27+ 51+ 75+ 99+ 43 3- 27- 51- 75- 99- 2 4+ 28+ 52+ 76+ 100+ 44 4- 28- 52- 76- 100- 3 5+ 29+ 53+ 77+ 101+ 45 5- 29- 53- 77- 101- 4 6+ 30+ 54+ 78+ 102+ 46 6- 30- 54- 78- 102- 5 7+ 31+ 55+ 79+ 103+ 47 7- 31- 55- 79- 103- 6 8+ 32+ 56+ 80+ 104+ 48 8- 32- 56- 80- 104- 7 9+ 33+ 57+ 81+ 105+ 49 9- 33- 57- 81- 105- 8 10+ 34+ 58+ 82+ 106+ 50 10- 34- 58- 82- 106- 9 11+ 35+ 59+ 83+ 107+ 51 11- 35- 59- 83- 107- 10 12+ 36+ 60+ 84+ 108+ 52 12- 36- 60- 84- 108- 11 13+ 37+ 61+ 85+ 109+ 53 13- 37- 61- 85- 109- 12 14+ 38+ 62+ 86+ 110+ 54 14- 38- 62- 86- 110- 13 15+ 39+ 63+ 87+ 111+ 55 15- 39- 63- 87- 111- 14 16+ 40+ 64+ 88+ 112+ 56 16- 40- 64- 88- 112- 15 17+ 41+ 65+ 89+ 113+ 57 17- 41- 65- 89- 113- 16 18+ 42+ 66+ 90+ 114+ 58 18- 42- 66- 90- 114- 17 19+ 43+ 67+ 91+ 115+ 59 19- 43- 67- 91- 115- 18 20+ 44+ 68+ 92+ 116+ 60 20- 44- 68- 92- 116- 19 21+ 45+ 69+ 93+ 117+ 61 21- 45- 69- 93- 117- Table 17. Issue 5 Rev 2 Input Rear Panels and Input Modules Balanced AES Rear Panel 62 Way High Density AES Socket Pin Outs Page 118 © 2014 Snell Limited Sirius 800 www.snellgroup.com Pin Number Socket 1 AES Socket 2 AES Socket 3 AES Socket 4 AES Socket 5 AES Balanced Balanced Balanced Balanced Balanced Input Input Input Input Input 20 22+ 46+ 70+ 94+ 118+ 62 22- 46- 70- 94- 118- 41 23+ 47+ 71+ 95+ 119+ 42 23- 47- 71- 95- 119- 39 24+ 48+ 72+ 96+ 120+ 40 24- 48- 72- 96- 120- 21 N/C N/C N/C N/C N/C 26 to 38 Signal GND Signal GND Signal GND Signal GND Signal GND Table 17. Issue 5 Rev 2 Input Rear Panels and Input Modules Balanced AES Rear Panel 62 Way High Density AES Socket Pin Outs Page 119 © 2014 Snell Limited Sirius 800 www.snellgroup.com Input Rear Panels and Input Modules 9.10 Unbalanced AES Input Rear Panels with MADI Inputs 9.10.1 Sirius 830: 1357 Unbalanced AES Input Rear Panel with MADI Inputs The 1357 unbalanced AES input rear panel has 5 x 62 way female high density sockets for unbalanced AES audio inputs and HD BNC connectors for up to 3 MADI inputs. Note: If balanced AES inputs are required see section 9.9.1 for details. The 1357 rear panel is used in the Sirius 830 with the 4915 120 channel AES/MADI input module. For the wiring details for the 62 way D-Type sockets see section 9.10.3 and for details of the MADI inputs see section 9.11. MADI 3 MADI 2 MADI 1 See section 9.11 for details Socket 1 Inputs 1 to 24 Socket 2 Inputs 25 to 48 Socket 3 Inputs 49 to 72 Socket 4 Inputs 73 to 96 Socket 5 Inputs 97 to 120 For the wiring details for the 62 way D-Type sockets see section 9.10.3 Fig 80. 1357 Unbalanced AES Input Rear Panel (Sirius 830 only) Issue 5 Rev 2 Page 120 © 2014 Snell Limited Sirius 800 www.snellgroup.com Input Rear Panels and Input Modules 9.10.2 Sirius 840/850: 1355 Unbalanced AES Input Rear Panel with MADI Inputs The 1355 unbalanced AES input rear panel has 5 x 62 way female high density sockets for unbalanced AES audio inputs and HD BNC connectors for up to 3 MADI inputs. Note: If balanced AES inputs are required see section 9.9.2 for details. The 1355 rear panel is used in the Sirius 840/850 with the 4915 120 channel AES/MADI input module. For the wiring details for the 62 way D-Type sockets see section 9.10.3 and for details of the MADI inputs see section 9.11. MADI 3 MADI 2 MADI 1 See section 9.11 for details Socket 1 Inputs 1 to 24 Socket 2 Inputs 25 to 48 Socket 3 Inputs 49 to 72 Socket 4 Inputs 73 to 96 Socket 5 Inputs 97 to 120 For the wiring details for the 62 way D-Type sockets see section 9.10.3 Fig 81. 1355 Unbalanced AES Input Rear Panel (Sirius 840/850 only) Issue 5 Rev 2 Page 121 © 2014 Snell Limited Sirius 800 www.snellgroup.com Input Rear Panels and Input Modules 9.10.3 62 Way High Density Unbalanced AES Socket Pin Outs 22 1 43 AES Unbalanced Input 1, 25, 49, 73 or 97 AES Unbalanced Input 2, 26, 50, 74 or 98 AES Unbalanced Input 3, 27, 51, 75 or 99 AES Unbalanced Input 4, 28, 52, 76 or 100 AES Unbalanced Input 5, 29, 53, 77 or 101 AES Unbalanced Input 6, 30, 54, 78 or 102 AES Unbalanced Input 7, 31, 55, 79 or 103 AES Unbalanced Input 8, 32, 56, 80 or 104 AES Unbalanced Input 9, 33, 57, 81 or 105 AES Unbalanced Input 10, 34, 58, 82 or 106 AES Unbalanced Input 11, 35, 59, 83 or 107 AES Unbalanced Input 12, 36, 60, 84 or 108 AES Unbalanced Input 13, 37, 61, 85 or 109 AES Unbalanced Input 14, 38, 62, 86 or 110 AES Unbalanced Input 15, 39, 63, 87 or 111 AES Unbalanced Input 16, 40, 64, 88 or 112 AES Unbalanced Input 17, 41, 65, 89 or 113 AES Unbalanced Input 18, 42, 66, 90 or 114 AES Unbalanced Input 19,43, 67, 91 or 115 AES Unbalanced Input 20, 44, 68, 92 or 116 AES Unbalanced Input 21, 45, 69, 93 or 117 AES Unbalanced Input 22, 46, 70, 94 or 118 AES Unbalanced Input 23,47, 71, 95 or 119 AES Unbalanced Input 24, 48, 72, 96 or 120 21 + 62 AES stereo pair Groupings GND 42 ALL other pins (GND/Chassis) Not Connected Fig 82. Unbalanced AES Rear Panel 62 Way High Density Socket (Viewed from the Rear of the Router) Issue 5 Rev 2 Page 122 © 2014 Snell Limited Sirius 800 www.snellgroup.com Pin Number Socket 1 AES Socket 2 AES Socket 3 AES Socket 4 AES Socket 5 AES Unbalanced Unbalanced Unbalanced Unbalanced Unbalanced Input Input Input Input Input 24 1+ 25+ 49+ 73+ 97+ 25 GND GND GND GND GND 22 2+ 26+ 50+ 74+ 98+ 23 GND GND GND GND GND 1 3+ 27+ 51+ 75+ 99+ 43 GND GND GND GND GND 2 4+ 28+ 52+ 76+ 100+ 44 GND GND GND GND GND 3 5+ 29+ 53+ 77+ 101+ 45 GND GND GND GND GND 4 6+ 30+ 54+ 78+ 102+ 46 GND GND GND GND GND 5 7+ 31+ 55+ 79+ 103+ 47 GND GND GND GND GND 6 8+ 32+ 56+ 80+ 104+ 48 GND GND GND GND GND 7 9+ 33+ 57+ 81+ 105+ 49 GND GND GND GND GND 8 10+ 34+ 58+ 82+ 106+ 50 GND GND GND GND GND 9 11+ 35+ 59+ 83+ 107+ 51 GND GND GND GND GND 10 12+ 36+ 60+ 84+ 108+ 52 GND GND GND GND GND 11 13+ 37+ 61+ 85+ 109+ 53 GND GND GND GND GND 12 14+ 38+ 62+ 86+ 110+ 54 GND GND GND GND GND 13 15+ 39+ 63+ 87+ 111+ 55 GND GND GND GND GND 14 16+ 40+ 64+ 88+ 112+ 56 GND GND GND GND GND 15 17+ 41+ 65+ 89+ 113+ 57 GND GND GND GND GND 16 18+ 42+ 66+ 90+ 114+ 58 GND GND GND GND GND 17 19+ 43+ 67+ 91+ 115+ 59 GND GND GND GND GND 18 20+ 44+ 68+ 92+ 116+ 60 GND GND GND GND GND 19 21+ 45+ 69+ 93+ 117+ 61 GND GND GND GND GND Table 18. Issue 5 Rev 2 Input Rear Panels and Input Modules Unbalanced AES Rear Panel 62 Way High Density AES Socket Pin Outs Page 123 © 2014 Snell Limited Sirius 800 www.snellgroup.com Pin Number Input Rear Panels and Input Modules Socket 1 AES Socket 2 AES Socket 3 AES Socket 4 AES Socket 5 AES Unbalanced Unbalanced Unbalanced Unbalanced Unbalanced Input Input Input Input Input 20 22+ 46+ 70+ 94+ 118+ 62 GND GND GND GND GND 41 23+ 47+ 71+ 95+ 119+ 42 GND GND GND GND GND 39 24+ 48+ 72+ 96+ 120+ 40 GND GND GND GND GND 21 N/C N/C N/C N/C N/C 26 to 38 Signal GND Signal GND Signal GND Signal GND Signal GND Table 18. Unbalanced AES Rear Panel 62 Way High Density AES Socket Pin Outs 9.10.4 FGAEY 2502910A: Unbalanced 62 Way AES to BNC Breakout Cable The optional breakout cable converts a single unbalanced 62 way high density AES connector to 24 unbalanced AES female BNC connectors. The breakout cable is optional and not supplied with the AES rear panels. Five cables are required for all of the AES connectors on each AES rear panel. 62 Way D-Type High Density Plug 24 x Female BNC Connectors AES number printed on sleeve of each cable 1 Metre (3 Feet 3 Inches) Fig 83. RMYS 2502910A Unbalanced AES Breakout Cable, 62 Way D-Type to 24 BNC Female 9.11 HD BNC MADI Input Connectors The HD BNC connector details are the same for the balanced and unbalanced AES rear panels (see section 9.9 or 9.10 for rear panel details). The first and last MADI Channels in the following table assume that the HD BNC breakout cables are connected to an AES rear panel located in input slot 1 of the router. HD BNC Plug Marking MADI 1 577 640 MADI 2 641 704 MADI 3 705 768 Table 19. Issue 5 Rev 2 First MADI Channel Last MADI Channel (Slot 1) (Slot 1) Starting and Ending MADI Channels for Slot 1 Page 124 © 2014 Snell Limited Sirius 800 www.snellgroup.com Input Rear Panels and Input Modules Use the following formula to calculate the first and last MADI channels for any other router input slot: First MADI Channel = ((Slot Number x 768) - 768) + X Where X = the First MADI channel for the required MADI connector Last MADI Channel = First MADI Channel + 63 Please see the following examples to see how this works in practice. 9.11.1 Example 1: Slot 5, MADI 1 Connector First MADI Channel: ((5 x 768) - 768) + 577 (3840 - 768) + 577 3072 + 577 = 3649 First MADI Channel = 3649 Last MADI Channel: 3649 + 63 = 3712 Last MADI Channel = 3712 9.11.2 Example 2: Slot 9, MADI 2 Connector First MADI Channel: ((9 x 768) - 768) + 641 (6912 - 768) + 641 6144 + 641 = 6785 First MADI Channel = 6785 Last MADI Channel: 6785 + 63 = 6848 Last MADI Channel = 6848 9.11.3 Example 3: Slot 12, MADI 3 Connector First MADI Channel: ((12 x 768) - 768) + 705 (9216 - 768) + 705 8448 + 705 = 9153 First MADI Channel = 9153 Last MADI Channel: 9153 + 63 = 9216 Last MADI Channel = 9216 Issue 5 Rev 2 Page 125 © 2014 Snell Limited Sirius 800 www.snellgroup.com Input Rear Panels and Input Modules 9.12 4915 Sirius 800 AES/MADI Input Module Important: Early Sirius 800 routers must be modified by Snell before they can be used with the 4915. See section 3.11 to check if the router needs modifying. The 4915 AES/MADI input module can accept either 120 AES inputs (balanced or unbalanced) with up to 3 MADI input channels or 12 channels of MADI inputs depending on the rear panel fitted. The 4915 Input Module is compatible with the rear panels listed in Table 20. Rear Panel See Section Up to 120 AES inputs and up to 3 MADI input channels: Sirius 830: 1354 Balanced AES + HD BNC MADI rear panel See section 9.9.1 1357 Unbalanced AES + HD BNC MADI rear panel See section 9.10.1 1299 Balanced AES rear panel (no MADI) - No longer supplied See Appendix B.1.1 Sirius 840/850: 1352 Balanced AES + HD BNC MADI rear panel See section 9.9.2 1355 Unbalanced AES + HD BNC MADI rear panel See section 9.10.2 1297 Balanced AES rear panel (no MADI) - No longer supplied See Appendix B.1.2 Up to 12 MADI input channels: Sirius 830: 1303 MADI Input BNC rear panel See section 9.3 1304 MADI Input Fiber rear panel See section 9.4 Sirius 840/850: 1285 MADI Input BNC rear panel See section 9.5 1286 MADI Input Fiber rear panel See section 9.6 Table 20. Issue 5 Rev 2 4915 Rear Panel Compatibility Page 126 © 2014 Snell Limited Sirius 800 www.snellgroup.com Input Rear Panels and Input Modules Fugue LED Sirius 830: Connectors to the 1354, 1357, 1303, 1304 or 1299 Rear Modules LEDs PL7 - Link fitted across two pins closest to SD Card Sirius 840/850: Connectors to the 1352, 1355, 1285, 1286 or 1297 Rear Modules Firmware/Licensing SD/SDHC Card (see the Sirius 800 Maintenance & Upgrade manual for details) Fig 84. 4915 Sirius 800 AES/MADI Input Module Note: • Jumpers and Headers are present on the audio input module and these are for Snell Use Only. • In normal operation no jumper links or headers are fitted except for PL7 which has a link fitted across the two pins closest to the SD card slot. 9.12.1 MADI Main and Redundant Inputs Each MADI rear panel has 12 main and 12 redundant MADI input connectors. If you have duplicate feeds for the MADI input channels these can be connected to the redundant MADI input connectors. The main and redundant connections are shown in the rear panel diagrams listed in Table 21. Rear Panel See Figure Number Sirius 830: 1303 BNC rear panel See Fig 71. on page 109. 1304 Fiber rear panel See Fig 72. on page 110. Sirius 840/850: 1285 BNC rear panel See Fig 73. on page 111. 1286 Fiber rear panel See Fig 74. on page 112. Table 21. MADI Main and Backup Connections If a main MADI input fails the input module will automatically switch to the redundant input for that feed. Once it has switched the input module will continue to use the redundant input even if the main input is restored. If, subsequently, the redundant input fails the input module will automatically switch back to the main MADI input. If required the MADI input used can also be manually changed using Workbench or the Door screen (see section 5.3.2). Issue 5 Rev 2 Page 127 © 2014 Snell Limited Sirius 800 www.snellgroup.com Input Rear Panels and Input Modules 9.12.2 AES Audio Functions • Up to 120 balanced or unbalanced AES inputs (dependant on rear panel fitted) at a nominal sample rate of 48 kHz • Passes all input audio channels, including VU&C (Validity, User and Channel status) data to the audio crosspoint • Passes AES audio asynchronously transparently from any input. • Dolby E is flagged as non audio and passed transparently to the audio crosspoint • Up to 3 MADI inputs are also available on HD BNC connectors (with correct rear panels, see section 9.11 for details) • Up to 64 channels of audio per MADI input • Each MADI input can be asynchronous 9.12.3 MADI Audio Functions Issue 5 Rev 2 • Up to 12 MADI inputs • 56 or 64 channels of audio per MADI input at a nominal sample rate of 48 kHz • Maximum of 768 (12 x 64) audio channels per 4915 audio input module • 12 redundant MADI inputs which automatically switch if a main MADI input fails • Each MADI input can be asynchronous to others • Passes all input audio channels, including VU&C (Validity, User and Channel status) data to the audio crosspoint • Dolby E is flagged as non audio and passed transparently to the audio crosspoint Page 128 © 2014 Snell Limited Sirius 800 www.snellgroup.com Input Rear Panels and Input Modules 9.12.4 Audio Processing on the Input Module The 4915 audio input module can manipulate the audio channels received from the input rear panels before outputting them to the audio crosspoint card. This makes it possible to customize the audio input channels to a house standard within the router. Note: The audio processing functions are gain control, phase invert and stereo mode (left/right swap, left both, right both or mono mix). The audio processing is supplied free of charge for each audio module. Audio processing is controlled from Workbench. Fig 85. and Fig 86. show the order that the processing is applied to the audio signals. *Input/Output Monitoring selected from either the input or the output of the module (pre or post processing). See section 5.6.3 for details on how to configure this using the router Door screen. Fig 85. Audio Channel Processing Block Diagram (AES Rear Panel) *Input/Output Monitoring selected from either the input or the output of the module (pre or post processing). See section 5.6.3 for details on how to configure this using the router Door screen. Fig 86. Audio Channel Processing Block Diagram (MADI Rear Panel) Issue 5 Rev 2 Page 129 © 2014 Snell Limited Sirius 800 www.snellgroup.com 9.12.4.1 Input Rear Panels and Input Modules Gain Control and Phase Invert Gain Gain is applied to an audio input channel as Silence (mute) or in steps of 0.1dB in a range of -72 dB to +30 dB. Phase Invert Phase invert will invert the audio waveform. 9.12.4.2 Stereo Mode Stereo Mode is used to manipulate stereo pairs. Options include: Left/Right Swap, Left Both, Right Both and Mono Mix. Left/Right Swap Left/Right swap is used to swap the two audio channels of an AES pair over. Left Both & Right Both Left Both and Right Both are used to duplicate the selected channel of a stereo pair and pass the two identical output channels on in place of the original pair. Mono Mix Mono mix is used to mix a stereo pair together to create a single mono signal. This single mono signal is then passed to the router for each of the mixed channels. A+B ------------2 9.12.5 4915 Connections to the Audio Crosspoints The Mono Mix is: The 4915 Audio input module creates two identical multiplexed audio transport streams each of which contains all of the audio channels on the input module (up to 768 mono channels). One transport stream is sent to the main audio crosspoint module and a duplicate transport stream is sent to the redundant audio crosspoint module. Issue 5 Rev 2 Page 130 © 2014 Snell Limited Sirius 800 www.snellgroup.com Input Rear Panels and Input Modules 9.12.6 4915 Input Module LED Information Table 22. shows the LED color code on the 4915 Input Module, and Fig 87. shows the front edge of the input module. LED Color Label Fugue Status Detail Status CPU status Flashing sequence Green, Green, Blue - normal operation the CPU is programmed and running Brief Red Flash at startup - normal Flashing Red - CPU Error. Remove module and refit to force a reboot. Blue/Green LED R Red FPGA status LED G Green Flashing rapidly between Red & Green (2 Hz each LED) - starting up Green On Solid & Red Off - normal state working correctly Green Off & Red On Solid - FPGA programming fault found. Remove module and refit to force a reboot. Red & Green Flashing very rapidly in sync (4 Hz each LED) - A change has been made to the module settings database in RAM but it has not yet been written to flash memory. This is not a fault and the flash memory will be updated after 10 seconds of no audio setting changes being made. Do not remove power from the module while this indication is present as the flash may become corrupted. Other indications are displayed when performing a firmware upgrade, see the Sirius 800 Maintenance & Upgrade manual for details. Green Power OK Power to the module On Solid - working correctly Receiving messages from the local Nucleus control module (the Nucleus controller in this frame) Flashing - receiving information and working correctly Yellow Local Command OK Local Error Error with messages from the local Nucleus control module (the Nucleus controller in this frame) Red Off - normal state Flashing - the command message from the router controller is corrupt or hasn’t been received. This communications error could be caused by a hardware failure or incorrect insertion. Check that the module is inserted correctly. If the “Local Error” LED is flashing at the same time as the “Local Command OK” LED is flashing it suggests a mismatch in the configuration of the Nucleus controller. Check the controller configuration. Table 22. Issue 5 Rev 2 4915 Input Module LED Information Page 131 © 2014 Snell Limited Sirius 800 www.snellgroup.com LED Color Label Yellow Input Rear Panels and Input Modules Detail Status Remote Command OK Receiving messages from remote Nucleus control module (the Nucleus controller in the frame linked to this frame) Sirius 830/840/850 (no expansion): Off - Expansion not used. Sirius 850 (expanded to second frame): Flashing - receiving information and working correctly Remote Error Error with messages from remote Nucleus control module (the Nucleus controller in the frame linked to this frame) Sirius 830/840/850 (no expansion): Off - Expansion not used. Sirius 850 (expanded to second frame): Off - normal state, Flashing - the command message from the remote router controller is corrupt or hasn’t been received. This communications error could be caused by a hardware failure or incorrect insertion. Check that the module is inserted correctly and the four RJ45 connections between the frames are fitted correctly (see section 12.2). Red If the “Remote Error” LED is flashing at the same time as the “Remote Command OK” LED is flashing it suggests a mismatch in the configuration of the Nucleus controller. Check the controller configuration. Table 22. 4915 Input Module LED Information Fugue Status LED R LED G Power OK Local Command OK Local Error Remote Command OK Remote Error Fig 87. 4915 Input Module LEDs Issue 5 Rev 2 Page 132 © 2014 Snell Limited Sirius 800 www.snellgroup.com Input Rear Panels and Input Modules 9.13 5917 Sirius 800 Standard Video BNC/Fiber Input Module The 5917 standard video BNC/fiber input module has 24 input channels and can handle SD, ASI and HD signals up to 3Gb/s. Connectors to the Motherboard Sirius 830: Connectors to the 1234, 1235 or 1236 Rear Panels LEDs Sirius 840/850: Connectors to the 1349, 1289 or 1305 Rear Panels Connectors to the Motherboard Fig 88. 5917 24 Channel Video Input Module with 24 Channel Re-clocking Note: • Jumpers and Headers are present on the video input module and these are for Snell Use Only. • In normal operation no jumper links or headers are fitted. The 5917 Input Module is compatible with the rear panels listed in Table 23. Rear Panel Sirius 830: 1234/1235 BNC rear panel See section 9.1 Sirius 830: 1236 Fiber rear panel See section 9.2 Sirius 840/850: 1349/1289 BNC rear panel See section 9.7 Sirius 840/850: 1305 Fiber rear panel See section 9.8 Table 23. Issue 5 Rev 2 See Section 5917 Rear Panel Compatibility Page 133 © 2014 Snell Limited Sirius 800 www.snellgroup.com Input Rear Panels and Input Modules 9.13.1 5917 Input Module LED Information Table 24. shows the LED color code on the 5917 Input Module, and Fig 89. shows the front edge of the input module. LED Color Label Detail Normal Working Status Green Power OK Power to the module On Solid - working correctly Receiving messages from local Nucleus control module (the Nucleus controller in this frame) Flashing - receiving information and working correctly Yellow Local Command OK Local Error Error with messages from local Nucleus control module (the Nucleus controller in this frame) Red Off - normal state Flashing - the command message from the router controller is corrupt or hasn’t been received. This communications error could be caused by a hardware failure or incorrect insertion. Check that the module is inserted correctly. If the “Local Error” LED is flashing at the same time as the “Local Command OK” LED is flashing it suggests a mismatch in the configuration of the Nucleus controller. Check the controller configuration. Yellow Remote Command OK Receiving messages from remote Nucleus control module (the Nucleus controller in the frame linked to this frame) Sirius 830/840/850 (no expansion): Off - Expansion not used. Sirius 850 (expanded to second frame): Flashing - receiving information and working correctly Remote Error Error with messages from remote Nucleus control module (the Nucleus controller in the frame linked to this frame) Sirius 830/840/850 (no expansion): Off - Expansion not used. Sirius 850 (expanded to second frame): Off - normal state, Flashing - the command message from the remote router controller is corrupt or hasn’t been received. This communications error could be caused by a hardware failure or incorrect insertion. Check that the module is inserted correctly and the four RJ45 connections between the frames are fitted correctly (see section 12.2). Red If the “Remote Error” LED is flashing at the same time as the “Remote Command OK” LED is flashing it suggests a mismatch in the configuration of the Nucleus controller. Check the controller configuration. Table 24. Issue 5 Rev 2 5917 Input Module LED Information Page 134 © 2014 Snell Limited Sirius 800 www.snellgroup.com Input Rear Panels and Input Modules Power OK Local Command OK Local Error Remote Command OK Remote Error Fig 89. 5917 Input Module LEDs Issue 5 Rev 2 Page 135 © 2014 Snell Limited Sirius 800 www.snellgroup.com Input Rear Panels and Input Modules 9.14 5919 Sirius 800 Video AHP Input Module with Delay and Sync Capability Important: Early Sirius 800 routers must be modified by Snell before they can be used with the 5919. See section 3.11 to check if the router needs modifying. The 5919 module heat sink can get very hot during normal operation. When removing the 5919 module from a router do not touch the heat sink until it has had time to cool down. The 5919 video AHP input module with delay and sync capability has 24 input channels and can handle SD, DVB-ASI and HD signals up to 3Gb/s. The audio de-embedder extracts up to 16 mono audio channels per video input channel (16 for SD and HD) giving up to 768 audio channels per 5919 input module. The 5919 AHP video input module contains a powerful processing engine that can manipulate the individual audio channels passing through it (see section 9.14.1). The input module also contains frame/line synchronizers allowing video signals to be synchronized with router references (see section 9.14.1.1). Audio and video processing are licensed features which must be purchased for each module they are needed on, See section 3.5.1 for licensing details. The 5919 passes all of the de-embedded audio channels (including VU&C data) to the audio crosspoints. Connectors to the Motherboard Sirius 830: Connectors to the 1234, 1235 or 1236 Rear Panels LEDs Fugue LED Sirius 840/850: Connectors to the 1349, 1289 or 1305 Rear Panels Eight Diagnostic LEDs - Snell Use Only Connectors to the Motherboard Firmware/Licensing SD/SDHC Card (see the Sirius 800 Maintenance & Upgrade manual for details) Fig 90. 5919 Sirius 800 Video AHP Input Module with Delay and Sync Capability Note: Issue 5 Rev 2 • Jumpers and Headers are present on the video input module and these are for Snell Use Only. • In normal operation no jumper links or headers are fitted. Page 136 © 2014 Snell Limited Sirius 800 www.snellgroup.com Input Rear Panels and Input Modules The 5919 input module is compatible with the rear panels listed in Table 25. Rear Panel See Section Sirius 830: 1234/1235 BNC rear panel See section 9.1 Sirius 830: 1236 Fiber rear panel See section 9.2 Sirius 840/850: 1349/1289 BNC rear panel See section 9.7 Sirius 840/850: 1305 Fiber rear panel See section 9.8 Table 25. 5915 Rear Panel Compatibility 9.14.1 Advanced Hybrid Processing on the 5919 Input Module The 5919 video input module can manipulate the video and audio channels received from the input rear panels before outputting them to the video and audio crosspoint cards. This makes it possible to customize the video and audio input channels to a house standard within the router. Note: Video and Audio processing are licensed options and must be purchased for each module they are used on (See section 3.5 for details). Processing is configured in Workbench. Fig 91. shows the order that the video and audio processing is applied to the signal. *Input/Output Monitoring selected from either the input or the output of the module (pre or post processing). See section 5.6.3 for details on how to configure this using the router Door screen. Fig 91. 5919 Processing Block Diagram If any embedded audio channels are asynchronous to the video signal the input module will use drop/repeat to synchronize the audio channels with the video signal. Issue 5 Rev 2 Page 137 © 2014 Snell Limited Sirius 800 www.snellgroup.com 9.14.1.1 Input Rear Panels and Input Modules Frame/Line Sync and Video Delay The video processing block can be used for frame/line sync or video delay on a channel by channel basis but they cannot both be used on the same channel. Note: Video Frame Synchronization is achieved by dropping or repeating video frames when the Frame Buffer is empty or full. Selecting audio post synchronization means that when a video frame is dropped or repeated a frame of audio will also be dropped or repeated. Selecting audio pre synchronization means that when a video frame is dropped or repeated the audio will not be dropped or repeated so will no longer be associated with the original video frame resulting in lip sync mismatch. Therefore Snell recommends that the synchronizers are used to re-time video in synchronous systems only. Fig 92. Example Workbench Frame Sync/Delay Summary Screen The video channel is selected using the dialup panel. The Frame Sync/Delay screen displays the currently detected video standard for the selected channel. The configuration buttons at the top of the screen are used to configure the general behavior of the video channel. The Summary tab displays all of the possible video standards and whether they are configured for frame sync or delay. The signal standard is auto detected and the channel uses the settings defined in the appropriate Frame sync or Delay tab for that standard. Function Function Description Channel Configuration (Applies to all video standards) Detected Standard: Displays the detected video standard for the selected video channel. Summary button Click on the Summary button to return to the summary screen Frame Sync Enabled Check the box to enable frame/line sync on the selected video channel. Audio Selection Select the embedded audio from before or after the frame sync block by clicking on the required option. Sync Function Select to sync to frame or to line by clicking on the required option. Table 26. Issue 5 Rev 2 Frame Sync/Delay Summary Screen Page 138 © 2014 Snell Limited Sirius 800 www.snellgroup.com Function Input Rear Panels and Input Modules Function Description Summary tab (Standard & Mode) for each video input standard Frame Sync Indicator Green when frame sync is enabled for the video standard. Red when frame sync is not enabled for the video standard Delay Indicator Green when video delay is enabled for the video standard. Red when video delay is not enabled for the video standard Table 26. Frame Sync/Delay Summary Screen Frame/Line Sync A video output signal can set to frame or line sync to a video reference signal (physical or derived) as long as the video output signal and reference frame rates match. An offset can be applied to the input signal relative to the frame or line sync to allow for delays later in the system. The offset for frame sync is set in frames, lines and pixels or in milliseconds. The offset for line sync is set in pixels or in milliseconds. The offset settings can be preset for each standard of video signal that might be expected to be input to the channel. Video offset is set in steps of 0.00001 ms up to a maximum of 14 frames for progressive video standards or 14 fields for interlaced video standards. The embedded audio can be sourced from before or after the frame sync block using the Pre/Post Selector as required. Each video standard has a tab for frame sync configuration and a tab for delay configuration. The signal standard is auto detected and the channel uses the settings defined in the appropriate Frame sync or Delay tab for that standard. Fig 93. Example Workbench 1080i Frame Sync Settings Tab The example in Fig 93. shows: 1080i50 - set to Ref 1 so a 1080i50 signal will use frame sync settings in the 1080i FS tab. 1080i59 - set to Lock to Input so a 1080i59 signal will use delay settings in the 1080i Delay tab. 1080i60 - set to Lock to Input so a 1080i60 signal will use delay settings in the 1080i Delay tab. Issue 5 Rev 2 Page 139 © 2014 Snell Limited Sirius 800 www.snellgroup.com Function Input Rear Panels and Input Modules Function Description XXXX FS tab (where XXXX is the video standard, eg 1080i FS) Video standard configuration tabs for Frame/Line Sync Frame Offset* Select the number of frames of offset from the reference. Only available if Sync Function is selected as Frame. If Line is selected then the frame slider is not visible. Line Offset* Select the number of lines of offset from the reference. Only available if Sync Function is selected as Frame. If Line is selected then the frame slider is not visible. Pixel Offset* Select the number of pixels of offset from the reference. Delay ms* Select the offset in milliseconds from the reference. *When setting any one of the above values the other settings will automatically changes to reflect the setting being made. Reference Input Loss behavior Table 27. Lock to Input- Select Lock to Input to enable video delay for the video standard. Reference 1 to 4 - Select which video reference the signal will be synchronized to. Freeze Frame - in the event of input signal loss the last good frame is output. Black Screen - in the event of input signal loss a black screen is output. Frame Sync Configuration Video Delay Delay is applied to a video output channel in frames, lines, pixels or in milliseconds. Video delay is set in steps of 0.00001 ms up to a maximum of 14 frames for progressive video standards or 14 fields for interlaced video standards. Note: To enable video delay for a particular video standard Lock to Input must be selected in either the delay tab or the frame sync tab of the same standard. Each video standard has a tab for frame sync configuration and a tab for delay configuration. The signal standard is auto detected and the channel uses the settings defined in the appropriate Frame sync or Delay tab for that standard. Fig 94. Example Workbench 1080i Delay Settings Screen The example in Fig 94. shows: 1080i50 - set to Ref 1 so a 1080i50 signal will use frame sync settings in the 1080i FS tab. 1080i59 - set to Lock to Input so a 1080i59 signal will use delay settings in the 1080i Delay tab. 1080i60 - set to Lock to Input so a 1080i60 signal will use delay settings in the 1080i Delay tab. Issue 5 Rev 2 Page 140 © 2014 Snell Limited Sirius 800 www.snellgroup.com Function Input Rear Panels and Input Modules Function Description XXXX Delay tab (where XXXX is the video standard, eg 1080i Delay) Video standard configuration tabs for Delay Frame Offset* Select the number of frames of video delay. Only available if Sync Function is selected as Frame. If Line is selected then the frame slider is not visible. Line Offset* Select the number of lines of video delay. Only available if Sync Function is selected as Frame. If Line is selected then the frame slider is not visible. Pixel Offset* Select the number of pixels of video delay. Delay ms* Select the video delay in milliseconds. *When setting any one of the above values the other settings will automatically change to reflect the setting being made. Reference Input Loss behavior Table 28. 9.14.1.2 Lock to Input- Select Lock to Input to enable video delay for the video standard. Reference 1 to 4 - Not used for Delay. Freeze Frame - in the event of input signal loss the last good frame is output. Black Screen - in the event of input signal loss a black screen is output. Video Delay Configuration Embedded Audio Delay Embedded audio delay is applied to an audio input channel in steps of 0.25 ms in a range of 0 to 5.46 Seconds. 9.14.1.3 Gain Control and Phase Invert Gain Gain is applied to an audio input channel as Silence (mute) or in steps of 0.1dB in a range of -72 dB to +30 dB. Phase Invert Phase invert will invert the audio waveform. 9.14.1.4 16 Channel Mixer There are 16 Mixers available per video input channel and each mixer can mix up to 16 channels of audio. Each 16 channel mixer is used to mix two or more audio input channels together to create a single mono signal that is output from the mixer. 9.14.1.5 Channel Swap (Shuffle) The channel shuffler is used to change the channel order of one or more of the audio channels. 9.14.2 5919 Connections to the Audio Crosspoints The 5919 video input module creates two identical multiplexed audio transport streams, each of which contains all of the audio channels on the input module (up to 768 mono channels). One transport stream is sent to the main audio crosspoint module and a duplicate transport stream is sent to the redundant audio crosspoint module. Issue 5 Rev 2 Page 141 © 2014 Snell Limited Sirius 800 www.snellgroup.com Input Rear Panels and Input Modules 9.14.3 5919 Input Module LED Information Table 29. shows the LED color code on the 5919 Input Module, and Fig 95. shows the front edge of the input module. LED Color Label Detail Red Green Each Pair of FPGA LEDS: 1 FPGA 1 status 2 FPGA 2 status 3 FPGA 3 status Red Green Red Green Red Green Normal Working Status 4 FPGA 4 status Flashing rapidly between Red & Green (2 Hz each LED) - starting up Green On Solid & Red Off - normal state working correctly Green Off & Red On Solid - FPGA programming fault found. Remove module and refit to force a reboot. Red & Green Flashing very rapidly in sync (4 Hz each LED) - A change has been made to the module settings database in RAM but it has not yet been written to flash memory. This is not a fault and the flash memory will be updated after 10 seconds of no audio setting changes being made. Do not remove power from the module while this indication is present as the flash may become corrupted. Other indications are displayed when performing a firmware upgrade, see the Sirius 800 Maintenance & Upgrade manual for details. Green Power OK Power to the module On Solid - working correctly Flashing - receiving information and working correctly Yellow Receiving messages from local Nucleus Local Command control module (the Nucleus controller in OK this frame) Error with messages from local Nucleus control module (the Nucleus controller in this frame) Red Local Error Off - normal state Flashing - the command message from the router controller is corrupt or hasn’t been received. This communications error could be caused by a hardware failure or incorrect insertion. Check that the module is inserted correctly. If the “Local Error” LED is flashing at the same time as the “Local Command OK” LED is flashing it suggests a mismatch in the configuration of the Nucleus controller. Check the controller configuration. Table 29. Issue 5 Rev 2 5919 Input Module LED Information Page 142 © 2014 Snell Limited Sirius 800 www.snellgroup.com LED Color Label Yellow Detail Normal Working Status Receiving messages from remote Nucleus Remote control module (the Command Nucleus controller in the OK frame linked to this frame) Sirius 830/840/850 (no expansion): Off - Expansion not used. Sirius 850 (expanded to second frame): Flashing - receiving information and working correctly Error with messages from remote Nucleus control module (the Nucleus controller in the frame linked to this frame) Sirius 830/840/850 (no expansion): Off - Expansion not used. Sirius 850 (expanded to second frame): Off - normal state, Flashing - the command message from the remote router controller is corrupt or hasn’t been received. This communications error could be caused by a hardware failure or incorrect insertion. Check that the module is inserted correctly and the four RJ45 connections between the frames are fitted correctly (see section 12.2). Remote Error Red Input Rear Panels and Input Modules If the “Remote Error” LED is flashing at the same time as the “Remote Command OK” LED is flashing it suggests a mismatch in the configuration of the Nucleus controller. Check the controller configuration. Blue/Green Fugue Status CPU status Flashing sequence Green, Green, Blue - normal operation the CPU is programmed and running Brief Red Flash at startup - normal Flashing Red - CPU Error. Remove module and refit to force a reboot. Normal LED Pattern Sequence Amber Eight Diagnostic LEDs Snell Use Only 1. All LEDs On for one Second 2. All LEDs Off except the top LED 3. All LEDs Off except the second LED from the top 4. This sequence continues until all LEDs are Off except for the bottom LED 5. All LEDs Off for 10 Seconds 6. Return to Step 1 Any other pattern - abnormal operation contact Snell Customer Support Table 29. Issue 5 Rev 2 5919 Input Module LED Information Page 143 © 2014 Snell Limited Sirius 800 www.snellgroup.com Input Rear Panels and Input Modules 1 2 3 4 Power OK Local Command OK Local Error Remote Command OK Remote Error Fugue Status Top LED Diagnostic LEDs x 8 Snell use only Bottom LED Fig 95. 5919 Input Module LEDs Issue 5 Rev 2 Page 144 © 2014 Snell Limited Sirius 800 www.snellgroup.com Crosspoint Modules 10. Crosspoint Modules 10.1 Video Crosspoint Modules The Sirius 800 routers all use the same video crosspoint modules with the larger routers fitted with more video crosspoint modules to cope with the higher number of routes that can be set. See section 10.2 for details of the Sirius 830 video crosspoint module arrangement and section 10.3 for the Sirius 840/850 video crosspoint module arrangement. There are two Video Crosspoint Module versions; the 5901 and the 5905. The crosspoint modules are functionally identical and can be mixed within a frame. The 5905 crosspoint module has an SD card slot and three extra LEDs which the 5901 doesn’t have. The Video Crosspoint modules each have a configuration of 288 inputs and 288 outputs. 10.1.1 5901 Sirius 800 Series Video Crosspoint Module LEDs Fig 96. 5901 Video Crosspoint Module Note: Issue 5 Rev 2 • The 5901 video crosspoint module was supplied with earlier Sirius 800 router systems and is shown here for users that already have them fitted. • On newer systems or when spares are required the 5905 video crosspoint module can be used as a direct replacement. see section 10.1.2 for details. Page 145 © 2014 Snell Limited Sirius 800 www.snellgroup.com Crosspoint Modules 10.1.2 5905 Sirius 800 Series Video Crosspoint Module LEDs SD/SDHC Card - Used for upgrading Crosspoint module firmware, see the Sirius 800 Maintenance & Upgrade manual for details. Fig 97. 5905 Video Crosspoint Module Note: Issue 5 Rev 2 • Jumpers and Headers are present on the video crosspoint module and these are for Snell Use Only. • In normal operation no Jumper links or headers are fitted. Page 146 © 2014 Snell Limited Sirius 800 www.snellgroup.com Crosspoint Modules 10.1.3 Video Crosspoint Module LED Information Table 30. shows the LED color code on the Video Crosspoint Modules, and Fig 98. shows the front edge of the module. Note: If the active LED is not illuminated, it is safe to remove the video crosspoint module without affecting any active routes. LED Color Label Red Config R (5905 only) Green Config G (5905 only) Detail FPGA status Status Flashing rapidly between Red & Green (2 Hz each LED) - starting up Green On Solid & Red Off - normal state working correctly Green Off & Red On Solid - FPGA programming fault found. Remove module and refit to force a reboot. Red & Green Flashing very rapidly in sync (4 Hz each LED) - A change has been made to the module settings database in RAM but it has not yet been written to flash memory. This is not a fault and the flash memory will be updated after a period of inactivity. Do not remove power from the module while this indication is present as the flash may become corrupted. Other indications are displayed when performing a firmware upgrade, see the Sirius 800 Maintenance & Upgrade manual for details. Green Green Yellow Power OK Power to the module On Solid - working correctly PAL OK FPGA Working Flashing - the FPGA is working correctly Command OK Command from the Control Flashing - receiving information and module working correctly Command Error Error with command from the Control module Off - normal state Flashing - the command message from the router controller is corrupt or hasn’t been received. If all of the crosspoint modules indicate a Command Error check that the router controller is operating correctly. If only one of the crosspoint modules indicates the error contact Snell Customer Support (see section 1.2 for contact details). Switch Flashes on a take signal when switching a route Off - normal state Flashes - each time a route is set Red Yellow Fugue CPU status Status The LED is approximately (5905 only) 25 mm (1 Inch) from the Blue/Green edge of the board. Table 30. Issue 5 Rev 2 Flashing Green, Green, Blue normal operation, the CPU is programmed and running Brief Flash Red at startup - normal Flashing Red - CPU error. Remove module and refit to force a reboot. Video Crosspoint Module LED Information Page 147 © 2014 Snell Limited Sirius 800 www.snellgroup.com LED Color Red Label Crosspoint Modules Detail Status Xpt Alarm Displays if there is a (5905 only) problem with any crosspoints Xpt Error (5901 only) Off - normal state On solid - problem with one or more crosspoints on the module. Flashing - Crosspoint module overheating, make sure the fan assemblies are all closed and the fans are all operating correctly. Active Route is active on crosspoint Flashing - when this module is routing one or more signals to live outputs. Removing the crosspoint module will disturb the signal(s) passing through the crosspoint module. Route Fail Illuminated if a route failure has been detected on this crosspoint Off - normal state Flashing - receiving error messages related to a route failure Yellow Red Route Fail Active Xpt Error PAL OK Switch Command Error Command OK Video Crosspoint Module LED Information Power OK Table 30. Route Fail Active Command OK Command Error Switch Fugue Status Xpt Alarm PAL OK Power OK Config R Config G 5901 SD/SDHC Card - Used for upgrading Crosspoint module firmware, see the Sirius 800 Maintenance & Upgrade manual for details. 5905 Fig 98. Video Crosspoint Module LEDs Issue 5 Rev 2 Page 148 © 2014 Snell Limited Sirius 800 www.snellgroup.com Crosspoint Modules 10.2 Sirius 830: Video Crosspoint Arrangement The Sirius 830 has two horizontally mounted video crosspoint modules situated near the top of the frame that send signals to the output modules. The lower module is the main video crosspoint module, the upper module is optional and for redundancy. For video crosspoint module locations see section 8.2.1. The 2882 router requires a minimum of one crosspoint module. The redundant crosspoint can take the place of the main crosspoint module in the unlikely event of a failure. If the redundant crosspoint has become active due to the failure of the main crosspoint, the system is no longer redundant. 10.2.1 Sirius 830: Redundant Video Crosspoint Operation The redundant crosspoint design is based around protecting against crosspoint module failure. In normal operation, all the routes pass through the main routing crosspoint module. The redundant signal path algorithm checks the signal paths on the main crosspoint module in turn by configuring the redundant crosspoint module to mimic the main crosspoint module. The algorithm compares the signal standard of each signal path through the main crosspoint module with the signal standard of the equivalent path through the redundant module. The algorithm also compares the signal lock status of each signal as it enters and leaves the main crosspoint module. A difference between the incoming and outgoing signal lock status indicates a route failure. Each signal path is compared in turn until all of the paths on the main module have been checked. Once all of the signal paths have been checked the algorithm repeats the checking process. If the algorithm finds a difference in the signal standard of a path passed by the main and redundant crosspoint modules or if a signal lock status check fails for a route the failure is flagged and the control system can (if configured) move the route to the redundant crosspoint module. If more routes fail then they can also be moved to the redundant crosspoint module. The algorithm will continue to check the crosspoint module for further failures. At this point the crosspoint matrix is still capable of setting all 2882 routes but redundancy protection has been lost. This failure must be addressed immediately to regain redundancy for the crosspoint matrix. Additionally if any one of the following situations occur the router controller will move all routes to the redundant crosspoint module: • The main crosspoint module is removed from the router. • The router controller looses communications with the main crosspoint module. • The crosspoint module reports one or more of its power rails has a fault. To replace the failed crosspoint module all the routes on the failed module must be moved to the redundant crosspoint module, see section 10.4.1 for details. Example: Router pre-configured to move the failed route to the redundant crosspoint module. • Output 1 on the main crosspoint fails: Output 1 on the output module switches to the redundant path • If Output 2 on the main crosspoint fails: Output 2 on the output module switches to the redundant path Note: Issue 5 Rev 2 Any failure needs addressing immediately to retain protection, see section 10.4.1 for details. Page 149 © 2014 Snell Limited Sirius 800 www.snellgroup.com Crosspoint Modules 10.3 Sirius 840/850: Video Crosspoint Arrangement The Sirius 840 router has five crosspoint modules situated below the input modules mounted horizontally, that send signals to the output modules, four are used as actual crosspoint modules, the fifth is optional and for redundancy. For Sirius 840 video crosspoint module locations see section 8.3.1. The Sirius 850 has the same video crosspoint module configuration as the Sirius 840 and also has a second set of video crosspoint modules mounted above the input modules that send signals to the expansion modules, four are used as actual crosspoint modules, the fifth is optional and for redundancy. For Sirius 850 video crosspoint module locations see section 8.3.3. Note: • In order to route any input to any output a minimum of four crosspoint modules must be fitted. • Fitting a fifth crosspoint will give the router redundancy. • Video signals passing through the main crosspoint modules are routed to output channels 1 to 576. • Video signals passing through the expansion crosspoint modules are routed to expansion output channels 577 to 1152. The crosspoint modules are mapped to inputs or outputs as shown in Table 31. The redundant crosspoint module can take the place of any of the four main crosspoints in the unlikely event of a failure. If the redundant crosspoint has become active due to the failure of another crosspoint, the system is no longer redundant. Crosspoint Input Output 1 Odd Odd 2 Even Odd R Any Any 3 Odd Even Even Even 4 Table 31. Sirius 840/850 Crosspoint Arrangement If the redundant video crosspoint module has become active due to a failure of another crosspoint module, the system is no longer redundant. When the failed crosspoint is replaced, the user must move routes from the redundant crosspoint back to the main crosspoint, see section 10.4.1 for details. Issue 5 Rev 2 Page 150 © 2014 Snell Limited Sirius 800 www.snellgroup.com Crosspoint Modules 10.3.1 Sirius 840/850: Redundant Crosspoint Operation The redundant crosspoint design is based around protecting against a single signal path failure. In normal operation, all the routes pass through the four main routing crosspoint modules. The redundant signal path algorithm checks the signal paths on each of the main crosspoint modules in turn by configuring the redundant crosspoint module to mimic the main module being checked. The algorithm compares the signal standard of each signal path through the main crosspoint module with the signal standard of the equivalent path through the redundant module. The algorithm also compares the signal lock status of each signal as it enters and leaves the main crosspoint module. A difference between the incoming and outgoing signal lock status indicates a route failure. Each signal path is compared in turn until all of the paths on the main module have been checked. The algorithm then moves on to check the next main crosspoint module in the same way. If the algorithm finds a difference in the signal standard of a path passed by the main and redundant crosspoint modules or if a signal lock status check fails for a route the failure is flagged and the control system can (if configured) move the route to the redundant crosspoint module. Once this has happened, the redundant crosspoint cannot take the place of any of the other three main crosspoint modules. If more routes fail on the main crosspoint that has already been substituted by the redundant crosspoint, then they can move to the redundant crosspoint. The algorithm will continue to check the crosspoint module with the failure for further failures. The other three main crosspoint modules are no longer checked. At this point the crosspoint matrix is still capable of setting all 5762 routes but redundancy has been lost. This failure must be addressed immediately to regain redundancy for the crosspoint matrix. Additionally if any one of the following situations occur the router controller will move all routes to the redundant crosspoint module: • A main crosspoint module is removed from the router. • The router controller looses communications with a main crosspoint module. • A crosspoint module reports one or more of its power rails has a fault. To replace a failed crosspoint module all the routes on the failed module must be moved to the redundant crosspoint module, see section 10.4.1 for details. Checking of all of the main crosspoint modules will be resumed when the failed crosspoint module has been replaced. Example: Router pre-configured to move the failed route to the redundant crosspoint module. • Output 1 on Main Crosspoint 1 fails: Output 1 on the output module switches to the redundant path • Output 7 on Main Crosspoint 1 fails: Output 7 on the output module switches to the redundant path Note: Issue 5 Rev 2 Any failure needs addressing immediately to retain protection, see section 10.4.1 for details. Page 151 © 2014 Snell Limited Sirius 800 www.snellgroup.com Crosspoint Modules 10.4 Video Crosspoint Failure If Video Redundancy is enabled (see section 10.2) and a video crosspoint routing failure is detected by the redundant crosspoint checking algorithm the Nucleus router controller performs one of the following actions based on the configuration in Workbench (see section 10.7 for details on changing this setting): • Move the failed route to the redundant crosspoint (default when shipped). • Move all routes from the crosspoint module with the failure to the redundant crosspoint module • Just notify the user and leave them to take appropriate action. Note: • Any failure needs addressing immediately to retain protection. • For information on replacing the failed crosspoint card see section 10.4.1. • Following a change in source for a given output (routing change) it can take several seconds to check the Sirius 800 redundancy. It is assumed that it is okay until this is done and so no alarm is flagged during this checking period. 10.4.1 Replacing a Failed Video Crosspoint Module using the Door PC Note: • The fan assembly should be placed back into the closed position as soon as possible after opening, as this ensures correct ventilation of the frame. Failure to do this will result in failure. • In practice the maximum time that a fan assembly can be left open will depend on a number of factors such as; ambient temperature, frame loading, crosspoint routings, etc. To ensure correct operation under all conditions the fan assemblies should be left open for no more than 4 minutes at a time. • Take care not to trap any cables when opening and closing the fan door. If one or more routes fail on a video crosspoint module this will be displayed on the Main or Expansion Video Crosspoint Matrix Status screen. Sirius 830 - see Fig 34. on page 64 for button and parameter locations. Sirius 840/850 - see Fig 35. on page 65 for button and parameter locations. A typical example of how the buttons will look is listed below.: • • Fail Found indicator - Red • Fault Present indicator - Red • First Failure Detected - Failed Source and Destinations will display the first failed route • XpntCardNone - Grey Sirius 830 • • Sirius 840/850 • Issue 5 Rev 2 XpntCardMain830 Yellow (indicates the crosspoint has failed) XpntCardxxxToxxx_x - Yellow (where xxx is the failed crosspoint module) Page 152 © 2014 Snell Limited Sirius 800 www.snellgroup.com Crosspoint Modules 1. Touch the Free Failed Crosspoint button to move all of the routes from the failed video crosspoint module to the redundant video crosspoint if Workbench has not been configured to do this automatically. 2. Check that the “Active” LED on the failed video crosspoint module is off and then remove the failed video crosspoint module (see section 10.1.3 for the location of the Active LED). 3. Replace the failed video crosspoint module with a replacement working crosspoint module. 4. The replacement video crosspoint module is automatically tested and the Fault Present indicator will change back to Green if the replacement is fully working. 5. Touch the Fault Fixed button to move all of the routes from the redundant video crosspoint module to the fixed video crosspoint module. • The Main or Expansion Video Crosspoint Matrix Status screen should now return to its working state: Sirius 830 - see Fig 34. on page 64 for button and parameter locations. Sirius 840/850 - see Fig 35. on page 65 for button and parameter locations. • • Issue 5 Rev 2 • Fail Found indicator - Green • Fault Present indicator - Green • First Failure Detected - Failed Source and Destinations will both be reset to Zero • XpntCardNone - Yellow Sirius 830 • XpntCardRedundant830 - Grey • XpntCardMain830 - Grey Sirius 840/850 • XpntCardOddToOdd_1 - Grey • XpntCardEvenToOdd_2 - Grey • XpntCardRedundant_R - Grey • XpntCardOddToEven_3 - Grey • XpntCardEvenToEven_4 - Grey Page 153 © 2014 Snell Limited Sirius 800 www.snellgroup.com Crosspoint Modules 10.5 5903 Sirius 800 Audio Crosspoint Module The 5903 Audio Crosspoint modules each have a maximum configuration of 36864 inputs by 18432 outputs. The maximum number of audio crosspoints that can be used on each audio crosspoint module varies depending on which router the audio crosspoint module is mounted in, see Table 32. Router Maximum Number of Audio Crosspoints Sirius 830 9216 inputs by 9216 outputs Max. Sirius 840 18432 inputs by 18432 outputs Max. Sirius 850 (Not Expanded) 18432 inputs by 18432 outputs Max. Sirius 850 (Expanded, two frame system) 18432 inputs by 18432 outputs Max. Table 32. Maximum Number of Audio Crosspoints There are two horizontally mounted audio crosspoint modules that send signals to the output modules. • Sirius 830 - For audio crosspoint module locations see section 8.2. • Sirius 840 - For audio crosspoint module locations see section 8.3. • Sirius 850 - For audio crosspoint module locations see section 8.3.3. The left hand 5903 is the main audio crosspoint module when the router is powered on and the right hand 5903 is optional for redundancy. Connectors to the Motherboard LEDs SD/SDHC Card - Used for upgrading the Audio Crosspoint module firmware, see the Sirius 800 Maintenance & Upgrade manual for details. Fig 99. 5903 Crosspoint Module Note: Issue 5 Rev 2 • Jumpers and Headers are present on the audio crosspoint module and these are for Snell Use Only. • In normal operation no Jumper links or headers are fitted. Page 154 © 2014 Snell Limited Sirius 800 www.snellgroup.com Crosspoint Modules 10.5.1 5903 Audio Crosspoint Module LED Information Table 33. shows the LED color code for the LEDs at the front of the 5903 Audio Crosspoint module, and Fig 100. shows the front edge of the module. CLK Master Route Fail Route Active Command Error SD/SDHC Card - Used for upgrading Crosspoint module firmware, see the Sirius 800 Maintenance & Upgrade manual for details. Command OK If the Route Active LED is not illuminated, it is safe to remove the crosspoint module without affecting any active routes (see section 10.5.5 for details). Power OK Note: Reset button located behind the Route Fail and CLK Master LEDs 5903 Fig 100. 5903 Sirius 800 Audio Crosspoint Module LEDs LED Color Function Green Power OK Power to the module On Solid - working correctly Status Flashing rapidly between Red & Green (2 Hz each LED) - starting up Green On Solid & Red Off - normal state working correctly Green Off & Red On Solid - FPGA programming fault found. Remove module and refit to force a reboot. Red Config R (located behind the Power OK LED) Green Config G (located behind the Power OK LED) Yellow Command OK Command from the Control module Red Command Error Off - normal state. Error with command Flashing - the command message from the from the Control router controller is corrupt or hasn’t been module received. Green Red Table 33. Issue 5 Rev 2 Detail FPGA status Other indications are displayed when performing a firmware upgrade, see the Sirius 800 Maintenance & Upgrade manual for details. Flashing - receiving information and working correctly Route Active Route is active on crosspoint On - if any signal is routed through this crosspoint module. Removing the crosspoint module will disturb the signal(s) passing through the crosspoint module. Off - no signal is present on this crosspoint module. Route Fail One or more audio transport streams have failed Off - normal state Flashing - there is a fault with one or more audio transport streams passing through the crosspoint module. For details on replacing the crosspoint module see section 10.5.5. 5903 Audio Crosspoint Module LED Information Page 155 © 2014 Snell Limited Sirius 800 www.snellgroup.com LED Color Function Detail Crosspoint Modules Status The 5903 module either generates the audio system clock or uses the clock generated on the other crosspoint (if fitted). In normal operation the main crosspoint module generates the audio system clock and the redundant crosspoint module is slaved to that. Green CLK Master Clock Master On - this crosspoint module is supplying the audio system clock. Off - this crosspoint module’s clock is slaved to the other crosspoint module. Note: If the 5903 module supplying the audio system clock fails then it is important that clock generation is moved to the working crosspoint before the failed crosspoint is replaced (see section 10.5.5 for details). Table 33. 5903 Audio Crosspoint Module LED Information 10.5.2 Sirius 800 Audio Crosspoint Arrangement The Sirius 800 routers have two horizontally mounted audio crosspoint modules that send audio signals to the output modules. The 5903 audio crosspoint module is used with the audio capable input (4915, 5919 and 5915) and output modules (4929, 5949, 4925 and 5925). For audio crosspoint module locations see section 8.2.1 (Sirius 830), section 8.3.1 (Sirius 840) or section 8.3.3 (Sirius 850). The router requires a minimum of one audio crosspoint module. The optional redundant crosspoint module can take the place of the main crosspoint module in the event of a failure. If the redundant crosspoint module has become active due to a failure on the main crosspoint module, the system is no longer redundant. 10.5.3 Audio Crosspoint Operation Each audio capable input module (4915, 5919 and 5915) creates two identical multiplexed audio transport streams, each of which contains all of the audio channels on the input module (up to 768 mono channels). One transport stream is sent to the main audio crosspoint module and a duplicate transport stream is sent to the redundant audio crosspoint module. Similarly each audio crosspoint module generates a multiplexed audio transport stream (up to 768 mono channels) to each audio capable output module (4929, 5949, 4925 and 5925). Each of the output modules receives one transport stream from each of the audio crosspoint modules. 10.5.4 Redundant Audio Crosspoint Operation The redundant crosspoint design is based around protecting against crosspoint module failure. In normal operation all of the routes pass through both crosspoint modules and the individual output modules will use the audio signals from the main crosspoint module. If an output module detects an error in the transport stream from the main audio crosspoint module or if the stream is not present it will use the transport stream from the redundant audio crosspoint module. The Route Fail LED on the audio crosspoint module with the failure will flash red, see section 10.5.1 for the location of the status LEDs. At this point the crosspoint matrix is still capable of setting all audio routes but redundancy protection has been lost. This failure must be addressed immediately to regain redundancy for the crosspoint matrix. Issue 5 Rev 2 Page 156 © 2014 Snell Limited Sirius 800 www.snellgroup.com Crosspoint Modules For example: • If Audio Output 1 on the main crosspoint fails: The output module that Audio Output 1 is routed to selects the redundant crosspoint audio transport stream. • If Audio Output 2 on the main crosspoint fails: The output module that Audio Output 2 is routed to selects the redundant crosspoint audio transport stream. Note: • Any failure needs addressing immediately to retain protection. • For information on replacing the failed crosspoint card see section 10.5.5 below. 10.5.5 Replacing a Failed Audio Crosspoint Module A failed audio crosspoint module can be replaced by either using the Door PC to move the routes from the failed module to the working module or without using the Door screen. Both methods are described in this section. • Replacing an audio crosspoint module using the Door PC, see section 10.5.5.1. or • 10.5.5.1 Replacing an audio crosspoint module without using the Door PC, see section 10.5.5.2. Replacing an Audio Crosspoint Module using the Door PC If one or more routes fail on a video crosspoint module this will be displayed on the Audio Crosspoint Matrix Status screen. A typical example of how the buttons will look is listed below (see Fig 36. on page 69 for button and parameter locations): Note: Fail Found indicator - Red • Fault Present indicator - Red • First Failure Detected - Failed Incoming Stream and/or Failed Outgoing Stream will display the first failed stream(s) • XpntCardNone - Grey • XpntCardRedundant: Grey • XpntCardMain: Yellow (indicates the main audio crosspoint has failed) 1. Touch the Free Failed Crosspoint button to move all of the routes from the failed audio crosspoint module to the other audio crosspoint module. • The fan assembly should be placed back into the closed position as soon as possible after opening, as this ensures correct ventilation of the frame. Failure to do this will result in failure. • In practice the maximum time that a fan assembly can be left open will depend on a number of factors such as; ambient temperature, frame loading, crosspoint routings, etc. To ensure correct operation under all conditions the fan assemblies should be left open for no more than 4 minutes at a time. • Take care not to trap any cables when opening and closing the fan door. 2. Issue 5 Rev 2 • Open the router door and then open the fan door to locate the audio crosspoint modules. Page 157 © 2014 Snell Limited Sirius 800 www.snellgroup.com 10.5.5.2 Note: Crosspoint Modules 3. Check that the “Route Active” LED on the failed audio crosspoint module is off and then remove the failed audio crosspoint module (see section 10.5.1 for the location of the Route Active LED). 4. Replace the failed audio crosspoint module with a replacement working crosspoint module and close and secure the fan door and router door. 5. The replacement audio crosspoint module is automatically tested and the Fault Present indicator will change back to Green if the replacement is fully working. 6. Touch the Fault Fixed button to move all of the routes from the redundant crosspoint module to the replacement audio crosspoint module. 7. The Audio Crosspoint Matrix Status screen should now return to its working state (see Fig 36. on page 69 for button and parameter locations): • Fail Found indicator - Green • Fault Present indicator - Green • First Failure Detected - Failed Incoming Stream and Failed Outgoing Stream will be reset to 0 • XpntCardNone - Yellow • XpntCardRedundant - Grey • XpntCardMain - Grey Replacing an Audio Crosspoint Module without using the Door PC • The fan assembly should be placed back into the closed position as soon as possible after opening, as this ensures correct ventilation of the frame. Failure to do this will result in failure. • In practice the maximum time that a fan assembly can be left open will depend on a number of factors such as; ambient temperature, frame loading, crosspoint routings, etc. To ensure correct operation under all conditions the fan assemblies should be left open for no more than 4 minutes at a time. • Take care not to trap any cables when opening and closing the fan door. 1. Open the router door and then open the fan door to locate the audio crosspoint modules. Identify the faulty audio crosspoint module, the “Route Fail” LED will be flashing Red (see section 10.5.1 for the location of the status LEDs). 2. Press the Reset button on the failed audio crosspoint module (Fig 100. on page 155) so that the working crosspoint module uses its own audio system clock. CLK Master LED = On for the working audio crosspoint module, see section 10.5.1 for the location of the “CLK Master” LED. Issue 5 Rev 2 3. The faulty audio crosspoint module can be hot swapped for a working audio crosspoint module without causing any disturbance to audio on the router. 4. Close and secure the fan door and router door. Page 158 © 2014 Snell Limited Sirius 800 www.snellgroup.com Crosspoint Modules 10.6 Enabling/Disabling Video/Audio Redundancy 10.6.1 Video Redundancy The video redundant crosspoint algorithm is enabled or disabled by using the Generic Configuration Editor. See the Workbench manual for information on using the Generic Configuration editor. Nucleus2 (2463) Controller Navigate to: Devices | Devices[1]: LocalRouterDevice | LocalRouterControl | RouterSpecificControl: Sirius800Control | RedundantXpntControl | Enable = True Nucleus (2450) Controller Navigate to: Control2450| CommonControl|RouterSpecificControl: Sirius800Control | RedundantXpntControl | Enable = True Select the required action from the drop down menu: Note: Important: Issue 5 Rev 2 • Redundant crosspoint algorithm enabled = True • Redundant crosspoint algorithm disabled = False • Sirius 850 single frame: Enabling video redundancy will enable redundancy for the main and expansion crosspoint modules in the router (if fitted). • Sirius 850 dual frame systems: Enabling video redundancy in frame one will enable redundancy for the main crosspoint modules mounted in frame one and the expansion crosspoint modules mounted in frame two. The reverse is true for frame two. In a dual frame system if redundancy is enabled in one frame it must also be enabled in the other frame. • If video redundancy is enabled or disabled the configuration must be pushed by Workbench to the controller for the new setting to take effect. • If the action on fail setting (see section 10.7) for video or audio needs to be changed make these changes at the same time and only one push is then required. • In a dual controller system use the Push Config to Controller(s) button in Workbench to make sure both controllers are set the same. Page 159 © 2014 Snell Limited Sirius 800 www.snellgroup.com Crosspoint Modules 10.6.2 Audio Redundancy - Nucleus2 2463 Controller Only The audio redundant crosspoint algorithm is enabled or disabled by using the Online Editor. See the Workbench manual for information on using the Online Editor. Nucleus2 (2463) Controller Navigate to: Devices | Devices[1]: LocalRouterDevice | LocalRouterControl | RouterSpecificControl: Sirius800Control | RedundantAudioXpntControl | Enabled = True Select the required action from the drop down menu: Important: Issue 5 Rev 2 • Redundant crosspoint algorithm enabled = True • Redundant crosspoint algorithm disabled = False • If audio redundancy is enabled or disabled the controller must be reset for the new setting to take effect. • If the action on fail setting (see section 10.7) for video or audio needs to be changed make these changes at the same time and only one database push is then required. • In a dual controller system both controllers must have the same redundancy settings. Page 160 © 2014 Snell Limited Sirius 800 www.snellgroup.com Crosspoint Modules 10.7 Configuring Video/Audio Crosspoint Failure Action The action on crosspoint failure for video and audio are set from the Workbench controller online editor. See the Workbench manual for information on using the online editor. Nucleus2 (2463) Controller Navigate to: Devices | Devices[1]: LocalRouterDevice | LocalRouterControl | RouterSpecificControl: Sirius800Control Nucleus (2450) Controller Navigate to: Control2450| CommonControl|RouterSpecificControl: Sirius800Control | Nucleus2 (2463) & Nucleus (2450) Controllers Video navigate to: | RedundantXpntControl | ActionOnFail = MoveFailedRoute| Select the required action from the drop down menu: • NoAction = Notify the user and leave them to take appropriate action • MoveFailedRoute = Move the failed route to the redundant crosspoint (default when shipped) • MoveAllRoutes = Move all routes from the crosspoint with the failure to the redundant crosspoint Audio (2463 only) navigate to: | RedundantAudioXpntControl | FailedAction = MoveFailedStream| Select the required action from the drop down menu: Important: Issue 5 Rev 2 • MoveFailedStream = Move the failed stream to the redundant crosspoint (default when shipped) • MoveAllStreams = Move all streams from the crosspoint with the failure to the redundant crosspoint • If the video or audio action on fail setting is changed the controller must be reset for the new settings to take effect. • If video or audio redundancy is enabled or disabled (see section 10.6) make these changes at the same time and push the configuration to the controller using Workbench, a reset is not be required after the push. • In a dual controller system both controllers must have the same redundancy settings. Page 161 © 2014 Snell Limited Sirius 800 Issue 5 Rev 2 www.snellgroup.com Crosspoint Modules Page 162 © 2014 Snell Limited Sirius 800 www.snellgroup.com Output Modules and Output Rear Panels 11. Output Modules and Output Rear Panels 11.1 4929 Sirius 800 Audio AES/MADI Output Module with Audio Delay Important: Early Sirius 800 routers must be modified by Snell before they can be used with the 4929. See section 3.11 to check if the router needs modifying. The 4929 Sirius 800 Audio AES/MADI output module with audio delay can transmit either 120 AES outputs (balanced or unbalanced) with up to 3 MADI output channels or 12 channels of MADI outputs depending on the rear panel fitted. The 4929 Output Module is compatible with the rear panels listed in Table 34. Rear Panel See Section Up to 120 AES outputs and up to 3 MADI output channels: 1353 Balanced AES + HD BNC MADI rear panel See section 11.8 1356 Unbalanced AES + HD BNC MADI rear panel See section 11.9 1298 Balanced AES rear panel (no MADI) - No longer supplied See Appendix B.4.1 Up to 12 MADI output channels: 1295 MADI Output BNC rear panel See section 11.6 1296 MADI Output Fiber rear panel See section 11.7 Table 34. 4929 Rear Panel Compatibility Fugue LED PL2 - Link fitted across two pins closest to LEDs LEDs Connectors to the 1353, 1356, 1295, 1296 or 1298 Rear Modules Firmware/Licensing SD/SDHC Card (see the Sirius 800 Maintenance & Upgrade manual for details) Fig 101. 4929 120 Channel AES/MADI Output Module Note: Issue 5 Rev 2 • Jumpers and Headers are present on the audio output module and these are for Snell Use Only. • In normal operation no jumper links or headers are fitted except for PL2 which has a link fitted across the two pins closest to the LEDs on the front of the module. Page 163 © 2014 Snell Limited Sirius 800 www.snellgroup.com Output Modules and Output Rear Panels 11.1.1 Duplicate MADI Outputs When fitted with the 1295 or 1296 MADI rear panels the 4929 module outputs 12 MADI channels and a further 12 duplicate MADI channels. The main and backup connections are shown in the rear panel diagrams listed below: Rear Panel See Figure Number 1295 BNC rear panel See Fig 117. on page 188. 1296 Fiber rear panel See Fig 118. on page 189. Table 35. MADI Main and Backup Connections 11.1.2 Configuring MADI to 56 or 64 Channels Individual MADI channels are configured to output in 56 or 64 channel MADI using the Workbench Online Editor. 2463 Nucleus2 Router Control Module Navigate to: Controller | Devices | Devices[1]: LocalRouterDevice | LocalRouterConfig | ModuleConfigurations | ModuleConfiguration[XXX]: AudioOutput | MADIControl | MADIControl[YY] | Format= Where: XXX= the Module ID of the Audio Output Module (see the Workbench manual for details) YY = the MADI channel (1 to 12) being configured Select the number of MADI channels from the drop down menu: Note: Issue 5 Rev 2 • MADI56 = configures the MADI channel to 56 channels • MADI64 = configures the MADI channel to 64 channels Ensure both 2463 router control modules are configured the same by using the Copy to Partner function in Workbench once configurations changes have been made. Page 164 © 2014 Snell Limited Sirius 800 www.snellgroup.com Output Modules and Output Rear Panels 11.1.3 AES Audio Outputs • Up to 120 balanced or unbalanced AES outputs (dependant on rear panel fitted) • Re-generates the AES clock from incoming data (nominal 48 kHz) • VU&C (Validity, User and Channel status) flags are regenerated to a default standard on each channel when re-aligning audio. (See Table 105. on page 327 for default standard details). • Pass asynchronous audio or Dolby E transparently at the original sample rate. • Asynchronous channels pass VU&C data transparently (parity is recalculated for each output). • Up to 3 MADI outputs are also available on HD BNC connectors (with correct rear panels, see section 11.10 for details) • Up to 64 channels of audio per MADI output 11.1.4 MADI Audio Outputs To connect MADI audio outputs from a 4929 input module it must be used with either a 1295 BNC or 1296 Fiber rear panel. • Note: Issue 5 Rev 2 Up to 12 MADI outputs, (one main and one duplicate output of each channel). When fiber SFP modules are used the main and duplicate MADI outputs span two separate SFP modules to guard against an SFP failure, see section 11.7 for details. • Up to 64 channels of audio per MADI output. • Maximum of 768 (12 x 64) audio channels per 4929 audio output module. • MADI streams are generated locked to the AES reference. All audio must be synchronous for fully transparent operation. Re-generate VU&C data. (See Table 105. on page 327 for default standard details). • Asynchronous AES channels will be added to the MADI using drop/repeat techniques. • Asynchronous Dolby E will not pass error free through MADI outputs. Page 165 © 2014 Snell Limited Sirius 800 www.snellgroup.com Output Modules and Output Rear Panels 11.1.5 Audio Processing on the Output Module The 4929 audio output module can manipulate the audio channels received from the audio crosspoint before outputting them. Note: • Sample Rate Conversion (SRC) is a licensed option and must be purchased for each module it is used on (See section 3.5 for details). • The audio processing functions allow delay, gain control, phase invert and stereo mode (left/right swap, left both, right both or mono mix). The audio processing is standard for each audio module. Audio processing is controlled from Workbench, RollCall or RollPod panels. Fig 102. and Fig 103. show the order that the processing is applied to the audio signals. *Input/Output Monitoring selected from either the input or the output of the module (pre or post processing). See section 5.6.3 for details on how to configure this using the router Door screen. Fig 102. Audio Channel Processing Block Diagram (AES Rear Panel) *Input/Output Monitoring selected from either the input or the output of the module (pre or post processing). See section 5.6.3 for details on how to configure this using the Fig 103. Audio Channel Processing Block Diagram (MADI Rear Panel) Issue 5 Rev 2 Page 166 © 2014 Snell Limited Sirius 800 www.snellgroup.com 11.1.5.1 Output Modules and Output Rear Panels Audio Delay Delay is applied to an audio output channel in steps of 0.25 ms: 11.1.5.2 • MADI - in a range of 0 to 2 Seconds @ 48 kHz • AES - in a range of 0 to 2 Seconds @ 48 kHz Sample Rate Conversion Sample Rate Conversion (SRC) allows the sample rate of audio from the audio crosspoint to be converted to a different sample rate and output from the 4929 module. The following figures show the SRC section of the Workbench audio output processing screens for both AES and MADI. Fig 104. Example Workbench AES Audio Processing Screen Showing SRC Settings Fig 105. Example Workbench MADI Audio Processing Screen Showing SRC Settings SRC Operation • The audio outputs use sample rate converted to one of five references: • Ref 1 - Derived Reference 1 (Video) • Ref 2 - Derived Reference 2 (Video) • Ref 3 - Derived Reference 3 (Video) • Ref 4 - Derived Reference 4 (Video) • Ref 5 - AES Reference input • Supported input sample rates from the audio crosspoint: 32 kHz, 44.1 kHz or 48 kHz • AES - Sample rate conversion is applied to groups of eight audio pairs rather than individual channels. All selected pairs in the group will be synchronous to each other and output at the same selected sample rate. Deselected pairs will pass through with their sample rates unchanged. • Issue 5 Rev 2 Supports conversion to: 32 kHz, 44.1 kHz or 48 kHz Page 167 © 2014 Snell Limited Sirius 800 www.snellgroup.com Note: • Output Modules and Output Rear Panels • When sample rate converting AES to 44.1 kHz the output must be locked to a 44.1 kHz AES reference. • When sample rate converting AES to 32 kHz or 48 kHz the output can be locked to any video reference or to the AES reference (but not an AES reference of 44.1 kHz). MADI - Sample rate conversion is applied to all pairs in the MADI output stream rather than individual channels. All pairs in the MADI stream will be synchronous to each other and output at the same selected sample rate. • Supports conversion to: 48 kHz • Channels within a pair must be the same initial sample rate and synchronous to each other. If they are asynchronous to each other then sample drop or repeat is used on the right channel to match the left channel. • Pairs within an AES group or MADI output stream can be asynchronous to each other and can be different sample rates to each other when they enter the sample rate conversion process. • The output from the sample rate conversion can be locked to the AES reference input or one of the four physical video reference inputs. • If no reference signal is present on the selected reference input all the SRCs on the 4929 module using that reference input will be free running and independent of any other module in the frame. Dolby Signals • Dolby signals must be routed as a synchronous AES pair. The Dolby signal will automatically bypass the SRC even if the pair is selected for sample rate conversion. Any near rate reference locking is achieved by dropping or repeating Null samples in the guard band. Example SRC mode (AES) SRC settings required to convert a group of eight AES pairs to 44.1 kHz locked to the AES reference (See Fig 104. on page 167 for setting locations): SRC Rate: 44.1 K SRC Reference: Ref 5 (must be 44.1 kHz) SRC Enable: Checked Use SRC: Checked for each of the eight pairs Example SRC mode (MADI) SRC settings required to convert a MADI stream to 48 kHz locked to video reference 2 (See Fig 105. on page 167 for setting locations): SRC Rate: 48 K SRC Reference: Ref 2 SRC Enable: Checked Use SRC: Checked Issue 5 Rev 2 Page 168 © 2014 Snell Limited Sirius 800 www.snellgroup.com Output Modules and Output Rear Panels SRC straight through mode • Note: If an AES pair doesn't have sample rate conversion enabled (Use SRC unchecked) and doesn’t have a reference selected (Reference Disabled) then that pair will be output at the same sample rate as the left channel of the pair. In the case of a MADI stream all of the pairs will be output at the same sample rate as the first active channel of the MADI stream. • The maximum sample rate that can be input to the SRC in straight through mode is 50 kHz. • AES - If channels within a pair are asynchronous to each other then sample drop or repeat is used on the right channel to match the left channel. • MADI - If channels from the audio crosspoint are asynchronous to each other then sample drop or repeat is used on all channels to match the first active channel in the MADI stream. Example SRC straight through mode (AES) SRC settings required for SRC straight through mode for one or more of a group of eight AES pairs (See Fig 104. on page 167 for setting locations): SRC Rate: Any SRC Reference: Disabled SRC Enable: Checked Use SRC: Unchecked for the pair(s) required to work in SRC straight through mode Example SRC straight through mode (MADI) SRC settings required for straight through mode for a MADI stream (See Fig 105. on page 167 for setting locations): SRC Rate: Any SRC Reference: Disabled SRC Enable: Checked Use SRC: Unchecked Issue 5 Rev 2 Page 169 © 2014 Snell Limited Sirius 800 www.snellgroup.com Output Modules and Output Rear Panels Reference lock only mode • A group of pairs or a MADI stream can be locked to the AES reference or one of the four physical video reference inputs without sample rate conversion being enabled. • Note: If no reference signal is present on the selected reference input all the SRCs on the 4929 module using that reference input will be free running and independent of any other module in the frame. • AES - If channels within a pair are asynchronous to each other then sample drop or repeat is used on the right channel to match the left channel. • MADI - If channels from the audio crosspoint are asynchronous to each other then sample drop or repeat is used on all channels to match the first active channel in the MADI stream. Example reference lock only mode (AES) SRC settings required for reference lock only mode on a group of eight AES pairs locked to video reference 1 (See Fig 104. on page 167 for setting locations): SRC rate: Any SRC Reference: Ref 1 SRC Enable: Unchecked Use SRC: Unchecked Example reference lock only mode (MADI) SRC settings required for reference lock only mode on a MADI stream locked to the AES reference (See Fig 105. on page 167 for setting locations): SRC Rate: Any SRC Reference: Ref 5 SRC Enable: Unchecked Use SRC: Unchecked Issue 5 Rev 2 Page 170 © 2014 Snell Limited Sirius 800 www.snellgroup.com 11.1.5.3 Output Modules and Output Rear Panels Gain Control and Phase Invert Gain Gain is applied to an audio output channel as Silence (mute) or in steps of 0.1dB in a range of -72 dB to +30 dB. Phase Invert Phase invert will invert the audio waveform. 11.1.5.4 Stereo Mode Stereo Mode is used to manipulate stereo pairs. Options include: Left/Right Swap, Left Both, Right Both and Mono Mix. Left/Right Swap Left/Right swap is used to swap the two audio channels of an AES pair over. Left Both & Right Both Left Both and Right Both are used to duplicate the selected channel of a stereo pair and pass the two identical channels out of the router in place of the original pair. Mono Mix Mono Mix is used to mix a stereo pair together to create a single mono signal. This single mono signal is passed out of the router on both of the original channels. A+B ------------2 11.1.6 4929 Connections to the Audio Crosspoints The Mono Mix is: The 4929 audio output module receives two identical multiplexed audio transport streams, each of which contains all of the audio channels on the output module (up to 768 mono channels). One transport stream is received from the main audio crosspoint module and a duplicate transport stream is received from the redundant audio crosspoint module. The output module monitors the transport streams received from each of the audio crosspoint modules for errors. If an error is found the output module will use the transport stream from the other audio crosspoint module if it is fitted. Important: Issue 5 Rev 2 • Due to the nature of multiplexed audio transport streams there is an extremely small delay between groups of channels as the transport stream is constructed. If the audio is locked to the input these delays will need to be considered. • If the audio is locked to an external reference or is sample rate converted these delays are managed by the router and the audio will remain co-timed. Page 171 © 2014 Snell Limited Sirius 800 www.snellgroup.com Output Modules and Output Rear Panels 11.1.7 4929 Output Module LED Information Table 36. shows the LED color code on the 4929 Output Module, and Fig 106. shows the front edge of the output module. LED Color Label Detail Normal Working Status Fugue Status CPU status Blue/Green Red Green LED R LED G FPGA status Flashing sequence Green, Green, Blue - normal operation the CPU is programmed and running Brief Red Flash at startup - normal Flashing Red - CPU Error. Remove module and refit to force a reboot. Flashing rapidly between Red & Green (2 Hz each LED) - starting up Green On Solid & Red Off - normal state working correctly Green Off & Red On Solid - FPGA programming fault found. Remove module and refit to force a reboot. Red & Green Flashing very rapidly in sync (4 Hz each LED) - A change has been made to the module settings database in RAM but it has not yet been written to flash memory. This is not a fault and the flash memory will be updated after 10 seconds of no audio setting changes being made. Do not remove power from the module while this indication is present as the flash may become corrupted. Other indications are displayed when performing a firmware upgrade, see the Sirius 800 Maintenance & Upgrade manual for details. Green Power OK Power to the module On Solid - working correctly Command OK Receiving messages from local Nucleus control module (the Nucleus controller in this frame) Flashing - receiving information and working correctly Error Error with messages from local Nucleus control module (the Nucleus controller in this frame) Off - normal state Flashing - the command message from the router controller is corrupt or hasn't been received. Yellow Red This communications error could be caused by a hardware failure or incorrect Insertion. Check that the module is inserted correctly. If the “Error” LED is flashing at the same time as the “Command OK” LED is flashing it suggests a mismatch in the configuration of the Nucleus controller. Check the controller configuration. Table 36. Issue 5 Rev 2 4929 Output Module LED Information Page 172 © 2014 Snell Limited Sirius 800 www.snellgroup.com LED Color Label Green Green Green Green Green Table 36. Output Modules and Output Rear Panels Detail Normal Working Status Video Ref 1 External Video Reference 1 Status On Solid - external video reference present and local oscillators locked. Off - external video reference not present. Video Ref 2 External Video Reference 2 Status On Solid - external video reference present and local oscillators locked. Off - external video reference not present. Video Ref 3 External Video Reference 3 Status On Solid - external video reference present and local oscillators locked. Off - external video reference not present. Video Ref 4 External Video Reference 4 Status On Solid - external video reference present and local oscillators locked. Off - external video reference not present. AES Ref External AES Reference Status On Solid - external AES reference present and local oscillators locked. Off - external video reference not present. 4929 Output Module LED Information Fugue Status LED R LED G Power OK Command OK Error Video Ref 1 Video Ref 2 Video Ref 3 Video Ref 4 AES Ref Fig 106. 4929 Output Module LEDs Issue 5 Rev 2 Page 173 © 2014 Snell Limited Sirius 800 www.snellgroup.com Output Modules and Output Rear Panels 11.2 5926 Sirius 800 Standard Video Output Module (Non Expandable) The 5926 Sirius 800 standard video output module with re-clocking has 24 video output channels and can handle SD, ASI and HD signals up to 3Gb/s. Note: Sirius 850: If video expansion is required from a second Sirius 850 frame use the 5938 video output module, See section 12.3. Connectors to the Motherboard LEDs Connectors to the 1294 or 1302 Rear Modules Fig 107. 5926Sirius 800 Standard Video Output Module (Non Expandable) Note: • Jumpers and Headers are present on the video output module and these are for Snell Use Only. • In normal operation no jumper links or headers are fitted. The 5926 video output module is compatible with the 1294 BNC rear panel (See section 11.4) and the 1302 Fiber rear panel (See section 11.5). Issue 5 Rev 2 Page 174 © 2014 Snell Limited Sirius 800 www.snellgroup.com Output Modules and Output Rear Panels 11.2.1 5926 Output Module LED Information Table 37. shows the LED color code on the 5926 Output Module, and Fig 108. shows the front edge of the output module. LED Color Label Green Yellow Detail Normal Working Status Power OK Power to the module On Solid - working correctly Local Command OK Flashing - receiving information Receiving messages from local Nucleus control module and working correctly (the Nucleus controller in this frame) Local Command Error Error with messages from local Nucleus control module (the Nucleus controller in this frame) Off - normal state Flashing - the command message from the router controller is corrupt or hasn't been received. This communications error could be caused by a hardware failure or incorrect insertion. Check that the module is inserted correctly. Red If the “Local Command Error” LED is flashing at the same time as the “Local Command OK” LED is flashing it suggests a mismatch in the configuration of the Nucleus controller. Check the controller configuration. Yellow Remote Command OK Receiving messages from local Nucleus control module (the Nucleus controller in the frame linked to this frame) Flashing - receiving information and working correctly Remote Error Error with messages from local Nucleus control module (the Nucleus controller in the frame linked to this frame) Off - normal state Flashing - the command message from the router controller is corrupt or hasn't been received. This communications error could be caused by a hardware failure or incorrect Insertion. Check that the module is inserted correctly. Red If the “Error” LED is flashing at the same time as the “Command OK” LED is flashing it suggests a mismatch in the configuration of the Nucleus controller. Check the controller configuration. Table 37. Issue 5 Rev 2 5926 Output Module LED Information Page 175 © 2014 Snell Limited Output Modules and Output Rear Panels Remote Error Remote Command OK Local Error Local Command OK www.snellgroup.com Power OK Sirius 800 5926 Fig 108. 5926 Output Module LEDs Issue 5 Rev 2 Page 176 © 2014 Snell Limited Sirius 800 www.snellgroup.com Output Modules and Output Rear Panels 11.3 5949 Sirius 800 Video Embedding & AHP Output Module with Delay and Sync Capability Important: Early Sirius 800 routers must be modified by Snell before they can be used with the 5949. See section 3.11 to check if the router needs modifying. The 5949 module heat sink can get very hot during normal operation. When removing the 5949 module from a router do not touch the heat sink until it has had time to cool down. The 5949 Sirius 800 video embedding & AHP output module with delay and sync capability has 24 video output channels and can handle SD, DVB-ASI and HD signals up to 3Gb/s. The 5949 module can be used for expansion in dual frame Sirius 850 systems, see section 12.2. The audio embedder synchronously re-inserts up to 16 mono audio channels per video output channel (16 for SD and HD) giving up to 768 audio channels per 5949 output module. The 5949 AHP video output module contains a powerful processing engine that can manipulate the individual audio channels passing through it (see section 11.3.1). The output module also contains frame/line synchronizers allowing video signals to be synchronized with router references (see section 11.3.1.1). Audio and video processing are licensed features which must be purchased for each module they are needed on, See section 3.5.1 for licensing details. The 5949 output module synchronizes routed audio channels (by drop/repeat) to re-time to the video signal for embedding. All VANC (Vertical Ancillary) data and all non-audio HANC (Horizontal Ancillary) data is removed. Connectors to the Motherboard LEDs Connectors to the 1294 or 1302 Rear Modules Fugue LED Eight Diagnostic LEDs - Snell Use Only Firmware/Licensing SD/SDHC Card (see the Sirius 800 Maintenance & Upgrade manual for details) Fig 109. 5949 24 Channel Video Output Module with Audio Embedding Note: • Jumpers and Headers are present on the video output module and these are for Snell Use Only. • In normal operation no jumper links or headers are fitted. The 5949 Output Module is compatible with the 1294 BNC rear panel (See section 11.4), and the 1302 Fiber rear panel (See section 11.5). Issue 5 Rev 2 Page 177 © 2014 Snell Limited Sirius 800 www.snellgroup.com Output Modules and Output Rear Panels 11.3.1 Processing on the Output Module The 5949 video output module can manipulate the audio channels received from the crosspoint modules before outputting them. Note: Video and Audio processing are licensed options and must be purchased for each module they are used on (See section 3.5 for details). Processing is configured in Workbench. Fig 110. shows the order that the video and audio processing is applied to the signal. *Input/Output Monitoring selected from either the input or the output of the module (pre or post processing). See section 5.6.3 for details on how to configure this using the router Door PC. Fig 110. Processing Block Diagram If any audio channels routed from the audio crosspoints are asynchronous to the video signal they are being embedded in the output module will use drop/repeat to synchronize the audio channels with the video signal. Issue 5 Rev 2 Page 178 © 2014 Snell Limited Sirius 800 www.snellgroup.com 11.3.1.1 Output Modules and Output Rear Panels Frame/Line Sync and Video Delay The video processing block can be used for frame/line sync or video delay on a channel by channel basis but they cannot both be used on the same channel. Note: Video Frame Synchronization is achieved by dropping or repeating video frames when the Frame Buffer is empty or full. Selecting audio post synchronization means that when a video frame is dropped or repeated a frame of audio will also be dropped or repeated. Selecting audio pre synchronization means that when a video frame is dropped or repeated the audio will not be dropped or repeated so will no longer be associated with the original video frame resulting in lip sync mismatch. Therefore Snell recommends that the synchronizers are used to re-time video in synchronous systems only. Fig 111. Example Workbench Frame Sync/Delay Summary Screen The video channel is selected using the dialup panel. The Frame Sync/Delay screen displays the currently detected video standard for the selected channel. The configuration buttons at the top of the screen are used to configure the general behavior of the video channel. The Summary tab displays all of the possible video standards and whether they are configured for frame sync or delay. The signal standard is auto detected and the channel uses the settings defined in the appropriate Frame sync or Delay tab for that standard. Function Function Description Channel Configuration (Applies to all video standards) Detected Standard: Displays the detected video standard for the selected video channel. Summary button Click on the Summary button to return to the summary screen Frame Sync Enabled Check the box to enable frame/line sync on the selected video channel. Audio Selection Select the embedded audio from before or after the frame sync block by clicking on the required option. Table 38. Issue 5 Rev 2 Frame Sync/Delay Summary Screen Page 179 © 2014 Snell Limited Sirius 800 www.snellgroup.com Function Sync Function Output Modules and Output Rear Panels Function Description Select to sync to frame or to line by clicking on the required option. Summary tab (Standard & Mode) for each video input standard Frame Sync Indicator Green when frame sync is enabled for the video standard. Red when frame sync is not enabled for the video standard Delay Indicator Green when video delay is enabled for the video standard. Red when video delay is not enabled for the video standard Table 38. Frame Sync/Delay Summary Screen Frame/Line Sync A video output signal can set to frame or line sync to a video reference signal (physical or derived) as long as the video output signal and reference frame rates match. An offset can be applied to the output signal relative to the frame or line sync to allow for delays later in the system. The offset for frame sync is set in frames, lines and pixels or in milliseconds. The offset for line sync is set in pixels or in milliseconds. The offset settings can be preset for each standard of video signal that might be expected to be routed to the output. Video offset is set in steps of 0.00001 ms up to a maximum of 14 frames for progressive video standards or 14 fields for interlaced video standards. The embedded audio can be sourced from before or after the frame sync block using the Pre/Post Selector as required. Each video standard has a tab for frame sync configuration and a tab for delay configuration. The signal standard is auto detected and the channel uses the settings defined in the appropriate Frame sync or Delay tab for that standard. Fig 112. Example Workbench 1080i Frame Sync Settings Tab The example in Fig 112. shows: 1080i50 - set to Ref 1 so a 1080i50 signal will use frame sync settings in the 1080i FS tab. 1080i59 - set to Lock to Input so a 1080i59 signal will use delay settings in the 1080i Delay tab. 1080i60 - set to Lock to Input so a 1080i60 signal will use delay settings in the 1080i Delay tab. Issue 5 Rev 2 Page 180 © 2014 Snell Limited Sirius 800 www.snellgroup.com Function Output Modules and Output Rear Panels Function Description XXXX FS tab (where XXXX is the video standard, eg 1080i FS) Video standard configuration tabs for Frame/Line Sync Frame Offset* Select the number of frames of offset from the reference. Only available if Sync Function is selected as Frame. If Line is selected then the frame slider is not visible. Line Offset* Select the number of lines of offset from the reference. Only available if Sync Function is selected as Frame. If Line is selected then the frame slider is not visible. Pixel Offset* Select the number of pixels of offset from the reference. Delay ms* Select the offset in milliseconds from the reference. *When setting any one of the above values the other settings will automatically changes to reflect the setting being made. Reference Input Loss behavior Table 39. Lock to Input- Select Lock to Input to enable video delay for the video standard. Reference 1 to 4 - Select which video reference the signal will be synchronized to. Freeze Frame - in the event of input signal loss the last good frame is output. Black Screen - in the event of input signal loss a black screen is output. Frame Sync Configuration Video Delay Delay is applied to a video output channel in frames, lines, pixels or in milliseconds. Video delay is set in steps of 0.00001 ms up to a maximum of 14 frames for progressive video standards or 14 fields for interlaced video standards. Note: To enable video delay for a particular video standard Lock to Input must be selected in either the delay tab or the frame sync tab of the same standard. Each video standard has a tab for frame sync configuration and a tab for delay configuration. The signal standard is auto detected and the channel uses the settings defined in the appropriate Frame sync or Delay tab for that standard. Fig 113. Example Workbench 1080i Delay Settings Screen The example in Fig 113. shows: 1080i50 - set to Ref 1 so a 1080i50 signal will use frame sync settings in the 1080i FS tab. 1080i59 - set to Lock to Input so a 1080i59 signal will use delay settings in the 1080i Delay tab. 1080i60 - set to Lock to Input so a 1080i60 signal will use delay settings in the 1080i Delay tab. Issue 5 Rev 2 Page 181 © 2014 Snell Limited Sirius 800 www.snellgroup.com Function Output Modules and Output Rear Panels Function Description XXXX Delay tab (where XXXX is the video standard, eg 1080i Delay) Video standard configuration tabs for Delay Frame Offset* Select the number of frames of video delay. Only available if Sync Function is selected as Frame. If Line is selected then the frame slider is not visible. Line Offset* Select the number of lines of video delay. Only available if Sync Function is selected as Frame. If Line is selected then the frame slider is not visible. Pixel Offset* Select the number of pixels of video delay. Delay ms* Select the video delay in milliseconds. *When setting any one of the above values the other settings will automatically change to reflect the setting being made. Reference Input Loss behavior Table 40. 11.3.1.2 Lock to Input- Select Lock to Input to enable video delay for the video standard. Reference 1 to 4 - Not used for Delay. Freeze Frame - in the event of input signal loss the last good frame is output. Black Screen - in the event of input signal loss a black screen is output. Video Delay Configuration 16 Channel Mixer There are 16 Mixers available per video output channel and each mixer can mix up to 16 channels of audio. Each 16 channel mixer is used to mix two or more audio output channels together to create a single mono signal that is output from the mixer. 11.3.1.3 Channel Swap (Shuffle) The channel shuffler is used to change the channel order of one or more of the audio channels 11.3.1.4 Gain control and Phase Invert Gain Gain is applied to an audio output channel as Silence (mute) or in steps of 0.1dB in a range of -72 dB to +30 dB. Phase Invert Phase invert will invert the audio waveform. 11.3.1.5 Embedded Audio Delay Embedded audio delay is applied to an audio input channel in steps of 0.25 ms in a range of 0 to 5.46 Seconds. Issue 5 Rev 2 Page 182 © 2014 Snell Limited Sirius 800 www.snellgroup.com Output Modules and Output Rear Panels 11.3.2 5949 Connections to the Audio Crosspoints The 5949 video output module receives two identical multiplexed audio transport streams, each of which contains all of the audio channels on the output module (up to 768 mono channels). One transport stream is received from the main audio crosspoint module and a duplicate transport stream is received from the redundant audio crosspoint module. The output module monitors the transport streams received from each of the audio crosspoint modules for errors. If an error is found the output module will use the transport stream from the other audio crosspoint module if it is fitted. Important: • Due to the nature of multiplexed audio transport streams there is an extremely small delay between groups of channels as the transport stream is constructed. If the audio is locked to the input these delays will need to be considered. • If the audio is locked to an external reference these delays are managed by the router and the audio will remain co-timed. 11.3.3 5949 Output Module LED Information Table 41. shows the LED color code on the 5949 Output Module, and Fig 114. shows the front edge of the output module. LED Color Label Detail Red Green Each Pair of FPGA LEDS: 1 FPGA 1 status 2 FPGA 2 status 3 FPGA 3 status 4 FPGA 4 status Red Green Red Green Red Green Green Table 41. Issue 5 Rev 2 Normal Working Status Power OK Power to the module Flashing rapidly between Red & Green (2 Hz each LED) - starting up Green On Solid & Red Off - normal state working correctly Green Off & Red On Solid - FPGA programming fault found. Remove module and refit to force a reboot. Red & Green Flashing very rapidly in sync (4 Hz each LED) - A change has been made to the module settings database in RAM but it has not yet been written to flash memory. This is not a fault and the flash memory will be updated after 10 seconds of no audio setting changes being made. Do not remove power from the module while this indication is present as the flash may become corrupted. Other indications are displayed when performing a firmware upgrade, see the Sirius 800 Maintenance & Upgrade manual for details. On Solid - working correctly 5949 Output Module LED Information Page 183 © 2014 Snell Limited Sirius 800 www.snellgroup.com LED Color Label Yellow Output Modules and Output Rear Panels Detail Normal Working Status Local Command OK Receiving messages from local Nucleus control module (the Nucleus controller in this frame) Flashing - receiving information and working correctly Local Command Error Error with messages from local Nucleus control module (the Nucleus controller in this frame) Off - normal state Flashing - the command message from the router controller is corrupt or hasn't been received. Red This communications error could be caused by a hardware failure or incorrect insertion. Check that the module is inserted correctly. If the “Local Command Error” LED is flashing at the same time as the “Local Command OK” LED is flashing it suggests a mismatch in the configuration of the Nucleus controller. Check controller configuration. Yellow Remote Command OK Receiving messages from remote Nucleus control module (the Nucleus controller in the frame linked to this frame) Sirius 830/840/850 (no expansion): Off - Expansion not used. Sirius 850 (expanded to second frame): Flashing - receiving information and working correctly Remote Error Error with messages from remote Nucleus control module (the Nucleus controller in the frame linked to this frame) Sirius 830/840/850 (no expansion): Off - Expansion not used. Sirius 850 (expanded to second frame): Off - normal state, Flashing - the command message from the remote router controller is corrupt or hasn’t been received. This communications error could be caused by a hardware failure or incorrect insertion. Check that the module is inserted correctly and the four RJ45 connections between the frames are fitted correctly (see section 12.2). Red If the “Remote Error” LED is flashing at the same time as the “Remote Command OK” LED is flashing it suggests a mismatch in the configuration of the Nucleus controller. Check controller configuration. Fugue Status CPU status Blue/Green Table 41. Issue 5 Rev 2 Flashing sequence Green, Green, Blue - normal operation the CPU is programmed and running Brief Red Flash at startup - normal Flashing Red - CPU Error. Remove module and refit to force a reboot. 5949 Output Module LED Information Page 184 © 2014 Snell Limited Sirius 800 www.snellgroup.com LED Color Label Output Modules and Output Rear Panels Detail Normal Working Status Eight Diagnostic LEDs - Normal LED Pattern Sequence Snell Use Only 1. All LEDs On for one Second Amber 2. All LEDs Off except the top LED 3. All LEDs Off except the second LED from the top 4. This sequence continues until all LEDs are Off except for the bottom LED 5. All LEDs Off for 10 Seconds 6. Return to Step 1 Any other pattern - abnormal operation contact Snell Customer Support Table 41. 5949 Output Module LED Information 1 2 3 4 Power OK Local Command OK Local Error Remote Command OK Remote Error Fugue Status Top LED Diagnostic LEDs x 8 Bottom LED Fig 114. 5949 Output Module LEDs Issue 5 Rev 2 Page 185 © 2014 Snell Limited Sirius 800 www.snellgroup.com Output Modules and Output Rear Panels 11.4 1294 Sirius 800 Video BNC Output Rear Panel The 1294 Sirius 800 video BNC output rear panel has 24 BNC outputs. The 1294 rear panel is used with the 5949/5925 video output module (24 channel video with audio embedder, re-clocking and AHP) and the 5926/5938 video output module (24 channel video with re-clocking). Video Output 1 Video Output 24 Sirius 850 Expansion Connectors: a b c Not Used with 5926 modules Fig 115. 1294Sirius 800 Video BNC Output Rear Panel All the BNC connectors on the output rear panel have Snell's unique Catsii feature that illuminates each connector. See section 6. for details of the Catsii functionality. Issue 5 Rev 2 Page 186 © 2014 Snell Limited Sirius 800 www.snellgroup.com Output Modules and Output Rear Panels 11.5 1302 Sirius 800 Video Fiber Output rear panel The 1302 Sirius 800 video fibre output rear panel has 12 fiber SFP cages with two outputs per fiber SFP module. The 1302 rear panel is used with the 5949/5925 output module (24 channel video with audio embedder, re-clocking and AHP) and the 5926/5938 video output module (24 channel video with re-clocking). Video Output 1 Video Output 2 Sirius 850 Expansion Connectors: a b c Not Used with 5926 modules Video Output 23 Video Output 24 Fig 116. Sirius 800 video fibre output rear panel All the fiber connectors on the output rear panel have Snell's unique Catsii feature that illuminates each connector. See section 6. for details of the Catsii functionality. When ordering the router the rear panels can be specified with or without fiber SFP transmitter modules. When the rear panels are ordered as spares they are supplied without Fiber SFP transmitter modules and these must be ordered separately. The Snell order code for the standard SFP transmitter module is shown below. • Fiber SFP Transmitter Module Order Code ST31ST31-3 Fiber SFP 2 channel 1310nm -5 to 0 dBm output power. For 3G, HD, SD & MADI. Max 12 per rear panel A number of CWDM Fiber SFP transmitter modules are also available, contact your local Snell representative for details. Issue 5 Rev 2 Page 187 © 2014 Snell Limited Sirius 800 www.snellgroup.com Output Modules and Output Rear Panels 11.6 1295 Sirius 800 Video/MADI BNC Output Rear Panel The 1295 Sirius 800 video/MADI BNC output rear panel has 24 BNC outputs. The 1295 rear panel is used with either the 4929/4925 12 channel MADI output module with AHP (a duplicate of each MADI channel is output along with the main output) or 5923 video output module (24 channel video with re-clocking). Video Output 1 when used with a 5923 video output module MADI Output 1a MADI Output 2a MADI Output 1b MADI Output 2b When used with a 4929/4925 audio output module MADI Output 11a MADI Output 12a MADI Output 11b MADI Output 12b Sirius 850 Expansion Connectors: a b c When used with a 5923 video output module Video Output 24 when used with a 5923 video output module MADI channel a = Main output MADI channel b = Duplicate output See section 11.1.1 for details Fig 117. 1295 Sirius 800 Video/MADI BNC Output Rear Panel All the BNC connectors on the output rear panel have Snell's unique Catsii feature that illuminates each connector. See section 6. for details of the Catsii functionality. Issue 5 Rev 2 Page 188 © 2014 Snell Limited Sirius 800 www.snellgroup.com Output Modules and Output Rear Panels 11.7 1296 Sirius 800 Video/MADI Fiber Output Rear Panel The 1296 Sirius 800 video/MADI fiber output rear panel has 12 fiber SFP cages with two outputs per fiber SFP module. The 1296 rear panel is used with either the 4929/4925 12 channel MADI output module with AHP (a duplicate of each MADI channel is output along with the main output) or 5924 video output module (24 channel video with re-clocking). Video Output 1 Video Output 2 when used with a 5924 video output module MADI Output 1a MADI Output 2a MADI Output 1b MADI Output 2b When used with a 4929/4925 audio output module Sirius 850 Expansion Connectors: a b c When used with a 5924 video output module MADI Output 11a MADI Output 12a MADI Output 11b MADI Output 12b Video Output 23 Video Output 24 when used with a 5924 video output module MADI channel a = Main output MADI channel b = Duplicate output See section 11.1.1 for details Fig 118. 1296 Fiber Output Rear Panel All the fiber connectors on the output rear panel have Snell's unique Catsii feature that illuminates each connector. See section 6. for details of the Catsii functionality. When ordering the router the rear panels can be specified with or without fiber SFP transmitter modules. When the rear panels are ordered as spares they are supplied without Fiber SFP transmitter modules and these must be ordered separately. The Snell order code for the standard SFP transmitter module is shown below. • Fiber SFP Transmitter Module Order Code ST31ST31-3 Fiber SFP 2 channel 1310nm -5 to 0 dBm output power. For 3G, HD, SD & MADI. Max 12 per rear panel A number of CWDM Fiber SFP transmitter modules are also available, contact your local Snell representative for details. Issue 5 Rev 2 Page 189 © 2014 Snell Limited Sirius 800 www.snellgroup.com Output Modules and Output Rear Panels 11.8 1353 Sirius 800 Balanced AES Output Rear Panel with MADI Outputs The 1353 Sirius 800 balanced AES output rear panel has 5 x 62 way female high density sockets for balanced AES audio outputs and HD BNC connectors for up to 3 MADI outputs. Note: If unbalanced AES outputs are required see section 11.9 for details. The 1353 rear panel is used with the 4929/4925 120 channel AES/MADI output module. For the wiring details for the 62 way D-Type sockets see section 11.8.1 and for details of the MADI inputs see section 11.10. MADI 3 MADI 2 MADI 1 see section 11.10 for details Sockets 1 Outputs 1 to 24 Sockets 2 Outputs 25 to 48 Sockets 3 Outputs 49 to 72 Sockets 4 Outputs 73 to 96 Sockets 5 Outputs 97 to 120 For the wiring details for the 62 way D-Type sockets see section 11.8.1 Fig 119. 1353 Sirius 800 Balanced AES Output Rear Panel Issue 5 Rev 2 Page 190 © 2014 Snell Limited Sirius 800 www.snellgroup.com Output Modules and Output Rear Panels 11.8.1 62 Way High Density Balanced AES Socket Pin Outs 22 1 43 AES Balanced Output 1, 25, 49, 73 or 97 AES Balanced Output 2, 26, 50, 74 or 98 AES Balanced Output 3, 27, 51, 75 or 99 AES Balanced Output 4, 28, 52, 76 or 100 AES Balanced Output 5, 29, 53, 77 or 101 AES Balanced Output 6, 30, 54, 78 or 102 AES Balanced Output 7, 31, 55, 79 or 103 AES Balanced Output 8, 32, 56, 80 or 104 AES Balanced Output 9, 33, 57, 81 or 105 AES Balanced Output 10, 34, 58, 82 or 106 AES Balanced Output 11, 35, 59, 83 or 107 AES Balanced Output 12, 36, 60, 84 or 108 AES Balanced Output 13, 37, 61, 85 or 109 AES Balanced Output 14, 38, 62, 86 or 110 AES Balanced Output 15, 39, 63, 87 or 111 AES Balanced Output 16, 40, 64, 88 or 112 AES Balanced Output 17, 41, 65, 89 or 113 AES Balanced Output 18, 42, 66, 90 or 114 AES Balanced Output 19,43, 67, 91 or 115 AES Balanced Output 20, 44, 68, 92 or 116 AES Balanced Output 21, 45, 69, 93 or 117 AES Balanced Output 22, 46, 70, 94 or 118 AES Balanced Output 23,47, 71, 95 or 119 21 62 AES stereo pair Groupings + - AES Balanced Output 24, 48, 72, 96 or 120 42 ALL other pins (GND/Chassis) Not Connected Fig 120. Balanced AES Rear Panel 62 Way High Density Socket (Viewed from the Rear of the Router) Issue 5 Rev 2 Page 191 © 2014 Snell Limited Sirius 800 www.snellgroup.com Pin Number Socket 1 AES Socket 2 AES Socket 3 AES Socket 4 AES Socket 5 AES Balanced Balanced Balanced Balanced Balanced Output Output Output Output Output 24 1+ 25+ 49+ 73+ 97+ 25 1- 25- 49- 73- 97- 22 2+ 26+ 50+ 74+ 98+ 23 2- 26- 50- 74- 98- 1 3+ 27+ 51+ 75+ 99+ 43 3- 27- 51- 75- 99- 2 4+ 28+ 52+ 76+ 100+ 44 4- 28- 52- 76- 100- 3 5+ 29+ 53+ 77+ 101+ 45 5- 29- 53- 77- 101- 4 6+ 30+ 54+ 78+ 102+ 46 6- 30- 54- 78- 102- 5 7+ 31+ 55+ 79+ 103+ 47 7- 31- 55- 79- 103- 6 8+ 32+ 56+ 80+ 104+ 48 8- 32- 56- 80- 104- 7 9+ 33+ 57+ 81+ 105+ 49 9- 33- 57- 81- 105- 8 10+ 34+ 58+ 82+ 106+ 50 10- 34- 58- 82- 106- 9 11+ 35+ 59+ 83+ 107+ 51 11- 35- 59- 83- 107- 10 12+ 36+ 60+ 84+ 108+ 52 12- 36- 60- 84- 108- 11 13+ 37+ 61+ 85+ 109+ 53 13- 37- 61- 85- 109- 12 14+ 38+ 62+ 86+ 110+ 54 14- 38- 62- 86- 110- 13 15+ 39+ 63+ 87+ 111+ 55 15- 39- 63- 87- 111- 14 16+ 40+ 64+ 88+ 112+ 56 16- 40- 64- 88- 112- 15 17+ 41+ 65+ 89+ 113+ 57 17- 41- 65- 89- 113- 16 18+ 42+ 66+ 90+ 114+ 58 18- 42- 66- 90- 114- 17 19+ 43+ 67+ 91+ 115+ 59 19- 43- 67- 91- 115- 18 20+ 44+ 68+ 92+ 116+ 60 20- 44- 68- 92- 116- 19 21+ 45+ 69+ 93+ 117+ 61 21- 45- 69- 93- 117- Table 42. Issue 5 Rev 2 Output Modules and Output Rear Panels Balanced AES Rear Panel 62 Way High Density AES Connector Pin Outs Page 192 © 2014 Snell Limited Sirius 800 www.snellgroup.com Pin Number Socket 1 AES Socket 2 AES Socket 3 AES Socket 4 AES Socket 5 AES Balanced Balanced Balanced Balanced Balanced Output Output Output Output Output 20 22+ 46+ 70+ 94+ 118+ 62 22- 46- 70- 94- 118- 41 23+ 47+ 71+ 95+ 119+ 42 23- 47- 71- 95- 119- 39 24+ 48+ 72+ 96+ 120+ 40 24- 48- 72- 96- 120- 21 N/C N/C N/C N/C N/C 26 to 38 Signal GND Signal GND Signal GND Signal GND Signal GND Table 42. Issue 5 Rev 2 Output Modules and Output Rear Panels Balanced AES Rear Panel 62 Way High Density AES Connector Pin Outs Page 193 © 2014 Snell Limited Sirius 800 www.snellgroup.com Output Modules and Output Rear Panels 11.9 1356 Sirius 800 Unbalanced AES Output Rear Panel with MADI Outputs The 1356 Sirius 800 balanced AES output rear panel has 5 x 62 way female high density sockets for balanced AES audio outputs and HD BNC connectors for up to 3 MADI outputs. Note: If balanced AES outputs are required see section 11.8 for details. The 1356 rear panel is used with the 4929/4925 120 channel AES/MADI output module. For the wiring details for the 62 way D-Type sockets see section 11.9.1 and for details of the MADI inputs see section 11.10. MADI 3 MADI 2 MADI 1 see section 11.10 for details Sockets 1 Outputs 1 to 24 Sockets 2 Outputs 25 to 48 Sockets 3 Outputs 49 to 72 Sockets 4 Outputs 73 to 96 Sockets 5 Outputs 97 to 120 For the wiring details for the 62 way D-Type sockets see section 11.9.1 Fig 121. 1356 Sirius 800 Unbalanced AES Output Rear Panel Issue 5 Rev 2 Page 194 © 2014 Snell Limited Sirius 800 www.snellgroup.com Output Modules and Output Rear Panels 11.9.1 62 Way High Density Unbalanced AES Socket Pin Outs 22 1 43 AES Unbalanced Output 1, 25, 49, 73 or 97 AES Unbalanced Output 2, 26, 50, 74 or 98 AES Unbalanced Output 3, 27, 51, 75 or 99 AES Unbalanced Output 4, 28, 52, 76 or 100 AES Unbalanced Output 5, 29, 53, 77 or 101 AES Unbalanced Output 6, 30, 54, 78 or 102 AES Unbalanced Output 7, 31, 55, 79 or 103 AES Unbalanced Output 8, 32, 56, 80 or 104 AES Unbalanced Output 9, 33, 57, 81 or 105 AES Unbalanced Output 10, 34, 58, 82 or 106 AES Unbalanced Output 11, 35, 59, 83 or 107 AES Unbalanced Output 12, 36, 60, 84 or 108 AES Unbalanced Output 13, 37, 61, 85 or 109 AES Unbalanced Output 14, 38, 62, 86 or 110 AES Unbalanced Output 15, 39, 63, 87 or 111 AES Unbalanced Output 16, 40, 64, 88 or 112 AES Unbalanced Output 17, 41, 65, 89 or 113 AES Unbalanced Output 18, 42, 66, 90 or 114 AES Unbalanced Output 19,43, 67, 91 or 115 AES Unbalanced Output 20, 44, 68, 92 or 116 AES Unbalanced Output 21, 45, 69, 93 or 117 AES Unbalanced Output 22, 46, 70, 94 or 118 AES Unbalanced Output 23,47, 71, 95 or 119 21 + 62 AES stereo pair Groupings GND AES Unbalanced Output 24, 48, 72, 96 or 120 42 ALL other pins (GND/Chassis) Not Connected Fig 122. Unbalanced AES Rear Panel 62 Way High Density Socket (Viewed from the Rear of the Router) Issue 5 Rev 2 Page 195 © 2014 Snell Limited Sirius 800 www.snellgroup.com Pin Number Socket 1 AES Socket 2 AES Socket 3 AES Socket 4 AES Socket 5 AES Unbalanced Unbalanced Unbalanced Unbalanced Unbalanced Output Output Output Output Output 24 1+ 25+ 49+ 73+ 97+ 25 GND GND GND GND GND 22 2+ 26+ 50+ 74+ 98+ 23 GND GND GND GND GND 1 3+ 27+ 51+ 75+ 99+ 43 GND GND GND GND GND 2 4+ 28+ 52+ 76+ 100+ 44 GND GND GND GND GND 3 5+ 29+ 53+ 77+ 101+ 45 GND GND GND GND GND 4 6+ 30+ 54+ 78+ 102+ 46 GND GND GND GND GND 5 7+ 31+ 55+ 79+ 103+ 47 GND GND GND GND GND 6 8+ 32+ 56+ 80+ 104+ 48 GND GND GND GND GND 7 9+ 33+ 57+ 81+ 105+ 49 GND GND GND GND GND 8 10+ 34+ 58+ 82+ 106+ 50 GND GND GND GND GND 9 11+ 35+ 59+ 83+ 107+ 51 GND GND GND GND GND 10 12+ 36+ 60+ 84+ 108+ 52 GND GND GND GND GND 11 13+ 37+ 61+ 85+ 109+ 53 GND GND GND GND GND 12 14+ 38+ 62+ 86+ 110+ 54 GND GND GND GND GND 13 15+ 39+ 63+ 87+ 111+ 55 GND GND GND GND GND 14 16+ 40+ 64+ 88+ 112+ 56 GND GND GND GND GND 15 17+ 41+ 65+ 89+ 113+ 57 GND GND GND GND GND 16 18+ 42+ 66+ 90+ 114+ 58 GND GND GND GND GND 17 19+ 43+ 67+ 91+ 115+ 59 GND GND GND GND GND 18 20+ 44+ 68+ 92+ 116+ 60 GND GND GND GND GND 19 21+ 45+ 69+ 93+ 117+ 61 GND GND GND GND GND Table 43. Issue 5 Rev 2 Output Modules and Output Rear Panels Unbalanced AES Rear Panel 62 Way High Density AES Socket Pin Outs Page 196 © 2014 Snell Limited Sirius 800 www.snellgroup.com Pin Number Output Modules and Output Rear Panels Socket 1 AES Socket 2 AES Socket 3 AES Socket 4 AES Socket 5 AES Unbalanced Unbalanced Unbalanced Unbalanced Unbalanced Output Output Output Output Output 20 22+ 46+ 70+ 94+ 118+ 62 GND GND GND GND GND 41 23+ 47+ 71+ 95+ 119+ 42 GND GND GND GND GND 39 24+ 48+ 72+ 96+ 120+ 40 GND GND GND GND GND 21 N/C N/C N/C N/C N/C 26 to 38 Signal GND Signal GND Signal GND Signal GND Signal GND Table 43. Unbalanced AES Rear Panel 62 Way High Density AES Socket Pin Outs 11.9.2 FGAEY 2502910A: Unbalanced 62 Way AES to BNC Breakout Cable The optional breakout cable converts a single unbalanced 62 way high density AES connector to 24 unbalanced AES female BNC connectors. The breakout cable is optional and not supplied with the AES rear panels. Five cables are required for all of the AES connectors on each AES rear panel. 62 Way D-Type High Density Plug 24 x Female BNC Connectors AES number printed on sleeve of each cable 1 Metre (3 Feet 3 Inches) Fig 123. RMYS 2502910A Unbalanced AES Breakout Cable, 62 Way D-Type to 24 BNC Female 11.10 HD BNC MADI Output Connectors The HD BNC connector details are the same for the balanced and unbalanced AES rear panels (see section 11.8 or 11.9 for rear panel details). The first and last MADI Channels in the following table assume that the HD BNC breakout cables are connected to an AES rear panel located in output slot 1 of the router. HD BNC Plug Marking MADI 1 577 640 MADI 2 641 704 MADI 3 705 768 Table 44. Issue 5 Rev 2 First MADI Channel Last MADI Channel (Slot 1) (Slot 1) Starting and Ending MADI Channels for Slot 1 Page 197 © 2014 Snell Limited Sirius 800 www.snellgroup.com Output Modules and Output Rear Panels Use the following formula to calculate the first and last MADI channels for any other router output slot: First MADI Channel = ((Slot Number x 768) - 768) + X Where X = the First MADI channel for the required MADI connector Last MADI Channel = First MADI Channel + 63 Please see the following examples to see how this works in practice. 11.10.1 Example 1: Slot 5, MADI 1 Connector First MADI Channel: ((5 x 768) - 768) + 577 (3840 - 768) + 577 3072 + 577 = 3649 First MADI Channel = 3649 Last MADI Channel: 3649 + 63 = 3712 Last MADI Channel = 3712 11.10.2 Example 2: Slot 9, MADI 2 Connector First MADI Channel: ((9 x 768) - 768) + 641 (6912 - 768) + 641 6144 + 641 = 6785 First MADI Channel = 6785 Last MADI Channel: 6785 + 63 = 6848 Last MADI Channel = 6848 11.10.3 Example 3: Slot 12, MADI 3 Connector First MADI Channel: ((12 x 768) - 768) + 705 (9216 - 768) + 705 8448 + 705 = 9153 First MADI Channel = 9153 Last MADI Channel: 9153 + 63 = 9216 Last MADI Channel = 9216 Issue 5 Rev 2 Page 198 © 2014 Snell Limited Sirius 800 www.snellgroup.com Sirius 850: Video Expansion 12. Sirius 850: Video Expansion The Sirius 850 is field expandable up to either 576 x 1152 in a single frame or up to 11522 video (dependant on input/output card configuration) by linking two Sirius 850 frames together using expansion cables. No other external splitters or combiners are required and expansion can be carried out while the system is in use. This section describes both expansion methods: • Single Sirius 850 frame up to 576 x 1152 - See section 12.1 for details. • Dual Sirius 850 frames up to 11522 - See section 12.2 for details. 12.1 Single Sirius 850 Frame up to 576 x 1152 Video To expand a Sirius 850 router up to 576 x 1152 video (dependant on input/output card configuration) the following extra modules are required: • 4 x 5905/5901 Video Crosspoint Modules mounted in upper part of the frame (a fifth crosspoint module is optional and provides redundancy for the video expansion crosspoint matrix). See section 10.1 for module details. • Up to 24 x 5928 Sirius 850 Standard Video Expansion Output Modules depending on the number of extra video outputs required. Fitted in the top section of the Sirius 850 frame, each 5928 provides 24 outputs. See section 12.4 for module details. • Up to 24 x 1293 Sirius 850 Video DIN 1.0/2.3 (mini Coax) Output Rear Panels one for each 5928 module fitted. Fitted in the rear of the Sirius 850 frame, each 1293 provides 24 DIN 1.0/2.3 coax outputs. See section 12.6 for module details. Video signals from the expansion video crosspoint matrix are passed to the 5928 modules (destinations 577 to 1152) and the video signals are then output from the 1293 rear panels on DIN 1.0/2.3 coax connectors. When 1293 cards are fitted to a Sirius 850 it is then a single frame 576 x 1152 router with no further expansion capability. 1129 577 1152 600 Fig 124. Single Sirius 850 Frame up to 576 x 1152 (top section of Sirius 850 shown) Note: • It is not possible to mix the 1290 and 1293 rear panels in a frame. • If a second Sirius 850 frame is required at a future date all 1293 rear panels must be removed and replaced with 1290 expansion rear panels (see section 12.2 for details). s Issue 5 Rev 2 Page 199 © 2014 Snell Limited Sirius 800 www.snellgroup.com Sirius 850: Video Expansion 12.2 Dual Sirius 850 Frames up to 1152 x 1152 Video The Sirius 850 is field expandable up to 1152 x 1152 video (dependant on input/output card configuration) by linking two Sirius 850 routers together using multi-way cables. No other external splitters or combiners are required and expansion can be carried out while the system is in use. This section describes what hardware is required to expand an existing single router to a dual router system. See Fig 126. for a details of the video signal wiring between the routers and Fig 126. for a diagram of the control interconnections. Existing Sirius 850 (Frame 1 of 2) The following extra equipment is required for the existing Sirius 850 frame: Note: • 4 x 5905/5901 Video Crosspoint Modules mounted in upper part of the frame (a fifth crosspoint module is optional and provides redundancy for the video expansion crosspoint matrix). See section 10.1 for module details. • Up to 24 x 5928 Sirius 850 Standard Video Expansion Output Modules depending on the number of extra video outputs required. Fitted in the top section of the router, each 5928 provides 24 outputs. See section 12.4 for module details. • Up to 24 x 1290 Sirius 850 Video Expansion Output Rear Panels one for each 5928 module fitted. Fitted in the rear of the router, each 1290 is used to connect 24 signals to the remote Sirius 850 router. The interconnect cables are supplied with the rear panels. See section 12.5 for module details. • Up to 24 x expandable video output modules (5938, 5949 and 5925 as required) one expandable video output module for each 5928 fitted in the remote router. Fitted in the output module slots of the router, they accept (via their rear panels and interconnect cables) the expansion outputs from the 1290 rear panels in the remote router. See section 12.3 for 5938, section 11.3 for 5949 and appendix B.3.3 for 5925 module details. • The 1290 expansion cables cannot be connected to the 5926 output module. • The 5926 module can be directly replaced by the 5938 module as it uses the same rear panels. Second Sirius 850 (Frame 2 of 2) The second Sirius 850 frame must be equipped with the expansion modules as listed above as well as the usual input modules, crosspoint modules, etc. Issue 5 Rev 2 Page 200 © 2014 Snell Limited Sirius 800 www.snellgroup.com Sirius 850: Video Expansion 12.2.1 Control of a Dual Frame System To link two Sirius 850 frame together they must both be fitted with the same router controller type, either the Nucleus 2450 or the Nucleus2 2463. The Nucleus modules control the main crosspoint modules of the local router and the expansion crosspoint modules of the remote router. Connecting the control busses of both frames together (Fig 125.) enables the controllers to route the video input signals in the remote frame to the outputs of the local frame. The controller in the second frame works in the same way enabling control of up to 1152 x 1152 video across the two frames. In a dual frame system, the controllers are connected using standard Cat 5e Ethernet cables (see Table 45. for connections) as follows: Frame 1 Frame 1 Local A Local A Local B Local B Remote A Remote A Remote B Remote B The connectors are located on the alarm rear panel (see section 16.3) Fig 125. Control Expansion in a Two Frame Sirius 850 System RJ45 connectors “Local A” and “Local B” take the local control signals (both outgoing clock and data and incoming data) from the local controller out to a remote frame. The connectors “Remote A” and “Remote B” receive commands from a remote controller and send the data back to the remote controller. RJ45 Cat 5e Connector Pin Out Cat 5e Cable Wire Colors 1 White with Orange 1 2 Orange 2 3 White with Green 3 4 Blue 4 5 White with Blue 5 6 Green 6 7 White with Brown 7 8 Brown 8 Table 45. Issue 5 Rev 2 RJ45 Cat 5e Cat 5e Connector Pin Cable Pairs Out Cat 5e Cable Connector Pin Outs for Dual Frame Page 201 © 2014 Snell Limited Sirius 800 www.snellgroup.com Sirius 850: Video Expansion Enabling video redundancy in frame one will enable redundancy for the main crosspoint modules mounted in frame one and the expansion crosspoint modules mounted in frame two. The reverse is true for frame two. Note: In a dual frame system if redundancy is enabled in one frame it must also be enabled in the other frame. See section 10.2 for details on enabling/disabling video redundancy. 12.2.2 Signal Flow Between Frames Video signals can be routed via the expansion video crosspoint matrix and passed to the 5928 standard video expansion output modules. The expansion video signals are then output from the 1290 rear panels to the output modules (5938, 5949 or 5925) in the other frame using the supplied expansion cables. Each 1290 rear panel must be connected to the expansion inputs of the corresponding output module (5938, 5949 or 5925) in the other Sirius 850 frame, i.e. slot 1 to slot 1, slot 2 to slot 2, etc. The expansion input connectors are located below the output module rear panel connectors (1 to 24) and are marked a, b and c. The connections on the 1290 rear panel are marked A, B and C. The expansion cables connect A to a, B to b and C to c. (See Fig 126.) The expansion video signals are output from the rear panel connectors of the selected module. Issue 5 Rev 2 Page 202 © 2014 Snell Limited Sirius 800 www.snellgroup.com Sirius 850: Video Expansion The following figure shows the cabling for expansion from slot 1 between routers as an example. A single 1290 expansion output from each router is shown for clarity and the method can be applied to any of the other 1290 expansion outputs. Expansion Out connectors A, B and C for outputs 1 to 24 in slot 1 Expansion Out connectors A, B and C for outputs 1 to 24 in slot 1 RJ45 Local Local A to Remote A Local B to Remote B RJ45 Local Remote A to Local A Remote B to Local B Expansion In connectors a, b and c for outputs 1 to 24 in slot 1 Expansion In connectors a, b and c for outputs 1 to 24 in slot 1 Fig 126. Two Sirius 850 Frames Connected Together (slot 1 cabling shown as an example) Important: Issue 5 Rev 2 • Ensure the Frame IDs are correctly set for both the Sirius 850 frames when connecting them together. The rotary Frame ID switch is located on the alarm rear panel of the router, See section 16.3.1 for details. • Each 1290 rear panel must be connected to the expansion inputs of the corresponding output module in the second Sirius 850 frame, i.e. slot 1 to slot 1, slot 2 to slot 2, etc. The expansion input connectors are located below the output module rear panel connectors (1 to 24) and are marked a, b and c. The connections on the 1290 rear panel are marked A, B and C. The expansion cables connect A to a, B to b and C to c. • The Remote and Local control connections between the two frames are connected as detailed in section 12.2.1. • It is not possible to mix the 1290 and 1293 Output Rear Panels in a frame. Page 203 © 2014 Snell Limited Sirius 800 www.snellgroup.com Sirius 850: Video Expansion 12.3 5938 Sirius 850 Standard Video Output Module (Expandable) The 5938 Sirius 850 standard video output module (expandable) has 24 video output channels and can handle SD, ASI and HD signals up to 3Gb/s. When the 5938 module is mounted in a Sirius 850 router it can receive video expansion signals from a 1290 24 channel expansion rear panel mounted in a second, linked, Sirius 850 frame (see section 12.2 for details). Connectors to the Motherboard LEDs Connectors to the 1294 or 1302 Rear Modules Fig 127. 5938 Sirius 850 Standard Video Output Module (Expandable) Note: • Jumpers and Headers are present on the video output module and these are for Snell Use Only. • In normal operation no jumper links or headers are fitted. The 5938 video output module is compatible with the 1294 BNC rear panel (See section 11.4) and the 1302 Fiber rear panel (See section 11.5). Issue 5 Rev 2 Page 204 © 2014 Snell Limited Sirius 800 www.snellgroup.com Sirius 850: Video Expansion 12.3.1 5938 Output Module LED Information Table 46. shows the LED color code on the 5938 Module, and Fig 128. shows the front edge of the output module. LED Color Label Detail Normal Working Status Green Power OK Power to the module On Solid - working correctly Receiving messages from local Nucleus control module (the Nucleus controller in this frame) Flashing - receiving information and working correctly Yellow Local Command OK Local Command Error Error with messages from local Nucleus control module (the Nucleus controller in this frame) Off - normal state Flashing - the command message from the router controller is corrupt or hasn't been received. This communications error could be caused by a hardware failure or incorrect insertion. Check that the module is inserted correctly. Red If the “Local Command Error” LED is flashing at the same time as the “Local Command OK” LED is flashing it suggests a mismatch in the configuration of the Nucleus controller. Check the controller configuration. Yellow Remote Command OK Receiving messages from remote Nucleus control module (the Nucleus controller in the frame linked to this frame) Sirius 850 (no expansion): Off - Expansion not used. Sirius 850 (expanded to second frame): Flashing - receiving information and working correctly Remote Error Error with messages from remote Nucleus control module (the Nucleus controller in the frame linked to this frame) Sirius 850 (no expansion): Off - Expansion not used. Sirius 850 (expanded to second frame): Off - normal state, Flashing - the command message from the remote router controller is corrupt or hasn’t been received. This communications error could be caused by a hardware failure or incorrect insertion. Check that the module is inserted correctly and the four RJ45 connections between the frames are fitted correctly (see section 12.2.1). Red If the “Remote Error” LED is flashing at the same time as the “Remote Command OK” LED is flashing it suggests a mismatch in the configuration of the Nucleus controller. Check the controller configuration. Table 46. Issue 5 Rev 2 5938 Sirius 850 Standard Video Output Module (Expandable) LED Information Page 205 © 2014 Snell Limited Sirius 850: Video Expansion Remote Error Remote Command OK Local Error Local Command OK www.snellgroup.com Power OK Sirius 800 5938 Fig 128. 5938 Sirius 850 Standard Video Output Module (Expandable) LEDs 12.4 5928 Sirius 850 Standard Video Expansion Output Module The 5928 Video Expansion Output Module has 24 video output channels and can handle SD, ASI and HD signals up to 3Gb/s. Connectors to the 1290 or 1293 rear panel LEDs Connectors to the Motherboard Fig 129. 5928 Sirius 850 Standard Video Expansion Output Module When the 5928 video expansion output modules are mounted in a Sirius 850 router they receive video signals from up to five expansion crosspoint modules. The expansion output signals are used in one of two ways depending on the expansion rear panel type that is fitted. Note: Issue 5 Rev 2 • 1290 rear panel is used to pass the expansion video signals to a second Sirius 850 router, see section 12.5. • 1293 rear panel has 24 x DIN 1.0/2.3 coax outputs giving the router up to 576 further outputs (destinations 577 to 1152), see section 12.6. It is not possible to mix the 1290 and 1293 Output Rear Panels in a frame. Page 206 © 2014 Snell Limited Sirius 800 www.snellgroup.com Sirius 850: Video Expansion 12.4.1 5928 Sirius 850 Standard Video Expansion Output Module LEDs Table 47. shows the LED color code on the 5928 Sirius 850 standard video expansion output module, and Fig 130. shows the front edge of the module LEDs. LED Color Function Detail Normal Working Status Green Power OK Power to the card On Solid - working correctly Yellow Command OK Receiving messages from local Nucleus control module (the Nucleus controller in this frame) Flashing - receiving information and working correctly Red Command Error Error with messages from local Nucleus control module (the Nucleus controller in this frame) Off - normal state Flashing - the command message from the router controller is corrupt or hasn't been received. This communications error could be caused by a hardware failure or incorrect insertion. Check that the module is inserted correctly. If the “Command Error” LED is flashing at the same time as the “Command OK” LED is flashing it suggests a mismatch in the configuration of the Nucleus controller. Check the controller configuration. Command Error Command OK 5928 Sirius 850 Standard Video Expansion Output Module LED Information Power OK Table 47. 5928 Fig 130. 5928 Sirius 850 Standard Video Expansion Output Module LEDs Issue 5 Rev 2 Page 207 © 2014 Snell Limited Sirius 800 www.snellgroup.com Sirius 850: Video Expansion 12.5 1290 Sirius 850 Video Expansion Output Rear Panel The 1290 Sirius 850 Video Expansion Output Rear Panel is used to connect 24 signals to a second Sirius 850 expansion router, driving destinations 577 to 1152. Connects to 5928 Expansion Output Module Expansion Output Ports labelled: A B C Fig 131. 1290 Expansion Output Rear Panel A video input signal passes through the 5928 expansion output module and out from the 1290 expansion rear panel to an output (577 to 1152) in the second frame. Output from a frame to the expanded frame is via three expansion cables per 1290 expansion output rear panel. The three expansion cables are supplied with each 1290 expansion rear panel that is purchased, the cables are six meters (19 feet) long. Spare expansion cables can be ordered using Snell order code: FGAEY WDS6THIN Each 1290 rear panel must be connected to the expansion inputs of the corresponding output module in the second Sirius 850 frame, i.e. slot 1 to slot 1, slot 2 to slot 2, etc. The expansion input connectors are located below the output module rear panel connectors (1 to 24) and are marked a, b and c. The connections on the 1290 rear panel are marked A, B and C. The expansion cables connect A to a, B to b and C to c. See section 12.2 for further information. Note: Issue 5 Rev 2 It is not possible to mix the 1290 and 1293 Output Rear Panels in a frame. Page 208 © 2014 Snell Limited Sirius 800 www.snellgroup.com Sirius 850: Video Expansion 12.6 1293 Sirius 850 Video DIN 1.0/2.3 (mini Coax) Output Rear Panel The 1293 Sirius 850 Video DIN 1.0/2.3 (mini Coax) Output rear panel has 24 x DIN 1.0/2.3 Coax connectors. The output from the 5928 expansion output module is via the 1293 24 Channel Expansion Output Rear Panel. When 1293 cards are fitted to a Sirius 850 it is then a single frame 576 x 1152 router with no further expansion capability. Video Output 1 Connects to Expansion Output Module Video Output 24 Fig 132. 1293 24 Channel Expansion Output Rear Panel Note: • It is not possible to mix the 1290 and 1293 Output Rear Panels in a frame. • It is not possible to monitor the 1293 expansion outputs. • The 1293 expansion output rear panels are not fitted with Catsii LEDs. • A second Sirius 850 frame cannot be used if one or more 1293 Output Rear Panels are fitted in a frame. • If a second Sirius 850 frame is required at a future date all 1293 rear panels must be removed and replaced with 1290 expansion rear panels. s Issue 5 Rev 2 Page 209 © 2014 Snell Limited Sirius 800 Issue 5 Rev 2 www.snellgroup.com Page 210 Sirius 850: Video Expansion © 2014 Snell Limited Sirius 800 www.snellgroup.com Multiviewer and Input/Output Monitoring Modules 13. Multiviewer and Input/Output Monitoring Modules 13.1 Monitoring and Multiviewer Overview The Sirius 800 routers have four independently selectable monitor outputs. The four monitor outputs can be selected from any of the video/audio inputs or outputs in the local frame. Monitoring outputs are not available on the Sirius 830 when it is equipped with multiviewer outputs. Note: • The monitor and multiviewer do not have any redundancy. • Sirius 830: Input/Output Monitoring is not available on the Sirius 830 when it is equipped with multiviewer outputs. • Sirius 840/850: If Input pre-processing is monitored using the monitor outputs then multiviewer outputs should not be routed from inputs 1, 3, 5 and 7 of any video input module as they will display duplicates of the four monitoring outputs. Inputs from Input Modules 5902: Multi-viewer Crosspoint Module 5931: Multiviewer Output Modules Sirius 840/850 only: Four signals to the 5933 output monitoring module and then to the BNC connectors on the control panel rear (see section 16.2) Sirius 830/840: up to 3 x 1309 rear panels - 140 Signals Sirius 850: up to 2 x 1291 rear panels - 96 Signals DIN 1.0/2.3 Connectors Fig 133. Monitoring and Multiviewer A multiviewer output module does not take any routing capability away from the main crosspoint matrix, the multiviewer output module takes a copy of each input signal, and sends out up to 140 (Sirius 850 - up to 96) outputs to DIN 1.0/2.3 connectors. Each monitor output port must be configured to match the type of signal it will be monitoring when the router is in use (see Table 48.). This configuration is carried out in Workbench, see the Workbench manual for information. Signal Type Monitored Monitor Output Port Configuration Required Discrete MADI or AES Audio 4915, 4929 and 4925 modules Configure Monitor Output Port to Matrix 2 (Audio) Video 5917, 5919, 5926, 5928, 5938, 5949, 5913, 5914, 5915, 5916, 5923, 5924, 5925 and 5937 modules Configure Monitor Output to Matrix 1 (Video) Embedded audio is passed with the video signal Table 48. Monitor Output Port Configuration The monitor output ports only output mono signals. If an AES left or right channel is routed to a monitor output the relevant AES pair will be output as a combined mono signal. Issue 5 Rev 2 Page 211 © 2014 Snell Limited Sirius 800 www.snellgroup.com Multiviewer and Input/Output Monitoring Modules 13.2 Sirius 830 Monitoring and Multiviewer 13.2.1 Sirius 830: Multiviewer Outputs Only (no monitoring) • 5902 (qty 1) Multiviewer Crosspoint Module • 5931 (qty 1-3) Multiviewer Output Module(s) • 1309 rear panel (qty 1-3) Multiviewer Rear Panel(s) Video/Audio Inputs 5902 Multiviewer Crosspoint Module, see section 13.5 Up to three 5931 Multiviewer Output Modules, see section 13.6.1 5931 5931 5931 Up to three 1309 Multiviewer Coax Rear Panels, see section 13.10 MV 1 to 48 MV 49 to 96 MV 97 to 140 Fig 134. Multiviewer Outputs Only (No Monitoring) Option (Sirius 830) 13.2.2 Sirius 830: Input/output Monitoring Only (no multiviewer outputs) • 5939 (qty 1) Input/Output Monitoring Card • 1237 (qty 1) Input/Output Monitoring Rear Panel **Video/Audio Inputs Process *1237, Monitor Output 1 to 4 5939 Input/Output Monitoring Module, see section 13.7 Process **Video/Audio Outputs *For details of the “Monitor 1 to 4” BNC connections see section 13.8. **Input/Output Monitoring selected from either the input or the output of the module (pre or post processing). See section 5.6.3 for details on how to configure this using the router Door PC. Fig 135. Input/Output Monitoring Only (No Multiviewer Outputs) Option (Sirius 830) Issue 5 Rev 2 Page 212 © 2014 Snell Limited Sirius 800 www.snellgroup.com Multiviewer and Input/Output Monitoring Modules 13.3 Sirius 840 Monitoring and Multiviewer 13.3.1 Sirius 840: Multiviewer Outputs Only (no monitoring) • 5902 (qty 1) Multiviewer Crosspoint module • 5931 (qty 1 to 3) Multiviewer Output module(s) • 1309 (qty 1 to 3) Multiviewer Coax Rear panel(s) Video/Audio Inputs 1 x 5902 Multiviewer Crosspoint Module, see section 13.7 Up to three 5931 Multiviewer Output Modules, see section 13.6.1 5931 5931 5931 Up to three 1309 Multiviewer Coax Rear Panels, see section 13.10 MV 1 to 48 MV 49 to 96 MV 97 to 140 Fig 136. Multiviewer Outputs Only (No Monitoring) Option (Sirius 840) Issue 5 Rev 2 Page 213 © 2014 Snell Limited Sirius 800 www.snellgroup.com Multiviewer and Input/Output Monitoring Modules 13.3.2 Sirius 840: Multiviewer Outputs and Input/Output Monitoring • 5902 (qty 1) Multiviewer Crosspoint module • 5931 (qty 1 to 3) Multiviewer Output module(s) • 1309 (qty 1 to 3) Multiviewer Coax Rear panel(s) • 5933 (qty 1) Output Monitor module **Video/Audio Outputs Process Process 1 x 5902 Multiviewer Crosspoint Module, see section 13.5 Multiviewer signals are post processing 1 x 5933 See section 13.8.2 **Video/Audio Inputs Up to three 5931 Multiviewer Output Modules, see section 13.6.1 5931 5931 5931 Up to three 1309 Multiviewer Coax Rear Panels, see section 13.10 MV 1 to 48 MV 49 to 96 MV 97 to 140 *Monitor 1 to 4 *For details of the “Monitor 1 to 4” BNC connections see section 16.2. **Input/Output Monitoring selected from either the input or the output of the module (pre or post processing). See section 5.6.3 for details on how to configure this using the router Door PC. Multiviewer signals are always post processing. Fig 137. Multiviewer Outputs and Input/Output Monitoring Option (Sirius 840) Note: Issue 5 Rev 2 If Input pre-processing is monitored using the monitor outputs then multiviewer outputs should not be routed from inputs 1, 3, 5 and 7 of any video input module as they will display duplicates of the four monitoring outputs. Page 214 © 2014 Snell Limited Sirius 800 www.snellgroup.com Multiviewer and Input/Output Monitoring Modules 13.3.3 Sirius 840: Output Monitoring Only (no multiviewer outputs) • 5933 (qty 1) Output Monitor module **Video/Audio Outputs Process 1 x 5933 See section 13.8.2 *Monitor 1 to 4 *For details of the “Monitor 1 to 4” BNC connections see section 16.2. **Output Monitoring selected from either the input or the output of the module (pre or post processing). See section 5.6.3 for details on how to configure this using the router Door PC. Fig 138. Output Monitoring Only (No Multiviewer outputs) Option (Sirius 840/850) 13.3.4 Sirius 840: Input/Output Monitoring Only (no multiviewer outputs) • 5930 (qty 1) Input Monitor module • 5933 (qty 1) Output Monitor module **Video/Audio Outputs Process 1 x 5930 See section 13.8.1 Process 1 x 5933 See section 13.8.2 **Video/Audio Inputs *Monitor 1 to 4 *For details of the “Monitor 1 to 4” BNC connections see section 16.2. **Input/Output Monitoring selected from either the input or the output of the module (pre or post processing). See section 5.6.3 for details on how to configure this using the router Door PC. Fig 139. Input/Output Monitoring Only Option (Sirius 840/850) Issue 5 Rev 2 Page 215 © 2014 Snell Limited Sirius 800 www.snellgroup.com Multiviewer and Input/Output Monitoring Modules 13.4 Sirius 850 Monitoring and Multiviewer 13.4.1 Sirius 850: Multiviewer Outputs Only (no monitoring) • 5902 (qty 1) Multiviewer Crosspoint module • 5931 (qty 1 to 2) Multiviewer Output module(s) • 1291 (qty 1 to 2) Multiviewer Coax Rear panel(s) Video/Audio Inputs 1 x 5902 Multiviewer Crosspoint Module, see section 13.7 Up to two 5931 Multiviewer Output Modules, see section 13.6.1 5931 5931 Up to two 1291 Multiviewer Coax Rear Panels, see section 13.11 MV 1 to 48 MV 73 to 120 Fig 140. Multiviewer Outputs Only (No Monitoring) Option (Sirius 850) Note: Issue 5 Rev 2 • Earlier Sirius 850 systems were sometimes fitted with 5932 multiviewer output module(s) and either 1291 multiviewer coax rear panel(s) or 1292 MV-Link rear panel(s). • The 1292 MV-Link rear enabled up to 140 multiviewer outputs to be connected to a Miranda KaleidoX multiviewer, see sections B.5 and B.5.2 for details. • 5932 modules and 1292 rear panels are no longer available and are shown here for users that already have them fitted. Page 216 © 2014 Snell Limited Sirius 800 www.snellgroup.com Multiviewer and Input/Output Monitoring Modules 13.4.2 Sirius 850: Multiviewer Outputs and Input/Output Monitoring • 5902 (qty 1) Multiviewer Crosspoint module • 5931 (qty 1 to 2) Multiviewer Output module(s) • 1291 (qty 1 to 2) Multiviewer Coax Rear panel(s) • 5933 (qty 1) Output Monitor module **Video/Audio Outputs Process Process Multiviewer signals are post processing 1 x 5902 Multiviewer Crosspoint Module, see section 13.5 1 x 5933 See section 13.8.2 **Video/Audio Inputs Up to two 5931 Multiviewer Output Modules, see section 13.6.1 5931 5931 Up to two 1291 Multiviewer Coax Rear Panels, see section 13.11 MV 1 to 48 MV 73 to 120 *Monitor 1 to 4 *For details of the “Monitor 1 to 4” BNC connections see section 16.2. **Input/Output Monitoring selected from either the input or the output of the module (pre or post processing). See section 5.6.3 for details on how to configure this using the router Door PC. Multiviewer signals are always post processing. Fig 141. Multiviewer Outputs and Input/Output Monitoring Option (Sirius 850) Note: Issue 5 Rev 2 • If Input pre-processing is monitored using the monitor outputs then multiviewer outputs should not be routed from inputs 1, 3, 5 and 7 of any video input module as they will display duplicates of the four monitoring outputs. • Earlier Sirius 850 systems were sometimes fitted with 5932 multiviewer output module(s) and either 1291 multiviewer coax rear panel(s) or 1292 MV-Link rear panel(s). • The 1292 MV-Link rear enabled up to 140 multiviewer outputs to be connected to a Miranda KaleidoX multiviewer, see sections B.5 and B.5.2 for details. • 5932 modules and 1292 rear panels are no longer available and are shown here for users that already have them fitted. Page 217 © 2014 Snell Limited Sirius 800 www.snellgroup.com Multiviewer and Input/Output Monitoring Modules 13.4.3 Sirius 850: Output Monitoring Only (no multiviewer outputs) • 5933 (qty 1) Output Monitor module **Video/Audio Outputs Process 1 x 5933 See section 13.8.2 *Monitor 1 to 4 *For details of the “Monitor 1 to 4” BNC connections see section 16.2. **Output Monitoring selected from either the input or the output of the module (pre or post processing). See section 5.6.3 for details on how to configure this using the router Door PC. Fig 142. Output Monitoring Only (No Multiviewer outputs) Option (Sirius 840/850) 13.4.4 Sirius 850: Input/Output Monitoring Only (no multiviewer outputs) • 5930 (qty 1) Input Monitor module • 5933 (qty 1) Output Monitor module **Video/Audio Outputs Process 1 x 5930 See section 13.8.1 Process 1 x 5933 See section 13.8.2 **Video/Audio Inputs *Monitor 1 to 4 *For details of the “Monitor 1 to 4” BNC connections see section 16.2. **Input/Output Monitoring selected from either the input or the output of the module (pre or post processing). See section 5.6.3 for details on how to configure this using the router Door PC. Fig 143. Input/Output Monitoring Only Option (Sirius 840/850) Issue 5 Rev 2 Page 218 © 2014 Snell Limited Sirius 800 www.snellgroup.com Multiviewer and Input/Output Monitoring Modules 13.5 5902 Sirius 800 Series Multiviewer Crosspoint Module The 5902 Sirius 800 series multiviewer crosspoint module is a 576x144 crosspoint, taking all the input signals and routing them to a multiviewer output module. Connectors to the Motherboard LEDs Fig 144. 5902 Sirius 800 Series Multiviewer Crosspoint Module Note: • There is no crosspoint redundancy protection. • Sirius 830: Output Monitoring is not available on the Sirius 830 when it is equipped with multiviewer outputs. • Sirius 840/850: If Input pre-processing is monitored using the monitor outputs then multiviewer outputs should not be routed from inputs 1, 3, 5 and 7 of any video input module as they will display duplicates of the four monitoring outputs. The multiviewer output of the 5902 is connected to up to three 5931 (Sirius 850 up to two) multiviewer output modules, see section 13.6 for details. 13.5.1 Sirius 840/850 only The 5902 Sirius 800 series multiviewer crosspoint module provides up to four signals for input monitoring to the 5933 output monitor module (see section 13.8.2). The 5933 output monitor module passes the signals onto the BNC monitor connectors on the control panel rear (see section 16.2). Issue 5 Rev 2 Page 219 © 2014 Snell Limited Sirius 800 www.snellgroup.com Multiviewer and Input/Output Monitoring Modules 13.5.2 5902 Sirius 800 Multiviewer Crosspoint Module LED Information Table 49. shows the LED color code on the 5902 Multiviewer Crosspoint Module, and Fig 145. shows the front edge of the module. LED Color Function Detail Normal Working Status Green Power OK Power to the module On Solid - working correctly Yellow Command Command from the Control OK module Flashing - receiving information and working correctly Command Error Error with command from the Control module Off - normal state Flashing - the command message from the router controller is corrupt or hasn’t been received. Contact Snell Customer Support (see section 1.2 for contact details). Switch Flashes on a take signal when switching a route Off - normal state Flashes - each time a route is set PAL OK Flashes and signals that the Flashing - the FPGA is working FPGA is working correctly correctly Xpt Error Displays if there is a problem with any crosspoints Red Yellow Green Red Xpt Error PAL OK Switch Command Error Command OK 5902Sirius 800 Series Multiviewer Crosspoint Module LED Information Power OK Table 49. Off - normal state On solid - problem with one or more crosspoints on the module. Flashing - Crosspoint module overheating, make sure the fan assemblies are all closed and the fans are all operating correctly. 5902 Fig 145. 5902Sirius 800 Series Multiviewer Crosspoint Module LEDs Issue 5 Rev 2 Page 220 © 2014 Snell Limited Sirius 800 www.snellgroup.com Multiviewer and Input/Output Monitoring Modules 13.6 5931 Sirius 800 Multiviewer Output Module The 5931 Sirius 800 multiviewer output module takes the 48 multiviewer output signals from the 5902 multiviewer crosspoint module and passes each signal through a re-clocker. Each 5931 multiviewer output module has 48 outputs. Connectors to the Motherboard LEDs Fig 146. 5931 Sirius 800 Multiviewer Output Module The multiviewer output of the 5931 module is connected to one of two possible rear panels, for details see Table 50. One 5931 multiviewer output module is required for each rear panel fitted. Rear Panel Sirius 830/840: 1309 Rear Panel Up to 3 rear panels with 48 Coax DIN 1.0/2.3 connectors per rear panel (up to 140 multiviewer outputs). Sirius 850: 1291 Rear Panel Up to 2 rear panels with 48 Coax DIN 1.0/2.3 connectors per rear panel (up to 96 multiviewer outputs). Table 50. Note: Issue 5 Rev 2 Connectors 5931 Multiviewer Output Module - Possible Rear Panel Arrangements • Sirius 830: Output Monitoring is not available on the Sirius 830 when it is equipped with multiviewer outputs. • Sirius 840/850: If Input pre-processing is monitored using the monitor outputs then multiviewer outputs should not be routed from inputs 1, 3, 5 and 7 of any video input module as they will display duplicates of the four monitoring outputs. Page 221 © 2014 Snell Limited Sirius 800 www.snellgroup.com Multiviewer and Input/Output Monitoring Modules 13.6.1 5931 Sirius 800 Multiviewer Output Module LED Information Table 51. shows the LED color code on the 5931 multiviewer output module, and Fig 147. shows the front edge of the module. LED Color Function Detail Normal Working Status Green Power OK Power to the module On Solid - working correctly Yellow Command OK Command from the Control module Flashing - receiving information and working correctly Red Command Error Error with command from the Control module Off - normal state Flashing - the command message from the router controller is corrupt or hasn’t been received. If all of the multiviewer output modules indicate a Command Error check that the router controller is operating correctly. If only one of the modules indicates the error contact Snell Customer Support (see section 1.2 for contact details). Command Error Command OK 5931 Sirius 800 Multiviewer Output Module LED Information Power OK Table 51. 5931 Fig 147. 5931 Sirius 800 Multiviewer Output Module LEDs Issue 5 Rev 2 Page 222 © 2014 Snell Limited Sirius 800 www.snellgroup.com Multiviewer and Input/Output Monitoring Modules 13.7 5939 Sirius 830 Video & Audio, Input & Output Monitoring Module The 5939 Sirius 830 video & audio, input & output monitoring module is compatible with the 1237 rear panel (see section 13.9). Note: • The 5939 Input/Output module must be configured in Workbench before it can be used. The 5939 module is configured from the Local Router Hardware tab, Advanced Configuration, Edit Module Configurations... See the Workbench user manual for module configuration details. • The Modules Present screen of the Door PC can be used to check that the Input/Output Monitoring module is correctly configured, see section 5.2.2. Connectors to the Motherboard LEDs Fig 148. 5939 Sirius 830 Video & Audio, Input & Output Monitoring Module Issue 5 Rev 2 Page 223 © 2014 Snell Limited Sirius 800 www.snellgroup.com Multiviewer and Input/Output Monitoring Modules 13.7.1 5939 Sirius 830 Video & Audio, Input & Output Monitoring Module LEDs Table 53. shows the LED color code on the 5939 Input/Output Monitoring Module, and Fig 151. shows the front edge of the module. LED Color Function Detail Normal Working Status Green Power OK Power to the module On Solid - working correctly Yellow Command OK Command from the Control module Flashing - receiving information and working correctly Red Command Error Error with command from the Control module Off - normal state Flashing - the command message from the router controller is corrupt or hasn’t been received. Contact Snell Customer Support (see section 1.2 for contact details). Yellow Switch Flashes on a take signal when switching a route Off - normal state Flashes - each time a route is set Green PAL OK Flashes and signals that the Flashing - the FPGA is working FPGA is working correctly correctly PAL OK Switch Command Error Command OK 5939Sirius 830 Video & Audio, Input & Output Monitoring Module Power OK Table 52. 5939 Fig 149. 5939 Sirius 830 Video & Audio, Input & Output Monitoring Module LEDs Issue 5 Rev 2 Page 224 © 2014 Snell Limited Sirius 800 www.snellgroup.com Multiviewer and Input/Output Monitoring Modules 13.8 5930 Sirius 840/850 Input and 5933 Output Monitoring Modules Monitoring can only be used if a 5933 output monitor module is present. This module enables the four monitor outputs on the Control Rear Panel (see section 16.2) to be routed from any of the 576 main router outputs or from any input via a 5902 Multiviewer Crosspoint Module or 5930 input monitoring crosspoint module. 13.8.1 5930 Sirius 840/850 Input Monitoring Crosspoint Module Note: • The 5930 Sirius 840/850 input monitoring crosspoint module must be configured in Workbench before it can be used. The 5930 module is configured from the Local Router Hardware tab, Advanced Configuration, Edit Module Configurations... See the Workbench user manual for module configuration details. • The Modules Present screen of the Door PC can be used to check that the 5930 module is correctly configured, see section 5.2.2. Connectors to the Motherboard LEDs Fig 150. 5930 Sirius 840/850 Input Monitoring Crosspoint Module Issue 5 Rev 2 Page 225 © 2014 Snell Limited Sirius 800 www.snellgroup.com 13.8.1.1 Multiviewer and Input/Output Monitoring Modules 5930 Sirius 840/850 Input Monitoring Crosspoint Module LEDs Table 53. shows the LED color code on the 5930 input monitoring crosspoint module, and Fig 151. shows the front edge of the module. LED Color Function Detail Normal Working Status Green Power OK Power to the module On Solid - working correctly Yellow Command OK Command from the Control module Flashing - receiving information and working correctly Red Command Error Error with command from the Control module Off - normal state Flashing - the command message from the router controller is corrupt or hasn’t been received. Contact Snell Customer Support (see section 1.2 for contact details). Yellow Switch Flashes on a take signal when Off - normal state switching a route Flashes - each time a route is set Green PAL OK Flashes and signals that the FPGA is working correctly PAL OK Switch Command Error Command OK 5930 Sirius 840/850 Input Monitoring Crosspoint Module LEDs Power OK Table 53. Flashing the FPGA is working correctly 5930 Fig 151. 5930 Input Monitoring Module LEDs Issue 5 Rev 2 Page 226 © 2014 Snell Limited Sirius 800 www.snellgroup.com Multiviewer and Input/Output Monitoring Modules 13.8.2 5933 Sirius 840/850 Output Monitoring Module Note: The 5933 does not have any way of determining signal format, so there are only a limited number of options the Catsii LED's on the control rear panel BNC monitor outputs can display, see Table 54. Signal Monitor Output Catsii Color Default Monitor port not enabled Off Off No signal Current configured setting for “No valid signal” Red SD or DVB-ASI Current configured setting for “Valid SD signal” Yellow Any HD or 3G signal Current configured setting for “Valid 1080i signal” Green AES audio signal Current configured setting for “No valid signal” (via 4915/4929/4925 modules) Table 54. Red Control Panel Catsii Signal Status Colors (Sirius 840/850) Connectors to the Motherboard LEDs Connector to Control Rear Panel Monitor LEDs Fig 152. 5933 Sirius 840/850 Output Monitoring Module Issue 5 Rev 2 Page 227 © 2014 Snell Limited Sirius 800 www.snellgroup.com 13.8.2.1 Multiviewer and Input/Output Monitoring Modules 5933 Sirius 840/850 Output Monitoring Module LEDs Table 55. shows the LED color code on the 5933 output monitoring module, and Fig 153. shows the front edge of the module. LED Color Function Detail Normal Working Status Green Power OK Power to the module On Solid - working correctly Yellow Command OK Command from the Control module Flashing - receiving information and working correctly Red Command Error Error with command from the Control module Off - normal state Flashing - the command message from the router controller is corrupt or hasn’t been received. Contact Snell Customer Support (see section 1.2 for contact details). Ethernet For Future Use Off - normal state Yellow Mon4 Mon3 Mon2 Mon1 For Future Use Command Error Command OK 5933 Sirius 840/850 Output Monitoring Module LEDs Power OK Table 55. Monitor LED's replicate the four monitor Catsii LED's, see section 13.8.2 5933 Fig 153. 5933 Sirius 840/850 Output Monitoring Module LEDs Issue 5 Rev 2 Page 228 © 2014 Snell Limited Sirius 800 www.snellgroup.com Multiviewer and Input/Output Monitoring Modules 13.9 1237 Sirius 830 Monitoring Rear Panel The 1237 Sirius 830 monitoring rear panel is compatible with the 5939 input/output monitoring module. The 1237 monitoring rear panel is a purchasable option and is shown in Fig 154. Ethernet (Not Used) 4 4 Video Monitor 3 2 1 3 2 1 Audio Monitor Fig 154. 1237 Sirius 830 Monitoring Rear Panel The output of audio monitors 1 to 4 is a copy of the output of video monitors 1 to 4. The BNC video outputs are optimized for video signals (impedance and data rates) and the DIN 1.0/2.3 audio monitor outputs are optimized for audio outputs (impedance and data rates). Audio Monitor outputs 1 to 4 output AES audio signals on DIN 1.0/2.3 connectors. The four monitor output signals are generated by the Input/Output Monitoring module. Each monitor output port must be configured to match the type of signal it will be monitoring when the router is in use (see Table 48.). This configuration is carried out in Workbench, see the Workbench manual for information. Signal Type Monitored Monitor Output Port Configuration Required Discrete MADI or AES Audio 4915, 4929 and 4925 modules Configure Monitor Output Port to Matrix 2 (Audio) Video 5917, 5919, 5926, 5949, 5915, 5916, 5925 and 5937 modules Configure Monitor Output to Matrix 1 (Video) Embedded audio is passed with the video signal Table 56. Monitor Output Port Configuration If an AES left or right channel is routed to a monitor output the relevant AES pair will be output. Note: The 5939 does not have any way of determining signal format, so there are only a limited number of options the Catsii LED's on the 1237 input/output rear panel BNC and DIN monitor outputs can display, see Table 57. Signal Monitor Output Catsii Color Default Monitor port not enabled Off Off No signal Current configured setting for “No valid signal” Red SD or DVB-ASI Current configured setting for “Valid SD signal” Yellow Any HD or 3G signal Current configured setting for “Valid 1080i signal” Green AES audio signal Current configured setting for “No valid signal” (via 4915/4929/4925 modules) Table 57. Issue 5 Rev 2 Red 1237 Control Panel Catsii Signal Status Colors Page 229 © 2014 Snell Limited Sirius 800 www.snellgroup.com Multiviewer and Input/Output Monitoring Modules 13.10 1309 Sirius 830/840 Multiviewer Coax Rear Panel The 1309 Sirius 830/840 multiviewer coax rear panel has 48 DIN 1.0/2.3 connectors. The 1309 rear panel is compatible with the 5931 multiviewer output module (see section 13.6). One 5931 is module required to drive each of the 1309 48 channel rear panels. Up to three 1309 rear panels can be fitted to the Sirius 830 or Sirius 840 router frames. If three 1309 rear panels are used then the third rear panel is fitted in the top multiviewer slot and numbered as follows: Not Used 139 Not Used 95 97 140 98 If two 1309 rear panels are used then the second rear panel is fitted in the middle multiviewer slot and numbered as follows: 96 47 49 50 If one 1309 rear panel is used it is fitted in the bottom multiviewer slot and numbered as follows: 48 1 2 Fig 155. 1309 Sirius 830/840 Multiviewer Coax Rear Panel Issue 5 Rev 2 Page 230 © 2014 Snell Limited Sirius 800 www.snellgroup.com Multiviewer and Input/Output Monitoring Modules 13.11 1291 Sirius 850 Multiviewer Coax Rear Panel The 1291 Sirius 850 multiviewer coax rear panel has 48 DIN 1.0/2.3 connectors. The 1291 rear panel is compatible with the 5931 multiviewer output module (see section 13.6). One 5931 is module required to drive each of the 1291 48 channel rear panels. Up to two 1291 rear panels can be fitted to the Sirius 850 router frame. Note: • Earlier Sirius 850 routers used the 5932 multiviewer output module (see appendix B.5.1) with the 1291 rear panel. • The 5931 multiviewer output module is a direct replacement for the 5932 when it is used with the 1291 rear panel. • 5932 modules are no longer available and are mentioned here for users that already have them fitted. 119 If two 1291 rear panels are used then the second rear panel is fitted in the top multiviewer slot and numbered as follows: 120 47 73 74 If one 1291 rear panel is used it is fitted in the bottom multiviewer slot and numbered as follows: 48 1 2 Fig 156. 1291 Sirius 850 Multiviewer Coax Rear Panel Issue 5 Rev 2 Page 231 © 2014 Snell Limited Sirius 800 Issue 5 Rev 2 www.snellgroup.com Page 232 Multiviewer and Input/Output Monitoring Modules © 2014 Snell Limited Sirius 800 www.snellgroup.com Nucleus Router Control Modules 14. Nucleus Router Control Modules The Nucleus router control modules are real-time router control cards which perform the following functions: • Interface to all the external devices (control system, panels and so on), through Ethernet and serial port connections. • Provides redundant control connections on RS422/485 and Ethernet. • Store the local configuration of the router. • Contain all circuitry to manage multiple reference inputs. • Set video and audio crosspoints in response to external commands and responds with tally information (audio crosspoints - Nucleus2 controllers only) • Monitor the status of the system components and reports this to the door PC and the external systems as required. Up to two router controllers can be fitted to the router in a main and backup configuration. When two controllers are fitted the controller in the left slot is the main controller and will be active when the router is powered up.This is the default power up setting but this setting can be changed from Workbench if required. See the Workbench manual for details. The controller mounted in the left slot is Controller A and the controller in the right slot is Controller B. Note: Issue 5 Rev 2 • When two controllers are fitted in the router they must both be the same type running the same software version. For example: either 2 x 2463 or 2 x 2450 controllers should be fitted. • When two controllers are fitted in the router they must both have a network connection (Ethernet A and Ethernet B) for connection details see section 16.2, Table 78. Page 233 © 2014 Snell Limited Sirius 800 www.snellgroup.com Nucleus Router Control Modules 14.1 Workbench The Workbench software uses a database to store router and system configuration details. The database can be created from scratch, custom built by Snell (chargeable) or based on one of the supplied sample/default databases. See section 3.2 for further details. The router is supplied with Workbench, LiveRunner and a sample database installed on the Door PC. The installed sample database is either video only or AHP depending on the input/output modules fitted. If one or more LiveRunner clients are to be installed on computers, other than the Door PC, the database shipped on the Door PC must be moved to a separate Workbench server or client/server. This does not apply to Workbench clients used for configuration or to RollCall clients connected to the controller(s). Although Workbench configuration can be carried out using the Door PC (if a USB mouse and keyboard are connected) this is not recommend as the screen resolution on the door screen is relatively low. A Workbench installation DVD is supplied with the router and this can be used to install a Workbench client on a separate computer which can then be used to configure the router. 14.1.1 Initial Connection and Configuration Steps The following outlines the basic steps required for a new router to be connected to Workbench. This process is described in more detail in the Sirius Installation and Quick Start manual. 1. Connect the router controller module(s), Door PC and Workbench computer to a network. 2. Install Workbench. 3. Associate Workbench with a database using one of the following methods: a Create a new Workbench database. b Associate Workbench with an existing Workbench database. c Move the Workbench database from the Door PC to a Workbench server or client/server. 4. Add the router control module(s) to Workbench, only required if the Workbench database doesn’t already contain the controller details. 5. Configure or edit the router control module(s). • Issue 5 Rev 2 Push the configuration to the router control module(s). Page 234 © 2014 Snell Limited Sirius 800 www.snellgroup.com Nucleus Router Control Modules 14.2 Nucleus Router Controller Compatibility Two versions of the Nucleus router control module are available for the Sirius 800 router. • The 2463 Nucleus2 router control modules support both audio and video routing. • The 2450 Nucleus router control modules only supports video routing and cannot be used if any audio signals need to be routed. Table 58. lists the compatibility between the Sirius 800 modules and Nucleus controllers. 2463 Nucleus2 Controller Compatibility 2450 Nucleus Controller Compatibility 5913 - Sirius 840/850 Standard Video BNC Input module Yes Yes 5914 - Sirius 840/850 Standard Video Fiber input module Yes Yes 5915 - Sirius 800 Video AHP input module Yes No 5916 - Sirius 830 Standard Video BNC/Fiber input module Yes Yes 5917 - Sirius 800 Standard Video BNC/Fibre input module Yes Yes 5919 - Sirius 800 Video AHP input module with delay and sync capability Yes No 4915 - Sirius 800 AES/MADI input module - 120 AES Pairs and up to 3 MADI inputs or 4915 - Sirius 800 AES/MADI input module - 12 MADI (Main & Redundant) Yes No 5923 - Sirius 840/850 Standard Video BNC output module Yes Yes 5924 - Sirius 840/850 Standard Video Fiber output module Yes Yes 5925 - Sirius 800 Video AHP output module Yes No 5926 - Sirius 800 Standard Video output module (non-expandable) Yes Yes 5937 - Sirius 830 Standard Video BNC/Fiber output module Yes Yes 5938 - Sirius 850 Standard Video output module (expandable) Only fitted if expansion is required between two Sirius 850 frames Yes Yes 5949 - Sirius 800 Video embedding & AHP output module with delay and sync capability Yes No 4925 - Sirius 800 AES/MADI output module (no audio delay) - 120 AES Pairs and up to 3 MADI outputs or 4925 - Sirius 800 AES/MADI output module (no audio delay) - 12 MADI (Main & Redundant) Yes No 4929 - Sirius 800 AES / MADI output module with audio delay - 120 AES Pairs and up to 3 MADI outputs or 4929 - Sirius 800 AES / MADI output module with audio delay - 12 MADI (Main & Redundant) Yes No Modules Input Modules Output Modules Table 58. Issue 5 Rev 2 2463 Nucleus2 Router Control Module Compatibility Table. Page 235 © 2014 Snell Limited Sirius 800 www.snellgroup.com Nucleus Router Control Modules 2463 Nucleus2 Controller Compatibility 2450 Nucleus Controller Compatibility 5901/5905 - Sirius 800 Series Video crosspoint module Yes Yes 5903 - Sirius 800 Audio crosspoint module Yes No 2453 - Control/Fan interface module (Sirius 830) Yes Yes 2455 - Control/Fan interface module (Sirius 830) Yes No 2457 - Control/Fan interface module (Sirius 830) Yes No 2452 - Control/Fan interface module (Sirius 840/850) Yes Yes 2456 - Control/Fan interface module (Sirius 840/850) Yes No 2458 - Control/Fan interface module (Sirius 840/850) Yes No Modules Crosspoint Modules Control/Fan Interface Module Table 58. Issue 5 Rev 2 2463 Nucleus2 Router Control Module Compatibility Table. Page 236 © 2014 Snell Limited Sirius 800 www.snellgroup.com Nucleus Router Control Modules 14.3 2463 Nucleus2 Router Control Module USB Upgrade Connector, See the Sirius 800 Maintenance & Upgrade manual Micro SD Card, Not currently used LEDs, see section 14.3.2 Reset Button (see section 14.3.1 for details) Fig 157. 2463 Nucleus2 Router Control Module Refer to the Workbench manual for details on configuring the Nucleus2 Router Control Module. Note: The Nucleus2 router control module has a default database, use Workbench to configure the modules in the Sirius 800. Modules are configured from the Local Router hardware tab | Advanced Configuration | Edit Module Configurations... in Workbench. See the Workbench manual for full details. 14.3.1 Reset Button The Reset button resets the 2463 router control module and will also failover control to the second router control module in a dual-redundant controller system. See Fig 157.above for reset button location details. 2463 Router control modules can be reset remotely using Workbench or a third party control system. After fitting a replacement controller, the active controller synchronizes persistence (AHP audio settings) and crosspoint tally table files with it. This process (replication) is indicated on the idle controller by LED 5 flashing orange. When replication is complete, LED 5 will flash green. Failing over to the idle controller before data synchronization is complete may corrupt the data files being synchronized and affect the operation of the router. Important: Dual-Redundant 2463 Router Control Modules: • Do not fail-over to the idle controller if LED 5 on the idle controller is flashing orange (data synchronization in progress). Failing over to the idle controller before data synchronization is complete may corrupt the data files being synchronized and affect the operation of the router. When LED 5 on the idle controller flashes green (data synchronization complete) it is safe to fail over the controller. • If resetting the 2463 router control module remotely check the value of OID 2.5.6 for the active controller. True = Replication is complete (Safe to Reset) False = Replication is not complete (Do Not Reset) Single 2463 Router Control Module: • Issue 5 Rev 2 All communication with the 2463 router control module will be lost during a reset. Because of this the crosspoints cannot be switched and tallies are not reported during this process. Video and audio processing is unaffected. Page 237 © 2014 Snell Limited Sirius 800 www.snellgroup.com Nucleus Router Control Modules 14.3.2 2463 Nucleus2 Router Control Module LEDs The LEDs on the Nucleus2 router control module are shown in Fig 158. and Table 59. lists the Nucleus2 Controller LED functions. USB Connector Power OK Reset Button (see section 14.3.1 for details) 1 2 3 4 5 6 7 Fig 158. Nucleus2 Router Control Module LEDs LED Description Power OK Power OK • Green = Power is connected and okay • Off = Power not connected or not okay Active/Idle 1 • Flashing Green = Active • Flashing Blue = Idle Master/Slave 2 • Green = Master Controller • Blue = Slave Controller Watchdog Status 3 Table 59. Issue 5 Rev 2 • Flashing Green = Watchdog enabled and running • Flashing Orange = Watchdog disabled Nucleus2 Router Control Module LEDs Page 238 © 2014 Snell Limited Sirius 800 www.snellgroup.com LED Nucleus Router Control Modules Description Serial Link Between Controllers Displays the status of the serial link between the active and idle controllers. See LED 5 for further information. • Blue pulsing Green = Link okay, data is being transferred. • Green pulsing Blue = Link okay, no data is being transferred. • Magenta pulsing Blue = Link error, no connection with the other controller. Indicates; the other controller is not present/not running or the serial link is not working. • Orange Pulses = Error, received data for unconfigured device Indicates; the other controller is configured differently from the controller receiving the data or it has no configuration. • Red Pulses = Error, received data with invalid format. Check both controllers are running the same version of CentraController.rtb software. Workbench can be used to check the controller software versions loaded. 4 Serial Data Replication (Local Router Device) The Serial Link is used to replicate LocalRouter device data between the active and idle controllers. Replicated data includes; crosspoint status, module configuration and port configuration. 5 Off = Active Controller • Flashing Green = Idle controller, receiving background update data. • Flashing Orange = Idle controller, data synchronisation with Active controller in progress. Note: Do not fail-over to the idle controller until data synchronization is complete and the LED is flashing green on the idle controller as there is a risk that data will become corrupted and affect the operation of the router. 6 Not used 7 Not used Table 59. Issue 5 Rev 2 • Nucleus2 Router Control Module LEDs Page 239 © 2014 Snell Limited Sirius 800 www.snellgroup.com Nucleus Router Control Modules 14.3.3 2463 Nucleus2 Router Control Module LEDs at Startup/Reset When the controller starts up or is reset the Power OK LED will illuminate first and then LEDs 1 to 6 will start to flash as the controller goes through its boot process. They will reach the state shown in Table 60. when the first part of the boot process is complete. The controller will be ready to communicate with the control system and control the router up to two minutes after this. This will be indicated by the Snell control system connected to the router. Dual Controllers Single Controller LED Active Controller Inactive Controller Active Controller Power OK Solid Green Solid Green Solid Green 1 - Active/Idle Flashing Green Flashing Blue Flashing Green 2 - Master/Slave Solid Green Solid Blue Solid Green 3 - Watchdog Status Flashing Green Flashing Green Flashing Green 4 - Serial Link Between Controllers Blue Pulsing Green Blue Pulsing Green Magenta Pulsing Blue 5 - Serial Data Replication Off Flashing Green Off 6 - Not Used Off Off Off 7 - Not Used Off Off Off Table 60. 2463 Nucleus2 Router Control Module LED Sequence Startup/Reset 14.3.4 2463 Nucleus2 Router Control Module LEDs on Database Push When a Workbench database is pushed to a controller in a frame with two controllers it should be pushed to the inactive controller first. This means that route changes and processing can be controlled while the inactive controller is being updated. The inactive controller can then be made active for the user to test the database. If the test is successful the database is then pushed to the other (now inactive) controller so that the databases in both controllers matches. In a frame with a single controller this is not possible and the database must be pushed to the single active controller. All communication with the router controller will be lost during the database push of the configuration changes and subsequent reset. Because of this the crosspoints cannot be switched and tallies are not reported during this process. Video and audio processing is unaffected. The following description assumes that the controllers are set to automatically reset after a database push. This can be checked and changed by using the Workbench Online Editor. In a dual controller system remember to check that both controllers are set the same: 2463 Nucleus2 Router Control Module Navigate to: ConfigurationItems | MiscellaneousFeatures | ResetControllerAfterConfigurationPush • Reset after database push enabled = True • Reset after database push disabled = False While the database is being pushed the LEDs will operate as normal, see Table 60. Pushing a large database can take up to 5 minutes. Once the push is complete the controller will automatically reset and the LEDs will operate as they do during a normal reset (described in section 14.3.3). The exception to this is when the database is pushed to the first controller of a pair. In this case the database will not match the database in the active controller and so LED 4 will be Pulsing Orange showing there is a mismatch between the databases in the two controllers. The mismatch will be corrected as soon as the database is pushed to the other controller in the pair. Issue 5 Rev 2 Page 240 © 2014 Snell Limited Sirius 800 www.snellgroup.com Nucleus Router Control Modules 14.3.5 Nucleus2 2463: Sirius 800 Input and Output Port Mapping Note: 14.3.5.1 • The information in this section is only correct if the Sirius 800 router is fitted with Nucleus 2463 router controllers with the default database. Databases can be modified including the mapping information. • If the router is shipped with a custom database the mapping may vary but can be checked and edited using the Workbench software, see the Workbench User Manual for details. Sirius 830: Input and Output Port Mapping Table 61. shows the Sirius 830 crosspoint address mapping: Input/Output Range Addresses Video Inputs 1 to 288 Source 0 to 287 Main Video Outputs 1 to 288 Destination 0 to 287 Multiviewer Outputs 1 to 140 Destination 1152 to 1291 Monitoring Outputs 1 to 4 Destination 16370 to 16373 Video Destinations 289 to 1152 are not used and do not respond to any control Audio Inputs (Nucleus2 only) 1 to 9216 Source 0 to 9215 Audio Outputs (Nucleus2 only) 1 to 9216 Destination 0 to 9215 Table 61. 14.3.5.2 Sirius 830 Input and Output Port Mapping Sirius 840: Input and Output Port Mapping Frame ID Switch set to 3 - see section 16.3.1. Table 62. shows the Sirius 840 crosspoint address mapping: Input/Output Range Addresses Video Inputs 1 to 576 Source 0 to 575 Main Video Outputs 1 to 576 Destination 0 to 575 Multiviewer Outputs 1 to 140 Destination 1152 to 1291 Monitoring Outputs 1 to 4 Destination 16370 to 16373 Video Destinations 577 to 1152 are not used and do not respond to any control Audio Inputs (Nucleus2 only) 1 to 18432 Source 0 to 18431 Audio Outputs (Nucleus2 only) 1 to 18432 Destination 0 to 18431 Table 62. Issue 5 Rev 2 Sirius 840 Input and Output Port Mapping Page 241 © 2014 Snell Limited Sirius 800 www.snellgroup.com 14.3.5.3 Nucleus Router Control Modules Sirius 850: Input and Output Port Mapping Sirius 850 Single Frame: Frame 1 of 1 (Frame ID Switch set to 0 - see section 16.3.1) Table 63. shows the Sirius 850 crosspoint address mapping for Frame 1 of 1: Input/Output Range Addresses Video Inputs 1 to 576 Source 0 to 575 Main Video Outputs 1 to 576 Destination 0 to 575 Expansion Video Outputs (using 5928 expansion modules & 1293 expansion output rear panels) 577 to 1152 576 to 1151 *Multiviewer Outputs (using two 1291 multiviewer rear panels) 1 to 96 Destination 1152 to 1199 & Destination 1224 to 1271 *Multiviewer Outputs: 1152 to 1291 only if two 1292 multiviewer MV-Link rear panels are fitted - (no longer supplied) Monitoring Outputs 1 to 4 Destination 16370 to 16373 Audio Inputs (Nucleus2 only) 1 to 18432 Source 0 to 18431 Audio Outputs (Nucleus2 only) 1 to 18432 Destination 0 to 18431 Table 63. Sirius 850 Input and Output Port Mapping (Frame 1 of 1) Sirius 850 Dual Frames: Frame 1 of 2 (Frame ID Switch set to 1 - see section 16.3.1) Table 64. shows the Sirius 850 crosspoint address mapping for Frame 1 of 2: Input/Output Range Addresses Video Inputs 1 to 1152 Source 0 to 1151 Main Video Outputs (using 5928 expansion modules & 1290 expansion output rear panels) 1 to 576 Destination 0 to 575 *Multiviewer Outputs (using two 1291 multiviewer rear panels) 1 to 96 Destination 1152 to 1199 & Destination 1224 to 1271 Destinations 577 to 1152 are not used and do not respond to any control *Multiviewer Outputs: 1152 to 1291 only if two 1292 multiviewer MV-Link rear panels are fitted - (no longer supplied) Monitoring Outputs 1 to 4 Destination 16370 to 16373 Audio Inputs (Nucleus2 only) 1 to 18432 Source 0 to 18431 Audio Outputs (Nucleus2 only) 1 to 18432 Destination 0 to 18431 Table 64. Issue 5 Rev 2 Sirius 850 Input and Output Port Mapping (Frame 1 of 2) Page 242 © 2014 Snell Limited Sirius 800 www.snellgroup.com Nucleus Router Control Modules Sirius 850 Dual Frames: Frame 2 of 2 (Frame ID Switch set to 2 - see section 16.3.1) Table 65. shows the Sirius 850 crosspoint address mapping for Frame 2 of 2: Input/Output Range Addresses Video Inputs 1 to 1152 Source 0 to 1151 Main Video Outputs (using 5928 expansion modules & 1290 expansion output rear panels) 577 to 1152 Destination 576 to 1151 *Multiviewer Outputs (using two 1291 multiviewer rear panels) 1 to 96 Destination 1292 to 1339 & Destination 1364 to 1411 Destinations 1 to 576 are not used and do not respond to any control *Multiviewer Outputs: 1292 to 1431 only if two 1292 multiviewer MV-Link rear panels are fitted - (no longer supplied) Monitoring Outputs 1 to 4 Destination 16370 to 16373 Audio Inputs (Nucleus2 only) 1 to 18432 Source 0 to 18431 Audio Outputs (Nucleus2 only) 1 to 18432 Destination 0 to 18431 Table 65. Sirius 850 Input and Output Port Mapping (Frame 2 of 2) 14.3.6 Configuring Nucleus2 2463 Controller Replication When two router controllers are fitted in a Sirius 800 router they work as a main and redundant pair. The active controller in the pair sends the inactive controller data such as; crosspoint status, module configuration and port configuration. This means if the active controller fails the other controller in the pair has the latest information available to it at all times. To enable this function each controller must be configured with the details of the other. The replication address can be configured by using Workbench or RollCall. Using Workbench 2463 Nucleus2 Router Control Module Navigate to: ConfigurationItems | ReplicatedPeer Note: Issue 5 Rev 2 • Name = enter the name of the controller that will be the replicated peer as shown on the Workbench configuration screen • IPAddress = enter the IP address of the controller that will be the replicated peer as shown on the Workbench configuration screen • IPPort = if blank then the network port will be the default value which is 2007 • ConnectionState = True or False - this is a status and is read only • Active = True or False - this is a status and is read only • Changes will not take effect until the controller has been reset. Page 243 © 2014 Snell Limited Sirius 800 www.snellgroup.com Nucleus Router Control Modules Using RollCall • Note: If RollCall does not connect to the router controller check that the controller is enabled for RollCall, see section 14.3.9 for details. Use the RollCall application or the RollCall web applet to connect to the router. Double click on the controller in the network tree and select the Comms Setup screen. Available Settings: • Redundant Peer IP Address: enter the IP address of the controller that will be the redundant peer (replicated peer) • Redundant Peer DCCP Port: if blank then the network port will be the default value which is 2007 • Note: The changes will not take effect until the controller has been restarted. Click on the Restart Unit button to restart the Nucleus2 router control module. 14.3.7 Changing the IP Address of a Nucleus2 Controller If the current IP Address of the Nucleus2 controller is known then that IP address can be changed by using the Workbench online editor or RollCall. If the controller IP address is not available a new one can be set using a USB memory stick (see the Sirius 800 Maintenance & Upgrade manual for details). Using Workbench 2463 Nucleus2 Router Control Module Navigate to: ConfigurationItems | IP | IP[1] Note: Issue 5 Rev 2 • Number = 0 • DHCP = False - set to false for a fixed IP address • Address = set the IP address of the controller • Port = if blank then the network port will be the default value which is 2007 • SubnetMask = set to match the network • DefaultGateway = if unknown or not required enter 0.0.0.0 • Speed = NWK_AUTO - (Default setting) - Configures the controller to negotiate its communication speed with the network switch. This setting should always be used unless the network switch is set to force a specific speed in which case one of the following settings should be used to match the network switch setting. NWK_10_BASE - Forces the controller to 10 Mbps NWK_100_BASE - Forces the controller to 100 Mbps NWK_1000_BASE - Not Available • Changes will not take effect until the Nucleus2 controller has been reset. This forces it to read the new IP Address from its config.xml file. • Having changed the controller IP address remember to use its new IP address to connect to it. • If the controller is one of a pair in the router the other controller’s replication address details must be changed to match the new IP address details set (see section 14.3.6 for details). Page 244 © 2014 Snell Limited Sirius 800 www.snellgroup.com Nucleus Router Control Modules Using RollCall • Note: If RollCall does not connect to the router controller check that the controller is enabled for RollCall, see section 14.3.9 for details. Use the RollCall application or the RollCall web applet to connect to the router. Double click on the controller in the network tree and select the Comms Setup screen. Available Settings: Note: • Unit IP Address: set the IP address of the controller • Subnet Mask: set to match the network • Default Gateway Address: if unknown or not required enter 0.0.0.0 • DCCP Port: if blank then the network port will be the default value which is 2007 • The changes will not take effect until the controller has been restarted. Click on the Restart Unit button to restart the Nucleus2 router control module. • Having changed the controller IP address remember to use its new IP address to connect to it. • If the controller is one of a pair in the router the other controller’s replication address details must be changed to match the new IP address details set (see section 14.3.6 for details). 14.3.8 Setting the Network Communication Speed of a Nucleus2 Controller The Nucleus2 network communication speed is set using the Workbench Online Editor in the IP address configuration section, see section 14.3.7 for details. Issue 5 Rev 2 Page 245 © 2014 Snell Limited Sirius 800 www.snellgroup.com Nucleus Router Control Modules 14.3.9 Enable/Disable RollCall on a Nucleus2 Controller Using the Online Editor RollCall is enabled on the controller by default. If RollCall needs to be disabled then this is done using the Workbench Online Editor. The RollCall Command Set Files must be present on the controller to connect using RollCall (see the Sirius 800 Maintenance & Upgrade manual for details on installing these files if they are not present). 2463 Nucleus2 Router Control Module Navigate to: ConfigurationItems | RollCall Note: • Enabled = - set to True to enable RollCall and False to disable RollCall. The other settings are shown with their default values and they need not be changed unless instructed to do so by Snell Support. • StartupDelay = 5 • SharePort = 2050 • BridgePort = 2600 • BridgeRemoteAddress = 128.1.1.1 • BridgeAutoConnect = False • Name = Router • Information1 = Info1 • Information2 = Info2 • NetNibbles = 1000 • UseLongNames = False • Changes will not take effect until the controller has been reset. • If two Nucleus2 controllers are fitted in a router then the second one must also be enabled for RollCall. Connect to the RollCall web applet by typing the controller IP address into the address bar of your web browser. When the Nucleus2 web page is displayed click on the RollCall Control tab and the RollCall web applet will start. Issue 5 Rev 2 Page 246 © 2014 Snell Limited Sirius 800 www.snellgroup.com Nucleus Router Control Modules 14.3.10 Enable/Disable Auto Change Over of Controller Ethernet Connection If a Nucleus2 2463 controller looses its Ethernet connection the system will auto change over to the second Nucleus2 controller (if a second controller is fitted and auto change over is enabled). The auto change over function using the Generic Online Editor. Auto change over is disabled by default. 2463 Nucleus2 Router Control Module Navigate to: ConfigurationItems | MiscellaneousFeatures AutoChangeoverIfNoNetworkTime = -1 (see below for details) • Auto change over can be enabled by setting the parameter to a number greater than or equal to Zero, This number is the time, in seconds, that the controller will wait after loosing network connection before changing over to the second controller. Note: • The default Auto Change Over Time is -1 = disabled. • Changes will not take effect until the controller has been reset. • If two Nucleus2 controllers are fitted in a router then the second one must also be configured with the same auto changeover settings. • The AutoChangeOverIfNoNetworkTime setting under the Features node is not used. 14.3.11 Further Information The Sirius 800 Maintenance & Upgrade manual contains details on; • Issue 5 Rev 2 Updating the controller software/firmware Page 247 © 2014 Snell Limited Sirius 800 www.snellgroup.com Nucleus Router Control Modules 14.4 Nucleus 2450 Router Controller Card Compact Flash Card, see section 14.4.3 LEDs, see section 14.4.1 Reset Switch Jumpers - Factory Use Only Fig 159. Nucleus 2450 Control Module Refer to the Workbench manual for details about configuring the Nucleus Controller. Note: • The Nucleus controller has a default database, use Workbench to configure the modules in the Sirius 800. Modules are configured from the Local Router hardware tab | Advanced Configuration | Edit Module Configurations... in Workbench. See the Workbench manual for full details. • The IP address of the Nucleus controller is found in the Config.ini file, see section 14.4.6. 14.4.1 Nucleus 2450 Controller LEDs The LEDs on the Nucleus controller card are shown in Fig 160. and Table 66. lists the 2450 Nucleus controller LED functions. Table 66. D4 D5 D6 D9 D10 D11 D12 D13 D14 D15 D16 Fig 160. Nucleus 2450 Controller LEDs Issue 5 Rev 2 Page 248 © 2014 Snell Limited Sirius 800 www.snellgroup.com Nucleus Router Control Modules Table 66. lists the 2450 Nucleus router control module LEDs. LED Description Active/Idle D4 • Blue = Active • Purple (Blue + Red) = Idle 100Mb Ethernet D5 • Green = 100 Mb (Ethernet) • Off = 10Mb Ethernet Ethernet Link D6 • Flashes = Ethernet activity Crosspoint Switch D9 • Toggles between Blue and Off each time a Crosspoint is switched D10 Not used D11 Not used D12 Not used Communications to other processor D13 • Green = Communications to other processor • Off = No communications to other processor LTC • Flashes Blue = 625 TC present • Green = 525 TC present, • Off = TC not present D14 When the Nucleus Controller powers up, if it detects a difference between what was configured last and the current configuration, it applies the new configuration and the D15 LED shows an FPGA validation error, see Fig 160. The next time the Nucleus Controller is rebooted there is no mismatch and therefore the D15 LED is off. If the D15 LED remains on, it could indicate a fault in the interface to the modules. D15 An FPGA interface validation error occurs if the software detects a difference between the modules configured in the database and the configuration last written to the modules in the frame. This can happen when a reconfigure is done to recognise new cards and the Nucleus Controller is rebooted. On a dual processor system, the D15 LED can indicate a mismatch between the databases on the two controllers. • Red = FPGA interface validation error • Off = no error Active/Idle D16 Table 66. Issue 5 Rev 2 • Flashes Green = Active • Flashes Red = Idle 2450 Nucleus Router Control Module LEDs Page 249 © 2014 Snell Limited Sirius 800 www.snellgroup.com Nucleus Router Control Modules 14.4.2 Nucleus 2450: Sirius 800 Input and Output Port Mapping Note: 14.4.2.1 • The information in this section is only correct if the Sirius 800 router is fitted with Nucleus 2450 router controllers with the default database. Databases can be modified including the mapping information. If this is the case please see the database configuration for details. • When the Sirius 800 router is fitted with 2463 router controllers using the default database the number scheme will be different. Please see the database configuration for details. Sirius 830 Input and Output Port Mapping Table 67. shows the Sirius 830 crosspoint address mapping: Input/Output Range Addresses Video Inputs 1 to 288 Source 0 to 287 Main Video Outputs 1 to 288 Destination 0 to 287 Multiviewer Outputs 1 to 140 Destination 1152 to 1291 the default configuration controls these as 289 to 428 as this then reduces the matrix size and provides a continuous range of outputs Monitoring Outputs 1 to 4 Destination 16370 to 16373 Video Destinations 289 to 1152 are not used and do not respond to any control Table 67. 14.4.2.2 Sirius 830 Input and Output Port Mapping Sirius 840 Input and Output Port Mapping Frame ID Switch set to 3 - see section 16.3.1. Table 68. shows the Sirius 840 crosspoint address mapping: Input/Output Range Addresses Video Inputs 1 to 576 Source 0 to 575 Main Video Outputs 1 to 576 Destination 0 to 575 Multiviewer Outputs 1 to 140 Destination 1152 to 1291 the default configuration controls these as 577 to 716 as this then reduces the matrix size and provides a continuous range of outputs Monitoring Outputs 1 to 4 Destination 16370 to 16373 Video Destinations 577 to 1152 are not used and do not respond to any control Table 68. Issue 5 Rev 2 Sirius 840 Input and Output Port Mapping Page 250 © 2014 Snell Limited Sirius 800 www.snellgroup.com 14.4.2.3 Nucleus Router Control Modules Sirius 850: Input Output Port Mapping Sirius 850 Single Frame: Frame 1 of 1 (Frame ID Switch set to 0 - see section 16.3.1) Table 69. shows the Sirius 850 crosspoint address mapping for Frame 1 of 1: Input/Output Range Addresses Video Inputs 1 to 576 Source 0 to 575 Main Video Outputs 1 to 576 Destination 0 to 575 Expansion Video Outputs (using 5928 expansion modules & 1293 expansion output rear panels) 577 to 1152 576 to 1151 *Multiviewer Outputs (using two 1291 multiviewer rear panels) 1 to 96 Destination 1152 to 1199 & Destination 1224 to 1271 Monitoring Outputs 1 to 4 Destination 16370 to 16373 Table 69. Note: Sirius 850: Input Output Port Mapping (Frame 1 0f 1) *Multiviewer Outputs: 1152 to 1291 only if two 1292 multiviewer MV-Link rear panels are fitted - (no longer supplied) Expanded Sirius 850 Two Frame System Sirius 850 frame one of two (Frame ID Switch set to 1 - see section 16.3.1) Table 70. shows the Sirius 850 crosspoint address mapping for Frame 1 of 2: Input/Output Range Addresses Video Inputs 1 to 1152 Source 0 to 1151 Main Video Outputs (using 5928 expansion modules & 1290 expansion output rear panels) 1 to 576 Destination 0 to 575 *Multiviewer Outputs (using two 1291 multiviewer rear panels) 1 to 96 Destination 1152 to 1199 & Destination 1224 to 1271 Monitoring Outputs 1 to 4 Destination 16370 to 16373 Destinations 577 to 1152 are not used and do not respond to any control Table 70. Note: Issue 5 Rev 2 Sirius 850: Input Output Port Mapping (Frame 1 0f 2) *Multiviewer Outputs: 1152 to 1291 only if two 1292 multiviewer MV-Link rear panels are fitted - (no longer supplied) Page 251 © 2014 Snell Limited Sirius 800 www.snellgroup.com Nucleus Router Control Modules Sirius 850 frame two of two (Frame ID Switch set to 2 - see section 16.3.1) Table 71. shows the Sirius 850 crosspoint address mapping for Frame 2 of 2: Input/Output Range Addresses Video Inputs 1 to 1152 Source 0 to 1151 Main Video Outputs (using 5928 expansion modules & 1290 expansion output rear panels) 577 to 1152 Destination 576 to 1151 *Multiviewer Outputs (using two 1291 multiviewer rear panels) 1 to 96 Destination 1292 to 1339 & Destination 1364 to 1411 Monitoring Outputs 1 to 4 Destination 16370 to 16373 Destinations 1 to 576 are not used and do not respond to any control Table 71. Note: Sirius 850: Input Output Port Mapping (Frame 2 0f 2) *Multiviewer Outputs: 1292 to 1431 only if two 1292 multiviewer MV-Link rear panels are fitted - (no longer supplied) 14.4.3 Nucleus 2450: Config.ini File The Nucleus configuration details can be found in the Config.ini file which is on the Compact Flash memory card. The Config.ini file stores configuration details such as; Test Mode, switching delay, SW-P-02 over IP settings, etc. See the Workbench user manual for full details of the Config.ini file. The following entries are required in the Config.ini file: [DEBUG] TestMode=0 Snell internal testing use only. Must be set to “=0” for router control. The Nucleus router control module will not be able to control the router if TestMode is set to any other value. [ROUTING] Set_Delay=-1 A delay in milliseconds before setting a crosspoint following the first crosspoint received. The default is -1 (disabled). The purpose is to ensure multiple crosspoints, sent serially, are set on a single frame boundary. For example, if an external controller is setting two crosspoints serially using general switcher protocol, and the external controller cannot tell where in the frame it is sending the messages, it is possible for one crosspoint to go on one frame, and the second on the next, if the serial commands straddled a frame. By configuring a Set Delay of two milliseconds (the time to send the second crosspoint), both crosspoints will have been received when they are set. That way both crosspoints will go on the same frame. [CONFIG] ResetAfterConfigPush=1 Issue 5 Rev 2 Configure the action to be taken after a configuration push. Set to “1” to restart the controller after a full database push. Default “0” disables automatic restart. Page 252 © 2014 Snell Limited Sirius 800 www.snellgroup.com Nucleus Router Control Modules [O2overIP] Enable=true Enables SW-P-02 protocol over IP control. Note: The default setting for this parameter is Enabled, so if the parameter is missing, or commented out, it will still be enabled. TCP_IP_Port=2000 Port used for TCP/IP server connection. Default port is 2000. UDP_Connect_Port=2001 Port used for UDP broadcast messages for connecteds. Default port is 2001. UDP_Stat6_Port=2002 Port used for UDP broadcast messages for status 6 changes. Default port is 2002. Connect_MC_addr=224.1.1.1 Multi-cast address used for connecteds. Default address is 224.1.1.1 Issue 5 Rev 2 Stat6_MC_addr=224.1.1.2 Multi-cast address used for status 6 changes. Default address is 224.1.1.2 TCP_IP_Link_Time=0 Time (in seconds) that the link remains open after the last message is received. A value of 0 causes the link to remain open indefinitely. Default is 0 (ink remains open indefinitely). Polltime=1000 The frequency (in milliseconds) the 2450 polls the router for status. Default value is every 1000 milliseconds. Increasing this value reduces the load on 2450 and the router by polling it less frequently. However, it does in crease the time before an error is reported. It may be necessary to do this on a heavily loaded 2450 or router. Reducing this value reduces the time before an error is reported but increases the load on the 2450 and the router. The value should not be set lower than the TIMEOUT value. Timeout=50 This is the timeout in milliseconds for a response from the router. The default is 50 milliseconds. This should be sufficient for most routers when single commands are sent in a TCP/IP packet. If multiple connect messages are sent in a single TCP/IP packet the timeout should be increased to 200 milliseconds. Also if the router is heavily loaded this value may need to be increased. The number of TCP/IP connections to the 2450 should not effect the timeout, since this is the timeout on the serial port to the router. The clients connecting to the 2450 may need to adjust their timeout for the response on the network due to messages on multiple TCP/IP connections being serialized to the router. Return_Status_5=true This determines whether status request 1 messages return the status response 5 message, or whatever response is returned from the router. The default is YES. Setting this to NO means that status response 1 to 4 are returned depending on what router the 2450 is connected to (See SW-P-02 for which routers return which responses). This is intended for use with existing equipment that does not support the status response 5 message. TCP_Connecteds=true Used to switch on or off unsolicited connects on the TCP connection. When set to false a connected messages are only sent on a TCP port in response to a connect on that TCP port. When set to true it behaves more like the serial ports in that whenever a crosspoint is set a connected is sent on all open TCP connections, even if not set by a command on that port, for example, a panel. The default =true. Connect_MC_ENA=true Enables the multi-cast address used for connecteds. Default=true. Stat6_MC_ENA=true Enables the multi-cast address used for status 5 changes. Default=true. Page 253 © 2014 Snell Limited Sirius 800 www.snellgroup.com Nucleus Router Control Modules 14.4.4 Nucleus 2450: Network.ini File Each Nucleus 2450 controller has its own configuration file that defines the network connections. The Network.ini file can be edited using a text editor, for setting the IP address, for example. The following fields are required in the Network.ini file: [NETWORK] Force10M=1 The “Force10M” flag specifies whether the network speed of the controller is limited to 10Mbits per second or 100Mbits per second. For Sirius 800 routers this must be set to 1, this is the default value and sets the network communication speed to 10 Mbps. IPAddress= nnn.nnn.nnn.nnn This specifies a standard 4 byte IPv4 address. This value is not used if “UseDHCP” is set to 1. SubNetMask= nnn.nnn.nnn.nnn. This specifies a standard 4 byte IPv4 subnet mask. This value is not used if “UseDHCP” is set to 1. DefaultGateway= nnn.nnn.nnn.nnn This specifies a standard 4 byte IPv4 address of the default gateway. This value is not used if “UseDHCP” is set to 1. DNSAddress= nnn.nnn.nnn.nnn This specifies a standard 4 byte IPv4 address of the domain name server. This value is not used if “UseDHCP” is set to 1. UseDHCP=1 The “UseDHCP” parameter is used to specify if the Nucleus controller should obtain an IP address via DHCP (as opposed to the address specified in the ini file). If this is set to 1 then the IP address of the controller is assigned by the local DHCP server and the IPAddress, SubNetMask, DefaultGateway and DNSAddress settings in the ini file are ignored. If it is set to 0 then the ini file settings is used. If “UseDHCP” is not specified in the ini file then it defaults to 1. UseSNMP=1 The “UseSNMP” flag enables or disables the SNMP features on the controller card. If set to 0 no SNMP features are activated on the card. If set to 1 the SNMP features are activated (subject to the restrictions in the next section). Note. If this changes, the card requires a restart. If this entry is omitted from the ini file it defaults to 0. [ROLLCALL] Enable=1 The “Enable” flag enables or disables the ability of the Nucleus 2450 router controller to connect to a computer running RollCall. Set to 1 to enable RollCall connection (this is the default setting) or set to 0 to disable RollCall connection. StartupDelay=5 SharePort=2050 BridgePort=2600 BridgeRemoteAddress= 128.1.1.1 BridgeAutoConnect=0 Name=2450 Information1=Info1 Information2=Info2 NetNibbles=1000 UseLongNames=0 Issue 5 Rev 2 These settings are shown with their default values and they need not be changed unless instructed to do so by Snell Support Page 254 © 2014 Snell Limited Sirius 800 www.snellgroup.com Nucleus Router Control Modules [SNMP] Version=Version Description Text The “Version” variable is the text that is returned when the sysDescr SNMP request (.1.3.6.1.2.1.1.1) is received by the card. Contact=Unknown The “Contact” variable is the text that is returned when the sysContact SNMP request (.1.3.6.1.2.1.1.4) is received by the card. This can be set to the name and/or contact details responsible for this equipment. Location=Unknown The “Location” variable is the text that is returned when the sysLocation SNMP request (.1.3.6.1.2.1.1.6) is received by the card. This can be set to the physical location of the equipment in the facility. SysName=2450 The “SysName” variable is the text that is returned when the SysName SNMP request (.1.3.6.1.2.1.1.5) is received by the card. This can be set to the name by which the equipment is locally referred to. NumberCommunityGet Names=1 The “NumberCommunityGetNames” variable is used to specify how many community get names are listed in the ini file using the CommunityGetNameN variable. Up to 2 community strings of up to 20 characters in length can be specified for get operations. This is typically set to 1. NumberCommunitySet Names=1 The “NumberCommunitySetNames” variable is used to specify how many community get names are listed in the ini file using the CommunitySetNameN variable. Up to 2 community strings of up to 20 characters in length can be specified for set operations. This is typically set to 1. TrapManager=1 The “TrapManager” variable is used to specify how many trap manager addresses are listed in the ini file using the TrapManagerAddrN variable. Up to 10 trap manager addresses can be specified. Any more than this is ignored. This is typically set to 1. TrapManagerAddrN=172. The “TrapManagerAddrN” variable is used to specify the IP 31.7.133 address for trap managers. The N should be replaced by the number of the trap manager (1-10). Issue 5 Rev 2 CommunityGetName N=public The “CommunityGetNameN” variable is used to specify 1 of the community strings used for get operations. The N should be replaced by a unique digit (either 1 or 2). CommunitySetName N=private The “CommunitySetNameN” variable is used to specify 1 of the community strings used for set operations. The N should be replaced by a unique digit (either 1 or 2). EnableSnellTraps=1 The “EnableSnellTraps” variable is used to specify whether traps are sent for changes to certain Snell specific variables. If this is set to 0 MIBv2 system traps are sent, but no Snell specific traps (for example, routed source change) are sent. Page 255 © 2014 Snell Limited Sirius 800 www.snellgroup.com Nucleus Router Control Modules [SNMP] TrapMessageDelay=10 The “TrapMessageDelay” variable specifies the number of milliseconds minimum that occurs between consecutive Snell trap messages. For example if it is set to 10 there is a gap of at least 10ms between each Snell specific trap message that is sent. The reason for this is that when large numbers of crosspoints are changed simultaneously (for example) a large number of traps can be sent in quick succession, which can cause unnecessary loading on the controller and management station. It is recommended that this variable is set to a value between 0 and 100. Note: No traps are discarded as a result of this setting they are simply queued up and sent at the specified intervals. DisableInitialNotify=1 Issue 5 Rev 2 The “DisableInitialNotify” flag can be used to prevent the controller card from sending power on startup traps for each variable type that supports traps. The reason for implementing this flag is that in a router with a large number of destinations (512 for example) there are 5 trappable parameters per destination. On startup this particular router would result in 2560 traps for the destination variables alone. By setting this variable to 1 these initial traps are not sent (but all subsequent ones are). This is global setting that affects all Snell specific variables. Page 256 © 2014 Snell Limited Sirius 800 www.snellgroup.com Nucleus Router Control Modules 14.4.5 Nucleus 2450: Viewing/Modifying Config.ini and Network.ini Files The Nucleus 2450 controller Compact Flash card stores the Config.ini file and the Network.ini file. These files are used to set various controller parameters and can be modified if required to change controller configuration. The contents of the Config.ini file are listed in section 14.4.3 and the contents of the Network.ini file are listed in section 14.4.4. This section describes how to view and modify the ini files using a simple text editor such as Microsoft Notepad. There are two methods to modify the ini files: 14.4.5.1 • FTP access to the Nucleus, see section 14.4.5.1. • Removing the compact flash card and viewing/modifying an ini file on the compact flash card, see section 14.4.5.2. Modify an ini File Using FTP 1. Use Workbench to check the IP address(es) of the Nucleus controller(s) to be updated. 2. Use a client FTP program such as “FileZilla” or “SmartFTP”. Open an FTP connection to either one of the Nucleus controllers in the router using the IP address of the Nucleus and the normal login: User: 2450 Password: xyz 3. Note: Note: If no changes are required the ini file can simply be opened with a text editor, such as Microsoft Notepad, viewed and then closed again without saving. Before making any changes backup the ini file to be modified to the computer using the FTP software. It is a good idea to modify the backup filename with a date in case it is required at a future date. 4. Copy the ini file to be modified from the controller to your computer using the FTP software and open it using a text editor such as Microsoft Notepad. 5. Make any changes required to the ini file and Save the modified file to the computer. 6. Copy the modified ini file back to the controller using the FTP software and confirm that the file is to be overwritten when prompted. 7. Now use the FTP program to connect to the second Nucleus controller (if it is fitted) and repeat the process so that both controllers contain the modified ini file. 8. Now with the modified ini file on both controllers check which of the controllers is Idle (using Workbench) and reset the idle controller from the controller Reset button or Workbench. If the router is only fitted with a single controller the controller will be Active rather than Idle. 9. If only one controller is fitted to the router frame the update will be complete once the controller has rebooted and is displayed as connected (Green) in Workbench. 10. If a second controller is fitted reset it from the Workbench Controller Configuration interface software so that it goes Idle. Issue 5 Rev 2 Page 257 © 2014 Snell Limited Sirius 800 www.snellgroup.com 14.4.5.2 Modify an ini File Using Copy 1. Note: Ensure the Nucleus Controller card to be removed is idle: If the router is only fitted with a single controller the controller will be Active rather than Idle. Nucleus Controller 2450 Table 72. Note: Nucleus Router Control Modules LED Number/Color LED D4: Idle = Purple Active = Blue LED Number/Color LED D16: Idle = Flashing Red Active = Flashing Green Nucleus 2450 Active/Idle LED Status 2. If the Nucleus controller to be removed is Active (see Table 72.) press the reset button on it (see Fig 159. on page 248) and the Active and Idle Nucleus controllers will swap over. 3. Remove the Idle Nucleus controller card. 4. Remove the Compact Flash memory card from the Nucleus controller and insert it into a card reader. 5. Plug the card reader into your computer and view the files on the memory card. 6. If no changes are required the ini file can simply be opened with a text editor, such as Microsoft Notepad, viewed and then closed again without saving. Before making any changes backup the ini file to be modified to the computer. It is a good idea to modify the backup filename with a date in case it is required at a future date. 7. Open the ini file to be modified using a text editor such as Microsoft Notepad. 8. Make any changes required to the ini file and Save the modified file to the Compact Flash card. 9. Eject the Compact flash card from your computer and remove the Compact flash card. 10. Insert the Compact flash card back in the Nucleus controller. 11. Replace the Nucleus controller in the router and it will reboot. 12. If changes are also required on the second Nucleus controller (if it is fitted) repeat the process so that both controllers contain the modified ini file. 14.4.6 Nucleus 2450: Changing the IP Address The Nucleus controller IP address and network connection information is stored in the Network.ini file on the Compact Flash card on the Nucleus controller, see section 14.4.4 for details of the contents of the Network.ini file. The Network.ini can be opened by using a text editor such as Microsoft Notepad at which point it can be viewed, backed up and modified as required. If the IP address is known then this can be done remotely via FTP software or if it is not known then the Compact Flash card can be removed from the controller and read locally on a computer. See section 14.4.5 for details on both methods. Note: Issue 5 Rev 2 If the controller IP address is changed remember to use the new IP address to connecting to it. Page 258 © 2014 Snell Limited Sirius 800 www.snellgroup.com Nucleus Router Control Modules 14.4.7 Nucleus 2450: Setting the Network Communication Speed The Nucleus 2450 network communication speed is set in the controller Network.ini file. The Nucleus 2450 controller network speed must be set to 10 Mbps, see section 14.4.4 for details. 14.4.8 Nucleus 2450: Enabling RollCall RollCall is enabled by default. To use RollCall with the router the RollCall template files must be loaded on the controller and RollCall must be enabled in the controller Network.ini file. In the [RollCall] section of the ini file change Enabled=0 to Enabled=1. For details on editing the Network.ini files see section 14.4.5. 14.4.9 Nucleus 2450: Setting Parity for SW-P-02 & SW-P-08 Protocols Note: • The default parity settings for the SW-P-02 and SW-P-08 protocol are correct when used with Snell products and need not be changed. • Some third party products use a parity that is different from the default parity. In this case the parity used by the Snell router controller can be changed to match the third party product. Parity can be changed for communication ports configured with SW-P-02 or SW-P-08 protocols (Nucleus 2450 only). Parity is set using the Workbench Generic Editor and can be; Default, None, Even or Odd. Note: • For a dual controller router systems select the inactive controller and set that one first. • The new Parity setting will only take effect after the controller has been restarted. Using the Generic Editor Navigate to: RouterController | Comms | Comms[1] to [4] (as required) | CommsType: Serial | Parity= Parity options are: • Default: - SW-P-02 - Even - SW-P-08 - None • None • Even • Odd Push the new configuration to the controller (see the Workbench user manual for details). In a dual controller system make the updated controller active, select it and click on the Copy to Partner button to update the second controller. 14.4.10 Further Information The Sirius 800 Maintenance & Upgrade manual contains details on updating the controller software/firmware. Issue 5 Rev 2 Page 259 © 2014 Snell Limited Sirius 800 www.snellgroup.com Nucleus Router Control Modules 14.5 Multi-Drop Panel Communications Protocol (SW-P-06) This protocol is designed to communicate between a Snell router control system and serially controlled router Control Panels. Up to sixteen devices may be daisy chained onto one multi-drop control port, each device requires a unique address, identified using an address switch. The control system database must hold configuration data for all devices. The full specification for this protocol is available from the Customer Support section of the Snell web site. http://www.snellgroup.com/support/customer-support 14.6 General Switcher Protocol (SW-P-02) The General Switcher Communication Protocol can be used to control Snell routers. It uses numbers in the range 0 to 16383 (when in extended mode) to set, acknowledge and poll crosspoints via a single Nucleus control module. Master router ports must be configured for this protocol if the router is to be controlled by a Centra or Aurora control system. If the system is a multi-level router, and configured as such in it’s database, all levels may be controlled using a destination offset appropriate to its level position in the Nucleus database settings. In order for Centra or Aurora (or any system using General Switcher protocol) to control a multi-level Nucleus system, the user must have knowledge of the local database in use, only then can the router control module direct the correct the data to the correct crosspoints. The full specification for this protocol is available from the Customer Support section of the Snell web site. http://www.snellgroup.com/support/customer-support 14.6.1 SW-P-02 Routing, Monitoring O/Ps & MV Destination Control Note: • The information in this section is only correct if the Sirius 800 router is fitted with Nucleus 2450 router controllers with the default database. Databases can be modified including the SW-P-02 information. If this is the case please see the database configuration for details. • When the Sirius 800 router is fitted with 2463 router controllers using the default database the number scheme will be different. Please see the database configuration for details. Extended commands - Interrogate (65), Connect (66), Tally (67), Connected (68). For all these commands the monitor rows are mapped onto destinations starting at 16370* (0x3FF2). Note: All numbers with an Asterisk (*) against them are Base 0. • Destination 16370* = Monitor row 1 • Destination 16371* = Monitor row 2 • Destination 16372* = Monitor row 3 • Destination 16373* = Monitor row 4 Alternatively use the New Monitor Row Interrogate or connect commands in SW-P-02 issue 32 and above. The sources are mapped the same way as the standard commands, however all of the inputs are now accessible. Note: Issue 5 Rev 2 Monitor Row Source Numbering Some older routers only had output monitoring which was addressed as sources 0 to 575*. When the input monitoring feature was added to routers the input monitoring sources had to be added on top of the existing range to maintain compatibility with the older routers and controllers. Page 260 © 2014 Snell Limited Sirius 800 www.snellgroup.com 14.6.1.1 Nucleus Router Control Modules Sirius 830 Fig 161. Sirius 830 Router Diagram • Main video inputs and outputs are 1 - 288 • Outputs 16370* = Monitor row 1 • Outputs 16371* = Monitor row 2 • Outputs 16372* = Monitor row 3 • Outputs 16373* = Monitor row 4 • Note: Issue 5 Rev 2 • Mon Row Sources 0 - 287* = outputs 0 - 287* • Mon Row Sources 576* - 863* = inputs 0 - 287* Outputs 1153 - 1292 are multiviewer outputs All numbers with an Asterisk (*) against them are Base 0. Page 261 © 2014 Snell Limited Sirius 800 www.snellgroup.com 14.6.1.2 Nucleus Router Control Modules Sirius 840 Fig 162. Sirius 840 Router Diagram • Main video inputs and outputs are 1 - 576 • Outputs 16370* = Monitor row 1 • Outputs 16371* = Monitor row 2 • Outputs 16372* = Monitor row 3 • Outputs 16373* = Monitor row 4 • Note: Issue 5 Rev 2 • Mon Row Sources 0 - 575* = outputs 0 - 575* • Mon Row Sources 576* - 1151* = inputs 0 - 575* Outputs 1153 - 1292 are multiviewer outputs All numbers with an Asterisk (*) against them are Base 0. Page 262 © 2014 Snell Limited Sirius 800 www.snellgroup.com 14.6.1.3 Nucleus Router Control Modules Sirius 850 (Single Frame with Optional Expansion Outputs) Sirius 850 single router with optional expansion outputs: Fig 163. Sirius 850 Single Router Diagram • No expansion outputs used - Main video inputs and outputs are 1 - 576 Expansion outputs used - Main video inputs are 1 - 576 and outputs are 1 - 1152 • Outputs 16370* = Monitor row 1 • Outputs 16371* = Monitor row 2 • Outputs 16372* = Monitor row 3 • Outputs 16373* = Monitor row 4 • Note: Issue 5 Rev 2 • - No expansion outputs used - Mon Row Sources 0 - 575* = outputs 0 - 575* - Mon Row Sources 576 - 1151 = inputs 0 - 575* • - Expansion outputs used - Mon Row Sources 0 - 1151* = outputs 0 - 1151* - Mon Row Sources 576 - 1151* = inputs 0 - 575* Single frame - Outputs 1153 - 1292 are multiviewer outputs All numbers with an Asterisk (*) against them are Base 0. Page 263 © 2014 Snell Limited Sirius 800 www.snellgroup.com 14.6.1.4 Nucleus Router Control Modules Sirius 850 (Dual Frame) Sirius 850 dual routers connected together: Fig 164. Sirius 850 Dual Router Diagram Note: Issue 5 Rev 2 • Frame 1 of 2 - Main video inputs and outputs are 1 to 576 • Frame 2 of 2 - Main video inputs and outputs are 577 - 1152 • Outputs 16370* = Monitor row 1 • Outputs 16371* = Monitor row 2 • Outputs 16372* = Monitor row 3 • Outputs 16373* = Monitor row 4 • Frame 1 of 2 - Mon Row Sources 0 - 575* = outputs 0 - 575* - Mon Row Sources 576 - 1151 = inputs 0 - 575* • Frame 2 of 2 - Mon Row Sources 0 - 575* = outputs 0 - 575* - Mon Row Sources 576 - 1151 = inputs 0 - 575* • Frame 1 of 2 - Outputs 1153 - 1292 are multiviewer outputs • Frame 2 of 2 - Outputs 1293 - 1432 are multiviewer outputs All numbers with an Asterisk (*) against them are Base 0. Page 264 © 2014 Snell Limited Sirius 800 www.snellgroup.com Control/Fan Interface Module 15. Control/Fan Interface Module Two Control/fan interface modules are fitted in each router. The control/fan interface modules performs the following functions: • Fanning out of the control busses • Dual redundant fan out of control busses • Driving all the fans • Dual redundant fan power • Collecting alarm signals from power supply shelves and fans. • Generating relay alarm outputs In addition to the above functions, the module has the following secondary functions: • Providing power to the LED's in the door • Providing power and control to the Catsii LED's on the control rear panel Connectors to the Motherboard LEDs Connectors to the Bottom Motherboard Fig 165. Control/Fan Interface Module - Video Processing Compatible Version Shown Issue 5 Rev 2 Page 265 © 2014 Snell Limited Sirius 800 www.snellgroup.com Control/Fan Interface Module 15.1 Control/Fan Interface Module Compatibility Three versions of the control/fan interface module exist for each of the Sirius 800 routers. Sirius 830: Control/Fan Interface Module Supports Table 73. 2457 Supports video/audio routing and video/audio processing. 2455 Supports video/audio routing and audio processing but cannot be used if any video signals need video processing. 2453 Supports video routing and cannot be used if any audio signals need to be routed. Sirius 830 Control/Fan interface Compatibility Sirius 840/850: Control/Fan Interface Module Supports Table 74. Important: Issue 5 Rev 2 2458 Supports video/audio routing and video/audio processing. 2456 Supports video/audio routing and audio processing but cannot be used if any video signals need video processing. 2452 Supports video routing and cannot be used if any audio signals need to be routed. Sirius 840/850 Control/Fan interface Compatibility • When two control/fan interface modules are fitted in the router they must both be the same version. For the Sirius 840/850 for example: either 2 x 2452, 2 x 2456 or 2 x 2458 modules should be fitted. • The 2452/2453 modules can only be fitted in original unmodified Sirius 800 routers, see Table 5. in section 3.11 for identification details. • The 2457/2458 modules can only be fitted in Sirius 800 routers built or modified with blue fan casings, see section 3.11 for identification details. • The 2455/2456 modules can only be fitted in Sirius 800 routers modified with silver fan casings stamped with “HF”, see Table 5. in section 3.11 for identification details. • DO NOT fit Blue Control/Fan Interface modules (2457/2458) in a router equipped with fans with Silver casings as this will damage the router and the router will stop working. • DO NOT fit Green Control/Fan Interface modules (2455/2456/2452/2453) in a router equipped with fans with Blue casings as this will damage the router and the router will stop working. Page 266 © 2014 Snell Limited Sirius 800 www.snellgroup.com Control/Fan Interface Module Table 75. lists compatibility between the Sirius 800 modules and the control/fan interface modules. 2457/2458 Control/Fan Interface Module Compatibility 2455/2456 Control/Fan Interface Module Compatibility 2452/2453 Control/Fan Interface Module Compatibility 2450 - Nucleus Router Control Module No No Yes 2463 - Nucleus2 Router Control Module Yes Yes Yes Modules Nucleus Controllers Input Modules 5913 - Sirius 840/850 Standard Video BNC Input module Yes Yes Yes (not Sirius 830) (not Sirius 830) (not Sirius 830) 5914 - Sirius 840/850 Standard Video Fiber input module Yes Yes Yes (not Sirius 830) (not Sirius 830) (not Sirius 830) 5915 - Sirius 800 Video AHP input module Yes Yes No 5916 - Sirius 830 Standard Video BNC/Fiber input module Yes (not Sirius 840/850) Yes (not Sirius 840/850) Yes (not Sirius 840/850) 5917 - Sirius 800 Standard Video BNC/Fibre input module Yes Yes Yes 5919 - Sirius 800 Video AHP input module with delay and sync capability Yes No No 4915 - Sirius 800 AES/MADI input module 120 AES Pairs and up to 3 MADI inputs or 4915 - Sirius 800 AES/MADI input module 12 MADI (Main & Redundant) Yes Yes No Output Modules 5923 - Sirius 840/850 Standard Video BNC output module Yes Yes Yes (not Sirius 830) (not Sirius 830) (not Sirius 830) 5924 - Sirius 840/850 Standard Video Fiber output module Yes Yes Yes (not Sirius 830) (not Sirius 830) (not Sirius 830) 5925 - Sirius 800 Video AHP output module Yes Yes No 5926 - Sirius 800 Standard Video output module (non-expandable) Yes Yes Yes Yes (not Sirius 840/850) Yes (not Sirius 840/850) Yes (not Sirius 840/850) 5937 - Sirius 830 Standard Video BNC/Fiber output module 5938 - Sirius 850 Standard Video output module (expandable) Only fitted if expansion is required between two Sirius 850 frames 5949 - Sirius 800 Video embedding & AHP output module with delay and sync capability Table 75. Issue 5 Rev 2 Yes Yes Yes (not Sirius 830) (not Sirius 830) (not Sirius 830) Yes No No Control/Fan Interface Module Compatibility Table. Page 267 © 2014 Snell Limited Sirius 800 www.snellgroup.com Control/Fan Interface Module Modules 2457/2458 Control/Fan Interface Module Compatibility 2455/2456 Control/Fan Interface Module Compatibility 2452/2453 Control/Fan Interface Module Compatibility 4925 - Sirius 800 AES/MADI output module (no audio delay) - 120 AES Pairs and up to 3 MADI outputs or 4925 - Sirius 800 AES/MADI output module (no audio delay) - 12 MADI (Main & Redundant) Yes Yes No 4929 - Sirius 800 AES/MADI output module with audio delay - 120 AES Pairs and up to 3 MADI outputs or 4929 - Sirius 800 AES/MADI output module with audio delay - 12 MADI (Main & Redundant) Yes Yes No 5901/5905 - Sirius 800 Series Video crosspoint module Yes Yes Yes 5903 - Sirius 800 Audio crosspoint module Yes Yes No Crosspoint Modules Table 75. Control/Fan Interface Module Compatibility Table. 15.1.1 Fan-Out The control bus is fanned out to the router motherboard. The return signals from each module are combined together and sent back to the control modules. This functionality is copied making it dual-redundant. Only one of these modules can be active, so an active/inactive changeover is implemented similar to that on the controller itself. 15.1.2 Sirius 850: Control/Fan Interface Module in a Two Frame System All the signals to the bottom motherboard are routed from the local controller. In a single frame system the control signals are sent to all the modules in the frame. In a two frame system control signals are distributed to the local and remote busses. If the control signals from the remote bus fail, the data to the expansion outputs and crosspoints is substituted by the local control. In a single frame system the input module never illuminates the “Control Error” LED. In a two frame system the input module illuminates this “Control Error” LED if the remote bus fails. Issue 5 Rev 2 Page 268 © 2014 Snell Limited Sirius 800 www.snellgroup.com Control/Fan Interface Module 15.1.3 Control/Fan Interface Module LEDs Table 76. shows the LED color code on the control/fan interface module, and Fig 166. shows the module LEDs. LED Color Function Detail Normal Working Status Green Power OK Power to the module Yellow Local Command OK Receiving messages from local Nucleus control module On Solid - working correctly Flashing - receiving information and working correctly Off - normal state Flashing - the command message from the router controller is corrupt or hasn’t been received. Red Local Error Error with messages from local Nucleus control module This communications error could be caused by a hardware failure although this is unlikely. Check that the module is inserted correctly. If the “Local Error” LED is flashing at the same time as the “Local Command OK” LED is flashing it suggests a mismatch in the configuration of the Nucleus controller. Yellow Table 76. Issue 5 Rev 2 Remote Command OK (not 2453/ 2455/2457) Receiving messages from remote Nucleus control module Sirius 830 - not fitted Sirius 840/850 - (no expansion): Off - Expansion not used. Sirius 850 (expanded to second frame): Flashing - receiving information and working correctly Control/Fan Interface Module LED Indication Page 269 © 2014 Snell Limited Sirius 800 www.snellgroup.com LED Color Function Control/Fan Interface Module Detail Normal Working Status Sirius 830 - not fitted Sirius 840/850 - (no expansion): Off - Expansion not used. Sirius 850 (expanded to second frame): Off - normal state, Flashing - the command message from the remote router controller is corrupt or hasn’t been received. Red Remote Error (not 2453/ 2455/2457) Error with messages from remote Nucleus control module This communications error could be caused by a hardware failure although this is unlikely. Check that the module is inserted correctly and the four RJ45 connections between the frames are fitted correctly (see section 12.2). If the “Remote Error” LED is flashing at the same time as the “Remote Command OK” LED is flashing it suggests a mismatch in the configuration of the Nucleus controller. Card is active On Solid - working correctly Active OK Remote COM Error (not 2453/2455/2457) Remote COM OK (not 2453/2455/2457) Local Com Error Control/Fan Interface Module LED Indication Power OK Table 76. Active Local COM OK Green Fig 166. Control/Fan Interface Module LEDs Issue 5 Rev 2 Page 270 © 2014 Snell Limited Sirius 800 www.snellgroup.com Control and Alarm Rear Panel Connections 16. Control and Alarm Rear Panel Connections 16.1 Sirius 830: Control Connections The Sirius 830 control rear panel located in the middle of the frame, contains all the control connectors for the router. PSU A Status Alarms PSU B Status 1 (Com 3) 2 (Com 4) RS485 Ports 3 (Com 5) Fuses Door Spare Door Ethernet 4 (Com 6) 1 2 3 Video Reference 4 Controller A Controller B Ethernet Connectors Balanced + LTC AES Reference Unbalanced Fig 167. Sirius 830 Control Panel Connector Function PSUA Status and PSU B Status 25-Way D-Type socket - PSU Alarm Inputs, collect alarm signals from the PSUs, using the supplied cable(s) ALARMS 25-Way D-Type socket - Alarm Outputs: Alarm outputs switch in the event of the following failures: Fan, Controller, PSU. For details on the output that switches for each failure see section 16.4.3. Ethernet A, B RJ45 x2 - Ethernet for Nucleus controller A and B If two Nucleus controllers are fitted both the Ethernet A and Ethernet B ports must be connected to the network. Video Reference BNC x 8 - Video reference (4 pairs, each with passive loop through) B+B, and Tri-level Note: No internal termination. RS485 1 (COM 3) to 4 (COM 6) Female 9 Pin D-Type socket x4 - Serial Control, these correspond to ports; COM 3 to COM 6 in Workbench. Door Fuse & Spare Fuse 5 A Anti-Surge, Ceramic fuse (5 mm x 20 mm) Door Ethernet RJ45 Ethernet - connects the door PC to an external network Table 77. Issue 5 Rev 2 Sirius 830 Control Rear Panel Page 271 © 2014 Snell Limited Sirius 800 www.snellgroup.com Control and Alarm Rear Panel Connections Connector Function AES Reference 9 Pin D-Type socket - AES reference 110balanced termination and LTC input termination Physically only one AES reference (balanced or unbalanced) should be connected. Connecting both will stop the audio router module(s) functioning correctly Table 77. Sirius 830 Control Rear Panel 16.2 Sirius 840/850: Control Connections AES Reference Controller A Controller B Unbalanced Balanced + LTC Ethernet Connectors 1 2 3 Video References 4 1 (COM 3) 2 (COM 4) RS485 Ports 3 (COM 5) 4 (COM 6) 1 2 Monitor Outputs 3 4 Ethernet Not Used EXP Not Used Fig 168. Sirius 840/850 Control Rear Panel Connector Function Unbal BNC - AES reference, 75 termination BAL + LTC 9 Pin D-Type socket - AES reference 110 balanced termination and LTC input termination Physically only one AES reference (balanced or unbalanced) should be connected. Connecting both will stop the audio router module(s) functioning correctly. Ethernet A, B RJ45 x2 - Ethernet for controller A and B. If two Nucleus controllers are fitted both the Ethernet A and Ethernet B ports must be connected to the network. Video Ref BNC x8 - Video reference (4 pairs, each with passive loop through) B+B, and Tri-level Note: No internal termination. RS485 1 (COM 3) to 4 (COM 6) 9 Pin D-Type socket x4 - Serial Control, these correspond to ports; COM 3 to COM 6 in Workbench Table 78. Issue 5 Rev 2 Control Rear Panel (Sirius 840/850) Page 272 © 2014 Snell Limited Sirius 800 www.snellgroup.com Control and Alarm Rear Panel Connections Connector Function Ethernet Not Used EXP Not Used Monitor Outputs 1 - 4 BNC x 4 - Supports 3G, SD, HD video and AES audio output monitoring (see section 13.7 for configuration requirements) Table 78. Control Rear Panel (Sirius 840/850) 16.3 Sirius 840/850: Alarm Rear Panel Connections The Alarm Rear Panel contains all the alarm control connectors for the Router. 4 x RJ45 Connectors Sirius 840 - Not Used Sirius 850 - Used when expanding between two Sirius 850 frames, see section 12.2.1 for details Alarms PSU Status B PSU Status A Frame ID Door Ethernet Door Fuse Spare Fuse Fig 169. Alarm Rear Panel Connections Connector Function 4 x RJ45 Connectors Sirius 840 - Not Used Sirius 850 - Used when expanding between two Sirius 850 frames, 12.2 for details Alarms 25-Way D-Type socket - Alarm Outputs: Alarm outputs switch in the event of the following failures: Fan, Controller, PSU. For details on the output that switches for each failure see section 16.4.3. For example the outputs can be used for warning lights in a panel or monitoring by an external control system. PSU Status B PSU Status A Table 79. Issue 5 Rev 2 25 Way D-Type socket x 2 - PSU Alarm Inputs. Collects alarm signals from the PSU(s), using the supplied cable(s) Sirius Alarm Rear Panel Connections Page 273 © 2014 Snell Limited Sirius 800 www.snellgroup.com Control and Alarm Rear Panel Connections Connector Function Frame ID Rotary Switch - Frame identification switch (see section 16.3.1 for full details): Sirius 840 - set to position 3 Sirius 850, single frame - set to position 0 Sirius 850, frame 1 of 2 - set to position 1 Sirius 850 frame 2 of 2 - set to position 2 Door Ethernet RJ45 Ethernet - Used to connect the door PC to an external network Door Fuse & Spare Fuse 5 A Anti-Surge, Ceramic fuse (5 mm x 20 mm) Table 79. Sirius Alarm Rear Panel Connections 16.3.1 Sirius 840/850: Frame ID Rotary Switch on the Alarm Rear Panel Each Sirius 840/850 router frame contains a rotary decimal switch situated on the Alarm rear panel, it is used to identify the system being used. The frame number is set using a 10 way rotary decimal switch on the rear of the router (see Table 79.). This uniquely identifies the Sirius 850 router within a multiple frame expanded system. The Frame ID switch should be set according to the following table: Frame Switch Value 0 Sirius 850: Only frame in a single frame system (576 x 1152) 1 Sirius 850: First frame in a two frame system expanded to 11522. (Outputs 1-576) 2 Sirius 850: Second frame in a two frame system expanded to 11522. (Outputs 577-1152) 3 Sirius 840 4 to 9 Table 80. Note: • Description These positions are reserved for future use Frame ID Numbering If a Sirius 850 router installation is modified from a single frame system to a two frame system (or back to a single frame system) the Frame ID will need to be changed on each Sirius 850. 16.4 Control I/O and Alarm Pin-outs 16.4.1 RS485 9 Way D-Type Socket Pins Multi-drop General Switcher and General Remote 1 9 Table 81. Issue 5 Rev 2 1 Chassis Chassis 2 Rx- Tx- 3 Tx+ Rx+ 4 0V 0V 5 N/C N/C 6 0V 0V 7 Rx+ Tx+ 8 Tx- Rx- 9 Chassis Chassis RS485 9 Way D-Type Socket Page 274 © 2014 Snell Limited Sirius 800 www.snellgroup.com Control and Alarm Rear Panel Connections 16.4.2 LTC & AES Reference 9 Way D-Type Socket Pins Function 1 9 Table 82. Note: • 1 GND 2 AES balanced + 3 Ground 4 LTC + 5 AES Unbalanced 6 GND 7 AES balanced - 8 Not connected 9 LTC - RS485 9 Way D-Type Socket Physically only one AES reference (balanced or unbalanced) should be connected. Connecting both will stop the audio router module(s) functioning correctly. 16.4.3 Alarm Relay Output 25 Way D-Type Socket Pins Function 1 14 25 13 NO NC COM Table 83. COM 1 Alarm 1 Normally Open 14 Alarm1 Common 2 Alarm 1 Normally Closed 15 Alarm 2 Normally Open 3 Alarm 2 Common 16 Alarm 2 Normally Closed 4 Alarm 3 Normally Open 17 Alarm 3 Common 5 Alarm 3 Normally Closed 18 Alarm 4 Normally Open 6 Alarm 4 Common 19 Alarm 4 Normally Closed 7 Alarm 5 Normally Open 20 Alarm 5 Common 8 Alarm 5 Normally Closed 21 Alarm 6 Normally Open 9 Alarm 6 Common 22 Alarm 6 Normally Closed 10 Alarm 7 Normally Open 23 Alarm 7 Common 11 Alarm 7 Normally Closed 24 Alarm 8 Normally Open 12 Alarm 8 Common 25 Alarm 8 Normally Closed 13 Not Connected Alarm Relay Output 25 Way D-Type Socket Alarm Number Table 84. NO NC Pins Function Alarm Description 1 Fans - Front 2 Fans - Rear 3 Controller Failure (ok if both controllers are operational) 4 Spare (later this could be implemented as a General Purpose Fault) 5 Power Supply 1 (& PSU 5 if present) 6 Power Supply 2 (& PSU 6 if present) 7 Power Supply 3 (& PSU 7 if present) 8 Power Supply 4 (& PSU 8 if present) Alarm Description Under normal operating conditions where everything is working correctly, the relay contacts are in their normally-closed (NC) position. Issue 5 Rev 2 Page 275 © 2014 Snell Limited Sirius 800 Issue 5 Rev 2 www.snellgroup.com Page 276 Control and Alarm Rear Panel Connections © 2014 Snell Limited Sirius 800 www.snellgroup.com Router and Power Supply Shelf Dimensions Appendix A. Router and Power Supply Shelf Dimensions A.1 Sirius 830 Frame Dimensions Make sure that sufficient space is available for the Sirius 830. For ventilation purposes, there must be an additional 50 mm (2 inch) gap on the left and right sides. The full height of the Sirius 830 is 668 mm (26.3 inches). Allow an additional 200 mm (8 inches) behind the unit for power, control and signal cables. Dimensions are of full size system (without the power supplies) Dimensions are in millimeters (inches). 17.60 668.1 594.3 23.40 130 6.82 173.3 5.12 481 8.44 18.94 214.4 20.77 527.5 26.30 540.2 21.27 447 22.61 574.4 Fig 170. Sirius 830 Frame Dimensions Issue 5 Rev 2 Page 277 © 2014 Snell Limited Sirius 800 www.snellgroup.com Router and Power Supply Shelf Dimensions A.2 Sirius 840 Frame Dimensions Make sure that sufficient space is available for the Sirius 840. For ventilation purposes, there must be an additional 50 mm (2 inch) gap on the left and right sides. The full height of the Sirius 840 is 1198 mm (47.2 inches). Allow an additional 200 mm (8 inches) behind the unit for power, control and signal cables. Dimensions are of full size system (without the power supplies) Dimensions are in millimeters (inches). Fig 171. Sirius 840 Frame Dimensions Issue 5 Rev 2 Page 278 © 2014 Snell Limited Sirius 800 www.snellgroup.com Router and Power Supply Shelf Dimensions A.3 Sirius 850 Frame Dimensions Make sure that sufficient space is available for the Sirius 850. For ventilation purposes, there must be an additional 50 mm (2 inch) gap on the left and right sides. The full height of the Sirius 850 is 1511 mm (59.49 inches). Allow an additional 200 mm (8 inches) behind the unit for power, control and signal cables. Dimensions are of full size system (without the power supplies) Dimensions are in millimeters (inches). Fig 172. Sirius 850 Frame Dimensions Issue 5 Rev 2 Page 279 © 2014 Snell Limited Sirius 800 www.snellgroup.com Router and Power Supply Shelf Dimensions A.4 Power Supply Shelf Dimensions The power supply shelf is a separate 2U assembly; Power Supply Shelves are rack mountable and can be placed above, below or remote from the Sirius Frame. You must allow at least 250 mm (10 Inches) at the rear of the shelf for cables and connectors. Dimensions are in millimeters (inches) Fig 173. Power Supply Shelf Dimensions Issue 5 Rev 2 Page 280 © 2014 Snell Limited Sirius 800 www.snellgroup.com Modules No Longer Supplied With New Systems Appendix B. Modules No Longer Supplied With New Systems B.1 Input Rear Panels B.1.1 Sirius 830: 1299 Balanced AES Input Rear Panel The 1299 balanced AES input rear panel has 5 x 62 way female high density sockets for balanced AES audio inputs. Note: • The 1299 Sirius 830 Balanced AES input rear panel was supplied with earlier Sirius 830 router systems and is shown here for users that already have them fitted. • The 1354 Sirius 830 Balanced AES input rear panel can be supplied as direct replacement for the 1299 if required. See section 9.9.1 for details of the 1354 rear panel. • If unbalanced AES inputs are required see section 9.10.1 for details. The 1299 rear panel is used in the Sirius 830 with the 4915 120 channel AES/MADI input module. For the wiring details for the 62 way D-Type sockets see section 9.9.3. Not Used Socket 1 Inputs 1 to 24 Socket 2 Inputs 25 to 48 Socket 3 Inputs 49 to 72 Socket 4 Inputs 73 to 96 Socket 5 Inputs 97 to 120 Fig 174. 1299 AES Balanced Input Rear Panel (Sirius 830 only) Issue 5 Rev 2 Page 281 © 2014 Snell Limited Sirius 800 www.snellgroup.com Modules No Longer Supplied With New Systems B.1.2 Sirius 840/850: 1297 Balanced AES Input Rear Panel The 1297 balanced AES input rear panel has 5 x 62 way female high density sockets for balanced AES audio inputs. Note: • The 1297 Sirius 840/850 Balanced AES input rear panel was supplied with earlier Sirius 840/850 router systems and is shown here for users that already have them fitted. • The 1352 Sirius 840/850 Balanced AES input rear panel can be supplied as direct replacement for the 1297 if required. See section 9.9.2 for details of the 1352 rear panel. • If unbalanced AES inputs are required see section 9.10.2 for details. The 1297 rear panel is used in the Sirius 840/850 with the 4915 120 channel AES/MADI input module. For the wiring details for the 62 way D-Type sockets see section 9.9.3. Not Used Socket 1 Inputs 1 to 24 Socket 2 Inputs 25 to 48 Socket 3 Inputs 49 to 72 Socket 4 Inputs 73 to 96 Socket 5 Inputs 97 to 120 Fig 175. 1297 Balanced AES Input Rear Panel (Sirius 840/850 only) Issue 5 Rev 2 Page 282 © 2014 Snell Limited Sirius 800 www.snellgroup.com Modules No Longer Supplied With New Systems B.2 Input Modules B.2.1 5913/4 Sirius 840/850 Standard Video Input Module Note: • The 5913 and 5914 Sirius 840/850 standard video input modules were supplied with earlier Sirius 840/850 router systems and are shown here for users that already have them fitted. • The 5913 and 5914 Sirius 840/850 standard video input modules can be supplied as replacements for these earlier systems if required. • On newer systems the 5917 video input module can be used instead of either the 5913 or 5914 but the 5917 requires different rear panels so is not a direct replacement. See section for details. The 5913 Sirius 840/850 standard video BNC input module has 24 BNC input channels and can handle SD, ASI and HD signals up to 3Gb/s. The 5914 Sirius 840/850 standard video fiber input module has 24 fiber input channels (12 dual channel fiber receivers) and can handle SD, ASI and HD signals up to 3Gb/s. Connectors to the Motherboard LEDs Connectors to the 1285 BNC Rear Module or the 1286 Fiber Rear Module (depending on the input module used) Connectors to the Motherboard Fig 176. 5913/5914 Sirius 840/850 Standard Video Input Module The 5913 Input Module is compatible with the 1285 BNC rear panel (see section 9.5). The 5914 Input Module is compatible with the 1286 Fiber rear panel (see section 9.6). Issue 5 Rev 2 Page 283 © 2014 Snell Limited Sirius 800 www.snellgroup.com B.2.1.1 Modules No Longer Supplied With New Systems 5913/5914 Input Module LED Information Table 85. shows the LED color code on the 5913 and 5914 input modules, and Fig 177. shows the input module LEDs on the edge of the module. LED Color Function Detail Normal Working Status Green Power OK Power to the module On Solid - working correctly Receiving messages from local Nucleus control module (the Nucleus controller in this frame) Flashing - receiving information and working correctly Yellow Local Command OK Local Error Error with messages from local Nucleus control module (the Nucleus controller in this frame) Red Off - normal state Flashing - the command message from the router controller is corrupt or hasn’t been received. This communications error could be caused by a hardware failure or incorrect insertion. Check that the module is inserted correctly. If the “Local Error” LED is flashing at the same time as the “Local Command OK” LED is flashing it suggests a mismatch in the configuration of the Nucleus controller. Check the controller configuration. Yellow Remote Command OK Receiving messages from remote Nucleus control module (the Nucleus controller in the frame linked to this frame) Sirius 830/840/850 (no expansion): Off - Expansion not used. Sirius 850 (expanded to second frame): Flashing - receiving information and working correctly Remote Error Error with messages from remote Nucleus control module (the Nucleus controller in the frame linked to this frame) Sirius 830/840/850 (no expansion): Off - Expansion not used. Sirius 850 (expanded to second frame): Off - normal state, Flashing - the command message from the remote router controller is corrupt or hasn’t been received. This communications error could be caused by a hardware failure a or incorrect insertion. Check that the module is inserted correctly and the four RJ45 connections between the frames are fitted correctly (see section 12.2). Red If the “Remote Error” LED is flashing at the same time as the “Remote Command OK” LED is flashing it suggests a mismatch in the configuration of the Nucleus controller. Check the controller configuration. Table 85. Issue 5 Rev 2 5913/5914 Sirius 840/850 Standard Video Input Module LED Information Page 284 © 2014 Snell Limited Modules No Longer Supplied With New Systems Remote Error Remote Command OK Local Error Local Command OK www.snellgroup.com Power OK Sirius 800 5913/5914 Fig 177. 5913/5914 Sirius 840/850 Standard Video Input Module LEDs Issue 5 Rev 2 Page 285 © 2014 Snell Limited Sirius 800 www.snellgroup.com Modules No Longer Supplied With New Systems B.2.2 5915 Sirius 800 Video AHP Input Module Important: • The 5915 Sirius 800 video AHP input module was supplied with earlier Sirius 800 router systems and is shown here for users that already have them fitted. • The 5915 Sirius 800 video AHP input module can be supplied as a replacement for these earlier systems if required. The 5915 module heat sink can get very hot during normal operation. When removing the 5915 module from a router do not touch the heat sink until it has had time to cool down. The 5915 Sirius 800 video AHP input module with audio de-embedder and re-clocking has 24 input channels and can handle SD, DVB-ASI and HD signals up to 3Gb/s. The audio de-embedder extracts up to 16 mono audio channels per video input channel (16 for SD and HD) giving up to 768 audio channels per 5915 input module. The 5915 passes all of the de-embedded audio channels (including VU&C data) to the audio crosspoints. The 5915 AHP video input module contains a powerful processing engine that can manipulate the individual audio channels passing through it (see Appendix B.2.2.1). Audio processing is a licensed feature which must be purchased for each module it is needed on, See section 3.5.1 for licensing details. Connectors to the Motherboard Sirius 830: Connectors to the 1234, 1235 or 1236 Rear Panels LEDs Fugue LED Sirius 840/850: Connectors to the 1349, 1289 or 1305 Rear Panels Eight Diagnostic LEDs - Snell Use Only Connectors to the Motherboard Firmware/Licensing SD/SDHC Card (see the Sirius 800 Maintenance & Upgrade manual for details) Fig 178. 5915 Sirius 800 Video AHP Input Module Note: Issue 5 Rev 2 • Jumpers and Headers are present on the video input module and these are for Snell Use Only. • In normal operation no jumper links or headers are fitted. Page 286 © 2014 Snell Limited Sirius 800 www.snellgroup.com Modules No Longer Supplied With New Systems The 5915 Input Module is compatible with the rear panels listed in Table 86. Rear Panel See Section Sirius 830: 1234 & 1235 BNC rear panel See section 9.1 Sirius 830: 1236 Fiber rear panel See section 9.2 Sirius 840/850: 1349 & 1289 BNC rear panel See section 9.7 Sirius 840/850: 1305 Fiber rear panel Table 86. B.2.2.1 See section 9.8 5915 Rear Panel Compatibility Processing on the Input Module The 5915 video input module can manipulate the audio channels received from the input rear panels before outputting them to the video and audio crosspoint modules. This makes it possible to customize the audio input channels to a house standard within the router. Note: Processing is a licensed option and must be purchased for each module it is used on (See section 3.5 for details). Processing is configured in Workbench. Fig 179. shows the order that the processing is applied to the audio. *Input/Output Monitoring selected from either the input or the output of the module (pre or post processing). See section 5.6.3 for details on how to configure this using the router Door PC. Fig 179. Processing Block Diagram If any embedded audio channels are asynchronous to the video signal the input module will use drop/repeat to synchronize the audio channels with the video signal. Issue 5 Rev 2 Page 287 © 2014 Snell Limited Sirius 800 www.snellgroup.com B.2.2.2 Modules No Longer Supplied With New Systems Gain Control and Phase Invert Gain Gain is applied to an audio input channel as Silence (mute) or in steps of 0.1dB in a range of -72 dB to +30 dB. Phase Invert Phase invert will invert the audio waveform. B.2.2.3 16 Channel Mixer There are 16 Mixers available per video input channel and each mixer can mix up to 16 channels of audio. Each 16 channel mixer is used to mix two or more audio input channels together to create a single mono signal that is output from the mixer. For example, using Mixer 6 to mix the stereo pair of channels 1 and 2 would result in a single mono signal being output from Mixer 6. B.2.2.4 Channel Swap (Shuffle) The channel shuffler is used to change the channel order of one or more of the audio channels. B.2.2.5 5915 Connections to the Audio Crosspoints The 5915 video input module creates two identical multiplexed audio transport streams, each of which contains all of the audio channels on the input module (up to 768 mono channels). One transport stream is sent to the main audio crosspoint module and a duplicate transport stream is sent to the redundant audio crosspoint module. Issue 5 Rev 2 Page 288 © 2014 Snell Limited Sirius 800 www.snellgroup.com B.2.2.6 Modules No Longer Supplied With New Systems 5915 Input Module LED Information Table 87. shows the LED color code on the 5915 Input Module, and Fig 180. shows the front edge of the input module. LED Color Label Detail Red Green Each Pair of FPGA LEDS: 1 FPGA 1 status 2 FPGA 2 status 3 FPGA 3 status Red Green Red Green Red Green Normal Working Status 4 FPGA 4 status Flashing rapidly between Red & Green (2 Hz each LED) - starting up Green On Solid & Red Off - normal state working correctly Green Off & Red On Solid - FPGA programming fault found. Remove module and refit to force a reboot. Red & Green Flashing very rapidly in sync (4 Hz each LED) - A change has been made to the module settings database in RAM but it has not yet been written to flash memory. This is not a fault and the flash memory will be updated after 10 seconds of no audio setting changes being made. Do not remove power from the module while this indication is present as the flash may become corrupted. Other indications are displayed when performing a firmware upgrade, see the Sirius 800 Maintenance & Upgrade manual for details. Green Power OK Power to the module On Solid - working correctly Receiving messages from local Nucleus control module (the Nucleus controller in this frame) Flashing - receiving information and working correctly Yellow Local Command OK Local Error Error with messages from local Nucleus control module (the Nucleus controller in this frame) Red Off - normal state Flashing - the command message from the router controller is corrupt or hasn’t been received. This communications error could be caused by a hardware failure or incorrect insertion. Check that the module is inserted correctly. If the “Local Error” LED is flashing at the same time as the “Local Command OK” LED is flashing it suggests a mismatch in the configuration of the Nucleus controller. Check the controller configuration. Table 87. Issue 5 Rev 2 5915 Sirius 800 Video AHP Input Module LED Information Page 289 © 2014 Snell Limited Sirius 800 www.snellgroup.com LED Color Label Yellow Modules No Longer Supplied With New Systems Detail Normal Working Status Remote Command OK Receiving messages from remote Nucleus control module (the Nucleus controller in the frame linked to this frame) Sirius 830/840/850 (no expansion): Off - Expansion not used. Sirius 850 (expanded to second frame): Flashing - receiving information and working correctly Remote Error Error with messages from remote Nucleus control module (the Nucleus controller in the frame linked to this frame) Sirius 830/840/850 (no expansion): Off - Expansion not used. Sirius 850 (expanded to second frame): Off - normal state, Flashing - the command message from the remote router controller is corrupt or hasn’t been received. This communications error could be caused by a hardware failure or incorrect insertion. Check that the module is inserted correctly and the four RJ45 connections between the frames are fitted correctly (see section 12.2). Red If the “Remote Error” LED is flashing at the same time as the “Remote Command OK” LED is flashing it suggests a mismatch in the configuration of the Nucleus controller. Check the controller configuration. Fugue Status CPU status Blue/Green Flashing sequence Green, Green, Blue normal operation the CPU is programmed and running Brief Red Flash at startup - normal Flashing Red - CPU Error. Remove module and refit to force a reboot. Normal LED Pattern Sequence Amber Eight Diagnostic LEDs Snell Use Only 1. All LEDs On for one Second 2. All LEDs Off except the top LED 3. All LEDs Off except the second LED from the top 4. This sequence continues until all LEDs are Off except for the bottom LED 5. All LEDs Off for 10 Seconds 6. Return to Step 1 Any other pattern - abnormal operation contact Snell Customer Support Table 87. Issue 5 Rev 2 5915 Sirius 800 Video AHP Input Module LED Information Page 290 © 2014 Snell Limited Sirius 800 www.snellgroup.com Modules No Longer Supplied With New Systems 1 2 3 4 Power OK Local Command OK Local Error Remote Command OK Remote Error Fugue Status Top LED Diagnostic LEDs x 8 Snell use only Bottom LED Fig 180. 5915 Sirius 800 Video AHP Input Module LEDs Issue 5 Rev 2 Page 291 © 2014 Snell Limited Sirius 800 www.snellgroup.com Modules No Longer Supplied With New Systems B.2.3 5916 Sirius 830 Standard Video BNC/Fiber Input Module Note: • The 5916 video input module was supplied with earlier Sirius 830 router systems and is shown here for users that already have them fitted. • The 5916 video input module can be supplied as a replacement for these earlier systems if required. • On newer systems the 5917 video input module can be used instead of the 5916 and uses the same rear panels so is a direct replacement. See section for details. The 5916 standard video BNC/Fiber input module has 24 input channels and can handle SD, ASI and HD signals up to 3Gb/s. Connectors to the Motherboard LEDs Connectors to the 1234, 1235 or 1236 Rear Panels Connectors to the Motherboard Fig 181. 5916 Standard Video BNC/Fiber Input Module The 5916 Input Module is compatible with the 1234/1235 BNC (See section 9.1) and 1236 Fiber rear panels (See section 9.2). Issue 5 Rev 2 Page 292 © 2014 Snell Limited Sirius 800 www.snellgroup.com B.2.3.1 Modules No Longer Supplied With New Systems 5916 Input Module LED Information Table 85. shows the LED color code on the 5916 input module, and Fig 177. shows the input module. LED Color Label Detail Normal Working Status Green Power OK Power to the module On Solid - working correctly Receiving messages from local Nucleus control module (the Nucleus controller in this frame) Flashing - receiving information and working correctly Yellow Local Command OK Local Error Receiving CRC error messages from local Nucleus control module (the Nucleus controller in this frame) Red Off - normal state Flashing - the command message from the router controller is corrupt or hasn’t been received. This communications error could be caused by a hardware failure or incorrect insertion. Check that the module is inserted correctly. If the “Local Error” LED is flashing at the same time as the “Local Command OK” LED is flashing it suggests a mismatch in the configuration of the Nucleus controller. Check the controller configuration. Yellow Remote Command OK Receiving messages from remote Nucleus control module (the Nucleus controller in the frame linked to this frame) Sirius 830/840/850 (no expansion): Off - Expansion not used. Sirius 850 (expanded to second frame): Flashing - receiving information and working correctly Remote Error Error with messages from remote Nucleus control module (the Nucleus controller in the frame linked to this frame) Sirius 830/840/850 (no expansion): Off - Expansion not used. Sirius 850 (expanded to second frame): Off - normal state, Flashing - the command message from the remote router controller is corrupt or hasn’t been received. This communications error could be caused by a hardware failure or incorrect insertion. Check that the module is inserted correctly and the four RJ45 connections between the frames are fitted correctly (see section 12.2). Red If the “Remote Error” LED is flashing at the same time as the “Remote Command OK” LED is flashing it suggests a mismatch in the configuration of the Nucleus controller. Check the controller configuration. Table 88. Issue 5 Rev 2 5916 Standard Video BNC/Fiber Input Module LED Information Page 293 © 2014 Snell Limited Sirius 800 www.snellgroup.com Modules No Longer Supplied With New Systems Power OK Local Command OK Local Error Remote Command OK Remote Error Fig 182. 5916 Standard Video BNC/Fiber Input Module LEDs Issue 5 Rev 2 Page 294 © 2014 Snell Limited Sirius 800 www.snellgroup.com Modules No Longer Supplied With New Systems B.3 Output Modules B.3.1 4925 Sirius 800 AES/MADI Output Module (no audio delay) Important: • The 4925 audio output module was supplied with earlier Sirius 800 router systems and is shown here for users that already have them fitted. • The 4925 audio output module can be supplied as a replacement for these earlier systems if required. The 4925 Sirius 800 AES/MADI output module (no audio delay) can transmit either 120 AES outputs (balanced or unbalanced) with up to 3 MADI output channels or 12 channels of MADI outputs depending on the rear panel fitted. The 4925 Output Module is compatible with the rear panels listed in Table 89. Rear Panel See Section Up to 120 AES outputs and up to 3 MADI output channels: 1353 Balanced AES + HD BNC MADI rear panel See section 11.8 1356 Unbalanced AES + HD BNC MADI rear panel See section 11.9 1298 Balanced AES rear panel (no MADI) - No longer supplied See Appendix B.4.1 Up to 12 MADI output channels: 1295 MADI Output BNC rear panel See section 11.6 1296 MADI Output Fiber rear panel See section 11.7 Table 89. 4929 Rear Panel Compatibility PL2 - Link fitted across two pins closest to LEDs Fugue LED LEDs Connectors to the 1353, 1356, 1295, 1296 or 1298 Rear Modules Firmware/Licensing SD/SDHC Card (see the Sirius 800 Maintenance & Upgrade manual for details) Fig 183. 4925 Sirius 800 AES/MADI Output Module (no audio delay) Note: Issue 5 Rev 2 • Jumpers and Headers are present on the audio output module and these are for Snell Use Only. • In normal operation no jumper links or headers are fitted except for PL2 which has a link fitted across the two pins closest to the LEDs on the front of the module. Page 295 © 2014 Snell Limited Sirius 800 www.snellgroup.com B.3.1.1 Modules No Longer Supplied With New Systems Duplicate MADI Outputs When fitted with the 1295 or 1296 MADI rear panels the 4925 module outputs 12 MADI channels and a further 12 duplicate MADI channels. The main and duplicate channels can be used to give the MADI outputs resilience if the equipment receiving the outputs is capable of automatically switching between main and backup feeds. The main and backup connections are shown in the rear panel diagrams listed in Table 90. Rear Panel 1295 BNC rear panel See Fig 117. on page 188. 1296 Fiber rear panel See Fig 118. on page 189. Table 90. B.3.1.2 See Figure Number MADI Main and Backup Connections Configuring MADI to 56 or 64 Channels Individual MADI channels are configured to output in 56 or 64 channel MADI using the Workbench Online Editor. 2463 Nucleus2 Router Control Module Navigate to: Controller | Devices | Devices[1]: LocalRouterDevice | LocalRouterConfig | ModuleConfigurations | ModuleConfiguration[XXX]: AudioOutput | MADIControl | MADIControl[YY] | Format= Where: XXX= the Module ID of the Audio Output Module (see the Workbench manual for details) YY = the MADI channel (1 to 12) being configured Select the number of MADI channels from the drop down menu: Note: Issue 5 Rev 2 • MADI56 = configures the MADI channel to 56 channels • MADI64 = configures the MADI channel to 64 channels • Ensure both 2463 router control modules are configured the same by using the Copy to Partner function in Workbench once configurations changes have been made. Page 296 © 2014 Snell Limited Sirius 800 www.snellgroup.com B.3.1.3 AES Audio Outputs • Up to 120 balanced or unbalanced AES outputs (dependant on rear panel fitted) • Re-generates the AES clock from incoming data (nominal 48 kHz) • VU&C (Validity, User and Channel status) flags are regenerated to a default standard on each channel when re-aligning audio. (See Table 105. on page 327 for default standard details). • Pass asynchronous audio or Dolby E transparently at the original sample rate. • Asynchronous channels pass VU&C data transparently (parity is recalculated for each output). • Up to 3 MADI outputs are also available on HD BNC connectors (with correct rear panel, see section 11.10 for details) • B.3.1.4 Modules No Longer Supplied With New Systems Up to 64 channels of audio per MADI output MADI Audio Outputs To connect MADI audio outputs from a 4925 input module it must be used with either a 1295 BNC or 1296 Fiber rear panel. • Note: Issue 5 Rev 2 Up to 12 MADI outputs, (one main and one duplicate output of each channel). When fiber SFP modules are used the main and duplicate MADI outputs span two separate SFP modules to guard against an SFP failure, see section 11.7 for details. • Up to 64 channels of audio per MADI output. • Maximum of 768 (12 x 64) audio channels per 4925 audio output module. • Maximum of 768 (12 x 64) audio channels per 4929 audio output module. • MADI streams are generated locked to the AES reference. All audio must be synchronous for fully transparent operation. Re-generate VU&C data. (See Table 105. on page 327 for default standard details). • Asynchronous AES channels will be added to the MADI using drop/repeat techniques. • Asynchronous Dolby E will not pass error free through MADI outputs. Page 297 © 2014 Snell Limited Sirius 800 www.snellgroup.com B.3.1.5 Modules No Longer Supplied With New Systems Audio Processing on the Output Module The 4925 audio output module can manipulate the audio channels received from the audio crosspoint before outputting them. This makes it possible to manipulate the audio output channels within the router. Note: The audio processing functions allow gain control, phase invert and stereo mode (left/right swap, left both, right both or mono mix). The audio processing is standard for each audio module. Audio processing is controlled from Workbench, RollCall or RollPod panels. Fig 184. and Fig 185. shows the order that the processing is applied to the audio signals. *Input/Output Monitoring selected from either the input or the output of the module (pre or post processing). See section 5.6.3 for details on how to configure this using the router Door screen. Fig 184. Audio Channel Processing Block Diagram (AES Rear Panel) *Input/Output Monitoring selected from either the input or the output of the module (pre or post processing). See section 5.6.3 for details on how to configure this using the router Door screen. Fig 185. Audio Channel Processing Block Diagram (MADI Rear Panel) Issue 5 Rev 2 Page 298 © 2014 Snell Limited Sirius 800 www.snellgroup.com B.3.1.6 Modules No Longer Supplied With New Systems Gain Control and Phase Invert Gain Gain is applied to an audio output channel as Silence (mute) or in steps of 0.1dB in a range of -72 dB to +30 dB. Phase Invert Phase invert will invert the audio waveform. B.3.1.7 Stereo Mode Stereo Mode is used to manipulate stereo pairs. Options include: Left/Right Swap, Left Both, Right Both and Mono Mix. Left/Right Swap Left/Right swap is used to swap the two audio channels of an AES pair over. Left Both & Right Both Left Both and Right Both are used to duplicate a single channel of a stereo pair and pass the two duplicate channels out of the router in place of the original pair. Mono Mix Mono Mix is used to mix a stereo pair together to create a single mono signal. This single mono signal is passed out of the router on both of the original channels. The Mono Mix is: B.3.1.8 A+B ------------2 4925 Connections from the Audio Crosspoints The 4925 audio output module receives two identical multiplexed audio transport streams, each of which contains all of the audio channels on the output module (up to 768 mono channels). One transport stream is received from the main audio crosspoint module and a duplicate transport stream is received from the redundant audio crosspoint module. The output module monitors the transport streams received from each of the audio crosspoint modules for errors. If an error is found the output module will use the transport stream from the other audio crosspoint module if it is fitted. Important: Issue 5 Rev 2 • Due to the nature of multiplexed audio transport streams there is an extremely small delay between groups of channels as the transport stream is constructed. If the audio is locked to the input these delays will need to be considered. • If the audio is locked to an external reference these delays are managed by the router and the audio will remain co-timed. Page 299 © 2014 Snell Limited Sirius 800 www.snellgroup.com B.3.1.9 Modules No Longer Supplied With New Systems 4925 Output Module LED Information Table 91. shows the LED color code on the 4925 output module, and Fig 186. shows the front edge of the output module. LED Color Label Fugue Status Detail Normal Working Status CPU status Flashing sequence Green, Green, Blue - normal operation the CPU is programmed and running Brief Red Flash at startup - normal Flashing Red - CPU Error. Remove module and refit to force a reboot. Blue/Green Red Green LED R LED G FPGA status Flashing rapidly between Red & Green (2 Hz each LED) - starting up Green On Solid & Red Off - normal state working correctly Green Off & Red On Solid - FPGA programming fault found. Remove module and refit to force a reboot. Red & Green Flashing very rapidly in sync (4 Hz each LED) - A change has been made to the module settings database in RAM but it has not yet been written to flash memory. This is not a fault and the flash memory will be updated after 10 seconds of no audio setting changes being made. Do not remove power from the module while this indication is present as the flash may become corrupted. Other indications are displayed when performing a firmware upgrade, see the Sirius 800 Maintenance & Upgrade manual for details. Green Power OK Power to the module On Solid - working correctly Command OK Receiving messages from local Nucleus control module (the Nucleus controller in this frame) Flashing - receiving information and working correctly Error Error with messages from local Nucleus control module (the Nucleus controller in this frame) Off - normal state Flashing - the command message from the router controller is corrupt or hasn't been received. Yellow Red This communications error could be caused by a hardware failure or incorrect insertion. Check that the module is inserted correctly. If the “Error” LED is flashing at the same time as the “Command OK” LED is flashing it suggests a mismatch in the configuration of the Nucleus controller. Check the controller configuration. Table 91. Issue 5 Rev 2 4925 Sirius 800 AES/MADI Output Module (no audio delay) LED Information Page 300 © 2014 Snell Limited Sirius 800 www.snellgroup.com LED Color Label Detail Modules No Longer Supplied With New Systems Normal Working Status Green Video Ref 1 External Video Reference 1 Status On Solid - external video reference present and local oscillators locked. Off - external video reference not present. Green Video Ref 2 External Video Reference 2 Status On Solid - external video reference present and local oscillators locked. Off - external video reference not present. Green Video Ref 3 External Video Reference 3 Status On Solid - external video reference present and local oscillators locked. Off - external video reference not present. Green Video Ref 4 External Video Reference 4 Status On Solid - external video reference present and local oscillators locked. Off - external video reference not present. AES Ref External AES Reference Status On Solid - external AES reference present and local oscillators locked. Off - external video reference not present. Green Table 91. 4925 Sirius 800 AES/MADI Output Module (no audio delay) LED Information Fugue Status LED R LED G Power OK Command OK Error Video Ref 1 Video Ref 2 Video Ref 3 Video Ref 4 AES Ref Fig 186. 4925 Sirius 800 AES/MADI Output Module (no audio delay) LEDs Issue 5 Rev 2 Page 301 © 2014 Snell Limited Sirius 800 www.snellgroup.com Modules No Longer Supplied With New Systems B.3.2 5923/4 Sirius 840/850 Standard Video Output Module Note: • The 5923 and 5924 video output modules were supplied with earlier Sirius 840/850 router systems and are shown here for users that already have them fitted. • The 5923 and 5924 video output modules can be supplied as replacements for these earlier systems if required. • On newer systems the 5926 video output module can be used instead of either the 5923 or 5924 but the 5926 requires different rear panels so is not a direct replacement. See section 11.2 for details. The 5923 Sirius 840/850 standard video BNC output module connects to the 1295 rear panel (See section 11.6) which has 24 BNC outputs. The 5924 Sirius 840/850 standard video BNC output module connects to the 1296 rear panel (See section 11.7) which has 24 Fiber outputs which are split into 12 dual channel transmitters. Connectors to the Motherboard Connectors to the 1295 or 1296 Rear Module LEDs Fig 187. 5923/5924 Sirius 840/850 Standard Video Output Module The 5923 video output module is compatible with the 1295 BNC rear panel (see section 11.6). The 5924 output module is compatible with the 1296 Fiber rear panel (see section 11.7). Issue 5 Rev 2 Page 302 © 2014 Snell Limited Sirius 800 www.snellgroup.com B.3.2.1 Modules No Longer Supplied With New Systems 5923/5924 Output Module LED Information Table 92. shows the LED color code on the 5923 and 5924 output module, and Fig 188. shows the output module LEDs. LED Color Function Detail Normal Working Status Green Power OK Power to the module On Solid - working correctly Yellow Command OK Flashing - receiving information and Receiving messages working correctly from local Nucleus control module (the Nucleus controller in this frame) Red Command Error Error with messages from local Nucleus control module (the Nucleus controller in this frame) Off - normal state Flashing - the command message from the router controller is corrupt or hasn't been received. This communications error could be caused by a hardware failure or incorrect insertion. Check that the module is inserted correctly. If the “Command Error” LED is flashing at the same time as the “Command OK” LED is flashing it suggests a mismatch in the configuration of the Nucleus controller. Check the controller configuration. Yellow Remote Command OK Receiving messages from remote Nucleus control module (the Nucleus controller in the frame linked to this frame) Sirius 830/840/850 (no expansion): Off - Expansion not used. Sirius 850 (expanded to second frame): Flashing - receiving information and working correctly Red Remote Error Error with messages from remote Nucleus control module (the Nucleus controller in the frame linked to this frame) Sirius 830/840/850 (no expansion): Off - Expansion not used. Sirius 850 (expanded to second frame): Off - normal state, Flashing - the command message from the remote router controller is corrupt or hasn’t been received. This communications error could be caused by a hardware failure or incorrect insertion. Check that the module is inserted correctly and the four RJ45 connections between the frames are fitted correctly (see section 12.2). If the “Remote Error” LED is flashing at the same time as the “Remote Command OK” LED is flashing it suggests a mismatch in the configuration of the Nucleus controller. Check the controller configuration. Table 92. Issue 5 Rev 2 5923/5924 Sirius 840/850 Standard Video Output Module LED Information Page 303 © 2014 Snell Limited Sirius 800 www.snellgroup.com Modules No Longer Supplied With New Systems 5923/5924 Power OK Command OK Command Error Remote Command OK Remote Error Fig 188. 5923/5924 Sirius 840/850 Standard Video Output Module LEDs Issue 5 Rev 2 Page 304 © 2014 Snell Limited Sirius 800 www.snellgroup.com Modules No Longer Supplied With New Systems B.3.3 5925 Sirius 800 Video AHP Output Module Important: • The 5925 Sirius 800 video AHP output module was supplied with earlier Sirius 800 router systems and is shown here for users that already have them fitted. • The 5925 Sirius 800 video AHP output module can be supplied as a replacement for these earlier systems if required. The 5925 module heat sink can get very hot during normal operation. When removing the 5925 module from a router do not touch the heat sink until it has had time to cool down. The 5925 Sirius 800 video AHP output module with audio embedder and re-clocking has 24 video output channels and can handle SD, DVB-ASI and HD signals up to 3Gb/s. The audio embedder synchronously re-inserts up to 16 mono audio channels per video output channel (16 for SD and HD) giving up to 768 audio channels per 5925 output module. The 5925 AHP video output module contains a powerful processing engine that can manipulate the individual audio channels passing through it (see Appendix B.3.3.1). Audio processing is a licensed feature which must be purchased for each module it is needed on, See section 3.5.1 for licensing details. The 5925 output module synchronizes routed audio channels (by drop/repeat) to re-time to the video signal for embedding. All VANC (Vertical Ancillary) data and all non-audio HANC (Horizontal Ancillary) data is removed. Connectors to the Motherboard LEDs Connectors to the 1294 or 1302 Rear Modules Fugue LED Eight Diagnostic LEDs - Snell Use Only Firmware/Licensing SD/SDHC Card (see the Sirius 800 Maintenance & Upgrade manual for details) Fig 189. 5925 Sirius 800 Video AHP Output Module Note: • Jumpers and Headers are present on the video output module and these are for Snell Use Only. • In normal operation no jumper links or headers are fitted. The 5925 output module is compatible with the 1294 BNC rear panel (see section 11.4), and the 1302 Fiber rear panel (see section 11.5). Issue 5 Rev 2 Page 305 © 2014 Snell Limited Sirius 800 www.snellgroup.com B.3.3.1 Modules No Longer Supplied With New Systems Processing on the Output Module The 5925 video output module can manipulate the audio channels received from the crosspoint modules before outputting them. This makes it possible to customize the video and audio output channels to a house standard reference within the router. Note: Audio processing is a licensed option and must be purchased for each module it is used on (See section 3.5 for details). Processing is configured in Workbench. Fig 190. shows the order that the processing is applied to the signal. *Input/Output Monitoring selected from either the input or the output of the module (pre or post processing). See section 5.6.3 for details on how to configure this using the router Door PC. Fig 190. Processing Block Diagram If any audio channels routed from the audio crosspoints are asynchronous to the video signal they are being embedded in the output module will use drop/repeat to synchronize the audio channels with the video signal. B.3.3.2 16 Channel Mixer There are 16 Mixers available per video output channel and each mixer can mix up to 16 channels of audio. Each 16 channel mixer is used to mix two or more audio output channels together to create a single mono signal that is output from the mixer. For example, using Mixer 6 to mix the stereo pair of channels 1 and 2 would result in a single mono signal being output from Mixer 6. B.3.3.3 Channel Swap (Shuffle) The channel shuffler is used to change the channel order of one or more of the audio channels For example, this might be used if a stereo pair arrives at the router as right, left and they need to be swapped to left, right to match the house reference. Issue 5 Rev 2 Page 306 © 2014 Snell Limited Sirius 800 www.snellgroup.com B.3.3.4 Modules No Longer Supplied With New Systems Gain control Gain is applied to an audio output channel as Silence (mute) or in steps of 0.1dB in a range of -72 dB to +30 dB. For example, this might be used when the feed is destined for another country that requires a specific audio level that is different from the current audio level. B.3.3.5 Phase Invert Phase invert will invert the audio waveform. For example, this might be used if one channel of a stereo pair is out of phase with the other. B.3.3.6 5925 Connections to the Audio Crosspoints The 5925 video output module receives two identical multiplexed audio transport streams, each of which contains all of the audio channels on the output module (up to 768 mono channels). One transport stream is received from the main audio crosspoint module and a duplicate transport stream is received from the redundant audio crosspoint module. The output module monitors the transport streams received from each of the audio crosspoint modules for errors. If an error is found the output module will use the transport stream from the other audio crosspoint module if it is fitted. Important: Issue 5 Rev 2 • Due to the nature of multiplexed audio transport streams there is an extremely small delay between groups of channels as the transport stream is constructed. If the audio is locked to the input these delays will need to be considered. • If the audio is locked to an external reference these delays are managed by the router and the audio will remain co-timed. Page 307 © 2014 Snell Limited Sirius 800 www.snellgroup.com B.3.3.7 Modules No Longer Supplied With New Systems 5925 Output Module LED Information Table 93. shows the LED color code on the 5925 output module, and Fig 191. shows the front edge of the output module. LED Color Label Detail Red Green Each Pair of FPGA LEDS: 1 FPGA 1 status 2 FPGA 2 status 3 FPGA 3 status 4 FPGA 4 status Red Green Red Green Red Green Normal Working Status Flashing rapidly between Red & Green (2 Hz each LED) - starting up Green On Solid & Red Off - normal state working correctly Green Off & Red On Solid - FPGA programming fault found. Remove module and refit to force a reboot. Red & Green Flashing very rapidly in sync (4 Hz each LED) - A change has been made to the module settings database in RAM but it has not yet been written to flash memory. This is not a fault and the flash memory will be updated after 10 seconds of no audio setting changes being made. Do not remove power from the module while this indication is present as the flash may become corrupted. Other indications are displayed when performing a firmware upgrade, see the Sirius 800 Maintenance & Upgrade manual for details. Green Power OK Power to the module On Solid - working correctly Receiving messages from local Nucleus control module (the Nucleus controller in this frame) Flashing - receiving information and working correctly Yellow Local Command OK Local Command Error Error with messages from local Nucleus control module (the Nucleus controller in this frame) Off - normal state Flashing - the command message from the router controller is corrupt or hasn't been received. Red This communications error could be caused by a hardware failure or incorrect insertion. Check that the module is inserted correctly. If the “Local Command Error” LED is flashing at the same time as the “Local Command OK” LED is flashing it suggests a mismatch in the configuration of the Nucleus controller. Check the controller configuration. Table 93. Issue 5 Rev 2 5925 Sirius 800 Video AHP Output Module LED Information Page 308 © 2014 Snell Limited Sirius 800 www.snellgroup.com LED Color Label Yellow Modules No Longer Supplied With New Systems Detail Normal Working Status Remote Command OK Receiving messages from remote Nucleus control module (the Nucleus controller in the frame linked to this frame) Sirius 830/840/850 (no expansion): Off - Expansion not used. Sirius 850 (expanded to second frame): Flashing - receiving information and working correctly Remote Error Error with messages from remote Nucleus control module (the Nucleus controller in the frame linked to this frame) Sirius 830/840/850 (no expansion): Off - Expansion not used. Sirius 850 (expanded to second frame): Off - normal state, Flashing - the command message from the remote router controller is corrupt or hasn’t been received. This communications error could be caused by a hardware failure a or incorrect insertion. Check that the module is inserted correctly and the four RJ45 connections between the frames are fitted correctly (see section 12.2). Red If the “Remote Error” LED is flashing at the same time as the “Remote Command OK” LED is flashing it suggests a mismatch in the configuration of the Nucleus controller. Check the controller configuration. Fugue Status CPU status Blue/Green Flashing sequence Green, Green, Blue - normal operation the CPU is programmed and running Brief Red Flash at startup - normal Flashing Red - CPU Error. Remove module and refit to force a reboot. Normal LED Pattern Sequence Amber Eight Diagnostic LEDs Snell Use Only 1. All LEDs On for one Second 2. All LEDs Off except the top LED 3. All LEDs Off except the second LED from the top 4. This sequence continues until all LEDs are Off except for the bottom LED 5. All LEDs Off for 10 Seconds 6. Return to Step 1 Any other pattern - abnormal operation contact Snell Customer Support Table 93. Issue 5 Rev 2 5925 Sirius 800 Video AHP Output Module LED Information Page 309 © 2014 Snell Limited Sirius 800 www.snellgroup.com Modules No Longer Supplied With New Systems 1 2 3 4 Power OK Local Command OK Local Error Remote Command OK Remote Error Fugue Status Top LED Diagnostic LEDs x 8 Bottom LED Fig 191. 5925 Sirius 800 Video AHP Output Module LEDs Issue 5 Rev 2 Page 310 © 2014 Snell Limited Sirius 800 www.snellgroup.com Modules No Longer Supplied With New Systems B.3.4 5937 Sirius 830 Standard Video BNC/Fiber Output Module Note: • The 5937 Sirius 830 standard video BNC/Fiber output module was supplied with earlier Sirius 830 router systems and is shown here for users that already have it fitted. • The 5937 Sirius 830 standard video BNC/Fiber output module can be supplied as replacements for these earlier systems if required. • On newer systems the 5926 Sirius 800 standard video output module (non-expandable) can be used instead of the 5937 and uses the same rear panels so is a direct replacement. See section for details. The 5937 Sirius 830 standard video BNC/Fiber output module is a 24-channel output module with re-clocking. Routing to the output module is controlled by the Nucleus router controller module. There are two main busses to the output module, one from the motherboard and one from the rear connector board. LEDs Connectors to the 1294 or 1302 Rear Modules Fig 192. 5937 Sirius 830 Standard Video BNC/Fiber Output Module The 5937 Output Module is compatible with the 1294 BNC rear panel (See section 11.4), and the 1302 Fiber rear panel (See section 11.5). Issue 5 Rev 2 Page 311 © 2014 Snell Limited Sirius 800 www.snellgroup.com B.3.4.1 Modules No Longer Supplied With New Systems 5937 Output Module LED Information Table 92. shows the LED color code on the 5937 output module, and Fig 188. shows the output module. LED Color Label Detail Normal Working Status Green Power OK Power to the module On Solid - working correctly Yellow Command OK Receiving messages from local Nucleus control module (the Nucleus controller in this frame) Flashing - receiving information and working correctly Red Command Error Error with messages from local Nucleus control module (the Nucleus controller in this frame) Off - normal state Flashing - the command message from the router controller is corrupt or hasn't been received. This communications error could be caused by a hardware failure or incorrect insertion. Check that the module is inserted correctly. If the “Command Error” LED is flashing at the same time as the “Command OK” LED is flashing it suggests a mismatch in the configuration of the Nucleus controller. Check the controller configuration. Yellow Expansion Message OK Message from the Off - Expansion not used. corresponding expansion module received correctly Red Expansion Message Error Error Message sent from Off - Expansion not used. the output of one frame to the output of the expanded frame Table 94. 5937 Sirius 830 Standard Video BNC/Fiber Output Module LED Information Power OK Command OK Command Error Expansion Message OK Expansion Message Error Fig 193. 5937 Sirius 830 Standard Video BNC/Fiber Output Module LEDs Issue 5 Rev 2 Page 312 © 2014 Snell Limited Sirius 800 www.snellgroup.com Modules No Longer Supplied With New Systems B.4 Output Rear Panel B.4.1 1298 Sirius 800 Balanced AES Output Rear Panel The 1298 Sirius 800 balanced AES output rear panel has 5 x 62 way female high density sockets for balanced AES audio outputs. Note: • The 1298 Sirius 800 Balanced AES output rear panel was supplied with earlier Sirius 800 router systems and is shown here for users that already have them fitted. • The 1353 Sirius 800 Balanced AES output rear panel can be supplied as direct replacement for the 1298 if required. See section 11.8 for details of the 1353 rear panel. • If unbalanced AES outputs are required see section 11.9 for details. The 1298 rear panel is used with the 4929/4925 120 channel AES/MADI output module. For the wiring details for the 62 way D-Type sockets see section 11.8.1. Sockets 1 Outputs 1 to 24 Sockets 2 Outputs 25 to 48 Sockets 3 Outputs 49 to 72 Sockets 4 Outputs 73 to 96 Sockets 5 Outputs 97 to 120 Not Used Fig 194. 1298 Sirius 800 Balanced AES Output Rear Panel Issue 5 Rev 2 Page 313 © 2014 Snell Limited Sirius 800 www.snellgroup.com Modules No Longer Supplied With New Systems B.5 Multiviewer Modules B.5.1 5932 Sirius 850 Multiviewer Output Module The 5932 Sirius 850 multiviewer output module takes the multiviewer output signals from the multiviewer crosspoint module and passes each signal through a re-clocker. Each 5932 module has 72 Outputs. Connectors to the Motherboard LEDs Fig 195. 5932 Sirius 850 Multiviewer Output Module The output of the 5932 is connected to one of the two possible rear panel arrangements in order to link to an external multiviewer system. One 5932 multiviewer output module is required for each rear panel fitted. Sirius 850: 1291 Rear Panel - up to two Up to 2 rear panels with 48 Coax DIN 1.0/2.3 connectors per rear panel (up to 96 multiviewer outputs). See section 13.11 Sirius 850: 1292 Rear Panel- up to two No longer supplied and shown here for users that already have them fitted. Up to two rear panels with nine MV-Link connectors per rear panel. The 1292 rear panel is an interface to the Miranda KaleidoX multiviewer. Fitting one rear panel supplies 72 outputs and fitting two rear panels supplies 140 outputs. See section B.5.2 for details. Table 95. Issue 5 Rev 2 5932 Sirius 850 Multiviewer Output Module - Possible Rear Panel Arrangements Page 314 © 2014 Snell Limited Sirius 800 www.snellgroup.com B.5.1.1 Modules No Longer Supplied With New Systems 5932 Multiviewer Output Module LED Information Table 96. shows the LED color code on the edge of the 5932 multiviewer output module, and Fig 196. shows the module. LED Color Function Detail Normal Working Status Green Power OK Power to the module On Solid - working correctly Yellow Command OK Command from the Nucleus Module Flashing - receiving information and working correctly Red Command Error Error messages from Nucleus control Off - normal state, if it is module flashing then it is receiving error messages. Command Error Command OK 5932 Sirius 850 Multiviewer Output Module LED Information Power OK Table 96. 5932 Fig 196. 5932 Sirius 850 Multiviewer Output Module LEDs Issue 5 Rev 2 Page 315 © 2014 Snell Limited Sirius 800 www.snellgroup.com Modules No Longer Supplied With New Systems B.5.2 Sirius 850: 1292 MV-Link Rear Panel Note: The 1292 MV-Link rear panel is no longer supplied and is shown here for users that already have them fitted. If two 1292 rear panels are used then the second rear panel is fitted in the top multiviewer slot and numbered as follows: 137-140 129-136 121-128 113-120 105-112 97-104 89-96 81-88 MV18 73-80 MV10 If one 1292 rear panel is used it is fitted in the bottom multiviewer slot and numbered as follows: 66-72 57-64 49-56 41-48 MV9 33-40 25-32 17-24 9-16 1-8 MV1 Fig 197. 1292 MV-Link Rear Panel Note: Issue 5 Rev 2 Fig 197. shows that Multiviewer port 18 has only has four outputs, the other four outputs are not used. Page 316 © 2014 Snell Limited Sirius 800 www.snellgroup.com B.5.2.1 Modules No Longer Supplied With New Systems Sirius 850: Multiview Link Outputs Pins Function 1 15 Table 97. Note: Issue 5 Rev 2 14 28 Pins Function 1 Input [7] + 15 Input [7] Shield 2 Input [7] - 16 Input [8] + 3 Input [8] Shield 17 Input [8] - 4 Input [5] + 18 Input [5] Shield 5 Input [5] - 19 Input [6] + 6 Input [6] Shield 20 Input [6] - 7 Input [3] + 21 Input [3] Shield 8 Input [3] - 22 Input [4] + 9 Input [4] Shield 23 Input [4] - 10 Input [1] + 24 Input [1] Shield 11 Input [1] - 25 Input [7] + 12 Input [2] Shield 26 Input [7] - 13 NC + 27 Shield 14 NC - 28 NC Multiview Link Outputs Cables are supplied if MV-Link is ordered, Kaleido must also be ordered with MV-Link. Page 317 © 2014 Snell Limited Sirius 800 Issue 5 Rev 2 www.snellgroup.com Page 318 Modules No Longer Supplied With New Systems © 2014 Snell Limited Sirius 800 www.snellgroup.com Specifications Appendix C. Specifications C.1 Inputs C.1.1 Video Inputs 5917, 5919, 5913, 5915 and 5916 Video Input Modules used with 1234, 1349, 1235, 1285 or 1289 Main Coax Video Input Rear Panels Number and type 24 per module automatic cable equalisation and re-clocked Connectors BNC to IEC61169.8, 75 electrical impedance. Gold plated. Standards supported SMPTE-259M 525 and 625 SD-SDI EN50083-9 DVB-ASI SMPTE 292M 720p and 1080i HD-SDI SMPTE 424M 1080p 3G-SDI Impedance 75 Data rate 3 Mb/s - 3 Gb/s. Standard video rates re-clocked, all other rates auto-bypassed. Return loss >15dB 10MHz to 1.5GHz, >10dB 1.5GHz to 3GHz Amplitude 800mV p-p nominal DC offset <5V Cable Equalisation Automatic for: Up to 350 m (1150 feet) Belden 1694A, PSF1/2M at SD rates Up to 200 m (650 feet) Belden 1694A at HD Up to 140 m (460 feet) Belden 1694A at 3G Table 98. Main Coax Video Inputs 5917, 5919, 5914, 5915 and 5916 Video Input Modules used with 1236, 1286 or 1305 Main Optical Input Rear Panels Number and type 24 per module, re-clocked - removable video SFP modules Note: Specifications are based on fitting standard SFP receivers - Snell Order Code SRR-3 Connectors LC/PC single mode fiber connection as standard. Wavelength Wideband receiver, 1260-1620 nm nominal Sensitivity -18 dBm Typical link length 10km @ 3 Gb/s, 20km @ 1.5 Gb/s, 30km @ 270MBit/s Standards supported SMPTE-259M 525 and 625 SD-SDI EN50083-9 DVB-ASI SMPTE 292M 720p and 1080i HD-SDI SMPTE 424M 1080p 3G-SDI Table 99. Issue 5 Rev 2 Main Optical Video Inputs Page 319 © 2014 Snell Limited Sirius 800 www.snellgroup.com Specifications C.1.2 Video AHP Inputs 5919 and 5915 - Video AHP Input Modules Video Processing - 5919 only (optional Licensed features - see section 3.5) Video Processing License, Snell Order Code: S8AHP-VF, 1 license, 8 assignable channels (assigned to any input or output channels) *Frame/Line Sync and Video Delay *Frame Sync offset: set in frames, lines and pixels or milliseconds *Line Sync offset: set in pixels or milliseconds *Video Delay: set in pixels *The video processing block can be used for frame/line sync or video delay on a channel by channel basis but they cannot both be used on the same channel. Input Standard 1125 (1080)/50P (A & B - Level B dual link only) 1125 (1080)/59P (A & B - Level B dual link only) 1125 (1080)/29i 1125 (1080)/25i 750 (720)/59P 750 (720)/50P 525 (480)/29i 625 (576)/25i Default Video Output Standard Last known good Controls (per channel) Genlock & Video Delay Genlock Mode Lock to Reference, Lock to Input Genlock H-Phase ±0.5H in pixel clock steps Genlock V-Phase ±0.5F in 1 line steps Video H-Delay 0 - 1 Line in pixel clock steps Video V-Delay 0 - 1 Frame in 1 line steps Video Delay 0 - 14 Pictures (Picture = Frame in progressive formats) (Picture = Field in interlaced formats) Reference Select Mode Configured for each input or output - any of 4 looping references or internally derived references Other Controls Action on Loss of Input Freeze, Black (configurable) HANC Data Blank On/Off On removes all HANC data. Note: this includes removal of embedded audio VANC Data Blank On = Blank all VANC interval Off = Pass VANC except SMPTE defined switching line and line following Other Functions DVB-ASI Handling Automatically detected and passed transparently Synchronization Method Video and audio frame drop/repeat Audio Selection Pre or post video synchronization Freeze Field on interlaced standards Frame in progressive standards Minimum Delay (Reference lock or free run) 2 µs to 7 µs for all formats (dependent on hysteresis state) Synchronizer Hysteresis Window 5 µs Table 100. 5919 and 5915 Video AHP Input Modules Issue 5 Rev 2 Page 320 © 2014 Snell Limited Sirius 800 www.snellgroup.com Specifications 5919 and 5915 - Video AHP Input Modules Embedded Audio Delay - 5919 only (optional Licensed feature - see section 3.5) Embedded Audio Delay License, Snell Order Code: S8AHP-VD (1 per module, 24 channels) Audio Delay Per audio input channel in steps of 0.25 ms in a range of 0 to 5.46 Seconds. Embedded Audio Processing (including de-embedding) - 5919 & 5915 (optional Licensed features - see section 3.5) Embedded Audio Processing License, Snell Order Code: S8AHP-VA (1 per module, 24 channels) Audio phase Invert Available per mono or stereo signal. NORMAL/INVERT control (on/off) Audio Gain/Mute adjustment Per mono or stereo signal. Silence (Mute) or -72 to +30 dB in 0.1 dB steps Audio mixing Up to 16 mono channels per mix. Gain adjustment range per channel -Silence or -72 to +30 dB in 0.1 dB steps Channel Swap (shuffle) Change the channel order of up to 16 audio inputs. Video Format Audio Channels Format 525/625 Up to 16 SMPTE ST259 carrier: Embedded Audio to SMPTE ST272ADEF; synchronous and asynchronous, 20 bit audio packets only 720p Up to 16 SMPTE ST292 carrier: SMPTE ST296 720p - 4:2:2 10 bit, 50/59.94/60 progressive frames/s. Embedded Audio to SMPTE ST299-1 Audio synchronous or asynchronous to video 48 kHz nominal sample rate 1080i Up to 16 SMPTE ST292 carrier: SMPTE ST274 1080i - 4:2:2 10 bit, 25/29.97/30 interlaced frames/s Embedded Audio to SMPTE ST299-1 Audio synchronous or asynchronous to video 48 kHz nominal sample rate Table 100. 5919 and 5915 Video AHP Input Modules Issue 5 Rev 2 Page 321 © 2014 Snell Limited Sirius 800 www.snellgroup.com Specifications 5919 and 5915 - Video AHP Input Modules 1080p Up to 16 SMPTE ST424M carrier: SMPTE ST 425M Level A - 1080p 4:2:2 10 bit 50/59.94/60 progressive frames/s (Mapping structure 1) Embedded Audio to SMPTE299-1 & ST299-2 Audio synchronous or asynchronous to video 48 kHz nominal sample rate Up to 16 SMPTE ST 425 Level B Dual Link, mapped to SMPTE ST372/ST274 - 4:2:2 10bit at 50/59.94/60 progressive frames/s Embedded Audio to SMPTE ST299 Audio synchronous or asynchronous to video 48 kHz nominal sample rate Table 100. 5919 and 5915 Video AHP Input Modules Issue 5 Rev 2 Page 322 © 2014 Snell Limited Sirius 800 www.snellgroup.com Specifications C.1.3 AHP Audio Inputs 4915 - AES/MADI Input Module AES Inputs - Functional Signal Standard AES3-2009 Sample Rate 48 kHz nominal Synchronous or asynchronous to references or video input signals Format 20 bit or 24 bit transparent AES Inputs Electrical Interface (1352, 1354, 1355, 1357,1297 and 1299 Rear Panels) Number and Type 120 AES pairs per card Balanced AES: 1352, 1354, 1297 and 1299 Unbalanced AES: 1355 and 1357 Connector 5 x 62 way high density D type Sockets Input signal sensitivity >250 mV pk-pk MADI Inputs - Functional Signal Standard AES10-2003 56 or 64 channels @ 48 kHz sample rate Sample Rate 48 kHz nominal Synchronous or asynchronous to references or video input signals Audio Format 20 bit or 24 bit transparent MADI Inputs on AES Rear Panel (1352, 1354, 1355 and 1357 Rear Panels) Number 3 Connector HD BNC, 75 electrical impedance. Impedance 75 nominal Cable Equalisation 200 m (650 Feet) Belden 1855 or equivalent MADI Inputs on Coax Rear Panel (1285 or 1303 Rear Panels) Number and Type 12 with main and backup inputs per signal, auto fail-over on signal loss, or manual changeover. Connector BNC to IEC61169-8, 75 electrical impedance. Impedance 75 nominal Cable Equalisation 200 m (650 Feet) Belden 1855 or equivalent MADI Inputs on Fiber Rear Panel (1286 or 1304 Rear Panels) Number and Type 12 with main and backup inputs per signal, auto fail-over on signal loss, or manual changeover. Removable SFP modules Fiber Connector LC/PC single mode Wavelength Wideband receiver, 1260-1620 nm nominal Sensitivity -18 dBm Typical Fiber Length 20 km (12.5 Miles) single mode Note: Fiber MADI specifications are based on fitting standard SFP receivers - Snell Order Code SRR-3 Audio Processing (free License with each module) Gain/Mute Per mono or stereo signal. Silence (Mute) or -72 to +30 dB in 0.1 dB steps Phase Invert Available per mono or stereo signal. NORMAL/INVERT control (on/off) Stereo Mode Options are; Left/Right swap, Left Both, Right Both, Mono Mix or Normal Table 101. 4915 AES/MADI Input Module Issue 5 Rev 2 Page 323 © 2014 Snell Limited Sirius 800 www.snellgroup.com Specifications C.2 Outputs C.2.1 Video Outputs 5926, 5938, 5949, 5923 and 5925 Video Output Modules used with 1294 or 1295 Main Router Coax Video Output Rear Panels Type 24 per module, re-clocked. Connectors BNC to IEC61169.8, 75 electrical impedance. Gold plated. Standards supported SMPTE-259M 525 and 625 SD-SDI EN50083-9 DVB-ASI SMPTE 292M 720p and 1080i HD-SDI SMPTE 424M 1080p 3G-SDI Impedance 75 Data rate 3Mb/s - 3 Gb/s. Standard video rates re-clocked, all other rates auto-bypassed. Return loss >15 dB 10 MHz to 1.5 GHz, >10dB 1.5 GHz to 3 GHz Amplitude 800 mV p-p ±10% Rise/Fall time 90ps @ 3G <180ps @ HD <650ps @ SD Timing Jitter <0.25UI @ 1.5G and 3G <0.15UI @ SD Alignment Jitter <0.15UI @ 1.5G and 3G <0.1UI @ SD DC offset 0V ± 0.5V Table 102. Main Coax Video Outputs 5926, 5938, 5949, 5924 and 5925 Video Output Modules used with 1296 or 1302 Main Router Optical Video Output Rear Panels Type 24 per module, re-clocked, removable video SFP modules Note: Fiber MADI specifications are based on fitting standard SFP transmitters Order Code ST31ST31-3 Connector LC/PC single mode connection as standard. Wavelength 1310nm Output Power Typical -2dBM Other power and CWDM options available - contact factory Standards supported SMPTE-259M 525 and 625 SD-SDI EN50083-9 DVB-ASI SMPTE 292M 720p and 1080i HD-SDI SMPTE 424M 1080p 3G-SDI Data rate 3Mb/s - 3 Gb/s. Standard video rates re-clocked, all other rates auto-bypassed. Table 103. Main Optical Video Outputs Issue 5 Rev 2 Page 324 © 2014 Snell Limited Sirius 800 www.snellgroup.com Specifications C.2.2 Video AHP Outputs 5949 and 5925 - Video AHP Output Modules Video Processing - 5949 only (optional Licensed features - see section 3.5) Video Processing License, Snell Order Code: S8AHP-VF, 1 license, 8 assignable channels (assigned to any input or output channels) *Frame/Line Sync and Video Delay *Frame Sync offset: set in frames, lines and pixels or milliseconds *Line Sync offset: set in pixels or milliseconds *Video Delay: set in pixels *The video processing block can be used for frame/line sync or video delay on a channel by channel basis but they cannot both be used on the same channel. Input Standard 1125 (1080)/50P (A & B - Level B dual link only) 1125 (1080)/59P (A & B - Level B dual link only) 1125 (1080)/29i 1125 (1080)/25i 750 (720)/59P 750 (720)/50P 525 (480)/29i 625 (576)/25i Default Video Output Standard Last known good Controls (per channel) Genlock & Video Delay Genlock Mode Lock to Reference, Lock to Input Genlock H-Phase ±0.5H in pixel clock steps Genlock V-Phase ±0.5F in 1 line steps Video H-Delay 0 - 1 Line in pixel clock steps Video V-Delay 0 - 1 Frame in 1 line steps Video Delay 0 - 14 Pictures (Picture = Frame in progressive formats) (Picture = Field in interlaced formats) Reference Select Mode Configured for each input or output - any of 4 looping references or internally derived references Other Controls Action on Loss of Input Freeze, Black (configurable) HANC Data Blank On/Off On removes all HANC data. Note: this includes removal of embedded audio VANC Data Blank On = Blank all VANC interval Off = Pass VANC except SMPTE defined switching line and line following Other Functions DVB-ASI Handling Automatically detected and passed transparently Synchronization Method Video and audio frame drop/repeat Audio Selection Pre or post video synchronization Freeze Field on interlaced standards Frame in progressive standards Minimum Delay (Reference lock or free run) 2 µs to 7 µs for all formats (dependent on hysteresis state) Synchronizer Hysteresis Window 5 µs Table 104. 5949 and 5925 Video AHP Output Modules Issue 5 Rev 2 Page 325 © 2014 Snell Limited Sirius 800 www.snellgroup.com Specifications 5949 and 5925 - Video AHP Output Modules Embedded Audio Processing (including embedding) - 5949 & 5925 (optional Licensed features - see section 3.5) Embedded Audio Processing License, Snell Order Code: S8AHP-VA (1 per module, 24 channels) Audio Mixing Up to 16 mono channels per mix. Selectable from incoming video or separately routed audio. Gain adjustment range per channel - Silence or -72 to +30 dB in 0.1 dB steps Channel Swap (Shuffle) Change the channel order of up to 16 audio outputs. Audio phase Invert Available per mono or stereo signal. NORMAL/INVERT control (on/off) Audio Gain adjustment Per mono or stereo signal. Silence or -72 to +30 dB in 0.1 dB steps Audio Embedding Embedding onto each video signal is done synchronously to the video signal. All video signals operate independently to each other. Ancillary Data All VANC data is removed All non-audio HANC (Horizontal Ancillary) data is removed Embedded Audio Delay - 5949 only (optional Licensed feature - see section 3.5) Embedded Audio Delay License, Snell Order Code: S8AHP-VD (1 per module, 24 channels) Audio Delay Per audio input channel in steps of 0.25 ms in a range of 0 to 5.46 Seconds. Video Format Audio Channels Format 525/625 Up to 16 SMPTE ST259 carrier: Audio to SMPTE ST272 - level A (20 bits) Synchronous to video at 48 kHz sample rate nominal, 4 audio groups maximum for 525/59.94 or 525/60 720p Up to 16 SMPTE ST292M carrier: SMPTE ST296M 720p - 4:2:2 10 bit, 50/59.94/60 progressive frames/s. Embedded Audio to SMPTE ST299M Synchronous to video at 48 kHz sample rate nominal 1080i Up to 16 SMPTE ST292 carrier: SMPTE ST274 1080i - 4:2:2 10 bit, 25/29.97/30 interlaced frames/s Embedded Audio to SMPTE ST299 Synchronous to video at 48 kHz sample rate nominal Table 104. 5949 and 5925 Video AHP Output Modules Issue 5 Rev 2 Page 326 © 2014 Snell Limited Sirius 800 www.snellgroup.com Specifications 5949 and 5925 - Video AHP Output Modules 1080p Up to 16 SMPTE 424M carrier: SMPTE 425M Level A - 1080p 4:2:2 10 bit 50/59.94/60 progressive frames/s (Mapping structure 1) Embedded Audio to SMPTE ST299-1 and ST299-2 Synchronous to video at 48 kHz sample rate nominal Up to 16 SMPTE 425M Level B Dual Link, mapped to SMPTE372M/274M - 4:2:2 10bit at 50/59.94/60 progressive frames/s Embedded Audio to SMPTE ST299-1 Synchronous to video at 48 kHz sample rate nominal Table 104. 5949 and 5925 Video AHP Output Modules C.2.3 AHP Audio Outputs 4929 and 4925- AES/MADI Output Module Audio Delay - 4929 only (free License with each module) Audio Delay Per audio output channel in steps of 0.25 ms • MADI - in a range of 0 to 2 Seconds @ 48 kHz • AES - in a range of 0 to 2 Seconds @ 48 kHz Audio Processing - 4929 only (optional Licensed features - see section 3.5) Sample Rate Conversion (SRC) License, Snell Order Code: S8A-SRC (1 per module, 768 mono channels on MADI/240 mono AES channels) Sample Rate Conversion (SRC) • Supported input sample rates from the audio crosspoint: 32 kHz, 44.1 kHz or 48 kHz • MADI - Supports conversion to: 48 kHz • AES - Supports conversion to: 32 kHz, 44.1 kHz, 48 kHz • Dolby - signals must be routed as a synchronous AES pair. The Dolby signal will automatically bypass the SRC even if the pair is selected for sample rate conversion. Any near rate reference locking is achieved by dropping or repeating Null samples in the guard band. Audio Processing - 4929 and 4925 (free License with each module) Gain Per mono or stereo signal. Silence or -72 to +30 dB in 0.1 dB steps Phase Invert Available per mono or stereo signal. NORMAL/INVERT control (on/off) Stereo Mode Options are; Left/Right swap, Left Both, Right Both, Mono Mix or Normal Table 105. 4929 and 4925 AES/MADI Output Modules Issue 5 Rev 2 Page 327 © 2014 Snell Limited Sirius 800 www.snellgroup.com Specifications 4929 and 4925- AES/MADI Output Module AES Outputs - Functional Signal Standard AES3-2009 Output Sample Rate Free running (asynchronous to any reference) the signal input sample rate is re-generated at the output. Format 20 bit or 24 bit, as input format Transparency Default channel status and User data applied to all re-synchronised outputs. Default Channel Status bits set to: • Consumer Use of Channel Status (bit 0) = Professional (1) • Linear PCM Identification (bit 1) = PCM Data Carried (0) or Non PCM data carried, e.g. Dolby data (1) • Sampling Frequency (bits 6 & 7) = 48kHz (0 & 1), 44.1 kHz (1 & 0) or 32 kHz (1 & 1) or Not Indicated (0, 0) • Sampling Frequency (bits 35 to 38) = 96 kHz (0, 1, 0, 0), 192 kHz (1, 1, 0, 0) or Not Indicated (0, 0, 0, 0) • Use of Auxiliary Sample Bits (bit 18) = 24 bit format (1) • All other default channel status bits set to Zero (0) Default User Data bits set to: • All bits set to Zero (0) Parity re-calculated on outputs. Transparent to audio data. Sample rate adjustment for near rate locking by drop/repeat. Transparency (free running asynchronous outputs) Transparent to audio data. Transparent to Input Channel Status and User data. Parity re-calculated on outputs. AES Outputs Electrical Interface (1353, 1356 and 1298 Rear Panel) Number and Type 120 AES pairs per card Balanced AES: 1353 and 1298 Unbalanced AES: 1356 Connector 5 x 62 way high density D type Sockets Output Amplitude >2V pk-pk into 110 Output Impedance 110 ±10% Output Rise & Fall Time <30 ns MADI Outputs - Functional Signal Standard AES10-2003 56 or 64 channels @ 48 kHz sample rate 4929 - see section 11.1.2 for configuration 4925 - see appendix B.3.1.2 for configuration Sample Rate 48 kHz nominal Synchronous to the selected reference. AES or video reference 1 to 4 can be selected (AES reference selected by default). Lock to MADI channel 0 if no reference is present. Audio Format 20 bit or 24 bit transparent Table 105. 4929 and 4925 AES/MADI Output Modules Issue 5 Rev 2 Page 328 © 2014 Snell Limited Sirius 800 www.snellgroup.com Specifications 4929 and 4925- AES/MADI Output Module Transparency Default channel status and User data applied to all re-synchronised outputs. Default Channel Status bits set to: • Consumer Use of Channel Status (bit 0) = Professional (1) • Linear PCM Identification (bit 1) = PCM Data Carried (0) or Non PCM data carried, e.g. Dolby data (1) • Sampling Frequency (bits 6 & 7) = 48kHz (0 & 1), 44.1 kHz (1 & 0) or 32 kHz (1 & 1) or Not Indicated (0, 0) • Sampling Frequency (bits 35 to 38) = 96 kHz (0, 1, 0, 0), 192 kHz (1, 1, 0, 0) or Not Indicated (0, 0, 0, 0) • Use of Auxiliary Sample Bits (bit 18) = 24 bit format (1) • All other default channel status bits set to Zero (0) Default User Data bits set to: • All bits set to Zero (0) Parity re-calculated on outputs. Transparent to audio data. Sample rate adjustment for near rate locking by drop/repeat. Transparency (free running asynchronous outputs) Transparent to audio data. Transparent to Input Channel Status and User data. Parity re-calculated on outputs. MADI Outputs on AES Rear Panel (1353 and 1356 Rear Panel) Number 3. Connector HD BNC, 75 electrical impedance. Impedance 75 ±2 Output Amplitude 720 mV nominal MADI Outputs on Coax Rear Panel (1295 Rear Panel) Number and Type 12, with dual outputs per signal. Connector BNC to IEC61169-8, 75 electrical impedance. Impedance 75 ±2 Output Amplitude 720 mV nominal MADI Outputs on Fiber Rear Panel (1296 Rear Panel) Number and Type 12 with dual outputs per signal. Removable SFP modules Fiber Connector LC/PC single mode Wavelength 1310 nm nominal. Output Power Typical -2 dBm. Other power and CWDM wavelength options available - contact factory Typical Fiber Length (MADI) 20 km (12.5 Miles) single mode Note: Fiber MADI specifications are based on fitting standard SFP transmitters Order Code ST31ST31-3 Table 105. 4929 and 4925 AES/MADI Output Modules Issue 5 Rev 2 Page 329 © 2014 Snell Limited Sirius 800 www.snellgroup.com Specifications C.2.4 Multiviewer and Additional Coax Outputs 577 to 1152 5925 5931 Multiviewer Output Module used with 1291 or 1309 MV DIN 1.0/2.3 Coax Output Rear Panels 5928 Standard Video Expansion Output Module (Sirius 850 Only) used with 1293 DIN 1.0/2.3 Coax Output Rear Panels for Additional Outputs 577 to 1152 Type Multiviewer: 48 per module, re-clocked. Additional Outputs: 24 per module, re-clocked Connectors DIN 1.0/2.3 Gold plated. Standards Supported SMPTE-259M 525 and 625 SD-SDI EN50083-9 DVB-ASI SMPTE 292M 720p and 1080i HD-SDI SMPTE 424M 1080p 3G-SDI Impedance 75 Data Rate 3 Mb/s - 3 Gb/s. Standard video rates re-clocked, all other rates auto-bypassed. Return Loss >15dB 10MHz to 1.5GHz, >10dB 1.5GHz to 3GHz Amplitude 800 mV p-p ±10% Rise/Fall time <270ps @ HD <800ps @ SD Timing Jitter <0.3UI @ 1.5G and 3G, <0.15UI @ SD Alignment Jitter <0.2UI @ 1.5G and 3G, <0.1UI @ SD DC Offset 0V ± 0.5 V Table 106. Multiviewer and Additional Coax Outputs Issue 5 Rev 2 Page 330 © 2014 Snell Limited Sirius 800 www.snellgroup.com Specifications C.3 Control Nucleus2 2463 Serial 4 x RS485 on 9 way D type Support for SW-P-02, SW-P-06 (RS 485 multi-drop panel protocol), SW-P-08 Default 38.4 kbaud Ethernet 1 x RJ45 per controller. 10/100Base-T SW-P-02, SW-P-08 IN, RollCall, third party control systems (using SW-P-02 & SW-P-08), SNMP Control and SNMP Monitoring support, plus DCCP connection to Workbench Table 107. Nucleus2 2463 Router Control Module Nucleus 2450 Serial 4 x RS485 on 9 way D type Support for SW-P-02, SW-P-02 IN (time stamped crosspoint set), SW-P-06 (RS 485 multi-drop panel protocol), SW-P-08, GVG ES-Control and Harris Passthrough Default 38.4 kbaud Ethernet 1 x RJ45 per controller. 10/100Base-T SW-P-02 IN (IP), RollCall, third party control systems (using SW-P-02), SNMP Control, SNMP Monitoring support, plus DCCP connection to Workbench Table 108. Nucleus 2450 Router Control Module Alarms Alarms Relay changeover for PSU, fan and Controller failure Comprehensive alarms reporting and auto failure recovery via Workbench Table 109. Alarms Reference Inputs Number and Type 4 x analogue video, all auto sensing to 525 and 625 B&B, or HD tri-level reference 1 x AES reference 48 kHz only Switch timing to SMPTE-RP168. Sources individually assignable to each reference or internally derived* reference or auto detected. *Internally derived reference Nucleus2 2463 only. Table 110. Reference Inputs Issue 5 Rev 2 Page 331 © 2014 Snell Limited Sirius 800 www.snellgroup.com Specifications C.4 Physical Sirius 830 Frame Weight Between 73 kg (161 lbs) and 85 kg (187 lbs) typical full frame (without packaging and depending on modules fitted) Height 15RU chassis - 668 mm (26.3 inches) Power requirements Auto ranging 100 Vac to 240 Vac, 50/60 Hz via external power supply shelf/shelves (see Table 115.). See Appendix B.1.1 on page 283 for details on the number of power supply shelves and power supply units required. Max Rated Power 2500 W for video only routing on a fully equipped system. 6500 W for video and audio routing on a fully equipped system. Power Consumption for Typical Usage Examples Fully Equipped - Standard Video modules all Coax. No monitoring or redundancy options. 1750 W Fully Equipped - Standard Video modules all Fiber. No monitoring or redundancy options. 2000 W Fully Equipped - 50% standard Video, 50% Video AHP, all Coax. No monitoring or redundancy options. 2970 W Additional - Redundant Video crosspoints 50 W Additional - Redundant Audio crosspoints 55 W Additional - 96 MV outputs 320 W Table 111. Sirius 830 Frame Details Sirius 840 Frame Weight Between 150 kg (330 lbs) and 175 kg (386 lbs) typical full frame (without packaging and depending on modules fitted) Height 27RU chassis - 1198mm (47.17 inches) Power requirements Auto ranging 100 Vac to 240 Vac, 50/60Hz via external power supply shelf/shelves (see Table 115.). See Appendix B.1.2 on page 284 for details on the number of power supply shelves and power supply units required. Max Rated Power 7000 W for video only routing on a fully equipped system. 13000 W for video and audio routing on a fully equipped system. Power Consumption for Typical Usage Examples Fully Equipped - Standard Video modules all Coax. No monitoring or redundancy options. 3250 W Fully Equipped - Standard Video modules all Fiber. No monitoring or redundancy options. 3800 W Fully Equipped - 50% standard Video, 50% Video AHP, all Coax. No monitoring or redundancy options. 5640 W Additional - Redundant Video crosspoints 50 W Additional - Redundant Audio crosspoints 55 W Additional - 96 MV outputs 320 W Table 112. Sirius 840 Frame Details Issue 5 Rev 2 Page 332 © 2014 Snell Limited Sirius 800 www.snellgroup.com Specifications Sirius 850 Frame Weight Between 190 Kg (419 lbs) and 215 Kg (474 lbs) typical full frame (without packaging and depending on modules fitted) Height 34RU Expandable chassis - 1511mm (59.49 inches) Power requirements Auto ranging 100 Vac to 240 Vac, 50/60Hz via external power supply shelf/shelves (see Table 115.). See Appendix B.1.3 on page 285 for details on the number of power supply shelves and power supply units required. Max Rated Power 7000 W for video only routing on a fully equipped system. 13000 W for video and audio routing on a fully equipped system. Power Consumption for Typical Usage Examples Fully Equipped - Standard Video modules all Coax. No monitoring or redundancy options. 4500 W (576 x 1152) Fully Equipped - Standard Video modules all Fiber. No monitoring or redundancy options. 4870 W (576 x 1152, Fiber available on first 576 outputs only) Fully Equipped - 50% standard Video, 50% Video AHP, all Coax. No monitoring or redundancy options. 6900 W (576 x 1152, Video AHP on 288 inputs and 288 outputs) Additional - Redundant Video crosspoints 50 W Additional - Redundant Audio crosspoints 55 W Additional - 96 MV outputs 320 W Table 113. Sirius 850 Frame Details All Sirius 800 Frames Depth 590.7mm (23.26 inches) Width 482mm (19 inches) - Physical Frame 447mm - (17.6 inches) Power redundancy Dual redundancy Operating Temp. 0 to +40°C Storage Temp. -10 to +50°C, non-condensing Cooling Fan cooled. Front inlet, rear and side exhaust Table 114. Sirius 800 Common Frame Details Power Supply Shelf Weight 24 kg - 53lbs typical (without packaging) Height 2RU - 88mm (3.46 inches) Depth 619.8mm (24.4 inches) Width 482mm (19 inches) - Physical Size 449mm - (17.6 inches) Input Voltage Auto ranging 100 Vac to 240 Vac, 50/60Hz Table 115. Power Supply Shelf Details Issue 5 Rev 2 Page 333 © 2014 Snell Limited Sirius 800 Issue 5 Rev 2 www.snellgroup.com Page 334 Specifications © 2014 Snell Limited