1
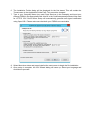
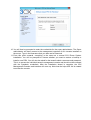
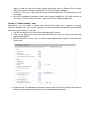
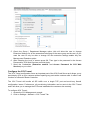
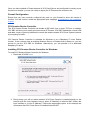
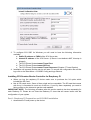
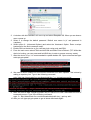
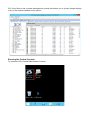
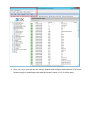
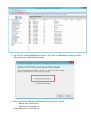
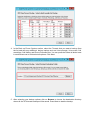
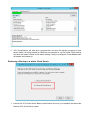
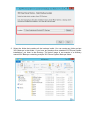
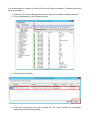
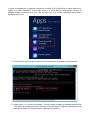
3CX Phone System Cloud Server Administration Manual Copyright 20132014, 3CX Ltd. http://www.3cx.com Email: [email protected] Information in this document is subject to change without notice. Companies’ names and data used in examples herein are fictitious unless otherwise noted. No part of this document may be reproduced or transmitted in any form or by any means, electronic or mechanical, for any purpose, without the express written permission of 3CX Ltd. 3CX Phone System Cloud Server is a copyright of 3CX Ltd. 3CX is a registered trademark, and 3CX Phone System Cloud Server and the 3CX logo are trademarks of 3CX Ltd. in Europe, the United States and other countries. Version 1 – Last updated 4th February 2014 Table of Contents 1. Introduction What is 3CX Phone System Cloud Server? How it works Special Hosting Edition Features Manage all 3CX instances from a central console Backup all 3CX Phone System instances with the Backup Tool Full VMware and Hyper V compatibility Easily configure a new 3CX Phone System instance Allow companies to manage user settings with granular user access Easy remote provisioning Eliminate firewall and bandwidth issues with inbuilt Session Border Controller Why 3CX Phone System Cloud Server over other hosted solutions? Built for Windows Server 2012 Retain Control of YOUR Customers Customers Prefer to Deal with their Trusted Resellers Retain Support Revenue of Your Customer Offer a full featured hosted PBX Full virtualization of Phone System and Data Licensing Full licenses Time based licenses Purchasing 3CX Phone System Cloud Server Activating Your 3CX Phone System Cloud Server License 2. Getting Started System Requirements Firewall Configuration Common Ports for all tenants For Each tenant Tenant 1 Tenant 2 Additional Tenants 3. Installing 3CX Cloud Server Introduction Installing the first tenant 4. Installing Additional Tenants Introduction Installing Another Tenant 5. Configuring a Tenant instance for a Customer Introduction Create Extensions Create a Dedicated SIP Trunk Create an Administrator for the Tenant (Optional) Create a “limited access” user Configure the 3CX Tunnel 6. Deploying A Configuration for Customers Introduction Firewall Configuration 3CX Session Border Controller Installing 3CX Session Border Controller for Windows Installing 3CX Session Border Controller for Raspberry Pi Part 1: Raspberry Pi Preparation and 3CX SBC Installation Part 2: Configuring 3CX SBC 7. Preparing the IP Phones Introduction Provisioning Yealink Phones Provisioning snom Phones Provisioning Cisco SPA Phones 8. The Central Management Console Introduction Running the Central Console 9. Backing up all tenants Introduction Running the Backup Restoring a Backup or a whole Cloud Server Performing a Backup or Restore via Command Line Backup via Command line Restore via Command line 10. Updating 3CX Cloud Server via Service Pack Updates Introduction 11. Uninstallation Introduction What is 3CX Phone System Cloud Server? Cloud based PBX demand is growing. Outsourced PBX is attractive to smaller customers but comes with a price: Existing Cloud PBXs have a basic feature set and the companies providing them will take control of YOUR customers and make you dependent on their Quality Control and support procedures. This is a recipe for disaster. 3CX Phone System Cloud Server is a special version of 3CX Phone System, designed to allow companies to host 3CX Phone System for customers and retain FULL control of data and quality. How it works 3CX Phone System Cloud Server allows you to host up to 50 separate 3CX Phone System instances on one Windows Server 2012 machine. Each instance is entirely separate from the other and allows you to completely separate configurations and resources between customers. By hosting 50 instances on one Windows Server machine, you can avoid having to license & manage individual Windows instances, saving greatly on licensing, management and hardware costs. Connect each instance to its own dedicated SIP trunk or Gateway port and keep call billing perfectly separated for each customer. As a reseller, maintain close customer contact for PBX services, but outsource telecom call costs and billing to your SIP trunk provider of choice. As a SIP trunk provider, enjoy economies of scale by keeping control of the SIP trunks, but outsource PBX support and service to your resellers – allowing you to scale easily. Special Hosting Edition Features The feature set of the actual hosted edition of 3CX Phone System is identical to the onsite edition. 3CX Phone System Cloud Server though offers additional features to allow you to easily deploy and manage these hosted instances of 3CX Phone System. Manage all 3CX instances from a central console The central console allows you to quickly manage each 3CX Phone System instance/customer. Each node represents a customer and allows you to switch into the customer configuration without having to login in to that particular portal. Backup all 3CX Phone System instances with the Backup Tool The hosting edition offers a backup and restore tool that is able to backup ALL instances on the machine and restore all instances on another machine if need be. Automate backup on a scheduled basis and restore all instances in minutes in case of hardware failure. Full VMware and Hyper V compatibility If you want to leverage your existing Vmware or Hyper V knowledge you can do so with 3CX Phone System Cloud Server. It has been verified and tested against the leading virtualization platforms and allows you to take full advantage of VMware and Hyper V management and redundancy features. Easily configure a new 3CX Phone System instance Ability to quickly create a 3CX Phone System configuration using our wizard or from a web input form: Import users, configure trunks and push out to a new 3CX Phone System instance. Allow companies to manage user settings with granular user access Allow customers to manage their own extensions, but not Trunk, Gateway and other system configurations. Two additional user levels: Department manager, who can manage the extensions of his/her group, and System manager, who can manage all extensions. The System administrator level allows the customer full access to the system and can be disabled to avoid any misconfigurations by the customer. Easy remote provisioning 3CX Phone System Cloud Server can easily provision remote IP Phones and 3CX Phone instances via the extended SIP Proxy manager which acts as an agent for provisioning requests. With the SIP Proxy manager you can send phones readily configured for true plug and play at the customer site. Eliminate firewall and bandwidth issues with inbuilt Session Border Controller 3CX Phone System features the unique SIP Proxy Manager, which allows all SIP traffic for the customer to be tunneled over a single port. Drastically simplify remote installs and eliminate firewall configuration issues. Furthermore, the intelligent 3CX Proxy Manager can detect calls being made between local extensions and avoid sending audio streams to the hosted PBX – saving valuable bandwidth and drastically improving audio quality. Why 3CX Phone System Cloud Server over other hosted solutions? Built for Windows Server 2012 Windows Server 2012 is a stable and manageable platform and allows you to provide 3CX Phone System as a hosted edition much more effectively than competing solutions available for Linux. Linux based multi tenant phone systems are much harder to configure and manage. With 3CX Phone System, you can leverage your existing knowledge without having to learn a new operating system or software platform to offer hosted PBX. Retain Control of YOUR Customers 3CX Partners don’t need to give up control of their customers when working with a 3rd party hosting company. With 3CX Cloud Server, partners host their customers’ PBX themselves. Some 3rd party companies could previously take control of customer accounts, cutting out the 3CX Partner from the picture. Customers Prefer to Deal with their Trusted Resellers Customers prefer dealing with their trusted local 3CX Partner as they know their needs and have built up working relationships, rather than with an unknown 3rd party hosting company. Retain Support Revenue of Your Customer Because 3CX Cloud Server gives 3CX Partners complete control over the hosted PBX, they can generate recurring income by offering technical support to their customers. With 3rd party hosting companies, the customer will medium to long term deal directly with them without the need for the 3CX Partner, resulting in a loss of support revenue. Offer a full featured hosted PBX Rather than a scaled down basic PBX, you can offer customers a full virtualized 3CX Phone System instance, together with the advanced feature set that 3CX is known for. Advanced PBX features, unified communications and broad client support – fully virtualized and controlled per customer. Full virtualization of Phone System and Data 3CX Cloud Server actually runs forty fully virtualized and separated instances of 3CX Phone System. That means that any applications run by one customer will never affect the 3CX Phone System run by other customers. Data is fully separated and allows you to meet strict privacy and reporting requirements Licensing 3CX Partners can license each tenant individually, depending on the requirements of the customer, i.e. number of simultaneous calls, whether customer requires PRO edition or not and so on. Licenses for 3CX Phone System Cloud Server are available in two types: Full licenses Customers can buy a full 3CX Phone System license that can be activated either on 3CX Cloud Server or onsite. This is the most economical way to license 3CX Phone System. Time based licenses <This feature is not available yet> Customers that prefer to pay per month or per 6 months, can opt for time based licenses. These licenses can ONLY be activated on 3CX Phone System Cloud Server. Time based licenses include maintenance but are more expensive in the long run. However they allow partners to license 3CX Phone System for short period of times and reduce the ‘risk’ when entering into contracts with customers. Purchasing 3CX Phone System Cloud Server 3CX Cloud Server is provided free of cost. Every tenant needs a valid 3CX Phone System licence. For 3CX Phone System pricing information visit: http://www.3cx.com/ordering/pricing/ Activating Your 3CX Phone System Cloud Server License Once you have purchased a license, you can activate it as follows. Step 1: Login as Super Administrator in the main management console Step 2: Click on Activate (top middle section of the screen) or select the System node > License Activation and paste in your License key. System Requirements To run 3CX Phone System Cloud Server the following Software and Hardware specifications are required: Software Requirements 1. 2. 3. 4. 5. 6. Windows Server 2008 R2 64Bit or Windows Server 2012 64Bit. IMPORTANT: Server core editions are NOT supported Microsoft .NET Framework 4.5. Internet Information Services. VMware ESX and Hyper V environments are fully supported No DNS OR DHCP server installed on this machine! This machine must be dedicated to 3CX Phone System Cloud Server 7. Each tenant cannot have more than 32 simultaneous calls. Minimum Hardware requirements: 1. Intel Xeon CPU – E5505 2.00 GHz 2.00 GHz (2 processors) or higher. 2. Memory: 12 GB or higher. Total memory footprint per 3CX Phone System tenant is 300500 MB of memory. 3. Hard disk: SATA 100GB or higher 4. Network card: 1Gbit / 10Gbit Firewall Configuration Each tenant has its own dedicated set of ports that are used by 3CX Phone System. You will need to open the following ports for 3CX Cloud Server on the system: Common Ports for all tenants Website Port 80 & 443 Media Server From 55,000 65,000 UDP Only Note: If your firewall facing the internet is directly the Windows Firewall, you need to do nothing because the 3CX Cloud Installation opens all required ports on the target server. Alternatively you will need to open and port forward the below mentioned ports on your firewall. For Each tenant 3CX Phone System uses specific ports for different services. 1000 ports are allocated for each tenant. Tenant 1 starts from 50005999, tenant 2 from 60006999, tenant 3 from 70007999 etc. Tenant 1 Tenant 1 will use the following ports from the range 5000 to 5999. HTTP access for all Web sites (80 or 443) https://cloud7.3cx.com/t1/management Phone System SIP Port TCP and UDP 5060 Phone System Secure SIP Port TCP 5061 3CX Tunnel Service TCP and UDP 5090 Tenant 2 Tenant 2 has the exact same ports but in the range 6000 to 6999: HTTP access for all Web sites (80 or 443) https://cloud7.3cx.com/t2/management Phone System SIP Port 6060 Phone System Secure SIP Port 6061 3CX Tunnel Service 6090 Additional Tenants Additional tenants will follow the exact same pattern as Tenant 2 but starting at the following range: Tenant 3 7000 Tenant 4 8000 Tenant 5 9000 Tenant 6 10000 Tenant 7 11000 etc. Installing 3CX Cloud Server 3CX Cloud Server setup needs to be run for each tenant you wish to install. The installation procedure for the first tenant is slightly different from the installation procedure for other tenants as certain settings for the whole Cloud Server are configured. Installing the first tenant 1. Download 3CX Phone System Cloud Server edition from here: http://downloads.3cx.com/downloads/3CXPhoneSystemCloudServer12.exe 2. Once the download is completed double click the setup file to launch setup. 3. You will be prompted to enter the name for the first tenant. The first tenant name should ideally be the name of the company or branch office that you’re hosting. The Tenant name cannot be empty or longer than 20 characters and can only consist of lowercase letters and numbers, without spaces or any other special characters. In this case we will name the tenant ‘t1’. Press Next when you input the tenant name to proceed. 4. The 3CX Phone System Cloud Server System Requirements will be displayed, please make sure that you read them and that your system configuration complies with them. Select Next to continue and press Next again in the next screen after you read the last part of System Requirements. 5. Read the End User Licence Agreement , accept the terms and continue the setup. 6. The Installation Folder dialog will be displayed for the first tenant. This will contain the Tenant name in the Application Folder Path. This cannot be changed. 7. Type in your Company Name (we used Cloud Services in the example) and insert your external FQDN in the appropriate field. Also fill in the Certificate password that will be used for HTTPS. 3CX Cloud Server Setup will automatically generate self signed certificates using Open SSL. Please make sure that both your FQDN’s are resolvable. 8. Select Next when done and press Install at the next screen to begin the file installation. 9. Once setup is complete, the 3CX Wizard dialog will come up. Select your language and click Next to proceed. 10. You will then be prompted to enter the credentials for the super administrator. The Super administrator will have access to the management consoles of ALL tenants installed on the server. Type in the Username that you want and a Password. 11. From this point onwards, everything is the same as a normal 3CX Phone System installation. You will be prompted to choose whether you want to restore a backup or install a new PBX. You will also be asked for the tenant’s admin username and password. This is to access the individual tenant’s management console and should not be confused with the Sysadmin credentials. After the installation wizard is complete, the 3CX Management Console web interface will come up. Note how the https URL link is created to access the console. Installing Additional Tenants For each additional tenant that you wish to install on 3CX Phone System Cloud Server, you need to rerun the Cloud Server setup so make sure you keep the original installation setup saved. Installing Another Tenant 1. Double click on the installation setup file. 2. A dialog will appear with a list of instances that the setup can support. The 3CX Phone System Cloud Server Setup package can install up to 50 instances from Tenant 1 to Tenant 50. 3. Select the “Install new instance” option. In this example we will select Tenant 2. Press “Next” to continue. 4. Enter the tenant name for tenant 2 in this example we named it ‘t2’. Follow the same installation procedures as outlined for Tenant 1 (except steps 7 ssl configuration, and 10 where the super administrator for the 3CX Cloud Server was specified). 5. To install additional Tenants repeat the steps shown above. Once you have installed one or more tenants, you must continue to configure the 3CX Phone System instance for the customer. Once configured, you can then roll out the configuration to the customer. Create Extensions The process for creating extensions on 3CX Cloud Server is identical to the standard 3CX Phone System. You probably wish to use the capability to import extensions and DIDs to speed up the process. For more information on how to import extensions and DIDs please see Chapter 5 and Chapter 7 of the 3CX Phone System 12 User Manual respectively. Create a Dedicated SIP Trunk For billing purposes, you must create a dedicated SIP trunk for each customer. 3CX Phone System does not include a billing feature. However as a reseller its much better to work with one of the many SIP trunk providers that are able to provide you a separate account per customer and send you the bills for each trunk or bill the customer directly. Separating the SIP trunk will greatly reduce the security and credit risk compared to having one SIP trunk for all customers. The procedure to create a dedicated SIP trunk is identical to the standard 3CX Phone System. For more information please see the 3CX Phone System manual . Create an Administrator for the Tenant (Optional) If you wish to allow your customer to be able to edit ALL 3CX Phone System settings, including the SIP trunk, then you must create an administrator account for the customer and send the credentials to your customer. To do this: 1. Log into the tenant’s 3CX Cloud Server Management Console. 2. Click on the Extensions node and select the Extension that you want to provide with Administrator Rights. 3. Edit the extension of the user you want to grant administrative rights to and select the Options tab. 4. Check the Allow 3CX Management Console Access checkbox and then click on Configure Permissions to set the extension’s access level to the Management Console. 5. Check the options Global Extension Manager (this will allow the user to manage all extensions and extension groups within 3CX Phone System). 6. Check the VoIP/ Trunk Administrator option so the user can manage and create SIP trunks and configure VoIP Provider accounts. You may also enable the System Administrator option so that the user can modify System Extensions such as Queues, Ring Groups, IVRs,have access to Settings and perform 3CX Phone System Updates. 7. Press OK. Then type in the password in the Access Password for 3CX Web Services and click Apply. 8. Send the Credentials (extension number and Access Password for 3CX Web Services to your client. The URL will look like this https://cloud7.3cx.test/t2/management. Create a “limited access” user Alternatively, you can create a limited user account that allows your customer to change extension settings only. This way the customer can not accidentally change SIP trunk and other important system settings. To do this: 1. Log into the tenant’s 3CX Cloud Server Management Console. 2. Click on the Extensions node and select the Extension that you want to provide with Administrator Rights. 3. Edit the extension of the user you want to grant administrative rights to and select the Options tab. 4. Enable Allows 3CX Management Console Access and click on the Configure Permissions button to set the extension’s access level to the Management Console. 5. Check the Group / Department Manager option (this will allow the user to change Extension Settings for all the extensions belonging to the same group as the user). If you want the user to only be able to change his own extension settings enable only the Manage own Extension option. 6. After selecting the level of access press OK. Then type in the password in the Access Password for 3CX Web Services and click Apply. 7. Send the Credentials ( Extension number and Access Password for 3CX Web Services ) to your client. Configure the 3CX Tunnel The 3CX Tunnel configuration forms an important part of the 3CX Cloud Server as it allows you to send deploy 3CX at your customer without opening any ports at the customer side. In effect it will function as a Session Border Controller. The 3CX Tunnel will bundle all SIP traffic over a single TCP port and avoid any firewall configuration issues. Furthermore, all provisioning information can be sent via the 3CX Tunnel and it will allow you to manage the IP Phones installed at the customer site remotely. To configure 3CX Tunnel: 1. Access the 3CX Management console. 2. Click on Settings > Network > 3CX Tunnel Tab. 3. Enter a password for all 3CX Tunnel Connections. You will need this later for the SBC. 4. Select the Tunnel Network Listening interface from the dropdown. (Default interface is preselected). 5. Take a note of the tunnel listening port. If you restore a backup from a standard 3CX Phone System Installation onto a cloud tenant, you might need to change the port depending on which tenant you are restoring the backup for. Once you have installed a Tenant instance of 3CX Cloud Server and configured it correctly as per the previous chapter, you are now ready to deploy the IP Phones at the customer site. Firewall Configuration Ensure that you have correctly configured the ports on your firewall to allow this tenant to function. You will need to create the appropriate port mappings as explained in the installation chapter. 3CX Session Border Controller The 3CX Session Border Controller will bundle all SIP traffic over a single TCP port. In addition 3CX SBC will allow you to easily provision remote IP Phones. 3CX SBC establishes a virtual VPN and adds a layer of security between the remote site and the hosted 3CX Phone System instance by encrypting all traffic. 3CX Session Border Controller is available for Windows or as a Raspberry Pi Linux Debian Version. If the customer has an existing Windows Server or Desktop that is always on, you can choose to use the 3CX SBC for Windows. Alternatively, you can preload it on a dedicated Raspberry PI device. Installing 3CX Session Border Controller for Windows To install 3CX Session Border Controller for Windows: 1. Download 3CX SBC here . 2. During setup you will be asked whether 3CX Phone System is installed directly on the internet (with the local interface being a public IP Address) or behind a NAT (Where the local interface is a local IP Address). Choose the appropriate option. In this example we will assume that 3CX Cloud Server is installed behind a NAT. 3. To configure 3CX SBC for Windows you will need to have the following information available: a. Public IP address or FQDN of the 3CX Server site b. Internal IP address of the 3CX Server. (If Server is not behind a NAT, this step is skipped) c. The 3CX Phone System tenant Tunnel Port d. The 3CX Phone System tenant SIP Port e. The 3CX Phone System tenant Tunnel Password (Chapter 5 Tunnel Section) 4. Installation will proceed and the service will start. To access the configuration file and the logs click on the Start Menu > 3CXSBC Config and logs Shortcut. Installing 3CX Session Border Controller for Raspberry Pi ● When you buy the raspberry Pi device make sure to purchase the 'kit' option which includes the SD Card. ● Not all SD cards work. Some of them might not be compatible. The SD card that comes with the pi is formatted to work out of the box. If you buy them separately you need to follow guides on the internet to get the card readable. IMPORTANT NOTE: The following procedure after this section needs to be done separately for each Rasberry Pi. Please do not clone the Rasberry Pi since that will cause issues with the configuration of your system Part 1: Raspberry Pi Preparation and 3CX SBC Installation 1. Assemble the Pi and power up the device 2. 3. 4. 5. 6. 7. A window with title 'NOOBS' will come up and select Raspbian OS. When you are done a menu comes up. Select 2 to change the default password. Default user name is ‘pi’ and password is ‘raspberry’. Select option 8 (Advanced Options) and select the ‘Hostname’ Option. Enter a unique hostname for the device example rasp1. Enable SSH on the device so you can later login using putty and SSH. From the main menu select Finish and hit Enter and select Yes to Reboot. (TIP: Whilst the device is booting, you can press and hold Shift key in order to access recovery mode.) After the device is up, it is recommended to update debian OS. Open a terminal and type sudo aptget update 8. We need to inform Debian OS from where to download 3CX SBC Updates. This is done by adding a repository link. Type in the following command: echo “deb http://downloads.3cx.com/downloads/sbc /” >> /etc/apt/sources.list 9. After we need to add a digital signature key to ensure 3CX SBC downloads are from a trustworthy source. Type in the following command: wget O http://downloads.3cx.com/downloads/sbc/public.key | aptkey add 10. After you can type aptget update to get all latest downloads again. 11. Now you can install 3CX SBC. Type the command aptget install 3cxsbc. 3CX Session Border Controller will be installed and started automatically. Some Important things to know about 3CX SBC on Raspberry Pi After installation the application will have the following structure ● /etc/3cxsbc.conf The 3CX SBC Configuration file ● /var/log/3cxsbc.log 3CXSBC Log file. Default is disabled. If required enable temporarily and then disable. File size can grow and consume limited SD Card space on the Pi causing the OS to crash. ● /usr/sbin/3cxsbc Here is the actual executable file ● /etc/init.d/3cxsbc Daemon File. Part 2: Configuring 3CX SBC 1. Type in the following command to configure 3CX SBC Config file nano /etc/3cxsbc.conf 2. Enter the below information in 3cxsbc.conf a. [Bridge] section > Password 3CX Tunnel Password taken from the 3CXTunnel Tab in the tenant’s management console b. TunnelAddr Public IP address or FQDN of the 3CX Server site c. TunnelPort The 3CX Phone System tenant Tunnel Port d. Name 3CX SBC Connection Name e. PbxSipIP IP Address of PBX f. PbxSipPort The 3CX Phone System tenant SIP Port g. Save all modifications and exit the file. (Ctrl X) 3. Type in the following command ‘service 3cxsbc restart’ to restart the 3CX SBC Service so the modifications come into effect. Once 3CX SBC’s are configured and connected to the 3CX Cloud Servers, it is time to deploy phones to the remote networks. ● Yealink and snom Phones will send a Plug and Play request. Other phones require the provisioning link to be entered manually in their web interface. ● Yealink and snom Phones are provisioned using HTTPS. Other phones use HTTP. Provisioning Yealink Phones 1. Power up the Yealink phone at the client’s site 2. Access the web interface of the Yealink phone and log in 3. Navigate to Security > Trusted Certificates and set the option “Only Accept Trusted Certificates” to Disabled. Press Confirm to apply the changes. The Phone will reboot. 4. Access the 3CX Tenant’s Management console and navigate to the Phones node. Select the Yealink Phone entry and right click to add an extension or assign an existing extension. 5. Go to the Phone Provisioning tab to ensure that all the settings are correct. Click on the Select Interface dropdown and confirm that the preselected interface is correct. The IP and Port of the Session Border Controller will be automatically populated. 6. Click OK. 3CX Phone System will instruct the Phone to provision. It may take around 510 minutes for the phone to provision. After you will see the phone registered in the Phones node. Provisioning snom Phones 1. Power up the snom Phones at the client’s site. The snom phone will send a Plug and Play Notification. 2. 3. 4. 5. Access the 3CX Tenant’s Management console and navigate to the Phones node. Select the snom Phone entry and right click to add an extension or assign an existing extension. Go to the Phone Provisioning tab to ensure that all the settings are correct. Click on the Select Interface dropdown and confirm that the preselected interface is correct. The IP and Port of the Session Border Controller will be automatically populated. Click OK. 3CX Phone System will instruct the Phone to provision. Access the remote site and open the web interface of the snom Phone. 6. Navigate to Certificates > Unknown Certificates and in the section TLS Server Authentication click “Activate”. The phone will immediately reboot after this. 7. When the phone is back up again, access the web interface again, go to Certificates > Unknown Certificates, and click on the link “Add Exception”. 8. Click Advanced > Update and press Reboot. Phone will reboot and will register to 3CX Phone System. Provisioning Cisco SPA Phones The Cisco SPA Phones at the remote site will require the below instructions: 1. Log into the 3CX Cloud Server Tenant Management console. 2. Create or edit an existing extension. This the extension that will be used and provisioned as a remote extension. 3. Select the Phone Provisioning tab, insert the MAC address and select the Model of the phone that you want to provision. 1. If you want you can also select the Phone Display Language of your choice by clicking and selecting from the dropdown list. 2. Click Provisioning Method dropdown and select 3CX Session Border Controller 3. The Select Interface dropdown will be automatically configured to use the Public Interface. Confirm that you see the FQDN of the Server. 4. In the field “IP Address of Session Border Controller” enter the Local IP Address of the 3CX SBC Machine or Raspberry Pi. The Port should remain 5060 as all SBC’s are configured to work on port 5060. Changing this port will break the setup. 5. Configure any Codec priorities or BLF lamp fields in the sections that follow. 6. Press Apply or OK to save the configuration. 7. Access the web interface of the SIP Phone on the client site and depending on the type of phone used, you will need to configure the provisioning url in each phone. Since each phone has a specific URL format, samples are provided below for the HTTP URL format used by the most popular 3CX supported phones: Provisioning Popular 3CX Supported Phones The provisioning URL can be achieved by accessing the 3CX Management console, navigate to Settings > Phone Provisioning > General Tab. The External Provisioning URL is visible and needs to be used and formatted for each phone. The following notation will be used to describe the provisioning URL PublicIPofPBX should be replaced with the public IP or FQDN of the 3CX Cloud Server . Tenantname should be replaced with the tenant friendly name ProvSubDir variable should be replaced with the Provisioning Sub Directory folder name. Provisioning link for Cisco SPA phones: Click on Admin Logon>Advanced>Provisioning>Profile Rule and enter the following url: http://PublicIPofPBX/tenantname/provisioning/%%ProvSubDir%%/$MA.xml Provisioning link for Cisco 7940 / 7960 phones: Cisco 7940 and 7960 phones require a TFTP server. If the remote client site has a DHCP that supports option 66, create an option 66 rule and specify the IP Address of your TFTP server. Place the generated cisco files in the root of the TFTP and restart the phone. If DHCP option 66 is not available, enter the TFTP server manually in the GUI of the phone. 3CX Cloud Server has a central management console that allows you to quickly change settings in any of the tenants installed on the system. Running the Central Console To access the 3CX Central Administrator Console: 1. Click on the 3CX Cloud Server Management Console shortcut on your Desktop (which is created when you install the first tenant). 2. Select your Language and type in the Username and password for the System administrator. This was configured during the 3CX Wizard right after installing the first tenant. 3. Press Login to log into the Central Management Console. 4. Once you log in you can see the various tenants and configure each tenant’s 3CX Phone System simply by selecting the tab with the tenant’s name (t1, t2, t3 in this case) 3CX Cloud Server allows you to backup all tenants in one automated procedure. This saves valuable administration time. Running the Backup There are two methods available to users to run backup and restore: 1. On the desktop, click on the icon 3CX Cloud Server Backup and Restore or, 2. Log into the Central Management Console. Then click on Maintenance at the top menu options and select “Backup and Restore”. 3. After you launch the Backup and Restore tool you will see 2 options: ○ Backup 3CX Cloud Server ○ Restore 3CX Cloud Server. Select “Backup 3CX Cloud Server” 4. In the Back up Phone System section, select the Tenants that you want to backup from the list and also any additional backup options such as Voice prompts, Voice mails, Call recordings, Call History and Phone Firmware files. You can press the Select all button next in each tenant row to bulk select all options. Click Next. 5. After selecting your backup options click on Browse to choose the destination directory where all the 3CX tenant backups will be saved. Press Next to start the backup. 6. 3CX Cloud Backup will start and a progress bar will show the backup progress of each tenant whilst it is being backed up. Backups are standard in .zip file format. Each backup will have the tenant’s name as file name making it easy to distinguish. Press Close when all tenants are backed up. Restoring a Backup or a whole Cloud Server 1. Launch the 3CX Cloud Server Backup and Restore tool from your desktop and select the Restore 3CX Cloud Server option. 2. Select the folder that contains all the backups inside. You can create any folder and put 3CX Backups in that folder. If you have any backups from standard 3CX Phone System installations, put them in the directory. The below image is an example of a directory named 3CX Backups containing multiple 3CX Phone System Backups inside. 3. Select the tenant that you want to restore, and map each tenant with the appropriate backup file by clicking on the 3CX Backup File dropdown on the far right. Do this for all the tenants you plan to restore. Press Next to start the restore procedure. 4. A progress bar will be displayed. Note Restoring might take some time. Also some services are common for all tenants so restoring a client’s backup should be done outside of office hours and the other clients should be informed that a period of downtime will be experienced. Performing a Backup or Restore via Command Line 3CX Cloud Server Backup and restore can also allow the admin to trigger backup and restore operations via command line utility. This means that you can make a scheduled task and trigger a batch file to perform daily backups of your cloud server. Backup via Command line 1. Open a command prompt window and navigate to the 3CX Program files > Bin folder of the FIRST Tenant. Example: “cd C:\Program Files\3CX PhoneSystem t1\Bin” (Where t1 in this example is the Tenant name of the first tenant installation.) 2. The Backup and restore tool can accept commands in the following order: 3CXBackup.exe [hidden] [backup|restore] [path_to_backups] [options] exit 3. Example command would look like this: 3CXBackup.exe hidden backup C:\backup /callrecordings /voicemails /voiceprompts /callhist /firmware exit 4. Available options are the following: hidden: runs the utility in hidden mode /callrecordings: backup extension call recordings /voicemails: backup stored voicemails /voiceprompts: backup voice prompts and music on hold /callhist: backup call history tables from database /firmware: backup stored firmwares 5. The backup will be completed and all the backups of all the tenants will be located in the folder specified in this example C:\backup Restore via Command line 1. Open a command prompt window and navigate to the 3CX Program files > Bin folder of the FIRST Tenant. Example: “cd C:\Program Files\3CX PhoneSystem t1\Bin” (Where t1 in this example is the Tenant name of the first tenant installation.) 2. The Restore functionality can accept commands in the following order: 3CXBackup.exe [hidden] [backup|restore] [path_to_backups] exit 3. Example command would look like this: 3CXBackup.exe hidden restore C:\backup exit (Where C:\backup is a directory that contains all the backups taken previously) 4. There is no need to specify options during restore because data will be restored depending on the data that was backed up. 5. The restore procedure will know which backup to restore to which Tenant installation depending on the Tenant Name. The backup file names should not be modified because they represent the Tenant Name. TIP: An Administrator should make a simple batch file and save it on the 3CX Phone System Server. Then a Scheduled Task in Windows should be created and the batch file will be triggered periodically ideally after office hours. Keep in mind that a complete backup takes time and also depends on the number of tenants installed and the size of each installation. So when the backup task starts, make sure that between one task and another, there is enough time for the backup to complete. Same applies for restore procedures. It is recommended to update to the latest 3CX Service Packs immediately. To update perform the following procedure. 1. Access the 3CX Central Management Console and log in using the Sysadmin Account. 2. Click on Maintenance in the Sysadmin toolbar. 3. Select Check for Updates. 4. Select the service pack and press Update. All 3CX Cloud Tenants will be stopped, updated and restarted automatically. In some circumstances, it might be required to uninstall 3CX Cloud Server to either perform an update or a fresh installation. In this case, there is a script that will automatically remove all installed tenants except the first one. This will save you a lot of time uninstalling each tenant manually one by one. 1. Click Start and show all apps. Launch Cloud Server Bulk Uninstaller as Administrator. 2. Select option 1 to remove all tenants. This will quietly uninstall all installed tenants from 250. When all tenants have been removed, to Control Panel, Programs and Features and manually uninstall 3CX Phone System Cloud Server Tenant 1.