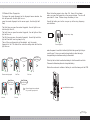
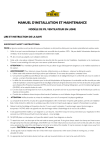
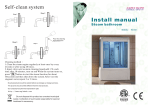
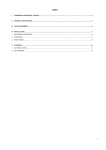
1
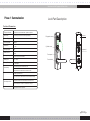
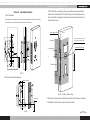
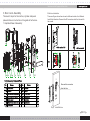
USER MANUAL OF FINGERPRINT DOOR LOCK
User manual of fingerprint door lock
Please Read the Manual
Please check the packing before use.
Any change submit to our confirmation.
Any error or question in the manual, please feel free to contact us.
It is forbidden to copy our manual and for other usage, except the
authorized company and users.
Front Panel
Back Panel
Mortise
For any wrong operation or installation to the user or third party,
Tengo does not responsible for the duty.
For the damage caused by anthropic factor or inevitable reason,
Tengo does not pay the loss or maintain for free, please check our
after sale service terms.
Buckle/Plastic box
Cylinder/Key
Screws/Tool
Please do not take apart the lock if you are not technician, if
necessary, please make the operation under the guide of
technician.
Notice: There is maybe a little difference for product pictures with
real goods, please subject to our real products.
After changing the battery, please do not throw away them , kindly
refund to recycle bin in case of pollution!
01-02
User manual of fingerprint door lock
Phase 1 Summarization
Lock Part Description
Technical Parameters
Fingerprint Sensor:
Optical sensor, blue window/360 degree recognition
Main Parts:
Front/Back panel,mortise,buckle.cylinder,key
Master Fingerprint:
1pcs
User Fingerprint:
100pcs
Resolution:
500DPI
Reading Speed:
<1S
Static Current:
<25uA
Working Voltage:
DC4.5V~6v, 4pcs AA batteries
Battery Life:
15000 times
Working Temperature:
-20-55 degree
Unlock way:
Fingerprint sensor
Reset Button
Cylinder cover
Back panel
Front panel
Front handle
Touch the fingerprint to thewindow, the
blue light flash one time with one sound, turn the
handle to open the door.
if you do not open, it will lock after 5 seconds automatically.
Low voltage alarm:
if the power is less than 4.8v, there are 3 sounds for tip.
you can still open 10 times. if it is less than 4.5v, you
can not open the door any more.
03-04
User manual of fingerprint door lock
Phase 2 Installation Guide
1.Drill the Hole
We suggest you making the hole under the guide with manufacturer and the
door factory, to avoid the mistake or damage to the doors.
3.Drill the hole: see the pic(3), please first draw one horizontal
base line in the position of 1 meter to the ground, align the base
line in the drill drawing with the drawn line and make the hole as
the picture shows:
Door center line
Doo
Door
r s id
F ro n t
e
Align the horizontal line with
the base line in drilling map
Arrow Up!
Horizontal datum line
1 meter to ground
Door thickness/2
Door Frame
Pic(1)
2.Door frame drilling diagram
Door Thickness/2
Pic(3) Drilling Sketch Map
1 meter to ground
Datum line
Pic(2)
4.Drill door frame: please drill the hole in the door frame as drawing.
It is better to ask the technician to make the hole.
05-06
User manual of fingerprint door lock
II. Door Lock Assembly
Picture
There are 3 steps for the mortise, cylinder and panel.
please follow our instruction or the guide of technician.
1. Exploded View of Assembly
2.Mortise Installation
There are 3 types of mortises to use for different models. And different
for left/right direction. Draw out the 8P connector out of the hole and fix
the screws.
ANSI mortise 70#
ANSI mortise 60#
Size
Pic(4) Assembly Exploded View
No.
①
②
③
④
⑤
⑥
⑦
Name
Qty. No.
1
1
Buckle
ST4x20 Cross sunk self-ta pping screw 4
M5x40 Hexagon socke t-cap -screw
3
Back panel
1
M4x6 Cross sunk crew 3
Side plate
1
Buckle box
⑧
⑨
⑩
⑾
⑿
⒀
Name
Mortise
Latch
Front panel
Logo cover
Cylinder
Battery box
Qty.
1
2
1
1
1
1
Draw out the connector
from the hole
Pic(5) Install Mortise
09-10
User manual of fingerprint door lock
5.Front panel installation: connect the 8p connector as the picture, align
3. Install the cylinder as the picture and fix the screws.
Pic(6) Install Cylinder
4.Latch assembly in front and back, check pic(8).
the square latch and the handle hole, then fix the front panel on the door.
Pic(9) Install Front Panel
6.Back panel installation: Connect the 2p connector as the picture,
align the latch and handle, fix the panel and the screws.
Remark: dot in the spindle shall
align with the arrow in the mortise.
Pic(10) Install Back Panel
Pic(7)
Dot/ Arrow
Pic(8) Install Latch
11-12
User manual of fingerprint door lock
7.Battery and battery box installation as below picture:
3.1 Enroll Master Fingerprint
Notice the anode and cathode of battery, or it will cause damage
If the lock is under the factory state, just insert the mechanical key
to the PCB and battery box.
into the cylinder and turn the mechanical key to open the door with
the blue light turns on, press one fingerprint on the sensor window,
there is one short beep. Then press the same one fingerprint on the
sensor window, with one long beep, you can enroll the master fingerprint
successfully.
If the operation failed, there are three short beeps.
blue light
blue light
Long beep
Success!
Turn the key
to unlock
Pic(11) Install Battery Box
Press finger
Press finger again
During the blue light flashes, please press another fingerprint to
enroll as user fingerprint, there is one short beep. Then press the
same one fingerprint on the sensor window, with one long beep,
Phase 3 Operation Setting
you can enroll the user fingerprint successfully.
If the operation failed, there are three short beeps.
If the operation is not right for three times or no operation within 5
Function Description
seconds, the lock will exit the setting state automatically with two
1.Factory State
short beeps for tip.
Under factory state, there is no fingerprint memory inside, any
fingerprint can open the door,after you set the master fingerprint, this
blue light
blue light
Long beep
function will be invalid.
Success!
2.Master fingerprint: It is to enroll and delete the user fingerprints.
3.User fingerprint: to open the door include the dead locking door.
Press another finger
Press finger again
13-14
User manual of fingerprint door lock
3.3 Delete One User Fingerprint
If the master fingerprint existed already, when you press your
fingerprint on the sensor windows, there is beep-beep tips and red
light flash. You can insert the mechanical key into the cylinder and
turn the mechanical key to open the door with the blue light turns
on, press the master fingerprint on the sensor window, there is one
short beep. Then press another fingerprint on the sensor window for
two times, each time there is one short beep. Then the new
fingerprint will turn to the master fingerprint. The old user
fingerprints that enrolled under the old master fingerprint will not
work anymore.
Red light
Beep-beep
Short beep
Short beep
First press the master fingerprint on the fingerprint sensor window,
the lock will open with the blue light turn on, then press the master
fingerprint on the sensor again, the blue light will flash, then press
the master fingerprint on the sensor for the third time, the red light
turn on and blue light turn off, finally press one fingerprint that you
want to delete, there is one long beep, that means the operation is
successful, you can continue to delete other user fingerprint as
Short beep
Short beep
Turn the key
to unlock
Master fingerprint
existed
Press the master fingerprint for 3 times and one time the user
fingerprint.
Press master fingerprint
Press master fingerprint Press another finger
Press another finger
2nd time
3.2 Add User Fingerprint
Press the master fingerprint on the sensor windows, there is one
short beep with the blue light turns on( the lock will open too),
press one fingerprint on the sensor window, there is one short beep.
Then press the same one fingerprint on the sensor window, with one
long beep, you can enroll the new under fingerprint successfully.
Blue light flash
2nd time
Red light on
Blue light off
3nd time
Long beep
Press one user finger
3.4 Alway Open Function
First press the master fingerprint on the fingerprint sensor window,
the lock will open with the blue light turn on, then press the lock
latches(3 parts) for 5 seconds, there is one short beep, then press
the master fingerprint on the sensor window, there is one long beep,
then the lock will be under the always open state, that means you
can depress the handle to open the door without pressing any
fingerprints.
If you want to cancel this state, you can press the master
fingerprint or any valid user fingerprint.
If the operation failed, there are three short beeps.
If the operation is not right for three times or no operation within 5
seconds, the lock will exit the setting state automatically with two
short beeps for tip.
Short beep
Short beep
Long beep
Always open state
Short beep
Short beep
Long beep
Success!
Press master
fingerprint
3 short beep
Press master fingerprint
Press latch
5 seconds
Press master
fingerprint
Failed!
Press another finger Press another finger
2nd time
15-16
First press the master fingerprint on the fingerprint sensor window, the
lock will open with the blue light turn on;
When the battery power is less than 4.8v, there is 3 long beeps
User you
manual
of fingerprint
dooron
lock
when
press
the fingerprint
the sensor windows. You can still
open about 10 times. Please change the battery in time.
press the master fingerprint on the sensor again, the blue light will
flash;
Usually the battery can last for one year up to the using frequency
and conditions.
3.5 Delete All User Fingerprints
The third time you press the master fingerprint, the red light turn on
but blue light turn off;
The forth time you press the master fingerprint, the red light and blue
light will turn on.
The fifth time you press the master fingerprint, the red light and blue
light will flash with one long beep for tip.
Then all the user fingerprints will be deleted, only the master
fingerprint is left. The lock will be under the setting state with the blue
light turns on.
blue light
Red light on
Blue light off
blue light flash
: Beep---beep---beep
Low power
Press fingerprint
when the power is low:di-di-di with red light flash then green light. but you
can still open 10 times, you need to change battery in time.the way to
change battery is as below according to the models:
Warm tip: the lock shall use alkaline battery! or it will cause failure of lock.
Please refer the below picture to change the battery.
Notice the anode and cathode of battery to avoid the damage to the PCB.
Press master fingerprint
2nd Time
Red light on
Blue light on
3rd time
Red light flash
Blue light flash
All user fingerprints are deleted.
Only master fingerprint left
4th time
4pca AA Alkaline batteries
5th time
17-18