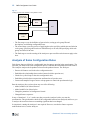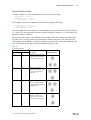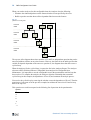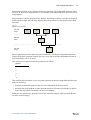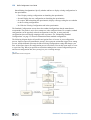
1
User Guide QAD Configurator Welcome to QAD Configurator QAD Configurator Basics QAD Configurator Workspace Configurator Setup Sales Configuration Product Configuration Configuration Questionnaire Administration Configurator Best Practices 70-3189-5.8 QAD Configurator 5.8 September 2015 This document contains proprietary information that is protected by copyright and other intellectual property laws. No part of this document may be reproduced, translated, or modified without the prior written consent of QAD Inc. The information contained in this document is subject to change without notice. QAD Inc. provides this material as is and makes no warranty of any kind, expressed or implied, including, but not limited to, the implied warranties of merchantability and fitness for a particular purpose. QAD Inc. shall not be liable for errors contained herein or for incidental or consequential damages (including lost profits) in connection with the furnishing, performance, or use of this material whether based on warranty, contract, or other legal theory. QAD and MFG/PRO are registered trademarks of QAD Inc. The QAD logo is a trademark of QAD Inc. Designations used by other companies to distinguish their products are often claimed as trademarks. In this document, the product names appear in initial capital or all capital letters. Contact the appropriate companies for more information regarding trademarks and registration. Copyright © 2015 by QAD Inc. Configurator_UG_v058.pdf/p9w/lgw QAD Inc. 100 Innovation Place Santa Barbara, California 93108 Phone (805) 566-6000 http://www.qad.com Contents Configurator User Guide Change Summary . . . . . . . . . . . . . . . . . . . . ix Chapter 1 Welcome to QAD Configurator . . . . . . . . . . . . . . . . . . . . .1 QAD Configurator General Workflow . . . . . . . . . . . . . . . . . . . . . . . . . . . . . . . . . 2 Integration With QAD Enterprise Applications . . . . . . . . . . . . . . . . . . . . . . . . . . 3 Support for QAD EA Domains . . . . . . . . . . . . . . . . . . . . . . . . . . . . . . . . 3 Integration with QAD Trade Management . . . . . . . . . . . . . . . . . . . . . . . . . . . . . . 3 Integration with QAD Enterprise Material Transfer . . . . . . . . . . . . . . . . . . . . . . . 4 Chapter 2 QAD Configurator Basics . . . . . . . . . . . . . . . . . . . . . . . . . .5 Configurable Item, Generic Product Structure, and Generic Routing . . . . . . . . . 6 Variables and Features . . . . . . . . . . . . . . . . . . . . . . . . . . . . . . . . . . . . . . . . . . . . . 7 Variable and Feature Data Types . . . . . . . . . . . . . . . . . . . . . . . . . . . . . . . 7 Variable and Feature Options . . . . . . . . . . . . . . . . . . . . . . . . . . . . . . . . . 8 Sales Configuration Rules . . . . . . . . . . . . . . . . . . . . . . . . . . . . . . . . . . . . . . . . . . . 9 Rule Statement Formats . . . . . . . . . . . . . . . . . . . . . . . . . . . . . . . . . . . . . . 9 Sales Configuration Rule Grouping and Application . . . . . . . . . . . . . . . . . . . . . 11 Analysis of Sales Configuration Rules . . . . . . . . . . . . . . . . . . . . . . . . . . . . . . . . 12 Feature Relationships . . . . . . . . . . . . . . . . . . . . . . . . . . . . . . . . . . . . . . . 13 Feature Sequences . . . . . . . . . . . . . . . . . . . . . . . . . . . . . . . . . . . . . . . . . 16 Multi-Level Analysis . . . . . . . . . . . . . . . . . . . . . . . . . . . . . . . . . . . . . . . 16 Configuration Keys . . . . . . . . . . . . . . . . . . . . . . . . . . . . . . . . . . . . . . . . . . . . . . . 17 Product Configuration Rules . . . . . . . . . . . . . . . . . . . . . . . . . . . . . . . . . . . . . . . . 18 Selection Rules . . . . . . . . . . . . . . . . . . . . . . . . . . . . . . . . . . . . . . . . . . . . 19 Assignment Rules . . . . . . . . . . . . . . . . . . . . . . . . . . . . . . . . . . . . . . . . . 19 Item Number Definition Rules . . . . . . . . . . . . . . . . . . . . . . . . . . . . . . . . 19 Dynamic Update of Routing Operation Comments . . . . . . . . . . . . . . . . 20 Cost Roll-Up . . . . . . . . . . . . . . . . . . . . . . . . . . . . . . . . . . . . . . . . . . . . . . . . . . . . 21 Element Roll-Up . . . . . . . . . . . . . . . . . . . . . . . . . . . . . . . . . . . . . . . . . . . . . . . . . 21 Cross Validation of Rules . . . . . . . . . . . . . . . . . . . . . . . . . . . . . . . . . . . . . . . . . . 23 What the Cross Validation Analyzer Checks . . . . . . . . . . . . . . . . . . . . . 23 Example of Using the Cross Validation Analyzer . . . . . . . . . . . . . . . . . 24 Cross Validation Analyzer Report . . . . . . . . . . . . . . . . . . . . . . . . . . . . . 25 Questionnaire . . . . . . . . . . . . . . . . . . . . . . . . . . . . . . . . . . . . . . . . . . . . . . . . . . . 25 Questionnaire Questions . . . . . . . . . . . . . . . . . . . . . . . . . . . . . . . . . . . . 26 iv QAD Configurator User Guide Configurations . . . . . . . . . . . . . . . . . . . . . . . . . . . . . . . . . . . . . . . . . . . . 26 Pricing . . . . . . . . . . . . . . . . . . . . . . . . . . . . . . . . . . . . . . . . . . . . . . . . . . . . . . . . . 26 Chapter 3 QAD Configurator Workspace . . . . . . . . . . . . . . . . . . . . .29 Workspace Overview . . . . . . . . . . . . . . . . . . . . . . . . . . . . . . . . . . . . . . . . . . . . . 30 Accessing QAD Configurator Functions . . . . . . . . . . . . . . . . . . . . . . . . . . . . . . 30 Application Toolbar . . . . . . . . . . . . . . . . . . . . . . . . . . . . . . . . . . . . . . . . . . . . . . 31 Selecting a Master Group . . . . . . . . . . . . . . . . . . . . . . . . . . . . . . . . . . . . . . . . . . 31 Maintaining Records . . . . . . . . . . . . . . . . . . . . . . . . . . . . . . . . . . . . . . . . . . . . . . 31 Editing Comments . . . . . . . . . . . . . . . . . . . . . . . . . . . . . . . . . . . . . . . . . . . . . . . . 33 Using the Rule Assistant . . . . . . . . . . . . . . . . . . . . . . . . . . . . . . . . . . . . . . . . . . . 33 Using Browses and Browse Collections . . . . . . . . . . . . . . . . . . . . . . . . . . . . . . . 33 Customizing the Configuration Browse . . . . . . . . . . . . . . . . . . . . . . . . . 36 Chapter 4 Configurator Setup . . . . . . . . . . . . . . . . . . . . . . . . . . . . . .37 Setting Up Data in QAD EA . . . . . . . . . . . . . . . . . . . . . . . . . . . . . . . . . . . . . . . . 38 Creating Items . . . . . . . . . . . . . . . . . . . . . . . . . . . . . . . . . . . . . . . . . . . . 39 Creating Generic Product Structure . . . . . . . . . . . . . . . . . . . . . . . . . . . . 41 Creating Generic Routings . . . . . . . . . . . . . . . . . . . . . . . . . . . . . . . . . . . 41 Setting Up QAD Configurator . . . . . . . . . . . . . . . . . . . . . . . . . . . . . . . . . . . . . . 42 Configuring System Settings . . . . . . . . . . . . . . . . . . . . . . . . . . . . . . . . . 42 About Master Groups . . . . . . . . . . . . . . . . . . . . . . . . . . . . . . . . . . . . . . . 44 Maintaining Master Groups . . . . . . . . . . . . . . . . . . . . . . . . . . . . . . . . . . 45 Maintaining Configurable Items . . . . . . . . . . . . . . . . . . . . . . . . . . . . . . 48 Copying Configurable Item Data . . . . . . . . . . . . . . . . . . . . . . . . . . . . . . 56 Maintaining External Entities . . . . . . . . . . . . . . . . . . . . . . . . . . . . . . . . 57 Chapter 5 Sales Configuration . . . . . . . . . . . . . . . . . . . . . . . . . . . . .59 Sales Configuration Overview . . . . . . . . . . . . . . . . . . . . . . . . . . . . . . . . . . . . . . 61 Maintaining Question Types . . . . . . . . . . . . . . . . . . . . . . . . . . . . . . . . . . . . . . . . 61 Maintaining Functional Groups . . . . . . . . . . . . . . . . . . . . . . . . . . . . . . . . . . . . . 62 Maintaining Variables and Features . . . . . . . . . . . . . . . . . . . . . . . . . . . . . . . . . . 63 Maintaining Variables . . . . . . . . . . . . . . . . . . . . . . . . . . . . . . . . . . . . . . 63 Maintaining Features . . . . . . . . . . . . . . . . . . . . . . . . . . . . . . . . . . . . . . . 70 Maintaining Feature Sequence . . . . . . . . . . . . . . . . . . . . . . . . . . . . . . . . 74 Using System Variables . . . . . . . . . . . . . . . . . . . . . . . . . . . . . . . . . . . . . 75 Maintaining Sales Configuration Rules . . . . . . . . . . . . . . . . . . . . . . . . . . . . . . . 76 Maintaining General Rules . . . . . . . . . . . . . . . . . . . . . . . . . . . . . . . . . . 76 Grouping Sales Configuration Rules . . . . . . . . . . . . . . . . . . . . . . . . . . . . . . . . . 83 Maintaining General Rules in Rule Groups . . . . . . . . . . . . . . . . . . . . . . 83 Maintaining Rule-Group-Specific Rules . . . . . . . . . . . . . . . . . . . . . . . . 84 Applying Sales Configuration Rules . . . . . . . . . . . . . . . . . . . . . . . . . . . . . . . . . . 84 Contents Applying General Rules and Rule Groups to Configurable Items . . . . 85 Maintaining Item-Specific Rules . . . . . . . . . . . . . . . . . . . . . . . . . . . . . . 85 About Sales Configuration Rule Table . . . . . . . . . . . . . . . . . . . . . . . . . . . . . . . . 86 Rule Table Shortcut Keys . . . . . . . . . . . . . . . . . . . . . . . . . . . . . . . . . . . 88 Rule Table Limitations . . . . . . . . . . . . . . . . . . . . . . . . . . . . . . . . . . . . . 88 Interpolation . . . . . . . . . . . . . . . . . . . . . . . . . . . . . . . . . . . . . . . . . . . . . . 88 Interpolation Process . . . . . . . . . . . . . . . . . . . . . . . . . . . . . . . . . . . . . . . 89 Maintaining General Rules Using General Rule Tables . . . . . . . . . . . . . . . . . . . 90 Generating Rule Tables . . . . . . . . . . . . . . . . . . . . . . . . . . . . . . . . . . . . . 90 Editing Rule Tables . . . . . . . . . . . . . . . . . . . . . . . . . . . . . . . . . . . . . . . . 94 Maintaining Item Rule Tables . . . . . . . . . . . . . . . . . . . . . . . . . . . . . . . . . . . . . . . 97 Linking General Rule Tables to Configurable Items . . . . . . . . . . . . . . . 98 Maintaining Item-Specific Rule Tables . . . . . . . . . . . . . . . . . . . . . . . . . 99 Accelerating Rule Tables . . . . . . . . . . . . . . . . . . . . . . . . . . . . . . . . . . . . . . . . . . 99 Sales Configuration Rules Report . . . . . . . . . . . . . . . . . . . . . . . . . . . . . . . . . . . 100 Analyzing Sales Configuration Rules . . . . . . . . . . . . . . . . . . . . . . . . . . . . . . . . 101 Results of the Analysis . . . . . . . . . . . . . . . . . . . . . . . . . . . . . . . . . . . . . 101 Maintaining Questions Sequence . . . . . . . . . . . . . . . . . . . . . . . . . . . . . . . . . . . 102 Maintaining Configuration Keys . . . . . . . . . . . . . . . . . . . . . . . . . . . . . . . . . . . 103 Configuration Key Maintenance and Pricing . . . . . . . . . . . . . . . . . . . 104 Where-Used Report . . . . . . . . . . . . . . . . . . . . . . . . . . . . . . . . . . . . . . . . . . . . . . 104 Chapter 6 Product Configuration . . . . . . . . . . . . . . . . . . . . . . . . . .107 Product Configuration Overview . . . . . . . . . . . . . . . . . . . . . . . . . . . . . . . . . . . 108 Maintaining Product Configuration Rules . . . . . . . . . . . . . . . . . . . . . . . . . . . . 109 Maintaining Variant Item Number Rules . . . . . . . . . . . . . . . . . . . . . . 109 Maintaining Variant Item Data Rules . . . . . . . . . . . . . . . . . . . . . . . . . 112 Maintaining Variant Planning Item Rules . . . . . . . . . . . . . . . . . . . . . . 112 Maintaining Variant Item Product Structure Rules . . . . . . . . . . . . . . . 114 Maintaining Variant Routing Rules . . . . . . . . . . . . . . . . . . . . . . . . . . . 117 Maintaining Variant Sales Order Line Rules . . . . . . . . . . . . . . . . . . . . 120 Maintaining Variant Sales Quote Line Rules . . . . . . . . . . . . . . . . . . . 120 Maintaining General Product Structure Rules . . . . . . . . . . . . . . . . . . . . . . . . . 121 Maintaining Element Roll-Up Rules . . . . . . . . . . . . . . . . . . . . . . . . . . . . . . . . . 121 Maintaining External Entity Rules . . . . . . . . . . . . . . . . . . . . . . . . . . . . . . . . . . 123 Using Custom Functions in Product Configuration Rules . . . . . . . . . . . . . . . . 124 Running Product Configuration Rule Report . . . . . . . . . . . . . . . . . . . . . . . . . . 125 Cross-Validating Rules . . . . . . . . . . . . . . . . . . . . . . . . . . . . . . . . . . . . . . . . . . . 125 Chapter 7 Configuration Questionnaire . . . . . . . . . . . . . . . . . . . . .127 Launching Questionnaire . . . . . . . . . . . . . . . . . . . . . . . . . . . . . . . . . . . . . . . . . 128 Navigating in Questionnaire . . . . . . . . . . . . . . . . . . . . . . . . . . . . . . . . . . . . . . . 129 v vi QAD Configurator User Guide Exiting Questionnaire . . . . . . . . . . . . . . . . . . . . . . . . . . . . . . . . . . . . . . . . . . . . 131 Variant Item Configuration Workflow . . . . . . . . . . . . . . . . . . . . . . . . . . . . . . . 132 Using Standard/Existing Configurations . . . . . . . . . . . . . . . . . . . . . . . . . . . . . 133 Browsing Standard/Existing Configurations . . . . . . . . . . . . . . . . . . . . 134 Searching for Configurations . . . . . . . . . . . . . . . . . . . . . . . . . . . . . . . . 135 Ordering an Existing Variant Item . . . . . . . . . . . . . . . . . . . . . . . . . . . . 136 Creating a Variant Item . . . . . . . . . . . . . . . . . . . . . . . . . . . . . . . . . . . . 137 Creating a Variant Supplier Item . . . . . . . . . . . . . . . . . . . . . . . . . . . . . 137 Reloading a Configuration . . . . . . . . . . . . . . . . . . . . . . . . . . . . . . . . . . 138 Creating a New Configuration . . . . . . . . . . . . . . . . . . . . . . . . . . . . . . . 138 Configuring Item . . . . . . . . . . . . . . . . . . . . . . . . . . . . . . . . . . . . . . . . . . . . . . . . 139 Answering Questions . . . . . . . . . . . . . . . . . . . . . . . . . . . . . . . . . . . . . . 140 Reviewing Answer Summary . . . . . . . . . . . . . . . . . . . . . . . . . . . . . . . 142 Editing Comments . . . . . . . . . . . . . . . . . . . . . . . . . . . . . . . . . . . . . . . . 143 Customizing the Questionnaire . . . . . . . . . . . . . . . . . . . . . . . . . . . . . . 143 Reviewing and Submitting Configuration . . . . . . . . . . . . . . . . . . . . . . . . . . . . 145 Reviewing Current Configuration . . . . . . . . . . . . . . . . . . . . . . . . . . . . 146 Viewing Similar Configurations . . . . . . . . . . . . . . . . . . . . . . . . . . . . . 146 Submitting Configuration . . . . . . . . . . . . . . . . . . . . . . . . . . . . . . . . . . 147 Chapter 8 Administration . . . . . . . . . . . . . . . . . . . . . . . . . . . . . . . . .149 Administration Functions Overview . . . . . . . . . . . . . . . . . . . . . . . . . . . . . . . . . 150 Performing Element Roll-Up . . . . . . . . . . . . . . . . . . . . . . . . . . . . . . . . . . . . . . 150 Maintaining Component Effective Dates . . . . . . . . . . . . . . . . . . . . . . . . . . . . . 151 Maintaining Routing Effective Dates . . . . . . . . . . . . . . . . . . . . . . . . . . . . . . . . 151 Exporting and Importing Models . . . . . . . . . . . . . . . . . . . . . . . . . . . . . . . . . . . 152 Exporting Data . . . . . . . . . . . . . . . . . . . . . . . . . . . . . . . . . . . . . . . . . . . 152 Importing Data . . . . . . . . . . . . . . . . . . . . . . . . . . . . . . . . . . . . . . . . . . . 154 Publishing Models Across Domains . . . . . . . . . . . . . . . . . . . . . . . . . . . . . . . . . 156 Deleting and Archiving Configurations . . . . . . . . . . . . . . . . . . . . . . . . . . . . . . 160 Changing Configurable Item Numbers . . . . . . . . . . . . . . . . . . . . . . . . . . . . . . . 161 Maintaining Configurations Manually . . . . . . . . . . . . . . . . . . . . . . . . . . . . . . . 161 Rebuilding Configurations . . . . . . . . . . . . . . . . . . . . . . . . . . . . . . . . . . . . . . . . 163 Rebuild for Multi-level Configurations . . . . . . . . . . . . . . . . . . . . . . . . 167 Running Batch Compiler . . . . . . . . . . . . . . . . . . . . . . . . . . . . . . . . . . . . . . . . . 169 Maintaining Standard Configurations . . . . . . . . . . . . . . . . . . . . . . . . . . . . . . . . 170 Using Configurator Metrics . . . . . . . . . . . . . . . . . . . . . . . . . . . . . . . . . . . . . . . 171 Chapter 9 Configurator Best Practices. . . . . . . . . . . . . . . . . . . . . .173 Using Placeholder Component . . . . . . . . . . . . . . . . . . . . . . . . . . . . . . . . . . . . . 174 Using Base Price for Configurable Items in Questionnaire . . . . . . . . . . . . . . . 174 Populating Fields in Variant Item-Site Planning Records . . . . . . . . . . . . . . . . 174 Contents Dealing with a Large Number of Feature Options . . . . . . . . . . . . . . . . . . . . . . 175 Managing Models Across Databases . . . . . . . . . . . . . . . . . . . . . . . . . . . . . . . . 176 Multiple Language Support . . . . . . . . . . . . . . . . . . . . . . . . . . . . . . . . . . . . . . . 177 Placing EMT Orders for Configurable Items . . . . . . . . . . . . . . . . . . . . . . . . . . 180 Product Information Resources . . . . . . . . . . . . . . . . . . . . . . . . . . . . .183 Index. . . . . . . . . . . . . . . . . . . . . . . . . . . . . . . . . . . . . . . . . . . . . . . . . . . .185 vii viii QAD Configurator User Guide Configurator User Guide Change Summary The following table summarizes significant differences between this document and the last published version. Date/Version Description Reference September 2015/5.8 Added information on Automatic Price Calculation Page 28, Page 43, and Page 140 Updated the section Placing EMT Orders for Configurable Items Page 180 Added the section Integration with QAD Enterprise Material Transfer Page 4 Added new components for item number definition Page 20 Updated the screenshot of Configurator Control Page 42 Added new fields in Configurator Control Page 43 Added information on copying model publishing settings in Master Group Copy Page 46 Added new fields in Configurable Item Maintenance Page 51 Added the newly exposed system variable sysSOQNumber Page 76 Added new Element options in Variant Item Number Rule Maintenance Page 110 Added new components in the Variant Item Number Definition Parameters table Page 111 Updated the screenshot in the section Using Standard/Existing Configurations Page 134 Added information on the new icon View Available Inventory Page 134 Updated the screenshots of Model Import/Export Page 152 and Page 154 Added new table grppubd_det in the Configurator Data table Page 153 Added new field Publish Models in Model Import/Export Page 156 Updated the section Publishing Models Across Domains Page 156 Added the best practice for placing EMT orders for configurable items Page 180 October 2014/5.6-Rev1 Updated the section Importing Data Page 154 September 2014/5.6 Added Start Date and End Date in the View Configurations browse Page 34 Added Start Date, End Date, and Active in the Master Group browse Page 35 Added Start Date and End Date in the View Configuration Details browse Page 36 Added Start Date and End Date to Master Group Maintenance Page 45 Added the Auto Select Product Structure Components option to Master Group Maintenance Page 45 March 2015/5.7 x QAD Configurator User Guide Date/Version March 2014/5.5 Description Reference Added a section about copying master group Page 46 Added Start Date and End Date in Variable Language Browse Page 65 Added Start Date and End Date in Variable Option Language Browse Page 70 Added information on multiple-language support for rule description in General Rule Maintenance Page 76 Added information on multi-language support for rule table description in General Rule Table Maintenance Page 90 Updated information on maintaining variant item product structure rules Page 114 Updated the section Launching Questionnaire Page 128 Added error icons and warning icons in Configuration Questionnaire Page 141 Updated information on viewing question rules Page 142 Updated the section Reviewing Current Configuration Page 146 Updated the section Creating Data Package Page 152 Updated the section Loading QAD EA and QAD Configuration Data Page 154 Added a section Publishing Models Across Domains Page 156 Added Start Date and End Date in Rebuild Report Page 166 Added information on setting up translation records of rule descriptions Page 179 Updated information on creating master comments in multiple languages Page 41 Added a note on item-site data Page 50 Updated information on Copying Configurable Item Data Page 56 Added information on multiple-language support for functional groups Page 62 Added information on multiple-language support for option questions in Variable Maintenance Page 64 Added information on Variable Language Browse Page 64 Added information on multiple-language support for option answers in Variable Maintenance Page 69 Added information on Variable Option Language Browse Page 69 Added information on multiple-language support for option questions in Feature Maintenance Page 71 Added information on Feature Language Browse Page 71 Added information on multiple-language support for option answers in Feature Maintenance Page 73 Added information on Feature Option Language Browse Page 73 Added information on multiple-language support for warning messages Page 82 Added a note for the questionnaire Page 140 Added a note for Model Import/Export Page 152 Added the pstr_mstr table information for Model Import/Export Page 153 Added an example of dealing with a large number of feature options Page 175 Added a section on Multiple Language Support Page 177 September 2013/5.4.1 Added information on Feature-Based Pricing Page 71 March 2013/5.4 Updated information on editing comments Page 33 Added information on creating master comments Page 40 Added information on creating master comments in multiple languages Page 41 Configurator User Guide Change Summary Date/Version September 2012/5.3.1 March 2012/5.3 September 2011/5.2.2 Description Reference Added the browse shortcut keys Page 65 Updated information on how default values are displayed on the Questionnaire Page 72 Added a field Allow User Override in General Rule Maintenance Page 81 Added some notes for rule tables Page 87 Updated information on the date format Page 96 Added information on creating variant supplier items Page 137 Updated the picture for Configuration Questionnaire Page 139 Updated the default value for the field Reprice the Configuration Page 145 Updated the default value for the field Show low level questions Page 144 Added a field Variant Item Cost Roll-Up in Configuration Rebuild Page 165 Added more information on setting up data for a configurable item Page 39 Added a note about cost set Page 51 Added a section on Configurator Best Practices Page 175 Rebranded for 5.3 - Added a note about Allow Net Price Change and Allow Manual Price List Change Page 45 Added a note about Browse Code Page 64 Added system variables sysConfigurationCmmt, sysConfigurationDesc, sysExtLaunch, and sysQuestLaunch Page 75 Updated the number of features that form a configuration key Page 103 Added a Standard Configurations tab in Configuration Questionnaire Page 129 Added a note about viewing question rules Page 142 Updated the section of Maintaining Configurations Manually Page 161 Added a section of Rebuild for Multi-level Configurations Page 163 Added a function Standard Configuration Maintenance Page 170 Added a section of Configurator Best Practices Page 174 Rebranded for 5.2.2 - Added a Show All Options of Feature setting for Configurable Item Maintenance Page 51 Added a Customer Specific List Price setting for Configurable Item Maintenance Page 52 Added a Copy from Variable button for Variable Maintenance Page 64 Added enhancement for Browse Code Page 65 Added a Browse Code browse for Feature Maintenance Page 71 Changed descriptions about a system variable systVariantItemID Page 76 Added a Copy from Rule Table button for Generating Rule Tables Page 90 Changed descriptions for Editing Rule Tables Page 95 Added options Validate Orphaned Rule and Delete Orphaned Rule for Cross Validation Analyzer Page 126 Updated the section of Using Custom Functions in Product Configuration Page 124 Rules xi xii QAD Configurator User Guide Date/Version Description Reference Added an option Show all options of feature setting for questionnaire customization in Configuration Questionnaire Page 144 Added an Effective Date setting for Configuration Rebuild Page 165 Chapter 1 Welcome to QAD Configurator QAD Configurator is a rule-based product configuration and guided selling tool. It allows maketo-order and assemble-to-order companies to quickly and efficiently create sales orders based on specific customer requirements and ultimately manufacture and fulfill complex, customized products and services. It is an add-on module to QAD Enterprise Applications (QAD EA) and provides flexible and powerful product configuration and computer-aided order entry capabilities. QAD Configurator is designed for manufacturing companies who produce products that are highly configurable or are routinely customized to meet the unique needs of their customers. QAD Configurator ensures complete and valid product configuration during order entry. QAD Configurator instantaneously translates customer requests into quotations, sales orders, bills of material, and routings. QAD Configurator effectively bridges the information and knowledge gap between product engineering and sales. It allows sales personnel to access the product data maintained by engineering personnel. Sales personnel can create orders with complex configurations based on specific customer requirements without having to possess a strong technical background. QAD Configurator General Workflow 2 Configurator process map and workflow details. Integration With QAD Enterprise Applications 3 Integration and support for ERP domains. Integration with QAD Trade Management 3 Integration and support for QAD Trade Management. 4 Integration and support for QAD Enterprise Material Transfer. Integration with QAD Enterprise Material Transfer 2 QAD Configurator User Guide QAD Configurator General Workflow Fig. 1.1 QAD Configurator Process Map 1 System Setup Before using QAD Configurator, perform system setup including setting up data in QAD EA and configuring QAD Configurator settings. 2 Sales Configuration Sales personnel do the following: • Maintain variables and features that define configurable product characteristics. • Designate how to present features as questions in the guided sales process—that is, the questionnaire. • Set up sales configuration rules to ensure that data collected from the questionnaire is valid. 3 Product Configuration Engineering personnel define product configuration rules that translate feature data collected from questionnaires into product structures and routings of configured products. 4 Guided Sales Sales personnel run the questionnaire during order or quotation entry to configure products to meet specific customer needs. Data collected in this guided sales process identify new product configurations and translate new customer requirements into new product structures and routings. 5 Administration Use a range of administrative functions to maintain the system for optimal performance. Questions? Visit community.qad.com Welcome to QAD Configurator 3 Integration With QAD Enterprise Applications QAD Configurator is integrated with the following QAD EA functions: • Sales Quote Maintenance (7.12.1) • Sales Order Maintenance (7.1.1) • Item Master Maintenance (1.4.1) • Product Structure Maintenance (13.5) • Routing Maintenance (14.13.1) • Item-Site Inventory Data Maintenance (1.4.16) • Item-Site Planning Maintenance (1.4.17) • Item-Site Cost Maintenance (1.4.18) QAD Configurator does not use any of the standard functions of the Configured Products module in QAD EA. Support for QAD EA Domains QAD Configurator fully supports multiple domains in QAD EA. However, not all of its functions are domain-specific. While some QAD Configurator functions retrieve and process data only available in the current domain, other functions work with data across domains, due to the nature of the data these functions deal with. QAD Configurator functions that work with item-related data, which is domain-specific itself, are domain-enabled. The following QAD Configurator functions are not domain-enabled since the data they work with is not associated with any specific domain and can be accessed across domains: • Master Group Maintenance • Question Type Maintenance • Rule Group Maintenance • Variable Maintenance • Functional Groups • General Rules Integration with QAD Trade Management QAD Configurator can be integrated with QAD Trade Management. If you want to integrate the QAD Configurator variant item creation process with the QAD Trade Management product, apply the Configurator-TrM integration patch and perform some additional steps. See Installation Guide: QAD Configurator for details. If Integrate with TrM in Sales Order Control is Yes, but the TrM patch is not applied, the system displays an error message when you try to create a variant item: TrM Integration detected. Apply TrM Item API patch first. Comments? Go to goo.gl/MfwKHm 4 QAD Configurator User Guide When integrated with QAD Trade Management, the system copies TrM product data as well as product division data from the configurable item to the variant item. Integration with QAD Enterprise Material Transfer QAD Configurator 5.8 can be integrated with the QAD Enterprise Material Transfer (EMT) module in QAD Enterprise Applications 2015. When it is integrated with the QAD Enterprise Material Transfer (EMT) module, you can place EMT orders for configurable items within a domain, across domains, or across databases. Questions? Visit community.qad.com Chapter 2 QAD Configurator Basics 6 Outlines the concepts of configurable items, generic product structures, and generic routings. Configurable Item, Generic Product Structure, and Generic Routing Variables and Features 7 Discusses variable and feature data types and options. 9 Explains some of the rules and rule statement formats. Sales Configuration Rules Sales Configuration Rule Grouping and Application 11 Outlines how rules are grouped and linked to different items to increase effectiveness. 12 Explains how rules apply to questionnaires, as well as how rule feature relationships and feature sequences work; describes multi-level analysis. Analysis of Sales Configuration Rules 17 Explains how configuration keys apply to variants. Configuration Keys 18 Discusses different configuration rules and processes, including selection rules, assignment rules, item number definition rules, and dynamic updates of routing operation comments. Product Configuration Rules 21 Explains how costs are calculated and roll-ups are completed. Cost Roll-Up Element Roll-Up 21 Outlines the element roll-up process and requirements. 23 Discusses the Cross Validation Analyzer function, what it checks, gives an example, and discusses Cross Validation Analyzer Report. Cross Validation of Rules 25 Describes how questionnaire questions are generated and gives information on the configurations that result from completing a questionnaire. Questionnaire Pricing 26 Discusses the pricing functionality of QAD Configurator. 6 QAD Configurator User Guide Configurable Item, Generic Product Structure, and Generic Routing Configurable item, generic product structure, and generic routing are a set of inter-related concepts. A configurable item is a virtual, non-buildable item that can be configured to form various end products—or variant items—that can be manufactured to meet specific customer requirements. As the parent item for a particular generic product structure, the configurable item identifies the complete list of child items and customer-selectable components and ties them together. A configurable item can also be the parent item of other configurable items. A variant item is a configured end product created from a configurable item. As opposed to a configurable item, which is virtual and non-buildable, a variant item can be ordered and manufactured. A generic product structure is an artificial grouping of all possible component items—even mutually exclusive ones—that go into a configurable item showing the quantity of each required to make an assembly. Unlike a common product structure, a generic product structure cannot be used directly to build components or end products. It is used with QAD Configurator to simplify and facilitate order processing and fulfillment. Note Generic product structure and generic bill of material (BOM) are used interchangeably in this book. Example An electrical product has different power cords for use in different countries. But in each variant of the product that you configure for each country, there is only one appropriate power cord for that country. The generic product structure includes all power cords, but each variant product structure includes only one. A generic routing of a configurable item includes all possible operations to build any possible variant of a configurable item. Generating a variant routing means selecting the correct operations for your configured variant from the generic routing. Like generic product structure, generic routings are artificial and unrealistic listings of operations that cannot be directly used to manufacture products. Example A variant routing for a product that has only one control panel includes either anodizing an aluminum control panel or electroplating a steel control panel, but not both. The generic routing, however, includes both processes. The primary purpose of using configurable items, generic bills material, and routing is to simplify order processing and master schedule planning. Example Suppose that a company manufactures tables with five different leg styles, three different sides and ends, and ten different tops. In total, they are making 5 x 3 x 10 = 150 different tables, each with its own product structure and routing. When placing orders for a table, customers have to pick their desired configurations from a long list of 150 different tables. When master planning for the product, the master scheduler have to maintain 150 different product structures and routings for all table variations. Questions? Visit community.qad.com QAD Configurator Basics 7 This process can be simplified by creating one configurable item and one set of generic product structure and routing for that item. Using QAD Configurator, customers can specify the table they want by selecting options for the three features—leg style, sides and ends, and top—respectively. QAD Configurator then creates a variant item for each new configuration of table customers order and automatically generates the corresponding product structure and routing. Variables and Features You define all the configurable aspects of your products using variables and features. Variables are shared configurable characteristics of products that accept certain values (options) or a range of values. By linking a variable to a configurable item, you create a feature — a configurable product characteristic specific to that configurable item. The feature inherits its properties from the variable, including ID, data type, and data format. As to options, you can choose to inherit feature options from variable options or create a set of feature options. Example Color is defined as a variable for your products with three options: blue, red, and white. By linking this variable to a configurable item, you create a feature which inherits the three options of the Color variable. You can use the inherited options as is or define new feature options by adding new color options or removing inherited ones. Variables and features always pertain to a certain master group. Make sure that you have selected the right master group when you maintain variables and features. Features are domain-specific but variables are available across domains. Variable and Feature Data Types Variables and Features have six data types that represent different data formats and acceptable values or value ranges. After you first define the data type of a variable, it can no longer be changed either in variable maintenance. The data type of the variable cannot be changed when the variable is inherited by a feature. Table 2.1 Variable and Feature Data Types Data Type Description Numeric Accepts numeric values that can be used in calculations. You can set the range of acceptable values by specifying a maximum value and/or a minimum value. You can also set the multiplier attribute to specify increments between acceptable values. Length, width, and weight are examples of numeric variables and features. Text Accepts a list of predefined text values which cannot be used in calculations. Examples include Color, with options blue, white, and red, and body type, with options saloon, coup, and hatchback. Select Free Format to accept additional user input. Numeric List Accepts a list of predefined numeric values or options that can be used in calculations. Examples include Engine Capacity, with options 1300, 1600, 1900, 2300, and Voltage, with options 115, 220. Date Accepts the current date, a fixed date, or a list of predefined date options, depending on which date format you select. Comments? Go to goo.gl/MfwKHm 8 QAD Configurator User Guide Data Type Description Logical Accepts only Yes or No boolean values. Element An element variable is directly associated with a field in a database table. You can see a variable of the element type. But in the background, QAD Configurator changes the type so that the value of the variable can be compared to the value in the database. Comparisons require identical data types. QAD Configurator supports Element variable links to two types of entities: Internal Entities, which are defaults within QAD Configurator, and External Entities, which you have to define using External Entity Maintenance. Variable and Feature Options Options are predefined values for selection and are available for three types of variables: text, numeric list, and date list. Here are some examples of variable options. Variable Variable Type Options Cloth Text Cotton Cotton/Polyester Nylon Cabinet-height Numeric List 100 125 150 175 When maintaining options for a variable, you can set the default variable option or arrange the order of the variable options. In this way, more frequently chosen options appear toward the top of the list. Feature options are based on options of the variable from which the feature is created. When maintaining a feature, you can select the variable options you want as feature options or create new options for the feature. You can also set the option and change the order of options in the list. However, these changes you make to feature options do not affect their source variable options. If you select Use Standard Options in Master Group Maintenance, all the features in this master group use the same options as those of the variables they are created from. Example The variable Cloth has three options (Sunset Orange, Tropical Blue, and Arctic White). The Std Options field has not been set (so feature options can be included), and this variable has been linked to the Sunblind configurable item 9-100-100 to create a feature also called Cloth. The following table shows a possible configuration of using Feature Option Maintenance to change the available options. Questions? Visit community.qad.com QAD Configurator Basics 9 Table 2.2 Feature Options Variable Options Feature Dependent Options Configurable item: 9-100-100 Variable Option Feature Cloth Sunset Orange Cloth Options Available Sunset Orange Included Tropical Blue 1 Excluded Arctic White Arctic White 2 Royal Blue Included Added 1. Tropical blue is not a possible cloth for the Sunblind 9-100-100 configurable item and has been excluded 2. The additional option of Royal Blue cloth is unique for the Sunblind 9-100-100 configurable item and has been added. Sales Configuration Rules The options of one feature can affect the option choices of another feature. Example In the automobile industry, the configurable item could be a family of different models of a type of car. If a customer selects the 1.1-liter engine option, the 5-speed gearbox is not an option that can be selected. If the customer selects the Sport model, alloy wheels are automatically included. If the customer selects the cabriolet model, the sunroof is not a possible option. In QAD Configurator, you use sales configuration rules to control all these decisions regarding which options automatically include or exclude other options. The IF statement specifies what the condition is for which you are testing, which is also known as preposition. The THEN statement specifies what the conclusion should be when the preposition is satisfied. You can extend your control by adding an ELSE statement to specify what happens when the IF condition does not occur. The ELSE statement is optional and specifies the alternative conclusion. Rules that have as a conclusion the automatic selection of an option are known as inclusions. IF model-type = "sport" THEN wheel-type = "alloy" The alloy wheels option is automatically included when the customer selects the sport model type. Rules that have as a conclusion the automatic removal of an option from the available choices are known as exclusions; for example: IF engine-capacity = "1.1" THEN gearbox <> "5-speed" If the customer selects the 1.1 liter engine, the gearbox can be anything other than 5-speed. The 5speed gearbox has been excluded. Rule Statement Formats The statements that you can use in the basic rule structure of QAD Configurator have three possible formats: basic, advanced, and free format. Comments? Go to goo.gl/MfwKHm 10 QAD Configurator User Guide • Basic format statements take the form of a simple variable = option; for example: IF operation = manual. • Advanced format statements take the form of variable = expression; for example: IF width < 0.5 * length. • Free format statements take the form of a Boolean expression which is either true or false; for example: IF (width > 200 and color = arctic white). In addition to these statement formats for rules, you can include Boolean operators such as AND and OR in the lines that specify a rule. Using these techniques, you can construct quite complex conditions for the sales configuration rules as in the following example. IF variable 1 > 'value 1' AND variable 2 <= 'value 2' AND variable 3 = option x THEN variable 4 = option y AND variable 5 <> option z ELSE variable 6 = 1.5 * 'value 1' The first three lines in the previous example are all part of the preposition and cause QAD Configurator to compare between the specified variables and values or options. The next two lines are the conclusion: they cause QAD Configurator to set the specified variables to include and exclude the named options when the preposition (the IF statement) is true. The last line is the ELSE statement. It acts in the same way as the THEN statement, but specifies the option to be defined for the specified variable when the preposition (IF statement) is not satisfied. Example Consider an example of a sunblind where the feature width specifies the width of the sunblind cloth in centimeters, and the feature cloth has three options: Sunset Orange, Tropical Blue, and Arctic White, but only the Sunset Orange cloth can be supplied in widths greater than 200 cm. To build this restriction into the QAD configuration questionnaire logic, you need to create a rule, as follows: IF width > 200 THEN cloth = sunset orange You do not need an ELSE statement in this case. If the cloth width is not greater than 200 cm, the customer can select any of the cloth options, without restriction. Example The cabinet-height can range from 50 to 250 centimeters. The cabinet-pane can be made of wood, plastic, aluminum, or steel. Cabinets more than 200 cm high have steel panes, and steel panes are only for cabinets more than 200 cm high. The rule is as follows. IF cabinet-height > 200 THEN cabinet-pane = steel ELSE cabinet-pane <> steel If the cabinet height is over 200 cm, the pane is steel. Otherwise, the pane can be any of the available options except steel. The rules are the way you can translate the engineering restrictions of your product into limitations regarding customer choice of product configuration. Questions? Visit community.qad.com QAD Configurator Basics 11 Sales Configuration Rule Grouping and Application You can create as many rules as you like, but they do not automatically take effect when you configure a particular configurable item until you apply them to that item. You apply rules by linking them to specific configurable items. To avoid the repetitive work of linking rules to configurable items one at a time, you can group rules together and apply them to configurable items all at once. Within the group, you can use any of the available variables in constructing your rules. The rules that you create in this way are called general rules because they apply generally to the variables you specify, wherever those variables are used. The rules are not initially attached to features or configurable items. QAD Configurator provides separate functions that let you select which of the general rules you want to apply to a particular configurable item. The advantage of using general rules is that you only need to maintain a rule once, and then link it to all the configurable items to which it applies. You can link general rules to items either directly or through rule groups, which is time-saving. If you know that a number of rules all apply in a particular set of circumstances, you can link these rules together in a rule group. You can then attach that rule group to a configurable item in a single operation, which has the same effect as linking all the rules to the item separately. When you link a general rule to an item directly, you have the following options: • Make the rule an item-specific rule that applies only to this item. • Leave the rule as a general rule that can also be applied to other items. An item-specific rule is a copy of the general rule, but the general rule remains available to be applied to other items. An item-specific rule does not need to be based on a general rule. You can also create an entirely new rule using the Maintain button in Item Rule Maintenance. Before the Analyzer can prepare the questionnaire for correct configuring of the product, you decide: • Which rules have been linked individually to the item (both general rules and item-specific rules) • Which rule groups have been linked to the item • Which general rules are in each of the linked rule groups This process is shown in the following diagram. Comments? Go to goo.gl/MfwKHm 12 QAD Configurator User Guide Fig. 2.1 Linking General Rules and Rule Group Rules to Items Rule Rule Group Group Specific SpecificRules Rules Rule Rule Group Group Rules Rules General GeneralRules Rules Item Item Item ItemSpecific Specific Rules Rules • The first stage covers the definition of general rules, setting up rule group IDs and descriptions, and defining configurable items. • The second stage covers the process of applying the rules: specifying which rules are linked to a rule group, specifying which rules are linked directly to an item, and specifying which rule groups are linked to an item. • The final stage covers the running of the Analyzer to process all the rules that now apply to the item. Analysis of Sales Configuration Rules Each feature that you define for a configurable item becomes a question in the questionnaire. The rules that you define in the sales configuration process establish the relationships between features. The Analyzer analyzes the dependencies between the product features. The Analyzer: • Extracts all features used in the sales configuration rules • Establishes the relationships between the features (builds a question tree) • Checks for cyclical loops in the sales configuration rules • Establishes priorities between questions and branches of question trees • Creates and compiles Progress source code programs to control the questionnaire logic Run the Analyzer after you have done any one of the following: • Added, modified, or deleted features. • Added, modified, or deleted rules. • Changed a parameter in Configurator Control. • Changed feature sequences. In any of situations 1, 2, or 3, make sure that you run the Analyzer before you start the questionnaire. The questionnaire checks if the configurable item has been analyzed, and forces you to analyze the item first whenever something significant has been changed. In situation 4, running the Analyzer is not required. However, to make the feature sequence modifications active, run the Analyzer. Questions? Visit community.qad.com QAD Configurator Basics 13 Feature Relationships A simple example of a sales configuration rule could state the following: IF variable A = option 1 THEN variable B = option 2 AND variable C = option 3 You could have another rule attached to the same item stating the following: IF variable C = option 3 AND variable D = option 4 THEN variable E = option 5 This relationship shows that variable E can be dependent on the options chosen for all of variables A, C, and D. So, the questionnaire presents questions relating to variables A, C, and D before the question relating to variable E. The following table shows a development of this example, where the variables are identified by the letters A to G, and the options are represented by numbers. Each row in the table shows the relationship between different variables specified by a particular rule that has been attached to the item. The column on the right shows the relationship in graphic form. Table 2.3 Feature Relationships Rule Proposition Conclusion Description A=1 B=2 Questions B and C depend on the answer to question A, so answer question A first. C=3 C=3 E=5 Question E depends on answers to questions C and D, so answer questions C and D first. E=5 G=E+F Question G depends on answers to questions E and F. (Question E itself depends on question D.) G=6 D=4 Question D depends on the answer to question G, so answer question G before you can answer question D. D=4 Comments? Go to goo.gl/MfwKHm Graphical Relation 14 QAD Configurator User Guide When you run the Analyzer for this configurable item, the Analyzer does the following: • Examines the relationships between the features that have been specified by the rules • Builds a question tree that shows all the dependent links between the features Fig. 2.2 Question Tree Diagram 1 Low Level A Code 0 D F Low Level Code 1 B C Low Level Code 2 E Low Level Code 3 G D The top row of the diagram shows that variables A, D, and F are independent questions that can be answered without reference to any other features. However, the final rule in the table specifies that variable D depends dependent on the answer to question G; the diagram shows that this creates a cyclical loop. When the Analyzer finds a cyclical loop, it reports the fact in the Analyzer Report. The Analyzer also turns off the field that indicates Configurable Item Analyzed in Configurable Item Maintenance. It is impossible to use the configurable item in the questionnaire until the loop has been resolved. To complete the analysis, the Analyzer skips the relationship that caused the cyclical loop (in this example, the dependence of D on G) and continues the analysis process. You resolve the cyclical loop by removing the rule that creates the dependence of D on G. Then the question tree is the same as in the previous example, but without the lowest level D and its loop back to the top level. This question tree would correspond to the following list of questions in the questionnaire: Question A .B .C D ..E F ...G Questions? Visit community.qad.com QAD Configurator Basics 15 Independent questions are not indented in the list of questions. The independent questions in this list are A, D, and F (as in the question tree). The amount of the indentation shows successive levels of dependence. The question tree and the question list are dynamic, and change each time a question is answered. In the current example, the following diagram shows the question tree after question A has been answered. Fig. 2.3 Question Tree Diagram 2 Low Level Code 0 B C D F Low Level Code 1 Low Level E G Code 2 Because question A has been answered, questions B and C now become independent questions, along with D and F. Questions E and G move up a level, but are still not independent because of their relationships with C, D, and F. This question tree is represented in the question list as follows: Question B C D .E F ..G This example shows that there are two ways that questions can become independent and therefore, ready for answering: • Genuinely independent questions that were never dependent on other questions • Questions that are dependent on other questions that have been answered already, so that the result of the dependent relationship can now be established In the previous question list, questions D and F are in the first category, while questions B and C are in the second category. Comments? Go to goo.gl/MfwKHm 16 QAD Configurator User Guide Feature Sequences Each feature corresponds to a question in the questionnaire; customers answer the question to define the configuration of the product. You can control the sequence in which the questions are asked using Feature Sequence Maintenance, but only within the limits imposed by the logical structure of the interdependence of the features. Example One question asks if the customer wants backup power, and another question asks about the type of the backup power. Then it would be illogical to ask about the backup power type before asking if the customer wants the backup power. The Analyzer analyzes the relationship between the possible feature options and determines the sequence of questions. However, within the limits of the logical constraints, you can determine the order in which the questions are asked. If you specify a sequence that goes against the logical structure, the Analyzer modifies your specified sequence to account for the interdependence. Example A product includes three features: length, width, and material. The length and width are numeric values within a range, and the material offers a choice of five different materials. However, only two of the materials are available in widths greater than 1.5 meters. Material is, therefore, dependent on the answer to width. Without any user-controlled sequencing, the Analyzer would present the questions in the following sequence. width .material length The indentation of material indicates that it depends on a previous independent feature, in this case, width. Using Feature Sequence Maintenance, you could manually set the feature sequence as follows. length material width When the Analyzer processes the features and rules for your product, it determines that material depends on width and modifies the sequence. length width .material The part of the sequence that does not affect the logical structure remains the same as you set, so length is now the first question. However, the Analyzer has changed the sequence of the width and material questions to keep the dependency of the latter on the former. Multi-Level Analysis The Analyzer has multi-level capabilities; it can handle configurable item product structures with lower-level component items that are themselves configurable items. When dealing with a multi-level configurable item, the Analyzer performs the following activities: Questions? Visit community.qad.com QAD Configurator Basics 17 • Collects all the features and rules on the different levels so that each question occurs only once • Creates one tree of questions • Checks for cyclical loops • Creates one program for the total product structure of the top-level configurable item to control the questionnaire logic for the complete generic product structure The lower level configurable items in a multi-level generic product structure are automatically analyzed when the higher-level configurable item is analyzed. In the following example, when configurable item G1 is analyzed, the configurable item G2 is analyzed automatically as well. You can run the questionnaire for item G2 without first analyzing it separately. Example The top-level configurable item (G1) includes another configurable item (G2) at a lower level. Fig. 2.4 Multi-level Analysis Single-level question tree for configurable item G1 G1 Single-level question tree for configurable item G2 G2 C1 C2 C4 C5 C3 In this example, features F2 and F3 occur for both configurable item G1 and configurable item G2. When the Analyzer is run for configurable item G1, it also analyzes configurable item G2 and produces a question tree for the multi-level item. This question tree applies when the system runs the questionnaire for the higher-level item, G1. Configuration Keys When all the questions in the questionnaire are answered for a product configuration, QAD Configurator defines a new configuration used by the Variant Generator, which is a part of the questionnaire, to construct a new variant item, product structure, and routing. The step from creating a configuration to generating a new variant is only automatic if you have defined a configuration key. You can choose to save the configuration as a description of a product configuration without generating the corresponding variant. It is quite possible, therefore, that some previous use of the questionnaire has produced either a configuration or a variant that matches the specifications of your present customer’s configuration requirements. Comments? Go to goo.gl/MfwKHm 18 QAD Configurator User Guide To avoid configuration and variant redundancies, QAD Configurator uses the configuration characteristics; that is, the answers to the questions. When a configuration exists, there can also be a variant that matches your current customer’s requirements. You can then decide whether to use the existing configuration or variant, or to continue with the questionnaire to create one. To find a specific configuration, QAD Configurator needs a key to use as an index. Due to performance considerations and Progress limitations, it is not advisable to include the complete configuration description as the index. In most cases, only a subset of all the configuration elements, that is, the configuration details, is needed to uniquely describe a variant. You can use Configuration Key Maintenance to select the features that uniquely describe a variant. Note If a feature is added to or removed from an existing configuration key, make sure that you rebuild all unique variant keys for the configurable item. Product Configuration Rules Product configuration rules govern how answers given to questions in the questionnaire are translated into variant items, product structures, and routings. The output from the questionnaire is a product configuration. When a particular set of answers to the questionnaire produces a unique configuration, QAD Configurator automatically translates it into a variant item if you did not specify a configuration key. When a configuration key is defined, the system lets you choose whether to convert the configuration into a new variant item. When you make this decision, the Variant Product Structure/Routing Generator (which is a part of the questionnaire function) converts the configuration into real components and manufacturing processes. At the end of this process, you have a variant product structure and a variant routing. The variant product structure defines components that are to be included and their respective quantities. The variant routing defines processes that are required to make the new variant item. Note You can define in Master Group Maintenance whether a group is to use routings or not. If you select not to use routings, the Variant Product Structure/Routing Generator does not calculate operations. To convert the configuration from the questionnaire into the necessary component selection, quantities, and routings, the Variant Product Structure/Routing Generator requires rules that specify what components and processes should be used. The features, options, and rules in the sales configuration are used by the questionnaire to generate a product configuration. The system follows the product configuration rules to include components from the generic product structure. If there is no rule that applies to the component, the system always selects the component. Example The customer selects the Sport model, which automatically includes the feature alloy wheels. To produce this feature, define which components from the generic product structure to include: SELECT alloy wheels, qty 5 SELECT sport wheel nuts, qty 20 SELECT sport tyres 185/70 SR13, qty 5 Questions? Visit community.qad.com QAD Configurator Basics 19 The product configuration rules maintenance functions let you define the rules that enable the Variant Product Structure/Routing Generator to generate detailed specifications for new variant items. Selection and assignment rules are optional. When no selection rule is available for a component or an operation, the system always selects the component or operation. When no assignment rules are available, the values from the generic product structure/routing are used. The item number definition rule is required for each configurable item to be used to create a variant. Selection Rules A selection rule is a Progress expression; it is either true or false. When a selection rule is applied to an item, Variant Product Structure/Routing Generator tests the condition specified in the rule. If the condition is true, Variant Product Structure/Routing Generator selects the item. Example A certain component might only be included in the variant product structure if: color = "Sunset Orange" and Environment-of-use = "Easy" Another component might be selected if: length * width / 100 > 300 Selection rules are similar to the expressions used in sales configuration rules, and use variables, options, values, and Boolean operators. You can use standard rules for frequently used expressions which you want to include in a number of different selection rules. Assignment Rules An assignment rule is an assignment of a value to a database element in QAD EA. Although modifying component quantity is the most obvious use for assignment rules, you can also use them to assign values to any database element in pt_mstr, ps_mstr, and ro_det tables. For example: pt_ord_qty = 100 + (safety-stock) / 100 pt_desc1 = "Item with color" + color For a detailed review of all available data elements, refer to the QAD EA Data Definitions manual. Item Number Definition Rules An item number definition rule defines how to build up the new variant item numbers. Each variant needs a unique item number. By defining a rule for each configurable item, you enable the Variant Product Structure/Routing Generator to standardize the structure of the variant item numbers it creates from that configurable item. In the item number definition rule, the structure of the item number consists of one or more of the following components: • Current configurable item number: position From/To • Master configurable item number: From/To Comments? Go to goo.gl/MfwKHm 20 QAD Configurator User Guide • Feature: position From/To • QAD EA database element: position From/To • Fixed text • Character • Alphanumeric Sequence: length, multiplier, and start value • Numeric Sequence: number of digits, start value, and multiplier • Global Alphanumeric Sequence: length, multiplier, and start value • Global Numeric Sequence: number of digits, start value, and multiplier You can combine these components in any order you want to create new variant item numbers. The maximum number of positions you can use is 18. Except for the alphanumeric and numeric sequence component, you can use the individual components more than once in an item number definition. For the numeric sequence and alphanumeric sequence components, you can add them only once—you can add a numeric sequence and an alphanumeric sequence. Example The master configurable item number is 9-100-100. For the item number definition rule, you specify that the item number is to include the master configurable item number, followed by a character (-) and then followed by a 3-digit sequence number that starts at 001. Then the successive variant item numbers are as follows: 9-100-100-001 9-100-100-002 9-100-100-003... Dynamic Update of Routing Operation Comments Answers to the QAD Configurator questionnaire can be used to dynamically update the comments for operations in the variant routing. Routing Maintenance in QAD EA has a Comments field. When this field is set to Yes, you can add comment text that is printed on shop floor documents for work orders for the item. Sometimes it is helpful to inform the shop floor of one or more answers from the questionnaire. To include information from questionnaire answers, you can refer to the QAD Configurator feature name in the comments of the applicable operation by putting the name of the feature in brackets [ ]. Example Comments Operation 10 (Generic routing): The required specifications for the product are: Length = [length] Width = [width] Color = [color] As soon as a new variant routing is created, the customer’s selected values (answers) for these questions are used to fill out these fields. In the previous example: Comments Operation 10 (Variant routing): The required specifications for the product are: Length = 120 Width = 80 Color = white You do not need to set up anything in QAD Configurator to make this work. It requires the definition of the routing comments for the relevant operations in the generic routing in QAD EA. Questions? Visit community.qad.com QAD Configurator Basics 21 Cost Roll-Up The system uses the existing routing cost roll-up and product cost roll-up routines in QAD EA to calculate the costs of manufacturing an item. In order to do this, QAD EA takes into account the various types of costs that appear in the product structure of the item. Because QAD Configurator adds the product structure of the items that you configure to the QAD EA database, the cost roll-up functionality is incorporated in QAD Configurator as well. Calculating the costs for an item involves adding the following five types of costs: • Material costs • Labor costs • Burden costs • Subcontract costs • Overhead costs The roll-up of the total costs consists of one product structure roll-up and one or more routing rollups. When a routing roll-up has been completed on every level in the product structure and a product structure roll-up has been done for the top-level item, costs of the lower levels and costs of this level can be added. They constitute the total costs of the top-level item. For more information on product costing, see either the Costing chapter in QAD Financials User Guide or QAD Costing User Guide, depending on your product version. Element Roll-Up When the Variant Product Structure/Routing Generator creates a variant, the process normally includes the element roll-up calculations. The Element Roll-Up function operates only on non-cost element-related data elements, such as lead time or weight. Before you run Element Roll-Up, first define the element roll-up rules for configurable items. You do this using Element Roll-Up Rule Maintenance. See “Maintaining Element Roll-Up Rules” on page 121. Depending on whether you want to roll up component-related elements or routing-related elements, you can use Element Roll-Up Rule Maintenance to compose roll-up rules from either of the following sources: • Product structure (ps_mstr) and/or item data (pt_mstr), both using either master data or component data • Routing data (ro_det) and/or Work Center data (wc_mstr) The following diagram illustrates the element roll-up process. Comments? Go to goo.gl/MfwKHm 22 QAD Configurator User Guide Fig. 2.5 Element Roll-Up Process G1 Roll-up one level Roll-up all levels G2 C Roll-up one level G3 C C C Roll-up rules can be simple expressions, which contain only one element; these rules are called basic rules. Roll-up rules can also be complex expressions, which contain two or more elements; these rules are called advanced rules. Example A basic rule that rolls up the production lead time of all components could take the following form. Example A more complex rule could take the following form. Within Element Roll-Up Rule Maintenance, for a basic rule, you select the single element to roll up from a drop-down list. For an advanced rule, you compose the expression for the rule in an editor window. An advanced rule can contain any of the elements listed in the following tables. Product Structure Roll-Up pt_mstr The elements of the master item (variant item number) can be used. By using the element name without prefix or by adding the prefix master, the values of the master item (pt_mstr) are selected. The elements of the component item (component item number) can be used. By adding the prefix component to the element name, the values of the component item (pt_mstr) are selected. ps_mstr The elements of the product structure (ps_mstr) can be used. Questions? Visit community.qad.com QAD Configurator Basics 23 Routing Roll-Up pt_mstr Only the elements of the master item (variant item number) can be used (no prefix or prefix master). wc_mstr The elements of the work center can be used. ro_det The elements of the variant routing (variant routing number = variant item number) can be used. You cannot use variables, features, or options in element roll-up rules, and only one roll-up rule can be defined for each master item element. Cross Validation of Rules Because the sales configuration and the product configuration data are maintained separately, it is necessary to check discrepancies between the two sets of data. For example, variables in the product configuration rules are not used for features of a configurable item. In this situation, unknown answers can appear on the questionnaire. You can use the Cross Validation Analyzer to check if the product configuration rules and rules match the sales configuration data (features and rules). This analyzer detects any discrepancies between the two modules and produces a report. Note that the Analyzer does not correct any errors that it finds. To correct the errors, use QAD Configurator maintenance functions. For example, you might add a feature to the configurable item using Feature Maintenance, or modify a product configuration selection rule. The Cross Validation Analyzer has multi-level capabilities: it takes into account all lower-level items and components of the selected configurable item. The Cross Validation Analyzer checks any inconsistencies in the model from the current configurable item downwards. So it can also report likely errors during a cross validation of a lower level configurable item. You can also use the Delete Orphaned Rule option in Cross Validation Analyzer to delete the orphaned rules. For more details, see “Validate Orphaned Rule, Delete Orphaned Rule” on page 126. What the Cross Validation Analyzer Checks You control what the Cross Validation Analyzer checks with selection flags in the Cross Validation Analyzer main window: • Configurable item components only Only the components that are one level lower than the configurable item are checked, not the components on lower levels. • Variant assignment rules Make sure that the variables in the assignment rules are valid features for the relevant configurable item or its child items. • Rule syntax The Cross Validation Analyzer checks the syntax of all selected rules by compiling the code using the Progress Compiler. • Variant item numbers Comments? Go to goo.gl/MfwKHm 24 QAD Configurator User Guide Checks if a variant item number exists for every configurable item in the product structure. If there are no variant item definition rules to specify the item number, QAD Configurator cannot create a variant item. • Features This routine checks if all features are used properly given the configurable items in the generic product structure and the features that are defined for each of them. Example of Using the Cross Validation Analyzer The following diagram shows a schematic representation of an example configurable item structure. Items annotated with (G) are configurable items. Fig. 2.6 Example Configurable Item Structure The paragraphs below show example checks and the warnings or errors reported for the situations numbered *1 to *7 in the diagram, when analyzing the top level configurable item. 1 Warning/Error: component [name] variable V-6 not defined as feature for item [Item number]. Feature V-6 is defined for configurable item Item-2, which is a component item of the top level Item-T. All features in the product structure are collected into the highest level, and thus the selection rules on every level can be verified. When the top-level configurable item is used to create a variant, no error occurs. However, if the Item-1 configurable item is used as the toplevel item to create a variant, an error situation occurs. 2 Correct. The V-4 variable is defined as a feature for the next higher configurable item Item-3, so the selection rule can always be verified. 3 Warning/Error: component [name] variable V1 not defined as feature for item [name]. Questions? Visit community.qad.com QAD Configurator Basics 25 The V-1 feature is not defined for configurable item Item-3, but for a higher-level configurable item Item-1. When creating a variant of the top- level configurable item or of Item-1, there is no problem. But when you create a variant of Item-3, QAD Configurator cannot verify this selection rule and an error occurs. 4 Error: Variable V-9 not defined as feature for [top-level item name]. The V9 variable is used in the selection rule but is not defined as a feature for any of the configurable items in the product structure. 5 Warning/Error: Broken Chain of configurable items. The Item-4 parent item is not a configurable item. As a result, the system handles Item-5 as a standard item and selects all its components. So, defining Item-5 as generic is meaningless. Defining lower-level items as generic requires a linked chain of configurable items up through higher levels. 6 Warning/Error: Selection rule found for non-generic component item or assignment rule found for non-generic component item in the case of an assignment rule. The Item-4 parent item is not a configurable item. As a result, the system automatically selects every (generic) component on a lower level into the variant product structure. Selection rules on lower levels are, therefore, meaningless. Selection rules are only active if the parent item of the component is a configurable item. 7 Error: No variant item number definition found for configurable item. It is not possible for QAD Configurator to generate a new variant in QAD EA for the top-level configurable item since it does not know how to store its findings. Cross Validation Analyzer Report Cross Validation Analyzer Report is displayed on the screen in the standard output window and can be printed using the standard print routine. Questionnaire Questionnaire is the front end guided selling module of QAD Configurator that lets you configure products for specific customers by selecting product feature options in the form of a questionnaire. Product configurations resulting from the questionnaire can be saved and used to create new variant items. Questionnaire can be started from the QAD Configurator menu or automatically launched from Sales Order Maintenance (7.1.1) or Sales Quote Maintenance (7.12.1) when you enter a configurable item in the order line. When you configure a product for a specific customer in Questionnaire, you are presented with a list of questions that correspond to the product’s features. As you answer each question, you select options for each feature of the product. When you finish all the questions, you have a combination of answers or feature options that is called a configuration in QAD Configurator. Each product configuration can be saved and reused later. Comments? Go to goo.gl/MfwKHm 26 QAD Configurator User Guide When a firm order is placed for a new product configuration, you convert the configuration to a variant item. The variant item has its own item number, variant product structure, and, if necessary, variant routing. Questionnaire Questions Each question corresponds to a configurable product feature and each option in a question corresponds to a feature option. How questions are generated and how you can answer them are determined by questionnaire-related sales configuration data. Sales configuration data include feature and option sequence, feature and option characteristics, as well as inclusions, exclusions, and interdependency rules. The main types of questions recognized by QAD Configurator are as follows: • Foreground questions, which require answers from the customer. • Background questions, which can be answered by the customer, but do not need to be. If no answer is supplied, the default is used, even if there is no rule to cover the question. • Temporary questions, which are usually answered by QAD Configurator calculating values according to the rules. When you customize the question display, you can select which levels and types of question are shown in the display, and how many levels should be displayed. If you select only one level, only the questions currently ready to be answered are displayed. If you select two or more levels, that number of levels of dependent questions is also displayed. Configurations When you have finished answering the questions in the questionnaire, QAD Configurator generates a uniquely identified configuration. The configuration is an intermediate stage between answering the questions and generating the new variant item and its product structure and routing. QAD Configurator can automatically check if a configuration exists, thus preventing sales personnel from configuring the same item twice. QAD Configurator records each configuration that is generated by the questionnaire. Whenever the system creates a variant from a configuration, the variant has a unique item number according to the item number definition rule. To avoid configuration and variant redundancies, QAD Configurator uses the configuration characteristics; that is, the answers to the questions. When a configuration exists, there can also be a variant that matches your current customer’s requirements. You can then decide whether to use the existing configuration or variant, or to continue with the questionnaire to create one. Pricing In many situations, the price of a configuration is equal to the sum of the prices of its components. Now suppose that each component is only chosen if a certain option is selected as an answer (a one-to-one relationship between the options and the components). Then instead of associating a price with the component you can also associate a price with the relevant option and sum the prices of the options. QAD Configurator uses this method. Questions? Visit community.qad.com QAD Configurator Basics 27 To link a price to an option, define a pricing part for that option. QAD Configurator uses the price and price lists (if any) of this pricing part to find the best net price and the best list price of the feature option. Any item can serve as a pricing part. If there is a one-to-one relationship between the options and the components, all QAD Configurator has to do is to sum the prices associated with the selected options. But sometimes, selecting a certain option leads to selecting more than one unit of some component. In this case, you can include the number of the component in the price of the configuration. For numeric features, you can use the value of this feature as the number of units of the component; select Qty Based check box in Variable Maintenance or Feature Maintenance. If you do not select Qty Based, the quantity is one. For other types of features, the Quantity Based check box is not available. In these cases, you can set the pricing quantity (pricing_qty) attribute of a feature. The pricing functionality offers many more possibilities for defining the price of a configuration: • The pricing part of an option does not have to be the component that is selected if you choose that option. In other words, you can associate with an option any price you want, by specifying a dummy item and using that item as a pricing part for the option. • If a pricing part is not the component that is selected when you choose an option, then the number of units is not the number of units of the actual component, but the number of units of the item that serves as the pricing part. The pricing quantity only helps you find a price in a price list and does not even have to refer to a number of units that is selected in the variant product structure. This means that you can force the price of a configuration to go up when a certain option is selected, even if you do not want the choice to result in the selection of a component. • If some components are always selected (independent of the answers given), you can define a separate price list containing the total price of this collection of items. Then you link the price list to a dummy item. Later this dummy item can be used as a pricing part. Its price can always be included in the configuration price, for instance by having a rule that makes sure that the relevant option of this dummy feature is always selected. • If more than one different component is selected, you can create price lists containing the prices of the relevant collection of components. Then you can link the price lists to the pricing part. Apart from a pricing part and a pricing quantity, also provide a pricing unit of measure for best price calculation. The pricing quantity of (a pricing part associated with) an option is always expressed in terms of the pricing unit of measure that you enter in QAD Configurator. For instance, if the unit of measure for an item or in a price list is gram and the unit of measure as entered in QAD Configurator is kilogram, then a pricing quantity of 2 in the questionnaire means a quantity of 2 kilograms. To enter pricing part, quantity based, and unit of measure correctly, you should first enter the data in Variable Maintenance and Feature Maintenance. In general the data as entered in Feature Maintenance is used, but there are two exceptions to this rule: • If Std Options is selected in Feature Maintenance, the data from the variable option is used. • If the feature is a logical and the answer in the questionnaire is equal to no, then QAD Configurator uses 0 as the price for the feature. If the answer is yes then QAD Configurator uses the pricing information as specified in Feature Maintenance. Comments? Go to goo.gl/MfwKHm 28 QAD Configurator User Guide Note The price of the configuration as shown in the questionnaire is always the price of one unit of the configuration. If Calculate Pricing is set to Yes in Configurator Control, when a question on the questionnaire is answered, the system automatically calculates the price. If it is set to No, the system does not automatically calculate the price. The questionnaire respondent can use the Calculate Prices button on the questionnaire to manually calculate the price. However, regardless of how this Calculate Pricing field is set, after you save a configuration, the system always calculates the configuration price. Questions? Visit community.qad.com Chapter 3 QAD Configurator Workspace 30 Gives context for how QAD Configurator relates to other QAD programs. Workspace Overview Accessing QAD Configurator Functions 30 Describes different methods of accessing QAD Configurator functions and illustrates the Configurator process map. 31 Describes the functions of the Applications Toolbar. Application Toolbar 31 Explains how to identify and select different master groups. Selecting a Master Group 31 Explains how to modify records by creating, viewing, editing, cycling through, or deleting them. Maintaining Records 33 Explains how to use the Comment Editor toolbar. Editing Comments 33 Explains how to use the Rule Assistant to compose valid rules. Using the Rule Assistant 33 Describes how to use the configuration browse, view the Variables and Features browse and Configurations browse collections, and customize the configuration browse. Using Browses and Browse Collections 30 QAD Configurator User Guide Workspace Overview Integrated with QAD EA, QAD Configurator is embedded in the application area of the QAD .NET user interface. QAD Configurator is consistent with the rest of the QAD EA applications in terms of look and feel and navigation. For information on the .NET user interface, see Introduction to QAD Enterprise Applications User Guide. This section describes some common UI features specific to QAD Configurator. Accessing QAD Configurator Functions You can access QAD Configurator functions by using either the Menu Search field or the menu tree in the Applications pane in the QAD .NET user interface. After you install QAD Configurator, QAD Configurator functions are grouped under Customer Management|Configurator by default in QAD 2008.1 Enterprise and later. For earlier versions of QAD EA, QAD Configurator functions can be found under Distribution|Configurator. You can also access QAD Configurator functions using QAD Configurator process maps. By linking related subprocesses and activities together in the form of interactive workflow diagrams, process maps tie up all the functions sequentially. You can drill down a process map by clicking a subprocess icon to access lower-level functions. The Configurator process maps are integrated into the Supply Chain View and Vertical Industry View process maps in the QAD .NET UI. Fig. 3.1 Configurator Process Map When you select a configurable item in the order line in Sales Order Maintenance or Sales Quote Maintenance in the QAD EA .NET UI environment, the Questionnaire module launches automatically. Questions? Visit community.qad.com QAD Configurator Workspace 31 Application Toolbar Like other QAD EA applications, QAD Configurator’s application toolbar resides at the top of the application area and provides access to the most common functions. Fig. 3.2 QAD Configurator Application Toolbar Action. Use the following action commands to cycle through records in a record maintenance screen: • First Record • Previous Record • Next Record • Last Record Print. Print out the current screen. Print Preview. Preview the current screen before printing. Delete. Delete the current record on a record maintenance screen. Note The Delete button is only enabled in edit mode. Group. Displays the current master group. You can specify another master group by clicking the Browse button next to it. Selecting a Master Group When executing QAD Configurator functions, make sure that you are in the right master group. Your current master group is displayed on the right of the toolbar and all the data you work with is associated with it. To specify another master group: Click the Browse button next to the current master group on the toolbar and select the group you want from the browse window. Maintaining Records Record maintenance functions such as Variable Maintenance, Question Type Maintenance, and Master Group Maintenance let you create, view, edit, or delete records in a consistent manner. Comments? Go to goo.gl/MfwKHm 32 QAD Configurator User Guide Fig. 3.3 Example of Record Maintenance Functions To create a record: • When you first access a record maintenance function, enter a new record ID in the record ID field, which is typically the first field on the screen. Then press Enter or Tab to edit the new record. • When you have a record opened or created for editing, click the New button in the bottom- right corner of the screen. Or directly enter a new record ID in the record ID field, which is typically the first field on the screen, then press Enter or Tab. The system asks you whether to save the current record. To view a record: Enter an existing record ID in the record ID field. Or click the Browse button next to the record ID field and select an existing record from the browse window. The specified record is loaded for viewing. To edit a record: Enter an existing record ID in the record ID field or click the Browse button next to the record ID field and select an existing record from the browse window. Then press Enter or Tab to enter edit mode. To cycle through records: Use the Action commands on the toolbar or place the cursor in the record ID field and press the Up and Down arrow keys to navigate through records. To delete a record: When the record is in edit mode, click the Delete button on the toolbar. Note The Delete button on the toolbar is disabled in record view mode. Questions? Visit community.qad.com QAD Configurator Workspace 33 Editing Comments In QAD Configurator, several record maintenance functions provide the Comment tab. To add or edit a comment: Click the Edit button on the Comment Editor toolbar; then select a language and enter text in the Comment box. To delete a comment: Select the comment in the list and click the Delete button on the Comment Editor toolbar or press the Delete key. Using the Rule Assistant When you edit rules in most rule maintenance functions, you can use the Rule Assistant to assist you in composing valid rules. Fig. 3.4 Rule Assistant Click the Down arrow to expand the Rule Assistant panel. To add an element to the Rule box, select it from the drop-down list and click the Plus sign + to the right. Note The available fields and options vary depending on the type of rule you are editing. Using Browses and Browse Collections Use the following menu-level browses and browse collections to easily view, filter and sort configurations, variables, and features: • Configuration browse • View Variables and Features browse collection • View Configurations browse collection • View Configuration Details browse collection Comments? Go to goo.gl/MfwKHm 34 QAD Configurator User Guide Fig. 3.5 Configuration Browse In a browse collection, a main browse drives the fields selected in the other browses and programs. The QAD .NET UI displays the other browses and programs in the lower part of a horizontal splitscreen, with the main browse located in the upper part. Fig. 3.6 View Configurations Browse Collection The View Configurations browse collection includes a Configurable Item browse with a Configuration browse and a Variant Item browse. If you click a record in Configurable Item, the associated browses automatically have the data for that selected item. You can click the Configuration Browse tab to see existing configurations for that configurable item, or click the Variant Item Browse tab to see existing variant items created from it. Questions? Visit community.qad.com QAD Configurator Workspace 35 Fig. 3.7 View Variables and Features Browse Collection The View Variables and Features browse collection includes a Master Group browse with a Variable browse and a View Configurable Items and Features browse collection. The Master Group browse lists all the master groups in the current domain. You can see whether a master group is active from the Active field. An active group is a group whose start date is no later than the current date and whose end date is no earlier than the current date. If you click a record in Master Group, the associated browses automatically have the data pertaining to that group. You can click the Variable Browse tab to see existing variables under the group. You can also click the View Configurable Items and Features tab to see configurable items, related configurations and variant items. Comments? Go to goo.gl/MfwKHm 36 QAD Configurator User Guide Fig. 3.8 View Configuration Details Browse Collection The View Configuration Details browse collection includes a View Configurable Items browse and a Configuration Details browse. If you click a record in View Configurable Items, the associated browse automatically has the data pertaining to that item. Customizing the Configuration Browse To customize the Configuration Browse, click the Customize icon beneath the search box to the right. You can specify whether to show temporary questions and background questions and whether to display long or short questions in the Configuration Browse. Note You cannot hide temporary or background questions when they are used as filter criteria in the search box. Fig. 3.9 Customize the Configuration Browse Questions? Visit community.qad.com Chapter 4 Configurator Setup 38 Explains how to set up data in QAD EA with sections on creating items, product structures, and generic routings. Setting Up Data in QAD EA 42 Explains how to configure system settings, addresses master groups and how to maintain them, and explains how to maintain configurable items, copy configurable item data, and maintain external entities. Setting Up QAD Configurator 38 QAD Configurator User Guide Setting Up Data in QAD EA QAD Configurator is designed to work with QAD EA. It does not maintain a separate database of item data, product structure, or routings. To use QAD Configurator, define which items in QAD EA are to be used as configurable items by QAD Configurator. Make sure that QAD EA contains all the item, product structure, and routing details for the products you intend to configure using QAD Configurator. If you are setting up QAD Configurator to configure a new product range, create the following: • All the item details in QAD EA Item Master Maintenance • All the bills of material in QAD EA Product Structure Maintenance • All the possible operations in QAD EA Routing Maintenance If you enabled the item-site data creation feature during system installation, make sure that you create item-site records for all the sites in which variant items are manufactured or sold. Use the following QAD EA functions: • Item-Site Inventory Data Maintenance (1.4.16) • Item-Site Planning Maintenance (1.4.17) • Item-Site Cost Maintenance (1.4.18) Create or modify records of other QAD EA elements, such as sites and work centers relating to the product range you want to configure. Note The item details and the product structure details are necessary for QAD Configurator. Set these up in QAD EA before you use QAD Configurator. However, use of generic routings is optional in QAD Configurator. You can set up QAD Configurator so that it does not generate variant routings when you configure a variant item. In this case, you do not have to set up the generic routings in QAD EA for your product family. When all the correct product-related data are present in QAD EA, you can define the parent item for the product as a configurable item in QAD Configurator. It is necessary as the first step in the sales configuration process for the product, because all the QAD Configurator programs make reference to the configurable item. Questions? Visit community.qad.com Configurator Setup 39 The following figure illustrates the relationship between QAD EA and QAD Configurator. Fig. 4.1 Relationship between QAD EA and QAD Configurator The parent item, generic product structure, and generic routing information from QAD EA is used in QAD Configurator by way of the configurable item. When you use QAD Configurator to create a variant item, QAD EA can use the resultant variant product structure and variant routing for manufacturing. Creating Items Make sure that all items in the generic product structure exist in QAD EA before you start using QAD Configurator. If you are setting up QAD Configurator to configure products that exist in the QAD EA database, make sure that all the item data is correct and up-to-date. If you are setting up QAD Configurator to configure a new configurable item, create all the related item records in QAD EA first. When you set up data for a configurable item using Item Master Maintenance (1.4.1), it is recommended that you leave the following fields blank. Drawing. Leave this general data field blank. During variant item creation, you can use Variant Item Data Rule to assign a specific value to the field. Revision. Leave this general data field blank. During variant item creation, you can use Variant Item Data Rule to assign a specific value to the field. Comments? Go to goo.gl/MfwKHm 40 QAD Configurator User Guide Article Number. Leave this inventory data field blank. During variant item creation, you can use Variant Item Data Rule to assign a specific value to the field. Ship Weight. Leave this shipping data field blank. During variant item creation, it can be automatically calculated by Element Roll-Up. Net Weight. Leave this shipping data field blank. During variant item creation, it can be automatically calculated by Element Roll-Up. Volume. Leave this shipping data field blank. During variant item creation, it can be automatically calculated by Element Roll-Up. Run Time. Leave this item planning data field blank. During variant item creation, it can be automatically calculated by Routing Cost Roll-Up. Setup Time. Leave this item planning data field blank. During variant item creation, it can be automatically calculated by Routing Cost Roll-Up. Routing Code. Leave this item planning data field blank. Note If there is a value for this field, the created variant item might have an unexpected routing instead of the routing created by QAD Configurator. BOM/Formula. Leave this item planning data field blank. Note If there is a value for this field, the created variant item might have an unexpected BOM instead of the product structure created by QAD Configurator. Price. Leave this field blank. The price of a configurable item can be dynamic; unless you want the price to be a fixed one, leave the field blank. GL and Current Costs. Leave this item cost data field blank. During variant item creation, it can be automatically calculated if Variant Item Cost Roll-Up is enabled in Configurable Item Maintenance. For more information about creating and modifying item details in Item Master Maintenance, refer to the QAD EA documentation. (Optional) Creating Item Master Comments You can define master comments to add configuration descriptions to an item. The configuration descriptions can be printed on documents such as sales quotes, sales orders, invoices, or packing lists. Note For sales orders or sales quotations to have master comments, make sure that you set the Comment field to Yes in Sales Order Maintenance (7.1.1) or Sales Quote Maintenance (7.12.1). For a configurable item, you can define the master comments with feature names to show feature options. Example You define the master comment for a configurable item 01040 (an industrial ultrasound device) as follows: This ultrasound device operates with the frequency of [Freq]. Questions? Visit community.qad.com Configurator Setup 41 Freq is the feature name for the device’s frequency. When you select the frequency option 10 MHz in Configuration Questionnaire and create a variant item, the system creates the master comment as follows: This ultrasound device operates with the frequency of 10MHz. Note If the feature is the array data type, after the feature name put a colon and the array element, such as [Freq:1]. (Optional) Creating Item Master Comments in Multiple Languages You can define the master comment in any of the QAD-supported languages, as the option answer can be in any of the QAD-supported languages. For more information about multi-language support for variable and feature options, see “Feature Options” on page 72. Example You are a German user; for the configurable item 01040, you define the comment in German: ANZEIGETYP: [U-Type] U-Type is the feature name for the device’s display. When you select the option ANZEIGE OBEN in Configuration Questionnaire and create a variant item, the system creates the master comment for the variant item as follows: ANZEIGETYP: ANZEIGE OBEN In other words, the system populates the feature value placeholder with the option short answer in the language of the master comment. Creating Generic Product Structure Make sure that the multi-level or single-level generic product structures for the products you want to configure exist in QAD EA. Also ensure that all possible components that could be configured for a product exist. Use Product Structure Maintenance (13.5) to check. Refer to the QAD EA documentation for details on creating and modifying product structure details. Creating Generic Routings QAD Configurator requires the existence of the items and generic product structures in QAD EA for the products you want to configure, but the generic routings are optional. If you want to use QAD Configurator to configure routings, make sure that the generic routings exist in QAD EA. Generic routing means all possible processes for the variant item manufacturing. Using Routing Maintenance (14.13.1) for creating and modifying generic routings. For more details on generic routings, refer to the QAD EA documentation. Note Before you start creating the routings, create departments, work centers, and standard operations information. Comments? Go to goo.gl/MfwKHm 42 QAD Configurator User Guide Setting Up QAD Configurator Setting up QAD Configurator involves the following general steps: 1 Configure QAD Configurator system settings 2 Set up master groups 3 Maintain configurable items 4 Copy configurable item data (optional) 5 Maintain external entities (optional) Fig. 4.2 Configurator Base Data Setup Process Configuring System Settings Use Configurator Control to configure the QAD Configurator system settings. Fig. 4.3 Configurator Control Questions? Visit community.qad.com Configurator Setup 43 AppServer Questionnaire Directory. Specify where to store the questionnaire files on the AppServer. These files are generated by the Analyzer and contain the inclusion and exclusion logic for features and options. Map the remote directory on the AppServer to a local drive first. AppServer Variable Directory. Specify where to store the Variant Product Structure Generator files on the AppServer; the questionnaire uses these files. These files contain the variant product structure and variant routing information. Map the remote directory on the AppServer to a local drive first. Max Variable per Procedure. Specify the maximum number of variables permitted in each procedure generated by the system. This setting can help you to avoid analysis failures that result from too many variables in one procedure. Pegging for Re-analyze. If you select this option, whenever a rule changes at some level of the product structure, QAD Configurator reanalyzes the relevant configurable item and all higherlevel configurable items. Keep this option selected, unless the analysis time is too much. Show Warning Icons when Questionnaire Opens. This field determines whether to display yellow warning icons on functional group tabs in Configuration Questionnaire in the following situations. The icons indicate that some questions have not been answered. • Situation 1: When the Questionnaire opens • Situation 2: When the respondent saves the configuration before answering all the questions When the field is selected, the system displays the warning icons in both situations. When the field is not selected, the system displays the warning icons in Situation 2 only. Calculate Pricing. Yes: The system automatically calculates the price each time a question on the questionnaire is answered. No: The system does not automatically calculate the price each time a question on the questionnaire is answered. The questionnaire respondent can use the Calculate Prices button on the questionnaire to manually refresh the price. Regardless of how this Calculate Pricing field is set, the system always calculates the configuration price after you save a configuration. SQ/SO Maintenance. Use these options to select the type of entry that QAD Configurator uses to store sales quote and sales order information. Select Product Structure if you want the system to create item product structures when creating configurations; otherwise, select Off. By default, Product Structure is selected for both SQ Maintenance and SO Maintenance. WebSpeed URL. Enter the WebSpeed Workshop URL in the following format: http://WebSpeedServerHostName/cgi-bin/wspd_cgi.ksh/WService= WebSpeedBrokerName Web URL. Enter the URL address in the format http://server_ip/alias_name where the scripts, images, and styles folders are published. alias_name is the Apache server Alias configuration that points to ConfiguratorWebSpeedInstallDir/cpd/htdocs Comments? Go to goo.gl/MfwKHm 44 QAD Configurator User Guide Web Timeout. Specify the amount of time allowed for the system to try to connect to the Web server before the system stops trying. Property Path. Specify the path where the AppServerConnection.xml file is to be stored. First create the directory for storing the configuration file under ConfiguratorWebSpeedInstallDir, and then give it read and write permissions. About Master Groups When you have a large quantity of manufacturing data in your QAD EA database, you can simplify data management and access in QAD Configurator by classifying the data into different master groups. You can base master groups on product family or product type. Master groups are not domain-specific. When you have several master groups, make sure that you are in the right master group when you work with such data as configurable items, variables, features, and rules. Data created in one master group exclusively pertains to that group and cannot be accessed from other master groups. A variable in one group cannot be accessed in another group. Likewise, all the sales configuration rules and product configuration rules you set up in a group only apply to that group. QAD Configurator provides a built-in master group STD and it cannot be deleted. Example The Industrial Ultrasound is part of a product family that covers industrial, medical, implantable, and domestic ultrasound equipment. Despite major differences in the component parts included in its generic product structure, many of the variables are common to the entire range: • CPU • Frequency • Paint color for the equipment housing Therefore, you can set up a master group called ULTRA (Ultrasound products) to include all these products. Now, whenever you work on sales configuration activities for any of the products in this range, you first make sure that you have selected the ULTRA group. In this way, all the variables that have already been used within this group are available to you. When you create a group, you can also set up various defaults and settings that control the way QAD Configurator operates within this group only. For example, you can set up the default number of digits and decimals that are used for numeric variables and features created in the group; you can select a default rounding method; you can specify whether single-level or multilevel product structures are used; and you can specify whether you require QAD Configurator to generate variant routings for products configured in this group. In this way, you can customize the way QAD Configurator operates in a different manner for each group of products. If variant routings are required for some products but not for others, you can create one group with the routings option selected and another with it deselected. You can create as many different groups as you need. When creating a group, you can either create it from scratch, or copy from an existing one. Questions? Visit community.qad.com Configurator Setup 45 Maintaining Master Groups You can use Master Group Maintenance to create, view, edit, or delete master groups. Master groups can simplify and streamline the configuration process. They categorize product data based on products’ common characteristics. Rules and default settings are also for a group of products. Fig. 4.4 Master Group Maintenance Master Group. Enter a name that uniquely identifies a master group, or select a master group from the master group browse. The field length can be up to 20 characters. Start Date. You can specify from which date the master group becomes effective. End Date. You can specify until which date the master group is effective. In the General Settings pane, specify the general settings associated with variant configuration and generation in this group. Allow Multi-Level product structure. Select this option unless all product structures are single- level. Auto Select Product Structure Components. Specify whether you want the system to automatically select components from the generic product structure for the variant product structure. • By default, this field is Yes, which means that the system automatically copies components from the generic product structure to the variant product structure. Comments? Go to goo.gl/MfwKHm 46 QAD Configurator User Guide • If you want to stop the system from automatically selecting components into the variant product structure, set this field to No. In this way, you can prevent components being inadvertently included in the product structure of variant items. Create Variant Routings. Select this option if you want QAD Configurator to create variant routings when generating variant items. Use Standard Options. Specify whether new feature options can be created in addition to the options inherited from variable standard options when maintaining feature options. Select this option to allow only variable standard options to be used as feature options. Clear this option to allow new feature options to be defined in addition to the standard options. UOM. Specify the default unit of measure for variables and features in this group. In the Default Numeric Format Settings pane, specify the default formats for numeric variables and features in this group. You can change the formats when defining specific numeric variables and features later in Variable Maintenance and Feature Maintenance. Digits. Specify a value that defaults to the Digits field in Variable Maintenance when you create a numeric variable. Rounding Method. Specify the rounding method to be used by numeric variables and features. Standard: Rounds a decimal value to a specified number of fractional digits using the standard midpoint rounding method. A value is rounded up when it is equal or greater than the midpoint value and is rounded down when it is less than the midpoint value. For example, 3.1415 is rounded up to 3.142 when it is rounded to three decimal digits but is rounded down to 3.14 when it is rounded to two decimal digits. Up: Always round up a decimal value to a specified number of fractional digits. For example, both 3.141 and 3.148 are rounded up to 3.15 when they are rounded to two decimal digits. Down: Always round down a decimal value to a specified number of fractional digits. For example, both 3.141 and 3.148 are rounded down to 3.14 when they are rounded to two decimal digits. Decimal. Specify the number of fractional digits for numeric variables and features. Allow Negative. Specify whether negative values are allowed for numeric variables and features. Select this option to permit variable and feature values to be smaller than zero; otherwise, clear this option. In the Configurable Item Selection pane, specify the default settings for the variant product rule filter in Variant Product Structure Rule Maintenance. These options are used to filter component items in the product structure when you define variant item product structure rules for a configurable item. See “Maintaining Variant Item Product Structure Rules” on page 114 for details. Copying Master Groups In addition to using Master Group Maintenance to create a master group, you can also create a master group by copying from an existing one. In copying a master group, the system copies all data that is associated with the source master group. Questions? Visit community.qad.com Configurator Setup 47 Note Model publishing settings are also included in the copied data. The following details are intact after copying: • Domain • Source • Sales Configuration • Product Configuration • Routing Configuration However, the system sets the values of the following fields to blank in the new records: • Valid • Date Published • Time • Remarks For more information on model publishing settings, see “Publishing Models Across Domains” on page 156. To create a master group by copying from an existing one, use Master Group Copy. 1 In the Source Group field, specify an existing master group that you want to copy. Fig. 4.5 Master Group Copy 2 In the New Group field, specify a name for the new master group. 3 (Optional) Modify the description for the new master group. If you do not modify it, the new master group uses the description of the source group. 4 (Optional) Specify the start date and end date for the new master group to be effective during a certain period. By default, the date fields are blank. After you click OK, the system copies all data associated with the source group to the new group. Note During the copying process, the system locks both the source group and the target new group. Therefore, during the copying process: • You cannot import or export a model that uses the source group or the target group. • You cannot use Master Group Maintenance for the source group or the target group. Comments? Go to goo.gl/MfwKHm 48 QAD Configurator User Guide • You can still launch Configurator Questionnaire for configurable items in the source group. Maintaining Configurable Items Use Configurable Item Maintenance to create, view, edit, or delete configurable items in QAD Configurator. You can also define some default settings for variant items created from a configurable item. Adding a configurable item in QAD Configurator is a process of selecting a parent item in QAD EA and defining it as a configurable item. Fig. 4.6 Configurable Item Maintenance Configurable Item. Select a configurable item to view, modify, or delete. Click the New button to add a new configurable item. Note In QAD 2008.1 Enterprise and later, configurable items cannot have item replacement records and cannot be memo items. Description. The field displays the description from the QAD EA item details. Lock Configurable Item. Select this option to lock the configurable item so that it cannot be configured in the questionnaire; clear the check box to unlock it. Questions? Visit community.qad.com Configurator Setup 49 SO Type. Designate the configurable item as a product structure, a physical or a phantom kit. The default type is BOM. Note If the configurable item has been designated as a planning item, you cannot change its SO type to Physical or Phantom. BOM: One sales order or quote line is created for the variant item. Physical: A physical kit is used in situations where the kit is pre-assembled and can be placed in inventory. If a configurable item is designated a physical kit, the following applies: • A final assembly item is generated and retained. • A standard product structure is generated and retained. • The first line of the quote or sales order is the top-level kit. The system designates this line as a memo line. The pricing for the entire kit appears on this line. • Each level-one component of the kit has its own quote or sales order line. The line-item quantity is the quantity defined in the kit product structure. The price for each component is $0.00. • Pricing for the kit can use all standard pricing methods including QAD Configurator feature/options based pricing. Phantom: A phantom kit is used in situations where the kit is assembled and shipped using the QAD EA pick list and is never in inventory. For a phantom kit: • No final assembly item or product structure is retained. • Each component of the kit has its own quote or sales order line. The line-item quantity is the quantity defined in the generic product structure or product configuration rule. Pricing for each individual component can be turned on or off in Variant Product Structure Rule Maintenance; for example, a free user manual when a system is purchased. • Pricing for the kit can use all standard pricing methods including QAD Configurator feature/options based pricing. Analyzed. This field indicates whether the configurable item has been processed by the QAD Configurator Analyzer. If it has been analyzed, the other two fields show the date and time the configurable item was last analyzed. You can click the Analyze button to force reanalysis of this configurable item. Variant P/M. Specify the default P/M type of variant items created from the current configurable item. Configurable P/M. Displays the P/M type of the current configurable item. Configuration Selection. Specify the method to be used to select a configuration in the questionnaire for variant items created from this configurable item. When you have finished answering questions in the questionnaire, QAD Configurator displays a browse window showing all the configurations that have the same answers for the configuration key features. It can also highlight one particular configuration in the browse window. You can then select either the highlighted configuration, or another configuration from the list. The options for the selection method are as follows: • Just created configuration: QAD Configurator always highlights the configuration you have created, regardless of the other existing configurations. • Select last matching: QAD Configurator highlights the most recently created matching configuration. Comments? Go to goo.gl/MfwKHm 50 QAD Configurator User Guide • Select first matching: QAD Configurator highlights the oldest matching configuration. Auto Select. Specify whether variant item number is selected automatically by QAD Configurator or manually by the user. Configuration Retention. Specify how QAD Configurator handles generated variant items. Variant Item-Site Record/Site Variable. Specify, for each configurable item, whether to create item-site data along with item master records when the system generates variants from the configurable item, and if so, which sites to use to create item-site data. Note When the item-site data creation feature is disabled during system installation, these two fields are grayed. For information about switching off the item-site data creation feature, see Installation Guide: QAD Configurator. • None: The variants are non-site-specific and there is no variant item-site data. • Current site only: The system generates variant item-site data to a particular site. If you choose this option, make sure that you specify a valid site variable for creating item-site data in the Configurator questionnaire. A valid site variable is a site associated with the configurable item as defined in Item-Site Planning Maintenance (1.4.17) in QAD EA. When you access the questionnaire from a sales order or sales quote, the site variable defaults from the site in the sales order or quote header. However, if the header site is not valid, the site variable then defaults from the default site of the configurable item. When you access the stand-alone questionnaire function, the site variable defaults from the default site of the configurable item. • All sites: The system generates variant item-site data to all the sites that are defined in Item-Site Planning Maintenance. When you create variant items at the end of the configuration process, the system creates the variant item data. Note During variant item creation, the system only copies the item-site planning data from the configurable item to the variant. Item-site inventory and cost data are not copied. It is recommended that you leave the item cost and inventory fields blank when you set up data for a configurable item. During variant item creation, inventory and cost data can be automatically calculated by roll-up. The variant item data depends on the Variant Item-Site Record option you choose for the current configurable item. None Current Site Only All Sites Item master Yes Yes Yes Product structure Yes Yes Yes Routing Yes Yes Yes Cost data (if cost roll-up Yes is selected) Yes Yes Item-site planning data Yes (specific to the Yes (specific to all the specified site) sites associated with the configurable item) Questions? Visit community.qad.com Configurator Setup None 51 Current Site Only All Sites Item-site inventory data Yes (specific to the Yes (specific to all the specified site) sites associated with the configurable item) Item-site cost data (if cost roll-up is selected) Yes (specific to the Yes (specific to all the specified site) sites associated with the configurable item) If the Variant Item-Site Record option is Current Site Only, when you reload an existing configuration with variant items, the system checks whether a different site variable has been specified than the one previously used to generate the existing variant items. If so, the system creates additional variant item-site data specific to the new site variable. Note Configurable items on multiple levels of a product structure cannot share the site variable. Show Existing Configurations. Specify whether and how to display existing configurations in the Configurator questionnaire: • First: Display existing configurations on launching the questionnaire. • Second: Display the new configuration on launching the questionnaire. • On request: When launching the questionnaire, display a message asking the user whether to show existing configurations. • No: Hide the Existing Configurations tab in the questionnaire. Show All Options of Feature. Specify whether to show all feature options. If this setting is selected, the excluded options, which are not available to select, can be seen as dimmed. If this setting is not selected, you cannot see the excluded options. Validate Missing Product Structure Data As. Select Error or Warning from the drop-down list. This field determines whether to report any missing product structure data in the target domain as an error or as a warning during model publishing validation. By default, this field is set to Error. Validate Missing Routing Data As. Select Error or Warning from the drop-down list. This field determines whether to report any missing routing data in the target domain as an error or as a warning during model publishing validation. By default, this field is set to Error. Variant Item Cost Roll-Up. Indicate whether the cost roll-up function is to be applied to this item. Cost Set. Specify the cost set to use in cost roll-up calculations. This field only applies when cost roll-up is in use. Note that the system does not let you roll up an average GL cost set. Calculate Configuration Price. Select the check box if you want to use pricing for this configurable item. If you do not select this check box, there is a Pricing column in the questionnaire, but no pricing information appears. The remaining pricing fields on this screen apply only when you select the Use Pricing check box. Allow Net Price Changes. Select the check box if you want to change the calculated net price for a specific component that is selected in the questionnaire. Note This setting does not apply for the integration of the Configurator questionnaire with QAD CSS (an add-on product for QAD EA). Comments? Go to goo.gl/MfwKHm 52 QAD Configurator User Guide Allow manual price list changes. Select the check box if you want to update the manual price list of a selected component while running the questionnaire. Note This setting is for internal use; it does not work for questionnaire shown in QAD CSS. Store All Pricing Info. Specify how much pricing information is stored by QAD Configurator. If you select this check box, QAD Configurator stores the pricing information of all the components that can be selected in the questionnaire. If you have performance concerns, do not select this check box; then only the pricing information of the actual option chosen is in QAD Configurator. Create a Price List. Specify whether you want the system to create price lists for generated variant items. If you select this option, make sure that you specify list price and net price variables to store price information. Customer Specific List Price. This setting only applies when Create a Price List is selected. By default, this setting is selected when Create a Price List is selected. This setting is to control whether the price list for list price, created by the system, is customer-specific or not. • If this check box is selected, the price list for list price, which is created by the system, is based on the current customer. • If this check box is not selected, the created price list for list price is general, not customer specific. Whether the check box is selected or not, the created price list for net price is always customer-specific. List Price Variable. Specify the variable to store the list price. List price represents the unit price before applicable discounts or markups are applied. This value is used by the system to calculate the net price. The list price is posted to the Sales account during invoice post. If there is a difference between the net price and list price, the difference is posted to the Sales Discount account. Net Price Variable. Specify the variable to store the net price. The net price represents what the customer pays. It prints on all formal documents and helps calculate taxes, sales margins, and commission amounts. Any difference between the list and net price is posted to the Sales Discount account during invoice post. The following table lists the effects of different combinations of choices for Auto Select, Configuration Selection, and Configuration Retention. Questions? Visit community.qad.com Configurator Setup Table 4.1 Field Combination Effects Configuration Selection Auto Select Configuration Retention Just Created Yes Retain all Configurations and Disabled QAD Configurator always creates a variant and keeps all configurations. Just Created No Retain all Configurations and Disabled The Configuration Selection browse is opened and the Just Created Configuration is highlighted. Effect The variant part number selected and accepted in the browse is returned to the SO line. The variant part number is assigned to the new configuration and this new configuration is returned to pcsod_det. If the new configuration is selected and accepted, it creates a variant from this configuration and this configuration is returned to pcsod_det. First matching Yes No Duplicates The first matching configuration (if available) is selected. This variant part number is automatically returned to the SO line (bypassing the Configuration Selection browse). The new configuration is deleted and the selected configuration is returned to pcsod_det. First matching Yes No Customer Duplicates The first matching customer-configuration or first matching configuration (if available) is selected. This variant part number is automatically on the SO line (bypassing the Configuration Selection browse). If a customer-configuration match was found, the new configuration is deleted and the existing resid is returned to pcsod_det. If a configuration match was found for a different customer, the matching variant part number is assigned to the new configuration and the new configuration is assigned to pcsod_det. First matching Yes Retain All Configurations The first matching configuration (if available) is selected. This variant part number is automatically on the SO line (bypassing the Configuration Selection browse). The variant part number is assigned to the new configuration and this new configuration is returned to pcsod_det. Table 4.1 — Field Combination Effects (Page 1 of 4) Comments? Go to goo.gl/MfwKHm 53 54 QAD Configurator User Guide Configuration Selection Auto Select Configuration Retention First matching No No Duplicates Effect The Configuration Selection browse is opened and the first matching configuration (if available) is highlighted. The variant part number selected and accepted in the browse is returned to the SO line. The new configuration is deleted and the selected configuration is returned to pcsod_det. First matching No No Customer Duplicates The Configuration Selection browse is opened and the first matching customer-configuration or, if not available, the first matching configuration (if available) is highlighted. The variant part number selected and accepted in the browse is returned to the SO line. If a customer-configuration match was found, the new configuration is deleted and the existing resid is returned to pcsod_det. If a configuration match was found for a different customer, the matching variant part number is assigned to the new configuration and the new configuration is assigned to pcsod_det. First matching No Retain All Configurations The Configuration Selection browse is opened and the first matching configuration (if available) is highlighted. The variant part number selected and accepted in the browse is returned to the SO line. The variant part number is assigned to the new configuration and this new configuration is returned to pcsod_det. If the new configuration is selected and accepted, the system creates a variant from this configuration and this configuration is returned to pcsod_det. Last matching Yes No Duplicates The last matching configuration (if available) is selected. This variant part number is automatically on the SO line (bypassing the Configuration Selection browse). The new configuration is deleted and the selected configuration is returned to pcsod_det. Table 4.1 — Field Combination Effects (Page 2 of 4) Questions? Visit community.qad.com Configurator Setup Configuration Selection Auto Select Configuration Retention Last matching Yes No Customer Duplicates Effect The last matching customer-configuration or last matching configuration (if available) is selected. This variant part number is automatically on the SO line (bypassing the Configuration Selection browse). If a customer-configuration match was found, the new configuration is deleted and the existing resid is returned to pcsod_det. If a configuration match was found for a different customer, the matching variant part number is assigned to the new configuration and the new configuration is assigned to pcsod_det. Last matching Yes Retain All Configurations The last matching configuration (if available) is selected. This variant part number is automatically on the SO line (bypassing the Configuration Selection browse). The variant part number is assigned to the new configuration and this new configuration is returned to pcsod_det. Last matching No No Duplicates The Configuration Selection browse is opened and the last matching configuration (if available) is highlighted. The variant part number selected and accepted in the browse is returned to the SO line. The new configuration is deleted and the selected configuration is returned to pcsod_det. Table 4.1 — Field Combination Effects (Page 3 of 4) Comments? Go to goo.gl/MfwKHm 55 56 QAD Configurator User Guide Configuration Selection Auto Select Configuration Retention Last matching No No Customer Duplicates Effect The Configuration Selection browse is opened and the last matching customer-configuration or, if not available, the last matching configuration (if available) is highlighted. The variant part number selected and accepted in the browse is returned to the SO line. If a customer-configuration match was found, the new configuration is deleted and the existing resid is returned to pcsod_det. If a Configuration match was found for a different customer, the matching variant part number is assigned to the new configuration and the new configuration is assigned to pcsod_det. Last matching No Retain All Configurations The Configuration Selection browse is opened and the last matching configuration (if available) is highlighted. The variant part number selected and accepted in the browse is returned to the SO line. The variant part number is assigned to the new configuration and this new configuration is returned to pcsod_det. When the new configuration is selected and accepted, the system creates a variant from the configuration and this configuration is returned to pcsod_det. Table 4.1 — Field Combination Effects (Page 4 of 4) Copying Configurable Item Data When you want to set up the sales configuration data for a configurable item, you can copy them from an existing configurable item, and then modify them for the new configurable item. Fig. 4.7 Configurable Item Data Copy Questions? Visit community.qad.com Configurator Setup 57 To copy a configurable item data: 1 Specify the source and target configurable items for the duplication. 2 Specify the sales configuration elements that you want to copy to the new item in the Copy pane. Note To view the feature translations you are about to copy, you can use Feature Language Browse. To view the feature option translations you are about to copy, you can use Feature Option Language Browse. Note When the target item is a kit, you cannot select variant planning item rule to copy. 3 Click OK. When you confirm the copy, the system displays a message about whether to run the Analyzer for the new configurable item. You cannot use the item in the questionnaire until it has been analyzed. But you can change the sales configuration elements that you copied before running the Analyzer. Maintaining External Entities Use External Entity Maintenance to create, view, edit, or delete external entities for use in QAD Configurator. An external entity is a reference to a table in a database. It lets you establish a link between a question in the questionnaire and customer or item-related data in the QAD EA database. It uses a condition to set the answer to the question. When a variable is linked to an external entity, the questionnaire looks up the assigned value of the feature in the specified field of a particular record in the specified database table. The correct record is determined by the selection rule defined for the external entity. Note You can update the records in referenced tables by defining external entity rules. For more information, please refer to “Maintaining External Entity Rules” on page 123. Fig. 4.8 External Entity Maintenance In the Database and Table fields, use the drop-down lists to select the database and table containing the external entity; then select a field from the table. Comments? Go to goo.gl/MfwKHm 58 QAD Configurator User Guide To edit a selection rule: You can either manually type the rule by directly typing the statements in the Rule box or use the Rule Assistant to assist you in the process. See “Using the Rule Assistant” on page 33. Click Check Syntax to validate the rule syntax. If syntax errors are found, error messages display and the status becomes Failed. Click Save to save the rule. On saving the rule, the system performs a syntax check on the rule. If syntax errors are found, error messages display. Questions? Visit community.qad.com Chapter 5 Sales Configuration 61 Discusses the sales configuration process. Sales Configuration Overview Maintaining Question Types 61 Explains how to use Question Type Maintenance. 62 Explains how to use Functional Group Maintenance. Maintaining Functional Groups 63 Maintaining Variables and Features Explains how to use Variable Maintenance, Feature Maintenance, and Feature Sequence Maintenance, as well as how to use system variables. Maintaining Sales Configuration Rules 76 Explains how to maintain general rules. 83 Explains how to maintain general rules in rule groups, and maintain rule-group-specific rules. Grouping Sales Configuration Rules 84 Explains how to link general rules and rule groups to configurable items and how to maintain itemspecific rules. Applying Sales Configuration Rules 86 Discusses the sales configuration rule tables, table limitations, interpolation, and the interpolation process. About Sales Configuration Rule Table Maintaining General Rules Using General Rule Tables 90 Explains how to generate and edit rule tables. 97 Explains how to link rule tables to configurable items and how to maintain item-specific rule tables. Maintaining Item Rule Tables 99 Discusses how the Rule Table Accelerator works and why you use it. Accelerating Rule Tables Sales Configuration Rules Report 100 Explains how to use Sales Configuration Rule Report. 101 Explains how to use Configuration Analyzer and how analysis results are handled in the system. Analyzing Sales Configuration Rules 60 QAD Configurator User Guide Maintaining Questions Sequence 102 Explains how to use Questionnaire Sequence Maintenance. 103 Explains how to use Configuration Key Maintenance and address it to pricing. Maintaining Configuration Keys Where-Used Report 104 Explains how to use Where-Used Report. Questions? Visit community.qad.com Sales Configuration 61 Sales Configuration Overview In the sales configuration process, sales people do the following: • Maintain variables and features that define configurable product characteristics. • Designate how to present features as questions in the guided sales process – questionnaire. • Set up sales configuration rules to ensure that data collected from the questionnaire is valid. Fig. 5.1 Sales Configuration Process Fig. 5.2 Variable/Feature Maintenance Sub-Process Maintaining Question Types You can group or classify questions into different types to manage them more efficiently. Use Question Type Maintenance to create, view, edit, or delete question types. Note Question types are non-domain-specific. Comments? Go to goo.gl/MfwKHm 62 QAD Configurator User Guide Fig. 5.3 Question Type Maintenance Foreground: Questions always appear in the questionnaire; the user answers them. Background: The system can automatically answer the questions according to configuration rules, but the user can also answer them. You can suppress Background questions so that they do not display in the questionnaire. Maintaining Functional Groups Use Functional Group Maintenance to create, view, edit, or delete functional groups. Functional groups are used to categorize variants and features by their functions. For example, you can group features of a computer product into hardware, software, and accessories. You can enter the Functional Group name in any of the QAD-supported languages. Fig. 5.4 Functional Group Maintenance You can also maintain the Functional Group name in multiple languages. For example, you have named one functional group Accessories. Now you want to translate the name into Chinese. You can follow these steps to set up the translation records: 1 Click the String Translation button. Fig. 5.5 String Translation Button 2 On the String Translation screen, select the target language and enter the translation. Questions? Visit community.qad.com Sales Configuration 63 Fig. 5.6 String Translation for Functional Group Name Maintaining Variables and Features Maintaining Variables Use Variable Maintenance to create, view, edit, or delete variables. Fig. 5.7 Variable Maintenance Variable . Enter a variable ID that uniquely identifies a variable in the current master group. Note Enter a variable ID and press Enter or Tab first before you can edit other fields in the screen. Note You cannot use spaces in variable IDs. Use hyphens or underline characters instead, such as pane-color or environment_of_use. Note You cannot use Progress keywords as variable IDs. Comments? Go to goo.gl/MfwKHm 64 QAD Configurator User Guide Copy From Variable. To create a variable, you can also copy from existing variables. Enter the variable ID first, click the Copy From Variable button, and select a variable whose details you want to copy. Data Type. Select a variable data type from the drop-down list. The default data type is numeric. Data type determines the content under the Data Format tab and whether the Variable Options tab appears in the lower pane of the screen. Note Once you have selected a data type, you cannot change it even if you have not saved the variable yet. Extent. Specify the number of times or instances the variable can be used in a questionnaire. For example, you want to collect requirements regarding the colors of body, interior, and seats of a car in the questionnaire, there are two ways you can define variables: • Create three variables: body-color, interior-color, and seat-color. • Or, create one variable color with an extent of 3, and then use it three times in questionnaire and different them by assigning an extent number to each instance: color[1] = body color[2] = interior color[3] = seats However, these relationships are not so obvious when the variable instances display as questions in the questionnaire. Use extent numbers correctly when creating rules that involve variables with multiple extents. Variable Details Use the settings under Variable Details to specify how to generate the variable-related questions. You can further modify these settings at the feature level. Functional Group. Assign the variable to a functional group. Functional groups are used to categorize variables and features and are maintained in Functional Group Maintenance. Question Type. Specify the question type for the variable. Question types are defined in Question Type Maintenance. Short Question. Enter a brief question to display in the questionnaire to prompt for answers relating to this variable. Long Question. Enter a longer question to display in the questionnaire. You can customize the questionnaire to display either short or long questions. Note You can specify short and long questions in any of the QAD-supported languages. The short question can be up to 64 characters long. You can also maintain the question in multiple languages. Click the String Translation button next to the question field, and enter the translation on the String Translation screen. Questions? Visit community.qad.com Sales Configuration 65 Fig. 5.8 String Translation for Option Questions To display the short and long question of each variable in each language, you can use Variable Language Browse. Fig. 5.9 Variable Language Browse UOM. Enter the unit of measure for the variable. This field sets the default for the same field in Variable Options Maintenance. This field is only enabled when data type is numeric, numeric list, or text. Allow Fill-In. Specify whether to display an additional text field for the question related to this variable in the questionnaire. In this way, the question respondent can type in a free-format answer or select an answer from an associated browse, if any. This field is only enabled for text, date, and numeric list variables. For temporary questions, this field is always dimmed. Browse Code. This field is only available when variable data type is text and you have selected Allow Fill-In. You can associate the variable with an existing browse, so that the question respondent can select a value from the browse instead of manually typing in an answer in the questionnaire. You can specify as many as five parameters for the browse in the questionnaire; the parameter can be a variable, a feature, or even a constant. The shortcut keys to bring up the browse in the questionnaire are Alt+B. Browses are created and maintained in Browse Maintenance. For information about creating browses, see QAD Enterprise Applications user guides. Note This setting does not apply for the integration of the Configurator questionnaire with QAD CSS (an add-on product for QAD EA). QAD CSS does not support .NET UI browses. Comments? Go to goo.gl/MfwKHm 66 QAD Configurator User Guide Question or Temporary. Question. If you select this option, users answer the variable-related question on the questionnaire. Temporary. If you select this option, the system stores the information that does not need answers from users. By default, the temporary information does not show on the questionnaire. If you want to see the information, select Show temporary questions on the questionnaire customization screen. Example Area is the product of length and width. You can define a variable called area as temporary, which is calculated from answers to the variables length and width. Then you can use the value of the area variable as a factor in other rules. When variable data type is numeric, or date (current or fixed), the Pricing Part Information pane is available under Variable Details. Pricing Part. Enter an existing item number in QAD EA to associate it with the answer to this question for pricing calculation. Note There is no validation for the value that you enter in this field. You can specify an item for the variable here in QAD Configurator first and then create it in QAD EA. Qty Based. If the type of the variable is numeric, you can select this check box. When you have selected Qty Based, the pricing engine uses feature quantity entered in the questionnaire. See “Pricing” on page 26 for more pricing information. UOM. Enter the unit of measure of the item that is specified in the Pricing Part field. The pricing engine uses it in price calculation. Variable Data Format Different variable data types have different data formats. Note The Data Format pane is disabled for the text and logical data types. Numeric Data Format Numeric data format applies to numeric and numeric list data types. The default values for these numeric settings are defined for the group in Master Group Maintenance, but you can change them for individual variables. Fig. 5.10 Numeric Format Digits. Specify the maximum number of digits for numeric variables and features. The value defaults from Master Group Maintenance. Decimals. Specify the number of fractional digits for numeric variables and features. Questions? Visit community.qad.com Sales Configuration 67 Rounding Method. Specify the rounding method for numeric variables and features. Standard: Rounds a decimal value to a specified number of fractional digits using the standard midpoint rounding method. A value is rounded up when it is equal or greater than the midpoint value and is rounded down when it is less than the midpoint value. For example, 3.1415 is rounded up to 3.142 when it is rounded to three decimal digits but is rounded down to 3.14 when it is rounded to two decimal digits. Up: Always round up a decimal value to a specified number of fractional digits. For example, both 3.141 and 3.148 are rounded up to 3.15 when they are rounded to two decimal digits. Down: Always round down a decimal value to a specified number of fractional digits. For example, both 3.141 and 3.148 are rounded down to 3.14 when they are rounded to two decimal digits. Allow Negative Values. Specify whether negative values are allowed for numeric variables and features. Select this option to permit variable and feature values to be smaller than zero; otherwise, clear this option. Minimum. Specify the minimum value allowed. Leaving it blank means that there is no lower boundary. Maximum. Specify the maximum value allowed. Leaving it blank means there is no upper boundary. Multiplier. Specify a fixed incremental value. Default. Specify the default value for the variable. Date Format The date format settings display when the variable data type is date. Fig. 5.11 Date Format Current. The value of the variable defaults to the date on which the questionnaire is answered. Fixed. The variable value is a fixed date. Specify a default value using the date selection calender to the right. List. When you select this option, the Variable Option tab is enabled to allow you to specify date options for the variable. Comments? Go to goo.gl/MfwKHm 68 QAD Configurator User Guide Element Format Element format settings apply to element type variables. Use the settings to link the variable to a database entity field. Fig. 5.12 Element Data Format Element Type. Specify whether you want to associate the variable with an internal or external entity field. Internal: The Entity option list displays all the tables in the QAD Configurator database. External: The Entity option list displays all the external entities defined in External Entity Maintenance. Entity. Select an entity to associate the variable with. Field. Select a field to link the variable to. Extent. This value is 1 when the selected field is of the array data type in the database. In this case, specify the index number of the field in the array you want to link the variable to. Do not modify the Extent field when its value defaults to 0. Note The lower boundary of the array index range is 1. Variable Options The Variable Options tab displays when the variable data type is text, numeric list, logical, or date with the List date format. Use this tab to maintain options, or selectable values of the variable. Fig. 5.13 Variable Options List The toolbar at the top of the variable options gives you access to all the variable option maintenance functions. You can create, modify, delete options, as well as setting the default option and arranging the order of options. Maintaining Variable Options To create a variable option, click the Create button on the toolbar. To modify an existing variable option, select the option in the list and click the Modify button on the toolbar or double-click the option in the list. Enter variable option information in the Variable Option Maintenance dialogue box. Questions? Visit community.qad.com Sales Configuration 69 Fig. 5.14 Variable Options Maintenance Option. Enter a selectable value as a variable option. What you can enter in this field is determined by the variable data type and data format. For example, if the variable data type is numeric list and the numeric data format is defined as a positive 1-digit number with no decimals, you can only enter a number between 0 and 9. Short Answer. Optionally enter a short answer that represents the option in the questionnaire. Long Answer. Optionally enter a long answer that represents the option in the questionnaire. You can choose whether to display option value, short answer, or long answer when you customize the questionnaire. Note If the variable is of type Text, Logical, Numeric List, or Date (Data Format = List), you can enter the option answers in any of the QAD-supported languages. The short answer can be up to 64 characters long. You can also maintain the answers in multiple languages. Click the String Translation button next to the answer field, and enter the translation on the String Translation screen. Fig. 5.15 String Translation for Option Answers To display the answer for each variable option in each language, you can use Variable Option Language Browse. Comments? Go to goo.gl/MfwKHm 70 QAD Configurator User Guide Fig. 5.16 Variable Option Language Browse Pricing Part. Enter an existing item number in QAD EA to associate it with the answer to this question for pricing calculation. Note There is no validation of the value you enter in this field. You can specify an item for the variable here in QAD Configurator first and then create it in QAD EA. Qty Based. Select this option to use the answer to this question as the item quantity in pricing calculation. UOM. Enter the unit of measure of the item specified in the Pricing Part field. The pricing engine uses it in price calculation. Setting the Default Option The first option you create automatically becomes the default option. As you create more options, you can change the default option by selecting another option and click the Set Default button on the toolbar. Text or numeric list type Variable/Feature can be defined with no default value. Changing the Order of Variable Options To change the order in which to display variable options, use the Move to Top, Move Up, Move Down, and Move to Bottom buttons on the toolbar to arrange the position of the options in the list. To move multiple options around, press and hold down Ctrl to select nonconsecutive options or press and hold down Shift to select a range of consecutive options and use the Move buttons on the toolbar. However, the order here is not necessarily the final one in the questionnaire. You can make further changes in Feature Maintenance to include or exclude some options, add new feature options, and rearrange their order. Maintaining Features Use Feature Maintenance to create, view, edit, or delete features. Questions? Visit community.qad.com Sales Configuration 71 Fig. 5.17 Feature Maintenance Select a group and a configurable item using the binocular buttons on the toolbar. If you select a group that contains no configurable item in it, the system displays an error message and disables the Feature Maintenance screen. To create a feature, click the Copy From Variable button next to the Feature field; then select a variable to associate it with the current configurable item as a feature. To edit an existing feature, enter the feature ID in the Feature field. You cannot delete feature when it is used in any variant planning item rule. Feature Details All the feature details inherit from the selected variable details. You can change this information for the feature. See “Variable Details” on page 64. Similar to Variable Details, Feature Details also supports multiple languages. You can specify short and long questions in any of the QAD-supported languages. The short question can be up to 64 characters long. You can also translate the question from one language to another. Click the String Translation button next to the question field, and enter the translation on the String Translation screen. If the translation is already set up in Variable Details|String Translation, you can see the translation here in Feature Details|String Translation and change the translation for the feature. You can also use Feature Language Browse to display the feature questions that you have set up for each language. Note When you click Save in Feature Details|String Translation, the system: • saves the updated record, and • creates feature translation records for all the languages that have been set up for the variable but not the feature. Comments? Go to goo.gl/MfwKHm 72 QAD Configurator User Guide If you do not set up the translations in Feature Details, the questionnaire displays the translated records that you have set up in Variable Details. In other words, the system uses the following defaulting logic to display translated records for the questionnaire: • If the translation is set up in Feature Details, the system takes the translation from there. • If the translation is not set up in Feature Details but has been set up in Variable Details, the system takes the translation from there. • Otherwise, the system has no translated records to display. Feature Value as Pricing Part When the feature data type is text and you have selected Allow Fill-in, you can use Feature-Based Pricing to calculate pricing for a feature rather than for a feature option. Fig. 5.18 Feature Value as Pricing Part For feature-based pricing, you can use either the Pricing Part field or the Feature Value as Pricing Part check box: • To use the Pricing Part field, enter an existing item number from QAD EA. • To use the Feature Value as Pricing Part check box, you select it and then the system dynamically uses the feature answer on the questionnaire as the pricing part. • When there is already a pricing part and you select the Feature Value as Pricing Part check box, the system prompts you to confirm your action. Fig. 5.19 Feature Value as Pricing Part or Existing Pricing Part • Click OK to use the answer on the questionnaire as the pricing part. • Click Cancel to use the Pricing Part field. For more pricing information, see “Pricing” on page 26. Feature Options Feature options inherit from the options of the selected variable. To include a variable option as a feature option, select its check box on the left and then clear the check box to exclude it from the feature options. Questions? Visit community.qad.com Sales Configuration 73 If you set the Use Standard Options option to Yes for the current group in Master Group Maintenance, you can only use variable standard options as feature options. If you set this value to no, you can modify the variable standard options for the feature or add new options. Fig. 5.20 Feature Options List If you click the Standard Options button on the toolbar, only the variable options are available for this feature. You cannot exclude any of the variable options or add new options for this feature. Click this button again if you want to modify the standard variable options for the feature. You can set default values for features, and then default values are on the Questionnaire. But the questions on the Questionnaire are not answered automatically. To automatically answer the questionnaire, click the Answer All button to answer all the questions using their default options. Note Besides setting the default values in Feature Maintenance, you can also define default values using rules in General Rule Maintenance. You can modify feature options in the same way as you modify variable options. See “Variable Options” on page 68. Similar to Variable Options, Feature Options also supports multiple languages. You can specify short and long answers in any of the QAD-supported languages. The short answer can be up to 64 characters long. You can also translate the answer from one language to another. Click the String Translation button, and enter the translation on the String Translation screen. If the translation is already set up in Variable Options|String Translation, you can see the translation here in Feature Options|String Translation and change the translation for the feature. You can also use Feature Option Language Browse to display the feature option answers that you have set up for each language. Note When you click Save in Feature Options|String Translation, the system: • saves the updated record, and • creates feature translation records for all the languages that have been set up for the variable but not the feature. If you do not set up the translations in Feature Options, the questionnaire displays the translated records that you have set up in Variable Options. In other words, the system uses the following defaulting logic to display translated records for the questionnaire: • When Standard Options is set to Yes: • If the translation has been set up in Variable Options, the system takes the translation from there. • Otherwise, the system has no translated records to display. • When Standard Options is set to No: • If the translation is set up in Feature Options, the system takes the translation from there. Comments? Go to goo.gl/MfwKHm 74 QAD Configurator User Guide • If the translation is not set up in Feature Options but has been set up in Variable Options, the system takes the translation from there. • Otherwise, the system has no translated records to display. Maintaining Feature Sequence Use Feature Sequence Maintenance to set the sequence of feature-associated questions on the questionnaire. The extent to which you can control the sequence is determined by the dependencies among feature options. When the Analyzer processes the sales configuration for a configurable item, it imposes a sequence for the questions. In this way, questions that depend on answers to other feature questions are asked after the questions on which they depend. However, within the constraints of the logical structure of the questions, you can arrange the sequence of feature questions in any way you want. If you specify a sequence that ignores the logical structure, the Analyzer rearranges the sequence so that the logical requirements are satisfied. Fig. 5.21 Feature Sequence Maintenance To change the order of functional groups: Drag and drop the functional group tab your desired position. To change the order of features: Use the Move to Top, Move Up, Move Down, Move to Bottom, and Reverse Order buttons on the toolbar to arrange the position of the features in the list. To move multiple features around, use Ctrl for nonconsecutive features or Shift for consecutive features and use the buttons on the toolbar. When you have finished rearranging the feature list sequence, click OK to save the new sequence. The system then prompts you to run the Analyzer to activate the question sequence in the questionnaire. Questions? Visit community.qad.com Sales Configuration Using System Variables You can use the following exposed system variables when defining sales and product configuration rules. Variable Description Comment sysConfigurableItemID Current configurable Used in both sales and product item ID configuration rules. sysDomainID Current domain ID sysGroupID Current master group ID in Configurator sysUserID Current QAD EA log-in user ID sysUserLanguage Current QAD EA user language code sysConfigurationCmmt Current configuration comment • • sysConfigurationDesc Current configuration description • • sysConfigurationID Configuration ID • • sysExtLaunch Who to launch Configuration Questionnaire • • Comments? Go to goo.gl/MfwKHm When used in sales configuration rules, the variable can be assigned for the configuration comment. Write only. When used in product configuration rules, the variable contains the current configuration comment. When used in sales configuration rules, the variable can be assigned for the configuration description. Write only. When used in product configuration rules, the variable contains the current configuration description. When used in sales configuration rules, the variable contains the reloaded configuration ID for reloaded configurations and is blank for new configurations. When used in product configuration rules, the variable contains the current configuration ID. If the value is EA, Configuration Questionnaire is launched from QAD Enterprise Applications. If the value is a CSS, Configuration Questionnaire is launched from QAD CSS. 75 76 QAD Configurator User Guide Variable Description sysQuestLaunch Where to launch Configuration Questionnaire Comment • • • • If the value is SQ, Configuration Questionnaire is launched from Sales Quote. If the value is SO, Configuration Questionnaire is launched from Sales Order. If the value is CSS, Configuration Questionnaire is launched from QAD CSS. If the value is SA, the Configuration Questionnaire is a stand-alone questionnaire function. sysSOQNumber Sales Order Number Used in product configuration rules. or Sales Quote When used in product configuration Number rules, the variable contains the sales order number or the sales quote number. sysVariantItemID Variant item number • • When used in sales configuration rules, the variable contains the variant item number for reloaded configurations and is blank for new configurations. When used in External Entity Rules, the variable contains the variant item number regardless of whether the configurations are new or reloaded. Maintaining Sales Configuration Rules Maintaining General Rules Use General Rule Maintenance to create, view, edit, or delete general sales configuration rules. Questions? Visit community.qad.com Sales Configuration 77 Fig. 5.22 General Rule Maintenance When creating a rule, you can either build it from scratch, or copy from an existing one and modify it. To copy from an existing rule, click the Copy From Rule button next to the Rule ID field and select the rule you want to copy from in the pop-up browse window. You can then proceed to modify the duplicated rule. You can enter a description for the rule, in any of the QAD-supported languages. You can also maintain the rule description in multiple languages. Click the String Translation button next to the Description field. Then on the String Translation screen, select the target language and enter the translation. When there are translation records, the system uses the translation. When there are no translation records, the system uses the default description. Example The questionnaire respondent uses Chinese. In this case, you set up Chinese records for rule descriptions. Fig. 5.23 General Rule Maintenance Then when the questionnaire respondent logs in as a Chinese user, and the question type on the questionnaire is short or long question, the system displays the rule descriptions in Chinese. Comments? Go to goo.gl/MfwKHm 78 QAD Configurator User Guide Composing Rules To compose conditional and assignment rules: 1 In the Rule Editor pane, select a conditional rule type. If you select Conditional, If, Then, and Else statements display; If you select Assignment, only an Assign statement displays. 2 Edit rule statements. For the IF conditional statements, you can convert them to free format and edit the conditions manually. A conditional rule has at least an If Statement and an Else statement. 3 To add a statement after an existing one, click the + sign next to the statement; to delete an existing statement, click the X sign next to it. 4 To change the order of the statements, click the Move Up or Move Down signs next to the statement to move it up or down. 5 Click the Update button to display the rule you are composing in the Preview pane. Note Once you click the Update button, you cannot modify existing statements in the current rule. However, you can still delete existing statements and add new ones. 6 Click the Check Syntax button to check whether the rule syntax is correct. If the rule is valid, you can see the status Passed under the button. Otherwise, a Rule Check Configuration window pops up displaying detailed error messages. Note The syntax check function only checks the rule in the Preview pane. Any changes you make in the Rule Editor pane are not validated. 7 Click Save to save the rule. Composing Statements in Basic Format To compose a conditional statement: 1 Select a variable from the Variable drop-down list. Only variables pertaining to the current master group are available for selection. 2 Select a variable attribute from the Attribute drop-down list. Variable attributes differ for different types of variables in different statements. 3 Statement Variable Data Type Available Attributes IF numeric, numeric list Value, Min, Max, Default, Multiplier IF text, date, logical, element Value, Default THEN, ELSE, ASSIGN numeric, numeric list Value, Min, Max, Default, Multiplier, Show THEN, ELSE, ASSIGN text, date, logical, element Value, Default, Pricing Qty, Show Select an operator from the Operator drop-down list. Available operators differ for numeric and non-numeric variables in different statements. Questions? Visit community.qad.com Sales Configuration 4 Statement Variable Data Type Available Operators IF numeric, numeric list =, <>, <, >, <=, >= IF text, date, logical, element =, <> THEN, ELSE, ASSIGN numeric, numeric list =, <> THEN, ELSE, ASSIGN text, date, logical, element =, <> 79 Click the icon next to the Values/Options field. A Values/Options window displays. Fig. 5.24 Values/Options Window (Basic Rule Format) 5 If you are composing a simple conditional statement that does not involve additional expressions or calculations (for example, color = red), use the Basic rule format. Enter a value or select an option or multiple options in the Values/Options window, which differs for different variable types in basic mode. • When variable data type is numeric, specify a valid numeric value. • When variable data type is text, numeric list, date list, or logical, select an option or multiple options in the list box. Multiple options represent the OR relationship among selected values. • For text, numeric list and date list type variables, when Allow Fill-in is selected, you can enter a value and use the Add button to add new options to the option list. Then you select the options you want. • For element, current date, and specified date type variables, you can only specify value using the Advanced rule format. 6 If you are composing a more complex conditional statement that involves expressions or calculations (for example, If Length > Width * 2), select the Advanced rule format. Comments? Go to goo.gl/MfwKHm 80 QAD Configurator User Guide Fig. 5.25 Values/Options Window (Advanced Rule Format) Enter an expression in the advanced format value input box either manually or with the help of the drop-down lists above the input box. You can include any valid combination of available variables, variable options, operators, and functions in the expression. Here is an example of a valid advanced-format expression: round((Width * Length)/12) 7 Click OK to close the window and return your specified values to the Value field in the conditional statement. You have completed composing the conditional statement. Composing IF Statements in Free Format If you are composing complex conditional statements that involve expressions or calculations, you can use the free format. To convert all IF statements to free format and manually edit the conditions, select the Free Format check box next to the first IF statement. Then the system converts all conditions that you have composed to free format. You can also go back from free format to basic format, but all changes in the IF statement are no longer there. Fig. 5.26 Free Format Free-format expressions take the form of a Boolean expression, either true or false. You can use all the basic Boolean operators, brackets, ANDs, and ORs, as well as variable names and option names. Option names for text variables are in double quotes, but this does not apply to date list variable options or numeric list variable options. The free-format mode is applicable only to the IF statement of the rule. A rule can contain only one free-format block, which defines the whole of the IF statement. You cannot combine a freeformat IF line with further AND lines for the IF statement in basic or advanced format. The process of composing a free-format expression consists of entering the details of the expression into the expression editor window. The expression can contain any combination of values, variable options, and Boolean operators with correct Progress syntax. The word IF is there automatically (as for basic and advanced expressions). Questions? Visit community.qad.com Sales Configuration 81 Allowing Users to Overwrite Sales Configuration Rules You can control whether rule assignment can be overwritten by question respondents. If Allow User Override is selected, the system allows the rule assignment to be overwritten when users answer questions in the Questionnaire. Fig. 5.27 Allow User Override Example A sales configuration rule is defined as follows and the field Allow Users Override is selected: IF: backup-type = Alkaline THEN: CPU = High When answering questions in the Questionnaire, the user selects Alkaline for the backup-type option; according to the rule, the CPU option is automatically selected as High. But since now the rule assignment allows user override, the user can still select other CPU options, such as Standard. By default, Allow User Override is not selected. Composing Pricing Rules You can compose pricing rules using the Pricing Qty attribute of text, date, logical, and element type variables in THEN, ELSE, and ASSIGN statements. Pricing rules are used to set the quantity to be used by the QAD pricing engine for non-numeric features. Example IF: salesprice <> 0.00 THEN: pump:pricing_qty = pricing ELSE: pump:pricing_qty = 0 The variable pricing is a numeric feature, which gives the quantity of variant items to be configured. This quantity is important because prices for components can differ depending on the number sold. When users answer one of the first questions on the questionnaire, the pricing variable gets its value. The pricing variable is one subset of independent questions. The previous rule states that if the user is selecting a feature option for the feature pump, the pricing engine calculates prices based on the value of pricing entered in the questionnaire. Pricing rules differ from ordinary rules in that the right side of the equation contains a feature instead of an option. In this example, the system uses the value of the feature pricing as the pricing quantity for the pump. Using the value of feature pricing in the right side of the THEN part of the rule is only possible in advanced mode. Comments? Go to goo.gl/MfwKHm 82 QAD Configurator User Guide Defining Warning Messages When constructing sales configuration rules, you can define warning messages to display when a particular rule condition is met during the questionnaire entry process. To define a warning message: 1 Define a logical type variable. 2 Create a sales configuration rule and assign the following function to the variable: showMessageBox(title, message) Where title is the title of the warning message box and message is the warning message you want to display. You can enter the message box title and the message in any of the QAD-supported languages. Example You define a message and the message box title in Chinese. Fig. 5.28 Define Message in Chinese Then when the Chinese questionnaire respondent uses the questionnaire, the system displays the message box title and the message in Chinese. Fig. 5.29 Message Shown in Chinese 3 Attach the rule to an item. When the system processes the rule in the questionnaire, there is a warning message. Using Custom Functions in Sales Configuration Rules The system lets you easily define and maintain custom functions in the pcfunc.i file and use them in sales configuration rule definitions. Custom functions are called and executed when the system processes general rules and item rules containing them. Note Custom functions cannot be called from rule tables. To use a custom function: 1 Edit the pcfunc.i file to define your custom function using Progress. Here is a sample function that converts time from minutes to seconds: function CovertTime returns integer (input Hours as integer): return Hours*60 Questions? Visit community.qad.com Sales Configuration 83 end function. 2 Define a rule in General/Item Rule Maintenance in the advanced mode and assign the custom function to a variable/feature; for example: If TimeUnit = “Minutes” Then Duration = ConvertTime (Hours) Where TimeUnit, Duration, and Hours are all defined variables or features. 3 Use Check Syntax to validate both the rule and the custom function. 4 When you launch the questionnaire for the configurable item, if you set TimeUnit to Minutes and Hours to 2, Duration is 120. 5 Whenever there are any changes to the custom function in pcfunc.i, analyze the configurable item using Configuration Analyzer to make the changes effective. Grouping Sales Configuration Rules Use Rule Group Maintenance to create sales configuration rule groups, link general rules to rule groups, and create rule-group-specific rules. Fig. 5.30 Rule Group Maintenance Maintaining General Rules in Rule Groups To maintain general rules in a rule group: 1 Enter a rule group ID in the Rule Group ID field. 2 All general rules in the current master group are displayed in the general rule list. Click a rule record to view its full statements in the Preview pane. Comments? Go to goo.gl/MfwKHm 84 QAD Configurator User Guide 3 Select the check box next to a rule ID to link it to the current rule group. Clear the check box next to a rule ID to remove the rule from the current rule group. You can see selected rules are grouped under the General Rule node in the Summary pane. 4 Click Save. Maintaining Rule-Group-Specific Rules To create a rule-group-specific rule: 1 Enter a rule group ID in the Rule Group ID field. 2 In the Rule Group Details pane, click the New button on the toolbar. 3 A General Rule Maintenance window displays. Create a rule or load an existing rule; then click OK. See “Maintaining General Rules” on page 76. 4 The rule is added to the current rule group as a rule-group-specific rule. You can see the rule display in the rule-group-specific rule list as well as under the Rule-Group-Specific Rules Node in the Summary pane. 5 Click Save. To remove a rule-group-specific rule from the current group: Select the rule in the rule-group-specific rule list and click the Delete button on the toolbar in the Rule Group Details pane. Applying Sales Configuration Rules Use Item Rule Maintenance to link general rules and rule groups to items and create item-specific rules. Questions? Visit community.qad.com Sales Configuration 85 Fig. 5.31 Item Rule Maintenance Applying General Rules and Rule Groups to Configurable Items To apply general rules and rule groups to a configurable item: 1 Enter an existing configurable item ID in the Configurable Item field. 2 All general rules and rule groups in the current master group are listed in the Item Rule Details pane. Click a rule record to view its full statements in the Preview pane. 3 Select the check box next to a rule ID or rule group ID to link it to the current configurable item. Clear the check box next to a rule ID or rule group ID to remove the link between it and the current configurable item. You can see selected rules and rule groups grouped under the General Rule node and the Rule Group node respectively in the Summary pane. 4 Click Save. Maintaining Item-Specific Rules To create an item-specific rule: 1 Enter an existing configurable item ID in the Configurable Item field. 2 In the Item Rule Details pane, click the New button on the toolbar. 3 A General Rule Maintenance window displays. Create a rule or load an existing one; then click OK. Note that you can enter the rule description in any of the QAD-supported languages or maintain the description in multiple languages. For more details, see “Maintaining General Rules” on page 76. 4 The rule is applied to the current configurable item as an item-specific rule. You can see the rule display in the item-specific rule list as well as under the Item-Specific Rules Node in the Summary pane. Comments? Go to goo.gl/MfwKHm 86 5 QAD Configurator User Guide Click Save. To remove an Item-specific rule: Select the rule in the item-specific rule list and click the Delete button on the toolbar in the Rule Group Details pane. About Sales Configuration Rule Table Rule tables are used as an easy way to enter one or more straightforward rules. Each rule in a rule table specifies an IF-THEN relationship between variables. You cannot enter rules containing ELSE clauses in a rule table. A rule table consists of rows and columns. The intersection of a row and a column is called a cell. Row numbers display on the left. Fig. 5.32 Rule Table The variables that are involved in the relationships in the table are shown above the columns. Because a rule generally consists of a number of clauses, the type of clause to which the variable belongs is shown as well. Each row of the table corresponds to a single rule. The cells on a particular row specify the values of the variables that make up the rule. Suppose you have the following two rules. Rule A: if coolant = standard and usage = industrial then pump = high capacity and power-converter = standard Rule B: if coolant = standard and usage = domestic then pump = medium capacity and power-converter = standard The part of the rule table containing these rules would look like this: coolant IF usage IF pump THEN power-converter THEN 1 standard industrial high capacity standard 2 standard domestic medium capacity standard Rule A corresponds to row 1 in the rule table, and rule B to row 2. Questions? Visit community.qad.com Sales Configuration 87 A rule table can contain one or more conditions (IF variables) and one or more results (THEN variables); the only restriction is that the total number of variables cannot exceed 20. The various clauses that are specified in a table are linked in an AND relationship, as you can see in the previous example. A variable can appear both in the IF clause and in the THEN clause of a single rule table. • An empty cell in an IF clause means that any feature option is OK for the condition. • An empty cell in a THEN clause means that the feature remains as is. • A rule table works only when all features in the IF clauses have values. • Search of a rule table is by the sequence of display. The search stops at the first match; then the system evaluates no further rows. Apart from its actual value, a variable can also have an extent, a minimum value, a maximum value, and a default value. So, specify the variable-ID and the extent of the variable you want to use in a certain clause of a rule, but also the type of value you are testing for (condition) or manipulating (result). The various types of value are called attributes of the variable. Attributes are displayed after variable IDs in the rule table header. A particular variable, is therefore, characterized by the combination of its ID, its extent, and its attribute. It is in fact this combination that can be used only once in a clause; the same variable with another attribute can be used in the same clause without any problem. Example coolant IF (value) housing-height IF (value) housing-height THEN (max) housing-width THEN (min) 1 standard 200 400 100 2 standard 300 400 200 Rules in a table can only be built from the variables that appear in the table. However, a rule in a table need not use every variable that is available in the table. In other words, a column relating to a variable can have empty cells for one or more rules (rows) in the table. Note The rule table functions only check the syntax of the values in the cells. It is possible to enter values that are not in the list of options, and values that are outside the range between the minimum value and the maximum value of a variable. In addition, in the case of item-specific rule tables, it is possible to use variables that are not defined as features for the item. In this way, it is possible to define rule tables for future models. You can move through the cells of a table in the following way. To move one cell to the right, press the Tab key. To move one cell to the left, press the Tab key while holding down the Shift key. To move one cell up or down, use the up arrow and down arrow cursor keys on the keyboard. Continuing down through a column reveals the rows beyond the originally displayed 12. The two Rule Table Maintenance functions, General Rule Table Maintenance and Item Rule Table Maintenance, are used in the same way as the basic Rule Maintenance functions. • You can create a general rule table and link it to one or more items afterward without modifying it. • You can link a general rule table to an item and modify it to make it specific for that item. • You can create an item-specific rule table without using a general rule table as a basis. Comments? Go to goo.gl/MfwKHm 88 QAD Configurator User Guide Rule Table Shortcut Keys You can use shortcut keys to navigate around in a rule table. Press Ctrl+F to perform the search function within a rule table. Press Ctrl+G to go to a specified row and column in a rule table. Rule Table Limitations The number of rows in a rule table is currently limited to 9999, which is the maximum number that can be displayed in the Rule Table Maintenance programs. The number of columns (variables) in a rule table is currently limited to 20. Any mix of condition and result variables, that is, IF and THEN columns, is valid as long as you use at least one condition and one result variable. Cells have the following limitations: • Progress statements and operators are not allowed. • An empty range, specified by only a colon (:) is not allowed. • Ranges and exclusions are not allowed for logical variables. • Rule tables cannot handle empty dates, even for an empty cell. • For a result variable, lists and exclusions are allowed only if the variable is of the type text, numeric, or date list and only if the attribute of the variable is value. Interpolation Interpolation is a method by which the system can determine values for result variables that lie between the specific values that you specify in the rule table. This method only works for rule tables with two numerical conditions (IF clauses) and one numerical result (THEN clause) that have the interpolation switch turned on. Only when real numerical values are entered for the conditions and the result, interpolation works. It cannot handle complex formats such as ranges, lists, and exclusions. If both conditions exist in the rule table, interpolation returns the specified result, but if one or both of the conditions cannot be found, simple linear interpolation is used to calculate the result. For such numerical value rules, the rule table only defines the measure points. The following table shows Production-densities (result) for a given Density (condition 1) and Width (condition 2). Note This is a table of values, not an example of a rule table. Table 5.1 Production Density Width Density 1000 1500 2000 0.8 25 30 40 1.0 32 35 40 2.0 36 42 48 Example If the Density is 0.8 and the Width is 1500, the production density would be 30. However, if the Density was 0.9 and the Width was 1250, there is no specified value in the rule table. Without interpolation, the rule could not provide the required result. Questions? Visit community.qad.com Sales Configuration 89 The next table is similar to the previous one, but expanded with interpolated values for production density. • Bold values represent the measure points from the previous table. • Italic values represent condition-values and calculated result-values that do not exist in the rule table. Table 5.2 Production Density Width Density 1000 1250 1500 1600 2000 0.8 25 27.5 (a) 30 32 40 0.9 28.5 (b) 30.5 (d) 32.5 (c) 34 40 1.0 32 33.5 (e) 35 36 40 1.2 34 36.25 38.5 39.6 44 2.0 36 39 42 (f) 43.2 48 The letters (a) to (f) identify particular cases that are explained later. Interpolation Process The system first determines the closest range (from/to) for both Density and Width. The nearest values are determined by searching in the rule table. For sample values, the ranges are as follows: Density Width Case Value From To Value From To (a) 0.8 0.8 0.8 1250 1000 1500 (b) 0.9 0.8 1.0 1000 1000 1000 (c) 0.9 0.8 1.0 1500 1500 1500 (d) 0.9 0.8 1.0 1250 1000 1500 (e) 1.0 1.0 1.0 1250 1000 1500 (f) 2.0 2.0 2.0 1500 1500 1500 If the given Density equals the From value of Density and the given Width equals the From value of Width (case f), the result can be taken from the rule table without any calculation. The same is true if the given values equal the To values. If only the given Density equals the From value or to value of Density (cases a and e), the system uses interpolation rules to calculate the Width. If only the given Width equals the From value or to value of Width (cases b and c), the system uses interpolation rules to calculate the Density. If the given Density is unequal to the From or To value of Density and the given Width is unequal to the From or To value of Width (case d), it is necessary for the system to calculate two extra points based on either the given Density or the given Width, representing the closest range for either Density or Width. Interpolation rules then provide the calculated result. If the given value for Density or Width is outside the scope of the rule table, it is not possible to calculate a result because the system only handles interpolation, and not extrapolation. Comments? Go to goo.gl/MfwKHm 90 QAD Configurator User Guide Maintaining General Rules Using General Rule Tables Use General Rule Table Maintenance to create, view, edit, or delete Rule Tables. Rule tables provide an easy way to maintain simple rules. You can enter a description for the rule table, in any of the QAD-supported languages. You can also maintain the rule table description in multiple languages. Click the String Translation button next to the Description field. Then on the String Translation screen, select the target language and enter the translation. Fig. 5.33 General Rule Table Maintenance Generating Rule Tables To generate a rule table, you can copy from an existing rule table or create a rule table from scratch. To generate a rule table by copying from existing rule tables, click the Copy from Rule Table button, and select a rule table whose rules you want to copy. After the new rule table is generated, you can edit the table to get the rules that you need. Questions? Visit community.qad.com Sales Configuration 91 To create a rule table from scratch, follow the generation wizard: 1 Select variables and attributes for the IF conditional statements. Fig. 5.34 Rule Table Generation - Step 1 To select a variable into the rule table, click the variable in the Available Variables list box; then double-click the variable’s attribute you want in the Attributes list box to move the variable:attribute combination into the Selected Variables list box. To remove a selected variable from the rule table, double-click it in the Selected Variables list box. You can also select multiple variables and click the Select or Deselect buttons to add them into or remove them from the Selected Variables list. However, when you select multiple variables in the Available Variables list box, only common attributes shared by all the selected variables are available for selection in the Attributes list box. To change the order of variables in the Selected Variables list box, use the Up and Down arrows above the list box. When you have selected all the variables you want, click Next. 2 Set values for the variables for the IF conditional statements. Comments? Go to goo.gl/MfwKHm 92 QAD Configurator User Guide Fig. 5.35 Rule Table Generation - Step 2 To set the value for a variable as a condition, click the variable in the Selected Variables list box and then choose the following actions: • If the variable has options, they display in the Values list box. To select an option as the value for the variable, double-click the option. • To specify a new value for the variable, click the Add Value button and enter a valid value in the Assigned Values list box. • To specify an empty value for the variable, click the Down arrow next to the Add Value button and select Add Empty Value. The values you specify display under the variable node in the Assigned value list box. After you finish assigning values, click Next. 3 Select variables for the THEN statements. Questions? Visit community.qad.com Sales Configuration 93 Fig. 5.36 Rule Table Generation - Step 3 To select a variable into the rule table, click the variable in the Available Variables list box; then double-click the variable’s attribute you want in the Attributes list box to move the variable:attribute combination into the Selected Variables list box. To remove a selected variable from the rule table, double-click it in the Selected Variables list box. You can also select multiple variables and click the Select or Deselect buttons to add them into or remove them from the Selected Variables list. However, when you select multiple variables in the Available Variables list box, only common attributes shared by all the selected variables are available for selection in the Attributes list box. When you have selected all the variables you want, click Next. 4 Set values for the variables for the THEN statements. Comments? Go to goo.gl/MfwKHm 94 QAD Configurator User Guide Fig. 5.37 Rule Table Generation - Step 4 To assign a value to a variable in a THEN statement, click the variable in the Selected Variables list box and then choose the following actions: • If the variable has options, they display in the Values list box. To select an option as the value for the variable, double-click the option. • To specify a new value for the variable, click the Add Value button and enter a valid value in the Assigned Values list box. • To specify an empty value for the variable, click the Down arrow next to the Add Value button and select Add Empty Value. • When Delete Rows is selected, the Add All Values command is enabled. To delete all records with empty variable values, click the Down arrow next to the Add Value button and select Add All Values. The values you specify display under the variable node in the Assigned value list box. 5 Specify a rule table behavior: add, override, or delete rows. 6 When applicable, you can select the Interpolation check box to allow interpolation in the rule table. 7 Click Finish to generate the rule table. Editing Rule Tables After a rule table is generated, edit it to maintain the general rule. Questions? Visit community.qad.com Sales Configuration 95 Fig. 5.38 Editing Rule Table To insert a row into the rule table, click the New button on the toolbar under the Rule Table tab. To delete a row, click the Delete button. Entering Data in Rule Table Cells To enter a value in a cell: First select the cell by positioning the cursor in it. You can then either enter the required expression in the cell, or use the option selection window. Make sure that the expressions you enter in a cell of the rule table conform to the format rules that were defined for the rule tables. The exact choice of formats for a certain cell depends on the type of clause you are specifying and on the type of variable for which you are entering the expression. The following table lists all possible formats and their meaning. Note [..] is used to exclude certain values from a range. Applying this information to the first five entries in the table helps you understand the meaning of the entries in the other rows. Table 5.3 Rule Table Formats Entry Meaning value1 value1 value1|value2|value3 value1 or value2 or value3 value1:value2 >= value1 and <= value2 :value1 <= value1 value1: >= value1 [value1] not value1 [value1|value2|value3] not value1 and not value2 and not value3 [value1:value2] < value1 or > value2 [:value1] > value1 [value1:] < value1 [value1]:value2 > value1 and <= value2 [value1]:[value2] > value1 and < value2 value1:[value2] >= value1 and < value2 :[value1] < value1 [value1]: > value1 [[value1]:value2] <= value1 or > value2 [[value1]:[value2]] <= value1 or >= value2 Comments? Go to goo.gl/MfwKHm 96 QAD Configurator User Guide Entry Meaning [value1:[value2]] < value1 or >= value2 [:[value1]] >= value1 [[value1]:] <= value1 Note In the case of result variables, you can only use lists and exclusions if the type of the variable is text, numeric list, or date list and its attribute is value at the same time. Using the Option Selection Window The option selection window displays the options of the variable associated with the cell you are editing in the rule table to help you enter values for the variable. To bring up the option selection window, click the Options icon on the toolbar. Fig. 5.39 Option Selection Window Numeric/Element. There is an extra fill-in field. Entering a value creates the condition/result variable = value. Text/Numeric List. There is an extra fill-in field in which you can enter a value. The options of the variable are shown in a list. Entering a value creates the condition/result variable = value. Date. There is an extra fill-in field, in which you can enter a date. Use the date format on your operating system. Entering a value creates the condition/result variable = value. Logical. There is an extra check box in the window. The variable, extent, and attribute to which it refers are shown next to it. Select the check box to enter the condition or result variable = yes in the table; deselect it to enter variable = no in the table. The variable is shown above the column; the cell contains yes or no. Select the Exclusion check box to indicate that you want to enter a condition or result of the type Variable <> value (the variable is NOT equal to the value you enter in the cell). This check box is dimmed in the case of THEN variables (except for the following types of THEN variables: text, numeric, date list, provided that their attribute is value) and in the case of an IF variable of the type logical, because using exclusions in these clauses would be meaningless. Questions? Visit community.qad.com Sales Configuration 97 Previewing Rules To preview the rule defined by the selected row in the rule table: Click the Preview button on the toolbar. Fig. 5.40 Rule Preview Accelerating Rule Tables Click the Accelerator button if you want to prepare the table for accelerated searching. See “Accelerating Rule Tables” on page 99. Maintaining Item Rule Tables Use Item Rule Table Maintenance to link general rule tables to items and create item-specific rule tables. Comments? Go to goo.gl/MfwKHm 98 QAD Configurator User Guide Fig. 5.41 Item Rule Table Maintenance Linking General Rule Tables to Configurable Items To link rule tables to a configurable item: 1 Enter an existing configurable item ID in the Configurable Item field. 2 All general rule tables in the current master group are listed. Click a rule table record to view its defined rule in the Preview pane. 3 Select the check box next to a rule table ID to link it to the current configurable item. Clear the check box next to a rule table ID to remove the link between it and the current configurable item. You can see selected rule tables grouped under the General Rule Table node in the Summary pane. 4 Click Save. Questions? Visit community.qad.com Sales Configuration 99 Maintaining Item-Specific Rule Tables To create an item-specific rule table: 1 Enter an existing configurable item ID in the Configurable Item field. 2 Click the New button on the toolbar. 3 A Rule Table Maintenance window displays. Create a rule or load an existing rule; then click OK. Note that you can enter the rule description in any of the QAD-supported languages or maintain the description in multiple languages. For more details, see “Maintaining General Rules Using General Rule Tables” on page 90. 4 The rule table is applied to the current configurable item as an item-specific rule table. You can see the rule table display in the item-specific rule table list as well as under the ItemSpecific Rule Tables Node in the Summary pane. 5 Click Save. To remove an Item-specific rule table: Select the rule table in the item-specific rule table list and click the Delete button on the toolbar. Accelerating Rule Tables Use Rule Table Accelerator to make an indexed search on one or more rule tables possible. When you Use Rule Table Accelerator for a rule table, the Accelerator stores additional information needed for the indexed search in the database. Suppose that you want to delete a rule table. With Rule Table Accelerator, the table deletion is faster. Note The additional information becomes obsolete when the search mode for the rule table changes from indexed to sequential. The change happens whenever the data in the rule table have changed. When a rule table has been accelerated, the system automatically uses an indexed search when searching the table. Rule Table Accelerator can also be used to undo the actions that made such an indexed search possible. In that case, any obsolete information is deleted from the database and then the system can only perform a sequential search. Fig. 5.42 Rule Table Accelerator Comments? Go to goo.gl/MfwKHm 100 QAD Configurator User Guide Rule Table Accelerator can operate on general rule tables or on item rule tables but it cannot accelerate both types of tables at the same time. Select general rule tables if you want to accelerate one or more general rule tables. Select item rule tables if you want to accelerate one or more item rule tables. When you are accelerating item rule tables, also specify from which configurable items you want to accelerate the tables. You can specify one configurable item or a range of configurable items. To indicate which tables you want to accelerate, specify a range by entering tables IDs in the From/To fields of the table ID frame. You can enter a value either by entering it directly in the field or by clicking the Browse button next to the field and selecting the required configurable item or table ID in the displayed list. If you select both one or more configurable items and a range of table IDs, only the tables that satisfy both conditions are accelerated or de-accelerated. Select Accelerate if you want to accelerate one or more tables. If you want to switch from an indexed search to a sequential search, select Undo Acceleration. If you have undone an acceleration for a certain table and you want to use an indexed search on it, run Rule Table Accelerator—using Accelerate—for that table first. Select the Not Accelerated Only check box if you only want to accelerate rule tables that have not yet been accelerated. Deselect this check box if you want to accelerate all rule tables that meet the criteria in the rule tables frame and the table ID frame. Click Save to start the rule table accelerating process. Sales Configuration Rules Report Use Sales Configuration Rule Report to generate reports on sales configuration rules. Fig. 5.43 Sales Configuration Rule Report To run a sales configuration rules report: 1 Select a report category. 2 Specify the range of data and information you want to see on the report. Questions? Visit community.qad.com Sales Configuration 101 3 Specify additional report options, including report detail level, syntax options, and sorting options. 4 Click Run Report. 5 The report displays. Click Print to print the report; Click Save to save it to a file; click Close to close the report. Analyzing Sales Configuration Rules Use Configuration Analyzer to analyze sales configuration rules. Fig. 5.44 Configuration Analyzer Configurable Item. Specify a configurable item or a range of configurable items to analyze. File. Specify an ASCII file that contains the item numbers of the configurable items you want to analyze. Not Analyzed Only. Select this check box to only analyze configurable items that have not been analyzed; otherwise, clear this check box. Reuse Old Analyzer Sequence. Select this check box to reuse the sequences established by past analysis; otherwise, clear this check box. Click OK to start analyzing. When the analysis is complete, the system displays a report specifying the analyzed details of the selected configurable items. The report includes lower level configurable items within the configurable items you select, and gives details of the feature lists for the questionnaire. The report also identifies whether any configurable items were encountered for which no features or rules have been entered. You can print or save the report. If no problems were encountered during the analysis, QAD Configurator updates the status of the analyzed configurable items by modifying the Analyzed fields in Configurable Item Maintenance. If problems were encountered during the analysis, the status of the configurable item remains No in the Analyzed field. Results of the Analysis The Analyzer creates Progress source and object code to be run by the questionnaire. This source and object code contains the Inclusion and Exclusion logic as defined by the rule maintenance functions and the rule tables. Comments? Go to goo.gl/MfwKHm 102 QAD Configurator User Guide The object code files are stored in the directory that was defined as the questionnaire object directory in Configurator Control. Each configurable item has a unique 6-digit object code number (pcpt_rcode). This code is used to create the object code file names and directories specific to that configurable item. Example Consider a configurable item, G1, with an object code number 000100. The directory structure for the object code files looks like this: c:\mfg84gus\mfgdemo\qu000100.r \qu000100\qu0001.r \qu000100\qu0002.r .... The first line specifies the configurable item control program; the following lines specify the feature/rule files 0001 to 9999. For performance reasons, a maximum of 10 features are included in each feature/rule file; then a new file is created. These feature/rule files are stored together in the directory with the object code number preceded by qu. The control program takes care of the process of finding the correct feature/rule file for the questionnaire. The feature/rule object files (.r files) for a configurable item can be deleted, for example, using the Windows File Manager/Explorer, without any problem. The QAD Configurator Analyzer creates them or refreshes them automatically when they are next needed. When there is any doubt about the validity of the object codes, you should always delete them and run the Analyzer again to rebuild them. Maintaining Questions Sequence The sequence in which questions are presented in the questionnaire is determined by the Analyzer. Questionnaire Sequence Maintenance lets you manually rearrange the questions. Questions? Visit community.qad.com Sales Configuration 103 Fig. 5.45 Questionnaire Sequence Maintenance To arrange the question sequence in the questionnaire: Select a configurable item and use the commands on the toolbar to change the order of the item’s features in the feature list. If there are multiple feature groups, click the function group tabs to switch among them. Maintaining Configuration Keys Use Configuration Key Maintenance to specify key features for configurable items that identify unique configurations. To identify unique configurations, and thus unique variant items, specify features that determine whether a particular configuration is unique. You can specify up to twenty features for a configurable item that together form a configuration key. When you run the questionnaire for this item, QAD Configurator examines the options chosen for the configuration key features for previous configurations. The system compares them with the equivalent options chosen for the current configuration. In this way, you can avoid duplication of configurations and variants. Comments? Go to goo.gl/MfwKHm 104 QAD Configurator User Guide Fig. 5.46 Configuration Key Maintenance To specify configuration keys for a configurable item: 1 Specify a configurable item in the Configurable Item field. 2 To set a feature as a configuration key, select it in the Features list box and click Include to move it to the Configuration Keys list box. Click Include All to set all available features as configuration keys. To remove a configuration key, select it in the Configuration list box and click Exclude to move it to the Feature list box. Click Exclude All to remove all configuration keys. 3 Click Save. Configuration Key Maintenance and Pricing In models where pricing is used, it is recommended that you include the customer and all features that are used in pricing rules as key features. This is because prices can vary depending on the customer and quantities of components ordered. Where-Used Report The Where-Used Report provides information on where variables are used in QAD Configurator; that is, which configurable items in which groups use each variable. Fig. 5.47 Where-Used Report Questions? Visit community.qad.com Sales Configuration To run a where-used report: 1 Specify the element you want in the report: • Question type • Rule group • Variable • Feature • Rule • Configurable item Note If you choose Configurable item, planning items appear in a separate section of the report. 2 Specify an ID or a range. 3 Run the report. The report opens and you can print or save it. Comments? Go to goo.gl/MfwKHm 105 106 QAD Configurator User Guide Questions? Visit community.qad.com Chapter 6 Product Configuration 108 Outlines the product configuration process. Product Configuration Overview Maintaining Product Configuration Rules 109 Explains how to maintain variant item number rules, variant item data rules, variant item product structure rules, variant routing rules, variant sales order line rules, and variant sales quote line rules. Maintaining General Product Structure Rules 121 Explains how to use General Product Structure Rule Maintenance. 125 Explains how to use Element Roll-Up Rule Maintenance. Running Product Configuration Rule Report Maintaining External Entity Rules 123 Explains how to use External Entity Rule Maintenance. 124 Describes the system’s rules for allowing the user to define and maintain custom functions and use them in product configuration rules. Using Custom Functions in Product Configuration Rules 125 Explains how to run Product Configuration Rule Report. Running Product Configuration Rule Report 125 Explains how to use Cross-Validation Analyzer. Cross-Validating Rules 108 QAD Configurator User Guide Product Configuration Overview In the product configuration process, engineering personnel define product configuration rules that translate feature data collected from questionnaires into product structures and routings of configured products. Fig. 6.1 Product Configuration Process Product configuration rules include the following rules that the system runs and applies at different stages of the variant creation process during order entry, as illustrated in the diagram below: • Variant item number rules • Variant item data rules • Variant planning item rules • Variant product structure rules • Variant routing rules • Variant sales order line rules • Variant sales quote line rules • General product structure rules • Element roll-up rule • External entity rules Questions? Visit community.qad.com Product Configuration 109 Fig. 6.2 Variant Item Creation and Sales Order/Quote Generation Process Maintaining Product Configuration Rules Maintaining Variant Item Number Rules Use Variant Item Number Rule Maintenance to define how QAD Configurator assigns item numbers to new variant items. Define rules for each configurable item from which you intend to create variant items. The configurable items are items for which you run the questionnaire, and all lower level configurable items in the product structure. Variants of these lower-level items are created in the same process. A variant item number rule can be a combination of the following elements: • Fixed: a string of characters that does not vary with variant item • Character: a separator between elements of the number, such as a hyphen (-) • Current Configurable Item: the number of the current configurable item • Master Configurable Item: the number of the top level configurable item • Field: QAD EA database element field name • Feature: a selected feature for the variant item Comments? Go to goo.gl/MfwKHm 110 QAD Configurator User Guide • Alphanumeric Sequence: alphabetically sequenced character, incremented for each variant item. • Numeric Sequence: a sequential number, incremented for each variant item • Global Alphanumeric Sequence: alphabetically sequenced character, globally incremented for each variant item, regardless of domain • Global Numeric Sequence: a sequential number, globally incremented for each variant item, regardless of domain With the exception of the following, components can be used more than once in a rule, as long as the total length of the number does not exceed 18 character positions. • Alphanumeric sequence • Numeric sequence • Global alphanumeric sequence • Global numeric sequence Also, if you use numeric sequences, you cannot use a global numeric sequence in the rule. The same rule applies to alphanumeric sequences and to global alphanumeric sequences. Fig. 6.3 Variant Item Number Rule Maintenance To edit a variant item number rule: 1 Specify a configurable item in the Configurable Item field. 2 Select from three different variant item number rules. Each Function option represents the point from which a variant item can be created: item (the Variant Product Structure/Routing Generator), sales quote, or sales order. Each configurable item can have up to three different variant item numbering rules. 3 To copy from an existing rule, click the Copy button. In the Copy Rule window, specify a configurable item and select a function option; then click OK. The system copies the selected rule to the current rule. 4 Edit the rule element list in the Rule Details pane. Questions? Visit community.qad.com Product Configuration 111 • To add an element to the list, select an element from the Element drop-down list and click OK. In the pop-up window, supply the value and parameters and click OK. You cannot add more than one numeric sequence and alphanumeric sequence element to a format. Table 6.1 Variant Item Number Definition Parameters Component Parameters to complete in the subsidiary window Fixed Fixed string of characters. Character Separator to use between elements of the number. The default is a hyphen (–), but you can specify another separator if necessary. Current Configurable Item Position from and position to; the specified positions are copied from the current configurable item number. Master Configurable Item Position from and position to; the specified positions are copied from the top level configurable item number. Field The QAD EA database element field name; the position from and the position to; the character values in the specified positions are copied from the specified field. Feature The feature; the position from and the position to: the character values in the specified positions are copied from the value selected for this feature in the questionnaire for the variant item. Alphanumeric Sequence Length, multiplier (increment), and start value. Numeric Sequence Length, multiplier (increment), and start value. Global Alphanumeric Sequence Length, multiplier (increment), and start value. Global Numeric Sequence Length, multiplier (increment), and start value. • To remove an element from the list, select it in the list and click the Remove button. • To adjust the order of elements in the list, click use the Up and Down arrows. 5 After you make changes to the rule elements, the resulting variant item number format appears in real time above the element list. It uses character 9 to represent numbers and x to represent alphabetical characters. Review the format. 6 Click Save to save the current rule. Example A variant item number definition rule consists of the following elements: • Current Configurable Item: positions 1 to 5 • Character: – • Feature: color, positions 1 to 3 • Character: / • Numeric Sequence: length 3, multiplier 1, start value 1 If the current configurable item is 3-100-150, and the color selected for the first variant item is tropical blue, then the first variant item number is: 3-100-tro/001 Comments? Go to goo.gl/MfwKHm 112 QAD Configurator User Guide If the color for the second variant item is sunset orange, then the second variant item number is: 3-100-sun/002 Maintaining Variant Item Data Rules Use Variant Item Data Maintenance to assign values to database fields in newly created variant items. You do this by defining assignment rules for the configurable item, which specify how the values are to be assigned to the database fields. When the Variant Product Structure/Routing Generator creates a variant item for that particular configurable item, it applies the assignment rules defined for that item in order to assign the required database values to the specified fields. After a variant item has been created by QAD Configurator, you can carry out any further maintenance of the database field values for the new item using the QAD EA Item Master Maintenance function. Fig. 6.4 Variant Item Data Rule Maintenance Maintaining Variant Planning Item Rules Use Variant Planning Item Rule Maintenance to define variant planning item selection rules for non-kit configurable items. Variant planning items are used to consume forecast when confirmed sales orders are created for variant items. For configurable items that are physical or phantom kits, when you generate variant items from them, the system adds components of their variant items to the mrp_det table so that they also consume forecasts upon sales order confirm. When you create a variant item by either creating a configuration or modifying an existing one, the system runs the variant planning item rule to add the variant item to the product structure of the planning item as a component with the following values: • Structure Type = “P” (planning) • Forecast Percent = zero to prevent MRP from generating planned orders for the components of the variant item from the forecast of the planning item. • Quantity Per = 1 As Structure Type is P, the system consumes the forecast of the planning item with the variant item order quantity on the sales order line. Questions? Visit community.qad.com Product Configuration 113 When the variant is put on a sales order line and confirmed, the forecast of the planning item, if set up, is consumed by the variant order quantity. For a multi-level product structure, there can be multiple configurable items with their own planning items and selection rules. 1 Specify an existing configurable item and press Enter. The item cannot be a physical or phantom kit. The system validates the item number and displays an error message when: • The item does not exist. • The item is not a configurable item. • The configurable item is a physical or phantom kit. 2 Click the New icon to create a planning item and define selection rule for it. The selection rule in Variant Planning Item Rule Maintenance is optional and if it is left blank, the system always adds variant items to the planning bill of the specified planning item. To edit a selection rule: You can either manually type the rule by directly typing the statements in the Rule box or use the Rule Assistant to assist you in the process. See “Using the Rule Assistant” on page 33. Click Check Syntax to validate the rule syntax. If syntax errors are found, error messages appear. The Status becomes Failed. Click Save to save the rule. On saving the rule, the system performs a syntax check on the rule. If syntax errors are found, error messages display. Fig. 6.5 Variant Planning Item Rule Maintenance Comments? Go to goo.gl/MfwKHm 114 QAD Configurator User Guide Maintaining Variant Item Product Structure Rules Use Variant Product Structure Rule Maintenance to define selection and assignment rules for component items in the generic product structure. By default, if no selection rule has been defined for a component in the generic product structure, the system always selects the component into the variant product structure. If you want to stop the system from automatically selecting components into the variant product structure, use Master Group Maintenance and set the Auto Select Product Structure Components field to No. Fig. 6.6 Variant Product Structure Rule Maintenance To select a component item in a configurable item product structure: 1 Specify a configurable item number in the Configurable Item field. The item’s description displays next to the configurable item number. 2 If the configurable item has a multi-level product structure, do one of the following to view its child components: • Select the number of levels you want to expand the product structure in the Levels drop- down list. • Click the left arrow next to a parent component to display its sub-components. If a component already has selection and assignment rules defined, they are displayed in the Selection Rule and Assignment Rule columns respectively in the product structure table. 3 You can filter the components in the generic product structure. To filter the components: Click the Filter icon next to the Levels drop-down list; then specify in the Filter window which type of components you want to display in the generic product structure. Questions? Visit community.qad.com Product Configuration 115 Fig. 6.7 Variant Product Structure Rule Filter P/M Type. Select the type of items to display as defined in QAD EA. See QAD EA documentation for descriptions of these item types. Include Phantom Items. Clear this check box to exclude phantom items when displaying specified P/M types of items; otherwise, select this check box. Effective Only. Select this check box to filter items using their effective start and end dates. Effective Start Date <= Today <= Effective End Date The system always displays items with no effective start and end dates. Note The default filter settings are defined in Master Group Maintenance. Click OK to apply the filter. 4 Click the component whose selection rule or assignment rule you want to edit. Defining Selection Rules Define selection rules under the Selection Rule Tab. When defining a selection rule, you may have three options: • Create a selection rule from scratch • Use a general selection rule. General selection rules are defined in General Product Structure Rules Maintenance. • Create a selection rule based on a general selection rule. To edit a selection rule: You can either manually enter the rule by directly typing the statements in the Rule box or use the Rule Assistant to assist you in the process. See “Using the Rule Assistant” on page 33. Click Syntax Check to validate the rule syntax. If syntax errors are found, error messages display and the status becomes Failed. Click Save to save the rule. On saving the rule, the system performs a syntax check on the rule. If syntax errors are found, error messages display. To use a general selection rule: Comments? Go to goo.gl/MfwKHm 116 QAD Configurator User Guide Select Use General Product Structure Rule above the Selection Rule box. When a general selection rule is found, it displays in non-editable mode in the Selection Rule box after you confirm to overwrite the existing selection rule. If no general selection rule has been defined for this item, the system informs you that no general selection rule is available. To copy from a general selection rule: Click the Copy from General Rule button to duplicate the general selection rule into the Selection Rule box. If no general selection rule has been defined for this item, the system informs you that no general selection rule is available. To copy a selection rule to the general selection rule: Click the Copy to General Rule button. If no general selection rule has been defined for the item, the current selection rule is duplicated to the general selection rule. If a general selection rule exists for the item, the system notifies you that you cannot overwrite the existing general selection rule. The general selection rule you create this way can be maintained in General Product Structure Rule Maintenance. Defining Assignment Rules Define assignment rules under the Assignment Rule tab. The Assignment Rule tab displays the number of assignment rules for your reference. You can define multiple assignment rules for a component. Fig. 6.8 Assignment Rule List Questions? Visit community.qad.com Product Configuration 117 To create an assignment rule: 1 Click the New button on the toolbar above the assignment rule list. The Assignment Rule Maintenance window displays. Fig. 6.9 Assignment Rule Maintenance 2 Specify a field to which to apply the assignment rule from the Field list, which contains all the fields in the product structure table (ps_mstr) in QAD EA. 3 Compose the assignment rule with the assistance of the Rule Assistant. See “Using the Rule Assistant” on page 33. 4 Click Check Syntax to validate the rule syntax. If syntax errors are found, error messages display and the status becomes Failed. The assignment rule can still be saved without having to pass the syntax check. 5 Click OK to save the rule and close the window. To specify the assignment rule for multiple fields: Use the drop-down list located next to the Field field to move from field to field for specifying the assignment rules. To open an existing assignment rule for editing: Double-click the assignment rule in the assignment rule list or select it and click the Modify button on the toolbar. To delete an existing assignment rule: Select the assignment rule in the assignment rule list and click the Delete button on the toolbar. Maintaining Variant Routing Rules Use Variant Routing Rule Maintenance to define selection and assignment rules for operations in the generic routing. Comments? Go to goo.gl/MfwKHm 118 QAD Configurator User Guide If no selection rule has been defined for an operation in the generic routing, the variant product structure always includes the operation. Fig. 6.10 Variant Routing Rule Maintenance To select an operation of a generic routing: 1 Specify a configurable item number in the Configurable Item field. The item’s description displays next to the configurable item number. The routing table below lists all the operations in the item’s generic routing. If an operation already has selection and assignment rules defined, they display in the Selection Rule and Assignment Rule columns respectively in the generic routing table. 2 Click the operation whose selection rule or assignment rule you want to edit. Defining Selection Rules Define selection rules under the Selection Rule Tab. To edit a selection rule: 1 Type the rule in the Selection Rule box. Use the Rule Assistant to assist you in the process. See “Using the Rule Assistant” on page 33. 2 Click Check Syntax to validate the rule syntax. If syntax check is successful, Status changes from Not Run to Passed. If syntax errors are found, error messages display and Status changes from Not Run to Failed. 3 Click Save to save the rule. On saving the rule, the system performs a syntax check on the rule. If syntax errors are found, error messages display. Questions? Visit community.qad.com Product Configuration 119 Defining Assignment Rules Define assignment rules under the Assignment Rule tab. You can define multiple assignment rules for an operation. Fig. 6.11 Assignment Rule List To create an assignment rule: 1 Click the New button on the toolbar above the assignment rule list. The Assignment Rule Maintenance window displays. Fig. 6.12 Assignment Rule Maintenance 2 Specify a field to which to apply the assignment rule from the Field list, which contains all the fields in the routing detail table (ro_det) in QAD EA. 3 Compose the assignment rule with the assistance of the Rule Assistant. See “Using the Rule Assistant” on page 33. 4 Click Check Syntax to validate the rule syntax. If syntax errors are found, error messages display and the status becomes Failed. 5 Click OK to save the rule and close the window; click OK and Create to save the rule and create another rule. On saving the rule, the system performs a syntax check on the rule. If syntax errors are found, error messages display. To view or edit an existing rule: Comments? Go to goo.gl/MfwKHm 120 QAD Configurator User Guide Double-click the assignment rule in the assignment rule list or select it and click the Modify button on the toolbar. To delete an existing assignment rule: Select the assignment rule in the assignment rule list and click the Delete button on the toolbar. Maintaining Variant Sales Order Line Rules Use Variant SO Line Rule Maintenance to define assignment rules for a configurable item to assign values to sales order details fields of newly created variant item records. Note Make sure that data are valid for the correct business logic in Sales Order Maintenance. You can only assign values to those sales order details fields that do not have default values or calculation logic, such as sod_qty_ord. If you use assignment rules fields such as sod_site and sod_price, QAD EA business logic overwrites them. To define a sales order line rule: 1 Specify a configurable item in the Configurable Item field. 2 Specify a sales order details field with a sod prefix in the Field field. 3 Compose the assignment rule with the assistance of the Rule Assistant. See “Using the Rule Assistant” on page 33. 4 Click Check Syntax to validate the rule syntax. If syntax errors are found, error messages display and the status becomes Failed. Maintaining Variant Sales Quote Line Rules Use Variant SQ Line Rule Maintenance to define assignment rules for a configurable item to assign values to sales quote details fields of newly created variant item records. Note To ensure data validity for the correct business logic in Sales Quote Maintenance, you can only assign values to those sales quote details fields that do not have default values or calculation logic, such as qod_desc. If you use assignment rules fields such as sod_site and sod_price, QAD EA business logic overwrites them. To define rules for a sales quote line: 1 Specify a configurable item in the Configurable Item field. 2 Specify the details field with a qod prefix in the Field field. 3 Compose the assignment rule with the assistance of the Rule Assistant. See “Using the Rule Assistant” on page 33. 4 Click Check Syntax to validate the rule syntax. If syntax errors are found, error messages display and the status becomes Failed. Questions? Visit community.qad.com Product Configuration 121 Maintaining General Product Structure Rules Use General Product Structure Rule Maintenance to define general selection rules for selecting components into variant product structures that are not specific to configurable items. Fig. 6.13 General Product Structure Rule Maintenance To edit a selection rule: 1 Specify a component item number in the Component field. 2 Type the rule in the rule box. Use The Rule Assistant to assist you in composing the rule. See “Using the Rule Assistant” on page 33. Note When using the Rule Assistant General Product Structure Rule Maintenance, an “Unknown Answer” option is available in the Variable Option list. This element translates into /* Unknown Answer */ in the selection rule statement and is used to accept user-provided values that are not valid configurable item features into the selection rule. 3 Click Check Syntax to validate the rule syntax. If syntax check is successful, Status changes from Not Run to Passed. If syntax errors are found, error messages display and Status changes from Not Run to Failed. 4 Click Save to save the rule. On saving the rule, the system performs a syntax check on the rule. If syntax errors are found, error messages display. Maintaining Element Roll-Up Rules Use Element Roll-Up Rule Maintenance to define rules for rolling up non-cost-related data elements when generating variant items. Comments? Go to goo.gl/MfwKHm 122 QAD Configurator User Guide Fig. 6.14 Element Roll-Up Rule Maintenance Master Element (pt_mstr). Specify the database field in the item master table (pt_mstr) to which you want to roll up data elements. Whenever the system creates a variant item and rolls up data elements, the system stores the rolled-up value to this field of the variant item record in the item master table. An item master table field uniquely identifies an element roll-up rule. Take Product Structure Quantities into Account. Select this check box if you want QAD Configurator to automatically correct rolled-up values to take into account required component quantities as defined in the product structure (ps_qty_per). Rule Type. Select whether you want to edit a simple rule in basic mode or a more complex rule in advanced mode. Roll-Up Type. Select Product Structure to roll up component-related data or select Routing to roll up routing-related data. To edit a simple rule: Specify a field data to roll up in a simple rule. Roll-Up Data. Select a table. If you selected the Product Data roll-up type, you can choose from the item master table (pt_mstr) or the product structure master table (ps_mstr) from the drop-down list. If you selected the Routing roll-up type, you can choose from the work center master table (wc_mstr) or the routing operation detail (ro_det) table. Roll-Up Element. Select the field whose data you want to roll up. To edit an advanced rule: 1 Type the rule in the rule box. Use The Rule Assistant to assist you in composing the rule. See “Using the Rule Assistant” on page 33. 2 Click Check Syntax to validate the rule syntax. If syntax check is successful, Status changes from Not Run to Passed. If syntax errors are found, error messages display and Status changes from Not Run to Failed. 3 Click Save to save the rule. On saving the rule, the system performs a syntax check on the rule. If syntax errors are found, error messages display. Questions? Visit community.qad.com Product Configuration 123 Maintaining External Entity Rules Use External Entity Rule Maintenance to assign values to fields in databases defined as external entities. For information on defining external entities, see “Maintaining External Entities” on page 57. Fig. 6.15 External Entity Rule Maintenance To assign values to entity fields: 1 Specify a previously defined external entity. Its database and table information is displayed below. 2 Click a field in the Database Field list to select it. 3 In the Progress Database column, specify whether your QAD EA is running on the Progress database. Select the check box when QAD EA runs on the Progress database. The system assigns values to the selected field in the Progress database based on assignment rule without any truncation. Clear the check box when you are using a database other than Progress. If the value string exceeds the maximum length allowed for that field, the system automatically truncates values assigned to the selected field. 4 Edit the assignment rule for the selected field. a Type the rule in the rule box. Use The Rule Assistant to assist you in composing the rule. See “Using the Rule Assistant” on page 33. Define variables as Features of the given item. Otherwise, the system prompts you to convert the variables to Features; select Yes to map the variables to the features. Comments? Go to goo.gl/MfwKHm 124 QAD Configurator User Guide b Click Check Syntax to validate the rule syntax. If syntax check is successful, Status changes from Not Run to Passed. If syntax errors are found, error messages display and Status changes from Not Run to Failed. c Click Update to display the rule and its syntax check status in the Database Field list. On updating the rule, the system performs a syntax check on the rule. If syntax errors are found, error messages appear. 5 Repeat steps 2 through 4 to define rules for multiple fields. 6 Click Save to save all the changes. Using Custom Functions in Product Configuration Rules The system lets you easily define and maintain custom functions in the pccop.i file and use them in the following product configuration rules: • Variant item data rules (assignment rules) • Variant product structure rules (selection rules and assignment rules) • Variant routing rules (selection rules and assignment rules) • Variant SO line rules (assignment rules) • Variant SQ Line rules (assignment rules) • External entity rules (assignment rules) • General product structure rules (selection rules) Custom functions are called and executed when the system processes the rules containing them. To use a custom function: 1 Edit the pccop.i file to define your custom function using Progress. Here is a sample function: function AddDesc return character (input cName as character): return "This is a new variant of item " + cName. end function. 2 When defining product configuration rules, you can use the custom function by passing parameters to it; for example, assign the following to the pt_desc1 field of a particular configurable item: AddDesc(“A01”) 3 Use Check Syntax to validate both the rule and the custom function. 4 When the system applies the rule to the variant item generation process, the function is executed and returns a value. In the previous example, the description of the new variant item would be “This is a new variant of item A01.” 5 Whenever there are any changes to the custom function in pccop.i, you need to run Batch Compiler for the configurable item to make the changes effective. Questions? Visit community.qad.com Product Configuration 125 Running Product Configuration Rule Report Run Product Configuration Rule Report to view detailed product configuration rule information. This function lets you generate reports that display any types of product configuration rules associated with a specific range of configurable items and components. You can also choose whether to show validated rules or rules that have failed validation, or both. The tool helps you manage and analyze product configuration rules. Fig. 6.16 Product Configuration Rule Report Cross-Validating Rules Use Cross Validation Analyzer to check if the product configuration rules and rules match features and rules in sales configuration. This analyzer detects any discrepancies between the two modules and produces a report. Fig. 6.17 Cross Validation Analyzer Comments? Go to goo.gl/MfwKHm 126 QAD Configurator User Guide Configurable Item/To. Specify a configurable item or a range of configurable items for which you want to run rule cross validation. When the field is blank, the system checks all configurable items. First Level Component Only. Select this option if you want to only perform cross-validation only for the first-level components in a generic product structure. Otherwise, the system performs cross-validation for all levels of components in the generic product structure. Variant Assignment Rules. Specify whether to check variant assignment rules. Variant Item Number Definitions. Specify whether to check if a variant item number exists for every configurable item in the generic product structure. Check Rule Syntax, Check Feature. Select the rules and/or features you want to check for. Validate Orphaned Rule, Delete Orphaned Rule. Select these two options if you want to validate and/or delete the orphaned rules. Note The routing checks are available only when you have selected the Routings field in Master Group Maintenance for the group. Click OK to run the Cross Validation Analyzer. When the analysis is complete, you can see an analysis report. Questions? Visit community.qad.com Chapter 7 Configuration Questionnaire 128 Describes the contents of the questionnaire window. Launching Questionnaire Navigating in Questionnaire 129 Describes the default organization of the questionnaire UI. 131 Explains how to exit the questionnaire module. Exiting Questionnaire Variant Item Configuration Workflow 132 Illustrates the workflow and describes the steps required to configure a variant item. 133 Explains how to use the Existing Configurations tab, browse through configurations, search for configurations, order an existing variant item, create a variant item from existing configurations, load an existing configuration, and create a configuration. Using Standard/Existing Configurations 139 Describes the Configure Item screen and details how to answer questions, review answer summaries, edit comments, and customize the questionnaire. Configuring Item 145 Explains how to use the Configuration Summary Screen, review current configurations, view similar configurations, and submit configurations. Reviewing and Submitting Configuration 128 QAD Configurator User Guide Launching Questionnaire You can launch the configuration questionnaire in either of the following ways: • Use Configuration Questionnaire • In Sales Order Maintenance or in Sales Quote Maintenance, specify a configurable item in the order line or the quote line Note Selecting a variant item in the order line or the quote line does not trigger the configuration process. When launching the Questionnaire from Sales Order Maintenance or Sales Quote Maintenance, you can only specify a configurable item in an active group. Note An active group is a group whose start date is no later than the current date and end date is no earlier than the current date. If the configurable item is linked with multiple active groups, by default the system displays the master group that has the latest start date. Fig. 7.1 Default Active Group You can also click the drop-down button to select another active master group. The system displays the active groups sorted by the start date in descending order. Fig. 7.2 Selecting a Group Then you can use the Questionnaire for the configurable item. Questions? Visit community.qad.com Configuration Questionnaire 129 Fig. 7.3 Configuration Questionnaire The title bar of the Configuration Questionnaire window displays the following information: Group. The group that the configurable item you are configuring belongs to. Groups are defined using QAD Configurator’s Master Group Maintenance function. Customer. Shows which customer you are configuring the item for. It is the same customer ID in the Sold-To field in the header of the sales order or sales quote from which Questionnaire was launched. Item. Shows the configurable item that you are configuring. It is the same configurable item number that you selected in Sales Order Maintenance (7.1.1) or Sales Quote Maintenance (7.12.1). Navigating in Questionnaire The Configuration Questionnaire user interface organizes task-oriented information under the following tabs: • Standard Configurations • Existing Configurations • Configure Item • Configuration Summary By default, when the Questionnaire window is launched, you see the Existing Configurations screen first. The Configure Item and Configuration Summary tabs are disabled; after you reload a configuration or create a configuration, you can then switch to these two tabs. However, by using the Show Existing Configurations option in Configurable Item Maintenance, you can specify whether you want to see the Existing Configurations screen first. Comments? Go to goo.gl/MfwKHm 130 QAD Configurator User Guide Show Existing Configurations. Specify whether and how to display existing configurations in the questionnaire: • First: Display existing configurations on launching the questionnaire. • Second: Display the new configuration on launching the questionnaire. • On request: When launching the questionnaire, display a message asking the user whether to show existing configurations. • No: Hide the Existing Configurations tab in the questionnaire. The Standard Configurations screen shows the standard configurations that the manufacturer recommends. They make it easier for a customer to order configured items. For example, standard configurations can be popularly ordered configurations in the past, or some particular configurations that a marketing campaign wants to promote. See “Maintaining Standard Configurations” on page 170 for more information about standard configurations. The following diagram depicts all possible navigation flows of screens in your configuration process. Squares represent Questionnaire screens, lines represent actions that trigger flows among screens, and the diamond represents the Show Existing Configurations setting that changes your flow. As the figure shows, the configuration process is not linear. You can skip some steps or revert to a previous step. When you perform an action that endangers the current configuration process and current configuration data, the system gives you a warning message. Fig. 7.4 Questionnaire Screen Navigation Questions? Visit community.qad.com Configuration Questionnaire 131 Exiting Questionnaire You exit the Questionnaire module when you either complete or cancel the configuration process. When you have gone through all the configuration steps and successfully submitted your configuration, the Questionnaire window closes. And a variant item number is returned to the Item Number field in the order line in Sales Order Maintenance or Sales Quote Maintenance. This variant item number could be an existing variant item number or a newly created variant item number, depending on the configuration you submitted. You can cancel at any point in the configuration process by clicking the Cancel button in the Questionnaire screen. A confirmation window appears. Fig. 7.5 Exit Confirmation When you cancel the configuration process, the Questionnaire window closes and no item number is returned. You can then select a different item in the order line in Sales Order Maintenance or Sales Quote Maintenance. Or you can launch the Questionnaire window again to continue with the original configurable item number. Note Do not exit Questionnaire by clicking the Close Window button (X) in the upper right corner of the Questionnaire window or pressing Alt+F4. You are not prompted to confirm the exit this way and may lose your changes to the configuration. Comments? Go to goo.gl/MfwKHm 132 QAD Configurator User Guide Variant Item Configuration Workflow The following diagram outlines the variant item configuration workflow. Fig. 7.6 General Item Configuration Workflow A typical configuration workflow is as follows: 1 View standard configurations in the Standard Configurations screen or existing configurations in the Existing Configurations screen. Before you start configuring an item for a customer, you can browse through standard configurations in the Standard Configurations screen or existing configurations in the Existing Configurations screen. There are possibly existing variant items associated with the current configurable item and you can use these configurations or modify them to get a similar configuration to meet your specific requirements. If you find a variant item that exactly matches your requirements, you can directly submit it to add it to the sales order line and skip all the subsequent configuration steps. If you find a configuration that exactly matches your requirements, but no variant item has been created from it, you can create a variant item based on this configuration. And then you can add it to the sales order line. Questions? Visit community.qad.com Configuration Questionnaire 133 If you find a configuration that partially matches your requirements, reload the configuration into the questionnaire and then customize the configuration in the Configure Item screen. After the customization, you can proceed to review and submit the configuration to create a variant item from it. If a saved configuration is unfinished, you can load it to complete the configuration. If there is no configuration that you can reuse, create a configuration from scratch. 2 Configure a variant item in the Configure Item screen. Whether you reload an existing configuration or create one from scratch, you customize your configuration in the Configure Item screen. Answer a list of questions that correspond to the current configurable item features, and when you finish answering the questions, you have created a configuration. You can then proceed to review and submit it. 3 Review and submit configuration in the Configuration Summary screen. After you have completed the Questionnaire questions, review the complete configuration summary information to make sure that everything is correct. If you find errors in your answers, you can always go back to the Configure Item screen to correct your answers. Unanswered questions and answers that conflict with variable rules prevent successful submission of your configuration. You can view similar configurations by filtering existing configurations using your configuration as a criterion. You can then choose to order a similar variant item, create a variant item from a similar configuration, or continue with your own configuration. Unless you set the Show Existing Configurations option to No in Configurable Item Maintenance, the system finds existing configurations that match the configuration based on configuration keys. You can choose either to create a variant item using your configuration or associate an existing item number with your configuration. Using Standard/Existing Configurations Before you start configuring an item for a customer, you can browse through standard configurations in the Standard Configurations screen or existing configurations in the Existing Configurations screen. There are possibly existing variant items associated with the current configurable item and you can use these configurations or modify them to get a similar configuration to meet your specific requirements. Note The Show Existing Configurations option in Configurable Item Maintenance determines whether and how the Existing Configurations tab is displayed in the questionnaire. This section assumes that the Show Existing Configurations option is set to First. For details about this option, see “Maintaining Configurable Items” on page 48. Comments? Go to goo.gl/MfwKHm 134 QAD Configurator User Guide Fig. 7.7 Viewing Standard Configurations in Standard Configuration Screen Note Now that QAD CSS and QAD Configurator are integrated, there can be configurations that CSS users create. For example, in Figure 7.7, CSS_demo in the User ID field indicates that a CSS user created the configuration. The prefix CSS_, as in CSS_demo, can be modified in the cssUserPrefix.i file under the ConfiguratorWebSpeedInstallDir/src/webconf directory. After you compile the Configurator WebSpeed files, the prefix modification takes effect. Browsing Standard/Existing Configurations For standard configurations in the Standard Configurations screen or existing configurations in the Existing Configurations screen, the key attributes and all item features are displayed for each configuration. Configuration ID. Configuration ID uniquely identifies a configuration stored in the system. Variant Item. A variant item number uniquely identifies a variant item created in the system. A configuration ID is associated with a variant item number only when a variant item has been created from the configuration. Note When the Questionnaire is not launched from CSS, and the variant item has inventory on hand or on order, the system displays a View Available Inventory icon next to the variant item number. Click this icon to open a browse that lets you view and search available inventory records for the variant item. Customer. Specifies which customer this configuration was created for. Status. Specifies the status of the configuration. O: The configuration has not been completed yet—that is, not all required questions in the Questionnaire have been answered. You can load and proceed with the configuration. Unfinished configurations cannot be used to create variant items. Questions? Visit community.qad.com Configuration Questionnaire 135 F: The configuration has been completed. You can load the configuration to modify it or directly create a variant item from it. Note Standard configurations are completed configurations, so the status for standard configurations is always F. List Price. Displays the list price of the configuration. QAD Configurator calculated the list price when the configuration was created. You can reprice it when you load the configuration to bring the list price of the configuration up-to-date. Net Price. Displays the net price of the configuration. QAD Configurator calculated the net price when the configuration was created. You can reprice it when you load the configuration to bring the net price of the configuration up-to-date. Create Date. Shows when the configuration was created. User ID. Shows which QAD Configurator user created this configuration. Description. Provides a brief description of the configuration. Item Features. All features of the current configurable item are listed along with their values. By default, five configuration records are displayed on each page. You can use the Item Per Page value at the bottom of the screen. If the configuration display exceeds the screen size, use the horizontal scroll bar at the bottom of the grid to view all configuration records. If there are multiple pages, use the navigation controls at the bottom of the screen to page through the records or jump to a specific page. The existing configurations grid provides flexible ways to display configuration records and lets you easily compare configurations. You can change the position of a configuration record by dragging and dropping its configuration ID column header. This way, you can place configurations of interest side by side for easy feature comparison. You can also sort configuration attributes and features by clicking the column header displaying the configuration ID. Searching for Configurations The Questionnaire .NET UI provides extensive, configurable search capabilities that let you create both simple and complex queries. Fig. 7.8 Configurations Search Box 1 Initially, one search condition displays. Choose the attribute or feature that you want to search from the drop-down list. 2 Choose a search operator from the drop-down list. The search operators include the following: • equals • no equals • greater than Comments? Go to goo.gl/MfwKHm 136 QAD Configurator User Guide • less than • is null • is not null • range • starts at • contains 3 If you choose the Range operator, enter a beginning value of the range in the first search box. Optionally, enter an ending value of the range in the second search box. 4 Click Search. 5 To refine your search further, click the plus (+) icon to add another search row. You can add as many rows as needed, each with different search values and operators. Note When you specify several criteria, multiple criteria for the same field are treated as a logical AND condition. 6 To remove a search criteria row, click the delete (X) icon. Ordering an Existing Variant Item If you find an existing variant item that exactly matches your specific configuration requirements, you can directly order the variant by clicking the Order This Item icon next to the variant item number. This action closes the Questionnaire window and returns the variant item number to the item number field in the Sales Order Maintenance or to the Sales Quote Maintenance order line. Existing variant items are configuration records that have variant item numbers and are marked with the F status. Run SO/SQ Line Rules for Ordering Existing Variant Items SO/SQ Line rule is executed both when creating a variant item and ordering an existing variant item. Selecting an existing variant item sets default values for the line fields. The following list describes the cases when the SQ/SO Line rule is executed: • When the user clicks the Order icon on existing configuration lists • When the user clicks the Order icon on the similar configuration lists • When the user clicks the Order icon on the Save Variant Item pop-up window • When the program finds a matching variant item and selects it automatically, due to the auto- selection clause setting Check and Recreate Price List for Ordering Existing Variant Items If you order an existing variant item from QAD Configurator, the system first checks whether there are any valid price lists. If there are none, QAD Configurator creates a price list to make sure that the correct price is provided to the SO/SQ line. To enable this function, set Create Price List in Configurable Item Maintenance to Yes. Questions? Visit community.qad.com Configuration Questionnaire 137 Creating a Variant Item If there is a configuration that you can reuse but no variant item has been created from it, you can create a variant item by clicking the Create Variant icon next to the Configuration ID. Then the system returns the newly created variant item number to the Sales Order Maintenance or Sales Quote Maintenance order line. The system creates variant items only from completed configurations (status F). For incomplete configurations with a status of O, complete them first before item creation. Creating a Variant Supplier Item In the Enterprise Material Transfer (EMT) process, supplier item is the cross-reference to convert Primary Business Unit (PBU) SO line items into Secondary Business Unit (SBU) SO line items. In other words, to support EMT, setting up the supplier items at the PBU is required so that EMT purchase orders transmitted to the SBU reference the correct item numbers. If the item is configurable, you can create a variant supplier item. 1 In Configurable Item Maintenance, make sure that the following fields are selected correctly for the configurable item. Variant Item-Site Record. Select Current Site Only or All Sites. • When you want to create the supplier item on a particular site, select Current Site Only. Otherwise, select All Sites. Site Variable. If you have selected Current Site Only, specify a valid site variable. Note A valid value for the site variable is a site associated with the configurable item as defined in Item-Site Planning Maintenance (1.4.17). 2 Use Supplier Item Maintenance (1.19) to a create supplier-item relationship. Item Number. Enter the configurable item number. Supplier. If you have specified a site variable in Configurable Item Maintenance, enter the same site code as your answer for the variable on the questionnaire. If you did not specify any particular site in Configurable Item Maintenance, leave the field Supplier blank here. Example You have specified a site variable supsite in Configurable Item Maintenance. For the variable supsite, there is a question Supplier Site on the questionnaire. If the answer for the question Supplier Site is 10-300, enter 10-300 as the supplier site in Supplier Item Maintenance. The system creates the supplier item for supplier site 10-300. Example You selected All Sites in Configurable Item Maintenance. Leave the Supplier field in Supplier Item Maintenance blank. The system creates the supplier item for all suppliers. Supplier Item. Enter the configurable item number. In a simple EMT scenario, PBU and SBU are in different sites but are within the same domain, and the item number is the same for both business units. Comments? Go to goo.gl/MfwKHm 138 QAD Configurator User Guide Fig. 7.9 Supplier Item Maintenance 3 Use Configuration Questionnaire to create a variant item. When the system creates a variant item, the system populates the configurable item in the supplier-item relationship with the new variant item. For example, when the system has created variant items for the configurable item 01040, the variant supplier items are there as well. Fig. 7.10 Supplier Item Browse Reloading a Configuration You can reload a configuration in the Standard Configurations screen or Existing Configurations screen, and modify it in the Questionnaire. To reload an existing configuration, click the Reload Configuration icon next to the Configuration ID. This action directs you to the Configure Item screen, which displays all the configuration questions and answers. • If you reload a finished configuration with a status of F, the system creates a duplicate of the existing configuration with a new configuration ID. All the questions and answers in the Questionnaire are the same, but the configuration is a new copy of the original configuration. Note Standard configurations are always finished configuration with a status of F. • If you reload an incomplete configuration with a status of O, the system loads the original configuration with the same configuration ID. Creating a New Configuration To create a configuration from scratch, click the New Configuration button in the Existing Configurations screen to go to the Configure Item screen. Questions? Visit community.qad.com Configuration Questionnaire 139 Configuring Item Whether you reload a configuration or create one from scratch, you customize your configuration in the Configure Item screen. In customizing your configuration, you answer a list of questions that correspond to the current configurable item features. Fig. 7.11 Configure Item Screen Comments? Go to goo.gl/MfwKHm 140 QAD Configurator User Guide Answering Questions In the Configure Item screen, questions are grouped under corresponding functional group tabs. Note When there are multiple language records for functional group names, option questions, option answers, and user messages, the questionnaire shows in the language of the user who runs the questionnaire. For more information about multi-language support, see “Maintaining Functional Groups” on page 62, “Variable Options” on page 68, and “Feature Options” on page 72. As a questionnaire respondent, you can switch among different functional group tabs to view and answer questions. If no functional group is defined, all questions are listed under a single tab. By default, foreground questions are displayed in the short question format. You can customize the questionnaire settings to display temporary and background questions as well, and show questions in the long question format. You can also specify how many dependency levels of questions to display in the questionnaire. For more details, see “Customizing the Questionnaire” on page 143. Next to the Customization button, there is a Calculate Prices button. If Calculate Pricing in Configurator Control is set to No, the system does not automatically calculate the price. The questionnaire respondent can use the Calculate Prices button on the questionnaire to manually calculate the price. However, regardless of how this Calculate Pricing field is set, after you save a configuration, the system always calculates the configuration price. Fig. 7.12 Calculate Prices Button For multiple levels of questions, since higher-level questions depend on lower-level questions, the system disables lower-level questions until the customer answers higher-level questions. Default answers are highlighted but are not automatically selected or entered for foreground questions. If there is a value range for the answers, the beginning and end values of the range appear next to the question. You can use them as reference to provide valid answers. When the system applies rules to restrict possible selection of the question options and there is only one choice remaining, the system automatically selects that choice. The automatic selection of the last remaining option by the system has the same effect as you manually selecting that option. To reset questions, click the Reset button to revert all the questions to the unanswered state. Questions? Visit community.qad.com Configuration Questionnaire 141 To automatically answer the questionnaire, click the Answer All button to answer all the questions using their default options. If you provide invalid answers or your answers violate the option dependency rules, you can see red error icons on relevant tabs. You can also see the error messages. Fix all errors to complete the questionnaire. Fig. 7.13 Error in Configuration Questionnaire Yellow warning icons on tabs means that not all questions are answered for the configuration. You can save the configuration before answering all questions. But you are required to answer all questions to complete the questionnaire and create a variant item. Comments? Go to goo.gl/MfwKHm 142 QAD Configurator User Guide Fig. 7.14 Saving Configuration Before Completing the Questionnaire Reviewing Answer Summary The hideable Summary panel lets you review at a glance all the answers you have provided so far in the process of answering questions. At the top, the Summary panel displays the current configuration ID and item price information. Item price is updated each time you answer a question. You can customize the Questionnaire settings to specify which type of price information you want to see. The summary panel includes a running summary of questions and answers you have supplied for each functional group. You can click a question in the panel to access it, making it easy to locate a question and navigate in the questionnaire. Viewing Question Rules If a question has rules, the questionnaire respondent can see a question mark icon next to it. To see the rule information, move the cursor over the icon. • When the question is the question ID, the questionnaire respondent sees the rule itself. • When the question is a short or long question, the questionnaire respondent sees the rule description. For more information about how to customize the questionnaire to show different types of questions, see “Customizing the Questionnaire” on page 143. Questions? Visit community.qad.com Configuration Questionnaire 143 Multiple-language support is available for the rule description. For more information about how to set up multiple-language records for the rule description, see “Maintaining General Rules” on page 76. Note The configuration questionnaire shown in QAD CSS does not display the question mark. Therefore, if you want question rules to be shown, include the question rules in the question description. Fig. 7.15 Question Help Editing Comments To view or edit a comment for a configuration, click the Edit Comment button. In the Comment widow, edit the comment description or details. You can search for configurations in the Existing Configurations screen based on the comment description. Fig. 7.16 Comment Window Customizing the Questionnaire You can customize whether to display certain elements in the questionnaire and how they are displayed. To customize the questionnaire, click the Customize icon next to the message bar in the Configure Item screen. A Customize screen displays. Change the settings and click OK to save your changes. Note Display settings only apply to the Questionnaire window you are currently working in. Your customized settings are not saved when you exist Questionnaire. Comments? Go to goo.gl/MfwKHm 144 QAD Configurator User Guide Fig. 7.17 Customize Screen Show temporary questions. Specify whether to show temporary questions in the questionnaire. QAD Configurator automatically answers temporary questions according to rules. The default is No. Show background questions. Specify whether to show background questions in the questionnaire. Background questions are questions that always have default answers and that the user is not required to answer. However, users can manually answer background questions and override default answers. The default is No. Show question type. Specify whether to display long questions and answers or short questions and answers in the questionnaire. Short questions and answers are displayed by default. Show low level questions. Specify whether to show low-level questions in the questionnaire. Question levels are determined by question dependencies. A lower-level question depends on the answers to a higher-level question and cannot be answered before the higher-level question is answered. • Yes: Low-level questions appear on the questionnaire. You can specify the number of levels to display. The default is 100. • No: Only the first-level questions appear. Show all options of feature. Specify whether to show all feature options. If this setting is selected, the excluded options, which are not available to select, can be seen as dimmed. If this setting is not selected, you cannot see the excluded options. Select the setting if you want to facilitate diagnosing configuration errors. The default value of the option is inherited from the setting of the current configurable item in Configurable Item Maintenance. Show price info. Specify whether to show price information for the item being configured. Price is not displayed by default. Note If your transaction currency is different from the domain currency, the system converts the price from the domain currency and displays it in the transaction currency. Price type. Choose the type of the price to be calculated for the item being configured. Pricing method. Specify the method to use to calculate and display the price of the configuration. Questions? Visit community.qad.com Configuration Questionnaire 145 Absolute: The item price is calculated by adding up the prices of all the components in the item based on configuration answers. Relative: The item price is displayed as a price variance relative to the default item price. Reprice the configuration. Specify whether to reprice the configuration when you load an existing one. The price of a configuration is the cumulative sum of the prices of all its components. Since component prices can possibly change over time, repricing a configuration recalculates the price based on the most current component prices. When a configuration is repriced, existing price lists are updated. The system does not expire existing price lists and create new ones. • Always Reprice: By default, the configuration price is always recalculated based on current component prices. • Prompt for Reprice: When you load an existing configuration, you are prompted to reprice the configuration. • Don’t Reprice: The configuration price is not recalculated; the original price stored as part of the configuration is used. Create variant item on. Specify whether you want to create variant items on the item level. After you complete all the questions, click the View Summary button or the Configuration Summary tab to proceed to the next step in the item configuration process. Reviewing and Submitting Configuration The Configuration Summary screen lets you review your answers, save your configuration, view similar configurations, and finally create and order a variant item based on your configuration. Fig. 7.18 Configuration Summary Screen Comments? Go to goo.gl/MfwKHm 146 QAD Configurator User Guide Reviewing Current Configuration The configuration summary table displays question group (functional group), question (feature), error, answer (selected feature option), and net price of components calculated based on selected feature options for each question. The hideable Summary panel on the right displays general information about the configurable item you are configuring. All the questions or features of the configurable item you are configuring are displayed in the configuration grid. For each unanswered question, you can see a yellow warning icon in the Error column. And for each question to which you provide an invalid answer, you can see a red error icon in the Error column. Invalid answers are shown in red in the Answer column, and unanswered questions show Select an Option in the Answer column. When you review your answers, you can always click the Back button or the Configure Item tab to return to the questionnaire to change your answers. To jump to a specific question in the questionnaire, click the answer in the configuration grid. Viewing Similar Configurations When you have completed or partially completed the questionnaire, you can view existing configurations that are similar to the configuration you have created so far. The system searches for similar configurations by filtering existing records using your answers as search criteria. If no answer is provided to a question, the corresponding feature is not used to compare configurations. If none of the questions are answered, all existing configurations associated with the current configurable item are considered similar configurations. To use this feature, click the View Similar Configurations button in the Configuration Summary screen. A Similar Configurations window displays. Fig. 7.19 Similar Configurations Window Questions? Visit community.qad.com Configuration Questionnaire 147 Your current configuration is displayed on the left of the screen with all the configurable item questions and the answers you have provided. On the right of the screen, all similar configurations with identical feature options to the answers you have answered are displayed in a comparison table. Submitting Configuration Submitting configuration is the final step in the item configuration process. After you have gone through all the questions in the questionnaire and created a configuration based on your answers, you submit the configuration. The system saves it as a new variant item or a matching one and returns the variant item to the order line in Sales Order Maintenance or Sales Quote Maintenance. To submit your completed configuration, click the Save Configuration button at the bottom of the Configuration Summary screen. If the configuration you are submitting was loaded from an incomplete configuration in the previous step, the system prompts you to update the original configuration or to create one. If you choose to update the original configuration, it is overwritten by your current configuration. If you choose to create a configuration, a new configuration record is created with a new configuration ID. The Matching Configurations window displays when the current configuration is submitted. Note If Auto Select is set to Yes in Configurable Item Maintenance, the Matching Configurations window does not display and the Questionnaire window closes. Different combinations of configuration-selection, auto-select, and configuration-retention values determine how the system behaves when a configuration is submitted and how variant items are created. Fig. 7.20 Matching Configurations Your current configuration is displayed on the left of the screen with all the configurable item questions and the answers you have provided. On the right of the screen, the system displays all matching configurations with identical configuration keys. Compare matching configurations with your current one to make sure that you do not create redundant variant items with identical configurations. Comments? Go to goo.gl/MfwKHm 148 QAD Configurator User Guide Depending on displayed data, you can perform one of the following actions in the Matching Configurations screen: • Create a variant item from the current configuration. Click the C (Create variant item) icon in the Variant Item field of the current configuration to create a variant item. After a brief display of the variant item creation process bar, the Questionnaire window closes. And the newly created variant item number is returned to the Item Number field in Sales Order Maintenance or Sales Quote Maintenance. Note If you set up variant planning item rules and if changes to the configuration lead to changes to the variant planning item, the system attaches the new variant item to the new planning item as a component and consumes its forecast. • Assign an existing variant item to the current configuration. Click the S (Select the variant item) icon next to a matching variant item number to save the current configuration and associate it with that variant item number. The Questionnaire window closes and the newly assigned variant number is returned to the Item Number field in Sales Order Maintenance or Sales Quote Maintenance. Note If you set up variant planning item rules and if changes to the configuration lead to changes to the variant planning item, the system attaches the reassigned variant item to the original planning item and consumes its forecast. Once attached to a planning item, an existing variant item is always associated with the planning item unless you perform a configuration rebuild. Questions? Visit community.qad.com Chapter 8 Administration 150 Explains how to use Element Roll-Up. Performing Element Roll-Up 151 Maintaining Component Effective Dates Explains how to use Component Effectivity Date Maintenance. 151 Explains how to use Routing Effectivity Date Maintenance. Maintaining Routing Effective Dates Exporting and Importing Models 152 Discusses creating data packages and loading QAD EA and QAD Configurator data. 156 Explains how to use Configuration Delete/Archive. Publishing Models Across Domains 161 Changing Configurable Item Numbers Explains how to use Configurable Item Number Change. 161 Explains how to use Manual Configuration Maintenance. Maintaining Configurations Manually Rebuilding Configurations 163 Explains how to use Configuration Rebuild. 169 Explains how to use Batch Compiler. Running Batch Compiler Maintaining Standard Configurations 170 Explains how to use Standard Configuration Maintenance. 171 Lists the metrics that allow the user to gauge how effectively QAD Configurator is being used. Using Configurator Metrics 150 QAD Configurator User Guide Administration Functions Overview QAD Configurator provides you with a host of system administration tools. You can use these tools to effectively maintain the system and keep it running with high performance and stability on a day-to-day basis. Fig. 8.1 Configurator Administration Functions Performing Element Roll-Up Use Element Roll-Up to roll up non-cost-related data elements. This function can be either automatically performed during variant item generation or manually executed from the menu. Fig. 8.2 Element Roll-Up Variant Item. Specify a variant item or a range of variant items to roll up. Variant Item File. Specify a previously created ASCII file that contains the item numbers of all the configurable items you want to roll up. Configurable Item. Specify a configurable item or a range of configurable items to roll up. Configurable Item File. Specify a previously created ASCII file that contains the item numbers of all the configurable items you want to roll up. Click OK to start the element roll-up process and generate an element roll-up report, which you can view, save, and print. Questions? Visit community.qad.com Administration 151 Maintaining Component Effective Dates Use Component Effectivity Date Maintenance to update component effective dates in the QAD EA production database when engineering changes occur. This functionality is required when components have been added to the QAD EA production database with start or end effective dates that prevent the selection of these components. Fig. 8.3 Component Effectivity Date Maintenance The function displays all the components of the selected configurable item along with their reference, start, and end effective dates in the source database. To update the effective dates of a component: Specify the destination start date, new start date, and new end date by clicking the Down arrow next to these column heads. Click the Save button to save the changes. The Rule column changes to Y to indicate that there is an active rule for this component. To remove a rule, select the component and click Delete Rule. Maintaining Routing Effective Dates Use Routing Effectivity Date Maintenance to update operation effective dates in the production database when engineering changes occur. This functionality is required when operations have been added to the QAD EA production database with start or end effective dates that prevent the selection of these operations. Fig. 8.4 Routing Effectivity Date Maintenance Comments? Go to goo.gl/MfwKHm 152 QAD Configurator User Guide The function displays all the operations of the selected configurable item with their effective dates in the source database. To update the effective dates of an operation: Specify the destination start date, new start date, and new end date by clicking the Down arrow next to these column heads. Click the Save button to save the changes. The Rule column changes to Y to indicate that there is an active rule for this component. To remove a rule, select the operation and click Delete Rule. Exporting and Importing Models Use Model Import/Export to transfer models between databases. Example You can use the Model Import/Export function to copy data between the test database and the production database. Exporting Data Click the Export button to create a data package file for the database records that are associated with your selected groups. When you select Configurator Database, the system creates the package file that only contains the Configurator data. For data details, see Table 8.1 on page 153. When you select Configurator and ERP Database, the system creates the package file that contains both Configurator data and QAD EA data. For data details, see Table 8.2 on page 154. Note Model publishing settings for the selected groups are automatically included in the package file. Fig. 8.5 Creating Data Package Questions? Visit community.qad.com Administration File Name. Specify the name and location of the package (.pkg) file. You can select an existing file using the Browse button and then the system overwrites the existing file. Groups. Select the groups you want to include in the package. The package includes the tables listed in the following two tables. Table 8.1 Configurator Data Table Description ag_mstr Generic Product Structure Master table agd_det Generic Product Structure Assignment Rule table agpd_det Part Master table agqd_det Holds the rules for the fields to be set in Sales Quote Detail agr_mstr Routing Master table agrd_det Generic Routing Assignment Rule table agsd_det Holds all the rules for fields to be set in the sod_det table ans_mstr Structure of (questionnaire) features per configurable item cee_mst External Entity Master table een_mstr Element Entity Master table effc_mstr Component Effectivity Update Master table effr_mstr Routing Operation Effectivity Update Master table eru_mstr Element Roll-Up Master table fea_mstr Feature Master table fed_det Feature Detail table fg_mstr Functional Group Master table fod_det Rule Detail table for_mstr Rule Master table fpg_mstr Xref Rule table for part or rule groups ftb_mstr Rule/Rule table Master table grp_mstr Master Group table grppubd_det Group Publishing Setting table pcm_mstr Configurable Item Master Comment table pcpt_mstr Configurable Item Master table prg_mstr Item – Rule Group Master table pri_mstr Option Priority/Default Master File prid_det Option Priority/Default Detail table pstr_mstr String Translation Master table ptn_det Part Number Master table ptp_mstr Item-Site Planning Master table qst_mstr Question Type Master table rea_mstr Product Configuration Rule table rg_mstr Rule Group Master table tb_det Detail Rule table tb_find Search Logic table for Rule tables Comments? Go to goo.gl/MfwKHm 153 154 QAD Configurator User Guide Table Description tb_mstr Master table for Rule tables tb_pack Cell expressions for Rule tables tb_xref Expression to column Xref for Rule tables tpt_mstr Xref table for Item and Rule table vad_det Variable Detail table (Options) var_mstr Variable Master table Table 8.2 QAD EA Data Table Description pt_mstr Item Master Table ps_mstr Product Structure Master Table ro_det Routing Detail Table Importing Data Click the Import button to load data from data package files to the QAD EA and QAD Configurator databases respectively. Fig. 8.6 Model Import File Name. Specify the name and location of the package (.pkg) file to load data from. Destination. Select a database to load the data to. You can either select Configurator Database or ERP Database. Importing Data to QAD EA Database In the Destination field, select ERP Database. Make sure that the .pkg file contains QAD EA data. Otherwise, the system displays an alert message and stops the loading process. Questions? Visit community.qad.com Administration 155 Importing Data to QAD Configurator Database In the Destination field, select Configurator Database. The system first validates that no QAD EA data is missing in any of the domains: • The system checks whether there are item master records for the configurable items. • The system checks whether there are item master records for the planning items specified in the variant planning item rules. • The system checks whether there are product structures for the configurable items specified in the variant product structure rules. • The system checks whether there are item master records for the components specified in the variant product structure rules. • The system checks whether the components specified in the variant product structure rules exist in the product structure. • The system checks whether there are routings for the configurable item specified in the variant routing rules. • The system checks whether the operations specified in the variant routing rules exist in the routing. • The system checks whether there are item master records for the components specified in the general product structure rules. • The validation of the following rules is also covered when the system validates the configurable item: • Variant Item Number Rule • Variant Item Data Rule • Variant Sales Order Line Rules • Variant Sales Quote Line Rules • Element Roll-Up Rules • External Entity Rules If there are validation errors, by default the system does not continue with the data loading process. You can use the validation report to find out which domains have data validation errors. If you want to load partial data even when there are validation errors for some domains, set Allow Partial Load to Yes. Allow Partial Load. When you set this field to Yes, even when there are validation errors for some domains, data can still be loaded to those domains that have no validation errors. By default, the field is set to No. • Lock Configurable Items if Errors Detected. You can only select this field when you have selected the Allow Partial Load field. By default, the field is set to No. When there are validation errors and the field is Yes, the system locks the configurable items in the domains that have the missing QAD EA data. In this way, the system prevents users in those domains from creating variant items until the missing EA data is added and the new revision of the model is imported. Comments? Go to goo.gl/MfwKHm 156 QAD Configurator User Guide After the validation process, the system determines if there are any users currently processing questionnaires within the groups being loaded. If active users are found, the Active User Manager appears, showing which users are currently active and prompting you to cancel the load or wait until no user is active. If you choose to wait, when all users have completed their questionnaires, the importing process automatically continues. Then the system deletes all associated item, product structure, and routing records in the database, and loads data from the package file to ensure exact data duplication. But before deleting associated records and loading data into the QAD Configurator database, the system takes a snapshot of the existing data. In this way, the system can restore to its previous state when errors occur during data loading. Also, before deleting associated records and loading data into the QAD Configurator database, the system locks the related configurable items. So no one can start a questionnaire while the load is in process. If the user tries to start a questionnaire in a group that is being loaded, a message displays showing that the configurable item is currently unavailable. After loading data from the package file, the system can also automatically analyze the data when you have set the Analyze field to Yes. Analyze. When the field is selected, the system automatically analyzes the imported configurable item for every domain so that users do not have to manually analyze the configurable item later. Publish Models. You can only select this field when you have selected the Analyze field. When this field is set to Yes, the system runs Analyzer only in the domains that are specified as source domains in the model publishing records. You select this field to let the system automatically publish models from the specified source domains to the target domains. In this way, you can avoid manually running Model Publish after you import the data package. During the validation process, the system verifies that: • The settings in the model publishing records are valid. Otherwise, the system does not load the model publishing data for the associated master groups. For information on model publishing settings, see the fields Sales Configuration, Product Configuration, and Routing Configuration on page 157. • The specified source domains in the model publishing records pass the data validation for data import. Otherwise, the system does not publish the associated models. • The target domains are valid. Otherwise, the system does not publish the models into those domains. For information on data validation in target domains for model publishing, see the Validate field on page 158. Publishing Models Across Domains You can use Model Publish to transfer sales configuration details, product configuration details, and routing configuration details across domains. 1 In the Source Group field, specify a master group. 2 In the Source column, select a domain as the source domain. 3 Select the combinations of target domains and configuration details to indicate what configuration details you want to copy into the target domains. 4 (Optionally) Click Validate to validate the records in the selected target domains. Questions? Visit community.qad.com Administration 5 157 Click Publish to publish the configuration details in the source group from the source domain to valid target domains. Fig. 8.7 Publishing a Model Source Group. Specify a master group. Start Date. The system displays the start date of the specified master group. End Date. The system displays the end date of the specified master group. Source. Select a source domain. Sales Configuration. Select one or more target domains where the sales configurations from the source domain are to be published. When you clear the field for one domain, the system also clears the settings in both the Product Configuration and the Routing Configuration fields. Product Configuration. Select one or more target domains where the product configurations from the source domain are to be published. When you select to publish the production configurations into one domain, the system automatically selects the Sales Configuration field for the domain if it is not selected. When you clear the field, the system also clears the setting in the Routing Configuration field if it is selected, but the Sales Configuration field remains selected. Routing Configuration. Select one or more target domains where the routing configurations from the source domains are to be published. When you select to publish the routing configurations into one domain, the system automatically selects both the Sales Configuration and the Product Configuration fields if they are not selected. When you clear the field, the settings for both the Sales Configuration and the Product Configuration fields remain. Comments? Go to goo.gl/MfwKHm 158 QAD Configurator User Guide Valid. The system displays the validation result, either Yes or No. The system publishes models only into valid target domains. Date Published. The system displays the date when the master group was last published to this target domain. Time. The system displays the time when the master group was last published to this target domain. Remarks. The system displays the comments added when the master group was last published to this target domain. Save. Click this button to save your selection. Remarks. Enter comments on current model publishing. Validate. Click this button to validate the records set up in all selected target domains. This feature enables you to discover and to correct any data issues in the target domains in advance. When you click the Publish button at a later stage, there should be no validation errors to impact the publishing process. • When the Sales Configuration field is selected for the target domains, the system validates whether all related item master records have been set up in each target domain. If a configurable item in the source domain has a component that is also a configurable item, the system validates whether there is a matching product structure record in each target domain. This product structure is required so that the Questionnaire can display the features that are associated with the component configurable items. The product structure need only contain the parent configurable item and the component configurable items; the complete generic product structure is not required. If there is missing data in any of the target domains, the system reports error messages. • When the Product Configuration field is selected for the target domains, for each target domain the system verifies that: • A product structure for the configurable item is specified in the variant product structure rules. • An item master record for the component item is specified in the variant product structure rules. • The component item specified in the variant product structure rules is in the product structure of the configurable item specified in the rules. If there is missing product structure data, the system reports either error or warning messages. The message type is determined by the setting for the Validate Missing Product Structure Data As field in Configurable Item Maintenance. • When the Routing Configuration field is selected for the target domains, for each target domain the system verifies that: • A routing for the configurable item is specified in the variant routing rules. • The operation specified in the variant routing rules exists in the routing of the configurable item specified in the rules. If there is missing routing data, the system reports either error or warning messages. The message type is determined by the setting for the Validate Missing Routing Data As field in Configurable Item Maintenance. Questions? Visit community.qad.com Administration 159 You can view the validation results in the Validation Results report. If the system reports any errors, you cannot publish the model until you resolve the data issues in the target domains. If the system reports only warnings, the validation is regarded as successful. Publish. Click this button to publish the configuration details from the source domain to the target domains. Before publishing, the system first checks whether the configurable items in the source group have been analyzed and whether the analysis result is successful. If a configurable item is not analyzed, you can choose to analyze that model. If you do not analyze, the publishing does not continue. If the configurable item is analyzed, but the result indicates failure, the publishing process stops. In Model Publish, the system only publishes successfully analyzed models so that it is not necessary to manually analyze the published models in the target domains later. If the analysis result is successful, the system continues with the validation process. For information on the validations, the Validate field on page 158. If the validation fails, you can view the Validation Results report to find out which records require setup in the target domains. Fig. 8.8 Model Validation Results If the validation is successful, the system continues with the publishing process. In publishing the model, in addition to copying the sales configurations, the system also copies the following product configuration rules to all target domains: • Variant item number rules • Variant item planning rules, so that the forecast can be consumed for a variant item Comments? Go to goo.gl/MfwKHm 160 QAD Configurator User Guide • Variant item data rules • Variant SO line rules • Variant SQ line rules When the Product Configuration field is selected for a target domain, the system copies the following rules to the target domain: • Variant product structure rules • Element roll-up rules when the Roll-Up Type field is set to Product Structure • External entity rules When the Routing Configuration field is selected for a target domain, the system copies the following rules to the target domain: • Variant routing rules • Element roll-up rules when the Roll-Up Type field is set to Routing Deleting and Archiving Configurations Use Configuration Delete/Archive to archive and/or delete existing configurations. Each time you complete the questions in the questionnaire and click OK, QAD Configurator generates a new configuration in the database, containing all the answers to the questions for the configurable item. The configuration is created even if no variant is generated. As a consequence, the configuration table in the QAD Configurator database can grow rapidly. You can use Configuration Delete/Archive to archive one or more configurations to a file for later use, or permanently delete configurations from the set of configurations available in QAD Configurator. The variant product structure generator in the questionnaire uses configurations to create variant items. After you delete a configuration, this configuration is no longer available for creating a variant or for selection with the unique configuration key. Fig. 8.9 Configuration Delete/Archive • Enter the configuration IDs of the particular configurations to be transferred or deleted. and • Specify the variant numbers that correspond with the particular configurations to be transferred or deleted. Warning If you do not enter any configuration IDs or variant numbers, the system archives and/or deletes all the available configurations in the group. Questions? Visit community.qad.com Administration 161 Changing Configurable Item Numbers Use Configurable Item Number Change to manually update configurable item numbers in QAD Configurator to be in sync with changes in QAD EA. Note In QAD 2008.1 Enterprise and later, configurable items cannot have item replacement records and cannot be memo items. Fig. 8.10 Configurable Item Number Change Maintaining Configurations Manually Use Manual Configuration Maintenance to manually enter and maintain configurations. A configuration consists of answers to all the questions relating to the configurable item. QAD Configurator uses configurations in two ways: • For creating a variant from the configurable item • For selecting existing variants with the same configuration description Selecting existing variants reduces the number of variant items that are created in the QAD EA item, product structure, and routing tables. When you run the questionnaire and answer the questions with the same answers as in a previous configuration, QAD Configurator does not create a variant. The Configurator uses the existing configuration and thus limits the number of variants being created. In this way, the system can significantly reduce the effort and the time involved in creating the variant product structure. It is possible that there can be items in the QAD EA item and product structure tables that are valid variants. But these items were not created using the QAD Configurator questionnaire and variant creator. These variants do not have a configuration description—that is, a configuration—in QAD Configurator and can never be selected as an existing variant. Using Manual Configuration Maintenance, you can create this configuration description afterwards and link it to the item in QAD EA. Note Make sure that the variant that is linked to the manually created configuration is an item in QAD EA. The variant cannot be a configurable item in QAD Configurator, because a configurable item can never be a variant of another configurable item. Comments? Go to goo.gl/MfwKHm 162 QAD Configurator User Guide Fig. 8.11 Manual Configuration Maintenance The variant field shows the variant item number for the manually maintained configuration that has been most recently accessed. The configuration ID, status, date, and time are shown in the frame below this field. Details of the questionnaire answers that make up the configuration are shown in the feature/option list window. To select another configuration to maintain, you can either use the navigation buttons in the button area, or you can click the Browse button to the right of the Variant field. The system displays a screen where you can select the required variant item, using filter fields in the top part of the screen to narrow the search. When you have selected a manually maintained configuration, you can modify it by changing the answers to the questionnaire questions in much the same way as when using the questionnaire. If you no longer require the configuration, you can delete it by clicking the Delete button. The system displays a message prompting you to confirm the deletion. For variant items created from questionnaire configurations, you can browse the configuration, modify descriptions, and add comments. Questions? Visit community.qad.com Administration 163 Fig. 8.12 For Variant Item Created from Questionnaire Configuration Rebuilding Configurations Use this function to update one or more existing configurations and variant items which are repeatedly ordered and need adjustments for one of the following reasons: • Changes to the configuration details; for example, a new feature has been added or an option has changed • Pricing changes, including changes in the Sales Configuration pricing rules • Engineering changes to item data, product structure, or routing, including changes in the Product Configuration rules Comments? Go to goo.gl/MfwKHm 164 QAD Configurator User Guide Fig. 8.13 Configuration Rebuild 1 Select a configurable item. If the configurable item has not been analyzed yet, the system prompts you to analyze it first. 2 A Configuration Browse window is displayed. Use the search box to filter records and look up the configurations you want to modify. Click OK to select all the configurations displayed in the browse. 3 Selected configurations are displayed in the Configurations to Rebuild list. You can click the Change Configurations icon to bring up the browse window to change your selections. For information on using the Configuration Browse, see “Using Browses and Browse Collections” on page 33. 4 To make batch changes to features in all the selected configurations, select Feature Options. In the expanded box, specify changes to be applied to features of the selected configurations across the board during the rebuild process. Important Use caution if you try to update features that are a part of the configuration key. for it can possibly lead to multiple variants associated with the same configuration key. a Under the Add/Update tab, specify changes to apply to the configurations by selecting features of the configurable item and assigning values to them. To assign a value to a feature, click the Browse icon to bring up a pop-up window that lets you designate values in either the basic format or the advanced format. • In the basic format, for features with defined options, select an option from the option list and click OK to assign the value to the feature. For features that allow fill-ins, including those associated with browse codes, you can add a feature option or browse code to the option list. Then select it as the new value for the feature. The system validates the new value during the rebuild process and displays an invalid option error when invalid values or undefined browse codes are found. Questions? Visit community.qad.com Administration 165 Fig. 8.14 Rebuild Feature Options • In the advanced format, you can directly type feature values. b 5 Under the Delete tab, specify variables to delete from the configurations. You can only delete variables that are no longer defined as features attached to configurable items. If you want to reprice the configurations, select the Pricing check box. When you select this option, the system updates the list price and net price of the configurations, as well as related price lists. Note In the Effective Date drop-down list, you can select or manually enter a date for the updated price lists to take effect. The effective date is no earlier than the current date. 6 If you want to update the product structures and routings of the variant items, select the Product Structure/Routing check box. Then specify whether you want to obsolete or delete the old product structures and routings. • Delete: Old product structure and routing records are removed from the system. New records are created without date information. • Expire and Effective Date: Old product structure and routing records are marked as expired but are still retained in the system. You can manually enter the effective date for the new records; the End Date for old records is one day before the Effective Date for the new records. By default, the Effective Date is Today. Note When expiring old product structure/routing records and creating new ones, the system keeps the records effective in the future intact. 7 By using Variant Item Cost Roll-Up in Configuration Rebuild, you can control whether to rebuild configurations with cost roll-up. • Yes. In rebuilding a variant item, the system does the cost roll-up, recalculating the variant item cost. • No. By default, in rebuilding a variant item, the system does not modify any cost data of the variant item. This is often the case when costs are frozen for a certain period, typically a financial year, but the configuration changes within that period. 8 If you selected the Pricing and Product Structure/Routing options, you can select Show Detail to display detailed change information in the rebuild report. 9 Click Rebuild. The system displays the number of configurations and variant items to rebuild and tells you that the rebuild process may take a long time. Click OK to start the rebuild process. Note The rebuild process may take a long time depending on the number of configurations and variants to rebuild and the complexity of the configurations. Comments? Go to goo.gl/MfwKHm 166 QAD Configurator User Guide 10 Depending on your selected rebuild options, the system performs a number of batch updates to the configurations and variants including changing feature values, repricing configurations, and re-creating product structures and routings. Note Currently, the system does not create new variants during configuration rebuild even if new variant item numbers should be generated from the changes. In such cases, the system displays a warning message informing you that the configuration changes warrant new variant item numbers. You can manually assign new numbers to affected variant items in Item Number Change (1.4.13). 11 When the rebuild process is complete, the system displays a rebuild report. The report summarizes all the updates made to the configurations and variants, including changes to features, product structures, routings, and price information. You can print and save the report. Fig. 8.15 Rebuild Report The system runs the following product configuration rules when rebuilding a configuration: • Variant item data rule • Variant product structure rule • Variant routing rule Currently, the system does not process sales configuration rules during configuration rebuilds. Note The rebuild process does not update product structures and routings for kit type configurable items—either physical kit or phantom kit. If errors occur during the rebuild process, the system displays error messages that show affected variant item numbers and invalid options. If the configuration rebuild process causes the planning item to be changed, the system removes the association between the variant items and the old planning item. Then the system associates the variant items and with the new planning item. The changes are displayed in the result report. Questions? Visit community.qad.com Administration 167 Rebuild for Multi-level Configurations A multi-level configurable product structure enables the modularization of product structures. Rather than one huge BOM that lists all possible components of a configured variant item, the product structure is divided into subassemblies that are configurable themselves and may have their own routings. For example, as shown in Figure 8.16, C1 is a configurable item of the SO Type BOM. C2 is a component of C1 while C2 is also a configurable item itself. Fig. 8.16 Multi-level Configurations Here are some scenarios where multi-level configurations are used, including information about how the Configuration Rebuild performs. Scenario 1: Configurable Subassembly In this scenario, a configured subassembly is selected or created, depending on whether there exists a matching configured variant item. Fig. 8.17 Configurable Subassembly Item C2, a configurable subassembly, has a configurable product structure. • If there is a configuration key for C2, either an existing variant is selected or a new variant is created. As shown in Figure 8.17, C2-1 is selected or C2-2 is created. • In Configurable Item Maintenance, set Configuration Selection to First Matching or Last Matching, if you want the system to select an existing variant. • In Configurable Item Maintenance, set Configuration Selection to Just Created, if you want the system to create a variant. • If there is no configuration key defined for C2, a new C2 variant, C2-2, is created. In rebuilding the configuration for C1, the top-level configurable item, the system searches for a matching configuration for C2 according to the configuration key. • If there is a match, the system uses the variant item, attaching it to the product structure of C1. • If there is no match, the system deletes the entire variant product structure and rebuilds the multi-level structure according to the updated configuration and current rule set. Comments? Go to goo.gl/MfwKHm 168 QAD Configurator User Guide Note In rebuilding C1, when a matching configuration is found for C2, the system does not run product configuration rules. If there are any rule changes or feature value changes that could cause item data changes, make sure to build the lower-level configurations first. Scenario 2: Pre-configured Subassembly In this scenario, all C2 sub-assemblies have been pre-configured and each has a configuration attached to it. The pre-configuration can be the result of the Configurator variant item creation process, or can come from Manual Configuration Maintenance, where you manually attach configurations to standard items after item creation. For more information about manually maintaining configurations, see “Maintaining Configurations Manually” on page 161. Fig. 8.18 Pre-configured Subassembly The system compares the relevant features of the new configuration with the configuration key defined for C2: • If there is a match, C2 subassembly is selected. • If there is no match, the system terminates the creation of C1 and reports an error. In this scenario, the configurable item C2 does not have a configurable product structure since there is no new configured variant item created. C2 serves as a placeholder. In rebuilding the configuration for C1, the top-level configurable item, the system searches for a matching configuration for C2 according to the configuration key. • If there is a match, the system uses the variant item, attaching it to the product structure of C1. • If there is no match, the system reports an error in the rebuild report. Note In rebuilding C1, when a matching configuration is found for C2, the system does not run the Variant Item Data Rule. If there are any rule changes or feature value changes that could cause item data changes, lower-level configurations need to build first. Scenario 3: Item Number Selection In this scenario, C2 has a huge number of variations and the possible component items can possibly have dynamic life cycles. Additionally, the possible component items are standard items not created by the Configurator. Questions? Visit community.qad.com Administration 169 Fig. 8.19 Item Number Selection Without a configuration key, the system selects the actual item wanted explicitly by its item number. Use Variant Item Number Rule Maintenance to set the variant item number as the number of an existing standard item based on a single feature. Typically, an option list or item browse in the Questionnaire is used to manually select the wanted standard item. In this scenario, C2 does not have a configurable product structure since there is no new configured variant item created. C2 serves as a placeholder. In rebuilding the configuration for C1, the top-level configurable item, the system searches for a matching configuration for C2 according to the variant item number rule. • If there is a match, the system uses the variant item, attaching it to the product structure of C1. • If there is no match, the system reports an error in the rebuild report. Note In rebuilding C1, when a matching configuration is found for C2, the system does not run the Variant Item Data Rule. If there are any rule changes or feature value changes that could cause item data changes, lower-level configurations need to build first. In Scenario 2 and Scenario 3, C2 serves as a placeholder. A configurable item placeholder can appear multiple times in the product structure when each placeholder gets the same item. But the system does not support the situation where a placeholder configurable item appears multiple times in the product structure while each placeholder has a different item. The reason is that for a placeholder configurable item, there is only one variant item number rule and one configuration key. If you want different configurable items in the product structure, define different configurable items with configuration keys and variant item number rules. Running Batch Compiler Use Batch Compiler to compile the Progress source code for selection and assignment rules for one or more selected configurable items (including planning items). Recompiling the code after significant changes have been made—for example, after re-creation of the database—can save considerable time in subsequent Variant Creation processes. Comments? Go to goo.gl/MfwKHm 170 QAD Configurator User Guide Fig. 8.20 Batch Compiler Maintaining Standard Configurations You can use Standard Configuration Maint (50.4.10) to get standard configurations that are shown in the Standard Configurations screen of the Questionnaire. To set an existing configuration to a standard configuration, select the check box above the configuration ID of the existing configuration. Fig. 8.21 Standard Configuration Maintenance To use Standard Configuration Maintenance, 1 Select a group using the binocular button on the toolbar. 2 Specify a configurable item in the Configurable Item field; the system displays all available configurations of the configurable item for you to choose. 3 Browse through all available configurations; you can also use the search capabilities to search for configurations that meet your search criteria. Questions? Visit community.qad.com Administration 171 4 Select the check box above a Configuration ID to set the configuration as standard. You can set one or more standard configurations. 5 Click Save. After you have standard configurations, the next time you use Standard Configuration Maintenance, the standard configurations are shown first. After that, then you can see nonstandard configurations. Note Standard configurations are not customer-specific. Using Configurator Metrics QAD Configurator offers you a set of metrics to help you gauge how effectively you are using QAD Configurator on a daily basis. The metrics reveal opportunities for improvement and help you make the best use of the product. This visual management tool lends at-a-glance insight into your performance level in using QAD Configurator by graphically representing the following KPIs (Key Performance Indicators): • Configurator Model Completeness • Configurator Rules Completeness • Configurator Operational Performance Comments? Go to goo.gl/MfwKHm 172 QAD Configurator User Guide Questions? Visit community.qad.com Chapter 9 Configurator Best Practices 174 Describes a scenario of broad product structures and gives a solution. Using Placeholder Component Using Base Price for Configurable Items in Questionnaire 174 Describes how to use base price for configurable items in the Questionnaire. 174 Describes how to update item-site planning records for each variant item with specific settings. Populating Fields in Variant Item-Site Planning Records Dealing with a Large Number of Feature Options 175 Describes a solution for improving questionnaire performance when a product feature has a large number of options. 176 Describes a solution for managing models across domains within a database and also across databases. Managing Models Across Databases 177 Describes a solution for showing the questionnaire in the language of the questionnaire respondent. Multiple Language Support 180 Describes a solution for placing EMT orders for configurable items. Placing EMT Orders for Configurable Items 174 QAD Configurator User Guide Using Placeholder Component In this scenario, the business is faced with broad product structures; the product structures include a huge number of possible component items (or non-configured sub-assemblies) on one or more levels. To deal with the situation, you can create a multilevel configuration with a placeholder configurable item where a component is then inserted. 1 Associate a placeholder component with the wanted product structure. 2 Make the placeholder component a configurable item of type BOM. 3 Define a feature that has the item number of the to-be-associated component. 4 Set up Variant Item Number Rule with element Feature and select the feature that you defined in the previous step. 5 Assign the item number to the new feature, which can be an item browse, a manual entry, an external entity lookup, or any other lookup or calculation. See “Rebuild for Multi-level Configurations” on page 167 to see more information about multilevel configuration. Using Base Price for Configurable Items in Questionnaire The business scenario is that a configurable item has a base price; certain selected options are then added to the price. In this situation, you can create a feature that retrieves the base price. 1 Define a feature, such as Model. 2 Add an option, which can be the item number or description of the configurable item. 3 Add the configurable item as a pricing part for the feature; you can either set up a price in the item master or a price list for the item. 4 Write an item rule of type Assignment that selects this option. Populating Fields in Variant Item-Site Planning Records In this scenario, item-site planning records that are created by Configurator for each variant item need to be updated with specific settings—for example, minimum order quantities. To deal with the situation, you can create an external entity that populates variant item-site planning records. 1 Set up a configurable item that creates variant item-site records. • If you want to create item-site records for all sites defined for the configurable item, set Variant Item Site Record to All Sites. Questions? Visit community.qad.com Configurator Best Practices 175 • If you want to create only one item-site record, set Variant Item Site Record to Current Site Only and create a variable/feature you reference in Site Variable. 2 Create an external entity to select the ptp_det record with the following selection rule (based on your setup in the previous step) • ptp_domain = sysDomainID, ptp_part = sysVariantItemID, ptp_site = your site • ptp_domain = sysDomainID, ptp_part = sysVariantItemID, ptp_site = site variable 3 Create an external entity rule that assigns values to your wanted ptp_ field. Dealing with a Large Number of Feature Options In this business scenario, an item has many features and each feature has a huge number of options. If you put all those options on the questionnaire, there might be system performance issues. In this case, you do not need to list all the feature options on the questionnaire. Instead, you can define the features as the fill-in type and let question respondents enter free-format answers or select answers from the associated browse. Example A product has 20 features; for some of these features, each feature has more than 100 options. Instead of listing all these options on the questionnaire, for features that have many options, you can select Allow Fill-in and define browses for them. Take the feature country as an example. 1 In Feature Details, select Allow Fill-in and define a browse for the country feature. 2 In Feature Options, define two country names that question respondents frequently select; for example, Australia and China. Then on the questionnaire, the respondent can select either of the frequent answers, or enter a desired country name, or select a country name from the browse. Fig. 9.1 Dealing with Many Options Comments? Go to goo.gl/MfwKHm 176 QAD Configurator User Guide Managing Models Across Databases In this business scenario, a company has different types of databases: • Model development database • Test database • Production database Modelers work in the Development database and are not allowed to access the Production database due to Sarbanes-Oxley compliance. Models are tested in the Test database before they are in use in the Production database. Also, within one database, there are multiple domains. In this case, you can use the following approach. Fig. 9.2 Managing Models Across Databases Example A model ULTRA is in use in the Production database. Now you want to make a new model based on the ULTRA model and you want the existing model to continue to be in use until the new model becomes active. By using Model Import/Export and Master Group Copy, you can easily make a new model in the Development database while the existing model continues to be in use in the Production database. Also, by using Model Publish, you can easily manage the model changes across multiple domains within one database. 1 Use Model Import/Export to transfer a model ULTRA from the production database to the development database. 2 In the Development database, use Master Group Copy to make a copy of the master group. In making a copy of the master group, the system copies all data that is associated with the source master group. Name the new model ULTRA_advanced. 3 In the Development database, make sales configuration changes to the new model in a domain. Questions? Visit community.qad.com Configurator Best Practices 177 4 In the Development database, use Model Publish to publish the updated sales configurations to all desired domains in the Development database. 5 In the Development database, manually make product configuration changes in each target domain. These changes are done individually because product structures and routings can vary from domain to domain. 6 Use Model Import/Export to transfer the new model from the Development database to the Test database. 7 Use Model Import/Export to transfer the new model from the Test database to the Production database. Multiple Language Support Configurator provides the capability to display all elements of the questionnaire in any user language. Whereas the static label translation for all supported languages comes with the installation files of Configurator, the translation of the dynamic data is entered during the setup of the configuration model. In this way, the questionnaire can display the following in the language of the user that launches the questionnaire: • Functional groups, which are the tabs on the questionnaire • Features, which are the questions on the questionnaire • Feature options, which are the answers on the questionnaire • Rule descriptions Note Translations for features and feature options are optional. If not defined, the system looks for translations for the variable and variable options. In this way, the system maintains a single translation record within a group, no matter in which configurable item and domain that it is used. But the system also allows you to create configurable item or domain-specific translations by adding feature and feature option translations. If no translations have been set up for variables, features and options, the system uses the default feature and feature option texts. Comments? Go to goo.gl/MfwKHm 178 QAD Configurator User Guide Example The questionnaire respondent uses Chinese. In this case, you set up Chinese records for functional group names, option questions, and option answers: 1 In Functional Group Maintenance, set up Chinese records for functional group names by using the String Translation button. Fig. 9.3 String Translation for Functional Group Name 2 In Feature Maintenance|Feature Details, set up Chinese records for option questions by using the String Translation button. Fig. 9.4 String Translation for Option Questions 3 In Feature Maintenance|Feature Options, set up Chinese records for option answers by using the String Translation button. Questions? Visit community.qad.com Configurator Best Practices 179 Fig. 9.5 String Translation for Option Answers 4 In General Rule Maintenance, set up Chinese records for rule descriptions by using the String Translation button. Fig. 9.6 General Rule Maintenance Then when the questionnaire respondent logs in as a Chinese user, the system displays the questionnaire in Chinese. Fig. 9.7 Questionnaire in Chinese You can also define the warning message in multiple languages when you create the sales configuration rule. Example The questionnaire respondent uses Chinese. In this case, you set up the warning message in Chinese when you create the sales configuration rule: Comments? Go to goo.gl/MfwKHm 180 QAD Configurator User Guide Fig. 9.8 Define Message in Chinese Then when the Chinese questionnaire respondent uses the questionnaire, the system displays the message box title and the message in Chinese. Fig. 9.9 Message Shown in Chinese You can also define master comments in the customer language to add configuration descriptions to an item. The configuration descriptions in the customer language can be printed on documents such as sales quotes, sales orders, invoices, or packing lists. Example The customer language is Chinese. You define a master comment for the configurable item 01040 in Chinese: 这台微波仪器的颜色是 [color]。 Color is a feature for the item. When the questionnaire respondent selects the color option 白色 on the questionnaire and create a variant item, the system creates the master comment for the variant item as follows: 这台微波仪器的颜色是白色。 Placing EMT Orders for Configurable Items In this scenario, you are using QAD Enterprise Applications 2015. You want to place Enterprise Material Transfer (EMT) orders for a configurable item across multiple domains in the same database or multiple databases using standard EMT. To deal with this scenario, in addition to all other regular setup for using EMT, you are required to set up references to QAD-developed document definitions in Trading Partner Maintenance. 1 Enter the identification code of your trading partner. 2 In the Trading Partner Document Records frame, set up the following records for the purchase order records exchanged with your trading partner: 3 TP Doc ID Dir Document Map 850 Out MFG850-CFG 850 In MFG850-CFG In the Trading Partner Document Records frame, set up the following records for the purchase order change records exchanged with your trading partner. TP Doc ID Dir Document Map 860 Out MFG860-CFG 860 In MFG860-CFG Questions? Visit community.qad.com Configurator Best Practices 4 181 In the Trading Partner Document Records frame, set up the following records for the purchase order change acknowledgment records exchanged with your trading partner: TP Doc ID Dir Document Map 865 Out MFG865-CFG 865 In MFG865-CFG The following flow explains how to place EMT orders for the configurable item. 1 In the PBU, when you create a sales order line for the configurable item, the system automatically creates a variant item and generates an EMT PO. 2 Use eCommerce Manager to export the EMT PO to the SBU. The system includes sales configuration details of the variant item in the exported EMT PO transaction records. 3 The SBU imports the EMT PO. If the variant item does not exist in the SBU, the system automatically creates one that has the same item number as the originating variant item in the PBU. The system then generates a secondary SO containing this variant item. Note When all of the following conditions are met at the PBU, the system sends a PO change acknowledgment record to the PBU. • The GL cost of the variant item is zero. • The cost of the variant item in the SO line details is zero. • The cost of the variant item in the PO line details is zero. The PO change acknowledgment contains the net price of the variant item from the secondary SO created in the SBU. After the PBU imports the PO change acknowledgment, the system updates the following costs of the variant item at the PBU with the net price copied from the SBU: • Unit cost on the EMT purchase order line • Unit cost on the sales order line • This-Level material cost in the GL cost set, in each site where this variant item exists • This-Level material cost in the current cost set, in each site where this variant item exists, when the costing method of the current cost set is AVG or Last When you add a new EMT line for a configurable item to an existing sales order, the system creates a PO change transaction if an associated EMT PO exists with the same EMT type and supplier as an existing SO line on that sales order. 1 Use eCommerce Manager to export the PO change transaction to the SBU. This transaction contains the sales configuration details of the variant item. 2 The SBU imports the EMT PO change transaction. If the variant item does not exist in the SBU, the system automatically creates one that has the same item number as the originating variant in the PBU. 3 The system sends a PO change acknowledgment transaction to the SBU. When all the following conditions are true in the PBU: • The GL cost of the item is zero. • The cost of the variant item on the SO line is zero. • The cost of the variant item on the EMT PO line is zero. Comments? Go to goo.gl/MfwKHm 182 QAD Configurator User Guide The PO change acknowledgment contains the net price of the variant item from the secondary SO in the SBU. After the PBU imports the PO change acknowledgment, the system updates the following costs of the variant item at the PBU with the net price copied from the SBU: • Unit cost on the EMT purchase order line • Unit cost on the sales order line • This-Level material cost in the current cost set in each site where this variant item exists, when the costing method of the current cost set is AVG or Last • This-Level material cost in the GL cost set, in each site where this variant item exists Questions? Visit community.qad.com Product Information Resources QAD offers a number of online resources to help you get more information about using QAD products. QAD Forums (community.qad.com) Ask questions and share information with other members of the user community, including QAD experts. QAD Knowledgebase (knowledgebase.qad.com)* Search for answers, tips, or solutions related to any QAD product or topic. QAD Document Library (www.qad.com/documentlibrary) Get browser-based access to user guides, release notes, training guides, and so on; use powerful search features to find the document you want, then read online, or download and print PDF. QAD Learning Center (learning.qad.com)* Visit QAD’s one-stop destination for all courses and training materials. *Log-in required 184 QAD Configurator User Guide Questions? Visit community.qad.com Index B Batch Compiler 169 C comments 20, 33 Component Effectivity Date Maintenance 151 Configurable Item Maintenance 48 Configurable Item Number Change 161 Configuration Analyzer 101 Configuration Control 42 Configuration Delete/Archive 156 configuration key 17 Configuration Key Maintenance 103 cost roll-up 21 cross validation 23 Cross Validation Analyzer 23, 24, 125 report 25 E Element Roll-Up 21, 150 Element Roll-Up Rule Maintenance 121 External Entity Rule Maintenance 123 F Feature Maintenance 70 feature relationships 13 feature sequence 16 Feature Sequence Maintenance 74 Feature-Based Pricing 72 Functional Group Maintenance 62 G General Rule Maintenance 76 General Rule Table Maintenance 90 I Item Rule Maintenance 84 Item Rule Table Maintenance 97 M Maintaining 151 Manual Configuration Maintenance 161 master group about 44 maintain 45 Model Import/Export 152 multi-level analysis 16 P process product configuration 108 sales configuration 61 variant item configuration 132 process map general 2 product configuration rules 18 item number definition rules 19 Q Question Type Maintenance 61 questionnaire 25 configurations 26 questions 26 Questionnaire Sequence Maintenance 102 R Routing Effectivity Date Maintenance 151 Rule Assistant 33 Rule Group Maintenance 83 rule statement formats 9 Rule Table Accelerator 99 S Sales Configuration Rule Report 100 sales configuration rule table 86 sales configuration rules 9 T toolbar 31 Trade Management, integration with 3 V Variable Maintenance 63 variables and features data types 7 options 8 sequences 16 Variant Item Number 109 Variant Item Number Rule Maintenance 112 Variant Routing Rule Maintenance 117 Variant SO Line Rule Maintenance 120 Variant SQ Line Rule Maintenance 120 W Where-Used Report 104 186 QAD Configurator User Guide