1
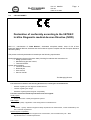
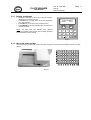
Plate Washer
USER MANUAL
This manual contains DAS reserved information. All rights reserved. Unauthorized copying of this
manual or part of it is prohibited.
das srl
Viale Tivoli Km 18,642 – 00018 Palombara Sabina (Roma) - Italy
Tel. (+39) 0774 66840 – 0774 637070 - Fax 0774 634039
E-mail: [email protected] - http://www.dasitaly.com
PLATE WASHER
USER MANUAL
Causal
Date
Emissione Rev.00
04.02.2002
Rev. 01
19.07.02
Rev. 02
27.05.2004
Doc. N° M05-EN
Rev.02
Date 27.05.2004
Revision description
New edition issue
Da A1 a A2
New CE Declaration
Page 3
PLATE WASHER
USER MANUAL
Doc. N° M05-EN
Rev.02
Date 27.05.2004
Page 4
CONTENTS
INTRODUCTION ................................................................................................................................................... 5
0.1. DESCRIPTION ....................................................................................................................................... 5
0.2. WARRANTY ........................................................................................................................................... 5
0.3. CE CONFORMITY................................................................................................................................. 6
SECTION 1 - GENERAL SAFETY WARNINGS ............................................................................................... 7
1.1. DANGER-WARNING SYMBOLS ........................................................................................................ 7
1.2. INTENDED USE OF THE INSTRUMENT.......................................................................................... 7
1.3. USE OF THE INSTRUMENT................................................................................................................ 7
SECTION 2 - GENERAL INFORMATION ........................................................................................................ 8
2.1. INSTRUMENT DESCRIPTION: PURPOSE AND FEATURES....................................................... 8
2.3. INSTRUMENT DESCRIPTION............................................................................................................ 8
2.4. INSTRUMENT FUNCTIONING PRINCIPLE.................................................................................. 10
2.5. INSTRUMENT TECHNICAL DATA................................................................................................. 11
SECTION 3 - PACKAGING, TRANSPORT AND STORAGE ....................................................................... 12
3.1. GENERAL WARNINGS ...................................................................................................................... 12
3.2. PACKAGING ........................................................................................................................................ 12
3.3. INSTRUMENT TRANSPORTATION................................................................................................ 12
3.4. STORAGE OF THE INSTRUMENT.................................................................................................. 12
SECTION 4 - INSTALLATION AND START-UP INSTRUCTIONS ............................................................ 13
4.1
PLACING THE INSTRUMENT ......................................................................................................... 13
4.2
POWER SUPPLY.................................................................................................................................. 13
SECTION 5 - HOW TO USE PLATE WASHER ............................................................................................. 14
5.1. INTRODUCTION ................................................................................................................................. 14
5.2. SWITCHING THE INSTRUMENT ON ............................................................................................. 14
5.4. NEW PROGRAM SET UP................................................................................................................... 17
5.5. PROGRAM MODIFICATION ............................................................................................................ 19
5.6. PROGRAM RUN .................................................................................................................................. 20
5.7. PRIME.................................................................................................................................................... 22
5.8. DISPLAYED MESSAGES ................................................................................................................... 22
SECTION 6 - PC CONNECTION ....................................................................................................................... 23
6.1. INTRODUCTION ................................................................................................................................. 23
6.2. CONNECTION PLATE WASHER – COMPUTER.......................................................................... 23
SECTION 7 - MAINTENANCE AND CONTROLS ......................................................................................... 24
7.1. PREVENTIVE MAINTENANCE AND CONTROLS....................................................................... 24
7.2. TROUBLESHOOTING (DIAGNOSIS) .............................................................................................. 25
7.3. REPAIRS................................................................................................................................................ 25
SECTION 8 - DISINFECTION AND PUT OUT OF SERVICE ...................................................................... 26
8.1. INSTRUMENT DISINFECTION ........................................................................................................ 26
8.2. PUT THE INSTRUMENT OUT OF SERVICE ................................................................................. 27
8.3. DEMOLISHING PROCEDURE.......................................................................................................... 27
PLATE WASHER
USER MANUAL
Doc. N° M05-EN
Rev.02
Date 27.05.2004
Page 5
INTRODUCTION
0.1.
DESCRIPTION
This manual provides the operator with all the necessary instructions for a safety, suitable use as well as the
instrument maintenance recommendations.
Manual content:
•
introduction - warranty information, Service maintenance and the CE mark conformity declaration
•
section 1 - general safety-warnings;
•
section 2 - general information such as the producer data, technical data, instrument
performances, etc.;
•
section 3 - packaging, transport and storage instructions;
•
section 4 - installation and start up;
•
section 5 - operating instructions;
•
section 6 - PC connection instructions;
•
section 7 - the user’s periodic maintenance and checking, the trouble shooting at user’s level and
the repair policy;
•
section 8 - instrument disinfection, how to put it out of service and demolishing instructions;
•
section 9 - spare parts list, consumable material and accessories.
This manual is considered as a part of the instrument; it has to be at the operator’s hand as well as at the
maintenance operator’s availability.
For accurate installation, use and maintenance, please read the following instructions carefully.
In order to avoid damages to the instrument or to people, carefully read the “GENERAL SAFETY
WARNINGS” Section 1, describing the suitable operating procedures.
In case of breakdowns or any troubles with the instrument, apply to the local Technical Service.
0.2.
WARRANTY
Each provided instrument is completely tested, and guaranteed for twelve months from delivery.
The warranty affects all the mechanical and electrical parts. It is granted only for a proper installation, use
and maintenance in compliance with the given instructions in this manual contained.
According to this warranty, DAS commits itself to repairing or replacing all the parts which show off to be
defective from the beginning.
The warranty does not include any responsibility for direct or indirect personal and material damages,
caused by improper use and maintenance of the instrument.
All parts that are subject to deterioration, because of their specific use, are excluded from the warranty.
Due to a misuse of the instrument the above mentioned warranty does not include (if requested) the travel
and labor-hour expenses as well as all the accommodation expenses.
0.2.1.
Asking for Service
DAS is always at the Customer’s disposal for any kind of information about use, maintenance, installation,
etc.. When asking for service please refer to this manual pointing out the data reported on the identification
label (registration number and production year).
Only qualified Technicians are entitled to fix the instrument; ordinary maintenance should be carried out by
the user, as described in this manual.
DAS Technical Service or a licensed Service Center with Specialized Technicians, with suitable
instrumentation and original spare parts are always available for extraordinary maintenance (repair), under a
yearly assistance contract or on specific demand.
0.2.2.
Ordering the spare parts
Parts subject to deterioration or defective which need to be replaced have to be requested as shown below.
Ordering the spare parts, the following data are to be mentioned:
• customer’s purchase order
• name and version of the instrument
• instrument code number
• part code number
• description of the part
• requested quantity
• name and company address to deliver the ordered goods.
Replacing the parts, the use of ORIGINAL SPARE PARTS guarantees the efficiency and a lasting
instrument life.
PLATE WASHER
USER MANUAL
0.3.
Doc. N° M05-EN
Rev.02
Date 27.05.2004
Page 6
CE CONFORMITY
Declaration of conformity according to the 98/79/EC
In-Vitro Diagnostic medical devices Directive (IVDD)
DAS s.r.l., manufacturer of “Plate Washer”, Automated microplate washer, class of risk In-Vitro
Diagnostic Medical Devices, declares that the mentioned system complies with the European Directive
98/79/EC (IVDD).
The present conformity declaration is based upon the following requirements:
Quality Management System (ISO 9001:2000): Working Procedures and Instructions for
• Design process control;
• Manufacturing process control;
• Tests and Checks.
System documentation:
• Technical documents;
• Risk analysis;
• User manual;
• Service manual.
The Managing Director
The instrument conforms to the following EC Directives, including the last modifications:
−
98/79/EC regarding in-vitro diagnostic medical devices
−
73/23/EC regarding low voltage
−
89/336/EC regarding Electromagnetic Compatibility
The below harmonized standard specifications have been applied:
Quality system:
−
EN ISO 9001:2000 “Quality management systems”
Risk analysis:
−
EN 14971 (2000) “Application of risk management to medical devices”
Safety:
−
EN 61010 -1 (1997) “Electrical equipment safety requirements for measurement, control and laboratory use
Part 1: General requirements”
Electromagnetic Compatibility:
−
EN 61326 -1 (1998) “Electrical equipment for measurement, control and laboratory use – EMC
requirements Part 1: General requirements”
PLATE WASHER
USER MANUAL
Doc. N° M05-EN
Rev.02
Date 27.05.2004
Page 7
SECTION 1 - GENERAL SAFETY WARNINGS
1.1.
DANGER-WARNING SYMBOLS
In this manual the following symbols are to remind the user of the safety rules:
This is a symbol of generic DANGER. It means that serious dangers might occur to the
operator if the described precautions are not fulfilled.
This is a symbol of high electrical voltage; by touching parts reporting this label, life endanger
might occur. Parts reporting this label can be handled only by qualified operators after having
unplugged the instrument.
This symbol indicates that the instrument makes use of chemical reagents and other
dangerous (corrosive, irritant and harmful) CHEMICAL SUBSTANCES which can cause
damages to people and things. When this label is found, pay attention to the producer’s
recommendations
This symbol indicates that the instrument involves the handling of samples which can be
infected (urine and human serum). In this condition INFECTIONS or CONTAMINATION might
occur. Pay attention to the general safety warnings when in presence of such biological
substances. Use protective clothes, gloves and glasses.
This symbol indicates that damages to the instrument and/or its incorrect results could occur if
the given warnings are not respected
This symbol is to advise that the instrument or part of the manual which is particularly important
has to be consulted.
1.2.
INTENDED USE OF THE INSTRUMENT
The instrument is designed to be used in the following working conditions:
• washing of micro-titer plate
• work at room temperature and humidity, according to the specified data;
• do not power the instrument in a potentially explosive environment or at risk of fire.
The instrument has to be used as described in this manual. Any other use has to be regarded as improper.
1.3.
USE OF THE INSTRUMENT
The instrument has to be used for the expected purposes and in perfect technical conditions, by qualified
personnel, in working conditions and maintenance operations as described in this manual, according to the
safety rules.
This manual contains instructions for qualified operators.
• Qualified User has to make sure that environmental condition is suitable, the installation is correct,
the use and maintenance are proper, according to the general safety rules as well as to the particular
precautions described in the manual (although he is not entitled to repair the instrument).
• Qualified Technician is entitled to maintain and fix the instrument, according to the instructions
received and using the original spare parts.
Alterations of the instrument are prohibited. The user is liable for any instrument improper
modification as well as the deriving consequences.
Should the machine need extraordinary maintenance, ask for DAS Service or for licensed service centers.
The maintenance will be carried out by Specialized Technicians that will be able to fix the instrument using
the original spare parts to replace the defective ones.
PLATE WASHER
USER MANUAL
Doc. N° M05-EN
Rev.02
Date 27.05.2004
Page 8
SECTION 2 - GENERAL INFORMATION
2.1.
INSTRUMENT DESCRIPTION: PURPOSE AND FEATURES
PLATE WASHER is a microplate automated washer. It can be programmed according to a specific
protocol. In a combination with a microplate reader can be useful to automatize the ELISA washing
process.
The free program open system allows the operator to run any possible plate washing by setting up the
wanted program through its in-built keyboard.
2.3.
INSTRUMENT DESCRIPTION
Components of different views of the below pictured instrument:
Front view
− two lines by 16 characters display,
− alphanumerical key-pad,
− Micro titer plate carriage
Rear view:
− power socket and switch,
− RS232 output connector
− identification label.
Display
Keypad
Micro titer plate
carriage
Front view
RS232
connector
Power socket
and switch
Identification label
PLATE WASHER
USER MANUAL
Page 9
Doc. N° M05-EN
Rev.02
Date 27.05.2004
2.3.1. Display and keypad
•
•
•
•
Press F1 or F2 keys to select one of the two functions
displayed on the screen low line
Press SET key to modify some of the set parameters
(e.g. date and hour).
Press ESC key to go back to the preceding menu.
Press ENTER key to enter the data when provided from
the specific menu.
NOTE: The keys SET and ENTER have different
functions according to the specific menu as better specified
in the SECTION 5 of this manual.
PLATE WASHER
Washer
Prime
F1
F2
1
2
3
4
ESC
5
6
7
8
SET
9
0
fig.2.4
2.3.2. Micro titer plate carriage
The instrument is provided with a micro titer plate carriage to move the micro titer plate towards the inside
washer.
fig. 2.5
PLATE WASHER
USER MANUAL
2.4.
Doc. N° M05-EN
Rev.02
Date 27.05.2004
INSTRUMENT FUNCTIONING PRINCIPLE
Below (fig.2.6) is the diagram representing the main functional elements of the instrument.
fig. 2.6
Page 10
PLATE WASHER
USER MANUAL
2.5.
Doc. N° M05-EN
Rev.02
Date 27.05.2004
Page 11
INSTRUMENT TECHNICAL DATA
Display
Alphanumerical 2 lines 16 characters LCD
Keypad
17 keys, two of which with variable functions to guide the user.
Program setting up
−
washing volume
−
delay time before starting the washing cycle
−
washing cycle delay between strips
−
strip selection to start with washing
−
number of strips to be washed
−
number of washing cycles for each strip
−
number of the plate washing cycles
−
Final aspiration for the single strip
−
Plate washing aspiration starting
Program memorization
storing capability of 100 programs
RS232 serial output
9600 baud, 1 start, 8 data, 1 stop, no parity, XON/XOFF protocol
Electrical power requirement
Standard 230 VAC 50 Hz
Optional 115 VAC 60 Hz
Power consumption
80 W max
Operating conditions
temperature from +10 to +35°C
relative Humidity up to 85%
Shelf condition
temperature from -10 °C up to +60 °C
relative humidity up to 85%
Dimensions
width 34 mm, height 18.5 mm, depth 36 mm
Weight
13 Kg
INSTRUMENT EQUIPMENT:
•
•
•
•
•
•
User’s manual
Three 1 liter bottles for Wash and Waste and Cleaner.
Tubing kit
AC power Cable
Fuses kit
1 Dust cover
Additional accessories (optional):
• PC cable connection
PLATE WASHER
USER MANUAL
Doc. N° M05-EN
Rev.02
Date 27.05.2004
Page 12
SECTION 3 - PACKAGING, TRANSPORT AND STORAGE
3.1.
GENERAL WARNINGS
Before starting with the packaging operations the machine has to be put out of service, as well as before the
transportation and storage the instructions as indicated in Section 8 of this manual have to be properly
observed
The instrument has been used with samples potentially infected (urine, human sera etc.) that could
have been caused INFECTED CONTAMINATIONS. General safety warnings about biological
substances potentially infected have to be observed.
Before putting the instrument out of service, IT HAS TO BE DISINFECTED!
Before transportation or storage of the instrument, draw up the minutes of declaration of
disinfection dated and signed by a qualified person.
3.2.
PACKAGING
Packaging is needed anytime the instrument has to be transported or shipped by courier or other means.
To pack the instrument follow the instructions as below described:
−
put the instrument into the original packaging box or into a suitable cardboard box; in this case the
instrument has to be properly protected by plastic protective material.
−
mark the package with address, instrument identification and warning labels:
“OUT OF SERVICE MATERIAL”
Biological substances potentially infected
3.3.
INSTRUMENT TRANSPORTATION
The transportation of the instrument when unpacked must be limited within the room where it is used,
avoiding damaging bumping.
When shipped or transported the instrument has to be provided with DISINFECTION DECLARATION
CERTIFICATE (see Sec. 8 of this manual).
3.4.
STORAGE OF THE INSTRUMENT
Before storing the instrument for a long period, pack it carefully as described above.
Relative humidity has to be less than 85% and temperature between 0°C and 50°C.
The instrument disinfection declaration has to be labeled on the packaging before storing it. (see Sec. 8
of this manual)
PLATE WASHER
USER MANUAL
Doc. N° M05-EN
Rev.02
Date 27.05.2004
Page 13
SECTION 4 - INSTALLATION AND START-UP INSTRUCTIONS
Installing and setting up the instrument, the safety warnings and general rules described in
Section 1 must be observed.
4.1
PLACING THE INSTRUMENT
The instrument has to be placed on a leveled bench. Room temperature has to be between 15 and 32 °C
with a relative humidity below 80%; protect it from direct sunshine.
4.2
POWER SUPPLY
Once the instrument has been placed, plug it to a power of 220VAC by the supplied cable.
fig.4.1
Warning: make sure that the electrical power is the one as requested and indicated on the
identification label of the instrument !
[ 230 V~ or 115 V~ ]
Warning: make sure that the fuses correspond to the ones indicated on the identification label of
the instrument and in the manual!
230 VAC mains
# 2 quick fuses 1 A
115 VAC mains
# 2 quick fuses 2 A
Page 14
Doc. N° M05-EN
Rev.02
Date 27.05.2004
PLATE WASHER
USER MANUAL
SECTION 5 - HOW TO USE PLATE WASHER
5.1.
INTRODUCTION
The flow diagram below indicates how the instrument is used. Detailed information for each step can be
found in the indicated paragraph.
Table 5.1 GENERAL FLOW DIAGRAM
IN ITIA L
MENU
IN S TR U M E N T
SE T UP
PR IM E
F UN C T ION
PR O GR A M
SE T
LA N GU A G E
DE L E T E
M E M OR Y
NE W P RO GR A M
IN S TR U M E N T
TE S T
PR O G.
M E M OR Y
RU N
PR O G R A M
5.2.
SWITCHING THE INSTRUMENT ON
The safety warning and general rules described in Section 1 have to be observed when using the
instrument
When switched on, the instrument automatically
checks the functionality of its main parts; it
show the heading containing the instrument
name, the software revision, it checks the plate
carriage home position.
SELECT
Washing Prime
Then the initial menu is shown as in fig. 1
F1
Select one of the two options as shown on the
display lower line (Washer or Prime) by
pressing the function keys F1 or F2
F2
1
2
3
4
ESC
5
6
7
8
SET
9
0
fig. 5.1 Initial menu
Page 15
Doc. N° M05-EN
Rev.02
Date 27.05.2004
PLATE WASHER
USER MANUAL
When this initial menu is displayed the SET button assume specific functions:
•
SET button is to modify some parameters (as specified in the SET menu chapter);
•
When in this menu, ENTER button (usually it allows to enter data when required on the specific menu) is
not enabled.
•
ESC usually allows to go back to the previous menu
NOTE:
SET and ENTER, in particular menus can change their function as after explained.
By pressing SET button when in the initial menu (fig. 1), some instrument parameters can be modified. In
the succeeding phases use ESCAPE to go back to the initial menu, use SET to go to the next menu.
5.3.1. Language selection
From the initial menu, press SET button only once, the
LANGUAGE SELECTION menu is displayed.
After the selection, the DELETE MEM MENU is
displayed.
LINGUA / LANGUAGE
Change
F1
5.3.2. How to delete stored programs
DELETE MEM menu allows
programs.
to
delete
filed
F2
SET
DELETE PROGRAMS
A ll
Num
-----------------F1
F2
SET
DELETE PROGRAMS
All
Num
F1
F2
F2
F1
GO TO
SET SHAKING TEST
When F1 key is pressed, in order to avoid
fortuitous mistakes, a further confirmation, before
deleting all the filed programs, is required.
If F1 is pressed, the identification number of the
programs to be deleted is required, then press
ENTER.
Before deleting the selected program a
confirmation is required. Then the menu DELETE
PROGRAM is displayed again.
DELETE PROGRAMS
PROG no: [nn]
----------------------------F1
F2
ENTER
Go back to
DELETE PROGRAMS
menu
ARE YOU SURE
yes
no
-------------------------F1
F2
F1/F2
Go back to
PROGRAM
DELETED
menu
PLATE WASHER
USER MANUAL
Page 16
Doc. N° M05-EN
Rev.02
Date 27.05.2004
5.3.3. Set shaking
SET
SET SHAKING menu allows to set the shaking
speed of the plate
S E T S H A K IN G
S et
SET
-----------------F1
F2
SET SHAKING
F1
Set
SPEED = n
from 1 to 5
-------------------------F1
F2
GO TO
INSTRUMENT TEST
F1
F2
ENTER
Executes a test
3 sec. long
5.3.4. Instrument test
SET
INSTRUMENT TEST
RUN
F1
INSTRUMENT TEST
SET
RUN
-------------------------------F1
F2
F1
F2
Press F1 to enter the Service function.
The instrument test has the following functions:
Plate
to move the plate
Aspirator
to move the aspirator up and down
Pump1
to run pump1
Pump2
to run pump2
Valve
to open/close valve
Test on strip 1
to calibrated the dispenser
go back to language
SELECT MENU
SERVICE
PLATE WASHER
USER MANUAL
SET
Page 17
DISPENSER CALIBRATION
TEST ON STRIP 1
run
factor
-------------------------------F1
F2
F2
F1
VOLUME FACTOR
(x.xxx) = ___
-------------------------------F1
F2
Liquid vol.(xxx)
+
-------------------------------F1
F2
Press F1 to start the strip dispensation test.
Set the volume to be dispensed (from 200 to 400µl in
step of 50µl)
Press Enter
The dispensation take place on strip 1
EN TER
After the dispensation, a visual check has to be made
on the plate, to verify if the dispensation is correct. (use
a pipette to verify the effective dispensed volume).
F1/F2
EN TER
SET T HE
LIQUID VOLUME
Eventually repeat the dispensation test .
If a correction is needed change the volume factor(F2).
Press Enter and repeated the test up to a satisfactory
result.
DISPENSING
LIQUID STRIP 1
-------------------------------F1
F2
F1
Doc. N° M05-EN
Rev.02
Date 27.05.2004
REPEAT?
yes
no
-------------------------------F1
F2
F2
5.4.
NEW PROGRAM SET UP
SELECT
washing
prime
-------------------------------F1
F2
Select “washing” pressing F1
Select a new program set up (F2)
Digit the starting strip position and press
Enter. (if we set zero at this request it
will always repeat before program
execution and the number of the strip
to wash will be set to zero)
F1
SELECT PROGRAM
memory
new
-------------------------------F1
F2
F2
Digit the number of strips to wash (or
activate) and press Enter. (if we set zero
at this request it will always repeat
before program execution)
Set the desired liquid volume from 200µl to
400µl (in step of 50µl) or 0 and press
Enter.
Starting strip
position(nn)=
-------------------------------F1
F2
ENTER
Number of strip
to wash (nn)=
-------------------------------F1
F2
If the liquid volume is 0 the machine will
perform only an aspiration of the plate.
ENTER
Liquid vol.(nnn)
+
-------------------------------F1
F2
Select a washing cycle or an activation
cycle as needed pressing F1 or F2.
Press Enter after the selection
ENTER
Liquid vol.
>0
=0
Plate management
[wash]
activ.
-------------------------------F1
F2
F1/F2
ENTER
Sele ct wash or
activa te
Go to the plate
strip empty
Follows in the
next page
PLATE WASHER
USER MANUAL
Doc. N° M05-EN
Rev.02
Date 27.05.2004
Page 18
PLATE ACTIVATION
follows from
previous page
activate
Plate management
Time delay
to asp.(nns)=
-------------------------------F1
F2
ENTER
Set the time after witch the application
plate take place on all the plate.
wash
Stri p soak
time (nns)=
-------------------------------F1
F2
PLATE WASH
Set the time ( sec.) of liquid permanence
into the strip. Press Enter.
F1
Stri p washing
cycles (nn)=
-------------------------------F1
F2
Set the number washing cycle for the strip.
Press Enter
ENTER
Strip empty
[yes]
no
-------------------------------F1
F2
Select (F2/F2) if the strip has to be left
empty or full after the washing cycle. Press
Enter.
ENTER
Strip washing
delay (nns)=
-------------------------------F1
F2
Set the time delay (sec.) between the
washing cycle of one strip and the
beginning of the washing cycle of the
following strip. Press Enter.
ENTER
No. of washing
cycles (nn)=
-------------------------------F1
F2
Set the number of complete washing cycle
for the plate. Press Enter.
ENTER
Set the time delay between a cycle and
the next one.
=1
Cycles
Select plate empty or not at the end of the
working cycle ( if the strips were full).
>1
Waiting beetwen
cycles (000s)=
-------------------------------F1
F2
Set the incubation time before washing
take place. Press Enter.
ENTER
no
Strip empty
Plate empty
[yes]
no
-------------------------------F1
F2
yes
ENTER
Plate starting
incub.(nnmin)=
-------------------------------F1
F2
SHAKING
yes
[no]
-------------------------------F1
F2
ENTER
F1
NAME = XXXXXX
incr
decr
-------------------------------F1
F2
GO TO THE FIRST EMPTY
FREE POSITION
F1
Go to Program RUN
Shaking selection: if shaking is selected
the plate will be shacked during
incubation time (at the selected shaking
speed, see par. 5.3.3)
Insert the name of the program using
F1/F2.
Press Enter to go to program RUN
ENTER
SAVE PARAMETERS
yes
no
-------------------------------F1
F2
Press F1 to save the parameters.
F2
PLATE WASHER
USER MANUAL
5.5.
Doc. N° M05-EN
Rev.02
Date 27.05.2004
Page 19
PROGRAM MODIFICATION
SELECT
washing
prime
-------------------------------F1
F2
F1
SELECT PROGRAM
memory
new
-------------------------------F1
F2
F2
Select the program by number or by the list of existent
programs.
SELECT PROGRAM
number
list
-------------------------------F1
F2
F1
F2
PROGRAM NO.:
-------------------------------F1
F2
ENTER
001 NAME XXXXXX
next
previous
-------------------------------F1
F2
SET
001 NAME XXXXXX
show
change
-------------------------------F1
F2
F2
STARTING STRIP
POSITION
nn
-------------------------------F1
F2
Follow NEW PROGRAM SETUP
Pressing set is possible:
− to show the parameter (F1) of the program.
− To change the parameters of the program following
the steps of par. 5.4
Doc. N° M05-EN
Rev.02
Date 27.05.2004
PLATE WASHER
USER MANUAL
5.6.
PROGRAM RUN
5.6.1. GENERAL FLOW DIAGRAM
- START-
prog r.
sto red ?
yes
yes
mod if y
prog r. ?
no
no
progr. set up
progr.
mod ifi cation
yes
PRI ME ?
RUN
no
Page 20
Doc. N° M05-EN
Rev.02
Date 27.05.2004
PLATE WASHER
USER MANUAL
5.6.2. PROGRAM START UP
SELECT
prime
washing
-------------------------------F1
F2
F1
SELECT PROGRAM
memory
new
-------------------------------F1
F2
F1
SELECT PROGRAM
number
list
-------------------------------F1
F2
F2
F1
PROGRAM NO.:
-------------------------------F1
F2
ENTER
nnn NAME xxxxxx
next
previous
-------------------------------F1
F2
F1/F2
SELECT THE PROGRAM
ENTER
FIRST POSITION
STRIP
>0
=0
POSITION STRIP
initial(nn)
-------------------------------F1
F2
ESC
ENTER
NUMBER STRIP
>0
=0
NUMBER OF STRIP
TO WASH
-------------------------------F1
F2
ESC
ENTER
INSERT PLATE
run
-------------------------------F1
F2
F1
PRIME
yes
no
-------------------------------F1
F2
F1/F2
RUN
ESC
Page 21
PLATE WASHER
USER MANUAL
5.7.
Doc. N° M05-EN
Rev.02
Date 27.05.2004
Page 22
PRIME
From the main Menu it is possible to process a complete prime at each
working starting of the machine (use washing solution).
SELECT
Washing
Prime
-------------------------------F1
F2
In order to wash the hydraulic circuit the prime command has to be
used at the and of each session to perform the above change the wash
solution with distilled water and then prime at least two times.
F2
PRIME ON
5.8.
DISPLAYED MESSAGES
In case of failure the instrument is able to display the below messages.
See Section 8 for the needed operations
MEMORY ERROR
This message means that some memorized data are missing.
MISSING CALIBR.
This message means that instrument is not operative as the dispensation
volume is not defined.
PLATE WASHER
USER MANUAL
Doc. N° M05-EN
Rev.02
Date 27.05.2004
Page 23
SECTION 6 - PC CONNECTION
6.1.
INTRODUCTION
The instrument is equipped with an RS232 serial port for PC connection.
A cable and software are optionally available to link the instrument to PC (IBM or compatible in order to print
, transfer and record the acquired data.
To use different communication programs, be sure that the following parameters are set:
− 8 bit
− 9600 baud rate
− no parity
− stop bit
6.2.
CONNECTION PLATE WASHER – COMPUTER
Use a cable to link the instrument to the RS232 serial port. Make sure of its compatibility as following:
• A 9 pins connector is available at the rear of the instrument (see fig. 6.1).
• Two serial ports are located on the PC: usually a 9 pins or a 25 pins male connector.
fig. 6.1 RS232 serial port location
PLATE WASHER
USER MANUAL
Page 24
Doc. N° M05-EN
Rev.02
Date 27.05.2004
SECTION 7 - MAINTENANCE AND CONTROLS
!
7.1.
Only qualified personnel is entitled to carry out maintenance (see Section 1 of this manual).
Carrying out the maintenance operations, follow the general warnings as described in Section 1 of
this manual as well as the below safety rules
PREVENTIVE MAINTENANCE AND CONTROLS
Operation
Period
Cleaning
Daily and/or at the end of each working
session.
General inspection and checks
At interval of 6 months
As the instrument could be used in different conditions and terms, maintenance has to be done according to
the use of the instrument, the period indicated on the above table has to be taken on account as an
average. After a long period of the instrument inactivity, a general maintenance is required before using it
again.
7.1.1. Cleaning
This symbol indicates that the instrument makes use of chemical reagents and other dangerous (corrosive,
irritant and harmful) CHEMICAL SUBSTANCES which can cause damages to people and things. When this
label is found, pay attention to the producer’s recommendations.
This symbol indicates that the instrument involves the handling of samples which can be infected (urine
and human serum). In this condition INFECTIONS or CONTAMINATION might occur. Pay attention to the
general safety warnings when in presence of such biological substances. Use protective clothes, gloves
and glasses.
After each working session, clean the instrument carefully.
−
−
−
Use a water soaked cloth (or light detergent) to clean the instrument external parts
To clean the micro titer plate location, use a water soaked cloth with 0.5% Sodium Hypoclorite. Make
sure not to leave any loose threads.
The room and desk where the instrument is placed have to be always clean; remove any dirt.
Warning: cleaning the instrument, do not use alcohol or similar solutions!
When cleaning don’t let electric parts (connectors, etc.) get wet. If necessary, before turning
the instrument on, dry them out
7.1.2. Inspection and controls
It is advisable to check periodically all the instrument parts.
PLATE WASHER
USER MANUAL
7.2.
Doc. N° M05-EN
Rev.02
Date 27.05.2004
Page 25
TROUBLESHOOTING (DIAGNOSIS)
Some troubles that might occur during the instrument functioning as well as the specific remedy are shown
in the following table.
TROUBLE
PROBABLE CAUSE
The instrument doesn’t go The power source is faulty
on
REMEDY
Check the power cord and source
Check the fuses, if necessary replace them
Incomprehensible
messages are displayed
The start has gone wrong
Switch off the instrument and after while
switch on again. In case of failure repetition
call for Technical Assistance.
MEMORY ERROR is
displayed
It means that some memorized Call for Technical Assistance
data are missing.
MISSING CALIBR.
It means that the dispensation Calibrate the dispensation (see par. 5.3.3)
volume is not defined.
The instrument doesn’t
dialogue with the PC
Incorrect connection
Check the cable connection, be sure of the
serial port
Check the program setting for the utilized
serial port
The instrument sends to
the PC wrong messages
7.3.
The instrument transmission is
different from the one of the
communication program
Check the data transmission speed of the
instrument and the one of the program are the
same (9600 baud)
REPAIRS
Only simple repairs are allowed to the operator.
In case of complex breakdowns, or defects might occur to the instrument, qualified technical interventions
are required.
REPAIR (extraordinary maintenance) has to be carried out (see Section 1) only by:
• Authorized Technical Service licensed center, which can operate (on request or under
assistance contract), by Specialized Technicians, using original spare parts.
Transformations or modifications of the instrument are not allowed. The user is liable for any
instrument improper use or modification and for the deriving consequences.
PLATE WASHER
USER MANUAL
Doc. N° M05-EN
Rev.02
Date 27.05.2004
Page 26
SECTION 8 - DISINFECTION AND PUT OUT OF SERVICE
8.1.
INSTRUMENT DISINFECTION
The instrument involves the handling of samples which can be infected (urine and human serum) and
positive controls. In this condition INFECTIONS or CONTAMINATION might occur.
Every part and accessory of the instrument must be considered potentially infected.
Carefully disinfect the instrument, before transporting it to another place or before starting any maintenance.
Before sending back the instrument it has to be carefully disinfected. Fill in a disinfection certificate and
enclose it with the instrument. If the certificate is missing, the customs officers or your service center can
refuse the instrument!
8.1.1. Disinfection Process
Prior to any repair or maintenance intervention and before transporting the instrument a
disinfection is necessary by using wide band solutions!
Warning !
USE LABORATORY PROTECTIVE CLOTHES, DISPOSABLE GLOVES AND GLASSES WHILE
DISINFECTING THE INSTRUMENT.
Use one of the following wide band solutions:
Aseptisol
Manufacturer: Bode Chemie Amburg
Germocid Plus
Manufacturer: Germo S.p.a. Milano
Lysetol
Manufacturer: Schülke & Mayr Ges.m.b.H.
If the above solutions are not available use other wide band disinfectant solutions.
Use the solution only for the instrument surface.
1. Wear disposable gloves, protective glasses and suitable clothes.
2. Prepare an autoclave bag for the disposable items used for the disinfection and label the bag with an
autoclave band mark.
3. Unplug the instrument in order to avoid explosions.
4.
5.
Remove all the accessories and disinfect the ones which have to be sent with the instrument.
Spray the disinfectant solution on the instrument surface. or use a cloth or paper soaked in a
disinfectant solution.
6. Leave the solution on the instrument for 10 minutes and repeat the treatment from the preceding
point.
7. Leave the solution on the instrument for 5 hours, clean the instrument surface by a light detergent or
water to eliminate any dirt or disinfectant solution.
8 Carefully dry the instrument.
9. Put the instrument and its accessories into their original box.
10. Wash and disinfect the hands by using a light detergent.
11. Fill in a Disinfection Certificate and enclose it with the instrument.
Doc. N° M05-EN
Rev.02
Date 27.05.2004
PLATE WASHER
USER MANUAL
Page 27
8.1.2 Disinfection certificate
The Disinfection certificate as shown below, has to be filled in and enclosed with the instrument before
shipping it for a maintenance service.
The certificate Has to be stuck on the instrument package.
Disinfection certificate
Instrument:
Model:
S.N.:
We declare that :
the instrument and its accessories never came in touch with
dangerous biological substances,
the instrument and its accessories have been disinfected and / or
decontaminated to eliminate every biological substance. which
could be dangerous for the staff.
Responsible name:
User
Address:
Country:
Date
8.2.
Signature
PUT THE INSTRUMENT OUT OF SERVICE
At the end of the instrument operating life, dispose of it taking in account the safety for people and
environment.
− Unplug the instrument and the PC.
− If the instrument has been used, carefully disinfect and clean it following the above instructions or
the internal rules of the laboratory.
if the instrument has to be transported or stored, enclose the disinfection Certificate, dated and signed by
a qualified operator.
8.2.1. Momentary stocking
Disactivate the instrument and label it with warning signals of “OUT OF SERVICE ” (see Sec. 3).
8.3.
DEMOLISHING PROCEDURE
−
−
Dismantle the instrument parts that connect the elements according to their chemical nature
Start demolishing procedure respecting the local current laws and regulations.