1
IBM Tealeaf CX
Version 9 Release 0.2
June 18, 2015
Tealeaf CX Upgrade Manual
Note
Before using this information and the product it supports, read the information in “Notices” on page 69.
This edition applies to version 9, release 0, modification 2 of IBM Tealeaf CX and to all subsequent releases and
modifications until otherwise indicated in new editions.
© Copyright IBM Corporation 1999, 2015.
US Government Users Restricted Rights – Use, duplication or disclosure restricted by GSA ADP Schedule Contract
with IBM Corp.
Contents
Tealeaf CX upgrade information . . . . v
Chapter 1. Overview of Upgrade Process 1
Upgrade path . . . . . . . . . . . .
Order of Upgrades . . . . . . . . . .
1. Upgrade CX platform and core applications
2. Verify functionality of CX platform and core
applications. . . . . . . . . . . .
3. Post-Upgrade Cleanup . . . . . . .
4. Upgrade Other Tealeaf Software . . . .
.
.
.
. 1
. 1
. 2
.
.
.
. 2
. 2
. 3
Chapter 2. Upgrading and Migrating to
New Hardware . . . . . . . . . . . . 5
General Steps .
.
.
.
.
.
.
.
.
.
.
.
.
. 5
Chapter 3. Preparing to Upgrade to the
Current Release . . . . . . . . . . . 7
Adding or removing products . . . . . . .
Upgrade preparation . . . . . . . . . .
Migrating to new hardware . . . . . . .
Report Server Time Zone . . . . . . . .
Perform All Microsoft-Recommended Updates .
.NET Framework 4.5 is required . . . . . .
Database Migration . . . . . . . . . .
Additional tasks . . . . . . . . . . .
Acquire Latest Build . . . . . . . . . .
Test Pre-Upgrade System . . . . . . . .
Copy Files to Each Server . . . . . . .
Backup . . . . . . . . . . . . . .
Data Export . . . . . . . . . . . .
Getting Started with the Upgrade . . . . . .
Stopping Traffic at the HBR . . . . . . .
Stopping Traffic into Each Canister . . . .
Completing Data Collection . . . . . . .
Remove Canister Spool Files. . . . . . .
Next Steps. . . . . . . . . . . . . .
. 7
. 7
. 7
. 7
. 7
. 8
. 8
. 8
. 9
. 9
. 10
. 11
. 12
. 13
. 13
. 13
. 14
. 14
. 14
Chapter 4. Upgrading Tealeaf Software
on a Server . . . . . . . . . . . . . 17
Prerequisite checklist . . . . . . .
How to begin. . . . . . . . . .
Running the Tealeaf Upgrader on a Server
Running the Tealeaf Installer to Upgrade a
Uninstall . . . . . . . . . .
Troubleshooting during Upgrading . .
Review Logs . . . . . . . . .
. . .
. . .
. . .
Server
. . .
. . .
. . .
. 17
. 17
. 18
20
. 21
. 21
. 21
Chapter 5. Release Upgrade for
All-in-One Deployment . . . . . . . . 23
Prerequisite Checklist . . .
1. Stop Services . . . . .
2. Upgrade Tealeaf Software .
3. Restart Services . . . .
© Copyright IBM Corp. 1999, 2015
.
.
.
.
.
.
.
.
.
.
.
.
.
.
.
.
.
.
.
.
.
.
.
.
.
.
.
.
.
.
.
.
23
23
24
24
Post-Upgrade Cleanup. . . . .
Perform Other Tealeaf Upgrades .
.
.
.
.
.
.
.
.
.
.
. 24
. 24
Chapter 6. Upgrade for Multi-Server
Deployment . . . . . . . . . . . . 25
Prerequisite checklist . . . . . . . . .
1. Stop Services . . . . . . . . . . .
2. Upgrade Report Server. . . . . . . .
3. Upgrade Processing Servers . . . . . .
4. Upgrade Databases . . . . . . . . .
5. Restart Servers . . . . . . . . . .
Restart Processing Servers . . . . . .
Restart the Report Server . . . . . . .
6. Upgrade Health-Based Routing Server . .
7. Verify Components . . . . . . . . .
Post-Upgrade Cleanup. . . . . . . . .
Perform Other Tealeaf Upgrades . . . . .
Release Upgrade for Reporting Server . . .
Prerequisites Checklist . . . . . . . . .
Change localhost References . . . . . .
Database Requirements . . . . . . .
Upgrade Sequencing . . . . . . . . .
Before You Begin . . . . . . . . . .
User Permissions . . . . . . . . .
Upgrading the Reporting Servers . . . . .
Next Steps. . . . . . . . . . . . .
Upgrade for Processing Server . . . . . .
Prerequisite Checklist . . . . . . . . .
Stop Traffic to the Processing Server . . . .
Upgrading the Processing Server . . . . .
Next Steps. . . . . . . . . . . . .
Upgrade for HBR . . . . . . . . . .
Prerequisite Checklist . . . . . . . . .
Upgrade Sequencing . . . . . . . . .
Upgrading the HBR Servers . . . . . . .
Adding as a new component to this server .
Upgrading an existing HBR . . . . . .
After Upgrading HBR . . . . . . . . .
Next Steps. . . . . . . . . . . . .
.
.
.
.
.
.
.
.
.
.
.
.
.
.
.
.
.
.
.
.
.
.
.
.
.
.
.
.
.
.
.
.
.
.
.
.
.
.
.
.
.
.
.
.
.
.
.
.
.
.
.
.
.
.
.
.
.
.
.
.
.
.
.
.
.
.
.
.
25
25
26
26
26
26
26
27
27
27
27
27
27
27
28
28
28
29
29
29
29
30
30
30
30
30
31
31
31
31
32
32
32
32
Chapter 7. Upgrading the databases to
the current release . . . . . . . . . 33
SQL Server versions . . . . .
Database compatibility mode .
SA permissions required . . .
Use of dynamic ports . . . .
Required temporary space . . .
Preparing the Report Server . . .
Preparing the database server . .
Database upgrade steps . . . .
Disabling the StatsLogger session
Creating the cxReveal databases
Upgrading the databases . . .
Troubleshooting . . . . . . .
. .
. .
. .
. .
. .
. .
. .
. .
agent
. .
. .
. .
.
.
.
.
.
.
.
.
.
.
.
.
.
.
.
.
.
.
.
.
.
.
.
.
.
.
.
.
.
.
.
.
.
.
.
.
.
.
.
.
.
.
.
.
.
.
.
.
33
33
33
33
33
34
34
34
34
35
35
37
iii
Upgrading when the database server times out
during upgrade of rs_activity_log table . .
TLEventManager Utility . . . . . . . . .
Prerequisites . . . . . . . . . . . .
When to Use . . . . . . . . . . . .
Chapter 9. Upgrade for CX PCA . . . . 53
.
.
.
.
37
38
39
39
Chapter 8. Post-Upgrade Cleanup . . . 43
Updating the Tealeaf Application Pool settings .
Review Print Out of Preparing Page . . . . .
Apply Any Patches . . . . . . . . . . .
Review Conversion report . . . . . . . .
Review Logs . . . . . . . . . . . . .
TLEventManager log . . . . . . . . .
TealeafDatabaseManager log. . . . . . .
Event Viewer . . . . . . . . . . . .
Set Recovery Model to Simple . . . . . . .
Re-Apply Portal Custom Configurations . . . .
Replay server post-upgrade cleanup tasks . . .
Disable Interactive Services Detection. . . .
Replay Server must run as Local System. . .
Replay Server Access to Origin Server . . .
Updating POST Data Matching Configuration to
Recognize New Content Types . . . . . .
Start All Tealeaf Services . . . . . . . . .
Configure Permissions . . . . . . . . .
Event Model Backup . . . . . . . . . .
Verify Tealeaf Operations . . . . . . . . .
Check for Active Sessions. . . . . . . .
Verify Events . . . . . . . . . . . .
Verify Event Activity . . . . . . . . .
Verify Scorecards . . . . . . . . . .
Verify Exported Dashboards . . . . . . .
Verify Search Templates . . . . . . . .
Search for Completed Sessions . . . . . .
Check Database Filegroup Size Report . . .
Remove Tealeaf Upgrader Files from Servers . .
Upgrading Other Tealeaf Components . . . .
Upgrade RTV. . . . . . . . . . . .
Recommended PCA Upgrade . . . . . .
Upgrade to Latest Version of UI Capture . .
Upgrading Other Tealeaf Applications . . .
Archive. . . . . . . . . . . . . . .
Send message . . . . . . . . . . . .
Upgrade Troubleshooting . . . . . . . . .
Problem: No events displayed in the Tealeaf
Portal . . . . . . . . . . . . . .
Location . . . . . . . . . . . . . .
Color Codes . . . . . . . . . . . . .
iv
Tealeaf CX Upgrade Manual
.
.
.
.
.
.
.
.
.
.
.
.
.
.
43
43
43
43
43
44
44
44
44
44
44
44
44
45
.
.
.
.
.
.
.
.
.
.
.
.
.
.
.
.
.
.
.
.
.
.
45
45
45
45
46
46
46
47
47
48
48
49
49
49
49
49
50
50
51
51
51
51
Verify Requirements . . . . .
System Requirements . . . .
Data Requirements . . . . .
RPM of Installed Version . . .
Data Capture . . . . . . . .
Upgrade Passive Capture . . . .
Verify Passive Capture. . . . .
Verify Windows Pipeline Processing
For Multiple PCA Servers . . .
Reverting Your PCA Upgrade . .
.
.
.
.
.
.
.
.
.
.
.
.
.
.
.
.
.
.
.
.
.
.
.
.
.
.
.
.
.
.
.
.
.
.
.
.
.
.
.
.
.
.
.
.
.
.
.
.
.
.
.
.
.
.
.
.
.
.
.
.
53
53
53
53
54
54
54
55
55
55
Chapter 10. Testing Your Tealeaf
Solution . . . . . . . . . . . . . . 57
Methodology . . . . . . . . . . .
Temporary Configuration Changes . .
Installation . . . . . . . . . . .
Some Considerations in Generating Your Test
Session . . . . . . . . . . . . .
Generate Session . . . . . . . . .
Active Session Tests . . . . . . . .
Capture . . . . . . . . . . .
Reporting . . . . . . . . . . .
Search . . . . . . . . . . . .
Replay . . . . . . . . . . . .
Completed Session Tests . . . . . . .
Capture . . . . . . . . . . .
Search . . . . . . . . . . . .
Replay . . . . . . . . . . . .
Reporting . . . . . . . . . . .
Data Export . . . . . . . . . .
Export Chart . . . . . . . . . .
Export Scorecard . . . . . . . .
Export Dashboard . . . . . . . .
Capturing Additional Test Sessions . . .
Testing for Mobile Visitors . . . . .
Testing for Unique cxResults Identifier .
Alerts . . . . . . . . . . . .
Next Steps. . . . . . . . . . . .
.
.
.
.
.
.
. 57
. 57
. 58
.
.
.
.
.
.
.
.
.
.
.
.
.
.
.
.
.
.
.
.
.
.
.
.
.
.
.
.
.
.
.
.
.
.
.
.
.
.
.
.
.
.
.
.
.
.
.
.
.
.
.
.
.
.
.
.
.
.
.
.
.
.
.
58
60
60
60
61
61
61
61
62
62
62
62
63
63
64
64
64
64
64
64
65
Chapter 11. IBM Tealeaf documentation
and help . . . . . . . . . . . . . . 67
Notices . . . . . . . . . . . . . . 69
. 51
. 52
. 52
Trademarks . . . . . . .
Privacy Policy Considerations .
.
.
.
.
.
.
.
.
.
.
.
.
. 71
. 71
Tealeaf CX upgrade information
Before beginning the upgrade process, review the new features and fixes that are
included in this IBM Tealeaf release.
For a list of new IBM Tealeaf features and fixes that are included in this release,
see the IBM Tealeaf Customer Experience Release Notes.
Even if you have completed upgrades of Tealeaf® software in the past, it is
recommended that you review the entire Upgrade Manual prior to upgrading your
Tealeaf system.
As part of your overall upgrade process, you should review and set up your
rollback process.
Note: Familiarize yourself with the entire process before you begin it. These
upgrade procedures are generalized methods for upgrading the IBM Tealeaf CX
Platform, its components, and the associated databases. Some customization of the
process is required to match the configuration of most customer installations. For
more information, please contact Tealeaf Professional Services.
© Copyright IBM Corp. 1999, 2015
v
vi
Tealeaf CX Upgrade Manual
Chapter 1. Overview of Upgrade Process
The objective of the upgrade is to minimize downtime and data loss. The
recommended approach is to suspend the processing components, letting data
spool to disk while the Data Collector collects any unaggregated statistical data.
The system can then be upgraded. When it is restarted, it will attempt to work off
the spooled data until it catches up.
Note: If you have any questions about the process or the steps required to
upgrade your Tealeaf solution, please contact support.
Note: During the actual upgrade of the processing server software in a non-HBR
environment, incoming data will be lost, but this approach minimizes that loss.
After the processing servers are restarted, the Reporting Server and database
upgrades must be completed in a timely manner to avoid getting too far behind.
v Where possible, Tealeaf recommends upgrading using HBR. See “Upgrading
with HBR” on page 2.
Note: These general instructions may need to be modified for your installation.
Review with Tealeaf Customer Support before attempting the upgrade.
In most environments, Tealeaf's ability to capture all session traffic for a web
application performs an important business function. Since Tealeaf is upgraded in
place in a real-time environment, it is important to upgrade components in an
order that minimizes spooling of data.
v Upgrading individual software components on each Tealeaf server in your
environment typically requires running an Upgrader to upgrade all components
currently installed on the server.
Upgrade path
The following upgrade paths are available for this version of IBM Tealeaf.
IBM Tealeaf can be upgraded to the current release from versions 8.7 and later. If
you are upgrading from a version of Tealeaf that is earlier than version 8.7, you
must first upgrade to version 8.7, then upgrade to the current version.
If your IBM Tealeaf environment supports Enhanced International Character
Support (EICS), make sure that the release that you are upgrading to also support
EICS.
Note: Before you begin upgrading, verify that your system is properly sized for
the new version, as the system requirements can change.
Order of Upgrades
The upgrade process follows a specific sequence.
The following sections provide an overview of the upgrade process for IBM
Tealeaf.
© Copyright IBM Corp. 1999, 2015
1
1. Upgrade CX platform and core applications
The first step in the upgrade process is to upgrade the IBM Tealeaf CX platform,
applications, and the Tealeaf databases.
This upgrade step includes the following applications:
v IBM Tealeaf cxImpact
v IBM Tealeaf cxView
v IBM Tealeaf cxReveal (not including IBM Tealeaf cxReveal database. See
"cxReveal Installation" in the IBM Tealeaf cxReveal Administration Manual).
v IBM Tealeaf cxConnect for Data Analysis
v IBM Tealeaf cxVerify
This upgrade step applies to the following Tealeaf servers:
v Report Server
v Processing Server (Canister)
v Search Server
v Portal Server
v SQL Server (host of the Tealeaf databases)
Depending on your Tealeaf deployment, these servers may be hosted on a single
machine or on multiple machines. Specific steps for upgrading based on the
number of servers are provided later in this document.
Upgrading with HBR
In a multi-Processing environment, the potential for data loss is best mitigated in
an HBR environment. Health-Based Routing enables the balancing of loads
between Processing Servers. When one server is offline, the HBR server
redistributes the load, enabling you to upgrade Processing Servers sequentially. If
no Processing Server is available, hits are spooled to the storage device on the HBR
machine.
v HBR does not apply to environments with a single Processing Server.
Note: When upgrading the IBM Tealeaf CX platform and core applications in
multi-Canister environments, Tealeaf recommends using Health-Based Routing to
manage load balancing while Canisters are offline during the upgrade.
v HBR requires a separate dedicated machine to run the HBR pipeline. See
"Health-Based Routing (HBR) Session Agent" in the IBM Tealeaf CX Configuration
Manual.
2. Verify functionality of CX platform and core applications
After you complete the upgrade of the IBM Tealeaf CX platform and core
applications, you should verify that the upgraded components are properly
functioning before you upgrade the other Tealeaf products in your environment.
v See “1. Upgrade CX platform and core applications.”
3. Post-Upgrade Cleanup
After the upgrade has completed, additional tasks may need to be completed.
2
Tealeaf CX Upgrade Manual
Update Tealeaf Portal application pool
After you have upgraded IBM Tealeaf, update the application pool settings for
Tealeaf in Windows IIS Manager. If you do not update the application pool
settings, you might experience an error when you attempt to log in to the Tealeaf
Portal. For more information, see “Updating the Tealeaf Application Pool settings”
on page 43.
4. Upgrade Other Tealeaf Software
The core upgrade process covers all software that is installed on Windows-based
servers that are used by the IBM Tealeaf CX platform and its server-based
applications. Other Tealeaf components in your system must be upgraded
separately.
Note: Tealeaf recommends performing these upgrades after the upgrades of the
core IBM Tealeaf CX components.
v See Chapter 8, “Post-Upgrade Cleanup,” on page 43.
Chapter 1. Overview of Upgrade Process
3
4
Tealeaf CX Upgrade Manual
Chapter 2. Upgrading and Migrating to New Hardware
If you are deploying new hardware in conjunction with your upgrade, please
complete the upgrade in the following general steps.
Note: Before you begin, you should review the system requirements to verify that
your current system is capable of managing the upgrade process and running the
new version of Tealeaf. See "System requirements for installing IBM® Tealeaf in the
IBM Tealeaf CX Installation Manual.
General Steps
1. Install the latest IBM Tealeaf version on the new hardware.
2. Migrate your reporting data and event definitions to the new hardware.
3. Restart the new Tealeaf system.
4. Verify that it is capturing data, events are firing, and that newly captured event
data is appearing in reports.
5. Review the preparing to upgrade steps. See Chapter 3, “Preparing to Upgrade
to the Current Release,” on page 7.
6. Perform the upgrade in place.
Note: Depending on your Tealeaf environment, the steps to upgrade may vary.
See Tealeaf CX Upgrade Manual.
7. Complete the post-upgrade steps. See Chapter 8, “Post-Upgrade Cleanup,” on
page 43.
Note: Avoid performing the upgrade by installing the current IBM Tealeaf release
on the new hardware, moving the databases, and then upgrading them separately.
© Copyright IBM Corp. 1999, 2015
5
6
Tealeaf CX Upgrade Manual
Chapter 3. Preparing to Upgrade to the Current Release
To upgrade your IBM TealeafcxImpact solution, review the entire process before
you commence the upgrade. The process that you follow varies depending on the
number of servers that are deployed in your IBM TealeafcxImpact solution.
Note: If you have any questions about the process or the steps that are required to
upgrade your Tealeaf solution, contact IBM Tealeaf support. For more information,
see Chapter 11, “IBM Tealeaf documentation and help,” on page 67.
Adding or removing products
If you are adding or removing products as part of this upgrade process, Tealeaf
recommends that you make these product changes to your current release before
upgrading.
The upgrade process requires that you upgrade to release 8.7 before you upgrade
to the current release.
When you perform these installs or uninstalls, follow the documented instructions
that are provided in the documentation for your installed release.
Note: Products and components that are introduced in the current IBM Tealeaf
release cannot be installed to a previous release. New products and components
can only be installed after completing the upgrade and migration to the current
release.
Upgrade preparation
Upgrade preparation involves performing many tasks as described in the following
sections.
Migrating to new hardware
If you are migrating to new hardware as part of this upgrade, there are more
instructions.
See Chapter 2, “Upgrading and Migrating to New Hardware,” on page 5.
Report Server Time Zone
The time zone for the Windows machine that hosts the Tealeaf Report Server must
be configured to match the Tealeaf system time zone.
This requirement may be loosened in a subsequent release.
v See "Configuring the System Timezone" in the IBM Tealeaf CX Configuration
Manual.
v See "Configuring the Report Server" in the IBM Tealeaf CX Configuration Manual.
Perform All Microsoft-Recommended Updates
Before you begin upgrading, you should perform all updates to your Microsoft
operating system and SQL Server software.
© Copyright IBM Corp. 1999, 2015
7
.NET Framework 4.5 is required
Tealeaf requires the .NET Framework version 4.5 for the current IBM Tealeaf
release.
Note: All Windows-based servers that host Tealeaf software must upgrade to .NET
4.5 before you upgrade to the current IBM Tealeaf release.
Failure to perform the .NET framework update to a supported version results in
the Data Collector being unable to start after the upgrade is complete. The
following error might be reported in the Event Viewer:
An unhandled exception (’System.MissingMethodException’) occurred in
TeaLeafDataCollector.exe [3268]. Just-In-Time debugging this exception
failed with the following error:
Debugger could not be started because no user is logged on.
Database Migration
If you are upgrading your Tealeaf software and deploying it on new hardware,
observe the following considerations:
v For more information about migrating the Tealeaf databases, see "Migrating
Tealeaf Databases" in the IBM Tealeaf Databases Guide.
Additional tasks
Perform additional tasks for preparing to upgrade as documented here.
Clean up events
If you plan to remove events or event-related objects as part of your upgrade to
the current release, Tealeaf recommends that you perform this cleanup task before
upgrade.
Removing events or event-related objects accelerates the time to perform the event
migration during upgrade.
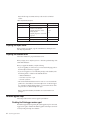
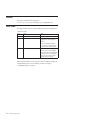
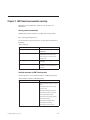
Review Canister Safety Limits
In Release 7.2 and earlier, the Canister safety limits were controlled by three
settings for the Canister.
These settings defined limits for:
v Maximum number of hits in a session
v Maximum total bytes in a session
v Maximum total time in seconds in a session
In Release 8.0 and later, these limits are defined by a Tealeaf system event. During
upgrade, the values for these limits are reset to factory defaults.
Before you upgrade, record the values for the Canister safety limits. These settings
and their default values are listed below:
Table 1. Review Canister Safety Limits
8
Setting
Release 7.2
Release 8
Max
Hits
Per
Session
2048
2048
Tealeaf CX Upgrade Manual
Value for Your Tealeaf
Solution
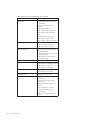
Table 1. Review Canister Safety Limits (continued)
Setting
Release 7.2
Release 8
Max
Size
Per
Session
5242880 bytes
5242880 bytes
Max
Time
Per
Session
3600 seconds
3600 seconds
Value for Your Tealeaf
Solution
SQL Server on remote server
If the Tealeaf SQL Server databases are on a remote database server, you should
validate the full paths to those remote database files beforehand.
Failing to do so can cause problems during the upgrade process. See "CX
Installation and Setup" in the IBM Tealeaf CX Installation Manual.
Migrating to a new SQL Server instance
If you are migrating to a new instance of SQL Server, more steps are required
during the restore process.
See "Troubleshooting - Tealeaf Databases" in the IBM Tealeaf Troubleshooting Guide.
Acquire Latest Build
For the release to which you are upgrading, verify that you have the latest build.
For more information, see the Release Notes for your version.
For more information on downloading IBM Tealeaf, see IBM Passport Advantage®
Online.
Test Pre-Upgrade System
Before you begin the upgrade, you should verify that your current Tealeaf solution
is operational.
The following tests may be used to verify aspects of Tealeaf operations:
1. Run Portal Tests:
a. From the Portal menu, select Help > About IBM Tealeaf CX Portal.
b. In the Portal Performance Tests panel, click the Execute All link.
c. When the tests are completed, a Success message or a time value should be
displayed in the Results column. These messages indicate that the Portal is
operational and able to communicate with its required components and the
Tealeaf database.
2. Generate Portal Status Report: The Tealeaf Portal Status report can be
configured to provide useful status information from Tealeaf databases, servers,
and components, including the IBM Tealeaf CX Passive Capture Application.
Through the Portal, you can generate one of these reports.
a. If you have not configured the Portal Status report yet, the Portal uses
default settings when it generates the report. For best results, you should
configure Portal Status to match your Tealeaf solution.
Chapter 3. Preparing to Upgrade to the Current Release
9
b. To execute the Portal Status, select Help > Portal Management.
c. In the Portal Management page, click the Logs section in the left navigation
panel.
d. Under the Logs heading, click the View Portal Status link.
e. The Portal Status report is generated in the Portal.
f. Review the generated report for error or warning conditions.
v
Note: As of Release 8.0, the Portal Status report is deprecated and
superseded by the Tealeaf Status report. See "Tealeaf Status Report" in the
IBM Tealeaf cxImpact Administration Manual.
3. Review Logs:
a. In the Portal Management page under the Logs heading, you can bundle
the Tealeaf logs together in to a .ZIP file for external review. Click the
Tealeaf Logs and Configuration Files link. Save the file locally.
b. Review each of the compressed log files for ERROR or {{_E_}}entries.
c. You should also review the Windows Event Viewer logs for errors.
4. System Status:
a. The System Status report allows you to check the status of key components
in the Tealeaf system, including Canisters, HBR machines, and storage. To
review status reports, select Tealeaf > System Status.
b. In the System Status submenu, select a report. Review the report for error
conditions, warnings, or problems with capacity or utilization. These issues
should be examined and, if possible, addressed before upgrading.
c. For the selected report, review the subreport for each Tealeaf server in the
environment.
d. Repeat the steps for each type of System Status report.
Showstoppers
If you have error conditions or significant performance problems in any of the
following Tealeaf components, do not proceed with the upgrade prior to resolving
these issues.
v Tealeaf Reference Utility
– Before you upgrade, you should verify that your reference values are
properly configured and are appearing as expected in reports.
v ResultSet Extractor Service
– To verify operations of the RSE Service, analyze a session segment that
contains many sessions.
v Data Collector must be able to complete collections.
– To verify operations, select the Collector Statistics tool when the
Canister/Indexer is selected in the Portal Management page.
v Verify Customer Support issues
– If you have any open Customer Support issues, it is a good practice to verify
with Customer Support that they do not impact the upgrade.
Copy Files to Each Server
On each Tealeaf server to be upgraded, copy the following files:
v For each Tealeaf IBM Tealeaf CX Passive Capture Application Server:
10
Tealeaf CX Upgrade Manual
1. Verify that the machine meets the system requirements and has the installed
operating system components. See "Installation" in the IBM Tealeaf Passive
Capture Application Manual.
2. Copy the OS-appropriate .rpm file to the /root directory of each PCA server.
v For each Tealeaf server:
1. Copy the upgrade .zip file into a temporary directory on the hard disk drive
where the software is to be installed.
2. Extract the .zip file on each server.
Copy event definition files from Event Master server
If the Report Server is hosted on a different machine from the Processing Server
(Canister), you must copy the event definition files from the Event Master server to
the Report Server before it is upgraded.
Instructions are provided for you during the Report Server upgrade.
v See “Release Upgrade for Reporting Server” on page 27.
Backup
Verify that any scheduled TLBackup backup jobs occurred and completed
successfully on last execution.
v Later in the process, you back up the SQL databases before they are upgraded.
Recommended backup
Before you begin, Tealeaf recommends that you perform the following backup
operations:
v Complete mirroring of each server that is to be upgraded. The servers where the
databases are stored and the Event Master server are the most important.
v Valid backup of all SQL Server databases. For more information, see the SQL
Server product documentation.
Upgrade with HBR
Health-Based Routing (HBR) enables effective load balancing and spooling in a
multi-Canister environment. If you installed HBR or have an extra server available
where you can install HBR, Tealeaf recommends enabling HBR before upgrade and
using it as part of your upgrade process. The use of HBR significantly mitigates
the potential for data loss during the migration.
v See Chapter 1, “Overview of Upgrade Process,” on page 1.
v For more information about HBR, see "Health-Based Routing (HBR) Session
Agent" in the IBM Tealeaf CX Configuration Manual.
Event Model Backup
If you are upgrading from Release 8.4 or later, you should perform a backup of
your Tealeaf event model, which can be used to restore event definitions to your
pre-upgrade system.
v See "Event Model Backup and Restore" in the IBM Tealeaf cxImpact Administration
Manual.
Chapter 3. Preparing to Upgrade to the Current Release
11
Data Export
Before you shut down services and upgrade, you can perform the following
exports from your Tealeaf system.
Export a dashboard
Through the Tealeaf Portal, export a dashboard for a specific date or week that
contains a representative sample of event information.
This dashboard can be used after upgrade to verify that data was successfully
migrated.
Note: Avoid exporting for the current date.
1. From the Dashboards menu in the Portal, select the dashboard that you wish
to export.
2.
3.
4.
5.
Note: Do not select the Technical Site Metrics dashboard, which is exported in
the next step.
When the dashboard is displayed, click Options. Select Export/Email
Dashboard.
Select the export option of your choice.
Click Entire Dashboard.
The dashboard is exported. Retain this dashboard for review after upgrade.
Export Technical Site Metrics dashboard
Using the same method you used to export the dashboard, export the Technical
Site Metrics dashboard.
v From the Portal, select Dashboard > Technical Site Metrics. Export the
dashboard.
Note: Avoid exporting for the current date.
Export event activity
From the Portal, you should export the Event Activity report from a representative
date from all servers.
v Optionally, you might choose to export this report from individual servers, too.
1. From the Portal menu, select Analyze > Events > Event Activity.
2. Configure the report to select the appropriate Focus date and servers.
Note: Avoid exporting for the current date.
3. From the View drop-down, select List to display them in alphabetical order.
4. In the upper-right corner, click the Excel export icon.
5. The report is exported to Excel. Save it locally. Retain this report for review
after upgrade.
Export dashboard and scorecard templates
As a precaution, you should export the dashboard and scorecard templates from
your pre-upgrade version of the Portal.
These objects may be reimported after upgrade, in case they are not successfully
migrated during the process.
v See "Importing and Exporting Reports" in the IBM Tealeaf cxView User Manual.
12
Tealeaf CX Upgrade Manual
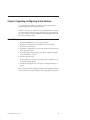
Getting Started with the Upgrade
When you are ready to begin your upgrade, complete the following steps just
before you begin your upgrade.
v Stop traffic: Traffic must be stopped into the Canister.
1. In HBR environment: If you deployed an HBR server, you can manage traffic
through the HBR. See “Stopping Traffic at the HBR.”
2. In non-HBR environment: If you do not use HBR, you can stop traffic
through Search Server. See “Stopping Traffic into Each Canister.”
v Complete a Data Collector run: Allow one Data Collector run to complete before
you begin the upgrade. See “Completing Data Collection” on page 14.
Stopping Traffic at the HBR
In an HBR environment, there is no need to stop traffic. As soon as a Processing
Server is no longer available to receive hits, traffic is diverted to other available
Processing Servers or spooled locally to the HBR disk until servers become
available.
v For more information about HBR, see "Health-Based Routing (HBR) Session
Agent" in the IBM Tealeaf CX Configuration Manual.
Before you begin the upgrade, verify that the Data Collector completed its run.
v See “Completing Data Collection” on page 14.
Stopping Traffic into Each Canister
Before upgrading, traffic must be stopped into the processing pipeline of each
Tealeaf Canister.
After traffic stops and the Data Collector completes a run, the upgrade can be
performed.
Note: When traffic is stopped to the Canister pipeline, data is spooled to disk.
Each processing server should have sufficient disk space to queue for 30 minutes.
If all available disk space is consumed, hits that are forwarded to the Canister are
dropped.
For each Processing Server
1. Start an Internet Explorer browser and navigate to the following URL:
http://<Machine_Name>:19000
where:
<Machine_Name> is the name or IP address of the Processing Server
2. The TeaLeaf Search Server web interface is displayed.
3. In the Governor pane at the lower left, click Drain STC. This step forces the
Tealeaf pipeline to start queuing data and instructs the Short Term Canister to
write out any active sessions to long-term storage.
4. Repeat the steps for each Processing Server before you check for Data
Collection completion.
Before you begin the upgrade, verify that the Data Collector completed its run.
v See “Completing Data Collection” on page 14.
Chapter 3. Preparing to Upgrade to the Current Release
13
Completing Data Collection
After traffic stops and immediately before you begin upgrading your IBM Tealeaf
CX platform and core applications, you should verify that the latest execution of
the Data Collector is complete.
After you complete the following verification steps, you may begin your upgrade.
For more information, see Data Collector Status in the IBM Tealeaf cxImpact
Administration Manual.
Note: If the Data Collector run is not allowed to complete, there will be gaps in
your reporting data after the upgrade is complete.
Remove Canister Spool Files
Remove the existing Canister spool files from your existing installation before you
upgrade from a version of IBM Tealeaf without EICS to a version of IBM Tealeaf
with EICS.
Note: Canister spool files cannot be migrated from an IBM Tealeaf environment
that does not have Enhanced International Character Support (EICS) to a version
that does support EICS. EICS support is introduced in IBM Tealeaf version 9.0A. If
you are upgrading your IBM Tealeaf environment from a version earlier than 9.0A,
you must remove any spool files from your existing IBM Tealeaf installation before
you begin the upgrade process.
To remove the Canister spool files from your existing IBM Tealeaf installation:
1. Verify that the last execution of the Data Collector is complete. For more
information, see “Completing Data Collection.”
2. Go to the directory where the spool files are saved.
The default directory where the spool files are written, is
\<Tealeaf_install_directory>\spool where <Tealeaf_install_directory> is
the directory where Tealeaf is installed.
To verify the location of the spool directory:
a. Log in to the Tealeaf portal.
b. Select Tealeaf > TMS
c. Select the WorldView tab.
d. Select Transport Service > Transport Service configuration
e. Locate Config Actions and select View/Edit (Raw).
f. Locate the [DecouplEx] heading in the configuration text. The value of
SpoolDir displays the spool directory.
3. Delete the Canister spool files. Canister spool files use .tsp as the file
extension.
Continue with “Next Steps” to continue the upgrade process.
Next Steps
Depending on the number of physical servers and the use of Health-Based Routing
(HBR) in your Tealeaf deployment, the upgrade process can be straightforward or
more involved.
v All-In-One: If you are upgrading an All-in-One Tealeaf deployment, see
Chapter 5, “Release Upgrade for All-in-One Deployment,” on page 23.
14
Tealeaf CX Upgrade Manual
v Multi-Machine Deployment: If your Tealeaf environment contains multiple
Processing Servers, remote Report Servers, or both, or if it uses Health-Based
Routing, see Chapter 6, “Upgrade for Multi-Server Deployment,” on page 25.
For more information about Tealeaf architecture, see "Overview of the CX System"
in the IBM Tealeaf CX Installation Manual.
For more information about HBR, see "Health-Based Routing (HBR) Session Agent"
in the IBM Tealeaf CX Configuration Manual.
Chapter 3. Preparing to Upgrade to the Current Release
15
16
Tealeaf CX Upgrade Manual
Chapter 4. Upgrading Tealeaf Software on a Server
This section describes how to upgrade Tealeaf software on an individual server.
You must repeat this basic process on each Windows-based Tealeaf server in the
environment and make adjustments to the process as needed.
Note: If you have any questions about the process or the steps that are required to
upgrade your Tealeaf solution, contact support.
Prerequisite checklist
Review the following checklist before beginning the upgrade.
Note: Avoid using localhost entries in the Upgrader. Particularly for the Report
Server, these entries can corrupt Portal features in the upgraded system.
v These references should be purged from the entries in the Portal Management
page before the upgrade is initiated. See Chapter 3, “Preparing to Upgrade to the
Current Release,” on page 7.
Before you begin, verify that you completed the following items:
v Reviewed the overall process. See Chapter 1, “Overview of Upgrade Process,” on
page 1.
v Reviewed the changes for Release 8. See Migration to the current release.
v Completed the preparation steps. See Chapter 3, “Preparing to Upgrade to the
Current Release,” on page 7.
1. Copied Tealeaf software to each server. For every server that you are
upgrading, you should copy the Tealeaf software to a directory outside of the
Tealeaf installation directory.
2. Backed up the server. You should perform a backup of all Tealeaf directories
and SQL Server databases on the server before you begin the upgrade of it.
– Ideally, you should create a complete mirror image of the server.
v Stopped traffic and allowed Data Collector finish: Immediately before upgrade,
you must stop traffic to the Processing Servers in your environment and allow
the Data Collector to complete its collection that is run from the stopped
Canisters. See Chapter 3, “Preparing to Upgrade to the Current Release,” on
page 7.
Note: For more information about issues that may occur during installation or
upgrade, see Upgrading Tealeaf Software on a Server.
You should also know the process for upgrading an individual server, whether you
are upgrading only the current components or changing the configuration. See
Upgrading Tealeaf Software on a Server.
How to begin
The way to begin the upgrade depends on whether you are performing an
upgrade of all components that currently exist on the server and are not adding or
removing any Tealeaf components, or if you are changing the configuration of
installed components on the server.
© Copyright IBM Corp. 1999, 2015
17
Use the links for steps to perform your specific type of server upgrade:
v If you are performing an upgrade of all components that currently exist on the
server and are not adding or removing any Tealeaf components, then you can
use the Tealeaf upgrader. See “Running the Tealeaf Upgrader on a Server.”
v If you are changing the configuration of installed components on the server, you
must perform an uninstall and a reinstall through the Tealeaf installer. Extra
steps might be required. See “Running the Tealeaf Installer to Upgrade a Server”
on page 20.
(Optional) Tealeaf Silent Upgrade
If you want to upgrade your Tealeaf databases or you want to perform a first-time
installation of the Tracking service, you can use the Tealeaf silent installer to
automate the upgrade process. For more information about using the silent
installer, see "Tealeaf CX silent installation, uninstallation, and upgrade" and
"Upgrading silently" in the IBM Tealeaf CX Installation Manual.
Running the Tealeaf Upgrader on a Server
The following process is used to upgrade all Tealeaf services that are deployed on
an individual server. During the upgrade of all Tealeaf servers, you use this
process on each server one time.
Note: Do not use the Tealeaf Installer to perform a simple upgrade of all
components on a Tealeaf server. You should use the Upgrader instead.
To Upgrade a Server:
Note: The same license key must be applied to each server in the Tealeaf
environment. If you are adding IBM Tealeaf cxResults to your Tealeaf solution as
part of this upgrade, you must have a valid Tealeaf product license key enabling
IBM Tealeaf cxResults. Before you begin, please verify that you have acquired the
proper key. See "Managing Your Tealeaf License Key" in the IBM Tealeaf cxImpact
Administration Manual.
Note: Tealeaf recently changed its license key format. If you have not done so
already, please acquire a new license key from Tealeaf http://support.tealeaf.com.
Note: Use of UNC paths in the Tealeaf Upgrader is supported only if they
reference locations on the local machine.
1. Back up the contents of the Tealeaf Install Directory on the server to a location
on a different hard disk drive or a different machine. Retain this location.
Note: If you receive an error that indicates that TLREPORTS_EVENTDATA is being
used by another user, the Tealeaf databases are installed within the Tealeaf
install directory. You must stop the following service through the
Administration console:
SQL Server (MSSQLSERVER)
Then, execute the copy. After the copy is completed, restart the SQL Server
services.
18
Tealeaf CX Upgrade Manual
Note: This directory backup does not create an effective backup of the Tealeaf
databases. That backup must be executed through your SQL Server
administration tools. For more information, see the SQL Server product
documentation.
2. From the Tealeaf distribution, copy the following directory to the machine
where the upgrade is to be completed. Do not copy to the Tealeaf install
directory:
<software_distribution_directory>\cx\Upgrade_*
3. Verify that the current run of the Data Collector is complete. See Chapter 3,
“Preparing to Upgrade to the Current Release,” on page 7.
4. If it is open, close the Windows Event Viewer Control Panel.
5. Open a command-line shell. Navigate to the directory where you stored the
Tealeaf upgrade distribution.
6. From the upgrade directory, run Setup.exe.
Note: If prompted for a Tealeaf License key at any point during the upgrade
process, enter the value that is provided to you by Tealeaf Support.
a. Select the language that you want to use for the installation and click OK.
b. The Upgrader checks to see whether an upgrade performed on the machine
already. If so, the following message is displayed.
An update has already been performed on this system.
Note: Choose Yes only if you are installing IBM Tealeaf cxResults or IBM
Tealeaf cxReveal databases search on the current system. Otherwise, do not
upgrade the system.
c. If the server you are upgrading is a Report Server, extra dialogs may be
displayed, including one in which you may choose to perform an event data
migration to the new version or a migration of all data.
Note: Migration of all of your existing data may take significant time.
Tealeaf recommends that you perform this migration during off-peak hours
through the Tealeaf Database Manager. See "Tealeaf Database Manager
Reference" in the IBM Tealeaf Databases Guide.
Note: During the upgrade of the Report Server, you may optionally choose
to migrate reference dimensions and their data. This data is not migrated by
default. See “Release Upgrade for Reporting Server” on page 27.
v For more information, see Chapter 3, “Preparing to Upgrade to the
Current Release,” on page 7.
v For more information about Report Server upgrading, see “Release
Upgrade for Reporting Server” on page 27.
d. If prompted for the TMS server at any point during the upgrade process,
enter the machine name of the TMS master.
e. On the Welcome screen, click Next.
f. On the Upgrade screen, the list of components to upgrade is displayed.
Click Yes.
g. If your pre-upgrade system does not include IBM Tealeaf cxResults or IBM
Tealeaf cxReveal, the Upgrader may prompt you to choose to install these
products.
h. If your pre-upgrade system does not include a Tracking Service, the
Upgrader displays a window asking "Do you want to configure Tracking
Service?".
Chapter 4. Upgrading Tealeaf Software on a Server
19
The Tracking Service tracks Replay Server logging information and delivers
the logging data to Browser Based Replay (BBR). Configure the Tracking
Service if administrators need access to real-time page load logging
information in BBR. For information about real time page load logging, see
the IBM Tealeaf cxImpact Administration Manual.
If you do not want to create a configuration for the Tracking Service, click
No.
If you want to create a configuration for the Tracking Service, click Yes. The
Upgrader presents a configuration window in which you specify a Server
and Port. The server and port information you enter is applied to the
common registry used by IBM Tealeaf Servers.
Note: The registry is still available inside Tracking Service component, but
other services look at the same registry location.
i. The upgrade process begins, during which the following occurs:
v Install the Microsoft Redistributes.
v Transfer files.
v The Canister is rebuilt, while preserving session data. This process may
take 5-10 minutes to complete. While this process is occurring, you may
restart the other Canisters in the environment.
Note: If you are upgrading the Portal Server, the Upgrader automatically
disables the Interactive Services Detection service, which causes conflicts
with the BBR rendering instances. See "CX Pre-Installation Checklist" in
the IBM Tealeaf CX Installation Manual.
j. In the Finish screen, deselect the option to Start Tealeaf Services.
k. Click OK/Done.
7. Restart the Windows server.
v The Data Collector resumes collection automatically.
8. When the server has restarted, check the Event Log for Error-type messages.
v Ignore error messages that state failure to connect to the TMS Master.
Running the Tealeaf Installer to Upgrade a Server
If you are changing the configured components that are installed on an individual
server, then you must uninstall all current components and then reinstall the
wanted components through the Tealeaf Installer for the upgrade version.
Note: If you are upgrading all of the current components on the server and are not
making changes to these components, do not use the Tealeaf Installer. Use the
Tealeaf Upgrader instead. See “Running the Tealeaf Upgrader on a Server” on page
18.
v The Tealeaf Upgrader manages the installation of IBM Tealeaf cxResults and IBM
Tealeaf cxReveal.
Note: Tealeaf recently changed its license key format. If you have not done so
already, acquire a new license key from Tealeaf http://support.tealeaf.com.
Note: If you are uninstalling and reinstalling Tealeaf software on a server that
hosts the Report Server, the Tealeaf databases are uninstalled and reinstalled as
part of the process. Before you begin, execute or verify a current backup of the
Tealeaf databases.
20
Tealeaf CX Upgrade Manual
Note:
v Back up the Tealeaf directory. Mirror the entire server, if possible.
v Before you begin, identify the components that are going to be installed on this
server. During the installation process, you must select from the following
available components:
– IBM Tealeaf CX Components - base IBM Tealeaf CX Impact platform
- Transport Service
- Processor Service
– Report Server and Portal Application
v If you are changing components, you need a new license key to complete the
installation. For more information, contact http://support.tealeaf.com.
Uninstall
v If you have not done so already, download the IBM Tealeaf CX Impact zip file
from the distribution. Extract it in a directory on the server that is not within the
Tealeaf installation directory.
v Before you begin, you must stop all Tealeaf services, including the ones that
cannot be stopped through the menu. You also backed up the Tealeaf installation
directory on the server.
– For more information, see the first few steps of “Running the Tealeaf
Upgrader on a Server” on page 18.
v From the downloaded package, run setup.exe.
v When prompted, choose to uninstall.
v The uninstall is completed.
To re-install:
v Acquire the necessary license key and server information before you begin.
v Rerun setup.exe.
v For more information about the individual steps, see "CX Installation and Setup"
in the IBM Tealeaf CX Installation Manual.
Troubleshooting during Upgrading
If you encounter issues during the execution of the Tealeaf Upgrader, review the
steps documented here.
Note: Do not attempt to rerun the Upgrader. Rerunning the Upgrader corrupts the
system.
Note: Do not attempt to manually manipulate data files to resolve upgrade issues.
Event migration failure
Note: If event definitions do not successfully migrate during upgrading of the
Report Server, Processing Servers cannot be restarted, and they continue to spool
data. To prevent filling the spool space on disk and dropping of hits, this issue
should be addressed as soon as possible.
Review Logs
Review the following logs for ERROR or _E_ entries:
Chapter 4. Upgrading Tealeaf Software on a Server
21
v Tealeaf Installation and Upgrader log:
<Tealeaf_install_directory>\Logs\TeaLeafInstall_BBBB.log
v Event Manager log:
<Tealeaf_install_directory>\Logs\TLEventManagerYYYYMMDD.log
v Tealeaf Database Manager log:
<Tealeaf_install_directory>\Logs\TeaLeafDatabaseManagerYYYYMMDD_*.log
Note: For any upgrade issues, Tealeaf Customer Support requires these log files.
See Chapter 8, “Post-Upgrade Cleanup,” on page 43.
22
Tealeaf CX Upgrade Manual
Chapter 5. Release Upgrade for All-in-One Deployment
This section describes the general process for upgrading an All-In-One Tealeaf
server. In these configurations, all Tealeaf components are installed on the same
physical system.
Note: If you have any questions about the process or the steps that are required to
upgrade your Tealeaf solution, contact support.
Review the entire process before you begin the upgrade.
Prerequisite Checklist
Before you begin, verify that you completed the items on the prerequisite checklist,
as documented here.
1. Reviewed the overall process. See Chapter 1, “Overview of Upgrade Process,”
on page 1.
2. Reviewed the changes for the current release. See Migration to the current
release.
3. Completed the preparation steps. See Chapter 3, “Preparing to Upgrade to the
Current Release,” on page 7.
a. Copied Tealeaf software to each server. For every server that you are
upgrading, you should copy the Tealeaf software to a directory outside of
the Tealeaf installation directory.
b. Backed up the server. You should perform a backup of all Tealeaf directories
and SQL Server databases on the server before you begin the upgrade of it.
v Ideally, you should create a complete mirror image of the server.
4. Stopped traffic and allowed Data Collector finish: Immediately before upgrade,
you must stop traffic to the Processing Servers in your environment and allow
the Data Collector to complete its collection run from the stopped Canisters.
See Chapter 3, “Preparing to Upgrade to the Current Release,” on page 7.
Note: For more information about issues that may occur during installation or
upgrade, see Chapter 4, “Upgrading Tealeaf Software on a Server,” on page 17.
You should also know the process for upgrading an individual server, whether you
are upgrading only the current components or changing the configuration. See
Chapter 4, “Upgrading Tealeaf Software on a Server,” on page 17.
1. Stop Services
Stop all Tealeaf Services on the server that is being upgraded.
1. Log in to the server as an administrator.
2. Stop all Tealeaf Services:
Start > Programs > Tealeaf Technology > Stop All Services
or
Start > Programs > Tealeaf Technology > Stop Tealeaf Services
3. Wait until all services stop.
4. Open the Windows Services applet and manually stop all remaining services
whose name begins with Tealeaf, including the following.
© Copyright IBM Corp. 1999, 2015
23
v Tealeaf Scheduler Service
v Tealeaf Transport Service
v Tealeaf Management Service
5. Close the Windows Services Control Panel.
6. If it is open, close the Windows Event Viewer Control Panel.
7. When these services are stopped, you may continue.
2. Upgrade Tealeaf Software
If your upgrade process includes a migration to a new SQL Server, see "Migrating
Tealeaf Databases" in the IBM Tealeaf Databases Guide.
For more information about upgrading Tealeaf software, including databases on an
All-in-One server, see Chapter 4, “Upgrading Tealeaf Software on a Server,” on
page 17.
3. Restart Services
After upgrading the Tealeaf software, you must restart the Tealeaf services.
To restart the services:
1. For each server, you can start all services through the Windows Start menu:
Start menu > Programs > Tealeaf Technology > Start Tealeaf Services
2. When the server restarts, check the Event Log for Error-type messages.
Post-Upgrade Cleanup
After completing the upgrade, you can perform a few cleanup tasks.
See Chapter 8, “Post-Upgrade Cleanup,” on page 43.
Perform Other Tealeaf Upgrades
After you complete the upgrade of the IBM Tealeaf CX platform and core
applications, you may upgrade your other Tealeaf applications and components.
v See Chapter 1, “Overview of Upgrade Process,” on page 1.
24
Tealeaf CX Upgrade Manual
Chapter 6. Upgrade for Multi-Server Deployment
The steps in this upgrade process provide a generalized outline for how to
complete an upgrade of a sophisticated multi-machine installation of Tealeaf. For
these types of upgrades, services must be stopped in a specific order after which
individual Tealeaf servers must be upgraded in the order that is listed.
Note: If you have any questions about the process or the steps that are required to
upgrade your Tealeaf solution, contact http://support.tealeaf.com.
Review the entire process before you begin the upgrade.
Prerequisite checklist
Before you begin, verify that you completed the prerequisite checklist items
documented here.
1. Reviewed the overall process. See Chapter 1, “Overview of Upgrade Process,”
on page 1.
2. Reviewed the changes for the current release. See Migration to the current
release.
3. Completed the preparation steps. See Chapter 3, “Preparing to Upgrade to the
Current Release,” on page 7.
a. Copied Tealeaf software to each server. For every server that you are
upgrading, you can copy the Tealeaf software to a directory outside of the
Tealeaf installation directory.
b. Backed up the server. You can perform a backup of all Tealeaf directories
and SQL Server databases on the server before you begin the upgrade of it.
v Ideally, you should create a complete mirror image of the server.
4. Stopped traffic and allowed Data Collector finish: Immediately before upgrade,
you must stop traffic to the Processing Servers in your environment and allow
the Data Collector to complete its collection run from the stopped Canisters.
See Chapter 3, “Preparing to Upgrade to the Current Release,” on page 7.
Note: For more information about issues that may occur during installation or
upgrade, see Chapter 4, “Upgrading Tealeaf Software on a Server,” on page 17.
You should also know the process for upgrading an individual server, whether you
are upgrading only the current components or changing the configuration. See
Chapter 4, “Upgrading Tealeaf Software on a Server,” on page 17.
1. Stop Services
Stop all Tealeaf Services on the servers being upgraded.
Note: If the Tealeaf Data Collector and Reporting services are on a different
machine than the Processing Servers, allow the Data Collector to complete its run.
Then, stop all Tealeaf services on the Report Server machine first, if you have not
done so already. After you stop the services, the Data Collector does not try to
harvest any data from a Processing Server while being upgraded.
1. Log in to the server as an administrator.
© Copyright IBM Corp. 1999, 2015
25
2. Stop all Tealeaf Services:
Start > Programs > Tealeaf Technology > Stop All Services
or
Start > Programs > Tealeaf Technology > Stop Tealeaf Services
3. Wait until all services stop.
4. Open the Windows Services applet and manually stop all remaining services
whose name begins with Tealeaf, including the following.
v Tealeaf Scheduler Service
v Tealeaf Transport Service
v Tealeaf Management Service
5. Close the Windows Services Control Panel.
6. If it is open, close the Windows Event Viewer Control Panel.
7. When these services are stopped, you may continue.
2. Upgrade Report Server
After stopping the services, you can upgrade the Report server.
The Report Server typically includes the Portal.
You may upgrade the MS SQL databases as part of the Report Server upgrade.
v See “Release Upgrade for Reporting Server” on page 27.
Note: If your upgrade process includes a migration to a new SQL Server, see
"Migrating Tealeaf Databases" in the IBM Tealeaf Databases Guide.
See "Upgrading the Databases" in the IBM Tealeaf CX Upgrade Manual.
3. Upgrade Processing Servers
After upgrading the Report server, upgrade the Processing servers in the Tealeaf
environment.
See “Upgrade for Processing Server” on page 30.
4. Upgrade Databases
If you did not already as part of your Report Server upgrade, you must upgrade
the databases through the Tealeaf Database Manager.
Note: If your upgrade process includes a migration to a new SQL Server, see
"Migrating Tealeaf Databases" in the IBM Tealeaf Databases Guide.
See "Upgrading the Databases to Release 8.x" in the IBM Tealeaf CX Upgrade
Manual.
5. Restart Servers
After upgrading the databases, start the Processing servers and the Report server.
Restart Processing Servers
You can restart the TMS subordinate Processing Servers.
26
Tealeaf CX Upgrade Manual
1. For each server, you can start all services through the Windows Start menu:
Start menu > Programs > Tealeaf Technology > Start Tealeaf Services
2. When the server restarts, check the Event Log for Error-type messages.
Restart the Report Server
After upgrading the databases and restarting the Processing servers,you can restart
the Report server.
1. For each server, you can start all services through the Windows Start menu:
Start menu > Programs > Tealeaf Technology > Start Tealeaf Services
2. When the server restarts, check the Event Log for Error-type messages.
3. Ignore error messages that state failure to connect to the Canister servers.
6. Upgrade Health-Based Routing Server
If one or more Health-Based Routing Servers is installed, you can upgrade them
now.
See “Upgrade for HBR” on page 31.
7. Verify Components
After upgrading the server-side components of Tealeaf, verify that all IBM Tealeaf
CX components are working on the appropriate servers.
1. Log on to IBM Tealeaf CX portal. Typically, the URL is the following:
http://<Server_Name>/portal
2. Verify that active sessions are present in the Portal.
3. Verify that sessions can be replayed through the Portal.
4. Verify that all functions of the IBM Tealeaf CX solution work as expected.
Post-Upgrade Cleanup
After completing the upgrade, you can perform the cleanup tasks.
For more information, see Chapter 8, “Post-Upgrade Cleanup,” on page 43.
Perform Other Tealeaf Upgrades
After you complete the upgrade of the IBM Tealeaf CX platform and core
applications, you can upgrade your other Tealeaf applications and components.
See Chapter 1, “Overview of Upgrade Process,” on page 1.
Release Upgrade for Reporting Server
If you have any questions about the process or the steps that are required to
upgrade your Tealeaf solution, contact support.
Prerequisites Checklist
Before continuing, verify that you completed the following items:
Chapter 6. Upgrade for Multi-Server Deployment
27
v Reviewed the overall process. See Chapter 1, “Overview of Upgrade Process,” on
page 1.
v Reviewed the changes for Release 8. See Migration to the current release.
v Completed the preparation steps. See Chapter 3, “Preparing to Upgrade to the
Current Release,” on page 7.
1. Copied Tealeaf software to each server. For every server that you are
upgrading, copy the Tealeaf software to a directory outside of the Tealeaf
installation directory.
2. Backed up the server. Perform a backup of all Tealeaf directories and SQL
Server databases on the server before you begin the upgrade of it.
– Ideally, you should create a complete mirror image of the server.
v Stopped traffic and allowed Data Collector to finish: Immediately before
upgrade, you must stop traffic to the Processing Servers in your environment
and allow the Data Collector to complete its collection run from the stopped
Canisters. See Chapter 3, “Preparing to Upgrade to the Current Release,” on
page 7.
Note: For more information about issues that may occur during installation or
upgrade, see Chapter 4, “Upgrading Tealeaf Software on a Server,” on page 17.
You should also know the process for upgrading an individual server, whether you
are upgrading only the current components or changing the configuration. See
Chapter 4, “Upgrading Tealeaf Software on a Server,” on page 17.
Change localhost References
Before you upgrade from the release, verify that the server references in the Portal
Management page do not use localhost values. Instead, use a host name or fully
qualified domain name.
Note: This step is important for the Report Server, if it is also the host of any
Tealeaf databases. Upon upgrade, some Portal reporting can be corrupted if this
change is not made.
See Chapter 3, “Preparing to Upgrade to the Current Release,” on page 7.
Database Requirements
As part of the Report Server upgrade, you may choose to upgrade the Tealeaf
databases and migrate data from the previous version to the new schema.
More requirements apply to the database upgrades.
v See "Upgrading the Databases" in the IBM Tealeaf CX Upgrade Manual.
Upgrade Sequencing
In a multi-server Tealeaf environment, the server that hosts the Reporting Server
should be upgraded first.
Note: During the upgrade of the Report Server, you may also choose to upgrade
the Tealeaf databases. Tealeaf recommends upgrading them after the server
upgrade through the Database Manager. Some additional information about the
database upgrade is available on this page. See "Upgrading the Databases" in the
IBM Tealeaf CX Upgrade Manual.
28
Tealeaf CX Upgrade Manual
Before You Begin
As part of the upgrade of the Reporting Server, all Tealeaf databases can be
upgraded, as well. Before you begin to upgrade the Reporting Server, review the
prerequisites and other requirements for upgrading the database, which includes
acquiring the necessary permissions to complete the upgrade.
Upgrading the databases to a new release requires system administrator privileges.
See "Upgrading the Databases" in the IBM Tealeaf CX Upgrade Manual.
If the upgrade process includes a migration of the SQL databases to a new server,
see "Migrating Tealeaf Databases" in the IBM Tealeaf Databases Guide.
User Permissions
The user account that is used during the upgrading of the databases requires
ADMIN privileges.
During the upgrade steps, the following dialog is displayed.
Upgrading the Report/Visitor databases require the current user
to have DB admin privileges. If this not the case, select NO.
This can be performed later by one with sufficient privileges.
See Chapter 7, “Upgrading the databases to the current release,” on page 33.
Upgrading the Reporting Servers
Upgrade the Tealeaf software on the Reporting Server.
Adding as a new component to this server:
If you are adding the Reporting Server to the current machine, you must use the
Tealeaf Installer. The component to add is Report Server and Portal Web
Application.
v See Chapter 4, “Upgrading Tealeaf Software on a Server,” on page 17.
Upgrading an existing Report Server
v Run the Tealeaf Upgrader.
– See Chapter 4, “Upgrading Tealeaf Software on a Server,” on page 17.
v If you chose to upgrade the database during this process, the Tealeaf Database
Manager utility is started. This utility upgrades the MS SQL databases to Release
8.x format. For more information, see Chapter 7, “Upgrading the databases to
the current release,” on page 33.
v The report server upgrade is complete.
v If you are prompted to restart and the Tealeaf databases are upgraded, then click
Yes to the restart machine. Else, click No.
Next Steps
If you are performing a multi-server upgrade, you can resume the process with
other servers.
v See Chapter 6, “Upgrade for Multi-Server Deployment,” on page 25.
If you did not upgrade the databases as part of the main upgrade process, you
must upgrade them after you complete the software upgrades.
Chapter 6. Upgrade for Multi-Server Deployment
29
v See Chapter 7, “Upgrading the databases to the current release,” on page 33.
Upgrade for Processing Server
You can upgrade each Processing Server in sequence or all in parallel.
Note: If you have any questions about the process or the steps that are required to
upgrade your Tealeaf solution, contact http://support.tealeaf.com.
Prerequisite Checklist
Before you begin, verify that you completed the items listed here.
1. Reviewed the overall process. See Chapter 1, “Overview of Upgrade Process,”
on page 1.
2. Reviewed the changes for the release. See Migration to the current release.
3. Completed the preparation steps. See Chapter 3, “Preparing to Upgrade to the
Current Release,” on page 7.
a. Copied Tealeaf software to each server. For every server that you are
upgrading, copy the Tealeaf software to a directory outside of the Tealeaf
installation directory.
b. Backed up the server. Perform a backup of all Tealeaf directories and SQL
Server databases on the server before you begin the upgrade of it.
v Ideally, you should create a complete mirror image of the server.
4. Stopped traffic and allowed Data Collector finish: Immediately before upgrade,
you must stop traffic to the Processing Servers in your environment and allow
the Data Collector to complete its collection run from the stopped Canisters.
See Chapter 3, “Preparing to Upgrade to the Current Release,” on page 7.
Note: For more information about issues that may occur during installation or
upgrade, see Chapter 4, “Upgrading Tealeaf Software on a Server,” on page 17.
You should also know the process for upgrading an individual server, whether you
are upgrading only the current components or changing the configuration. See
Chapter 4, “Upgrading Tealeaf Software on a Server,” on page 17.
Stop Traffic to the Processing Server
If you did not do so already, traffic must be stopped to the Processing Server for a
period of time first.
See Chapter 5, “Release Upgrade for All-in-One Deployment,” on page 23.
Upgrading the Processing Server
Run the Tealeaf upgrading software. See Chapter 4, “Upgrading Tealeaf Software
on a Server,” on page 17.
Next Steps
If you are performing a multi-server upgrade, you can resume the process with
other servers.
See Chapter 6, “Upgrade for Multi-Server Deployment,” on page 25.
30
Tealeaf CX Upgrade Manual
Upgrade for HBR
This section describes how to upgrade the Health-Based Routing (HBR) server and
software.
Note: If you have any questions about the process or the steps that are required to
upgrade your Tealeaf solution, contact support.
HBR enables you to balance loads between Processing Servers in a multi-Canister
environment.
Note: When you upgrade Tealeaf in a multi-Canister environment, Tealeaf
recommends deploying HBR to manage loads during the upgrade process. HBR
requires a separate server and more installation before you upgrade. See
Health-Based Routing (HBR) Session Agent.
Prerequisite Checklist
Before you begin, verify that you have completed the items listed in the checklist
documented here.
1. Reviewed the overall process. See Chapter 1, “Overview of Upgrade Process,”
on page 1.
2. Reviewed the changes to Tealeaf. See Migration to the current release.
3. Completed the preparation steps. See Chapter 3, “Preparing to Upgrade to the
Current Release,” on page 7.
a. Copied Tealeaf software to each server. For every server that you are
upgrading, copy the Tealeaf software to a directory outside of the Tealeaf
installation directory.
b. Backed up the server. You should perform a backup of all Tealeaf directories
and SQL Server databases on the server before you begin the upgrade of it.
v Ideally, you should create a complete mirror image of the server.
4. Stopped traffic and allowed Data Collector finish: Immediately before upgrade,
you must stop traffic to the Processing Servers in your environment and allow
the Data Collector to complete its collection run from the stopped Canisters.
See Chapter 3, “Preparing to Upgrade to the Current Release,” on page 7.
Note: For more information about issues that may occur during installation or
upgrade, see Chapter 4, “Upgrading Tealeaf Software on a Server,” on page 17.
You should also know the process for upgrading an individual server, whether you
are upgrading only the current components or changing the configuration. See
Chapter 4, “Upgrading Tealeaf Software on a Server,” on page 17.
Upgrade Sequencing
You can perform the upgrade for each HBR server serially or simultaneously.
Upgrading the HBR Servers
You can upgrade the HBR servers.
Chapter 6. Upgrade for Multi-Server Deployment
31
Adding as a new component to this server
Note: If you are adding HBR to the current machine, contact Tealeaf
http://support.tealeaf.com first.
Upgrading an existing HBR
1. For the HBR server, run the Tealeaf Upgrader setup.exe from the directory
where you extracted the upgrade archive. See Chapter 4, “Upgrading Tealeaf
Software on a Server,” on page 17.
2.
3.
4.
5.
Note: The Tealeaf Upgrader shuts down all Tealeaf software on the server.
During the time of HBR upgrade, traffic from the PCA is dropped.
Click Next on the Welcome Screen.
Click Yes on the Upgrade Screen.
The upgrade proceeds with the following:
a. Install the Microsoft Redistributes.
b. Transfer files.
c. Canister Rebuild Screen (preserving session data). This step takes 5-10
minutes.
d. Start the upgrade process on other Canisters while you are waiting for this
step to complete.
e. The Finish screen is displayed.
Next, you see either:
a. If prompted to restart the server, click Yes.
b. If prompted to Finish:
1) Check the option that says Start Tealeaf Services.
2) Click OK/Done.
The HBR server starts processing data from the PCA and feeding that data to the
Processing Servers or spooling if none is available. Reports are not updated until
completion of the Report Server upgrade and resumption of data collection.
After Upgrading HBR
Depending on the sequence of tasks performed for the upgrade, there might be
additional things you need to do.
Note:
v If you followed the recommended order of upgrade by upgrading HBR last,
then you can ignore this note.
v After you upgraded HBR and rebooted the server, the Tealeaf Management
Service automatically restarts. If you did not upgrade other Tealeaf servers yet,
this service must be stopped manually. TMS on the upgraded server should not
be allowed to communicate with other servers that are not yet upgraded.
Next Steps
If you are performing a multi-server upgrade, you may resume the process with
other servers.
See Chapter 6, “Upgrade for Multi-Server Deployment,” on page 25.
32
Tealeaf CX Upgrade Manual
Chapter 7. Upgrading the databases to the current release
This section describes how to upgrade the Tealeaf databases to the latest version of
Tealeaf.
Depending on how databases are deployed in your Tealeaf environment, you may
choose to upgrade the databases inline with upgrading its host server or after you
complete your upgrade of the Report Server.
Note: If you have any questions about the process or the steps that are required to
upgrade your Tealeaf solution, contact http://support.tealeaf.com.
Note: It is possible to upgrade your Tealeaf software and migrate only your event
and alert definitions into a new database. See "Upgrading with Event and Alert
Migration Only" in the IBM Tealeaf CX Upgrade Manual.
SQL Server versions
Make sure you are using a supported version of SQL Server.
See Supported SQL Server Versions for a list of supported SQL Server versions for
IBM Tealeaf.
For information about general database server requirements, see the "CX
Pre-Installation Checklist" in the IBM Tealeaf CX Installation Manual.
Database compatibility mode
When the databases are upgraded to Release 8.x, you may be required to update
the SQL Server Compatibility Mode.
SA permissions required
Upgrading the databases to Release 8.1 or later requires System Administrator
permissions, as the process creates new filegroups. You cannot upgrade by using
the TLADMIN account. Verify that the account you are using has the appropriate
permissions.
Use of dynamic ports
If your SQL Server installation uses dynamic ports, extra configuration is required
before you install or upgrade the Tealeaf databases.
Required temporary space
During the upgrade process, you may choose to migrate event definitions and
reporting data. Depending on the options you choose, the Tealeaf Database
Manager requires sufficient space to perform the upgrade operations.
v The values in the Required Temp Space column indicate the volume of space that
is required on the SQL Server machine as a multiple of the size of the database.
v If you are performing multiple operations, they are additive, meaning that the
required temp space factors must be added to see the total required temporary
space.
© Copyright IBM Corp. 1999, 2015
33
Note: The following are estimates and may not be exact for each Tealeaf
solution.
Table 2. Required Temporary Space
Product
Operations
Required Temp Space
No data migration
Install the event definitions
0x
IBM Tealeaf CX
v Install the event definitions
v 0x
v Migrating Report data - Delete
during migration
v 1.25x
v 2x
v Migrating Report data - Delete after
migration
IBM Tealeaf cxReveal
Migrate Search data
1.25x
IBM Tealeaf cxResults
Migrating Visitor data
0x
Preparing the Report Server
Before you begin your upgrade, copy the event definitions to the Report Server
and verify user permissions.
Preparing the database server
Follow these instructions to prepare the database server.
Before you begin, run or verify that you have a valid and up-to-date backup of the
current Tealeaf databases.
Before you upgrade the databases, verify the following:
v If you are upgrading on a remote server, you must create the filegroup paths on
the remote SQL Server before you upgrade.
v If you are not logged in as a user with admin privileges on the database, make
the following entries or selections in the Authentication box:
– Manual Authentication
– User name: <SQL Server login>
– Password: <password>
v The user that installs the databases must have access to a user account that has
permissions to create databases on the remote SQL Server. You must be logged
in as a trusted user that has admin privileges, or you must have the user name
and password for an authorized SQL Server login.
Note: To upgrade the databases, the database user account must have SA
privileges.
Database upgrade steps
Follow the procedures in this section to upgrade your databases.
Disabling the StatsLogger session agent
The database upgrade may hang during the System upgrade step if an active Stats
Logger session agent is enabled in the Windows pipeline on the Report Server and
is actively writing to the SQL Server database.
34
Tealeaf CX Upgrade Manual
Before you begin, consider disabling the Stats Logger session agent on the Report
Server.
Creating the cxReveal databases
If you have newly licensed IBM Tealeaf cxReveal or are upgrading from a version
of IBM Tealeaf cxReveal that did not include the IBM Tealeaf cxReveal database,
you must create the IBM Tealeaf cxReveal database through the Tealeaf Database
Manager.
v The IBM Tealeaf cxReveal database was introduced in Release 7.2.12.7296. It
requires separate installation and configuration of a dedicated Windows
pipeline.
v The IBM Tealeaf cxReveal database requires a separate installation process. See
"cxReveal Installation" in the IBM Tealeaf cxReveal Administration Manual.
Upgrading the databases
Through the Tealeaf Database Manager, the Tealeaf databases can be upgraded all
at one time or individually.For Release 8.x, the databases must be upgraded in a
specific order. This order is managed for you in All Databases mode. When you
upgrade databases individually, you must complete the upgrade in the order
described in this section.
In All Databases mode
Use this procedure to upgrade your databases in All Databases mode.
Note: You should be on the Tealeaf Portal Server.
1. Run the following executable:
<Tealeaf_Install_Directory>\Reporting\TeaLeafDatabaseManager.exe
2. Enter your connection information. See "Tealeaf Database Manager Reference"
in the IBM Tealeaf Databases Guide.
3. In the menu, select Mode > Database Setup > All Databases.
4. From the Action drop-down, select Upgrade.
5. Click OK.
Note: After you begin installation or upgrading in All Database Mode,
canceling interrupts the process after the requested action is completed on the
current database. The actions on the current database and all previous
databases are retained, and any remaining databases are left untouched. You
may want to revert to the backup or make adjustments before you complete the
action.
6. After the operation completes, review the output window.
v Be sure to review the Failed Statements pane to verify that all statements
were successfully run.
Note: After completion of an upgrade, the Tealeaf Database Manager
attempts to start the SQL Server services on the host machine, in case they
stop at some point. If the Database Manager fails to start them on a remote
machine, an error message may be generated. If the services are operational,
then this message is harmless; a restart of SQL Server is not required during
upgrade.
Chapter 7. Upgrading the databases to the current release
35
In Single Database mode
Follow these steps in the order shown to manually upgrade your Tealeaf
databases.
The databases must be ugraded in the following order.
1. The System database must be upgraded first.
2. The Reports database must be upgraded second.
Note: If you install or update the System database, you must install or reinstall
the event definitions through the Tealeaf Database Manager at some later point
in the installation process. See "Installing Tealeaf Databases" in the IBM Tealeaf
Databases Guide.
3. The other databases can then be created and updated in any order.
Perform the following steps on the Tealeaf Portal Server.
1. Run the following executable: <Tealeaf_Install_Directory>\Reporting\
TeaLeafDatabaseManager.exe
2. Enter your connection information. See "Tealeaf Database Manager Reference"
in the IBM Tealeaf Databases Guide.
3. Upgrade the System database:
Note: The System database must always be created first.
a.
b.
c.
d.
In the menu, select Mode > Database Setup > Single Database.
From the Database drop-down, select System.
From the Action drop-down, select Upgrade.
Click OK.
e. After the operation completes, review the output window.
v Be sure to review the Failed Statements pane to verify that all statements
were successfully run.
Note: If you install or update the System database, you must install or
reinstall the event definitions through the Tealeaf Database Manager at
some later point in the installation process.
f. Close the output window.
4. Upgrade the Reports database:
a.
b.
c.
d.
e.
In the menu, select Mode > Database Setup > Single Database.
From the Database drop-down, select Reports.
From the Action drop-down, select Upgrade.
Click OK.
After the operation completes, review the output window.
v Be sure to review the Failed Statements pane to verify that all statements
were successfully run.
f. Close the output window.
5. Upgrade the RS Extractor database:
a. In the menu, select Mode > Database Setup > Single Database.
b. From the Database drop-down, select RS Extractor.
c. From the Action drop-down, select Upgrade.
d. Click OK.
e. After the operation completes, review the output window.
36
Tealeaf CX Upgrade Manual
v Be sure to review the Failed Statements pane to verify that all statements
were successfully run.
f. Close the output window.
6. Upgrade the Statistics database:
a. In the menu, select Mode > Database Setup > Single Database.
b. From the Database drop-down, select Statistics.
c. From the Action drop-down, select Upgrade.
d. Click OK.
e. After the operation completes, review the output window.
v Be sure to review the Failed Statements pane to verify that all statements
were successfully run.
f. Close the output window.
7. Upgrade the IBM Tealeaf cxReveal database:
Note: The IBM Tealeaf cxReveal database requires special setup.
a. In the menu, select Mode > Database Setup > Single Database.
b. From the Database drop-down, select Search.
c. From the Action drop-down, select Upgrade.
d. Click OK.
e. Close the output window.
8. In single database mode, after you complete the upgrade, you must install the
event definitions.
Troubleshooting
Topics in this section describe steps you can take to resolve common problems you
might encounter when upgrading your database.
Upgrading when the database server times out during
upgrade of rs_activity_log table
Use this procedure when you encounter a timout error during a database upgrade.
During the upgrade of the rs_activity_log table in the TL_SYSTEM database, you
may receive a timeout error similar to the following:
4/8/2010 9:04:40 AM
TL_SYSTEM
ERROR
There was an error executing
the command list.
Timeout expired. The timeout period elapsed prior to completion of
the operation or the server is not responding.
At statement: --Move all the ’DocumentsFound’ attribute values into the
new REPORT_VALUE column to make them reportable/chartable in the Portal
This database table contains the user activity logs from the Portal. In pre-Release
7.2 versions, there was a known issue in which this database table was not
properly trimmed. As a result, the table can grow large. Depending on the size of
the SQL Server timeout setting, the timeout may occur during the upgrading of
this table.
You may want to review the rs_activity_log table to identify if the data should
be preserved or not.
To fix this issue:
Chapter 7. Upgrading the databases to the current release
37
1. Back up the contents of the rs_activity_log, if you want to preserve it for
auditing purposes.
2. You can do either of the following:
a. Increase the SQL Server timeout setting for the Tealeaf databases.
b. Clear the rs_activity_log database.
Increasing the SQL Server timeout
Complete the following steps to increase the SQL Server timeout setting that is
used by Tealeaf and complete the upgrade.
1. Log in to the Tealeaf Portal as an administrator.
2. From the Portal menu, select Tealeaf > TMS.
3. The Tealeaf Management System is displayed. See "Tealeaf Management
System" in the IBM Tealeaf cxImpact Administration Manual.
4. In Server view, click the Tealeaf node.
5. Select Shared configuration information.
6. In the Config Actions pane, click View/Edit.
7. The Tealeaf Report Configuration dialog is displayed. Click the Database tab.
8. Click Connection Timeout.
v By default, this value is set to 600 (seconds), which is 10 minutes.
9. Enter a higher value and click Apply.
10. Click Save.
11. In the Update Servers dialog, select Add Tasks and Submit.
12. After the job runs, all Tealeaf servers in your environment are updated with
the new database connection timeout setting.
v See "TMS Jobs Tab" in the IBM Tealeaf cxImpact Administration Manual.
v For more information about the database connection timeout, see "Shared
configuration information" in the IBM Tealeaf cxImpact Administration
Manual.
13. Upgrade the TL_SYSTEM database in Individual Database mode through the
Tealeaf Database Manager.
Clearing the rs_activity_log table
To clear the contents of the rs_activity_log table and complete the upgrade,
complete the following steps.
1. Log in to SQL Management Studio.
2. To clear the table, run the following SQL:
Note: This statement removes the contents of the rs_activity_log table. Verify
that you have a backup.
use tl_system;
TRUNCATE TABLE RS_ACTIVITY_LOG;
3. Upgrade the TL_SYSTEM database in Individual Database mode through the
Tealeaf Database Manager.
TLEventManager Utility
Note: Tealeaf events are installed as part of the initial deployment or upgrade of
your Tealeaf system. During normal operations, you should never need to use this
utility. It is provided for use during resolution of issues with Tealeaf
http://support.tealeaf.com.
38
Tealeaf CX Upgrade Manual
TLEventManager.exe is an external utility that can be used to install or update the
event definitions in use by your Tealeaf system to all active Tealeaf Canisters.
v This utility is available to customers in release 8.3.1.8372 and later.
Prerequisites
v The Portal application must be made aware of each Canister in the environment.
Verify that there is a reference to each Canister in the Portal Management page.
– See "Managing Tealeaf Servers" in the IBM Tealeaf cxImpact Administration
Manual.
v If you are loading only the default Tealeaf events, no additional files are
required.
v If you load or import an event XML file, TLE, or convert 7.2 CSVs, these files
must be placed in the TeaLeaf\System directory on the same machine as
TLEventManager.exe
Backup
Before you make changes to a Tealeaf system that already contains event
definitions, perform a backup of the existing definitions. Through the Tealeaf Event
Manager, you can export a version of the event definitions that can be reimported
as needed.
v See "TEM Import-Export Tabs" in the IBM Tealeaf Event Manager Manual.
Location
The command-line utility is available here:
<Tealeaf_install_directory>\Reporting\TLEventManager.exe
When to Use
For customers, the primary use of this utility is to apply patches to the Tealeaf
event definitions installed on your system.
For implementation engineers, this utility can be used for a one-time migration of
event definitions between a previous installation and the current installation. The
most common use case is when the customer wants a fresh Tealeaf system with no
pre-existing data, other than their event definitions.
Loading the default event definitions
If your database installation did not run TLEventManager or you must reload the
system's default event definitions, follow the steps.
1. Log in to the Report Server as an administrator.
2. Navigate to the following directory:
<Tealeaf_install_directory>\Reporting
3. Execute the following command at the command line:
TLEventManager.exe -bootstrap
4. If the events are successfully loaded, the following message is displayed:
Event Manager Utility completed with return code: 0 (OK)
Return codes
Below you can review the possible return codes are their meaning.
Note: If you receive a non-zero return code when you load event definitions from
the command line after a fresh installation, retrieve the log file for the utility from
the Logs directory and contact Tealeaf http://support.tealeaf.com.
Chapter 7. Upgrading the databases to the current release
39
Table 3. Return codes
Return Code
Description
0
No Errors
1
Invalid command arguments
2
Unable to connect to the Data Device
3
Data Service started with error
4
License file not valid
5
Unable to load internal event resources
6
Unable to load event definitions from the Data Service
7
Error saving events
8
Error saving reports
9
Invalid namespace
10
Unable to connect to Search Server
11
Error saving legacy event definitions
12
A required Dimension Group was not found
13
Error loading 7.2 event CSVs
14
Error importing/converting events
15
Error converting Custom Charts
16
Error converting Dashboards
17
Error converting Scorecards
18
Error converting Schedules
19
Error saving legacy dimension values
20
Error loading deleted events list from the Data Service
21
Error generating event XML
Upgrading
During an upgrade, the utility is automatically called by the Tealeaf Database
Manager.
Note: Running the TLEventManager.exe utility on the same set of definitions for
the same version of the software is harmless.
Database Install or Upgrade
If you installed or upgraded one or more Tealeaf databases, rerun the utility as a
precaution.
Loading/importing events via TLEventManager: You can use TLEventManager to
import and export of Tealeaf events in XML and TLE format. Sample execution
scenarios are listed below:
Note: Depending on the number of events that are imported and the dependencies
of those events, import may be a time-intensive process.
Loads the default Tealeaf events
TLEventManager.exe -bootstrap
40
Tealeaf CX Upgrade Manual
Imports event definitions for an Event XML
TLEventManager.exe -importxml events.xml
Imports event definitions from an Event TLE
TLEventManager.exe -importtle events.tle
events.xml and events.tle above can be replaced with any file names of your
choosing.
Note: File names cannot contain spaces. Specified XML and TLE files must exist in
the TeaLeaf\System directory on the local computer where TLEventManager is
being executed.
Convert and import events from 7.2 CSVs from TeaLeaf\System
TLEventManager.exe -convert
Note: Event IDs are properly maintained only if TLEventManager.exe has never
previously been executed against this database installation. If this utility has been
previously executed, the 7.2 CSVs are converted and imported, but IDs are not
maintained.
Limitations
v Event icons are not currently imported
v 7.2 Event IDs are only preserved if the -convert command switch is specified on
the first execution, which is typically handled automatically by the normal
upgrade process.
Execution: During execution, TLEventManager.exe launches the Tealeaf Data
Service, which connects to a variety of Tealeaf systems. However, the utility only
needs the Data Service to insert the event definitions into the database. Other
Tealeaf components do not need to be available during execution of the utility.
Order of execution for events
TLEventManager has a fixed order of executing steps. Whether the following steps
are executed depends upon the command-line arguments:
v
v
v
v
Bootstrap events
Converted events
XML events
TLE events
The XML or TLE events can override bootstrap and converted events. Each
subsequent event type can potentially override the preceding in the same
operation.
Arguments: The following arguments are available at the command line.
Argument
Description
-ss
Search Server host
-ssport
Search Server port
-ds
Data Service host
Chapter 7. Upgrading the databases to the current release
41
-dsport
Data Service port
-bootstrap
Load base objects only
-convert
Convert legacy events
-fullenumconvert
Convert enum lists with ref value support. See Importing enumerated
events.
-importtle <tle>
Import Event TLE from TeaLeaf\System
-importxml <xml>
Import Event XML from TeaLeaf\System
-outfile <file>
Writes program exit status to file
-dimgroups <group1,group2>
Dimension groups for conversion
Log file Location: TLEventManager.exe generates and maintains a robust log file
in the following location:
<Tealeaf_install_directory>\Logs\TLEventManager_YYYYMMDD.log
where:
v YYYYMMDD is the date stamp for the log file. Log files are rolled every night at
midnight.
Note: If you encounter issues while you use the Tealeaf Event Manager utility,
acquire the log file for the date in question before contacting Tealeaf
http://support.tealeaf.com.
Conversion report
For more information about the Conversion report, see Chapter 8, “Post-Upgrade
Cleanup,” on page 43.
Data Service Log Messages
If the Tealeaf system is offline, errors may be generated in the Tealeaf Data Service
log indicating that the service was unable to connect to other Tealeaf components.
For example, the following error message indicates that the Data Service could not
connect to Search Server.
2010-03-24T16:53:58
SsConnector.PrimeServer
ERROR
TEALEAF.EXAMPLE.COM:19000 Server.Initialize returned null.
Error: Initialize error for TEALEAF:19000 - Cannot connect to
a search server! (Web Exception), AttemptCount=0 : Unable to
connect to the remote server
42
Tealeaf CX Upgrade Manual
Chapter 8. Post-Upgrade Cleanup
After you complete the upgrade, you should complete the following tasks, if you
did not do so already.
Note: If you have any questions about the process or the steps that are required to
upgrade your Tealeaf solution, contact support.
Updating the Tealeaf Application Pool settings
Complete the steps listed here to update the Tealeaf Application Pool settings in
Microsoft Internet Information Services (IIS).
1. From the server that is running the Tealeaf Portal, log in to the Windows
server.
2. Open IIS Manager. For more information on how to open IIS Manager, see the
documentation for your Windows server.
3. Locate the Tealeaf Portal server node, then click Application Pools.
4. Change the setting for .NET Framework Version to a support version. You can
review the installation requirements for the release in the Installation Guide.
5. Restart the IIS service before you log in to the Tealeaf Portal.
Review Print Out of Preparing Page
If you printed and annotated the Preparing to Upgrade page, you may want to
review the print out to identify the items that may require follow up after upgrade.
Some of these items may be reflected in the following tasks in this section.
See Chapter 3, “Preparing to Upgrade to the Current Release,” on page 7.
Apply Any Patches
From time to time, Tealeaf may publish patches to official builds to address specific
issues.
Before you verify your installation, see whether there are any patches for the build
to which you have upgraded. For more information on downloading IBM Tealeaf,
see IBM Passport Advantage Online.
Review Conversion report
After the upgrade completes, review the Conversion Report, which identifies the
status of conversion.
See Event Conversion Report.
Review Logs
Review the following logs for error messages.
© Copyright IBM Corp. 1999, 2015
43
TLEventManager log
Errors that are related to the conversion of events and installation of new event
definitions is stored in the following location:
<Tealeaf_install_directory>\Logs\TLEventManager-yyyyMMdd.log
TealeafDatabaseManager log
This log contains messages on the database upgrade and data migration processes.
It is stored in the following location:
<Tealeaf_install_directory>\Logs\TeaLeafDatabaseManagerYYYYMMDD_*.log
Event Viewer
Check the Windows Event Viewer for Application errors.
1. Open the Event Viewer through the Windows Start menu.
2. Click the Application node.
3. Sort the results by the Source column.
4. Review the entries for the Tealeaf entry.
5. Review warning and error messages.
Set Recovery Model to Simple
Tealeaf recommends setting the Recovery Model for all Tealeaf databases to Simple.
Re-Apply Portal Custom Configurations
The following files enable you to specify configurations specific to your instance of
the Portal web application.
During the upgrade process, these files are automatically backed up in the same
directory where they are located:
<Tealeaf_install_directory>\Portal\WebApp\custom_content.htm
<Tealeaf_install_directory>\Portal\WebApp\Web.Config
<Tealeaf_install_directory>\Portal\WebService\Web.Config
After the upgrade is complete, review these files and apply and changes made
specific to your pre-upgrade Tealeaf solution to the default files installed during
the upgrade process.
Replay server post-upgrade cleanup tasks
There are several post-upgrade cleanup tasks to do on the Replay server.
Disable Interactive Services Detection
For the WebKit/Chrome renderer to function properly, the Interactive Services
Detection service on the server that hosts Replay Server must be disabled.
See "CX Pre-Installation Checklist" in the IBM Tealeaf CX Installation Manual.
Replay Server must run as Local System
The Replay Server must be run as the Local System user.
Before you begin replaying sessions through BBR, complete the following steps for
each Replay Server.
44
Tealeaf CX Upgrade Manual
Note: These steps must be applied to each Replay Server in your environment.
1. Log in to the server that hosts the Replay Server.
2. From the Start menu, open the Services control panel.
3. From the list of services, select Tealeaf Replay Server.
4. Right-click the service and select Properties.
5.
6.
7.
8.
9.
10.
Click the Logon tab.
Click the Local System account radio button.
Select the Allow service to interact with desktop option.
Click OK.
Right-click the service and select Restart.
Repeat the steps for any other Replay Servers in your Tealeaf environment.
Replay Server Access to Origin Server
The Tealeaf Replay Server requires access to the server that hosts the web
application for effective replay.
See "Configuring the Replay Server" in the IBM Tealeaf CX Configuration Manual.
Updating POST Data Matching Configuration to Recognize
New Content Types
If you upgraded to the current release and use the DWR library, you must update
the Replay Server profile and each RTV replay profile to recognize the DWR
requests and to apply the appropriate POST data matching plug-in to locate the
corresponding response.
v See "Configuring the Replay Server" in the IBM Tealeaf CX Configuration Manual.
v Individual users of RTV must apply this change to their local replay profiles. See
"RealiTea Viewer Overview" in the IBM Tealeaf RealiTea Viewer User Manual.
Start All Tealeaf Services
If you did no do so already, start all Tealeaf services on all upgraded servers.
Configure Permissions
Note: If your upgrade includes any newly licensed Tealeaf products, automatic
access to product features is granted to the ADMIN group if you did not modify
your ADMIN group permissions since original installation.
v If you modified the ADMIN group, you must update menu permissions manually
for that group.
v For all other users and groups, you must configure the appropriate permissions.
v See "CX User Administration" in the IBM Tealeaf cxImpact Administration Manual.
Event Model Backup
Before you begin making modifications to your event definitions, you may want to
perform an event model backup, which can be used to restore event definitions to
a previous state.
v See "Event Model Backup and Restore" in the IBM Tealeaf cxImpact Administration
Manual.
Chapter 8. Post-Upgrade Cleanup
45
Verify Tealeaf Operations
After you upgraded all Tealeaf servers with the appropriate software, you can use
the following steps to verify basic Tealeaf operations through the Tealeaf Portal.
1. Log in to the Portal as a regular Tealeaf user.
Note: When you log in to the Portal, you might notice that a message at the
top of the window indicates that there is a delay in processing reporting data.
During the period when the upgrade was completed, hits were received and
were spooled until they were processed. In time, this message disappears. See
"Portal State Messages" in the IBM Tealeaf cxImpact User Manual.
v Check various pages in the Portal to see that data is being properly received
and displayed.
2. Log in to the Portal as an Administrator.
v Check that data is being properly received and displayed in the selections
available in the Tealeaf menu.
v Perform the same Portal tests that you executed on the solution before the
upgrade. See Chapter 3, “Preparing to Upgrade to the Current Release,” on
page 7.
3. Launch the IBM Tealeaf CX RealiTea Viewer, if it is used in your Tealeaf
solution.
v Verify that you can see, search for, and replay Tealeaf sessions.
Check for Active Sessions
If all Tealeaf services successfully restarted, you can verify capture of session data
through the Portal.
1. In the Portal menu, select Active > Sessions.
2. Verify that a non-zero number of sessions is displayed.
v See "Monitoring Active Sessions" in the IBM Tealeaf cxImpact User Manual.
3. If no sessions are displayed, you can verify the state of your Windows
pipelines. From the Portal menu, select Tealeaf > TMS.
4. The Tealeaf Management System is displayed. See "Tealeaf Management
System" in the IBM Tealeaf cxImpact Administration Manual.
5. Click the Pipeline Status tab.
6. You can verify that non-zero numbers of hits are being processed by your
operational pipelines.
v See "TMS Pipeline Status Tab" in the IBM Tealeaf cxImpact Administration
Manual.
7. If no hits are entering the pipeline, there may be an issue in the IBM Tealeaf CX
Passive Capture Application.
v The PCA may not capture enabled. See "PCA Web Console - Console Tab" in
the IBM Tealeaf Passive Capture Application Manual.
v The PCA may not be configured to deliver hits to the appropriate Transport
Service. See "PCA Web Console - Delivery Tab" in the IBM Tealeaf Passive
Capture Application Manual.
Verify Events
Verify that events are being properly displayed in the Portal.
1. From the Portal menu, select Active > Events.
2. If no events are displayed, click the Include Zeroes checkbox.
46
Tealeaf CX Upgrade Manual
3. Verify that there are active events in the displayed. The event counts might not
be relevant.
4. If no events are displayed, you may need to reinstall the event definitions.
v See "Installing Tealeaf Databases" in the IBM Tealeaf Databases Guide.
Events That Fail to Convert
In the Conversion Report, some events are labeled to require extra attention. These
events must be reviewed and modified through the Tealeaf Event Manager.
1. Log in to the Tealeaf Portal as an administrator.
2. Select Configure > Event Manager. The Tealeaf Event Manager is displayed.
v See "Tealeaf Event Manager" in the IBM Tealeaf Event Manager Manual.
3. You can review the events that require attention. Click the Events tab.
4. Click the Needs Attention event label. The list of events that require attention
is displayed. This list includes events that converted with Failed or Needs
Attention status.
5. Edit each object to repair it.
v To prevent these events from firing when they are not working, the upgrade
process may disable the event and insert the following condition:
Session GUID == ""
The event condition never evaluates to true. After you fix the problem that is
identified in the Conversion Report for the event, you must remove the
condition from the event for it to properly function.
Other events that require your review may not have this condition.
v For more information, see "TEM Events Tab" in the IBM Tealeaf Event Manager
Manual.
6. After you edit each object, click Save Draft.
7. After you complete editing the events, click Save Changes. Your changes are
saved to the server and immediately applied to the capture stream.
v See "Tealeaf Event Manager" in the IBM Tealeaf Event Manager Manual.
Events with malformed regular expressions: If any Release 7.2 event definitions
contained regular expressions, the regular expressions were validated during the
event migration process. If validation failed, then the regular expressions are
commented out, and the event cannot fire in the upgraded environment. These
events should be reviewed.
Verify Event Activity
1. From the Portal menu, select Analyze > Event Activity.
2. Compare the listed values to the Event Activity report that you exported before
the upgrade.
Verify Scorecards
If you licensed IBM Tealeaf cxView in your pre-upgrade solution, verify that
scorecard data is properly migrated.
Note: At the top of the next hour after the upgrade is complete, scorecards are
automatically recalculated. Wait until after the first successful top-of-the-hour Data
Collector run occurs before you check the scorecard data.
Chapter 8. Post-Upgrade Cleanup
47
v In some cases, scorecard data is not successfully recalculated. If the data is not
present after the Data Collector run, then troubleshooting steps are provided to
address this issue. See "Scorecard Aggregation Dates" in the IBM Tealeaf cxView
User Manual.
Verify Exported Dashboards
1. From the Dashboards menu, select one of the Dashboards that you exported
from your pre-upgrade system.
Note: Do not use the Deprecated - Technical Site Metrics dashboard for
comparison. It is included if you customized that dashboard and need to
migrate those customizations to Release 8.1 or later, which includes a different
version of the dashboard (Technical Site Metrics).
2. Compare the data in the selected dashboard to the dashboard version that you
exported before the upgrade.
v See "Using Dashboards" in the IBM Tealeaf cxView User Manual.
3. Repeat the steps for any other dashboards you may have exported.
Verify Search Templates
As part of the upgrade process, the Canister and Search Server identifiers are
rebuilt in the database. After the upgrade is complete, verify that the default search
servers identified in your search templates are valid. In the template properties,
verify that the Search Server property is properly specified.
v See "Configuring Search Templates" in the IBM Tealeaf cxImpact Administration
Manual.
Reconfigure cxReveal Search Templates
The IBM Tealeaf cxReveal Search database enables the capture of session attributes
and storage of them in the Search database for immediate search access.
Note: If you are upgrading to the current release and you configured IBM Tealeaf
cxReveal search templates to access the search database, these search templates
need to be reconfigured after upgrade, as the method of populating them changed.
During the upgrade process, IBM Tealeaf cxReveal search templates might have
some search fields that are removed from them. If you captured screen capture as
recommended of your IBM Tealeaf cxReveal search template fields before upgrade,
you may now re-create these fields in the upgraded IBM Tealeaf cxReveal search
templates.
Note: You should load each IBM Tealeaf cxReveal search template field and save it
again, which may prevent issues in the Search page.
Note: You should also verify that all upgraded search templates are still of the
same type: IBM Tealeaf cxImpact or IBM Tealeaf cxReveal.
v See "Configuring Session Attribute Search" in the IBM Tealeaf cxReveal
Administration Manual.
v See "Configuring Search Templates" in the IBM Tealeaf cxImpact Administration
Manual.
v For more information about the pre-upgrade steps, see Chapter 3, “Preparing to
Upgrade to the Current Release,” on page 7.
48
Tealeaf CX Upgrade Manual
Reconfigure LoginID and other attribute search fields
During the upgrade process, the LoginID and UserDef1-4 attributes are converted
to LoginID and SessionAttributes1-4 in the new system.
Note: You should also verify that all upgraded search templates are still of the
same type: IBM Tealeaf cxImpact or IBM Tealeaf cxReveal.
v For more information about how these are mapped in the new system, see
Chapter 3, “Preparing to Upgrade to the Current Release,” on page 7.
Now you can reconfigure your IBM Tealeaf cxImpact search templates that
reference any of the above Release 7.2 attributes to work with the current release.
v For more information about verifying the conversion, see Review First Five
Session Attributes Mappings.
v LoginID requires additional configuration before it is working properly in the
upgraded system. See "E2E Scenario - Configure Login ID to be Searchable" in
the IBM Tealeaf cxImpact User Manual.
See "Configuring Search Templates" in the IBM Tealeaf cxImpact Administration
Manual.
Search for Completed Sessions
In the Portal, verify that completed sessions migrated.
1. In the Portal menu, select Search > Completed Sessions.
2. Specify a search that should return a positive number of sessions.
3. Execute the search and verify that sessions are returned.
4. Check the Events column to verify that events are recorded for the sessions.
v See "Searching Session Data" in the IBM Tealeaf cxImpact User Manual.
Check Database Filegroup Size Report
In the Portal, select Tealeaf > System Status > Database Filegroup Size.
Note: If the Database Filegroup Size report contains no data and you upgraded
from Release 7.2, contact Tealeaf support for a SQL patch.
Remove Tealeaf Upgrader Files from Servers
If you successfully verified operations of the above features, you can remove the
Tealeaf Upgrader and installation files from each server in your environment now.
Upgrading Other Tealeaf Components
After you complete the steps and verify that Tealeaf is operating, review and
perform the following upgrades.
Upgrade RTV
The IBM Tealeaf CX RealiTea Viewer (RTV) stand-alone application enables Tealeaf
users to replay sessions from the Windows desktop.
v IBM Tealeaf CX RealiTea Viewer installations on Tealeaf servers are
automatically upgraded when the other Tealeaf software is upgraded on the
system.
Chapter 8. Post-Upgrade Cleanup
49
Note: All RTV users should upgrade their desktop installations to the RTV version
provided with the upgrade distribution. Old versions of RTV cannot evaluate
Release 8.x event data. Release 8.x versions of RTV can search for and read in
Release 7.x sessions. This upgrade process should be coordinated to occur near the
core upgrade.
The IBM Tealeaf CX RealiTea Viewer requires a separate installation and upgrade
for each desktop on which it is installed in your environment.
Note: As part of your upgrade, you may be required to apply changes to the
Tealeaf.js stub file used by RTV.
Note: It is important to upgrade the Tealeaf.js file, see "RealiTea Viewer
Overview" in the IBM Tealeaf RealiTea Viewer User Manual.
Recommended PCA Upgrade
Note: Avoid upgrading the PCA and the IBM Tealeaf CX platform at the same
time. Upgrading asynchronously may help in resolving any issues that occur
during the upgrade process.
In most deployments, the IBM Tealeaf CX Passive Capture Application can be
upgraded independently of the Windows-based components of IBM Tealeaf CX.
Tealeaf recommends that you upgrade the PCA after you perform the core
upgrade.
Note: Tealeaf recommends upgrading the PCA to the latest version when possible.
If issues are encountered after you upgrade the IBM Tealeaf CX platform and core
applications, an upgrade of the IBM Tealeaf CX Passive Capture Application may
rectify the issue.
Note: If your web application uses binary posts or non-standard data, you must
upgrade your PCA to build 3326 or later to enable the configuration of
non-standard capture types.
For more information about configuring new capture types, see "PCA Web Console
- Pipeline Tab" in the IBM Tealeaf Passive Capture Application Manual.
For more information about upgrading the PCA, see Chapter 9, “Upgrade for CX
PCA,” on page 53.
Upgrade to Latest Version of UI Capture
Note: Avoid upgrading UI Capture and IBM Tealeaf CX components at the same
time. Asynchronously upgrades may help in debugging issues if they arise. Tealeaf
recommends upgrading UI Capture after you complete all upgrades of your other
Tealeaf products.
Tealeaf UI Capture is a component of the IBM Tealeaf CX license. When deployed
with your web application, UI Capture enables the capture and processing of user
interface events that occur on the client browser, enabling high fidelity replay and
additional reports on client-side metrics.
v See "UI Capture FAQ" in the IBM Tealeaf UI Capture for AJAX FAQ.
Note: If you deployed the IBM Tealeaf CX UI Capture for AJAX library to your
web application, it is recommended that you upgrade to the latest version as
50
Tealeaf CX Upgrade Manual
part of your overall upgrade to Tealeaf Release 8. Depending on how UI
Capture is implemented and deployed with your web application, this process
may require significant lead time to complete.
Note: You must upgrade IBM Tealeaf CX UI Capture for AJAX to build
2011.03.15.1 or later if you licensed IBM Tealeaf CX Mobile to replay mobile
sessions in Release 8.1 or later.
v See "UI Capture for Ajax Installation and Implementation" in the IBM Tealeaf UI
Capture for AJAX Guide.
Upgrading Other Tealeaf Applications
Upgrading cxReveal database
IBM Tealeaf cxReveal now includes a separate database and Windows pipeline to
enable search for sessions based on session attributes.
When you upgrade IBM Tealeaf cxImpact, IBM Tealeaf cxReveal can be upgraded
at the same time.
Note: To enable the IBM Tealeaf cxReveal database and Windows pipeline,
separate installation and configuration is required after you have upgraded IBM
Tealeaf cxImpact. See "cxReveal Installation" in the IBM Tealeaf cxReveal
Administration Manual.
Upgrading the Tealeaf Cookie Injector
See "Installing and Configuring the Tealeaf Cookie Injector" in the IBM Tealeaf
Cookie Injector Manual.
Archive
Transfer all backups that you made before the upgrade to a safe and permanent
location.
Send message
If you are notifying Tealeaf users that the upgrade is complete, mention the
following:
Note: The IBM Tealeaf CX system is upgraded. Before you begin to use Tealeaf,
clear your browser's cache, as files in your cache might change on the server
during the upgrade. For more information about clearing the cache, see your
browser's documentation.
Upgrade Troubleshooting
Problem: No events displayed in the Tealeaf Portal
If no events are appearing in the Tealeaf Portal and you had active events in your
pre-upgrade Portal, you may need to reload the event definitions through the
Tealeaf Database Manager.
v See "Installing Tealeaf Databases" in the IBM Tealeaf Databases Guide.
Chapter 8. Post-Upgrade Cleanup
51
Location
This report is stored in the following location:
<Tealeaf_install_directory>\Logs\TLEventManager-Report_yyyyMMdd_HHmmss.html
Color Codes
The report provides conversion status information by using color-coded indicators.
Table 4. Color Codes
Color
Level
Notes
green
Success
No action is required
orange
Needs Attention
Converted object may require extra
configuration to work properly in
Release 8.
v Items marked Needs Attention
may include a red-lined item that
indicates what requires attention.
red
Failed
Object was not converted properly
and does not exist in the upgraded
environment. Item may be deprecated
in the new release or superseded by a
new object or may fail to upgrade,
requiring Customer Support.
Note: Events that failed to convert to the new format are modified so that they are
easily identified yet do not ever fire until they are fixed. See Chapter 8,
“Post-Upgrade Cleanup,” on page 43.
52
Tealeaf CX Upgrade Manual
Chapter 9. Upgrade for CX PCA
It is recommended that you always use the latest version of the IBM Tealeaf CX
Passive Capture Application suitable for your version of IBM Tealeaf CX. For more
information on downloading IBM Tealeaf, see IBM Passport Advantage Online.
Note: If you have any questions about the process or the steps that are required to
upgrade your Tealeaf solution, contact support.
Note: Avoid upgrading the CX PCA and the Windows components at the same
time. Upgrading asynchronously may help in resolving any issues that occur
during the upgrade process.
The IBM Tealeaf CX Passive Capture Application is installed on a separate Linux
server from the Windows components and can be upgraded independently of the
rest of the IBM Tealeaf CX upgrade. However, for purposes of upgrading the entire
IBM Tealeaf CX installation, Tealeaf recommends that you upgrade your CX PCA
to the latest version after you upgrade the other Windows components.
v This process works for a multi-instance CX PCA.
v If the environment is using multiple CX PCA servers, the process must be
repeated for each server.
Note: Before you begin, review the Limitations on Upgrade Path.
Verify Requirements
System Requirements
Note: Before you begin upgrading the IBM Tealeaf CX Passive Capture
Application, verify that you have the correct packages installed. See "Installation"
in the IBM Tealeaf Passive Capture Application Manual.
Note: If your PCA is set to decrypt SSL traffic, verify that your existing SSL keys
are compatible with the version of PCA that you are installing. If you are using the
wrong keys, then the PCA cannot decrypt SSL traffic and data is not available in
Tealeaf. See "Installation" in the IBM Tealeaf Passive Capture Application Manual.
Data Requirements
The IBM Tealeaf CX Passive Capture Application requires hi-fidelity traffic of all
requests and responses that are communicated between your web application and
visitors to it. Before you upgrade, you should verify that your network
environment supports PCA data requirements.
v See "Tealeaf PCA Network Capture Traffic Requirements" in the IBM Tealeaf
Passive Capture Application Manual.
RPM of Installed Version
Before you begin, you should verify that you retained a version of the RPM file
that is used to install your current version of the PCA. If the PCA fails to install
and you are unable to rectify the problem, you may use RPM to revert to the old
version of the PCA its RPM file.
© Copyright IBM Corp. 1999, 2015
53
See “Reverting Your PCA Upgrade” on page 55.
For more information on downloading IBM Tealeaf, see IBM Passport Advantage
Online.
Data Capture
Note: Unless the PCA is using failover, Tealeaf does not capture hits at all during
the period between the Tealeaf stop and Tealeaf start commands. Typically, this
process lasts between 5-10 minutes. Tealeaf recommends scheduling the upgrade
during off-peak hours.
Depending on your version of the PCA, Failover may or may not be supported.
See "PCA Web Console - Failover Tab" in the IBM Tealeaf Passive Capture Application
Manual.
Upgrade Passive Capture
Note: The upgrade process for the IBM Tealeaf CX Passive Capture Application is
consistent across all versions of Linux.
1. Log on to the IBM Tealeaf CX Passive Capture Application server as root.
2. Stop Tealeaf services:
tealeaf stop
3. Navigate to the /root directory, where the .rpm file is stored:
cd /root
4. Upgrade the Tealeaf Capture software by using the following command:
rpm -Uvh <tealeaf rpm>
v Example RPM from PCA 3330: tealeaf-pca-3330-1.RHEL3.i386.rpm
5. Verify that process completes without errors.
6. Start Tealeaf services:
tealeaf start
Verify Passive Capture
1. Log on to the IBM Tealeaf CX Passive Capture Application (PCA) web user
interface.
v See "Passive Capture Configuration via Web Console" in the IBM Tealeaf
Passive Capture Application Manual.
2. In the Summary tab, verify that traffic is being captured and is flowing from
the IBM Tealeaf CX Passive Capture Application server to the appropriate
downstream server.
v Traffic to stopped servers is spooled.
v To refresh the display, click Refresh at the top of the screen.
3. If the traffic is not flowing, select the Console tab. Verify that Capture is on.
v See "Troubleshooting - Capture" in the IBM Tealeaf Troubleshooting Guide.
54
Tealeaf CX Upgrade Manual
Verify Windows Pipeline Processing
If your Windows pipeline is enabled and the Portal is available, you can verify that
data is being processed through it.
1. Log in to the Portal as an administrator.
2. From the Portal menu, select Tealeaf > TMS. The Tealeaf Management System
is displayed.
See "Tealeaf Management System" in the IBM Tealeaf cxImpact Administration
Manual.
3. Click the Pipeline Status tab.
4. Select the pipeline that performs the processing of captured data.
5. Verify that hits are flowing through each session agent in the pipeline. For
more information, see "TMS Pipeline Status Tab" in the IBM Tealeaf cxImpact
Administration Manual.
For Multiple PCA Servers
Repeat the above processes for each PCA server.
Reverting Your PCA Upgrade
If your PCA upgrade failed for some reason and you must revert to the previous
installation to resume capturing traffic, you can revert to your previous build.
v See in the "Installation" in the IBM Tealeaf Passive Capture Application Manual .
Chapter 9. Upgrade for CX PCA
55
56
Tealeaf CX Upgrade Manual
Chapter 10. Testing Your Tealeaf Solution
After you complete installation and the initial configuration tasks for each licensed
Tealeaf product and module, verify the operations of your Tealeaf solution. This
section provides a simple procedure for testing end-to-end operations of the
Tealeaf solution, with modifications based on optional components that you may
have installed.
Methodology
This testing procedure requires the generation of a test session on the web
application and the capture of the session through Tealeaf and locally through the
Tealeaf Client-Side Capture utility.
As you browse through the session, you can test, search, replay, and report
capabilities for active sessions and then perform similar tests when the session
completes.
v In an active session, hits are currently being added to the session stored in the
in-memory Short Term Canister, or the session is not yet closed or timed out.
v A completed session is a closed session that moved from the Short Term
Canister to the Long Term Canister for indexing and storage. Sessions that
archived out of the LTC are also considered to be completed sessions.
The methodology tests the following fundamental features of the Tealeaf solution
by locating your captured session data in various parts of the capture, processing,
and reporting areas of the Tealeaf solution.
Features
v Capture: Session capture by the IBM Tealeaf CX Passive Capture Application.
v Search: Search for the session data as an active or completed session.
v Replay: Replay of the session through Browser-Based Replay and the IBM
Tealeaf CX RealiTea Viewer as an active and completed session
v Reporting: Display of data in the Portal as an active or completed session
v Data Export: Export of captured and processed data
Temporary Configuration Changes
The previous steps mirror the generalized flow of data through the solution, which
is outlined below.
v All items below apply to completed sessions. Items also marked (active) apply
to active sessions, too.
General Data Flow of Session Data throughIBM TealeafCX
v Active session begins.
– (active) Session is available for replay in Portal and RTV.
v Session is completed.
v Session is moved from Short Term Canister to Long Term Canister.
v Session is indexed for search in LTC.
– (completed) Session becomes available for search by using completed search
templates in the Portal and RTV.
© Copyright IBM Corp. 1999, 2015
57
v Session data is aggregated for reporting purposes.
– (completed) Session data populates Portal reports.
v Session data is trimmed from the Long Term Canister and, optionally, archived.
For testing purposes, you may want to shorten the intervals for some of the steps
to hasten the testing process. These intervals can be configured by modifying the
following configuration options.
Note: Do not make these changes on a production server. These changes should
only be applied in a testing environment and should be reverted when the testing
is complete.
v Session is indexed for search in LTC: For more information about configuring
indexing, see "Configuring CX Indexing" in the IBM Tealeaf CX Configuration
Manual.
1. The control program for indexing (indexprogram) checks for sessions that
need indexing that is based on the Sleep Time When No Work setting.
2. When sessions are detected that need indexing, the indexing process begins.
Indexes are not committed to disk, which enables searching until the Direct
Pull Timeout setting expires or the index size exceeds the Maximum Index
Size threshold.
v Session data is aggregated for reporting purposes: By default, the Data Collector
polls the Long Term Canister for data to aggregate every five minutes.
1. If necessary, you can restart the Tealeaf Data Collector Service through the
Windows Services Control Panel to immediately perform a data collection.
However, you must be certain that the data to be collected is already
generated for this step to work.
Installation
Before you begin, install the components listed here, if you have not already done
so.
v Client-Side Capture: The Tealeaf Client-Side Capture is a plug-in for Fiddler that
enables the capture of your IE navigation experience to your local desktop. The
session that you explore on the monitored web application is captured locally as
a control to test the results of capture, processing, and replay through Tealeaf's
replay features.
– For more information about installing Client-Side Capture, see "Using
Client-Side Capture for Fiddler" in the IBM Tealeaf Client-Side Capture Manual.
v IBM Tealeaf CX RealiTea Viewer: The RTV application can be installed on the
desktop systems of Tealeaf users to enable the search and replay of session data.
Additionally, through RTV, users with the appropriate permissions can edit
event definitions that are applied to the Tealeaf capture stream.
– If RTV is used by Tealeaf users in your enterprise, you should test its
capabilities as part of the testing process. For more information about
installing RTV, see "RealiTea Viewer Overview" in the IBM Tealeaf RealiTea
Viewer User Manual.
Some Considerations in Generating Your Test Session
Before you capture your test session, you should consider the following items,
which may affect the pages that you attempt to capture.
58
Tealeaf CX Upgrade Manual
v Session Identifier: You should decide how you are going to explore the web
application in a way that permits you to uniquely identify the session through
search and replay. When you test the captured session, you must be able to
uniquely identify it.
– If no unique identifier is available, you may be able to identify the session by
timestamps.
– If you licensed and deployed IBM Tealeaf cxResults, you can use the visitor
identifier that you configured for the product. See "Initial cxResults
Configuration" in the IBM Tealeaf cxResults Administration Manual.
v Tracking Event: You should design your session so that you trigger at least one
known event that you configured for the web application. Later, you can use this
event as a key for digging through Tealeaf report data to locate the completed
session.
v Scorecard: For testing report features, you should trigger an event that registers
in a KPI or Process Scorecard.
– For more information about KPI scorecards, see "Using Scorecards" in the IBM
Tealeaf cxView User Manual.
– For more information about Process scorecards, see "Using Scorecards" in the
IBM Tealeaf cxView User Manual.
v PCA: Before capture, you may want to open the Summary tab of the PCA Web
Console, where you may be able to monitor the traffic if there is little other
activity on the web application.
– If you have enabled data filter rules, configured traffic to ignore, or other
tuning parameters, you may want to design your capture session so that you
test these settings. For example, if you know of specific host traffic that is
configured to be ignored, you should design your session to generate session
data from that host, which is forwarded to the PCA and then ignored. See
"PCA Web Console - Interface Tab" in the IBM Tealeaf Passive Capture
Application Manual.
– If the PCA is capturing some SSL traffic, you should design your session to
explore secured areas of the web application. See "PCA Web Console Interface Tab" in the IBM Tealeaf Passive Capture Application Manual.
– The PCA supports data sessioning, multiple capture modes, inclusion and
exclusion of specific file extensions, and other features. You should be able to
design your capture to identify that the captured and processed data properly
reflects capture mode, file extension settings, and any data sessioning
configuration that is managed through the PCA. See "PCA Web Console Pipeline Tab" in the IBM Tealeaf Passive Capture Application Manual.
– The following configuration areas may require separate captures in order to
test them well.
– Privacy rules that are applied at the PCA should be thoroughly tested.
Depending on the complexity of your configured rules, you should consider
reviewing each of them through a separately captured session. See "PCA Web
Console - Rules Tab" in the IBM Tealeaf Passive Capture Application Manual.
- Privacy Tester rules can also be tested through the external Privacy Tester
utility. See "Privacy Tester Utility" in the IBM Tealeaf CX Configuration
Manual.
v TMS: No additional tests are required. See "Initial TMS Configuration" in the
IBM Tealeaf CX Configuration Manual.
v IBM Tealeaf cxImpact: No additional tests are required. See "Initial Portal
Configuration" in the IBM Tealeaf CX Configuration Manual.
Chapter 10. Testing Your Tealeaf Solution
59
v Pipeline: No additional tests are required. See "Initial Portal Configuration" in
the IBM Tealeaf CX Configuration Manual.
Optional Components
v RTV: RTV tests are included as part of the workflow in this testing procedure.
v IBM Tealeaf cxResults: The key criteria for configuring IBM Tealeaf cxResults are
establishing a unique, multi-session identifier for each visitor and being able to
search for visitors. See “Testing for Unique cxResults Identifier” on page 64.
v IBM Tealeaf cxReveal: No additional tests are required. See "Initial cxReveal
Configuration" in the IBM Tealeaf cxReveal Administration Manual.
v IBM Tealeaf CX Mobile Module: Optionally, you can perform these tests by
using a mobile device to verify proper configuration of the IBM Tealeaf CX
Mobile module. See “Testing for Mobile Visitors” on page 64.
v IBM Tealeaf cxConnect for Data Analysis: No additional tests are required. See
"Initial cxConnect Configuration" in the IBM Tealeaf CX Configuration Manual.
v IBM Tealeaf cxVerify: No additional tests are required. See "Initial cxVerify
Configuration" in the IBM Tealeaf CX Configuration Manual.
To capture all of the above configuration items, you may decide to perform
multiple captures of different aspects of the web application. Since some of the
following tests are applied while the session is still active, you should perform all
of the tests on the page for the first session before you begin capture and testing of
any subsequent sessions.
v See “Capturing Additional Test Sessions” on page 64.
Generate Session
1. Open Internet Explorer.
2. Browse to the home page of the web application.
3. Start Client-Side Capture.
4. Note the time at which you started local capture. This timestamp should be
correlated to the timestamps that later appear in the Portal.
5. Navigate to the pages in the web application that you must capture to complete
the tests of the above systems.
6. Do not close the session. Continue with the following tests.
Note: Depending on the data volume, network throughput, and server
performance, there may be a delay between beginning your session and hits
appearing in Tealeaf.
Active Session Tests
The following tests can be applied to the active session you are currently
capturing.
Capture
If you are in a production environment with general web traffic, you may not be
able to test for the capture process only. It may not be easy to detect the hit data
for your specific active session through the PCA Web Console or the Windows
pipeline, which receives the PCA data.
60
Tealeaf CX Upgrade Manual
However, if you are in a test environment with no other traffic, you may be able to
verify capture by monitoring the following sections in the Summary Tab of the
PCA Web Console:
v Current Per Seconds Stats section indicates the transfer rates of each PCA
process through the pipeline.
v Peers section indicates delivery of PCA data to the destination Processing Server
and its Windows pipeline.
v See "PCA Web Console - Summary Tab" in the IBM Tealeaf Passive Capture
Application Manual.
Reporting
Through the Portal, you can review all active sessions. From the Portal menu,
select Active > Sessions. The session list displays all active sessions. If you are able
to locate the session that you are currently creating, then you verified that the
Windows pipeline is working properly.
v In the Portal session list, you can click the Info icon to review session
information for verification purposes. See "Searching Session Data" in the IBM
Tealeaf cxImpact User Manual.
In the Session List, click the Pages List icon to display a list of pages in the
session. You can drill into individual pages to review captured data. This area is
useful for reviewing Windows pipeline operations, such as privacy, Tealeaf
reference values, and more.
v You can also replay the active session from this screen.
v See "Searching Session Data" in the IBM Tealeaf cxImpact User Manual.
Search
To search for active sessions through the Portal, select Search > Active Sessions.
See "Searching Session Data" in the IBM Tealeaf cxImpact User Manual.
v If you triggered a known event in your session, you can search by that event for
sessions.
v To search for active sessions in RTV, click the Search Active Sessions check box
in the Search Builder tab. For more information about RTV search, see "RealiTea
Viewer - Session Search and Subsearch" in the IBM Tealeaf RealiTea Viewer User
Manual.
Replay
If you find the active session in the Portal, you can click the Camera icon in the
Session List to replay the session.
v Depending on your configuration, you may be able to use the method to replay
in the Portal, RTV, or both. See "CX Browser Based Replay" in the IBM Tealeaf
cxImpact User Manual.
v For more information about RTV replay, see "RealiTea Viewer - Replay View" in
the IBM Tealeaf RealiTea Viewer User Manual.
Completed Session Tests
If you successfully completed the tests, then you can end the session at which
point it is queued for transferred to the Long Term Canister for indexing.
v Stop your Client-Side Capture, and save the capture file to a local directory.
Chapter 10. Testing Your Tealeaf Solution
61
Capture
No additional testing is required.
Search
If you are able to find your completed session by using a completed session
template, then you verified indexing operations. Specifically, you should perform a
search for known data in the [appdata] section of the request, which is always
indexed.
v If you triggered a known event in your session, you can also search by that
event for sessions.
v See "Searching Session Data" in the IBM Tealeaf cxImpact User Manual.
v For more information about RTV search, see "RealiTea Viewer - Session Search
and Subsearch" in the IBM Tealeaf RealiTea Viewer User Manual.
Searching for Visitors
If you enabled IBM Tealeaf cxResults, you can perform a search for the session that
is based on the visitor identifier. When you drill down into the results, you should
be able to retrieve the same session as above.
v For more information, "Searching for Visitors" in the IBM Tealeaf cxResults User
Manual.
Replay
In the Session List page, you can click the Camera icon to replay the session. For
replay in this case, verify the following against the version you captured by using
Client-Side Capture:
v Verify the page counts of each capture.
v Verify that the last page of each capture corresponds to the other capture.
For RTV:
v Look at several pages in the RTV capture to verify that all meaningful content is
displayed.
v If highlighting is enabled in RTV, check that the appropriate page elements have
been properly highlighted.
v If UI Capture is deployed in your web application, then you should verify that a
selection of UI events is captured and displayed appropriate in RTV.
– UI Capture requires a separate deployment of JavaScript into your web
application infrastructure. See "UI Capture for AJAX Guide" in the IBM Tealeaf
UI Capture for AJAX Guide.
Discrepancies between the Tealeaf replay and your CSC replay should be
reconciled by using replay rules in your profile.
v See "RealiTea Viewer - Profile Options" in the IBM Tealeaf RealiTea Viewer User
Manual.
Reporting
Event reporting
If the events for your captured session tabulated for reporting purposes, complete
the following steps.
1. In the Portal menu, select Analyze > Report Builder.
2. Click Add Event.
62
Tealeaf CX Upgrade Manual
3. Select the event that you triggered in your captured session. Click Select.
4. Verify that the Focus Date is configured for today or the date when you created
the session.
5. Click Refresh if necessary.
6. In the displayed chart, find the hour during which the session was made. If
you cannot find the appropriate link, click the Total link at the bottom of the
display.
7. The list of relevant sessions is displayed. Find your session in the displayed
list.
8. If you are able to complete the test, then you verified that event data from your
session is available for reporting.
v See "Tealeaf Report Builder" in the IBM Tealeaf Reporting Guide.
Aggregated data reporting
Identify if the aggregated data from captured session is tabulated for reporting
purposes, complete the following steps.
1. In the Portal menu, select Analyze > Scorecards. The Scorecards screen is
displayed.
2. Verify that the Focus Date is configured for today or the date when you
created the session.
3. For Focus Period, select Day.
4. Click Change. Select a scorecard that includes events that are triggered during
your captured session. Click Select.
5. Click Refresh if necessary.
6. In the displayed scorecard, click a link that displays a count of sessions for the
event that was triggered during your capture.
7. An event chart for the selected event is displayed.
8. In the displayed chart, find the hour during which the session was made. If
you cannot find the appropriate link, click the Total link at the bottom of the
display.
9. The list of relevant sessions is displayed. Find your session in the displayed
list.
10. If you are able to complete the test, then you verified that your session data is
being aggregated for reporting.
v See "Using Scorecards" in the IBM Tealeaf cxView User Manual.
Data Export
You can test the data export features of the Tealeaf system by completing the
following procedures.
Export Chart
1. From the Portal menu, select Analyze > Report Builder.
2. Select an event, reporting period, and server options so that you can see data
display on-screen.
3. Use the buttons in the upper-right corner to test export to Microsoft Excel and
PDF.
v See "Tealeaf Report Builder" in the IBM Tealeaf Reporting Guide.
4. Verify the data in the exported chart against the displayed version.
Chapter 10. Testing Your Tealeaf Solution
63
Export Scorecard
1. From the Portal menu, select Analyze > Scorecards.
2. Select a scorecard and reporting period that contains data.
3. Use the buttons in the upper-right corner to test export to Microsoft Excel and
PDF.
v See "Using Scorecards" in the IBM Tealeaf cxView User Manual.
4. Verify the data in the exported scorecard against the displayed version.
Export Dashboard
1.
2.
3.
4.
From the Portal menu, select a dashboard from the Dashboards menu.
Verify that the dashboard contains meaningful data.
In the upper-right corner, click Options.
Email the dashboard to yourself.
5. A PDF version of the dashboard is attached to the email. Verify the data in the
exported dashboard against the displayed version.
Capturing Additional Test Sessions
You may want to create sessions to test the following situations:
Testing for Mobile Visitors
If you enabled the IBM Tealeaf CX Mobile module, you can perform the tests by
using a mobile device to verify that Tealeaf is properly configured to capture
mobile user activities.
Testing for Unique cxResults Identifier
If you licensed and enabled IBM Tealeaf cxResults, generate and close a second
session to verify that you generated a visitor identifier in the session list that
matches two sessions. See "Analyzing Visitor Segments" in the IBM Tealeaf cxResults
User Manual.
Alerts
If you enabled the alert service, complete the following procedure to test alerts.
v For more information about enabling the alert service, see "Configuring the Alert
Service" in the IBM Tealeaf CX Configuration Manual.
This procedure defines an alert that is triggered when the number of active
sessions is greater than 1. After you define the alert and commit your changes,
when you begin exploring the web application, you should receive an alert email.
v Alerts are generated through the Event Manager in the Tealeaf Portal. See
"Tealeaf Event Manager" in the IBM Tealeaf Event Manager Manual.
v For more information about configuring alerts, see "TEM Alerts Tab" in the IBM
Tealeaf Event Manager Manual.
1. Log in to the Portal as an administrator.
2. In the Portal menu, select Configure > Event Manager.
3.
4.
5.
6.
64
In the Tealeaf Event Manager, click the Alerts tab.
Click New Canister Alert.
Click the Active check box.
For Alert Type, select Count.
Tealeaf CX Upgrade Manual
7.
8.
9.
10.
11.
Click Select Event. Select the Active Sessions event.
For Alert Function, select Positive.
Click the Alert Threshold Only check box.
In the Threshold text field, enter a value of 1.
For Interval, enter a value of 100.
12. For Reset, enter a value of 100.
13.
14.
15.
16.
Note: This alert should fire only one time. After you verified the test, modify
the alert properties or delete the alert.
Clear the Enable Warnings check box.
In the Notification panel, select the email check box and clear all other check
box.
Enter your email address in the space provided.
In the Blackout panel, verify that the Enable Alert Blackout check box is not
selected.
17. Click Save Draft.
18. The Alert should be displayed in red in the Alerts tab.
19. To commit the changes to the server, click Commit Changes.
20. Open a browser window to explore the application that is monitored by
Tealeaf.
21. Open a second browser to explore the application. You should now have two
active sessions, which exceed the alert threshold.
22. A copy of the alert should be emailed to you.
23. Remember to delete the alert after you received and reviewed it.
v See "TEM Alerts Tab" in the IBM Tealeaf Event Manager Manual.
Next Steps
If all of the tests complete successfully, your Tealeaf solution is operational.
Remember to switch any temporary configuration settings back to their previous
values. See “Temporary Configuration Changes” on page 57.
Chapter 10. Testing Your Tealeaf Solution
65
66
Tealeaf CX Upgrade Manual
Chapter 11. IBM Tealeaf documentation and help
IBM Tealeaf provides documentation and help for users, developers, and
administrators.
Viewing product documentation
All IBM Tealeaf product documentation is available at the following website:
https://tealeaf.support.ibmcloud.com/
Use the information in the following table to view the product documentation for
IBM Tealeaf:
Table 5. Getting help
To view...
Do this...
Product documentation
On the IBM Tealeaf portal, go to ? > Product
Documentation.
IBM Tealeaf Knowledge Center
On the IBM Tealeaf portal, go to ? > Product
Documentation and select IBM Tealeaf
Customer Experience in the ExperienceOne
Knowledge Center.
Help for a page on the IBM Tealeaf Portal
On the IBM Tealeaf portal, go to ? > Help
for This Page.
Help for IBM Tealeaf CX PCA
On the IBM Tealeaf CX PCA web interface,
select Guide to access the IBM Tealeaf CX
PCA Manual.
Available documents for IBM Tealeaf products
The following table is a list of available documents for all IBM Tealeaf products:
Table 6. Available documentation for IBM Tealeaf products.
IBM Tealeaf products
Available documents
IBM Tealeaf CX
v IBM Tealeaf Customer Experience Overview
Guide
v IBM Tealeaf CX Client Framework Data
Integration Guide
v IBM Tealeaf CX Configuration Manual
v IBM Tealeaf CX Cookie Injector Manual
v IBM Tealeaf CX Databases Guide
v IBM Tealeaf CX Event Manager Manual
v IBM Tealeaf CX Glossary
v IBM Tealeaf CX Installation Manual
v IBM Tealeaf CX PCA Manual
v IBM Tealeaf CX PCA Release Notes
© Copyright IBM Corp. 1999, 2015
67
Table 6. Available documentation for IBM Tealeaf products (continued).
IBM Tealeaf products
Available documents
IBM Tealeaf CX
v IBM Tealeaf CX RealiTea Viewer Client Side
Capture Manual
v IBM Tealeaf CX RealiTea Viewer User
Manual
v IBM Tealeaf CX Release Notes
v IBM Tealeaf CX Release Upgrade Manual
v IBM Tealeaf CX Support Troubleshooting
FAQ
v IBM Tealeaf CX Troubleshooting Guide
v IBM Tealeaf CX UI Capture j2 Guide
v IBM Tealeaf CX UI Capture j2 Release Notes
IBM Tealeaf cxImpact
v IBM Tealeaf cxImpact Administration Manual
v IBM Tealeaf cxImpact User Manual
v IBM Tealeaf cxImpact Reporting Guide
IBM Tealeaf cxConnect
v IBM Tealeaf cxConnect for Data Analysis
Administration Manual
v IBM Tealeaf cxConnect for Voice of Customer
Administration Manual
v IBM Tealeaf cxConnect for Web Analytics
Administration Manual
IBM Tealeaf cxOverstat
IBM Tealeaf cxOverstat User Manual
IBM Tealeaf cxReveal
v IBM Tealeaf cxReveal Administration Manual
v IBM Tealeaf cxReveal API Guide
v IBM Tealeaf cxReveal User Manual
IBM Tealeaf cxVerify
v IBM Tealeaf cxVerify Installation Guide
v IBM Tealeaf cxVerify User's Guide
IBM Tealeaf cxView
IBM Tealeaf cxView User's Guide
IBM Tealeaf CX Mobile
v IBM Tealeaf CX Mobile Android Logging
Framework Guide
v IBM Tealeaf Android Logging Framework
Release Notes
v IBM Tealeaf CX Mobile Administration
Manual
v IBM Tealeaf CX Mobile User Manual
v IBM Tealeaf CX Mobile iOS Logging
Framework Guide
v IBM Tealeaf iOS Logging Framework Release
Notes
68
Tealeaf CX Upgrade Manual
Notices
This information was developed for products and services offered in the U.S.A.
IBM may not offer the products, services, or features discussed in this document in
other countries. Consult your local IBM representative for information on the
products and services currently available in your area. Any reference to an IBM
product, program, or service is not intended to state or imply that only that IBM
product, program, or service may be used. Any functionally equivalent product,
program, or service that does not infringe any IBM intellectual property right may
be used instead. However, it is the user's responsibility to evaluate and verify the
operation of any non-IBM product, program, or service.
IBM may have patents or pending patent applications covering subject matter
described in this document. The furnishing of this document does not grant you
any license to these patents. You can send license inquiries, in writing, to:
IBM Director of Licensing
IBM Corporation
North Castle Drive
Armonk, NY 10504-1785
U.S.A.
For license inquiries regarding double-byte (DBCS) information, contact the IBM
Intellectual Property Department in your country or send inquiries, in writing, to:
Intellectual Property Licensing
Legal and Intellectual Property Law
IBM Japan, Ltd.
19-21, Nihonbashi-Hakozakicho, Chuo-ku
Tokyo 103-8510, Japan
The following paragraph does not apply to the United Kingdom or any other
country where such provisions are inconsistent with local law: INTERNATIONAL
BUSINESS MACHINES CORPORATION PROVIDES THIS PUBLICATION "AS IS"
WITHOUT WARRANTY OF ANY KIND, EITHER EXPRESS OR IMPLIED,
INCLUDING, BUT NOT LIMITED TO, THE IMPLIED WARRANTIES OF
NON-INFRINGEMENT, MERCHANTABILITY OR FITNESS FOR A PARTICULAR
PURPOSE. Some states do not allow disclaimer of express or implied warranties in
certain transactions, therefore, this statement may not apply to you.
This information could include technical inaccuracies or typographical errors.
Changes are periodically made to the information herein; these changes will be
incorporated in new editions of the publication. IBM may make improvements
and/or changes in the product(s) and/or the program(s) described in this
publication at any time without notice.
Any references in this information to non-IBM Web sites are provided for
convenience only and do not in any manner serve as an endorsement of those Web
sites. The materials at those Web sites are not part of the materials for this IBM
product and use of those Web sites is at your own risk.
© Copyright IBM Corp. 1999, 2015
69
IBM may use or distribute any of the information you supply in any way it
believes appropriate without incurring any obligation to you.
Licensees of this program who wish to have information about it for the purpose
of enabling: (i) the exchange of information between independently created
programs and other programs (including this one) and (ii) the mutual use of the
information which has been exchanged, should contact:
IBM Bay Area Lab
1001 E Hillsdale Boulevard
Foster City, California 94404
U.S.A.
Such information may be available, subject to appropriate terms and conditions,
including in some cases, payment of a fee.
The licensed program described in this document and all licensed material
available for it are provided by IBM under terms of the IBM Customer Agreement,
IBM International Program License Agreement or any equivalent agreement
between us.
Any performance data contained herein was determined in a controlled
environment. Therefore, the results obtained in other operating environments may
vary significantly. Some measurements may have been made on development-level
systems and there is no guarantee that these measurements will be the same on
generally available systems. Furthermore, some measurements may have been
estimated through extrapolation. Actual results may vary. Users of this document
should verify the applicable data for their specific environment.
Information concerning non-IBM products was obtained from the suppliers of
those products, their published announcements or other publicly available sources.
IBM has not tested those products and cannot confirm the accuracy of
performance, compatibility or any other claims related to non-IBM products.
Questions on the capabilities of non-IBM products should be addressed to the
suppliers of those products.
All statements regarding IBM's future direction or intent are subject to change or
withdrawal without notice, and represent goals and objectives only.
This information contains examples of data and reports used in daily business
operations. To illustrate them as completely as possible, the examples include the
names of individuals, companies, brands, and products. All of these names are
fictitious and any similarity to the names and addresses used by an actual business
enterprise is entirely coincidental.
COPYRIGHT LICENSE:
This information contains sample application programs in source language, which
illustrate programming techniques on various operating platforms. You may copy,
modify, and distribute these sample programs in any form without payment to
IBM, for the purposes of developing, using, marketing or distributing application
programs conforming to the application programming interface for the operating
platform for which the sample programs are written. These examples have not
been thoroughly tested under all conditions. IBM, therefore, cannot guarantee or
imply reliability, serviceability, or function of these programs. The sample
70
Tealeaf CX Upgrade Manual
programs are provided "AS IS", without warranty of any kind. IBM shall not be
liable for any damages arising out of your use of the sample programs.
Trademarks
IBM, the IBM logo, and ibm.com® are trademarks or registered trademarks of
International Business Machines Corp., registered in many jurisdictions worldwide.
Other product and service names might be trademarks of IBM or other companies.
A current list of IBM trademarks is available on the Web at “Copyright and
trademark information” at www.ibm.com/legal/copytrade.shtml.
Privacy Policy Considerations
IBM Software products, including software as a service solutions, ("Software
Offerings") may use cookies or other technologies to collect product usage
information, to help improve the end user experience, to tailor interactions with
the end user or for other purposes. A cookie is a piece of data that a web site can
send to your browser, which may then be stored on your computer as a tag that
identifies your computer. In many cases, no personal information is collected by
these cookies. If a Software Offering you are using enables you to collect personal
information through cookies and similar technologies, we inform you about the
specifics below.
Depending upon the configurations deployed, this Software Offering may use
session and persistent cookies that collect each user's user name, and other
personal information for purposes of session management, enhanced user usability,
or other usage tracking or functional purposes. These cookies can be disabled, but
disabling them will also eliminate the functionality they enable.
Various jurisdictions regulate the collection of personal information through
cookies and similar technologies. If the configurations deployed for this Software
Offering provide you as customer the ability to collect personal information from
end users via cookies and other technologies, you should seek your own legal
advice about any laws applicable to such data collection, including any
requirements for providing notice and consent where appropriate.
IBM requires that Clients (1) provide a clear and conspicuous link to Customer's
website terms of use (e.g. privacy policy) which includes a link to IBM's and
Client's data collection and use practices, (2) notify that cookies and clear gifs/web
beacons are being placed on the visitor's computer by IBM on the Client's behalf
along with an explanation of the purpose of such technology, and (3) to the extent
required by law, obtain consent from website visitors prior to the placement of
cookies and clear gifs/web beacons placed by Client or IBM on Client's behalf on
website visitor's devices
For more information about the use of various technologies, including cookies, for
these purposes, See IBM's Online Privacy Statement at: http://www.ibm.com/
privacy/details/us/en section entitled "Cookies, Web Beacons and Other
Technologies."
Notices
71
72
Tealeaf CX Upgrade Manual
Printed in USA