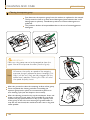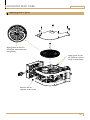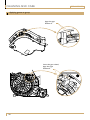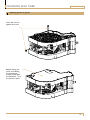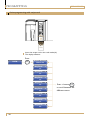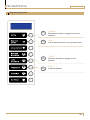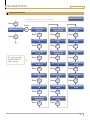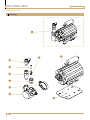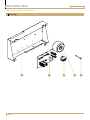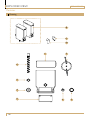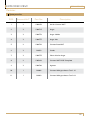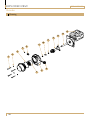
1
BRILLIANCE
TECHNICAL MANUAL
T_EN II
Part No.
CONTENT
BRILLIANCE
CONTENT..........................................................................................................................................................2
GENERAL.............................................................................................................................................................4
Facts & weight............................................................................................................................................................4
Dimension...................................................................................................................................................................5
OVERVIEW OF COMPONENTS.......................................................................................................... 6
Front exterior............................................................................................................................................................6
Front interior.............................................................................................................................................................7
Recipe and cleaning card.........................................................................................................................................8
GRINDER SETTINGS.................................................................................................................................... 9
Coarsness adjustment..............................................................................................................................................9
Doser adjustment.................................................................................................................................................. 10
CLEANING PROGRAM........................................................................................................................... 11
Rinsing...................................................................................................................................................................... 11
Cleaning with tablets............................................................................................................................................. 12
Launching the rinsing without cleaning card.................................................................................................... 13
CLEANING AND CARE.......................................................................................................................... 14
Disassemble mixing system................................................................................................................................. 14
Wash these parts................................................................................................................................................... 15
Reassemble mixing system ................................................................................................................................. 15
Disassemble the espresso group........................................................................................................................ 16
Reassemble the espresso group......................................................................................................................... 17
Cleaning the espresso group............................................................................................................................... 18
Applying grease to group..................................................................................................................................... 19
Periodic maintenance............................................................................................................................................ 22
Safety......................................................................................................................................................................... 22
Every month............................................................................................................................................................ 23
Disassembly the grinder....................................................................................................................................... 24
MESSAGE SHOWN ON DISPLAY.................................................................................................... 25
Temporary warnings messages........................................................................................................................... 25
Alarms...................................................................................................................................................................... 26
What to do if.......................................................................................................................................................... 27
PROGRAMMING......................................................................................................................................... 28
Active programming with recipe card............................................................................................................... 28
Programming buttons............................................................................................................................................ 29
Doses program....................................................................................................................................................... 30
Machine Parameter................................................................................................................................................ 31
Other settings......................................................................................................................................................... 32
Recipe explanation................................................................................................................................................. 33
ELECTRICAL DIAGRAM......................................................................................................................... 37
IO-Board outputs................................................................................................................................................... 37
Wiring sketch.......................................................................................................................................................... 38
FLOW CHARTS............................................................................................................................................ 39
Water system vibration pump............................................................................................................................ 39
Water system rotary pump................................................................................................................................. 40
2
CONTENT
BRILLIANCE
EXPLODED VIEW....................................................................................................................................... 41
Machine 1................................................................................................................................................................. 41
Drawing.................................................................................................................................................................... 41
Spare parts list........................................................................................................................................................ 42
Machine 2................................................................................................................................................................. 43
Drawing.................................................................................................................................................................... 43
Spare parts list........................................................................................................................................................ 44
Door/Front.............................................................................................................................................................. 45
Drawing.................................................................................................................................................................... 45
Spare parts list........................................................................................................................................................ 46
Vibration pump....................................................................................................................................................... 47
Drawing.................................................................................................................................................................... 47
Spare parts list........................................................................................................................................................ 47
Rotary pump........................................................................................................................................................... 48
Drawing.................................................................................................................................................................... 48
Spare parts list........................................................................................................................................................ 49
Boiler assembly....................................................................................................................................................... 50
Drawing.................................................................................................................................................................... 50
Spare parts list........................................................................................................................................................ 51
Electronic panel assembly.................................................................................................................................... 52
Drawing.................................................................................................................................................................... 52
Electronic panel assembly.................................................................................................................................... 53
Spare parts list........................................................................................................................................................ 53
Mixing system and outlet..................................................................................................................................... 54
Drawing.................................................................................................................................................................... 54
Spare parts list........................................................................................................................................................ 55
Canister.................................................................................................................................................................... 56
Drawing.................................................................................................................................................................... 56
Spare parts list........................................................................................................................................................ 57
Grinder..................................................................................................................................................................... 58
Drawing.................................................................................................................................................................... 58
Spare parts list........................................................................................................................................................ 59
Espresso group....................................................................................................................................................... 60
Drawing.................................................................................................................................................................... 60
Espresso group....................................................................................................................................................... 61
Spare parts list........................................................................................................................................................ 61
FACTORY SETTINGS............................................................................................................................... 62
Default recipes........................................................................................................................................................ 62
Some important information may appear in textboxes seen below
IMPORTANT!
INFO.
CAUTION!
INFO.
More INFO.
Note
INFO.
3
GENERAL
BRILLIANCE
Facts & weight
FACTS
VIBRATION PUMP 2.0
ROTARY PUMP (RP)
Yes
Yes
None
None
Drink options
8
8
Ingredient canister
2
2
Bean hopper
1
1
Brewing mechanism
Yes
Yes
Cleaning function by smart card
Yes
Yes
Electronic temperature control
Yes
Yes
Adjustable coffee strength
Yes
Yes
None
None
Option
Option
None
None
Height
664mm
664mm
Width
394mm
394mm
Depth
474mm
474mm
Yes
None
0.7 L
0.7 L
Power supply (standard)
220-230VAC,
50/60Hz/1500W
220-230VAC,
50/60Hz/1500W
Power supply (option)
110VAC,
50/60Hz/1000W
110VAC,
50/60Hz/1000W
Cold water connection
½” External thread
½” External thread
Water purification filter
None
None
Built-in grinder
Function for selecting jug
Illumination of cup during brewing
Base cabinet: large grounds container
Energy saving mode
Air break tank
Boiler tank
MODEL/NAME
BRILLIANCE
Note
4
WEIGHT
35kg(Empty) / 39kg (Full)
To determine what power supply the machine uses, please check power label at the
back of the machine.
GENERAL
BRILLIANCE
A
Dimension
D
B
C
Model
A
B
C
D (Min~ Max)
Brilliance
664mm
474mm
394mm
75mm ~ 133mm
5
OVERVIEW OF COMPONENTS
BRILLIANCE
Front exterior
Eight buttons are available to select 8 different beverages. Some of these buttons
have additional functions as below (while in settings menu, which is not covered
in this user manual but on the service manual):
Selection Button
_
K1
Canc
K2
Bean Hopper
Display
K3
Door
K4
Door Lock
Smart Card Reader
+
K5
Enter
K6
K7
Height-Adjustable Spouts
K8
Drip Grid
Drip Tray
6
BUTTON
SUPPLEMENTARY
FUNCTION
FUNCTION DESCRIPTION
K1
-(Minus)
Decreases the value or changes to previous selection
K2
Canc
K5
+(Plus)
K6
Enter
Cancel selection and/or exit to previous menu
Increases the value or changes to next selection
Confirms selection
OVERVIEW OF COMPONENTS
BRILLIANCE
Front interior
Bean Hopper
Ingredient Canisters
Mixing Bowl
Espresso Group
Height-Adjustable Spouts
Grounds Container
Drip Tray
Ingredient canisters
DETAIL
INGREDIENTS
WIDTH
DEPTH
Bean Hopper
Beans
200mm
Canister
Chocolate
65mm
165mm
Canister
Milk/Topping
65mm
165mm
HEIGHT
CAPACITY
CUPS/
UNIT
75mm
~2kg
~250 cups
250mm
~1kg
~50 cups
250mm
~0.6kg
~75 cups
7
OVERVIEW OF COMPONENTS
BRILLIANCE
Recipe and cleaning card
Cleaning card
Recipe card
(Vibration Pump)
Recipe card
(Rotary Pump)
Cleaning card is used to access the cleaning functions of the machine.
Recipe card is used to update or download recipe setting of the machine. There are two version,
Rotary pump and Vibration pump.
Insert card with the chip in, according to the fig.A
A
8
GRINDER SETTINGS
BRILLIANCE
Coarsness adjustment
CCW for
coarser grinding
CW for
finer grinding
To adjust the coarseness, please rotate the adjuster counterclockwise for
coarser grinding, or clockwise for finer.
Take into consideration that after the adjuster is moved, the effect is not
immediate; it takes about 3 espresso cycles for the new cofee grounds to reach
the outlet of the doser. So to test the new adjustment, observe the third or
fourth espresso after the change.
The thinner the grinding, the slower the espresso will come out, and longer time
will be needed for the extraction of the espresso and vice versa.
9
OPERATION
BRILLIANCE
Doser adjustment
Dosers are devices that can control the amount of ground coffee that the
espresso group is supplied with.
Doser must be adjusted between position 3 to 9, if the piston of the Espresso
group is adjusted to A, the doser adjustment should be from 6.5g to 8.5g . if the
piston is adjusted to B the doser adjustment should be from 8.5g to 9.5g, never
further, as over charging the group will produce a poor espresso.
To adjust the doser, push gently the selector out of position and adjust to the
selected amount.
Doser Pos.
Gram
3
4
5
6
7
8
9
6.5
7
7,5
8
8,5
9
9.5
A
B
Ajusting doser between position 3 ~ 9.
10
The piston position A and B.
CLEANING PROGRAM
BRILLIANCE
Rinsing
Rinsing
This rinsing function allows for an easy cleaning of the outlets of the machine.
Rinsing is recommended at least once a week, but preferable every day,
especially if used in high consumption environments. This software routine
flushes the different outlets of the machine, Starting with the mixing system
and finishing with the espresso group.
Place a cup under the outlet after, Insert the cleaning card in the card reader,
the display will show: “Rinsing” .
Just press, “Enter” to run this function, and wait until the cycle is finished. Take
into consideration that the door of the machine has to be closed (as long as
it is open, the cleaning will not start). The process can be canceled by pressing
“Canc”. When the routine has finished, the machine will return into service
and the message “Select Beverage” will show on the display. This function
takes about 1min 45secs, and uses aprox. 150Cc of water.
11
CLEANING PROGRAM
BRILLIANCE
Weekly Cleaning
Cleaning with tablets
_
K1
Canc
K2
K3
K4
+
K5
Enter
K6
K7
K8
Cleaning with tablet
Insert the cleaning card in the card reader with the chip downwards, toggle
through the menus using “-” or “+” until “Cleaning with tablet” is shown on
the display, press “Enter” to start the operation.
Open door add tablet
Remove the cleaning card when the display shows “Open door add tablet”.
The display on the machine gives you step-by-step information of what to do.
The function cleans the inside of the espresso group, the filters and pipes.
The cleaning programme takes about 10 minutes and about 1 litre of water
mixed with detergent comes out from the drain.
Finally, make one cup of coffee and throw it away!
12
CLEANING PROGRAM
BRILLIANCE
Launching the rinsing without cleaning card
_
K1
Canc
K2
K3
K4
Switch
+
K5
Enter
K6
K7
K8
The execution of the rinsing can be launched without having to open the door
of the machine. As to do that :
Turn off power to the machine from its main switch.
With its door closed, turn on the machine, and simultaneously keep pressed
buttons K3 & K7. The rinsing process will begin shortly.
When finished, the machine will enter the normal functioning mode.
13
CLEANING AND CARE
BRILLIANCE
Weekly Cleaning
Disassemble mixing system
Rotate the canister chutes so they point
upwards and pull out the outlet hose.
Turn the mounting plate lever anticlockwise.
01
02
Loosen the mixing bowl by pulling it straight
out.
Loosen the whipper by pulling it straight out.
03
04
05
06
Loosen the mounting plate. Turn the lever
anticlockwise, until it stops.
Pull the mounting plate straight out.
Reassemble mixing system
See the next page
14
CLEANING AND CARE
BRILLIANCE
Weekly Cleaning
Wash these parts
Mixing bowl
Condensation trap
Mounting plate
Whipper
Clean with a moist
cloth and wipe dry.
All parts must be dry before reassembly.
Reassemble mixing system
A
01
Check all seals (red) before
reassembly of parts.
03
02
The flat side of the whipper shaft must correspond with the
marked arrow on the whipper.
To fit the whipper push onto the shaft until a click sound can be
heard. It is only possible to assemble the whipper in one way.
Fix the mixing bowl and condensation trap. Push-fit the mixing
bowl and fix with lever.
Connect the outlet hose.
Note
04
Ensure that all water hoses have been
connected and fitted.
15
CLEANING AND CARE
BRILLIANCE
Disassemble the espresso group
To remove the espresso group follow the following steps:
01
02
03
05
16
04
06
CLEANING AND CARE
BRILLIANCE
Reassemble the espresso group
To reassemble the espresso group follow the following steps:
01
03
“Click”
02
04
05
17
CLEANING AND CARE
BRILLIANCE
Cleaning the espresso group
First, dismount the espresso group from the machine as explained in this manual.
Then proceed to clean it up with neutral detergents (avoid solvents that could
damage paint or plastics). Disinfectant products as Chlorine-detergents are
preferred.
The producer declines all responsibilities due to the use of caustic/aggressive
detergents.
IMPORTANT!
Now, turn the group around, and proceed to clean the
upper filter of the espresso chamber. (See the figure)
Whenever the quality or speed of the outgoing
espresso changes, proceed to clean thoroughly this
Note filter, it will be very likely partially clogged with tiny
coffee bean’s powder. Cleaning this filter will solve
the speed & quality issues.
After this, proceed to clean the remaining surfaces of the group.
Once completed this cleaning, and after re-installing the
espresso group back in place, we recommend to perform an
auto-cleaning cycle (see the chapter in this manual).
After the cleaning, proceed to dry up the mechanism. Invert and
shake it to force as much water out as possible. Dry up all the
surfaces, and pay special attention to dry up the superior cone
of the group, as this is the one receiving the grinded coffee. In
case this one was humid, this would cause the cone to clog with
coffee powder.
18
CLEANING AND CARE
BRILLIANCE
Applying grease to group
Apply grease on the cam
of the gear wheel (this side
facing down)
Apply grease on the
pin of piston rod and
verify it moves freely
Recover the nut
opposite to the screw
19
CLEANING AND CARE
BRILLIANCE
Applying grease to group
align the signs
Position 0 °
Insert the gear wheel,
align the signs
Position 0 °
20
CLEANING AND CARE
BRILLIANCE
Applying grease to group
Insert the nut and
tighten the screw
Before closing the
cover and refitting
the appropriate
screws, check again
the Position 0 ° as in
the previous sheet
21
CLEANING AND CARE
BRILLIANCE
Grinder Adjustment Wheel
Fixation Screw
Periodic maintenance
Each month: clean outlet, grinding house and grinding discs.
Monthly cleaning of grinder using GRINDZ cleaning tablets (item no. E1001001).
Safety
Please read and observe the following service instructions carefully. Nonobservance can result in damage to the grinder as well as in healththreatening
risks for the user.
All installations shall been done by an qualified personnel.
Symbols
Safety instruction:
In case of non-observance, extreme risk of accidents exists.
General instruction:
In case of non-observance, the device can become damaged or optimum
operation not be guaranteed.
Safety instructions
The grinder is only allowed to be used to grind whole coffee beans. Ground
coffee is never allowed to be filled into the input-shaft.
Do not carry out any modifications or changes on the grinder. In case for
non-observance, the manufacturer shall be liable for resulting damain no case
whatsoever.
Never put your fingers or objects into the rotating grinding mechanism inside
the input-shaft.The grinder must not be operated when turning parts are
accessible!
Make sure, that the power cannot be turned on when working on the built-in
grinder!
In order to avoid damages, do not use power tools or cordless electric
screwdrivers for any work on the grinder.
22
CLEANING AND CARE
BRILLIANCE
Grinder
Every month
Approximately every month the grinder housing and spout should be inspected
for coffee residues and obvious damages.
Proceed as follows:
A
Fig.1
Fig.2
Remove bean container. Remove all coffee residues from the spout and the
grinder housing by grinding through all coffee beans and using a vacuum cleaner
to remove all residues.
Remove the four phillips screws (A, see fig.1) on the top of grinder housing lid.
Carefully detach the grinding housing. Fig.1
Note: its position for correct reassembly. Do not alter the adjustment of
the grinding discs.
Clean the inside of the grinder housing with a soft brush. (See fig.2)
When reassembling the grinder housing, again check for the correct position and
do not alter the grind adjustment of the discs. Fasten the four phillips screws.
23
CLEANING AND CARE
BRILLIANCE
Grinder
Disassembly the grinder
01
02
A
remove the holder
clip (A) then loosen
the adjuster wheel by
pulling it straight out.
Remove the four phillips
screws on the top of grinder
housing lid. Then pull the
grinder housing straight up.
03
CCW
Loosen the grinding disc
holder by rotating it counter
clockwise, then push out the
grinder disc.
04
Remove the nut on top of
grinder shaft, then pull the
center ginder disc and shaft
straight out.
24
MESSAGE SHOWN ON DISPLAY
BRILLIANCE
Temporary warnings messages
There are two
levels of alarms,
warnings and fixed
alarms.
Insufficient Credit
Warning
In this type of warnings, once the issue is solved, the message will disappear from
the display and the machine will operate as normal.
Insufficient credit
If a selection is made without having enough credit on the inserted smartcard,
the display will show “Insufficient Credit Warning”. Please, proceed to recharge
the credit of your smartcard first to the nearest location, then insert the smart
card again and select the desired beverage.
Empty coffee tray
After a certain number of coffees, a warning showing “Empty Coffee Tray” will
appear on the screen when the coffee waste tray is full to prevent coffee spillage
inside the machine. To remove this warning, please proceed as follows:
With the machine turned on, open the door of the machine.
Empty Coffee Tray
Lift the outlet if necessary in order to remove the coffee waste tray.
Take out the waste tray and empty it, the micro-switch in the back of the tray
once released will remove the warning message from the display.
Please reassemble the waste tray and close the door to continue the normal
operation.
Note: the machine has to be powered as to detect if the waste tray is removed
or not. In the case of emptying it with the machine powered off, the counter in
the control board will not be reset to 0, and the error “Empty Coffee Tray” will
appear the next time the machine is powered on.
Coffee tray alarm
Alarm Coffee Tray
Whenever the grounds coffee tray is removed from its place, an “Alarm Coffee
Tray” will appear on the screen. This alarm resets the espressos counter to 0,
(when it remains on for more than 2 secs).
During normal functioning of the machine when replacing the grounds coffee
tray to its place, the alarm will dissapear. But, if this alarm lights up during the
start up of the machine, we will have to restart it as to make it dissapear.
Take cup
When the machine has finished dispensing a beverage, once the beverage is
ready, this message will appear on the display for some seconds, advising to take
the cup.
Air-break filling up
Some times we will see this message appearing on the screen for a short while.
During this short time, the machine will be temporarily unavailable, as it will be
performing an internal refilling of an interior water deposit.
Drip-tray full
Drip-Tray full
The display will show the warning “drip-tray full” when the drip-tray sensor
pins detects the presence of water in front drip-tray, the machine will block
dispensing of any beverage until the drip tray is emptied to prevent water
spillage.
25
MESSAGE SHOWN ON DISPLAY
BRILLIANCE
Alarms
This type of alarms requires the user to turn off and on the machine, in order
to remove the message on the display. If the problem persist, the next time the
machine is powered the alarm will show again.
No coffee
No Coffee
When the machine runs out of coffee beans, the display will show “no coffee”.
This alarm will show to prevent the grinder to overheat, in case the doser does
not fill up with ground coffee. When the machine is showing “no coffee” on the
display, it’s not possible to dispense any beverage that include espresso.
In order to refill the bean hopper with coffee, please follow the steps described
on page 9. To reset this alarm after refilling, please, restart the machine, turning
off and on the main switch in the back.
Stop irregular cycle
Stop Irregular Cycle
The espresso group is controlled by two u-switches located inside the grey
gearbox, in the right side of the group. If the espresso group does not reach
certain positions so that these two u-switches are activated on time, when
rotating to complete one cycle the alarm “stop irregular cycle” will show on the
display. This is normally occurring due to wrong assembly of the group. If after
inspecting the group and making sure that is properly assembled the alarm keeps
showing, please call service & support.
Temperature probe unconnected
This alarm occurs when the control board detects a failure in the connection of
the temperature probe ntc. Disconnect the machine and call service & support.
Time-out alarm filling up
This alarm shows when an excessive time has been detected to fill up the air
break deposit. This is often caused by too low pressure at the inlet valve.
Note: in some occasions more than one dispenser is connected to the same
water supply; and from time to time, both machines will try to get water
simultaneously, failing to give enough pressure, causing this alarm to show.
Connecting each machine to an independent water supply will then solve this
issue.
No water
If the pump has been working for a certain time while dispensing a beverage and
no water flow is detected by the flow meter, the display will show “no water”.
This can be caused by:
No Water
The adjustment of the grinder being too thin, preventing the water from
getting through the coffee cake. In order to solve this issue, try to adjust the
grinder to a coarser setting then make two or three coffees (as described in
page 10 due to the doser stores between two to three doses), to check if the
flow improves, if still too slow, adjust coarser and try again.
By a defective flow-meter unit, in which case, please call service & support for
replacement.
26
MESSAGE SHOWN ON DISPLAY
BRILLIANCE
Coffee doser error
Doser Error
If the control board detects a problem when opening the doser to empty the
ground coffee into the espresso group chamber before the extraction starts, the
display will show “Doser Error”. This alarm can be caused by a bad connection
in the wire of the doser to the control board, or by a defective doser unit.
Disconnect the machine and call service and support.
Anti flooding alarm
If due to any reason, there is some kind of water leakage inside the machine, so
that the control board detects (by the flow-meter count) water consumption
without dispensing any beverage; the third time that the air break needs to
be refilled, the display will show “Alarm time-out in dication”. Disconnect the
machine and call service and support.
Alarm temperature boiler
Alarm Temperature
Boiler
In case that the temperature probe ntc inside the boiler, senses a temperature
higher than a certain safety limit for more than 5 seconds, the display will show
“Alarm Temperature Boiler” and the heating element will be disconnected. The
alarm will remain as long as the temperature remains higher than the safety limit.
The recommendation in this case is to disconnect the machine and call service
& support.
What to do if
Outgoing speed of espresso decreases over time
The most common cause for this to occur is the lack of cleaning the espresso
group. Paying special attention to the filters in the top piston and in the bottom
of the chamber.
Other factors that can affect the performance and quality of the product in
the cup are changing weather conditions, mainly humidity. If humidity is higher
than usual, the speed of the outgoing espresso will be affected, please consider
adjusting the grinder to a slightly coarser setting.
Mixer Cloggs
The clogging of the mixing bowl will cause water and soluble product to be
spilled inside the machine. If this happens from the first time you use the
machine; this will be very likely caused by using inappropriate soluble products
or wrong recipes.
If this happens after the machine has been in service, please check that all the
components in the mixing system are correctly assembled.
Water spillage under the machine
If water hardness is too low, it might be causing a defective level sensing in the
machine. The reccomended hardness level is between 3 and 50 (Geman degree)
(30mg/l). Lower levels will cause corrosion in the inner parts of the machine. To
reduce water hardness problems it’s recommended to install a water filter.
27
PROGRAMMING
BRILLIANCE
Active programming with recipe card
A
www.creminternational.co m
----- RP ----RECIPE CARD
BRILLIANCE
Insert the recipe card in the card reader(A).
The display indicates:
Press
INFO
28
K6
Global Counter
Doses xx
Key Total
xx
1
Key Total
xx
2
Key Total
xx
3
Key Total
xx
4
Key Total
xx
5
Key Total
xx
6
Key Total
xx
7
Key Total
xx
8
Press + button K5
to scroll between the
different menus
PROGRAMMING
BRILLIANCE
Programming buttons
K1
K2
K5
K6
-(Minus)
Decreases the value or changes to previous
selection
Canc
Cancel selection and/or exit to previous menu
-(Plus)
Increases the value or changes to next
selection
Enter
Confirms selection
29
PROGRAMMING
BRILLIANCE
Doses program
Change doses program setting.
Doses Program
Press
Doses Program
K6
Doses Program
1
Press K5
Time 2 Water1
Key 1 0.0s.
Press K5
Soluble Time2
Key 1 0.0s.
Press K5
Press K5
Coffee Water Vol
Key 1 xx cc
Press K5
Grinding Time
Key 1 0.0s.
Press K5
Brewing Coffee 1
AFTER SOLUBILE
Press K5
To see setup for all
drinks. Check the
default setting on
the page 62
Multi Expresso 1
off
Press K5
Time1 Water1
Key 1 0.0s.
Press K5
Pause Water1
Key 1 0.0s.
Press K5
30
Time1 Water2
Key 1 x.xs.
Press K5
Pause Water2
Key 1 x.xs.
Press K5
Time2 Water2
Key 1 x.xs.
Press K5
Mixer Time1
Key 1 0.0s.
Press K5
Mixer Time2
Key 1 0.0s.
Press K5
Soluble Time1
Key 1 0.0s.
Press K5
Soluble Time3
Key 1 0.0s.
Press K5
Soluble Time4
Key 1 0.0s.
Press K5
Soluble Delay
Key 1 0.0s.
PROGRAMMING
BRILLIANCE
Machine Parameter
Machine Param.
Change machine param. setting.
Press K5
Machine Param.
Press K5
Press
K6
Language
English
Press K5
Temperature
0
C
Press K5
Boiler Temperat.
xx 94 0C
This setting is only
for BRILLIANCE
rotary pump.
Press K5
Min Temperature
xx 65 0C
Press K5
StandBy DT
00C
Press K5
Grounds Program
70
Press K5
Preinfusion
ENABLED
Press K5
Extra Speed
DISABLED
Press K5
Pump
RP
Press K5
Smart Card
ENABLED
Press K5
Decamalprice
2
Press K5
Dose prices 1
0.00
Press K5
Dose prices 2
0.00
Dose prices 4
0.00
Press K5
Dose prices 5
0.00
Press K5
Dose prices 6
0.00
Press K5
Dose prices 7
0.00
Press K5
Dose prices 8
0.00
Press K5
Dose prices 9
0.00
Press K5
Dose prices 3
0.00
Press K5
31
PROGRAMMING
BRILLIANCE
Other settings
Info
Change other settings.
Press K5
Coin Box
Press
K6
Coin Box
Disabled
Press K5
Press
Rinsing
K6
Rinsing
In progress
Press K5
Press
Cleaning with
Tablets
K6
Open the door
Add Tablet
Press K5
Press
Emptying
K6
Emptying
In progress
Press K5
Press
Smart Card
K6
Machine → Card
Press K5
Card → Machine
32
Open door
Press Enter K6
to Proceed cleaning
PROGRAMMING
BRILLIANCE
Recipe explanation
Press K6
K2
Coffee Water Vol.
key 1 ↑## ↓cc
Press K6
Press K6
This section will explain how to change specific settings for drink 1.
Same explanations will then apply to all buttons (1-8).
To see the machines default settings for all buttons, please refer to
page 62.
The first adjustment available is the “Coffee Water Vol.”. With it the
volume of water pumped to brew the espresso is set. With “+” and “
- ”, the volume is adjusted. With “enter” the quantity set is accepted,
and next parameter will be shown on the screen. The volume is
measured in Cubic centimeters.
Accordingly to this setting, during normal service of the machine,
when button 1 is selected, the machine will automatically grind the
needed beans of coffee, and brew the espresso with the set volume
of water. If the quantity is set to 0, no espresso will be brewed on
the selection, neither grinding will be performed.
Press
K2
Before Coffe 1
After Solubile
K5 / K1
Before Coffe 1
Before Solubile
Press K6
Next setting, will adjust if the brewing of the espresso will be done
before, or after having brewed the part of soluble drinks. One or
the other option can be set by pressing “+” or “-“.With “enter” the
selection set is accepted, and next parameter will be shown on the
screen.
Press K6
K2
Time 1 Water 1
Key 1 ↑## ↓s.
Press K6
Pause Water 1
Key 1 ↑## ↓s.
Press K6
Now it comes the time to set the water times for the soluble
drinks brewed on the mixer. These times set the quantity of water
used to brew the selection. With buttons “+” and “-“ we adjust the
times; with “enter” we accept the set times, and proceed to the
next adjustment. The Time 1, sets the time to get the main quantity
of water for the brewing; the time 2, adjust the amount of water to
flush the mixer clean. Between them the pause can be adjusted with
the time for “Pause Water 1”. The amount of water set here will be
mixed with the soluble powders set in following parameters.
Water1
Time 1 Water 1
Pause Water1 Time 2 Water1
Time 2 Water 1
Key 1 ↑## ↓s.
33
PROGRAMMING
BRILLIANCE
Recipe explanation
Press K6
K2
Time 1 Water 2
Key 1 ↑## ↓s.
Press K6
The next three parameter set the hot water coming out from the
hot water spout. This water will not be mixed with any soluble.
Here we can set the “Pause Water2” and the “Time2Water2” to 0.
With “Enter” we will accept the different settings and proceed to
following.
Water 2
Time 1 Water 2
Pause Water2 Time 2 Water2
Pause Water 2
Key 1 ↑## ↓s.
Press K6
Time 2 Water 2
Key 1 ↑## ↓s.
Press K6
K2
Mixer Time 1
key 1 ↑## ↓s.
Press K6
Press K6
K2
Mixer Time 2
key 1 ↑## ↓s.
Press K6
34
Now we will set the times for the mixer (Mixer Time 1). This time
setting, adjusts how long will the mixer run while receiving the
water and the powder. With buttons “+” and “-“ we adjust the
time; with “enter” we accept the setting, and proceed to the next
adjustment.
Mixer Time 1
The following parameter (Mixer time 2) is not used in this
machine (let it as 0).
The following parameter(Mixer time 2) controls if water will come
out or not from infusion water spout, set it to 0 as to stop water
from coming out the hot water for infusion spout. Make it bigger
than 0 as to allow the machine to dispose the hot water from this
spout. with buttons “+“ and “-“ adjust the desired value, with enter
proceed to the next parameter.
Mixer Time 2= 0
Mixer Time 2> 0
PROGRAMMING
BRILLIANCE
Recipe explanation
Press K6
K2
Now it comes the adjusting of the soluble ingredients. The quantity
of soluble powder that will be added to the actual recipe. Two
canisters are available. Soluble time 3&4 are not used in this
machine: keep them set to 0. Each amount of product is set by
increasing (pressing “+”) or decreasing (pressing “-“) the time during
which the soluble is added.
Soluble Time 1
Key 1 ↑## ↓s.
Press K6
K2
Soluble Time 2
Key 1 ↑## ↓s.
Soluble Time 1
Soluble Time 2
Press K6
K2
Soluble Time 3
Key 1 ↑## ↓s.
Press K6
K2
Soluble Time 4
Key 1 ↑## ↓s.
Press K6
K2
Finally we have to set the delay with which the solubles will be
brewed. With buttons “+” and “-“ adjust the desired value; with
“enter” we would begin adjusting parameters of button “2”. With
“Canc” we would come back to the superior menu.
Soluble Delay
key 1 ↑## ↓s.
Press K6
Soluble Delay
35
PROGRAMMING
BRILLIANCE
Doses adjustment time scheme
Each one of the 8 selections can be adjusted, modifying the following parameters:
Coffee
Water Vol
Brewing Coffee
BEFORE
Brewing Coffee
AFTER
Before Soluble
Coffee
Water Vol
After Soluble
Water
Time 1 Water 1
Pause Water1 Time 2 Water1
Water
Time 1 Water 2
Pause Water2 Time 2 Water2
Time 2 Water2
Mixer Time 2= 0
Mixer time 1
Mixer Time 2> 0
Soluble time 1
Soluble time 2
Soluble delay
36
T
ELECTRICAL DIAGRAM
BRILLIANCE
IO-Board outputs
37
ELECTRICAL DIAGRAM
Wiring sketch
38
BRILLIANCE
FLOW CHARTS
BRILLIANCE
Water system vibration pump
39
FLOW CHARTS
Water system rotary pump
40
BRILLIANCE
EXPLODED VIEW
BRILLIANCE
Machine 1
Drawing
6
18
17
5
6
2
19
8
16
15
10
12
13
9
4
3
1
11
7
14
41
EXPLODED VIEW
BRILLIANCE
Machine 1
Spare parts list
POS.
42
Amount/UniT
Part No.
Description
1
2
1604632
Motor gear 85RPM
2
4
1104537
Vibrations damper H15 D15 M4
3
1
160570
Electr. Inlet
4
1
C60900043
Main switch
5
1
6
4
1401100
Screw M4
7
1
1204969E
Air break
8
1
1206371-120624
9
1
CESC00001
Brilliance pump
10
1
C60100060
Flow measurer
11
2
1604614
Motor axel adapter to canister
12
1
1604171
Fan 24 VDC
13
1
1604173
Fan housing
14
2
160841
Microswitch
15
4
120316
Adjustable foot
16
1
253600
Main chassis brilliance
17
1
1604753
Grinder
18
1
1604754
Grinder doser
19
1
CESC00262
Mind side of ajuster
Inlet valve 2,5L/min
Brilliant boiler assy
EXPLODED VIEW
BRILLIANCE
Machine 2
Drawing
1
21
3
2
15
10
14
17
12
9
19
22
11
6
8
22 20
18 4
5
7
13
16
43
EXPLODED VIEW
BRILLIANCE
Machine 2
Spare parts list
POS.
44
Amount/UniT
Part No.
Description
1
1
C18001050
Hopper Lower
2
1
C18001030
Hopper Upper Brilliance
3
1
C18001040
Hopper Lid Brilliance
4
1
C10003125
Floating level indicator
5
1
1105511
Driptray Brilliance
6
2
1105515
Cover Outlets Brilliance
7
1
253611
Driptray insert
8
1
120250
Door lock, clip and key
9
1
1301704
Spout's Arm
10
1
1403515
Hinge Lower Zinc Brilliance
11
1
1204871
Outlet Cross
12
1
120162E
Salfer espresso Group
13
1
C70000061
14
1
1364008
15
1
CESC00101
16
1
1.105.513
17
1
160565
Power Cord Europe
18
3
120459
Cable protector D13
19
5
1201411
Dispense nozzle
20
1
160841
Microswitch
21
1
253621
Beanstop; Hopper slide door
22
1
1031102
Ground container
Magnet_Ø10_L5mm
Strangle Pipe Mixing House 25mm
Front Door assy Brilliance
Spouts holder
EXPLODED VIEW
BRILLIANCE
Door/Front
Drawing
45
EXPLODED VIEW
BRILLIANCE
Door/Front
Spare parts list
POS.
46
Amount/UniT
Part No.
Description
1
1
C60100302
2
1
60105060
Coin Validator
3
1
C*70000102
Product Labels
4
1
180115
5
1
1.031.307
Right Front Cover Brilliance
6
2
1.031.308
Central Front Cover Brilliance
7
1
1.031.306
Left Front Cover Brilliance
8
1
1603867
Adhesive Frontal Keyboard
9
1
C60105050
10
1
1403514
Hinge Zink Upper
11
1
1.304.048
Front Door Brilliance
12
1
1.105.516
Front Door Insert Keyboard
13
1
C60105000
14
2
Tornillo
15
1
25096513
Screw for plastics D3,5x10
16
1
1105514
Cover Outlets Brilliance
17
2
25.093.400
18
2
Cubierta
Crem Display 2row
Door centering pin
Smartcard Card Reader
Keyboard Brilliance
Screw Alu d3,5XL9,5
Nut DIN 934 M4
Door Interior Cover Brilliance
EXPLODED VIEW
BRILLIANCE
Vibration pump
Drawing
6
5
4
1
2
3
Spare parts list
POS.
Amount/UniT
Article. No.
Description
1
1
60000040
Pump Motor
2
1
30400055
Pump Bypass
3
1
30400010
90º Racor Male G1/8 - D6
4
2
30400060
Vibrating pump support
5
1
30400070
90º plastic connection
Office Pump
6
1
CESC00001
Vending pump assembled
47
EXPLODED VIEW
BRILLIANCE
Rotary pump
Drawing
10
5
8
1
7
2
6
3
4
9
48
EXPLODED VIEW
BRILLIANCE
Rotary pump
Spare parts list
POS.
Amount/UniT
Part No.
1
1
Montaje_Bypass
2
1
Valvula retencion 3I8x1I8(min-mon-ec65000015
3
1
Arandela Motor
4
1
Bomba Compacta 60000033
5
1
Motor Compacto 220V 60000022
6
1
Macho Porta Filtros
7
1
Filtro22
8
1
Porta Filtro Ptfe
9
1
Office Level Pump Bottom Holder
10
1
CA00004
Description
Compact motor pump
49
EXPLODED VIEW
BRILLIANCE
Boiler assembly
Drawing
17
10
4
9
8
3
7
11
16
12
5
6
1
18
2
13
15
14
50
EXPLODED VIEW
BRILLIANCE
Boiler assembly
Spare parts list
POS.
Amount/UniT
Part No.
Description
1
3
C60000108
Solenoid valve G1/8 3-way 24V DC
2
1
C60100076
Temp Probe +SUSP.STEAM PIPE ICD
3
1
C30400080
Right male 1/4-Tube 6
4
1
C15100006
Boiler 0.7L vending
5
1
C10200110
Office thermostat 16A
6
2
1401101
M3 Nut
7
2
1860006
Straight male 1/8 tube 6
8
1
C30000000
9
1
260473
Blind Plug G1/4" Female SS
10
1
1801129
Connector L speed fitting G1/8-4mm
11
2
C30400020
Male bend 1/4 tube 6battery
12
2
C30400010
Pump tube 6 male bend
13
1
C15000310
Tap drainage G1/4M-G1/4F
14
1
C30000215
CONICAL BEND ADAPTOR 1/4 X 1/4
15
1
C50010020
13.2*18.2*2.5 1/4 TEFLON GASKET
16
2
C35021015
Tube PTFE 4-6
17
1
260470
Boiler holder(1of2)
18
1
260471
Boiler holder catcher
T H-H-H-1/4 Mini
51
EXPLODED VIEW
BRILLIANCE
Electronic panel assembly
Drawing
4
52
2
1
3
5
EXPLODED VIEW
BRILLIANCE
Electronic panel assembly
Spare parts list
POS.
Amount/UniT
Part No.
Description
1
1
2 Pole Faston
2
1
CPU Brilliance
3
1
5003111
Transformator 40VAC-18VAC-100VA
4
1
253607
Cover Panel bottom
5
1
Screw DIN933 M6x50
53
EXPLODED VIEW
BRILLIANCE
Mixing system and outlet
Drawing
10
11
9
54
8
7
6
5
4
3
2
1
EXPLODED VIEW
BRILLIANCE
Mixing system and outlet
Spare parts list
POS.
Amount/UniT
Part No.
Description
1
1
1604591
MOTOR WHIPPER 24V DC
2
1
1206701
Motor Whipper Plate
3
2
5004120
SCREW M3X10, PH, FLAT HD
4
1
1604804
Slinger Disc
5
1
1206702
Mounting Plate
6
1
1604813
O-Ring
7
1
1604814
Rubber Use for Whipp Bas (Viton)
8
1
1206703
Whipper
9
1
1206704
Mixing Bowl
10
1
1206707
Steam trap Black
11
1
1206707
Bulkhead Adaptor Black
55
EXPLODED VIEW
BRILLIANCE
Canister
Drawing
88
11
10
1
9
2
3
4
5
56
6
7
EXPLODED VIEW
BRILLIANCE
Canister
Spare parts list
POS.
Amount/UniT
Part No.
Description
1
2
1204953
Lid for Canister W67
2
3
1204715
Auger
3
3
1204776
Auger Holder
4
3
1204777
Auger Nut
5
2
1204722
Canister Base W67
6
3
120633
Outlet
7
3
1204775
Plastic Nut for Auger
8
2
1205626
Canister W67 H335 Complete
9
3
1204746
Agitator
10
1
120489
Canister W64 pipe destra 7cm L H
11
1
120493
Canister W64 pipe destra 7cm R H
57
EXPLODED VIEW
BRILLIANCE
Grinder
Drawing
15
14
13
12
11
10
9
4
5
3
2
1
6
58
7
8
EXPLODED VIEW
BRILLIANCE
Grinder
Spare parts list
POS.
Amount/UniT
Part No.
Description
1
2
3
4
5
6
7
8
9
10
11
12
13
14
59
EXPLODED VIEW
BRILLIANCE
Espresso group
Drawing
11
10
12
9
13
14
2
8
7
3
15
16
6
5
4
1
60
EXPLODED VIEW
BRILLIANCE
Espresso group
Spare parts list
POS.
Amount/UniT
Part No.
Description
1
2
3
4
5
6
7
8
9
10
11
12
13
14
15
16
61
FACTORY SETTINGS
BRILLIANCE
Default recipes
Long
Espresso
Latte
Hot
Cappuccino Chocolate
Espresso Macchiato Macchiato
Water
Coffee
Espresso
60cc
35cc
65cc
35cc
35cc
35cc
0
0
Before
After
After
After
After
After
--------
--------
Time 1 Water 1
2.3
6.0
5.0
7.8
Pause Water 1
0.5
1.0
1.0
0.5
Time 2 Water 1
0.5
0.7
0.7
0.5
0
0.1
0.2
0.2
3.0
8.0
7.0
9.0
Coffee water
volume
Brewing coffee
Time 1 Water 2
3.5
Pause Water 2
0.5
Time 2 Water 2
0.5
Mixer 1 Time
Mixer 2 Time
0.1
Soluble delay
0.5
0.5
0.5
Time soluble 1
(Topping)
1.5
5.0
4.0
Time soluble 2
(Chocolate)
11.5
0.5
7.0
Time expressed in seconds
Note
62
Observe that fields marked with red should not be changed, these values are
important for the function of the machine.
Total drink volume measured using different powder for the ingredients may differ
from the volume stated above.
For the warranty to be valid the conditions for maintenance must have been
followed according to our instructions, proper precaution has been made and
warranty claim been issued without delay.
The affected equipment may not be used during awaiting service if there is any risk
that the damage or defect would worsen.
The warranty will not cover consumption supplies such as glassware, normal
maintenance such as cleaning of filters, contaminations in water, lime, incorrect
voltages, pressure or adjustment of water amounts.
The warranty will not cover damages of defects caused by incorrect handling and
operation of the appliance.
FOR SERVICE
Please contact your dealer
Your Dealer
www.creminternational.com