1
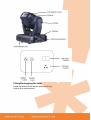
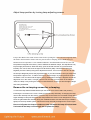
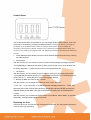
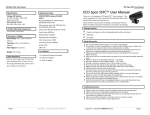
X-TORM 300
CAUTION!
Keep this device away from rain and moisture!
Unplug mains lead before opening the housing!
FOR YOUR OWN SAFETY, PLEASE READ THIS USER MANUAL
CAREFULLY BEFORE YOU INITIAL START - UP!
Introduction
Thank you for having chosen a new moving head 250. You acquired a versatile, powerful and
intelligent lighting-effect. Unpack your unit and make sure that there are no damages caused
by transportation. Should there be any, please consult your local dealer and do not take the
device into operation.
Features
Colour-system: Colour-wheel with 7 different, dichroic colour-filtres and white • Rainbow-effect
in both directions • Gobo-wheel with 7 interchangeable rotating gobos and open • The rotating
gobos can be turned by 360°, the adjusted position is memorized • High-speed rotating 4-facet
prism • shutter/dimmer unit allowing very smooth dimming and strobo effect 1-10 flash per sec.
• LED display • Readout fixture, receiving DMX values• Remote reset function • Silent fans
cooling; 10 DMX-channels• Pan-movement range 530° • Tilt-movement range 280° • High
luminous-efficiency parabolic mirror and double condenser system • Motorized focus
controllable via DMX • All lenses are anti-reflection coated •For PHILIPS MSD 250/2 lamp•
DMX-control via every standard DMX-controller
Operating determinations
This device is a moving-head spot for creating decorative effects. This product is only allowed
to be operated with an alternating current of 220 V, 60 Hz and was designed for indoor use
only. This device is designed for professional use, e.g. on stages, in discotheques, theatres etc.
Lighting effects are not designed for permanent operation. Consistent operation breaks will
ensure that the device will serve you for a long time without defects. Never run the device
without lamp! Do not shake the device. Avoid brute force when installing or operating the
device. The minimum distance between light-output and the illuminated surface must be more
than 1 meter. Always fix the fixture with an appropriate safety-rope. Fix the safety-rope at the
correct holes only. Only operate the fixture after having checked that the housing is firmly
closed and all screws are tightly fastened. The lamp must never be ignited if the objective-lens
or any housing-cover is open, as discharge lamps may expose and emit a high ultraviolet
radiation, which may cause burns. The maximum ambient temperature ta must never be
exceeded.
Fitting/Exchanging the lamp
Install the lamp with the device switched off only.
Unplug from mains before!
Adjust lamp position by turning lamp adjusting screws
Lamp is hot! Risk of fire! Wait at least 15min. before opening the covers and removing lamp from
the fixture. Disconnect the fixture from AC power before re-lamping. Protect hands and eyes.
Maximum room temperature t=40°C Minimum distance from flammable material d=0,5m. The
lamp holder is aligned at the factory. Due to differences between lamps, fine adjustment may
improve light performance. Strike the lamp, open the shutter and the iris, set the dimmer
intensity onto 100 % and focus the light on a flat surface (wall). Center the hot-spot (the
brightest part of the beam) using the 3 adjustment screws. Turn one screw at a time to drag
the hot-spot diagonally across the projected image. If you cannot detect a hot-spot, adjust the
lamp until the light is even. To reduce a hot-spot, pull the lamp in by turning all three screws
clockwise ¼-turn at a time until the light is evenly distributed. If the light is brighter around the
edge than it is in the center, or if light output is low, the lamp is too far back in the reflector.
"Push” the lamp out by turning the screws counterclockwise ¼-turn at a time the light is bright
and evenly distributed.
Remove the re-lamping screws for re-lamping
To insert the lamp PHILIPS MSD 250/2 open the small cover at the head's rear panel by
loosening the 2 screws on the cover. Gently pull out the lamp assembly. If changing the lamp,
remove the old lamp from the socket. Insert the lamp to the socket. Do not install a lamp with a
higher wattage! A lamp like this generates temperatures the device is not designed for. Do not
touch the glass-bulb bare-handed during the installation! Make sure that the lamp is installed
tightly into the lamp holder system. Reinsert the lamp assembly and tighten the screws again.
Never on/off power the lamp at continuous step and when the lamp off, wait at least
5 minutes till the lamp cools enough and on power the lamp.
DANGER OF FIRE!
When installing the device, make sure there is no highly-inflammable materials within a distance of
min. 0.5 m.
CAUTION!
Use 2 appropriate clamps to rig the fixture on the truss.
Follow the instructions mentioned at the bottom of the base.
Use 2 appropriate clamps to rig the fixture on the truss. Follow the instructions mentioned at
the bottom of the base. Make sure that the device is fixed properly! Ensure that the structure
(truss) to which you are attaching the fixtures is secure. Clamps must be locked with both 1/4
turns and the 1/4 turns lock in position when turned fully clockwise. Always use two clamps to
mount the fixture. Always secure safety wire before suspending the fixture.
Use the m10 screws to fix the clamps on the fixing holders on the bottom of the device and
then screw the hanging screw into the bottom base and put on safety wire.
DMX-512 connection / connection between fixtures
The wires must not come into contact with each other, otherwise the fixtures
will not work at all, or will not work properly.
Only use a stereo shielded cable and 3-pin XLR-plugs and connectors in order to connect the
controller with the fixture or one fixture with another. Connect the DMX-output of the first fixture
in the DMX-chain with the DMX-input of the next fixture. Always connect one output with the
input of the next fixture until all fixtures are connected. At the last fixture, the DMX-cable has to
be terminated with a terminator. Solder a 120 . resistor between Signal (–) and Signal (+) into
a 3-pin XLR-plug and plug it in the DMX-output of the last fixture.
Function of the control channels
Channel 1 - Horizontal movement (Pan)
Push slider up in order to move head horizontally (PAN). Gradual head adjustment from one
end of the slider to the other. The head can be turned by 530° and stopped at any position you
wish.
Channel 2 - Vertical movement (Tilt)
Push slider up in order to move head vertically (TILT). Gradual head adjustment from one end
of the slider to the other. The head can be turned by 280° and stopped at any position you
wish.
Channel 3 - rotating gobo-wheel
0 - 15
Open/hole
16-31
Gobo 1
32-47
Gobo 2
48-63
Gobo 3
64-79
Gobo 4
80-95
Gobo 5
96-111
Gobo 6
112-127
Gobo 7
128-255
Gobo wheel rotation from slow to fast
Channel 4 - Colour-wheel
0-15
Open / white
16-31
pink
32-47
yellow
48-63
orange
64-79
green
80-95
red
96-111
blue
112-127
purple
128-255
rainbow effects in both directions
Channel 5 - Rotating gobo index, rotating gobo rotation
0 - 127
forward gobo rotation from slow to fast
128 - 252
backward gobo rotation from slow to fast
253-255
gobo to be static
Channel 6 – shutter and strobe
0-50
shutter open
51-220
strobe from slow to fast
221-255
shutter open
Channel 7 – four-facet prism
0-255
static prism
Channel 8 – prism rotation
0-159
clockwise prism rotation
160-255
counter clockwise prism rotation
Channel 9 - focusing
Channel 10 - reset
Channel 11 - prism rotation
0-159
160-255
clockwise prism rotation
counter clockwise prism rotation
Channel 12 - focusing
Channel 13 - gobo indexing
Channel 14 - reset
Control Board
The Control Board offers several features: you can simply set the starting address, reset. The
main menu is accessed by pressing the MENU and browse through the menu by pressing the
Up-button. Press the Enter-button in order to select the desired menu. You can change the
selection by pressing the Up-button. Confirm every selection by pressing the Enter-button. You
can leave every mode by pressing the mode. The functions provided are described in the following
sections.
1.
Press [MENU] till A001 displays and then set the desired address and confirm by pressing
the button ENTER.
2. Pan Reverse
With this function you can reverse the Pan-movement. Select [PAN] by pressing [UP] button.
. Press [ENTER], the display shows [PAN +] and it means the pan moves in the direction set
ex factory and [PAN -]
means the pan moves in the opposite direction.
3. Tilt Reverse
With this function you can reverse the tilt -movement. Select [TLT] by pressing [UP] button.
. Press [ENTER], the display shows [TLT +] and it means the pan moves in the direction set ex
factory and [TLT-] means the pan moves in the opposite direction.
4. - Display the DMX 512 value of each channel
With this function you can display the DMX 512 value of each channel.
. Select "CH…" by pressing [UP]. Press [ENTER] and the display shows CH1…CH10, and
select any one of the 10 items and confirm by pressing the button ENTER and then the
different effects on the DMX value will be achieved by pressing UP or DOWN buttons.
5. Reset
With this function you can Reset the device via the Control Board. Select “REST” by pressing
[UP] button. Press [ENTER], the device will reset.
Replacing the fuse
If the lamp burns out, the fine-wire fuse of the device might fuse, too. Only replace the fuse by
a fuse of same type and rating.
Before replacing the fuse, unplug mains lead.
Procedure:
Step 1: Unscrew the fuse holder on the rear panel with a fitting screwdriver from the housing
(anti-clockwise).
Step 2: Remove the old fuse from the fuse holder.
Step 3: Install the new fuse in the fuse holder.
Step 4: Replace the fuse holder in the housing and fix it.
Should you need any spare parts, please use genuine parts. If the power supply cable of this
device becomes damaged, it has to be replaced by a special power supply cable available at
your dealer. Should you have further questions, please contact your dealer.
TECHNICAL SPECIFICATIONS
Power supply: 220 V AC, 60 Hz ~
Power consumption: 500W
DMX-512-connection: 3-pin XLR
Flash-rate: 10 Hz
Dimension: 420x410x490mm
Weight (net): 22.0 kg
Maximum ambient temperature ta : 45° C
Please note: Any information is subject to change without prior notice.