1
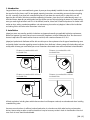
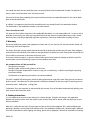
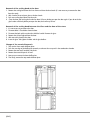
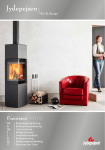
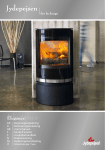
Cosmo & Mido
Cosmo & Mido
DK D
GB F
S
N
NL IT Betjeningsvejledning
Befeuerungsanleitung
User’s manual
Mode d’emploi
Användarhandbok
Bruksanvisning
Bedieningshandleiding
Istruzioni per l’uso
1. Introduction
Congratulations on your new wood-burning stove. By now you have probably installed the stove already, and maybe lit
the stove for the first time as well. To most people, operating instructions are something you consult when everything
else fail - especially if you have had a wood-burning stove in your home for several years. In spite of this, we still
hope that you will take a little time to read these operating instructions, since the use of a wood-burning stove is an
individual matter, depending on which model you have. Before you can fully enjoy being the owner of a wood-burning
stove, you need to get to know it well. This is not difficult, however, it does take a little bit of patience. For further information on heat, stoking, combustion problems and maintenance, please refer to Jydepejsen´s Manual for installation
and stoking. Please also refer to the illustrations in the back.
2. Installation
Jydepejsen stoves are tested by specialist institutions and approved according to applicable legislative requirements.
Before final approval is granted, stoves have to successfully complete a variety of combustion tests. The stove tested
featured a top outlet. The wood used for the tests was birch, with a moisture content of 15–21%.
Jydepejsen’s professional distributors will be able to advise you on the requirements for this type of wood-burning stove
and provide further instruction regarding correct installation. Your distributor / chimney sweep will also be able to tell you
exactly which chimney you need. Below you can see illustrations of mounted stoves with and without isolated firetubes.
Distance to combustible with
insulated flues
50
50
Distance to combustible with
insulated flues
350
50
Distance to combustible without
insulated flues
200
200
Distance to combustible without
insulated flues
200
300
All local regulations, including those which refer to national and European standards, must be observed when installing
a wood-burning stove.
You must ensure that there is sufficient intake of combustion air, also when used with other heating and extraction
devices. Houses today are often so well insulated that it may be necessary to take in fresh air from outside via fresh air
vents. Fresh air vents should not be blocked.
[GB 1,2]
You should also check that the vermiculite plates are correctly fitted inside the combustion chamber. The position of
these is shown in the illustration in this instruction manual.
You must install your stove according to the required minimum distance to combustible materials. See also the boiler
plate on the stove for details.
In addition, it is important to check that the Vermiculite panels are correctly fitted in the combustion chamber.
The wood holder in the combustion chamber is not to be removed.
Floor/foundation/wall
The stove must be installed / hanged on a non-combustible foundation / at a non-combustible wall - i.e. where a tile or
brick floor is non-existing, the stove must meet the demands for the distance to combustible material under / above /
beside the stove, according to applicable legislative requirements. Consult you dealer before installing the stove.
3. Warranty
Brand new wood burning stoves from Jydepejsen A/S come with a 5 year warranty. The warranty includes defects and
burn through with correct operation.
Any claims during the warranty period should be directed to the dealer who sold the stove. All stoves from Jydepejsen
come with their own individual serial number on the type plate on the back of the stove. Please quote stove model and
serial number to your dealer in connection with service tasks.
In the event of warranty repairs, a signed and dated invoice must also be produced, showing the dealer’s name. The
warranty does not cover dismantling, transport and reassembly of your stove.
No compensation will be granted for
-- Damage during transport.
-- Damage to other articles resulting from use of the stove.
-- Damage arising from misoperation or incorrect usage, such as overheating – avoid this by reading the operating
instructions carefully.
-- The directions in the operating instructions have not been followed.
The stove is supplied with wearing parts, which are to be replaced due to usage of the stove. These parts are not covered
by the warranty – how often they are to be replaced is individual and depends on the stove usage. The wearing parts are:
Vermiculite panels - baffle plates - sealing band.
Furthermore, Glass and soapstone are not covered by the warranty. If any of the above mentioned need replacing, new
parts can be ordered from your dealer.
4. Stoking instructions
It is very important to ensure that your chimney has a decent draught. The Alpha and Omega is the cooperation
between the chimney and the stove. Your dealer or your chimney sweep will be able to guide and advice you on your
chimney conditions.
When this is settled, the next step is that you make the stove and the chimney cooperate. This is done by following the
operating instructions and using fuel which inflames easily in the combustion chamber, until a decent draught is obtained.
For further information on correct lighting and stoking, please refer to Jydepejsen´s Manual for installation and stoking.
[GB 3,4]
Please note that the stove paint will harden during the first few initial lightings. This means that the stove will generate
smoke and an odour of paint, which will dissipate after about 1 hours´s operation. It is a good idea to ensure effective
ventilation during this phase. Also, touching the stove should be avoided, since this may cause the paint to scale.
The stove will expand and contract during the lighting and cooling phase, possibly resulting in creaking noises. This
phenomenon is completely normal for sheet-iron stoves, and cannot be regarded as a fault.
All Jydepejsen wood-burning stoves are intermittent, which means that new wood should be added when there is a
layer of embers in the burning chamber.
Once there is a good bed of embers in the stove, you can add wood. It is important not to open the door while there are
flames in the stove, as this may cause smoke to flow out into the room. Add wood on the basis of your heating requirements. The amount of wood you need to add will depend on the season. However, never add more than 2 kg of wood
every 1.5–2 hours. Please remember that the exterior surfaces of the stove in particular will become very hot during firing.
Initial lighting
1. Turn the air intake to the maximum.
2. Add firelighters and billets to the bottom of the fire box (combustion chamber).
3. The billets (about 1,5 kg) are to be built up crosswise.
4. Light the fire.
5. The door should be ajar for a couple of minutes during the lighting phase.
6. The air intake must be adjusted down after approx. 10 minutes; how much depends on the chimney draught however, the air supply must be diminished to the point where you obtain steady and calm flames.
Stoking
1. Turn the air intake to the maximum.
2. To minimize the underpressure, the door should be ajar for about one minute before you open it completely.
3. Open the door slowly.
4. Add 2 – 3 pieces of firewood to the combustion chamber.
5. Close the door.
6. Turn down the air supply when the fire has caught the wood, to obtain steady and calm flames.
5. Maintenance
Sealing band and vermiculite panels are wearing parts which need to be renewed. How often this is needed depends
on how much you use your stove. In some cases every year, others every second or third year. A principal rule is that
the sealing band needs renewal when it is flattened, and the door no longer fits tightly against the front of the stove. A
new set of sealing band with glue can be purchased from your local dealer.
Vermiculite panels must be renewed when they are worn thin, or when possible cracks are so wide that you can actually see steel through them. If the panels are not renewed on such occations, they lose their power of insulation and
heat reflection.
Movable and mechanical parts should be greased once a year with a heat-resisting lubricant (closing mechanisms,
hinges etc).
[GB 4,5]
Renewal of the sealing band at the door
1. Remove the sealing band from the inner frame and clean the band mark (it is not necessary to remove the door
from the stove).
2. Add a band of heat-resistant glue on the band mark.
3. Push new sealing band down into the mark.
4. Close the door and let the glue harden for about 24 hours, before you open the door again. If you do not let the
glue harden sufficiently before you open the door, the band may fall out.
Renewal of the sealing band between the Glass and the door of the stove
1. It is not nescessary to remove the door.
2. Dismount bolts / Glassholders from the door.
3. Dismount the bolt and the ratchet that hold the handle. Remove the glass.
4. Remove the old sealingband from the door.
5. Add new sealing band to the door.
6. Insert the glass and tighten the bolts and the glassholders.
Change of the vermiculite panels
1. Take out the front smoke deflector plate.
2. Push the rear edge of the baffle plate upwards, to take out the rear panel in the combustion chamber.
3. Remove the two small, bevelled side panels.
4. Remove thae two side panels in front.
5. Now you can remove the lower baffle plate.
6. Then lastly, remove the top smoke deflector plate.
[GB 5]
6. Spare parts list
Type Description Vermiculiteset (lower baffle plates incl.) Vermiculite side panel, right 400 x 148,3 x 25 mm
Vermiculite side panel, left 400 x 148,3 x 25 mm
Vermiculite side panel, left bevelled 395 / 254,4 x 140,9 x 29 mm
Vermiculite side panel, right bevelled 395 / 254,4 x 140,9 x 29 mm
Vermiculite rear panel 271,6 x 237,1 x 29 mm
Vermiculite baffle plate, upper 378 / 258 x 220 x 15 mm
Vermiculite baffle plate, rear 390 / 268,9 x 180,3 x 20 mm
Vermiculite baffle plate, front 385 x 155 x 20 mm
Article no.
44101000-0
We are only able to deliver a complete vermiculiteset, and not single parts.
Glass 485 x 340 x 4 mm Cast-iron bottom T
hickness: 9 mm Ash pan Capacity: 4,2 l Gasket with glue Ø 12 mm Shaking grate 56700020
55015140
56700058
44300120
55000100
[GB 6]