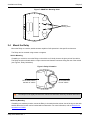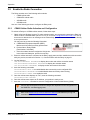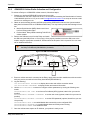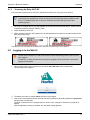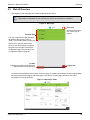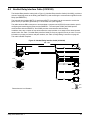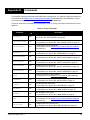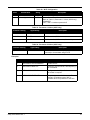
1
Relay™ User Manual OM-20000161 Rev 1 March 2015 Relay User Manual Revision Level: Publication Number: Revision Date: Firmware Version: 1 OM-20000161 March 2015 6.610 (OEM060610RN0000) Warranty NovAtel® Inc. warrants that its GNSS products are free from defects in materials and workmanship, subject to the conditions set forth on our web site: www.novatel.com/products/warranty/. Relay Module One (1) Year Cables and Accessories Ninety (90) Days Software Warranty One (1) Year Return Instructions To return products, refer to the instructions found under the Return Policy tab on the Warranty page: www.novatel.com/products/warranty/. Proprietary Notice Information in this document is subject to change without notice and does not represent a commitment on the part of NovAtel Inc. The software described in this document is furnished under a license agreement or nondisclosure agreement. The software may be used or copied only in accordance with the terms of the agreement. It is against the law to copy the software on any medium except as specifically allowed in the license or non-disclosure agreement. The information contained within this manual is believed to be true and correct at the time of publication. NovAtel, NovAtel Connect and OEM6 are registered trademarks of NovAtel Inc. Relay and SMART6-L are trademarks of NovAtel Inc. Manufactured and protected under U.S. Patent: #5,390,207 #6,184,822 B1 #6,664,923 B1 #5,495,499 #6,211,821 B1 #6,922,167 B2 #5,734,674 #6,445,354 B1 #7,250,916 #5,809,064 #6,608,998 B1 #7,738,536 B2 #5,414,729 #6,452,560 B2 #7,738,606 B2 #5,736,961 #6,728,637 B2 #7,885,317 B2 #6,243,409 B1 © Copyright 2015 NovAtel Inc. All rights reserved. Unpublished rights reserved under International copyright laws. Relay User Manual Rev 1 2 Table of Contents Notices 7 Customer Service 14 1 Introduction 15 1.1 Features and Models ...................................................................................................................................................16 1.2 Overview—Relay Hardware ........................................................................................................................................17 2 Installation and Setup 18 2.1 Additional Equipment Required (user supplied) ..........................................................................................................18 2.2 Relay Setup .................................................................................................................................................................18 2.3 Connect the SMART6-L to the Relay ..........................................................................................................................20 2.4 Mount the Relay ..........................................................................................................................................................21 2.4.1 Mount the Relay Using the Integrated Magnets ................................................................................................22 2.4.2 Mount the Relay Using Screws .........................................................................................................................22 2.4.3 Optional Mounting Plate ....................................................................................................................................23 2.4.4 Optional Pole Mounting Plate ............................................................................................................................24 2.5 Connect the NovAtel Relay Interface Cable (01019382).............................................................................................26 2.6 Connect the Radio Antenna ........................................................................................................................................26 2.6.1 Connect an Enclosure Mounted Antenna..........................................................................................................26 2.6.2 Connect a Separately Mounted Antenna ..........................................................................................................28 2.7 Connect Power ............................................................................................................................................................28 2.7.1 Power Supply Requirements .............................................................................................................................28 2.7.2 Connect Power to the Relay..............................................................................................................................28 2.8 Connect the Data Communication Equipment.............................................................................................................28 2.9 Additional Features and Information............................................................................................................................29 2.9.1 Status Indicators................................................................................................................................................29 2.9.2 Mark Input (MKI) Strobe ....................................................................................................................................29 2.9.3 Pulse Per Second (PPS) Strobe .......................................................................................................................29 2.9.4 Emulated Radar ................................................................................................................................................30 2.9.5 Controller Area Network (CAN) .........................................................................................................................30 3 Operation 31 3.1 Communications with the Relay ..................................................................................................................................31 3.1.1 Serial Port Default Settings ...............................................................................................................................31 3.1.2 Communicating Using a Remote Terminal........................................................................................................31 3.1.3 Communicating Using a Computer....................................................................................................................31 3.2 Enable the Radio Connection ......................................................................................................................................32 3.2.1 CDMA Cellular Radio Activation and Configuration ..........................................................................................32 3.2.2 GSM/HSPA Cellular Radio Activation and Configuration ..................................................................................33 3.2.3 400 MHz UHF Radio Configuration ...................................................................................................................34 3.2.4 900 MHz UHF Radio Configuration ...................................................................................................................34 3.3 NTRIP Configuration ...................................................................................................................................................35 4 Operation—Web User Interface 36 4.1 Configuring the Wi-Fi ...................................................................................................................................................36 4.1.1 Wi-Fi Access Point Setup (UHF radio models only) ..........................................................................................36 4.1.2 Accessing the Relay Wi-Fi AP...........................................................................................................................37 4.2 Logging in to the Web UI .............................................................................................................................................37 4.3 Web UI Overview.........................................................................................................................................................38 4.3.1 Status Pages .....................................................................................................................................................39 4.3.2 Configuration Pages ..........................................................................................................................................40 4.3.3 Tools Page ........................................................................................................................................................41 4.4 Configuring the Relay ..................................................................................................................................................42 4.4.1 Set the Base Station Position—Auto-Survey.....................................................................................................42 4.4.2 Set the Base Station Position—Manually ..........................................................................................................43 4.4.3 Set the Elevation Mask......................................................................................................................................44 Relay User Manual Rev 1 3 Table of Contents 4.4.4 Enable/Disable SBAS Corrections ....................................................................................................................45 4.4.5 Set the RTK Correction Message Type.............................................................................................................46 4.4.6 Set the Radio Parameters—400MHz Radio......................................................................................................47 4.4.7 Set the Radio Parameters—900MHz Radio......................................................................................................48 4.4.8 Enable or Disable the Radio..............................................................................................................................49 4.4.9 Change the Password .......................................................................................................................................50 4.4.10 Reset the Web UI Password ...........................................................................................................................50 4.5 Logging out ..................................................................................................................................................................50 5 Updating Relay Product Firmware 51 5.1 Using the WinLoad Utility.............................................................................................................................................51 5.1.1 Open a File to Download ...................................................................................................................................51 5.1.2 Communications Settings..................................................................................................................................51 5.1.3 Downloading Firmware......................................................................................................................................52 5.2 Updating Using ESoftLoad Commands .......................................................................................................................52 5.2.1 ESoftLoad Commands and Logs ......................................................................................................................52 5.2.2 Working With S-Records ...................................................................................................................................52 5.2.3 Sending Firmware Data.....................................................................................................................................53 5.2.4 SoftLoad Update Method ..................................................................................................................................54 5.2.5 ESoftLoad Logs .................................................................................................................................................56 5.2.6 ESoftLoad Errors ...............................................................................................................................................56 A Technical Specifications 57 A.1 Relay Specifications ....................................................................................................................................................57 A.1.1 Relay Radio Specification .................................................................................................................................60 A.2 NovAtel Relay Interface Cable (01019382).................................................................................................................61 A.2.1 Relay Connector and Cable Requirements.......................................................................................................63 A.3 Relay NMO to TNC Adapter Cable (01019372) ..........................................................................................................65 B Commands 66 B.1 Syntax Conventions ....................................................................................................................................................67 B.2 AUTOSURVEY ...........................................................................................................................................................68 B.3 CELLULARACTIVATE ................................................................................................................................................70 B.4 EPERSONALITY.........................................................................................................................................................71 B.5 ESOFTLOADCOMMIT ................................................................................................................................................72 B.6 ESOFTLOADDATA .....................................................................................................................................................73 B.7 ESOFTLOADRESET...................................................................................................................................................74 B.8 ESOFTLOADSREC.....................................................................................................................................................75 B.9 M3TRCONFIG.............................................................................................................................................................76 B.10 M3TRMODE..............................................................................................................................................................78 B.11 MM2TCONFIG ..........................................................................................................................................................79 B.12 MM2TMODE .............................................................................................................................................................82 B.13 WIFIAPCONFIG ........................................................................................................................................................83 B.14 WIFIAPCONTROL ....................................................................................................................................................85 B.15 WIFICONFIG.............................................................................................................................................................86 C Logs 88 C.1 CELLULARACTIVATESTATUS..................................................................................................................................89 C.2 ESOFTLOADSTATUS ................................................................................................................................................90 C.3 M3TRINFO..................................................................................................................................................................92 C.4 MM2TINFO .................................................................................................................................................................94 C.5 NTRIPSTATUS ...........................................................................................................................................................96 C.6 VERSION ....................................................................................................................................................................98 D Replacement Parts 101 D.1 Relay ...........................................................................................................................................................................101 D.2 User Manuals ..............................................................................................................................................................101 Relay User Manual Rev 1 4 Figures 1 2 3 4 5 6 7 8 9 10 11 12 13 14 15 16 17 18 19 20 21 22 Relay with SMART6-L .............................................................................................................................15 Relay Front Connector ............................................................................................................................17 Relay Back Connectors ...........................................................................................................................17 Simplified Relay Setup ............................................................................................................................19 Connect to Relay .....................................................................................................................................20 Align SMART6-L with Relay ....................................................................................................................20 SMART6-L Mounting Holes ....................................................................................................................21 Relay Orientation ....................................................................................................................................21 Relay Mounting Holes .............................................................................................................................22 Relay Surface Mounting Plate (NovAtel Part #: 70023098) ....................................................................23 Screws to Remove for the Pole Mounting Plate ......................................................................................24 Relay Pole Mounting Plate (NovAtel Part #: 70023100) .........................................................................25 Radio Antenna Installation and Mounting ...............................................................................................27 SIM Card Installation ...............................................................................................................................33 NTRIP System ........................................................................................................................................35 Main Page ...............................................................................................................................................38 Main Page—Wide ...................................................................................................................................38 WinLoad Open Window ..........................................................................................................................51 Open File in WinLoad ..............................................................................................................................51 Relay Dimensions ...................................................................................................................................59 NovAtel Relay Interface Cable (01019382) .............................................................................................61 Relay NMO to TNC Adapter Cable .........................................................................................................65 Relay User Manual Rev 1 5 Tables 1 2 3 4 5 6 7 8 9 10 11 12 13 14 15 16 17 18 19 20 21 22 23 24 25 26 27 28 29 30 31 32 33 34 35 Relay Models ...........................................................................................................................................16 Relay Connectors.....................................................................................................................................17 Relay Connector Pin-Out .........................................................................................................................26 Relay LED Status Indicators with SMART6-L ..........................................................................................29 Function Bar Status..................................................................................................................................39 Tool Tab Definitions .................................................................................................................................41 NovAtel Relay Interface Cable Pin-Outs ..................................................................................................62 Relay Mating Connectors.........................................................................................................................63 Recommended Fuse and Fuse Holders ..................................................................................................64 Relay Commands.....................................................................................................................................66 Supported Operators................................................................................................................................70 Trait Values ..............................................................................................................................................71 M3TRCONFIG Parameters......................................................................................................................77 Compatibility Mode...................................................................................................................................77 Error Check Mode ....................................................................................................................................77 Satel M3-TR3 Modes ...............................................................................................................................78 MM2TCONFIG Parameters .....................................................................................................................80 Transmit Power ........................................................................................................................................81 MM2-T Modes ..........................................................................................................................................82 WifiApId....................................................................................................................................................83 WIFIAPConfiguration ...............................................................................................................................84 Wi-Fi Configuration ..................................................................................................................................87 Parameter 1 Values (ASCII only) .............................................................................................................87 Parameter 2 Values (ASCII only) .............................................................................................................87 Relay Logs ...............................................................................................................................................88 SoftLoad Statuses....................................................................................................................................90 M3TRINFO Fields ....................................................................................................................................93 Compatibility Mode...................................................................................................................................93 COM Port Identifiers.................................................................................................................................96 NTRIP Status ...........................................................................................................................................97 Supported Relay Components .................................................................................................................100 WWW_CONTENT version information ....................................................................................................100 REGULATORY version information .........................................................................................................100 Relay Products.........................................................................................................................................101 Reference User Manuals .........................................................................................................................101 Relay User Manual Rev 1 6 Notices General Notices The following notices apply to the Relay. Changes or modifications to this equipment not expressly approved by NovAtel Inc. could result in violation of FCC, Industry Canada and CE Marking rules and void the user’s authority to operate this equipment. Relay products are available in several different radio configurations. Relay equipment should be installed under the guidance of experienced, qualified professionals to ensure that applicable licensing considerations are properly addressed, and that operation of the installed system configuration, (including selected antennas), will be compliant with local regulatory and safety requirements. It remains the installer’s responsibility to ensure that an installation operates within EIRP emission limits, and that appropriate separation distances for personal safety are maintained. Users of UHF 400 MHz radio transceiver modules in North America should be aware, that due to the allocation of the frequency band 406.0 – 406.1 MHz for government use only, the use of radio transceiver module on this frequency band without a proper permit is strictly forbidden. Regulations for legal operation of these radio devices vary by country and the applicable local frequency management authorities. They may operate either on license free channels or on channels where the operation requires a license. Radio transceiver modules shall only be operated at frequencies allocated by local authorities, and without exceeding the given maximum allowed output power ratings. Refer to the radio specific notices later in this section for additional guidance. Export Restrictions Relay UHF radio variants may be subject to control by the Export Administration Regulations (EAR) and/or the International Traffic in Arms Regulations (ITAR). Export, re-export, or transfer of these products without required authorization from the U.S. Department of Commerce, Bureau of Industry and Security, or the U.S. Department of State, Directorate of Defense Trade Controls, as applicable, is prohibited. Any party exporting, re-exporting, or transferring these products is responsible for obtaining all necessary U.S. government authorizations required to ensure compliance with these and other applicable U.S. laws. Consult with your legal counsel for further guidance. FCC Notices This device complies with part 15 of the FCC Rules. Operation is subject to the following two conditions: (1) this device may not cause harmful interference, and (2) this device must accept any interference received, including interference that may cause undesired operation. Relay has been tested and found to comply with the emission limits for a Class B digital device, pursuant to part 15 of the FCC Rules. The Class B limits are designed to provide reasonable protection against harmful interference in a residential installation. Relay User Manual Rev 1 7 Notices This equipment generates, uses, and can radiate radio frequency energy and, if not installed and used in accordance with the instructions, may cause harmful interference to radio communications. However, there is no guarantee that interference will not occur in a particular installation. If this equipment does cause harmful interference to radio or television reception, which can be determined by turning the equipment off and on, the user is encouraged to try to correct the interference by one or more of the following measures: • Re-orient or relocate the Relay or receiving antenna • Increase the separation between the equipment and the Relay • Connect the equipment to an outlet on a circuit different from that to which the Relay is connected • Consult the dealer or an experienced radio/TV technician for help Changes or modifications not expressly approved by the party responsible for compliance could void the user's authority to operate the equipment. To maintain compliance with the limits of a Class B digital device, you must use properly shielded interface cables (such as Belden #9539 or equivalent) when using the serial data ports, and double-shielded cables (such as Belden #9945 or equivalent) when using the I/O strobe port. A twisted pair cable should be used for the CAN port (shielded twisted pair will improve CAN performance in electrically harsh environments). I/O signals should be referred to signal ground (connector pin 5) and not power ground (connector pin 9). If I/O signals route to different areas of the vehicle, dedicated signal grounds for I/O should be spliced into a common connection to connector pin 5 at a point close to the Relay. Industry Canada Relay Class B digital apparatus complies with Canadian ICES-003. Relay appareil numérique de la classe B est conforme à la norme NMB-003 du Canada. This device complies with Industry Canada's license-exempt RSS-GEN and RSS-210. Operation is subject to the following two conditions: (1) This device may not cause interference; and (2) This device must accept any interference, including interference that may cause undesired operation of the device. Relay User Manual Rev 1 8 Notices CE Marking Relay-400 Hereby, NovAtel Inc. declares that Relay-400 radio transceiver is in compliance with the essential requirements (radio performance, electromagnetic compatibility and electrical safety) and other relevant provisions of Directive 1999/5/EC, EMC Directive 2004/108/EC, and the RoHS Directive 2011/65/EU. Therefore the equipment is labeled with the following CE-marking. The notification sign informs users that the operating frequency range of the device is not harmonized throughout the market area, and the local spectrum authority should be contacted before the usage of the radio module. 1987 1588 Relay-GSM NovAtel Inc. declares that RELAY-GSM radio transceiver is in compliance with the essential requirements (radio performance, electromagnetic compatibility and electrical safety) and other relevant provisions of Directive 1999/5/ EC, EMC Directive 2004/108/EC, and the RoHS Directive 2011/65/EU. Therefore the equipment is labeled with the following CE-marking. 1909 1588 The Declaration of Conformity may be obtained from NovAtel Inc., 1120-68th Ave N.E., Calgary, Alberta, Canada. T2E-8S5. E-mark The Relay has been granted EC type approval of an electric/electronic subassembly with respect to electromagnetic compatibility ECE Regulation 10.04. Therefore, the equipment is labeled with the following approval marks. E11 Relay User Manual Rev 1 10 R - 04 8643 9 Notices Safety Switch OFF your Relay when around gasoline or diesel-fuel pumps and before filling your vehicle with fuel. Respect restrictions on the use of radio equipment in fuel depots, chemical plants or where blasting operations are in progress. There may be a hazard associated with the operation of your Relay close to inadequately protected personal medical devices such as hearing aids and pacemakers. Consult the manufacturers of the medical device to determine if it is adequately protected. Operation of your Relay close to other electronic equipment may also cause interference if the equipment is inadequately protected. Observe any warning signs and manufacturers’ recommendations. RF Exposure Maximum permissible antenna gains and minimum permissible separation distances between antennas and all persons will vary by radio variant, and must be addressed on a radio specific basis to ensure compliance with FCC, IC, and other applicable RF exposure compliance requirements. Devices must not be co-located or operating in conjunction with any other antenna or transmitter. Refer to the radio specific notices for additional guidance. Cellular Radios GSM/HSPA Radios Relays with GSM/HSPA contain a cellular radio with the following modular approvals: • FCC ID: RI7HE910 • IC: 5131A-HE910 RF Exposure The maximum antenna gain including cable loss for compliance with radiated power limits, RF exposure requirements and the categorical exclusion requirements of 2.1091 is 5.22 dBi for 850MHz bands, 3.31 dBi for 1900 MHz bands and 6.45 dBi for 1700 MHz band. The antenna(s) used for this transmitter must be installed to provide a separation distance of at least 20 cm from all persons and must not be co-located or operated in conjunction with any antenna or transmitter not described under this FCC id, except in accordance with FCC multi-transmitter product procedures. Professional installation is required. CDMA Radios CDMA Relay variants contain a cellular radio with the following modular approvals: • FCC ID: RI7DE910-DUAL • IC: 5131A-DE910DUAL RF Exposure The maximum antenna gain including cable loss for compliance with radiated power limits, RF exposure requirements and the categorical exclusion requirements of 2.1091 is 5.12 dBi for part 22H and 6.12 dBi for part 24E. The antenna(s) used for this transmitter must be installed to provide a separation distance of at least 20 cm from all persons and must not transmit simultaneously with any other antenna or transmitter. Professional installation is required. Relay User Manual Rev 1 10 Notices UHF Radios 400 MHz Radios 400 MHz UHF Relays variants contain a radio transceiver module with the following modular approvals: • FCC ID: MRBSATEL-TA23 • IC: 2422A-SATELTA23 The radio transceiver module has been designed to operate on 403-473 MHz, the exact use of which differs from one region and/or country to another. The user of a radio transceiver module must take care that the said device is not operated without the permission of the local authorities on frequencies other than those specifically reserved and intended for use without a specific permit. The radio transceiver is allowed to be used in the following countries, either on license free channels or on channels where the operation requires a license. More detailed information is available at the local frequency management authority. • Countries: AT, BE, BG, CA, CH, CY, CZ, DE, DK, EE, ES, FI, FR, GB, GR, HU, IE, IS, IT, LT, LU, LV, MT, NL, NO, PL, PT, RU, RO, SE, SI, SK, US Restricted Use Users of UHF 400 MHz radio transceiver modules in North America should be aware, that due to the allocation of the frequency band 406.0 – 406.1 MHz for government use only, the use of radio transceiver module on this frequency band without a proper permit is strictly forbidden. RF Exposure To comply with FCC and IC RF exposure compliance requirements, maximum antenna gain is 14 dBi and separation distance of at least 1 meter must be maintained between the antenna of this device and all persons, (when Relay 400 MHz is used in a transmitter/base station configuration). Professional installation is required, and radio power must be adjusted by the installer, based on the antenna system gain, so as not to exceed FCC prescribed output power limits. This device must not be co-located or operating in conjunction with any other antenna or transmitter. Installers shall ensure that the device is not configured as a transmitter/base station when installed on a rover, and personal separation distances of only 20 cm may be expected. 900 MHz Radios 900 MHz UHF Relays variants contain a radio transceiver module with the following module approvals: • FCC ID: KNYAMM0921TT • IC: 2329B-AMM0921TT The radio transmitter IC: 2329B-AMM-0921TT has been approved by Industry Canada to operate with antennas having maximum permissible gain as indicated below. Antennas having a gain greater than the maximum gain indicated for that type are strictly prohibited for use with this device. RF Exposure Antennas used with the RELAY UHF 900 MHz variant must have the following characteristics to remain in compliance with FCC requirements and regulations; Antenna gain does not exceed 12 dBi for Yagi antennas and 8.15 dBi for Omni antennas, and, Overall system Equivalent Isotropically Radiated Power (EIRP) does not exceed 36 dBm. Professional installation is required, and radio power must be adjusted by the installer, based on the antenna system gain, so as not to exceed FCC prescribed output power limits. The antenna(s) used for this transmitter must be installed to provide a separation distance of at least 23 cm from all persons and must not be collocated or operating in conjunction with any other antenna or transmitter. Relay User Manual Rev 1 11 Notices Wi-Fi Relay models containing UHF radios may contain Wi-Fi wireless technology (802.11 b/g/n). Relay contains a Wi-Fi radio having an internal antenna with the following modular approvals: • FCC ID: TFB-TIWI1-01 • IC: 5969A-TIWI101 WEEE Notice If you purchased your Relay product in Europe, please return it to your dealer or supplier at the end of its life. The objectives of the European Community's environment policy are, in particular, to preserve, protect and improve the quality of the environment, protect human health and utilize natural resources prudently and rationally. Sustainable development advocates the reduction of wasteful consumption of natural resources and the prevention of pollution. Waste electrical and electronic equipment (WEEE) is a regulated area. Where the generation of waste cannot be avoided, it should be reused or recovered for its material or energy. WEEE products may be recognized by their wheeled bin label ( ).1 REACH NovAtel strives to comply with the EU Directive EC 1907/2006 on chemicals and their safe use as per the Registration, Evaluation, Authorization and Restriction of Chemical substances (REACH) for its products, including the Relay product. Since REACH SVHC lists are updated occasionally, please contact NovAtel Customer Support if you require further information. Cables may contain DEHP (CAS Number 117-81-7) in concentrations above 0.1% w/w. RoHS The SMART family are compliant with the European Union (EU) Restriction of Hazardous Substances (RoHS) Directive 2011/65/EU. 1. Visit the NovAtel Web site at www.novatel.com/products/weee-and-rohs/ through Products | WEEE and RoHS for more information. Relay User Manual Rev 1 12 Notices Conventions Conventions used in this manual are the following: Note that provides information to supplement or clarify the accompanying text. Caution that a certain action, operation or configuration may result in incorrect or improper use of the product. Warning that a certain action, operation or configuration may result in regulatory noncompliance, safety issues or equipment damage. • The letter H in the Offset columns of the commands and logs tables represents the header length for that command or log. Refer to the OEM6 Family Firmware Reference Manual for ASCII and binary header details. • The number following 0x is a hexadecimal number. • Command descriptions’ brackets, [ ], represent optional parameters. • In tables where values are missing they are assumed to be reserved for future use. • Status words are output as hexadecimal numbers and must be converted to binary format (and in some cases then also to decimal). For an example of this type of conversion, refer to the RANGE log in the OEM6 Family Firmware Reference Manual. • Conversions and their binary or decimal results are always read from right to left. Relay User Manual Rev 1 13 Customer Service NovAtel Knowledge Base If a technical issue is encountered, browse the NovAtel Web site: www.novatel.com/support/search/. Use the support pages to search for general information about GNSS and other technologies, information about NovAtel hardware and software and installation and operation issues. Before Contacting Customer Support Before you contact NovAtel Customer Support about a software problem perform the following steps: 1. Issue the following logging commands to collect data to a file on your computer for 15 minutes: LOG VERSIONA ONCE LOG RXSTATUSA ONCHANGED LOG RXCONFIGA ONCE LOG RAWEPHEMA ONNEW LOG BESTPOSA ONTIME 1 LOG RANGEA ONTIME 1 LOG GLORAWEPHEMA ONCHANGED1 2. Send the file containing the logs to NovAtel Customer Service, using either the NovAtel ftp site at ftp://ftp.novatel.com/incoming or the [email protected] e-mail address. 3. You can also issue a FRESET command to the receiver to clear any unknown settings. The FRESET command will erase all user settings and perform a factory reset. You should know your configuration and be able to reconfigure the receiver before you send the FRESET command. If you are having a hardware problem, send a list of the troubleshooting steps taken and the results. Contact Information Use one of the following methods to contact NovAtel Customer Support: Call the NovAtel Hotline at 1-800-NOVATEL (U.S. and Canada) or +1-403-295-4500 (international) Fax: +1-403-295-4501 E-mail: [email protected] website: www.novatel.com Write: NovAtel Inc. Customer Support Department 1120 - 68 Avenue NE Calgary, AB Canada, T2E 8S5 1. For GLONASS channel configuration. Relay User Manual Rev 1 14 Chapter 1 Introduction The Relay is a radio telecommunication module that connects directly to a NovAtel SMART6-L dual-frequency GNSS receiver. The Relay provides the SMART6-L with radio connectivity to support RTK or Precise Point Positioning (PPP) corrections. Depending on the model, the Relay contains one of the following radios: • CDMA 1xRTT cellular radio • GSM HSPA cellular radio • 400 MHz licensed radio • 900 MHz unlicensed radio Only the 400 and 900 MHz radio models have access to Wi-Fi for monitoring and configuring the Relay. Refer to Section 4.1, Configuring the Wi-Fi on page 36 for details. The Relay also features Light Emitting Diodes (LEDs) for status indication. Figure 1: Relay with SMART6-L Radio antenna not included Relay User Manual Rev 1 15 Introduction 1.1 Chapter 1 Features and Models The main features of the Relay are: • • • • • • • physical connectivity for a SMART6-L receiver radio connectivity for RTK or differential corrections Wi-Fi connectivity for monitoring and configuration (UHF radio models only) integrated NTRIP client magnetic or screw mounting three LED status indicators water and dust tight enclosure Table 1: Relay Models NovAtel Part # Description 01019343 Relay with GSM HSPA 01019345 Relay with CDMA 1xRTT 01019347 Relay with Satel 400 MHz radio 01019349 Relay with Freewave 900 MHz radio Contact NovAtel Sales at www.novatel.com/where-to-buy/contact-us for information regarding available models. The Relay functions only with a SMART6-L running firmware version 6.61. Relay User Manual Rev 1 16 Introduction 1.2 Chapter 1 Overview—Relay Hardware The Relay has a port on the front to connect to a SMART6-L and ports on the back to connect to other equipment. Figure 2: Relay Front Connector SMART Antenna Port Figure 3: Relay Back Connectors Status LEDs Vent Holes Do not cover SIM COM and Power Port Radio Antenna Port SIM Card Cover The pressure equalization vent holes (labeled Vent Holes in the diagram above), must never be covered. Table 2: Relay Connectors Connector Description SMART Antenna Port 14-pin Ampseal connector Connects to the 14-pin connector on the SMART6-L COM and Power Port 14-pin Ampseal connector Connects to the cable that provides power for the Relay and SMART6-L. Also, provides access to the serial communication ports and the Pulse Per Second (PPS), Emulated Radar, Mark Input and CAN Bus signals Radio Antenna Port Connects the radio in the Relay to the external radio antenna Relay User Manual Rev 1 17 Chapter 2 Installation and Setup This chapter contains instructions and tips to install the Relay. 2.1 Additional Equipment Required (user supplied) The following additional equipment is required: 2.2 • A NovAtel SMART6-L with compatible firmware • A cable harness for communicating with and powering the Relay and the SMART6-L (NovAtel Relay interface cable (01019382)) is available with three DB-9 connectors, five bare wire cables and a Relay connector) • A fused power supply (see Table 9, Recommended Fuse and Fuse Holders on page 64 for details) • A computer with a serial port for configuring the SMART6-L • A Wi-Fi capable computer or mobile device for monitoring and configuring 400 MHz or 900 MHz radio Relay models only. Wi-Fi is only available when a UHF radio model Relay is configured as a Base Station. The Relay is typically shipped configured as a Rover. Refer to Section 3.2.3, 400 MHz UHF Radio Configuration on page 34 or Section 3.2.4, 900 MHz UHF Radio Configuration on page 34 for instructions on configuring the Relay as a Base Station. Installers shall ensure that the device is not configured as a transmitter/base station when installed as a rover, and personal separation distances of only 20 cm may be expected. Such a configuration will create a human safety hazard, and FCC rules for maximum personal exposure will be violated. Relay Setup Complete the following steps to connect and power the Relay. Also see Figure 4, Simplified Relay Setup on page 19. 1. Connect the SMART6-L to the Relay (refer to Section 2.3, Connect the SMART6-L to the Relay on page 20 for details). 2. Mount the Relay on a secure, stable structure with an unobstructed view of the sky from horizon to horizon (refer to Section 2.4, Mount the Relay on page 21 for details). 3. Connect the NovAtel Relay interface cable (01019382) or custom wiring harness, to the COM and Power port on the back of the Relay (refer to Section 2.5, Connect the NovAtel Relay Interface Cable (01019382) on page 26 for details). 4. Connect the Relay to the external antenna (refer to Section 2.6, Connect the Radio Antenna on page 26 for details). 5. Connect the NovAtel Relay interface cable (01019382) or custom wiring harness to the power supply and turn on the power supply to the Relay (the NovAtel Relay interface cable (01019382) is also a power cable). The power LED on the Relay glows red when the Relay is properly powered. Fuse/holder recommendations can be found in Table 9, Recommended Fuse and Fuse Holders on page 64. 6. Connect the NovAtel Relay interface cable (01019382) or custom wiring harness to a DB-9 serial port on a computer or other data storage device. Relay User Manual Rev 1 18 Installation and Setup Chapter 2 Figure 4: Simplified Relay Setup Radio Antenna Top Plate of NMO to TNC Adapter Cable Tyco 14-pin Connector COM NMO to TNC Adapter Cable User supplied 5A fast blow fuse COM COM Ground MKI PPS CAN ER_OUT Minimum conductor size for all signal wiring is 0.5 mm/20 AWG. Minimum conductor size for power wiring is 1.25 mm/16 AWG. For user fabricated cables, all wire insulation sizes in the Tyco 14-pin connector must conform to the manufacturer’s recommendations for insulation diameter range (or watertight seal integrity will be compromised). Relay User Manual Rev 1 19 Installation and Setup 2.3 Chapter 2 Connect the SMART6-L to the Relay Use the following procedure to connect the SMART6-L to the Relay. 1. Connect the SMART6-L to the Relay using the Ampseal connectors. Ensure the connection is fully seated (wait for click). Figure 5: Connect to Relay Pull up on tab to release connection 2. Slide the SMART6-L into the Relay, tucking the cable assembly into the Relay cavity. Figure 6: Align SMART6-L with Relay 3. Turn the Relay over so the bottom of the Relay is facing up. 4. Use four supplied M4 screws to screw up from the bottom of the Relay into the SMART6-L mounting holes. See Figure 7, SMART6-L Mounting Holes on page 21. Four appropriately sized M4 screws are included in the Relay box. Torque must not exceed 8 in. lbs. If replacement screws are used, the screws must be 18 mm (M4 X 18) or 20 mm (M4 x 20) long. Relay User Manual Rev 1 20 Installation and Setup Chapter 2 Figure 7: SMART6-L Mounting Holes SMART6-L Mounting Holes 2.4 Mount the Relay Mount the Relay on a secure, stable structure capable of safe operation in the specific environment. The Relay can be mounted using screws or magnets. Vehicle Mounting If installing on a vehicle, mount the Relay on the vehicle roof, ideally close to the pivot point of the vehicle. The Relay must be mounted with the 14-pin connector and antenna connector facing the rear of the vehicle (see Figure 8, Relay Orientation). Figure 8: Relay Orientation Route cable toward the back of vehicle Orient toward the front of vehicle The Relay must be rigidly secured to the vehicle to avoid errors caused by vibration and motion. Stationary Mounting If installing in a stationary location, mount the Relay in a location that has a clear view of the sky so that each satellite above the horizon can be tracked without obstruction. For more information, refer to NovAtel’s An Introduction to GNSS. Relay User Manual Rev 1 21 Installation and Setup 2.4.1 Chapter 2 Mount the Relay Using the Integrated Magnets The Relay has five rare earth magnets integrated into the bottom of the module. These magnets will securely attach the Relay to any magnetic surface. 2.4.2 To mount the Relay on a non-magnetic surface, mount the module using screws (see Section 2.4.2, Mount the Relay Using Screws on page 22) or use the optional mounting plate (see Section 2.4.3, Optional Mounting Plate on page 23). Mount the Relay Using Screws The Relay can be mounted using four M4 screws. See Figure 9, Relay Mounting Holes for the location of these holes. Screws can be used to mount the Relay directly to the roof of the vehicle or to the optional mounting plate (see Section 2.4.3, Optional Mounting Plate on page 23). The optimal screw penetration into the Relay mounting holes is 6 mm (±1 mm) deep. When selecting screws for mounting the Relay, make sure the screw penetration does not exceed this specification. Using excessively long screws can damage the Relay enclosure. Figure 9: Relay Mounting Holes 181.65 Mounting Holes 130 51.65 0.00 Relay User Manual Rev 1 163.50 33.50 0.00 130 Dimensions are in millimetres. 22 Installation and Setup 2.4.3 Chapter 2 Optional Mounting Plate An optional mounting plate is available to facilitate mounting the Relay. To install the mounting plate, use the mounting holes at each corner of the plate (see Figure 10, Relay Surface Mounting Plate (NovAtel Part #: 70023098). The mounting plate has two alignment pegs on the top of the plate. These alignment pegs match holes on the bottom of the Relay. If attaching the Relay using the integrated magnets, first attach the mounting plate to the vehicle and then attach the Relay to the plate using the magnets. If attaching the Relay using screws, use the screws to attach the Relay to the mounting plate before attaching the plate to the vehicle. When attaching the Relay to the mounting plate using screws, the screws must not exceed 8 mm in length. Using excessively long screws can damage the Relay enclosure. Torque must not exceed 8 in. lbs. Figure 10: Relay Surface Mounting Plate (NovAtel Part #: 70023098) Dimensions are in millimetres. Relay User Manual Rev 1 23 Installation and Setup 2.4.4 Chapter 2 Optional Pole Mounting Plate An optional pole mounting plate is available to facilitate mounting the Relay onto a mount such as a range pole, tribrach or tripod using a 5/8”” x 11 UNC thread. To install the pole mounting plate: 1. Remove two of the screws used to secure the SMART6-L to the Relay. See Figure 11, Screws to Remove for the Pole Mounting Plate. Figure 11: Screws to Remove for the Pole Mounting Plate Remove the screws from these locations If you plan to use screws as well as the integrated magnets to mount the Relay to the pole mounting plate, remove all four SMART6-L mounting screws. 2. Align the two holes from which the SMART6-L mounting screws were removed with the two alignment pegs on the top of the pole mounting plate. 3. Set the Relay on the pole mounting plate. The integrated magnets will securely hold the Relay to the pole mounting plate. If screws are being used to further secure the Relay, use two M4 x 24 mm screws to secure the SMART6-L and Relay to the pole mounting plate. See Figure 12, Relay Pole Mounting Plate (NovAtel Part #: 70023100) on page 25 for the location of the screw holes. When attaching the Relay to the pole mounting plate using screws, the screws must not exceed 24 mm in length. Using excessively long screws can damage the SMART6-L enclosure. Torque must not exceed 8 in. lbs. 4. Screw the pole mounting plate onto the 5/8” x 11 UNC thread mount. Relay User Manual Rev 1 24 Installation and Setup Chapter 2 Figure 12: Relay Pole Mounting Plate (NovAtel Part #: 70023100) 16.66 157.45 130.50 103.55 2X 10.00 Optional Mounting Holes 126.95 100.00 73.05 Dimensions are in millimetres. Relay User Manual Rev 1 25 Installation and Setup 2.5 Chapter 2 Connect the NovAtel Relay Interface Cable (01019382) All physical connections to the SMART6-L are made using the COM and Power port on the back of the Relay (see Figure 3, Relay Back Connectors on page 17). The pin-out for this connector is shown in Table 3, Relay Connector Pin-Out. Table 3: Relay Connector Pin-Out Pin Use Pin Use 1 COM1 Transmit Data 8 COM3 Transmit Data 2 COM1 Receive Data 9 Power Negative/Return 3 COM2 Transmit Data 10 Emulated Radar Outputa 4 COM2 Receive Data 11 MKI (Mark Input) 5 Signal Ground (COM/MKI/PPS/ER) 12 PPS (Pulse Per Second) Output 6 CAN+ 13 COM3 Receive Data 7 CAN- 14 Power Positive/Source a. Emulated Radar is available only on SMART6-L hardware versions 3.03 or greater. To determine the hardware version of the SMART6-L, refer to the label on the bottom of the SMART6-L. To access the power and communication signals, connect the 14-pin connector on the NovAtel Relay interface cable (NovAtel part #: 01019382) to the COM and Power port on the Relay. See Section A.2, NovAtel Relay Interface Cable (01019382) on page 61 for more information. Alternately, a custom interface cable can be used to access the power and communication signals. For information about making a custom interface cable, see Section A.2.1, Relay Connector and Cable Requirements on page 63. 2.6 Connect the Radio Antenna To receive cellular or UHF radio signals, the Relay must be connected to a radio antenna. To connect the radio antenna, the accessory cable may be used to connect the antenna directly to the Relay (refer to Connect an Enclosure Mounted Antenna on page 26) or a separate cable and antenna may be used (refer to Connect a Separately Mounted Antenna on page 28). 2.6.1 Connect an Enclosure Mounted Antenna To ensure the overall antenna system gain complies with the radio specific FCC requirements, the TNC Accessory Cable is only used when approved by a professional installer for use in combination with a designated antenna. Refer to Cellular Radios on page 10 for additional guidance. Mounting the antenna on the Relay enclosure is supported on Rover configurations only. Do not mount the antenna on a Relay that is acting as a base station. 1. Connect the TNC connector on the radio antenna cable to the Radio Antenna port ( Relay User Manual Rev 1 ) on the Relay. 26 Installation and Setup Chapter 2 2. Separate the NMO adapter from the NMO to TNC Adapter Cable (NovAtel part #: 01019372. Refer to A.3, Relay NMO to TNC Adapter Cable (01019372) on page 65 for details). Ensure the white gasket does not fall out. Separated NMO Adapter NMO to TNC Adapter Cable TNC Connector 3. Insert the NMO to TNC Adapter cable up and through the Relay radio mounting hole. Ensure the gold portion of the cable is between the two connector guides found under the antenna mounting hole on the Relay. Connector Guides 4. Re-secure the NMO adapter to the NMO to TNC Adapter cable from the top of the Relay. Ensure the white gasket is between the plate and the top of the Relay plastic. 5. Screw a radio antenna (NMO style mounting) to the radio adapter plate on the Relay. Hand tighten the radio antenna until it is securely attached to the top of the Relay. Do not over tighten the antenna, as over tightening could damage the Relay or the antenna. See Figure 13, Radio Antenna Installation and Mounting on page 27 and Figure 4, Simplified Relay Setup on page 19. Figure 13: Radio Antenna Installation and Mounting White Gasket Radio Antenna Mounting Hole NMO to TNC Adapter Cable Relay User Manual Rev 1 27 Installation and Setup 2.6.2 Chapter 2 Connect a Separately Mounted Antenna For base station installations, the radio antenna needs to be mounted separately from the Relay. To connect the antenna in this type of installation: 1. Obtain an antenna cable with a TNC connector on one end and the appropriate connector for the antenna on the other end. 2. Connect the TNC connector of the antenna cable to the Radio Antenna port on the Relay. 3. Connect the other end of the antenna cable to the antenna. 2.7 Separation Distance: Maximum permissible antenna gains and minimum permissible separation distances between antennas and all persons will vary by radio variant, and must be addressed on a radio specific basis to ensure compliance with FCC, IC and other applicable RF exposure compliance requirements. Professional installation is required. Devices must not be co-located or operating in conjunction with any other antenna of transmitter. Refer to Cellular Radios on page 10 for additional guidance. Connect Power Power is connected to the Relay through the COM and Power port on the back of the Relay. This power connection provides power to both the Relay and the SMART6-L. 2.7.1 Power Supply Requirements The Relay requires +9 to +36 VDC input power (refer to Relay Specifications on page 57 for additional power supply specifications). The power supply connected to the Relay must be capable of providing enough power for both the Relay and the SMART6-L. 2.7.2 The Relay power source must be protected by a 5 A Fast Blow Fuse or damage to wiring may result (not covered by warranty). Refer to Relay Connector and Cable Requirements on page 63). Connect Power to the Relay 1. Connect the positive pole of the power supply or battery (through a 5 A fuse) to pin 14 of the COM and Power port. If using the NovAtel Relay interface cable (01019382), connect (through a 5 A fuse) to the lead labeled BATT+. 2. Connect the negative pole of the power supply or battery to pin 9 of the COM and Power port. If using the NovAtel Relay interface cable (01019382), connect to the lead labeled the BATT-. 3. If using the NovAtel Relay interface cable (01019382), connect the ground lug on the interface cable to the vehicle ground system. 2.8 Connect the Data Communication Equipment To communicate with the receiver for sending commands and obtaining logs, a connection to data communications equipment is required. The COM and Power ports on the Relay provide access to three RS-232 serial communication ports. COM1 and COM2 are used to communicate with the SMART6-L. COM3 is a service port used only to update the Relay firmware. The default baud rate for the Relay service port is 115200. If using the NovAtel Relay interface cable (01019382), these three ports are available on three DB-9 connectors labeled COM1, COM2 and COM3. If using a custom interface cable, refer to Table 3, Relay Connector Pin-Out on page 26 for more information. Relay User Manual Rev 1 28 Installation and Setup 2.9 Chapter 2 Additional Features and Information This section contains information about the additional features of the Relay, which may affect the overall design of the receiver system. 2.9.1 Status Indicators LED indicators on the Relay provide the status of the receiver. The table below shows the meaning of the LEDs. Table 4: Relay LED Status Indicators with SMART6-L Icon LED Color State Description Green Position Valid Indicates a valid GNSS position solution is available Yellow Error The receiver is in the error state and tracking is disabled Possible cause: - a fatal error - an unusual receiver status indicator, setup to act like a fatal error Error status remains until the cause of the error is corrected and the receiver is reset Red 2.9.2 Power Power is on Mark Input (MKI) Strobe The MKI strobe is a 5 V logic tolerant input signal used for synchronization. When a pulse greater than 150 ns is detected on this input, the receiver will generate certain logs. See the OEM6 Family Firmware Reference Manual (OM-20000129) for more information. If using the NovAtel Relay interface cable (01019382), the Mark Input signal is available on the leads labeled MK1 and MK1 GND. If using a custom interface cable, the pin-out information can be found on Table 3, Relay Connector Pin-Out on page 26. 2.9.3 Pulse Per Second (PPS) Strobe The PPS output strobe is a time synchronization signal. This 3.3 V CMOS output strobe is a pulse where the leading edge is synchronized to receiver-calculated GNSS Time. See the OEM6 Family Firmware Reference Manual (OM-20000129) for more information. If using the NovAtel Relay interface cable (01019382), the PPS output signal is available on the leads labeled PPS and PPS GND. If using a custom interface cable, the pin-out information can be found on Table 3, Relay Connector Pin-Out on page 26. Relay User Manual Rev 1 29 Installation and Setup 2.9.4 Chapter 2 Emulated Radar The ER outputs a logic high of supply voltage minus 0.5 V minimum and logic low of 0.5 V maximum with a rise and fall time of less than 1 ms. Its output references signal GND and provides logic low output until its speed is greater than 1 km/Hr. ER can be configured to operate at one of six distinct frequencies (10.06, 16.32, 26.11, 28.12, 34.80 or 36.11 Hz/km/Hr, with 36.11 Hz/km/Hr being the default value) and with an effective range from 1 km/ Hr to 55 km/Hr for near-horizontal applications. See the SMART6-L User Manual (OM-20000146) for more information. 2.9.5 Emulated Radar is available only on SMART6-L hardware versions 3.03 or greater. To determine the hardware version of the SMART6-L, refer to the label on the bottom of the SMART6-L. Controller Area Network (CAN) The SMART6-L supports the following NMEA2000 Parameter Group Number (PGN) messages: • PGN 129029 GNSSPositionData (1 Hz) • PGN 129025 GNSSPositionRapidUpdate (10 Hz) • PGN 129026 COGandSOGRapidUpdate (10 Hz) If you are using the NovAtel Relay interface cable (01019382), the CAN signals are available on the leads labeled CAN+ and CAN-. If you are using a custom interface cable, the CAN signals are available on pin 6 and pin 7 of the COM and Power port (see Table 3, Relay Connector Pin-Out on page 26). The CAN must be activated by entering the SETCANNAME command (refer to the SMART6-L User Manual (OM-20000146) for more information). To have the CAN set up automatically at subsequent start ups, also send the SAVECONFIG command. Details for the PGN messages can be found in the NMEA2000 specification which can be purchased directly from the National Marine Electronics Association (www.nmea.org/). Relay User Manual Rev 1 30 Chapter 3 Operation Before operating the Relay for the first time, ensure the installation instructions in Chapter 2, Installation and Setup were followed. This chapter describes the operation of the Relay. It does not describe the operation of the SMART6-L that is connected to the Relay. For information about the operation of the SMART6-L, refer to the SMART6-L User Manual (OM-20000146) available from our website at www.novatel.com/support/info/documents/925. 3.1 Communications with the Relay Communication with the Relay typically consists of issuing commands or receiving logs through the communication ports from an external serial communications device. This could be either a terminal or computer connected directly to the COM1 or COM2 serial port, available on the COM and Power Port on the back of the Relay. The commands issued to COM1 or COM2 are passed to the SMART6-L where the commands are processed. The SMART6-L then performs the required action on either the receiver or the Relay. It is recommended that you become thoroughly familiar with the commands and logs detailed in the OEM6 Family Firmware Reference Manual (OM-20000129) to ensure maximum utilization of the receiver’s capabilities. 3.1.1 Serial Port Default Settings The receiver communicates with the computer or terminal via the COM1 and COM2 ports on the Relay. For communication to occur, both the Relay and the operator interface have to be configured properly. The Relay’s COM1 andCOM2 default port settings are as follows: - 9600 bps, no parity, 8 data bits, 1 stop bit, no handshaking, echo off Changing the default settings requires using the SERIALCONFIG command. See for the SMART6-L User Manual (OM-20000146) details. The data transfer rate chosen determines how fast information is transmitted. For example, outputting a log whose message byte count is 96. The default port settings allows 10 bits/byte (8 data bits + 1 stop bit + 1 framing bit). It therefore takes 960 bits per message. To get 10 messages per second, 9600 bps is required. Also remember that even if the bps is set to 9600, the actual data transfer rate is lower and depends on the number of satellites being tracked, data filters in use and idle time. It is suggested a margin is set when choosing a data rate (115200 is recommended for most applications). 3.1.2 Although the receiver can operate at data transfer rates as low as 300 bps, this is not desirable. For example, if several data logs are active (that is, a significant amount of information needs to be transmitted every second) but the bit rate is set too low, data will overflow the serial port buffers, causing a warning in the receiver status and loss of data. Communicating Using a Remote Terminal One method of communicating with the Relay is through a remote terminal. The Relay is pre-wired to allow proper RS-232 interface with the data terminal. To communicate with the terminal, the Relay only requires the RX, TX and GND lines to be used. Request to Send (RTS)/Clear to Send (CTS) hardware handshaking is not available. Ensure the terminal’s communications set up matches the receiver’s RS-232 protocol. 3.1.3 Communicating Using a Computer A computer can be set up to emulate a remote terminal as well as provide the added flexibility of creating multiple command batch files and data logging storage files. Any standard communications software package, that emulates a terminal, can be used to establish bidirectional communications with the Relay. For example, HyperTerminal or NovAtel’s Graphical User Interface (GUI) program NovAtel Connect™. All data is sent as raw 8-bit binary or ASCII characters. Relay User Manual Rev 1 31 Operation 3.2 Chapter 3 Enable the Radio Connection The Relay contains one of the following radio modules. • CDMA cellular radio • GSM HPSA cellular radio • 400 MHz radio • 900 MHz radio Use one of the following sections to configure the Relay radio. 3.2.1 CDMA Cellular Radio Activation and Configuration To activate a Relay on a CDMA cellular network, follow these steps: 1. Obtain a Verizon Wireless Account. To make activation easier, we recommend contacting the Data Activation Center at 1-866-966-8881 (toll-free in U.S.) or via e-mail [email protected] to set up an account or add service to an existing account. Alternatively, you can contact Verizon Wireless directly to set up an account. You may need to provide the following information: a. CDMA Mobile Equipment Identifier (MEID): Modem serial number from Relay product label b. Product Name: Relay-CDMA [Part Number: 01019344] c. Once the modem has been assigned a 10 digit wireless number and data plan, proceed to next step. 2. Ensure a cellular antenna is connected to the Relay, apply power and then establish a serial connection with your product, as outlined in Section 3.1, Communications with the Relay on page 31. 3. Log the following: LOG CELLULARSTATUS ONCHANGED to display the modem and cellular connection status LOG CELLULARACTIVATESTATUS ONCHANGED to display the activation status LOG CELLULARINFO ONCHANGED to display modem and network information 4. Issue the following commands: CELLULARCONFIG DATA ON to enable/disable data connectivity on the configured APN CELLULARCONFIG DATAROAM ON to enable/disable data connectivity when roaming CELLULARCONFIG POWER ON to enable the radio 5. Once the cellular status displays as “Full”, issue the following command: CELLULARACTIVATE VERIZON 6. Once the cellular status reports an IP Address, your product is ready to use. 7. Issue the SAVECONFIG command to save the configuration to Non-Volatile Memory (NVM). Cellular data consumption and service charges are dependent on the configuration of the SMART6-L and data logging rates. Refer to the OEM6 Family Firmware Reference Manual (OM-20000129) for log and command details. Relay User Manual Rev 1 32 Operation 3.2.2 Chapter 3 GSM/HSPA Cellular Radio Activation and Configuration To activate a Relay on a GSM/HSPA cellular network, follow these steps: 1. Contact your preferred GPRS/HSPA cellular service provider. For activations on the AT&T network in the U.S., we recommend contacting the Data Activation Center at 1-866-966-8881 (toll-free in U.S.) or via e-mail [email protected] to set up an account or add service to an existing account. 2. Obtain an active wireless account and SIM card providing GPRS/HSPA data services (recommended data plans for Network RTK are 5 GB/Month Rate Plans). You may need to provide the following information: a. Modem Serial Number (IMEI): Modem serial number from Relay product label b. Product Name: Relay-HSPA containing Telit HE-910 cellular module 3. Remove the SIM card cover from the Relay and install the SIM card (mini-SIM (25 mm x 15 mm) only). Once properly installed, secure the SIM cover to the modem using the appropriate screwdriver. Screws should be torqued to 4-6 inch-pound. See user manual for detailed instructions. Failure to properly secure the SIM cover will violate Relay IP67 ingress rating. Refer to the Relay User Manual (OM-20000161) for details. Figure 14: SIM Card Installation SIM 4. Ensure a cellular antenna is connected to the Relay, apply power and then establish a serial connection with your product, as outlined in the Relay User Manual (OM-20000161). 5. Log the following: LOG CELLULARSTATUS ONCHANGED to display the modem and cellular connection status LOG CELLULARINFO ONCHANGED to display modem and network information 6. Use the CELLULARCONFIG command to configure cellular parameters by issuing the following commands: CELLULARCONFIG APN <APN> to set Access Point Name (APN) (optional, obtain from your service provider) CELLULARCONFIG USERNAME <USERNAME> to set the user name (optional, obtain from your service provider) CELLULARCONFIG PASSWORD <PASSWORD> to set the APN password (optional, obtain from your service provider) CELLULARCONFIG DATA ON to enable/disable data connectivity on the configured APN CELLULARCONFIG DATAROAM ON to enable/disable data connectivity when roaming CELLULARCONFIG POWER ON to enable the radio 7. Once the cellular status reports an IP Address, your product is ready to use. Relay User Manual Rev 1 33 Operation Chapter 3 8. Issue the SAVECONFIG command to save the configuration to Non-Volatile Memory (NVM). Cellular data consumption and service charges are dependent on the configuration of the SMART6-L and data logging rates. Refer to the OEM6 Family Firmware Reference Manual (OM-20000129) for log and command details. How to Eject a SIM Card Issue the CELLULARCONFIG POWER OFF command to power down the cellular radio before removing a SIM card. To remove the SIM card, push it slightly in. It should then partially eject from the SIM card holder. The modem does not work if the SIM is in the partially ejected “ready for removal” position. Replace the SIM Card holder cover and ensure the cover is properly aligned and secured. Issue the CELLULARCONFIG POWER ON command to turn the cellular radio on. 3.2.3 400 MHz UHF Radio Configuration The 400 MHz UHF radio can also be configured using the Web User Interface. See Chapter 4, Operation—Web User Interface on page 36. Follow these steps to configure the Satel M3-TR3 400 MHz radio: 1. Enter M3TRMODE PROG to switch the radio into programming mode. See M3TRMODE on page 78 for more information. 2. Use the M3TRCONFIG command to configure the Satel M3-TR3 radio parameters. See Section B.9, M3TRCONFIG on page 76 for information about this command. 3. Enter M3TRMODE NORMAL to switch the radio into normal operating mode. 3.2.4 900 MHz UHF Radio Configuration The 900 MHz UHF radio can also be configured using the Web User Interface. See Chapter 4, Operation—Web User Interface on page 36. Follow these steps to configure the Freewave MM2-T 900 MHz radio: 1. Enter MM2TMODE PROG to switch the radio into programming mode. See MM2TMODE on page 82 for more information. 2. Use the MM2TCONFIG command to configure the Freewave MM2-T radio parameters. See MM2TCONFIG on page 79 for information about this command. 3. Enter MM2TMODE NORMAL to switch the radio into normal operating mode. Relay User Manual Rev 1 34 Operation 3.3 Chapter 3 NTRIP Configuration Network Transport of RTCM via Internet Protocol (NTRIP) is an application protocol used to stream GNSS differential correction data over the Internet. A SMART6-L using a Relay can be configured as an NTRIP client. For more information about NovAtel’s NTRIP, refer to our website at www.novatel.com/products/firmware-options/ntrip/. Figure 15: NTRIP System The NTRIP caster is an HTTP Internet service that acts as a communication medium between NTRIP servers and NTRIP clients. The NTRIP caster is provided by third party sources. For a full list of NTRIP casters, refer to the following link: www.rtcm-ntrip.org/home. The following procedure describes how to configure a NovAtel rover through a third party NTRIP caster. This configuration is recommended for optimal RTK performance. 1. Establish a connection to the receiver. 2. Use the following commands to enable the rover receiver as an NTRIP Client: NTRIPCONFIG NCOM1 CLIENT <protocol> <endpoint> <mountpoint> <username> <password> <bindInterface> If using a specific Network RTK system, certain National Marine Electronics Association (NMEA) strings are required to be sent from the rover back to the RTK network. For example, if connected to the VRS mount point, the rover is required to send its position to the network in a standard NMEA GGA message. This is achieved by issuing the following command: LOG NCOMx GPGGA ONTIME 5, until data is received by the caster. For more information about Network RTK options and properties, refer to the application note APN-041 Network RTK for OEMV Receivers found on our website at www.novatel.com/support/search/. The following is an NTRIP Client configuration example without the use of a Network RTK system: INTERFACEMODE NCOM1 RTCA NONE OFF RTKSOURCE AUTO ANY PSRDIFFSOURCE AUTO ANY LOG BESTPOS ONTIME 1 (optional) SAVECONFIG Relay User Manual Rev 1 35 Chapter 4 Operation—Web User Interface The Relay Web User Interface (Web UI) provides monitoring and configuration access to the Relay from a Wi-Fi enabled mobile device, such as a laptop, tablet or smartphone. Before accessing the Relay from the Web UI, the SMART6-L and Relay must be connected and powered on. See the installation instructions in Chapter 2, Installation and Setup on page 18. 4.1 The Web UI is available only on UHF radio models of the Relay. Other Relay models do not have the Wi-Fi AP functionality required for Web UI. Configuring the Wi-Fi Before using the Web UI, the Wi-Fi must be configured on the Relay and the mobile device. The following steps must be performed to set up the Wi-Fi: 1. Configure the Wi-Fi Access Point (AP) on the Relay. See Section 4.1.1, Wi-Fi Access Point Setup (UHF radio models only) on page 36. 2. Access the Relay Wi-Fi AP from the mobile device. See Section 4.1.2, Accessing the Relay Wi-Fi AP on page 37. 4.1.1 Wi-Fi Access Point Setup (UHF radio models only) The Wi-Fi radio, available on UHF radio Relay models only, acts as an AP that allows Wi-Fi enabled devices, such laptops, tablets and smartphones, to communicate with the Relay. With the Relay and SMART6-L connected, the Relay Wi-Fi AP can be configured. 1. Connect the Relay to a computer using a serial cable to the COM1 port (9600). 2. Open a terminal emulator program, for example Tera Term. 3. Turn power on. 4. At the [COM1] prompt, enter: EPERSONALITY B [return]. Refer to Section B.4, EPERSONALITY on page 71 for command details. 5. Reset the Relay. The Relay is now set up as a Wi-Fi network Access Point. By default, the Wi-Fi AP is enabled with the following settings: • IP address: 192.168.2.1 • Protocol: bgn • Authentication: WPA PSK • Encryption: AES_CCMP • SSID: Printed on a label attached to the Relay • Passphrase: Printed on a label attached to the Relay • DHCP: Enabled The SMART6-L antenna must be configured with the correct FW model otherwise the Relay base functionality does not work. Valid models include D2L-RPG-TTN-P and D2L-BPG-TTN-P. NTRIP is not supported over a Wi-Fi connection. Relay User Manual Rev 1 36 Operation—Web User Interface 4.1.2 Chapter 4 Accessing the Relay Wi-Fi AP This procedure must be done on the Wi-Fi enabled device before you can log in to the Web UI. This section provides a high level procedure for accessing the Relay Wi-Fi AP. The actual steps required will vary depending on the device being used and operating system installed on that device. For detailed steps, refer to the user documents that came with your device and operating system. 1. On the Wi-Fi enabled device, scan the available Wi-Fi networks and locate the RELAY_XXXX in the list of available networks (example: RELAY_PSN). 2. Select the Relay from the list. 3. When prompted, enter the Wi-Fi password. The default password is located on the label located on the back panel of the Relay. The device is now connected to the Relay Wi-Fi and can be used to log in to the Web UI. 4.2 Logging in to the Web UI Cookies should always be on and never blocked on the browser being used to connect to the Wi-Fi network. If SMART6-L or Relay firmware has recently been upgraded, clear the browser cache before logging into the WebUI 1. Open a web browser on the mobile device and enter http://192.168.2.1 in the address bar. The following screen appears: 2. The default user name is always admin and cannot be changed. 3. Click or tap on the password button and enter the Web UI password (the default password is password) and press the LOG IN button. The Web UI password can be changed (refer to Section 4.4.9, Change the Password on page 50 for details). After the application loading is complete, the main Web UI page appears. Relay User Manual Rev 1 37 Operation—Web User Interface 4.3 Chapter 4 Web UI Overview After logging in, the main page of the Web UI appears on the device. Page display is dependent on the mobile device, screen size and device orientation. Figure 16: Main Page Tools Icon Access the Tools page. See Tools Page on page 41. Function Bars The color of the Function Bar indicates the status of the function. Refer to Table 5, Function Bar Status on page 39. Tap the bar to view the status of the function. See Status Pages on page 39. Drag the bar to the right to access the configuration page for the function. See Configuration Pages on page 40. Up time Indicates the time the Relay has been operating since the last power up Logout Icon On devices with sufficiently wide screens, such as a laptop or a tablet held sideways, the main page displays the three function bars along the top of the page. In this layout, the main page also shows the status information for all three functions. Figure 17: Main Page—Wide Relay User Manual Rev 1 38 Operation—Web User Interface Chapter 4 Table 5: Function Bar Status Color Position GNSS Radio Base position configured Green The Position icon changes to indicate if Fixed Auto 4.3.1 Broadcasting corrections Corrections being transmitted Corrections message type set. Radio is off or the position has not been set. Corrections not being sent. Radio is off or is selected Yellow Surveying Red Corrections not No position. Position No corrections. GNSS configuration being sent. Radio is configuration required off required Status Pages To view the status of a function (e.g. Position), tap the Function Bar. Tap the function bar again to close the status page. Relay User Manual Rev 1 39 Operation—Web User Interface 4.3.2 Chapter 4 Configuration Pages To access the configuration options for a function (e.g. GNSS), pull the Function bar to the right. Use the back arrow Relay User Manual Rev 1 in the upper left corner to return to the Main Page. 40 Operation—Web User Interface 4.3.3 Chapter 4 Tools Page Click the Tools icon to open the User Preferences page. On the right side of the page, there are several tabs that provide access to other Web UI tools. Refer to Table 6, Tool Tab Definitions. Table 6: Tool Tab Definitions User Preferences Use the options on this page to select language, a light or dark display, units of measure and position format. Wi-Fi Use the options on this page to set the AP name or SSID, change the Wi-Fi password, change the Authentication Protocol Type, change the Encryption Protocol and enable or disable broadcasting the SSID. Device Info Displays information about the Relay and SMART6-L including serial numbers, receiver mode, version numbers and supported features (use for requesting model upgrades) Terminal Use this page to enter commands and view responses and logs. Password Use this page to change the Web UI password (the admin user name cannot be changed). For security reasons, NovAtel recommends changing the default password. Relay User Manual Rev 1 41 Operation—Web User Interface 4.4 Chapter 4 Configuring the Relay The Web UI can be used to perform several Relay configuration tasks. 4.4.1 All of the configuration tasks performed on the Web UI can also be performed through the command line interface. See Chapter 3, Operation on page 31 for configuration procedures and Appendix B, Commands on page 66 for descriptions of the commands available. Set the Base Station Position—Auto-Survey Before a base station can send differential corrections, the position of the base station must be determined. The Auto-Survey function uses GNSS position data reported by the SMART6-L to determine the position of the base station. If you know the exact position of the base station (e.g. from a survey marker), the base station position can be set using the Fixed tab. See Set the Base Station Position—Manually on page 43. 1. From the Web UI main page, pull the Position function bar to the right. The Position Configuration page appears. 2. From the Survey Time drop menu, select the maximum time allowed for the auto-survey to run. 3. From the Accuracy drop menu, select the accuracy level target. The auto-survey will stop when the specified level of accuracy is achieved. If you select Ignore, the auto-survey will ignore the accuracy level and run for the time specified in the Survey Time field. 4. Press the Start button. The auto-survey will run until the specified level of accuracy is achieved or the maximum survey time is exceeded. When complete, the Position function bar changes to green and the calculated position is displayed at the bottom of the page. Relay User Manual Rev 1 42 Operation—Web User Interface 4.4.2 Chapter 4 Set the Base Station Position—Manually If the exact position where the Relay is located is known, the base station position can be entered manually. When setting the base station position manually, any error in the position entered results in the same amount of error being added to the differential position provided. Make sure the position in which the Relay is placed is accurately surveyed or the Relay is placed precisely over a survey marker. 1. From the Web UI main page, pull the Position function bar to the right. The Position Configuration page appears. 2. Press the Fixed tab. The Fixed tab of the Position Configuration page appears. 3. In the Latitude, Longitude and Altitude fields, enter the exact position of the Relay. 4. In the Height Offset field, enter the distance from the antenna reference point to the ground. 5. Press the Save button. The Position function bar changes to green. Relay User Manual Rev 1 43 Operation—Web User Interface 4.4.3 Chapter 4 Set the Elevation Mask 1. From the Web UI main page, pull the GNSS function bar to the right. The GNSS Configuration page appears. 2. Enter the elevation masks for GPS satellites, GLONASS satellites and SBAS satellites in the appropriate elevation mask fields. 3. Press the Apply button to save the changes. Relay User Manual Rev 1 44 Operation—Web User Interface 4.4.4 Chapter 4 Enable/Disable SBAS Corrections 1. From the Web UI main page, pull the GNSS function bar to the right. The GNSS Configuration page appears. 2. Press the System Type drop menu and select the SBAS system the base station will use for corrections. 3. To enable SBAS corrections, slide the SBAS Control button to the right. The SBAS Control bar changes from white to green. To disable SBAS corrections, slide the SBAS Control button to the left. The SBAS Control bar changes from green to white. 4. Press the Apply button to save the changes. Relay User Manual Rev 1 45 Operation—Web User Interface 4.4.5 Chapter 4 Set the RTK Correction Message Type 1. From the Web UI main page, pull the GNSS function bar to the right. The GNSS Configuration page appears. 2. Press the Correction Type drop menu. A list of correction types appears. 3. Press the correction type to use on the base station. 4. Press the Apply button to save the changes. The GNSS function bar turns yellow indicating that it is ready to transmit corrections, but is still waiting for the Radio to be activated. The GNSS function bar will also be yellow if the base station position has not be set. When the GNSS function bar turns green, it is transmitting corrections. Relay User Manual Rev 1 46 Operation—Web User Interface 4.4.6 Chapter 4 Set the Radio Parameters—400MHz Radio Use this procedure to configure Relay models with the Satel M3-TR3 400 MHz UHF radio. 1. From the Web UI main page, pull the Radio function bar to the right. The Radio Configuration page appears. 2. Press Channel Spacing drop menu and select the channel spacing to be used by the radio. If the Channel Spacing, Frequency and TX Power drop menus are dimmed, you cannot change these values. This indicates that the radio settings have been pre-programmed and locked by your dealer or supplier. Contact your dealer, supplier or NovAtel for further information. 3. Press Frequency box and enter the frequency to use. The valid range is 403 to 473 MHz. 4. Press the TX Power drop menu and select the transmit power to be used by the radio. 5. To enable Forward Error Correction, slide the FEC button to the right. The FEC bar changes from white to green. To disable Forward Error Correction, slide the FEC button to the left. The FEC bar changes from green to white. 6. Press the Compatibility drop menu and select the compatibility mode used by the radio. 7. Press the Apply button to save the changes. After the radio configuration is complete, the radio needs to be enabled. See Enable or Disable the Radio on page 49. Relay User Manual Rev 1 47 Operation—Web User Interface 4.4.7 Chapter 4 Set the Radio Parameters—900MHz Radio Use this procedure to configure Relay models with the Freewave MMT-2 900 MHz UHF radio. 1. From the Web UI main page, pull the Radio function bar to the right. The Radio Configuration page appears. 2. Press the Tx Power drop menu and select the transmit power to be used by the radio. 3. Press the Tx Channel box and enter the transmit channel used by the radio. 4. Press the Apply button to save the changes. After the radio configuration is complete, the radio needs to be enabled. See Enable or Disable the Radio on page 49. Relay User Manual Rev 1 48 Operation—Web User Interface 4.4.8 Chapter 4 Enable or Disable the Radio 1. From the Web UI main page, pull the Radio function bar to the right. The Radio Configuration page appears. 2. To enable the radio, slide the Transmitter State button to the right. The Transmitter State bar changes from white to green. To disable the radio, slide the Transmitter State button to the left. The Transmitter State bar changes from green to white. 3. Press the Apply button to save the changes. Relay User Manual Rev 1 49 Operation—Web User Interface 4.4.9 Chapter 4 Change the Password For security reasons, NovAtel recommends changing the default Web UI password. Use the following steps to change the password. 1. Click the Tools icon and select the Password icon from the tool bar. 2. Enter the default or old password. 3. Enter the new password and confirm. 4. Press SAVE to confirm the password change. 5. Use the back arrow in the upper left corner to return to the main page. 4.4.10 Reset the Web UI Password If the Web UI password is lost, use the following procedure to reset the password: 1. Connect a terminal or a computer to the COM1 or COM2 serial port on the Relay. 2. Issue the following command: FRESET USER_ACCOUNTS The Web UI password is reset to the Product Serial Number (PSN) of the SMART6-L attached to the Relay (e.g. BFNxxxxxxx). To determine the SMART6-L PSN, issue the LOG VERSION command. See Section C.6, VERSION on page 98 for information about this log. After resetting the Web UI password, change the password using the procedure in Section 4.4.9, Change the Password on page 50. 4.5 Logging out On any Web UI page, press the log out icon Relay User Manual Rev 1 . 50 Chapter 5 Updating Relay Product Firmware The Relay product firmware can be updated using the WinLoad utility or the ESOFTLOAD command. To obtain the WinLoad utility, go to the Downloads section of www.novatel.com/support/search/. 5.1 Using the WinLoad Utility If opening WinLoad for the first time, ensure the file and communications settings are correct. Use COM3 on the Relay when updating using the WinLoad utility. 5.1.1 Open a File to Download Select File | Open. Navigate to the file to open (Figure 18). Figure 18: WinLoad Open Window When a file is selected, the filename appears in the main WinLoad display area and in the title bar (Figure 19). Figure 19: Open File in WinLoad 5.1.2 Communications Settings To set the communications port and baud rate, select Settings | COM Settings. WinLoad can use any available COM port on the PC. The Relay must use COM3. Choose the computer port to use from the Com Port drop down list and the baud rate from the Download Baudrate drop down list. Set the baud rate as high as possible (the default of 115200 is preferred if a higher baud rate is not available). Relay User Manual Rev 1 51 Updating Relay Product Firmware 5.1.3 Chapter 5 Downloading Firmware 1. Select the file to download according to Open a File to Download on Page 51. 2. Ensure the file path and name are displayed in main display area (see Figure 19, Open File in WinLoad on Page 51). 3. Click Write Flash to download the firmware. 4. When Searching for card appears in the main display, power cycle the Relay. 5. The Relay finishes the download and then resets. The process is complete when Done appears in the main display area. 6. Close WinLoad. 5.2 Updating Using ESoftLoad Commands The ESoftLoad process is made up of a set of commands and logs that are used to send new firmware data to the Relay and check the progress of the update. Use ESoftLoad if automated loading is desired or if a connection is only possible through COM1 or COM2. 5.2.1 ESoftLoad Commands and Logs Command Description ESOFTLOADRESET Initiate a new ESoftLoad process ESOFTLOADSREC Send an S-Record to the Relay for the ESoftLoad process ESOFTLOADDATA Send firmware image data to the Relay for the ESoftLoad process ESOFTLOADCOMMIT Complete the ESoftLoad process Log ESOFTLOADSTATUS Description Provides status updates for the ongoing ESoftLoad process Each command and log can be used in abbreviated ASCII, ASCII or binary format, with the exception of ESOFTLOADDATA, which should only be used in binary format. File Types Firmware data is stored in *.hex files as ASCII data in the form of S-Records, based on the Motorola SRecord format. 5.2.2 Working With S-Records Each S-Record has a header indicating the type of information contained in the record. Records beginning with S0, S5 and S7 contain metadata about the firmware image, such as version information and which card types are supported by the firmware image. Example S0 Record S0~V~OEM060400RN0000 Example S5 Records S50000 S503D9FE25 S5033158D5A Relay User Manual Rev 1 52 Updating Relay Product Firmware Chapter 5 Example S7 Records S70000 S70500000000FA Records beginning with S3 contain the actual firmware image data. Aside from the header, each pair of characters forms the ASCII representation of a binary byte. The format is as follows: S3 LL AAAAAAAA DDDDDDDD...DDDDDDDD CC Check Sum. Little Endian Data. These bytes are copied into the "data" field of the ESOFTLOADDATA command 4 - Byte Address. Set this as the value of "offset" in the ESOFTLOADDATA command Length. This is the hexadecimal number of character pairs to follow in the record. This value minus 4 bytes for the address and 1 byte for the check sum is copied into the "data length" field of the ESOFTLOADDATA command Header 5.2.3 Sending Firmware Data C++ source code is available to provide example code of processing S-Records and converting them to NovAtel format commands, as well as providing help with the ESoftLoad process. Contact NovAtel Customer Support and ask about the srec2esoftload utility. The ESOFTLOADSREC and ESOFTLOADDATA commands can be used to send firmware data from the *.hex file to the Relay. S0, S5 and S7 S-Records should be sent directly to the Relay using the ESOFTLOADSREC command, by enclosing the S-Record in quotation marks and issuing the command to the Relay, as follows: ESOFTLOADSREC "<S-RECORD>" The data from an S3 record can be parsed and packaged together with data from other S3 records into a binary ESOFTLOADDATA command. Packaging data parsed from multiple S3 records into a binary ESOFTLOADDATA command can result in improved firmware update times as each S3 record contains only a small number of bytes of firmware data. A single ESOFTLOADDATA command can package up to 492 bytes of firmware data from multiple S3 records, whereas a single ESOFTLOADSREC command contains a maximum of 28 bytes of firmware data from a single S3 record. Multiple S3 records can be packaged into a single ESOFTLOADDATA command as long as the data from one S3 record follows immediately after the previous record. That is, the address from the current S3 record must equal the address from the previous S3 record plus the data length of the previous S3 record. If the data is not consecutive then the ESOFTLOADDATA command can be sent with the amount of data it has packaged up to that point. Subsequent data can be packaged in a new ESOFTLOADDATA command. Within the ESOFTLOADDATA command, the "offset" field remains the address of the first S3 record and the "data" and "data length" are updated to include the new data. Relay User Manual Rev 1 53 Updating Relay Product Firmware Chapter 5 Example Packaging Multiple S3 Records In A ESOFTLOADDATA Command Start a new ESOFTLOADDATA command S32100407AD48FCA63034B80F5CE0C36507DE3D8DCC0C6C0C00515D74BCACF2F2949E1 Address: 0x00407AD4 Num Data Bytes: 0x21 – 0x01 – 0x04 = 0x1C S32100407AF04CCA4985F0F7B081E41D9B7D806C26989AE2D4E4CCBCB47C10FBFD3E43 Previous Address + Previous Num Bytes = 0x00407AD4 + 0x1C = 0x00407AF0 Address: 0x00407AF0 Num Data Bytes: 0x1C Add data to existing ESOFTLOADDATA command S30D00407B0CDE0400A6374D5BFFC5 Previous Address + Previous Num Bytes = 0x00407AF0 + 0x1C = 0x00407B0C Address: 0x00407B0C Num Data Bytes: 0x0D – 0x01 – 0x04 = 0x08 Add data to existing ESOFTLOADDATA command S3210000000007F0A7F1F4060000147B4000F49217813C7BB00014493F005C00000009 Previous Address + Previous Num Bytes = 0x00407B0C + 0x08 = 0x00407B14 Address: 0x00000000 Num Data Bytes: 0x1C Requires new ESOFTLOADDATA command because address does not match previous address + previous number of data bytes Send existing ESOFTLOADDATA command, and start a new ESOFTLOADDATA command S3210000001C80040000E001000030000000082B0100D8060000E4060000C806000063 Address: 0x0000001C Num Data Bytes: 0x1C Previous Address + Previous Num Bytes = 0x00000000 + 0x1C = 0x0000001C Add data to existing ESOFTLOADDATA command The ESOFTLOADDATA command must be sent as a NovAtel binary format command. 5.2.4 SoftLoad Update Method This section describes the sequence of commands that are issued to the Relay when updating using a *.hex file. The response for each command must be processed before sending the next command so as to determine if the command was accepted or rejected, and to wait for the Relay to complete the operation. Responses to ESoftLoad commands are guaranteed to be output from the Relay within a specific time, which varies by command. 1. Open a connection to any port on the Relay (COM1 or COM2) with the input and output INTERFACEMODE set to NOVATEL. 2. Request the ESOFTLOADSTATUS log using the following command: LOG ESOFTLOADSTATUSA ONCHANGED 3. Initialize ESoftLoad with a ESOFTLOADRESET command. 4. Open the *.hex firmware file. 5. Read each line of the *.hex firmware file. A. Send S0, S5 and S7 S-Records directly to the Relay using the ESOFTLOADSREC command. The S-Record must be enclosed in quotation marks: ESOFTLOADSREC "<S-RECORD>" B. S3 S-Records must be parsed and packaged into a ESOFTLOADDATA command. Relay User Manual Rev 1 54 Updating Relay Product Firmware Chapter 5 6. Send the ESOFTLOADCOMMIT command after all data from the *.hex file has been transferred to the Relay. The ESOFTLOADSTATUS log reports the status of the loading process. Wait for a ESOFTLOADSTATUS log to indicate the status is COMPLETE. The Relay will continue to retry until COMPLETE. 7. Reset the Relay using any of the following methods: A. Enter the RESET command B. Enter the FRESET command C. Power-cycle the Relay Once the Relay resets, the new version of firmware is active. The ESoftLoad process can be safely canceled at any time using the ESOFTLOADRESET command or by otherwise resetting the Relay. Once the COMPLETE status is reported by ESOFTLOADSTATUS, the firmware is running. Relay User Manual Rev 1 55 Updating Relay Product Firmware 5.2.5 Chapter 5 ESoftLoad Logs Each command and log can be used in abbreviated ASCII, ASCII or binary format. Log ESOFTLOADSTATUS 5.2.6 Description Provides status updates for the ongoing ESoftLoad process ESoftLoad Errors It is possible for errors to occur during the ESoftLoad update. All command responses should be checked to verify all issued commands were accepted. The ESoftLoad status must be monitored in the ESOFTLOADSTATUS log. Any status enum value greater than the ERROR status indicates an error has occurred during the ESoftLoad update. In the event of an error, the ESoftLoad update should be restarted by issuing a ESOFTLOADRESET command or normal operation can be restored by resetting the Relay. Relay User Manual Rev 1 56 Appendix A A.1 Technical Specifications Relay Specifications PHYSICAL Size 290 x 275 x 80 mm Weight 2 kg 5 x magnetic mounts Mounting 4 x M4 screw inserts Optional mounting plate ENVIRONMENTAL Operating Temperature Base Station Rover -30C to +60C -30C to +70C Storage Temperature -40C to +80C Humidity MIL-STD-810G, Method 507.5 Procedure 2 Immersion MIL-STD-810G, Method 512.5 Procedure 1 Salt Fog MIL-STD-810G, Method 509.5 Sand and Dust MIL-STD-810G, Method 510.5 Procedure 1 Solar Radiation MIL-STD-810G, Method 505.5 Procedure 1 & 2 Acidic Atmosphere MIL-STD-810G, Method 518.1 Vibration MIL-STD-810G, Method 514.6, Category 24 Shock MIL-STD-810G, Method 516.6 REGULATORY Compliance FCC, Industry Canada, CE Marking, E-mark POWER Input Voltage Range +9 to +36 V DC Maximum Power Consumption UHF 400 MHz radio UHF 900 MHz radio CDMA radio HSPA radio 10.5 W 8.5 W 7.5 W 5.5 W LED INDICATORS Power, Error and Position Valid Relay User Manual Rev 1 Refer to Section 2.9.1, Status Indicators on page 29 for details 57 INPUT/OUTPUT CONNECTORS 14-pin Tyco Ampseal For the cable pin-outs and drawings, see Section A.2, NovAtel Relay Interface Cable (01019382) on page 61 COM and Power Port Radio Antenna Connector CDMA, HSPA, 400 MHz radio TNC female jack, 50 Ω nominal 900 MHz radio SIM Card Slot Push-push 14-PIN AMPSEAL SIGNALS Power +9 to +36 V DC Serial Com Ports RS-232 F Compliant (receive and transmit signals only) CAN SAE J1939/ ISO 11783/ ISO 11898 Compatible Emulated Radar Output High = Supply Voltage -0.5 V Minimum Low = 0.5 V Maximum Load = 3K Ohm Minimum PPS Output 3.3 V CMOS Logic Compatible MKI Input 3.3 V CMOS Logic/5 V Tolerant INPUT/ OUTPUT CONNECTOR PROTECTION Electrical Conducted/ Coupled disturbance tolerance ISO 7637-2:2004 Functional Class A: Pulses 2a, 3a, 3b, 4 Functional Class C: Pulses 1, 2b INPUT/OUTPUT DATA INTERFACE COM1 (pass through from SMART6-L) Electrical format RS-232 Bit rates (bps) 2400, 4800, 9600 (default), 19200, 38400, 57600, 115200, 230400 or 460800 Signals supported TxD1, RxD1 Flow control XON/XOFF COM2 (pass through from SMART6-L) Electrical format RS-232 Bit rates (bps) 2400, 4800, 9600 (default), 19200, 38400, 57600, 115200, 230400 or 460800 Signals supported TxD2, RxD2 Flow control XON/XOFF COM3 is a radio service port and does not function as a standard NovAtel receiver COM port. The default baud rate for the radio service port is 115200. Relay User Manual Rev 1 58 Figure 20: Relay Dimensions Dimensions are in millimeters Relay User Manual Rev 1 59 A.1.1 Relay Radio Specification WI-FI RADIO (only on available UHF radio models in Base Station Configuration) Standards 802.11 b/g/n Frequency Band 2.4 GHz CDMA CELLULAR RADIO Frequency Band 800/1900 MHz Air Interface IS-95A/B and CDMA2000 Data Support 1xRTT / EVDO Sensitivity CDMA 1x: -108 dBm (typical) HSPA CELLULAR RADIO Frequency Band 850, 900, 1800, 1900, AWS 1700, 2100 Depending on frequency band(s) provided by the network operator. Use the most suitable antenna for the band(s). Bandwidth 70 MHz in GSM850, 80 MHz in GSM900, 170 MHz in DCS and 140 MHz PCS band VSWR Maximum <= 10:1 Recommended <= 2:1 Sensitivity -107 dBm (typical) Output Power Class 4 (2 W) @ 850/900 MHz Class 1 (1 W) @ 1800/1900 MHz 400 MHZ RADIO Frequency Band 403 to 473 MHz Transmit Power 1W Data Bandwidth 12.5 or 25 kHz Receive Sensitivity -113 dBm @ 25 kHz Compatibility Satelline 3AS, PacCrest (4FSK, GMSK and FST), TrimTalk 450s (P and T) 900 MHZ RADIO Frequency Band 902 to 928 MHz Transmit Power 1W Receive Sensitivity -108 dBm Compatibility Freewave MM2-T Relay User Manual Rev 1 60 A.2 NovAtel Relay Interface Cable (01019382) The NovAtel Relay interface cable (refer to Figure 21, NovAtel Relay Interface Cable (01019382)), provides a means of supplying power to the Relay (and SMART6-L) and accessing the communication signals from the Relay (and SMART6-L). The exposed wires (labeled BATT+ for positive and BATT- for negative) can be connected to a vehicular power circuit (or equivalent) protected by a 5 A fast blow fuse (user supplied). The cable has three DB-9 connectors to accommodate a computer serial (RS-232) communication port for configuring and monitoring the Relay and the SMART6-L. The serial ports COM1 and COM2 provide communication with the SMART6-L and COM3 provides communication with the Relay. In addition, there are a number of bare wires where the outer insulation is cut away but the wires beneath remain intact. See Table 7, NovAtel Relay Interface Cable Pin-Outs on page 62 for their pin-outs. For more information on mating connectors and part numbers, see Table 8, Relay Mating Connectors on page 63. This cable is RoHS compliant. Figure 21: NovAtel Relay Interface Cable (01019382) 3000 +100/-0 2000 +100/-0 25±5 50±10 10±5 J1 PIN 14 PIN 5 J2 PIN 10 PIN 1 PIN 6 J3 J4 PIN 1 PIN 6 Dimensions are in millimeters Relay User Manual Rev 1 PIN 5 PIN 9 61 Table 7: NovAtel Relay Interface Cable Pin-Outs J1 (14-pin) J2 (COM1) COM1 TXD 1 2 COM1 RXD 2 3 COM2 TXD 3 2 COM2 RXD 4 3 COM3 TXD 8 2 COM3 RXD 13 3 Signal Name COM1 GND J3 (COM2) Wire Bundle Label COM1 COM2 COM3 5 COM2 GND 5 COM3 GND 5 COM1 SHLD COM2 SHLD J4 (COM3) SHELL 5 COM3 SHLD SHELL SHELL Event Mark In (MKI) GND MKI GND Emulated Radar GND ER GND Pulse Per Second GND PPS GND CAN+ 6 CAN+ CAN- 7 CAN- Power Return (GND) 9 BATT- Emulated Radar Out 10 ER_OUT Event Mark In (MKI) 11 MKI Pulse Per Second Out 12 PPS Power Input 14 BATT+ Relay User Manual Rev 1 62 A.2.1 Relay Connector and Cable Requirements Custom cables for installing the Relay can be created using the following guidelines: • Minimum conductor size for all signal wiring is 0.8 mm/20 AWG • Minimum conductor size for power wiring is 1.25 mm/16 AWG • All wire insulation sizes in the Tyco 14-pin connector must conform to the manufacturer’s recommendations for insulation diameter range (or watertight seal integrity will be compromised) • Batt+ connection must be protected by 5 A fast blow fuse • Serial data signals (TxD, RxD, signal ground) must be run in shielded cable. Connect shield to Pin 5 at Relay end and to serial connector shell at the user end • CAN signal conductors must be twisted (40 twists/m, 12 twists/ft) • Use only the recommended mating connectors listed below. Use only gold plated pins Failure to observe the given cable construction guidelines and fusing requirements in this section may result in damage to the wiring or equipment and voiding the warranty. NovAtel recommends biasing unused inputs to their default states. The connector used in the Relay is an “AMPSEAL” dust and water sealed type produced by Tyco. The following part numbers pertain to the mating connector required to make connections to the Relay. These numbers are provided for information only and are not available from NovAtel as separate parts. Table 8: Relay Mating Connectors Product Part Description Company Part Number Relay mating connector (J1 - Figure 21, NovAtel Relay Interface Cable (01019382) on page 61) 14-pin sealed receptacle Tyco/AMP housing-black 776273-1 Gold plated pins (20-16 AWG) for (J1) Relay connector Gold plated pins for Relay connector/strip Pins, loose piece Tyco/AMP 770854-3 Pins, strip (reel) Tyco/AMP 770520-3 Tyco/AMP 770678-1 Seal Plug for unused pins on mating connector. (All connector positions must be populated with a pin or Seal plug seal plug to achieve the IP-67 rating for the cable connection.) Relay User Manual Rev 1 63 Table 9, Recommended Fuse and Fuse Holders details the part numbers for recommended fuses and fuse holders. These numbers are provided for information only and are not available from NovAtel as separate parts. Table 9: Recommended Fuse and Fuse Holders Fuse 12 V System Fuse (standard size blade) 12 V System Fuse (mini size blade) Recommended Fuse/Fuse Holder ATO Silver Blade Fuse 5 A (32 V) Littelfuse Or Equivalent Mini Blade Fuse 5 A (32 V) Littelfuse 0297005 Littelfuse 166.7000.450 Littelfuse FHAC0001 Littelfuse 0FHM0001 Or Equivalent 24 V System Fuse High Reliability, Harsh Environment (standard size blade) FKS ATO Blade Fuse 5A (80 V) In-line Fuse Holder, (for standard size blade) Waterproof ATO Fuse Holder Incline Fuse Holder, (for mini size blade) Waterproof Mini Fuse Holder Relay User Manual Rev 1 0287005 Or Equivalent Or Equivalent Or Equivalent 64 A.3 Relay NMO to TNC Adapter Cable (01019372) The Relay NMO to TNC Adapter cable (refer to Figure 22, Relay NMO to TNC Adapter Cable), connects the Relay to the external radio antenna. This cable is used when the radio antenna is mounted on the top of the Relay. This cable is RoHS compliant. Figure 22: Relay NMO to TNC Adapter Cable 150 ±10 P1 P2 Dimensions are in millimeters To avoid possible GNSS performance degradation, do not mount the antenna on the top of the Relay when the module is operated as a base station. To ensure the overall antenna system gain complies with the radio specific FCC requirements, the NMO to TNC Adapter Cable is only used when approved by a professional installer for use in combination with a designated antenna. Refer to Cellular Radios on page 10 for additional guidance. Relay User Manual Rev 1 65 Appendix B Commands The SMART6-L firmware implements the OEM6 family command set. The majority of these commands are documented in the OEM6 Family Firmware Reference Manual (OM-20000129), while SMART6-L specific commands are documented in the SMART6-L User Manual (OM-20000146). Commonly used Relay commands are summarized in Table 10, Relay Commands and documented in this appendix. Table 10: Relay Commands Command Message ID Description AUTOSURVEY 1795 Survey for accurate position See Section B.2, AUTOSURVEY on page 68. CELLULARACTIVATE 1817 Activates the cellular subscription on the cellular network. For information see Section B.3, CELLULARACTIVATE on page 70. CELLULARCONFIG 1683 Configures the cellular parameters. For information see the OEM6 Family Firmware Reference Manual (OM-2000129). EPERSONALITY 9021 Configures Relay as Base or Rover. For information see Section B.4, EPERSONALITY on page 71. ESOFTLOADCOMMIT 9025 Complete the SoftLoad process. For information see Section B.5, ESOFTLOADCOMMIT on page 72. ESOFTLOADDATA 9024 Uploads data for SoftLoad. For information see Section B.6, ESOFTLOADDATA on page 73. ESOFTLOADRESET 9022 Restarts the SoftLoad process. For information see Section B.7, ESOFTLOADRESET on page 74. ESOFTLOADSREC 9023 Sends S-Records to the Relay. For information see Section B.8, ESOFTLOADSREC on page 75. FRESET 20 Resets the receiver to factory default. For information see the SMART6-L User Manual (OM-20000146). M3TRCONFIG 9008 Configures the Satel M3 Radio For information see Section B.9, M3TRCONFIG on page 76. M3TRMODE 9016 Sets the Satel M3 radio mode. For information see Section B.10, M3TRMODE on page 78. MM2TCONFIG 9007 Configures the MM2-T radio. For information see Section B.11, MM2TCONFIG on page 79. MM2TMODE 9015 Sets the MM2-T radio mode. For information see Section B.12, MM2TMODE on page 82. RESET 18 Performs a hardware reset. For information see the OEM6 Family Firmware Reference Manual (OM-2000129). WIFIAPCONFIG 1665 Configures the Wi-Fi Access Point. For information see Section B.13, WIFIAPCONFIG on page 83. Relay User Manual Rev 1 66 Command Message ID Description WIFICONFIG 1617 Configures tunneling between Relay serial functions. For information see Section B.15, WIFICONFIG on page 86. WIFIAPCONTROL 9017 Controls the Wi-Fi Access Point (AP). For information see Section B.14, WIFIAPCONTROL on page 85. For a complete listing and description of the other commands that the SMART6-L, an OEM6 based receiver, is capable of processing, refer to the OEM6 Family Firmware Reference Manual (OM-20000129) and the SMART6-L User Manual (OM-20000146). B.1 SYNTAX CONVENTIONS The following rules apply when entering commands, at the command prompt, from a keyboard. 1. Courier font is used to illustrate program output or user input. 2. References to other commands, logs or any of their fields are shown in italics. 3. The commands are not case sensitive. For example, you could type either RESET or reset. 4. Except where noted, either a space or a comma can separate commands and their required entries. For example, you could type either fix position 51.11358042 -114.04358013 1059.4105 or fix,position,51.11358042,-114.04358013,1059.4105. 5. At the end of a command, a carriage return is required. For example, press <Enter> or <Return> on your keyboard. 6. Responses are provided to indicate whether or not an entered command was accepted. The format of the response depends on the format of the command. Refer to the OEM6 Family Firmware Reference Manual (OM-20000129) for more information. 7. Optional parameters are indicated by square brackets ( [ ] ). For commands that contain optional parameters, the value used if the optional parameter is not specified is given in the syntax table for the command. 8. Data format definitions, as specified in the “Format” field, are detailed in the OEM6 Family Firmware Reference Manual (OM-20000129). Note that all binary data is little-endian byte-ordered. Relay User Manual Rev 1 67 B.2 AUTOSURVEY Survey for accurate position The AUTOSURVEY command uses position averaging to automatically determine the position for a base station. When the AUTOSURVEY command is sent, the receiver starts position averaging. The position averaging continues until a specified accuracy level is met or until the specified survey time expires. When position averaging is complete, the calculated position is saved as the fix position for the base station. This calculated position is then used when transmitting differential corrections to the rover. Always send a SAVECONFIG command after the AUTOSURVEY command. This saves the fix position and ensures an AUTOSURVEY is run each time the receiver is powered on or reset. On subsequent power ups or resets, an AUTOSURVEY runs to determine if the base station has moved. As the AUTOSURVEY runs, the average position calculated is compared to the saved fix position. If the average position is within the AUTOSURVEY tolerance setting, the receiver assumes it has not moved and uses the previously saved fix position. If the average position is outside of the AUTOSURVEY tolerance setting, the receiver assumes it has moved and will continue calculating a position average until the accuracy level is met or until the specified survey time expires. Message ID: 1795 Abbreviated ASCII Syntax: AUTOSURVEY switch [time] [accuracy] [tolerance] Input Example: In the following example, the receiver is set up to survey its position for up to 24 hours or until the averaged position accuracy is 10 cm. On subsequent power ups at the same location, the survey will terminate as soon as the receiver determines the position is within 4 m of its surveyed position. Once the receiver has fixed its position, it will transmit RTCM V3 corrections over COM2. serialconfig com2 115200 n 8 1 n on interfacemode com2 none rtcmv3 off log com2 rtcm1004 ontime 1 log com2 rtcm1006 ontime 10 log com2 rtcm1019 ontime 120 autosurvey enable 1440 .1 4 saveconfig Field ASCII Value Field Type Binary Value Description Binary Format Binary Bytes Binary Offset - H 0 Enum 4 H 1 AUTOSURVEY header - This field contains the command name or the message header depending on whether the command is abbreviated ASCII, ASCII or binary, respectively. 2 control disable 0 Disables the self-survey feature and halts any self-survey related activity enable 1 Enables the self-survey feature Relay User Manual Rev 1 68 Field ASCII Value Field Type Binary Value Description Binary Format Binary Bytes Binary Offset 3 max time 10 - 6000 minutes Maximum amount of time to perform self-survey (default = 1440 minutes) Ulong 4 H+4 4 accuracy 0 - 100 metres Desired horizontal standard deviation (default = 0.1 metres) Float 4 H+8 5 tolerance 3 - 100 metres Maximum distance between calculated position and saved position. During the self-survey, if the distance between the calculated position and the previously surveyed position is less than this value, the previous position is used. (default = 4 metres) Float 4 H+12 6 reserved For future use. Ulong 4 H+16 Relay User Manual Rev 1 69 B.3 CELLULARACTIVATE Activate cellular subscription The CELLULARACTIVATE command activates the cellular subscription on the CDMA network. The CELLULARACTIVATE command needs to be sent once to activate the subscription. It may take a few minutes to complete activation. Consult the CELLULARACTIVATESTATUS log to review progress. This command is intended for use only on Relays equipped with a CDMA radio. Message ID: 1817 Abbreviated ASCII Syntax: CELLULARACTIVATE operator Input Example: cellularactivate verizon Field ASCII Value Field Type Binary Value - Description Binary Format Binary Bytes Binary Offset This field contains the command name or the message header depending on whether the command is abbreviated ASCII, ASCII or binary. - H 0 The operator or network on which the CDMA modem is activated. String 32 H 1 CELLULARACTIVATE header 2 operator 3 Reserved String 32 H+32 4 Reserved Int 4 H+64 See Table 11, Supported Operators Table 11: Supported Operators No 1 Relay User Manual Rev 1 Value Verizon 70 B.4 EPERSONALITY Configure Relay personality The EPERSONALITY command is used to configure the personality traits of the Relay. The Relay must be reset for the changes made by this command to take effect. Message ID: 9021 Abbreviated ASCII Syntax: EPERSONALITY [traits] Input Example: epersonality r Field ASCII Value Field Type 1 EPERSONALITY header 2 Traits Binary Value - See Table 12, Trait Values Binary Format Binary Bytes Binary Offset This field contains the command name or the message header depending on whether the command is abbreviated ASCII, ASCII or binary, respectively. - H 0 String identifying the configurable personality traits. Each character in the string represents one personality trait. The string is treated as a left-justified string. Characters that are not specified are treated as spaces. Spaces cause the corresponding trait to be set to the default value as listed below. Traits are not case sensitive. If no Traits parameter is specified, the Relay is configured as a Rover. String [32] variable H Description Table 12: Trait Values Index 0 Trait Name RTK Role Description Identifies the receiver as either a Base or Rover. r or R = Rover (default) b or B = Base A Relay equipped with a cellular modem cannot be configured as a base. 1-31 Relay User Manual Rev 1 Reserved for future use. 71 B.5 ESOFTLOADCOMMIT Complete the SoftLoad process The ESOFTLOADCOMMIT command completes the SoftLoad process by verifying the downloaded image and activating it. This command can only be sent to the receiver when the ESOFTLOADSTATUS log reports READY_FOR_DATA. After issuing the ESOFTLOADCOMMIT command, the user must wait for the OK or ERROR command response before proceeding. This response is guaranteed to be output from the receiver within 300 seconds from the time the command was received by the receiver. If an error response is returned, consult the ESOFTLOADSTATUS log on page 90 for more detail. Message ID: 9025 Abbreviated ASCII Syntax: ESOFTLOADCOMMIT Input Example: esoftloadcommit Field Field Type ASCII Value Binary Value Description 1 ESOFTLOADCOMMIT header - This field contains the command name or the message header depending on whether the command is abbreviated ASCII, ASCII or binary, respectively 2 Reserved 1 Reserved. Set to 1 in the binary case. Relay User Manual Rev 1 - Binary Binary Binary Format Bytes Offset - H 0 Enum 4 H 72 B.6 ESOFTLOADDATA Uploads data for SoftLoad The ESOFTLOADDATA command is only valid in binary mode. This command is used to upload data to the Relay for the SoftLoad process. After each ESOFTLOADDATA command, the user must wait for the OK or ERROR command response before proceeding. This response is guaranteed to be output within 15 seconds from the time the command was received. If an error response is returned, consult the ESOFTLOADSTATUS log on page 90 for more detail. This command can only be sent to the receiver once the ESOFTLOADSREC command is sent with the content of the S0 records from the start of a firmware *.hex file. In these cases, the ESOFTLOADSTATUS log reports READY_FOR_SETUP or READY_FOR_DATA. Message ID: 9024 Abbreviated ASCII Syntax: N/A Input Example: N/A Field Field Type Binary Value Description 1 ESOFTLOADDATA header NovAtel binary message header. 2 offset - 3 data length 4 data Relay User Manual Rev 1 Binary Binary Binary Format Bytes Offset - H 0 Offset of the data within the downloaded image. Ulong 4 H - Number of bytes of data. This must match the number of bytes contained within the "data" field. Ulong 4 H+4 - Incoming data up to a maximum of 4096 bytes. Ulong 492 H+8 73 B.7 ESOFTLOADRESET Restarts SoftLoad process The ESOFTLOADRESET command restarts the SoftLoad process. The command does not affect the flash and does not reset the receiver. The ESOFTLOADRESET command can be issued at any time. If it is issued while a SoftLoad process is currently in progress then that process is terminated and a new one is started. After the ESOFTLOADRESET command is processed, the ESOFTLOADSTATUS log will report a status of READY_FOR_SETUP. After issuing the ESOFTLOADRESET command, the user must wait for the OK or ERROR command response before proceeding. This response is guaranteed to be output from the receiver within 300 seconds from the time the command was received by the receiver. If an error response is returned, consult the ESOFTLOADSTATUS log on page 90 for more detail. Message ID: 9022 Abbreviated ASCII Syntax: ESOFTLOADRESET Input Example: esoftloadreset Field ASCII Value Field Type Binary Value Description 1 ESOFTLOADRESET header - This field contains the command name or the message header depending on whether the command is abbreviated ASCII, ASCII or binary, respectively. 2 Reserved 1 Reserved. Set to 1 in the binary case. Relay User Manual Rev 1 - Binary Binary Binary Format Bytes Offset - H 0 Enum 4 H 74 B.8 ESOFTLOADSREC Sends S-Records to the Relay The ESOFTLOADSREC command is used to send S-Records to the Relay. After each ESOFTLOADSREC command, the user must wait for the OK or ERROR command response before proceeding. This response is guaranteed to be output from the receiver within 15 seconds from the time the command was received by the receiver. If an error response is returned, consult the ESOFTLOADSTATUS log on page 90 for more detail. This command can only be sent to the receiver when the ESOFTLOADSTATUS log reports READY_FOR_SETUP or READY_FOR_DATA. Message ID: 9023 Abbreviated ASCII Syntax: ESOFTLOADSREC s-record Input Example: esoftloadsrec s30900283c10faa9f000ef ASCII Value Field Field Type 1 ESOFTLOADSREC header - 2 SREC - 3 Reserved - a. Binary Value - 1 Binary Format Binary Bytes Binary Offset - H 0 ASCII S-Record string copied from firmware *.hex. String [515] variablea H Reserved. Set to 1 in the binary case. Ulong 4 variable Description This field contains the command name or the message header depending on whether the command is abbreviated ASCII, ASCII or binary, respectively. In the binary case, each string field needs to be NULL terminated and additional bytes of padding added to maintain 4-byte alignment, up to the maximum defined by the string size. The next defined field starts immediately at the next 4-byte alignment following the NULL. Relay User Manual Rev 1 75 B.9 M3TRCONFIG Configures the Satel M3-TR3 radio The M3TRCONFIG command is used to configure the Satel M3-TR3 radio. Before using this command to set the radio parameters, the radio must be set to programming mode using the M3TRMODE command. See M3TRMODE on page 78. Refer to the Satel radio documentation for information about the correct operation of the radio. The settings in this command are stored directly on the radio and are not saved using the SAVECONFIG command. Use the m3trconfig save command to save the settings made using this command. Adjustments to radio settings which may affect regulatory compliance and personal safety must be made only by qualified professional installers. Critical settings include transmit frequencies, transmit power levels, frequency zones and hop table parameters. Refer to the specific radios in the Cellular Radios on page 10 and UHF Radios on page 11 in the Notices chapter on page 7 as well as the radio manuals for additional information. Message ID: 9008 Abbreviated ASCII Syntax: M3TRCONFIG name value Input Example: m3trmode prog m3trconfig freqrx 438.000 m3trconfig spacing 12.5 m3trconfig save m3trmode normal Field Field Type ASCII Value Binary Value Description Binary Format Binary Bytes Binary Offset This field contains the command name or the message header depending on whether the command is abbreviated ASCII, ASCII or binary. - H 0 1 M3TRCONFIG header 2 name See Table 13, M3TRCONFIG The name of the radio Parameters on page 77 setting to modify. String[32] variable 3 value See Table 13, M3TRCONFIG The value to assign to the Parameters on page 77 setting. String[32] variable variable Relay User Manual Rev 1 - Enters programming state Sets the receiving frequency to 438.000 MHz Sets the channel spacing to 12.5 kHz Saves the current settings Enters normal operating state H 76 Table 13: M3TRCONFIG Parameters Name Description Values compat Compatibility mode See Table 14, Compatibility Mode freqtx Transmit frequency, MHz Range (403-473) Factory restore value: 438.000 freqrx Receive frequency, MHz Range (403-473) Factory restore value: 438.000 spacing Channel spacing, kHz 1250 or 2500 Factory restore value: 1250 txpwr Maximum transmit power, mW 100, 200, 500, 1000 Factory restore value: 1000 fec Forward error correction 0 (OFF) or 1 (ON) Factory restore value: 0 err_check Error check See Table 15, Error Check Mode Factory restore value: OFF save Save current settings as permanent settings N/A restorefactory Restore settings to their factory set values N/A Table 14: Compatibility Mode Value Mode 0 Satelline-3AS 1 PacCrest-4FSK 2 PacCrest-GMSK 3 Trimtalk450s(P) 4 Trimtalk450s(T) 5 PacCrest-FST Table 15: Error Check Mode Value Relay User Manual Rev 1 Mode 0 OFF 1 CRC8Partial 2 CRC8Full 3 CRC16Full 77 B.10 M3TRMODE Sets the Satel M3-TR3 radio mode The M3TRMODE command sets the Satel M3-TR3 radio mode. The radio mode determines how the radio interacts with the receiver. The radio must be placed into programming mode to change the settings using the M3TRCONFIG command. The M3TRMODE setting is saved using the SAVECONFIG command and reset using the FRESET command. Message ID: 9016 Abbreviated ASCII Syntax: M3TRMODE mode Input Example: m3trmode prog m3trmode normal Field ASCII Value Field Type 1 M3TRMODE header 2 mode Binary Value - Enters programming state Leaves programming state; enables normal operation Description Binary Format Binary Bytes Binary Offset - H 0 This field contains the command name or the message header depending on whether the command is abbreviated ASCII, ASCII or binary. See Table 16, Satel M3-TR3 Modes The mode to which the M3-TR3 radio String[32] variable will be set. H Table 16: Satel M3-TR3 Modes Mode Relay User Manual Rev 1 Description off Power off the radio. The radio is disconnected from the receiver prog Set the radio to programming mode. The radio is disconnected from the receiver. normal The radio is enabled and connected to the receiver. 78 B.11 MM2TCONFIG Configure the Freewave MM2-T radio The MM2TCONFIG command is used to configure the Freewave MM2-T radio. Before using this command to set the radio parameters, the radio must be set to programming mode using the MM2TMODE command. See MM2TMODE on page 82. Refer to the Freewave radio documentation for information about the correct operation of the radio. The settings in this command are stored directly on the radio and are not saved using the SAVECONFIG command. To ensure the overall antenna system gain complies with the radio specific FCC requirements, the TNC Accessory Cable is only used when approved by a professional installer for use in combination with a designated antenna. Refer to Cellular Radios on page 10 for additional guidance. Message ID: 9007 Abbreviated ASCII Syntax: MM2TCONFIG name value Input Example: mm2tmode prog mm2tconfig freq 1 mm2tconfig nid 0001 mm2tmode normal Field Field Type ASCII Value Enters programming state Sets the frequency key to 1 Sets the network ID to 1 Enters normal operating state Binary Value This field contains the command name or the message header depending on whether the command is abbreviated ASCII, ASCII or binary. Binary Format Binary Bytes Binary Offset - H 0 1 MM2TCONFIG header 2 name See Table 17, MM2TCONFIG The name of the radio Parameters on page 80 setting to modify. String[32] variable 3 value See Table 17, MM2TCONFIG The value to assign to the Parameters on page 80 setting. String[32] variable variable Relay User Manual Rev 1 - Description H 79 Table 17: MM2TCONFIG Parameters Name channel Description Virtual channel Values 1 - 3824 The virtual channel is translated to a 'Frequency Key' and 'Network Id' using a proprietary formula. Use of this parameter is mutually exclusive with the 'freq' and 'nid' parameters. Do not set the 'freq' and 'nid' parameters when the Virtual channel parameter is used. freq Frequency key 0 to 9 and A to E The hex values A to E must be entered in upper case. Specifying this parameter overrides any settings made using the Virtual channel command. See the Freewave MM2-T user documentation. hoptablever Hop table version See the Multipoint Parameters section of the Freewave MM2-T user documentation. hoptablesize Hop table size See the Multipoint Parameters section of the Freewave MM2-T user documentation. freqzone Frequency zone See the Multipoint Parameters section of the Freewave MM2-T user documentation. The value is a 16-digit sequence, where the position of each digit represents the index of the zone. E.g. "0000111111111111": Zones 0 - 3 are disabled, Zones 4-15 are enabled. nid Network ID 0001 to 0255 See the Multipoint Parameters section of the Freewave MM2-T user documentation. Must be provided as a 4-digit entry (for example, 0021) Specifying this parameter overrides any settings made using the Virtual channel command. snid Sub network ID See the Multipoint Parameters section of the Freewave MM2-T user documentation. The format is "RT", where: R = receive subnet ID, T = transmit subnet ID. The only values supported on the Relay: "00": Rx = 0, Tx= 0 ("Roaming") "ff": Rx = f, Tx = f ("Disabled") txpwr Transmit power See Table 18, Transmit Power on page 81 mmode Modem mode See the Operational Mode or Modem Mode sections of the Freewave MM2-T user documentation. radioid Radio ID See the Multipoint Parameters section of the Freewave MM2-T user documentation. The maximum value accepted by the radio is 4095. radioname Radio name See the Multipoint Parameters section of the Freewave MM2-T user documentation. minpkt Minimum packet size See the Radio Transmission Characteristics section of the Freewave MM2-T user documentation. maxpkt Maximum packet size See the Radio Transmission Characteristics section of the Freewave MM2-T user documentation. rfdatarate RF data rate See the Radio Transmission Characteristics section of the Freewave MM2-T user documentation. Relay User Manual Rev 1 80 Table 18: Transmit Power Value Relay User Manual Rev 1 Level, mW 0 5 1 10 2 35 3 80 4 140 5 230 6 330 7 480 8 600 9 800 10 1000 255 Reserved 81 B.12 MM2TMODE Sets the Freewave MM2-T radio mode The MM2TMODE command sets the Freewave MM2-T radio mode. The radio mode determines how the radio interacts with the receiver. The radio must be placed into programming mode to change the settings using the MM2TCONFIG command. The MM2TMODE setting is saved using the SAVECONFIG command and reset using the FRESET command. Message ID: 9015 Abbreviated ASCII Syntax: MM2TMODE mode Input Example: mm2tmode prog mm2tmode normal Field ASCII Value Field Type 1 MM2TMODE header 2 mode Binary Value - See Table 19, MM2-T Modes Description This field contains the command name or the message header depending on whether the command is abbreviated ASCII, ASCII or binary. Binary Format Binary Bytes Binary Offset - H 0 The mode to which the MM2-T radio is set. String[32] variable Default: off H Table 19: MM2-T Modes Mode Relay User Manual Rev 1 Description off Power off the radio. The radio is disconnected from the receiver. prog Set the radio to programming mode. The radio is disconnected from the receiver. normal The radio is enabled and connected to the receiver. 82 B.13 WIFIAPCONFIG Wi-Fi Access Point (AP) Configuration This command configures the Wi-Fi Access Points (AP), which are used when the Wi-Fi radio is configured for use as an AP. Up to four APs can be configured and saved using the SAVECONFIG command. There is no default configuration data after a factory reset. The network parameters for an AP must always be statically set. The DHCPCONFIG command cannot be used to set network parameters for an AP. In order for Wi-Fi changes to take effect, issue the WIFIAPCONTROL POWERCYCLE command to restart the access point. Message ID: 1665 Abbreviated ASCII Syntax: WIFIAPCONFIG <WifiApId> <WifiApConfiguration> <value> ASCII Example: wifiapconfig 1 ssid "myssid" Field This command must be entered in ASCII or Abbreviated ASCII. Field Type ASCII Value Binary Value 1 WIFIAPCONFIG header - - 2 Wifiapid See Table 20, WifiApId Description Binary Format Binary Bytes Offset Command header H 0 Enum 4 H 3 Wifiapconfiguration Table 21, WIFIAPConfiguration Configuration parameter Enum on page 84 for the network 4 H+4 4 Value 65 H+8 The ID of AP configuration Table 21, WIFIAPConfiguration Configuration parameter String on page 84 value Table 20: WifiApId No Relay User Manual Rev 1 WiFiAPId String Description 1 WIFIAPID_1 1 AP 1 2 WIFIAPID_2 2 AP 2 3 WIFIAPID_3 3 AP 3 4 WIFIAPID_4 4 AP 4 83 Table 21: WIFIAPConfiguration No WiFiApConfiguration String Description 1 WIFIAPCFG_SSID SSID Wi-Fi SSID 2 WIFIAPCFG_IS_HIDDEN ISHidden TRUE when the SSID is not broadcast 3 WIFIAPCFG_CHANNEL Channel 802.11 Channel ID to use Valid range: 1 to 14 4 WIFIAPCFG_BEACON_INTERVAL BeaconInterval Beacon interval (milliseconds) 5 WIFIAPCFG_AUTHENTICATION Authentication Authentication type: WPA2_PSK 6 WIFIAPCFG_ENCRYPTION Encryption Encryption protocol: AES_CCMP 7 WIFIAPCFG_PASSPHRASE Passphrase WPA/WPA2 passphrase (63 ASCII characters), or Hex key (32 bytes - 64 ASCII characters) 8 Reserved 9 Reserved 10 WIFIAPCFG_PROTOCOL Protocol 802.11 standard: bgn Relay User Manual Rev 1 84 B.14 WIFIAPCONTROL Controls the Wi-Fi Access Point (AP) Use the WIFILAPCONTROL command to power restart the Relay Wi-Fi AP. The WIFIAPCONTROL command cannot be saved with SAVECONFIG command. Message ID: 9017 Abbreviated ASCII Syntax: WIFIAPCONTROL cmd ASCII Example: wifiapcontrol powercycle Field ASCII Value Field Type 1 WIFIAPCONTROL header 2 cmd Relay User Manual Rev 1 Binary Value - powercycle Description Command header Binary Format Binary Bytes Offset - The Relay supports a single command, String POWERCYCLE, that restarts the Wi-Fi AP. H 0 32 H 85 B.15 WIFICONFIG Configure the Wi-Fi radio power and operating mode Use this command to configure the power and operating mode of the Wi-Fi radio. On the Relay, the Wi-Fi radio only operates in Access Point (AP) mode. The AP settings are configured using the WIFIAPCONFIG command. The command can be saved using the SAVECONFIG command. For Relay models containing UHF radios, the default sets the Wi-Fi radio to AP mode enabled. Disabling Wi-Fi will result in a loss of access to the Web User Interface. Message ID: 1617 Abbreviated ASCII Syntax: WIFICONFIG wificonfiguration parameter 1 [parameter 2] Factory Default: wificonfig mode ap wificonfig state enabled ASCII Examples: Field wificonfig mode ap Configures the receiver as an AP with the default profile (1) wificonfig mode ap 2 Configures the receiver as an AP with AP profile 2 wificonfig state enabled Enables Wi-Fi as an AP (since the mode is set to AP) wificonfig state off Completely powers off 802.11 chip Field Type Description 1 WIFICONFIG header Command header. 2 WifiConfiguration Configuration item, refer to Table 22, Wi-Fi Configuration on page 87 3 Value1 4 Value 2 Relay User Manual Rev 1 Binary Binary Binary Format Bytes Offset - H 0 Enum 4 H Parameter 1 value, refer to Table 23, Parameter 1 Values (ASCII only) on page 87 - - - Parameter 2 value, refer to Table 24, Parameter 2 Values (ASCII only) on page 87 - - - 86 Table 22: Wi-Fi Configuration Value Enumeration String Description 1 WIFICFG_MODE MODE Set the operating mode of the Wi-Fi Radio 2 WIFICFG_STATE STATE Set the state of the AP. Refer to Table 23, Parameter 1 Values (ASCII only). "ENABLED" "OFF": 802.11 hardware powered off Table 23: Parameter 1 Values (ASCII only) Parameter 1 String Applicability Description AP MODE Wi-Fi as 802.11 Infrastructure Access Point ENABLED STATE MODE is enabled, RF active OFF STATE MODE is disabled, RF inactive, 802.11 HW powered off Table 24: Parameter 2 Values (ASCII only) Parameter 2 String 1, 2, ...4 Applicability WIFICONG MODE AP Description Selects Access Points Profile (see WIFIAPCONFIG command) to be activated using STATE Examples: No Command Description 1 WIFICONFIG STATE ENABLED Enable the AP 2 WIFICONFIG MODE AP Configure enclosure as AP, default profile (1) AP is disabled. 3 WIFICONFIG MODE AP 2 Configures active AP profile 2. AP restart is required. 4 WIFICONFIG STATE OFF Completely powers off 802.11 chip. This results in a complete reset of 802.11 firmware when it is powered on next time. Relay User Manual Rev 1 87 Appendix C Logs The SMART6-L firmware generates the OEM6 Family log set. The majority of the OEM6 Family logs are documented in the OEM6 Family Firmware Reference Manual (OM-20000129), while SMART6-L specific commands are documented in the SMART6-L User Manual. This appendix describes the Relay specific logs. Commonly used Relay logs are summarized in Table 25, Relay Logs. Table 25: Relay Logs Log Message ID cellularactivatestatus 1818 Description CDMA activation status/progress message For information see Section C.1, CELLULARACTIVATESTATUS on page 89. cellularinfo 1686 Cellular modem and network information For information see the OEM6 Family Firmware Reference Manual (OM-2000129). cellularstatus 1685 Cellular modem and network status information For information see the OEM6 Family Firmware Reference Manual (OM-2000129). esoftloadstatus 9027 Status of the SoftLoad process For more information see Section C.2, ESOFTLOADSTATUS on page 90. m3trinfo 9012 Satel M3 radio configuration information For information see Section C.3, M3TRINFO on page 92. mm2tinfo 9011 Freewave MM2-T radio configuration information For information see Section C.4, MM2TINFO on page 94. ntripstatus 1820 NTRIP diagnostic information For information see Section C.5, NTRIPSTATUS on page 96. version 37 Hardware and software versions and serial numbers For information see Section C.6, VERSION on page 98. wifiapstatus 1666 Wi-Fi AP status For information see the OEM6 Family Firmware Reference Manual (OM-2000129). Relay User Manual Rev 1 88 C.1 CELLULARACTIVATESTATUS CDMA activation status/progress message The CELLULARACTIVATESTATUS log reports the CDMA activation status and progress message. The content of the messages in this log are specific the CDMA network operator. Message ID: 1818 Log Type: Async Recommended Input: log cellularactivatestatus onchanged ASCII Example: #cellularactivatestatusa,com2,0,71.0,finesteering,1810,503258.355, 00440000,1518,32768;"begin","",""*a15fdef2 #cellularactivatestatusa,com2,0,76.5,finesteering,1810,503258.604, 00040000,1518,32768;"start otasp","",""*a45040a2 #cellularactivatestatusa,com2,0,73.0,finesteering,1810,503272.396, 00040000,1518,32768;"start otasp commit","",""*1f4a9b58 #cellularactivatestatusa,com2,0,75.5,finesteering,1810,503272.635, 00040000,1518,32768;"end otasp","",""*8ec1054c Field Field type 1 CELLULARACTIVATE STATUS header 2 status Data Description Log header Format Binary Bytes Binary Offset - H 0 String[64] variable H String[128] variable variable String[64] variable variable Activation status The status can be reported using a #OTASP: <n> message. Error message (optional) The error can be any diagnostic message available from the modem (for example, AT+CEER contents) 3 error 4 reserved The sequence and interpretation of parameters is operator specific. Translation could be done per AT command spec for a particular operator. For example: 0 → "Origination" 1 → "Start Commit" 2 → "End Commit" 3 → "Failed" Relay User Manual Rev 1 89 C.2 ESOFTLOADSTATUS Describes the status of the SoftLoad process This log describes the status of the SoftLoad process. Message ID: 9027 Log Type: Async Recommended Input: log esoftloadstatusa onchanged ASCII Example: #esoftloadstatusa,com1,0,97.5,unknown,0,0.113,004c0001,2d64,10481; not_started*827fdc04 Field Field type Data Description Binary Bytes Binary Offset - H 0 Format 1 ESOFTLOADSTATUS Log header. header 2 status Status of the SoftLoad process. See Table 26, SoftLoad Statuses. Enum 4 H 3 xxxx 32-bit CRC (ASCII and binary only). Ulong 4 - 4 [CR][LF] Sentence terminator (ASCII only). - - - Table 26: SoftLoad Statuses Value 1 Name Description NOT_STARTED SoftLoad process has not begun READY_FOR_SETUP SoftLoad process is ready to receive setup information in the form of ESOFTLOADSREC commands with S0 records. Once sufficient setup data has been sent, the process is also ready for ESOFTLOADDATA commands. 3 READY_FOR_DATA SoftLoad process is ready to receive data in the form of ESOFTLOADDATA commands or ESOFTLOADSREC commands with S3 records. Once all data has been sent, send the ESOFTLOADCOMMIT command. 4 DATA_VERIFIED SoftLoad data has passed CRC. This status occurs after a ESOFTLOADCOMMIT command. 5 WRITING_FLASH SoftLoad data is being written to flash. This status occurs after a ESOFTLOADCOMMIT command. During a firmware upload, the receiver may remain in this state for a maximum of 300 seconds. 6 WROTE_FLASH SoftLoad data has been written to flash. 7 WROTE_AUTHCODE The embedded AuthCode was successfully written. 8 COMPLETE SoftLoad process has completed. The next step is to send the RESET command to reset the receiver. 9 VERIFYING_DATA SoftLoad is verifying the downloaded image. 2 Relay User Manual Rev 1 90 Value Name Description Signature AuthCodes have been copied from the current firmware to the downloaded firmware. 10 COPIED_SIGNATURE_AUTH 11 The downloaded firmware has been activated and will be executed if WROTE_TRANSACTION_TABLE the receiver is reset. This status is effectively the identical to COMPLETE. 16 ERROR Indicates an internal error in the SoftLoad process. This error is not expected to occur. Contact NovAtel Customer Support for assistance. 17 RESET_ERROR Error reseting SoftLoad. Reset the receiver and restart the SoftLoad process. 18 BAD_SRECORD A bad S Record was received. Ensure that S Records are enclosed in double quotes within the ESOFTLOADSREC command. 19 BAD_PLATFORM This data cannot be loaded onto this platform. Ensure that the correct *.hex file for the platform is being used. 20 BAD_MODULE This module cannot be loaded with SoftLoad. This file must be loaded using WinLoad or a similar loader. 21 BAD_AUTHCODE Bad AuthCode received for this PSN. 23 NO_MODULE No data type was entered before a ESOFTLOADDATA command was received. Set the data type using the ESOFTLOADSREC command with an "S0~T~" S Record. 24 NO_PLATFORM No platform was entered before a ESOFTLOADDATA command was received. Set the platform using the ESOFTLOADSREC command with an "S0~P~" S Record. 25 NOT_READY_FOR_DATA A ESOFTLOADDATA command was received but the receiver was not ready for it. 26 MODULE_MISMATCH The SoftLoad data module was changed in the middle of loading. Restart the SoftLoad process using the ESOFTLOADRESET command. 27 OUT_OF_MEMORY SoftLoad has run out of RAM to store the incoming data. Reset the receiver and restart the SoftLoad process. 28 DATA_OVERLAP SoftLoad data has overlapped. Ensure that the correct address and length is set in the ESOFTLOADDATA or ESOFTLOADSREC command. 29 BAD_IMAGE_CRC CRC of the downloaded image has failed. Ensure that all content from the *.hex file has been successfully downloaded. 30 IMAGE_OVERSIZE The downloaded image is too big for the intended data module. 31 AUTHCODE_WRITE_ERROR An error occurred when writing the embedded AuthCode to flash. 32 BAD_FLASH_ERASE Erasing of the flash failed. This could indicate a failure in the flash hardware. 33 BAD_FLASH_WRITE Writing to the flash failed. This could indicate a failure in the flash hardware. 34 TIMEOUT SoftLoad time out has occurred Relay User Manual Rev 1 91 C.3 M3TRINFO Satel M3-TR3 radio configuration information The M3TRINFO log reports the current configuration from the Satel M3-TR3 radio. Requesting this log will disrupt operation of the radio if data is currently being transmitted or received. Message ID: 9012 Log Type: Async Recommended Input: log m3trtinfoa onchanged m3trtinfoa prog m3trtinfoa log all ASCII Example—Satel 400 MHz Relay #M3TRINFOA,COM1,0,83.0,FINESTEERING,1810,321736.900,00040000,BA49,32768; 1,"STATE","PROG"*FF16494B #M3TRINFOA,COM1,0,83.0,FINESTEERING,1810,321737.257,00040000,BA49,32768; 1,"COMPAT","0"*6F782F6B #M3TRINFOA,COM1,0,83.0,FINESTEERING,1810,321737.269,00040000,BA49,32768; 1,"FREQTX","438.00000 MHZ"*65F76C5C #M3TRINFOA,COM1,0,83.0,FINESTEERING,1810,321737.279,00040000,BA49,32768; 1,"FREQRX","440.50000 MHZ"*F4F42A60 #M3TRINFOA,COM1,0,83.0,FINESTEERING,1810,321737.291,00040000,BA49,32768; 1,"SPACING","12.5 KHZ"*48D4AD3F #M3TRINFOA,COM1,0,83.0,FINESTEERING,1810,321737.301,00040000,BA49,32768; 1,"TXPWR","1000 MW"*0E2517CA #M3TRINFOA,COM1,0,83.0,FINESTEERING,1810,321737.312,00040000,BA49,32768; 1,"FEC","1"*1D146F57 #M3TRINFOA,COM1,0,83.0,FINESTEERING,1810,321737.323,00040000,BA49,32768; 1,"ERR_CHECK","0"*35D871B0 1 M3TRINFO header Log header - H 0 2 #fields Number of fields being reported. Long 4 H 3 name Name of the field being reported. See Table 27, M3TRINFO Fields on page 93. String String[32] variable 4 value Value of the field being reported. See Table 27, M3TRINFO Fields on page 93. String String[32] variable <name and value repeated for each field> - - - Sentence terminator (ASCII only) - - - [CR][LF] Relay User Manual Rev 1 Format Binary Offset Field type n Data Description Binary Bytes Field 92 Table 27: M3TRINFO Fields Name Binary ASCII Value Value Description Values off - power off, radio disconnected from receiver 1 state prog - programming mode, radio disconnected from receiver Radio state online - radio enabled, but not connected to receiver normal - radio enabled and connected to receiver 2 compat Compatibility mode See Table 28, Compatibility Mode 3 call_sign Not implemented Call sign provided by regulatory authority, e.g. FCC 4 freqtx Transmit frequency, MHz. 438.0000 to 473.0000 5 freqrx Receive frequency, MHz 438.0000 to 473.0000 6 spacing Channel Spacing, kHz 12.5 or 25.0 7 txpwr Maximum transmit power, milliwatts 100, 200, 500, 1000 8 fec Forward error correction. on, off 9 encryption Not implemented Reserved 10 err_check Reserved Error check, on/off Table 28: Compatibility Mode Value Relay User Manual Rev 1 Mode 0 Satelline-3AS 1 PacCrest-4FSK 2 PacCrest-GMSK 3 Trimtalk450s(P) 4 Trimtalk450s(T) 5 PacCrest-FST 93 C.4 MM2TINFO Freewave MM2-T radio configuration information The MM2TINFO log reports the current configuration from the Freewave MM2-T radio. Requesting this log will disrupt operation of the radio if data is currently being transmitted or received. Message ID: 9011 Log Type: Asnyc Recommended Input: log mm2tinfo onchanged ASCII Example: log mm2tinfoa onchanged mm2tmode prog mm2tconfig log all #MM2TINFOA,COM1,0,34.5,FINESTEERING,1810,319649.489,00040000,09AB,32768; 1,"STATE","PROG"*BF6988E4 #MM2TINFOA,COM1,0,55.0,FINESTEERING,1810,319650.543,00040000,09AB,32768; 1,"FREQ","E"*F7BF0BA1 #MM2TINFOA,COM1,0,49.5,FINESTEERING,1810,319652.116,00040000,09AB,32768; 1,"HOPTABLEVER","6"*84801D12 #MM2TINFOA,COM1,0,49.5,FINESTEERING,1810,319653.695,00040000,09AB,32768; 1,"HOPTABLESIZE","112"*A5FFC5CF #MM2TINFOA,COM1,0,55.0,FINESTEERING,1810,319656.856,00040000,09AB,32768; 1,"FREQZONE","0011001100110011"*E55B1236 #MM2TINFOA,COM1,0,52.0,FINESTEERING,1810,319657.979,00040000,09AB,32768; 1,"MAXPKT","9"*2B4D11CA #MM2TINFOA,COM1,0,52.0,FINESTEERING,1810,319658.952,00040000,09AB,32768; 1,"MINPKT","9"*A9DFFAC2 #MM2TINFOA,COM1,0,52.0,FINESTEERING,1810,319660.068,00040000,09AB,32768; 1,"XMITRATE","1"*B7C81603 #MM2TINFOA,COM1,0,46.5,FINESTEERING,1810,319661.062,00040000,09AB,32768; 1,"RFDATARATE","3"*42C94255 #MM2TINFOA,COM1,0,46.5,FINESTEERING,1810,319662.152,00040000,09AB,32768; 1,"NID","4095"*D818355B #MM2TINFOA,COM1,0,47.5,FINESTEERING,1810,319663.233,00040000,09AB,32768; 1,"SNID","FF"*62278B67 #MM2TINFOA,COM1,0,47.5,FINESTEERING,1810,319664.478,00040000,09AB,32768; 1,"TXPWR","0"*5D3A9488 #MM2TINFOA,COM1,0,47.5,FINESTEERING,1810,319665.311,00040000,09AB,32768; 1,"MMODE","3"*1025DEE7 #MM2TINFOA,COM1,0,49.0,FINESTEERING,1810,319666.401,00040000,09AB,32768; 1,"RADIOID","3737"*55F38E86 Relay User Manual Rev 1 94 #MM2TINFOA,COM1,0,49.0,FINESTEERING,1810,319667.482,00040000,09AB,32768; 1,"RADIONAME","TEST"*D77F40B0 #MM2TINFOA,COM1,0,49.0,FINESTEERING,1810,319668.075,00040000,09AB,32768; 1,"SERIALNO","863-5480"*0E164C1F #MM2TINFOA,COM1,0,47.5,FINESTEERING,1810,319668.652,00040000,09AB,32768; 1,"FWVERSION","V10.6.8"*D3D59815 #MM2TINFOA,COM1,0,47.5,FINESTEERING,1810,319669.241,00040000,09AB,32768; 1,"MODELCODE","DMM2TLF"*18EE0AA5 Data Description Binary Bytes Field type 1 MM2TINFO header Log header - H 0 2 name Name of the field being reported. See Table 17, MM2TCONFIG Parameters on page 80 String[32} variable H 3 value Value of the field being reported. String[32] variable variable [CR][LF] Sentence terminator (ASCII only) - - - Relay User Manual Rev 1 Format Binary Offset Field 95 C.5 NTRIPSTATUS NTRIP diagnostic information The NTRIPSTATUS log provides diagnostic information for the NTRIP connection. Message ID: 1820 Log Type: Asnyc Recommended Input: log ntripstatus onchanged ASCII Example: #ntripstatusa,com2,0,84.5,unknown,0,0.000,00000000,3c46,32768; ncom1,disconnected,0,0,0,""*ed521445 Data Description Binary Bytes Format Binary Offset Field Field type 1 NTRIPSTATUS header Log header - H 0 2 port NTRIP port See Table 29, COM Port Identifiers Enum 4 H 3 status State of the NTRIP connection See Table 30, NTRIP Status on page 97. Enum 4 H+4 4 rx bytes Total number of bytes received Uint 4 H+8 5 tx bytes Total number of bytes transmitted Uint 4 H+12 6 uptime Total time of continuous NTRIP service in seconds Uint 4 H+16 7 info Extra information about the current status Char (For example, an error message if the status is Error) 64 H+20 8 xxxx 32-bit CRC (ASCII and Binary only) Hex 4 H+84 9 [CR][LF] Sentence terminator (ASCII only) - - - Table 29: COM Port Identifiers Binary Relay User Manual Rev 1 ASCII Description 1 COM1 COM port 1 2 COM2 COM port 2 3 COM3 COM port 3 6 THISPORT The current COM port 8 ALL All COM ports 33 BT1 Bluetooth COM port 96 Table 30: NTRIP Status Value State Description 1 DISCONNECTED Client is not currently active 2 CONNECTING Client is establishing a TCP/IP socket to a caster (either to request a mount point or to request the source table) 3 REQUESTING Client is requesting a mount point and waiting for a response 4 STREAMING Client is streaming NTRIP corrections 5 RECONNECT_DELAY The connection to the caster was lost and the client is waiting for a period of time before attempting to reconnect 6 REQUESTING_SOURCETABLE Client is requesting the sourcetable from the caster 7 STREAMING_SOURCETABLE Client is retrieving the sourcetable from the caster 8 WAITING_GGA Client is waiting for a GGA log Relay User Manual Rev 1 97 C.6 VERSION Hardware and software versions and serial numbers The VERSION log contains the version information for all components of a system. A component may be hardware (for example, a receiver or data collector) or firmware in the form of applications or data (for example, data blocks for height models or user applications). Some components are not available until the module is powered on, for example, celluarconfig power on. Message ID: 37 Log Type: Polled Recommended Input: log versiona once ASCII Example—Base Log (Freewave MM2T): [COM1]<VERSION COM1 0 44.0 UNKNOWN 0 744.615 014C4020 3681 45477 < 5 < GPSCARD "D2LR0GTTRA" "BFN3070041H" "OEM628-2.01" "OEM060410RN0000" "OEM06000RBG000" "2014/MAY/20" "21:58:59" < DB_USERAPP "SMARTCOM" "0" "" "1.000" "" "0" "13:28:29" < ENCLOSURE "" "NMCM13210021T" "" "" "" "" "" < EXTENSION "SMARTCOM" "<SMARTCOM PSN>" "<HWVER>" "<SWVER>" "<BOOTVER>" "2014/MAY/20" "21:58:59" < WIFI "TIWIBLE" "" "" "1.4.1" "REV 6.3.0.0.77" "" "" < "RADIO" "MM2T" "" "1.0.0" "REV 1.2.1" "" "" ASCII Example—Rover Log (Satel M3TR): < 5 < GPSCARD "D2LR0GTTRA" "BFN3070041H" "OEM628-2.01" "OEM060410RN0000" "OEM06000RBG000" "2014/MAY/20" "21:58:59" < DB_USERAPP "SMARTCOM" "0" "" "1.000" "" "0" "13:28:29" < ENCLOSURE "" "NMCM13210021T" "" "" "" "" "" < EXTENSION "SMARTCOM" "<SMARTCOM PSN>" "<HWVER>" "<SWVER>" "<BOOTVER>" "2014/MAY/20" "21:58:59" < RADIO "M3TR" "" "" "1.0.0" "REV 1.2.1" "" "" ASCII Example—Cellular: [COM1]<VERSION COM1 0 44.0 UNKNOWN 0 744.615 014C4020 3681 45477 < 5 < GPSCARD "D2LR0GTTRA" "BFN3070041H" "OEM628-2.01" "OEM060410RN0000" "OEM06000RBG000" "2014/MAY/20" "21:58:59" < DB_USERAPP "SMARTCOM" "0" "" "1.000" "" "0" "13:28:29" < ENCLOSURE "" "NMCM13210021T" "" "" "" "" "" < EXTENSION "SMARTCOM" "<SMARTCOM PSN>" "<HWVER>" "<SWVER>" "<BOOTVER>" "2014/MAY/20" "21:58:59" < CELLULAR "HE910-D" "351579050414521" "" "12.00.023" "" "" "" The VERSION log is a useful log as a first communication with your receiver. Once connected, using NovAtel Connect or HyperTerminal, log VERSION and check that the output makes sense. Also, ensure that you have the receiver components you expected. Relay User Manual Rev 1 98 Field Field type Data Description Format Binary Bytes Binary Offset 1 VERSION header Log header - H 0 2 # comp Number of components (cards, and so on) Long 4 H 3 type Component type See Table 31, Supported Relay Components on page 100 Enum 4 H+4 OEM6 firmware model number 4 model e.g., G1SBOGTTO indicates the receiver’s current model functionality Char[16] 16 H+8 5 psn Product serial number Char[16] 16 H+24 Char[16] 16 H+40 Char[16] 16 H+56 Char[16] 16 H+72 Char[12] 12 H+88 Char[12] 12 H+100 Hardware version Field format: P-RS-CCC 6 hw version P = hardware platform (for example, OEM628) R = hardware revision (for example, 6.00) S = processor revision (for example, A)a CCC = COM port configuration (for example, 22T)b Firmware version Field format: OEM0603xxRN0000 7 sw version OEM06 = the product 03 = the feature release xx = the maintenance release number Boot code version Field format: OEM0603xxRGB000 8 boot version OEM06 = the product 03 = the feature release (content may not be the same as the software version) xx= the maintenance release number Firmware compile date Field format: YYYY/Mmm/DD 9 comp date YYYY = year Mmm = month DD = day (1 - 31) Firmware compile time Field format: HH:MM:SS 10 comp time HH = hour MM = minutes SS = seconds 11 Next component offset = H + 4 + (#comp x 108) Relay User Manual Rev 1 99 Field Field type Data Description Format Binary Bytes Binary Offset 12 xxxx 32-bit CRC (ASCII and Binary only) Hex 4 H+4+ (#comp x 108) 13 [CR][LF] Sentence terminator (ASCII only) - - - a. This field may be empty if the revision is not stamped onto the processor. b. One character for each of the COM ports 1, 2, and 3. Characters are: 2 for RS-232, 4 for RS-422, T for LV-TTL, and X for user-selectable (valid for COM1 of certain products). Therefore, the example is for a receiver that uses RS-232 for COM 1 and COM 2 and LV-TTL for COM 3. Table 31: Supported Relay Components Binary ASCII Description 1 GPSCARD OEM6 core card 2 DB_USERAPP SmartCom application 3 ENCLOSURE SMART6-L enclosure version 4 EXTENSION SmartCom card 5 WIFI Wi-Fi chip 6 RADIO UHF radio 7 CELLULAR Cellular radio 8 WWW_CONTENT Web content See Table 32, WWW_CONTENT version information 9 REGULATORY Regulatory settings see Table 33, REGULATORY version information Table 32: WWW_CONTENT version information Field Description comp date Date the web content was assembled psn reserved hw ver reserved comp time Time the web content was assembled sw ver Web content build number (SW version) boot ver Web content revision number model Web content type Table 33: REGULATORY version information Field Relay User Manual Rev 1 Description model Region boot version Flags other reserved 100 Appendix D Replacement Parts The following are lists of the replacement parts available for the NovAtel Relay. Should assistance be required or you need to order additional components, contact your local NovAtel dealer or Customer Service representative. D.1 Relay Table 34: Relay Products Part Description D.2 NovAtel Part Relay with GSM HPSA 01019343 Relay with CDMA 1xRTT 01019345 Relay with Satel 400 MHz UHF radio 01019347 Relay with Freewave 900 MHz UHF radio 01019349 NovAtel Relay Interface Cable: 14-pin socket to 3 DB-9 connectors, power connection, twisted CAN I/O pair and other bare wire connectors (see NovAtel Relay Interface Cable (01019382) on page 61) 01019382 Relay NMO to TNC Adapter Cable 01019372 Mounting Plate Kit 70023098 Pole Mounting Plate Kit 70023100 Magnetic Mount Radio Antenna Cable 12023300 User Manuals Table 35: Reference User Manuals Part Description NovAtel Part OEM6 Family Firmware Reference Manual OM-20000129 SMART6-L User Manual OM-20000146 The accessories above are also available from www.novatel.com Relay User Manual Rev 1 101 OM-20000161 Rev 1 March 2015