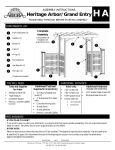
1
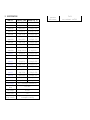
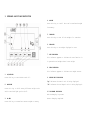
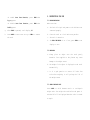
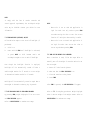
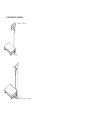
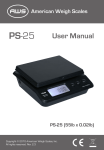
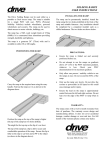
UFM SERIES
ELECTRONIC WEIGHING SCALE
CONTENTS
1. INSTALLATION
OPERATION MANUAL
2. SPECIFICATION
3. KEYBOARD LAYOUT AND DESCRIPTION
PLEASE READ THIS MANUAL VERY CAREFULLY BEFORE
4. INITIAL SETUP
ATTEMPTING TO OPERATE THIS SCALE
5. INSTRUCTION FOR USE
6. TROUBLE SHOOTING
7. DAILY CARE AND MAINTENANCE
8. INSTALLATION DIAGRAM
March 2004
Specifications subject to change without prior notice
1. INSTALLATION
Because
of
metrological
legislation,
the
setting
of
some metrological parameters only able to be accessed
by authorized personnel. Do not attempt to change any
of
the
built-in
parameters.
Contact
your
dealer
for
installation and technical assistance.
CAUTION:
This unit is legal for trade only when it is sealed
(and/or stamped) and bearing a serial number. Do not
attempt to break the seal (or stamp) affixed to this
SCALE or remove the serial number. Contact your dealer
for more information and after sales service.
For the most accurate weighing results, do not use the
scale when the environmental conditions fall outside
those listed in SPECIFICATIONS.
Do not attempt to open this unit or conduct any trouble
shooting other than those listed in TROUBLE SHOOTING.
2. SPECIFICATION
Model No.
Capacity (Max)
Readability (e)
UFM-B30H
30kg/60lb
0.005kg/0.01lb
UFM-B60H
60kg/120lb
0.01kg/0.02lb
UFM-B120H
UFM-F30H
120kg/300lb
30kg/60lb
0.02kg/0.05lb
0.005kg/0.01lb
UFM-F60H
UFM-F120H
60kg/120lb
120kg/300lb
0.01kg/0.02lb
0.02kg/0.05lb
UFM-F300H
UFM-L60H
300kg/600lb
60kg/120lb
0.05kg/0.1lb
0.01kg/0.02lb
UFM-L120H
120kg/300lb
0.02kg/0.05lb
UFM-L300H
300kg/600lb
0.05kg/0.1lb
UFM-L600H
UFM-B30
600kg/1200lb
30kg/60lb
0.1kg/0.2lb
0.01kg/0.02lb
UFM-B60
60kg/150lb
0.02kg/0.05lb
UFM-B150
150kg/300lb
0.05kg/0.1lb
UFM-F30
UFM-F60
30kg/60lb
60kg/150lb
0.01kg/0.02lb
0.02kg/0.05lb
UFM-F150
150kg/300lb
0.05kg/0.1lb
UFM-F300
300kg/600lb
0.1kg/0.2lb
UFM-L60
UFM-L150
UFM-L300
60kg/150lb
150kg/300lb
300kg/600lb
0.02kg/0.05lb
0.05kg/0.1lb
0.1kg/0.2lb
UFM-L600
600kg/1500lb
0.2kg/0.5lb
Tare Range
Power-on Zero
Range
Zero Range
Full Tare Range (Subtractive)
Min. Load
Power Voltage
Requirements
20e
By external power adaptor or
rechargeable battery
±10% Max.
±2% Max.
Operation
Environment
0o~40oC
Non-condensed. R.H.?85%
3. KEYBOARD LAYOUT AND DESCRIPTION
4.
MR KEY
Press this key to recall the total accumulated weight
from memory.
5.
TARE KEY
Press this key to tare off the weight of a container.
6.
ZERO KEY
Press this key to set weight displayed to zero.
7.
NET INDICATOR
This indicator appears to indicate the tare function is
in operation and weight shown is net weight.
8.
ZERO INDICATOR
This indicator appears to indicate zero weight status.
1.
ON/OFF KEY
Press this key to turn SCALE on and off.
9.
WEIGHT UNIT INDICATOR
“kg” indicates the metric unit is being displayed.
2.
MODE KEY
“lb” indicates the avoirdupois unit is being displayed.
Press this key to shift among different weight units
and/or turn backlight option on/off.
10. IN-CHARGE INDICATOR
Red: Recharging in process
3.
M+ KEY
Press this key to accumulate current weight to memory.
Green: Charging completed
11. AVERAGE INDICATOR
4. INITIAL SETUP
This indicator flashes to indicate the digital motion
4.1 PLACING THE SCALE
filtering function is being employed.
In order to obtain an accurate weighing result, the
complete weighing instrument, (hereinafter referred as
12. M+ INDICATOR
This
indicator
scale) must be placed on a strong and level surface.
illuminates
to
indicate
the
memory
contains stored data.
4.2 INTERNAL SETTING
4.2.1 Display Segment Check
13. MR INDICATOR
User can enter this function to check to see if the
This indicator illuminates to indicate the value shown
display and backlight (option) are functioning properly.
is the total accumulated weight stored.
a.
Scale is off
b.
Press and hold TARE, then press ON/OFF
14. LO-BAT INDICATOR
c.
Scale displays F.1
This indicator appears when the input voltage is below
d.
Press TARE until F.2 is displayed
the lowest input limit. Check the power supplied to the
e.
Press MODE and all segments will light up to allow
indicator.
user to check the condition of display
f.
Press any key to exit and TARE for next function
setup or ZERO to restart the scale
4.2.2 Select Auto Power Off Setting
The scale is equipped with Auto Power Off Function. The
scale will power off automatically if it is not used
for 4 minutes. Follow the below steps to enable/disable
Auto Power Off Function.
a.
Scale is off
b.
Press and hold TARE, then press ON/OFF
display, press TARE to confirm and proceed to the
c.
Scale displays F.1
next selection or ZERO to restart the scale.
d.
Press TARE until F.4 is displayed
e.
Press MODE to shift between 0._OFF or 4._OFF
NOTE:
-To enable Auto Power Off Function, press TARE when
The default data output format of the scale is
4._OFF appears
Baud Rate = 9600
-To disable
f.
i.
Auto Power Off Function, press
TARE
When the preferred transmission protocol shows on
Data Bit = 8
when 0._OFF appears
Stop Bit = 1
Press ZERO to restart the scale or TARE for next
Parity = None
function setup
4.2.4 Select Digital Motion Filtering Function
4.2.3 Select RS-232 (Optional) Baud Rate & Protocol
This scale equipped with animal weighing function that
This scale is equipped with 3 x RS232C output baud rate
enables user to select when the scale is using for
and 2
weighing livestock.
x
transmission
protocol settings
for
user
to
select.
a.
Scale is off
a. Scale is off
b.
Press and hold TARE, then press ON/OFF
b. Press and hold TARE, then press ON/OFF
c.
Scale displays F.1
c. Scale displays F.1
d.
Press TARE until F.5 is displayed
d. Press TARE until F.6 is displayed
e.
Press MODE to enter
e. Press MODE to shift between Filt.0 or Filt.1
f.
Press M+ to
select baud rate
of
4800,
9600
or
-
19200
g.
Press MODE again to enter transmission protocol
setup
h.
Press M+ to select protocol of P=N81 or P=E71
To enable
Animal Weighing Function, press TARE
when display shows Filt.1
-
To disable Animal Weighing Function, press TARE
when display shows Filt.0
f. After TARE is pressed, scale display F.7
g. Press MODE to enter next set up or ZERO to restart
the scale
print when stable weight is detected and when
M+ is
pressed.
a. Scale is off
4.2.5 Select Serial Output Mode
b. Press and hold TARE, then press ON/OFF
There are two selectable transmission formats to choose
c. Scale displays F.1
according to end user preference. For which FORMAT 1 is
d. Press TARE until F.8 is displayed
continuous transmission when weight is stabilized and
e. Press MODE to shift between Prnt.0 or Prnt.1
-
FORMAT 2 sends data in table form when press M+.
a. Scale is off
For
detail
printout
result,
press
TARE
when
result,
press
TARE
when
display shows Prnt.1
-
b. Press and hold TARE, then press ON/OFF
c. Scale displays F.1
For
simple
printout
display shows Prnt.2
d. Press TARE until F.7 is displayed
f. After TARE is pressed, scale display F.9
e. Press MODE to shift between Ser.0 or Ser.1
g. Press MODE to enter next set up or ZERO to restart
-
For continuous sending, press TARE when display
the scale
shows Ser. 1
-
For manual sending, press TARE when display shows
4.2.7 Select Auto Tare Function (If equipped)
Ser. 2
This scale is equipped with auto tare function which
f. After TARE is pressed, scale display F.8
tares off the initial weight automatically when this
g. Press MODE to enter next set up or ZERO to restart
function is engaged. The tare weight is automatically
the scale
cleared when everything is removed from platter.
a.
Scale is off
b.
Press and hold TARE, then press ON/OFF
4.2.6. Select Printer Output (Optional) Mode
c.
Scale displays F.1
There are two selectable printout formats to choose
d.
Press TARE until F.9 is displayed
according to end user preference. FORMAT 1 will print
f.
Press MODE to select between Tr_on or TroFF
in table form when press
M+ and FORMAT 2 will only
-To
enable
Auto
Tare
Function,
press
TARE
when
Tr_on appears
-To disable
5. INSTRUCTION FOR USE
5.1 BEFORE WEIGHING
Auto
Tare
Function, press
TARE
when
TroFF appears
Make sure that:
a.
The load cell signal and power to the indicator are
g.
After TARE is pressed, scale display F.1
connected properly
h.
Press MODE to enter next set up or ZERO to restart
b.
Place the scale on a level and strong surface
the scale
c.
The scale is turned on
d.
The ZERO INDICATOR is on. If not, press ZERO to set
display to zero
5.2 WEIGHING
a. Always
place
an
object
onto
the
scale
gently
Excessive force applied to the platter may cause
damage to the weight sensor
b. The weight of the object is displayed on the scale
automatically
c. It
is
a
good
practice
to
remove
all
loads
from
scale after weighing. It will prolong the life of
the weight sensor
5.3 SELECT WEIGHT UNIT
Press
MODE
to
shift
between
metric
or
avoirdupois
weight units. The weight unit used before the power is
switched off will be displayed when the scale is turned
on again.
NOTE:
To
comply
with
the
laws
of
certain
countries
and
certain approval requirements, the avoirdupois weight
NOTE:
units may be disabled. Contact your dealer for more
-
information.
When
scale
is
set
at
OIML
and
application
is
legal for trade. User only needs to press ZERO
once when setting the value to zero. The re-zero
5.4 TURN BACKLIGHT (OPTIONAL) ON/OFF
function will take place when reading is stable
Follow the below steps to turn on and off backlight (if
-
When scale is set at Normal and application is
purchased).
not legal for trade. User can set the value to
a.
Scale is on
zero at anytime when pressing ZERO
b.
Press and hold ZERO until backlight is activated;
or
press
MODE
to
shift
between
metric
and
avoirdupois weight to turn on and off backlight
5.6 TARE OFF THE WEIGHT OF A CONTAINER
When a container is used, follow the steps below to
manually tare off the weight of container and arrive at
Even
though
backlight
the
will
be
backlight
function
automatically
turned
is
employed,
off
when
the net weight.
a
a.
Remove all loads from the platter
stable weight remains for 25 seconds or a zero weight
b.
Make sure that the ZERO INDICATOR is on
is detected and remains stable for 10 seconds
c.
Place the container on the platter
d.
Press TARE
Backlight will be automatically turned on again when a
new weight is detected or when any key is pressed.
After TARE is pressed, the NET INDICATOR will appear.
5.5 SET DISPLAYED VALUE TO ZERO WHEN UNLOADED
Refer to 5.2 for weighing procedures. Weight displayed
By pressing ZERO, weight displayed will be set to zero
under is the net weight of the subject matter. Refer to
and ZERO INDICATOR appears.
SPECIFICATION for maximum tare range.
Refer to SPECIFICATION for maximum zero range.
NOTE:
-
NOTE:
When
scale
is
set
at
OIML
and application
legal for trade. User only needs to press
is
TARE
once when taring off a weight. The tare function
Unstable
weight
will
not
be
accumulated
to
memory.
After M+ is pressed, weight accumulation function will
take place automatically when reading is stable
will take place when the reading is stable
-
When scale is set at Normal and application is
not legal for trade. User can tare off the weight
anytime when pressing TARE
c. Scale displays “P. X” and M+ INDICATOR appears to
indicate that memory contains stored data
NOTE: “P. X” means the total number of transactions
accumulated to memory.
5.7 CLEAR THE TARE FUNCTION
d. Scale
a.
Remove all loads from the platter
b.
The tare effect will be cancelled:
-Automatically
c.
if
automatic
returns
to
normal
display
status
after
2
seconds
e. Repeat a to c for subsequent transactions
tare
function
is
employed, or
5.8.2 Memory Recall
-By pressing TARE
Press MR to recall total accumulated weight from memory.
After
TARE
is
pressed,
the
NET
INDICATOR
will
disappear
After MR is pressed, scale displays P. X (X Means the
number of transactions accumulated) follow by a value.
The value is the total accumulated weight stored in
5.8
MEMORY FUNCTION
memory.
5.8.1 To Accumulate a Transaction To Memory
When the total accumulated weight is being displayed,
a. Refer to 5.2 for weighing procedures
MR INDICATOR appears to indicate that the value being
b. Press
M+
to
save
and
transaction to memory.
accumulate
data
of
current
displayed is the total accumulated weight. Scale will
return to normal display status after 3 seconds.
5.8.3 Memory Clear
All
transactions
stored
in
memory
are
cleared
by
6. TROUBLE SHOOTING
pressing MR and TARE at the same time.
Symptom
Scale cannot be turned on
CAUTION: All data stored will be erased when the scale
Check:
Is the scale powered properly?
is turned/powered off.
Action:
Check power supply to scale.
Symptom
Scale turned off automatically
Check
Is Auto Power Off Function employed?
Action
Refer to
5.9 RECHARGE SCALE
The
scale
is
equipped
battery. When the
the
scale
with
a
built-in
rechargeable
LO-BAT INDICATOR appears, recharge
immediately.
Failure
to
do
so
may
4.2.2 to disable Auto Power Off
cause
Function.
unrecoverable damage to the rechargeable battery.
Charging is completed when the color of the
Check
Is the LO-BAT INDICATOR on?
Action
Check power supply.
Symptom
Rated capacity cannot be reached
Check
Is the NET INDICATOR on?
Action:
Turn the scale off. Remove all loads and
IN-CHARGE
INDICATOR turns green.
turn on again.
Check
Is there anything obstructing the scale?
Action
Remove all obstacles.
Symptom
Blank display with only "kg" or "lb"
Check
Is
the
load
applied
to
scale
rated capacity?
Action
Remove all loads and try again.
excess
the
-----
Symptom
Scale displays
Check
Is the load cell signal cable connected to
the indicator properly?
Action
Recheck signal cable connections.
Check
Is load cell working properly?
Action
Check load cell input/output.
7. DAILY CARE AND MAINTENANCE
7.1
Clean the scale with a soft, damp cloth. If
necessary, use a mild detergent in water.
7.2
Do
not
use
any
harsh,
abrasive
material,
acetone, volatile solvent, thinner or alcohol
for cleaning.
Symptom
Display shows 00000 after counting down
Check
Is the load applied to platter in excess of
calibrate the scale if necessary.
the rated capacity of scale?
NOTE: In some countries, calibration requires
Action
7.3
Remove all loads from platter and try again.
Verify the accuracy of scale periodically. Re-
authorized/qualified agent. Contact your dealer
for more information.
Symptom
Weighing result is not accurate
Check
Is the scale placed in a level condition?
Action
Obtain a level condition.
Check
Is the scale affected by airflow, vibration
or RFI?
Action:
Place the scale away from all disturbances.
Check
Is the scale calibrated correctly?
Action
Contact your dealer.
7.4
Store scale in a dry and clean place.
8. INSTALLATION DIAGRAM
UFM-B Range
UFM-F and L Range