1
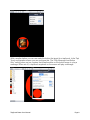
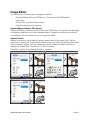
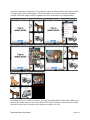
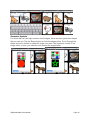
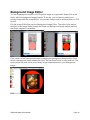
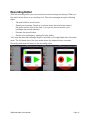
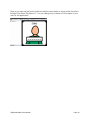
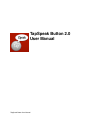
TapSpeak Button 2.0
User Manual
TapSpeak Button User Manual
Overview!
1
Adding a Button!
2
Orientations !
3
Settings!
5
Button Folders!
5
Button Border!
5
Lock Button!
6
Message Interrupt!
6
Button Zoom and Pan!
7
Tap/Touch Configurations!
9
Image Editor!
11
DynaVox/Mayer-Johnson PCS Library!
11
Symbol Search!
11
Symbol Zoom!
12
Symbol Categories!
12
Select Label and Custom Labels!
13
Photos!
13
Geometric Symbols!
15
Background Image Editor!
16
Recording Editor!
17
Title Editor!
18
TapSpeak Button User Manual
Overview
TapSpeak Button 2.0 brings a whole new set of features and capabilities to help kids
learn to communicate and overcome visual and motor skill disabilities. In this update
we’ve added these features:
• DynaVox/Mayer-Johnson PCS 4500 symbol core library included in the purchase
price.
• Photos can be used for button images.
• An expanded set of geometric symbols can be used as button images.
• PCS symbols and photos can use a geometric symbol as a background image. You
can now “place” a photo on top of a button.
• Folders have been added to organize your buttons. Create folders for each student
you have or for various situations.
• The button list has button thumbnail images to help identify a button in the button list.
• In portrait orientation, the toolbar completely disappears leaving a clutter-free button
image. Bring up the tool bar by swiping down and dismiss it by swiping up
• Touch/Tap configuration. Adjust the screen response to allow for a variable finger drift/
dwell on the iPad surface.
• External switch support via RJ Cooper’s iPad switch interfaces
• Shrink and move around the screen a button image to work with target acquisition and
eye-hand coordination.
• Use just the button image or the whole iPad surface to activate messages.
• Optional button border
TapSpeak Button User Manual!
Page 1
Adding a Button
To make sure you can access the edit mode of TapSpeak Button, rotate your iPad so it
is horizontal. This will make all of the editing feature of TapSpeak Button appear for
you.
When you first open up TapSpeak Button, you are presented with a blank screen.
To add your first button, press the “+” button on the top left hand corner. You are
presented with the “New Phrase” window, with this you will name the button that you are
creating. I named mine “Drink”. When you are done creating the title for the button,
simply press “Done”.
Now that you have your newly created button you can now edit it’s Title, Voice
Recording, Image and the Background Image.
TapSpeak Button User Manual!
Page 2
Orientations
We want to provide you with an option where you can show your child or student a
button without any distractions from menus or toolbars while still giving you quick and
complete access to buttons and tools. In landscape orientation you have easy access to
your buttons, button folders, and button editing tools.
Rotate your iPad to portrait orientation and the toolbar disappears. You now only have
the button image on the screen for your child/student to see and touch.
TapSpeak Button User Manual!
Page 3
You can make the toolbar appear in portrait orientation by swiping down. You now have
access to all your buttons and button editing tools. Swipe up and the toolbar disappears
again.
TapSpeak Button User Manual!
Page 4
Settings
From the Settings menu you can manage folders for your buttons, turn on/off button
borders, lock a button in its position and size when you zoom or pan the button, and
allow button taps to interrupt and replay a message.
Button Folders
You can store buttons in folders that you create and manage in this screen. Managing a
folder is like managing any other table item in iOS. The “+” button adds a folder, the Edit
button lets you delete folders and change folder order, and the Edit Folder Info button
lets you change a folder title.
Button Border
Turns on/off borders for a button image and background button image.
TapSpeak Button User Manual!
Page 5
Lock Button
This setting freezes a button’s size and location and disables the button zoom and pan
feature, thus locking the button in place.
Message Interrupt
By default, when the button is tapped while its message is playing, nothing will happen.
The message will continue to play. When this setting is enabled, tapping the button
while a message is playing will interrupt the message and play it from the beginning.
TapSpeak Button User Manual!
Page 6
Button Zoom and Pan
Zooming and panning is useful for vision assessments and training students with visual
target acquisition. Zooming and panning is performed with two-finger gestures. Tap the
button with two fingers and pinch in/out to make the button smaller/larger, or drag both
fingers to move the button around the screen. You can even simultaneously pinch and
drag.
Button size examples:
Button location examples:
Once you have a button in position you can lock the button with the button lock. In the
Settings screen turn on the Lock Button setting. This will freeze the button in its position.
Turn off the Lock Button setting to zoom/pan the button again. Note that rotating the
iPad to a different orientation will resize the button to its original size.
TapSpeak Button User Manual!
Page 7
With a smaller button you can use make the button the target for a tap/touch. In the Tap/
Touch configuration screen you can configure this. The “Play Message from Button
Only” setting, when set on, requires that a tap/touch be on the button image to play a
message. When set off, a tap/touch anywhere on the screen will play a message.
TapSpeak Button User Manual!
Page 8
Tap/Touch Configurations
Direct select mode also makes use of the tunable tap/touch. This feature
accommodates those who can touch a device but whose abilities don’t support a quick
touch and release (e.g. a “tap”). You get to the touch configuration screen from the Tap/
Touch Configuration toolbar button:
Use the Tap setting to require a touch and release in order to play a message. You can
vary the tap dwell time from 0.1 to 5.0 seconds and touch drift amount from 10% to
200% of the button’s size. Use the Touch setting to only require a touch on a button to
play a message. Dwell and drift settings don’t affect the Touch setting.
Failed Tap/Touch Feedback – enables/disables a “bloop” sound when a tap exceeds
the tap dwell or drift settings.
TapSpeak Button User Manual!
Page 9
Button Click Feedback – enables/disables a “click” sound when a tap/touch is initiated.
Play Message from Button Only – When enabled, a tap/touch will only be detected
within the boundaries of the button image. When disabled, the entire iPad/button player
surface can activate a message. For example, when this switch is enabled and you
zoom out on a button (pinch in to make smaller), you can encourage greater motor skill
control.
Enable External Switch Interface – When enabled, you can make use of RJ
Cooper’s iPad Cordless Super Switch or iPad Switch Interface to make use of an
external switch.
TapSpeak Button User Manual!
Page 10
Image Editor
You can use one of three types of images for buttons:
•
DynaVox/Mayer-Johnson PCS library. Choose from the 4500-symbol
core library.
•
Photos from your iPad Photo Library.
•
High-contrast geometric symbols.
DynaVox/Mayer-Johnson PCS Library
TapSpeak Button includes the 4500 symbol core PCS library. The symbols are arranged
in categories and have one to four standard labels. Symbols can belong in more than
one category. You can search on any of a symbols’ labels.
Symbol Search
Search for a symbol via its label by typing a search term in the search field. Tap the
return key to show a list of symbols who have at least one label that matches the search
term and search criteria. You can change the search criteria and search results by
tapping the “Starts With”, “Anywhere”, or “Exact” buttons.
Scroll left or right to scroll through the list of symbols.
TapSpeak Button User Manual!
Page 11
You can browse symbols in a category by tapping on a category title. If the category
contains symbols (e.g. it doesn’t just contain other categories) you will see the symbols
in the category. You can go back to a parent category by tapping the back button on the
category title bar.
Symbol Zoom
You can show from one to four rows of symbols in the symbol list. Zoom out (show more
rows) by pinching in. Zoom in (show larger symbols) by pinching out. By default, three
rows are shown.
Symbol Categories
As you tap categories, you’ll see a checkmark on the category row. This indicates that
the only this category will be searched with the keyword search. You can also select
multiple categories at a time and all the selected categories will be included in the
keyword search. To reset the category search filter, tap the clear button on the category
title bar.
TapSpeak Button User Manual!
Page 12
Select Label and Custom Labels
Once you’ve found the label you want, tap the label to select it. Select a label from the
label list by scrolling up and down and tapping on the label you want.
You can type a custom label in the PCS search screen. To do so, select the symbol you
want and then tap the “<tap to create>” row in the label table.
At this point, you’ve selected a symbol and a label. If the keyboard is still on-screen, tap
the keyboard dismiss key (at the lower right of the keyboard) to dismiss the keyboard.
Tap anywhere outside of the image editor to dismiss the image editor and you’ll see
your button, sorted alphabetically by title, with your newly selected PCS symbol.
All images are sorted so they appear at the end of a library.
Photos
You can use any photo in your iPad’s photo library as an image for a button. To get
started, tap the Photo button on the bottom of the image editor. The photo picker will
appear. If a photo hasn’t been selected before, tap the “Tap to select photo” message. If
you have selected a photo before for this button, tap the photo to show the image
picker.
In the image picker, scroll through your albums and select one to show the photos in the
album. Scroll through the album to find the photo you want and tap it to select it. You’ll
TapSpeak Button User Manual!
Page 13
now see a preview of the photo. If you want to select a different photo just tap the photo
to bring up the photo picker again. If this is the photo you want to use tap anywhere
outside of the the image picker to update the button and dismiss the image editor.
By default, there is no title for a photo. You can add a title with the title editor. When you
enter a title make sure you set on the Show Title switch. When you close the title editor
the photo button will be sorted in the library according to its title.
TapSpeak Button User Manual!
Page 14
Geometric Symbols
For those that can use high-contrast visual images, there are some geometric shapes
that you can use. Tap the Shape button to show the shape picker. Scroll through the
shape and color wheels to create the shape you want. Tap anywhere outside of the
image editor to save your selection and dismiss the image editor
TapSpeak Button User Manual!
Page 15
Background Image Editor
You can superimpose a photo or PCS symbol image on a geometric shape (like a red
circle) with the background image feature. To do this, you first have to select your
primary image with the Image Editor. Your primary image must be either a photo or PCS
symbol.
Exit the Image Editor then tap the Background Image Editor. The editor looks almost
identical to the Image Editor except that there is a Background Image switch and only
the Shape segment is available.
First, switch on the background image by tapping the background image switch. Next
select a background image shape and color. Tap the Done button to save and exit. The
button player will now show your primary image superimposed on your background
image.
TapSpeak Button User Manual!
Page 16
Recording Editor
With the recording editor you can record and review message recordings. When you
first add a button there is no recording for it. Record a message using the following
steps:
•
Tap and hold the record button.
•
Speak your message. Speak at a volume where the level meter stays in
the green section most of the time. If you go into the red section, your
message may sound distorted.
•
Release the record button.
•
Review your message by tapping the play button.
You’ll see the recorded message length in seconds on the right-hand side of the time
scale. The left-hand side of the time scale shows the elapsed time in seconds.
Recording and recorded views of the recording editor:
TapSpeak Button User Manual!
Page 17
Title Editor
The Title Editor within TapSpeak Button for the iPad lets you change the title of the
button and the label that is displayed on the button. In my example, I have created a
button for a Jake that will help introduce him by stating his name.
For most users, you don’t want the button itself to say “My name is ____” you want the
button to have displayed the name of the user. So to change the wording on the button,
you want to go back into the Title Editor and change the wording for the “Text” field. I put
the user’s name into the text field which is Jake. Now, to have the button display the
name Jake and not “My Name Is” you are going to want to change the switches around.
Make sure “Show Title” is switched to Off and the “Show Text” is switched to On.
TapSpeak Button User Manual!
Page 18
Now as you can see the button itself now has the name Jake on it and under the button
listings it has listed “My Name Is”. You can change any of these to fit the needs of your
user for the application.
TapSpeak Button User Manual!
Page 19