1
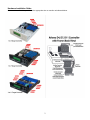
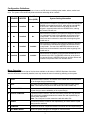
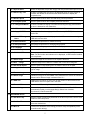
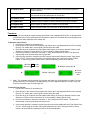
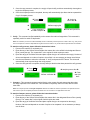
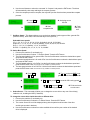
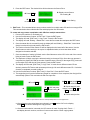
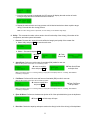
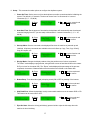
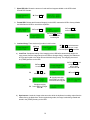
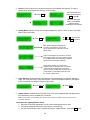
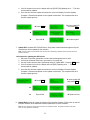
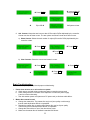
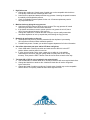
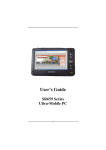
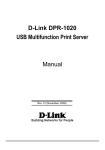
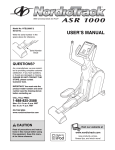
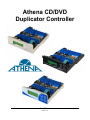
Athena CD/DVD
Duplicator Controller
User Manual
Version 1.70
TABLE OF CONTENTS
Introduction
1
Specifications
LCD Front Panel Overview
Hardware Installation Guide
Configuration Guidelines
Menu Overview
•
Setup
13
1
o Power on Time
1
o Auto Start Time
2
•
Image Manager
16
13
o Select Image
16
13
o Disc => Image
16
o Start-up Menu
13
o Set Reader Speed
16
3
o Display Mode
13
o Show Image Info
17
3-6
o Button Beep
13
o Rename Image
17
Functions
6
o Skip Read Error
13
o Delete Image
17
•
Copy
6
o Eject on Start
13
o Show HDD Info
18
•
Test
6
o Show Copy Time
14
o Format HDD
18
•
Copy & Verify
7
o Reader Speed
14
o Load and Copy
18
•
Copy & Compare
7
o Compare Speed
14
Advanced Setup
19
•
Verify
8
o Change Bad Master
14
o Set Burn Loop
19
•
Compare
8
o CD Overburn
14
o Set Burn Time
19
•
Set Burn Speed
9
o Copy CD-Text
14
o Burn-In
20
•
Select Source
9
o Show HDD Image
15
o Display Mode
20
•
Edit Track
10
o Boot Password
15
o Copy Interrupt
20
•
Utility
11
o Setup Password
15
o Update Plextor
20
o Prescan
11
o Language
16
o Update NEC
21
o Quick Erase
11
o Clear Setup
16
o Update BIOS
21
o Full Erase
11
o Adv. Counter
22
o Eject All Discs
11
o Disc Info
11
Basic Troubleshooting
22
o Drive Info
12
o System Info
12
o Update BIOS
12
o Copy Count
12
•
Introduction:
Thank you for purchasing Athena CD/DVD Duplicator Controller. This controller is specifically engineered to
run a stand-alone CD/DVD duplicator without additional computer or processing unit. With a simple, fourbutton interface and a LCD screen to display menu commands and real-time status, the Athena CD/DVD
Duplicator Controller provides a fast and reliable solution for CD and DVD duplication up to 15 targets from
one single master disc.
Operating Environment:
Temperature
Humidity
Working Temperature
0°C ~ 75°C
Storage Temperature
-20°C ~ 85°C
Working Humidity
20%~80%
Storage Humidity
5%~95%
LCD Front Panel Overview:
Scroll Button (UP)
ENT Button (ENTER)
LCD Screen
ESC Button
(ESCAPE)
Control Buttons: There are 4 control buttons: i , j , ENT , ESC
i : Up, Backward: To navigate backward in the menu.
j : Down, Forward: To navigate forward in the menu.
ENT : Enter, OK: Execute the function.
ESC : Escape, Cancel: Go back to the previous level in the menu.
1
Scroll Button (DOWN)
Hardware Installation Guide:
Connect drives with cables provided to the appropriate slot on controller as indicated below.
2
Configuration Guidelines:
Next are the basic operation guidelines on how to set IDE devices including optical reader, writers, and/or hard
drive. The system will automatically detect the drives and assign drive numbers.
READER
1
2
Installed
No
WRITER
Installed
Installed
Hard Disk
System Setting Information
Drive (HDD)
No
When machine is turned on, the system will detect and assign the
READER drive as the Source Drive, which will be automatically
set as Drive #1. WRITERS will be set as Writer Drives and
assigned in sequential order after the READER drive, starting
from Drive#2, Drive#3, etc.
No
When machine is turned on, the system will assign the WRITER
drive connected to Port#1 of the controller as the Source Drive
and as Drive#1. The rest of the WRITERS will then be set as
Writer Drives and numbered in sequential order beginning from
Drive#2 and on.
3
No
Installed
Installed
When machine is turned on, the system will assign the WRITER
drive connected to Hard Disk Drive (HDD) as the Source Drive
and as Drive#1. The rest of the WRITERS will then be set as
Writer Drives, and numbered in sequential order beginning from
Drive#2 and on.
4
Installed
Installed
Installed
When all drives are installed, ensure that the READER drive is
connected to the HDD. The READER will be set as the Source
Drive and as Drive#1. WRITERS will be set as Writer Drives and
numbered in sequential order from Drive#2 and on.
Menu Overview:
Below is a quick reference chart of the functions available on all Athena II CD/DVD Duplicator Controllers.
After the drives are successfully installed, user may access the menu functions by powering on the system.
1
COPY
Copies the master CD/DVD. All contents of the master disc will be duplicated
on to all target disc(s) simultaneously.
TEST
Simulates the copy process, but no data is recorded onto the blank disc(s).
Note: Test mode can only be done with DVD-R and CD-R media only.
3
COPY & VERIFY
Copies the master CD/DVD, and then verifies the presence of data on the
copied disc(s) to ensure readability of the copied disc(s).
4
COPY & COMPARE
Copies the master CD/DVD, and then immediately follows the copy process
with a bit-for-bit comparison between the master disc and copied disc(s) to
ensure exact duplication.
Note: The “Compare” function cannot be used with audio CDs.
5
VERIFY
Verifies the presence of data on the copied disc(s) to ensure that the copied
disc(s) can be read back.
6
COMPARE
Performs a bit-for-bit comparison between the master disc and copied disc(s).
7
SET BURN SPEED
Allows the speed settings to be changed for various formats.
2
3
8
SELECT SOURCE
Allows the source drive to be changed to any of the available drives in the
duplicator, including the Hard Disk Drive (HDD).
9
TRACK EDIT
Allows for the selection of individual track(s) from different master audio CDs to
create custom compilation.
9.1 Copy Track
Allows the selection of individual track(s) from the master CD and copies the
selected track(s) onto all target discs.
9.2. Close Disc
Closes the target discs when all of the track(s) are burned on to all target discs.
Note: The copied disc(s) will NOT play back without this step. Do NOT skip this
step.
9.3 Disc Info
Displays the information regarding the track(s) on the disc(s) and how much
space is remaining on the target disc(s).
10 UTILITY
10.1 Pre-scan
Performs a scan on the master disc before the copy process starts and ensures
the master disc can be copied in the duplicator.
10.2 Quick Erase
Erases all rewritable media (CD-RW and DVD+/-RW, DVD+/-RW DL).
10.3 Full Erase
Formats all rewritable media (CD-RW and DVD+/-RW, DVD+/-RW DL).
10.4 Eject All Disc
Ejects all disc trays, including source drive.
10.5 Disc Info.
Displays basic information of the discs inserted, such as disc type, amount of
data on disc for master disc(s) (in MB) and media book type. For blank media,
displays the media book type, available space and speed of the media.
10.6 Drive Info.
Displays information of all drives in the duplicator including the Reader, HDD (if
present) and Writer drive(s).
10.7 System Info.
Displays the duplicator controller information, such as the hardware version,
buffer memory and currently loaded firmware.
10.8 Update BIOS
Updates the firmware for the controller.
Note: Please make sure that the firmware is approved by the manufacturer and
compatible with the duplicator before performing the update.
10.9 Copy Count
Counts the number of successful and failed copies of CD and DVD made by
the duplicator.
11 SETUP
11.1 Power On Time
Sets system warm up time from 5 sec to 99 sec. Default is 15 seconds.
11.2 Auto Start
Sets auto start time from OFF (no auto start) to 99 sec. Allows the duplicator to
automatically start one of six following functions once the master disc and
desired number of target disc(s) are inserted and the drive trays are closed:
Copy, Test, Copy & Verify, Copy & Compare, Verify and Compare.
11.3 Startup Menu
Assigns a command to be displayed first after the duplicator has been
initialized.
11.4 Display Mode
Sets the amount of information displayed on the LCD during the performance
of various functions.
11.5 Button Beep
Enables or disables the audio feedback when buttons are pressed.
11.6 Skip Read Error
Enables the option to halt the duplication process if there is an error on the
master disc. Disables the option to allow the process to continue with the same
errors as the master disc.
4
11.7 Eject on Start
Allows the duplicator to eject disc tray(s) with disc present inside upon boot-up.
11.8 Show Copy Time
Enables or disables the copy time to be displayed when the copy process is
finished. Also allows for the various other timed functions to display the
completion time.
11.9 Reader Speed
Sets the speed at which discs are read during various processes.
11.10 Compare Speed
Sets the speed at which the compare process is executed.
11.11 Change Bad Master
Enables or disables changing of a master disc during the copy process when
an error is detected on the master disc.
11.12 CD Overburn
Enables or disables the duplication of overburned CDs.
11.13 Copy CD-TEXT
Enables or disables the copying of the CD subcode (CD-TEXT) information for
audio CDs.
11.14 Show HDD Image
Name
Allows the image name to be displayed on the LCD screen when selecting the
HDD as the source drive.
11.15 Boot Password
Sets password protection for machine boot-up.
11.16 Setup Password
Sets password protection for changing setup options.
11.17 Language
Allows different language selections for LCD display.
11.18 Clear Setup
Clears the CMOS and resets the duplicator controller back to factory defaults.
12 IMAGE MANAGER
The management for various functions of the hard disk drive (HDD).
Note: For this function and submenu to be displayed, a HDD must be installed
in the duplicator.
12.1 Select Image
Selects an image file as a source to be copied to the discs.
12.2 Disc → Image
Loads an image to the HDD from a master CD or DVD as an Image file.
12.3 Set Reader Speed
Sets the speed of data loading from the master CD/DVD to the HDD.
12.4 Image Info.
Displays the image file information such as image order, name, file size and
type of image.
12.5 Rename Image
Renames the HDD image partition name up to 8 characters.
12.6 Delete Image
Deletes an image file in HDD. Note: A file selected as the source file cannot be
deleted until a different image is selected. See 12.1.
12.7 HDD Info.
Displays the information in HDD, such as the number of discs stored on the
HDD and the amount of space left in the HDD.
12.8 Format HDD
Formats the HDD, erasing ALL data stored on the HDD.
12.9 Load & Copy
Allows an image to be loaded onto the HDD from a master CD or DVD and
automatically copied on to the target disc(s). Select from 3 modes:
Synchronous, Load First and Off.
13 ADVANCED SETUP
13.1 Set Burn Loop
Sets the number of test loops performed for the Burn-In process. Use the scroll
buttons to select loop count.
13.2 Set Burn Time
Sets the time for the burn in process to be performed. Use the scroll buttons to
select the desired time.
13.3 Burn-In
Performs the simulation of the testing process to verify the operability of the
controller and/or drive(s).
5
13.4 Display Mode
Sets the amount of information to be displayed during the performance of
various functions.
13.5 Copy interrupt
Allows for interruption of any function executed by holding down the ESC for
five seconds during the performance of the function.
13.6 Update Plextor
Updates the drive firmware for Plextor-brand drive(s) using the controller.
13.7 Update NEC
Updates the drive firmware for NEC-based drive(s) using the controller.
13.8 Update BIOS
Allows rollback or update of the firmware for the controller.
13.9 Adv. Counter
Tracks the total number of all CDs and/or DVDs duplicated by the controller.
Functions:
1. Copy – This command will copy the master disc placed in the designated Source Drive to all target discs
in the Writer Drives. This process burns all information contained on the master disc to the target discs so
the copies are exact duplicates of the master disc.
To Start the Copy Process:
1. Power on the machine (if not already on).
2. Eject disc tray of the Source Drive and place the master disc in the designated Source Drive (usually
the top). The “master disc” is the original of which copies are made.
3. Eject disc tray(s) of the Writer Drives and place blank disc(s) on the tray(s). Number of drives used
depends on number of copies desired. It is not necessary to always use all drives.
4. Use the scroll buttons to select the command “1. Copy” and press the ENT button. The drives will
automatically close trays and begin the copy process.
5. Once the copy process is completed, the disc trays will eject and the display will read “Copy Result:
Pass X, Fail Y,” with X being the number of successful copies, and Y being the number of failed
copies. To reduce copy failure, please refer to the troubleshooting section of the manual.
Î Press ENT to load
disc and execute Copy
Î
Î
Î Analyze master disc Î
Î Start copying Î
Î Finish
and eject
discs
2. Test – This command will simulate the copy process and make sure all target discs are usable. The test
process does NOT burn anything to the blank disc(s). A built-in diagnostic algorism is used to verify the
chance of successful copy for each target disc.
To start the Test Process:
1. Power on the machine (if not already on).
2. Eject disc tray of the Source Drive and place the master disc in the designated Source Drive (usually
the top). The “master disc” is the original of which copies are made.
3. Eject disc tray(s) of the Writer Drives and place blank disc(s) on the tray(s). Number of drives used
depends on number of discs to be tested. It is not necessary to always use all drives.
4. Use the scroll buttons to select the command “2. Test” and press the ENT button. The drives will
automatically close trays and begin the test process.
5. Once the test process is complete, the disc trays will eject and the display will read “Test Result: Pass
X, Fail Y, with X being the number of discs that passed the test, and Y being the number of failed
copies. Use discs that have passed the test for the actual duplication.
6
Î Press ENT to load
disc and execute Test
Î
Î Analyze source disc Î
Î Start simulation Î
Î Finish and
eject discs
3. Copy & Verify – This command will perform the copy process, and immediately follow with a verification
process on all target discs. This command is especially useful for audio CD duplication.
Note: The verification process uses a Disc Readability Check to individually check the presence of data on each copy. This process
does not compare the contents of duplicated discs against that of the master. It only verifies that the duplicated discs are readable.
To start the Copy & Verify process:
1. Power on the machine (if not already on).
2. Eject disc tray of the Source Drive and place the master disc in the designated Source Drive (usually
the top). The “master disc” is the original of which copies are made.
3. Eject disc tray(s) of the Writer Drives and place blank disc(s) on the tray(s). Number of drives used
depends on number of copies desired. It is not necessary to always use all drives.
4. Use the scroll buttons to select the command “3. Copy & Verify” and press the ENT button. The
drives will automatically close trays and begin the copy process.
5. Once the copy process is completed, the tray(s) will open briefly, and then automatically close again
to begin the verify process.
6. Once the verify process is completed, the trays will automatically eject discs that have passed the
Copy & Verify process.
Î Analyzing
source disc Î
Î Press ENT to
load disc Î
Î
Î
Î Start copying Î
Copy completed
and start Verify Î
Î Finish and eject discs
4. Copy & Compare – This command will perform the copy process, and immediately follows with a
comparison between the master disc and the copied disc(s) to ensure the copies are exact duplicates of
the master disc. This command is especially useful for DVDs, data CDs and video CDs.
Note: The Compare process is a bit-by-bit comparison between the master disc and the copied discs. This operation ensures that
all of the copies are completely identical to the Master disc. This command is not applicable to audio CDs.
To start the Copy & Compare process:
1. Power on the machine (if not already on).
2. Eject disc tray of the Source Drive and place the master disc in the designated Source Drive (usually
the top). The “master disc” is the original of which copies are made.
3. Eject disc tray(s) of the Writer Drives and place blank disc(s) on the tray(s). Number of drives used
depends on number of copies desired. It is not necessary to always use all drives.
4. Use the scroll buttons to select the “4. Copy & Compare” command and press the ENT button. The
drives will automatically close trays and begin the copy process.
7
5. Once the copy process is complete, the tray(s) will open briefly, and then automatically close again to
begin the compare process.
6. Once the compare process is completed, the trays will automatically eject discs that have passed the
Copy & Compare process.
Î Analyzing
source disc Î
Î Press ENT to
load disc Î
Î
Î
Î Start copying Î
Copy completed
and start Compare Î
ÎFinish and eject discs
5. Verify – This command verified readability on the master disc and/or all target discs. This command is
especially useful for audio CD duplication.
Note: The verification process uses a Disc Readability Check to individually check the presence of data on each copy. This process
does not compare the contents of duplicated discs against that of the master. It only verifies that the duplicated discs are readable.
To start the verify process, please follow the instructions below:
1. Power on the machine (if not already on).
2. Eject disc tray of the Source Drive and place the master disc to be verified in the designated Source
Drive (usually the top). The “master disc” is the original of which copies are made.
3. Eject disc tray(s) of the Writer Drives and place copied disc(s) to be verified on the tray(s). Number of
drives used depends on number of copies to be verified. It is not necessary to always use all drives.
4. Use the scroll buttons to select the command “5. Verify” and press the ENT button. The drives will
automatically close trays and begin the verify process.
5. Once the verify process is complete, the trays will eject the discs that have passed the verify process.
Î Press ENT to
load discs Î
Î
Î Analyzing source disc Î
Î Start verification Î
Î Finish
and eject
discs
6. Compare – This command compares copied disc(s) to the master disc and ensures that the copies
are exact duplicates of the master disc. This command is especially useful for DVDs, data CDs and
video CDs.
Note: The Compare process is a bit-by-bit comparison between the master disc and the copied discs. This operation ensures
that all of the copies are completely identical to the Master disc. This command is not applicable to audio CDs.
To start the Compare process, please follow the instructions below.
1. Power on the machine (if not already on).
2. Eject disc tray of the Source Drive and place the master disc in the designated Source Drive (usually
the top). The “master disc” is the original of which copies are made.
3. Eject disc tray(s) of the Writer Drives and place copied disc(s) to be compared on the tray(s).
Number of drives used depends on number of copies to be compared. It is not necessary to always
use all drives.
8
4. Use the scroll buttons to select the command “6. Compare” and press the ENT button. The drives
will automatically close trays and begin the compare process.
5. Once the compare process is complete, the trays will eject the discs that have passed the compare
process.
Î Press ENT to
load discs Î
Î Analyzing source
disc Î
Î Finish
and eject
disc
Î Start
comparison Î
Î
7. Set Burn Speed – This feature allows you to set the burn speed of various types of disc: general CDs
(data and VCDs), audio CDs, DVDs and dual-layer DVDs (DVD DL).
Selectable burn speeds:
CD: 1, 2, 4, 8, 10, 12, 16, 20, 24, 32, 36, 40 (default), 44, 48, 52, 56 MAX.
Audio CD: 1, 2, 4, 8, 10, 12, 16, 20, 24 (default), 32, 36, 40, 44, 48, 52, 56 MAX.
DVD: 1, 2, 2.4, 4, 6, 8 (default), 12, 16, 18, 20 MAX.
DVD DL: 1.2 (default), 2.4, 4, 6, 8, 12, 16, 18, 20 MAX.
To Set the Burn Speed:
1. Power on the machine (if not already on)
2. Use the Scroll buttons to select “7. Set Burn Speed”. Press the ENT button.
3. The first speed selection is for general CDs. Use the Scroll buttons to select the desired burn speed
and press the ENT button.
4. The second speed selection is for audio CDs. Use the Scroll buttons to select the desired burn speed
and press the ENT button.
5. The third speed selection is for DVDs. Use the Scroll buttons to select the desired burn speed and
press the ENT button. Note: The selection is only available on DVD duplicators.
6. The last speed selection is for DVD DL. Use the Scroll buttons to select the desired burn speed and
press the ENT button. Note: The selection is only available on DVD duplicators.
Î Press ENT &
i or j Î
Î
Î
Î i or j and press ENT to set
general data CD burning speed Î
Î i or j and press ENT to set audio CD burning speed Î
Î i or j and press ENT to
set DVD burning speed Î
Î Finish and return
to main menu
8. Select Source – This command will allow you to change the source drive to any one of the drive(s)
inside the unit, including the HDD (if installed).
To change the source drive inside the unit to a different drive:
1. Power on the machine (if not already on).
2. Use the Scroll buttons to select the “8. Select Source: Press the ENT button.
3. The current Source Drive will be displayed along with the partial model number of the drive
and the port number in brackets.
4. Use the Scroll buttons to select from other available drives until the port number of the desired
drive is displayed.
9
5. Press the ENT button. The desired drive will then become the Source Drive.
Î Press ENT Î
Î Display current Source
Drive setting Î
Î i or j
to select driveÎ
Î Press ENT to finish Setting
9. Edit Track – This command allows users to select tracks from multiple audio CDs and burn to target CDs.
This command also closes edited audio CDs and displays the disc information.
To create and copy custom compilation audio CDs from multiple master discs:
1. Power on the machine (if not already on).
2. Use the Scroll buttons to select “9. Edit Track”. Press the ENT button.
3. The display will read “[Edit Track] 1. Copy Track”. Press the ENT button.
4. The display will read “Waiting….Master Disc”. Insert the first master disc and press the ENT button.
5. Once the master disc is successfully read, the display will read “Waiting….Blank Disc”. Insert blank
disc(s) into writer drive(s) and press the ENT button.
6. The number of tracks on the master CD will be displayed on the lower half of the screen. Use the
Scroll buttons to select track(s) to be copied. In alphabetical order, a lower-case letter will be
assigned to the tracks selected.
7. Once the selection of tracks is finished, use the Scroll buttons to select “OK” at the end of the numeric
listing of tracks. Press the ENT button.
8. The duplicator will begin copying the selected track(s) to the target CD(s). Once the copy process is
completed, the display will read the number of tracks that are currently on the target CD(s), time used
on the target CD(s) and time left (free spaces). Press the ENT button.
9. The display will now read “[Edit Track] 1. Copy Track”. If tracks from a different master CD are
desired, press the ENT button and repeat steps 4 through 8 for each different master CD. If selection
of tracks is completed, proceed to step 10.
10. Use the Scroll buttons to select “[Edit Track] 2. Close Disc”. Press the ENT button.
11. The target disc(s) will now be finalized and closed for completion. Once completed, the disc(s) will be
automatically ejected. This concludes the Edit Track process.
Î i or j and press ENT to
select tracks Î
Î Press ENT Î
Î
Î j to OK and press
ENT to start burning Î
Î
Î Repeat steps for next
master or press i or j and
ENT to close discs Î
Î Finish and eject disc
Note: A copied audio CD must be closed (finalized) before it can be played back.
a. Once all tracks to be copied have been selected, pressj to select “OK” on the display.
Press ENT to confirm and begin the copy process.
b. Once the track selection is entered, the LCD screen will read “Copying Audio Tracks…”,
and display the track number, total time of current track and the current copying status.
10
c. Once the copy process is completed, the LCD screen will display the total number of tracks
on target CD(s), total time used and total time remained.
d. Repeat the track selection and copy process until all desired tracks have been copied to target
disc(s). Proceed with disc closing process.
Note: Once disc closing process is performed, no more track(s) can be added to target CD(s).
10. Utility – This command contains various tools to check functionality of the drive(s), information of the
components, and other system information.
1. Prescan: Prescans the master disc and verifies the integrity and quality of the master disc.
a. Select Utility and press ENT to enter the sub-menu.
b. Select 1. Pre-scan and press ENT
Î Press
ENT Î
Î Finish
Prescan Î
2. Quick Erase: Performs a quick erase of rewritable (RW) media for next use.
Note: Do NOT perform this function on recordable (R) media.
Î Insert re-writable
discs and press ENTÎ
ÎFinish Quick Erase
and eject discs
Note: If the display shows “O” “o” blinking, Erasing is in progress. If the display shows “F” “f” blinking, DVD+RW Disc
Formatting is in progress.
3. Full Erase: Performs a full erase and format of rewritable (RW) media for next use.
Note: Do NOT perform this function with recordable (R) media.
Î Insert re-writable disc
and press ENTÎ
ÎFinish Full Erase
and eject discs
Note: If the display shows “O” “o” blinking, Erasing is in progress. If the display shows “F” “f” blinking, DVD+RW Disc
Formatting is in progress.
4. Eject All Discs: Performs a simultaneous ejection of all of the optical disk drive(s) on the duplicator.
Î Press ENT Î All disc trays will open
5. Disc Info: Checks the capacity and space used on the disc(s) inside of the drive(s) of the duplicator.
11
Î Press ENT Î
6. Drive Info: Checks the make, model, firmware and the channel (port) of the drive(s) that are
connected to the duplicator controller.
Î Press i or j to select
different Drives
Î Press ENT Î
7. System Info: Checks the model number, buffer memory and firmware version of the
duplicator controller.
Î Press ENTÎ
8. Update BIOS: Updates the BIOS (firmware) of the duplicator controller.
Î Press ENTÎ
Î Insert update CD
and press ENT Î
Update completed and
eject disc Î
Î Re-boot system
Î
Î
9. Copy Count: Tracks the numbers of successful and failed copies made by the duplicator for both
CDs and DVDs. There are three (3) parts of this tool: Show Count (to display current copy counter),
Enable Counter (to turn the counter on or off) and Reset Counter (to clear counter).
1. Show Count
Î Press
ENT Î
Î Press
ENT Î
2. Enable Count
Î Press ENT Î
Î Press ENT Î
Î i or j and press ENT to select choice
Î
3. Reset Counter
Î Press
ENT Î
Î
Î Press
ENT Î
Press ENT to confirm or press to ESC cancel Î
12
11. Setup – This command contains options to configure the duplicator system.
1. Power On Time: Set the amount of time the duplicator controller counts down before initializing the
system. The default is 15 seconds. The time can be set from 5 to 99 seconds in 1-second
increments (5,6,7….97,98,99).
Î i or j to select seconds and
press ENT to confirm
Î Press
ENT Î
2. Auto Start Time: Set the amount of time before the duplicator will automatically start the selected
command ranging from OFF (no auto start) to 99 seconds in 1-second increments (1, 2, 3….97,
98, 99).
Î i or j to select seconds and
press ENT to confirm
Î Press
ENT Î
3. Start-up Menu: Sets the command to be displayed first when the machine is powered up and
initialized. All primary commands are available to be set for Start-up: Copy, Test, Copy & Verify,
Copy & Compare, etc.
Î i or j to select function and
press ENT to confirm
Î Press
ENT Î
4. Display Mode: Changes the display readout during the performance of various commands.
The “Basic” mode displays a progress bar, along with the amount of total data in MB on the master
DVD (or in time for the master CD). The “Expert” mode displayed the percentage of the process
completed, the amount of data transferred and the total amount of data on the master disc.
Î i or j to select mode and
press ENT to confirm
Î Press
ENT Î
5. Button Beep: Turns the audio signal (a beeping sound) ON or OFF for pressing of the buttons.
Î i or j to select mode and
press ENT to confirm
Î Press
ENT Î
6. Skip Read Error: Allows the duplicator to skip uncorrectable read errors on the master DVD or CD.
This feature can be turned ON or OFF.
Î i or j to select mode and
press ENT to confirm
Î Press
ENT Î
7. Eject On Start: Allows the drive(s) with disc(s) present inside to eject the disc trays when the
machine is done initializing.
13
Î i or j to select Eject All/ No
Eject/ Eject Target/ Eject Source
and press ENT to confirm
Î Press
ENT Î
8. Show Copy Time: Allows the display of total time taken for the copy process to be complete.
Î i or j to select mode and press
ENT to confirm
Î Press
ENT Î
9. Reader Speed: Sets the reader speed for the duplicator to read the master disc(s). The speeds for
CD are: 1, 2, 4, 8, 10, 12, 16, 20, 24, 32, 36, 40, 44, 48, 52, 56 (default), MAX. The speeds for DVD
are: 1, 2, 2.4, 4, 6, 8, 10, 12, 16, 18, 20 (default), MAX.
Î i or j to select
CD Read and press ENT Î
Î Press
ENT Î
Î i or j to select DVD read speed
and press ENT to finish.
Î
10. Compare Speed: Sets the speed at which the master disc is compared with the copies disc(s). The
speeds for CD are: 1, 2, 4, 8, 10, 12, 16, 20, 24, 32, 36, 40 (default), 44, 48, 52, 56, MAX. The
speeds for DVD are: 1, 2, 2.4, 4, 6, 8, 12, 16 (default), 18, 20 MAX.
Î i or j to select CD Compare
Speed and press ENT Î
Î Press
ENT Î
Î i or j to select DVD Compare speed
and press ENT to finish
Î
11. Change Bad Master: Allows the changing of the master disc during duplication when there is an
uncorrectable error on the master disc(s) that threatens to disrupt the copy process.
Î i or j to select mode and
press ENT to confirm
Î Press
ENT Î
12. CD Overburn: Allows the copying of CDs that have been burned over their maximum capacity.
The target disc(s) must be the same capacity as the master disc.
Î i or j to select mode and
press ENT to confirm
Î Press
ENT Î
13. Copy CD-TEXT: Allows the copying of the CD-TEXT on the master disc(s) to the target disc(s).
Î i or j to select mode and
press ENT to confirm
Î Press
ENT Î
14
14. Show HDD Image: Allows the option to display the name of the HDD image name (default) or the
image size (in MB).
Î i or j to select Image
Name/ Capacity and press
to ENT confirm
Î Press
ENT Î
15. Boot Password: Sets password protection for the duplicator before the boot-up process can be
started. The boot password prevents anyone unauthorized from using the duplicator system.
Î i or j to select mode and
press ENT to confirm
Î Press
ENT Î
If Disable is selected, no password will be set and the display will direct back to the
Setup sub-menu.
If Enable is selected, a password must be entered using the following guidelines:
Use i or j to select the character desired.
Press ENT to go to the next position.
There are a total of 6 positions for the password. To enable the password, set all 6 positions.
For space, press ENT without choosing a character to leave the position empty.
Press ESC to cancel the process.
The duplicator will ask for password when the unit is restarted.
16. Setup Password: Sets password protection for the duplicator before the setup settings can be
altered. The setup password prevents unauthorized changes to the system.
Î i or j to select mode and
press ENT to confirm
Î Press
ENT Î
If Disable is selected, no password will be set and the display will direct back to the
Setup sub-menu.
If Enable is selected, a password must be entered using the following guidelines:
Use i or j to select the character desired.
Press ENT to go to the next position.
There are a total of 6 positions for the password. To enable the password, set all 6 positions.
15
For space, press ENT without choosing a character to leave the position empty.
Press ESC to cancel the process.
The duplicator will ask for password when “11. Setup” is selected
17. Language: Sets the language selection of the display. Available languages are: English (default),
Spanish, Portuguese, and Japanese.
Î i or j to select language
and press ENT to confirm
Î Press
ENT Î
18. Clear Setup: Resets the duplicator controller back to factory default settings.
Î Press
ENT to confirmÎ
Î Press ENT Î
Î
Î Press ENT to clear all settings
12. Image Manager – This command is for the management of the hard disk drive (HDD) installed in the
duplicator. Note: This feature is only available on duplicators with a HDD installed. If there is no HDD present in the duplicator,
this feature will NOT show in the menu of commands.
1. Select Image: Allows the selection of the image(s) present on the HDD. The Scroll buttons cycle
through the image(s) on the HDD and the ENT button confirms the selection while the ESC button
cancels the selection. The image(s) are listed in order of which they were loaded.
Î i or j to select image and
press ENT to confirm
Î Press
ENT Î
2. Disc => Image: Transfers the information from the master CD/DVD to the HDD. After the image(s)
transfer is complete, the reader drive is ejected and the source drive is changed to the HDD.
Î Press
ENT Î
Î The source disc loaded to
HDD as image file, A001. Î
Î
Note: The Source Disc may be placed in the Reader Drive or any of the Writer Drives.
3. Set Reader Speed: Change the read speed (load speed) for the HDD. The speeds for CD are: 1, 2,
4, 8, 10, 12, 16, 20, 24, 32, 36, 40, 44, 48, 52, 56 (default), MAX. The speeds for DVD are: 1, 2, 2.4,
4, 6, 8, 10, 12, 16, 18, 20 (default), MAX.
16
Î i or j to select CD Read
Speed and press ENT to confirm
Î Press
ENT Î
Î i or j to select DVD Read Speed
and press ENT to confirm
Î
4. Show Image Info: Shows the image number in sequential order, the file name of the image stored
on the HDD, the type of image stored, and the amount of data the image contains (in MB for DVD
or time for CD).
Î i or j to select image and
press ENT to display info
Î Press
ENT Î
DVD disc image of
3.875GB as file A001
CD disc image of 65 min 28
sec as file A003
5. Rename Image: Renames the image instead of using default file names (A001, A002, etc.).
Up to 8 characters.
Î Select the image file to be
renamed and press ENT Î
Î Press
ENT Î
Î i or j to select character.
Press ENT to go to the
next position. Î
Î
Î Press ENT to
confirm Î
Î
There are 8 characters for each image name. No empty space allowed in the image file name.
Press ESC to cancel the process.
6. Delete Image: Deletes the image(s) from the HDD and reclaims the space occupied by the image
on the HDD.
Î Press
ENT Î
Î Select the image file
to be deleted Î
Î Press
ENT Î
Î Delete Image completed.
Repeat to delete more images.
17
7. Show HDD Info: Shows the amount of used and free images available on the HDD in both
CD and DVD formats.
Î Press ENT Î
8. Format HDD: Deletes and formats all image(s) on the HDD, restores the HDD to factory defaults
and initializes the HDD for use with the duplicator.
Î Press ENT to
confirm format Î
Î Press ENT Î
Î Press ENT again to
confirm and start
formatting Î
Î
9. Load and Copy: There are three (3) modes in this function.
Î i or j to select between
OFF / Synchronous / Load
First and press ENT to confirm
Î Press
ENT Î
a) Load First: Completes loading of the image(s) to the HDD before automatically begins the
copy process from the image stored on the HDD to all target disc(s). Image(s) are loaded one
at a time and copied to the Writer Drives with blank disc(s) ready. The image(s) are stored
in a [TEMP] partition on the HDD.
Î
Î Press ENT
to confirm Î
Î Press ESC to exit
Image Manager
and go back
to main menu Î
i or j to
select “1.Copy’”Î
Î Press ENT Î
Î Loads master disc
into [TEMP] on HDD to
100% then start copy Î
Î
Î
Complete copying
from HDD file to target
discs Î
b) Synchronous: Loads the image at the same time while the duplicator is making copies from the
master disc to the blank discs. As the copies being made, the image is also being created and
stored in the [TEMP] directory on the HDD.
18
Î
Î Press ENT
to confirm Î
Î Press ESC to exit
Image Manager
and go back
to main menu Î
i or j to
select “1.Copy” Î
Î Press ENT Î
Î Start copying to
target disc(s) and
loads image into HDD
at the same time Î
Î
Î
Ejects copies and
displays HDD file
in[TEMP] Î
c) OFF: Disables the load and copy function. No temporary image is loaded to the HDD
during the copy process.
Î press ENT to
confirm choice Î
Î press ENT Î
Î press ESC to exit
Image Manager and
move i,j to select
from main menu
Î
13. Advanced Setup – This menu is for the more advanced functions of the controller, including changing
the display of the controller, updating writer drive(s) of specific brands, setting the loop and time
parameters for the burn-in process to test the machine, and performing firmware rollbacks to earlier
versions. Note: The Advanced Setup is hidden within the Setup Menu (step 11). To access Advanced Setup, navigate to Setup
Menu, then press and hold down the scroll buttons simultaneously until the menu stop looping.
1. Set Burn Loop: Set the number of test loops performed for the Burn-In process. The numbers of
loops available are: 1 (default), 2, 5, 10, 20, 50, 100, 200, 300, 400, 500, 600, 700, 800, 900,
1000, 2000, 3000, 4000, 5000, 6000, 7000, 8000, 9000, 10000.
Î Press ENT Î
Î i or j to select loop
count and press ENT
to confirm
2. Set Burn Time: Sets the time limit for test burn-in process. The times available are: 30 minutes
(default), 1 hour, 2 hours, 3 hours, 4 hours, 5 hours….up to 65,536 hours.
Î Press ENT Î
19
Î i or j to select
Burn-in Time and
press ENT to confirm
3. Burn-In: Performs the burn-in test which tests the unit for stability and longevity. The test is
performed for the specified time and loop count selected.
Î Press ENT Î
Î Load master and
blank discs and press
ENT to startÎ
Î Finish and eject
discs. Automatically
restarts until all
parameters are reached
Î
4. Display Mode: Sets the amount of information displayed on screen. There are three (3) modes:
Basic, Expert and Debug.
Î Press ENT Î
Î i or j to select mode
and press ENT to confirm
Basic Display Settings will display the
command, a progress bar, type of disc
(CD or DVD) and size of disc (time for CD,
MB for DVD)
Expert mode displays the command, execution
time of the process, size of the master disc (time
for CD, MB for DVD), the percentage completed,
speed and amount of data completed.
Debug Mode displays the command, the
amount of data on the master disc, the amount
of data read by the designated source drive
with the amount of buffer used, and the amount
of data written on the slowest writer drive and
the amount of buffer used.
5. Copy Interrupt: Allows interruption and abortion of a command while in progress. Applies to
Copy, Test, Copy and Verify, Copy and Compare, Verify and Compare functions. Also applies
to sub-commands (for example, Prescan under Utility).
Î Press ENT Î
Î Press ENT
6. Update Plextor: Updates Plextor DVD/CD drives. Only select models tested and approved by
the manufacturer can be updated by the controller.
Note: The source drive must be different from the writer drive model being updated. This function will not work
in all-writer duplicators.
Instructions for updating Plextor drives:
1. Place the CD with the appropriate .bin file inside the designated source drive.
2. Proceed to Advanced Setup menu (see section 13 on page 22).
3. Use the Scroll buttons to select “[Advanced Setup] 6. Update Plextor”. Press the ENT button.
20
4. If the file inserted is correct, the display will read “[PLEXTOR] Updating drive…”. The drive
firmware will be updated.
5. Once the drive firmware update is finished, the screen will display “Firmware Update
Complete.” Restart the duplicator for the update to take effect. This completes the drive
firmware update process.
Î Press ENT Î
Î Insert update CD
and press ENT
Eject CD Î
Î Re-boot system
Î
Î
7. Update NEC: Updates NEC DVD/CD drives. Only select models tested and approved by the
manufacturer can be updated by the controller.
Note: The source drive must be different from the writer drive model being updated. This function will not work in
all-writer machines.
Instructions for updating the NEC drives:
1. Place the CD with the appropriate .bin file inside the designated source drive.
2. Proceed to Advanced Setup menu (see section 13 on page 22).
3. Use the Scroll buttons to select “[Advanced Setup] 6. Update NEC”. Press the ENT button.
4. If the file inserted is correct, the display will read “[NEC] Updating drive…”. The drive
firmware will be updated.
5. Once the drive firmware update is finished, the screen will display “Firmware Update
Complete.” Restart the duplicator for the update to take effect. This completes the drive
firmware update process.
Î Press ENT Î
Î Insert update CD
and press ENT Î
Eject CD Î
Î System re-boot
Î
Î
8. Update BIOS: Allows for update or rollback of the controller firmware. This function is used for
firmware rollbacks as the standard firmware update does not allow rollbacks.
Note: Use this command to restore previous version of controller firmware. The update command under utility
menu can only update but not rollback.
21
Î Press ENT Î
Î Insert update CD
and press ENT Î
Eject CD Î
Î System re-boot
Î
Î
9. Adv. Counter: Keeps the total count to date of CDs and/or DVDs duplicated by the controller.
Counter can also be reset to zero. The two options are Show Counter and Clear Counter.
a) Show Counter: Shows the total number of copies (CDs and/or DVDs) duplicated by the
controller to date.
Î Press ENT Î
Î Press ENT Î
Î Press ENT
to exit
Î
b) Clear Counter: Clears the counter and resets it to zero.
Î Press ENT Î
Î Press ENT Î
Î Press ENT to
confirm Î
Î
Basic Troubleshooting:
Follow these simple steps for quick and proper troubleshooting.
1. Power does not turn on or unit receives no power.
a. Check power cord and outlet to make sure power connections are secured.
b. Check voltage switch on the back of the duplicator to make sure power supply
is set for correct outlet rating.
c. Test with another power cord (same as a PC power cord) to eliminate cable failure.
2. Master disc cannot be read
a. Change the master disc. The master disc may be of poor quality or with error(s)
that can make duplication difficult or impossible.
b. Remake the master disc on another disc. Master disc may be of poor quality
or with error(s) that make duplication difficult or impossible.
c. Change the source drive to one of the other drives to test.
d. Make sure the master disc is finalized in standard ISO format.
22
3. High failure rate
a. Change the media type. Certain types of media may not be compatible with the drives.
Poor-quality media can also cause high failure rate.
b. Lower the burn speed and attempt another copy process. Lowering the speed increases
the stability of the duplication process.
c. Check for available firmware updates for the unit. A firmware update may resolve
any unspecified issues.
4. Machine locks up during the copy process
a. Hold down the ESC button to abort the copy process. The copy process will cancel
and menu goes back to the last function executed.
b. If the button cancel does not work, power cycle the unit (power the unit off, leave
off for five seconds and power the unit back on).
c. Change the master disc. A master disc with error(s) or a poor quality master disc
can cause duplication to lock up at particular points during the copy process.
5. Button(s) do not function on the unit.
a. The duplicator may be busy. Buttons pressed while the duplicator is processing
will not perform functions unless otherwise specified.
b. Possible faulty button. Contact your technical support department for further information.
6. One of the drives does not open and/or LED does not light up
a. Check USB and/or Firewire port switch and make sure the switch is in the OFF
position before machine power is turned on.
b. If a disc is stuck inside a drive, insert a paper clip or safety pin in the pinhole
underneath the drive door and push gently. Make sure the power is OFF during
this step. Then press the EJECT button of the drive a few times to test the disc tray.
7. The blank CD or DVD is not recognized in the writer drive(s)
a. Test the blank disc in another writer drive. A faulty writer drive will not recognize blank discs.
b. Change the blank disc to another disc. A defective blank disc will not be recognized
by the writer drive.
c. Change the brand of media or media type. Certain types of media may not be compatible
with the drives. Poor-quality media can also cause high failure rate.
Copyright © 2008. All rights reserved.
23