1
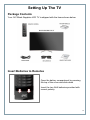
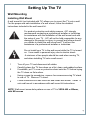
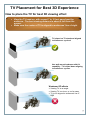
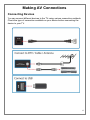
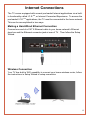
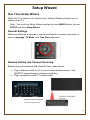
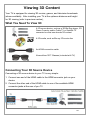
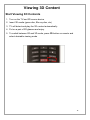
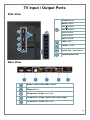
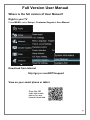
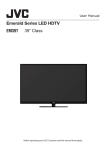
Safety Precautions Heed all warnings Follow all instructions Do not use this device near water Clean only with dry cloth Do not block any ventilation openings. Install in accordance with manufacturer’s instructions. Do not install near any heat sources such as radiators, heat registers, stoves, or other heat-generation devices. Do not defeat the safety purpose of the polarized or grounding-type plug. A polarized plug has two blades with one wider than the other. A grounding-type plug has two blades and a third grounding prong. The wide blade or the third prong is provided for your safety. If the provided plug does not fit into your outlet, consult an electrician for replacement of the obsolete outlet. Protect the power cord from being walked on or pinched, particularly at plugs, convenience receptacles, and the point where they exit from the device. Only use attachments/accessories specified by the manufacturer. Unplug this apparatus during lightning storms or when unused for long periods of time. Refer all servicing to qualified service personnel. Servicing is required when the apparatus has been damaged in any way, such as power supply cord or plug is damaged, liquid has been spilled or objects have fallen into the apparatus, the apparatus has been exposed to rain or moisture, does not operate normally, or has been dropped. When you connect the product to other equipment, turn off the power and unplug all of the equipment from the wall outlet. Failure to do so may cause electric shock and serious personnel injury. Read the owner’s manual of the other equipment carefully and follow the instructions when making any connections. Do not press hard or jolt the LCD panel. It may cause the LCD panel glass to break and injury may occur. 1 Setting Up The TV Package Contents Your JVC Black Sapphire LCD TV is shipped with the items shown below: Insert Batteries to Remotes Open the battery compartment by pressing the top of the cover and slide down Insert the two AAA batteries provided with correct polarity 2 Setting Up The TV Attaching the Stand Keep the protective bag on TV and place them on a flat surface. Attach stand to TV. Fasten the four screws provided. Carefully lift TV up Removing the TV Stand When television needs to be transported, remove TV Stand and pack TV back in its shipping box. To remove TV Stand, remove screws securing stand to rear of television. 3 Setting Up The TV Wall Mounting Installing Wall Mount A wall mount kit (not included with TV) allows you to mount the TV onto a wall. For the proper and safe installation of a wall mount, follow the detailed instructions included in the wall mount kit. For product protection and safety reasons, JVC strongly recommends contacting a professional installer or technician for assistance with the installation of the wall mount and with the setup of your TV. JVC will not be held responsible for any damage to the product or injury to yourself and others should you decide to install the wall mount and TV without the assistance of a professional installer or technician. Do not install your TV to the wall mount while the TV is turned on. It can result in personal injury due to electric shock. A minimum of two people should be used when moving TV, and when installing TV onto a wall mount. 1 Turn off your TV and disconnect all cables. 2 Carefully place the TV face down on a flat, clean, and padded surface. If available, put TV cover or protective sheet onto the TV before laying the TV down on flat surface. 3 Using a cross-tip screwdriver, remove four screws securing TV stand to rear of TV. Remove TV stand. 4 Follow instructions in wall mount kit and install wall mount. Install TV onto wall mount in accordance with wall mount kit instructions. NOTE: Wall mount screw hole pattern on rear of TV is VESA 400 x 400mm, with M6 screws 4 TV Placement for Best 3D Experience How to place the TV for best 3D viewing effect View the TV head-on, with around 7 to 10 feet away from the audience. The best viewing distance is about 9 feet from the screen. Make sure the center of TV is aligned to audiences’ line of sight TV placed on TV stand and aligned to audiences’ eye level Use wall mount hardware with tilt capability. TV is tilted down aligning to audiences’ eye line Weakened 3D effects Viewing TV at an angle Viewing TV too close, or too far away TV is not aligned to audiences’ line of sight 5 Making AV Connections Connecting Devices You can connect different devices to the TV using various connection methods. Check the type of connection available on your device before connecting the device to your TV. 6 Making AV Connections 7 Internet Connections The TV comes equipped with several pre-loaded Internet applications via a builtin functionality called I.C.E.TM, or Internet Connected Experience. To access the pre-loaded I.C.E.TM applications, the TV must be connected to the home network. This can be accomplished in two ways: Making a Hard-Wired Ethernet Connection Connect one end of a CAT 5 Ethernet cable to your home network’s Ethernet drop box and the Ethernet connector jack at rear of TV. Then follow the Setup Wizard. Wireless Connection Your TV has built-in WiFi capability to connect your home wireless router, follow the instructions in Setup Wizard to setup connection 8 Setup Wizard One Time Setup Wizard When the TV is turned on for the first time, a Setup Wizard will assist you in setting up the TV. Note: You could run Setup Wizard anytime by press MENU button, choose SETUP and then Setup Wizard General Settings Make sure batteries is inserted to remote and follows on-screen instruction to select, Language, TV Mode, and Time Zone selections Network Setting and Channel Scanning Before running the Network and Channel Scan, make sure to Plug in Ethernet cable to TV or turn on home wireless router. Use QWERTY keypad to input network security key Plug in antenna or cable TV coaxial cable Align the remote IR emitter to TV’s IR receiver lens 9 Viewing 3D Content Your TV is equipped for viewing 3D movies, games, and television broadcasts (where available). After installing your TV at the optimum distance and height for 3D viewing (refer to previous section), What You Need To View 3D A 3D source device, such as a 3D Blu-Ray player, 3D Game Console, and/or Cable TV or Satellite TV converter box that can decode 3D content A 3D media, such as Blu-ray 3D movie disc An HDMI connection cable XinemaView 3D™ Glasses (included with TV) Connecting Your 3D Source Device Connecting a 3D source device to your TV is very simple: 1. Connect one end of the HDMI cable to the HDMI connector jack on your device. 2. Connect the other end of the HDMI cable to one of the available HDMI connector jacks at the rear of you TV 10 Viewing 3D Content Start Viewing 3D Contents 1. Turn on the TV and 3D source device 2. Insert 3D media (game disc, Blu-ray disc, etc) 3. TV will detect and play the 3D content automatically 4. Put on a pair of 3D glasses and enjoy. 5. To switch between 2D and 3D mode, press 3D button on remote and select desirable viewing mode 11 Viewing 3D Content 3D Health & Safety Advisory Should you experience discomfort while viewing 3D video images, take a 10-to-15 minute break or try viewing the video in 2D. Consult your health care provider, if necessary. Due to vision development concerns, Do Not allow children under the age of 6 to view 3D video images. Parents should supervise children closely to prevent prolonged 3D viewing. Keep proper distance from TV while viewing 3D videos or images. Minimum distance between you and the TV screen should be 7 feet. Refer to Section 2: TV Placement for Best 3D Experience for proper TV distance and height from viewing audience. For those with epilepsy, have a family history linked to epilepsy, or have experienced epileptic-type symptoms in the past, consult your health care provider before viewing 3D videos or images. Avoid viewing 3D content when under the influence of alcohol. Viewing 3D content may cause dizziness and/or disorientation for some viewers. To avoid injury, do not place you the TV at or near stairwells, balconies, or wires. Clear viewing area of any objects that can break and cause injury when accidentally hit. 12 ICE Apps™ & USB Multimedia ICE Apps and Multimedia Operations The TV equipped with I.C.E™ (Internet Connected Experience) platform which provides connectivity to popular internet content streaming services. Note: To access any of the pre-loaded ICE applications, make sure the TV is connected to the Internet. On the remote, press the ICE Apps button to display the ICE applications screen. Select an app and press the OK button to enter the application. Follow the instruction on screen to setup each application. USB Multimedia control Control multimedia content* stored in your USB drive by choosing this icon, or press MULTIMEDIA button on remote. * The TV is capable of photos, music and video playback. However, due to the wide variety of multimedia file formats. Some formats may not be supported. New ICE Apps Update: With internet connection setup, the TV will periodically look for new ICE Apps, as well as other TV software update, available in server. The TV will automatically download newest ICE apps and software update 13 TV Input / Output Ports Side View Power Button MENU Button 1 2 CH Button CH Button VOL+ Button 1 VOL- Button INPUT Button 3 4 5 2 USB Ports 3 HDMI -3 Ports 4 Audio Out (headphone) 5 Optical Audio Out Rear View 1 HDMI -1 (ARC) and HDMI -2 ports 2 Ethernet Port 3 3 Component / Video Input Jack 4 Component / Video / Music Port Audio Input 5 TV Antenna / Cable Input Jack 14 Full Version User Manual Where is the full version of User Manual? Right in your TV Press MENU, select Setup > Customer Support > User Manual Download from internet http://go.jvc.com/HDTVsupport View on your smart phone or tablet Scan this QR code with smart phone for user manual download 15 Please do not send products or other correspondence to this address. PLACE STAMP HERE Attn: Product Registration P.O. BOX 50427 IRVINE, CA 92619 Register Online: http://go.jvc.com/HDTVSupport PRODUCT REGISTRATION First Name: Last Name: Address Apt. # City State: Zip Code: Phone Number: E-Mail Address: Date of Purchase: Model Number: Serial Number: Purchase Price: Dealer: 1) Would you like to receive the JVC Community e-mail newsletter? Yes No 2) Would you like to receive special offers from JVC? Yes No Comments: THANK YOU FOR PURCHASING THIS JVC PRODUCT Registering your product will allow us to contact you in the unlikely event a product safety notification is required. This form is for Product Registration purposes only. Failure to return this form does not diminish your rights during the warranty period. Instruction: Fold at crease and tape open edge in the middle Limited Warranty ON PARTS AND LABOR This Limited Warranty covers units that are purchased as new and in the United States Only. This Product is manufactured, distributed, and warranted by AmTRAN Video Corporation (hereinafter known as “Warrantor”) under brand license by JVC KENWOOD Corporation. The Warrantor provides a warranty to the original purchaser of a new Product against defects in materials and workmanship for a period of one (1) year of non-commercial usage and ninety (90) days of commercial use. If a Product covered by this warranty is determined to be defective within the warranty period, the Warrantor will either repair or replace the Product at its sole option and discretion. To obtain warranty service, contact our Technical Support: Visit the Web Site: http://go.jvc.com/HDTVSupport/ Or call our Customer Support and Service Center 1-855-868-1928 PRE-AUTHORIZATION MUST BE OBTAINED BEFORE SENDING ANY PRODUCT TO A DESIGNATED SERVICE CENTER. Proof of purchase in the form of a purchase receipt or copy thereof is required to show that a Product is within the warranty period. Parts and Labor There will be no charge for parts or labor during the warranty period. Replacement parts and Products may be new or recertified at the Warrantor’s option and sole discretion. Replacement parts and Products are warranted for the remaining portion of the original warranty or for ninety (90) days from warranty service or replacement, whichever is longer. Type of Service Defective Products must be sent to the designated service center to obtain warranty service. The Warrantor is not responsible for the transportation costs to the service center, but will cover the costs for return shipping to the customer. PRE-AUTHORIZATION IS REQUIRED BEFORE SENDING ANY PRODUCT TO A DESIGNATED SERVICE CENTER FOR WARRANTY SERVICE. Product returned to designated service centers must utilize either the original carton box and shipping material or packaging that affords an equal degree of protection. Technical Support will provide instructions for packing and shipping the covered Product to the designated service center. Limitations and Exclusions The Warrantor’s one-year limited warranty only covers defects in materials and workmanship. This warranty does not cover product issues caused by any other reason, including but not limited to cosmetic damage, normal wear and tear, improper operation, improper voltage supply or power surges, signal issues, damages from shipping, acts of God, any type of customer misuse, modifications or adjustments, as well as installation and set-up issues or any repairs attempted by anyone other than by an authorized service center. Products with unreadable or removed serial numbers, or requiring routine maintenance are not covered. This one year limited warranty does not cover Products that are sold “AS IS”, “Open Box”, “FACTORY RECERTIFIED”, or by a non-authorized reseller. THERE ARE NO EXPRESS WARRANTIES OTHER THAN THOSE LISTED OR DESCRIBED ABOVE. ANY IMPLIED WARRANTIES, INCLUDING ANY IMPLIED WARRANTY OF MERCHANTABILITY AND FITNESS FOR A PARTICULAR PURPOSE, SHALL BE LIMITED IN DURATION TO THE PERIOD OF TIME SET FORTH ABOVE. THE WARRANTOR’S TOTAL LIABILITY FOR ANY AND ALL LOSSES AND DAMAGES RESULTING FROM ANY CAUSE WHATSOEVER INCLUDING WARRANTOR’S NEGLIGENCE, ALLEGED DAMAGE, OR DEFECTIVE GOODS, WHETHER SUCH DEFECTS ARE DISCOVERABLE OR LATENT, SHALL IN NO EVENT EXCEED THE PURCHASE PRICE OF THE PRODUCT. THE WARRANTOR SHALL NOT BE RESPONSIBLE FOR LOSS OF USE, LOSS OF INFORMATION OR DATA, COMMERCIAL LOSS, LOST REVENUE OR LOST PROFITS, OR OTHER INCIDENTAL OR CONSEQUENTIAL DAMAGES. SOME STATES DO NOT ALLOW LIMITATIONS ON HOW LONG AN IMPLIED WARRANTY LASTS OR THE EXCLUSION OF INCIDENTAL OR CONSEQUENTIAL DAMAGES, SO THE ABOVE LIMITATIONS OR EXCLUSIONS MAY NOT APPLY TO YOU. THIS WARRANTY GIVES YOU SPECIFIC LEGAL RIGHTS, AND YOU MAY ALSO HAVE OTHER RIGHTS, WHICH VARY FROM STATE TO STATE. THIS WARRANTY IS SUBJECT TO CHANGE WITHOUT NOTICE. CHECK TV.JVC.COM FOR THE MOST CURRENT VERSION. Personal Data If your Product is capable of storing personal data and other information, all contents and information will be deleted in the course of some in-home and all ship-in warranty service. If this occurs, your product will be restored to you configured as originally purchased. You will be responsible for restoring all applicable data and passwords. Recovery and reinstallation of user data is not covered under this Limited Warranty. In order to protect your personal information, we recommends that you always clear all personal information from the unit before it is serviced, regardless of the servicer Important Open Source Software Notice Your JVC device contains free software which is based on the license granted under the GNU General Public License and Lesser General Public License (hereinafter “GPL/LPGL”) that are subject to the GPL2.0/LGPL2.1. You may use, modify, or distribute only if you agree to all of the terms and conditions of the GPL/LGPL. Please note that any software component developed or created independently by AmTRAN Video Corporation shall not be subject to “GPL/LGPL” requirement for provision of the source code. Users are urged to read the details for the relevant license carefully before using the software component covered by “GPL/LGPL.” You can obtain a copy of the GPL/LGPL license from http://www.gnu.org/licenses/gpl and http://www.gnu.org/licenses/lgpl. For details of any open source software on your JVC device, please visit the following web site: http://go.jvc.com/HDTVSupport. Please note that we are unable to answer any inquiry relating to the contents, etc of the source code. Permission is hereby granted, free of charge, to any person obtaining a copy of any such software and associated documentation files (the “Open Source Software”), to deal in the Open Source Software without restriction including without limitation the rights to use, copy, modify, merge, publish, distribute, sublicense, and/or sell copies of the Open Source Software, and to permit persons to whom the Open Source Software is furnished to do so, subject to the following conditions: THE SOFTWARE IS PROVIDED “AS IS”, WITHOUT WARRANTY OF ANY KIND, EXPRESS OR IMPLIED, INCLUDING BUT NOT LIMITED TO THE WARRANTIES OF MERCHANTIBILITY, FITNESS FOR A PARTICULAR PURPOSE AND NON-INFRINGEMENT, IN NO EVENT SHALL THE AUTHORS OR COPYRIGHT HOLDERS BE LIABLE FOR ANY CLAIM, DAMAGES OR OTHER LIABILITY, WHETHER IN AN ACTION OF CONTRACT, TORT OR OTHERWISE, ARISING FROM, OUT OF OR IN CONNECTION WITH THE SOFTWARE OR THE USE OR OTHER DEALINGS IN THE SOFTWARE. We Are Here To Help! Before Returning the Product Call Our Customer Service at 1-855- 868 1928 We can help you with Damaged Package Missing Parts Technical Support 192513015371