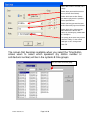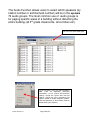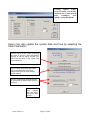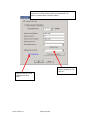
1
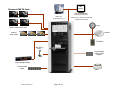
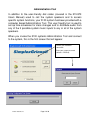
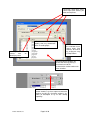
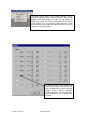
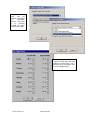
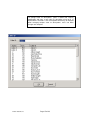
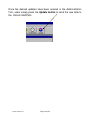
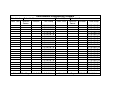
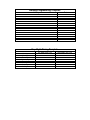
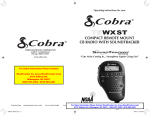
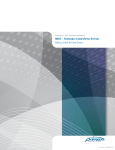
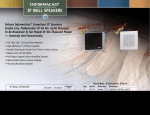
5100
Administrative Tool
User Manual
Revision 1
5100
System
!
#
$
"
Windows®
Programming Tool
%
2007 Valcom, Inc.
Page 2 of 20
Administrative Audio/Tone Schedule
Distribution Program
Congratulations! Your school is now using a state of the art
communication system. This 5100 system is a microprocessor-based
telephone to speaker communication and control system to help you
run your school efficiently.
The system allows both calls from office telephones to classroom and
hallway speakers and calls from classroom speaker locations to the
office telephones.
Office phones can simply dial the classroom number to speak to an
individual classroom. The teacher in the classroom can respond to the
call by directing their voice towards the classroom’s speaker. Office
phones can also make general one-way announcements to all or
selected groups of speakers.
Individual teachers can call the office by simply pressing the
classroom’s call button. Once a call button is pressed, the office
phone will ring and caller ID information will identify which classroom
is calling. Multiple calls from multiple rooms are simply queued.
If programmed to do so, individual teachers can make emergency
calls to the office by simply pressing the classroom’s call button 4
times within 3 seconds. Emergency calls are given priority over nonemergency calls.
The system also provides for class change tones (bell schedules),
emergency tones, audio/music distribution and other school system
controls.
2007 Valcom, Inc.
Page 3 of 20
Administration Tool
In addition to the user-friendly dial codes (covered in the 574-973
Users Manual) used to call the system speakers and to access
specific system functions, your 5100 system has been provided with a
computer based Administration Tool. This user friendly tool is used to
set up time schedules for class changes and to distribute audio from
any of the 3 possible system music inputs to any or all of the system
speakers.
When you invoke the 5100 systems Administration Tool and connect
to the system, this is the first screen that will appear:
Choose your method of
connection
Enter your system password
(default is 7467539)
2007 Valcom, Inc.
Page 4 of 20
Once the configuration is received from the 5100 System, you’re
ready to view or change the systems audio groups, time schedules,
time groups, date/time and distribute system music sources.
2007 Valcom, Inc.
Page 5 of 20
These tabs select which music
source input (Aux Source) you
want to manipulate.
The add function allows adding
stations from any combination
of the 72 audio groups.
You may label each aux
source
with
an
identifying name
You can turn each of
the individual music
source inputs (Aux
Sources) off and on
by clicking the Play
or Stop Buttons
You select which speakers will
receive the music by placing a
check mark next to the
architectural or station numbers for
those speakers.
You have the option to view either the default
station numbers, by the assigned architectural
number (usually the classroom numbers), by
caller ID description or by all with sorting
capability.
2007 Valcom, Inc.
Page 6 of 20
Phrases
If custom phrases have been added to the system digital recorder you
can access and distribute these phrases from the following window
Select the phrase that you
want to distribute.
Select remove to remove
phrase in queue. Select
remove all to remove all
phrases in queue.
Select Play to send message
Select where the phrase is
to be delivered and at what
priority level.
Choose how many
time to repeat the
announcement and
how much time
between each one.
List of phrases in queue to
be played.
2007 Valcom, Inc.
Page 7 of 20
Schedules
Each classroom/hallway may be assigned to any or all of the system’s
8 time groups. Each of the 8 time schedules (not to be confused with
time groups) may be set up to send audio (tone) to any of these 8
time groups at multiple scheduled times.
When you select the Schedules function, the following screen
becomes available. This screen allows users to turn schedules off and
on and to edit the scheduled events.
Select the schedule that
you want to manipulate by
clicking the appropriate
tab.
You can name each schedule
Check which days
of the week you
want this schedule
to
run
when
automatic schedule
operation is active.
If you’ve disabled automatic
schedule operation by using
dial code #50# or by forcing
a schedule, you can restore
automatic
operation
by
clicking here
Turn the desired
schedule off or
on with these
buttons
To add an event, simply click Add. To Edit
or Delete an event, simply click on the
specific event and click Edit or Delete (see
next page)
2007 Valcom, Inc.
The
Simplex
5100
system
supports up to up to 255 events
per schedule (system maximum of
1024 events).
You can easily copy events from one schedule to the
next or archive an entire schedule on your computer
to reload at a future time (great for seldom used
schedules).
Page 8 of 20
When Add or Edit is selected, users
simply:
Select when you want the event to
occur (24 hour time format).
Select which tone or Aux Source
you want to play over the speakers
at the specified time.
Select how long you want the tone
or Aux Source to play once initiated.
Select which of the 8 time groups
will broadcast the tone or aux
source by checking any combination
of 1 through 8.
The priority of the event may also be
selected. Priority 4 is the normal
setting for a class change tone.
Click OK.
The screen that becomes available when you select the Time Button
allows users to select which speakers (by station number or
architectural number) will be in the systems 8 time groups.
You can name each time group
2007 Valcom, Inc.
Page 9 of 20
The Audio Function allows users to select which speakers (by
station number or architectural number) will be in the systems
72 audio groups. The most common use of audio groups is
for paging specific areas of a building without disturbing the
entire building (all 3rd grade classrooms, all corridors etc.)
You can name each audio group
On the File menu, users may edit the address
book (used for organizing connection
information), set up system communication
settings, change the system date and time
settings, change the access password, print
reports, enable or disable automatic updates,
card fault detection or demo mode (used for
demonstrating the software).
2007 Valcom, Inc.
Page 10 of 20
Printing reports allows
users to create a hard copy
record of the system dialing
plan,
schedules,
time
groups and audio groups
Users may also update the system date and time by selecting the
Date/Time button:
You can opt to set the system time to be
the same as your PC’s time (Synchronize
System) or you can opt to set your PC’s
time to be the same as the system time
(Synchronize PC)
You can opt to synchronize the system
time to an Internet timeserver if an
Internet timeserver has been defined
(Options Menu)
You can send manual correction pulsed
to synchronous or impulse type clocks (if
installed)
Make sure you
press
update
after you adjust
the system date
or time !!
2007 Valcom, Inc.
Page 11 of 20
You can opt to synchronize the system time to an Internet
timeserver if an Internet timeserver has been defined. This
feature is found under the “Options” Menu).
You may add an offset
to your system time if so
desired
Click here to find a list of
available timeserver
URLs
2007 Valcom, Inc.
Page 12 of 20
The Options menu allows users to define holidays (for the
purpose of automatic time schedule operation), define when
daylight saving time begins and ends (for the purpose of
keeping the system time correct), modify caller ID descriptions
for the stations (up to 15 characters), define when the system
should operate in day mode and night mode and to set up or
modify time server parameters.
To define a holiday, check the box next
to the holiday that you want to define and
enter the holiday date. When a defined
holiday
occurs
during
automatic
schedule operation, all time schedules
that are denoted to run on holidays will
be active.
2007 Valcom, Inc.
Page 13 of 20
Daylight
Saving
Time
may
be
disabled, automated
via
calculation,
Internet timeserver
or
by
manually
entering the dates
for the time change.
You can set up the times that the
system will enter day and night
mode on a per day basis. This is
primarily for the call button class
of service programming.
2007 Valcom, Inc.
Page 14 of 20
To change Caller ID descriptions, select a station that requires
modification and enter a new caller ID description using up to 15
alphanumeric characters. Use the keyboard arrow keys to navigate
when changing multiple caller ID descriptions. Press OK when
changes are complete.
2007 Valcom, Inc.
Page 15 of 20
Once the desired updates have been entered in the Administration
Tool, users simply press the Update button to send the new data to
the Valcom MultiPath.
2007 Valcom, Inc.
Page 16 of 20
The following pages contain programming templates to aid in organizing the information required
to program the 5100 system. Please make additional copies as necessary.
Station Programming for Time Groups Template
Time Group 8
(If available)
Time Group 7
(if available)
Time Group 6
(if available)
Time Group 5
Time Group 4
Caller ID
Time Group 3
Architectural
Number
Time Group 2
Station #
Time Group 1
Time Groups
2
3
4
5
6
7
8
9
10
11
12
13
14
15
16
17
18
19
20
21
22
23
24
25
26
27
28
29
30
31
32
33
34
35
36
38
39
40
41
42
43
44
45
46
47
48
49
50
51
52
53
54
55
56
57
58
59
60
61
62
63
64
65
66
67
68
69
72
71
72
Station /Arch #
1
Station /Arch #
37
Station Programming for Audio Groups Template
Audio Group
Time Schedule Programming Template
Schedule #
Event Time
Schedule Name
Tone/Aux
Duration
Source
Schedule Run Days
Time Group
12345678
12345678
12345678
12345678
12345678
12345678
12345678
12345678
12345678
12345678
12345678
12345678
12345678
12345678
12345678
12345678
12345678
12345678
12345678
12345678
12345678
12345678
M T W TH F S S H
Holiday Programming Template
Holiday
Date
Day Night Timing Template
Sunday
Monday
Tuesday
Wednesday
Thursday
Friday
Saturday
Holidays
Day Mode Start Time
Night Mode Start Time