1
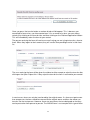
Table of Contents
1. Contents...............................................................................................................................1
1.1 Introduction/Getting Started......................................................................................1
1.1.1 Creating an Account.........................................................................................1
1.1.2 Logging In.........................................................................................................2
1.1.3 Forgotten Password..........................................................................................2
1.1.4 Creating a New Project.....................................................................................3
1.2 My Projects................................................................................................................3
1.2.1 Project Filter......................................................................................................4
1.2.2 Project Index/Navigate......................................................................................5
1.2.3 Forms − How to Use.........................................................................................7
1.2.3.1 Form Navigation.......................................................................................8
1.2.3.2 Form Filling.............................................................................................10
1.2.3.3 Form Contact Data.................................................................................10
1.2.3.4 Transfer Form.........................................................................................11
1.2.4 Reuse of Form Data........................................................................................13
1.2.5 Integrated Dataset..........................................................................................13
1.2.6 Managing Categories......................................................................................13
1.3 My Contacts............................................................................................................14
1.4 My Account.............................................................................................................15
1.5 Help.........................................................................................................................15
1.6 Contact Us..............................................................................................................15
1.7 Helpline...................................................................................................................15
1.8 Logout.....................................................................................................................15
1.9 Other IRAS Functions.............................................................................................16
1.9.1 Import XML.....................................................................................................16
1.9.2 Export XML.....................................................................................................19
1.9.3 Electronic Authorisations................................................................................19
1.9.3.1 Electronic Authorisations Step by Step..................................................20
1.9.3.2 Electronic Authorisations Notes..............................................................21
1. Contents
1.1 Introduction/Getting Started
This help manual should give you the information required to use IRAS. IRAS is not a form,
but a set of project information that is used to create the various forms needed for the relevant
approvals for a number of different review bodies. The concept of IRAS is to enable, as much
as possible, one time entry of information. This is also facilitated by the ability to import and
export information in XML format.
This manual should give you all the information you need to get started using IRAS and
further information is available on the site regarding the specific processes and information
required to apply to the various review bodies.
1.1.1 Creating an Account
If you do not have an account on the IRAS system, you can create an account at any time by
clicking the 'Create Account' link on the main menu bar on the IRAS login page. This will take
you to a form which must be filled in, in order to register an account. Most fields on this form
are required; however, if you are missing any required information the system will remind you
when you press the register button.
A valid email address is required to complete the registration process. After 'registering' your
details, IRAS will email you an activation code and a link which must be used to complete the
registration process. If for some reason you do not receive the automatic email, please call
the helpdesk/helpline who will be able to assist you in completing the registration process.
It is important to remember the following when registering:
• Your email address that you enter should be accurate in order to receive the
automated activation email.
• If you do not receive the automated email after about 1 hour please telephone the
helpdesk/helpline for assistance.
1
• You will need to create a password that includes both letters and numbers.
• Try and pick a password that no one will guess (avoid the obvious such as
family member names and birthdates).
• If you have any trouble at all please call the helpdesk/helpline during normal working
hours.
1.1.2 Logging In
When you access the IRAS system you will first encounter the 'Login Screen'. To login you
must have a registered and verified account that is valid on IRAS (see next paragraph if you
are in doubt).Your username and password are case sensitive − that means you must use
capitals on the same letters you did when you registered. Once you have entered the details,
press the 'Submit' button and you will be taken to a list of your active projects on the My
Projects page. It is from this page you will be able to navigate into the data you maintain for
each individual project you have on the system.
Be aware that your account details from the NRES form can be used to login on both the old
NRES form site and IRAS. If you do not have an NRES form account, you can create a new
IRAS account by clicking 'Create Account' link on the login page. Information on creating an
account can be found at Creating an Account.
1.1.3 Forgotten Password
If you have forgotten your password you can get a reminder by using the 'Forgotten
2
Password' link that can be found just below the login input boxes. If for some reason you have
forgotten all your account details, please contact the helpdesk who will assist you in
reactivating your account using the correct procedure.
1.1.4 Creating a New Project
Once you have logged in, you will be taken to the 'My Projects' page (1). Clicking on the
'Create New Project' button (2) on this page will create your first project. It is recommended
you read the next section − 'My Projects' before creating your first project.
1.2 My Projects
The 'My Projects' page is the first page you are directed to when you login. Once logged in,
you can always return to this page by clicking the 'My Projects' link on the 'Main Menu' bar of
IRAS (1). On this page you will see a number of sections. At the top of the page you will see
the usual IRAS 'Main Menu Bar'. Below that you will see the following sections:
3
Project Categories: This section (2) lists all the available categories in which you can store
your sets of project information − in a sense they act in a similar way to directories on a
computer filing system. When your account is created, you will have a category to store your
new projects in called 'New Projects'. You can manage (add/delete/rename) your categories
and change the categories in which existing projects are stored by clicking on the link called
'Manage Categories' (3). This is located just to the bottom right of the list of your project
categories. This help manual contains more information on Managing Categories in a later
section. In this example we have created a new category called 'My Archived Projects'.
Import IRAS/EUDRACT from XML Button: The import button (4) allows you to create new
projects from the XML exports of the IRAS system and the EUDRACT system. More
information about importing XML can be found in the Import XML section of this manual.
Projects: When you select a category by clicking on it you will see a list of projects (5) you
have stored in that category. When you first access your account, you should have no
projects. To create a new project, simply click the 'Create New Project' button at the bottom of
the page. This will create a new 'unnamed' project and take you to the Project Filter for that
project. If you wish to return to your list of projects − just click the 'My Projects' link at the top
of the page.
If there are projects in a category, a list will appear showing their short title name (once
you have assigned one on the Project Filter page), the date it was created, its status and a
link to access the project data and forms.
Create New Project: You can create a new project from this page by clicking on the 'Create
New Project' button (6) at any time.
1.2.1 Project Filter
The 'Project Filter' page is critical to each project. It is this page that defines exactly which
forms will be made available to your project. As you go through the page, the questions may
change depending on your answers to previous questions on the page. It is extremely
important that you answer the questions on this page correctly; however, if you are not sure of
4
an answer you can always come back at anytime to continue or change the answers. If you
do come back at a later time, please be aware that this may change the number of forms you
need to fill out.
The forms that are raised for completion can be seen on the Project Index/Navigate page and
this can be accessed at anytime by pressing the 'Navigate' link in the top left corner of the
'Project Filter' page (or 'Navigate' while you are on any other form page), or clicking on a
specific project listed on the 'My Projects' page.
One of the first fields you will see on the 'Project Filter' is the text box asking for the 'Short
Title' for your project. You should put a name to remind you what the project is about − this
can be changed at a later date if you want − but it is this name which will help you identify a
particular on the 'My Projects' page.
It is important to realise that there is only one 'Project Filter' per project.
1.2.2 Project Index/Navigate
This page is the main way of accessing your data and forms for a particular project. It can be
accessed by clicking on any Project listed on the My Projects page, or when you are in any
form or Project Filter − by clicking on the 'Navigate' button. This page also consists of many
active areas, but once you understand the basic principles of the page you will be able to
access all data and forms in your project very quickly.
Below the main IRAS menu bar you should find the following sections:
5
The Project Information Bar(1): This bar displays the basic information about the project
and the current project form that is selected (if any). It shows the project title (which is derived
from the short title once it has been entered on any form), followed by the project type and the
currently selected form for that project.
Project List: Underneath the Project Information Bar, on the left, you will find the 'Project
List'. This is a list of all items in your project. It consists of 4 main parts:
• A link to the Project Filter page (2).
• A link to the Integrated Dataset for your project (3).
• Links to the forms (4) that you will need to fill out for a particular research project. It is
important to be aware that the forms shown here are based on your answers to the
questions on the Project Filter. It is from this list that you can select individual forms by
clicking on the appropriate form name. When you select a form, you will see the
selected form name in the Project Information Bar, and you will see the corresponding
form action tabs to the right.
• Links to any site specific forms that are required for you project. For example an R&D
application may consist of one main R&D form and a number of related Site Specific
Information (SSI) forms. These forms would appear in this section (5).
Form Action Tabs (6): The form action tabs can be seen to the right of the Project List. They
correspond to the currently selected item from the 'Project List'. This is a particularly important
part of the site. It allows you to see which questions are active on a form as well as complete
a number of additional tasks for the selected item from the list. Tabs that are unavailable are
greyed out and are not clickable. The available tabs will be different depending on which item
you have selected; however, the selection of tabs include the following:
• Navigate: This tab is available on all forms. It shows you which questions are active
and which are not. Inactive questions are shaded blue and cannot be clicked on. Active
questions have a white background and clicking on them will take you directly to those
questions in the form. Questions are activated and deactivated depending on your
answers to questions in both the Project Filter and the form itself.
6
• Add SSI Forms: This tab only appears on the REC, R&D and GTAC forms. Selecting
this tab allows you to add individual Site Specific Information (SSI) forms to your
project.
• Checklist: This is not available on all forms. Where it exists, it takes you through a
submission checklist for that particular form.
• Authorisations: Where this tab exists, it is possible to obtain electronic authorisations
rather than 'ink' signatures for the roles shown on the authorisations page. The person
authorising the form must have an IRAS account. The process for electronic
authorisations is explained later in this document.
• Save/Print: This tab explains the processes which must be followed in order to print
both blank copies of the various forms and copies of the form which you have filled in.
• Submission: The submission tab details the information and process you need to
carry out in order to submit the selected form to the appropriate regulatory body. If you
have printed your form for submission on a previous occasion − you will be able to see
a historic list of your submissions and access these forms and their matching XML
exports. This section is specific to each form. Therefore if you have submitted a form to
Ethics, you will not see your ethics submission when you look under the submission
tab for the R&D form, etc.
• Progress: Where an organisation processing your application has a direct link into the
IRAS system, you will be able to monitor the progress of your application through this
tab. This tab is specific to each form.
• Amendment: Once you have submitted an ethics form, and providing it is not a clinical
trial of a medicinal product, you will be able to raise amendment forms for ethics.
Guidance on amendment procedures for other forms will be found under these tabs as
available.
• Manage: The manage tab is only available to the Integrated Dataset. These are
actions you can do to the complete form − such as duplicate and export the XML of the
project.
• Transfer: Allows you to transfer a form to another IRAS user. You must use the email
address that the other IRAS user is registered with in order for the system to find the
other user.
1.2.3 Forms − How to Use
As mentioned earlier, the forms that are accessible to you are determined by your answers in
the Project Filter. When you are in the Project Index/Navigate page you can see the form list
on the left hand side of the screen under the heading 'Project Forms' (1). You can select a
particular form by clicking on a form name(2).
7
The currently selected form can be identified as it will be highlighted with a blue background
and the form name will appear on the Project Information Bar and on headers in the tab
sections (3). Once selected you can use the tab section to perform various operations on that
form. Your form selection will be retained until you change it, or you are logged off the IRAS
system.
1.2.3.1 Form Navigation
Once you have selected your desired form, you can access the questions from the
'Navigation' tab. This will show you the active questions available to your form. Clicking on
any active link will take you directly to that section of the form.
8
Once inside a form, you can move around the form using the following buttons which are
available at the top and the bottom of the form page.
• Navigate: Will save your changes and take you back to the Project Index/Navigate
page. You can quickly access other parts of this form from that page − or access
another form in your project.
• Print: Pressing 'Print' will save your form data and allow you to print a PDF version of
your form. Please be aware that forms printed from this area cannot be used for
submission and you must use the 'Submission' tab from the Project Index/Navigate
page for that purpose.
• Save Now: This will save changes to the current page of the form. It is strongly
advised that you click this before leaving your work for any sustained period of time.
• Previous and Next: These buttons will save your current changes and move you to
the previous questions or next questions in that form
9
1.2.3.2 Form Filling
You can access the data entry mode of a form by clicking on any active section of the
'Navigate Tab'. Data entry is relatively easy and intuitive. Information will be saved whenever
you click any one of the 'navigate', 'print', 'save now', 'previous' and 'next' buttons at the top
and bottom of the form page.
Be aware that clicking the 'undo' button will erase any changes you have made since
your last save on that page. You will be asked to confirm this action.
There are a few other items to be aware of when filling in a form. The first is that some
information on forms is populated in a read only format from other forms. This is usually
indicated by the text of the question as can be seen in (1). In addition, each question will have
a Question Applicability Toolbar next to it if it is used in more than one form (2). This table will
tell you where else in your project form set that the question appears.
1.2.3.3 Form Contact Data
IRAS comes with an integrated contacts database under the My Contacts link on the main
menu bar. The form allows you to save contacts you have filled in on the form into your
contacts database, or fill the form in with contacts from your database. On each contact form
field you will see a set of icons which are shown below. The 'Select Contact' icon allows you
to fill the form from your saved contacts (contact database) and the 'Save details to My
Contacts' icon enables you to save a contact that you have filled in on the form into
your saved contacts. The two different icons are shown below:
10
To copy a contact's information into the form fields from your contacts database:
• Click on the 'Contact Icon' which will open a new window with your contact data.
• Select 'View' next to the appropriate contact (1)− this will put their details in the same
window on the right hand side.
• Once you have verified this is the correct contact, click on 'Copy Contact Details into
Form' (2).
The window will close and the details will be populated.
If you have filled in the contact fields in the form and wish to add this contact to your
database, then just click on the 'Save details to My Contacts' icon. It will ask you to confirm
this action and if you agree the contact will be added to your contacts database.
1.2.3.4 Transfer Form
IRAS allows you to transfer forms to other users that have registered accounts on the IRAS
system. To do this, select a form then click on the 'Transfer' tab. You will then have to put in
the email address of the user you wish to transfer the form to. Note that the system cannot
transfer to a person without an IRAS account as the form is not emailed − it is transferred
securely within the IRAS system.
11
Once you press the transfer button a number of tabs will disappear. This is because you
cannot edit a form unless you have control over it. As an owner of a form, you can always
reclaim it by clicking on the transfer tab, and then clicking on the 'Retrieve Application' button.
This will immediately return the form to your control.
The person receiving the form will receive an email saying you are trying to transfer a form to
them. When they log on to their account, they will see the form pending transfer in their form
list.
The user receiving the form will be given the choice to either accept or reject the transfer after
clicking on the Open Project link. If they reject the transfer the form is returned to your control.
In most cases, forms can only be transferred by the original owner. If a form must go to more
than one person, the form should be returned to the original owner and then the owner can
transfer it to the next person. However, there are some forms that are designed so that they
can be passed on from person to person. The ARSAC form is an example of this type of form.
12
1.2.4 Reuse of Form Data
The IRAS application is designed to reuse data between forms so that the effort required to fill
in multiple forms is minimised. For example, once you have filled in the Short Title for a
research project on one form − it will appear automatically on the other forms that require that
data item. For guidance, IRAS shows a Question Applicability Toolbar beside each question
where it is used in more than one form. An example of this table is shown below.
1.2.5 Integrated Dataset
The Integrated Dataset is designed to make filling the data on all your forms easier. The
Integrated Dataset combines all the questions from all your forms into a single, unified set of
data. If you fill this in you will have answered all the questions required for your applications
(with the exception of SSI Forms). However, before submitting your forms, it is recommended
that you check each one for accuracy and completeness.
Printing the Integrated Dataset will allow you to collect all the required information offline −
and then quickly fill in the form online.
1.2.6 Managing Categories
You can use the manage categories page to modify the Project categories available to you in
the 'My Projects' page. To add a new category, simply click on the 'Add Category' link (1) at
the bottom of the page. This will add a new category which you can name using the 'Edit' link
(2) attached to the new entry.
13
To move Projects into a new category, expand the category the Projects are stored in and tick
the Projects you want to move (3). Once this is done, go to the bottom of the page and select
the category you need to move the Projects into from the dropdown list (4) then click 'Go' (5)
which is next to the dropdown.
You can delete categories by clicking 'Delete' (6) − but only if you do not have any Projects
stored in it.
1.3 My Contacts
The 'My Contacts' link on the main menu bar takes you to your personal contact database.
This is designed to help you if you are filling out many forms and often refer to a contact
multiple times. Once a contact is in your contact database you can quickly fill in contact
details in a form by clicking on the 'Add Contact Details' icon whenever it is available. You will
find this icon on most questions that ask for contact information.
• Adding a Contact: You can add contacts from the 'My Contacts' page by clicking on
the link 'Add Contact' and filling in the appropriate details. If you have entered a contact
into a form but wish to change it, the contact information can be overwritten by clicking
on the 'Add Contact Details' icon and selecting a new contact from the contact
database.
• Editing a Contact: To edit a contact in your contact list, simply click the 'View' link.
This will display the contact details on the right hand side, from where they can be
edited. Once you have finished editing the details − click the 'Update' button to save
the changes.
• Deleting a Contact: To delete a contact in your contact list, simply click the 'View' link.
This will bring the contact details on the right hand side. At the bottom of the details
you will see the link 'Delete' clicking on this will delete the contact. You will be asked to
confirm the deletion before the contact is actually deleted from the database.
14
1.4 My Account
The 'My Account' link on the main menu bar gives you access to your personal details, an
Online CV and some personal settings for the IRAS website. Clicking on the link on the main
menu bar will take you to the 'Edit Account Information' page which allows you to change your
password and your address details.
The 'Edit CV' allows you to keep an online version of your CV which can be printed and
submitted when necessary.
Once this page is loaded you will see you can also 'Edit Preferences' which is accessible by a
link on the left hand side. In the 'Edit Preferences' section, you can change the font size and
the width of the screen that IRAS uses. This last parameter is designed to make maximum
use of your monitor capabilities.
1.5 Help
Clicking on 'Help' on the main menu bar will take you to an online manual which is capable of
being searched for specific terms. You will also be able to print the manual in PDF format for
reference.
Remember to check for updates of the help manual periodically.
1.6 Contact Us
The 'Contact Us' link on the main menu bar will provide a list of all the suitable contacts for the
various forms controlled by the system. This page will assist you in contacting the correct
organisation. Please remember that the Helpline is only responsible for technical queries and
general help. More specific queries and procedural questions should be addressed to the
appropriate organisation in this list.
1.7 Helpline
If you are having trouble with any aspects of the system and this manual does not help clear
up the issue please contact the helpdesk. The contact information can be found by clicking on
the 'Helpline' link on the right hand side of the main menu bar.
Please indicate to the helpdesk that you have an issue with IRAS and they will then assist you
with any problems you may have.
1.8 Logout
Clicking on the 'logout' link on the main menu bar will log you off the site. In order to access
your work again, you will need to login. The site will also log you off automatically after a
period of inactivity. It is therefore important that you save any unsaved form changes by
clicking the 'Save Now' link on the form page if you plan to leave your work inactive for any
period of time.
If you have not logged off the site you may have difficulty navigating away from IRAS. Please
15
ensure you log off before leaving the site.
1.9 Other IRAS Functions
IRAS offers many other facilities that will enable you to work more efficiently with the system −
particularly if you create a lot of projects. This section of the manual describes those features.
1.9.1 Import XML
You can import an exported version of IRAS XML or EudraCT XML into the system by clicking
on the 'Import IRAS/EudraCT Form XML' button on the 'My Projects' page (shown below).
This will take you to the first import page. On this page you will need to select a file from your
local file storage area. This file MUST be a valid IRAS or EudraCT XML export or the import
will not succeed. You select the file by clicking the 'Browse' button and then using the file
explorer box to find the target file. Once you have found the file, click on it and then press the
OK button. After this, press the 'Upload' button on the IRAS webpage. You can cancel the
process at anytime by clicking the 'Cancel' button. This page is shown below.
16
The next step will ask to verify what type of data you are importing. The IRAS system exports
information on the Project and all information on SSI Forms. You have the option to import the
main project information or a specific SSI. If you select to import the Project, a new Project will
be created and inserted at the top of your Project list.
If you select to import only SSI information, you will be asked which Project you wish to attach
the SSI Form to.
17
Once you have completed this stage you will have one more chance to cancel the import
before completing it. After the next step the import process is complete.
18
1.9.2 Export XML
IRAS will allow you to export your project data into XML for import into other systems so that
data does not have to be re−typed when data is moved from system to system. There are a
number of areas on the system where you can export your data:
1. Integrated Dataset: If you wish to export the full set of data for your project, this is best
done from by selecting the Integrated Dataset. Then, on the Project Index/Navigation
page, select the 'Manage' tab − and click the 'Export Project Data to XML' link. When
exporting XML, you will then be able to choose which parts of your data to export. You
can either export the main project data or the main project data and SSI data, or just
the SSI data. If you do not have any SSI forms raised, you will not be able to select the
SSI checkbox. Once you have selected the appropriate check boxes click 'Export' and
the XML will be downloaded to your computer.
2. Form Submission Tab: When a form is submitted, a snapshot is created of the data at
the time of submission. A list of these submissions, a print copy of the submission and
a copy of the XML are all available. To get the XML for any specific submission simply
click on the 'Save as XML' link in the appropriate row. You will have less export options
when exporting from the submissions tab of a form − as the data relates specifically to
that form and not the entire project.
During the download process you will be given the option to Open or Save the file. If you open
it, it will open directly in your browser. If you are planning to send it to someone else, then you
should save it to your hard drive and then send them the file. You should not edit this file by
hand unless you know the full implications of doing so.
1.9.3 Electronic Authorisations
IRAS offers the facility for electronic authorisations as an alternative to ink signatures on hard
copies. Except where ink signature is a legal requirement it will be possible for Principal
Investigators, radiation experts, sponsor representatives, educational supervisors, etc to
"sign" declarations by giving an authorisation on a form generated through IRAS. This avoids
the need to take or post paper copies of forms to the various individuals who need to
authorise information in applications.
Electronic authorisation is an option that may be used where convenient, but ink signatures
may still be used where preferred. There is no need to obtain both ink signatures and
electronic authorisation.
The system works by means of a secure transfer between the project owner and the person
giving authorisation (“the authoriser”). The authoriser receives an email through IRAS asking
them to authorise an application. The authoriser logs in to IRAS and is able to review the
application and then clicks to authorise or reject using a button. This creates an auditable
record on the system of what has been authorised, when and by whom. IRAS then sends an
email back to the applicant (project owner) confirming authorisation.
Please note that all authorisations other than radiation authorisations apply to a specific
application and not to the whole dataset. The appropriate form, e.g. the R&D form, must be
19
selected in order to access the authorisation function.
Applicants must obtain the relevant authorisations before selecting “Print for Submission”.
This is a different order to the process used for ink signatures. Applicants need to get the
authorisations first so that all the authorisations are included in the form which is then saved
and printed. If the applicant makes changes to the data after authorisation, the authorisation is
invalidated, so there is no possibility of applicants submitting forms that have been changed
after authorisation.
1.9.3.1 Electronic Authorisations Step by Step
1. On the main navigation page, the applicant selects the relevant form that requires
authorisation from the links under Project Forms, e.g. the REC form (do not select the
full project dataset as this does not have an authorisation function).
2. The applicant selects the “Authorisations” tab on the right hand side of the main
navigation page.
3. The tab will indicate all the authorisations that are required for that form, for that
particular project.
4. The applicant selects the relevant type of authoriser (e.g. sponsor) and clicks the
“Request” button.
5. The applicant enters the e−mail address of the authoriser and clicks "Send Request".
The tab now shows the authorisation that has been requested. Please note that the
authoriser MUST have an account on IRAS and you must use the e−mail address that
they used to register their IRAS account.
6. The authoriser will receive an email from IRAS requesting that they authorise the form,
with a link to log in.
7. When the authoriser logs into IRAS the main project page will now contain a “Requests
for Authorisation” section below any projects they own.
8. The authoriser clicks “Open Request”.
9. The main navigation page shows the relevant form. Only the “Authorisations” tab is
visible, showing details of the authorisation required.
20
10. The authoriser clicks “Review Requested Form”.
11. The main navigation page now shows the “Navigate” tab. The authoriser clicks on the
“Navigate” to view the application data in read−only format.
12. If the authoriser is happy with the form, the authoriser clicks “Authorise Form”.
13. When “Authorise Form” is selected, the authoriser is prompted to enter details
including their username, password and contact details (i.e. post) for the signature,
then clicks “Sign”. This acts as an extra layer of security to ensure that only the
registered authoriser can electronically authorise an application.
14. The applicant will receive an email from IRAS confirming the authorisation. They can
now navigate to the relevant section of the appropriate form. The declaration section
will now contain the text: “This section was signed electronically by [name] on [date,
time]”.
15. Alternatively the authoriser can select “Reject Request”. The applicant will receive an
email from IRAS confirming that the request to authorise was rejected. The applicant
should liaise directly with the authoriser to resolve the issue.
1.9.3.2 Electronic Authorisations Notes
1. The applicant must select the relevant form to request authorisations.
2. If the project involves radiation, authorisations from reviewers of the radiation
information need only be obtained for one form. The authorisations will cross−populate
to all other forms requiring these authorisations (REC Form, R&D Form, ARSAC
Forms). The data from Part B Section 3 is available in read−only form in the ARSAC
form and e−authorisation of a main form therefore also applies to any ARSAC forms
generated. The ARSAC form also contains one site−specific question which is not part
of the e−authorisation. Any change to the data in the radiation section (Part B Section
3) will invalidate the authorisations in all forms. The revised information will need to be
reauthorised, and submitted as an amendment to any bodies that have reviewed the
information.
3. The applicant must complete all the fields in a form or the relevant sections of a form
before requesting authorisation. Do not print for submission to get a submission code
on the form until after the authorisations have been obtained.
4. Electronic authorisation can only be performed by individuals who have an IRAS
account, and their registered email address must be used in requesting authorisation.
Applicants should check this with authorisers before attempting to request electronic
authorisation.
5. If data in an application is changed after any electronic authorisation, that authorisation
is invalidated by the system. If one authoriser requires changes to data that have been
21
authorised by others, all the authorisations will need to be requested again before the
form can be submitted. If a review body requests a re−submission of an application, all
the authorisations will need to be requested again before the application can be
submitted.
6. A Chief Investigator who is also the owner of the project on IRAS can authorise by
clicking the “Sign” button. Similarly an authoriser who also needs to enter information
into a transferred application, e.g. radiation authorisers, can have a form transferred to
them and then select the “Sign” button. This avoids the need for a separate process for
completing and authorising information.
7. Any authorisation that has been requested incorrectly, e.g. if the data is not complete,
can be revoked at any time by the requestor, using the “Revoke” button available on
the authorisation tab.
22