1
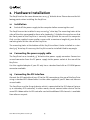
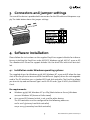
EasyDrive
PC Card Drive
for the IDE interface
Thank you for deciding to buy an altec product. In order to ensure correct functioning
and to avoid problems when installing this high-quality German-made product,
please read the entire manual and carefully observe the following points:
• Observe the general guidelines when handling components or modules which can
be damaged by electrostatic charge or discharge (this applies to the products
described in this manual).
• If you should encounter any problems during the installation or use of this product,
please contact our service department and ask for advice. If you do not do this, your
guarantee rights may be impaired.
Support hotline, Monday to Friday, 11 am to 3 pm German time (CET): Phone
+49-511-9 83 81-70 or eMail [email protected]
All rights reserved. No part of this manual may be reproduced, duplicated, transcribed,
distributed or translated into another language without express written permission
from altec ComputerSysteme GmbH.
The right is reserved to change specifications without prior notice. All trademarks
mentioned are the property of the respective owners.
© altec ComputerSysteme GmbH.
HB_Easy_e40.qxd4 Version 08/2002.
altec ComputerSysteme GmbH disclaims all liability for errors in this manual. Liability
for direct or consequential damages which arise in connection with the use of this
documentation is specifically excluded insofar as this does not contradict the law.
The EasyDrive is manufactured to EMC guideline 89/336/EWG and is CE compliant and
CE certified to EMVG.
Table of contents
1.
Introduction
3
1.1
Product description
3
1.2
Features
3
1.3
Scope of delivery
3
2.
Hardware installation
4
2.1
Installation
4
2.2
Connecting the power supply cable
4
2.3
Connecting the IDE interface
4
3.
Connectors and jumper settings
5
4.
Software installation
5
4.1
Installation under Windows operating systems
5
4.1.1 Installation under Windows 95/98 and ME
6
4.1.2 Installation under Windows NT, 2000 or XP
7
5.
Using the EasyDrive
10
5.1
Inserting a memory card
10
5.2
Removing a PC Card
11
6.
Technical Specifications EasyDrive
11
7.
Supported storage media
12
User Manual EasyDrive Version 4.0
2
1. Introduction
1.1
Product description
Intended for both commercial and industrial applications, the altec EasyDrive allows
user-friendly and rapid access to PC Card memory media from a PC and makes it easy
to exchange data with digital cameras, PDAs and notebooks.
The EasyDrive is an internal 3,5" drive and has an IDE interface and two slots. It lets you
write to, read and format PC Cards (Type I or II) or HDDs in PC Card format (Type II or
III). The EasyDrive is compatible with Windows 95/98, ME, NT, 2000, XP, MS-DOS, OS/2
and Windows 3.x.
The EasyDrive can be connected to the existing standard IDE controller in your PC. The
altec driver software makes the EasyDrive appear as three additional drives under
Windows.
1.2
Features
◆
Internal 3,5" drive with IDE interface and 40-pin IDE connector (2.54mm pin
spacing)
◆
Rapid data transfer of up to 1.5 MByte/sec
◆
2 x PC Card slots for two PC Cards Type I or II or one PC Card Type III
◆
Supports SRAM and ATA Flash PC Cards to the PCMCIA standard of any capacity
◆
Optimized drivers for Windows 95/98, ME, NT, 2000, and XP; no additional software required
◆
Automatic detection of the storage medium type (ATA and standard
SRAM/Flash memory)
◆
Automatic detection of memory size, even with unformatted PC Cards
1.3
Scope of delivery
◆
Internal PC Card Drive with 3.5" chassis; four fixing screws
◆
Drivers for DOS, Windows 95/98, ME, NT, 2000 and XP supplied on diskette
◆
Adapter for 3.5" diskette drive power connector
◆
40-pin standard IDE ribbon cable; connectors with polarity reversal protection
◆
Instruction manual supplied on diskette
◆
Available as an option: additional IDE controller card for a PC
3
User Manual EasyDrive Version 4.0
2. Hardware installation
The EasyDrive has the same dimensions as a 3.5" diskette drive. Please observe the following points when installing the EasyDrive:
2.1
Installation
➜
Switch off the power supply to the computer before removing the case!
The EasyDrive can be installed in any unused 3.5" drive bay. The mounting holes at the
sides of the drive correspond to those of a standard 3.5" diskette drive and ensure that
the front panel of the EasyDrive is correctly lined up with the case of the computer.
Only use the supplied screws and/or screws with a maximum length of 5 mm for the
mounting holes at the sides of the EasyDrive.
The mounting holes at the bottom of the EasyDrive allow it to be installed in a standard 5.25" drive bay. If necessary, the EasyDrive can be installed tilted to any angle.
2.2 Connecting the power supply cable
The EasyDrive has a standard 3.5" diskette drive power supply connector. Connect an
unused connector from the PC power supply to the power socket at the rear of the
EasyDrive.
Use the supplied adapter if your PC only has a standard hard disk or CD-ROM power
connector available.
2.3 Connecting the IDE interface
Connect the IDE controller of your PC to the IDE connector on the rear of the EasyDrive
using a standard IDE ribbon cable. Use the cable supplied if you PC does not have an
unused cable.
The EasyDrive must be the only device which is connected to the IDE channel (primary or secondary IDE controller). In other words, do not connect other devices to the
same IDE ribbon cable. An IDE controller card with additional IDE channels is available
from altec on request.
User Manual EasyDrive Version 4.0
4
3. Connectors and jumper settings
The rear of the device is provided with connectors for the IDE cable and the power supply. The table below shows the jumper settings.
4. Software installation
Please follow the instructions on the supplied EasyDrive support diskette for information on installing the EasyDrive under MS-DOS, Windows 95/98, ME, NT, 2000 or XP.
The »Readme.txt« file on the support diskette lists the driver files which will be installed.
4.1 Installation under Windows operating systems
The supplied drivers for Windows 95/98, ME, Windows NT, 2000 and XP allow the two
slots of the EasyDrive to be accessed as two different (logical) drives for exchangeable
media. The PC interface uses a standard IDE hard disk controller. The EasyDrive allows
you to write to, read and format Type I and II ATA PC cards, Type III HDDs, and SRAM PC
Cards.
Pre-requirements:
◆
Windows 95/98, ME, Windows NT 4.0 SP4 (Workstation or Server), Windows
2000 or Windows XP (Home or Professional)
◆
One unused IDE channel which is not used for other devices
The IDE controller must be configured for the following addresses:
0x1F0-0x1F7 (primary hard disk controller)
0x170-0x177 (secondary hard disk controller)
5
User Manual EasyDrive Version 4.0
Note: If no unused IDE channel is available, you can connect the EasyDrive to
an additional IDE controller card (available from altec as an option).
◆
If DOS drivers for the EasyDrive are already installed on your PC, please remove
the entries from the files "config.sys“ and "autoexec.bat“.
4.1.1 Installation under Windows 95/98 and ME
Step 1:
Start Windows 95/98 or ME
Step 2:
Copy the driver files as follows:
◆
Insert the altec Support Disk in drive "A:".
◆
Start the Device Manager in the Control Panel.
◆
Choose the option "Do not look for new hardware" and click "Next".
You will then be shown a list of device types, e.g. modems, HD controllers etc.
◆
Choose the device type "SCSI Controller".
You will be shown a list of the SCSI controllers which are already known to
Windows.
◆
Click "Diskette" and confirm the prompt for "A:" with "Next".
You should then see a single device with the name "EasyDrive Virtual SCSI
Controller."
◆
Click "Next" to install the driver.
◆
Confirm the prompt for the file "veasy.mpd" with the default setting "A:" by
clicking "Next".
Windows will now copy the driver to the following subdirectory:
WINDOWS\SYSTEM\IOSUBSYS
Windows will now prompt you to reboot the PC. Confirm the prompt with
"Yes".
Step 3:
◆
Restart the computer:
After installing the driver, it is necessary to reboot the PC to load and activate
the driver. Close all currently running programs and restart Windows.
User Manual EasyDrive Version 4.0
6
4.1.2 Installation under Windows NT, 2000 or XP
Import information
The EasyDrive must be the only device which is connected to the IDE channel (primary or secondary IDE controller). In other words, do not connect other devices to the
same IDE ribbon cable.
When you install the EasyDrive driver, the IDE channel to which the EasyDrive is connected will no longer be available to other devices. You will no longer be able to access
a hard disk or CD-ROM which is connected to the same ribbon cable.
If you make the mistake of installing the EasyDrive driver when both the EasyDrive and
the hard disk with the operating system are connected to the same ribbon cable, you
will no longer be able to boot the operating system!
Therefore, we recommend you to backup of your PC's hard disk before installing the
EasyDrive.
Take care to attach the EasyDrive to the correct IDE channel. The primary or first IDE
controller, which is usually marked primary or IDE0 on the PC's main board, is normally used for the hard disk. The secondary or second IDE controller, which is usually marked secondary or IDE1 on the main board, is normally used for CD ROM drives.
The POST (Power On Self Test) routines in the BIOS, which are shown when you boot
the PC and before Windows starts, also give an indication of which channel the hard
disk with the operating system is connected to. The information which is shown normally includes a list of the devices connected to the IDE channels, whereby primary
master and primary slave refer to the first IDE channel and secondary master and
secondary slave refer to the second IDE channel.
The Windows 2000 or XP Device Manager can also help: It is not possible to deactivate the IDE channel which is used for the hard disk with the operating system. If you
right click the first IDE channel in the Device Manager, the "Deactivate" option is not
shown in the context menu.
7
User Manual EasyDrive Version 4.0
Installation under Windows NT
Step 1:
Step 2:
Start Windows NT
You need a supervisor password to carry out the installation.
Copy the driver files as follows:
◆
Insert the altec Support Disk in drive "A:".
◆
Open the Control Panel with START ->SETTINGS -> CONTROL PANEL.
◆
Click SCSI to view the "SCSI" properties and choose the "Driver" tab. The click
"Add".
◆
Choose "Diskette" in the next dialog box and choose the sub-directory WINNT.
◆
Follow the instructions on the screen.
Step 3:
◆
Restart the computer:
After installing the driver, it is necessary to reboot the PC to load and activate
the driver. Close all currently running programs and restart Windows.
Installation under Windows 2000 or XP
Installation under XP and 2000 is very similar and differs only in a few dialog boxes.
Accordingly the following section jointly describes installation for both operating
systems and indicates the differences where applicable.
Step 1:
Step 2:
◆
Start Windows 2000 or XP.
You need a supervisor password to carry out the installation.
Copy the driver files as follows:
Open the device manager with START -> SETTINGS ->
CONTROL PANEL-> ADMINISTRATION -> COMPUTER ADMINISTRATION -> DEVICE MANAGER
User Manual EasyDrive Version 4.0
8
◆
Open the device class "IDE/ATAPI Controller" (click on the small "+" symbol to
the left of this entry).
◆
For a standard PC, you should see an entry similar to the following:
– INTEL 82801 BA Bus Master IDE Controller
(depending on the PC's chip set, you may also see VIA Bus Master).
– Primary IDE channel
– Secondary IDE channel
◆
Select the IDE channel to which you have connected the EasyDrive. This will
normally be the secondary IDE channel. Accordingly, the following steps are
described for the secondary IDE channel..
◆
Click the right mouse button to open the context menu.
Step 3 under Windows 2000:
◆
Choose "Properties" in the context menu to open the properties dialog box for
the device.
◆
Click the "Driver" tab, click "Update driver" and confirm the following dialog box
with "Next".
◆
Choose "List all known drivers..." in the following dialog box and confirm with
"Next".
◆
Click "Diskette" in the following dialog box.
◆
Enter the path "A:\WIN2000" in the following dialog box.
Step 3 under Windows XP:
◆
Choose "Update driver" in the context menu to start the Hardware Update
Wizard.
◆
Choose "Software from a list or known sources ..." In the following dialog box
and confirm with "Next".
◆
Choose "Do not search but choose from a list" in the following dialog box and
confirm with "Next".
◆
Click "Diskette" in the following dialog.
◆
In the following dialog box, enter the path "A:\WIN2000" in "Copy manufacturer's files from".
9
User Manual EasyDrive Version 4.0
Step 4:
◆
Insert the altec Support Disk in drive "A:".
◆
In the following dialog box, choose the device "EasyDrive on the secondary IDE
Controller" and confirm with "Next". Confirm the following warning about the
Windows Logo test with "Continue installation" (XP) or "Yes" (2000).
◆
Windows will now install the driver. Confirm the last message with "Finish".
◆
If the EasyDrive is already connected to the IDE Controller, you do not need to
restart the system.
◆
The entry "Secondary IDE channel" will no longer be visible in the Device
Manager and you will see instead a device with the name "EasyDrive on secondary IDE channel".
5. Using the EasyDrive
5.1
Inserting a memory card
After installing the altec EasyDrive as described above, you should see two removable
drives which correspond to the two slots in the drive. You can both slots for Type I and
Type II PC Card memory media simultaneously. Alternatively, you can use one Type III
HDD in the lower slot.
A small marker (arrow or triangle) on the label of the PC Cards shows which end to
insert in the drive (the label with the arrow or triangle is attached to the top side of
the card). The EasyDrive recognizes the storage media type and the memory capacity
automatically.
Analogously to diskette drives, you must only insert or remove PC Card memory
media when the red LED on the front panel of the drive is not lit. The LED lights up
after inserting a PC Card until initialization is finished and also when data on the PC
Card is being accessed.
User Manual EasyDrive Version 4.0
10
5.2 Removing a PC Card
Press the respective eject button to remove the PC Card from the slot. Use the left
eject button for the top slot and/or the right eject button for the bottom slot. Make
sure that the red LED on the front panel of the drive is not lit when you remove the
PC Card.
Under Windows NT, 2000 and XP, you must "unmount" (eject) the memory cards
before you remove them. Typically, this is done by clicking on a button on the task bar
at the bottom right of the screen.
6. Technical Specifications EasyDrive
Memory card slots
2 x PC Card Type I or II – or 1 x Type III f0r SRAM and ATA
Flash PC Cards or HDDs in PC Card format
Interface
40-pin IDE; 2.54 mm pin spacing
Max. cable length: 40 cm
Slave or Master use
Supported OS
Windows 95/98, ME, NT, 2000, XP and MS-DOS, OS/2,
Windows 3.x
Dimensions
standard 3.5" drive dimensions
101,6 mm x 25,4 mm x 149 mm (WxHxL)
Temperature
0°C to +70°C (operating)
–20°C to +70°C (non-operating)
Humidity
0 to 90% (non-condensing)
DC input voltage
5Volt ±5%
Power consumption
approx. 15–50 mA (w/o memory)
11
User Manual EasyDrive Version 4.0
7. Supported storage media
◆
SanDisk Type II ATA PC Cards
Storage capacities: 16 MByte – 2,0 GByte*
◆
SanDisk CompactFlash memory cards Type I and Type II (use an appropriate PC
Card adapter); IBM Microdrives (use a Type II PC Card adapter)
Storage capacities : CF Type I 16 – 512 MByte*
◆
SmartMedia memory cards (use an appropriate PC Card adapter)
Storage capacities : 8 – 128 MByte*
◆
SanDisk MultiMediaCards (use the altec SD Card & MultiMediaCard Adapter)
Storage capacities: 16 – 64 MByte*
◆
SanDisk SD Cards (use the altec SD Card & MultiMediaCard Adapter)
Storage capacities : 16 – 256 MByte*
◆
SanDisk Memory Stick (use an appropriate PC Card adapter)
Storage capacities : 8 – 128 MByte*
◆
altec Full Metal Cards Solid (ATA PC Card Type II)
Storage capacities : 16 MByte – 2,0 GByte*
◆
altec Full Metal Cards IP54 (ATA PC Card Type II)
protected against spray water and dust, industrial temperature range:
Operation: –40°C to +85°C; 5 V
Storage capacities : 16 MByte – 2,0 GByte*
◆
altec Full Metal Cards IP68 (ATA PC Card Type II)
can be immersed in water, industrial temperature range:
Operation: –40°C to +85°C; 5 V
Storage capacities : 16 MByte – 2,0 GByte*
◆
altec Full Metal Cards Hermetic Military (ATA PC Card Type II)
suitable for space applications, meets military standard vacuum, vibration and
shock tests, corrosion protection and resistant to all types of fungus, protected
against spray water and dust, industrial temperature range:
Operation : –40°C to +85°C; 5 V
Storage capacities : 16 MByte – 2,0 GByte*
* As of 08/2002
Ask for our product overview leaflet or visit our web site for information on the full
range of memory media, Drives and Solid State Disks which are available from altec:
http://www.altec-computersysteme.com
User Manual EasyDrive Version 4.0
12