1
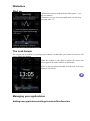
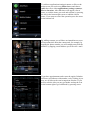
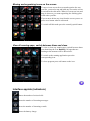
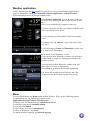
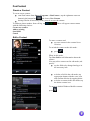
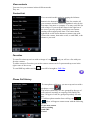
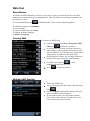
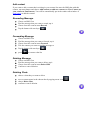
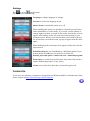
iWindowsMobile Communication Suite user's manual
Introduction
Requirements
Activation
Winterface
Start up
The Lock Screen
Managing your applications
Adding new applications/settings/contacts
Moving and organizing icons on the screen
View all running apps, switch between them and close
Interface applets (indicators)
Weather application
Menu
FunContact
Create a Contact
Edit a Contact
View Contacts
Contact List
Favorites
Phone Call History
Search of the contact
Additional Options
SMS-Chat
Main Window
Sending SMS
Multiple SMS Sending
Add Contact
Resending Message
Forwarding Message
Deleting Message
Deleting Chats
ZoomBoard
Typing
Settings
Contact us
Introduction
iWindowsMobile Communication Suite is a suite consisting of 4 applications for
communication: Winterface, FunContact, SMS-Chat and ZoomBoard.
Winterface is a touch oriented Windows Mobile launcher and task manager for Pocket
PC. Slide the screen with finger to move the list of favorites and running programs, installed
applications, and settings! Winterface has today plug-in and quick access to SMS-Chat and
FunContact.
FunContact is a contact manager that brings iPhone experience to your Pocket PC. Now
you can scroll a contact list just with a flick of a finger. When choosing the contact and tapping
SMS button you are put to SMS-Chat.
SMS-Chat is a messenger that organizes your SMS correspondence into threaded SMS
conversations. It is great to have a separate chat for every contact with whom you exchange short
text messages. You can easily follow a conversation scrolling thru a chat with a finger. If you
need to add a contact or look at the contact information you are automatically brought to
FunContact.
Finally, ZoomBoard is an onscreen keyboard for quick and accurate finger typing. The
popping up magnifying glass provides an instant zoom-in on the keyboard area under your
finger. Sliding technology allows for accurate and quick text input. ZoomBoard typing is
misprint free!
Requirements
Windows Mobile Classic (Pocket PC) 5.0/6.0/6.1
Windows Mobile Professional (Pocket PC Phone Edition) 5.0/6.0/6.1
Activation
Download 4 files of 4 programs (Winterface, FunContact, SMS-Chat and ZoomBoard)
Downloadable versions are fully functional and have to be purchased and activated for further
usage after 14-day trial period. Please purchase iWindowsMobile Communication Suite at
http://iwindowsmobile.com.
To activate:
connect your device to Internet
start any of the applications (Winterface, FunContact, SMS-Chat or ZoomBoard)
enter program Menu > About > Activate
choose “I have Internet”
type in your activation code from the e-mail you received from VITO after purchasing
iWindowsMobile Communication Suit and press Activate now.
For online activation it is required to activate only one of the products the rest 3 applications will
be activated automatically.
In case you can't connect to Internet from your pocket PC, activation will take more time:
· start any of the applications (Winterface, FunContact, SMS-Chat or ZoomBoard)
· go Menu >About> Activate
· press Activate button, type into the empty field the activation code from the email you
received from VITO Technology after purchasing iWindowsMobile Communication
Suit, choose “I have no Internet” and press Activate button below. The file
“send_to_support.txt” was saved to “\Program files\VITO\Winterface\License\” folder.
Please finish activation in the Support section http://vitotechnology.com/en/support/.
On this page choose off-line registration in combo box to proceed with the off-line
activation of your software.
To activate the program off-line make the following steps:
1. Press the button Choose and choose file send_to_support.txt that was created by
the program
2. Having chosen the file press the button Get License and safe the file with the
license
3. Put the file with your license in the folder where the file send_to_support.txt is
4. Make sure that:
the file with the license was named exactly as license_1.0.txt
the file is saved in Unicode format
Note: as you can see on-line activation is much easier than the off-line variant, which can
take considerably more time. We recommend you on-line activation.
The e-mails with activation codes are generated automatically, so if you didn’t get the key,
check your Spam Filters. Usually when you do not receive the key immediately the letter is
put in junk. If you have any questions or problems regarding the activation process, please
contact our support at http://vitotechnology.com/en/support/.
Winterface
Start up
Winterface starts up with the help of the gesture ^ (see
the screenshot).
Winterface lets you close any application you are in by
drawing letter “V”.
The Lock Screen
The screen can be locked by pressing power button, so that after you switch it on there will
appear The Lock Screen
Slide the padlock to the right to unlock the screen and
there appears the main window of Winterface.
There is also an option to disable Lock Screen, to do it go
Menu>Lock Screen.
Managing your applications
Adding new applications/settings/contacts/files/favorites
To add new applications/settings/contacts or files to the
main screen you need to tap Menu button and choose
Add, then coose either applications, settings, contacts,
files or favorites. After that there will appear a list of
items, so tick the items you need and confirm by pressing
the tick in the bottom right corner to add the chosen
items. If you want to cancel the operation press the arrow
in the bottom left.
By adding contacts you will have an immediate access to
all important info about the contact and, for example, by
tapping the phone number you will straight away dial the
number, by tapping e-mail address you will write e-mail.
If you have appointments and events the applet Calendar
will have red indicator with number, so by clicking it you
may see all info on the semi-transparent window. If you
need to edit the info you may go further and tap the icon
in the bottom right or go backwards by pressing arrow.
Moving and organizing icons on the screen
To move icons across the screen and organize the way
you like, you need to tap and hold any icon on the screen
to switch on the edit mode. When it is on tap an icon and
drag it wherever you want organizing the working place
in the order you like.
If you want to delete any icon from the screen you are to
press cross button when in edit mode.
To switch off this mode press the central joystick button.
View all running apps, switch between them and close
To view or close any running apps, switch between them
you should tap the icon Running. All apps that are
running at the moment will be shown here.
To switch to the running application press the
corresponding icon.
To close program press red button on the icon.
Interface applets (indicators)
Shows the number of missed calls
Shows the number of incoming messages
Shows the number of incoming e-mails
Shows the battery charge
Shows time
Shows percentage of occupied memory
Shows the date
Shows the ring profile
Shows the number of active tasks
Shows the number of coming events
Shows the phone carrier
Shows whether Bluetooth is on or off
Shows the weather forecast for the chosen city and starts weather application
Weather application
Firstly, download cab file here install it on your device. If you want Weather application to
appear in Winterface screen, start Winterface>Menu>Applications> tick the Weather
application and press tick in the right bottom corner.
Start Weather application, type in the name of the city
or choose it by scrolling the list of cities, tap the chosen
one.
Once you've added the city it appears in the list.
To delete it from the list, tap cross button beside the name
of the city and then press delete.
To open Settings tap setting button in the bottom right
corner:
To add new city, tap Add city> type in the name of the
city, tap it
To choose between Celsius and Fahrenheit, tap the icon
C (Celsius) or F (Fahrenheit)
You may also choose the way the weather is shown at you Winterface screen.
If you tap icons then Winterface weather icon will show
weather images (images are changing according to the
weather forecast).
If you tap degrees then Winterface weather icon will
show degrees (Celsius or Fahrenheit).
Press arrow to go back to the Weather application.
The Winterface weather icon will always show the
weather forecast for the first city that is on the list.
Menu
To access Main Menu, tap Menu button in Main Window. There are the following options:
To add applications, tap add and then choose either
Applications/Settings/Contacts/Files/Favorites
To disable Lock Screen function, tap options/Lock Screen
To minimize program, tap minimize button
To exit, tap cross button
To open About, press icon i (information)
To return to Winterface, tap cancel
To change interface language, go options/Language
FunContact
Create a Contact
To create a new contact:
start FunContact from Start > Programs > FunContact , tap the rightmost onscreen
button in the bottom bar
and choose New Contact
having filled in all necessary fields, press ok to save the contact.
To add new phone number from call log, tap
with the following choices:
Create new contact
Add to existing
Send SMS
Cancel
,
or
. There will appear context menu
Edit a Contact
To enter a contact card:
tap on a contact in the contact list or
favorites
To switch the contact to the edit mode:
press
When in edit mode:
Tap New field to add information about the
contact.
You may edit a contact card in edit mode (red
pencil):
tap the field to be changed and type in
the necessary info
to delete a field in the edit mode, tap
appropriate button with the cross icon
and confirm deletion by tapping delete
to delete a contact in the edit mode, tap
the delete contact icon
To move to default Windows Mobile contacts
press
.
View contacts
You can view your contacts in three different modes.
They are:
Contact List
You can switch to this mode by tapping the leftmost
button in the bottom bar
. This list contains all
your contacts which are sorted in alphabetic order by the
first name, last name or company. You may scroll the list
with a finger. If you scroll the letters in the right bar of
the screen you may quickly switch between contacts
starting with an appropriate letter. The letters shown
rightwards are the letters that most contacts start with.
Choose the contact, then make a call, or send SMS, or do
whatever you need.
Favorites
To enter Favorites tap an icon with an image of a star
. And you will see a list with your
favorite contacts.
To add a contact to Favorites you need to enter a contact card of a person and tap a star in the
right corner of the screen.
To send SMS tap white envelope
, you will be brought to SMS-Chat.
Phone Call History
To enter phone call history you are to tap an icon with a
telephone receiver
.
The calls in call history are now grouped by the type of
calls (missed, incoming or outgoing calls) and by the
date. All types of calls are grouped separately for each
day.
To add new phone number from call log, tap
,
,
or . There will appear context menu with the following
choices:
Create new contact
Add to existing
Send SMS
Cancel
Search of the Contact
If you need to find a contact out of the huge number of contacts you may do it differently.
Firstly, you can do it by scrolling the letters in the right bar of the screen. You may quickly
switch between contacts starting with an appropriate letter. The letters shown rightwards are the
letters that most contacts start with
Secondly, you may tap a grey arrow rightwards the screen to make the keypad visible. Tap the
necessary letters and numbers to use T9 contacts look up and in few secs to find the necessary
contact. Or you may dial the number that is missing in your contact list. If you dialed the wrong
letters and numbers then press backspace arrow to erase it, if you tap-and-hold backspace button
your number will be quickly erased. If you want to close the keypad you should press an arrow
that appears instead of the backspace button when all symbols in the input field are erased.
Additional Options
To sort the contacts by name, last name or company:
Go Menu > Sort > Name (or Last name, company)
To change interface language:
go Menu > Language
To add a contact:
go Menu > New contact
SMS-Chat
Main Window
It contains all SMS chats that you have on your device. They are sorted by the date, the chats
with the most recent messages are displayed first. The chat with a new message is marked with
the yellow envelope.
To access Main Menu, tap
in Main Window. There are the following options:
To minimize program, tap minimize
To exit, tap exit
To return to SMS-Chat, tap cancel
To change interface language:
go Menu > Language
Sending SMS
To start a new SMS-Chat:
start the program from Start >Programs>SMSChat, tap
and choose a contact.
to find a contact you may scroll the contact list
with a finger or tap an empty field at the top and
type the number. You can also sort contacts list by
typing letters or numbers in the same field.
having chosen a contact, tap an empty field at the
bottom of the screen and type a text message
to send the message tap
, it will
automatically appear in the chat
press
to return to chat list
Multiple SMS Sending
Start a new SMS Chat
access context menu in the chosen chat, tap menu
icon
choose recipients and tick the contacts who you
want to send the same message to
If you want to remove the recipients from the
chat, choose menu and put away the ticks. You
can not delete the main recipient
Add contact
If you want to add a contact that is missing in your contact list enter the SMS chat with this
contact, tap menu button and choose Add contact (to add new contact) or View Contact (to
view contact in FunContact). You will be automatically put in the contact edit window of
FunContact to add the contact.
Resending Message
Choose an SMS Chat
Find the message that you want to resend, tap it
Choose from the context menu Resend
Tap the button with envelope
Forwarding Message
Choose an SMS Chat
Find the message that you want to forward, tap it
Choose from the context menu Forward
Tick the contact you want to send the message to
Tap the button with envelope
press
to return to chat list
Deleting Message
Choose an SMS Chat
Find the message that you want to delete, tap it
Choose from the context menu Delete SMS
Confirm or cancel deletion
Deleting Chats
choose a chat that you want to delete
access context menu in the chosen chat by tapping menu icon
choose Delete Chat
confirm or cancel deletion
ZoomBoard
Typing
To start typing on ZoomBoard choose it by tapping the on-screen
button in the center of the tray where the default Windows Mobile
keyboard is. ZoomBoard will appear there as an application for
typing.
ZoomBoard looks like the usual keyboard but it works differently.
There are 3 different types of zooming:
Full zoom zooms in the whole
keyboard with letters
Lens zoom - appears above
the keyboard
Float zoom - appears straight
above the letter you press
When you tap the keys there appears a zoom (either flat, glass or i) with the zoomed in letters
under your finger. The key highlighted with red is ready to type. Slide over the necessary letter
until it gets red and release finger to type this letter.
Button
in the bottom left changes the layouts.
Tap it and change between the layouts you’ve chosen.
Shift button
(up arrow) changes register. Tap twice to print only Capital letters (to switch to
the upper case).
changes keys with letters to keys with numbers and symbols, access the setting button
Enter button
.
Backspace button
to erase symbols; tap and hold to start quick erasing of the text.
Control button.
The combinations of keys with Ctrl and Shift are supported.
Settings
Tap
to access
setting button.
The options are the following:
Language to change language of settings
Layouts to choose the language layout
Smart Zoom to switch this option on or off.
When enabling this option it is possible to zoom the pressed letters
either immediately or with a delay. If you need a zoom window to
emerge right away then you need at first stroke wait for the zoom to
appear. After that the zoom will come forward as quickly as you
touch the screen. When you do not touch the screen with keyboard
for at least three seconds the zoom is going to appear with the delay
again.
When disabling it the zoomed preview appears all the time with the
same interval.
Default keyboard to set ZoomBoard as a default keyboard (If you
want to delete ZoomBoard: you need first to switch off
Default_keyboard option > make soft reset > uninstall program.)
Zoom types to switch between full zoom, lens zoom, float zoom or
simple (without appearance of any zoom).
About to access the info about the version and register info.
Contact Us
If you have any questions, comments or suggestions on iWindowsMobile Communication Suite,
please contact us http://vitotechnology.com/en/support/.