1
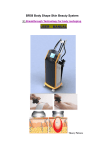
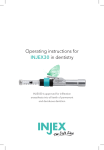
Comfort Injects50 Comfort-in™ INSTRUCTIONS FOR USE English user manual 1 Introduction Thank you for choosing the Comfortin™ Needlefree Injection system, developed with your comfort and convenience in mind. This manual contains step by step instructions how to use the it and keep it ready to operate. Before you start using the Comfortin™, please ensure that you familiarise yourself with the device by reading carefully the instructions before use. It is highly recommended after having studied the manual, first practice with the test fluid in order to become familiar with the Comfortin™. If you are internet savvy please check you tube videoinstruction at http://youtu.be/nkW8yNq1HB4 2 Table of Contents Introduction What is the Comfortin™ System for? Items in the Package The Comfortin System Overview The Comfortin™ Injector Body Principle of Operation Specifications Pressure Lever The needlefree syringe Filling Adaptor Instructions for Use the Comfortin™ Prepare the Comfortin™ Injector Fill the Syringe Load the Injector Give Injection Disposal Maintenance and Care Warranty Further Information 3 What is the Comfortin™ System for? The Comfortin™ system is a compact, springpowered technology that delivers up to 0.5 milliliters of liquid medication or vaccine by means of a narrow, highvelocity fluid jet, which penetrates the skin in less than a onethird of a second. The injection is fast and safe and intended for subcutaneous injections in adults.Healthcare providers who routinely administer injections may use the Comfortin™ Injection System. It can also be used by patients authorised by their physicians to selfinject, or have other individuals administer injections of prescribed medication. The majority of people who used the system have reported feeling no pain, while some indicated feeling slight pressure, a pinch or a snap at the time of the injection. Overall, user surveys indicate a preference for Needlefree injections over those given with conventional needles. Needlefree technology significantly reduces the fear and anxiety associated with a needle injection. It also eliminates needlestick injuries, greatly reduces the need for sharps management and disposal costs. 4 5 Items in the Package The Components of the Comfortin™ System consist of: ● ● ● ● An Injector Body A Pressure Lever A sterile singleuse filling adaptor with a cap A disposable single use sterile 0.5 ml graduated needlefree syringe The Comfortin™ System is sold as a complete starter kit contained in a carrying case. The starter kit contains the injector device, the pressure lever, eight (8) sterile needlefree (0.5 ml) syringes, one (1) sterile adaptor (Fig.1). Items not provided with the package: ● ● ● ● Alcohol swabs Ice pack Disposable ice pack Vials of medicine for injections Figure 1: Comfortin™ Starter Package 6 The Comfortin System Overview The Comfortin™ Injector Body The injector is a reusable compact springactuated needlefree hypodermic injector consisting of the main body, injection button and front head of injector which contains the required dose unit marks and spring. Figure 2: The Comfortin™ Injector Body Head of Injector Injection Button Principle of Operation The Comfortin™ Injector delivers liquid medications subcutaneously by creating a very narrow, high velocity fluid stream which penetrates the skin and delivers the medicine into the body. Energy to propel medicine is supplied by a handheld spring powered injector. When released, the spring 7 energy is transferred to the syringe plunger, expelling medicine through a very small orifice (0.15mm) in the face of the syringe contacting the user's skin. Specifications Table 1: Injector Body Specifications An Injector Body Description Dimensions 136.5mm(L) × 27 mm (D) (before injection) 136.5mm(L) × 27 mm (D) (after injection) 110g ± 5% For < 0.2 ml: the expelled dose ± 0.01 ml For > 0.2ml: the expelled dose ± 5% < 60dB Weight Dose accuracy Noise when accidentally fired into air Storage Spring Force Spring Pressure Spring Life Cycle Between 5°C – 40°C; RH 40%–95% 120 ± 5% lbf 4100 ± 10% 10,000 (Warranty for device: 1 year) Pressure Lever The pressure lever is used to charge/load the spring within the injector for injection. Pressure Lever Body Dimensions Weight Description 90mm(L) × 73mm(H) × 28 mm (W) 100g ± 5% 8 The needlefree syringe aka Nozzle The needlefree syringe is a single use, transparent, disposable container consisting of a barrel to hold 0.5 ml of medicine or vaccine, a plunger to discharge the medicine or vaccine through a small diameter orifice at the forward end of the barrel and a rubber seal at the end of the plunger to prevent rearward leakage. This part of the device comes into direct contact with the user’s skin and therefore is supplied in sterile form sealed in a pouch. Figure 3: Needlefree Syringe in a blister package Syringe Description Dimensions Weight Length 46.5 mm External Diameter 15 mm Internal Diameter 10 mm Orifice Diameter 0.146 mm 4.47g ± 3% 9 10 Filling Adaptor The filling adaptor allows the needle free syringe to be filled with medicine or vaccine from the medicine or vaccine storage vials. The adaptor and its cap are supplied sterile sealed in a pouch. Figure 4: Adaptor and Cap in a Pouch Adaptor Description Dimensions Length 26.9 mm External Diameter 21 mm 4.7 g ± 3% Weight 11 Instructions for Use the Comfortin™ Wash your hands with soapy water before using the Injection System Prepare the Comfortin™ Injector ● Take the Pressure Lever out of the carrying case. ● Open the wings of the Pressure Lever so that 3 parts of the Lever: Injector Holder, Pushing Bar and Metal Pressure Stick are clearly visible 12 ● Insert the Injector Head into Injector Holder as shown in the pictures below Put ‘Pressure stick’ into head of injector ● Insert the Pressure Stick into the hole of the Injector’s Head. ● With the help of “Push Bar” press the “Lever Stick” into the Injector’s Head. ● You should hear a “click” sound when the injector’s spring is fully loaded. Inappropriate loading of the Injector may cause damage and malfunction of the device. Now, when the spring is loaded you can adjust the dose level by turning the head of the injector. The dose levels are printed on the blue part of the Injector Body. Hold the device so that the dose window faces you. Wind the front head of the injector to fit your dose range. The range from 0 to 10 represents 0 – 0.1 cc dose (or 0 10 units); the range 10 – 20 corresponds to 0.1 – 0.2 cc (or 10 – 20 units) . 13 Warning: Using the injector without a syringe may result in damaging the device. Do not repeat dryfiring. Fill the Syringe ● Clean your hands again ● Remove protective cap from the primary medicine vial ● Prepare top of the vial by wiping it with alcohol swab, follow aseptic techniques ● Open a pouch with the sterile Filling Adaptor. Always visually inspect the package for damage before opening it. DO NOT use it if torn or damaged . DO NOT resterilise or Autoclave. ● Aseptically remove the filling Adaptor from packaging. ● Insert Adaptor’s spike into the vial with twisting motion until it fully engaged . ● Remove the protective cap from the Adaptor 14 ● Open a pouch with the sterile needlefree syringe. Always visually inspect the package fordamage before opening it. DO NOT use it if tornor damaged . DO NOT resterilize. 1. Take a syringe out of its sterile pack, 2. Push plunger inwards to release it, only then pull back and forth to loosen it. 3. Pull the plunger back to the 0.5 mark to fill with air. 4. Attach the syringe (filled with air) to the adapter turn syringe clockwise to lock in, turn vial including adapter upside down, now push the air in to the vial. ● Attach the syringe (filled with air) to the adapter turn syringe clockwise to lock in . ● Turn vial including adapter upside down, now push the air in to the vial (to prevent vacuum), and now slowly pull down on Syringe Plunger to draw injectable medication to the 0.5 cc (50 units) mark on the Syringe. Then draw up and gently push the piston into syringe to the mark of your needed dose. Remove bubbles if required by gently tapping the syringe with your fingertips to push the air out. 15 ● Separate the Syringe from the Adaptor by unscrewing counterclockwise. The Filling Adaptor may be used to fill several Syringes from a multidose vial. In this case replace protective adaptor cap back on the adaptor until next refilling. Keep the vial with adaptor refrigerated. Note that protective cap is designed to protect against touch contamination only, and does not provide a barrier against other forms of contamination. DO NOT reuse Filling Adaptor in another vial. Doing so may contaminate contents of new vial. Tip of the Filling Adaptor (spike) is sharp. Use caution when handling. Syringes are for single patient use and not to be reused. Using a syringe more than one time may result in contamination or injector malfunction. Load the Injector ● Double check if the set dose on the Injector and filled volume in the needlefree syringe are corresponding. In the picture, for example, the injector is set for 10 units and the syringe is filled with 10 units (0.1 cc) 16 ● Now take your medicine filled syringe and insert it in the head of the injector by screwing it firmly in. DO NOT direct the Syringe toward the face or nearby skin when loading the Syringe into an Injector, preparing to give an injection, or ejecting a Syringe after use. DO NOT touch Injection Button until you ready to inject into injection site to prevent from inadvertent firing.Injury may occur. Partial i nsertion of Syringe into Injector may damage Syringe and/or Injector. Give Injection Any of the sites that are normally recommended for conventional needle administration can be used with the Comfortin™. Choose an area with some fatty tissue. Avoid areas with a low fat content (e.g. the shinbone) or high muscle content (upper arm) to ensure subcutaneous delivery. When injecting into abdomen choose areas that are not too soft to prevent from wet shots . Improper injection site location or technique may res u lt in injury. 17 DO NOT position the Syringe directly over a blood vessel . Although injection into the vessel is highly unlikely, injection over a vessel may produce an adverse reaction including, but not limited to, bleeding, bruising, swelling, or tenderness. Select a site that is free from irritation, with a low likelihood of infection, and where the skin is intact and free from abrasions and bruises. ● Disinfect chosen area for administration with Alcohol swab ● Place the tip of the syringe against the skin firmly at 90° angle ● Once the tip of the syringe is tightly against the skin, push the injector button firmly. Wait 5 seconds for the medicine to penetrate the body and then remove the syringe. DO NOT deliver injection with Comfortin injector at an angle other than 90 degrees to the patient. Patients receiving anticoagulants or persons with hemophilia or other coagulation disorders may have more postinjection bleeding and/or bruising . Disposal Collect used disposables in suitably labe l ed medical waste containers a n d follow local requ i rements for proper disposal. 18 Maintenance and Care Since Comfortin™ Injector and Pressure Lever are reusable components it is important to maintain these parts of the System appropriately to ensure dose accuracy and life cycle of the device. Clean these parts regularly and store them in the provided carrying case. DO NOT autoclave Injector or Pressure Lever Injector and Pressure Lever may be cleaned and disinfected by wiping the exterior surfaces by using 70% Isopropyl Alcohol. Warranty The Comfortin™ System comes with a limited manufacturer warranty against defects in materials and workmanship for 1 year from the date of purchase.The warranty does not cover damages caused by improper usage and handling, accident and/or negligent care. 19 Further Information Ordering Information ASTS Enterprises Trading as Injex Australia. 2/11 Evans street,Burwood,VIC,3125 +61 3 98888771 [email protected] 20