1
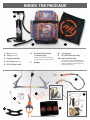
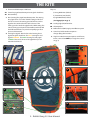
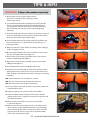
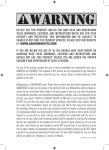
ATTENTION
WAINMAN HAWAII LLC STRONGLY SUGGESTS THAT YOU TAKE LESSONS AND BE A CONFIDENT AND
COMPETENT KITEBOARDER BEFORE USING THIS PRODUCT ON YOUR OWN. THE SUPPLIERS OF THIS
PRODUCT ARE NOT RESPONSIBLE FOR ANY DAMAGE TO PROPERTY OR ANY PERSONAL INJURY CAUSED
BY ANY USE, MISUSE, ABUSE OR IRRESPONSIBLE USE OF THIS PRODUCT BY THE USER.
This is a powerful traction kite made for you to do kitesurfing only. It is not a parachute
or a paraglider.
If you want to kitesurf, you have to first learn how to do it properly and safely from an
experienced and responsible kitesurfer.
KITEBOARDING IS AN EXTREME SPORT AND THE USE OF THIS EQUIPMENT COULD RESULT IN RISK OF
SERIOUS BODILY INJURY AND DEATH TO YOURSELF AND THOSE IN CLOSE PROXIMITY TO YOU. INJURIES
ARE AN INHERENT RISK OF KITEBOARDING AND PARTICIPATION IN KITEBOARDING IMPLIES THE USER’S
ACCEPTANCE AND ASSUMPTION OF THOSE RISKS.
When you kitesurf, always stay within swimming AND good visibility range of the Shoreline.
Don’t go out when the surf is big and the currents are strong. Remember that any activity
on the water might result in drowning. Never kitesurf alone.
When you kitesurf, remember to keep a safe distance from all objects as they could result
in serious injury or death: land, trees, buildings, cars, power lines, all objects in shallow
water, your own board and bar, other kites and all other vessels etc.
Avoid gusty winds and don’t go out if the wind is too strong. Never kitesurf when wind
is offshore. Take extreme care when the wind is blowing onshore. Perfect conditions to
kitesurf are side-shore steady winds with a moderate strength of 15-25 knots.
Regularly inspect and maintain all components of this kite properly, paying particular
attention to lines, which must always be replaced IF DAMAGED AND WORN. It is necessary
to ensure that your quick release is in proper working order by activating it prior TO each
kitesurfing session. After each use, rinse your quick release with fresh water.
Inflate the LE AND STRUTS of your kite firmly and make sure that all valves are closed
properly.
Always connect your flying lines properly to the kite. Follow the color coding of the
lines. Wrong connection Will change the kite flying CHARACTERISTICS AND POSSIBLY RESULT
IN SERIOUS BODILY INJURY. Remember to always have the lines symmetrical In length. This
should be checked regularly.
When using this kite, always use common sense, respect nature, and try to safely help
others when they are in trouble.
If you have any questions about how to use this kite properly, study the manual or
contact us through www.wainmanhawaii.com for more information.
DO NOT USE THIS PRODUCT UNLESS YOU HAVE READ AND UNDERSTAND THESE WARNINGS,
CAUTIONS, AND INSTRUCTIONS WHICH ARE FOR YOUR safety AND PROTECTION. THIS INFORMATION
MAY BE SUBJECT TO CHANGE AT ANY TIME. FOR CURRENT UPDATES, PLEASE VISIT OUR WEBSITE AT:
WWW.WAINMANHAWAII.COM.
HAVE FUN AND RIDE HARD! ALOHA!
Inside the Package
2.
1.
1. Kite (Inside the Bag)
2. Pump (Left Pouch)
3. Compression Bag
4. RG 3.0 Bar (Right Pouch)
5. RG 3.0 Safety Leash
3.
6. Bar Spare Parts located
in Accessory Bag
(hex key, suicide connector, metal ring,
front line pigtail, para suicide connector)
8. Line Storage
9. RG 3.0 Bar Accessory Bag
10. Kite Spare Parts Bag
(Iocated in the front pouch of Kite Bag) single
lines (5m, 6.25m, 7.5m and 9m only), bladder
patches, RAF inflation system spare parts, sail
repair, glue and stickers)
7. Bungee
4.
5.
7.
10.
6.
8.
9.
www.wainmanhawaii.com - 1
THE KITE
1. Thermo-molded bumpers - EVA foam.
They are:
2A. Center line pigtail attachment point using larks head knot.
I) Strong Wind Knot (labeled)
2B. Ronstan Pulley.
II) Center Knot (not labeled)
3. Rear (steering) line pigtail attachment points. The steering
line pigtail comes set on the “STOCK” setting (no label) on
the LE. To increase the turning speed of the kite, remove
pigtail and re-attach to the FAST tab. To decrease the
turning speed re-attach the pigtail to the SLOW setting. The
various turning speed options of the Rabbit combined with
the bridle attachments can provide unique flying and bar
pressure characteristics.
III) Light Wind Knot (labeled)
4. Steering line pigtail. Attach color coded steering line to
pigtail using larks head knot. The LEFT steering line and
pigtail is ORANGE. The RIGHT steering line and pigtail
is GREEN. There are (3) knots on the pigtail that you can
attach the back line to.
(See Rigging Tips on pg. 6)
5A. Leading Edge (LE) Inflate Valve.
5B. LE Dump Valve.
6. Rabbit Air Flow (RAF) single point inflation system
7. Center line bridle attachment options changes flying characteristics.
8.
Single Line Attachment point options on LE for 5m,
6.25m, 7.5m and 9m ONLY (see Single Line section
on pg. 5).
5.
1.
5A.
8.
5B.
2A.
6.
5A.
2.
2B.
7.
3.
8.
4.
2 - Rabbit Gang 3.0 User Manual
BRIDLE OPTions
It is suggested that the Rabbits be used on the factory “stock” setting for the first few sessions. This “stock” setting is the
bridle configuration that comes straight out of the bag when you purchase the kite (MIDDLE loop on LE and knot on LE
pigtail). Due to the low aspect ratio of the Rabbit canopy, the kite needs to be moved faster around the wind-window to
generate momentum. It is very important to properly trim the kite (on the clam cleat). If the kite is not properly trimmed,
the performance of the kite may be jeopardized (back stalling etc.). When you decide it is time for changing the Rabbit
performance characteristics, it is suggested that you always make a single change at a time (on bridle and back lines). This
approach will enable the rider to find his/her perfect setting to match their riding style and maximize optimal performance.
Remember: W
hen changing the bridle setting, be sure to adjust the knot to the corresponding setting. UPWIND tab on LE / UPWIND
knot on LE pigtail; DOWNWIND tab on LE / DOWNWIND knot on LE pigtail; “STOCK” tab on LE / “STOCK” center knot on
LE pigtail (“STOCK” is not labelled on kite).
“Stock" Setting
The Rabbit Kite bridle comes set up on the “STOCK” setting tab on the LE out the bag
using the MIDDLE tab and knots. The bridle attaches to a LE pigtail with 3 knots (see
diagram on left) on it: UPWIND which is labeled, “STOCK” which is the center knot
and not labeled, DOWNWIND which is labeled. The “STOCK” setting is the optimal allround setting. You can adjust the bridle to find your favorite riding characteristic for
the kite. To change the settings, undo larks head knot on LE pigtail. Remove LE pigtail
and attach to desired tab (UPWIND or DOWNWIND).
Upwind Setting
Attach LE pigtail to UPWIND tab on LE. Attach larks head knot to UPWIND knot
(see diagram on left) on LE pigtail that is labeled on the kite. This bridle option will
make the kite shift further towards the edge of the wind window enabling better
upwind capabilities. The kite will turn a bit slower than the “STOCK” setting and
jump with a traditional vertical lift. This setting will also have increased
bar pressure.
Downwind Setting
Attach LE pigtail to DOWNWIND tab on LE. Attach larks head knot to
DOWNWIND knot (see diagram on left) on LE pigtail that is labeled on the kite.
This bridle option will make the kite shift back into the window increasing
downwind riding. The kite will turn faster and jump with a more horizontal
lift. As the kite sits deeper (further back) in the window, it is a favorite for wave
riding and for everyday light weight riders, as the bar pressure decreases.
www.wainmanhawaii.com - 3
BRIDLE OPTions
FOR BOSS & Big Mama
BRIDLE ONLY
The 12m Boss and 14.5m Big Mama has
a double v bridle. The 10.5m Punch, 9m
Smoke, 7.5m Mr. Green, 6.25m Gypsy and
5m Bunny has a compact v bridle. When
changing a setting on the 12m and 14.5m
bridle, be sure to loosen up the larks head Figure 1.
loop (see Fig 1).
After you have loosened up the larks head loop, it is very
important that you get a proper and traditional launch
from the edge of the wind window. This will ensure that
that the bridle will find the best spot to set. This should
also be done once in while if you feel your kite pulling
to one side (after checking line lengths) as the loop can
shift when slamming your kite down repeatedly.
The 12m and 14.5m have an additional micro regulation
on the bridle called Slow/Fast (see fig 2). The kite comes
set on the Slow setting which is the optimal setting
with higher bar pressure than the Fast setting but better
upwind and lift . The Fast setting will make the kite
turn faster, with lower bar pressure but less life and
upwind performance. Similar to the Upwind/Stock/
Downwind adjustments, when adjusting the Slow/
Fast bridle setting, be sure to adjust the knot
on the corresponding setting. Slow tab on
LE, Slow knot on LE pigtail (see Fig 3).
Fast tab on LE, Fast knot on LE pigtail
(see Fig 4).
SLOW Setting
Figure 3.
Figure 2.
FAST Setting
Figure 4.
Remember: W
hen changing the mini bridle setting, be sure to adjust the knot to the corresponding setting. FAST tab on LE / FAST
knot on LE pigtail; SLOW tab on LE / SLOW knot on LE pigtail.
4 - Rabbit Gang 3.0 User Manual
Single line Setup
Single Line Attachment point options on LE for 5m, 6.25m, 7.5m and 9m ONLY.
To get a more direct feel and increased responsiveness
in the kite, the 5M, 6.25M, 7.5M and 9M Rabbits ONLY
can be ridden without the stock bridle. This setting is
called the Single Line setup. Start by removing the bridal
from the LE of the kite. There are 3 tabs on the Single
attachment point. The outside two tabs provide similar
flying characteristics as the UPWIND and DOWNWIND
bridle setting. (not labeled on the kite - see Figure 2 and
3). Each side will have two short pigtails and a SINGLE
line pigtail (found in front pouch of Rabbit Bag – see
Fig. 1) SINGLE line is recommended for advanced riders
only as the kite will be less forgiving and have a faster
turning speed. The SINGLE line will have similar depower
capabilities as the Rabbit with the bridle/pulley on pg. 2.
The SINGLE line setting works optimally for riders up to
165 pounds. Make sure that the kite is very well inflated.
Figure 1.
1. The SINGLE tab closest to the center of the kite is
the UPWIND SINGLE setting (Fig 2). After removing the
bridle, attach the 2 smaller pigtails to the tab closest
to the center of the kite and the center tab. Feed the
labeled SINGLE line through the two smaller pigtails
loops and pull tight (Fig 3 and 5). Attach grey center line
to the Single line using larks head knot. This will give
similar characteristics to the UPWIND bridle options
discussed on pg. 3.
2. The SINGLE tab furthest from the center of the kite is
the DOWNWIND SINGLE setting (Fig 2). After removing
the bridle, attach the 2 smaller pigtails to the tab
furthest from the center of the kite and the center tab.
Feed the labeled SINGLE line through the two smaller
pigtails loops and pull tight (Fig 4 and 5). Attach grey
center line to the Single line using larks head knot. This
will give similar characteristics as the DOWNWIND bridle
options discussed on pg. 3.
Center of kite
Figure 2.
UPWIND
Figure 3.
DOWNWIND
Figure 4.
Figure 5.
5 - Rabbit Gang 3.0 User Manual
RIGGING TIPS
s mentioned before, it is VERY IMPORTANT that you take lessons with a competent and
A
certified instructor which will ensure safe kite setup and rigging. REMEMBER: Safety is
the number one priority. Below are a few steps on rigging the Rabbit.
STEP 1. There are two ways of laying out your lines - upwind and downwind of the
kite. Wainman Hawaii highly recommends rigging DOWNWIND of the kite (figure 1).
There will be certain situations that you can only lay out your lines upwind of the kite.
When rigging DOWNWIND, make sure that your bar is flipped upside down and green
rear line is on left and orange rear line is on right (figure 1). Separate all four lines by
combing the lines towards the kite with the green line on your left and orange line on
your right. Double check that no lines are crossed over each other.
Figure 1.
STEP 2. Once you have pumped up your kite (see tips section on pg. 20), separated
all four lines and double checked that no lines are crossed over each other, you can
attach the lines to the pigtails on the kite. The lines are color coded to ensure that you
attach the correct lines to the corresponding pigtail on the kite.
i) Attaching Rear Steering Lines:
Attach color coded steering line to pigtail using larks head knot (see figure 2).
The LEFT steering line and pigtail is ORANGE. The RIGHT steering line and pigtail
is GREEN.
Depending on the wind conditions and rider experience level, always start by
using the MIDDLE knot (see figure 3) and move it up or down to get more or
less power.
There are (3) knots on the pigtail that you can attach the back line to. They are:
Figure 2.
Recommended Knot
Strong Wind (labeled) - The knot (furthest from the) kite will lengthen the back
lines providing more depower capabilities. This setting is recommended when
you are over powered and need to spill extra power from the kite.
Center Knot (not labeled) - This knot provides power in the kite that is in
between Strong Wind and Light Wind.
Light Wind (labeled) - The knot (closest to the kite) will shorten the back lines
and provide the most power in your kite.
NOTE: When adjusting the position of the rear line pigtail (SLOW/FAST) at the webbing on the kite tips, the rear to center line length ratio will also change. Please make sure your kite is trimmed correctly to ensure that the kite does not oversheet or backstall (see figure 3).
ii) Attaching Front Center Lines:
Figure 3.
Attach color coded (GREY) and labeled (CENTER) line to pigtail that is labeled
CENTER (attached to pulley) using larks head knot (see figure 4) . There are two
knots on the pigtail. Make sure you use the same knot on each side and that the
pulley is free of sand and moving freely on bridle line. You can use 2 different
knots in situations where you center lines are not of equal length. This is only a
temporary solution and if your front lines are not equal, they must be adjusted.
STEP 3. Once you have attached your lines, once again be sure to do a final check that
your lines are connected to the corresponding pigtails and not crossed. Makes sure all
knots are on corresponding pigtails.
Figure 4.
STEP 4. If you have rigged DOWNWIND, REMEMBER to flip your bar over the correct
way (DANGER label on bar facing down;left hand on the orange side; right hand on
green side). Double check once again that your lines are not crossed before you hook
your harness loop into spreader bar.
www.wainmanhawaii.com - 6
Rabbit relaunch
It is VERY IMPORTANT that you take lessons with a competent and certified instructor
which will ensure safe kite relaunch. Make sure your kite is properly inflated which will
assist in easy and quick relaunch capability. REMEMBER: Safety is the number one
priority. Below are steps and tips on relaunching the Rabbit.
STEP 1. When the kite goes down with the LE in the water,
make sure the kite is directly downwind of you. To ensure that
your lines are not crossed over, flip the bar upside down and
spin it until lines are uncrossed (see figure 1). Try to keep your
board on your feet as the added resistance that the board
provides will assist in quicker relaunch.
STEP 2. Remember that the bar will now be flipped over, so
once you have uncrossed the lines, spin bar facing right way
up, grab any one of the rear lines (you can use the Relaunch
Ball for assistance) and pull towards your body as illustrated in
Figure 2. This will cause the wind to catch the sail and wing tip
to lift.
STEP 3. Once the wing tip lifts, the kite will rotate on its side
and start moving towards the wind window. Remember to
keep the bar tensioned to maintain rear line tension and the
bar aimed towards the side of the wind window that your are
trying to move it towards.
STEP 4. Keep the tension on the line as the kite moves to the
edge of the window on the wing tip ready for relaunch (see
figure 3).
STEP 5. As the kite starts to relaunch, level out your bar and
slowly direct the kite up into the sky. Remember to sheet the
bar out to depower the kite as soon as the kite leaves the water
(see figure 4).
Figure 1.
Figure 2.
Figure 3.
Figure 4.
7 - Rabbit Gang 3.0 User Manual
Rabbit Traditional relaunch
It is VERY IMPORTANT that you take lessons with a competent and certified instructor
which will ensure safe kite relaunch. Make sure your kite is properly inflated which will
assist in easy and quick relaunch. REMEMBER: Safety is the number one priority.
Below are a few steps on relaunching the Rabbit (continued).
Depending on the wind conditions (light winds) and additional elements (currents etc.), it may take a little work to get the kite on its
wing tip and to the edge of window. You may have to use the traditional kite relaunch method as illustrated above. The concept is
very similar to the simple Rabbit Relaunch described on pg. 16, but requires letting the board go and swimming towards kite.
STEP 1.When the kite goes down with the LE in the water,
make sure the kite is directly downwind of you. To ensure
that your lines are not crossed over spin the bar it until lines
are uncrossed. Flip the bar over into the correct position.
Swim towards your kite to flip it over on its back (see figure
1) - picture shows kite on its LE. Be sure to keep tension in the
lines and not swim too much towards the kite as the kite will
flip over.
STEP 2. Once the kite is almost on its back, grab a rear line
(you can use the Relaunch Ball for assistance) and pull towards
your body. This will cause the wind to catch the sail and wing
tip to lift (see figure 2).
STEP 3. Once the wing tip lifts, the kite will rotate on its side
and start moving towards the wind window. Remember to
keep the bar sheeted in for rear line tension and the bar aimed
towards the side of the wind window that your are trying to
move it towards (see figure 3).
STEP 4. Keep the bar sheeted in and the kite moving to the
edge of the window on the wing tip ready for relaunch.
STEP 5. As the kite starts to relaunch, level out your bar and
slowly direct the kite up into the sky. Remember to sheet the
bar out to depower the kite (see figure 4).
Figure 1.
Figure 2.
Figure 3.
Figure 4.
www.wainmanhawaii.com - 8
Self Rescue
It is VERY IMPORTANT that you take lessons with a competent and certified instructor
which will ensure safe self rescue. REMEMBER: Safety is the number one priority.
Below are steps and tips on self rescue.
There are various circumstances that may occur and
require a self rescue (wind going offshore, sudden
and severe wind conditions, broken equipment,
dangerous situation etc.). Every rider should be well
versed in proper self rescue technique. To describe the
self rescue, the rider activated the Quick Release due
to a dangerous situation with the kite “flagging” on
Figure 1.
one of the front lines.
Step 1. Activate the Quick Release on the harness loop. Please refer
to pg. 19 for steps on proper Quick Release activation. As the bar was
setup on “shool safety” or “stock” the kite will depower and “ flag” on
center line (figure 1).
Figure 2.
Figure 3.
Step 2. Take the ONE center line that you flagged the kite on and
slowly start pulling yourself towards the kite until you have reached
the bar. When you reach the bar, start wrapping the ONE center line
around the bar. Once you have wrapped approximately 15-20 ft.,
start wrapping the remaining three lines around the bar. This is to
ensure that your kite does not power up. You should be slowly moving
toward the depowered kite (figure 2). Although it is hard sometimes,
make sure NOT TO get tangled in your lines while wrapping. It is
suggested that you always carry a kite knife in case you do get tangled.
Remember to always watch the kite when winding up your lines. Be
prepared to immediately let go of everything if needed in case the
wind increases and powers up the kite.
Step 3. Once you have rolled up your lines to within half of the kites
length, tie the lines down on the bar using a simple knot.
Step 4. Grab hold of the kite (center of LE). Fold the kite in half and
work yourself down to the wing tips. Grab hold of the center line
bridles (figure 3).
Step 5. Position the kite in the direction of wind (assuming the wind
direction is towards shore) and sail in the kite in (figure 4).
Figure 4.
Step 6. Sail the kite in until you reach the beach or a safe location
(figure 5). Be sure to secure your kite on the beach.
Please Note: Sometimes this method of self rescue will not work
(offshore winds etc.). If this is the case, follow Step 1- 4. Once you
have secured the kite, deflate the LE (not the struts) and roll the
kite up, securing it by wrapping your harness around it. Close
deflate valve afterwards so bladder does not fill with water.
The rolled up kite (with inflated struts) will offer flotation for
your to lie on and paddle back to shore.
Figure 5.
9 - Rabbit Gang 3.0 User Manual
RG 3.0 bar
1A. Front Flying Lines
330kg/725lbs grey color coded lines with preassembled
extensions that can be removed for different kite flying
characteristics.
1B.
1B. Rear Flying Lines
220kg/485lbs orange & green color coded lines with
preassembled extensions that can be removed for different
kite flying characteristics.
1A.
2. Swivel With Ceramic Bearing
2.
Marine swivel with the breaking strain of 500kg/1100lbs. This
unique high performance ceramic bearing offers unmatched
free spinning capabilities under high tension loads without
any corrosion risks that could result in the swivel getting stuck.
Our swivel allows for multiple safety set-up options and easy
maintenance.
3.
3. Relaunch Ball
The relaunch balls on the back lines are used to assist in
relaunching the kite when is leading edge down. Grab the
relaunch ball in windy conditions and pull towards you for
instant relaunch of kite.
4. Power Trim Adjustment With Magic Velcro
Simple trimming system based on the original Clam Cleat
mechanism: pull rope in to shorten the front lines and reduce
the kite`s power or release rope to lengthen front lines and
increase power. The strong velcro keeps the extra adjustment
rope in place while riding.
4.
5. Soft Bar Ends and Comfort Bar Grip
Ergonomic molded EVA (floating cushy foam) bar ends
provide soft touch feeling while riding and floats the bar
when in the water. The line winder and integrated bungees
on the barends keeps the winded lines in place after the
session. Molded “bmx” bar grip provides comfort for hands
during kite steering.
5.
6. Custom Depower Line
Dimmed transparent PU (very strong plastic) tube with two separate compartments,
the tube houses the depower main line (600kg/1320lbs of breaking strain) and safety
bungee line. This combo is well fitted in the center hole of the bar, providing superb
power/depower capabilities and results in an amazing and direct kite feel.
6.
7. Safety Buffer
Our unique buffer solution provides functionality for different safety setup options.
The buffer length also ensures that all quick release activations will be successful.
Additionally, the buffer provides chicken loop stability for unhooked riding as it gently
locks into the center hole of the bar.
8. Safety Quick Release
The push away quick release handle is used to release the kite from rider in case
of emergency. Depending on the selected set-up option, the kite will significantly
depower, totally depower (flag) or separate from the rider.
7.
8.
9. Soft Harness Loop
Covered with a molded EVA (soft cushy foam), the harness loop is very safe for hands
and it floats in the water. Due to its construction the loop doesn’t elongate while
riding. It comes equipped with a removable security pin (Dingy Guy), and the small,
integrated ring can be used as a leash attachment point for One Release set-up.
11 - Rabbit Gang 3.0 User Manual
9.
RG 3.0 bar: STOCK
STOCK Set-up
The “Stock” set-up is how the bar comes “out the bag” and
is geared towards the every day rider that engages his/her
quick release in rare emergency occasions. In this option
you attach the bar leash to the “safety” ring on buffer of the
stock bar. When engaging the quick release in case of an
emergency, the bar leash will stay connected to one of the
front lines and “flag” the kite (depowers the kite 100%). In
case of further danger activate your quick release on the
safety leash to totally separate from the kite.
IMPORTANT: Always attach clip (closest to red release) to
your harness so you can reach the release when needed.
Attach this clip to the harness
www.wainmanhawaii.com - 12
RG 3.0 bar: Suicide Connection
SUICIDE CONNECTION SET-UP
The “Suicide Connection” set-up is for experienced riders only. It
may meet the needs of expert riders who ride in waves and don’t
want to lose their kite. It allows for unhooked riding and letting
go of the bar without kite “flagging” even if you activate the quick
release. After you convert the bar to “Suicide Connection” by
attaching the suicide connector to the buffer, attach safety leash
to the ring on the suicide connector. When you unhook and let
go of bar, the kite will depower the distance of the depower main
line. If you activate your quick release, you will still be attached
to the kite (safety leash) and you must activate the safety leash
to release the kite. If a situation requires you needing to flag your
kite, grab the safety buffer handle prior to activating the release
on the leash.
HOW TO:
REQUIRED PARTS
- Suicide connector
- metal ring.
10.
13 - Rabbit Gang 3.0 User Manual
RG 3.0 bar: Suicide Connection
9.
1.
Remove suicide
connector and ring
from RG 3.0 Bar
accessory bag.
2.
Feed the suicide
connector through
the hole in the buffer.
5. Attatch the ring to the suicide connector as
illustrated above.
3.
Loop the suicide
connector around
the buffer.
4. Feed both ends of
6.
Attach your safety leash to the suicide connector on the
buffer (shown above) and your harness.
the suicide connector
through the loop.
IMPORTANT: Always attach clip (closest to orange release)
to your harness so you can reach the release when needed.
www.wainmanhawaii.com - 14
RG 3.0 bar: Double Depower
Double DePower
The “Double Depower” set-up is for experienced riders
only and a favorite among avid freestylers. It allows for
unhooked riding and letting go of the bar without the
kite “flagging” even if you activate the quick release.
After you convert the bar to the “Double Depower”
setup, attach the safety leash to the ring on the buffer.
Activating the double depower (when you unhook
and let go of the bar), shortens your center lines
double the distance of the depower main line. If you
activate your quick release, you will still be attached to
the kite (safety leash) and you must activate the safety
leash to release the kite.
HOW TO:
REQUIRED PARTS
(found in RG 3.0 Bar accessory bag)
- Front line swivel connector
- Metal ring
ADDITIONAL PARTS NEEDED
- Thin line
1. Remove the Safety Ring from the red bungee (as illustrated above).
2.
Attach thin line to
the bungee.
3.
Pull the bungee through the
plastic tube.
15 - Rabbit Gang 3.0 User Manual
4.
Remove the thin line from
the bungee.
RG 3.0 bar: Double Depower
Pull the bungee through the swivel and remove the front (grey) center line from the
5. bungee. Do not pull grey front line through the swivel.
Locate the front line (red) swivel
6. connector in RG 3.0 Bar accessory bag.
7. Attach the red connector to the grey front line as illustrate above.
Once the connector is attached to
8. front line, pull it tight so it seats
firmly in the swivel.
Pull the bungee back through
11. the plastic tube.
Feed the bungee line through
9. the side hole of swivel and loop
10. Attach the thin line to the bungee.
12. Remove the thin line from bungee.
13. Locate the metal ring in RG 3.0 Bar
through itself.
14. Attatch the metal ring to the bungee as illustrated above.
www.wainmanhawaii.com - 16
accessory bag.
Attach your safety leash to the metal
15. ring (shown above) and your harness.
RG 3.0 bar: Para Suicide
Para Suicide
The “Para-Suicide Connection” set-up is for
experienced riders only and gives you the same
benefit of Suicide Connection with the benefit of
flagging your kite if you activate your Quick Release.
It may meet the needs of expert riders who ride
unhooked and don’t want to lose their kite. It allows
for unhooked riding and letting go of the bar without
“flagging” the kite. After you convert the bar to
“Para- Suicide Connection” by attaching the suicide
connector to the safety bungee and feeding it through
the metal ring on the harness loop, attach the safety
leash to both the ring on the suicide connector and
metal ring on harness loop. When you unhook and
let go of bar, the kite will depower the distance of the
depower main line. If you activate your quick release,
you will “flag” your kite as the leash is attached to the
grey safety bungee that flags the kite on a front line.
HOW TO:
REQUIRED PARTS
(found in RG 3.0 Bar accessory bag)
- Para suicide connector
- Metal ring
IMPORTANT: Always attach clip
(closest to orange release) to your
harness so you can reach the release
when needed.
IMPORTANT: When setting
up and using “para-suicide”
connection, ALWAYS disconnect
the Dingy Guy from the harness
loop!
17 - Rabbit Gang 3.0 User Manual
RG 3.0 bar: Para suicide
the Safety Ring from the red
1. Remove
bungee (as illustrated above)
Attach para suicide leash to the red
2. bungee by looping through each
other (as illustrated above)
Feed the para suicide connector
3. through the buffer
Feed the para suicide connector
4. through the metal ring on the
harness loop (where security pin
named “Dingy Guy” is attached)
metal ring to the para suicide
5. Attach
connector
www.wainmanhawaii.com - 18
your safety leash through the
6. Attach
suicide connector ring and metal
ring on the harness loop
RG 3.0 bar: School Safety
SCHOOL SAFETY
The “School Safety” set-up is geared towards
beginners and all other riders that want the
safest option while riding. It provides the least
wear/tear on the bar components and the
smoothest flag out activation. This setup is
ideal for kite schools and for riders that engage
the quick release regularly. This is the safest
riding method due to the complete power loss
when “flagging” the kite on one of the front
line in an emergency situation.
HOW TO:
REQUIRED PARTS
(School safety kit can be purchased from your
local dealer to complement your RG 3.0 Bar)
- School Safety Line (Grey line with red sleeve)
- Front line swivel connector (labeled “Safety”)
19 - Rabbit Gang 3.0 User Manual
RG 3.0 bar: School Safety
the extension from
1. Remove
the grey center line that is
connected to the red bugee.
Feed the center line back
4. through the swivel and attach
“Safety” labeled connector.
After removing the extension,
2. pull the center line attached to
bungee through the swivel.
Feed the bungee through the
5. center of the swivel.
7. Connect the “safety “ and center line to the extension that was originally removed.
Remove the center line from
3. the bungee.
Connect the “Safety Line” to
6. the red bungee.
your safety leash to the metal
8. Attach
ring (with safety label shown above)
and your harness.
www.wainmanhawaii.com - 20
RG 3.0 bar: ONe Release setup
One Release
The “One Release” set-up is based on the simple principle that in
case of major danger, there should be one ultimate kite release and
kite will be completely detached from the rider. When choosing this
setup you have to be aware that when your activate your QR, your
kite will fly away. Make sure you don’t ride upwind from anyone
when activating the QR to avoid harming anyone downwind. “One
Release” can be ridden with the “Dingy Guy” or without It. Attach
safety leash to metal ring on the harness loop (where security pin
named “Dingy Guy” is attached). When you unhook and let go of the
bar, kite will depower the distance of the depower main line. If you
activate your quick release, you will be completely separated from
the kite. In certain circumstances, you may have time and choose to
grab the Safety Handle on the buffer while activating the QR which
will flag out the kite on one of the front lines.
How tO:
Attach your safety leash to the ring on the harness loop
(shown below) and your harness.
IMPORTANT: Always attach clip (closest to red release) to
your harness so you can reach the release when needed.
21 - Rabbit Gang 3.0 User Manual
The quick release & Safety Leash
Please remember that it is always your (and others) health and life that is more important
than the kite itself. If you ever feel that you are in a dangerous and uncertain situation,
activate the quick release. Be logical, know your limits, and kite in a safe environment.
NOTE: After every session the quick release, on both the harness loop and safety leash, should be rinsed with fresh water.
Before every session the quick release should be checked for solid functionality or be replaced.
MAIN RELEASE :
Every rider should be well versed in activating the
Quick Release in case of emergency. To activate your
Quick Release, please follow steps below:
1) Grab Quick Release firmly.
2) Push away from yourself (in direction of arrow).
3) Pushing hard enough under tension will
separate the kite from the harness loop.
2.
1.
3.
Resetting:
To reset the Quick Release, please follow steps below:
1) Slide lip of Harness Loop through the metal
rectangle (below Quick Release).
2) Bend the lip down, grab the Quick Release and
pull towards yourself (in opposite direction of
arrow).
SNAP!
3) Keep pulling (towards you) until Quick Release
mechanism “snaps” into place.
SAFETY LEASH:
1.
2.
3.
1.
2.
3.
IMPORTANT: Always attach clip (closest to orange
release) to your harness so you can reach the release
when needed - see diagrams on right. The other clip
will be attached to one of the options discussed on
pg. 11-18.
RELEASE:
To activate the safety leash release, grab the orange
handle firmly and push handle away from yourself
(grey arrow).
RESETTING:
To reset the safety leash, slide metal pin through loop
(see image in 2 ) turn it and pull towards yourself
(green arrow) until it “snaps” into place.
SNAP!
Attach this clip to the harness
www.wainmanhawaii.com - 22
TIPS & INFO
REMEMBER: Safety is the number one priority.
1. A
lways make sure your swivel and pulley moves
freely and is not jammed when setting up your kite
(before every session).
2. Y
ou should frequently check your flying lines to ensure that all 4
lines are equal in length when the bar is trimmed at full power
(release depower rope out of clam cleat). Lines will stretch over
time. Check with your local shop on line stretching/adjusting
techniques.
Figure 1.
3. Check your bridle rope (where the pulley runs on) for frays and weak
points. Your bridle will have wear and tear over time and should be
replaced to avoid bridle snapping while riding.
4. You should frequently inspect your kite canopy for small holes and
the seams for fraying. It is a good habit to inspect while you are
pumping your kite.
5. M
ake sure your lines are free of knots and damage when setting up
and/or de-rigging your lines.
Figure 2.
6. When closing the deflation valve on LE, remember to wet it, snap it
shut and seal it tightly with velcro (figure 1-2).
7. Always make sure the clamps on the RAF system are open when
pumping or deflating the kite (figure 3).
8. Always make sure the clamps on the RAF system are closed after inflating the kite (figure 4).
8. Use the Magic Velcro to lock in dangling depower rope.
9. Remember to trim your kite with your depower rope/clam cleat for
optimal performance. Failure to do so may result in the kite over or
under sheeting. Check with your local shop or instructor on trimming
techniques.
Figure 3
10 A. The 5m and 6.25m uses a Small bar (21.5m lines)
10 B. The 7.5m, 9m & 10.5m uses a Medium bar (23m lines)
10 C. The 12m & 14.5m used a Large bar (24.5m lines)
11. Secure your kite on the beach at all times (using sand, compression
bag filled with sand etc.).
12. Pump kite “right”, but use caution and do not over inflate.
Figure 4.
13. Certain situations will cause the kite to invert such as the kite
getting rolled in waves. To get kite to revert back, let go of bar and
swim hard towards kite.
14. Always rinse the swivel after every session to ensure that
it spins freely (figure 5).
15. Make sure you inspect your flying lines just as it is written on the
swivel – the lines go through it therefore they are under a bigger
threat of breaking if the system is activated very often. This is the
regular wear & tear and so it is up to rider to control that before
every session and replace if needed.
Figure 5.
23 - www.wainmanhawaii.com