1
A580 IP
GIGASET. INSPIRING CONVERSATION.
Gigaset A580 IP / US English / A31008-xxxx-xxxx-x-xxxx / overview.fm / 07.07.2010
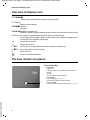
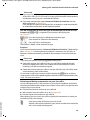
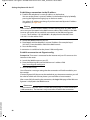
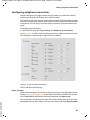
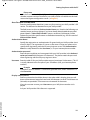
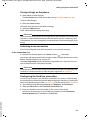
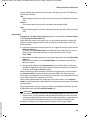
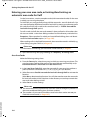
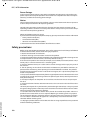
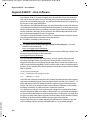
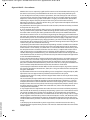
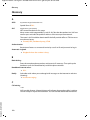
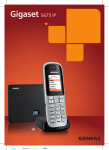
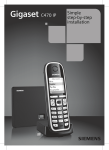
The handset at a glance
The handset at a glance
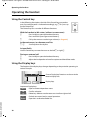
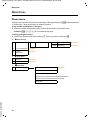
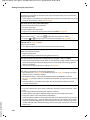
Handset keys
1
2
3
4
5
15
Ð
V
1
2
6
INT 1
Þ
10.10.08
Menu
3
7
8
9
14
13
4
12
5
10
11
11
10
6
9
7
8
12
13
14
15
Version 8, 03.09.2008
£
£
£
07:15
£
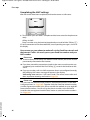
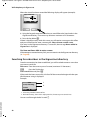
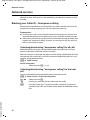
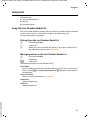
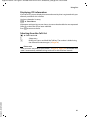
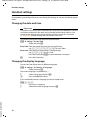
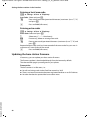
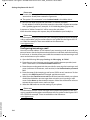
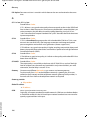
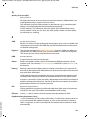
Display in idle status (example)
Charge status of the batteries ( Page 27)
Display keys ( Page 30)
Message key ( Page 58)
Access to Calls and Message lists;
Flashes: new message, new call or
new firmware or new provider profile available
End Call key, On/Off key
End call, cancel function, go back one menu
level (press briefly), back to idle status (press
and hold), activate/deactivate handset (press
and hold in idle status)
Pound key (#)
Keypad lock on/off (press and hold)
( Page 32)
Switch between upper/lower case letters and
digits for text input ( Page 155)
Internal key
Make an internal call ( Page 74)
Microphone
Flash key
Page 129)
Enter flash "F" (press briefly;
Fixed line network only:
Insert a dialing pause "P" (press and hold)
Asterisk key (*)
Idle status:
Ringer melody on/off (press and hold)
Fixed line network: switch between dial pulsing/touch tone dialing
Key 1 (press and hold)
Call a network mailbox (if applicable)
Talk key
Answer call, open Last Number Redial list
(press briefly in idle status), select connection
type and start dialing (press briefly/press and
Page 38)
hold after entering the number,
Speaker key
Switch between earpiece and handsfree mode
Lights up: handsfree talking activated
Flashes: incoming call
Control key ( Page 30)
Signal strength ( Page 27)
£
£
£
£
£
£
1
Gigaset A580 IP / US English / A31008-xxxx-xxxx-x-xxxx / overview.fm / 07.07.2010
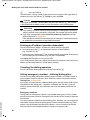
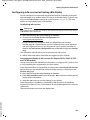
Overview of display icons
Overview of display icons
=eVU
Charge status of the batteries (empty to fully charged)
= (flashes)
Batteries almost empty
e V U (flashes)
Charging
Ò Ñ i Ð Reception strength icon
Reception signal strength between the base station and the handset (low to high)
| (flashes) No reception signal between the base station and the handset
Shortly after activating Eco , the ¼ symbol replaces the reception strength icon in
the top left of the handset's idle display.
Ø
Keypad lock activated
Ú
Ringer deactivated
Å Incoming calls on the fixed line network connection (ringer icon)
M Incoming call on a VoIP connection
¼
Alarm clock set
z
Open Last Number Redial list
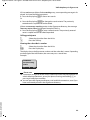
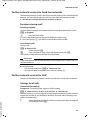
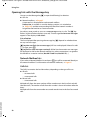
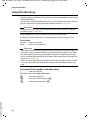
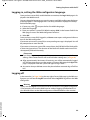
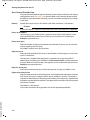
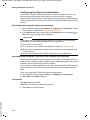
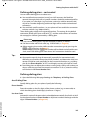
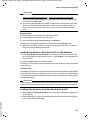
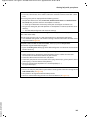
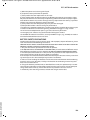
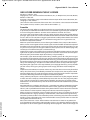
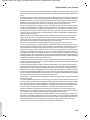
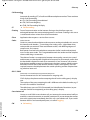
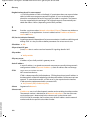
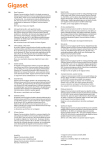
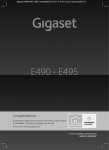
The base station at a glance
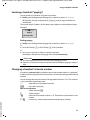
Base station key
1 Paging key
Lights up:
LAN connection active (phone is connected to
router)
Flashes:
data transfer to LAN connection
Press briefly:
Initiate paging ( Page 73),
Display the IP address on the handset
Press and hold:
Set base station to registration mode ( Page 71)
£
Version 8, 03.09.2008
1
2
£
Gigaset A580 IP / US English / A31008-xxxx-xxxx-x-xxxx / Gigaset_A580_IPIVZ.fm / 10.03.2010
Contents
Contents
The handset at a glance . . . . . . . . . . . . . . . . . . . . . . . . . . . . . . . . . . . . . . . . . . . . 1
Overview of display icons . . . . . . . . . . . . . . . . . . . . . . . . . . . . . . . . . . . . . . . . . . 2
The base station at a glance . . . . . . . . . . . . . . . . . . . . . . . . . . . . . . . . . . . . . . . . 2
Safety precautions . . . . . . . . . . . . . . . . . . . . . . . . . . . . . . . . . . . . . . . . . . . . . . . . . 7
Gigaset A580 IP – more than just making calls . . . . . . . . . . . . . . . . . . . . . . . 8
VoIP – making calls via the Internet . . . . . . . . . . . . . . . . . . . . . . . . . . . . . . . . . 9
Gigaset HDSP – telephony with brilliant sound quality . . . . . . . . . . . . . . 9
First steps . . . . . . . . . . . . . . . . . . . . . . . . . . . . . . . . . . . . . . . . . . . . . . . . . . . . . . . . 10
Checking the package contents . . . . . . . . . . . . . . . . . . . . . . . . . . . . . . . . . . . . . . . . . . . . . .
Setting up the handset for use . . . . . . . . . . . . . . . . . . . . . . . . . . . . . . . . . . . . . . . . . . . . . . .
Installing the base station . . . . . . . . . . . . . . . . . . . . . . . . . . . . . . . . . . . . . . . . . . . . . . . . . . . .
Connecting the base station . . . . . . . . . . . . . . . . . . . . . . . . . . . . . . . . . . . . . . . . . . . . . . . . .
Making settings for VoIP telephony . . . . . . . . . . . . . . . . . . . . . . . . . . . . . . . . . . . . . . . . . . .
What would you like to do next? . . . . . . . . . . . . . . . . . . . . . . . . . . . . . . . . . . . . . . . . . . . . . .
10
11
17
18
21
29
Operating the handset . . . . . . . . . . . . . . . . . . . . . . . . . . . . . . . . . . . . . . . . . . . . 30
Using the Control key . . . . . . . . . . . . . . . . . . . . . . . . . . . . . . . . . . . . . . . . . . . . . . . . . . . . . . . .
Using the Display keys . . . . . . . . . . . . . . . . . . . . . . . . . . . . . . . . . . . . . . . . . . . . . . . . . . . . . . .
Using the keys on the keypad . . . . . . . . . . . . . . . . . . . . . . . . . . . . . . . . . . . . . . . . . . . . . . . .
Correcting text entry errors . . . . . . . . . . . . . . . . . . . . . . . . . . . . . . . . . . . . . . . . . . . . . . . . . .
Using the menus . . . . . . . . . . . . . . . . . . . . . . . . . . . . . . . . . . . . . . . . . . . . . . . . . . . . . . . . . . . . .
Activating/deactivating the handset . . . . . . . . . . . . . . . . . . . . . . . . . . . . . . . . . . . . . . . . . .
Activating/deactivating the keypad lock . . . . . . . . . . . . . . . . . . . . . . . . . . . . . . . . . . . . . .
Using this guide . . . . . . . . . . . . . . . . . . . . . . . . . . . . . . . . . . . . . . . . . . . . . . . . . . . . . . . . . . . . .
30
30
31
31
31
32
32
33
Menu trees . . . . . . . . . . . . . . . . . . . . . . . . . . . . . . . . . . . . . . . . . . . . . . . . . . . . . . . 34
Phone menu . . . . . . . . . . . . . . . . . . . . . . . . . . . . . . . . . . . . . . . . . . . . . . . . . . . . . . . . . . . . . . . . . 34
Web configurator menu . . . . . . . . . . . . . . . . . . . . . . . . . . . . . . . . . . . . . . . . . . . . . . . . . . . . . . 37
Making calls with VoIP and the fixed line network . . . . . . . . . . . . . . . . . . 38
Version 8, 03.09.2008
Making an external call . . . . . . . . . . . . . . . . . . . . . . . . . . . . . . . . . . . . . . . . . . . . . . . . . . . . . .
Ending a call . . . . . . . . . . . . . . . . . . . . . . . . . . . . . . . . . . . . . . . . . . . . . . . . . . . . . . . . . . . . . . . . .
Accepting a call . . . . . . . . . . . . . . . . . . . . . . . . . . . . . . . . . . . . . . . . . . . . . . . . . . . . . . . . . . . . . .
Caller ID . . . . . . . . . . . . . . . . . . . . . . . . . . . . . . . . . . . . . . . . . . . . . . . . . . . . . . . . . . . . . . . . . . . . .
Using speaker mode . . . . . . . . . . . . . . . . . . . . . . . . . . . . . . . . . . . . . . . . . . . . . . . . . . . . . . . . .
Muting the handset . . . . . . . . . . . . . . . . . . . . . . . . . . . . . . . . . . . . . . . . . . . . . . . . . . . . . . . . . .
Deactivating your handset's microphone . . . . . . . . . . . . . . . . . . . . . . . . . . . . . . . . . . . . .
Making cost-effective calls . . . . . . . . . . . . . . . . . . . . . . . . . . . . . . . . . . . . . . . . . . . . . . . . . . .
38
41
41
42
44
45
45
45
3
Gigaset A580 IP / US English / A31008-xxxx-xxxx-x-xxxx / Gigaset_A580_IPIVZ.fm / 10.03.2010
Contents
VoIP telephony via Gigaset.net . . . . . . . . . . . . . . . . . . . . . . . . . . . . . . . . . . . . 46
Opening the Gigaset.net directory . . . . . . . . . . . . . . . . . . . . . . . . . . . . . . . . . . . . . . . . . . . .
Searching for subscribers in the Gigaset.net directory . . . . . . . . . . . . . . . . . . . . . . . . .
Using other functions . . . . . . . . . . . . . . . . . . . . . . . . . . . . . . . . . . . . . . . . . . . . . . . . . . . . . . . .
Managing your own entry . . . . . . . . . . . . . . . . . . . . . . . . . . . . . . . . . . . . . . . . . . . . . . . . . . . .
Calling a Gigaset.net subscriber . . . . . . . . . . . . . . . . . . . . . . . . . . . . . . . . . . . . . . . . . . . . . .
47
48
50
50
51
Network services . . . . . . . . . . . . . . . . . . . . . . . . . . . . . . . . . . . . . . . . . . . . . . . . . 52
Blocking your Caller ID – Anonymous calling . . . . . . . . . . . . . . . . . . . . . . . . . . . . . . . . . . 52
Further network services for fixed line networks . . . . . . . . . . . . . . . . . . . . . . . . . . . . . . 53
Further network services for VoIP . . . . . . . . . . . . . . . . . . . . . . . . . . . . . . . . . . . . . . . . . . . . . 53
Using lists . . . . . . . . . . . . . . . . . . . . . . . . . . . . . . . . . . . . . . . . . . . . . . . . . . . . . . . . 57
using the Last Number Redial list . . . . . . . . . . . . . . . . . . . . . . . . . . . . . . . . . . . . . . . . . . . . . 57
Opening lists with the Message key . . . . . . . . . . . . . . . . . . . . . . . . . . . . . . . . . . . . . . . . . . 58
Using the directory . . . . . . . . . . . . . . . . . . . . . . . . . . . . . . . . . . . . . . . . . . . . . . . 62
Using the network mailbox . . . . . . . . . . . . . . . . . . . . . . . . . . . . . . . . . . . . . . . 66
Configuring the network mailbox for fast access . . . . . . . . . . . . . . . . . . . . . . . . . . . . . . 66
Listening to messages on the network mailbox . . . . . . . . . . . . . . . . . . . . . . . . . . . . . . . 67
ECO DECT: Conserving energy . . . . . . . . . . . . . . . . . . . . . . . . . . . . . . . . . . . . . 69
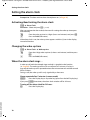
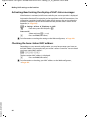
Setting the alarm clock . . . . . . . . . . . . . . . . . . . . . . . . . . . . . . . . . . . . . . . . . . . 70
Activating/deactivating the alarm clock . . . . . . . . . . . . . . . . . . . . . . . . . . . . . . . . . . . . . . 70
Changing the wake-up time . . . . . . . . . . . . . . . . . . . . . . . . . . . . . . . . . . . . . . . . . . . . . . . . . . 70
When the alarm clock rings… . . . . . . . . . . . . . . . . . . . . . . . . . . . . . . . . . . . . . . . . . . . . . . . . 70
Using multiples handsets . . . . . . . . . . . . . . . . . . . . . . . . . . . . . . . . . . . . . . . . . 71
Registering handsets . . . . . . . . . . . . . . . . . . . . . . . . . . . . . . . . . . . . . . . . . . . . . . . . . . . . . . . . .
De-registering handsets . . . . . . . . . . . . . . . . . . . . . . . . . . . . . . . . . . . . . . . . . . . . . . . . . . . . . .
Locating a handset ("paging") . . . . . . . . . . . . . . . . . . . . . . . . . . . . . . . . . . . . . . . . . . . . . . . .
Changing a handset's internal number . . . . . . . . . . . . . . . . . . . . . . . . . . . . . . . . . . . . . . .
Changing the name of a handset . . . . . . . . . . . . . . . . . . . . . . . . . . . . . . . . . . . . . . . . . . . . .
Making internal calls . . . . . . . . . . . . . . . . . . . . . . . . . . . . . . . . . . . . . . . . . . . . . . . . . . . . . . . . .
71
72
73
73
74
74
Handset settings . . . . . . . . . . . . . . . . . . . . . . . . . . . . . . . . . . . . . . . . . . . . . . . . . 78
Version 8, 03.09.2008
Changing the date and time . . . . . . . . . . . . . . . . . . . . . . . . . . . . . . . . . . . . . . . . . . . . . . . . . .
Changing the display language . . . . . . . . . . . . . . . . . . . . . . . . . . . . . . . . . . . . . . . . . . . . . .
Activating/deactivating the screensaver . . . . . . . . . . . . . . . . . . . . . . . . . . . . . . . . . . . . . .
Quickly accessing functions . . . . . . . . . . . . . . . . . . . . . . . . . . . . . . . . . . . . . . . . . . . . . . . . . .
Activating/deactivating auto answer . . . . . . . . . . . . . . . . . . . . . . . . . . . . . . . . . . . . . . . . .
Changing the handsfree/earpiece volume . . . . . . . . . . . . . . . . . . . . . . . . . . . . . . . . . . . .
Setting ringers . . . . . . . . . . . . . . . . . . . . . . . . . . . . . . . . . . . . . . . . . . . . . . . . . . . . . . . . . . . . . . .
Activating/deactivating advisory tones . . . . . . . . . . . . . . . . . . . . . . . . . . . . . . . . . . . . . . .
Setting the battery low tone . . . . . . . . . . . . . . . . . . . . . . . . . . . . . . . . . . . . . . . . . . . . . . . . .
Restoring the handset default settings . . . . . . . . . . . . . . . . . . . . . . . . . . . . . . . . . . . . . . . .
4
78
78
79
81
81
81
82
84
84
84
Gigaset A580 IP / US English / A31008-xxxx-xxxx-x-xxxx / Gigaset_A580_IPIVZ.fm / 10.03.2010
Contents
Setting the base station via the handset . . . . . . . . . . . . . . . . . . . . . . . . . . . 85
Protecting against unauthorized access . . . . . . . . . . . . . . . . . . . . . . . . . . . . . . . . . . . . . .
Restoring the base station to the factory settings . . . . . . . . . . . . . . . . . . . . . . . . . . . . .
Activating/deactivating music on hold . . . . . . . . . . . . . . . . . . . . . . . . . . . . . . . . . . . . . . .
Setting default connection . . . . . . . . . . . . . . . . . . . . . . . . . . . . . . . . . . . . . . . . . . . . . . . . . . .
Entering local and extra area codes . . . . . . . . . . . . . . . . . . . . . . . . . . . . . . . . . . . . . . . . . . .
Updating the base station firmware . . . . . . . . . . . . . . . . . . . . . . . . . . . . . . . . . . . . . . . . . .
85
86
87
87
87
88
Making VoIP settings on the handset . . . . . . . . . . . . . . . . . . . . . . . . . . . . . . 90
Using the connection wizard . . . . . . . . . . . . . . . . . . . . . . . . . . . . . . . . . . . . . . . . . . . . . . . . .
Changing settings without the connection wizard . . . . . . . . . . . . . . . . . . . . . . . . . . . .
Setting the phone's IP address in LAN . . . . . . . . . . . . . . . . . . . . . . . . . . . . . . . . . . . . . . . .
Activating/deactivating the display of VoIP status messages . . . . . . . . . . . . . . . . . . .
Checking the base station MAC address . . . . . . . . . . . . . . . . . . . . . . . . . . . . . . . . . . . . . .
90
90
92
94
94
Operating the base station on the PABX . . . . . . . . . . . . . . . . . . . . . . . . . . . 95
Changing the dialing mode . . . . . . . . . . . . . . . . . . . . . . . . . . . . . . . . . . . . . . . . . . . . . . . . . .
Setting recall . . . . . . . . . . . . . . . . . . . . . . . . . . . . . . . . . . . . . . . . . . . . . . . . . . . . . . . . . . . . . . . .
Setting access codes (external line prefixes) . . . . . . . . . . . . . . . . . . . . . . . . . . . . . . . . . . .
Setting pauses . . . . . . . . . . . . . . . . . . . . . . . . . . . . . . . . . . . . . . . . . . . . . . . . . . . . . . . . . . . . . . .
Switching temporarily to touch tone dialing (DTMF) . . . . . . . . . . . . . . . . . . . . . . . . . .
95
95
95
96
96
Version 8, 03.09.2008
Setting the phone with the PC . . . . . . . . . . . . . . . . . . . . . . . . . . . . . . . . . . . . 97
Connecting the PC with the telephone's Web configurator . . . . . . . . . . . . . . . . . . . . 97
Logging in, setting the Web configurator language . . . . . . . . . . . . . . . . . . . . . . . . . . . 99
Logging off . . . . . . . . . . . . . . . . . . . . . . . . . . . . . . . . . . . . . . . . . . . . . . . . . . . . . . . . . . . . . . . . . . 99
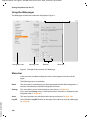
Using the Web pages . . . . . . . . . . . . . . . . . . . . . . . . . . . . . . . . . . . . . . . . . . . . . . . . . . . . . . . 100
Menu bar . . . . . . . . . . . . . . . . . . . . . . . . . . . . . . . . . . . . . . . . . . . . . . . . . . . . . . . . . . . . . . . . . . . 100
Navigation area . . . . . . . . . . . . . . . . . . . . . . . . . . . . . . . . . . . . . . . . . . . . . . . . . . . . . . . . . . . . . 101
Working area . . . . . . . . . . . . . . . . . . . . . . . . . . . . . . . . . . . . . . . . . . . . . . . . . . . . . . . . . . . . . . . 101
Buttons . . . . . . . . . . . . . . . . . . . . . . . . . . . . . . . . . . . . . . . . . . . . . . . . . . . . . . . . . . . . . . . . . . . . . 102
Opening Web pages . . . . . . . . . . . . . . . . . . . . . . . . . . . . . . . . . . . . . . . . . . . . . . . . . . . . . . . . 102
Setting the phone with the Web configurator . . . . . . . . . . . . . . . . . . . . . . . . . . . . . . . . 103
Configuring the IP . . . . . . . . . . . . . . . . . . . . . . . . . . . . . . . . . . . . . . . . . . . . . . . . . . . . . . . . . . 104
Configuring telephone connections . . . . . . . . . . . . . . . . . . . . . . . . . . . . . . . . . . . . . . . . . 107
Optimizing voice quality for VoIP connections . . . . . . . . . . . . . . . . . . . . . . . . . . . . . . . 117
Setting the telephone's default connection . . . . . . . . . . . . . . . . . . . . . . . . . . . . . . . . . . 121
Activating the fixed line network connection as an alternate connection . . . . . 121
Assigning send and receive numbers to handsets . . . . . . . . . . . . . . . . . . . . . . . . . . . . 122
Activating Call Forwarding for VoIP connections . . . . . . . . . . . . . . . . . . . . . . . . . . . . . 123
Entering your own area code, activating/deactivating an automatic area code
for VoIP . . . . . . . . . . . . . . . . . . . . . . . . . . . . . . . . . . . . . . . . . . . . . . . . . . . . . . . . . . . . . . . . . . . . . 124
Activating/deactivating network mailbox, entering numbers . . . . . . . . . . . . . . . . . 127
Setting DTMF signaling for VoIP . . . . . . . . . . . . . . . . . . . . . . . . . . . . . . . . . . . . . . . . . . . . . 128
Defining Flash key functions for VoIP (hook flash) . . . . . . . . . . . . . . . . . . . . . . . . . . . . 129
Configuring call forwarding via VoIP . . . . . . . . . . . . . . . . . . . . . . . . . . . . . . . . . . . . . . . . . 129
Defining local communication ports for VoIP . . . . . . . . . . . . . . . . . . . . . . . . . . . . . . . . 130
Messaging . . . . . . . . . . . . . . . . . . . . . . . . . . . . . . . . . . . . . . . . . . . . . . . . . . . . . . . . . . . . . . . . . . 132
Configuring info services/activating idle display . . . . . . . . . . . . . . . . . . . . . . . . . . . . . 135
5
Gigaset A580 IP / US English / A31008-xxxx-xxxx-x-xxxx / Gigaset_A580_IPIVZ.fm / 10.03.2010
Contents
Changing internal handset numbers and names . . . . . . . . . . . . . . . . . . . . . . . . . . . . . 136
Transferring handset directories to/from the PC . . . . . . . . . . . . . . . . . . . . . . . . . . . . . . 136
Activating VoIP status message display . . . . . . . . . . . . . . . . . . . . . . . . . . . . . . . . . . . . . . 138
Starting a firmware update . . . . . . . . . . . . . . . . . . . . . . . . . . . . . . . . . . . . . . . . . . . . . . . . . . 139
Activating/deactivating the automatic version check . . . . . . . . . . . . . . . . . . . . . . . . . 140
Copying the date/time from time server . . . . . . . . . . . . . . . . . . . . . . . . . . . . . . . . . . . . . 141
Querying the phone status . . . . . . . . . . . . . . . . . . . . . . . . . . . . . . . . . . . . . . . . . . . . . . . . . . 142
Getting help with your phone . . . . . . . . . . . . . . . . . . . . . . . . . . . . . . . . . . . 143
Questions and answers . . . . . . . . . . . . . . . . . . . . . . . . . . . . . . . . . . . . . . . . . . . . . . . . . . . . . 143
Using VoIP status codes . . . . . . . . . . . . . . . . . . . . . . . . . . . . . . . . . . . . . . . . . . . . . . . . . . . . . 147
Checking service information . . . . . . . . . . . . . . . . . . . . . . . . . . . . . . . . . . . . . . . . . . . . . . . 150
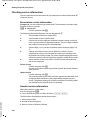
Protecting our environment . . . . . . . . . . . . . . . . . . . . . . . . . . . . . . . . . . . . . 151
Our environmental mission statement . . . . . . . . . . . . . . . . . . . . . . . . . . . . . . . . . . . . . . . 151
Appendix . . . . . . . . . . . . . . . . . . . . . . . . . . . . . . . . . . . . . . . . . . . . . . . . . . . . . . 152
Caring for your phone . . . . . . . . . . . . . . . . . . . . . . . . . . . . . . . . . . . . . . . . . . . . . . . . . . . . . . . 152
Specifications . . . . . . . . . . . . . . . . . . . . . . . . . . . . . . . . . . . . . . . . . . . . . . . . . . . . . . . . . . . . . . . 152
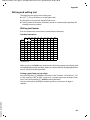
Writing and editing text . . . . . . . . . . . . . . . . . . . . . . . . . . . . . . . . . . . . . . . . . . . . . . . . . . . . . 155
Industry Canada Certification . . . . . . . . . . . . . . . . . . . . . . . . . . . . . . . . . . . 156
FCC / ACTA Information . . . . . . . . . . . . . . . . . . . . . . . . . . . . . . . . . . . . . . . . . 156
Safety precautions . . . . . . . . . . . . . . . . . . . . . . . . . . . . . . . . . . . . . . . . . . . . . . . . . . . . . . . . . . 158
End-user limited warranty . . . . . . . . . . . . . . . . . . . . . . . . . . . . . . . . . . . . . . . . . . . . . . . . . . . 160
Gigaset A580 IP – free software . . . . . . . . . . . . . . . . . . . . . . . . . . . . . . . . . . 164
Accessories . . . . . . . . . . . . . . . . . . . . . . . . . . . . . . . . . . . . . . . . . . . . . . . . . . . . . 171
Glossary . . . . . . . . . . . . . . . . . . . . . . . . . . . . . . . . . . . . . . . . . . . . . . . . . . . . . . . 172
Index . . . . . . . . . . . . . . . . . . . . . . . . . . . . . . . . . . . . . . . . . . . . . . . . . . . . . . . . . . 185
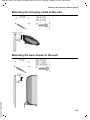
Mounting the charging cradle to the wall . . . . . . . . . . . . . . . . . . . . . . . . 195
Version 8, 03.09.2008
Mounting the base station to the wall . . . . . . . . . . . . . . . . . . . . . . . . . . . 195
6
Gigaset A580 IP / US English / A31008-xxxx-xxxx-x-xxxx / security.fm / 07.07.2010
Safety precautions
Safety precautions
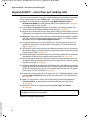
Warning
Be sure to read this user guide and the safety precautions before using your telephone.
Explain their content and the potential hazards associated with using the telephone to your
children.
$
Use only the power adapter supplied, as indicated on the underside of the base station or charging cradle.
Use only the recommended, rechargeable batteries (£ Page 152). Using conventional (non-rechargeable) batteries or other types of batteries could result in significant health risks and personal injury.
Do not charge the handset in the charging unit or base station while the headset is
connected.
Using your telephone may affect nearby medical equipment. Be aware of the technical conditions in your particular environment, e.g. doctor's surgery.
Do not hold the rear of the handset to your ear when it is ringing or when the handsfree function is activated. Otherwise you risk serious and permanent damage to your
hearing.
The handset may cause an unpleasant humming noise in hearing aids.
Do not install the base station or charging cradle in bathrooms or shower rooms. The
handset, base station and charging cradle are not waterproof (£ Page 152).
Do not use the phone in environments with a potential explosion hazard, e.g. paint
shops.
ƒ
If you give your phone to a third party, make sure you also give them the user guide.
Remove faulty base stations from use as they could interfere with other wireless
services.
Warning
When the keypad lock is active, you cannot call emergency numbers!
Version 8, 03.09.2008
Please note
Not all of the functions described in this user guide are available in all countries.
7
Gigaset A580 IP / US English / A31008-xxxx-xxxx-x-xxxx / starting.fm / 07.07.2010
Gigaset A580 IP – more than just making calls
Gigaset A580 IP – more than just making calls
You can use your phone to make calls via the fixed line network and also (cost effectively) via the Internet (VoIP) without a PC. – Your phone can do much more:
u Make calls with brilliant sound quality using High Definition Sound
Performance (HDSP) for either internal calls or calls made via VoIP (£ Page 9)
– for internal calls or calls via VoIP.
u A simple press of a button each time you make a call indicates whether you
want to call via the fixed line network or the Internet (£ Page 38).
u Register up to six handsets on your base station. With your base station, you can
simultaneously conduct two calls via VoIP and one call via the fixed line network.
u Multiline: Create up to six VoIP accounts with different VoIP providers. Together
with your fixed line number and the Gigaset.net number, your phone can then
be reached via up to eight different phone numbers.
u Assign each handset its own VoIP number as a send and receive number. If a
member of your family is called on their VoIP number, only their handset will
ring (£ Page 122).
u You can also use the VoIP accounts with different providers for cost control purposes. When dialing, specify the VoIP connection/the VoIP account you want to
use for its lower rates (£ Page 38).
u Setting dialing plans for phone numbers or area codes enables you to automate
the selection of the most cost-effective VoIP connection (£ Page 125).
u Use Gigaset.net for VoIP calls. Connect your phone to the electrical power supply and the Internet and enjoy free phone calls on Gigaset.net – without making
any further settings (£ Page 46).
u Configure the phone connection for VoIP without a PC. Your phone's connection
wizard downloads general data about your VoIP provider from the Internet and
guides you through entering your personal data (VoIP/SIP account). This makes
it easy for you to start using VoIP (£ Page 21).
u If necessary, make any further VoIP settings on a PC. The phone features a Web
interface (Web configurator) that can be accessed via your PC's Web browser
(£ Page 97).
u Make sure your phone is always up-to-date. Keep yourself informed about
firmware updates on the Internet and download them onto your phone
(£ Page 88).
u Reduce the transmission power by activating Eco mode / Eco mode+
(£ Page 69).
Your Gigaset A580 IP has a protected operating system that offers increased security against viruses from the Internet.
Version 8, 03.09.2008
Have fun using your new phone!
8
Gigaset A580 IP / US English / A31008-xxxx-xxxx-x-xxxx / starting.fm / 07.07.2010
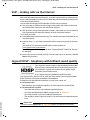
VoIP – making calls via the Internet
VoIP – making calls via the Internet
With VoIP (Voice over Internet Protocol), your calls are not made via a fixed connection as with the telephone network, but rather they are transmitted via the Internet
in the form of data packets.
You can take advantage of all the benefits of VoIP with your phone:
u You can make cost-effective calls in high voice quality with callers on the Internet, the fixed line network or the cell phone network.
u VoIP providers will give you personal numbers, with which you can be reached
from the Internet, the fixed line network and any cell phone network.
To use VoIP, you need:
u A broadband Internet connection (e.g. DSL) with flat rate (recommended) or volume-based price.
u Internet access, i.e. you need a router that will connect your phone to the Internet.
You can find a list of recommended routers on the Internet at:
www.gigaset.com/customercare
From here, go to the FAQ page and select "Gigaset A580 IP". Search for "Router",
for example.
u Access the services of a VoIP provider. You can open up to six accounts with different VoIP providers.
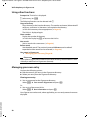
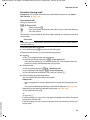
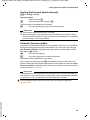
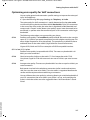
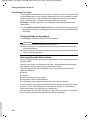
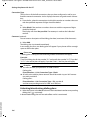
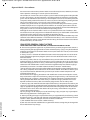
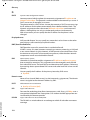
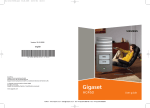
Gigaset HDSP – telephony with brilliant sound quality
Your Gigaset IP phone supports the Broadband codec G.722.
With your base station and the corresponding handset, you
can make calls via VoIP with brilliant sound quality (High
Definition Sound Performance).
Version 8, 03.09.2008
If you register further broadband-capable handsets
(e.g. Gigaset S67H, S68H or SL37H) with your base station, internal calls between
these handsets will also be conducted via broadband.
Prerequisites for broadband connections to your base station are:
u For internal calls:
Both handsets are broadband-capable, i.e. both support the codec G.722.
u For external calls via VoIP:
– You make the call from a broadband-capable handset.
– You have selected codec G.722 for outgoing calls, £ Page 117.
– Your VoIP provider supports broadband connections.
– The recipient's phone supports codec G.722 and accepts broadband connections.
Please note
The VoIP service Gigaset.net (£ Page 46) supports broadband connections.
9
Gigaset A580 IP / US English / A31008-xxxx-xxxx-x-xxxx / starting.fm / 07.07.2010
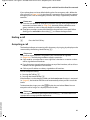
First steps
First steps
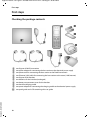
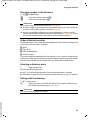
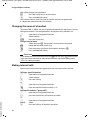
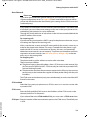
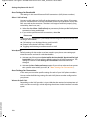
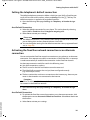
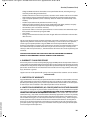
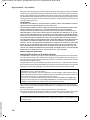
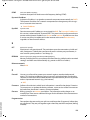
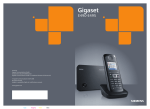
Checking the package contents
5
6
7
2
1
8
10
3
4
9
§§1§§
§§2§§
§§3§§
§§4§§
§§5§§
§§6§§
§§7§§
§§8§§
§§9§§
Version 8, 03.09.2008
§§10§§
10
one Gigaset A580 IP base station
one power adapter for connecting the base station to the electrical power supply
one phone cord for connecting the base station to the fixed line network
one Ethernet (LAN) cable for connecting the base station to the router (LAN/Internet)
one Gigaset A58H handset
two batteries for the handset (uncharged)
one battery compartment cover for the handset
one handset charging cradle
one power adapter for connecting the charging cradle to the electrical power supply
one quick guide and a CD containing this user guide
Gigaset A580 IP / US English / A31008-xxxx-xxxx-x-xxxx / starting.fm / 07.07.2010
First steps
Firmware updates
This user guide describes the basic functions from firmware version 179.
Whenever there are new or improved functions for your Gigaset A580 IP, base station firmware
updates will be made available for you to download to your telephone (£ Page 88). If this
results in operational changes to your phone, a new version of this user guide or the necessary
amendments will be published on the Internet at www.gigaset.com
Select "Gigaset A580 IP" in the product field to open the relevant product page where you will
find a link to the user guide.
For information on finding the current firmware version of your base station, £ Page 142
(using the Web configurator) or £ Page 150 (during an external call).
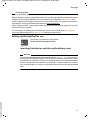
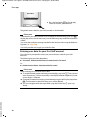
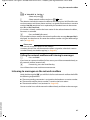
Setting up the handset for use
The display is protected by a plastic film.
Please remove the protective film!
Inserting the batteries and closing the battery cover
Warning
Version 8, 03.09.2008
Use only the recommended, rechargeable batteries (£ Page 152). Using conventional (non-rechargeable) batteries or other types of batteries could result in significant health risks and personal injury. For example, the outer casing of the batteries
could be destroyed or the batteries could explode. The phone could also malfunction or be damaged as a result of using batteries that are not of the recommended
type.
11
Gigaset A580 IP / US English / A31008-xxxx-xxxx-x-xxxx / starting.fm / 07.07.2010
First steps
¤ Insert the batteries with
the polarity in the correct direction.
The polarity is indicated
in/on the battery compartment.
1
2
¤ First insert the battery cover at
the top 1.
¤ Then press the cover 2 until it
clicks into place.
¤ To open the battery cover, for
Version 8, 03.09.2008
instance to replace the batteries,
remove the belt clip (if attached).
Insert a coin into the cavity on the
casing, then pull the battery cover
in an upward direction.
12
Gigaset A580 IP / US English / A31008-xxxx-xxxx-x-xxxx / starting.fm / 07.07.2010
First steps
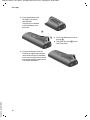
Connecting the charging cradle
The charging cradle is designed to be operated in enclosed, dry areas at temperatures ranging from +41°F to +113°F.
2
1
¤ Connect the empty plug from the
power adapter 1.
¤ Plug the electrical adapter into the
plug socket 2.
2
To disconnect the plug from the charging cradle, press the release button 1 and disconnect the plug 2.
1
Please note
u Only place the handset in the charging cradle for which it is intended.
u If the handset has turned itself off because the batteries are empty and is then
placed in the charging cradle, it will turn itself on automatically.
Version 8, 03.09.2008
If you have any questions and problems £ Page 143.
For information on attaching the charging cradle to the wall, £ Page 195.
13
Gigaset A580 IP / US English / A31008-xxxx-xxxx-x-xxxx / starting.fm / 07.07.2010
First steps
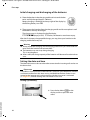
Initial charging and discharging of the batteries
¤ Place the handset in the charging cradle and wait until the batteries are fully charged (approx. 10 hours).
Battery charging is indicated in the top right of the display by
the flashing battery icon e.
10 h
¤ Then remove the handset from the charging cradle and do not replace it until
the batteries are fully discharged.
The charge status is displayed in the idle display.
= e V U (empty to full) = flashes, the batteries are almost empty.
After the first battery charge and discharge, you may place your handset in the
charging cradle after every call.
Warning
u Always repeat the charging and discharging procedure if you remove the bat-
teries from the handset and reinsert them.
u The batteries may warm up during charging.
This is not dangerous.
u After a while, the charge capacity of the batteries will decrease for technical rea-
sons.
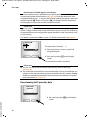
Setting the date and time
The date and time must be set to have the correct time for incoming calls and to use
the alarm clock.
Please note
The address of a time server on the Internet is stored on your telephone. The date
and time are taken from this time server, provided that the base station is connected to the Internet and synchronization with the time server is activated
(£ Page 141). Manual settings are overwritten in this case.
Setting up manually:
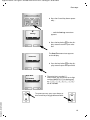
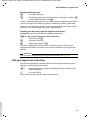
Þ
Menu
¤ Press the key below §Menu§ on the
Version 8, 03.09.2008
display screen to open the main
menu.
14
Gigaset A580 IP / US English / A31008-xxxx-xxxx-x-xxxx / starting.fm / 07.07.2010
First steps
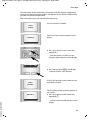
¤ Press the Control key down repeatedly ...
m
… until the Settings menu item
appears.
Settings
Ç
U
OK
¤ Press the key below §OK§ on the display screen to confirm your selection.
The Date/Time menu item appears
on the display.
Date/Time
Ç
U
OK
¤ Press the key below §OK§ on the display screen to open the input field.
¤ The active line is marked [...].
Enter Date:
Ç
10.10.2008]
U
OK
Enter month, day and year as an 8-digit
number (MMDDYYYY) via the keypad,
e.g. Q Q 2 Q Q N
for 10/10/2008.
Version 8, 03.09.2008
To correct an entry, press up or down on
the Control key to toggle between fields.
15
Gigaset A580 IP / US English / A31008-xxxx-xxxx-x-xxxx / starting.fm / 07.07.2010
First steps
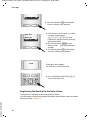
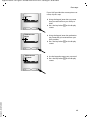
Ç
U
OK
¤ Press the key below §OK§ on the display
screen to confirm your selection.
¤ Enter the hours and minutes as 4-digit
Enter time:
[07:15] pm
am/pm U
OK
¤
¤
Saved
numbers via the keypad,
e.g. Q M 5 for 07:15 am.
If necessary, use the Control key to toggle between fields.
Press the key below §am/pm§ on the
display screen to choose between am
and pm.
Press the key below §OK§ on the display
screen to confirm your selection.
The display shows Saved.
You will hear a confirmation tone.
¤ Press and hold the End Call key a to
return to the idle status.
Registering the handset to the base station
Version 8, 03.09.2008
Your handset is registered to the base station by default.
For information on registering additional handsets with the base station and make
free internal calls, £ Page 71.
16
Gigaset A580 IP / US English / A31008-xxxx-xxxx-x-xxxx / starting.fm / 07.07.2010
First steps
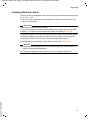
Installing the base station
The base station is designed for use in closed, dry rooms with a temperature range
of +41°F to +113°F.
¤ Set up the base station at a central location on a flat, non-slip surface in your
house or apartment.
Please note
Consider the range of the base station.
This is up to 328 yards in unobstructed outdoor areas and up to 54 yards inside
buildings. The range is reduced when eco mode is activated (£ Page 69).
The phone's feet do not usually leave any marks on surfaces. However, due to the
multitude of different varnishes and polishes used on today's furnishings, the
occurrence of marks on the surfaces cannot be completely ruled out.
For information on mounting the base station on the wall, £ Page 195.
Warning
u Never expose the telephone to any of the following: heat sources, direct sun-
light or other electrical appliances.
Version 8, 03.09.2008
u Protect your Gigaset from moisture, dust, corrosive liquids and fumes.
17
Gigaset A580 IP / US English / A31008-xxxx-xxxx-x-xxxx / starting.fm / 07.07.2010
First steps
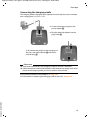
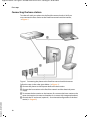
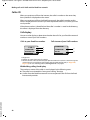
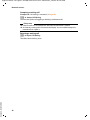
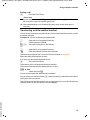
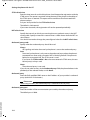
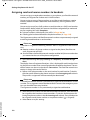
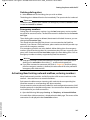
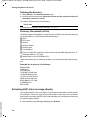
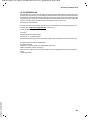
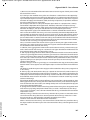
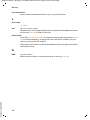
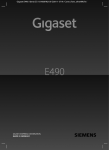
Connecting the base station
To make calls with your phone via the fixed line network and via VoIP, you
must connect the base station to the fixed line network and the Internet,
£ Figure 1.
§§4§§
§§1§§
§§3§§
§§2§§
Figure 1 Connecting the phone to the fixed line network and the Internet
Version 8, 03.09.2008
Follow the steps in the order given below (£ Figure 1):
§§1§§ Connect the phone cord and power lead to the base station.
§§2§§ Connect the base station to the fixed line network and the electrical power
supply.
§§3§§ To connect the base station to the Internet, first connect the base station to the
router (connection via router and modem or via router with integrated modem).
§§4§§ Connect the PC and router (optional) – for advanced configuration of the base
station (£ Page 97).
18
Gigaset A580 IP / US English / A31008-xxxx-xxxx-x-xxxx / starting.fm / 07.07.2010
First steps
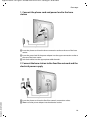
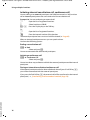
1. Connect the phone cord and power lead to the base
station
2
1
3
§§1§§ Insert the phone cord into the lower connection socket at the rear of the base
station.
§§2§§ Insert the power lead of the power adapter into the upper connection socket at
the rear of the base station.
§§3§§ Push both cables into the appropriate cable channels.
2. Connect the base station to the fixed line network and the
electrical power supply
§§2§§
§§1§§
Version 8, 03.09.2008
§§1§§ Insert the phone cord into the fixed line network connection socket.
§§2§§ Then insert the power adapter into the electrical socket.
19
Gigaset A580 IP / US English / A31008-xxxx-xxxx-x-xxxx / starting.fm / 07.07.2010
First steps
Warning
u Keep the power adapter plugged in at all times for operation, as the phone
does not work without an electrical power connection.
u Use only the power adapter and phone cord supplied. Pin connections on tel-
ephone cords can vary (pin connections £ Page 154).
You can now use your phone to make calls via the fixed line network and
can be reached on your fixed line number.
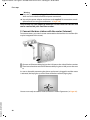
3. Connect the base station with the router (Internet)
For Internet access you need a router connected to the Internet via a modem (this
may be integrated in the router).
§§2§§
§§1§§
§§1§§ Connect an Ethernet cable plug into the LAN port at the side of the base station.
§§2§§ Then insert the other end of the Ethernet cable plug into a LAN port on the rout-
er.
As soon as the cable connecting the phone and router is plugged in and the router
is activated, the key lights up on the front of the base station (Paging key).
Version 8, 03.09.2008
You are now ready to establish VoIP connections within Gigaset.net (£ Page 46).
20
Gigaset A580 IP / US English / A31008-xxxx-xxxx-x-xxxx / starting.fm / 07.07.2010
First steps
Making settings for VoIP telephony
Before you can use the Internet (VoIP) to phone any other numbers on the Internet,
the fixed line network or the cellular phone network, you need the services of a VoIP
provider who supports the VoIP SIP standard.
Prerequisite: You have registered with such a VoIP provider (e.g. via your PC) and
set up at least one VoIP account.
To use VoIP, you need to enter the access data for your VoIP account. You will receive
all the necessary data from your VoIP provider. This will include:
u Your user name (if requested by the VoIP provider) is the user identification
(Caller ID) for your account, which is often identical to your phone number
u Your authentication name or login ID
u The (login) password registered with the VoIP provider
u General settings for your VoIP provider (server addresses, etc.)
Your phone connection wizard can help you make these entries.
Starting the connection wizard
Prerequisite:
The base station is connected to the electrical power supply and a router. Your
router is connected to the Internet (£ Page 20).
Please note
Your phone is preconfigured for dynamic assignment of the IP address. In order for
your router to "recognize" the phone, dynamic IP address assignment must also be
activated on the router, i.e. the router's DHCP server must be activated.
If the DHCP server cannot or should not be activated, you must first assign a fixed
IP address to the phone. For further information, see Page 92.
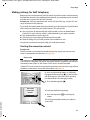
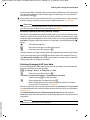
As soon as the handset battery is sufficiently
charged, the Message key f on the handset
will flash (approx. 20 minutes after you have
put the handset in the charging cradle).
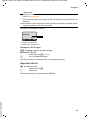
¤ Press the Message key f.
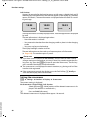
Start VoIP
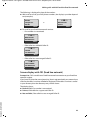
You will see the following display.
connection
wizard?
No
Yes
¤ Press the key below §Yes§ on the display
Version 8, 03.09.2008
screen.
You will be prompted to enter your phone's
system PIN.
21
Gigaset A580 IP / US English / A31008-xxxx-xxxx-x-xxxx / starting.fm / 07.07.2010
First steps
New firmware available appears in the display.
New/improved firmware is available for your phone on the Internet. First perform
an automatic update of the firmware (£ Page 89). Once the update has been
completed (after approx. 3 minutes) the handset's idle display appears again and
the Message key f flashes. If you press f, the display shown in the picture
above appears and you can start the connection wizard.
Please note
To protect your phone and its system settings from unauthorized access, please
define a 4-digit number code (system PIN) known only to yourself. This code must
be entered before you can register/de-register handsets or alter your phone's VoIP
or LAN settings.
The default system PIN is 0000 (4 x zero). For further information, see Page 85.
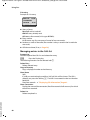
System PIN:
[____]
The active line is marked [----].
Ç
OK
¤ Enter your phone's current system PIN
using the keypad.
¤ Press the key below §OK§ on the display
screen.
The connection wizard is launched.
Please note
u You can also call up the connection wizard at any time via the menu
(£ Page 90).
u The connection wizard will also start automatically if you try to establish a con-
nection via the Internet before you have made the necessary settings. Prerequisite: You have not activated the fixed line network connection as a replacement connection (£ Page 121):
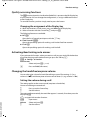
Downloading VoIP provider data
Select VoIP
provider?
No
Yes
¤ Press the key below §Yes§ on the display
Version 8, 03.09.2008
screen.
22
Gigaset A580 IP / US English / A31008-xxxx-xxxx-x-xxxx / starting.fm / 07.07.2010
First steps
The connection wizard establishes a connection with the Gigaset configuration
server on the Internet. Various profiles with general access data for different VoIP
providers can be downloaded here.
After a brief period you will see the following display:
A list of countries is loaded.
Select
country
The first country in the list appears in the
display.
Germany
Ç
V
OK
¤ Press up or down on the Control key
repeatedly ...
... until the country in which you are
using the phone appears on the display.
Ç
U
OK
¤ Press the key below §OK§ on the display
screen to confirm your selection.
A list of VoIP providers whose data you can
download is loaded.
Select
provider
The first VoIP provider in the list appears in
the display.
¤ Press up or down on the Control key
repeatedly q ...
Provider 1
Version 8, 03.09.2008
Ç
V
OK
... until your VoIP provider appears on the
display.
23
Gigaset A580 IP / US English / A31008-xxxx-xxxx-x-xxxx / starting.fm / 07.07.2010
First steps
Provider x
Ç
U
OK
¤ Press the key below §OK§ on the display
screen to confirm your selection.
The general access data for your VoIP provider is downloaded.
Please note
If the data for your VoIP provider is not available for downloading, press the ”
display key twice. You can then carry out the following steps with the connection
wizard.
You must then make the settings needed for the VoIP provider using the Web configurator (£ Page 108).
Your VoIP provider will supply you with this data.
Entering user data for your first VoIP account
You will now be prompted to enter your personal access data for your VoIP
accounts.
The following are provider-dependent:
u Username, Authentication Name, Authentication Password
Or:
u Authentication Name, Authentication Password
Version 8, 03.09.2008
Please note
When entering case sensitive access data:
u To switch between upper and lower case and digits, press the # key (several
times if necessary). You can see briefly in the display whether upper case, lower
case or digits is selected.
u Characters entered incorrectly can be deleted using the left Display key below
X. The character to the left of the cursor will be deleted.
u You can navigate within the input field using the Control key p (press up/
down).
24
Gigaset A580 IP / US English / A31008-xxxx-xxxx-x-xxxx / starting.fm / 07.07.2010
First steps
If your VoIP provider does not require a user
name, skip this step.
Username:
Û
T
OK
¤ Using the keypad, enter the user name
¤
¤ Using the keypad, enter the authentica-
Authentication
Name:
Û
T
OK
Authentication
Password:
Version 8, 03.09.2008
Û
T
that you received from your VoIP provider.
Press the key below §OK§ on the display
screen.
OK
¤
tion name that you received from your
VoIP provider.
Press the key below §OK§ on the display
screen.
¤ Use the keypad to enter your password.
¤ Press the key below §OK§ on the display
screen.
25
Gigaset A580 IP / US English / A31008-xxxx-xxxx-x-xxxx / starting.fm / 07.07.2010
First steps
Completing the VoIP settings
After the entries have been completed, the handset reverts to idle status.
Ð
V
INT 1
Þ
Menu
¤ Test whether your VoIP data is complete and has been stored in the phone correctly.
Calling via VoIP:
Enter a number using the handset keypad and press and hold the Talk key c.
If a VoIP connection cannot be established, a corresponding message is shown in
the display.
You can now use your phone to make calls via the fixed line network and
the Internet! Callers can reach you on your fixed line number and your
VoIP number.
Please note
u To ensure that you can always be reached via the Internet, the router must be
permanently connected to the Internet.
u If you have started the connection wizard via the menu, once the entries are
completed, press and hold the End Call key a to return the handset to idle
status.
u If you try to make a call via a VoIP connection that is not configured correctly,
the following VoIP status message will appear in the display:
VoIP config. error: xxx (xxx = VoIP status code). The various status codes and
their respective meanings are listed on Page 147.
Version 8, 03.09.2008
Please note
You can enter five additional VoIP accounts (VoIP phone numbers) via the Web
configurator later (£ Page 107). Together with your fixed line network number
and the Gigaset.net number, your phone can then be reached via up to eight different phone numbers. You can assign the phone numbers to the individual
handsets that are registered with the base station as send and receive numbers
(£ Page 122).
26
Gigaset A580 IP / US English / A31008-xxxx-xxxx-x-xxxx / starting.fm / 07.07.2010
First steps
Icons on the idle display
The following is displayed:
u the internal number, e.g. INT 1.
u the quality of the reception signal between base station and handset (signal
strength):
– poor to good: Ò Ñ i Ð
– no reception: | flashes
u battery charge status:
– = e V U (empty to full)
– = flashes: batteries almost empty
– e V U flashes: charging procedure
No connection to the Internet/VoIP server
If one of the following messages is displayed instead of the internal name after the
connection wizard is closed, errors have occurred:
u Server not accessible!
u SIP registration failed
Below you will find possible causes and measures you can take.
Server not accessible!
Version 8, 03.09.2008
The phone has no connection to the Internet.
¤ Check the cable connections between the base station and the router (the LED
on the base station must light up) and the connection between the router and
the Internet connection.
¤ Verify that the phone is connected to the LAN.
– It may not have been possible to dynamically assign an IP address to the
phone
or
– You have assigned a static IP address to the phone that has either already
been assigned to another LAN subscriber or does not belong to the router's
address block.
¤ Press the Paging key on the base station. The IP address appears on the handset display.
¤ Press the Talk key on the handset to end paging call.
¤ Start the Web configurator with the IP address.
¤ If no connection can be established, change the settings on the router (activate DHCP server) or the phone's IP address.
27
Gigaset A580 IP / US English / A31008-xxxx-xxxx-x-xxxx / starting.fm / 07.07.2010
First steps
SIP registration failed
u Your personal data for registering with the VoIP provider may have been entered
incompletely or incorrectly.
¤ Check your entries for Username, Authentication Name and Authentication
Password. Particularly check your use of upper and lower case.
To do this, open the following menu on your handset:
§Menu§ ¢ Settings ¢ Base ¢ Telephony ¢ VoIP (enter system PIN)
(£ Page 91)
u The server address for the VoIP server has not yet been entered, or has been
entered incorrectly.
¤ Start the Web configurator.
¤ Open the following Web page: Settings ¢ Telephony ¢ Connections.
¤ Click the Edit button next to the first VoIP connection.
¤ Edit the server address where necessary.
Version 8, 03.09.2008
Please note
If port forwarding is activated on your router for the ports (£ Page 130) that have
been registered as the SIP and RTP ports, we recommend to deactivate DHCP and
assign the phone a static IP address (otherwise you may not be able to hear the
other party during VoIP calls):
u Assign an IP address via the handset menu:
§Menu§ £ Settings £ Base £ Local Network
Or
u Assign an IP address via the Web configurator:
¤ Open the following Web page: Settings £ IP Configuration.
¤ Select IP address type.
Please note that the IP address and subnet mask depend on the router's address
block.
You must also enter the default gateway and DNS server. The IP address for the
router is generally entered here.
28
Gigaset A580 IP / US English / A31008-xxxx-xxxx-x-xxxx / starting.fm / 07.07.2010
First steps
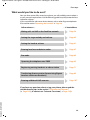
What would you like to do next?
Now you have successfully started your phone, you will probably want to adapt it
to your personal requirements. Use the following guide to quickly locate the most
important subjects.
If you are unfamiliar with menu-driven devices such as other Gigaset telephones
first read the section "Operating the handset" £ Page 30.
Information on ...
Making calls via VoIP or the fixed line network
Setting the ringer melody and volume
Setting the handset volume
Entering local area code/extra codes
Eco mode
Operating the telephone on a PABX
Registering existing handsets to a base station
Transferring directory entries from existing Gigaset
handsets to the new handset(s)
Entering additional VoIP accounts
g
g
g
g
g
g
g
g
... is located here.
g
Page 38
Page 82
Page 81
Page 87
Page 69
Page 95
Page 71
Page 65
Page 107
Version 8, 03.09.2008
If you have any questions about using your phone, please read the
troubleshooting tips in the section "Questions and answers"
(£ Page 143), or contact our Customer Care team (£ Page 143).
29
Gigaset A580 IP / US English / A31008-xxxx-xxxx-x-xxxx / starting.fm / 07.07.2010
Operating the handset
Operating the handset
Using the Control key
In the following description, the side of the Control key you need to
press for each operation is indicated accordingly, e.g. t for "press up
on the Control key".
The Control key has a number of different functions:
With the handset in idle status (without a screensaver)
s
Press briefly to open the handset directory.
Press and hold: open Gigaset.net directory.
Call up the menu to set the ringer volume (£ Page 82).
t
In the main menu, in submenus and lists
t/s
Scroll up/down line by line.
In input fields
Use the Control key to move the cursor to the left t or right s.
During an external call
s
t
Press briefly to open the handset directory.
Adjust the loudspeaker volume for earpiece and handsfree mode.
Using the Display keys
The function of the display keys changes depending on the particular operating situation. Example:
Ç
U
OK
Current Display key functions are shown in the
bottom display line.
Display keys
Important Display keys:
Menu
Open a context-dependent menu.
OK
Confirm selection.
W
Ç
Version 8, 03.09.2008
Þ
30
Delete key: deletes one character at a time from right to left.
Go back one menu level or cancel operation.
Open the Last Number Redial list.
Gigaset A580 IP / US English / A31008-xxxx-xxxx-x-xxxx / starting.fm / 07.07.2010
Operating the handset
Using the keys on the keypad
c / Q / *, etc.
Press the matching key on the handset.
~
Enter digits or letters.
Correcting text entry errors
You can correct incorrect characters in the text by navigating to the incorrect entry
using the Control key. You can then:
u Press X to delete the character to the left of the cursor
u Insert characters to the left of the cursor
u Overwrite the (flashing) character when entering the time and date, etc.
Using the menus
Your telephone's functions are accessed using a menu that has a number of levels.
Main menu (first menu level)
¤ When the handset is in idle status, press §Menu§ to open the main menu.
The main menu functions are shown on the display as a list with name and icon.
To access a function, i.e. to open the corresponding submenu (next menu level):
¤ Navigate to the function using the Control key q. Press the Display key §OK§.
Submenus
Version 8, 03.09.2008
The functions in the submenus are displayed as lists.
To access a function:
¤ Scroll to the function with the Control key q and press §OK§.
Or:
¤ Enter the corresponding digit combination (£ Page 34).
Briefly press the End Call key a once to return to the previous menu level/cancel
the operation.
31
Gigaset A580 IP / US English / A31008-xxxx-xxxx-x-xxxx / starting.fm / 07.07.2010
Operating the handset
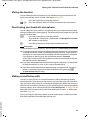
Reverting to idle status
You can revert to idle status from anywhere in the menu as follows:
¤ Press and hold the End Call key a.
Or:
¤ Do not press any key: after 2 minutes the display will automatically revert to idle
status.
Any settings you have not confirmed by pressing §OK§ will be discarded.
An example of the display in idle status is shown on £ Page 26.
Activating/deactivating the handset
a
With the phone in idle status, press and hold the End Call key (confirmation tone) to switch off the handset.
Press and hold the End Call key again to switch the handset on.
Activating/deactivating the keypad lock
Version 8, 03.09.2008
The keypad lock prevents any inadvertent use of the phone.
#
Press and hold the Pound key (#) to activate or deactivate the keypad
lock. You will hear the confirmation tone.
When the keypad lock is activated you will see the Ø icon on the display and a
message when you press a key.
The keypad lock is deactivated automatically if someone calls you. It is reactivated
when the call is finished.
32
Gigaset A580 IP / US English / A31008-xxxx-xxxx-x-xxxx / starting.fm / 07.07.2010
Operating the handset
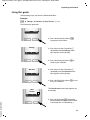
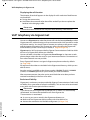
Using this guide
The operating steps are shown in abbreviated form.
Example:
§Menu§
¢ Settings ¢ Handset ¢ Auto Answer (‰ = on)
This illustration represents:
Þ
Menu
¤ Press the Display key below §Menu§
to open the main menu.
¤ Press down on the Control key s
Settings
Ç
U
OK
repeatedly until the Settings menu
item appears on the display.
¤ Press the Display key below §OK§ to
confirm your selection.
¤ Press down on the Control key s
Handset
Ç
U
OK
repeatedly until the Handset menu
item appears on the display.
¤ Press the Display key below §OK§ to confirm your selection.
Auto
Ç
Answer
U
‰
The Auto Answer menu item appears on
the display.
OK
Version 8, 03.09.2008
¤ Press the key below §OK§ to activate/
deactivate the function. If the function
is activated, this is indicated by ‰.
33
Gigaset A580 IP / US English / A31008-xxxx-xxxx-x-xxxx / menuetree.fm / 07.07.2010
Menu trees
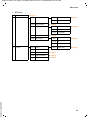
Menu trees
Phone menu
Open the main menu on your phone by clicking on the right Display key §Menu§ when the handset
is in idle status. There are two ways to select a function:
Using number combinations ("shortcut")
¤ Enter the number combination that is in front of the function in the menu tree.
Example: §Menu§ M 3 2 for "Set handset language".
Scrolling through the menus
¤ Scroll to the function with the Control key q (press up or down) and press §OK§.
3
êSelect Services
3-1 VoIP
3-1-6 For All Calls
3-1-6-1 Call Diversion
3-1-6-3 Call Waiting
3-3 All calls anonymous
3-4 Next call
anonymous
4
ì Alarm Clock
4-1 Activation
4-2 Wake up time
5
þ Voice Mail
5-2 Set Key 1
£ Page 52
£ Page 52
£ Page 70
£ Page 70
Net AM: Fixed Line
£ Page 66
Net AM: IP1
:
:
(dependent on the number of configured VoIP phone
numbers and receive numbers on the handset)
Version 8, 03.09.2008
Net AM: IP6
34
£ Page 53
£ Page 54
Gigaset A580 IP / US English / A31008-xxxx-xxxx-x-xxxx / menuetree.fm / 07.07.2010
Menu trees
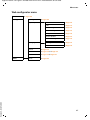
7
m Settings
7-1 Date/Time
7-2 Audio Settings
£ Page 14
7-2-1 Call Volume
7-2-1-1 Earpiece Volume
£ Page 81
7-2-1-2 Handsfree Volume
7-2-2 Ringer Volume
7-2-3 Ringer Melody
£ Page 82
7-2-3-1 External Calls
£ Page 83
7-2-3-2 Internal Calls
7-2-3-3 Alarm Clock
7-2-4 Advisory Tones
7-2-5 Battery Low
£ Page 84
7-2-5-1 Off
£ Page 84
7-2-5-2 On
7-2-5-3 During Call
7-3 Handset
7-3-1 Display
7-3-2 Language
7-3-3 Auto Answer
7-3-4 Register Handset
Version 8, 03.09.2008
7-3-5 Reset Handset
7-3-1-1 Screensaver
£ Page 78
£ Page 81
£ Page 71
£ Page 84
£ Page 79
35
Gigaset A580 IP / US English / A31008-xxxx-xxxx-x-xxxx / menuetree.fm / 07.07.2010
Menu trees
7-4 Base
7-4-1 Calls List Type
7-4-1-1 Missed Calls
£ Page 59
7-4-1-2 All Calls
7-4-2 Music on hold
7-4-3 System PIN
7-4-4 Base Reset
7-4-5 Additional Features
£ Page 87
£ Page 85
£ Page 86
7-4-5-2 Access Code
7-4-5-4 Eco mode
7-4-6 Local Network
7-4-6-1 Dynamic
IP address
£ Page 95
£ Page 69
£ Page 92
7-4-6-2 IP Address
7-4-6-3 Subnet Mask
7-4-6-4 DNS Server
7-4-6-5 Default Gateway
7-4-7 Telephony
7-4-7-1 Default Line Type
7-4-7-2 Connection Wizard
7-4-7-4 Area Code
7-4-7-5 Extra Codes
7-4-7-6 Fixed line
7-4-7-7 VoIP
Version 8, 03.09.2008
7-4-8 Firmware Update
36
£ Page 88
£ Page 87
£ Page 90
£ Page 88
£ Page 88
£ Page 95
£ Page 90
Gigaset A580 IP / US English / A31008-xxxx-xxxx-x-xxxx / menuetree.fm / 07.07.2010
Menu trees
Web configurator menu
Home
Settings
£ Page 100
IP Configuration
Telephony
£ Page 104
Connections
Audio
Number Assignment
Call Forwarding
Dialing Plans
Network Mailbox
Advanced Settings
Messaging
Messenger
E-Mail
Services
Handsets
Miscellaneous
Version 8, 03.09.2008
Status
Device
£ Page 135
£ Page 136 and Page 136
£ Page 139 to Page 141
£ Page 142
£ Page 107
£ Page 117
£ Page 122
£ Page 123
£ Page 125
£ Page 127
£ Page 128
£ Page 132
£ Page 134
37
Gigaset A580 IP / US English / A31008-xxxx-xxxx-x-xxxx / telephony.fm / 07.07.2010
Making calls with VoIP and the fixed line network
Making calls with VoIP and the fixed line network
Making an external call
External calls are calls made via the public telephone network (fixed line network)
or via the Internet (VoIP). You decide which connection type you want to use for a
specific call when you dial the number. You have the following options:
u Select the connection type with the Talk key c (briefly press/press and hold
c), £ Page 38.
u Select the connection type via the display keys by assigning VoIP or the fixed line
network to your left Display key, £ Page 39
u Select a special connection via your line suffix, £ Page 38
Please note
u You can conduct three separate external calls via your base station (using dif-
ferent handsets): two calls via VoIP and one via the fixed line network.
u You can define dialing plans for certain numbers or area codes by determining
the connection and therefore the billing method to be used (cost control
£ Page 125) when these numbers are dialed.
u Dialing with the Directory (£ Page 62), Shortcut keys (£ Page 64) or Last
Number Redial list (£ Page 57) saves repeated keying of phone numbers. You
can modify or add to these numbers on a call-to-call basis.
u If you use VoIP to make a call to the fixed line network, you may also have to dial
your local area code for local calls (depending on the VoIP provider). You can
avoid having to dial your own area code by entering it into the configuration (
£ Page 87, Page 124) and activating the option Predial area code for local
calls through VoIP (£ Page 124).
u Depending on the exchange, you may not have to dial your own area code
when making local calls via the fixed line network.
Version 8, 03.09.2008
Use the Talk key to select the type of connection and make the call
By briefly pressing or pressing and holding the Talk key c, you can determine the
type of connection for the call you want to make (fixed line network or VoIP).
Prerequisite: You enter the number without a line suffix (£ Page 38) and have not
defined any dialing plans for this number (£ Page 125).
~c
Enter number (without suffix) and briefly press/press and hold the
Talk key.
A default connection is established on your phone (fixed line network or VoIP
£ Page 87/Page 121).
¤ Briefly press the Talk key c to make a call via this default connection.
¤ Press and hold the Talk key c to make the call via the other connection type.
If you have assigned a number of VoIP numbers to your phone, you can define
which VoIP number (VoIP account) is used for external calls from each specific
handset (handset send number, £ Page 122).
38
Gigaset A580 IP / US English / A31008-xxxx-xxxx-x-xxxx / telephony.fm / 07.07.2010
Making calls with VoIP and the fixed line network
Please note
u If you are using a GAP compatible handset other than the Gigaset handsets
A58H, S67H, S68H, SL37H, S45 and C45, every call will be made via the standard
connection, even if you press and hold the Talk key.
u If you have activated the option Automatic Fallback to Fixed Line with the
Web configurator (£ Page 121):
If the attempt to establish a connection fails, an attempt is made automatically
to establish the connection via the fixed line network.
Use the Display key to select the type of connection and make the call
Prerequisite: §Phone§ or §IP§ is assigned to your handset's left Display key
(£ Page 81).
§Phone§ / §IP§ Press the Display key to define the connection type.
~/s
Enter number or select from the directory.
c / d Press the Talk or Handsfree key.
The number is dialed via the selected line type.
Exception:
If you have activated the option "Automatic Fallback to Fixed Line" (Web configurator, £ Page 121) and the attempt to establish a connection via VoIP fails, an
attempt is made automatically to establish the connection via the fixed line network.
Please note
If you have pressed the Display key §IP§ before dialing and ...
u Dialed the number with suffix #1 to #6, your call will be made via the VoIP
account assigned to the suffix. The number will not be dialed if the suffix is
invalid (e.g. no VoIP connection assigned).
u Dialed the number without a suffix or with the suffix #0, your call will be made
via the handset's VoIP send number.
Do not enter a suffix if you have pressed the Display key §Phone§ prior to dialing.
Otherwise the suffix will be dialed together with the number via the fixed line network. This may cause errors!
Version 8, 03.09.2008
Selecting and dialing a connection via your line suffix
You can configure up to six VoIP numbers on your phone in addition to the fixed
line network number and the Gigaset.net number. A (line) suffix is assigned to each
number (line) of your phone:
u The fixed line network number has the suffix #0
u VoIP numbers have the suffixes #1 to #6 (£ Page 108)
u And the Gigaset.net number has the suffix #9
When dialing, you can use this line suffix to specify the connection via which you
would like to call or be charged.
~
Enter the number of the party you wish to call.
~
Add the suffix of the connection (your phone number) from which the
call is to be made and charged to.
39
Gigaset A580 IP / US English / A31008-xxxx-xxxx-x-xxxx / telephony.fm / 07.07.2010
Making calls with VoIP and the fixed line network
c
Press the Talk key.
The connection is always made via the line with the assigned suffix, regardless of
whether you press the Talk key c briefly or press and hold.
Example
If you enter the number 1234567890#1 and press the Talk key c, the number
1234567890 will be dialed via the first VoIP connection in the configuration.
Please note
u If you specify a suffix for which no VoIP connection is configured in your base
station, the VoIP status code 0x33 is displayed. The number will not be dialed.
u If you have activated the option Automatic Fallback to Fixed Line with the
Web configurator (£ Page 121):
If the attempt to establish a connection fails, an attempt is made automatically
to establish the connection via the fixed line network.
Entering an IP address (provider-dependent)
You can also dial an IP address instead of a phone number using VoIP.
¤ Press the Asterisk key * to separate the sections of the IP address
(e.g. 149*246*122*28).
¤ If necessary press the Pound # key to attach the SIP port number of the person
you are calling to the IP address (e.g. 149*246*122*28#5060).
You cannot dial IP addresses using a line suffix.
If your VoIP provider does not support the choice of IP addresses, each part of the
address will be interpreted as a normal phone number.
Canceling the dialing operation
You can cancel the dialing operation with the End Call key a.
Dialing emergency numbers – defining dialing plans
You can use the Web configurator to block certain numbers or to define which of
your numbers (fixed line network, VoIP) should be used to call specific numbers
(Dialing Plans, £ Page 125).
If you enter a number that has a defined dialing plan, the call will be made via the
line defined in the dialing plan – regardless of whether the Talk key is pressed
briefly or pressed and held. Any automatic area code will not be prefixed to the
number.
Version 8, 03.09.2008
Emergency numbers
Dialing plans for emergency numbers (e.g. the local emergency service number)
are preset for certain countries. Emergency calls are then always made via the fixed
line network.
You cannot delete or deactivate these dialing plans. However, you can change the
connection through which each emergency number should be called (e.g. if the
phone is not connected to the fixed line network). You must make sure that the
VoIP provider for the selected connection supports emergency calls.
40
Gigaset A580 IP / US English / A31008-xxxx-xxxx-x-xxxx / telephony.fm / 07.07.2010
Making calls with VoIP and the fixed line network
If your phone does not have default dialing plans for emergency calls, define the
rules yourself (£ Page 125). Assign them to a connection that you know supports
emergency calls. Calls to emergency numbers are always supported by fixed line
networks.
Please note
u If no rules are defined for emergency numbers and you have programmed an
automatic local area code (£ Page 124), the code will be prefixed to emergency numbers as soon as they are dialed via a VoIP connection.
u Emergency numbers cannot be dialed if the keypad lock is activated. Before
dialing, press and hold the Pound key #, to release the keypad lock.
Ending a call
a
Press the End Call key.
Accepting a call
The handset indicates an incoming call in three ways: by ringing, by a display on the
screen and by the flashing Handsfree key d.
Please note
Only calls to receive numbers assigned to your handset will be signaled
(£ Page 122). The following conditions apply in particular:
u Calls made to a number that is not assigned to a handset as a receive number
will be signaled on all handsets.
u If you have not assigned receive numbers to any of the handsets, calls to all connections will be signaled on all handsets.
u Calls to your IP address are always signaled on all handsets.
You can accept the call by:
¤ Pressing the Talk key c.
¤ Pressing the Handsfree key d.
If the handset is in the charging cradle and the Auto Answer function is activated
(£ Page 81), the handset will take a call automatically when you lift it out of the
cradle.
To deactivate the ringer, press the §Menu§ Display key and select Silent. You can
accept the call as long as it is displayed on the screen.
Version 8, 03.09.2008
Please note
You can reject VoIP calls by pressing the End Call key a. The caller receives an
appropriate message (provider-dependent).
41
Gigaset A580 IP / US English / A31008-xxxx-xxxx-x-xxxx / telephony.fm / 07.07.2010
Making calls with VoIP and the fixed line network
Caller ID
When you receive a call from the Internet, the caller's number or the name they
have specified is displayed on the screen.
When you receive a call from the fixed line network, the caller's number and/or
name is displayed on the screen if you have requested Caller ID (CID) from your network provider.
If the phone number is identified and the caller's number is saved in the directory,
the name is displayed from the directory.
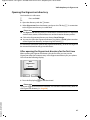
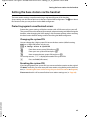
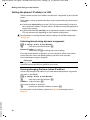
Call display
You can use the display to determine whether the call is for your fixed line network
number or one of your VoIP numbers.
Calls to your fixed line number
Å
1234567890
For Fixed Line
Menu
1
2
3
Calls to one of your VoIP numbers
1234567890
1234567890
2
For IP1
3
Menu
1 Ringer icon
2 Number or name of the caller if available
3 Receive number: indicates which of your phone numbers the caller has dialed. Assign the
name when you are configuring the phone with the Web configurator ( Page 109/
Page 115). For calls from Gigaset.net, For Gigaset.net is displayed.
£
Withholding calling line display
Version 8, 03.09.2008
The number or name of the caller is not displayed in the following cases:
u The caller has activated the "anonymous calling" function.
u A caller from the fixed line network has not requested Caller ID from the fixed
line network provider.
42
Gigaset A580 IP / US English / A31008-xxxx-xxxx-x-xxxx / telephony.fm / 07.07.2010
Making calls with VoIP and the fixed line network
The following is displayed in place of the number:
u With a call to one of your VoIP phone numbers, the display is provider-dependent (examples):
Private
or
anonymous
M
External Call
For IP1
For IP1
Menu
Menu
u For a call to your fixed line network number:
– If no number is transmitted:
Å
External Call
For Fixed Line
Menu
– If the caller has withheld Caller ID:
Å
Private
For Fixed Line
Menu
– If the caller has not arranged Caller ID:
Å
Not available
For Fixed Line
Menu
Screen display with CID (fixed line network)
Version 8, 03.09.2008
Prerequisite: Call is made from a fixed line network connection to your fixed line
network number.
If you have CID, then the name (town/city) that is registered with your network provider for the caller's number will also be displayed. If the caller's number is stored
in your directory then the directory entry will be shown.
The display shows:
u External Call, if no number is transmitted.
u Private, if the caller has suppressed Caller ID
u Not available, if the caller has not arranged Caller ID.
43
Gigaset A580 IP / US English / A31008-xxxx-xxxx-x-xxxx / telephony.fm / 07.07.2010
Making calls with VoIP and the fixed line network
VoIP: Displaying the called party's phone number (COLP)
Prerequisites:
u Your VoIP provider supports COLP (Connected Line Identification Presentation).
You may have to ask your provider to activate COLP (contact your VoIP provider
for more information).
u The called party has not activated COLR (Connected Line Identification Restriction).
For outgoing VoIP calls, the phone number of the connection on which the call is
received is displayed on the handset.
The displayed number may differ from the number you have dialed. Examples:
u The called party has activated call forwarding.
u The call is answered by another connection within a PABX system.
If there is an entry in the directory for this phone number, the corresponding name
is displayed.
Please note
u The number of the connection you have reached (or the assigned name) will
also be displayed instead of the called number during toggling, conference
calls and consultation calls.
u When the phone number is copied to the directory (§Menu§ £ Copy to phonebook) and the Last Number Redial list, the dialed number (not the displayed
number) is copied.
Using speaker mode
In speaker mode, instead of holding the handset to your ear you can put it down,
for example on the table in front of you. This allows others to participate in the call.
Activating/deactivating speaker mode
Activating while dialing
~d
¤
Enter number and briefly press/press and hold the Speaker key to
select the connection type (£ Page 38).
Inform your caller before you use the speaker function so that they know someone else may be listening.
Switching between earpiece and speaker mode
Version 8, 03.09.2008
¤ Press the Speaker key d to activate or deactivate the speaker during a call and
when listening to the answering machine.
If you wish to place the handset in the charging cradle during a call:
¤ Press and hold the Speaker key d while placing the handset in the charging
cradle.
¤ If the Speaker key d does not light up, press the key again.
For instructions on adjusting the handset volume, see £ Page 81.
44
Gigaset A580 IP / US English / A31008-xxxx-xxxx-x-xxxx / telephony.fm / 07.07.2010
Making calls with VoIP and the fixed line network
Muting the handset
You can deactivate the microphone in your handset during an external call. The
other party will hear music on hold, if activated (£ Page 87).
k
Press the Display key to mute the handset.
Ç / a Press the Display or the End Call key, to reactivate the microphone.
Deactivating your handset's microphone
You can deactivate your handset's microphone during an external call (including
during a conference or when toggling). The other party can no longer hear you, but
you can still hear them.
§Mute§
Press the Display key to mute the handset.
Your handset's microphone is deactivated. Im"Microphone is turned
off." appears in the display.
§On§
Press the Display key to switch the microphone back on.
Please note
Under the following circumstances, the microphone is automatically reactivated:
u If, during an external call (you have deactivated the microphone), you establish
a second connection, either by accepting a waiting call or by successfully connecting to an external/internal consultation call, the microphone is activated.
If you go back to the first party, the microphone remains activated.
(If you reject a waiting call or are unable to connect to a consultation call, the
microphone remains deactivated.)
u If you have deactivated the microphone during call swapping, it is reactivated
for both connections as soon as you swap to the other party.
u If you have deactivated the microphone during a conference call, the microphone is reactivated when you end the conference call by pressing §Menu§
¢ End Conference (call swap).
Making cost-effective calls
You can use your phone's cost control function for calls to fixed line or mobile
phone networks. Open accounts with various VoIP providers who offer favorable
rates for calls to other networks. In the phone configuration, define the most costeffective VoIP connections (account), e.g. for specific regional, national and cellular
network prefixes, to be used when calls are made (Dialing Plans, £ Page 125). Or
define the VoIP connection to be used when dialing the number ( £ dialing with
line suffix, Page 38).
Version 8, 03.09.2008
If you are using your fixed line network to make a call, choose a network provider
that offers particularly favorable rates (call-by-call).
45
Gigaset A580 IP / US English / A31008-xxxx-xxxx-x-xxxx / telephony.fm / 07.07.2010
VoIP telephony via Gigaset.net
Displaying the call duration
The duration of each call appears in the display for calls made via a fixed line network and VoIP
u During the conversation,
u Until about three seconds after the call has ended if you do not replace the
handset in the charging cradle.
Please note
The actual duration of the call can vary from that shown by a few seconds.
VoIP telephony via Gigaset.net
You can use Gigaset.net to make free phone calls via the Internet directly to other
Gigaset.net users, without having to set up an account with a VoIP provider or make
any further settings. You simply have to connect your phone to the power supply
and the Internet connection and, if necessary, enter yourself in the Gigaset.net
online directory under a name of your choice (£ Page 47/Page 50).
Gigaset.net is a VoIP service provided by Gigaset Communications GmbH to which
all users of a Gigaset VoIP device can subscribe.
You can call other subscribers to Gigaset.net free of charge, i.e. there are no telephone charges other than the costs for your Internet connection. Connections to/
from other networks are not possible.
Every Gigaset VoIP device is assigned a Gigaset.net phone number by default
(£ Page 150).
All registered subscribers are included in the Gigaset.net directory, which you are
able to access.
An echo service is available on the phone number 12341#9 (English), 12344#9
(French) or 12346#9 (Spanish) for you to check your VoIP connection.
After an announcement, the echo service sends back the voice data you have
received immediately in the form of an echo.
Version 8, 03.09.2008
Exclusion of liability
Gigaset.net is a voluntary service provided by Gigaset Communications GmbH with
no liability for or guarantee of network availability. This service can be terminated
at any time with a notice period of three months.
Please note
If you do not use your Gigaset.net connection for six weeks, it is automatically
deactivated. You cannot be reached for calls from Gigaset.net.
The connection is reactivated:
u As soon as you start a search in the Gigaset.net directory or
u Make a call via Gigaset.net (dial a number with #9 at the end) or
u Activate the connection via the Web configurator (£ Page 116).
46
Gigaset A580 IP / US English / A31008-xxxx-xxxx-x-xxxx / telephony.fm / 07.07.2010
VoIP telephony via Gigaset.net
Opening the Gigaset.net directory
Your handset is in idle status.
s
Press and hold.
Or:
¤ Open the directory with the s button.
¤ Select Gigaset.net from the directory and press the Talk key c. A connection
to the Gigaset.net directory is established.
Please note
u The Gigaset.net directory entry is transferred to a handset when it is registered
with the base station, if the handset can send and receive directory entries.
u Calls to the Gigaset.net directory are always free of charge.
u You can also open the Gigaset.net directory by dialing 1188#9 (phone number
of the Gigaset.net directory) and pressing the Talk key c.
If a connection cannot be made to the Gigaset.net directory, an error message will
be sent and the handset will go into idle status.
After opening the Gigaset.net directory for the first time
When opening the Gigaset.net directory for the first time you can use the
Gigaset.net wizard to create an entry in the Gigaset.net directory for your phone.
You will see the following display:
Start
Gigaset.net
wizard?
No
Yes
¤ Press the Display key §Yes§ to start the wizard.
Version 8, 03.09.2008
Please note
If you press §No§ the wizard will be canceled. You can then create the entry later via
the Gigaset.net directory (£ Page 50).
47
Gigaset A580 IP / US English / A31008-xxxx-xxxx-x-xxxx / telephony.fm / 07.07.2010
VoIP telephony via Gigaset.net
When the wizard has been started the following display will appear (example):
Your nickname:
1happyuser
Û
T
OK
¤ Using the keypad, enter the name that you would like to be listed under in the
Gigaset.net directory. The name may contain a maximum of 25 characters.
¤ Press the key below §OK§.
If there is already an entry under this name, you will receive a message to this effect
and you will be asked to enter a name again: Please choose another name.
If an entry in the Gigaset.net directory is successful, the message Name added to
Gigaset.net is displayed.
You have not been able to enter a name
If the attempt to create the entry fails you can create it via the Gigaset.net directory
(£ Page 50).
Searching for subscribers in the Gigaset.net directory
Once the connection has been established, you will be asked to enter a name that
you want to search for.
Nickname: Enter the name or part of a name (maximum 25 characters).
§Menu§
Press the Display key.
Start searchSelect and press §OK§.
If the search has been successful, a Hit list of all the names that begin with the specified character string is displayed.
Example:
5/25
Sand, Anna Mag
dalena
View
1
2
U Menu
1. 5/25: Entry number/number of hits
2. Name of the entry, the name is displayed in full, if necessary over several lines
Version 8, 03.09.2008
You can scroll through the Hit list with q.
48
Gigaset A580 IP / US English / A31008-xxxx-xxxx-x-xxxx / telephony.fm / 07.07.2010
VoIP telephony via Gigaset.net
If it has not been possible to find a matching entry, a corresponding message is displayed. You have the following options:
¤ Press the Display key §New§ to start a new search.
Or
¤ Press the Display key §Change§ to change the search criteria. The previously
entered name is copied and can be edited.
If there are too many matching entries in the Gigaset.net directory, the message
Too many entries found is displayed instead of a Hit list.
¤ Press the Display key §Refine§ to start a refined search. The previously entered
name is copied and can be edited/expanded.
Calling participants
q
c
Select the subscriber from the Hit list.
Press the Talk key.
Viewing the subscriber's number
q
Select the subscriber from the Hit list.
Press the Display key.
The display shows the Gigaset.net number and the subscriber's name. Depending
on the length of the information, the name may cross several lines.
Example:
§View§
1234567#9
Sand, Anna Mag
Ç
dalena
U
OK
Please note
u Connections to Gigaset.net are always established via the Internet regardless of
Version 8, 03.09.2008
which default connection is set on your phone. Pressing and holding c or
pressing it briefly have no effect.
u You can open the Gigaset.net directory and establish connections, even if you
have not entered yourself in the Gigaset.net directory.
49
Gigaset A580 IP / US English / A31008-xxxx-xxxx-x-xxxx / telephony.fm / 07.07.2010
VoIP telephony via Gigaset.net
Using other functions
Prerequisite: The Hit list is displayed.
q (select entry) ¢ §Menu§
The following functions can be selected with q:
Copy to Directory
Copy the entry to the handset directory. The number and name (abbreviated if
necessary, maximum 16 characters) are copied to the directory.
¤ Edit and save entry where appropriate (£ Page 63).
The Hit list is displayed again.
Show number
Display the number of the entry.
¤ Press the Display key §OK§, to return to the Hit list.
New search
Start a search with a new name (£ Page 48).
Refine search
Start detailed search. The previously entered Nickname can be edited/
expanded and the search can be restarted (£ Page 48).
Your name in Gigaset.net
£ "Managing your own entry", Page 50.
Please note
If you select a Gigaset.net number from the local directory, the connection is automatically established via Gigaset.net (Internet).
Managing your own entry
You have the following options:
u Edit the name of your entry in the Gigaset.net directory
u Delete your entry from the Gigaset.net directory
Viewing own entry
¤ You are connected to the Gigaset.net directory:
Select §Menu§ ¢ Your name in Gigaset.net and press §OK§.
Or:
¤ You are in a Gigaset.net Hit list:
Select §Menu§ ¢ Own information and press §OK§.
Version 8, 03.09.2008
Your Gigaset.net number and, where applicable, your currently entered name are
displayed.
50
Gigaset A580 IP / US English / A31008-xxxx-xxxx-x-xxxx / telephony.fm / 07.07.2010
VoIP telephony via Gigaset.net
Entering/editing a name
§Edit§
Press the Display key.
Edit name or enter new name (maximum 25 characters) and press §OK§.
You can delete the name with X.
If there is no existing entry with this name in the Gigaset.net directory, the name is
saved. A message to this effect is displayed. The handset switches to idle status.
If there is an existing entry with this name, or the entered name contains invalid
characters, you will be requested to enter a different name.
~
Deleting your own entry from the Gigaset.net directory
Prerequisite: You are connected to the Gigaset.net directory:
§Menu§ ¢ Your name in Gigaset.net / Own information
Select and press §OK§.
§Edit§
Press the Display key.
X
Delete name and press §OK§.
Your entry is deleted from the directory. You are no longer "visible" to other
Gigaset.net subscribers. However, you can still be reached via your Gigaset.net
number.
Please note
For instructions on displaying your Gigaset.net number, see Page 150.
Calling a Gigaset.net subscriber
Version 8, 03.09.2008
You can call a Gigaset.net subscriber directly via the Gigaset.net directory (see
above) or via their Gigaset.net number:
~ /s
Enter the Gigaset.net number (including the #9) or select from the
handset directory.
c
Press the Talk key.
Every number ending with #9 is dialed via Gigaset.net.
51
Gigaset A580 IP / US English / A31008-xxxx-xxxx-x-xxxx / netservices_SAG.fm / 07.07.2010
Network services
Network services
Network services are functions made available by your fixed line network or VoIP
provider.
Blocking your Caller ID – Anonymous calling
Phone number identification can be blocked. Your phone number will not be displayed when making outgoing calls. You are calling anonymously.
Prerequisites:
u For anonymous calls via your fixed line network connection you need to have
requested the relevant service (feature) from your fixed line network provider.
u Anonymous calls are only possible via VoIP connections through providers that
support the "anonymous calling" function. You may have to ask your VoIP provider to activate this function.
Activating/deactivating "anonymous calling" for all calls
Withholding caller ID can be activated/deactivated permanently for all of your
phone's connections (fixed line network and VoIP).
When this function is activated, the phone number will be withheld both for fixed
line network calls and for calls via a VoIP connection. Withholding caller ID is activated for all registered handsets.
§Menu§ ¢ Select Services
All calls anonymous
Select and press §OK§ (‰ = on).
Activating/deactivating "anonymous calling" for the next
call
Version 8, 03.09.2008
You can activate/deactivate withholding caller ID for the next call.
§Menu§ ¢ Select Services ¢ Next call anonymous
Yes / No
Select and press §OK§.
~
If necessary, enter the phone number with line suffix.
§Send§
Press the Display key. The phone number is dialed. If you have not
specified a line suffix, the number will be dialed via the default connection.
52
Gigaset A580 IP / US English / A31008-xxxx-xxxx-x-xxxx / netservices_SAG.fm / 07.07.2010
Network services
Further network services for fixed line networks
The following network services can only be used for making calls via the fixed line
network. You will need to request them from your fixed line network provider.
¤ Contact your network provider for further assistance.
Functions during a call
Initiating ringback
You have dialed a number via the fixed line network and can hear the busy tone.
§Menu§ ¢ Ringback
a
Press the End Call key.
As soon as the dialed number becomes available, the phone rings.
¤ Press the Talk key c, to establish a connection to that number.
Consultation calls
During a call:
§Menu§ ¢ External Call
Select and press §OK§.
~
Enter a number or copy it from the directory and press §OK§.
The number will be dialed via the fixed line connection.
Please note
After a few seconds, the number selected for a consultation call is saved in the Last
Number Redial list.
u Conference call:
– Talk to both participants: §Menu§ ¢ Conference Call.
– End call with both participants: press the End Call key a.
Further network services for VoIP
You can use the following network services to make calls via the VoIP connection.
Settings for all calls
Version 8, 03.09.2008
General call forwarding
Prerequisite: The VoIP provider supports call forwarding.
§Menu§ ¢ Select Services ¢ VoIP ¢ For All Calls ¢ Call Diversion
The display shows a list of configured and activated VoIP phone numbers and the
Gigaset.net number of your telephone. Numbers for which call forwarding is activated are marked with ‰.
q
Select the phone number for which you want to activate or change call
forwarding and press §OK§.
53
Gigaset A580 IP / US English / A31008-xxxx-xxxx-x-xxxx / netservices_SAG.fm / 07.07.2010
Network services
All Calls / No Answer / When Busy
Select and press §OK§ (‰ = on).
On
Select and press §OK§.
~
If necessary, enter the number to which the call is to be forwarded.
You can specify a fixed line network, VoIP or mobile number for forwarding calls from a VoIP number.
You must specify another Gigaset.net number for call forwarding from
your Gigaset.net number.
§OK§
Press the Display key.
a
Press and hold (idle status).
Call forwarding is activated for the selected phone number (receive number). This
does not result in calls for the other VoIP numbers or your fixed network numbers
being forwarded.
Deactivating call forwarding
q
Select the VoIP phone number for which you want to deactivate call
forwarding and press §OK§.
All Calls / No Answer / When Busy
Select and press §OK§ (‰ = on).
Off
Select and press §OK§.
a
Press and hold (idle status).
Call forwarding is deactivated.
Please note
Forwarding VoIP phone numbers can incur additional costs. Please consult your
VoIP provider.
Activating/deactivating call waiting
Version 8, 03.09.2008
Prerequisite: Your phone will permit two parallel VoIP connections (see Allow 1
VoIP call only, £ Page 118).
If call waiting is activated, a caller on one of your VoIP connections will hear the
ringer if you are already on a call using this VoIP connection. This call is announced
sound and visually on your handset screen.
Calls on the fixed line connection are not signaled as call waiting. They are signaled
on other registered handsets to which the fixed line number has been assigned as
a receive number. If no other handset is available, the caller will hear the busy tone.
Accepting/rejecting a waiting call, £ Page 56.
§Menu§ ¢ Select Services ¢ VoIP ¢ For All Calls ¢ Call Waiting
On / Off
Select and press §OK§.
a
Press and hold (idle status).
Please note
The setting applies to all VoIP phone numbers. It does not affect the procedure for
call waiting on the fixed line network.
54
Gigaset A580 IP / US English / A31008-xxxx-xxxx-x-xxxx / netservices_SAG.fm / 07.07.2010
Network services
Functions during a call
Prerequisite: Your phone will permit two parallel VoIP connections (see Allow 1
VoIP call only, £ Page 118).
Consultation calls
During an external call:
§Menu§ ¢ External Call
Select and press §OK§.
~
Enter the number (if necessary the suffix) or copy it from the directory.
c
Press the Talk key.
The number is always dialed via VoIP. If no suffix is entered, it is selected via the VoIP
send number.
Please note
After a few seconds, the number selected for a consultation call is saved in the Last
Number Redial list.
Version 8, 03.09.2008
If the participant does not answer:
¤ Press the Display key §End§, to return to the waiting call.
If the participant answers, you have the following options:
u Toggling:
¤ Use q to toggle between the participants.
¤ End call with active participant: §Menu§ ¢ End Active Call.
Press the End Call key a, to end the current call. The participant who was
previously waiting will automatically call you back.
u Conference call:
¤ Talk to both participants: §Menu§ ¢ Conference Call.
¤ End conference call (toggle): §Menu§ ¢ End Conference.
¤ End call with both participants: press the End Call key a.
u Call forwarding (provider-dependent):
You can connect the two external participants.
Prerequisites:
– You are toggling calls and you phoned the currently active participant yourself.
– You have activated call forwarding via the Web configurator (£ Page 129)
Depending on the setting in the Web configurator (£ Page 129):
¤ Press the End Call key a.
Or:
¤ Press key S.
If call forwarding was successful, a message will appear to this effect. The handset will then switch to idle.
If call forwarding was not successful, the party that was previously waiting will
call you back.
55
Gigaset A580 IP / US English / A31008-xxxx-xxxx-x-xxxx / netservices_SAG.fm / 07.07.2010
Network services
Accepting a waiting call
Prerequisite: Call waiting is activated (£ Page 54).
§Menu§ ¢ Accept Call Waiting
You have the option of toggling or holding a conference call.
Please note
u If the first call was an internal call, the internal connection is ended.
u An internal, waiting call is shown on the display. You can neither accept the
internal call nor reject it.
Rejecting a waiting call
Menu§
¢ Reject Call Waiting
Version 8, 03.09.2008
The caller hears the busy tone.
56
Gigaset A580 IP / US English / A31008-xxxx-xxxx-x-xxxx / directories_charges.fm / 07.07.2010
Using lists
Using lists
The options are:
u Last Number Redial list
u Calls list
u Network mailbox
using the Last Number Redial list
The Last Number Redial list contains the ten numbers last dialed with the handset
(maximum 32 numbers). If one of the numbers is in the directory, the
corresponding name is displayed.
Dialing from the Last Number Redial list
c
s
c
Press the key briefly.
Select entry.
Briefly press/press and hold the Talk key. The number is dialed using
the selected connection type (£ Page 38).
Managing entries in the Last Number Redial list
c
s
Version 8, 03.09.2008
Press the key briefly.
Select entry.
§Menu§
Open menu.
The following functions can be selected with q:
Use Number
Save or modify a saved number and then dial with c or save as a new entry;
to do so, press §Menu§ ¢ Copy to phonebook ¢ §OK§ after the number appears
on the display.
Copy to Directory
Copy an entry to the directory (£ Page 65).
Delete Entry
Delete selected entry.
Delete List
Delete complete list.
57
Gigaset A580 IP / US English / A31008-xxxx-xxxx-x-xxxx / directories_charges.fm / 07.07.2010
Using lists
Opening lists with the Message key
You can use the Message key f to open the following list selection:
u Calls list
u Network mailbox, £ Page 67
A separate list is displayed for each network mailbox.
Prerequisite: Its number is saved in the base station, it is switched on
(£ Page 127) and the corresponding VoIP/fixed line network number is
assigned to the handset as a receive number.
An advisory tone sounds as soon as a new message arrives in a list. The f key
flashes (it goes off when the key is pressed). The message You have new messages
appears in the display in idle status.
List selection
The lists displayed after pressing the message key f depend on whether there
are any new messages.
f key does not flash (no new messages): All lists are displayed. Select a list with
q. To open, press §OK§.
f key flashes (new messages received): All the lists that contain new messages
are displayed as well as the network mailbox lists, whose connection is assigned to
the handset as a receive number (Net AM Fixed Line, Net AM IP1,...).
Network Mailbox lists
If you select a Network Mailbox list and press §OK§ you will be connected directly to
the network mailbox. For information on network mailboxes, £ Page 67.
Calls list
Version 8, 03.09.2008
The Calls list contains the last 20 numbers, depending on the type of list set
u All calls
– answered calls
– unanswered calls
u Missed calls
– unanswered calls
Multiple calls from the same number will be stored once in the list of missed calls
(the latest call). The number of calls from this number is shown in brackets after the
entry.
Multiple calls from the same number are stored several times in the list of answered
calls.
58
Gigaset A580 IP / US English / A31008-xxxx-xxxx-x-xxxx / directories_charges.fm / 07.07.2010
Using lists
Please note
u Only calls to the receive numbers assigned to your handset are stored in the
Calls list (£ Page 122).
If no receive numbers are assigned, all calls will be stored in the Calls list for all
handsets.
u Missed calls are not stored in the Calls list if they were taken on another phone
registered with the same VoIP access data.
The Calls list is displayed as follows:
Calls List:
Ç
U
02+03
1
2
OK
1 Number of new entries
2 Number of old, read entries
Setting the Calls list type
¢ Settings ¢ Base ¢ Calls List Type
Missed Calls / All Calls
Select and press §OK§ (‰ = on).
a
Press and hold (idle status).
The Calls list entries are retained when you change the list type.
§Menu§
Open the Calls list
Version 8, 03.09.2008
f ¢ Calls List 01+02
Select and press §OK§.
q
Select entry.
The last incoming call is displayed in the Calls list.
59
Gigaset A580 IP / US English / A31008-xxxx-xxxx-x-xxxx / directories_charges.fm / 07.07.2010
Using lists
List entry
Example of a list entry:
New Call
01/02
1234567890
Ç
10.10.08
12:14
U Menu
u Status of entry
New Call: new missed call.
Old Call: entry already read.
Call recv.: call answered (in list type All Calls).
u Entry number
01/02 means e.g. first new entry of a total of two new entries.
u Number or name of the caller (the number is always stored in the list with the
area code)
u Call date and time (if set, £ Page 78).
Managing entries in the Calls list
Version 8, 03.09.2008
Prerequisite:
You have opened the Calls list and selected an entry.
§Menu§
Press the Display key.
The following functions can be selected with q:
Delete Entry
Delete selected entry.
Copy to Directory
Copy a displayed number to the directory.
Show Name
VoIP:
If a URI was received and stored for a VoIP call, this will be shown. The URI is
dialed if you press the Talk key c. The URI is not entered on the Last Number
Redial list.
Fixed line network: £ "Displaying CID information", Page 61.
Show Connection
Display the name of the connection (fixed line network/VoIP account), for which
the call was received.
Delete List
Delete complete list.
60
Gigaset A580 IP / US English / A31008-xxxx-xxxx-x-xxxx / directories_charges.fm / 07.07.2010
Using lists
Displaying CID information
If you have CID, you can display the name and town/city that is registered with your
network provider for this number.
You have selected a list entry.
§Menu§ ¢ Show Name
If the name and town/city are not shown, it means that the caller has not requested
Caller ID or that Caller ID has been withheld.
Press §OK§ to return to the list.
Selecting from the Calls list
f ¢ Calls List 01+02
q
Select entry.
c
Briefly press/press and hold the Talk key. The number is dialed using
the selected connection type (£ Page 38).
Version 8, 03.09.2008
Please note
Store your own area code on your phone ( £ Page 87, Page 124) so that the area
code is automatically withheld during local calls on the fixed line network.
61
Gigaset A580 IP / US English / A31008-xxxx-xxxx-x-xxxx / directories_charges.fm / 07.07.2010
Using the directory
Using the directory
You can save up to 150 entries in your directory (number dependent on the number
of individual entries).
You can create a personalized directory for your own individual handset. However,
you can send the list or individual entries to other handsets £ Page 65.
Please note
For quick access to a number from the directory (shortcut), you can assign the
number to a key (£ Page 64).
In the directory you can save numbers and corresponding names.
¤ With the handset in idle status, open the directory by pressing the s key.
Entry length
Number:
Name:
maximum 32 digits
maximum 16 characters
Please note
Some VoIP providers do not support local calls for calls to the fixed line network.
In this case, always enter the fixed line number with the area code in your directory. Alternately, you can also use the Web configurator to define an area code,
which is automatically prefixed to all numbers that are dialed via VoIP without an
area code (£ Page 124).
Please note that (depending on the fixed line network provider), when local calls
are made via the fixed line network the number cannot be dialed with an area
code.
Saving the first number in the directory
Version 8, 03.09.2008
s
Open the directory.
The display shows Dir. empty New entry?.
§OK§
Press the Display key.
~
Enter the number and press §OK§.
~
Enter the name and press §OK§.
62
Gigaset A580 IP / US English / A31008-xxxx-xxxx-x-xxxx / directories_charges.fm / 07.07.2010
Using the directory
Storing a number in the directory
s ¢ §Menu§ ¢ New Entry
~
Enter the number and press §OK§.
~
Enter the name and press §OK§.
Please note
£
u For information on entering IP addresses, Page 40.
u To dial a number using a certain line connection each time, you can add the rel-
evant line suffix to the number in question (Page 38).
u You can use the Web configurator to save the directory to a file on your PC,
where it can be edited and then sent back to the handset (£ Page 136). Or you
can transfer Outlook contacts from the PC to the handset's directory.
Order of directory entries
The directory entries are usually sorted in alphabetical order. Spaces and digits take
first priority. The sort order is as follows:
§§1§§ Space
§§2§§ Digits (0–9)
§§3§§ Letters (alphabetical)
§§4§§ Other characters
To work round the alphabetical order of the entries, insert a space or a digit in front
of the name. These entries will then move to the beginning of the directory. Names
that you have prefixed with an asterisk will move to the end of the directory.
Selecting a directory entry
s
Open the directory.
You have the following options:
u Use s to scroll through the entries until the required name is selected.
u Enter the first character of the name and scroll to the entry using s if required.
Dialing with the directory
s ¢ s (Select entry).
c
Briefly press/press and hold the Talk key. The number is dialed using
the selected connection type (£ Page 38).
Version 8, 03.09.2008
Please note
You can only dial IP addresses via VoIP.
63
Gigaset A580 IP / US English / A31008-xxxx-xxxx-x-xxxx / directories_charges.fm / 07.07.2010
Using the directory
Managing directory entries
s ¢ s (Select entry).
Editing entries
§Menu§
~
~
¢ Edit Entry
Edit the number if required, and press §OK§.
Edit the name if required, and press §OK§.
Using other functions
§Menu§
Press the Display key.
The following functions can be selected with q:
Use Number
Save or modify a saved number and then dial with c or save as a new entry;
to do so, press §Menu§ ¢ Copy to phonebook ¢ §OK§ after the number appears
on the display.
Delete Entry
Delete selected entry.
Send Entry
Send a single entry to a handset (£ Page 65).
Delete List
Delete all directory entries.
Send List
Send complete list to a handset (£ Page 65).
Shortcut
Assign the phone number of the current entry to a number key as a shortcut
(Shortcut key).
Using Shortcut keys
Version 8, 03.09.2008
You can assign phone numbers from the directory to number keys on your handset
( £ Shortcut, Page 64). Number keys to which phone numbers are assigned are
known as Shortcut keys.
¤ Press and hold the required Shortcut key.
If there is a valid line suffix at the end of the number in the directory (e.g.: #1), the
number will be dialed via the line belonging to the suffix (£ Page 108).
The number is dialed via the default connection. Exception: A dialing plan has been
defined for the number (£ Page 125).
64
Gigaset A580 IP / US English / A31008-xxxx-xxxx-x-xxxx / directories_charges.fm / 07.07.2010
Using the directory
Transferring the directory to another handset
Prerequisites:
u The sending and receiving handsets must both be registered to the same base
station.
u The other handset and the base station can send and receive directory entries.
s
s
¢ s (Select entry) ¢ §Menu§ (Open menu) ¢ Send Entry / Send List
Select the internal number of the receiving handset and press §OK§.
Successful transmission is confirmed by the message Entry copied. You can transfer several individual entries one after the other by responding §OK§ to the Next
entry? prompt.
Please note
u Entries with identical numbers are not overwritten on the receiving handset.
u The transfer is canceled if the phone rings or if the memory of the receiving
handset is full.
Copying a displayed number to the directory
You can copy numbers displayed in a list, e.g. the Calls list or Last Number Redial list,
to the directory.
If you have CID, the first 16 characters of the transmitted name are copied to the
Enter Name line.
A number is displayed:
§Menu§ ¢ Copy to phonebook
¤ Complete the entry, £ Page 63.
Copying a number from the directory
Version 8, 03.09.2008
There are many operating situations in which you can open the directory, e.g. to
copy a number. Your handset need not be in idle status.
s
Open the directory.
q
Select entry.
§Menu§
Press the Display key.
Select function with q.
65
Gigaset A580 IP / US English / A31008-xxxx-xxxx-x-xxxx / T-NetBox_SAG-registration.fm / 07.07.2010
Using the network mailbox
Using the network mailbox
Some fixed network providers and VoIP providers offer answer machines on the
network – these are known as network mailboxes.
Each network mailbox accepts incoming calls made via the corresponding line
(fixed line network or corresponding VoIP phone number). To record all calls, you
should therefore set up network mailboxes for both the fixed line network and for
each of your VoIP connections.
ú You can activate/deactivate the network mailboxes for your VoIP connections using
the Web configurator. To do this, you only need the network mailbox phone
number.
For information activating/deactivating network mailboxes via the Web configurator and to change their assigned numbers, £ Page 127.
ú You need to have requested the network mailbox for your fixed line network connection from your fixed line network provider. You can store the phone number for
the fixed line network mailbox in the Web configurator on the base station
(£ Page 127).
You cannot activate/deactivate the network mailbox for the fixed line network connection via the Web configurator. For activating/deactivating the network mailbox
for the fixed line network connection please refer to the fixed line network provider's information.
Please note
u For many VoIP network mailboxes, the phone number is automatically saved
on the base station when the general VoIP provider data is downloaded.
u If you have registered a Gigaset C47H, S67H or S68H handset to your base sta-
tion, you can also enter and activate the network mailbox via this handset. For
further information on this, read the user guide for the Gigaset C470 IP or S675
IP on the Internet.
Configuring the network mailbox for fast access
With fast access you can dial a network mailbox directly.
Version 8, 03.09.2008
Assigning key 1 of the handset, changing assignments
The setting for fast access is handset-specific. You can assign a different mailbox to
key on each registered handset.
No mailbox is preconfigured for fast access in the default settings.
Prerequisites:
u At least one receive number is assigned to the handset.
u The corresponding network mailbox has been entered and activated for at least
one of the receive numbers on the handset.
Fast access has not yet been set on the handset:
Press and hold key .
66
Gigaset A580 IP / US English / A31008-xxxx-xxxx-x-xxxx / T-NetBox_SAG-registration.fm / 07.07.2010
Using the network mailbox
Or:
§Menu§
¢ Voice Mail ¢ Set Key 1
Select and press §OK§.
s
Select network mailbox and press §OK§ ( ‰ = on).
The selection includes the network mailboxes that belong to a VoIP/fixed line network connection and whose phone number is assigned to the handset as a receive
number. Net AM: xxx where xxx is replaced by the standard name in the connection (IP1 to IP6, Fixed Line).
If a number is already saved to the base station for the selected network mailbox,
fast access is activated.
a
Press and hold (idle status).
If no number has been saved for the network mailbox the message Not possible! is
displayed. You then have to first enter the mailbox number using the Web configurator (£ Page 127).
Please note
You can only assign fast access to one mailbox.
However, you can also call the network mailbox assigned to a handset's receive
numbers directly via the Message key (£ Page 67).
Calling the network mailbox and listening to messages
Press and hold.
If you have set a network mailbox for fast access you will be connected directly to
this network mailbox (external call).
d
If necessary, press the Handsfree key.
You will hear the answer machine announcement.
Listening to messages on the network mailbox
Under the Message key f you will find a list for each network mailbox that fulfills
the following requirements:
u The corresponding connection is assigned to the handset as a receive number.
u The network mailbox phone number is saved on the base station.
u The network mailbox is on (activated £ Page 127).
Version 8, 03.09.2008
You can use the list to call the network mailbox directly and listen to the messages.
67
Gigaset A580 IP / US English / A31008-xxxx-xxxx-x-xxxx / T-NetBox_SAG-registration.fm / 07.07.2010
Using the network mailbox
When you press the Message key f, the following is displayed (example):
1
Net AM : IP1
Ç
U
[2]
2
OK
1 Network mailbox name. Net AM IP1, ..., Net AM IP6 or Net AM Fixed Line isdisplayed. IP1
... are the standard names of the corresponding connections. The default names are
always displayed regardless of which connection name you specified when configuring
via the Web configurator.
2 The number of new messages is displayed (2 = two new messages). If there are no new
messages, (0) is displayed. The number of messages stored in the network mailbox is not
displayed.
Displaying new messages on the handset
If a new message is present on one of the network mailboxes that is assigned to the
handset via its receive number, the Message key f flashes.
Calling the network mailbox and checking messages
f
Press the Message key.
Net AM Fixed Line / Net AM IP1 / ... / Net AM IP6
Select the network mailbox and press §OK§.
You are connected directly to the network mailbox (external call) and hear its
announcement.
Please note
u The network mailbox is automatically called via the corresponding connection.
An area code predefined for your phone is not prefixed.
u After the call, the number of new messages on the handset returns to (0), even
if not all or no new messages have been listened to.
Messages can generally be played back using your handset keypad (digit codes).
Listen to the announcement.
Version 8, 03.09.2008
ú You must define how the digit codes for VoIP should be converted to DTMF signals
and transmitted. The Web configurator is used to make this setting £ Page 128.
Ask your VoIP provider which type of DTMF transmission it supports.
68
Gigaset A580 IP / US English / A31008-xxxx-xxxx-x-xxxx / T-NetBox_SAG-registration.fm / 07.07.2010
ECO DECT: Conserving energy
ECO DECT: Conserving energy
The base station of your phone is an ECO DECT base station, this means that:
u The base station and the charging cradle consume less power because they are
equipped with a power-saving electrical power adaptor.
u The reduction of the handset's transmission power is dependent on the handset's proximity to the base station.
u The base station can also be switched to the Eco mode. Eco mode reduces the
transmission power and the power consumption of the base station further.
Eco mode means:
80% reduction of the transmission power in standby mode and when making
calls. Eco mode is available when the handset(s) and the base station are close
together, e.g. when the phone is being used in an office.
The setting can be made on the handset.
Activating/deactivating Eco mode
§Menu§
¢ Settings ¢ Base ¢ Additional Features
Eco mode
Select and press §OK§ (‰ = on).
Reception display
Screen icon
Ò Ñ i Ð
| (flashes)
Reception strength:
– poor to good
– no reception
Please
Version 8, 03.09.2008
u Activating Eco mode reduces the range of the base station.
69
Gigaset A580 IP / US English / A31008-xxxx-xxxx-x-xxxx / T-NetBox_SAG-registration.fm / 07.07.2010
Setting the alarm clock
Setting the alarm clock
Prerequisite: The date and time have already been set (£ Page 14).
Activating/deactivating the alarm clock
§Menu§ ¢ Alarm Clock
Activation Select and press §OK§ (‰ = on).
After you activate the alarm clock, the menu for setting the wake-up time opens
automatically.
~
Enter the wake-up time in 4 digits (hours and minutes) and press §OK§.
a
Press and hold (idle status).
If the alarm clock is set, the wake-up time appears with the ¼ icon in the display
instead of the date.
Changing the wake-up time
§Menu§
~
¢ Alarm Clock ¢ Wake up time
a
Enter the 4-digit wake-up time (in hours and minutes) and then press
§OK§.
Press and hold (idle status).
When the alarm clock rings…
A wake-up call with the selected ringer melody is signaled on the handset
(£ Page 83). The wake-up call lasts for a maximum of 5 minutes. If no key is
pressed, the wake-up call is repeated twice at five minute intervals and then turned
off for 24 hours.
During a call, the wake-up call is only signaled by a short tone.
Alarm repeated after 5 minutes (snooze mode)
§Snooze§
Press the Display key or any other key (apart from the left Display key).
If you press §Snooze§ three times, the alarm clock switches off for 24 hours.
Turning off the alarm clock for 24 hours
Version 8, 03.09.2008
§Off§
70
Press the Display key.
Gigaset A580 IP / US English / A31008-xxxx-xxxx-x-xxxx / T-NetBox_SAG-registration.fm / 07.07.2010
Using multiples handsets
Using multiples handsets
Registering handsets
You can register up to six handsets to your base station.
When you register a new Gigaset handset, the base station transfers the Gigaset.net
entry for the Gigaset.net directory (£ Page 48) to its local directory to enable you
to use the Gigaset.net directory on your new handset.
Prerequisite: The handset can send and receive directory entries. See the handset’s
user guide for further information.
Successful registration is acknowledged with the message Data Transfer x entries
rec for this reason.
Please note
u If several handsets are registered on your base station, you can simultaneously
make two calls via the Internet and one via the fixed line network. Up to two
additional internal connections are also possible.
u Selecting the connection via the Talk key (£ Page 38) is not supported on GAP
handsets. This means that if you enter a number without a line suffix and without defining a dialing plan for the phone number it will be dialed via the default
connection (£ Page 87).
u After registration, all the phone numbers for the phone will be assigned to the
handset as receive numbers. It will use the fixed line network number and the
first VoIP number in the configuration as send numbers.
For information on changing the assignments, £ Page 122.
Registering another Gigaset A58H handset on the
Gigaset A580 IP
Before you can use your handset, you must register it to the base station.
You must initiate handset registration on the handset and on the base station.
The handset will return to idle status if registration was successful. The handset's
internal name is shown in the display, e.g. INT 1. If it does not appear, repeat the
procedure. Registration can take up to one minute.
¤ On the handset: Select §Menu§ ¢ Settings ¢ Handset ¢ Register Handset
Version 8, 03.09.2008
and press §OK§.
¤ Enter the system PIN of the base station (the default is 0000) and press §OK§.
Handset is registering flashes on the display.
¤ Within the next 60 seconds press and hold (for approx. 3 seconds) the
Registration/Paging key (£ Page 2) on the base station.
The handset is assigned the lowest available internal number (1-6). The internal
number appears in the display after registration, e.g. INT 2. This means that the
internal number 2 has been assigned to the handset.
71
Gigaset A580 IP / US English / A31008-xxxx-xxxx-x-xxxx / T-NetBox_SAG-registration.fm / 07.07.2010
Using multiples handsets
Please note
If six handsets are already registered to the base station, there are two options:
u The handset with the internal number 6 is in idle status: the handset you wish
to register is assigned the number 6. The handset that was previously number
6 is de-registered.
u The handset with the internal number 6 is being used: the handset you wish to
register cannot be registered.
Registering other handsets on the Gigaset A580 IP
You can register other Gigaset handsets and handsets for other devices with GAP
functionality as follows.
¤ Start the registration procedure on the handset in accordance with the handset's operating instructions.
¤ Press and hold (for approx. 3 seconds) the Registration/Paging key (£ Page 2)
on the base station.
De-registering handsets
Version 8, 03.09.2008
You can de-register any registered handset from any registered Gigaset A58H
handset.
ÑÑ
Open list of internal participants.
The handset which you are using is marked with <.
q
Select the handset to be de-registered.
§Menu§
Press the Display key.
De-register Handset
Select and press §OK§.
~
Enter the system PIN of the base station (the default is 0000) and press
§OK§.
De-register handset?
Press §OK§, to confirm the prompt.
a
Press and hold (idle status).
The handset is de-registered immediately, even if it is not in idle status.
72
Gigaset A580 IP / US English / A31008-xxxx-xxxx-x-xxxx / T-NetBox_SAG-registration.fm / 07.07.2010
Using multiples handsets
Locating a handset ("paging")
You can locate your handset using the base station.
¤ Briefly press the Registration/Paging key on the base station (£ Page 2).
All handsets will ring simultaneously ("paging"), even if ringer melodies are
switched off.
The current (local) IP address for the base station appears in the handset displays.
Example:
Å
Paging
192.168.0.100
Ending paging
¤ Briefly press the Registration/Paging key on the base station (£ Page 2).
Or
¤ Press the Talk key c or End Call key a on any handset.
Or
¤ Do not press any key on the base station or handset:
After approx. 30 seconds, the paging call will end automatically.
Please note
u An incoming external call will not interrupt the paging process.
u If there is an internal connection between the two handsets, paging is not pos-
sible.
Changing a handset's internal number
Version 8, 03.09.2008
A handset is automatically assigned the lowest free number when it is registered.
In the list of internal participants, the handsets are sorted according to their internal
number.
You can change the internal number of all registered handsets (1–6). The numbers
1-6 can only be assigned once each.
k
Open the list of registered handsets.
§Menu§
Press the Display key.
Edit Handset Number
Select and press §OK§.
q
Select handset.
~
Enter the new internal number (1–6). The handset's old number is overwritten.
q~
If necessary, select another handset and change its number.
73
Gigaset A580 IP / US English / A31008-xxxx-xxxx-x-xxxx / T-NetBox_SAG-registration.fm / 07.07.2010
Using multiples handsets
After all the changes are completed:
§OK§
Press the Display key to save the input.
a
Press and hold (idle status).
You will hear the error tone if an internal number has been assigned twice.
¤ Repeat the procedure with a free number.
Changing the name of a handset
The names "INT 1", "INT 2", etc. are assigned automatically on registration. You can
change these names. The changed name is displayed in every handset's list.
k
Open the list of registered handsets.
q
Select handset.
§Menu§
Press the Display key.
Change Handset Name
Select and press §OK§. The handset's current name is displayed.
X
Delete the old name if necessary.
~
Enter new name (maximum 10 characters) and press §OK§.
a
Press and hold (idle status).
Please note
If you delete the current handset name with X and then press §OK§ without entering a new name, the handset will automatically be assigned the default name
"INT x" (x= internal number).
Making internal calls
Internal calls to other handsets registered on the same base station are free.
Calling a specific handset
k
s
c
Or:
k
~
Open the list of registered handsets.
Select handset.
Press the Talk key.
Open the list of registered handsets.
Enter the internal handset number (1–6).
Version 8, 03.09.2008
Calling all handsets ("group call")
k
*
Or:
k
Call All
c
74
Open the list of registered handsets.
Press the Asterisk key. All handsets are called.
Open the list of registered handsets.
Select.
Press the Talk key. All handsets are called.
Gigaset A580 IP / US English / A31008-xxxx-xxxx-x-xxxx / T-NetBox_SAG-registration.fm / 07.07.2010
Using multiples handsets
Ending a call
a
Press the End Call key.
Please note
u You can reject an internal call by pressing the End Call key a. Other handsets
will continue to signal an internal "group call".
u If the called handset is not answered, the busy tone sounds after approx.
3 minutes.
Transferring a call to another handset
You can forward (connect) an external call, made via the fixed line network or VoIP,
to another handset.
Prerequisite: You are conducting an external call.
k
Open the list of registered handsets.
s
Select handset or Call all.
§OK§ / c Press the Display key or the Talk key.
Or:
k
Open the list of registered handsets.
~
Enter the internal number of the handset.
The external participant hears music on hold if activated (£ Page 87).
When the internal participant answers:
¤ If necessary announce the external call.
a
Press the End Call key.
The external call is transferred to the other handset.
If the internal participant does not respond or is busy:
§Menu§ ¢ Back
Select and press §OK§.
You are reconnected with the external participant.
Version 8, 03.09.2008
You can also press the End Call key a when forwarding a call before the internal
participant picks up the call.
Then, if the internal participant does not answer or the line is busy, the call will automatically return to you (the display will show Recall).
75
Gigaset A580 IP / US English / A31008-xxxx-xxxx-x-xxxx / T-NetBox_SAG-registration.fm / 07.07.2010
Using multiples handsets
Initiating internal consultation call, conference call
You are talking to an external participant (via fixed line network or VoIP) and can
call an internal participant at the same time to hold a consultation call.
Prerequisite: You are conducting an external call.
k
Open the list of registered handsets.
s
Select handset or Call all.
§OK§ / c Press the Display key or the Talk key.
Or:
k
Open the list of registered handsets.
~
Enter the internal number of the handset.
The external participant hears music on hold if activated (£ Page 87).
When an internal participant answers you can speak to them.
You have the following options:
Ending a consultation call
§Menu§
¢ Back
Select and press §OK§.
You are reconnected with the external participant.
Initiating a conference call
§Menu§
¢ Conference Call
Select and press §OK§.
You are in a three-way conference call with the external participant and the internal
participant.
During an internal consultation/conference call
Version 8, 03.09.2008
If the internal participant who has been called ends the call (press End Call key a),
you will be reconnected with the external participant.
If you press the End Call key a, the external call will be transferred to the internal
participant ( £ „Transferring a call to another handset“, Page 75).
76
Gigaset A580 IP / US English / A31008-xxxx-xxxx-x-xxxx / T-NetBox_SAG-registration.fm / 07.07.2010
Using multiples handsets
Accepting/rejecting call waiting during an internal call
If you receive an external call during an internal call, you will hear the call waiting
tone (short tone). With Caller ID, the caller's number or name will appear in the display.
Ending an internal call, accepting an external call
§Menu§
¢ Accept Call Waiting
Select and press §OK§.
The internal call is ended. You are connected to the external caller.
Rejecting an external call (only possible for calls to your fixed line network
number)
§Menu§
¢ Reject Call Waiting
Version 8, 03.09.2008
Select and press §OK§.
The call waiting tone is turned off. You remain connected with the internal participant. The ringer melody can still be heard on the other registered handsets.
77
Gigaset A580 IP / US English / A31008-xxxx-xxxx-x-xxxx / settings_bs_hs_pabx.fm / 07.07.2010
Handset settings
Handset settings
Your handset is preconfigured, but you can change the settings to suit your individual requirements.
Changing the date and time
Please note
The address of a time server on the Internet is stored on your telephone. The date
and time are taken from this time server provided that the base station is connected to the Internet and synchronization with the time server is activated
(£ Page 141). Manual settings are overwritten in this case.
To manually change the time, open the input field with:
§Menu§ ¢ Settings ¢ Date/Time
Select and press §OK§.
Enter Date: Enter the month, day and year in 8-digit format,
e.g. Q Q2 Q QO for 10/1/2009.
Enter time: Enter the hours and minutes in 4-digit format,
e.g. Q M 5 for 07:15 AM.
Press the Display key am/pm to switch between am and pm.
§OK§
Press the Display key.
Changing the display language
You can view the display texts in different languages.
§Menu§ ¢ Settings ¢ Handset ¢ Language
Select and press §OK§.
The current language is indicated by a ‰.
q
Select a language and press §OK§.
a
Press and hold (idle status).
If you accidentally choose a language you do not understand:
§Menu§ M 3 2
Version 8, 03.09.2008
q
78
Press keys in sequence.
Select the correct language and press §OK§.
Gigaset A580 IP / US English / A31008-xxxx-xxxx-x-xxxx / settings_bs_hs_pabx.fm / 07.07.2010
Handset settings
Parts of the menu are not displayed in the language selected ...
... and three or more handsets are registered on your base station. A language that
is not one of the standard languages for the base station (= English (North America), Français (Amér. du Nord), Español) is set on at least three handsets.
Cause: Some display texts are only stored for the standard languages English,
Français and Español on your base station. In addition, these display texts can be
stored in the base station in two other languages or in another language for two
different types of Gigaset handsets. When selecting the language on the handset,
these texts are downloaded to the base station from the Internet. If another nonstandard language is set on a third handset, then display texts appear in one of the
standard languages on this handset.
Both the non-standard languages, which are set on the handsets with the lowest
internal numbers, are stored on the base station.
If there is no further handset registered on the base station whose type and language setting correspond to an additionally loaded language, then the memory
is freed up. If necessary, the language set for another registered handset is loaded
onto the base station.
Activating/deactivating the screensaver
You can have a screensaver displayed on the handset. The screensaver replaces the
display screen when the handset is in idle status. It hides the date, time and internal
name.
You have the following options:
No Screensaver
The screensaver is deactivated. The idle display status (£ Page 1) is displayed.
Digital Clock
Approx. 10 seconds after the handset returns to idle status, a digital clock
appears on the display.
Version 8, 03.09.2008
10:33
79
Gigaset A580 IP / US English / A31008-xxxx-xxxx-x-xxxx / settings_bs_hs_pabx.fm / 07.07.2010
Handset settings
Info Services
Approx. 10 seconds after the handset returns to idle status, a digital clock and (if
available) text information from the Internet appear in the display (e.g. weather
reports, RSS feeds). The text information is displayed below the clock as a scrolling message.
10:33
IP info
10:33
IP info
10:33
P info
IP
The text information is initially displayed once. Then the digital clock is displayed
by itself.
The text information is displayed again when:
– New information is received
– You remove the handset from the charging cradle or place it in the charging
cradle
– You press any key on the handset.
The display backlight switches itself on.
The text information can be made up of separate pieces of information
(£ Page 135). The weather report is preset.
Please note
u If you have set the screensaver Info Services, and you want to make a call or
change settings on the handset, you may, if necessary, need to repeat the first
key press (e.g. press the §Menu§ key twice to open the main menu). The first key
press activates the display of text information.
u The screensaver is not displayed in certain situations, e.g. during a call or if the
handset is de-registered.
u If the screensaver conceals the display, press the End Call key a briefly to
show the idle display with time and date.
Setting the screensaver
§Menu§
¢ Settings ¢ Handset ¢ Display ¢ Screensaver
Version 8, 03.09.2008
The current setting is displayed.
No Screensaver / Digital Clock / Info Services
Select and press §OK§. A brief preview of the selected screensaver is displayed. The selection is marked with ‰.
a
Press and hold (idle status).
The selected screensaver is displayed after approx. 10 seconds.
80
Gigaset A580 IP / US English / A31008-xxxx-xxxx-x-xxxx / settings_bs_hs_pabx.fm / 07.07.2010
Handset settings
Quickly accessing functions
The §z§ function (open the Last Number Redial list) is preset on the left Display key
of your handset. You can change the configuration, i.e. assign a different function
to the Display key.
To start the function, you then simply need to press the button.
Changing the assignment of the Display key
¤ When the handset is in idle status, press and hold the left Display key.
¤ Select a function with the Control key q and press §OK§.
The following features are available:
u INT (§INT§)
Open the list of internal participants with the k key.
u Fixed Line call (§Phone§)
Opens the predialing option for making a call via the fixed line network.
u IP call (§IP§)
Opens the predialing option for making a call via VoIP.
Activating/deactivating auto answer
If you activate this function, when you receive a call you can simply lift the handset
out of the charging cradle without having to press the Talk key c.
§Menu§ ¢ Settings ¢ Handset
Auto Answer
Select and press §OK§ (‰ = on).
a
Press and hold (idle status).
Changing the handsfree/earpiece volume
You can adjust the volume for handsfree talking to one of five settings (1-5, e.g.
volume 3 = Š) and the earpiece volume to one of three (1-3, e.g. volume 2 = ‰).
Version 8, 03.09.2008
Setting the volume during a call
The setting applies to the current mode (earpiece or handsfree).
You are conducting an external call.
t
Press up on the Control key.
q
Set the volume.
The setting will automatically be saved after approx. 3 seconds, if not then press the
display key §OK§.
If t is assigned with another function:
§Menu§
Open menu.
Volume
Select and press §OK§.
q
Set the volume.
81
Gigaset A580 IP / US English / A31008-xxxx-xxxx-x-xxxx / settings_bs_hs_pabx.fm / 07.07.2010
Handset settings
Adjusting the volume via the menu
t
Briefly press up on the Control key.
Call VolumeSelect and press §OK§.
Earpiece Volume / Handsfree Volume
Select and press §OK§.
q
Adjust the volume and press §OK§.
a
Press and hold (idle status).
Please note
You can also adjust the volume via §Menu§ £ Settings £ Audio Settings
£ Call Volume.
Setting ringers
u Volume:
You can choose between five volumes (1–5; e.g. volume 3 = ˆ) and the
"crescendo" ring (6; volume increases with each ring = ‡).
u Ringer melodies:
You can select various ringers from a list of pre-loaded ringer melodies. The first
three melodies are "classical" ringers.
You can set different ringer melodies for the following functions:
u External Calls: for external calls
u Internal Calls: for internal calls
u Alarm Clock: for the alarm clock
Setting the ringer volume
The ringer volume is the same for all types of ring.
When the handset is in idle status:
t
Briefly press up on the Control key.
Ringer Volume
Select and press §OK§.
q
Adjust the volume and press §OK§.
Version 8, 03.09.2008
Please note
You can also adjust the ringer volume via §Menu§ £ Settings £ Audio Settings
£ Ringer Volume.
82
Gigaset A580 IP / US English / A31008-xxxx-xxxx-x-xxxx / settings_bs_hs_pabx.fm / 07.07.2010
Handset settings
Setting the ringer melody
Set different ringer melodies for external calls, internal calls and the alarm clock.
t
Briefly press up on the Control key.
Ringer Melody
Select and press §OK§.
External Calls / Internal Calls / Alarm Clock
Select and press §OK§.
q
Select melody (‰ = on) and press §OK§.
a
Press and hold (idle status).
Please note
You can also adjust the ringer melody via §Menu§ £ Settings £ Audio Settings
£ Ringer Melody.
Activating/deactivating the ringer
You can deactivate the ringer on your handset before you answer a call or when the
handset is in idle status; the ringer can be deactivated permanently or just for the
current call. The ringer cannot be re-activated while an external call is in progress.
Deactivating the ringer permanently
*
Press and hold the Asterisk key until the Ú icon appears in the display.
Reactivating the ringer
*
Press and hold the Asterisk key in idle status.
Deactivating the ringer for the current call
§Menu§
Version 8, 03.09.2008
Silent
Open menu.
Select and press §OK§.
83
Gigaset A580 IP / US English / A31008-xxxx-xxxx-x-xxxx / settings_bs_hs_pabx.fm / 07.07.2010
Handset settings
Activating/deactivating advisory tones
Your handset uses various advisory tones to tell you about different activities and
statuses.
u Key click: every key press is confirmed.
u Confirmation tone (ascending tone sequence): at the end of an entry/setting
and when a new entry arrives in the Calls list
u Error tone (descending tone sequence): when you make an incorrect entry
u Menu end tone: when scrolling to the end of a menu
You cannot deactivate the confirmation tone for placing the handset in the base
station.
t
Briefly press up on the Control key.
Advisory Tones
Select and press §OK§ (‰ = on).
a
Press and hold (idle status).
Setting the battery low tone
The battery warning tone advises that the batteries need to be charged. You can
activate it, deactivate it or decide whether or not it should sound during a call.
t
Briefly press up on the Control key.
Battery LowSelect and press §OK§.
On / Off / During Call
Select and press §OK§ (‰ = on).
a
Press and hold (idle status).
Restoring the handset default settings
Version 8, 03.09.2008
Each individual handset setting is reset – in particular the language, display, volume, ringer melodies and alarm clock settings (£ Page 78). The Last Number
Redial list is cleared.
This will not affect entries in the directory, Calls list or the handset's registration to
the base station.
§Menu§ ¢ Settings ¢ Handset ¢ Reset Handset
§OK§
Press the Display key.
You can cancel the factory reset by pressing a or the Display key .
a
Press and hold (idle status).
84
Gigaset A580 IP / US English / A31008-xxxx-xxxx-x-xxxx / settings_bs_hs_pabx.fm / 07.07.2010
Setting the base station via the handset
Setting the base station via the handset
The base station settings are performed using a registered Gigaset A58H handset.
Some settings can also be carried out via the base station Web configurator. The ú icon identifies functions that you can perform via the Web configurator.
Protecting against unauthorized access
Protect the system settings of the base station with a PIN known only to yourself.
The system PIN must be entered, for example, when activating and deactivating the
handset, when changing the VoIP settings, with firmware updates, when resetting
the base station default settings and for launching the Web configurator.
Changing the system PIN
You can change the 4-digit system PIN set on the base station (default setting:
0000) to a 4-digit PIN known only by you.
§Menu§ ¢ Settings ¢ Base ¢ System PIN
~
Enter the current system PIN and press §OK§.
~
Enter your new system PIN and press §OK§.
~
Now re-enter the new system PIN and press §OK§.
For security reasons, "****" is displayed instead of the system PIN.
a
Press and hold (idle status).
Resetting the system PIN
Version 8, 03.09.2008
If you have forgotten your system PIN, you can reset the base station to the original
PIN 0000. To do this, you must reset your base station using the key on the base station ( £ Resetting the base station using a key on the base station on Page 86).
Please note that this will restore all other base station settings too (£ Page 86).
85
Gigaset A580 IP / US English / A31008-xxxx-xxxx-x-xxxx / settings_bs_hs_pabx.fm / 07.07.2010
Setting the base station via the handset
Restoring the base station to the factory settings
Resetting the base station via the menu
Each individual setting is reset, in particular:
u VoIP settings such as VoIP provider and account data and DTMF settings
(£ Page 90, Page 107, Page 128)
u Settings for the local network (£ Page 92, Page 104)
u Default connection (£ Page 87)
u The names of the handsets (£ Page 74)
u Eco mode is deactivated (£ Page 69)
u PABX connection settings (£ Page 95)
Calls list is deleted.
The following are not reset:
u Date and time
u System PIN
The handsets are still registered.
§Menu§
~
§OK§
¢ Settings ¢ Base ¢ Base Reset
Enter the system PIN and press §OK§.
Press the display key to confirm.
Resetting the base station using a key on the base station
As with resetting the base station via the menu, all individual settings are reset. The
system PIN will also be reset to 0000 and only the handsets registered to the
base station at delivery are registered.
Please note
For further information about reregistering the handsets after resetting, where
applicable, £ Page 71.
¤ Remove the cable connections from the base station to the router (£ Page 20)
and fixed line network (£ Page 19).
¤ Remove the base station power adapter from the socket (£ Page 19).
¤ Press and hold the Registration/Paging key (£ Page 2).
¤ Plug the power adapter back into the electrical socket.
¤ Press and hold the Registration/Paging key (at least 10 sec.).
¤ Release the Registration/Paging key. The base station has now been reset.
Version 8, 03.09.2008
You will then need to "prepare to use" the base station again, i.e. re-establish the
cable connections to the fixed line network and the router and make the settings
for VoIP telephony (£ Page 21).
86
Gigaset A580 IP / US English / A31008-xxxx-xxxx-x-xxxx / settings_bs_hs_pabx.fm / 07.07.2010
Setting the base station via the handset
Activating/deactivating music on hold
¢ Settings ¢ Base
Music on hold
Select and press §OK§ to activate or deactivate the music on hold
(‰ = on).
§Menu§
Setting default connection
You can make settings according to whether you want to make calls via VoIP or the
fixed line network as standard.
Please note
The default connection is only relevant when dialing numbers that are not subject
to dialing plans (£ Page 125) and are entered without a line suffix (£ Page 38).
¢ Settings ¢ Base ¢ Telephony ¢ Default Line Type
IP / Fixed LineSelect and press §OK§ (‰ = on).
§Menu§
When making calls:
ú
¤ Briefly press the Talk key c to make a call via this default connection.
¤ Press and hold the Talk key c to make the call via the other connection type.
For information on making the setting on the Web configurator, £ Page 121.
Entering local and extra area codes
Use the following guidelines to make local calls (calls to the local fixed line network):
u Depending on the exchange, area codes are not dialed for local calls via your
fixed line network. However, all calls are stored in the Calls list with access codes.
To call back a caller using the Calls list, you must store the local area code in the
phone in whose area your phone is being used. If your phone is in a "multiple
area code" area, you must also enter the other area codes that belong to this
area as extra codes.
u With local calls via your VoIP connection the area code must also be dialed. If you
have stored your area code in the phone and activated the Predial area code for
local calls through VoIP option (£ Page 124), the area code entered is dialed
automatically when dialing numbers without an area code (e.g. when dialing
from the directory).
Version 8, 03.09.2008
ú For entering the area code with the Web configurator, £ Page 124.
87
Gigaset A580 IP / US English / A31008-xxxx-xxxx-x-xxxx / settings_bs_hs_pabx.fm / 07.07.2010
Setting the base station via the handset
Entering a local area code
¢ Settings ¢ Base ¢ Telephony
Area Code Select and press §OK§.
~
Enter a local area code (permitted characters (maximum 3) are "*", "#")
and press §OK§.
a
Press and hold (idle status).
§Menu§
Entering extra codes
§Menu§
¢ Settings ¢ Base ¢ Telephony
Extra Codes Select and press §OK§.
q
Select entry ("–––" = blank entry).
X
If necessary, delete an existing extra code.
~
Enter an extra code (permitted characters (maximum 3) are "*", "#") and
press §OK§.
Repeat the above steps until you have entered all the extra codes for your area. A
maximum of 5 extra codes can be stored.
a
Press and hold (idle status).
Updating the base station firmware
If necessary, you can update your base station firmware.
The firmware update is downloaded directly from the Internet by default.
The relevant Web page is preconfigured in your phone.
Prerequisite:
Version 8, 03.09.2008
The base station is in idle status, i.e.:
u No calls are being made via the fixed line network or VoIP.
u There is no internal connection between registered handsets or to GHC devices.
u No other handset has opened the base station menu.
88
Gigaset A580 IP / US English / A31008-xxxx-xxxx-x-xxxx / settings_bs_hs_pabx.fm / 07.07.2010
Setting the base station via the handset
Starting the firmware update manually
¢ Settings ¢ Base
Firmware Update
Select and press §OK§.
~
Enter the system PIN and press §OK§.
The base station is connected to the Internet.
§Yes§
Press the Display key to start the firmware update.
§Menu§
Please note
u The firmware update can last up to 3 minutes.
u When updating from the Internet, checks are made to ensure that no newer
version of the firmware exists. If this is not the case, the operation is terminated
and a message is issued to that effect.
Automatic firmware update
Your phone will check daily whether a more recent firmware version is available on
the Gigaset configuration server on the Internet. If this is the case, the message
New firmware available is displayed when the handset is in idle status, and the
Message key f flashes.
f
Press the Message key.
§Yes§
Press the Display key to confirm the prompt.
The firmware will be loaded onto your phone.
If you respond to the prompt with §No§, the handset changes to idle status. Your
phone will then remind you again about the firmware update at a later date (New
firmware available is displayed again). However, you can also carry out a firmware
update manually (£ Page 89).
Please note
If the telephone is not connected to the Internet at the time when the check for
new firmware is to be carried out (e.g. because the router is deactivated), the check
is carried out as soon as the phone is reconnected to the Internet.
Version 8, 03.09.2008
ú You can deactivate the automatic version check via the Web configurator
(£ Page 140).
89
Gigaset A580 IP / US English / A31008-xxxx-xxxx-x-xxxx / settings_bs_hs_pabx.fm / 07.07.2010
Making VoIP settings on the handset
Making VoIP settings on the handset
To use VoIP, you must set a few parameters for your phone.
You can make the following settings using your handset.
u Download the general access data for your VoIP provider from the Gigaset configuration server and store it on your phone.
u Enter your personal access data for your first VoIP account (first VoIP phone
number). You can configure the access data for five further VoIP accounts via the
phone's Web configurator.
u Set the phone's IP address in the LAN.
The connection wizard on your phone can help you make the settings.
ú You can set these and other parameters conveniently via the Web configurator on
a PC connected to your local network (£ Page 97).
Using the connection wizard
The connection wizard starts automatically when you set the handset and base station up for the first time, or when you try to connect to the Internet before making
the necessary settings.
You can also start the connection wizard via the menu:
§Menu§ ¢ Settings ¢ Base ¢ Telephony
Connection Wizard
Select and press §OK§.
~
Enter the system PIN and press §OK§.
For entering VoIP settings using the connection wizard, £ Page 21.
Changing settings without the connection wizard
You can change your provider's VoIP settings and the VoIP user data via the menu
without starting the connection wizard.
Version 8, 03.09.2008
Downloading your VoIP provider's settings
The general settings for various VoIP providers are available to download on the
Internet. The relevant Web page is preconfigured in your phone.
Prerequisite: Your phone is connected to the Internet.
§Menu§ ¢ Settings ¢ Base ¢ Telephony ¢ VoIP
~
Enter the system PIN and press §OK§.
Select VoIP Provider
Select and press §OK§.
The phone establishes a connection to the Internet.
q
Select country and press §OK§.
q
Select your VoIP provider and press §OK§.
Your VoIP provider data is downloaded and saved in your phone.
90
Gigaset A580 IP / US English / A31008-xxxx-xxxx-x-xxxx / settings_bs_hs_pabx.fm / 07.07.2010
Making VoIP settings on the handset
If only one provider is available, the countries and providers lists are not displayed.
Only the name of this provider will then appear in the display. To start the download, confirm with §OK§.
ú If your VoIP provider is not included in the list, you need to enter or adjust the general VoIP settings manually via your phone's Web configurator, £ Page 108.
Please note
If an error occurs during the download, an error message is displayed. You can find
possible messages and measures in the table on Page 143.
Automatic update for the VoIP provider settings
After the first download of the VoIP provider settings, your phone will check daily
whether a newer version of the file for your VoIP provider is available via the Internet on the Gigaset configuration server. If this is the case, the message New profile
available is displayed when the handset is in idle status, and the Message key f
flashes.
f
Press the Message key.
§Yes§
Press the Display key to confirm the prompt.
~
Enter the system PIN and press §OK§.
The new data for your VoIP provider will be downloaded and saved on the phone.
If you respond to the prompt with §No§, the display will not be repeated. The message New profile available will only be shown again if a newer version of the VoIP
settings than the one rejected is available.
Entering/changing VoIP user data
Version 8, 03.09.2008
You must complete the VoIP settings with your personal data. You will receive all
necessary data from your VoIP provider.
§Menu§ ¢ Settings ¢ Base ¢ Telephony ¢ VoIP
~
Enter the system PIN and press §OK§.
Username / Authentication Name / Authentication Password
Select and press §OK§ one after the other.
~
Enter/change the user data and press §OK§.
When making these entries, please remember the VoIP user data is
case sensitive. To enter text £ Page 155.
Enter the caller ID for your VoIP provider account as the Username. The Username
is usually identical to your Internet phone number (the first part of your SIP address
£ Page 111).
For Authentication Name and Authentication Password enter the providerdependent access data that has to be transferred by the phone to the SIP service at
registration.
Please note
A previously set password is not displayed.
91
Gigaset A580 IP / US English / A31008-xxxx-xxxx-x-xxxx / settings_bs_hs_pabx.fm / 07.07.2010
Making VoIP settings on the handset
Setting the phone's IP address in LAN
The base station requires an IP address in order to be "recognized" by the LAN (the
router).
The IP address can be assigned to the base station automatically (by the router) or
manually.
u If performed dynamically, the router's DHCP server automatically assigns the
base station an IP address. The base station's IP address can be changed according to router settings.
u If performed manually/statically, you assign the base station a static IP address.
This may be necessary depending on your network configuration.
ú For information on making the local network settings on the Web configurator,
£ Page 104.
Activating/deactivating dynamic assignment
¢ Settings ¢ Base ¢ Local Network
~
Enter the system PIN and press §OK§.
Dynamic IP address (‰ = on)
Select and press §OK§ to change the current settings.
If you deactivate dynamic assignment, you must set the IP address and subnet
mask of the base station, the default gateway and DNS server manually.
A corresponding message is displayed.
§Menu§
Please note
To assign the IP address dynamically, the DHCP server on the router must be activated. Please also read the user guide for your router.
Viewing/changing the base station IP address
You can only change the IP address if you have deactivated dynamic assignment.
192.168.2.2 is the default.
§Menu§ ¢ Settings ¢ Base ¢ Local Network
~
Enter the system PIN and press §OK§.
IP Address Select and press §OK§.
The current IP address is displayed.
~
If necessary, enter the IP address and press §OK§.
Version 8, 03.09.2008
For information on the IP address, please see Page 104 and the glossary on
Page 178.
92
Gigaset A580 IP / US English / A31008-xxxx-xxxx-x-xxxx / settings_bs_hs_pabx.fm / 07.07.2010
Making VoIP settings on the handset
Viewing/changing the subnet mask
You can only change the subnet mask if you have deactivated dynamic assignment.
255.255.255.0 is the default.
§Menu§ ¢ Settings ¢ Base ¢ Local Network
~
Enter the system PIN and press §OK§.
Subnet Mask
Select and press §OK§.
The current subnet mask is displayed.
~
If necessary, enter the subnet mask and press §OK§.
For information on the subnet mask, please see Page 104 and the glossary on
Page 182.
Viewing/changing the DNS server
Enter the IP address for the preferred DNS server. The DNS server (Domain Name
System) converts the symbolic name of a server (DNS name) into the public IP
address for the server when the connection is made.
You can specify your router's IP address here. The router forwards phone address
requests to its DNS server.
192.168.2.1 is the default.
§Menu§ ¢ Settings ¢ Base ¢ Local Network
~
Enter the system PIN and press §OK§.
DNS Server Select and press §OK§.
~
If necessary, enter the IP address of your preferred DNS server and
press §OK§.
Viewing/changing the default gateway to the Internet
Version 8, 03.09.2008
Enter the IP address for the default gateway, by means of which the local network
is connected to the Internet. This is generally the local (private) IP address for your
router (e.g. 192.168.2.1). Your phone requires this information to access the Internet.
192.168.2.1 is the default.
§Menu§ ¢ Settings ¢ Base ¢ Local Network
~
Enter the system PIN and press §OK§.
Default Gateway
Select and press §OK§.
~
If necessary, enter the IP address of the default gateway and press §OK§.
93
Gigaset A580 IP / US English / A31008-xxxx-xxxx-x-xxxx / settings_bs_hs_pabx.fm / 07.07.2010
Making VoIP settings on the handset
Activating/deactivating the display of VoIP status messages
If the function is activated, a VoIP status code for your service provider is displayed.
Activate the function if, for example, you have problems with VoIP connections. You
will receive a provider-specific status code, which supports the service when the
problem is analyzed. You will find a table with the possible status screens in the
appendix (£ Page 147).
¢ Settings ¢ Base ¢ Telephony ¢ VoIP
~
Enter the system PIN and press §OK§.
Status on HS
Select and press §OK§ (‰ = on).
a
Press and hold (idle status).
§Menu§
ú For information on making the setting on the Web configurator, £ Page 142.
Checking the base station MAC address
Depending on your network configuration, you may have to enter your base station MAC address, for example, into your router's access Control list. You can check
your base station MAC address:
§Menu§ M 4 O M 5
The base station MAC address is displayed.
a
Press and hold (idle status).
Version 8, 03.09.2008
ú For information on checking your MAC address on the Web configurator,
£ Page 142.
94
Gigaset A580 IP / US English / A31008-xxxx-xxxx-x-xxxx / settings_bs_hs_pabx.fm / 07.07.2010
Operating the base station on the PABX
Operating the base station on the PABX
The following settings are only necessary when your PABX requires them; see the
PABX user guide. The settings only affect fixed line network connections.
Changing the dialing mode
You can set the dialing mode.
§§Menu§ ¢ Settings ¢ Base ¢ Telephony ¢ Fixed line ¢ Dialing Mode
Tone / Pulse
Select and press §OK§ (‰ = on).
a
Press and hold (idle status).
Please note
u Suffix dialing (for selecting the connection) is not possible in conjunction with
pulse dialing: a pound "#" is displayed during dialing but ignored when pulse
dialing is used.
u Enter an asterisk "*" to switch temporarily to touch tone dialing. The asterisk is
not displayed.
Setting recall
Your phone is preset at the factory for operation on the main connection (recall 250
ms). For operation on a PABX, you may have to change this value. Please refer to the
user guide for your PABX.
§§Menu§ ¢ Settings ¢ Base ¢ Telephony ¢ Fixed line ¢ Recall
q
Select recall and press §OK§.
The current setting is indicated by ‰.
a
Press and hold (idle status).
Setting access codes (external line prefixes)
Version 8, 03.09.2008
Depending on your PABX, to obtain an external line you must dial an access code
before making external calls. You can store this access code in your phone. It is then
added automatically to the numbers, e.g. when dialing using the Calls list.
§Menu§ ¢ Settings ¢ Base ¢ Additional Features
Access Code
Select and press §OK§.
~
Enter or edit the access code (maximum 3 characters) and press §OK§.
a
Press and hold (idle status).
95
Gigaset A580 IP / US English / A31008-xxxx-xxxx-x-xxxx / settings_bs_hs_pabx.fm / 07.07.2010
Operating the base station on the PABX
If an access code is set, the following applies:
u The access code is added automatically when dialing from the Calls list and
when dialing emergency numbers.
u When dialing manually and dialing numbers from the directory, you must add
the access code yourself.
Setting pauses
Changing pause after line activity
You can set the length of the pause inserted between pressing the Talk key c and
sending the phone number.
§Menu§ M 4 O L
~
Enter a number for the length of the pause (1 = 1 sec.; 2 = 3 sec.;
3 = 7 sec.) and press §OK§.
Changing the pause after the Flash key
You can change the length of the pause if your PABX requires this (refer to the user
guide for your PABX).
§Menu§ M 4 O ~
Enter a number for the length of the pause (1 = 800 ms; 2 = 1600 ms;
3 = 3200 ms) and press §OK§.
Switching temporarily to touch tone dialing (DTMF)
Version 8, 03.09.2008
If your PABX still operates with dial pulsing (DP), but you need touch tone dialing
for a connection (e.g. to listen to the network mailbox for your fixed line network
connection), you must switch to touch tone dialing for the call.
Prerequisite: You are currently conducting an external call via the fixed line network or you have dialed an external fixed line network number or an external call is
signaled.
§Menu§
Open menu.
Tone dialingSelect and press §OK§.
Touch tone dialing is now activated for this call only.
96
Gigaset A580 IP / US English / A31008-xxxx-xxxx-x-xxxx / web_server.fm / 07.07.2010
Setting the phone with the PC
Setting the phone with the PC
The Web configurator is the Web interface for your phone. It allows you to select the
settings for your phone's base station via your PC's Web browser.
The Web configurator on your phone provides you with the following
options:
u Configure your phone access to the local network (IP address, gateway to the
Internet).
u Configure your phone for VoIP. Assign up to six VoIP phone numbers to your tel-
ephone.
Load new firmware onto the phone if necessary.
Use Internet services: display text information on the handset (info services).
Synchronize the telephone's date/time with a time server on the Internet.
Copy contacts from the Outlook address book on your PC into the handset directories or back up your handsets' directories on your PC.
u Manage the names and internal numbers of registered handsets and your local
directories
u Obtain information about your phone's status (firmware version, MAC address,
etc.).
u
u
u
u
Prerequisites:
u A standard Web browser is installed on the PC, e.g. Internet Explorer version 6.0
or higher, or Firefox version 1.0.4 or higher.
u The phone and PC are connected with each other via a router.
Please note
u Depending on your VoIP provider, it is possible that you will be unable to
change individual settings in the Web configurator.
u The phone is not blocked while you select your settings in the Web configura-
tor. You can also use your phone to make calls or change base station or handset settings on your handset at the same time.
u While you are connected to the Web configurator, it is blocked to other users. It
cannot be accessed by more than one user at any time.
Connecting the PC with the telephone's Web configurator
Prerequisite: The settings of an available firewall installed on your PC allow the PC
and phone to communicate with each other.
Version 8, 03.09.2008
There are two ways of connecting your PC to the base station Web configurator:
u Via the (local) IP address of the base station
u Via Gigaset config
97
Gigaset A580 IP / US English / A31008-xxxx-xxxx-x-xxxx / web_server.fm / 07.07.2010
Setting the phone with the PC
Establishing a connection via the IP address:
¤ Establish the telephone's current IP address on the handset:
You can see the phone's current IP address in the handset display by briefly
pressing the Registration/Paging key on the base station.
Your phone's IP address can change if you have activated dynamic IP address
assignment (£ Page 104).
Warning
If one of the four parts of the IP address contains leading zeros (e.g. 002), these
zeros must not be entered in the Web browser address field. Otherwise the Web
browser will not be able to establish a connection to the Web configurator.
Example: The IP address 192.168.002.002 is displayed on the handset. Enter
192.168.2.2 in the address field.
¤ Launch the Web browser on your PC.
¤ Enter http:// and the telephone's current IP address (for example: http://
192.168.2.2) into the address field of the Web browser.
¤ Press the Return key.
A connection is established to the phone's Web configurator.
Establish a connection via Gigaset config:
Prerequisite: The router is connected to the Internet and your PC can access the
Internet via the router.
¤ Launch the Web browser on your PC.
¤ Enter the following URL into the Web browser's address field:
http://www.Gigaset-config.com.
¤ Press the Return key.
You will receive a message stating that the connection will be forwarded to your
base station.
If several Gigaset VoIP phones can be reached via your Internet connection, you will
be asked to which one of these phones you would like to be connected.
After successfully forwarding the connection, the Login Web page of the Web configurator is displayed in the Web browser.
Version 8, 03.09.2008
Please note
The connection between the PC and the Web configurator is a local connection
(LAN connection). The Internet is only accessed to establish the connection.
98
Gigaset A580 IP / US English / A31008-xxxx-xxxx-x-xxxx / web_server.fm / 07.07.2010
Setting the phone with the PC
Logging in, setting the Web configurator language
Once you have successfully established the connection, the Login Web page is displayed in the Web browser.
You can select the language you want the menus and Web configurator dialogues
to be displayed in. The language that is currently selected is displayed in the top
field of the Web page.
¤ If necessary, click to open the list of available languages.
¤ Select the language.
¤ Enter your phone's system PIN (default setting: 0000) in the bottom field of the
Web page, to access the Web configurator functions.
¤ Select OK.
Once you have successfully logged in, a Home screen opens with general information on the Web configurator.
If you enter an incorrect system PIN, a corresponding message is displayed. You will
be prompted to re-enter the PIN.
If you enter an incorrect system PIN a second time, the PIN field will be blocked for
a short time (grayed out). The duration of the block will double each time a PIN is
subsequently entered incorrectly.
Please note
u If you have forgotten your system PIN, you must restore your device's factory
settings. Please note that this will restore all other settings too (£ Page 86).
u After approximately 10 minutes of inactivity, you will be automatically logged
off. The next time you try to make an entry or open a Web page, the Login Web
page is displayed. Enter the system PIN again to log in back.
u Any entries that you did not save on the phone before automatic log-off will be
lost.
Logging off
In the menu bar (£ Page 100) at the top right of every Web page in the Web configurator, you will see the Log Off command. Select Log Off to log off from the Web
configurator.
Version 8, 03.09.2008
Warning
Always use the Log Off command to end the connection to the Web configurator.
If, for example, you close the Web browser without logging off beforehand, it is
possible that access to the Web configurator will be blocked for a few minutes.
99
Gigaset A580 IP / US English / A31008-xxxx-xxxx-x-xxxx / web_server.fm / 07.07.2010
Setting the phone with the PC
Using the Web pages
The Web pages contain the UI elements displayed in Figure 2.
Navigation area
Working area
Buttons
Menu bar
Figure 2 Example of the structure of a Web page
Menu bar
In the menu bar, the Web configurator menus are displayed in the form of tab
pages.
The following menus are available:
Home
Settings
Status
Version 8, 03.09.2008
Log Off
100
The start screen is opened once you have registered with the Web configurator. It
contains information on the Web configurator functions.
This menu allows you to make settings on your phone (£ Page 103).
If you select the Settings menu, a list with this menu's functions is displayed in the
navigation area (£ Page 101).
This menu provides you with information about your phone (£ Page 142).
You will find the Log Off function to the right of the menu bar on every Web page
(£ Page 99).
Gigaset A580 IP / US English / A31008-xxxx-xxxx-x-xxxx / web_server.fm / 07.07.2010
Setting the phone with the PC
Please note
An overview of the Web configurator menu £ Page 37.
Navigation area
In the navigation area, the functions of the menu selected in the menu bar
(£ Page 100) are listed.
If you select a function, the associated page opens in the working area with information and/or fields for your inputs.
If a function is assigned subfunctions, these are displayed with the function as soon
as you select the function. The relevant page for the first subfunction is displayed
in the working area.
Working area
Depending on the function selected, information or dialog boxes are displayed in
the working area, which allow you to make or change your phone settings.
Making changes
Settings can be changed via input fields, lists or options.
u There may be restrictions regarding the possible values for a field, e.g. the maximum number of characters, entering special characters or certain value ranges.
u To open a list, select
. You can select from preset values.
u There are two kinds of options:
– Options in a list, from which you can activate one or several options. Active,
i.e. selected options are highlighted with , non-active options with . You
can activate an option by selecting . The status of the other options in the
list does not change. You can deactivate an option by selecting .
– Alternate options. The active option in the list is highlighted with
, and the
non-active with . You can activate an option by selecting . The previously activated option is deactivated. You can only deactivate an option by
activating another option.
Version 8, 03.09.2008
Entering Cyrillic and Arabic characters
In the following, the specified maximum number of characters permitted in a field
refers to Latin characters and digits (1 character = 1 byte), i.e. 1 character means 1
byte.
Cyrillic and Arabic characters require 2 bytes each, i.e. with a field length of
16 characters, for example, you can enter a maximum of 8 Cyrillic or Arabic characters.
If you enter too many characters into a field, the entry will be rejected (not saved on
the base station). The "old" field content (e.g. the default settings) remains in place
and is displayed again when the web page is updated. No warning/confirmation is
given.
101
Gigaset A580 IP / US English / A31008-xxxx-xxxx-x-xxxx / web_server.fm / 07.07.2010
Setting the phone with the PC
Applying changes
As soon as you have made your change on a page, activate the new setting on the
phone by selecting Set.
If your input in a field does not comply with the rules for this field, an appropriate
error message is displayed. You can then repeat the input.
Warning
Changes that have not been saved on your phone are lost if you move to another
Web page or if the Web configurator is logged off, e.g. due to exceeding the time
limit (£ Page 99).
Buttons
Buttons are displayed in the bottom section of the working area.
Set
Save entries on the phone.
Cancel
Reject changes made on the Web page and reload the settings that are currently
saved in your phone to the Web page.
Opening Web pages
A brief outline of the navigation to the individual Web configurator functions is
given below.
Version 8, 03.09.2008
Example
Setting DTMF signaling
Settings ¢ Telephony ¢ Advanced Settings
To open the Web page, carry out the following steps after registration:
¤ Select the Settings menu in the menu bar.
¤ Select the Telephony function in the navigation area.
The Telephony subfunctions are displayed in the navigation tree.
¤ Click the Advanced Settings subfunction.
The Web page from Figure 2 will be shown in the Web browser.
102
Gigaset A580 IP / US English / A31008-xxxx-xxxx-x-xxxx / web_server.fm / 07.07.2010
Setting the phone with the PC
Setting the phone with the Web configurator
Version 8, 03.09.2008
You can make the following settings using the Web configurator:
u Connect your phone to the local network (£ Page 104).
u Configuration for telephony:
– Enter settings for the VoIP provider and configure or activate/deactivate VoIP
accounts (£ Page 108).
– Specify the name of the fixed line network (£ Page 115).
– Activate/deactivate the Gigaset.net connection (£ Page 116).
– Activate/deactivate call forwarding for calls to your VoIP numbers or to your
Gigaset.net number (£ Page 123).
– Configure settings to improve voice quality for the VoIP connections
(£ Page 117).
– Define the default connection for your telephone (fixed line network or VoIP)
(£ Page 121).
– Assign VoIP phone numbers to the individual handsets (£ Page 122).
– Define user-specific dialing plans for emergency numbers and for cost control purposes (£ Page 125).
– Enter and activate/deactivate the network mailbox for each number
assigned to the telephone (£ Page 127).
– Define the type of DTMF signaling (e.g. for remote operation of a VoIP network mailbox) and the Flash key function for VoIP (£ Page 128).
– Enter settings for call forwarding via VoIP (call placing, i.e. connecting two
external callers to each other, £ Page 129).
u Output of information from an IP info service on the handset (£ Page 135).
u Synchronize date and time on the base station with a time server on the Internet
(£ Page 141).
u Start firmware updates (£ Page 139).
u Manage registered handsets:
– Change names and internal numbers of the registered handsets
(£ Page 136).
– Copy contacts from your PC's Outlook address book to the handset directories or save handset directories to your PC (£ Page 136).
– Activate/deactivate the display of VoIP status messages on your handset
(£ Page 138).
103
Gigaset A580 IP / US English / A31008-xxxx-xxxx-x-xxxx / web_server.fm / 07.07.2010
Setting the phone with the PC
Configuring the IP
Assigning the IP address
Select the necessary settings for operating your phone in your local network and to
connect it to the Internet. For more detailed explanations of the individual components/terms, see the glossary (£ Page 172).
¤ Open the following Web page: Settings ¢ IP Configuration.
¤ In the Address Assignment area, select the IP address type.
Select Obtained automatically to use a dynamic IP address assigned by a DHCP
server in your local network. No further settings are necessary for the local network.
Select Static to set up a static local IP address for your phone. A static IP address is,
for example, useful if port forwarding or a DMZ is set up on the router for the phone.
The following fields are displayed when you select IP address type = Static:
IP address Enter an IP address for your phone. This IP address allows your phone to be reached
by other subscribers in your local network (e.g. PC).
192.168.2.2 is the default.
Please note the following:
u The IP address must be from the address block for private use that is used in the
router. This is generally in the range 192.168.0.1 – 192.168.255.254 with Subnet
mask 255.255.255.0. The subnet mask determines that the first three parts of the
IP address must be identical for all subscribers in your LAN.
u The static IP address must not belong to the address block (IP pool range) that is
reserved for the DHCP server of the router. It must also not be used by another
device on the router.
If necessary, check the settings on the router.
Subnet mask
Enter the subnet mask for your device's IP address. For addresses from the address
block 192.168.0.1 – 192.168.255.254, the subnet mask 255.255.255.0 is generally
used. This is preconfigured when the phone is supplied.
Version 8, 03.09.2008
Default gateway
Enter the IP address for the default gateway uses to connect the local network to
the Internet. This is generally the local (private) IP address for your router (e.g.
192.168.2.1). Your phone requires this information to access the Internet.
192.168.2.1 is the default.
104
Gigaset A580 IP / US English / A31008-xxxx-xxxx-x-xxxx / web_server.fm / 07.07.2010
Setting the phone with the PC
Preferred DNS server
Enter the IP address for the preferred DNS server. DNS (Domain Name System)
allows you to assign public IP addresses to symbolic names. The DNS server is
required to convert the DNS name into the IP address when a connection is being
established to a server.
You can specify your router's IP address here. The router forwards phone address
requests to its DNS server.
192.168.2.1 is the default.
Alternate DNS server (optional)
Enter the IP address for the alternate DNS server that should be used in situations
where the preferred DNS server cannot be reached.
¤ Select Set to save the changes.
Or
¤ Select Cancel to reject the changes.
After you have changed the IP configuration the base station is rebooted. You will
be logged off by the Web configurator. The Login Web page is displayed again after
the reboot.
Allowing access from other networks
The default setting for your phone is set so that you can only access your phone's
Web configurator via a PC that is in the same local network as your phone. The subnet mask of the PC must match that of the phone.
You can also allow access from PCs in other networks.
Warning
Expansion of access entitlement to other networks increases the risk of unauthorized access. It is therefore recommended that you deactivate remote access again
if you no longer require it.
¤ Open the following Web page: Settings ¢ IP Configuration.
Area: Remote Management
¤ Activate the Yes option to permit access from other networks.
Version 8, 03.09.2008
To deactivate remote access, activate the No option Access is then limited to PCs
in your own local network.
Access to the Web configurator services from other networks is only possible if your
router is set accordingly. The router must pass on the service requests from "outside" to Port 80 (default port) of the phone. Please also read the user guide for your
router.
To establish a connection, the public IP address or the DNS name of the router and,
where applicable, the port number on the router must be indicated in the Web
browser of the remote PC.
105
Gigaset A580 IP / US English / A31008-xxxx-xxxx-x-xxxx / web_server.fm / 07.07.2010
Setting the phone with the PC
Entering an HTTP proxy server
(only when connected to an internal company network)
Direct connections between network participants and the Internet are often not
permitted within internal company or organization networks (intranet). In such
cases, all HTTP calls from the network are "transferred" by a proxy server. The proxy
server is a computer or program within the network.
If your phone is connected to such a network, you must store the address of this
HTTP proxy server on the phone and activate handling of HTTP calls via the HTTP
proxy server.
Only then will you be able to access, for example, the Gigaset.net directory or
obtain weather information, etc. in idle display (information services).
¤ Open the following Web page: Settings ¢ IP Configuration.
Area: HTTP proxy
Enable proxy
Click the Yes option if your phone is to handle HTTP calls via your network's HTTP
proxy server.
If you select No, the phone attempts to access the Internet directly.
Proxy server address
Enter the URL (£ Page 183) of the proxy server to which your phone is to send
HTTP calls. The proxy server then creates the connection to the Internet.
Proxy server port
Specify the communication port used on the HTTP proxy server (number between
0 and 55000). Port 80 is usually assigned.
Version 8, 03.09.2008
¤ Select Set to save your settings.
106
Gigaset A580 IP / US English / A31008-xxxx-xxxx-x-xxxx / web_server.fm / 07.07.2010
Setting the phone with the PC
Configuring telephone connections
You can configure up to eight numbers on your phone: your fixed line network
number, your Gigaset.net number and six VoIP numbers.
You need to set up a VoIP account with a VoIP provider for each VoIP phone number.
You must save the access data for each account and for the relevant VoIP provider
in the phone. You can assign a name to each connection (VoIP and fixed line network).
To configure the connections:
¤ Open the following Web page: Settings ¢ Telephony ¢ Connections.
A list (£ Figure 3) will be shown containing all the possible connections that you
can configure, or have already configured, on your phone.
Figure 3 List of possible connections
The list will show the following:
Version 8, 03.09.2008
Name / Provider
Name of the connection. This will show the name that you have defined for the connection (£ Page 109, Page 115) or the default name (IP1 to IP6 for VoIP connections, Fixed Line for the fixed line network connection and Gigaset.net).
VoIP connections also display the name of the VoIP provider with which you have
opened the account. If the name is unknown the display will show Other Provider.
107
Gigaset A580 IP / US English / A31008-xxxx-xxxx-x-xxxx / web_server.fm / 07.07.2010
Setting the phone with the PC
Suffix
Line suffix that you have to add to the phone number of an outgoing call to allow
the account assigned to the suffix to be used as the sending account.
Example
If you dial 123456765#1, the connection will be made and billed through the first
VoIP account, regardless of the VoIP number you have assigned to your handset as
the send number and whether you briefly press/press and hold the Talk key.
If you dial 123456765#0, the connection will be made via the fixed line network.
Status
The status of the connection will be shown for VoIP connections:
Registered
The connection is activated. The phone has been successfully registered. You
can use the connection to make calls.
Disabled
The connection is deactivated. The phone is not registering with the corresponding account with the VoIP service. You cannot use the connection to make
or receive calls.
Registration failed / Server not accessible
Your phone was unable to register with the VoIP service, e.g. because the VoIP
access data is incorrect or incomplete or the phone is not connected to the Internet. You can find further information in section "Getting help with your
phone", £ Page 143.
Active
You can use the option in the Active column to activate ( ) and deactivate ( )
VoIP connections. If a connection is deactivated, the phone will not register for this
connection. The connection can be activated/deactivated by clicking directly on
the option. The change does not need to be saved.
To configure a connection or to change the configuration of a connection:
¤ Select Edit button next to the connection.
This will open a Web page where you can make the settings needed. More information is available
u In the section "Configuring the VoIP connection", £ Page 108 or
u In the section "Configuring the fixed line connection", £ Page 115 or
u In the section "Configuring the Gigaset.net connection", £ Page 116.
Configuring the VoIP connection
Version 8, 03.09.2008
¤ Open the following Web page: Settings ¢ Telephony ¢ Connections.
¤ Select the Edit button next to the VoIP connection that you want to configure or
the configuration you wish to change.
This will open a Web page where you can make the settings that your phone needs
to access your provider's VoIP server.
The Web page always displays the following areas:
u IP Connection (£ Page 109),
u Auto Configuration (£ Page 109)
u Personal Provider Data (£ Page 111).
108
Gigaset A580 IP / US English / A31008-xxxx-xxxx-x-xxxx / web_server.fm / 07.07.2010
Setting the phone with the PC
The areas
u General Provider Data (£ Page 112) and
u Network (£ Page 113)
can be shown and hidden by selecting the Show Advanced Settings and Hide
Advanced Settings buttons.
You must enter the VoIP provider's general access data in these areas. You can
download this data for many VoIP providers from the Internet ( £ "Area: Auto
Configuration", Page 109).
¤ Make the settings on the Web page.
¤ Save them in the phone £ Page 115.
¤ Activate the connection if necessary £ Page 115.
Area: IP Connection
Connection Name or Number
Enter a name for the VoIP connection or the VoIP phone number (maximum
16 characters). This name is used to display the connection on the handset and the
Web configurator interface, e.g. during allocation of send and receive numbers
(£ Page 122), for the call display (£ Page 42).
Area: Auto Configuration
Version 8, 03.09.2008
The entire configuration process or a large part of the configuration for a VoIP connection is automated for many VoIP providers. You can download the necessary
VoIP access data to your phone from the Internet.
You have the following options:
u Fully automated configuration
Prerequisites:
– You have received an auto configuration code from your VoIP provider.
– The general access data for your VoIP provider is available for downloading.
You can download all the data required for VoIP access from the Internet:
¤ Enter the auto configuration code you received from your VoIP provider in
the Auto Configuration area in the Auto Configuration Code field (maximum 32 characters).
¤ Select the Start Auto Configuration button.
The telephone establishes a connection to the Internet and downloads all data
required for the VoIP connection, i.e. the general provider information and your
personal provider data (account data) are saved to your base station.
If you have already entered details on the Web page, this is deleted as soon as
Start Auto Configuration is selected. The fields in the Personal Provider Data
and General Provider Data areas and the server addresses in the Network area
are overwritten by the downloaded data.
Generally, you should not have to enter any additional data on this Web page.
109
Gigaset A580 IP / US English / A31008-xxxx-xxxx-x-xxxx / web_server.fm / 07.07.2010
Setting the phone with the PC
Please note
If the message Download of settings not possible! File is corrupt! appears, no
data will be loaded onto the phone. Possible causes of this are:
u The incorrect code has been entered (e.g. upper/lower case rules have not
been followed). If necessary, enter the code again.
u The file that has been downloaded is invalid. Please consult your VoIP provider.
When the download is complete, the Connections list is displayed.
¤ Activate the connection as described on Page 115.
You can then be reached on the corresponding VoIP phone number.
u Automatic configuration of general VoIP provider data
Prerequisite: You have received your account details from your VoIP provider
(e.g. Authentication Name, Authentication password).
Profile files for the most important VoIP providers are available to download
from the Internet via the Gigaset configuration server. The address for the server
is stored in your phone (£ Page 139).
To load the data onto your telephone, proceed as follows:
¤ Select Select VoIP Provider in the Auto Configuration area. This will display
information on the download procedure.
Please note
If you select the Select VoIP Provider button, any changes that have been made
to the Web page will be saved and checked. Values may need to be corrected
before the Select VoIP Provider operation is started.
The download procedure consists of several steps:
¤ Select the Next button.
¤ From the list, select the country for which the list of VoIP providers is to be
loaded.
¤ Select the Next button.
¤ Select your VoIP provider from the list.
If your provider is not included in the list, select Other Provider. In this case
you will have to enter the general provider data by hand (see "Area: General
Provider Data" and "Area: Network" below).
¤ Select the Finish button.
Version 8, 03.09.2008
Please note
If only one provider is available, the countries and providers lists are not displayed.
The name of the provider is then displayed directly.
The details of the selected provider are loaded to your phone and saved under
General Provider Data (£ Page 112) and Network (£ Page 113). You cannot
make any further entries in these areas.
The Provider field shows the name of the selected provider or Other Provider.
A link to the provider's homepage is displayed where available.
To complete configuration of your VoIP connection, enter your account data in
the Personal Provider Data area.
110
Gigaset A580 IP / US English / A31008-xxxx-xxxx-x-xxxx / web_server.fm / 07.07.2010
Setting the phone with the PC
Please note
After the first download of the VoIP provider settings, your phone will check daily
whether a newer version of the file for your VoIP provider is available via the Internet on the Gigaset configuration server (£ Page 91).
Area: Personal Provider Data
Enter the configuration data that is necessary for accessing your VoIP provider's SIP
service. This data can be obtained from your VoIP provider.
The field names in this area (Authentication Name, etc.) listed in the following are
standard names and may change. If you have already downloaded the provider's
general details ("Select VoIP Provider" button, see above), field entries will be
replaced by provider-specific names to facilitate orientation (e.g. SIP-ID instead of
Authentication Name).
Authentication Name
Specify the registration or authentication ID agreed with your VoIP provider (maximum 32 digits). The registration ID serves as the access ID that your phone must
specify when registering with the SIP proxy/registrar server. The Authentication
Name is usually identical to the Username, i.e. to your Internet phone number.
Authentication password
Enter the password that you have agreed with your VoIP provider in the Authentication password field (maximum 32 characters). The phone needs the password
when registering with the SIP proxy/registrar server.
Username Enter the caller ID for your VoIP provider account (maximum 32 characters). This ID
is usually identical to the first part of your SIP address (URI, your Internet phone
number).
Example
Example: If your SIP address is "[email protected]", enter "987654321" as
the Username.
Version 8, 03.09.2008
Display name (optional)
Enter any name that should be shown in the other caller's display when you call
them via the Internet (example: Anna Sand). All characters in the UTF8 character set
(Unicode) are permitted. The name must not exceed 32 characters.
If you do not enter a name, your Username or your VoIP phone number is displayed.
Ask your VoIP provider if this feature is supported.
111
Gigaset A580 IP / US English / A31008-xxxx-xxxx-x-xxxx / web_server.fm / 07.07.2010
Setting the phone with the PC
Area: General Provider Data
If you have downloaded the general settings for the VoIP provider from the Gigaset
configuration server (£ Page 109), then the fields in this area will be preset with
the data from the download. Generally, you do not need to configure any settings
in this area.
Domain
Specify the last part of your SIP address (URI) here (maximum 74 characters).
Example
For the SIP address "[email protected]", enter "provider.com" in Domain.
Proxy server address
The SIP proxy is your VoIP provider's gateway server. Enter the IP address or the
(fully-qualified) DNS name of your SIP proxy server (maximum 74 characters).
Example: myprovider.com.
Proxy server port
Enter the number of the communication port that the SIP proxy uses to send and
receive signaling data (SIP port).
Port 5060 is used by most VoIP providers.
Registrar server
Enter the (fully-qualified) DNS name or the IP address of the registrar server (maximum 74 characters).
The registrar is needed when the phone is registered. It assigns the public IP
address/port number to your SIP address (Username@Domain) used by the phone
to log in. With most VoIP providers, the registrar server is identical to the SIP server.
Example: reg.myprovider.com.
Registrar server port
Enter the communication port used in the registrar. Usually, port 5060 is used.
Version 8, 03.09.2008
Registration refresh time
Enter the time intervals at which the phone should repeat the registration with the
VoIP server (SIP proxy) (a request will be sent to establish a session). The repeat is
required so that the entry of the phone in the tables of the SIP proxy is retained and
the phone can therefore be reached. The repeat will be carried out for all activated
VoIP phone numbers.
The default is 180 seconds.
If you enter 0 seconds, the registration will not be repeated periodically.
112
Gigaset A580 IP / US English / A31008-xxxx-xxxx-x-xxxx / web_server.fm / 07.07.2010
Setting the phone with the PC
Area: Network
Please note
If you have downloaded the general settings for your VoIP provider from the
Gigaset configuration server (£ Page 110), then some fields in this area will be
preset with the data from the download (e.g. the settings for the STUN server and
outbound proxy).
If your phone is connected to a router with NAT (Network Address Translation) and/
or a firewall, you must select some settings in this area so that your phone can be
reached from the Internet (i.e. can be addressed).
Through NAT, the IP addresses of subscribers in the LAN are concealed behind the
public IP address of the router.
For incoming calls
If port forwarding is activated or a DMZ is set up for the phone on the router, no special settings are required for incoming calls.
If this is not the case, an entry in the NAT routing table (in the router) is necessary in
order for the phone to be reached. This entry is created when the phone is registered with the SIP service. In the interest of security, this entry is automatically
deleted at certain intervals (session timeout). The phone must therefore confirm its
registration at certain intervals (see NAT refresh time, £ Page 114), so that the
entry stays in the routing table.
For outgoing calls
The phone needs its public address to receive caller voice data.
There are two possibilities:
u The phone requests the public address from a STUN server on the Internet (Simple Transversal of UDP over NAT). STUN can only be used with asymmetric NATs
and non-blocking firewalls.
u The phone does not direct the connection request to the SIP proxy but to an outbound proxy on the Internet that supplies the data packets along with the public address.
The STUN server and outbound proxy are used alternately to work around the NAT/
firewall in the router.
STUN enabled
Select Yes if you want your phone to use STUN as soon as it is used on a router with
asymmetric NAT.
STUN server
Enter the (fully-qualified) DNS name or the IP address of the STUN server on the
Internet (maximum 74 characters).
If you selected Yes in the STUN enabled field, you must enter a STUN server here.
Version 8, 03.09.2008
STUN port Enter the number of the communication port on the STUN server. The default port
is 3478.
113
Gigaset A580 IP / US English / A31008-xxxx-xxxx-x-xxxx / web_server.fm / 07.07.2010
Setting the phone with the PC
STUN refresh time
Enter the time intervals at which the phone should repeat the registration with the
STUN server. The repeat is required so that the entry of the phone in the tables of
the STUN server is retained. The repeat will be carried out for all activated VoIP
phone numbers.
Ask your VoIP provider for the STUN refresh time.
The default is 240 seconds.
If you enter 0 seconds, the registration will not be repeated periodically.
NAT refresh time
Specify the intervals at which you want the phone to update its entry in the NAT
routing table. Specify an interval in seconds that is a little shorter than the NAT session timeout.
You should not need to change the preconfigured value for the NAT refresh time.
Outbound proxy mode
Specify when the outbound proxy should be used.
Always
All signaling and voice data sent by the phone is sent to the outbound proxy.
Auto
Data sent by the phone is only sent to the outbound proxy when the phone is
connected to a router with symmetric NAT or blocking firewall. If the phone is
behind an asymmetric NAT, the STUN server is used.
If you have set STUN enabled = No or have not entered a STUN server, the outbound proxy is always used.
Never
The outbound proxy is not used.
If you do not make an entry in the Outbound proxy field, the phone behaves independently of the selected mode, as with Never.
Outbound proxy
Enter the (fully qualified) DNS name or the IP address of your provider's outbound
proxy (maximum 74 characters).
Please note
With many providers, the outbound proxy is identical to the SIP proxy.
Version 8, 03.09.2008
Outbound proxy port
Enter the number of the communication port used by the outbound proxy.
The default port is 5060.
114
Gigaset A580 IP / US English / A31008-xxxx-xxxx-x-xxxx / web_server.fm / 07.07.2010
Setting the phone with the PC
Saving settings on the phone
¤ Select Set to save the changes.
The Connections list will be shown after saving (£ Figure 3 on Page 107).
To discard the changes:
¤ Select the Cancel button.
If all fields are to be reset to the default settings:
¤ Select the Delete button.
Fields without default settings are empty.
Please note
If you do not make any entries for a longer period, the connection to the Web configurator is automatically terminated. Unsaved entries are lost. If necessary, save
intermittently. You can subsequently continue the entry and make changes if necessary.
Activating a new connection
If you have configured a new VoIP connection, you must also activate it.
In the Connections list:
¤ Activate the relevant option in the Active column ( = activated).
Your phone will register itself with the VoIP provider using the relevant access data.
Refresh the Web page (e.g. by pressing F5).
The Status Registered column will appear if registration was successful. You can
now be reached on this VoIP phone number.
Please note
Once the new entry has been made, the VoIP phone number is assigned to each
handset as a receive number. For adjusting the assignment, £ Page 122.
Configuring the fixed line connection
Version 8, 03.09.2008
You can assign a name to your fixed line connection. This name is used to display
the connection on the handset and the Web configurator interface, e.g. during allocation of send and receive numbers (£ Page 122), for the call display (£ Page 42).
¤ Open the following Web page: Settings ¢ Telephony ¢ Connections.
¤ Select the Edit button in the Fixed Line Connection area.
¤ Enter your fixed line network number or the name of your choice
(maximum 16 characters) for your fixed line connection in the Connection
Name or Number field. The default is "Fixed Line".
115
Gigaset A580 IP / US English / A31008-xxxx-xxxx-x-xxxx / web_server.fm / 07.07.2010
Setting the phone with the PC
Configuring the Gigaset.net connection
Your phone is assigned a Gigaset.net phone number by default. As soon as you
have connected your phone to the Internet, you can make calls using the
Gigaset.net and receive calls from other Gigaset.net subscribers, provided that your
Gigaset.net connection has been activated. You can deactivate the Gigaset.net connection.
Activating/deactivating the Gigaset.net connection
¤ Open the following Web page: Settings ¢ Telephony ¢ Connections. The list
of connections is displayed (£ Figure 3 on Page 107).
¤ In the Gigaset.net area: use the option in the Active column to activate ( ) or
deactivate (
) the Gigaset.net connection.
Please note
If you do not use your Gigaset.net connection for six weeks, it is automatically
deactivated. You cannot be reached for calls from Gigaset.net.
The connection is reactivated:
u As soon as you start a search in the Gigaset.net directory (£ Page 48) or
u Make a call via Gigaset.net, i.e. dial a number ending in #9 (two attempts may
be necessary) or
u Activate the connection via the Web configurator as described above.
Activating/deactivating the STUN server of the Gigaset.net connection
The Gigaset.net connection is preconfigured in your phone. The Gigaset.net uses a
STUN server as standard. In the sent data packets, Gigaset.net replaces the private
IP address of your phone with its public IP address.
If you operate your phone behind a router with symmetrical NAT, STUN cannot be
used. Otherwise, when making Gigaset.net calls you will not be able to hear the
caller.
In this case, deactivate STUN for the Gigaset.net connection.
¤ Open the following Web page: Settings ¢ Telephony ¢ Connections.
¤ Select Edit in the Gigaset.net area.
STUN enabled
Click No to deactivate STUN.
Select Yes if you want your phone to use STUN.
Version 8, 03.09.2008
¤ Select Set to save the changes.
116
Gigaset A580 IP / US English / A31008-xxxx-xxxx-x-xxxx / web_server.fm / 07.07.2010
Setting the phone with the PC
Optimizing voice quality for VoIP connections
You can make general and connection-specific settings to improve the voice quality for VoIP telephony.
¤ Open the following Web page: Settings ¢ Telephony ¢ Audio.
The voice quality for VoIP connections is mainly determined by the voice codec
used for transferring the data and the available bandwidth of your DSL connection.
In the case of the voice codec, the voice data is digitalized (coded/decoded) and
compressed. A "better" codec (better voice quality) means more data needs to be
transferred, i.e. perfect voice data transfer requires a DSL connection with a larger
bandwidth.
The following voice codecs are supported by your phone:
G.722
Excellent voice quality. The broadband speech codec G.722 works at the same bit
rate as G.711 (64 kbit/s per speech connection) but with a higher sampling rate. This
allows higher frequencies to be played back. The speech tone is therefore clearer
and better than for the other codecs (High Definition Sound Performance).
Gigaset S67H, S68H and SL37H are examples of HDSP-compatible handsets.
G.711 a law / G.711 μ law
Excellent voice quality (comparable with ISDN). The necessary bandwidth is 64
kbit/s per voice connection.
G.726
Good voice quality (inferior to that with G.711 but better than with G.729).
Your phone supports G726 with a transmission rate of 32 kbit/s per voice connection.
G.729
Average voice quality. The necessary bandwidth is less than or equal to 8 kbit/s per
voice connection.
Both parties involved in the telephone connection (caller/sender and recipient
side) must use the same voice codec. The voice codec is negotiated between the
sender and the recipient when establishing a connection.
Version 8, 03.09.2008
You can influence the voice quality by selecting (bearing in mind the bandwidth of
your DSL connection) the voice codecs your phone is to use, and specifying the
order in which the codecs are to be suggested when a VoIP connection is established.
117
Gigaset A580 IP / US English / A31008-xxxx-xxxx-x-xxxx / web_server.fm / 07.07.2010
Setting the phone with the PC
Area: Settings for Bandwidth
The settings in this area influence all VoIP connections (VoIP phone numbers).
Allow 1 VoIP call only
You can usually make two VoIP calls at the same time on your phone. If, however,
your DSL connection has a narrow bandwidth, there may be problems if two VoIP
calls are made at the same time. The data is no longer transferred properly (long
voice delay, data losses, etc.).
¤ Select Yes after Allow 1 VoIP call only to prevent any further parallel VoIP phone
connections being established.
¤ If you wish to permit two VoIP connections, select No.
Please note
If only one VoIP connection is permitted, the following VoIP network services will
no longer be available:
u Call waiting is not displayed during a call via VoIP.
u External consultation call from a VoIP call
u Toggling and initiating a conference call via VoIP
Voice Quality
Default settings for the codecs used are stored in your phone: one setting optimized for narrow and one for wide bandwidths.
¤ Activate one of the options Optimized for low bandwidth / Optimized for high
bandwidth if you wish to accept a default setting for all VoIP connections. The
settings are shown in the Settings for Connections area and cannot be
changed.
¤ Activate the Own Codec preference option if you wish to select and set connection-specific voice codecs yourself ( ¢ "Area: Settings for Connections").
Area: Settings for Connections
In this area you can make specific settings for each of your VoIP phone numbers.
You can make the following settings for each VoIP phone number configured on
your phone:
Version 8, 03.09.2008
Volume for VoIP Calls
Depending on the VoIP provider, it is possible that the received voice/earpiece volume is too low or too high, so that adjusting the volume via the handset is not adequate.
118
Gigaset A580 IP / US English / A31008-xxxx-xxxx-x-xxxx / web_server.fm / 07.07.2010
Setting the phone with the PC
Specify whether the received volume range is too high or too low. The following
options are available:
Low
Voice/earpiece volume is too high. Activate this option to reduce the volume by
6 dB.
Normal
The voice/earpiece volume does not need to be raised/lowered.
High
Voice/earpiece volume is too low. Activate this option to increase the volume by
6 dB.
Voice codecs
Prerequisite: The Own Codec preference option is activated for the Voice Quality
in the Settings for Bandwidth area.
Select the voice codecs your phone is to use, and specify the order in which the
codecs are to be suggested when a VoIP connection is established via this VoIP
phone number.
¤ Apply the voice codecs that your phone is to suggest for outgoing calls into the
Selected codecs list.
To do this, in the Available codecs list select the voice codec that you want to
apply (you can mark several entries using the Shift key or the Ctrl key).
Select <Add.
¤ Move the voice codecs that you do not want the phone to use into the Available
codecs list.
Select the voice codecs in the Selected codecs list (see above) and click the
Remove> button.
¤ Sort the voice codecs in the Selected codecs list into the order in which they
should be suggested to the receiving device when a connection is established.
To do this, use the Up and Down buttons.
When establishing a VoIP connection, the phone suggests the 1st voice codec in
the Selected codecs list to the receiving device to begin with. If the receiving
device does not accept this voice codec (e.g. because it is not supported), the 2nd
voice codec on the list is suggested, and so on.
If the receiving device does not accept any of the voice codecs in the Selected
codecs list, the connection is not established. An appropriate message is displayed
on the handset.
If the phone always starts by trying to establish a broadband connection, put the
G.722 codec at the top of the Selected codecs list.
Please note
Version 8, 03.09.2008
u Only deactivate codecs (put them in the Available codecs list) if there is a par-
ticular reason. The more codecs that are deactivated increases the risk of calls
not being established due to unsuccessful codec negotiations. In particular you
can only establish broadband connections if you permit the G.722 codec.
u With incoming calls, all supported voice codecs are always permitted.
119
Gigaset A580 IP / US English / A31008-xxxx-xxxx-x-xxxx / web_server.fm / 07.07.2010
Setting the phone with the PC
Area: Settings for Codecs
To save additional bandwidth and transmission capacity, on VoIP connections that
use the G.729 codec you can suppress the transmission of voice packets in pauses
("Silence Suppression"). Then, instead of the background noises in your environment, your caller hears a synthetic noise generated in the receiver.
Please note: "Silence Suppression" can sometimes lead to deterioration in the
voice quality.
¤ In the Enable Annex B for codec G.729 field, state whether the transmission of
data packets during pauses should be suppressed when using the G.729 codec,
(select Yes).
Saving settings on the phone
¤ Select Set to save the settings for the voice quality.
Please note
Please observe the following for good voice quality:
u When making calls using VoIP, avoid performing other Internet activities (e.g.
surfing the Internet).
u Please note that voice delays can occur depending on the codec used and the
network capacity utilization.
Voice quality and infrastructure
Version 8, 03.09.2008
With your Gigaset A580 IP, you have the opportunity to make calls with good voice
quality via VoIP.
However, your phone's performance with VoIP – and therefore the voice quality –
also depends on the properties of the entire infrastructure.
The following VoIP provider components are just some of the things that can
impact performance:
u Router
u DSLAM
u DSL transmission line and speed
u Connection paths over the Internet
u If applicable, other applications that also use the DSL connection
In VoIP networks, voice quality is affected by various things including the "Quality
of Service" (QoS). If the entire infrastructure demonstrates QoS, voice quality is
higher (fewer delays, less echoing, less crackling, etc.).
If, for example, the router does not have QoS, then the voice quality is not as good.
Please see the specialist documentation for further information.
120
Gigaset A580 IP / US English / A31008-xxxx-xxxx-x-xxxx / web_server.fm / 07.07.2010
Setting the phone with the PC
Setting the telephone's default connection
The default telephone connection defines which line type (VoIP or fixed line network) will be used to dial numbers when you briefly press the c Talk key. The
default connection is applied to all registered handsets.
¤ Open the following Web page: Settings ¢ Telephony ¢ Number Assignment.
Area Default Connection
¤ Select the default connection for your phone. This can be done by selecting
option VoIP or Fixed Line after Linetype for outgoing calls.
¤ Select Set to activate your settings.
Please note
u The default connection is only relevant when dialing numbers that are not sub-
ject to dialing plans and are entered without a line suffix.
u You can change the settings for the default connection via any registered hand-
set (£ Page 87).
Activating the fixed line network connection as an alternate
connection
You can activate the fixed line network connection on your phone as an alternate
connection. If an attempt to establish a connection via VoIP then fails, an attempt
is made automatically to establish the connection via the fixed line network.
An alternate connection would be used in the following cases:
u Your VoIP connections are busy.
u The SIP server for the VoIP connection cannot be accessed.
u The dialed VoIP connection has not (yet) been configured correctly
(e.g. incorrect password).
u The base station does not have a connection to the Internet, e.g. because your
router is deactivated or not connected to the Internet.
Exceptions
If a URI or IP address is dialed instead of a phone number, the connection cannot
be created via the fixed line network.
¤ Open the following Web page: Settings ¢ Telephony ¢ Number Assignment.
Area Default Connection
¤ To activate the fixed line network connection as an alternate connection, click
Version 8, 03.09.2008
¤
the Yes option next to Automatic Fallback to Fixed Line. Select No to deactivate
the function.
Select Set to activate your settings.
121
Gigaset A580 IP / US English / A31008-xxxx-xxxx-x-xxxx / web_server.fm / 07.07.2010
Setting the phone with the PC
Assigning send and receive numbers to handsets
You can assign up to eight phone numbers on your phone: your fixed line network
number, your Gigaset.net number and six VoIP numbers.
You can assign as many of these numbers as you like to each handset as receive
numbers. Receive numbers determine which handset(s) will ring when a call is
received.
You can assign one of your VoIP numbers to each handset as a (VoIP) send number.
Send numbers define which VoIP account should be used generally to make and
pay for outgoing VoIP calls. Exceptions:
u A phone number is dialed with a line suffix (£ Page 108) or
u A dialing plan has been defined for the phone number (£ Page 125).
The Gigaset.net number and fixed line network number are permanently assigned
to each registered handset as send numbers.
Please note
A handset is assigned the following numbers after it is registered on the base station:
u Receive numbers: all phone numbers assigned to the phone (fixed line network, Gigaset.net and VoIP).
u Send numbers: the fixed line network number and the VoIP phone number that
you entered at the start of the phone configuration.
¤ Open the following Web page: Settings ¢ Telephony ¢ Number Assign-
ment.
The display shows all registered handsets. A list is displayed for each handset showing the phone numbers that are configured and activated for the phone. The connection names are shown in the column Connections. The fixed line network connection is always at the end of the list.
¤ Define a VoIP phone number as the send number for each handset. To do this,
click the option following the phone number in the for outgoing calls column.
The previous assignment will automatically be deactivated.
Please note
The fixed line network number is permanently assigned to each handset as a send
number. This assignment cannot be deactivated. It ensures that emergency numbers can be called from every handset.
The Gigaset.net number is also permanently assigned to each handset.
¤ Select the phone numbers for each handset (fixed line network, VoIP) that are to
Version 8, 03.09.2008
¤
122
be assigned to the handset as receive numbers. To do this, click the option following the phone number in the for incoming calls column. Every handset can
be assigned several phone numbers or no phone number ( = assigned).
Select Set to save your settings.
Gigaset A580 IP / US English / A31008-xxxx-xxxx-x-xxxx / web_server.fm / 07.07.2010
Setting the phone with the PC
Please note
u If a VoIP phone number that has been assigned to a handset as a send number
is deleted, the handset will automatically be assigned the first configured VoIP
phone number.
u Calls made to a number that is not assigned to a handset as a receive number
will not be signaled on any handset.
u If you have not assigned receive numbers to any of the handsets, calls to all connections will be signaled on all handsets.
Activating Call Forwarding for VoIP connections
You can forward calls to your VoIP numbers and to your Gigaset.net number.
You can forward calls to your VoIP numbers to any external number (VoIP, fixed line
or mobile network number). The forwarding is done via a VoIP connection.
You can forward calls to your Gigaset.net number within the Gigaset.net, i.e. to
another Gigaset.net number.
You can define if and when calls to your Gigaset.net number and some of your VoIP
numbers (VoIP account) should be forwarded to this VoIP number.
You can also use the handset to set and activate/deactivate call forwarding,
£ Page 53.
¤ Open the following Web page: Settings ¢ Telephony ¢ Call Forwarding.
The display shows a list of all your configured VoIP connections and your
Gigaset.net number.
Connections
Select the name you have assigned to the VoIP number, or select Gigaset.net.
When
Select when a call to this VoIP number should be forwarded: When busy / No reply
/ Always. Select Off to deactivate call forwarding.
Call number
Enter the phone number to which the calls should be forwarded. Please note that
you may have to enter the area code when forwarding to a fixed line network
number in the same area (depending on your VoIP provider and the setting for the
automatic area code £ Page 124).
Version 8, 03.09.2008
The settings only affect the phone number selected in Connections.
123
Gigaset A580 IP / US English / A31008-xxxx-xxxx-x-xxxx / web_server.fm / 07.07.2010
Setting the phone with the PC
Entering your own area code, activating/deactivating an
automatic area code for VoIP
On the base station, save the complete code (with international code) for the area
in which you are using the phone.
For VoIP calls you must generally always dial the area code – even for local calls. You
can save the need to dial the area code for local calls by setting your phone to prefix
this code for all VoIP calls made in the same local area ( £ Predial area code for
local calls through VoIP option).
For calls made via VoIP, the area code entered is then prefixed to all numbers that
do not start with 0 – even when dialing numbers from the directory and other lists.
Exceptions: Phone numbers for which you have defined dialing plans and deactivated the Use Area Codes option (£ Page 125).
When making calls via the fixed line network, the area code entered is withheld, e.g.
when dialing using the Calls list (£ Page 61).
Please note
For information on entering your area code via the handset, £ Page 87.
¤ Open the following Web page: Settings ¢ Telephony ¢ Dialling Plans.
Area Area Codes
Make the following settings here:
¤ From the Country list, select the country in which you are using your phone. This
way the country code and the prefix of the area code are automatically set (in
International Prefix / Area Code and Local Prefix fields).
¤ In the Local Area Code field, enter the area code for your town/city without a
prefix (maximum 8 characters 0–9, *, #, R, P, r, p), e.g. 617 (for Boston).
¤ Select Yes next to Predial area code for local calls through VoIP to activate the
¤
function.
Select No to deactivate the function. You will then need to enter the area code
for local calls made via VoIP. Numbers in the directory must always contain the
area code when dialing via VoIP.
Select Set to save the settings.
Please note
u The area code will also be prefixed to VoIP calls made to emergency numbers if
Version 8, 03.09.2008
there are no defined dialing plans for these numbers.
u The numbers of your network mailbox saved in the base station are not prefixed with an area code (£ Page 127).
124
Gigaset A580 IP / US English / A31008-xxxx-xxxx-x-xxxx / web_server.fm / 07.07.2010
Setting the phone with the PC
Defining dialing plans – cost control
You can define dialing plans to reduce costs:
u You can define the connection (one of your VoIP accounts, the fixed line
network) through which calls to specific numbers should be made and paid for.
If you enter just a few digits (e.g. local area, national or cellular network code)
any call to a number beginning with these digits will be made via the elected
connection.
u You can block specific numbers, i.e. your phone will not establish a connection
to these numbers (e.g. 1900 numbers).
These dialing plans apply to all registered handsets. The settings for the default
connection (briefly press/press and hold c) and the send numbers of handsets
do not apply to numbers governed by a dialing plan.
Please note
You can override dialing plans, with the exception of blocks, as follows:
u Dial the number with a line suffix (e.g. 123456789#3, £ Page 38).
u Before entering the number, define another connection type by pressing the
§Phone§ or §IP§ Display key (£ Page 81).
If, for example, you press §Phone§, the number will be dialed via the fixed line network, even if the dialing plan states that a VoIP connection should be used.
Tips:
u Compare the rates for long-distance calls (especially for international calls)
offered by your fixed line network and VoIP providers, and determine which connection should be used specifically for these countries/locations, e.g. a dialing
plan for the Phone Number "01133" would apply to every call made to France.
u Use dialing plans to define that numbers starting with a call-by-call number are
always made via your fixed line network connection. To do so, enter the call-bycall number in the Phone Number field.
Defining dialing plans
¤ Open the following Web page: Settings ¢ Telephony ¢ Dialling Plans.
Area Dialling Plans
Specify dialing plans for your phone. Specify the following:
Phone Number
Enter the number or the first digits of the phone number (e.g. an area code) to
which the dialing plan should apply (maximum 15 digits).
Version 8, 03.09.2008
Use Area Codes
Activate this option if the area code is to be added automatically for all calls via VoIP
for the phone number in Phone Number or all phone numbers that begin with the
digits in Phone Number (£ Page 124).
125
Gigaset A580 IP / US English / A31008-xxxx-xxxx-x-xxxx / web_server.fm / 07.07.2010
Setting the phone with the PC
Connection Type
The list shows all the VoIP connections that you have configured as well as your
fixed line network connection. It also displays the name assigned to each connection.
¤ From the list, select the connection via which the number or numbers that start
with the specified sequence of digits should be dialed.
Or:
¤ Select Block if the number or numbers that start with the sequence of digits
should be blocked.
The display will show Not possible! if an attempt is made to dial a blocked
number.
Comment (optional)
You can enter a description of the dialing plan here (maximum of 20 characters).
¤ Select Add.
The dialing plan is activated immediately.
A new empty line for a new dialing plan will appear if your phone still has enough
space to add further plans.
Please note
If dialing plans overlap, the one with the greatest concordance will apply.
Example:
There is a dialing plan for the number "21" and one for the number "217". If you dial
"2171..." the second plan will apply; if you dial "2101..." the first plan will apply.
Examples
u You want to block your phone for all 1900 numbers.
Dialing plan:
Phone Number = 0190 Connection Type = Block
u All calls to the cellular phone network should be made via your VoIP connection with provider B.
Dialing plans:
Phone Number = 020 Connection Type = IP3, provider B
and the corresponding entries for "030" and "040", etc.
Activating/deactivating dialing plans
¤ Select the option in the Active column to activate/deactivate the corresponding
Version 8, 03.09.2008
dialing plan ( = activated).
A deactivated dialing plan will not take effect until it is reactivated.
126
Gigaset A580 IP / US English / A31008-xxxx-xxxx-x-xxxx / web_server.fm / 07.07.2010
Setting the phone with the PC
Deleting dialing plans
¤ Select Delete next to the dialing plan you wish to delete.
The dialing plan is deleted from the list immediately. The space in the list is released.
Please note
Predefined dialing plans set as defaults (for emergency numbers) cannot be deactivated and cannot be deleted.
Emergency numbers
Dialing plans for emergency numbers (e.g. the local emergency service number)
are preset for certain countries. The fixed line network is determined as the Connection Type.
These dialing plans cannot be deleted, deactivated or blocked. However, you can
change the Connection Type.
This should only be changed if the phone is not connected to the fixed line
network. If you choose a VoIP connection, please make sure the VoIP provider supports calls to emergency numbers.
If no emergency numbers are set by default, define dialing plans for emergency
numbers yourself and assign them to a connection that you know supports emergency calls. Deactivate the Use Area Codes option for these dialing plans. Calls to
emergency numbers are always supported by fixed line networks.
Warning
u Emergency numbers cannot be dialed if the keypad lock is activated. Before
dialing, press and hold the Pound key #, to release the keypad lock.
u If you have activated an automatic area code (£ Page 124) and if no dialing
plan for emergency numbers is defined, the area code will also be prefixed to
emergency calls made via VoIP.
Activating/deactivating network mailbox, entering numbers
Many fixed network providers and VoIP providers offer answer machines on the
network – these are known as network mailboxes.
Each network mailbox accepts incoming calls made via the corresponding line
(fixed line network or corresponding VoIP phone number).
You can enter the relevant network mailbox for each configured connection (VoIP,
fixed line network) via the Web configurator. You can activate or deactivate the network mailbox for your VoIP connections.
¤ Open the following Web page: Settings ¢ Telephony ¢ Network Mailbox.
Version 8, 03.09.2008
A list with all possible connections is displayed on the Web page. The names of the
connections are displayed in the Connection column.
127
Gigaset A580 IP / US English / A31008-xxxx-xxxx-x-xxxx / web_server.fm / 07.07.2010
Setting the phone with the PC
Entering numbers
¤ Enter the network mailbox number in the Call number column after the desired
¤
connection.
With some VoIP providers your mailbox number will be downloaded together
with the general VoIP provider data (£ Page 110), saved to your base station
and displayed under Call number.
Select Set to save your settings.
Activating/deactivating the network mailbox
¤ You can activate ( ‰ ) and deactivate (
) individual network mailboxes using
the option in the Active column. Activating/deactivating is carried out by selecting the appropriate option. The change does not need to be saved.
Please note
You need to have requested the network mailbox for your fixed line network connection from your fixed line network provider.
Setting DTMF signaling for VoIP
DTMF signaling, for example, is required to check and control some network mailboxes via digit codes.
To send DTMF signals via VoIP you must first define how key codes should be converted into and sent as DTMF signals: as audible information via the speech channel
or as a "SIP Info" message.
Ask your VoIP provider which type of DTMF transmission it supports.
¤ Open the following Web page: Settings ¢ Telephony ¢ Advanced Settings.
Area DTMF over VoIP connections
Make the required settings for sending DTMF signals.
¤ Activate Audio or RFC 2833, if DTMF signals are to be transmitted acoustically
(in voice packets).
¤ Activate SIP Info if DTMF signals are to be transmitted as code.
¤ Select Set to save your settings.
Please note
u The settings for DTMF signaling apply to all VoIP connections (VoIP accounts).
u DTMF signals cannot be transmitted in the audio path (Audio) on broadband
Version 8, 03.09.2008
connections (the G.722 codec is used).
128
Gigaset A580 IP / US English / A31008-xxxx-xxxx-x-xxxx / web_server.fm / 07.07.2010
Setting the phone with the PC
Defining Flash key functions for VoIP (hook flash)
Your VoIP provider may support special performance features. To make use of these
features, your phone needs to send a specific signal (data packet) to the SIP server.
You can assign this "signal" to your phone's Flash key.
If you press the Flash key during a VoIP call the signal will be sent to the server.
Prerequisite:
u DTMF reminders via SIP info messages is activated, i.e. the option SIP Info on this
Web page is activated (£ Page 128).
u The S key is not used for call forwarding, i.e. Use the R key to initiate call
transfer with the SIP Refer method. = No is set for call forwarding
(£ Page 129).
If one of these prerequisites is not fulfilled, the field in the Hook Flash (R-key) area
is hidden.
¤ Open the following Web page: Settings ¢ Telephony ¢ Advanced Settings.
Area Hook Flash (R-key)
¤ In the Application Type fields, (maximum 31 characters) and Application Signal
fields (maximum 15 characters) enter the data that you have received from your
VoIP provider.
¤ Select Set to save your settings.
The setting for the Flash key applies to all registered handsets.
Configuring call forwarding via VoIP
If you are toggling calls via VoIP connections, you can connect the two external callers (provider-dependent). You can configure settings for this type of call forwarding.
¤ Open the following Web page: Settings ¢ Telephony ¢ Advanced Settings.
Area Call Transfer
¤ Make your settings for call forwarding via VoIP in the following fields:
Use the R key to initiate call transfer with the SIP Refer method.
If you activate the Yes option, the two external parties you are toggling between
will be connected when you press the End Call key S. Your connections with the
callers will be terminated.
Version 8, 03.09.2008
Transfer Call by On-Hook
If you select Yes, the external parties you are toggling between will be connected
when you press the End Call key a. Your connections with the callers will be terminated.
129
Gigaset A580 IP / US English / A31008-xxxx-xxxx-x-xxxx / web_server.fm / 07.07.2010
Setting the phone with the PC
Preferred Refer To
Define the protocol (the contents of the "Refer To" information) that should be used
with preference when forwarding calls:
Target’s contact info
This protocol is recommended for "closed" networks (internal company and
business networks).
Original URL
This protocol is recommended when the base station is connected to the Internet via a router with NAT.
Automatic Refer To
If you select Yes, the base station will automatically attempt to determine the best
protocol.
If the base station cannot determine the best protocol, it will use the protocol
defined in Preferred Refer To.
¤ Select Set to save your settings.
Please note
For information on forwarding a call when you deactivate both Use the R key to
initiate call transfer with the SIP Refer method. and Transfer Call by On-Hook,
£ Page 55.
Defining local communication ports for VoIP
Specify which local communication ports (port numbers) the telephone is to use
for VoIP telephony. The ports must not be used by any other subscriber in the LAN.
The following communication ports are used for VoIP telephony:
u SIP port
Communication port via which the phone receives (SIP) signaling data.
u RTP port
Two consecutive RTP ports (consecutive port numbers) are required for each
VoiP connection. Voice data is received via one port and control data via the
other.
You can set port numbers or port number areas for SIP and RTP ports, or set your
telephone so that it can use any number of free ports from a predefined range of
port numbers.
Version 8, 03.09.2008
¤ Open the following Web page: Settings ¢ Telephony ¢ Advanced Settings.
130
Gigaset A580 IP / US English / A31008-xxxx-xxxx-x-xxxx / web_server.fm / 07.07.2010
Setting the phone with the PC
Area Listen ports for VoIP connections
Use random ports
Click No if you want the phone to use the ports specified in the fields SIP port and
RTP port.
Click Yes if you do not want the phone to use fixed ports for SIP port and RTP port,
but rather to use any free ports from predefined ranges of port numbers.
The use of random ports makes sense if you want several phones to be operated on
the same router with NAT. The phones must then use different ports so that the
router's NAT is only able to forward incoming calls and voice data to one (the
intended) phone.
Use random ports = No
SIP port
Specify the port number for the SIP port. Enter a number between 1024 and 49152
in the field.
The default port number for SIP signaling is 5060.
The port number specified must not be in the RTP port number range.
RTP port
Specify a range of port numbers that are to be used as RTP ports. This range must
be used in the LAN (router) for the phone.
Enter the lowest port number in the left-hand field and the highest number in the
right-hand field (numbers between 1024 and 55000).
Size of the port number range:
The difference between the port numbers must be at least 6 if you permit two
simultaneous VoIP calls on your phone. The difference must be at least 4 if you only
permit one VoIP call ( ¢ Allow 1 VoIP call only option on Page 118).
The lower of the port numbers in the range (in the left-hand field) must be an even
number. If you enter an odd number, the next lower even number will be selected
automatically (e.g. if you enter 5003, then 5002 is set automatically).
The default port number for voice transmission is 5004.
Use random ports = Yes
SIP port
Enter the port number range from which the SIP port is to be selected.
Specify the lowest port number in the left-hand field and the highest number in the
right-hand field (number between 1024 and 49152).
This port number range must not overlap the range specified for RTP port.
The default range is 5060 to 5076.
RTP port
Specify a range of port numbers from which the RTP ports are to be selected.
Specify the lowest port number in the range in the left-hand field and the highest
number in the right-hand field.
The default range is 5004 to 5020.
Version 8, 03.09.2008
¤ Select Set to save your settings.
131
Gigaset A580 IP / US English / A31008-xxxx-xxxx-x-xxxx / web_server.fm / 07.07.2010
Setting the phone with the PC
Messaging
Your Gigaset A580 IP base station has messaging functions that can be used via a
messaging capable handset, e.g. a Gigaset S67H, S68H, SL37H or C47H handset,
which you can register to your base station.
The following messaging functions are available:
u Messenger functions
The messenger client in your base station enables instant messaging (immediate message transfer, chatting). The phone supports the XMPP messenger (Jabber).
u E-mail functions
Your phone checks at regular intervals whether new e-mail messages have
arrived in your incoming e-mail server. New e-mail messages are displayed on a
messaging-capable handset in the form of e-mail notifications (e-mail sender
and subject). You can read approximately the first 500 to 600 characters of a text
e-mail on the handset.
Saving messenger access data
To use your base station's messenger functions, you need to register a handset with
messaging capability and save the access data for your message server in the
phone.
Your base station is already registered with the Gigaset.net Jabber server. An
account has been assigned to your phone. You can chat to other Gigaset.net subscribers via this account. To do this, you need to log on to the Gigaset.net message
server via your PC's Web browser using only this account, and then create a Buddy
list ( £ "Setting up a Gigaset.net Jabber account", Page 133).
You can also register with another instant messaging provider that supports XMPP
Messenger (Jabber).
In order for you to use your phone's messenger to "go online" and "chat" on the
Internet, the access data of a message server must be saved on your phone.
You can define a Resource name and a Priority for your phone. Both are required if
you are logged in (online) with the message server with several devices (phone,
desktop PC and laptop) at the same time using the same Jabber ID.
The Resource name is used to distinguish between these devices. The phone cannot log in to the message server if it does not have a resource name.
Assign a Priority as each message will only be sent to one device for each Jabber ID.
The Priority determines which of the devices receives the message.
Version 8, 03.09.2008
Example
You are online using one of your phone's handsets and your PC both at the same
time. You have assigned your phone (Resource name "phone") Priority 5 and your
PC (Resource name "PC") priority 10. In this case, any message addressed to your
Jabber ID will be sent to your phone.
¤ Open the following Web page: Settings ¢ Messaging ¢ Messenger.
132
Gigaset A580 IP / US English / A31008-xxxx-xxxx-x-xxxx / web_server.fm / 07.07.2010
Setting the phone with the PC
¤ In the Messenger Account field, select whether you wish to use the Gigaset.net
¤
¤
¤
¤
¤
¤
Jabber server or another provider's message server (Other).
The access data for Gigaset.net is already stored in the base station. It is displayed in Jabber ID, Authentication password and Jabber server. With this
data you can also register with the Gigaset.net Jabber server through your PC.
Enter the user ID (maximum 50 characters) and password (maximum
20 characters) that you used to register with the message server in the Jabber
ID and Authentication password fields. If you have selected = Messenger
Account Gigaset.net, the fields are preset with your Gigaset.net account.
In the Jabber server field, enter the IP address or the DNS name of the message
server with which you are registered for instant messaging.
Max. 74 alphanumeric characters.
If you have selected Messenger Account = Gigaset.net, the field is preconfigured with the name of the Gigaset.net server.
Enter the number of the communication port on the Jabber server in the Jabber
server port field. The default port is 5222.
If you have selected Messenger Account = Gigaset.net, the port number is preconfigured.
Enter a resource name (maximum 20 characters) in the Resource field.
The default is phone.
Enter the priority for your phone in the Priority field. Select a number between
-128 (highest priority) and 127 (lowest priority) for the priority.
The default is: 5
Select Set.
Setting up a Gigaset.net Jabber account
Your phone is already registered with the Gigaset.net Jabber server. An account has
been assigned to your phone.
To chat with other Gigaset.net subscribers via this account, you must transfer the
required Gigaset.net subscribers to a Contact list (Buddy list) on your PC. You can
use any conventional Jabber client for this (e.g. PSI, Miranda; see e.g. http://
www.swissjabber.ch).
Do the following to use your Gigaset.net Jabber account:
¤ Start the Web configurator, open the Settings ¢ Messaging ¢ Messenger
¤
¤
Version 8, 03.09.2008
¤
Web page and select the Messenger Account Gigaset.net field. Your account
data is displayed in Jabber ID and Authentication password. You will need
these to create a Buddy list via the Jabber client on the PC.
Start your Jabber client on the PC.
Enter your Gigaset.net Jabber ID on the Jabber client as a new account. The Jabber ID consists of your Gigaset.net number and "@jabber.gigaset.net"
Example: 12345678901#[email protected]
Then enter your Authentication password.
133
Gigaset A580 IP / US English / A31008-xxxx-xxxx-x-xxxx / web_server.fm / 07.07.2010
Setting the phone with the PC
Please note
u Do not select the option "Create new account". Your Gigaset.net Jabber
account has already been created in Gigaset.net.
u The option "SSL connection" must be deactivated in the Jabber client.
¤ Now you can enter Gigaset.net subscribers as contacts (buddies).
For the Jabber ID of each subscriber, enter the subscriber's Gigaset.net number
with "@jabber.gigaset.net" (example: 2141524901#[email protected]).
A request to "Add to Contact list" will be sent to the subscriber.
If the subscriber accepts this request, they will be added to your Buddy list.
Please note
For information on going online with your messaging-capable handset and chat
with or call buddies, please see the extensive user guides for the Gigaset S675 IP
or C470 IP for example. These are available on the Internet at:
www.gigaset.com
Configuring incoming e-mail
You must store the address or DNS name of your incoming e-mail server and your
personal access data in the phone and activate the e-mail check with the incoming
e-mail server, so that the phone can establish a connection to the incoming e-mail
server and connect to your mailbox.
¤ Open the following Web page: Settings ¢ Messaging ¢ E-Mail.
¤ Enter the user name (account name) agreed with the Internet provider (maximum 74 characters) in the Authentication Name field.
¤ Enter the password agreed with the provider for accessing the incoming e-mail
¤
¤
¤
server (maximum 32 characters; case sensitive) in the Authentication password
field.
Enter the name of the incoming e-mail server (POP3 server) (maximum 74 characters) in the POP3 Server field. Example: pop.theserver.com.
Select from the Check for new e-mail list the time interval at which your phone
should check whether new messages have arrived in your incoming e-mail
server. Select Never to deactivate the request. Select one of the other values to
activate the prompt for new e-mail messages.
Select the Set button to save the settings in your phone.
Version 8, 03.09.2008
Please note
For information on how e-mail messages are displayed and opened on the messaging-capable handset, please see the extensive user guides for the Gigaset S675
IP or C470 IP for example. These are available on the Internet at:
www.gigaset.com
134
Gigaset A580 IP / US English / A31008-xxxx-xxxx-x-xxxx / web_server.fm / 07.07.2010
Setting the phone with the PC
Configuring info services/activating idle display
You can configure your registered Gigaset A58H handsets to display customized
text information (e.g. weather reports, RSS feeds) in the idle display. To do this you
must set the Info Services screensaver on the handset (£ Page 79). The same
applies to a registered Gigaset C38H handset.
Configuring info services
Please note
The weather report is preset. It is shown in the handset's idle display as soon as you set the
Info Services as the screensaver.
¤ Open the following Web page: Settings ¢ Services.
¤ Click the link in the Info Services Configuration area.
www.gigaset.net/myaccount
or enter the URL into the address field of a different browser window.
The Web page for Gigaset.net info services is opened. You are now registered
with your Gigaset.net user ID. Your Gigaset.net user ID and password are displayed in the Info Services Configuration area of the Web configurator Services
page.
This will open a website where you can compile your info service.
¤ Define which information should be sent regularly to your handset.
Activating the display of info services for Gigaset S67H, S68H, SL37H
and C47H handsets
Version 8, 03.09.2008
You can also display the selected text information on a Gigaset S67H, S68H, SL37H
or C47H handset that is registered to your base station.
If one of these handsets is registered to your base station the Activate Info Services
area in which you can activate the display for these handsets is displayed on the
Services Web page.
¤ Open the following Web page: Settings ¢ Services.
¤ In the Activate Info Services area, activate Yes / No to activate or deactivate the
display of text information.
¤ Select the Set button to save the settings in your phone.
If text information is available it is displayed (in idle display) on all registered
Gigaset S67H, S68H, SL37H or C47H handsets for which the digital clock is set as the
screensaver.
The text information overwrites the digital clock.
135
Gigaset A580 IP / US English / A31008-xxxx-xxxx-x-xxxx / web_server.fm / 07.07.2010
Setting the phone with the PC
Changing internal handset numbers and names
Each handset is automatically assigned an internal number (1 to 6) and an internal
name ("INT 1", "INT 2", etc.) when it registers with the base station (£ Page 71).
The internal numbers and names of all registered handsets can be changed.
Please note
For information on changing internal names and numbers, £ Page 73.
¤ Open the following Web page: Settings ¢ Handsets.
The names and internal numbers of all registered handsets are displayed in the
Registered Handsets area.
¤ Select the handset whose number/name you want to change.
¤ Changing numbers: Select the internal number that you want to assign to the
handset in the No. column of the handset. If a handset with this internal number
already exists, you will also have to change the number assigned for this handset. The internal numbers 1-6 can only be assigned once each.
¤ Changing names: If necessary, change the name of the handset in the Name
column. The name may contain up to 10 characters.
¤ If necessary, repeat the process for other handsets.
¤ Select Set to save the settings.
The changes are saved in the internal lists of all registered handsets. Handsets are
sorted by their internal numbers in the internal list. The order of the handsets in the
list can be changed.
Please note
If an internal number has been entered twice, a message will appear. The internal
numbers are not changed.
Version 8, 03.09.2008
Transferring handset directories to/from the PC
The Web configurator has the following options for editing the directories of the
registered handsets.
u Store the handset directories on a PC. Entries are stored in vCard format in a vcf
file on the PC. You can edit these files with an ASCII editor (e.g. Notepad/Editor
in Windows Accessories) and load them onto any registered handset. You can
also transfer directory entries to your PC address book (e.g. Outlook Express™
address book).
u Transfer contact details from your PC address book to handset directories.
Export the contacts, e.g. with Outlook Express ™ to vcf files (vCards) and transfer
them to handset directories using the Web configurator.
u Delete the directory on the handset. If you have edited the directory file (vcf file)
on the PC and would like to use this modified directory on the handset, you can
delete the current directory from the handset first.
Tip: Back up the current directory on your PC before deleting it. You can then
reload it onto the handset if the modified directory is affected by formatting
errors and some, or all, of it cannot be loaded onto the handset.
136
Gigaset A580 IP / US English / A31008-xxxx-xxxx-x-xxxx / web_server.fm / 07.07.2010
Setting the phone with the PC
Please note
u You can find information on the vCard format (vcf ) on the Internet, e.g. at:
www.en.wikipedia.org/wiki/VCard or www.de.wikipedia.org/wiki/VCard
(You can set the display language at the bottom left-hand side in the navigation area of the Web page.)
u To transfer a handset directory (vcf file) saved on the PC that contains numerous
entries to a Microsoft Outlook™ address book, be aware that Microsoft Outlook™ only transfers the first (directory) entry from the vcf file to its address
book.
Prerequisites:
u The handset can send and receive directory entries.
u The handset is activated and is in idle status.
¤ Open the following Web page: Settings ¢ Handsets.
The names of all registered handsets are displayed in the Directory area.
¤ Select the handset for which you want to save or edit the directory. To do this,
click on the option before the handset.
Loading the directory file from the PC to the handset
¤ In the Transfer directory to handset area, specify the vcf file you want to load
on to the handset (complete path name), or select Browse... and navigate your
way to the file.
¤ Select Transfer button to start the transfer.
The display will show how many of the entries from the vcf file are being transferred
to the directory.
Transfer rules
The directory entries from a vcf file that are loaded onto the handset will be added
to the directory. If an entry already exists for a name, it will either be supplemented
or a new entry for the name will be created. The process will not overwrite or delete
any phone numbers.
Please note
Depending on your handset type, up to three entries with the same name will be
created in the handset directory for each vCard – one entry per entered number.
Loading the directory from the handset to the PC
¤ Select Save in the Handset Directory area. A Windows dialog box will be shown
to save the file.
¤ Enter the directory on the PC (complete path name) in which the directory file is
Version 8, 03.09.2008
to be stored. Select Save or OK.
137
Gigaset A580 IP / US English / A31008-xxxx-xxxx-x-xxxx / web_server.fm / 07.07.2010
Setting the phone with the PC
Deleting the directory
¤ Select Delete in the Handset Directory area.
¤ Confirm the security prompt Telephone directory of the selected handset will
be deleted. Continue? with OK.
This deletes all the entries in the directory,.
Please note
For deleting the directory on the handset, £ Page 64.
Directory file content (vcf file)
The following data (if available) is written into the vcf file for entry into the directory
or transferred from a vcf file into the handset directory.
§§1§§ Name
§§2§§ First name
§§3§§ Number
§§4§§ Number (office)
§§5§§ Number (cell)
§§6§§ E-mail address
§§7§§ Date (YYYY-MM-DD) and time of the reminder call (HH:MM) separated by a "T"
(example: 2008-01-12T11:00).
§§8§§ Identification as VIP (X-SIEMENS-VIP:1)
Other information that a vCard may contain is not entered into the handset directory.
Example for an entry in vCard format:
BEGIN:VCARD
VERSION:2.1
N:Smith;Anna
TEL;HOME:1234567890
TEL;WORK:0299123456
TEL;CELL:0175987654321
EMAIL:[email protected]
BDAY:2008-01-12T11:00
X-SIEMENS-VIP:1
END:VCARD
Activating VoIP status message display
Version 8, 03.09.2008
You can display VoIP status messages on your handset when there are VoIP connection problems. These messages give you information on the status of a connection
and contain a provider-specific status code that helps the service team when they
are analyzing the problem.
¤ Open the following Web page: Settings ¢ Handsets.
138
Gigaset A580 IP / US English / A31008-xxxx-xxxx-x-xxxx / web_server.fm / 07.07.2010
Setting the phone with the PC
Area VoIP Status
¤ Select Yes after Show VoIP status on handset to activate the status message dis¤
play.
If you select No, no VoIP status messages are displayed.
Select Set to save the changes.
Please note
This user guide contains a table with possible status codes and their definitions,
£ Page 147.
Starting a firmware update
If necessary, you can load updates of the base station firmware onto your phone.
The server on which Gigaset Communications makes new firmware versions available for your base station is set by default. The URL of the Internet server is displayed in the Data server field.
Only change this URL when requested by Customer Care. This address is also used
to load provider information from the Internet. Make sure you write down the
default URL exactly before changing it. Otherwise, you will only be able to reactivate the default URL by resetting the base station back to the default settings
(£ Page 86).
Please note
u When updating from the Internet, checks are made to ensure that no newer
version of the firmware exists. If this is not the case, the operation is terminated.
u The firmware is only loaded from the Internet if you have not entered a local file
in the User defined firmware file field prior to the update.
Prerequisites:
u No calls are being made via the fixed line network or VoIP.
u There is no internal connection between registered handsets or to GHC devices.
u The base station menu is not open in any of the handsets.
¤ Open the following Web page: Settings ¢ Miscellaneous.
¤ Select the Update Firmware button.
The firmware is updated. This process can take up to three minutes.
Version 8, 03.09.2008
Please note
You can also start the firmware update on the handset (£ Page 88).
139
Gigaset A580 IP / US English / A31008-xxxx-xxxx-x-xxxx / web_server.fm / 07.07.2010
Setting the phone with the PC
Firmware update from local firmware file
In extraordinary circumstances you may receive, for example, a firmware file from
Service that you can upload from your PC to your telephone (e.g. because the
firmware update via the Internet did not work).
Prerequisite: A Web server is running on the local PC (e.g. Apache).
¤ First load the firmware file onto your PC.
¤ In the User defined firmware file field enter the IP address of the PC in your local
network and the complete path and name of the firmware file on the PC (maximum 74 characters).
Example: 192.168.2.105/A580IP/FW_file.bin.
Select Set to save the changes.
¤
¤ Select the Update Firmware button to start the update.
This setting is automatically used for this particular firmware update. The URL in
the Data server field is saved and used again for subsequent firmware updates. You
will have to re-enter the IP address and file name to carry out another update with
a firmware file on your local PC.
Please note
If an error occurs during a firmware update from a local PC, the most recent version
of the firmware is automatically downloaded from the Internet.
Activating/deactivating the automatic version check
When the version check is activated, the phone checks on a daily basis whether the
Gigaset configuration server has a new version of the phone firmware/provider
profile (general provider data).
If a new version is available, a notification is sent to the handset and the Message
key flashes. You can then perfom an automatic update of the firmware (£ Page 89)
or carries out a provider data update.
¤ Open the following Web page: Settings ¢ Miscellaneous.
¤ Select Yes next to Automatic check for software/profile updates to activate the
¤
automatic version check.
Select No if you do not want a version check to be carried out.
Select Set to save the changes.
Version 8, 03.09.2008
Please note
If the telephone is not connected to the Internet at the time when the check for
new firmware is to be carried out (e.g. because the router is deactivated), the check
is carried out as soon as the phone is reconnected to the Internet.
140
Gigaset A580 IP / US English / A31008-xxxx-xxxx-x-xxxx / web_server.fm / 07.07.2010
Setting the phone with the PC
Copying the date/time from time server
The date and time are shown in the idle display of registered handsets. They are
important, for example, for stating the correct time in the Calls list and for the
"alarm clock" function.
There are two methods for updating the time and date on your base station: manually with one of the registered handsets (£ Page 14) or automatically by synchronization with a time server on the Internet.
Activate/deactivate synchronization with a time server as follows:
¤ Open the following Web page: Settings ¢ Miscellaneous.
¤ In the Automatic adjustment of System Time with Time Server field select Yes
to activate synchronization between base station and a time server. If you select
No the base station will not adopt time settings from a time server. In this case
set the time and date manually using a handset.
¤ The Last synchronisation with time server field shows the last time the base
station compared the time and date settings with a time server.
¤ In the Time Server field, enter the Internet address or name of the time server
¤
¤
¤
¤
from which the base station should adopt its time and date settings (maximum
74 characters). The time server "europe.pool.ntp.org" is set as default on the
base station. You can overwrite the setting.
From the Country list, select the country in which your base station is being
operated.
The Time Zone field shows the valid time zone for the Country. It shows the
deviation between local time (not daylight saving time) and Greenwich Mean
Time (GMT).
If a country is divided into various time zones, they will all appear in the list.
Select the appropriate Time Zone for the base station from the list.
The Automatically adjust clock to summer-time changes field is displayed if
your time zone differentiates between daylight saving time and standard time.
Select On to change the time automatically to daylight saving time or standard
time when daylight saving time begins and ends respectively.
Select Off if you do not want to change to daylight saving time.
Please note: If the date and time are updated by a time server that automatically
switches between daylight saving time and standard time, you must always
select Off here.
Select the Set button to save the settings in your phone.
Version 8, 03.09.2008
Once you have activated synchronization, the time and date will be compared with
a time server as soon as an Internet connection is established.
Synchronization will usually occur once a day (at night) if synchronization is activated. Any additional synchronization will take place only after each new system
start of the base station (e.g. after a firmware update or a power cut).
If you register a new handset on your base station it will assume the time and date
of the base station without any additional synchronization with the time server.
Date and time settings are transferred to every handset after synchronization.
141
Gigaset A580 IP / US English / A31008-xxxx-xxxx-x-xxxx / web_server.fm / 07.07.2010
Setting the phone with the PC
Please note
u The default time server "europe.pool.ntp.org" will remain stored in the base sta-
tion even if you overwrite it. If you delete your time server from the Time Server
field and synchronization is still activated, the base station will continue to synchronize with the default time server. However, it will no longer appear in
the Time Server field.
u If you have entered your own time server in the Time Server field and the base
station is unable to synchronize for ten consecutive attempts, the base station
will synchronize with the default time server.
u If you have deactivated synchronization with a time server, and if the date and
time are not set on any handset, then the base station will attempt to reference
date and time settings from the CID information of an incoming call.
Querying the phone status
General information about your phone is displayed.
¤ In the menu list, select the Status tab.
The following information is displayed:
Area: IP Configuration
IP address The phone's current IP address within the local network. For information on assigning the IP address, £ Page 104.
MAC address
The phone's device address.
Area: Software
Firmware version
Version of the firmware currently downloaded. You can download updates of the
firmware to your phone (£ Page 88). Firmware updates are available on the Internet.
Version 8, 03.09.2008
EEPROM version
Version of your phone's EEPROM storage chip (£ Page 175).
142
Gigaset A580 IP / US English / A31008-xxxx-xxxx-x-xxxx / appendix.fm / 07.07.2010
Getting help with your phone
Getting help with your phone
Questions and answers
If you have any questions about the use of your phone, you can contact us 24/7 at
www.gigaset.com/customercare. The table below contains a list of common problems and possible solutions.
Please note
To ensure the quickest and most efficient response from Customer Service, please
have the following information available:
u Version of firmware, EEPROM and your phone's MAC address
You can check this information with the Web configurator (£ Page 142). For
displaying the MAC address on your handset, £ Page 94
u VoIP status code (£ Page 147)
For problems with VoIP connections, set VoIP status messages to be displayed
on your handset (£ Page 91, Page 138). These messages contain a status code
that helps when the problem is analyzed.
The display is blank.
¥
1. The handset is not switched on.
Press and hold the End Call key a.
¥
£ Page 11).
2. The battery is flat.
Charge the battery or replace it (
"Base" flashes in the display.
1. The handset is out of range of the base station or the base station's range has decreased
because Eco mode is active.
Move the handset closer to the base station.
If necessary, deactivate Eco mode ( Page 69).
¥
¥
¥
£
£
2. The handset has been deregistered.
Register the handset ( Page 71).
¥
3. The base station is not turned on.
Check the base station's power adapter (
£ Page 18).
¥
4. The base station firmware is currently being updated (automatically).
Please wait until the update is complete.
Handset does not ring.
¥
£
1. The ringer melody is deactivated.
Activate the ringer melody ( Page 83).
¥
Version 8, 03.09.2008
2. Call forwarding set to All Calls.
Deactivate call forwarding (VoIP
£ Page 53/Page 123).
143
Gigaset A580 IP / US English / A31008-xxxx-xxxx-x-xxxx / appendix.fm / 07.07.2010
Getting help with your phone
You cannot hear a ringer melody/dialing tone from the fixed line network.
The phone cord supplied has not been used or has been replaced by a new cord with the
wrong pin connections.
Please always use the phone cord supplied or ensure that the pin connections are correct
when purchasing from a retailer ( Page 154).
¥
£
Error tone sounds after system PIN prompt.
¥ Re-enter system PIN.
Have you forgotten the system PIN?
¥ Reset the base station to set the system PIN back to 0000 (£ Page 86).
You have entered the wrong system PIN.
The other party cannot hear you.
You have pressed the k key or the §Mute§ Display key. The handset is "muted".
Press the Ç or §On§ Display key to re-activate the microphone ( Page 45).
¥
£
£
When making calls from the fixed line network, the caller's phone number is not displayed
although CID ( Page 42) is set.
¥
Caller ID is not enabled.
The caller should ask his network provider to enable Caller ID (CID).
You hear an error tone when keying an input (a descending tone sequence).
¥
Action has failed/invalid input.
Repeat the operation.
Watch the display and refer to the user guide if necessary.
You cannot connect to the router and the phone is assigned a static IP address.
¥
¥
Check on the router whether the IP address is already being used by another device in the
LAN or belongs to the block of IP addresses that is reserved on the router for dynamic
address assignment.
If necessary, change the phone's IP address ( Page 92).
£
You have made a call via VoIP but cannot hear the other caller.
¥
¥
£
£
Your phone is connected to a router with NAT/firewall.
Your STUN server ( Page 113) or outbound proxy ( Page 114) settings are incomplete or incorrect. Check the settings.
No outbound proxy is entered or the outbound proxy mode Never is activated
( Page 114) and your phone is connected to a router with symmetric NAT or a blocking
firewall.
Port forwarding is activated on your router, but no permanent IP address has been
assigned to your phone.
¥
£
You cannot make calls via VoIP. Server not accessible! is displayed.
¥
First wait a few minutes. This is often a short-term event that corrects itself after a short
time.
If the message continues to be displayed, proceed as follows:
Check whether your phone's Ethernet cable is correctly connected to the router.
Check your router's cable connection to the Internet.
Check whether the phone is connected to the LAN. Send a ping command, e.g. from your
PC, to the phone (ping s <local IP address of the phone>). It may be that no IP address
could be assigned to the phone or a permanently set IP address is already assigned to
another LAN subscriber. Check the settings on the router, you may have to activate the
DHCP server.
Version 8, 03.09.2008
¥
¥
¥
144
Gigaset A580 IP / US English / A31008-xxxx-xxxx-x-xxxx / appendix.fm / 07.07.2010
Getting help with your phone
¥
You cannot make calls via VoIP. SIP registration failed is displayed.
First wait a few minutes. This is often a short-term event that corrects itself after a short
time.
The message may still be displayed for the following reasons:
1. The personal VoIP access data ( Username, Authentication Name and Authentication
Password) that you have entered is incomplete or incorrect.
Check your information. Particularly check your use of upper and lower case.
¥
2. The general settings for your VoIP provider are incomplete or incorrect (incorrect server
address).
Start the Web configurator and check the settings.
¥
You cannot make calls via VoIP. VoIP config. error: xxx appears in the display
(xxx = VoIP status code).
¥
You are trying to make a call via a VoIP connection that is not properly configured.
Start the Web configurator and check the settings. Possible status codes and their meanings are listed on Page 147.
The phone does not dial an entered number. The display shows Not possible!.
¥
The number may be blocked (dialing plan).
Open the Dialling Plans Web page of the Web configurator and delete or deactivate the
block if necessary.
You cannot establish a connection to the phone with your PC's Web browser.
¥
¥
¥
¥
When establishing a connection, check the phone's local IP address that has been
entered. You can check the IP address on your handset.
Check the LAN connections for the PC and phone.
Check that your phone can be reached. Send a ping command, e.g. from your PC, to the
phone (ping s <local IP address of the phone>).
You have tried to reach the phone via a secure http (https://…).
Try again with http://…
You cannot be reached for calls from the Internet.
Version 8, 03.09.2008
¥
¥
¥
£
There is no entry for your phone in your router's routing table. Check the settings for the
NAT refresh time ( Page 114).
Your phone is not registered with the VoIP provider.
You have entered the wrong user ID or an incorrect domain ( Page 111).
£
145
Gigaset A580 IP / US English / A31008-xxxx-xxxx-x-xxxx / appendix.fm / 07.07.2010
Getting help with your phone
No firmware update or VoIP profile download is carried out.
1. If Not possible, try later. is displayed, the VoIP connections may be busy or a download/
update is already being carried out.
Repeat the process at a later time.
¥
¥
2. If File corrupt is displayed, the firmware or profile file may be invalid.
Please only use firmware and downloads that are available on the preconfigured
Gigaset configuration server ( Page 139) or at
www.gigaset.com/customercare.
£
¥
¥
3. If Server not available is displayed, the download server may not be accessible.
The server is currently not accessible. Repeat the process at a later time.
You have changed the preconfigured server address ( Page 139). Correct the
address. If necessary, reset the base station.
£
4. If Transmission error XXX is displayed, an error has occurred during the transmission of
the file. An HTTP error code is displayed for XXX.
Repeat the process. If the error occurs again, consult the Service department.
¥
¥
¥
5. If Check IP settings. is displayed, your phone may not be connected to the Internet.
Check the cable connections between the phone and router and between the router
and the Internet.
Check whether the phone is connected to the LAN, i.e. it can be reached at its IP
address.
You cannot listen to or control a network mailbox.
VoIP:
Your VoIP provider does not support the type of DTMF signaling set up on your phone.
Ask your VoIP provider which signaling it supports and change the settings on your
phone ( Page 128) if necessary.
When operating the base station within a PABX:
Your PABX is set for dial pulsing.
Set your PABX to touch tone dialing.
¥
£
¥
No time is specified for a message in the Calls list.
¥
¥
£
Version 8, 03.09.2008
Date and time have not been set.
Set date/time ( Page 14) or
Activate base station synchronization with a time server on the Internet (
146
£ Page 141).
Gigaset A580 IP / US English / A31008-xxxx-xxxx-x-xxxx / appendix.fm / 07.07.2010
Getting help with your phone
Using VoIP status codes
Version 8, 03.09.2008
If you have problems with your VoIP connections, activate the Status on HS function (£ Page 94, Page 138). You will then receive a VoIP status code that will support you during the problem analysis. Provide the code to the Service department
during the problem analysis.
In the following tables you will find the meaning of the most important status
codes and messages.
Status
code
Meaning
0x31
VoIP config. error: IP domain not entered.
0x33
VoIP config. error: SIP user name (Authentication Name) not entered.
This is shown, for example, when dialing with a line suffix, if no connection is configured for the suffix on the base station.
0x34
VoIP config. error: SIP password (Authentication password) not entered.
0x300
The called party can be reached under several phone numbers. If the VoIP provider
supports this, a list of the phone numbers is transmitted as well as the status code.
The caller can select to which number he wants to make the connection.
0x301
Permanently redirected.
The called party can no longer be reached under this number. The new number is
transferred to the phone together with the status code, and the phone then no
longer accesses the old number but dials the new address immediately.
0x302
Temporarily redirected.
The phone is informed that the called party cannot be reached under the dialed
number. The call is redirected for a limited period. The phone is also notified of the
length of the redirection.
0x305
The query is sent to a different "proxy server", e.g. to balance incoming queries. The
phone will make the same query once again to another proxy server. This is not a
redirection of the address per se.
0x380
Other service:
The query or call could not be transferred. But the phone is notified what other
options there are to connect the call.
0x400
Wrong call
0x401
Not authorized
0x403
The requested service is not supported by the VoIP provider.
0x404
Wrong phone number.
No connection on this number.
Example: In a local call you have not dialed the area code although your VoIP provider does not support local calls.
0x405
Method not permitted.
0x406
Not acceptable.
The requested service cannot be provided.
0x407
Proxy authentication required.
0x408
The party cannot be reached (e.g. account has been deleted).
0x410
The requested service is not available from the VoIP provider.
147
Gigaset A580 IP / US English / A31008-xxxx-xxxx-x-xxxx / appendix.fm / 07.07.2010
Version 8, 03.09.2008
Getting help with your phone
148
Status
code
Meaning
0x413
Message is too long.
0x414
URI is too long.
0x415
Query format is not supported.
0x416
URI is faulty.
0x420
Incorrect ending
0x421
Incorrect ending
0x423
The requested service is not supported by the VoIP provider.
0x480
The dialed number is temporarily unavailable.
0x481
The recipient is not available.
0x482
Double service query
0x483
Too many "jumps":
The query was rejected because the service server (proxy) has decided that this
query has already passed through too many service servers. The maximum
number is defined beforehand by the original sender of the query.
0x484
Wrong number:
In most cases this response means that you have simply omitted one or more digits in the phone number.
0x485
The URI dialed is not unique and cannot be processed by the VoIP provider.
0x486
The called party is busy.
0x487
General faults:
The call was canceled before a call was established. The status code confirms
receipt of the interruption signal.
0x488
The server cannot process the query because the data entered in the media
description is not compatible.
0x491
The server notifies that the query will be processed as soon as a previous query has
been completed.
0x493
The server rejects the query because the phone cannot decrypt the message. The
sender has used an encryption method that neither the server nor the receiver
phone can decrypt.
0x500
The proxy or the receiving device has discovered a fault while executing the query.
It is therefore impossible to execute the query. If this occurs, the caller or the
phone displays the fault and repeats the query after a few seconds. The number of
seconds after which the query can be repeated may be transmitted to the caller or
phone by the receiving device.
0x501
The query cannot be processed by the recipient because the recipient does not
have the functionality that the caller requires. If the recipient understands the
query but does not process it because the sender does not have the necessary
rights or the query is not permitted in the current context, status code 405 is transmitted instead of 501.
0x502
In this case, the receiving device that transmits this error code is a proxy or a gateway and has received an invalid response from its gateway via which this query is
to be processed.
Gigaset A580 IP / US English / A31008-xxxx-xxxx-x-xxxx / appendix.fm / 07.07.2010
Version 8, 03.09.2008
Getting help with your phone
Status
code
Meaning
0x503
The query can currently not be processed by the receiving device or the proxy
because the server is either overloaded or is being serviced. If it is possible for the
query to be repeated in the foreseeable future, the server informs the caller or the
phone of this.
0x504
Time limit exceeded at the gateway.
0x505
The server rejects the query because the indicated version number of the SIP protocol does not at least concur with the version that is used by server or the SIP
device involved in this query.
0x515
The server rejects the query because the message exceeds the maximum permitted size.
0x600
The called party is busy.
0x603
The called party has rejected the call.
0x604
The called URI does not exist.
0x606
The communication settings are not acceptable.
0x701
The called party has hung up.
0x703
Connection canceled because of time-out.
0x704
Connection interrupted because of a SIP error.
0x705
Wrong dialing tone
0x706
No connection established
0x751
Busy tone:
No codec match between the calling and called party.
0x810
General socket layer error: User is not authorized.
0x811
General socket layer error:
Wrong socket number
0x812
General socket layer error: Socket is not connected.
0x813
General socket layer error:
Memory error.
0x814
General socket layer error: Socket not available – check IP settings/connection
problem/VoIP setting incorrect.
0x815
General socket layer error:
Illegal application on the socket interface.
149
Gigaset A580 IP / US English / A31008-xxxx-xxxx-x-xxxx / appendix.fm / 07.07.2010
Getting help with your phone
Checking service information
You may need the service information of your phone (base station and handset) for
Customer Service.
Base station service information
Prerequisite: You are conducting an external call. The connection has been established for at least 8 seconds.
§Menu§ ¢ Service Info
Confirm selection with §OK§.
The following information/functions can be selected with q:
1:
Serial number of the base station (RFPI)
2:
Serial number of your handset (IPUI)
3:
Informs the service employees of the base station settings (in hex format), e.g. the number of registered handsets. The last 4 digits indicate
the number of operating hours (hexadecimal).
4:
Variant (digits 1 to 2), version of the base station firmware (digits 3 to
5).
5:
Gigaset.net number of your phone. With this number a service
employee can call you over the Internet without you needing to be
registered with a VoIP provider. This means that the employee can test
online connections and VoIP telephony regardless of the VoIP provider.
6:
Device number of the base station. Contains further information for
the service employee.
Unlock System
Confirm selection with §OK§.
You can use a code to cancel any provider-specific device lock that may
have been set.
Update Profile
Confirm selection with §OK§.
The current profiles of your VoIP providers (general provider data of all
configured VoIP connections) are automatically loaded onto your
phone. The general settings for all VoIP connections for which profiles
are available on the Gigaset server are updated.
Handset service information
Version 8, 03.09.2008
When the handset is in idle status:
Press the Display key §Menu§.
¤ Press the following keys one after the other: *#QL#.
The information displayed on the handset includes:
1: Serial number (IPUI)
2: Number of operating hours
3: Variant, version of handset software
150
Gigaset A580 IP / US English / A31008-xxxx-xxxx-x-xxxx / appendix.fm / 07.07.2010
Protecting our environment
Protecting our environment
Our environmental mission statement
We, Gigaset Communications GmbH, bear social responsibility and are actively
committed to a better world. Our ideas, technologies and actions serve people,
society and the environment. The aim of our global activity is to secure sustainable
life resources for humanity. We are committed to a responsibility for our products
that comprises their entire life cycle. The environmental impact of products, including their manufacture, procurement, distribution, utilization, service and disposal,
are already evaluated during product and process design.
Further information on environmentally friendly products and processes is available on the Internet at www.gigaset.com.
Environmental management system
Gigaset Communications GmbH is certified pursuant to the international standards EN 14001 and ISO 9001.
ISO 14001 (Environment): certified since September 2007 by TüV
SÜD Management Service GmbH.
ISO 9001 (Quality): certified since 17/02/1994 by TüV Süd Management Service GmbH.
Ecological energy consumption
The use of ECO DECT (£ Page 69) saves energy and is an active contribution
towards protecting the environment.
Disposal
Version 8, 03.09.2008
Batteries should not be disposed of in general household waste. Observe the local
waste disposal regulations, details of which can be obtained from your local authority or the dealer you purchased the product from.
All electrical and electronic equipment must be disposed of separately from general household waste using the sites designated by local authorities.
The appropriate disposal and separate collection of used equipment serve to prevent potential harm to the environment and to
health. They are a prerequisite for the re-use and recycling of used
electrical and electronic equipment.
For further information on disposing of your used equipment,
please contact your local authority, your refuse collection service or the dealer you
purchased the product from.
151
Gigaset A580 IP / US English / A31008-xxxx-xxxx-x-xxxx / appendix.fm / 07.07.2010
Appendix
Appendix
Caring for your phone
Wipe down the base station and handset with a damp cloth (no solvents) or an antistatic cloth. Never use a dry cloth. This can cause static.
Contact with liquid
!
If the handset comes into contact with liquid:
u Switch the handset off and remove the batteries immediately.
u Allow the liquid to drain from the handset.
u Pat all parts dry, then with the battery compartment open and the keypad facing
down place the handset in a dry, warm place for at least 72 hours (not in a
microwave, oven, etc.).
u Do not switch on the handset again until it is completely dry.
When it has fully dried out, you will normally be able to use it again.
Specifications
Recommended batteries
Version 8, 03.09.2008
Technology:
Nickel-metal-hydride (NiMH)
Size:
AAA (Micro, HR03)
Voltage:
1.2 V
Capacity: 550–1000 mAh
We recommend the following battery types, because these are the only ones that
guarantee the specified operating times, full functionality and long service life:
u GP 700 mAh
u Yuasa Phone 700 mAh
u Yuasa Phone 800 mAh
u Yuasa AAA 800
u Peacebay 600 mAh
The device is supplied with two recommended rechargeable batteries.
152
Gigaset A580 IP / US English / A31008-xxxx-xxxx-x-xxxx / appendix.fm / 07.07.2010
Appendix
Handset operating times/charging times
The operating time of your Gigaset depends on the capacity and age of the batteries and the way they are used. (All times are maximum possible times).
Capacity (mAh) approx.
Standby time (hours)
550
650
800
1000
180
210
265
330
Talktime (hours)
23
25
33
41
Operating time for 1.5 hrs of calls per day (hours)
80
95
115
145
Charging time, base station (hours)
8
10
12
15
Charging time, charging cradle (hours)
6
7
9
11
At the time of going to print, batteries up to 800 mAh were available and had been
tested in the system. Due to the constant progression in battery development, the
list of recommended batteries in the FAQ section of the Gigaset Customer Care
pages is regularly updated:
www.gigaset.com/customercare
Base station power consumption
The power consumption for the base station is approx. 1.3 watt.
Version 8, 03.09.2008
Power consumption of the charging cradle
Charging (maximum charge current):
approx. 1.4 watt
Sustained charge:
approx. 0.6 watt
Not charging (only the network adaptor):
approx. 0.3 watt
153
Gigaset A580 IP / US English / A31008-xxxx-xxxx-x-xxxx / appendix.fm / 07.07.2010
Appendix
General specifications
Interfaces
Fixed line network, Ethernet
No. of channels
60 duplex channels
Radio frequency range
1880–11900 MHz
Duplex method
Time multiplex, 10 ms frame length
Channel grid
1728 kHz
Bit rate
1152 kbit/s
Modulation
GFSK
Language code
32 kbit/s
Transmission power
10 mW, average power per channel
Range
up to 328 yards outdoors, up to 55 yards indoors
Base station power supply
120 V ~/60 Hz
Environmental conditions
in operation
+41°F to +113°F;
20% to 75% relative humidity
Codecs
G.711, G.726, G.729AB with VAD/CNG, G.722
Quality of Service
TOS, DiffServ
Protocols
DECT, GAP, SIP, RTP, DHCP, NAT Traversal (STUN), HTTP
Dialing mode
DTMF (touch tone dialing)/DP (dial pulsing)
Pin connections on the telephone jack
If you buy a replacement phone cord from a retailer, make sure that the phone jack
has the correct pin assignment.
Version 8, 03.09.2008
3
2
1
154
4
5
6
1
2
3
4
5
6
unused
unused
a
b
unused
unused
Gigaset A580 IP / US English / A31008-xxxx-xxxx-x-xxxx / appendix.fm / 07.07.2010
Appendix
Writing and editing text
The following rules apply when writing text:
u Use t s to move the cursor to the right or left.
u Characters are inserted to the left of the cursor.
u The first letter of the name of directory entries is automatically capitalized, followed by lower case letters.
Writing text/names
Press the relevant key several times to enter letters/characters.
Standard characters
1x 2x
2)
1)
2 a
b
3 d
e
4 g
h
5 j
k
L m n
M p
q
N t
u
O w x
Q .
,
1)Space
2)Line break
3x
1
c
f
i
l
o
r
v
y
?
4x
5x
6x
7x
8x
9x
10x
2
3
4
5
6
s
8
z
!
ä
ë
ï
á
é
í
à
è
ì
â
ê
î
ã
ç
ö
7
ü
9
0
ñ
ß
ú
ÿ
ó
ò
ô
õ
ù
ý
û
æ
ø
å
When you press and hold a key, the characters of that key appear in the display and
are highlighted one after the other. When you release the key, the highlighted character is inserted into the input field.
Setting upper/lower case or digits
Version 8, 03.09.2008
Press the Pound key # briefly to switch from "Abc" mode to "123" and from "123"
to "abc" and from "abc" to "Abc" (upper case: 1st letter upper case, all others lower
case). Press the Pound key # before entering the letter.
You can see briefly in the display whether upper case, lower case or digits is
selected.
155
Gigaset A580 IP / US English / A31008-xxxx-xxxx-x-xxxx / appendix.fm / 07.07.2010
Industry Canada Certification
Industry Canada Certification
Operation is subject to the following two conditions (1) this device may not cause interference, and (2) this device must accept any interference, including interference that may cause
undesired operation of the device.
NOTICE: The Industry Canada label identifies certified equipment. This certification means
that the equipment meets certain telecommunications network, protective, operational and
safety requirements as prescribed in the appropriate Terminal Equipment Technical Requirements document(s). The Department does not guarantee the equipment will operate to the
user’s satisfaction.
Before installing this equipment, users should ensure that it is permissible to be connected to
the facilities of the local telecommunications company. The equipment must also be installed
using an acceptable method of connection. The customer should be aware that compliance
with the above conditions may not prevent degradation of service in some situations.
Repairs to certified equipment should be coordinated by a representative designated by the
supplier. Any repairs or alterations made by the user to this equipment, or equipment malfunctions, may give the telecommunications company cause to request the user to disconnect the equipment.
Users should ensure for their own protection that the electrical ground connections of the
power utility, telephone lines and internal metallic water pipe system, if present, are
connected together.
This precaution may be particularly important in rural areas
NOTE: Users should not attempt to make such connections themselves, but should contact
the appropriate electric inspection authority, or electrician, as appropriate.
This product meets the applicable Industry Canada technical specifications.
The Ringer Equivalence Number is an indication of the maximum number of devices allowed
to be connected to a telephone interface. The termination of an interface may consist of any
combination of devices subject only to the requirement that the sum of the RENs of all devices
does not exceed five.
This Class B digital apparatus complies with Canadian ICES-003.
Cet appareil numérique de la classe B est conforme à la norme NMB-003 du Canada.
Version 8, 03.09.2008
FCC / ACTA Information
Warning: Changes or modifications to this unit not expressly approved by Gigaset Communications USA LLC could void the FCC authority to operate the equipment. This includes the
addition of any external antenna device.
This equipment complies with Part 68 of the FCC rules and the requirements adopted by the
ACTA. On the bottom of the base station is a label that contains, among other information,
a product identifier in the format US:AAAEQ##TXXXX. If requested, this number must be provided to the telephone company.
A plug and jack used to connect this equipment to the premises wiring and telephone network must comply with the applicable FCC Part 68 rules and requirements adopted by the
ACTA. A compliant telephone cord and modular plug is provided with this product. It is
designed to be connected to a compatible modular jack that is also compliant. See installation instructions for details.
The REN is used to determine the number of devices that may be connected to a telephone
line. Excessive RENs on a telephone line may result in the devices not ringing in response to
an incoming call. In most but not all areas, the sum of RENs should not exceed five (5.0). To be
certain of the number of devices that may be connected to a line, as determined by the total
RENs, contact the local telephone company. For products approved after July 23, 2001, the
REN for this product is part of the product identifier that has the format US:AAAEQ##TXXXX.
156
Gigaset A580 IP / US English / A31008-xxxx-xxxx-x-xxxx / appendix.fm / 07.07.2010
FCC / ACTA Information
The digits represented by ## are the REN without a decimal point (e.g., 03 is a REN of 0.3). For
earlier products, the REN is separately shown on the label.
A copy of the supplier's Declaration of Conformity (SDoC) is available at this Internet address:
www.gigaset.com/docs.
If this equipment causes harm to the telephone network, the telephone company will notify
you in advance, that temporary discontinuance of service may be required. But if advance
notice isn’t practical, the telephone company will notify the customer as soon as possible.
Also, you will be advised of your right to file a complaint with the FCC if you believe it is
necessary.
The telephone company may make changes in its facilities, equipment, operations or procedures that could affect the operation of the equipment. If this happens the telephone company will provide advance notice in order for you to make necessary modifications to maintain uninterrupted service. If you experience trouble with this telephone system, disconnect
it from the network until the problem has been corrected or until you are sure that the equipment is not malfunctioning.
If trouble is experienced with this equipment, for repair or warranty information, please contact Support at 1-866 247-8758. If the equipment is causing harm to the telephone network,
the telephone company may request that you disconnect the equipment until the problem is
resolved. This equipment is of a type that is not intended to be repaired by the Customer
(user).
This telephone system may not be used on coin service provided by the telephone company.
Connection to party line service is subject to state tariffs. Contact the state public utility commission, public service commission or corporation commission for information. Privacy of
communications may not be ensured when using this phone.
If your home has specially wired alarm equipment connected to the telephone line, ensure
the installation of this equipment does not disable your alarm equipment. If you have questions about what will disable alarm equipment, consult your telephone company or a qualified installer.
This telephone system equipment has been tested and found to comply with the limits for
Class B digital device, pursuant to Part 15 of the FCC Rules. Operation is subject to the following two conditions: (1) This device may not cause harmful interference, and (2) This device
must accept any interference received, including interference that may cause undesired operation. These limits are designed to provide reasonable protection against harmful interference in a residential installation. Some cordless telephones operate at frequencies that may
cause interference to nearby TV’s and VCR’s; to minimize or prevent such interference, the system base should not be placed near or on top of a TV or VCR; and, if interference is experienced, moving the base farther away from the TV or VCR will often reduce or eliminate
the interference.
However, there is no guarantee that interference will not occur in a particular installation.
If this telephone system does cause harmful interference to radio or television reception,
which can be determined by turning the system off and on, the user is encouraged to try to
correct the interference by one or more of the following measures:
1. Reorient or relocate the receiving antenna.
2. Increase the separation between the base station and receiver.
3. Connect the base station into an outlet on a circuit different from that to which the receiver
is connected.
4. Consult the dealer or an experienced radio TV technician for help.
Notice for Direct Inward Dialing ("DID")
ALLOWING THIS EQUIPMENT TO BE OPERATED IN SUCH A MANNER AS TO NOT PROVIDE FOR
PROPER ANSWER SUPERVISION IS A VIOLATION OF PART 68 OF THE FCC‘S RULES.
Version 8, 03.09.2008
Notice to Hearing Aid Wearers:
This phone system is compatible with inductively coupled hearing aids.
157
Gigaset A580 IP / US English / A31008-xxxx-xxxx-x-xxxx / appendix.fm / 07.07.2010
FCC / ACTA Information
Power Outage:
In the event of a power outage, your cordless telephone will not operate. The cordless telephone requires electricity for operation. You should have a telephone that does not require
electricity available for use during power outages.
Notice:
The installation of the base unit should allow at least 8 inches between the base and persons
to be in compliance with FCC RF exposure guidelines.
For body worn operation, the portable part (handset) has been tested and meets FCC RF
exposure guidelines. Use with an accessory that contains metal parts may not ensure compliance with FCC RF exposure guidelines.
Notice to telephone company service:
If you need service from your telephone company, please provide them with the information
– Facility interface Code (FIC)
– Service Order Code (SOC)
– Universal Service Order Code (USOC)
as indicated on the label on the bottom side of the base station.
Version 8, 03.09.2008
Safety precautions
Before using your telephone equipment, basic safety instructions should always be followed
to reduce the risk of fire, electric shock and injury to persons.
1. Read and understand all instructions.
2. Follow all warnings and instructions marked on the product.
3. Unplug this product from the wall telephone jack and power outlet before cleaning. Do not
use liquid cleaners or aerosol cleaners. Use damp cloth for cleaning.
4. Do not use this product near water, for example, near a bathtub, wash bowl, kitchen sink, or
laundry tub, in a wet basement or near a swimming pool.
5. Place this product securely on a stable surface. Serious damage and/or injury may result if
the unit falls.
6. Slots or openings in the cabinet and the back and bottom are provided for ventilation, to
protect it from overheating. These openings must not be blocked or covered. This product
should never be placed near or over a radiator or heat register, or in a place where proper ventilation is not provided.
7. This product should be operated only from the type of power source indicated on the marking label. If you are not sure of the type of AC line power to your home, consult your dealer or
local power company.
8. Do not place objects on the power cord. Install the unit where no one can step or trip on
the cord.
9. Do not overload wall outlets and extension cords as this can result in the risk of fire or electric shock.
10. Never push objects of any kind into this product through cabinet slots as they may touch
dangerous voltage points or short out parts that could result in the risk of fire or electric shock.
Never spill liquid of any kind on this product.
11. To reduce the risk of electric shock or burns, do not disassemble this product. Take it to a
qualified service center when service is required. Opening or removing covers may expose
you to dangerous voltages, dangerous electrical current or other risks. Incorrect reassembly
can cause electric shock when the appliance is subsequently used. Disconnect TNV circuit
connector before removing cover.
12. Unplug the product from the wall outlet and refer servicing to qualified service personnel
under the following conditions:
158
Gigaset A580 IP / US English / A31008-xxxx-xxxx-x-xxxx / appendix.fm / 07.07.2010
FCC / ACTA Information
a.) When the power cord is damaged or frayed.
b.) If liquid has been spilled into the product.
c.) If the product has been exposed to rain or water.
d.) If the product does not operate normally by following the operating instructions. Adjust
only those controls that are covered by the operating instructions because improper adjustment of other controls may result in damage and may require extensive work by a qualified
technician to restore the product to normal operation.
e.) If the product has been dropped or physically has been damaged.
f.) If the product exhibits a distinct change in performance.
13. Avoid using a telephone (other than a cordless type) during a thunderstorm. There may be
a remote risk of electrical shock from lightning. Therefore we suggest a surge arrestor.
14. Do not use the telephone to report a gas leak in the vicinity of the leak
15. Emergency/911 numbers may not be dialed if the keypad is locked.
16. CAUTION: To reduce the risk of fire , use only 26 AWG or larger ( e.g., 24 AWG) UL Listed or
CSA Certified Telecommunication Line Cord.
BATTERY SAFETY PRECAUTIONS
Version 8, 03.09.2008
To reduce the risk of fire, injury or electric shock, and to properly dispose of batteries, please
read and understand the following instructions.
CONTAINS NICKEL METAL HYDRIDE BATTERY. BATTERY MUST BE RECYCLED OR DISPOSED OF
PROPERLY. DO NOT DISPOSE OF IN MUNICIPAL WASTE.
1. Only use the batteries specified for use with this product.
2. DO NOT USE NICKEL CADMIUM OR LITHIUM BATTERIES, or mix batteries of different sizes or
from different manufacturers in this product. DO NOT USE NONRECHARGEABLE BATTERIES.
3. Do not dispose of the batteries in a fire; the cells may explode. Do not expose batteries to
water. Check with local codes for special disposal instructions.
4. Do not open or mutilate the batteries. Released electrolyte is corrosive and may cause damage to the eyes or skin. The electrolyte may be toxic if swallowed.
5. Exercise care in handling the batteries in order not to short the batteries with conducting
materials such as rings, bracelets, and keys. The batteries or conducting material may overheat and cause burns or fire.
6. Charge the batteries provided with, or identified for use with, this product only in accordance with the instructions and limitations specified in the user’s manual. Do not attempt to
charge the batteries with any means other than that specified in the users manual.
7. Periodically clean the charge contacts on both the charger and handset.
159
Gigaset A580 IP / US English / A31008-xxxx-xxxx-x-xxxx / appendix.fm / 07.07.2010
Service (Customer Care)
Service (Customer Care)
Customer Care Warranty for Cordless Products
To obtain Customer Care Warranty service,
product operation information, or for problem resolution, call:
Toll Free: 1-866 247-8758
End-user limited warranty
This product is covered by a one year limited warranty. Any repair replacement or warranty
service, and all questions about this product should be directed to: 1-866 247-8758.
This limited, non-transferable warranty is provided to the original buyer/end-consumer
("you") for systems, handsets and accessories (collectively, "Product") provided by Gigaset
Communications USA LLC or Gigaset Communications Canada Inc. (collectively "Gigaset
NAM"). Gigaset NAM warrants to you that at the date of purchase, the Product is free of defects
in workmanship and materials and the software included in the Product will perform in substantial compliance to its program specifications.
1. WARRANTY PERIOD
The Product warranty period is one (1) year from the original date of purchase by you. Proof
of purchase (e.g., sales slip or invoice) must be provided with any Product returned during the
warranty period. Batteries supplied with the Products are warranted to be free from defects at
the time of purchase only.
2. EXCLUSIVE REMEDY
Gigaset NAM's entire liability and your exclusive remedy if the Product is defective in materials
or workmanship during the warranty period and is returned shall be that the Product will be
repaired or replaced as set forth in Section 4 below. Reconditioned replacement components,
parts or materials may be used in the replacement or repair. Data in the memory of the Product may be lost during repair.
Version 8, 03.09.2008
3. THIS LIMITED WARRANTY DOES NOT COVER AND IS VOID WITH
RESPECT TO THE FOLLOWING:
– Cosmetic damage, physical damage to the surface of the Product, including, without limitation, breakage, cracks, dents, scratches or adhesive marks on the LCD screen or outside
casing of the Product.
– Products which have been repaired, maintained or modified (including the antenna) by
anyone other than Gigaset NAM or a Gigaset NAM-approved repair facility, or that have
been improperly installed.
– Cost of installation, removal or reinstallation.
– Damage due to any telephone, electronic, hardware or software program, network, Internet or computer malfunctions, failures, or difficulties of any kind, including without limitation, server failure or incomplete, incorrect, garbled or delayed computer transmissions.
– Equipment and components not manufactured, supplied or authorized by Gigaset NAM.
– Modification of the Product's components, or operation of the Product in an unsuitable
environment or in a manner for which it is not intended, including but not limited to failures or defects caused by misuse, abuse, accidents, physical damage, abnormal operation,
improper handling or storage, neglect, alterations, unauthorized installation, removal or
repairs, failure to follow instructions, problems caused by the carrier's network coverage,
exposure to fire, water or excessive moisture or dampness, floods, or extreme changes in
climate or temperature, acts of God, riots, acts of terrorism, spills of food or liquids, viruses
or other software flaws introduced into the Product or other acts which are not the fault
160
Gigaset A580 IP / US English / A31008-xxxx-xxxx-x-xxxx / appendix.fm / 07.07.2010
Service (Customer Care)
–
–
–
–
–
–
–
–
of Gigaset NAM and which the Product is not specified to tolerate, including damage
caused by mishandling or blown fuses.
Products which have had warranty stickers, electronic serial number and/or serial number
label removed, altered, rendered illegible or fraudulently applied to other equipment.
Signal reception problems (unless caused by defect in material or workmanship in the
Product).
Products operated outside published maximum ratings.
Performance of the Products when used in combination with other products or equipment not manufactured, supplied or authorized by Gigaset NAM.
Consumables (such as batteries and fuses).
Payments for labor or service to representatives or service centers not authorized to perform product maintenance by Gigaset NAM.
Loss of data.
Testing and examination discloses that the alleged defect or malfunction in the Product
does not exist.
This warranty does not cover customer education, instruction, installation or removal, set up
adjustments, problems related to service(s) provided by a carrier or other service provider,
and/or signal reception problems. Gigaset NAM shall not be responsible for software,
firmware, information, or memory data contained in, stored on, or integrated with any Products returned for repair, whether under warranty or not. This warranty is valid only in the
country in which it is purchased (i.e., the United States of America or Canada respectively, but
not both).
USE WITH ACCESSORIES NOT SUPPLIED BY GIGASET NAM OR NOT OTHERWISE
EXPRESSLY AUTHORIZED BY GIGASET NAM MAY VOID WARRANTY.
4. WARRANTY CLAIM PROCEDURE
All warranty claims must be made by notifying Gigaset NAM prior to the expiration of the warranty period. Gigaset NAM's obligation to provide warranty support shall not extend past the
end of the warranty period, except that any product repaired or replaced during the warranty
period shall continue to be warranted for the balance of such warranty period or thirty (30)
days, whichever is greater.
Support service will be provided for you by accessing the toll free customer service number:
1-866 247-8758
5. LIMITATION OF WARRANTY
Gigaset NAM makes no warranty or representation that the software in the Products will meet
your requirements or will work in combination with any hardware or applications software
products provided by third parties, that the operation of the software will be uninterrupted
or error free, or that all defects in the software products will be corrected.
Version 8, 03.09.2008
6. LIMITATION ON REMEDIES; NO CONSEQUENTIAL OR OTHER DAMAGES
Your exclusive remedy for any breach of this limited warranty is as set forth above. Except for
any refund elected by Gigaset NAM, YOU ARE NOT ENTITLED TO ANY DAMAGES, INCLUDING BUT NOT LIMITED TO CONSEQUENTIAL DAMAGES, if the Product does not meet the
limited warranty , and, to the maximum extent allowed by applicable law, even if any remedy
fails of its essential purpose. The terms below ("Exclusion of Incidental, Consequential and
Certain Other Damages") are also incorporated into this limited warranty . Some states/jurisdictions/provinces do not allow the exclusion or limitation of incidental or consequential
damages, so the above limitation or exclusion may not apply to you. This limited warranty
gives you specific legal rights. You may have others which vary from state/jurisdiction/province to state/jurisdiction/province.
161
Gigaset A580 IP / US English / A31008-xxxx-xxxx-x-xxxx / appendix.fm / 07.07.2010
Service (Customer Care)
7. DISCLAIMER OF WARRANTIES
GIGASET NAM AND ITS SUPPLIERS PROVIDE THE PRODUCT AND SUPPORT SERVICES (IF ANY)
AS IS AND WITH ALL FAULTS. THE LIMITED WARRANTY IS IN LIEU OF ANY OTHER EXPRESS
WARRANTIES (IF ANY) CREATED BY ANY DOCUMENTATION OR PACKAGING EXCEPT FOR THE
LIMITED WARRANTY, AND TO THE MAXIMUM EXTENT PERMITTED BY APPLICABLE LAW IS IN
LIEU OF ANY IMPLIED OR STATUTORY WARRANTIES, INCLUDING, BUT NOT LIMITED TO, THE
IMPLIED WARRANTIES OF MERCHANTABILITY AND FITNESS FOR A PARTICULAR PURPOSE, OF
ACCURACY OR COMPLETENESS OR RESPONSES, OF RESULTS, OF WORKMANLIKE EFFORT, OF
LACK OF VIRUSES AND OF LACK OF NEGLIGENCE, ALL WITH REGARD TO THE PRODUCT, AND
THE PROVISION OF OR FAILURE TO PROVIDE SUPPORT SERVICES. ALSO, THERE IS NO WARRANTY OR CONDITION OF TITLE, QUIET ENJOYMENT, QUIET POSSESSION, OR CORRESPONDENCE TO DESCRIPTION OR NONINFRINGEMENT WITH REGARD TO THE PRODUCT. Some
states/jurisdictions/provinces do not allow limitations on how long an implied warranty lasts
or the exclusion or limitation of incidental or consequential damages, so the above exclusions
or limitations may not apply to you. If an implied warranty or condition is created by your
state/province and federal or state/provincial law prohibits disclaimer of it, you also have an
implied warranty or condition, BUT ONLY AS TO DEFECTS DISCOVERED DURING THE PERIOD
OF THIS LIMITED WARRANTY (ONE YEAR). AS TO ANY DEFECTS DISCOVERED AFTER THE ONE
YEAR PERIOD, THERE IS NO WARRANTY OR CONDITION OF ANY KIND. This limited warranty
gives you specific legal rights, and you may also have other rights which vary from state to
state/province to province. In no event shall Gigaset NAM's liability exceed the cost of repairing or replacing defective Products as provided herein, and any such liabilities will terminate
upon expiration of the warranty period.
Any supplements or updates to the Product or the software in the Product, including without
limitation, any (if any) software fixes or upgrades or bug fixes provided to you after the expiration of the one year limited warranty period are not covered by any warranty or condition,
express, implied or statutory.
8. EXCLUSION OF INCIDENTAL, CONSEQUENTIAL AND CERTAIN OTHER
DAMAGES
TO THE MAXIMUM EXTENT PERMITTED BY APPLICABLE LAW, IN NO EVENT SHALL GIGASET
NAM, SELLER OR THEIR SUPPLIERS BE LIABLE FOR ANY SPECIAL, INCIDENTAL, INDIRECT, OR
CONSEQUENTIAL DAMAGES WHATSOEVER (INCLUDING, BUT NOT LIMITED TO, DAMAGES FOR
LOSS OF PROFITS OR CONFIDENTIAL OR OTHER INFORMATION, FOR BUSINESS INTERRUPTION, FOR PERSONAL INJURY, FOR LOSS OF PRIVACY, FOR FAILURE TO MEET ANY DUTY
INCLUDING OF GOOD FAITH OR OF REASONABLE CARE, FOR NEGLIGENCE, AND FOR ANY
OTHER PECUNIARY OR OTHER LOSS WHATSOEVER) ARISING OUT OF OR IN ANY WAY RELATED
TO THE USE OF OR INABILITY TO USE THE PRODUCT, THE PROVISION OF OR FAILURE TO PROVIDE SUPPORT SERVICES, OR OTHERWISE UNDER OR IN CONNECTION WITH ANY PROVISION
OF THIS LIMITED WARRANTY, EVEN IN THE EVENT OF THE FAULT, TORT (INCLUDING NEGLIGENCE), STRICT LIABILITY, BREACH OF CONTRACT OR BREACH OF WARRANTY OF GIGASET
NAM OR SELLER OR ANY SUPPLIER, AND EVEN IF GIGASET NAM OR SELLER OR ANY SUPPLIER
HAS BEEN ADVISED OF THE POSSIBILITY OF SUCH DAMAGES. REPAIR OR REPLACEMENT, AS
PROVIDED UNDER THE WARRANTY, IS YOUR SOLE AND EXCLUSIVE REMEDY FOR BREACH OF
THE LIMITED WARRANTY.
Version 8, 03.09.2008
9. LIMITATION OF LIABILITY AND REMEDIES
NOTWITHSTANDING ANY DAMAGES THAT YOU MIGHT INCUR FOR ANY REASON WHATSOEVER
(INCLUDING, WITHOUT LIMITATION, ALL DAMAGES REFERENCED ABOVE AND ALL DIRECT OR
GENERAL DAMAGES), THE ENTIRE LIABILITY OF GIGASET NAM, SELLER AND ANY OF THEIR SUPPLIERS UNDER ANY PROVISION OF THIS LIMITED WARRANTY AND YOUR EXCLUSIVE REMEDY
FOR ALL OF THE FOREGOING (EXCEPT FOR ANY REMEDY OF REPAIR OR REPLACEMENT
ELECTED BY GIGASET NAM OR SELLER OR SUPPLIER WITH RESPECT TO ANY BREACH OF THE
LIMITED WARRANTY) SHALL BE LIMITED TO THE GREATER OF THE AMOUNT ACTUALLY PAID BY
YOU FOR THE PRODUCT OR FIVE DOLLARS ($5.00 USD/CAN). THE FOREGOING LIMITATIONS,
EXCLUSIONS AND DISCLAIMERS SHALL APPLY TO THE MAXIMUM EXTENT PERMITTED BY
APPLICABLE LAW, EVEN IF ANY REMEDY FAILS ITS ESSENTIAL PURPOSE.
162
Gigaset A580 IP / US English / A31008-xxxx-xxxx-x-xxxx / appendix.fm / 07.07.2010
Service (Customer Care)
10. GOVERNING LAW
If this Product was purchased in the United States of America this limited warranty will be governed by the laws of Texas, and exclude the United Nations Convention on Contracts for the
International Sale of Goods. If this Product was purchased in Canada this limited warranty will
be governed by the laws of the Province of Ontario and the federal laws of Canada applicable
therein, and exclude the United Nations Convention on Contracts for the
International Sale of Goods.
If you want to learn more about Gigaset Service or for Support on your Gigaset phone, visit
our web site at http://www.gigaset.com or please call
1-866 247-8758.
Issued by
Gigaset Communications GmbH
Frankenstr. 2a, D-46395 Bocholt
Manufactured by Gigaset Communications GmbH under trademark license of Siemens AG.
Version 8, 03.09.2008
© Gigaset Communications GmbH 2010
All rights reserved.
Subject to availability. Rights of modifications reserved.
Product attributes subject to change.
We reserve the right, to make changes without notice in equipment design and/or components.
© Copyright 2010.
163
Gigaset A580 IP / US English / A31008-xxxx-xxxx-x-xxxx / appendix.fm / 07.07.2010
Gigaset A580 IP – free software
Gigaset A580 IP – free software
Your Gigaset A580 IP's firmware includes free software that is licensed under the
GNU Lesser General Public License. This free software was developed by a third
party and is protected by copyright. You will find the license text in its original English version on the pages that follow.
The software is provided free of charge. You are authorized to use this free software
in accordance with the above-mentioned license conditions. In the event of contradictions between these license conditions and the Gigaset Communications GmbH
license conditions that apply for the software, the aforementioned license conditions shall take precedence for the free software.
The GNU Lesser General Public License (LGPL) is supplied with this product. You can
also download the license conditions from the Internet:
u The LGPL is available on the Internet at:
http://www.gnu.org/copyleft/lesser.html
u The source text, including copyright notices for free software, is currently
available on the Internet at:
http://www.gigaset.com/developer
For more information and Internet links to the source text of the free software, see
the Online Support pages on the Internet at:
www.gigaset.com/customercare
If it is not already supplied with the product, you can request the source text,
including copyright notices, from Gigaset Communications GmbH. There is a
charge to cover the cost of copying and postage. Please submit this request by email or fax to the following address or fax number within 3 years of purchasing this
product. Please state the exact device type plus the version number of the installed
device software.
Small Parts Dispatch Bocholt
E-mail:
[email protected]
Fax:
0049 2871 / 91 30 29
Version 8, 03.09.2008
Use of the free software contained in this product extending beyond the program
sequence intended by Gigaset Communications GmbH is at the user's own risk – i.e.
there shall be no claims for liability for defects against Gigaset Communications
GmbH. The GNU Lesser General Public License contains references to the liability
for defects of authors or other proprietors of the free software.
You shall have no right to assert a claim against Gigaset Communications GmbH
based on liability for defects if a defect in the product is or could be due to changes
you have made to the programs or their configuration. Furthermore, you shall have
no right to assert a claim against Gigaset Communications GmbH based on liability
for defects if the free software violates the copyright of third parties.
Gigaset Communications GmbH shall not provide technical support for the software, including the free software included within it, if it has been changed.
164
Gigaset A580 IP / US English / A31008-xxxx-xxxx-x-xxxx / appendix.fm / 07.07.2010
Gigaset A580 IP – free software
GNU LESSER GENERAL PUBLIC LICENSE
Version 2.1, February 1999
Copyright (C) 1991, 1999 Free Software Foundation, Inc., 59 Temple Place, Suite 330, Boston,
MA 02111-1307 USA
Everyone is permitted to copy and distribute verbatim copies of this license document, but
changing it is not allowed.
[This is the first released version of the Lesser GPL. It also counts as the successor of the GNU
Library Public License, version 2, hence the version number 2.1.]
Version 8, 03.09.2008
Preamble
The licenses for most software are designed to take away your freedom to share and change
it. By contrast, the GNU General Public Licenses are intended to guarantee your freedom to
share and change free software--to make sure the software is free for all its users.
This license, the Lesser General Public License, applies to some specially designated software
packages--typically libraries--of the Free Software Foundation and other authors who decide
to use it. You can use it too, but we suggest you first think carefully about whether this license
or the ordinary General Public License is the better strategy to use in any particular case,
based on the explanations below.
When we speak of free software, we are referring to freedom of use, not price. Our General
Public Licenses are designed to make sure that you have the freedom to distribute copies of
free software (and charge for this service if you wish); that you receive source code or can get
it if you want it; that you can change the software and use pieces of it in new free programs;
and that you are informed that you can do these things.
To protect your rights, we need to make restrictions that forbid distributors to deny you these
rights or to ask you to surrender these rights. These restrictions translate to certain responsibilities for you if you distribute copies of the library or if you modify it.
For example, if you distribute copies of the library, whether gratis or for a fee, you must give
the recipients all the rights that we gave you. You must make sure that they, too, receive or can
get the source code. If you link other code with the library, you must provide complete object
files to the recipients, so that they can relink them with the library after making changes to the
library and recompiling it. And you must show them these terms so they know their rights.
We protect your rights with a two-step method: (1) we copyright the library, and (2) we offer
you this license, which gives you legal permission to copy, distribute and/or modify the
library.
To protect each distributor, we want to make it very clear that there is no warranty for the free
library. Also, if the library is modified by someone else and passed on, the recipients should
know that what they have is not the original version, so that the original author's reputation
will not be affected by problems that might be introduced by others.
Finally, software patents pose a constant threat to the existence of any free program. We wish
to make sure that a company cannot effectively restrict the users of a free program by obtaining a restrictive license from a patent holder. Therefore, we insist that any patent license
obtained for a version of the library must be consistent with the full freedom of use specified
in this license.
Most GNU software, including some libraries, is covered by the ordinary GNU General Public
License. This license, the GNU Lesser General Public License, applies to certain designated
libraries, and is quite different from the ordinary General Public License. We use this license for
certain libraries in order to permit linking those libraries into non-free programs.
When a program is linked with a library, whether statically or using a shared library, the combination of the two is legally speaking a combined work, a derivative of the original library.
The ordinary General Public License therefore permits such linking only if the entire combination fits its criteria of freedom. The Lesser General Public License permits more lax criteria for
linking other code with the library.
We call this license the "Lesser" General Public License because it does less to protect the
user's freedom than the ordinary General Public License. It also provides other free software
developers less of an advantage over competing non-free programs. These disadvantages are
165
Gigaset A580 IP / US English / A31008-xxxx-xxxx-x-xxxx / appendix.fm / 07.07.2010
Gigaset A580 IP – free software
the reason we use the ordinary General Public License for many libraries. However, the Lesser
license provides advantages in certain special circumstances.
For example, on rare occasions, there may be a special need to encourage the widest possible
use of a certain library, so that it becomes a de-facto standard. To achieve this, non-free programs must be allowed to use the library. A more frequent case is that a free library does the
same job as widely used non-free libraries. In this case, there is little to gain by limiting the free
library to free software only, so we use the Lesser General Public License.
In other cases, permission to use a particular library in non-free programs enables a greater
number of people to use a large body of free software. For example, permission to use the
GNU C Library in non-free programs enables many more people to use the whole GNU operating system, as well as its variant, the GNU/Linux operating system.
Although the Lesser General Public License is Less protective of the users' freedom, it does
ensure that the user of a program that is linked with the Library has the freedom and the wherewithal to run that program using a modified version of the Library.
The precise terms and conditions for copying, distribution and modification follow. Pay close
attention to the difference between a "work based on the library" and a "work that uses the
library". The former contains code derived from the library, whereas the latter must be combined with the library in order to run.
Version 8, 03.09.2008
GNU LESSER GENERAL PUBLIC LICENSE
TERMS AND CONDITIONS FOR COPYING, DISTRIBUTION AND MODIFICATION
0. This License Agreement applies to any software library or other program which contains a
notice placed by the copyright holder or other authorized party saying it may be distributed
under the terms of this Lesser General Public License (also called "this License"). Each licensee
is addressed as "you".
A "library" means a collection of software functions and/or data prepared so as to be conveniently linked with application programs (which use some of those functions and data) to
form executables.
The "Library", below, refers to any such software library or work which has been distributed
under these terms. A "work based on the Library" means either the Library or any derivative
work under copyright law: that is to say, a work containing the Library or a portion of it, either
verbatim or with modifications and/or translated straightforwardly into another language.
(Hereinafter, translation is included without limitation in the term "modification".)
"Source code" for a work means the preferred form of the work for making modifications to it.
For a library, complete source code means all the source code for all modules it contains, plus
any associated interface definition files, plus the scripts used to control compilation and
installation of the library.
Activities other than copying, distribution and modification are not covered by this License;
they are outside its scope. The act of running a program using the Library is not restricted, and
output from such a program is covered only if its contents constitute a work based on the
Library (independent of the use of the Library in a tool for writing it). Whether that is true
depends on what the Library does and what the program that uses the Library does.
1. You may copy and distribute verbatim copies of the Library's complete source code as you
receive it, in any medium, provided that you conspicuously and appropriately publish on each
copy an appropriate copyright notice and disclaimer of warranty; keep intact all the notices
that refer to this License and to the absence of any warranty; and distribute a copy of this
License along with the Library.
You may charge a fee for the physical act of transferring a copy, and you may at your option
offer warranty protection in exchange for a fee.
2. You may modify your copy or copies of the Library or any portion of it, thus forming a work
based on the Library, and copy and distribute such modifications or work under the terms of
Section 1 above, provided that you also meet all of these conditions:
a) The modified work must itself be a software library.
b) You must cause the files modified to carry prominent notices stating that you changed the
files and the date of any change.
166
Gigaset A580 IP / US English / A31008-xxxx-xxxx-x-xxxx / appendix.fm / 07.07.2010
Version 8, 03.09.2008
Gigaset A580 IP – free software
c) You must cause the whole of the work to be licensed at no charge to all third parties under
the terms of this License.
d) If a facility in the modified Library refers to a function or a table of data to be supplied by
an application program that uses the facility, other than as an argument passed when the facility is invoked, then you must make a good faith effort to ensure that, in the event an application does not supply such function or table, the facility still operates, and performs whatever
part of its purpose remains meaningful.
(For example, a function in a library to compute square roots has a purpose that is entirely
well-defined independent of the application. Therefore, Subsection 2d requires that any
application-supplied function or table used by this function must be optional: if the application does not supply it, the square root function must still compute square roots.)
These requirements apply to the modified work as a whole. If identifiable sections of that
work are not derived from the Library, and can be reasonably considered independent and
separate works in themselves, then this License, and its terms, do not apply to those sections
when you distribute them as separate works. But when you distribute the same sections as
part of a whole which is a work based on the Library, the distribution of the whole must be on
the terms of this License, whose permissions for other licensees extend to the entire whole,
and thus to each and every part regardless of who wrote it.
Thus, it is not the intent of this section to claim rights or contest your rights to work written
entirely by you; rather, the intent is to exercise the right to control the distribution of derivative or collective works based on the Library.
In addition, mere aggregation of another work not based on the Library with the Library (or
with a work based on the Library) on a volume of a storage or distribution medium does not
bring the other work under the scope of this License.
3. You may opt to apply the terms of the ordinary GNU General Public License instead of this
License to a given copy of the Library. To do this, you must alter all the notices that refer to this
License, so that they refer to the ordinary GNU General Public License, version 2, instead of to
this License. (If a newer version than version 2 of the ordinary GNU General Public License has
appeared, then you can specify that version instead if you wish.) Do not make any other
change in these notices.
Once this change is made in a given copy, it is irreversible for that copy, so the ordinary GNU
General Public License applies to all subsequent copies and derivative works made from that
copy.
This option is useful when you wish to copy part of the code of the Library into a program that
is not a library.
4. You may copy and distribute the Library (or a portion or derivative of it, under Section 2) in
object code or executable form under the terms of Sections 1 and 2 above provided that you
accompany it with the complete corresponding machine-readable source code, which must
be distributed under the terms of Sections 1 and 2 above on a medium customarily used for
software interchange.
If distribution of object code is made by offering access to copy from a designated place, then
offering equivalent access to copy the source code from the same place satisfies the requirement to distribute the source code, even though third parties are not compelled to copy the
source along with the object code.
5. A program that contains no derivative of any portion of the Library, but is designed to work
with the Library by being compiled or linked with it, is called a "work that uses the Library".
Such a work, in isolation, is not a derivative work of the Library, and therefore falls outside the
scope of this License.
However, linking a "work that uses the Library" with the Library creates an executable that is
a derivative of the Library (because it contains portions of the Library), rather than a "work
that uses the library". The executable is therefore covered by this License.
Section 6 states terms for distribution of such executables.
When a "work that uses the Library" uses material from a header file that is part of the Library,
the object code for the work may be a derivative work of the Library even though the source
code is not.
167
Gigaset A580 IP / US English / A31008-xxxx-xxxx-x-xxxx / appendix.fm / 07.07.2010
Version 8, 03.09.2008
Gigaset A580 IP – free software
Whether this is true is especially significant if the work can be linked without the Library, or if
the work is itself a library. The threshold for this to be true is not precisely defined by law.
If such an object file uses only numerical parameters, data structure layouts and accessors,
and small macros and small inline functions (ten lines or less in length), then the use of the
object file is unrestricted, regardless of whether it is legally a derivative work. (Executables
containing this object code plus portions of the Library will still fall under Section 6.)
Otherwise, if the work is a derivative of the Library, you may distribute the object code for the
work under the terms of Section 6.
Any executables containing that work also fall under Section 6, whether or not they are linked
directly with the Library itself.
6. As an exception to the Sections above, you may also combine or link a "work that uses the
Library" with the Library to produce a work containing portions of the Library, and distribute
that work under terms of your choice, provided that the terms permit modification of the
work for the customer's own use and reverse engineering for debugging such modifications.
You must give prominent notice with each copy of the work that the Library is used in it and
that the Library and its use are covered by this License. You must supply a copy of this License.
If the work during execution displays copyright notices, you must include the copyright
notice for the Library among them, as well as a reference directing the user to the copy of this
License. Also, you must do one of these things:
a) Accompany the work with the complete corresponding machine-readable source code for
the Library including whatever changes were used in the work (which must be distributed
under Sections 1 and 2 above); and, if the work is an executable linked with the Library, with
the complete machine-readable "work that uses the Library", as object code and/or source
code, so that the user can modify the Library and then relink to produce a modified executable containing the modified Library. (It is understood that the user who changes the contents of definitions files in the Library will not necessarily be able to recompile the application
to use the modified definitions.)
b) Use a suitable shared library mechanism for linking with the Library. A suitable mechanism
is one that (1) uses at run time a copy of the library already present on the user's computer
system, rather than copying library functions into the executable, and (2) will operate properly with a modified version of the library, if the user installs one, as long as the modified version is interface-compatible with the version that the work was made with.
c) Accompany the work with a written offer, valid for at least three years, to give the same user
the materials specified in Subsection 6a, above, for a charge no more than the cost of performing this distribution.
d) If distribution of the work is made by offering access to copy from a designated place, offer
equivalent access to copy the above specified materials from the same place.
e) Verify that the user has already received a copy of these materials or that you have already
sent this user a copy.
For an executable, the required form of the "work that uses the Library" must include any data
and utility programs needed for reproducing the executable from it. However, as a special
exception, the materials to be distributed need not include anything that is normally distributed (in either source or binary form) with the major components (compiler, kernel, and so
on) of the operating system on which the executable runs, unless that component itself
accompanies the executable.
It may happen that this requirement contradicts the license restrictions of other proprietary
libraries that do not normally accompany the operating system. Such a contradiction means
you cannot use both them and the Library together in an executable that you distribute.
7. You may place library facilities that are a work based on the Library side-by-side in a single
library together with other library facilities not covered by this License, and distribute such a
combined library, provided that the separate distribution of the work based on the Library
and of the other library facilities is otherwise permitted, and provided that you do these two
things:
a) Accompany the combined library with a copy of the same work based on the Library,
uncombined with any other library facilities. This must be distributed under the terms of the
Sections above.
168
Gigaset A580 IP / US English / A31008-xxxx-xxxx-x-xxxx / appendix.fm / 07.07.2010
Gigaset A580 IP – free software
Version 8, 03.09.2008
b) Give prominent notice with the combined library of the fact that part of it is a work based
on the Library, and explaining where to find the accompanying uncombined form of the same
work.
8. You may not copy, modify, sublicense, link with, or distribute the Library except as expressly
provided under this License. Any attempt otherwise to copy, modify, sublicense, link with, or
distribute the Library is void, and will automatically terminate your rights under this License.
However, parties who have received copies, or rights, from you under this License will not
have their licenses terminated so long as such parties remain in full compliance.
9. You are not required to accept this License, since you have not signed it. However, nothing
else grants you permission to modify or distribute the Library or its derivative works. These
actions are prohibited by law if you do not accept this License. Therefore, by modifying or distributing the Library (or any work based on the Library), you indicate your acceptance of this
License to do so, and all its terms and conditions for copying, distributing or modifying the
Library or works based on it.
10. Each time you redistribute the Library (or any work based on the Library), the recipient
automatically receives a license from the original licensor to copy, distribute, link with or
modify the Library subject to these terms and conditions. You may not impose any further
restrictions on the recipients' exercise of the rights granted herein.
You are not responsible for enforcing compliance by third parties with this License.
11. If, as a consequence of a court judgment or allegation of patent infringement or for any
other reason (not limited to patent issues), conditions are imposed on you (whether by court
order, agreement or otherwise) that contradict the conditions of this License, they do not
excuse you from the conditions of this License. If you cannot distribute so as to satisfy simultaneously your obligations under this License and any other pertinent obligations, then as a
consequence you may not distribute the Library at all. For example, if a patent license would
not permit royalty-free redistribution of the Library by all those who receive copies directly or
indirectly through you, then the only way you could satisfy both it and this License would be
to refrain entirely from distribution of the Library.
If any portion of this section is held invalid or unenforceable under any particular circumstance, the balance of the section is intended to apply, and the section as a whole is intended
to apply in other circumstances.
It is not the purpose of this section to induce you to infringe any patents or other property
right claims or to contest the validity of any such claims; this section has the sole purpose of
protecting the integrity of the free software distribution system which is implemented by
public license practices. Many people have made generous contributions to the wide range
of software distributed through that system in reliance on consistent application of that system; it is up to the author/donor to decide if he or she is willing to distribute software through
any other system and a licensee cannot impose that choice.
This section is intended to make thoroughly clear what is believed to be a consequence of the
rest of this License.
12. If the distribution and/or use of the Library is restricted in certain countries either by patents or by copyrighted interfaces, the original copyright holder who places the Library under
this License may add an explicit geographical distribution limitation excluding those countries, so that distribution is permitted only in or among countries not thus excluded. In such
case, this License incorporates the limitation as if written in the body of this License.
13. The Free Software Foundation may publish revised and/or new versions of the Lesser
General Public License from time to time. Such new versions will be similar in spirit to the present version, but may differ in detail to address new problems or concerns.
Each version is given a distinguishing version number. If the Library specifies a version number of this License which applies to it and "any later version", you have the option of following
the terms and conditions either of that version or of any later version published by the Free
Software Foundation. If the Library does not specify a license version number, you may
choose any version ever published by the Free Software Foundation.
169
Gigaset A580 IP / US English / A31008-xxxx-xxxx-x-xxxx / appendix.fm / 07.07.2010
Gigaset A580 IP – free software
14. If you wish to incorporate parts of the Library into other free programs whose distribution
conditions are incompatible with these, write to the author to ask for permission. For software
which is copyrighted by the Free Software Foundation, write to the Free Software Foundation;
we sometimes make exceptions for this. Our decision will be guided by the two goals of preserving the free status of all derivatives of our free software and of promoting the sharing and
reuse of software generally.
NO WARRANTY
15. BECAUSE THE LIBRARY IS LICENSED FREE OF CHARGE, THERE IS NO WARRANTY FOR THE
LIBRARY, TO THE EXTENT PERMITTED BY APPLICABLE LAW.
EXCEPT WHEN OTHERWISE STATED IN WRITING THE COPYRIGHT HOLDERS AND/OR OTHER
PARTIES PROVIDE THE LIBRARY "AS IS" WITHOUT WARRANTY OF ANY KIND, EITHER
EXPRESSED OR IMPLIED, INCLUDING, BUT NOT LIMITED TO, THE IMPLIED WARRANTIES OF
MERCHANTABILITY AND FITNESS FOR A PARTICULAR PURPOSE. THE ENTIRE RISK AS TO THE
QUALITY AND PERFORMANCE OF THE LIBRARY IS WITH YOU. SHOULD THE LIBRARY PROVE
DEFECTIVE, YOU ASSUME THE COST OF ALL NECESSARY SERVICING, REPAIR OR CORRECTION.
16. IN NO EVENT UNLESS REQUIRED BY APPLICABLE LAW OR AGREED TO IN WRITING WILL
ANY COPYRIGHT HOLDER, OR ANY OTHER PARTY WHO MAY MODIFY AND/OR REDISTRIBUTE
THE LIBRARY AS PERMITTED ABOVE, BE LIABLE TO YOU FOR DAMAGES, INCLUDING ANY
GENERAL, SPECIAL, INCIDENTAL OR CONSEQUENTIAL DAMAGES ARISING OUT OF THE USE OR
INABILITY TO USE THE LIBRARY (INCLUDING BUT NOT LIMITED TO LOSS OF DATA OR DATA
BEING RENDERED INACCURATE OR LOSSES SUSTAINED BY YOU OR THIRD PARTIES OR A FAILURE OF THE LIBRARY TO OPERATE WITH ANY OTHER SOFTWARE), EVEN IF SUCH HOLDER OR
OTHER PARTY HAS BEEN ADVISED OF THE POSSIBILITY OF SUCH DAMAGES.
END OF TERMS AND CONDITIONS
Applying These Terms to Your New Libraries
If you develop a new library, and you want it to be of the greatest possible use to the public,
we recommend making it free software that everyone can redistribute and change. You can
do so by permitting redistribution under these terms (or, alternatively, under the terms of the
ordinary General Public License).
To apply these terms, attach the following notices to the library. It is safest to attach them to
the start of each source file to most effectively convey the exclusion of warranty; and each file
should have at least the "copyright" line and a pointer to where the full notice is found.
<one line to give the library's name and a brief idea of what it does.>
Copyright (C) <year> <name of author>
This library is free software; you can redistribute it and/or modify it under the terms of the
GNU Lesser General Public License as published by the Free Software Foundation; either version 2.1 of the License, or (at your option) any later version.
This library is distributed in the hope that it will be useful, but WITHOUT ANY WARRANTY;
without even the implied warranty of MERCHANTABILITY or FITNESS FOR A PARTICULAR
PURPOSE. See the GNU Lesser General Public License for more details.
You should have received a copy of the GNU Lesser General Public License along with this
library; if not, write to the Free Software Foundation, Inc., 59 Temple Place, Suite 330, Boston,
MA 02111-1307 USA
Also add information on how to contact you by electronic and paper mail.
You should also get your employer (if you work as a programmer) or your school, if any, to sign
a "copyright disclaimer" for the library, if necessary. Here is a sample; alter the names:
Version 8, 03.09.2008
Yoyodyne, Inc., hereby disclaims all copyright interest in the library `Frob' (a library for tweaking knobs) written by James Random Hacker. <signature of Ty Coon>, 1 April 1990 Ty Coon,
President of Vice
170
Gigaset A580 IP / US English / A31008-xxxx-xxxx-x-xxxx / accessories_SAG.fm / 10.03.2010
Accessories
Accessories
Gigaset handsets
Upgrade your Gigaset to a cordless PABX:
Gigaset A58H handset
u
u
u
u
u
Illuminated graphic display
Illuminated keypad
Handsfree talking
Polyphonic ringer melodies
Directory for around 150 entries
www.gigaset.com/gigaseta58h
Gigaset S67H or S68H handset
u
u
u
u
u
u
u
u
u
u
HDSP ready
Illuminated graphical color display (65k colors)
Illuminated keypad
Handsfree talking
Polyphonic ringer melodies
Directory for around 250 entries
Picture Caller ID
Headset socket
Bluetooth (Gigaset S68H only)
Room monitor
www.gigaset.com/gigasets67h
www.gigaset.com/gigasets68h
Version 8, 03.09.2008
All accessories are available from your phone retailer.
Use only original accessories. This will avoid possible health risks and damage to
property, and also ensure that all the relevant regulations are complied with.
171
Gigaset A580 IP / US English / A31008-xxxx-xxxx-x-xxxx / glossary.fm / 07.07.2010
Glossary
Glossary
A
ADSL
Asymmetric Digital Subscriber Line
Special form of DSL.
ALG
Application Layer Gateway
NAT control mechanism of a router.
Many routers with integrated NAT use ALG. ALG lets the data packets in a VoIP connection pass and adds the public IP address of the secure private network.
The router's ALG should be deactivated if the VoIP provider offers a STUN server or
an outbound proxy.
£ Firewall, NAT, Outbound proxy, STUN
Authentication
Restriction of access to a network/service by use of an ID and password to log in.
Automatic ringback
£ Ringback when the number is busy.
B
Block dialing
Enter the complete phone number, and correct it if necessary. Then pick up the
handset or press the Handsfree key to dial the phone number.
Broadband Internet access
£ DSL.
Buddy
Subscriber with whom you exchange brief messages on the Internet in real time
(chatting).
£ Instant messaging.
C
Call waiting
= CW
Version 8, 03.09.2008
VoIP provider feature. A beep during a call indicates that another caller is waiting.
You can accept or reject the second call. You can activate/deactivate the feature.
172
Gigaset A580 IP / US English / A31008-xxxx-xxxx-x-xxxx / glossary.fm / 07.07.2010
Glossary
Call forwarding
= CF
Automatic forwarding (CF) of a call to a different telephone number. There are three
kinds of call forwarding:
u CFU, Call Forwarding Unconditional
u CFB, Call Forwarding Busy
u CFNR, Call Forwarding No Reply
CF
£ Call forwarding
Chatting
Form of communication on the Internet. During a chat, brief messages are
exchanged between the communicating parties in real time. Chatting in this sense
is understood to be a written form of communication.
Client
Application that requests a service from a server.
Codec
Coder/decoder
Codec is a procedure that digitizes and compresses analog voice before it is sent via
the Internet, and decodes – i.e. translates into analog voice – digital data when
voice packets are received. There are different codecs, with differing degrees of
compression, for instance.
Both parties involved in the telephone connection (caller/sender and recipient)
must use the same codec. This is negotiated between the sender and the recipient
when establishing a connection.
The choice of codec is a compromise between voice quality, transmission speed
and the necessary bandwidth. A high level of compression, for example, means that
the bandwidth required for each voice connection is low. However, it also means
that the time needed to compress/decompress the data is greater, which increases
execution time for data in the network and thus impairs voice quality. The time
required increases the delay between the sender speaking and the recipient hearing what has been said.
COLP / COLR
Connected Line Identification Presentation/Restriction
Service characteristic of a VoIP connection for outgoing calls.
COLP displays the phone number accepting the call on the calling party's display
unit.
The number of the party accepting the call is different to the dialed number, e.g. if
the call is forwarded or transferred.
The called party can use COLR (Connected Line Identification Restriction) to prevent the number from appearing on the calling party's display.
Version 8, 03.09.2008
Consultation call
You are on a call. With a consultation call, you interrupt the conversation briefly to
establish a second connection to another participant. If you terminate the connection to this participant immediately, then this was a consultation call. If you switch
between the first and second participant, it is called Toggling.
CW
£ Call waiting
173
Gigaset A580 IP / US English / A31008-xxxx-xxxx-x-xxxx / glossary.fm / 07.07.2010
Glossary
D
DHCP
Dynamic Host Configuration Protocol
Internet protocol which regulates the automatic assignment of IP addresses to
Network subscribers. The protocol is made available in the network by a server. A
DHCP server can, for example, be a router.
The phone contains a DHCP client. A router that contains a DHCP server can assign
the IP addresses for the phone automatically from a defined address block. The
dynamic assignment means that several Network subscribers can share one IP
address, although they can only use it alternately and not simultaneously.
With some routers you can specify that the IP address for the phone is never
changed.
Displayed name
VoIP provider feature. You can specify any name that is to be shown to the other
party during a call instead of your phone number.
DMZ (Demilitarized Zone)
DMZ describes a part of a network that is outside the firewall.
A DMZ is set up, as it were, between a network you want to protect (e.g. a LAN) and
a non-secure network (e.g. the Internet). A DMZ permits unrestricted access from
the Internet to only one or a few network components, while the other network
components remain secure behind the firewall.
DNS
Domain Name System
Hierarchical system that enables assignment of IP addresses to Domain names
that are easier to memorize. This assignment must be managed in each (W)LAN
from a local DNS server. The local DNS server determines the IP address, if necessary
by enquiring about superordinate DNS servers and other local DNS servers on the
Internet.
You can specify the IP address of the primary/secondary DNS server.
£ DynDNS.
Domain name
Name of one (several) Web server(s) on the Internet (e.g. gigaset.net). The domain
name is assigned to the relevant IP address by DNS.
DSCP
Differentiated Service Code Point
DSL
Digital Subscriber Line
£ Quality of Service (QoS).
Data transfer technology that allows Internet access with, for e.g. 1.5 Mbps over a
conventional telephone line. Prerequisites: DSL modem and the appropriate service offered by the Internet provider.
Version 8, 03.09.2008
DSLAM
Digital Subscriber Line Access Multiplexer
The DSLAM is a switch cabinet in an exchange at which all subscriber connectors
converge.
174
Gigaset A580 IP / US English / A31008-xxxx-xxxx-x-xxxx / glossary.fm / 07.07.2010
Glossary
DTMF
Dual Tone Multi-Frequency
Another description for dual tone multi-frequency dialing (DTMF).
Dynamic IP address
A dynamic IP address is assigned to a network component automatically via DHCP.
The dynamic IP address for a network component can change every time it registers or at certain time intervals.
£ Static IP address
DynDNS
Dynamic DNS
Domain names and IP addresses are assigned via DNS. For Dynamic IP addresses
this service is enhanced with "DynamicDNS". This permits the use of a network component with a dynamic IP address as a Server on the Internet. DynDNS ensures that
a service can always be addressed on the Internet at the same Domain name,
regardless of the current IP address.
E
ECT
Explicit Call Transfer
Participant A calls participant B. The participant puts the connection on hold and
calls participant C. Rather than connect everyone in a three-party conference, A
now transfers participant B to C and hangs up.
EEPROM
Electrically Erasable Programmable Read Only Memory
Memory building block in your phone with fixed data (e.g. default and customized
settings) and data saved automatically (e.g. entries to the list of callers).
Ethernet network
Wired LAN.
F
Firewall
You can use a firewall to protect your network against unauthorized external
access. This involves combining various measures and technologies (hard and/or
software) to control the flow of data between a private network you wish to protect
and an unprotected network (e.g., the Internet).
£ NAT.
Firmware Software for a device in which basic information is stored for the device's function.
To correct errors or update the device software, a new version of the firmware can
be loaded into the device's memory (firmware update).
Version 8, 03.09.2008
Flat rate
Billing system for an Internet connection. The Internet provider charges a set
monthly fee. There are no additional charges for the duration of the connection or
number of connections.
Fragmentation
Data packets that are too big are split into smaller packets (fragments) before they
are transferred. They are put together again when they reach the recipient (defragmented).
175
Gigaset A580 IP / US English / A31008-xxxx-xxxx-x-xxxx / glossary.fm / 07.07.2010
Glossary
Full duplex Data transmission is a mode in which data can be sent and received at the same
time.
G
G.711 a law, G.711 μ law
Standard for a Codec.
G.711 delivers a very good voice quality that corresponds to that in the ISDN fixed
line. As there is little compression, the necessary bandwidth is around 64 kbit/s per
voice connection, but the delay caused by coding/decoding is only 0.125 ms.
"a law" describes the European standard and "μ law" describes the North American/
Japanese equivalent.
G.722
Standard for a Codec.
G.722 is a broadband language codec with a bandwidth of 50 Hz to 7 kHz, a net
transmission rate of 64 kbit/s per language connection and integrated speech
pause recognition and comfort noise generation (silence suppression).
G.722 delivers very good voice quality. A higher sampling rate provides clearer and
better voice quality than other codecs and enables a speech tone in High Definition
Sound Performance (HDSP).
G.726
Standard for a Codec.
G.726 delivers a good voice quality. It is inferior to the quality with codec G.711 but
better than with G.729.
G.729A/B Standard for a Codec.
The voice quality is more likely to be lower with G.729A/B. As a result of the high
level of compression, the necessary bandwidth is only around 8 kbit/s per voice
connection, but the delay is around 15 ms.
Gateway
Connects two different Networks, e.g. a router as an Internet gateway.
For phone calls from VoIP to the telephone network, a gateway has to be connected to the IP network and the telephone network (gateway/VoIP provider). It
forwards calls from VoIP to the telephone network as required.
Gateway provider
£ SIP provider.
Global IP address
£ IP address.
GSM
Global System for Mobile Communication
Version 8, 03.09.2008
Originally, a European standard for mobile networks. GSM can now be described as
a worldwide standard. In the USA and Japan national standards are now more frequently supported than in the past.
176
Gigaset A580 IP / US English / A31008-xxxx-xxxx-x-xxxx / glossary.fm / 07.07.2010
Glossary
H
Headset
Combination of microphone and headphone. A headset makes handsfree talking
more convenient. There are headsets available that can be connected to the handset by a cable.
HTTP Proxy
Server via which the Network subscribers can process their Internet traffic.
Hub
Uses one Infrastructure network to connect several Network subscribers. All data
sent to the hub by one network subscriber is forwarded to all network subscribers.
£ Gateway, Router.
I
IEEE
Institute of Electrical and Electronics Engineers
International body that defines standards in electronics and electro-technology,
concerned in particular with the standardization of LAN technology, transmission
protocols, data transfer rate and wiring.
Infrastructure network
Network with central structure: All Network subscribers communicate via a central
Router.
Instant messaging
Service that uses a client program to allow chatting in real time, i.e. to send brief
messages to other subscribers on the Internet.
Internet
Global WAN. A series of protocols have been defined for exchanging data, known
by the name TCP/IP.
Each Network subscriber is identifiable via his IP address. DNS assigns a Domain
name to the IP address.
Important services on the Internet include the World Wide Web (WWW), e-mail, file
transfer and discussion forums.
Internet Service Provider
Enables access to the Internet for a fee.
Version 8, 03.09.2008
IP (Internet Protocol)
TCP/IP protocol on the Internet. IP is responsible for addressing subscribers in a
Network using IP addresses and transfers data from the sender to the recipient. IP
determines the paths (routing) along which the data packets travel.
177
Gigaset A580 IP / US English / A31008-xxxx-xxxx-x-xxxx / glossary.fm / 07.07.2010
Glossary
IP address A unique address for a network component within a network based on the TCP/IP
protocols (e.g. LAN, Internet). On the Internet, domain names are usually assigned
instead of IP addresses. DNS assigns the corresponding IP address to the domain
name.
The IP address consists of four three-digit decimal numbers separated from one
another by a period (e.g. 223.94.233.2). The first decimal number can be between 1
and 126 and between 128 and 223, the second and third between 0 and 255, and
the fourth between 1 and 254.
The IP address is made up of the network number and the number of the Network
subscriber (e.g. phone). Depending on the Subnet mask, the front one, two or
three parts make up the network number and the rest of the IP address addresses
the network component. The network number of all the components in any one
network must be identical.
IP addresses can be assigned automatically with DHCP (dynamic IP addresses) or
manually (static IP addresses).
£ DHCP.
IP pool range
Range of IP addresses that the DHCP server can use to assign dynamic IP addresses.
L
LAN
Local Area Network
Network with a restricted physical range. A LAN can be wireless (WLAN) and/or
wired.
Local IP address
The local or private IP address is the address for a network component in the local
network (LAN). The network operator can assign any address he or she wants.
Devices that act as a link from a local network to the Internet (gateway or router)
have a public and a private IP address.
£ IP address.
Local SIP Port
£ SIP port/Local SIP port.
M
MAC address
Media Access Control Address
Hardware address by means of which each network device (e.g. network card,
switch, phone) can be uniquely identified worldwide. It consists of 6 parts (hexadecimal numbers) separated by a "-" (e.g. 00-90-65-44-00-3A).
The MAC address is assigned by the manufacturer and cannot be changed.
Version 8, 03.09.2008
Mbps
Million bits per second
Unit of the transmission speed in a network.
178
Gigaset A580 IP / US English / A31008-xxxx-xxxx-x-xxxx / glossary.fm / 07.07.2010
Glossary
MRU
Maximum Receive Unit
Defines the maximum user data volume within a data packet.
MTU
Maximum Transmission Unit
Defines the maximum length of a data packet that can be carried over the network
at a time.
Music on hold
Music that is played while you are on a Consultation call or Toggling. The waiting
participant hears music while on hold.
N
NAT
Network Address Translation
Method for converting (private) IP addresses to one or more (public) IP addresses.
NAT enables the IP addresses of Network subscribers (e.g. VoIP telephones) in a
LAN to be concealed behind a shared IP address for the Router on the Internet.
VoIP telephones behind a NAT router cannot be reached by VoIP servers (on
account of the private IP address). To "get around" NAT, it is possible to use (alternately) ALG in the router, STUN in the VoIP telephone, or for the VoIP provider to
use an Outbound proxy.
If an outbound proxy is made available you must allow for this in the VoIP settings
for your phone.
Network
Group of devices. Devices can be connected in either wired or wireless mode.
Networks can also differ in range and structure:
u Range: local networks (LAN) or wide-area networks (WAN)
u Structure: Infrastructure network or ad-hoc network
Network subscriber
Devices and PCs that are connected to each other in a network, e.g. servers, PCs and
phones.
O
Version 8, 03.09.2008
Outbound proxy
Alternate NAT control mechanism to STUN and ALG.
Outbound proxies are implemented by the VoIP provider in firewall/NAT environments as an alternate to SIP proxy server. They control data traffic through the firewall.
Outbound proxy and STUN servers should not be used simultaneously.
£ STUN and NAT.
179
Gigaset A580 IP / US English / A31008-xxxx-xxxx-x-xxxx / glossary.fm / 07.07.2010
Glossary
P
Paging (handset search)
A base station function to locate registered handsets. The base station establishes
a connection to every registered handset. The handsets start to ring. Paging is activated by briefly pressing the button on the base station and is deactivated by
briefly pressing the same button again.
PIN
Personal Identification Number
Protects against unauthorized use. When the PIN is activated, a number combination has to be entered to access a protected area.
You can protect your base station configuration data with a system PIN (4-digit
number combination).
Port
Data is exchanged between two applications in a Network via a port.
Port forwarding
The Internet gateway (e.g. your router) forwards data packets from the Internet
that are directed to a certain Port to the port concerned. This allows servers in the
LAN to offer services on the Internet without you needing a public IP address.
Port number
Indicates a specific application of a Network subscriber. Depending on the setting
in the LAN, the port number is permanently assigned or else it is newly assigned
with each access.
The combination of IP address/Port number uniquely identifies the recipient or
sender of a data packet within a network.
Predialing
£ Block dialing.
Private IP address
£ Public IP address.
Protocol
Describes the agreements for communicating within a Network. It contains rules
for opening, administering and closing a connection, about data formats, time
frames and possible error handling.
Proxy/Proxy server
Computer program that controls the exchange of data between Client and Server
in computer networks. If the phone sends a query to the VoIP server, the proxy acts
as a server towards the phone and as a client towards the server. A proxy is
addressed via Domain names/IP addresses and Ports.
Version 8, 03.09.2008
Public IP address
The public IP address is the address for a network component on the Internet. It is
assigned by the Internet Service Provider. Devices that act as a link from a local network to the Internet (gateway, router) have a public and a local IP address.
£ IP address and NAT
180
Gigaset A580 IP / US English / A31008-xxxx-xxxx-x-xxxx / glossary.fm / 07.07.2010
Glossary
Q
Quality of Service (QoS)
Quality of service
Describes the Quality of Service in communication networks. Differentiations are
made between various Quality of Service classes.
QoS influences the flow of data packets on the Internet, e.g. by prioritizing data
packets, reserving bandwidth and data packet optimization.
In VoIP networks, QoS influences the voice quality. If the whole infrastructure
(router, network server, etc.) has QoS, the voice quality is better, i.e. fewer delays,
less echoing, less crackling.
R
RAM
Random Access Memory
Memory in which you have reading and storage rights. Items such as melodies and
screen pictures are saved in the RAM after you have loaded them onto the phone
via the Web configurator.
Registrar
The registrar manages the Network subscribers' current IP addresses. When you
register with your VoIP provider, your current IP address is saved on the registrar.
This means you can also be reached when on the move.
ROM
Read Only Memory
A type of memory that can only be read.
Router
Routes data packets within a network and between different networks via the
quickest route. Can connect Ethernet networks and WLAN. Can be a Gateway to
the Internet.
Routing
Routing is the transfer of data packets to another subscriber in your network. On
their way to the recipient, the data packets are sent from one router to the next until
they reach their destination.
If data packets were not forwarded in this way, a network like the Internet would
not be possible. Routing connects the individual networks to this global system.
A router is a part of this system; it transfers data packets both within a local network
and from one network to the next. Transfer of data from one network to another is
performed on the basis of a common protocol.
RTP
Realtime Transport Protocol
Global standard for transferring audio and video data. Often used in conjunction
with UDP. In this case, RTP packets are embedded in UDP packets.
Version 8, 03.09.2008
RTP port
(Local) Port that is used to send and receive voice data packets for VoIP.
Ringback when the number is busy
= CCBS (Completion of Calls to Busy Subscriber). If a caller hears the busy tone, he
or she can activate the ringback function. As soon as the connection is free the
caller is rung back. As soon as the caller lifts the receiver the connection is made
automatically.
181
Gigaset A580 IP / US English / A31008-xxxx-xxxx-x-xxxx / glossary.fm / 07.07.2010
Glossary
Ringback when the call is not answered
= CCNR (Completion of Calls on No Reply). If a participant does not respond when
called, a caller can arrange an automatic ringback. As soon as the destination
phone has completed a call and is free again, the caller is rung back. This feature
must be supported by the exchange. The ringback request is automatically canceled after about 2 hours (depending on the VoIP provider).
S
Server
Provides a service to other Network subscribers (Clients). The term can indicate a
computer/PC or an application. A server is addressed via IP addresses/Domain
names and Ports.
SIP (Session Initiation Protocol)
Signaling protocol independent of voice communication. Used for establishing and
ending a call. It is also possible to define parameters for voice transmission.
£ URI.
SIP address
SIP port/Local SIP port
(Local) Port that is used to send and receive SIP signaling data for VoIP.
SIP provider
£ VoIP provider.
SIP proxy server
IP address of your VoIP provider's gateway server.
Static IP address
A static IP address is assigned to a network component manually during network
configuration. Unlike a Dynamic IP address, a static IP address does not change.
STUN
Simple Transversal of UDP over NAT
NAT control mechanism.
STUN is a data protocol for VoIP telephones. STUN replaces the private IP address in
the data packets of the VoIP telephone with the public address of the secure private
network. To control data transfer, a STUN server is also required on the Internet.
STUN cannot be implemented with symmetric NATs.
£ ALG, Firewall, NAT, Outbound proxy.
Subnet
Segment of a Network.
Version 8, 03.09.2008
Subnet mask
IP addresses consist of a fixed network number and a variable subscriber number.
The network number is identical for all Network subscribers. The size of the network number part is determined in the subnet mask. In the subnet mask
255.255.255.0, for example, the first three parts of the IP address are the network
number and the last part the subscriber number.
182
Gigaset A580 IP / US English / A31008-xxxx-xxxx-x-xxxx / glossary.fm / 07.07.2010
Glossary
Symmetric NAT
A symmetric NAT assigns different external IP addresses and port numbers to the
same internal IP addresses and port numbers – depending on the external target
address.
T
TCP
Transmission Control Protocol
Transport protocol. Session-based transmission protocol: it sets up, monitors and
terminates a connection between sender and recipient for transporting data.
TLS
Transport Layer Security
Protocol for encrypting data transmissions on the Internet. TLS is a superordinated
Transport protocol.
Toggling
Toggling allows you to switch between two callers or between a conference call
and an individual caller without allowing the waiting caller to listen to the call.
Transmission rate
Speed at which data is transmitted in the WAN or LAN. The transmission rate is
measured in data units per unit of time (Mbit/s).
Transport protocol
Controls data transport between two communication partners (applications).
£ UDP, TCP, TLS.
U
UDP
User Datagram Protocol
Transport protocol. Unlike TCP, UDP is a non session-based protocol. UDP does not
establish a fixed connection. The data packets ("datagrams") are sent as a broadcast. The recipient is solely responsible for making sure the data is received. The
sender is not notified about whether it is received or not.
URI
Uniform Resource Identifier
Character sequence for identifying resources (e.g. e-mail recipient, http://
gigaset.com, files).
On the Internet, URIs are used as a uniform identification for resources. URIs are also
described as SIP addresses.
URIs can be entered in the phone as a number. By dialing a URI you can call an Internet subscriber with VoIP equipment.
URL
Universal Resource Locator
Version 8, 03.09.2008
Globally unique address of a domain on the Internet.
A URL is a subtype of URI. URLs identify a resource by its location on the Internet.
For historical reasons the term is often used as a synonym for URI.
User ID
£ User identification.
183
Gigaset A580 IP / US English / A31008-xxxx-xxxx-x-xxxx / glossary.fm / 07.07.2010
Glossary
User identification
Name/number combination for access, e.g. to your VoIP account.
V
Voice codec
VoIP
£ Codec.
Voice over Internet Protocol
Telephone calls are no longer placed and transmitted over the telephone network
but over the Internet (or other IP networks).
VoIP provider
A VoIP, SIP or Gateway provider is an Internet service provider that provides a Gateway for Internet telephony. As the phone works with the SIP standard, your provider must support the SIP standard.
The provider routes calls from VoIP to the telephone network (analog, ISDN and cellular) and vice versa.
W
WAN
Wide Area Network
Version 8, 03.09.2008
Wide-area network that is unrestricted in terms of area (e.g. Internet).
184
Gigaset A580 IP / US English / A31008-xxxx-xxxx-x-xxxx / Gigaset_A580_IPSIX.fm / 10.03.2010
Index
Index
Version 8, 03.09.2008
A
Access code (PABX) . . . . . . . . . . . . . . . . . . . . 95
Access protection . . . . . . . . . . . . . . . . . . . . . 85
Access to Web configurator
from other networks . . . . . . . . . . . . . 105
Accessories . . . . . . . . . . . . . . . . . . . . . . . . . . 171
Account name (e-mail) . . . . . . . . . . . . . . . 134
Acknowledge tones . . . . . . . . . . . . . . . . . . . 84
Activating
advisory tones . . . . . . . . . . . . . . . . . . . . . . 84
Annex B for G.729 . . . . . . . . . . . . . . . . . . 120
auto answer . . . . . . . . . . . . . . . . . . . . . . . . 81
handset . . . . . . . . . . . . . . . . . . . . . . . . . . 1, 32
keypad lock . . . . . . . . . . . . . . . . . . . . . . . . 32
network mailbox . . . . . . . . . . . . . . . . . . . 127
speaker . . . . . . . . . . . . . . . . . . . . . . . . . . . . 44
Address assignment (IP address) . . . . . . . 104
ADSL . . . . . . . . . . . . . . . . . . . . . . . . . . . . . . . . 172
Advisory tones . . . . . . . . . . . . . . . . . . . . . . . . 84
Alarm clock . . . . . . . . . . . . . . . . . . . . . . . . . . . 70
Alarm repeat . . . . . . . . . . . . . . . . . . . . . . . . . . 70
ALG . . . . . . . . . . . . . . . . . . . . . . . . . . . . . . . . . 172
Alternate DNS server (Web
configurator) . . . . . . . . . . . . . . . . . . . . 105
Anonymous calling . . . . . . . . . . . . . . . . . . . . 52
Application Layer Gateway (ALG) . . . . . . 172
Application signal (Flash key). . . . . . . . . . 129
Application type (Flash key) . . . . . . . . . . . 129
Arabic characters, entering . . . . . . . . . . . . 101
Area code
dialing automatically . . . . . . . . . . . . . . . 124
entering own . . . . . . . . . . . . . . . . . . . . . . 124
Area code predialing
activating/deactivating . . . . . . . . . . . . . 124
Area codes . . . . . . . . . . . . . . . . . . . . . . . . . . . 87
extra area codes . . . . . . . . . . . . . . . . . . . . 88
extra codes . . . . . . . . . . . . . . . . . . . . . . . . . 88
local area code . . . . . . . . . . . . . . . . . . . . . . 88
own area code . . . . . . . . . . . . . . . . . . . . . . 88
Assigning send number to handset . . . . 122
Asterisk key . . . . . . . . . . . . . . . . . . . . . . . . . 1, 83
Asymmetric Digital Subscriber Line . . . . 172
Audio (DTMF signaling) . . . . . . . . . . . . . . . 128
Authentication . . . . . . . . . . . . . . . . . . . . . . . 172
Authentication name
e-mail . . . . . . . . . . . . . . . . . . . . . . . . . . . . . 134
Auto answer . . . . . . . . . . . . . . . . . . . . . . . . . . 41
activating/deactivating . . . . . . . . . . . . . . 81
Automatic configuration
of a VoIP connection . . . . . . . . . . . . . . . 109
Automatic version check . . . . . . . . . . . . . . 140
Available codecs . . . . . . . . . . . . . . . . . . . . . 119
B
Base station
activating/deactivating eco mode . . . . 69
changing system PIN . . . . . . . . . . . . . . . . 85
checking service information . . . . . . . 150
connecting . . . . . . . . . . . . . . . . . . . . . . . . . 18
connecting to electrical power supply 19
connecting to fixed line network . . . . . 19
connecting to router . . . . . . . . . . . . . . . . 20
operating on PABX . . . . . . . . . . . . . . . . . . 95
power consumption. . . . . . . . . . . . . . . . 153
reducing power consumption . . . . . . . . 69
reducing transmission power . . . . . . . . 69
restoring factory settings . . . . . . . . . . . . 86
setting . . . . . . . . . . . . . . . . . . . . . . . . . . . . . 85
setting default connection . . . . . . . 87, 121
setting up . . . . . . . . . . . . . . . . . . . . . . . . . . 17
system PIN . . . . . . . . . . . . . . . . . . . . . . . . . 85
updating firmware . . . . . . . . . . . . . . 88, 139
wall mounting . . . . . . . . . . . . . . . . . . . . . 195
Base station power consumption
reducing . . . . . . . . . . . . . . . . . . . . . . . . . . . 69
Battery
charge status . . . . . . . . . . . . . . . . . . . . . . . . .2
charging . . . . . . . . . . . . . . . . . . . . . . . . . 1, 14
display . . . . . . . . . . . . . . . . . . . . . . . . . . . 1, 14
icon . . . . . . . . . . . . . . . . . . . . . . . . . . . . . . 1, 14
inserting . . . . . . . . . . . . . . . . . . . . . . . . . . . 11
recommended batteries . . . . . . . . . . . . 152
tone . . . . . . . . . . . . . . . . . . . . . . . . . . . . . . . 84
Block dialing . . . . . . . . . . . . . . . . . . . . . . . . . 172
Blocking your caller ID . . . . . . . . . . . . . . . . . 52
Broadband connections . . . . . . . . . . . . . . . . .9
Broadband Internet access . . . . . . . . . . . . 172
Broadband voice codec . . . . . . . . . . . 117, 176
Buddy . . . . . . . . . . . . . . . . . . . . . . . . . . . . . . . 172
Buttons (Web configurator) . . . . . . . . . . . 102
185
Gigaset A580 IP / US English / A31008-xxxx-xxxx-x-xxxx / Gigaset_A580_IPSIX.fm / 10.03.2010
Index
Version 8, 03.09.2008
C
Call
accepting . . . . . . . . . . . . . . . . . . . . . . . . . . 41
disconnecting (toggling) . . . . . . . . . . . . 55
ending . . . . . . . . . . . . . . . . . . . . . . . . . . . . . 41
external . . . . . . . . . . . . . . . . . . . . . . . . . . . . 43
incoming . . . . . . . . . . . . . . . . . . . . . . . . . . . . .2
internal . . . . . . . . . . . . . . . . . . . . . . . . . . . . 74
number/name display . . . . . . . . . . . . . . . 42
rejecting external . . . . . . . . . . . . . . . . . . . 77
transferring (connecting) . . . . . . . . . . . . 75
Call acceptance
automatic . . . . . . . . . . . . . . . . . . . . . . . . . . 81
Call display . . . . . . . . . . . . . . . . . . . . . . . . . . . 42
fixed line network . . . . . . . . . . . . . . . . . . . 42
VoIP. . . . . . . . . . . . . . . . . . . . . . . . . . . . . . . . 42
Call duration . . . . . . . . . . . . . . . . . . . . . . . . . . 46
Call forwarding . . . . . . . . . . . . . . . . . . . . . . 173
Gigaset.net . . . . . . . . . . . . . . . . . . . . . 53, 123
VoIP (handset) . . . . . . . . . . . . . . . . . . . . . . 53
VoIP (Web configurator) . . . . . . . . . . . . 123
Call waiting . . . . . . . . . . . . . . . . . . . . . . 172, 173
accepting/rejecting (VoIP) . . . . . . . . . . . 56
activating/deactivating (VoIP) . . . . . . . . 54
internal call . . . . . . . . . . . . . . . . . . . . . . . . . 77
Caller ID . . . . . . . . . . . . . . . . . . . . . . . . . . . . . . 42
Calling
anonymously . . . . . . . . . . . . . . . . . . . . . . . 52
entering IP address . . . . . . . . . . . . . . . . . . 40
external . . . . . . . . . . . . . . . . . . . . . . . . . . . . 38
Gigaset.net . . . . . . . . . . . . . . . . . . . . . . 49, 51
internal . . . . . . . . . . . . . . . . . . . . . . . . . . . . 74
via VoIP/fixed line network . . . . . . . . . . . 38
Calls list . . . . . . . . . . . . . . . . . . . . . . . . . . . . . . 58
Canceling
dialing . . . . . . . . . . . . . . . . . . . . . . . . . . . . . 40
operation . . . . . . . . . . . . . . . . . . . . . . . . . 102
Care of the telephone . . . . . . . . . . . . . . . . 152
CF . . . . . . . . . . . . . . . . . . . . . . . . . . . . . . . . . . 173
Changing
dialing mode . . . . . . . . . . . . . . . . . . . . . . . 95
earpiece volume . . . . . . . . . . . . . . . . . . . . 81
handsfree volume . . . . . . . . . . . . . . . . . . . 81
internal number . . . . . . . . . . . . . . . . 73, 136
system PIN . . . . . . . . . . . . . . . . . . . . . . . . . 85
to daylight saving time . . . . . . . . . . . . . 141
Charge status display (battery) . . . . . . . 1, 14
Charge status of the batteries . . . . . . . . . . . .2
186
Charging cradle
connecting . . . . . . . . . . . . . . . . . . . . . . . . . 13
wall mounting . . . . . . . . . . . . . . . . . . . . . 195
Chatting . . . . . . . . . . . . . . . . . . . . . . . . . . . . . 173
Checking EEPROM version . . . . . . . . . . . . 142
Checking service information . . . . . . . . . 150
Client . . . . . . . . . . . . . . . . . . . . . . . . . . . . . . . 173
Codecs . . . . . . . . . . . . . . . . . . . . . . . . . . . . . . 173
Codecs, available . . . . . . . . . . . . . . . . . . . . . 119
COLP . . . . . . . . . . . . . . . . . . . . . . . . . . . . . 44, 173
COLR . . . . . . . . . . . . . . . . . . . . . . . . . . . . . 44, 173
Conference . . . . . . . . . . . . . . . . . . . . . . . . . . . 76
Conference call
fixed line network . . . . . . . . . . . . . . . . . . . 53
VoIP . . . . . . . . . . . . . . . . . . . . . . . . . . . . . . . 55
Configuration
via PC . . . . . . . . . . . . . . . . . . . . . . . . . . . . . . 97
VoIP connection (automatic) . . . . . . . . 109
Configuring
VoIP connection (handset) . . . . . . . . . . . 91
VoIP connection (Web config.) . . . . . . 107
Confirmation tone . . . . . . . . . . . . . . . . . . . . 84
Connected Line Identification
Presentation . . . . . . . . . . . . . . . . . . 44, 173
Connecting
PC to the Web configurator . . . . . . . 97, 98
phone to internal company network . 106
Connection
activating (VoIP) . . . . . . . . . . . . . . . . . . . 115
Internet (troubleshooting) . . . . . . . . . . . 27
name/provider (Web config.). . . . . . . . 107
phone to an internal company
network. . . . . . . . . . . . . . . . . . . . . . . 106
selecting (line suffix) . . . . . . . . . . . . . 38, 39
to Gigaset.net . . . . . . . . . . . . . . . . . . . . . 116
Connection name
fixed line network . . . . . . . . . . . . . . . . . . 115
VoIP . . . . . . . . . . . . . . . . . . . . . . . . . . . . . . 109
Connection type
selecting (Display key) . . . . . . . . . . . . 38, 39
selecting (Talk key) . . . . . . . . . . . . . . . . . . 38
Connection wizard
starting (getting started) . . . . . . . . . . . . 21
Consultation call . . . . . . . . . . . . . . . . . . . . . 173
ending . . . . . . . . . . . . . . . . . . . . . . . . . . . . . 76
external (fixed line network) . . . . . . . . . 53
external (VoIP) . . . . . . . . . . . . . . . . . . . . . . 55
internal . . . . . . . . . . . . . . . . . . . . . . . . . . . . 76
Control key . . . . . . . . . . . . . . . . . . . . . . . . . 1, 30
Gigaset A580 IP / US English / A31008-xxxx-xxxx-x-xxxx / Gigaset_A580_IPSIX.fm / 10.03.2010
Index
Correcting incorrect entries . . . . . . . . . . . . 31
Cost control . . . . . . . . . . . . . . . . . . . . . . . . 8, 45
defining dialing plans . . . . . . . . . . . . . . 125
Customer Care . . . . . . . . . . . . . . . . . . . 143, 160
Customer Service . . . . . . . . . . . . . . . . . . . . 143
CW. . . . . . . . . . . . . . . . . . . . . . . . . . . . . . . . . . 173
Cyrillic characters, entering . . . . . . . . . . . 101
Version 8, 03.09.2008
D
Data packets, fragmentation . . . . . . . . . . 175
Data server for firmware update . . . . . . . 139
Date
set manually . . . . . . . . . . . . . . . . . . . . . . . . 14
transferring from time server . . . . . . . . 141
Daylight saving time
changing automatically. . . . . . . . . . . . . 141
Deactivating
advisory tones . . . . . . . . . . . . . . . . . . . . . . 84
auto answer . . . . . . . . . . . . . . . . . . . . . . . . 81
handset . . . . . . . . . . . . . . . . . . . . . . . . . . 1, 32
keypad lock . . . . . . . . . . . . . . . . . . . . . . . . 32
network mailbox . . . . . . . . . . . . . . . . . . . 127
speaker . . . . . . . . . . . . . . . . . . . . . . . . . . . . 44
Default gateway
entering (handset) . . . . . . . . . . . . . . . . . . 93
entering (Web configurator) . . . . . . . . 104
Default settings
handset . . . . . . . . . . . . . . . . . . . . . . . . . . . . 84
Delete key . . . . . . . . . . . . . . . . . . . . . . . . . . . . 30
Deleting characters. . . . . . . . . . . . . . . . . . . . 31
Demilitarized Zone . . . . . . . . . . . . . . . . . . . 174
De-registering
from Web configurator . . . . . . . . . . . . . . 99
handset from base station . . . . . . . . . . . 72
DHCP . . . . . . . . . . . . . . . . . . . . . . . . . . . 174, 175
Dialing
canceling . . . . . . . . . . . . . . . . . . . . . . . . . . . 40
directory . . . . . . . . . . . . . . . . . . . . . . . . . . . 63
IP address . . . . . . . . . . . . . . . . . . . . . . . . . . 40
using shortcuts . . . . . . . . . . . . . . . . . . . . . 64
Dialing mode . . . . . . . . . . . . . . . . . . . . . . . . . 95
Dialing plans . . . . . . . . . . . . . . . . . . . . 8, 45, 125
activating/deactivating . . . . . . . . . . . . . 126
defining . . . . . . . . . . . . . . . . . . . . . . . . . . . 125
deleting . . . . . . . . . . . . . . . . . . . . . . . . . . . 127
for emergency numbers . . . . . . . . . . . . 127
Differentiated Service Code Point . . . . . . 174
Digit key
changing assignment . . . . . . . . . . . . . . . 81
Digital clock . . . . . . . . . . . . . . . . . . . . . . . . . . 79
Digital Subscriber Line . . . . . . . . . . . . . . . . 174
Digital Subscriber Line Access
Multiplexer . . . . . . . . . . . . . . . . . . . . . . 174
Directory . . . . . . . . . . . . . . . . . . . . . . . . . . . . . 62
copying number . . . . . . . . . . . . . . . . . . . . 65
copying number from text . . . . . . . . . . . 65
deleting (Web configurator) . . . . . . . . 138
editing via PC . . . . . . . . . . . . . . . . . . . . . . 136
Gigaset.net . . . . . . . . . . . . . . . . . . . . . . . . . 48
loading from PC . . . . . . . . . . . . . . . . . . . 137
managing entries . . . . . . . . . . . . . . . . . . . 64
opening . . . . . . . . . . . . . . . . . . . . . . . . . . . . 30
order of entries . . . . . . . . . . . . . . . . . . . . . 63
saving entry . . . . . . . . . . . . . . . . . . . . . . . . 63
saving the first number . . . . . . . . . . . . . . 62
sending entry/list to handset. . . . . . . . . 65
transferring to/from PC . . . . . . . . . . . . . 136
Directory file
content (vCard format) . . . . . . . . . . . . . 138
Display
appointment/alarm activated . . . . . . . . . .2
call duration . . . . . . . . . . . . . . . . . . . . . . . . 46
call duration/costs . . . . . . . . . . . . . . . . . . 46
caller’s number (CID) . . . . . . . . . . . . . . . . 42
changing display language . . . . . . . . . . 78
charge status of the batteries . . . . . . . . . .2
in idle status . . . . . . . . . . . . . . . . . . . . . . 1, 32
incoming call . . . . . . . . . . . . . . . . . . . . . . . . .2
keypad lock . . . . . . . . . . . . . . . . . . . . . . . . . .2
name (CID) . . . . . . . . . . . . . . . . . . . . . . . . . 43
ringer melody deactivated . . . . . . . . . . . . .2
screensaver . . . . . . . . . . . . . . . . . . . . . . . . . 79
Display keys . . . . . . . . . . . . . . . . . . . . . . . . 1, 30
assigning . . . . . . . . . . . . . . . . . . . . . . . . . . . 81
changing assignment . . . . . . . . . . . . . . . 81
Displayed name (VoIP) . . . . . . . . . . . . 111, 174
Disposal . . . . . . . . . . . . . . . . . . . . . . . . . . . . . 151
DMZ . . . . . . . . . . . . . . . . . . . . . . . . . . . . . . . . 174
DNS . . . . . . . . . . . . . . . . . . . . . . . . . . . . . . . . . 174
DNS server . . . . . . . . . . . . . . . . . . . . . . . . . . . 93
alternate (Web configurator) . . . . . . . . 105
preferred (handset) . . . . . . . . . . . . . . . . . 93
preferred (Web configurator). . . . . . . . 105
Domain . . . . . . . . . . . . . . . . . . . . . . . . . . . . . 112
Domain name . . . . . . . . . . . . . . . . . . . . . . . 174
Domain Name System . . . . . . . . . . . . . . . . 174
DSCP . . . . . . . . . . . . . . . . . . . . . . . . . . . . . . . . 174
DSL . . . . . . . . . . . . . . . . . . . . . . . . . . . . . . . . . 174
187
Gigaset A580 IP / US English / A31008-xxxx-xxxx-x-xxxx / Gigaset_A580_IPSIX.fm / 10.03.2010
Index
DSLAM . . . . . . . . . . . . . . . . . . . . . . . . . . . . . . 174
DTMF (tone dialing) . . . . . . . . . . . . . . . . . . . 96
DTMF signaling for VoIP. . . . . . . . . . . . . . . 128
Dynamic DNS . . . . . . . . . . . . . . . . . . . . . . . . 175
Dynamic Host Configuration Protocol . . 174
Dynamic IP address . . . . . . . . . . . . . . 104, 175
DynDNS . . . . . . . . . . . . . . . . . . . . . . . . . . . . . 175
E
Earpiece mode . . . . . . . . . . . . . . . . . . . . . . . . 44
Earpiece volume . . . . . . . . . . . . . . . . . . . 81, 82
Echo service
Gigaset.net . . . . . . . . . . . . . . . . . . . . . . . . . 46
ECO DECT . . . . . . . . . . . . . . . . . . . . . . . . . . . . 69
Eco mode . . . . . . . . . . . . . . . . . . . . . . . . . . . . 69
E-mail
account name . . . . . . . . . . . . . . . . . . . . . 134
authentication name/password . . . . . 134
entering access data . . . . . . . . . . . . . . . 134
incoming e-mail server . . . . . . . . . . . . . 134
settings (Web config.) . . . . . . . . . . . . . . 134
Emergency numbers
dialing . . . . . . . . . . . . . . . . . . . . . . . . . . . . . 40
dialing plans for . . . . . . . . . . . . . . . . . . . . 127
End Call key. . . . . . . . . . . . . . . . . . . . . . 1, 40, 41
Ending, call . . . . . . . . . . . . . . . . . . . . . . . . . . . 41
Entering
access data (e-mail) . . . . . . . . . . . . . . . . 134
flash . . . . . . . . . . . . . . . . . . . . . . . . . . . . . . . . .1
user data . . . . . . . . . . . . . . . . . . . . . . . . . . . 24
Entering Cyrillic/Arabic characters . . . . . 101
Entry
selecting from directory . . . . . . . . . . . . . 63
Error tone . . . . . . . . . . . . . . . . . . . . . . . . . . . . 84
Ethernet network . . . . . . . . . . . . . . . . . . . . 175
Explicit Call Transfer . . . . . . . . . . . . . . . . . . 175
External consultation call
fixed line network . . . . . . . . . . . . . . . . . . . 53
VoIP. . . . . . . . . . . . . . . . . . . . . . . . . . . . . . . . 55
External line prefix (PABX) . . . . . . . . . . . . . . 95
Extra area codes. . . . . . . . . . . . . . . . . . . . . . . 88
Extra codes . . . . . . . . . . . . . . . . . . . . . . . . . . . 88
Version 8, 03.09.2008
F
Factory settings
base station . . . . . . . . . . . . . . . . . . . . . . . . 86
Fast access . . . . . . . . . . . . . . . . . . . . . . . . . . . . 66
Firewall . . . . . . . . . . . . . . . . . . . . . . . . . . . . . . 175
Firmware . . . . . . . . . . . . . . . . . . . . . . . . . . . . 175
automatic update . . . . . . . . . . . . . . . 89, 140
188
checking version . . . . . . . . . . . . . . . 142, 150
starting update (handset) . . . . . . . . . . . . 88
starting update (Web conf.) . . . . . . . . . 139
updates . . . . . . . . . . . . . . . . . . . . . . . . . . . . 11
Fixed line network
conference call . . . . . . . . . . . . . . . . . . . . . 53
connection name . . . . . . . . . . . . . . . . . . 115
external consultation call . . . . . . . . . . . . 53
settings for calls. . . . . . . . . . . . . . . . . . . . . 53
Fixed line network connection
line suffix . . . . . . . . . . . . . . . . . . . . . . . . . . 108
Flash key . . . . . . . . . . . . . . . . . . . . . . . . . . . . . . .1
function for VoIP . . . . . . . . . . . . . . . . . . . 129
Flat rate . . . . . . . . . . . . . . . . . . . . . . . . . . . . . 175
Fragmentation of data packets . . . . . . . . 175
Free software, licenses . . . . . . . . . . . . . . . . 164
Full duplex . . . . . . . . . . . . . . . . . . . . . . . . . . 176
G
G.711 μ law . . . . . . . . . . . . . . . . . . . . . . . . . . 117
G.711 a law . . . . . . . . . . . . . . . . . . . . . . . . . . 117
G.722 . . . . . . . . . . . . . . . . . . . . . . . . . . . . . 9, 117
G.722 Broadband language codec . . . . . 117
G.726 . . . . . . . . . . . . . . . . . . . . . . . . . . . . . . . 117
G.729 . . . . . . . . . . . . . . . . . . . . . . . . . . . . . . . 117
Gateway. . . . . . . . . . . . . . . . . . . . . . . . . . . . . 176
Gateway provider . . . . . . . . . . . . . . . . . . . . 176
Getting help with your phone . . . . . . . . . 143
Gigaset config . . . . . . . . . . . . . . . . . . . . . 97, 98
Gigaset HDSP, see HDSP
Gigaset.net . . . . . . . . . . . . . . . . . . . . . . . . . . . 46
(de)activating connection . . . . . . . . . . 116
call forwarding. . . . . . . . . . . . . . . . . . 53, 123
calling participant . . . . . . . . . . . . . . . . 49, 51
changing/deleting own name . . . . . . . . 50
directory . . . . . . . . . . . . . . . . . . . . . . . . . . . 48
Echo service . . . . . . . . . . . . . . . . . . . . . . . . 46
entering name . . . . . . . . . . . . . . . . . . . 47, 50
Jabber server . . . . . . . . . . . . . . . . . . . . . . 133
messaging . . . . . . . . . . . . . . . . . . . . . . . . 133
searching for subscriber . . . . . . . . . . . . . 48
Gigaset.net directory
open . . . . . . . . . . . . . . . . . . . . . . . . . . . . . . . 30
specifying/editing own name . . . . . . . . 50
Global IP address . . . . . . . . . . . . . . . . . . . . . 176
Global System for Mobile
Communication . . . . . . . . . . . . . . . . . 176
GNU Lesser General Public License . . . . 164
Group call . . . . . . . . . . . . . . . . . . . . . . . . . . . . 74
GSM . . . . . . . . . . . . . . . . . . . . . . . . . . . . . . . . 176
Gigaset A580 IP / US English / A31008-xxxx-xxxx-x-xxxx / Gigaset_A580_IPSIX.fm / 10.03.2010
Index
H
Handset
activating/deactivating . . . . . . . . . . . . 1, 32
activating/deactivating advisory tones 84
assigning receive number. . . . . . . . . . . 122
assigning send number . . . . . . . . . . . . . 122
changing internal names . . . . . . . . 74, 136
changing internal number . . . . . . . 73, 136
changing name . . . . . . . . . . . . . . . . . 74, 136
checking service information . . . . . . . 150
contact with liquid . . . . . . . . . . . . . . . . . 152
de-registering . . . . . . . . . . . . . . . . . . . . . . 72
display language . . . . . . . . . . . . . . . . . . . . 78
diverting a call . . . . . . . . . . . . . . . . . . . . . . 75
earpiece volume . . . . . . . . . . . . . . . . . . . . 81
handsfree volume . . . . . . . . . . . . . . . . . . . 81
idle status . . . . . . . . . . . . . . . . . . . . . . . . . . 32
locating . . . . . . . . . . . . . . . . . . . . . . . . . . . . 73
muting . . . . . . . . . . . . . . . . . . . . . . . . . . . . . 45
registering . . . . . . . . . . . . . . . . . . . . . . 16, 71
restoring to factory settings . . . . . . . . . . 84
setting (individual) . . . . . . . . . . . . . . . . . . 78
setting up . . . . . . . . . . . . . . . . . . . . . . . . . . 11
using several . . . . . . . . . . . . . . . . . . . . . . . 71
Handset directory, see Directory
HDSP. . . . . . . . . . . . . . . . . . . . . . . . . . . . 8, 9, 117
Headset . . . . . . . . . . . . . . . . . . . . . . . . . . . . . 177
Hearing aids . . . . . . . . . . . . . . . . . . . . . . . . . . . .7
High Definition Sound Performance,
see HDSP
HTTP Proxy . . . . . . . . . . . . . . . . . . . . . . 106, 177
Hub . . . . . . . . . . . . . . . . . . . . . . . . . . . . . . . . . 177
I
Version 8, 03.09.2008
Icon
display . . . . . . . . . . . . . . . . . . . . . . . . . . . . . 30
for new messages . . . . . . . . . . . . . . . . . . . 58
Idle status
display . . . . . . . . . . . . . . . . . . . . . . . . . . . 1, 32
returning to . . . . . . . . . . . . . . . . . . . . . . . . 32
IEEE . . . . . . . . . . . . . . . . . . . . . . . . . . . . . . . . . 177
Incoming e-mail server (e-mail) . . . . . . . 134
Incorrect input (correction) . . . . . . . . . . . . 31
Industry Canada Certification . . . . . . . . . 156
Info services . . . . . . . . . . . . . . . . . . . . . . . . . 135
configuring . . . . . . . . . . . . . . . . . . . . . . . . 135
Infrastructure network . . . . . . . . . . . . . . . . 177
Installing, base station . . . . . . . . . . . . . . . . . 17
Instant messaging. . . . . . . . . . . . . . . . 132, 177
Institute of Electrical and Electronics Engineers . . . . . . . . . . . . . . . . . . . . . . . . . . . 177
Interface language
handset . . . . . . . . . . . . . . . . . . . . . . . . . . . . 78
Web configurator . . . . . . . . . . . . . . . . . . . 99
Internal call . . . . . . . . . . . . . . . . . . . . . . . . . . . 74
call waiting . . . . . . . . . . . . . . . . . . . . . . . . . 77
Internal company network . . . . . . . . . . . . 106
Internal consultation call . . . . . . . . . . . . . . . 76
Internal key . . . . . . . . . . . . . . . . . . . . . . . . . . . . .1
Internet . . . . . . . . . . . . . . . . . . . . . . . . . . . . . 177
no connection to. . . . . . . . . . . . . . . . . . . . 27
Internet access (broadband) . . . . . . . . . . 172
Internet protocol . . . . . . . . . . . . . . . . . . . . . 177
Internet Service Provider . . . . . . . . . . . . . . 177
Intranet . . . . . . . . . . . . . . . . . . . . . . . . . . . . . 106
IP . . . . . . . . . . . . . . . . . . . . . . . . . . . . . . . . . . . 177
IP address . . . . . . . . . . . . . . . . . . . . . . . . . . . 178
assigning (handset) . . . . . . . . . . . . . . . . . 92
assigning (Web configurator) . . . . . . . 104
checking (Web configurator) . . . . . . . . 142
dialing . . . . . . . . . . . . . . . . . . . . . . . . . . . . . 40
display on handset . . . . . . . . . . . . . . . . . . . .2
dynamic. . . . . . . . . . . . . . . . . . . . . . . . . . . 175
global . . . . . . . . . . . . . . . . . . . . . . . . . . . . . 176
local . . . . . . . . . . . . . . . . . . . . . . . . . . . . . . 178
obtaining automatically . . . . . . . . . 92, 104
private . . . . . . . . . . . . . . . . . . . . . . . . . . . . 180
public . . . . . . . . . . . . . . . . . . . . . . . . . . . . . 180
static . . . . . . . . . . . . . . . . . . . . . . . . . . . . . . 182
IP address type. . . . . . . . . . . . . . . . . . . . . . . 104
IP configuration
handset . . . . . . . . . . . . . . . . . . . . . . . . . . . . 92
Web configurator . . . . . . . . . . . . . . . . . . 104
IP pool range . . . . . . . . . . . . . . . . . . . . . . . . 178
J
Jabber ID (messenger) . . . . . . . . . . . . . . . . 133
Jabber server (messenger) . . . . . . . . . . . . 133
Jabber server port (messenger). . . . . . . . 133
K
Key 1 (fast access) . . . . . . . . . . . . . . . . . . . . . . .1
assigning . . . . . . . . . . . . . . . . . . . . . . . . . . . 66
Key click . . . . . . . . . . . . . . . . . . . . . . . . . . . . . . 84
Keypad lock . . . . . . . . . . . . . . . . . . . . . . . . . . 32
189
Gigaset A580 IP / US English / A31008-xxxx-xxxx-x-xxxx / Gigaset_A580_IPSIX.fm / 10.03.2010
Index
Keys
assigning directory entry . . . . . . . . . . . . 64
Asterisk key . . . . . . . . . . . . . . . . . . . . . . . 1, 83
Control key . . . . . . . . . . . . . . . . . . . . . . . 1, 30
Delete key . . . . . . . . . . . . . . . . . . . . . . . . . . 30
delete key . . . . . . . . . . . . . . . . . . . . . . . . . . 30
Display keys . . . . . . . . . . . . . . . . . . . . . . 1, 30
End Call key . . . . . . . . . . . . . . . . . . . 1, 40, 41
fast access . . . . . . . . . . . . . . . . . . . . . . . . . . . .1
Flash key . . . . . . . . . . . . . . . . . . . . . . . . . . . . .1
Internal key . . . . . . . . . . . . . . . . . . . . . . . . . . .1
keypad lock . . . . . . . . . . . . . . . . . . . . . . . . 32
Message key . . . . . . . . . . . . . . . . . . . . . . . . . .1
On/Off key . . . . . . . . . . . . . . . . . . . . . . . . . . .1
Paging key (base station) . . . . . . . . . . . . . .2
Pound key . . . . . . . . . . . . . . . . . . . . . . . . 1, 32
Shortcut. . . . . . . . . . . . . . . . . . . . . . . . . . . . 64
Speaker key . . . . . . . . . . . . . . . . . . . . . . . . . .1
Talk key . . . . . . . . . . . . . . . . . . . . . . . . . . . . . .1
Version 8, 03.09.2008
L
LAN . . . . . . . . . . . . . . . . . . . . . . . . . . . . . . . . . 178
Language
handset . . . . . . . . . . . . . . . . . . . . . . . . . . . . 78
Web configurator . . . . . . . . . . . . . . . . . . . 99
Last number redial . . . . . . . . . . . . . . . . . . . . 57
LGPL . . . . . . . . . . . . . . . . . . . . . . . . . . . . . . . . 164
Licenses, free software . . . . . . . . . . . . . . . . 164
Line suffix
dialing with. . . . . . . . . . . . . . . . . . . . . . 38, 39
display (Web configurator) . . . . . . . . . . 108
Line type
for outgoing calls . . . . . . . . . . . . . . . . . . 121
Liquid . . . . . . . . . . . . . . . . . . . . . . . . . . . . . . . 152
List
Calls List . . . . . . . . . . . . . . . . . . . . . . . . . . . . 58
Missed Calls . . . . . . . . . . . . . . . . . . . . . 58, 60
Network Mailbox . . . . . . . . . . . . . . . . . 58, 67
Local area code . . . . . . . . . . . . . . . . . . . . . . . 88
Local Area Network. . . . . . . . . . . . . . . . . . . 178
Local communication ports . . . . . . . . . . . 130
Local IP address . . . . . . . . . . . . . . . . . . . . . . 178
Local network . . . . . . . . . . . . . . . . . . . . . . . . 104
Local SIP port . . . . . . . . . . . . . . . . . . . . . . . . 182
Lock (keypad lock) . . . . . . . . . . . . . . . . . . . . 32
Login password
e-mail . . . . . . . . . . . . . . . . . . . . . . . . . . . . . 134
messenger . . . . . . . . . . . . . . . . . . . . . . . . 133
190
M
MAC address. . . . . . . . . . . . . . . . . . . . . . . . . 178
checking (handset) . . . . . . . . . . . . . . . . . . 94
checking (Web configurator) . . . . . . . . 142
Mailbox
defining for fast access . . . . . . . . . . . . . . 66
Main menu . . . . . . . . . . . . . . . . . . . . . . . . . . . 34
Making calls
accepting a call . . . . . . . . . . . . . . . . . . . . . 41
cost-effective calls . . . . . . . . . . . . . . . . . . 45
external (VoIP, fixed line network) . . . . 38
internal . . . . . . . . . . . . . . . . . . . . . . . . . . . . 74
Maximum Receive Unit . . . . . . . . . . . . . . . 179
Maximum Transmission Unit . . . . . . . . . . 179
Mbps . . . . . . . . . . . . . . . . . . . . . . . . . . . . . . . 178
Media Access Control . . . . . . . . . . . . . . . . . 178
Medical appliances . . . . . . . . . . . . . . . . . . . . . .7
Menu
end tone . . . . . . . . . . . . . . . . . . . . . . . . . . . 84
phone overview . . . . . . . . . . . . . . . . . . . . 34
prompting . . . . . . . . . . . . . . . . . . . . . . . . . 31
Web configurator overview . . . . . . . . . . 37
Menu bar (Web configurator) . . . . . . . . . 100
Message key . . . . . . . . . . . . . . . . . . . . . . . . . . . .1
opening lists . . . . . . . . . . . . . . . . . . . . . . . . 58
Messages
listening to network mailbox . . . . . . . . . 67
Messaging
Gigaset.net . . . . . . . . . . . . . . . . . . . . . . . . 133
Messenger
account . . . . . . . . . . . . . . . . . . . . . . . . . . . 133
entering access data . . . . . . . . . . . . . . . 132
priority . . . . . . . . . . . . . . . . . . . . . . . . . . . . 132
resource name . . . . . . . . . . . . . . . . . . . . . 132
Microphone . . . . . . . . . . . . . . . . . . . . . . . . . . . .1
Million bits per second . . . . . . . . . . . . . . . 178
Missed calls . . . . . . . . . . . . . . . . . . . . . . . . 58, 60
MRU . . . . . . . . . . . . . . . . . . . . . . . . . . . . . . . . 179
MTU . . . . . . . . . . . . . . . . . . . . . . . . . . . . . . . . 179
Music on hold. . . . . . . . . . . . . . . . . . 45, 87, 179
Muting
microphone . . . . . . . . . . . . . . . . . . . . . . . . 45
Muting the handset . . . . . . . . . . . . . . . . . . . 45
Muting the microphone . . . . . . . . . . . . . . . 45
Gigaset A580 IP / US English / A31008-xxxx-xxxx-x-xxxx / Gigaset_A580_IPSIX.fm / 10.03.2010
Index
N
P
Name
changing name of the handset . . . 74, 136
displayed (VoIP) . . . . . . . . . . . . . . . . . . . . 174
displaying caller’s name (CID) . . . . . . . . 43
fixed line network connection . . . . . . . 115
NAT . . . . . . . . . . . . . . . . . . . . . . . . . . . . . . . . . 179
symmetric . . . . . . . . . . . . . . . . . . . . . . . . . 183
updating . . . . . . . . . . . . . . . . . . . . . . . . . . 114
Navigation area (Web config.) . . . . . . . . . 101
Network . . . . . . . . . . . . . . . . . . . . . . . . . . . . . 179
Ethernet. . . . . . . . . . . . . . . . . . . . . . . . . . . 175
Network Address Translation . . . . . . . . . . 179
Network area . . . . . . . . . . . . . . . . . . . . . . . . 113
Network mailbox . . . . . . . . . . . . . . . . . . . . . . 66
activating/deactivating . . . . . . . . . . . . . 127
calling . . . . . . . . . . . . . . . . . . . . . . . . . . 67, 68
defining for fast access . . . . . . . . . . . . . . 66
entering number . . . . . . . . . . . . . . . . . . . 127
list . . . . . . . . . . . . . . . . . . . . . . . . . . . . . . . . . 67
Network services
fixed line network . . . . . . . . . . . . . . . . . . . 53
fixed line network and VoIP . . . . . . . . . . 52
settings for fixed line network calls . . . 53
settings for VoIP calls . . . . . . . . . . . . . 53, 55
VoIP. . . . . . . . . . . . . . . . . . . . . . . . . . . . . . . . 53
Number
copying from directory . . . . . . . . . . . . . . 65
copying to directory . . . . . . . . . . . . . . . . . 65
displaying caller’s number (CID) . . . . . . 42
entering network mailbox number . . 127
entering with directory . . . . . . . . . . . . . . 65
saving in the directory . . . . . . . . . . . . . . . 63
Number assignment . . . . . . . . . . . . . . . . . . 122
Number display
withholding . . . . . . . . . . . . . . . . . . . . . . . . 52
PABX
access code (external line prefix) . . . . . 95
operating base station on PABX . . . . . . 95
pauses . . . . . . . . . . . . . . . . . . . . . . . . . . . . . 96
setting dialing mode . . . . . . . . . . . . . . . . 95
setting recall. . . . . . . . . . . . . . . . . . . . . . . . 95
Pack contents . . . . . . . . . . . . . . . . . . . . . . . . . 10
Paging . . . . . . . . . . . . . . . . . . . . . . . . . 2, 73, 180
Pauses (PABX) . . . . . . . . . . . . . . . . . . . . . . . . . 96
Personal Identification Number . . . . . . . 180
Personal provider data . . . . . . . . . . . . . . . . 111
Phone
configuring via PC . . . . . . . . . . . . . . . . . . 97
functions, overview . . . . . . . . . . . . . . . . . 34
menu overview . . . . . . . . . . . . . . . . . . . . . 34
protecting . . . . . . . . . . . . . . . . . . . . . . . . . . 85
setting (Web configurator) . . . . . . . . . . 103
setting base station (on handset) . . . . . 85
setting up . . . . . . . . . . . . . . . . . . . . . . . . . . 10
status (Web configurator) . . . . . . . . . . . 142
Phone number display
withholding . . . . . . . . . . . . . . . . . . . . . . . . 52
PIN. . . . . . . . . . . . . . . . . . . . . . . . . . . . . . . . . . 180
changing . . . . . . . . . . . . . . . . . . . . . . . . . . . 85
POP3 server . . . . . . . . . . . . . . . . . . . . . . . . . 134
Port . . . . . . . . . . . . . . . . . . . . . . . . . . . . . . . . . 180
Port forwarding . . . . . . . . . . . . . . . . . . . . . . 180
Port number . . . . . . . . . . . . . . . . . . . . . . . . . 180
Pound key . . . . . . . . . . . . . . . . . . . . . . . . . . 1, 32
Power adapter . . . . . . . . . . . . . . . . . . . . . . . . . .7
Power consumption of base station . . . . 153
Predialing . . . . . . . . . . . . . . . . . . . . . . . . . . . 180
Preferred DNS server
entering (handset) . . . . . . . . . . . . . . . . . . 93
entering (Web configurator) . . . . . . . . 105
Priority (messenger) . . . . . . . . . . . . . . . . . . 132
Private IP address . . . . . . . . . . . . . . . . . . . . 180
Protocol . . . . . . . . . . . . . . . . . . . . . . . . . . . . . 180
Proxy. . . . . . . . . . . . . . . . . . . . . . . . . . . . . . . . 180
Proxy server address. . . . . . . . . . . . . . . . . . 112
Proxy-Server . . . . . . . . . . . . . . . . . . . . . . . . . 180
Public IP address . . . . . . . . . . . . . . . . . . . . . 180
Version 8, 03.09.2008
O
On/Off key . . . . . . . . . . . . . . . . . . . . . . . . . . . . . .1
Online directory
Gigaset.net . . . . . . . . . . . . . . . . . . . . . . . . . 48
Operation (preparing to use the phone) . 10
Order in directory . . . . . . . . . . . . . . . . . . . . . 63
Outbound proxy . . . . . . . . . . . . . . . . . 114, 179
mode . . . . . . . . . . . . . . . . . . . . . . . . . . . . . 114
port . . . . . . . . . . . . . . . . . . . . . . . . . . . . . . . 114
Own area code
area code. . . . . . . . . . . . . . . . . . . . . . . . . . . 88
entering . . . . . . . . . . . . . . . . . . . . . . . . . . . 124
Q
Quality . . . . . . . . . . . . . . . . . . . . . . . . . . . . . . 181
Quality of Service . . . . . . . . . . . . . . . . . . . . 181
191
Gigaset A580 IP / US English / A31008-xxxx-xxxx-x-xxxx / Gigaset_A580_IPSIX.fm / 10.03.2010
Index
R
RAM . . . . . . . . . . . . . . . . . . . . . . . . . . . . . . . . 181
Random Access Memory . . . . . . . . . . . . . . 181
Read Only Memory . . . . . . . . . . . . . . . . . . . 181
Recall . . . . . . . . . . . . . . . . . . . . . . . . . . . . . . . . 75
Receive number
assigning to handset . . . . . . . . . . . . . . . 122
display on the handset . . . . . . . . . . . . . . 42
Registering
handset . . . . . . . . . . . . . . . . . . . . . . . . . 16, 71
with the Web configurator . . . . . . . . . . . 99
Registrar . . . . . . . . . . . . . . . . . . . . . . . . . . . . 181
Registrar server . . . . . . . . . . . . . . . . . . . . . . 112
Registrar server port . . . . . . . . . . . . . . . . . . 112
Registration name
VoIP account . . . . . . . . . . . . . . . . . . . . . . 111
Registration password
VoIP account . . . . . . . . . . . . . . . . . . . . . . 111
Registration refresh time . . . . . . . . . . . . . . 112
Remote access to Web configurator . . . . 105
Remote management . . . . . . . . . . . . . . . . 105
Resetting
base station . . . . . . . . . . . . . . . . . . . . . . . . 86
handset . . . . . . . . . . . . . . . . . . . . . . . . . . . . 84
Resource name (messenger) . . . . . . . . . . 132
RFC 2833 (DTMF signaling) . . . . . . . . . . . . 128
Ringback
initiating (fixed line network) . . . . . . . . . 53
when busy . . . . . . . . . . . . . . . . . . . . . . . . 181
when the call is not answered . . . . . . . 182
Ringer
deactivating permanently . . . . . . . . . . . 83
icon . . . . . . . . . . . . . . . . . . . . . . . . . . . . . . . . . .2
setting melody. . . . . . . . . . . . . . . . . . . . . . 83
Ringer melody
changing . . . . . . . . . . . . . . . . . . . . . . . . . . . 82
muting . . . . . . . . . . . . . . . . . . . . . . . . . . . . . 41
setting volume. . . . . . . . . . . . . . . . . . . . . . 82
ROM . . . . . . . . . . . . . . . . . . . . . . . . . . . . . . . . 181
Router. . . . . . . . . . . . . . . . . . . . . . . . . . . . . . . 181
connecting base station . . . . . . . . . . . . . 20
Routing . . . . . . . . . . . . . . . . . . . . . . . . . . . . . 181
RTP . . . . . . . . . . . . . . . . . . . . . . . . . . . . . . . . . 181
RTP port . . . . . . . . . . . . . . . . . . . . . . . . . 131, 181
Version 8, 03.09.2008
S
Safety precautions . . . . . . . . . . . . . . . . . . . . . .7
Scope of delivery . . . . . . . . . . . . . . . . . . . . . . 10
Screen protection, see Screensaver
Screensaver. . . . . . . . . . . . . . . . . . . . . . . . . . . 79
192
Search for subscriber on Gigaset.net . . . . 48
Searching
handset . . . . . . . . . . . . . . . . . . . . . . . . . . . . 73
in directory . . . . . . . . . . . . . . . . . . . . . . . . . 63
Sending
directory entry to handset . . . . . . . . . . . 65
Server . . . . . . . . . . . . . . . . . . . . . . . . . . . . . . . 182
for firmware update . . . . . . . . . . . . . . . . 139
Server port . . . . . . . . . . . . . . . . . . . . . . . . . . 112
Service (Customer Care) . . . . . . . . . . . . . . 160
Setting
base station . . . . . . . . . . . . . . . . . . . . . . . . 85
date . . . . . . . . . . . . . . . . . . . . . . . . . . . . . . . 78
date/time on handset . . . . . . . . . . . . . . . 14
default connection . . . . . . . . . . . . . . 87, 121
handset . . . . . . . . . . . . . . . . . . . . . . . . . . . . 78
melody (ringer) . . . . . . . . . . . . . . . . . . . . . 83
recall (PABX) . . . . . . . . . . . . . . . . . . . . . . . . 95
time . . . . . . . . . . . . . . . . . . . . . . . . . . . . . . . 78
time zone . . . . . . . . . . . . . . . . . . . . . . . . . 141
wake-up time . . . . . . . . . . . . . . . . . . . . . . . 70
Settings for VoIP telephony . . . . . . . . . . . 108
Shortcut (digit combination) . . . . . . . . . . . 34
Shortcuts . . . . . . . . . . . . . . . . . . . . . . . . . . 62, 64
Signal strength. . . . . . . . . . . . . . . . . . . . . . . . . .1
Signal tone, see Advisory tones
Simple Transversal of UDP over NAT . . . 182
SIP . . . . . . . . . . . . . . . . . . . . . . . . . . . . . . . . . . 182
SIP address . . . . . . . . . . . . . . . . . . . . . . . . . . 182
SIP Info (DTMF signaling) . . . . . . . . . . . . . 128
SIP port . . . . . . . . . . . . . . . . . . . . . . . . . 131, 182
SIP provider . . . . . . . . . . . . . . . . . . . . . . . . . 182
SIP proxy server . . . . . . . . . . . . . . . . . . . . . . 182
Snooze (alarm clock) . . . . . . . . . . . . . . . . . . 70
Snooze mode (alarm clock) . . . . . . . . . . . . 70
Sound, see Ringer melody
Speaker . . . . . . . . . . . . . . . . . . . . . . . . . . . . . . 44
activating/deactivating . . . . . . . . . . . . . . 44
key . . . . . . . . . . . . . . . . . . . . . . . . . . . . . . . . . .1
mode . . . . . . . . . . . . . . . . . . . . . . . . . . . . . . 44
Specifications . . . . . . . . . . . . . . . . . . . . . . . . 152
Starting connection wizard (menu) . . . . . 90
Static IP address. . . . . . . . . . . . . . 92, 104, 182
Status
VoIP connection . . . . . . . . . . . . . . . . . . . 108
Status codes
activating display (handset) . . . . . . . . . . 94
activating display (Web config.) . . . . . 138
table (VoIP) . . . . . . . . . . . . . . . . . . . . . . . . 147
Structure of IP address . . . . . . . . . . . . . . . . 178
Gigaset A580 IP / US English / A31008-xxxx-xxxx-x-xxxx / Gigaset_A580_IPSIX.fm / 10.03.2010
Index
STUN . . . . . . . . . . . . . . . . . . . . . . . . . . . . . . . . 182
STUN port . . . . . . . . . . . . . . . . . . . . . . . . . . . 113
STUN refresh time . . . . . . . . . . . . . . . . . . . . 114
STUN server . . . . . . . . . . . . . . . . . . . . . . . . . 113
Subnet . . . . . . . . . . . . . . . . . . . . . . . . . . . . . . 182
Subnet mask . . . . . . . . . . . . . . . . . . . . . . . . . 182
defining (handset) . . . . . . . . . . . . . . . . . . 93
defining (Web configurator) . . . . . . . . 104
Suffix . . . . . . . . . . . . . . . . . . . . . . . . . . . . . . . . 108
dialing with. . . . . . . . . . . . . . . . . . . . . . 38, 39
Suppressing
silence . . . . . . . . . . . . . . . . . . . . . . . . . . . . 120
speech pauses . . . . . . . . . . . . . . . . . . . . . 120
speech pauses (VoIP) . . . . . . . . . . . . . . . 120
Symmetric NAT . . . . . . . . . . . . . . . . . . . . . . 183
Synchronization with time server . . . . . . 141
System settings . . . . . . . . . . . . . . . . . . . . . . . 85
T
Version 8, 03.09.2008
Talk key . . . . . . . . . . . . . . . . . . . . . . . . . . . . . . . .1
TCP . . . . . . . . . . . . . . . . . . . . . . . . . . . . . . . . . 183
Telephone connection
configuring (Web config.) . . . . . . . . . . . 107
Telephone jack pin connections . . . . . . . 154
Telephone jack, pin connections . . . . . . . 154
Text information
in idle display mode . . . . . . . . . . . . . . . . 135
Time
set manually . . . . . . . . . . . . . . . . . . . . . . . . 14
transferring from time server . . . . . . . . 141
Time server . . . . . . . . . . . . . . . . . . . . . . . . . . 141
TLS. . . . . . . . . . . . . . . . . . . . . . . . . . . . . . . . . . 183
Toggling. . . . . . . . . . . . . . . . . . . . . . . . . . . . . 183
disconnecting call . . . . . . . . . . . . . . . . . . . 55
VoIP. . . . . . . . . . . . . . . . . . . . . . . . . . . . . . . . 55
Touch tone dialing . . . . . . . . . . . . . . . . . . . . 96
Transferring PC address book
to directory. . . . . . . . . . . . . . . . . . . . . . 136
Transmission Control Protocol . . . . . . . . . 183
Transmission power
reducing for the base station . . . . . . . . . 69
Transmission rate . . . . . . . . . . . . . . . . . . . . 183
Transport Layer Security . . . . . . . . . . . . . . 183
Transport protocol . . . . . . . . . . . . . . . . . . . 183
Troubleshooting
Internet connection . . . . . . . . . . . . . . . . . 27
U
UDP . . . . . . . . . . . . . . . . . . . . . . . . . . . . . . . . . 183
Uniform Resource Identifier . . . . . . . . . . . 183
Universal Resource Locator . . . . . . . . . . . 183
Unknown. . . . . . . . . . . . . . . . . . . . . . . . . . . . . 43
Unknown caller . . . . . . . . . . . . . . . . . . . . . . . 43
URI. . . . . . . . . . . . . . . . . . . . . . . . . . . . . . . . . . 183
URL . . . . . . . . . . . . . . . . . . . . . . . . . . . . . . . . . 183
Use random ports . . . . . . . . . . . . . . . . . . . . 131
User Datagram Protocol . . . . . . . . . . . . . . 183
User ID . . . . . . . . . . . . . . . . . . . . . . . . . . . . . . 183
User identification. . . . . . . . . . . . . . . . . . . . 184
User name (VoIP-Account) . . . . . . . . . . . . 111
V
vCard format . . . . . . . . . . . . . . . . . . . . . . . . 138
vcf file . . . . . . . . . . . . . . . . . . . . . . . . . . . . . . . 136
Version check, automatic . . . . . . . . . . . . . 140
Voice over Internet Protocol . . . . . . . . . 9, 184
Voice quality . . . . . . . . . . . . . . . . . . . . . . . . . 117
Voice quality and infrastructure . . . . . . . 120
VoIP . . . . . . . . . . . . . . . . . . . . . . . . . . . . . . . . . 184
accepting/rejecting call waiting . . . . . . 56
activating/deactivating call waiting. . . 54
activating/deactivating status
message . . . . . . . . . . . . . . . . . . . . . . . 94
advantages . . . . . . . . . . . . . . . . . . . . . . . . . . .9
assigning IP address . . . . . . . . . . . . . . . . . 92
call forwarding. . . . . . . . . . . . . . . . . . . . . . 53
completing settings . . . . . . . . . . . . . . . . . 26
conference call . . . . . . . . . . . . . . . . . . . . . 55
configuring account . . . . . . . . . . . . . . . . 108
configuring account (first) . . . . . . . . . . . 24
connection name . . . . . . . . . . . . . . . . . . 109
displaying called party's number . . . . . 44
external consultation call . . . . . . . . . . . . 55
loading provider data . . . . . . . . 22, 90, 110
making call settings . . . . . . . . . . . . . . . . . 53
network services . . . . . . . . . . . . . . . . . . . . 53
phone number . . . . . . . . . . . . . . . . . 26, 109
prerequisites . . . . . . . . . . . . . . . . . . . . . . . . .9
settings (on handset) . . . . . . . . . . . . . . . . 90
starting connection wizard . . . . . . . 21, 90
status codes (table) . . . . . . . . . . . . . . . . 147
toggling. . . . . . . . . . . . . . . . . . . . . . . . . . . . 55
193
Gigaset A580 IP / US English / A31008-xxxx-xxxx-x-xxxx / Gigaset_A580_IPSIX.fm / 10.03.2010
Index
VoIP connection
activating/deactivating . . . . . . . . . 108, 115
automatic configuration . . . . . . . . . . . . 109
configuring (handset) . . . . . . . . . . . . . . . 90
configuring (Web configurator) . . . . . 108
line suffix . . . . . . . . . . . . . . . . . . . . . . . . . . 108
name (Web configurator) . . . . . . . . . . . 109
name/provider (Web config.). . . . . . . . 107
VoIP provider . . . . . . . . . . . . . . . . . . . . . . . . 184
downloading data . . . . . . . . . . . . . . 22, 110
selecting (Web configurator) . . . . . . . . 110
VoIP status messages
activating display (handset) . . . . . . . . . . 94
activating display (Web config.) . . . . . 138
status codes table . . . . . . . . . . . . . . . . . . 147
VoIP telephony
settings (Web config.) . . . . . . . . . . . . . . 108
VoIP user data
entering . . . . . . . . . . . . . . . . . . . . . . . . . . . . 24
entering (handset) . . . . . . . . . . . . . . . . . . 91
entering (Web configurator) . . . . . . . . 111
Volume
earpiece . . . . . . . . . . . . . . . . . . . . . . . . . . . . 81
earpiece volume . . . . . . . . . . . . . . . . . . . . 81
handset handsfree volume. . . . . . . . . . . 81
loudspeaker . . . . . . . . . . . . . . . . . . . . . . . . 81
ringer melody . . . . . . . . . . . . . . . . . . . . . . 82
W
Version 8, 03.09.2008
Wall mounting
base station . . . . . . . . . . . . . . . . . . . . . . . 195
charging cradle . . . . . . . . . . . . . . . . . . . . 195
WAN . . . . . . . . . . . . . . . . . . . . . . . . . . . . . . . . 184
Warning tone, see Advisory tones
Weather forecasts, in idle display mode 135
Web configurator . . . . . . . . . . . . . . . . . . . . . 97
activating VoIP connection . . . . . . . . . 108
alternate DNS server . . . . . . . . . . . . . . . 105
assigning receive number. . . . . . . . . . . 122
assigning send number . . . . . . . . . . . . . 122
checking EEPROM version . . . . . . . . . . 142
194
checking firmware version . . . . . . . . . . 142
checking IP address . . . . . . . . . . . . . . . . 142
checking MAC address . . . . . . . . . . . . . 142
connecting with PC . . . . . . . . . . . . . . . . . 97
creating e-mail settings. . . . . . . . . . . . . 134
deactivating VoIP connection . . . . . . . 108
defining default gateway . . . . . . . . . . . 104
defining IP address . . . . . . . . . . . . . . . . . 104
de-registering . . . . . . . . . . . . . . . . . . . . . . 99
directory transfer . . . . . . . . . . . . . . . . . . 136
DTMF signaling for VoIP . . . . . . . . . . . . 128
firmware update . . . . . . . . . . . . . . . . . . . 139
interface language . . . . . . . . . . . . . . . . . . 99
IP configuration . . . . . . . . . . . . . . . . . . . . 104
local network . . . . . . . . . . . . . . . . . . . . . . 104
menu . . . . . . . . . . . . . . . . . . . . . . . . . . . . . . 37
messenger access data . . . . . . . . . . . . . 132
name of a VoIP connection. . . . . . . . . . 109
name/provider of a connection . . . . . 107
number assignment . . . . . . . . . . . . . . . . 122
opening web page . . . . . . . . . . . . . . . . . 102
phone status . . . . . . . . . . . . . . . . . . . . . . 142
preferred DNS server . . . . . . . . . . . . . . . 105
remote access . . . . . . . . . . . . . . . . . . . . . 105
selecting IP address type . . . . . . . . . . . 104
setting phone . . . . . . . . . . . . . . . . . . . . . 103
specifying dialing plans. . . . . . . . . . . . . 125
status of a VoIP connection . . . . . . . . . 108
structure of the web pages . . . . . . . . . 100
subnet mask . . . . . . . . . . . . . . . . . . . . . . . 104
Web interface, see Web configurator
Web page (Web configurator)
opening . . . . . . . . . . . . . . . . . . . . . . . . . . . 102
structure . . . . . . . . . . . . . . . . . . . . . . . . . . 100
Web server, see Web configurator
Wide Area Network . . . . . . . . . . . . . . . . . . . 184
Withholding
phone number display . . . . . . . . . . . . . . 52
Working area (Web configurator) . . . . . . 101
Writing, editing text . . . . . . . . . . . . . . . . . . 155
Gigaset A580 IP / US English / A31008-xxxx-xxxx-x-xxxx / montage_charger_base.fm / 10.03.2010
Mounting the charging cradle to the wall
Mounting the charging cradle to the wall
approx. 2.5 mm
Version 8, 03.09.2008
Mounting the base station to the wall
195
Gigaset Communications GmbH
Frankenstr. 2a, D-46395 Bocholt
Manufactured by Gigaset Communications GmbH
under trademark license of Siemens AG.
As of 1 Oct. 2011 Gigaset products bearing the
trademark 'Siemens' will exclusively use the trademark 'Gigaset'.
© Gigaset Communications GmbH 2010
All rights reserved. Subject to availability.
www.gigaset.com