1
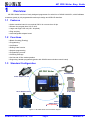
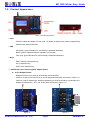
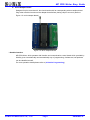
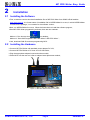
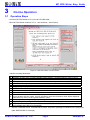
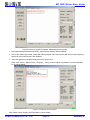
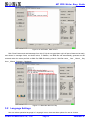
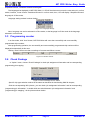
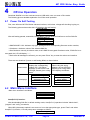
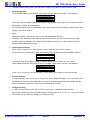
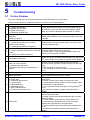
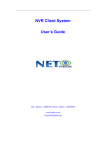
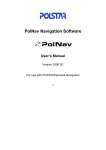
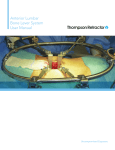
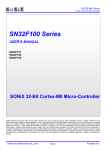
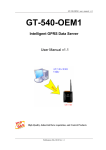
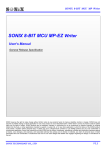
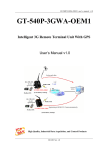
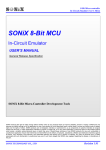
SONiX 8-bit MCU
MP PRO Writer
Easy Guide
(Please refer to this manual before using)
SONiX TECHNOLOGY CO., LTD.
www.sonix.com.tw
MP PRO Writer Easy Guide
Preface
Welcome to use MP PRO Writer, We will try our best to provide excellent development tools and after-sales
services.
The guide not only helps you to be familiar with all the main functions of MP PRO Writer, but also makes you
realize form the operation guide and the solution for trouble shooting. For better using of the Writer, please refer
to the manual before using.
There might be some oversight or insufficiency in this document even though we made great efforts to
ensure that the information was comprehensive and correct. If you find any errors or confusion, please contact
with us or e-mail to: [email protected] . SONiX tools and documentation are constantly evolving to meet
customer needs, so if the information is changed that caused by the update of the product, we will not inform you
separately. You could refer to the latest information in our website or contact with the agent or SONiX directly.
SONiX TECHNOLOGY CO., LTD
Page 2
Version1.0
MP PRO Writer Easy Guide
Amendment History
Version
Date
Comments
V1.0
APR.2010
First issue
SONiX TECHNOLOGY CO., LTD
Page 3
Version1.0
MP PRO Writer Easy Guide
Table of Contents
Amendment History............................................................................................................................................. 3
11
Overview ........................................................................................................................................................ 5
1.1
Features.................................................................................................................................................. 5
1.2
Functions ................................................................................................................................................ 5
1.3
Standard Configuration ........................................................................................................................... 5
1.4
Product Appearance ............................................................................................................................... 6
22
Installation ..................................................................................................................................................... 8
2.1
Installing the Software ............................................................................................................................ 8
2.2
Installing the Hardware ........................................................................................................................... 8
33
On-line Operation.......................................................................................................................................... 9
3.1
Operation Steps...................................................................................................................................... 9
3.2
Language Settings................................................................................................................................ 14
3.3
Programming counter ........................................................................................................................... 15
3.4
Check Package..................................................................................................................................... 15
3.5
Rolling Code Settings ........................................................................................................................... 16
3.6
Handler Mode Settings ......................................................................................................................... 17
44
Off-line Operation ....................................................................................................................................... 18
4.1
Power On Self-Testing.......................................................................................................................... 18
4.2
Main Menu Interface ............................................................................................................................. 18
4.3
Other Function Menu Interface ............................................................................................................. 19
55
Troubleshooting.......................................................................................................................................... 22
5.1
On-line Problem.................................................................................................................................... 22
5.2
Off-line Problem.................................................................................................................................... 23
5.3
Usage Attention .................................................................................................................................... 23
66
Handler Programming ................................................................................................................................ 24
6.1
Handler Introduction ............................................................................................................................. 24
6.2
Handler Hardware Connections............................................................................................................ 24
6.3
Handler Program Mode ........................................................................................................................ 25
77
Maintenance Notice .................................................................................................................................... 26
SONiX TECHNOLOGY CO., LTD
Page 4
Version1.0
MP PRO Writer Easy Guide
1
Overview
MP PRO Writer is a kind of newly-designed programmer for entire line of SONiX 8-bit MCU, which facilitates
customers greatly by 40-programmable-socket-pin design and USB HID interface.
1.1 Features
¾ Writer transition board is not required if MCU is not more than 40 pin
¾ Shorten the program time 20% to 30%
¾ Large and bright LCD unit(128 * 64 pixels)
¾ Plug and play
¾ Interchangeable adapter board
1.2 Functions
¾ Blank Checking (Erasing)
¾ Programming
¾ Verification
¾ Rolling Code function
¾ Keyless programming
¾ Programming counter
¾ Checking Package
¾ On-line and off-line mode operation
¾ Supporting Handler programming(works with SONiX communication control board)
1.3 Standard Configuration
MP PRO Writer
A-B USB Cable
Power Adapter DC 18V
40 Pin Adapter Board
20 Pin Cable
48 Pin
Adapter Board
(sold separately)
Figure 1-1 MP PRO Writer and accessories diagram
SONiX TECHNOLOGY CO., LTD
Page 5
Version1.0
MP PRO Writer Easy Guide
1.4 Product Appearance
Figure 1-2 Product appearance
¾ LCD
Features a large and bright LCD unit (128 * 64 pixels) to display easy menus, programming
statistics and status information.
¾ LED
OK (Green): gives indication for successfully completed operations;
BUSY (yellow): indicates that the operation is in process;
FAIL (red): gives indication for unsuccessfully completed operations;
¾ Keys
Enter: function confirmation key;
Up: up selection key;
Down: down selection key.
¾ SONiX offers two interchangeable adapter board
z 40 Pin Adapter Board
Designed for pins not more than 40 and Chip On Board MCU.
If MCU is 40 pin or less than 40 pin, it can be programmed directly, as shown in Figure 1-3;
If MCU is Chip On Board type, all the programming pin of MCU should be connected to the
adapter board interface(JP3)via 20-pin cable, as shown in Figure 1-4.
Figure 1-3
SONiX TECHNOLOGY CO., LTD
Figure 1-4
Page 6
Version1.0
MP PRO Writer Easy Guide
z 48 Pin Adapter Board
Designed for pins more than 40, but should works with its corresponding writer transition board.
Plug writer transition board onto the adapter board before placing chips to text tool. (Refer to
Figure 1-5 48 Pin Adapter Board.)
Figure 1-5 48 Pin Adapter Board
¾ Handler Interface
MP PRO Writer, while operates with Handler and communication control board which provided by
SONiX, gives a mechanically and automatically way of programming, furthermore, bad products
can be classified as well.
For more operation details please refer to (6.Handler Programming)
SONiX TECHNOLOGY CO., LTD
Page 7
Version1.0
MP PRO Writer Easy Guide
2
Installation
2.1 Installing the Software
¾ First, customers need to download installation files of MP PRO Writer from SONiX official website
www.sonix.com.tw , the format name of installation file is: MPPROWriterVx.xx.exe, in which MPPROWriter
is name for the package, Vx.xx stands for the software version;
¾ Next, run MPPROWriterVx.xx.exe, follow the instructions to install the software program;
¾ Start MP PRO Writer programming software, there are two methods:
on desktop;
Method 1: Run shortcut icon
Method 2: “StartÆAll ProgramsÆ MP PRO WriterÆ MP PRO Writer ”;
¾ Last, download SN8 file and start programming MCU.
2.2 Installing the Hardware
¾ Connect MP PRO Writer with standard power adapter DC 18V;
¾ Connect MP PRO Writer to PC-host via A-B USB cable ;
¾ Plug the appropriate adapter board and socket module;
¾ Place MCU onto the text tool, refer to adapter board placement method;
Figure 2-1 MP PRO Writer hardware connection
SONiX TECHNOLOGY CO., LTD
Page 8
Version1.0
MP PRO Writer Easy Guide
3
On-line Operation
3.1 Operation Steps
¾ Connect MP PRO Writer to PC–host via A-B USB cable;
¾ Run MP PRO Writer software, PC UI(user interface)shows below;
Figure 3-1 MP PRO Writer on-line interface
Interface message illustration:
A
B
C
D
E
F
G
H
I
J
K
L
M
N
¾
MCU type selection and SN8 file download menu.
Auxiliary function menu, including Handler mode settings, Language settings, Help functions.
Operation function buttons.
Rolling Code parameters selection button, only can be configured after starting Rolling Code.
Information box to give operation status and result.
Chip type display area.
Chip package display area.
Writer driver version display area.
SN8 file name display area, move mouse at the file name to display the full path of the file.
Code Option (contained in SN8 file) information display area.
Checksum value(contained in SN8 file)display area;
If user enables security option, security checksum value and checksum value will be displayed,
otherwise only show non-encrypted checksum value;
Auto-program recording display area, clicking “Clear” can clear the counter.
System program updating and SN8 file downloading progress display bar.
USB connection status display area (Green indicates that USB is in process of connecting, and
red indicates that USB is not connected).
“Device / Load SN8” menu, and select MCU series, chip name, package and SN8 file in the prompt box
(take SN8P2501BP for example)
SONiX TECHNOLOGY CO., LTD
Page 9
Version1.0
MP PRO Writer Easy Guide
Figure 3-2 choose chip series
Chip Series:
COB Series
COB1 Series
COB Series includes all types of serial programming Chip On Board MCU
COB1 Series includes all types of parallel programming Chip On Board MCU
Figure 3-3 choose chip name and package
Refer to the following table for symbols behind chip name:
Abbreviated form of the letters
Corresponding chip package
K
SK-DIP
S
SOP
X
SSOP
P
P-DIP
Q
QFP
F
LQFP
J
QFN
@
Chip On Board (COB)
SONiX TECHNOLOGY CO., LTD
Page 10
Version1.0
MP PRO Writer Easy Guide
Figure 3-4 choose programming code
¾
Select the desired program SN8 file, MP PRO Writer will update the firmware and download SN8 file to
the programmer automatically, as shown below:
Figure 3-5 Firmware update & SN8 file download in process
Note: Be sure not to remove the power adapter or USB cable at this time, until PC prompts “Download SN8 file
success!!”;
SONiX TECHNOLOGY CO., LTD
Page 11
Version1.0
MP PRO Writer Easy Guide
Figure 3-6 firmware update completed, SN8 download successfully
¾
After SN8 file downloaded successfully, some function buttons will be enabled;
¾
Only if user select chip model, rather than select program files, the interface will return to the beginning
status, all the function buttons are disabled;
¾
User can operate on the MCU after place it on the text tool.
Click “Auto” button, “Blank Check”, “Program”, “Verify” function will be completed in turn automatically;
PC UI shows below:
Figure 3-7 Execute “Auto Program”
Click “Blank Check” button, the information is shown below:
SONiX TECHNOLOGY CO., LTD
Page 12
Version1.0
MP PRO Writer Easy Guide
Figure 3-8 execute “Blank Check” function
Click “Program” button, the information is shown below:
Figure 3-9 Programming finished
Click “Verify” button to check whether the code programmed to the chip is correct, if data verification
correct, PC UI shows below:
SONiX TECHNOLOGY CO., LTD
Page 13
Version1.0
MP PRO Writer Easy Guide
Figure 3-10 verification, data correct
Click “Read” button and read message from chip (if chip is encrypted then only half part of data can be read) ,
and shown in message frame, as shown below; In addition, one BBB file will automatically generate and be
restored under the same portfolio as SN8 file, BBB file naming rules is: SN8 file name _ Year _ Month _ Day
Hour _ Minute _Seconds _Checksum.
Figure 3-11 Read the data from chip
3.2 Language Settings
User can select operation language in “Language” menu, there are three options for user to choose:
SONiX TECHNOLOGY CO., LTD
Page 14
Version1.0
MP PRO Writer Easy Guide
Simplified Chinese, Traditional Chinese and English.
The language that displayed on MP PRO Writer ‘s LCD will be shown as soon as the user select it in on-line
mode; However, if user choose “Traditional Chinese” in on-line mode, then, LCD will display “Simplified Chinese”
language in off-line mode;
Language setting method is shown below:
Figure 3-12 Language settings
Note: Language can not be selected in off-line mode, so the language in off-line mode is the language
selected in on-line mode.
3.3 Programming counter
In on-line mode, click “Auto” button, MP PRO Writer will count the successfully and unsuccessfully
programmed chip numbers;
After programming operation, the successfully and unsuccessfully programmed chip numbers will be
displayed automatically in this area.
Clicking “Clear” button can clear recordings of success and failure counter.
Figure 3-13 On-line counter
3.4 Check Package
In “Option” menu, choose “Check Package” to check pin assignment information and its corresponding
programming pin mapping.
Figure 3-14 Check Package function menu
Specific chip type selection method is the same as described in downloading SN8 file chapter;
Click the corresponding MCU picture, you can check “pin assignment information” and its corresponding
“programming pin information”; A double-click can switch between “pin assignment information” and
“programming pin mapping”, as the pictures shown below:
SONiX TECHNOLOGY CO., LTD
Page 15
Version1.0
MP PRO Writer Easy Guide
Figure 3-15 SN8P2501BP“pin assignment information”
Figure 3-16 SN8P2501BP “programming pin mapping”
In Figure 3-16,look at the programming pin mapping VDD [1], GND [2], CLK [3], etc. The figures in
parentheses indicates writer interface JP1/JP2 pin number, for more detailed information please refer to its
corresponding datasheet programming pin section.
3.5 Rolling Code Settings
Only if the Rolling Code function is used and SN8 file downloaded successfully can “Rolling Code” button
become effective, meanwhile, “Program” button becomes ineffective, as shown below:
Figure 3-17 Rolling Code downloaded interface
Click “Rolling Code” button, user can set parameters in the prompted Rolling Code view; through this window
Rolling value and step value can be modified, as shown below:
SONiX TECHNOLOGY CO., LTD
Page 16
Version1.0
MP PRO Writer Easy Guide
Figure 3-18 Rolling Code parameter settings
Click “Auto Program” after finishing Rolling Code parameter settings and the setting of data will be updated
synchronous in writer. In the subsequent programming, Rolling Code values will increase by the step increment
value.
3.6 Handler Mode Settings
Click “Option” menu and select “Handler Mode” in its drop-down menu, then choose “Open” or “Close” to
operate, as shown in the picture below;
Figure 3-19 Handler mode setting
Note: this menu is only for Handler users;
Note: user can not set MP PRO Writer to Handler Mode in off-line mode;
SONiX TECHNOLOGY CO., LTD
Page 17
Version1.0
MP PRO Writer Easy Guide
4
Off-line Operation
Download SN8 file in on-line mode and remove USB cable, user can enter off-line mode.
The following gives a detailed explanation for off-line mode operation.
4.1 Power On Self-Testing
First, user will enter MP PRO Writer welcome interface, at this time, voltage self-checking is going on;
The following picture shows what the LCD displays after self-testing:
SONiX MP PRO
WELCOME!
Self Test OK
S/N:09CN0001
After self-testing passed, meanwhile, Buzzer alarm, user will enter an interface to confirm SN8 file:
SN8P2501BP-V130
Checksum:2100
SecChecksum:---Start
¾ SN8P2501BP-V130: indicates chip type, package and its corresponding firmware version number;
¾ Checksum: checksum value of the selected SN8 file;
¾ SecChecksum: security checksum value, that is SN8 file encrypted Checksum value; if SN8 file is not
encrypted, the LCD will display “----”.
¾ Start: after all messages confirmed, you can press “Enter” key to enter the main menu interface.
There are two situations if power on self-testing failed, as shown below:
Phenomenon
When self-testing fails, LCD
displays the corresponding
voltage VPP, VXX failure
message, at this time the red
LED light, Buzzer gives a long
alarm:
LCD displays
When using the wrong
adapter, the red LED light,
Buzzer gives a long alarm,
LCD displays as follows:
Test VPP Fail_1!
Check Power!
Please Contact:
Please Plug 18V
[email protected]
Power Adapter
.tw SONiX
SONiX TECHNOLOGY
4.2 Main Menu Interface
Main menu interface is as follows:
Auto(B+P+V)
Other Function
Back
Auto(B+P+V) function:
After downloading SN8 file, in default working mode, Auto(B+P+V) operation includes “blank check” ,
“program” and “verify” procedures;
When MCU placement method is not correct or is not the appropriate type, press “Enter” and select
Auto(B+P+V) function, LCD will prompt error message as follows:
1、Check IC Type
SONiX TECHNOLOGY CO., LTD
Page 18
Version1.0
MP PRO Writer Easy Guide
and Direction
2、Check Text tool
OK:XXXXXXXXXX
At this time, red LED light, Buzzer gives a long alarm. Press “Up” or “Down” key to cancel the alarm and
return to the main interface.
After placing the corresponding chip, select auto programming function in the main menu interface and press
“Enter” key, then “blank check”, “program” and “verify” operation will be operated at this time.
First, yellow LED light, LCD shows:
Auto Programming..
When programming and verification are complete, the yellow light extinguished, green LED light, and
successfully programmed MCU numbers will be shown on LCD:
Checksum :XXXX
OK:XXXXXXXXXX
Auto (B+P+V)
Back
If user enables Rolling Code function, Rolling Code value will be displayed on LCD instead of successfully
programmed MCU numbers, as shown below:
Rolling Code
0000000000000001
Auto (B+P+V)
Back
Some errors may occur when running this function, the error messages are as follows (refer to 5.2 Off-line
Problem )
¾ Blank Check fail!!!
¾ Program fail!!!
¾ Verify fail!!!
¾ IHRC Calibrate Error!!!
¾ Feedback Signal Error!!!
¾ Compare Checksum Error!!!
¾ Read SN8 file fail!!!
At this time, Buzzer gives a long alarm, red LED light, press any key to cancel alarm.
There is some information to be emphasized:
¾
In the main interface, select “Auto” and press “Enter” key, it will detect automatically whether the MCU
has been placed, if auto-programming is completed, remove the MCU, LCD displays: “Please put MCU
to text tool.”
Under this page, add the appropriate type of MCU or press any key to return to the main interface.
¾
Enable “Keyless” function, all program procedures will be executed automatically;
When user placed MCU for the second time, MCU can be programmed automatically without keys.
4.3 Other Function Menu Interface
In main interface, press “Up” or “Down” key to select “Other Function” and press “Enter” key to enter other
function interface (gray fonts section require user to press “Up” or “Down” key to select):
Auto
SONiX TECHNOLOGY CO., LTD
Page 19
Version1.0
MP PRO Writer Easy Guide
Blank Check
Program
Verify
Read ROM
Read SN8 File
Read Rolling Code
Clear
Auto Setting
Keyless Setting
Check Voltage
Back
¾
Auto
If you choose “Auto” function, the functionality is the same as the default functionality when user
download SN8 file at first time.
¾
Blank Check/Program/Verify
Press “Up” or “Down" key to select the appropriate function, press “Enter” key to enter the confirmation
page;
Select “No” to return “other function” interface;
Select “Yes”, then enter the former selected functions of main interface;
Blank Check
Other Function
Back
Press “Enter” key to confirm, MCU operation steps and function are the same as “Auto”, but without
keyless function.
Note: When enables Rolling Code function of SN8 file, only “program” operation is not supported for
writer; Run “program”, LCD displayer shows:
Please Use Auto
Program
Back
¾
Read ROM
Their operation is approach with the “Blank Check” operation;
Information showing section should be noted that if the user does not enable the Rolling Code function,
when reading ROM data is successful, all the indication lights extinguished, Buzzer alarm, LCD
displays:
Read ROM OK
Checksum: XXXX
Read ROM
Back
If MCU has been encrypted, it shows secChecksum value; otherwise displays unencrypted Checksum
value;
If the user enables Rolling Code function, reading the ROM data is successful, LCD displaying
checksum value is as above, 0.5 seconds later, shows MCU own Rolling Code value; if the MCU has
been encrypted, then some series can only display encrypted Rolling Code value; LCD shows:
Rolling Code:
XXXX XXXX
Read ROM
Back
¾
Read SN8 File
With the completion of reading SN8 file, all the lights extinguished, Buzzer alarm, LCD first line displays:
“Reading SN8 file successfully”, the second line shows the checksum value; if there are some errors in
the process of reading SN8 file, red LED light, Buzzer gives a long alarm, LCD first line displays:
SONiX TECHNOLOGY CO., LTD
Page 20
Version1.0
MP PRO Writer Easy Guide
“Reading SN8 file failed.” After, user can press “Enter” key to return to “other function” page.
¾
Read Rolling Code
If user enables Rolling Code function, all the lights extinguished, Buzzer alarm, LCD displays:
Rolling Code:
XXXXXXXXXXXXXXXX
Back
If the user does not enable Rolling Code function, red LED light, Buzzer gives a long alarm, LCD first
line displays: “Rolling Code Disabled!!!”
This function allows writer to read Rolling Code values stored in MP PRO Writer, rather than the own
Rolling Code values of MCU.
¾
Clear
Select this function, press “Enter” key to enter the confirmation interface;
Choosing “Yes” allows MP PRO Writer to clear success, failure counter, and return to the “other
function” interface; Choosing “No” allows MP PRO Writer returns to the “other function” interface
directly without clearing the counter.
¾
Auto Program Settings
Press “Up” or “Down” key in “other function” option, user can set for “Auto” function;
Press “Enter” key, LCD displays: (After downloading SN8 file, “blank check” is enabled in default)
Blank Check ON
Auto (B+P+V)
Back
This item is used to set whether enable or disable “Blank Check” function in “Auto” mode;
Select “Blank Check On” and press “Enter” key to close “Blank Check” function, LCD displays:
Blank Check OFF
Auto (P+V)
Back
Press “Up” or “Down” key and select “Back”, press “Enter” key to return to the previous page.
¾
Keyless Settings
In “Other function” menu, press “Up” or “Down” key, select “Keyless Settings”, user can enable “Auto
programming” function (Auto mode),which is turned off in default mode when downloaded SN8 file;
Select “Keyless On” and press “Enter” key to enable keyless function.
¾
Voltage checking
In “Other function” menu, press “Up” or “Down” key to enter “Voltage checking” function;
This function allows to measure several important voltage points (3.3V, 5.0V, 7.5V, 12.5V) used in MP
PRO Writer and to confirm the voltage is in deviation range.
SONiX TECHNOLOGY CO., LTD
Page 21
Version1.0
MP PRO Writer Easy Guide
5
Troubleshooting
5.1 On-line Problem
There are different types of fault information tips for MP PRO Writer in on-line mode;
SONiX provide solutions for different problems, as shown in the following table:
Problems
Solutions
1
A: Update ISP file fail!!!
B: Update PRO file fail!!!
C: Read PRO file fail!!!
D: Download SN8 file fail!!!
2
The type of MCU is not consistent with the
SN8 file!!!
Please try again!!!
3
SN8 ERROR!!!
A:Please check SN8 source code or
Rolling Code Setting!!!
B:Please download SN8 file again!!!
Please confirm the source code is set in line with the INI
file on the Rolling Code;
4
VXX or VPP error!!!
A:Please check MP PRO Writer's VXX and
VPP!!!
B:Please check MCU direction!!!
A: Please take off MCU and re-power on;
B: Remove MCU, if this prompt information is still exist,
please contact provider or SONiX;
5
Set Handler mode fail!!!
Please check the connection between MP PRO Writer and
PC, and re-setting, any questions, please contact SONiX;
6
MCU can not be found!!!
A: Please check text tool!!!
B: Please check the type and direction of
MCU!!!
7
Please check MCU type!!!
8
Blank check fail!!!
9
A: Erase fail!!!
B: Feedback signal error!!!
C: Program fail!!!
D: Read ROM fail!!!
E: Read flash error!!!
F: IHRC calibrate error!!
G: Compare checksum error!!!
10
Verify fail!!!
SONiX TECHNOLOGY CO., LTD
Please Check the connection of MP PRO Writer with PC
and also the connection with the power adapter, reload
SN8, any questions please contact provider or SONiX;
Please reload SN8 file when confirmed the MCU type and
SN8 file;
A: MCU can’t be found, please put MCU on text tool;
B: Placed wrong type MCU, please replace it for the right
type;
C: MCU location or direction wrong;
D: The certain MCU may have open / short problems and
so on ;
Placed wrong type MCU;
Please make sure that the MCU is blank;
A: Please check the connection between MCU and MP
PRO Writer;
B: Please confirm 20-pin cable no longer than 15cm;
C: Please make sure the socket is in normal status, clean
and replace on a regular basis;
D: The certain MCU may have open / short problems and
so on;
If you still have questions, please contact provider or
SONiX;
A: Please confirm SN8 file information the same with the
MCU programmed code;
B: Please confirm the connection between MCU and the
MP PRO Writer;
C: Please confirm 20-pin cable no longer than 15cm;
D: Confirm the socket being used is in good contact,
please clean and replace on a regular basis;
E: The certain MCU may have open /short problems and
so on;
If you still have questions, please contact provider or
SONiX;
Page 22
Version1.0
MP PRO Writer Easy Guide
5.2 Off-line Problem
There are different types of fault information tips for MP PRO Writer in off-line mode;
SONiX provide solutions for different problems, as shown in the following table:
Problems
Solutions
1
2
Please check power supply!!!
Please use DC 18V power adapter
Please check VPP error X(X stands for
1or 2)!!!
Please check VPP error X!!!
Please use standard DC 18V power adapter provided by
SONiX;
Please contact SONiX following the provided e-mail:
[email protected];
3
Download SN8 file fail!!!
Please reload SN8 file!!!
Please confirm that the source code is set in line with the
INI file on the Rolling Code;
4
VXX or VPP error!!!
Please take off MCU and re-power on;
If this prompt information is still exist, please contact
provider or SONiX;
5
A:Please check the type and direction of
MCU!!!
B:Please check text tool!!!
A: MCU can’t be found, please put MCU on text tool;
B: Placed wrong type MCU;
C: MCU location or direction wrong;
D: The certain MCU may have open / short problems and
so on ;
6
Please put MCU to text tool!!!
Please put MCU again!!!
7
Please use Auto program!!!
8
Rolling Code disabled!!!
9
Blank Check fail!!!
10
IHRC calibrate error!!!
Feedback signal error!!!
Program fail!!!
Compare checksum error!!!
Read SN8 file fail!!!
11
Verify fail!!!
When enables Rolling Code function and shield program
function, please use AUTO mode;
Please confirm that the downloaded SN8 file enables
Rolling Code function;
Please confirm the MCU to be checked blank;
A: Please check the connection between MCU and MP
PRO Writer;
B: Please confirm 20-pin cable no longer than 15cm;
C: Please make sure the socket is in normal status, please
clean and replace on a regular basis;
D: The certain MCU may have open / short problems and
so on;
If you still have questions, please contact provider or
SONiX;
A: Please confirm SN8 file information the same with the
MCU programmed code;
B: Please confirm the connection between MCU and the
MP PRO Writer;
C: Please confirm 20-pin cable no longer than 15cm;
D: Confirm the socket being used is in good contact,
please clean and replace on a regular basis;
E: The certain MCU may have open / short problems and
so on ;
If you still have questions, please contact provider or
SONiX。
5.3 Usage Attention
When users program low voltage MCU chips such as SN8P26L3X series and SN8PC20, if the fail rate of
programming is too high or the code can not be programmed, please solder a 0.1uF capacitor corresponding to
chip’s Vdd and GND on the TEXTTOOL or socket. By doing so, the fail rate would be reduced and
programming yield could be increased.
SONiX TECHNOLOGY CO., LTD
Page 23
Version1.0
MP PRO Writer Easy Guide
6
Handler Programming
6.1 Handler Introduction
Handler is a machine which can program specified form of MCU automatically, including automatic
discharge, detection and sub-materials, but it must work with MP PRO Writer to complete all these work,
The following is a picture of Handler Machine:
Figure 6-1 Handler machine
6.2 Handler Hardware Connections
Communication control board, which is designed by SONiX, sets up a bridge for MP PRO Writer and
Handler machine. The following diagram shows the connection of MP PRO Writer, communication control board,
and Handler machine.
Figure 6-2, Figure 6-3 MP PRO Writer, communication control board and Handler connection diagram
SONiX TECHNOLOGY CO., LTD
Page 24
Version1.0
MP PRO Writer Easy Guide
A
B
C
Communication control board and handler machine connection ports
MP PRO Writer and Communication control board connection ports
MP PRO Writer and handler machine connection ports
If customers want to use Handler machine for mass production, please set MP PRO Writer to Handler mode
in on-line mode. Please connect MP PRO Writer, Handler machine and communication control board together in
accordance with the above steps.
6.3 Handler Program Mode
Handler mode is turned off in normal mode; To carry out mass production, Handler Mode should be set
correctly in on-line mode first; For more information please refer to 3.6 Handler Mode Settings.
For detailed descriptions of Handler setting method, please contact SONiX.
SONiX TECHNOLOGY CO., LTD
Page 25
Version1.0
MP PRO Writer Easy Guide
7
Maintenance Notice
SONiX’S goal is to provide user with programmers which with powerful functionality, high reliability and
convenient usage, thus it also causes the complex design of the MP PRO Writer. So it’s strongly recommend
using it carefully, Please be sure to keep MP PRO Writer away from the miscellaneous element or wire during
using, Be sure to unplug the adapter after using, and then place it in the dry and ventilated area.
After buying the MP PRO Writer, you could enjoy the technical support, examine and repair services
provided by SONiX. About the programmer repair, upgrade or the related expense, please consult with our
agents or contact us directly. For more information of programmers or other development tools, please log on our
website: www.sonix.com.tw.
SONiX TECHNOLOGY CO., LTD
Page 26
Version1.0
MP PRO Writer Easy Guide
Notice
SONiX reserves the copyright on all information appearing in this guide. It’s illegal to copy, reform or
translate any content or figure in this guide without SONiX authorization.
Main Office:
Address: 10F-1, No.36,Taiyuan Street, Chupei City, Hsinchu, Taiwan R.O.C.
Tel: 886-3-560 0888
Fax: 886-3-560 0889
Shenzhen Office:
Address: 2F,T2-B Building, GaoXin Ave.7.S,South Hign-Tech Industrial Park, ShenZhen,China.
Tel: 86-755-26719666
Fax: 86-755-26719786
Taipei Office:
Address: 15F-2, NO. 171, Song Ted Road, Taipei, Taiwan R.O.C.
Tel: 886-2-2759 1980
Fax: 886-2-2759 8180
Hong Kong Office:
Address: Flat 3 9/F Energy Plaza 92 Granville Road, Tsimshatsui East Kowloon.
Tel: 852-2723 8086
Fax: 852-2723 9179
Technical Support by Email:
[email protected]
SONiX TECHNOLOGY CO., LTD
Page 27
Version1.0