1
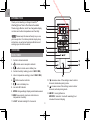
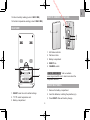
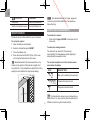
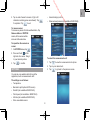
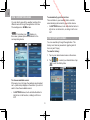
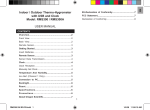
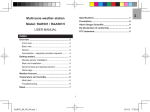
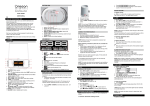
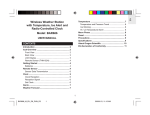
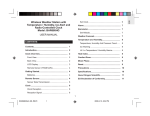
d
e
ad
o
nl
ow
D
m
fro
an
.v
w
w
w
e
.b
re
or
nb
de
Weather@Home Thermo Plus
Bluetooth-enabled Thermo-Hygro Monitor
Model: RAR213HG
USER MANUAL
d
e
ad
o
nl
ow
D
an
.v
w
w
w
EN
m
fro
or
nb
de
Weather@Home Thermo Plus
Bluetooth-enabled Thermo-Hygro Monitor
e
.b
re
Connect With Your Mobile Device-----------------------------------7
Pairing Your Weather Station----------------------------------------7
Model: RAR213HG
Settings--------------------------------------------------------------------8
View Current Readings------------------------------------------------9
USER MANUAL
View History Readings------------------------------------------------9
Optional Sensor For Additional Information---------------------10
Contents
Precautions------------------------------------------------------------------10
Introduction-----------------------------------------------------------------3
Specifications---------------------------------------------------------------11
Overview----------------------------------------------------------------------3
About Oregon Scientific-------------------------------------------------11
Front View----------------------------------------------------------------3
EU-Declaration Of Conformity----------------------------------------11
Rear View-----------------------------------------------------------------4
FCC & Ic Statement-------------------------------------------------------12
Remote Sensor (THGN132N)---------------------------------------4
Declaration Of Conformity--------------------------------------------12
Getting Started-------------------------------------------------------------4
Insert Batteries----------------------------------------------------------4
Remote Sensor-------------------------------------------------------------5
Sensor Data Transmission-------------------------------------------5
Clock---------------------------------------------------------------------------6
Manually Set Clock-----------------------------------------------------6
Temperature And Humidity---------------------------------------------6
Ice Warning--------------------------------------------------------------6
Backlight---------------------------------------------------------------------7
Reset--------------------------------------------------------------------------7
d
e
ad
o
nl
ow
D
w
w
w
EN
m
fro
an
.v
introduction
de
e
.b
re
or
nb
Thank you for selecting our Oregon ScientificTM
Weather@Home Thermo Plus Bluetooth-enabled
Thermo-Hygro Monitor, which has changeable display
on indoor and outdoor temperatures and humidity.
NOTE Please keep this manual handy as you use
your new product. It contains practical step-by-step
instructions, as well as technical specifications and
warnings you should know about.
OVERVIEW
FRONT VIEW
1. Outdoor channel selected
2.
: remote sensor reception indicator
3.
: outdoor remote sensor battery low
4. Outdoor humidity reading (current / MAX / MIN)
5. Indoor temperature reading (current / MAX / MIN)
6.
: BLE connection indicator
7.
: main unit battery low
12. : decrease value of the settings; select outdoor
channels; deactivate pairing mode
13. : increase value of the settings; select outdoor
channels; activate pairing mode
8. Ice alert LED indicator
9. MODE: change settings / display; search remote sensor
14.AM/PM : morning/afternoon
10.MEM: view current, maximum and minimum
temperature / humidity
11.LIGHT: activate backlight for 5 seconds
MD/DM/Yr: calendar / clock with weekday (hour :
minute with second display)
d
e
ad
o
nl
ow
D
w
w
w
EN
m
fro
REMOTE SENSOR (THGN132N)
an
.v
15.Indoor humidity reading (current / MAX / MIN)
de
2
REAR VIEW
e
.b
re
or
nb
16.Outdoor temperature reading (current / MAX / MIN)
1
3
4
5
1. LED status indicator
2. Wall mount hole
3. Battery compartment
4. RESET hole
5. CHANNEL switch
R ESE T
C0 F
USEFUL REFERENCE Visit our website www.oregonscientific.com to learn more about the
compatible sensors.
GETTING STARTED
INSERT BATTERIES
1. Remove the battery compartment.
1. RESET: reset the unit to default settings
2. Insert the batteries, matching the polarities (+/-).
2. °C / °F: select temperature unit
3. Battery compartment
3. Press RESET after each battery change.
d
e
ad
o
nl
ow
D
w
w
w
EN
m
fro
NOTE Use alkaline batteries for longer usage and
consumer grade lithium batteries in temperatures
below freezing.
.v
MEANING
e
.b
re
Sensor batteries low
or
nb
Outdoor temperature area
de
Main unit batteries low
an
LOCATION
Clock area
SENSOR DATA TRANSMISSION
REMOTE SENSOR
To search for a sensor:
The main unit can collect data from up to 5 sensors.
• Press and hold
2 seconds.
To set up the sensor:
1. Open the battery compartment.
and MODE at the same time for
To auto-scan among sensors:
The main unit can search for the sensor(s)
automatically. The temperatures will be displayed
automatically in sequential order.
2. Select a channel then press RESET.
3. Close the battery door.
4. Place the sensor within 98 ft (30 m) of the main
unit using the table stand or wall mount.
The sensor reception icon in the remote sensor
area shows the status:
TIP Ideal placements for the sensor would be in any
location on the exterior of the home at a height of not
more than 5 ft (1.5 m) and which can shield it from direct
sunlight or wet conditions for an accurate reading.
ICON
DESCRIPTION
Main unit is searching for sensor(s).
A channel has been found.
The sensor cannot be found.
1.5 m (5 ft)
TIP The transmission range may vary depending on
many factors. You may need to place the sensor(s) in
different locations to get the best result(s).
d
e
ad
o
nl
ow
D
w
w
w
EN
m
fro
To auto-scan among sensors:
MANUALLY SET CLOCK
and MEM at a time for 2
1. Press and hold
seconds to enable auto-scan function for all 5
channels. The temperature will be displayed
automatically in sequential order for 3 seconds
each.
an
.v
CLOCK
e
.b
re
or
nb
de
1. Press and hold MODE for 2 seconds to enter the
setting mode.
2. The settings order is: 12/24 hour format, hour,
minute, year, calendar format (day-month /
month-day), month, day and language.
3. Press
or
2. To end, press
• Toggle MEM.
The language options are English (E), German (D),
French (F), Italian (I), and Spanish (S).
To clear the records:
• Press and hold MEM for 2 seconds.
To select display mode:
Toggle MODE to choose among clock with seconds
/ clock with weekday / calendar.
NOTE The record will also be cleared once the
batteries are removed from the main unit.
ICE WARNING
TEMPERATURE AND HUMIDITY
If the channel 1 sensor falls from 37°F to 28°F (3°C
to -2°C), LED indicator
will flash, and
will stop flashing once the temperature is out of this
range.
To select temperature unit:
1. Open the battery compartment.
2. Select °C or °F for temperature readings by a pin
or the top of a pen.
• To disable the ice alert warning, press
the same time.
3. Close the battery door.
To select an outdoor sensor’s reading:
or
.
To display current, minimum and maximum
records of the day from a selected sensor:
to change the settings.
4. Press MODE to confirm.
• Toggle
or
to select your desired sensor channel.
and
at
• The ice warning detection will restart once the
temperature falls out of 37°F to 28°F (3°C to -2°C),
and will then trigger the flash again when the
temperature falls into this range.
d
e
ad
o
nl
ow
D
w
w
w
EN
m
fro
PAIRING YOUR WEATHER STATION
an
.v
NOTE As ice alert is only applicable to channel 1,
to prevent flashing of LED, select other channels on
outdoor sensor.
de
BACKLIGHT
Press LIGHT to activate backlight for 5 seconds.
RESET
e
.b
re
or
nb
First of all, you need to pair
your weather station with your
mobile device. will flash
on the screen of the weather
station while pairing and be on
after successful pairing.
• Press and hold
for 2 seconds to enable a pairup for the main unit for 30 seconds.
• Open the battery compartment.
• Press and hold
• Press RESET to return to the default settings by a
pin or the top of a pen.
for 2 seconds to disable a pair-up mode.
• Close the battery door.
CONNECT WITH YOUR MOBILE DEVICE
You can remotely set the
weather station and read the
weather information through
Bluetooth®v4.0 using your mobile
device with the downloaded
application from the Apple Store.
To quickly find the application,
type ‘Weather@Home’ as
keyword in the search engine.
Ensure your mobile device is
compatible with iOS 5 or Android
4.3 with Bluetooth®v4.0
1. Tap
to enter SETTINGS screen.
2. Tap on STATION area.
3. Tap Pair Up. Searching… displays. If you want to
cancel the pairing, tap Cancel.
4. Once the pairing is successful, it will return to
STATION screen.
d
e
ad
o
nl
ow
D
w
w
w
EN
m
fro
• Automatically sync time
• Show sea level pressure (not available in RAR213HG)
an
.v
5. Tap on each channel to rename it. (Up to 20
characters including space are allowed). Tap
if completed. Tap
to exit.
e
.b
re
or
nb
de
To remove sensor:
To remove any sensor from the weather station, Tap
Remove station on STATION
screen, all the sensors will be
removed at the same time.
To reposition the sensors on
screen:
1. On STATION screen, tap
.
at the
2. Press and hold
right side of a sensor. Drag it
to your desired position.
To select the measurement unit:
3. Tap
1. Tap
to confirm.
to view the measurement unit options.
2. Tap on your desired unit.
SETTINGS
3. Tap
You can set your weather station through the
application, such as measurement units.
The settings are as follows:
• Temperature
• Barometric (with optional BTH sensor)
• Rainfall (not available in RAR213HG)
• Wind speed (not available in RAR213HG)
• Altitude (not available in RAR213HG)
• Show unavailable sensor
to go back to the previous screen.
d
e
ad
o
nl
ow
D
w
w
w
EN
m
fro
VIEW CURRENT READINGS
an
.v
To automatically synchronize time:
Time and date on your weather station could be
automatically synchronized by your mobile device.
de
e
.b
re
or
nb
You can directly view all the weather readings from
different sensors through the application at a time.
The readings are in HOME screen.
• On SETTINGS screen, touch and slide the button to
right to turn on the function, or sliding to left to turn
it off.
NOTE If low battery icon
displays on
the screen, please replace the batteries for the
corresponding device.
VIEW HISTORY READINGS
You can view history through the application. The
history could also be presented in graphs (past 24
hours or past 7 days).
To view the history:
1. Tap on your desired sensor area on the screen.
2. Tap
To show unavailable sensor:
If the sensor is out of range, the readings are interrupted
and -- (dash mode) displays on the screen. If you do not
want to show the unavailable sensor:
• On SETTINGS screen, touch and slide the button to
right to turn on the function, or sliding to left to turn
it off.
to select your desired data or tap
to sort the data by date.
d
e
ad
o
nl
ow
D
w
w
w
EN
m
fro
OPTIONAL SENSOR FOR ADDITIONAL
INFORMATION
an
.v
• When disposing of this product, ensure it is
collected separately for special treatment and not
as household waste.
e
.b
re
or
nb
de
By applying the optional sensor (Model: BTH Sensor)
at a time, you can also view the following information
using your mobile device.
• Placement of this product on certain types of wood
may result in damage to its finish for which Oregon
Scientific will not be responsible. Consult the furniture
manufacturer's care instructions for information.
• Weather Forecast
• The contents of this manual may not be reproduced
without the permission of the manufacturer.
• Air Pressure
USEFUL REFERENCE The optional sensor (Model:
BTH Sensor) can be purchased from Oregon Scientific.
• Do not dispose old batteries as unsorted municipal
waste. Collection of such waste separately for
special treatment is necessary.
• Please note that some units are equipped with
a battery safety strip. Remove the strip from the
battery compartment before first use.
PRECAUTIONS
• Do not subject the unit to excessive force, shock,
dust, temperature or humidity.
NOTE The technical specifications for this product
and the contents of the user manual are subject to
change without notice.
• Do not cover the ventilation holes with any items
such as newspapers, curtains etc.
• Do not immerse the unit in water. If you spill liquid
over it, dry it immediately with a soft, lint-free cloth.
NOTE Features and accessories will not be available
in all countries. For more information, please contact
your local retailer.
• Do not clean the unit with abrasive or corrosive
materials.
• Do not tamper with the unit’s internal components.
This invalidates the warranty.
• Only use fresh batteries. Do not mix new and old
batteries.
• Images shown in this manual may differ from the
actual display.
10
d
e
ad
o
nl
ow
D
w
w
w
EN
m
fro
SPECIFICATIONS
an
.v
For any enquiry, please contact our Customer
Services at [email protected].
or
nb
de
DESCRIPTION
Oregon Scientific Global Distribution Limited reserves
the right to interpret and construe any contents, terms
and provisions in this user manual and to amend it, at
its sole discretion at any time without prior notice. To
the extent that there is any inconsistency between the
English version and any other language versions, the
English version shall prevail.
e
.b
re
TYPE
MAIN UNIT
LxWxH
135.6 x 73 x 51.2 mm
5.34 x 2.87 x 2.02 in
Weight
183g (6.46 ounces) include battery
Temperature range
-5°C to 50°C (23°F to 122°F)
Humidity range
25% - 95%
Power
2 x UM-3 (AA) 1.5V batteries
Temperature range
for ice alert
3°C to -2°C
EU-DECLARATION OF CONFORMITY
Hereby, Oregon Scientific, declares that Weather@
Home Thermo Plus Bluetooth-enabled Thermo-Hygro
Monitor (Model: RAR213HG) is in compliance with the
essential requirements and other relevant provisions
of Directive 1999/05/EC. A copy of the signed and
dated Declaration of Conformity is available on
request via our Oregon Scientific Customer Service.
REMOTE UNIT (THGN132N)
LxWxH
50 x 22 x 96 mm
(1.97 x 0.87 x 3.78 in)
Weight
62g (2.22 ounces) without battery
Transmission range
98 ft (30 m) unobstructed
Signal frequency
433 MHZ
Temperature range
-20°C to 60°C (-4°F to 140°F)
Humidity range
25% - 95%
Power
1 x UM-3 (AA) 1.5 V battery
COUNTRIES RTTE APPROVED COMPLIED
All EU countries, Switzerland CH
and Norway N
ABOUT OREGON SCIENTIFIC
Visit our website www.oregonscientific.com to learn
more about Oregon Scientific products.
11
d
e
ad
o
nl
ow
D
w
w
w
EN
m
fro
FCC & IC STATEMENT
an
.v
Connect the equipment into an outlet on a circuit
different from that to which the receiver is connected.
or
nb
de
This device complies with Part 15 of the FCC Rules.
Operation is subject to the following two conditions:
(1) This device may not cause harmful interference,
and (2) This device must accept any interference
received, including interference that may cause
undesired operation.
e
.b
re
Consult the dealer or an experienced radio / TV
technician for help.
DECLARATION OF CONFORMITY
The following information is not to be used as contact
for support or sales. Please call our customer service
number (listed on our website at
WARNING Changes or modifications not expressly
approved by the party responsible for compliance could
void the user's authority to operate the equipment.
www.oregonscientific.com), or on the warranty card
for this product) for all inquiries instead.
We
NOTE This equipment has been tested and found
to comply with the limits for a Class B digital device,
pursuant to Part 15 of the FCC Rules. These limits
are designed to provide reasonable protection against
harmful interference in a residential installation.
This equipment generates, uses and can radiate radio
frequency energy and, if not installed and used in
accordance with the instructions, may cause harmful
interference to radio communications. However, there
is no guarantee that interference will not occur in a
particular installation. If this equipment does cause
harmful interference to radio or television reception,
which can be determined by turning the equipment
off and on, the user is encouraged to try to correct the
interference by one or more of the following measures:
Oregon Scientific, Inc.
Address:
10778 SW Manhasset Drive,
Tualatin, OR 97062 USA
Telephone No.:
1-800-853-8883
Declare that the product
Product No.:
Model: RAR213HG
Product Name: Weather@Home Thermo Plus
Bluetooth-enabled Thermo-Hygro
Monitor Manufacturer:
IDT Technology Limited
Address:
Block C, 9/F, Kaiser Estate,
Reorient or relocate the receiving antenna.
Increase the separation between the equipment
and receiver.
Name:
12
Phase 1,41 Man Yue St.,
Hung Hom, Kowloon,
Hong Kong.
d
e
ad
o
nl
ow
D
m
fro
an
.v
w
w
w
e
.b
re
or
nb
de