1
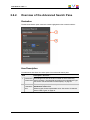
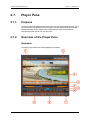
USER MANUAL
Version 1.1 - March 2014
USER MANUAL IPWeb 1.1
Copyright
EVS Broadcast Equipment SA– Copyright © 2013-2014. All rights reserved.
Disclaimer
The information in this manual is furnished for informational use only and subject to
change without notice. While every effort has been made to ensure that the information
contained in this user manual is accurate, up-to-date and reliable, EVS Broadcast
Equipment cannot be held responsible for inaccuracies or errors that may appear in this
publication.
Improvement Requests
Your comments will help us improve the quality of the user documentation. Do not
hesitate to send improvement requests, or report any error or inaccuracy on this user
manual by e-mail to [email protected].
Regional Contacts
The address and phone number of the EVS headquarters are usually mentioned in the
Help > About menu in the user interface.
You will find the full list of addresses and phone numbers of local offices either at the end
of this user manual (for manuals on hardware products) or at the following page on the
EVS website: http://www.evs.com/contacts.
User Manuals on EVS Website
The latest version of the user manual, if any, and other user manuals on EVS products
can be found on the EVS download center, on the following webpage:
http://www.evs.com/downloadcenter.
I
EVS Broadcast Equipment SA
Issue 1.1.A - March 2014
Table of Contents
TABLE OF CONTENTS
II
WHAT'S NEW?
V
1.
1
INTRODUCTION
1.1. Product Description
1
1.2. Process Overview
2
1.3. Accessing IPWeb
2
2.
USER INTERFACE
4
2.1. Overview of the Main Window
4
2.2. Tree View
6
2.2.1. Introduction
6
2.2.2. Tree View Elements
7
2.2.3. Keyboard Shortcuts
9
2.3. Quick Text Search Area
9
2.3.1. Introduction
9
2.3.2. Quick Text Search Associated Buttons
9
2.4. Toolbar
10
2.5. Elements Grid / List
11
2.5.1. Introduction
11
2.5.2. Selecting the View
12
2.5.3. Sorting the Elements in the Grid or List
14
2.5.4. Organizing Columns
14
2.5.5. Operations Allowed from the Elements Grid/List
16
2.6. Advanced Search Pane
2.6.1. Purpose
16
2.6.2. Overview of the Advanced Search Pane
17
2.7. Player Pane
18
2.7.1. Purpose
18
2.7.2. Overview of the Player Pane
18
2.7.3. Video Display
20
2.7.4. Audio Configuration and Monitoring
20
2.7.5. Time Information Fields
21
2.7.6. Jog Bar
21
2.7.7. Player Full Screen Mode
22
2.8. Bins Pane
II
16
23
2.8.1. Purpose
23
2.8.2. Overview of the Bins Pane
24
Table of Contents
USER MANUAL IPWeb 1.1
3.
SEARCHING FOR MEDIA
3.1. Filtering Tools
26
3.2. Branch Selection in the Tree
26
3.3. Quick Text Search
26
3.3.1. Purpose and Context of Use
26
3.3.2. Search for Synonyms
27
3.3.3. Quick Text Search Field Display
27
3.3.4. Quick Text Search Syntax Rules
27
3.3.5. Autocomplete Function in Quick Text Search Field
28
3.4. Advanced Search
31
3.4.1. Purpose and Context of Use
31
3.4.2. Advanced Search Fields Display
32
3.4.3. Advanced Search Fields Types
34
3.4.4. How to Clear an Applied Advanced Search Filter
34
3.4.5. Search in Free Text Fields
34
3.4.6. Search in Non-Free Text Fields
36
3.5. Using Saved Filters
39
3.5.1. Introduction
39
3.5.2. How to Save Filters
39
3.5.3. How to Apply a Saved Filter
39
3.5.4. How to Delete a Saved Filter
40
4.
LOADING MEDIA
41
4.1. Introduction
41
4.2. Possible Loading Actions
41
4.3. Loading a Recording Ingest
42
4.3.1. How to Load a Recording Ingest
42
4.3.2. How to Reload the Last Loaded Recording Ingest
42
4.3.3. How to Load the Source Media of a Clip
43
4.4. Loading a Clip
5.
44
4.4.1. How to Load a Clip from the Elements Grid/List
44
4.4.2. How to Load a Clip from the Bins Pane
44
4.4.3. How to Load a Linked Clip
44
4.4.4. How to Load a Clip Associated to a Log
45
MOVING THROUGH MEDIA
46
5.1. Introduction
46
5.2. Transport Functions
46
5.2.1. Using the Jog Bar
46
5.2.2. Transport Buttons and Shortcuts
46
5.2.3. Fast Forward and Fast Rewind Speed
47
5.3. Jumping to a Given Timecode within the Loaded Media
Table of Contents
26
48
III
EVS Broadcast Equipment SA
6.
49
6.1. Introduction
49
6.2. Clip Settings
49
6.3. Clip Creation Buttons and Shortcuts
50
6.4. How to Create a Clip from the Player Pane
51
6.5. How to Trim a Clip
52
6.6. Sending a Clip to a Bin
52
7.
ORGANIZING THE BINS
54
7.1. Introduction
54
7.2. Bins Management
54
7.3. Clips Management
55
8.
IV
CREATING A CLIP AND SENDING IT TO A BIN
Issue 1.1.A - March 2014
7.3.1. Possible Actions on Clips in a Bin
55
7.3.2. Copying Clips
56
7.3.3. Moving Clips
57
PUBLISHING AND TRANSFERRING CLIPS
58
8.1. Introduction
58
8.2. Publishing a Bin
58
8.3. Transferring Clips
59
8.3.1. Transfer Target Destinations
59
8.3.2. Transfer Options
59
8.3.3. Auto Send Mode
59
8.3.4. Sending Bin as Clips
60
8.3.5. Sending Bin as Edit
61
8.3.6. Sending a Selection of Clips
63
8.3.7. Monitoring the Transfer Status
64
Table of Contents
USER MANUAL IPWeb 1.1
What's New?
No section has been updated in the manual of IPWeb 1.1 (compared to version 1.0).
What's New?
V
USER MANUAL IPWeb 1.1
1.
Introduction
1.1.
Product Description
General Description
News or sport journalists and assistant producers are users who will benefit from this
application.
The IPWeb window is an integrated window from which it is possible to perform all the
following actions. Users can apply different search techniques to find the right media from
the list of clips and logs. The results are clearly presented in a list, easy to consult. A
Player pane is used to display the selected media, browse it and create a clip from it if
needed. Users place the selected clips in predefined bins where clips can be re-ordered.
Then, they send the bin content to target destinations, such as post-production systems.
Logs added to media are particularly useful to easily and quickly retrieve the interesting
moments of the recorded sequences. Logs cannot be created with IPWeb, but they can
be with IPDirector or IPClipLogger. IPWeb can be used to search for logs, preview them
on the Player pane inside the clip(s) associated to them and create new clips based on the
logs.
The IPWeb clients works with floating licenses imported in the IPDirector database.
IPWeb requires some additional license keys being imported to XSecure. For more
information on the required license keys, contact the Support or Sales team.
Depending on the workflow, different types of installation can be performed. Refer to the
IPWeb Installation procedure for more information on the system architecture, installation
and configuration.
Global Workflow
The IPWeb administrator must configure the IPWeb system to determine exactly which
IPDirector media are to be made available to IPWeb. IPWeb uses MS Smooth streaming
files not readable by IPDirector. These files are stored on a web storage separate from the
IPDirector nearline. XTaccess is in charge of generating the web format files from the
IPDirector media.
The main IPWeb database stores all the configurations specific to IPWeb as well as the
list of transcoded media.
1. Introduction
1
EVS Broadcast Equipment SA
1.2.
Issue 1.1.A - March 2014
Process Overview
The table below details the different steps of the process and the corresponding sections
describing each step.
1.3.
Step
Section
Searching for media
"Searching for Media"
Loading media
"Loading Media"
Browsing a clip
"Moving through Media"
Creating a clip
"Creating a Clip and Sending it to a Bin"
Organizing the bins
"Organizing the Bins"
Sending a clip to a bin
"Sending a Clip to a Bin"
Transferring the bin content to a target
"Transferring Clips"
Accessing IPWeb
IPWeb being a web-based interface, you access it using a web browser.
Supported browsers are IE9 and Safari.
To open an instance of the IPWeb interface, type the URL of the IPWeb webserver in the
browser.
This will display a login screen where users need to enter their own username and
password.
2
1. Introduction
USER MANUAL IPWeb 1.1
Password can be changed at any time by clicking the [username] button on the main
toolbar and selecting Change Password from the menu.
A window opens and allows you to change your password.
To log out of the application, click the [username] button on the main toolbar and then
Logout.
1. Introduction
3
EVS Broadcast Equipment SA
Issue 1.1.A - March 2014
2.
User Interface
2.1.
Overview of the Main Window
Illustration
The IPWeb window contains the areas highlighted on the screenshot below:
4
2. User Interface
USER MANUAL IPWeb 1.1
Area Description
The table below describes the various parts of the IPWeb window:
Area
Description
1.
Tree View The Tree view shows all the clips, bins and logs present in the database
and on the nearline. The tree branches can be used to filter items
displayed in the Elements grid/list.
See section "Tree View" on page 6 for details on the interface.
2.
Advanced The Advanced Search area allows searches on parameters
Search
corresponding to clips or logs metadata.
See section "Advanced Search Pane" on page 16.
pane
3.
Quick
Text
Search
area
The Quick Text Search area provides functions to perform quick text
searches.
See section "Quick Text Search Area" on page 9.
4.
Elements
grid or list
The Elements grid/list displays all the items included in the selected
tree branch or resulting from a search. Two different views are
available: grid or list.
See section "Elements Grid / List" on page 11.
The total number of results found is shown in the bottom bar.
5.
Toolbar
The toolbar on the top of the Elements grid/list provides a series of
buttons and menus to define options related to the elements view,
saved filters, clip creation and password management.
See section "Toolbar" on page 10.
6.
Player
pane
This pane is used to preview the loaded item, to create clips from media
and to send clips to a selected bin.
See section "Player Pane" on page 18.
7.
Bins pane This pane may contain several bins. It is used to sort clips within the
bins. The transfer of clips to targets is requested from the Bins pane.
See section "Bins Pane" on page 23.
8.
Transfer
Status
pane
This pane gives detailed information on the clip transfers, would they be
scheduled, on-going, finished or failed.
See section "Monitoring the Transfer Status" on page 64.
Adaptable Display
The layout of the IPWeb can be adapted to users' needs:
•
the Tree View and the Advanced Search Pane can be hidden by clicking the
box or shown by clicking the
•
2. User Interface
split box.
the Transfer Status pane can be hidden by clicking the
clicking the
split
split box or shown by
split box.
5
EVS Broadcast Equipment SA
•
Issue 1.1.A - March 2014
most of the panes can be enlarged or reduced by moving the intersection line between
them
2.2.
Tree View
2.2.1.
Introduction
The Tree view allows the users to browse and perform search in the database, among all
the clips, logs, or clips stored in bins.
Click the arrow next to a tree branch to expand a branch. By browsing the tree structure, a
selection is made and the items available displayed in the Elements grid or list. See
section "Branch Selection in the Tree" on page 26.
The associated Refresh button
6
is used to refresh the Tree view content.
2. User Interface
USER MANUAL IPWeb 1.1
2.2.2.
Tree View Elements
The current section mentions which items are displayed in the Elements grid/list based on
the tree branch selected.
All Clips
Selecting this branch displays, in the Elements grid/list, all the clips present in the
database.
Bins
Selecting this branch displays, in the Elements grid/list, all the clips which are in bins and
bin directories.
Expanding the Bins view shows the bins and bin directories in the Tree view, as detailed
in the table below:
Tree Branch /
Sub-Branch
Description
Bin Directory: shows all the elements which are in all the bins and
directories under the selected directory.
Bin: shows all the elements which are in the selected bin.
Users Bin Directory: shows all the elements which are under all
the System [User] bin directories.
This directory is created by the system. It is visible by all the users
but no one can modify, delete or publish it, nor add a bin or bin
directory directly under this directory.
Expanding the Users Bin Directory view displays the System [User]
bin directories for all the users:
2. User Interface
7
EVS Broadcast Equipment SA
Tree Branch /
Sub-Branch
Issue 1.1.A - March 2014
Description
System [User] Bin Directory: shows all the elements which are in
the bins and bin directories for the selected user.
Expanding a System [User] Bin Directory view displays all the bins
and bin directories for the selected user (here: pge). Its name
contains the user logging ID.
This directory is created by the system. It is visible by all the users
but only the owner of the directory and an administrator can modify,
delete or publish it, or add a bin or bin directory directly under this
directory.
System [User] Bin created by the system for the selected user. Its
name contains the user logging ID.
It shows all the elements put in it by the selected user.
It is visible by all the users but only the owner of the bin and an
administrator can modify, delete or publish it, or move this bin.
[User] Bin: created by the selected user under its System [User]
bin directory.
It shows all the elements put in it by the selected user.
[User] Bin Directory: created by the selected user under its
System [User] bin directory.
It shows all the elements put in it by the selected user.
Logs
Selecting this branch displays, in the Elements grid/list, all the logs present in the
IPDirector database.
Expanding the Logs view shows the log sheets and log directories in the Tree view, as
detailed in the table below:
Tree Branch /
Sub-Branch
Description
Log Directory: shows all the logs from all the log sheets which are
in the selected directory.
Log Sheet: shows all the logs which are in the selected log sheet.
8
2. User Interface
USER MANUAL IPWeb 1.1
2.2.3.
Keyboard Shortcuts
The following shortcuts can be used in the Tree view:
Key
Action / Behavior
Up Arrow
Select the previous line
Down Arrow
Select the next line
Left arrow
Collapses the branch
Right Arrow
Expands the branch
2.3.
Quick Text Search Area
2.3.1.
Introduction
The Quick Text Search is used to perform a search based on free text entered in the
Quick Text Search field. This field is available on the top of the Elements grid / list.
The Clip/Log icon, displayed on the top left of the Elements grid/list, depends on the
selection made in the tree: Clip icon
for the All or Bins branches, Log icon
for the
Logs branch.
The search is performed on the selected tree branch.
See section "Quick Text Search" on page 26 for details on the various ways to use this
function.
2.3.2.
Quick Text Search Associated Buttons
The following table gives a description of the buttons located next to the Quick Text
Search field. These buttons may be used not only for the Quick Text Search function but
also for the other search functions in the grid.
Interface
Element
Description
Applies the search again and refreshes the Elements grid.
Displays the Syntax Rules list. See section "Quick Text Search Syntax
Rules" on page 27.
Clears the applied Quick Text search.
2. User Interface
9
EVS Broadcast Equipment SA
2.4.
Issue 1.1.A - March 2014
Toolbar
Toolbar Options
The toolbar is located on the top of the window.
The following table gives a description of the buttons available from the toolbar.
Button
Description
Refreshes the Elements grid/list.
Favorites button: used to save applied filters or to recall a saved filter.
Clear All button: clears all the applied searches.
Switch View
Switches the view of the database content, or the results of a search,
from grid to list and vice-versa.
In Grid view, the button is gray. In List view, the button is highlighted.
[username]
This button, located at the top right of the window, displays a menu with
various options for the management of IPWeb operations.
These includes refreshing the whole interface, changing password,
logging out.
The Tools button provides options related to clip naming, keyboard
shortcuts and reset of the Elements grid columns to default.
See sections "Clip Settings " on page 49 and "Organizing Columns" on
page 14 for more information.
Order by
Order by button: only available in List view. It displays a contextual
menu listing the parameters the Elements list can be ordered by.
See section "Sorting the Elements in the List" on page 14.
Keyboard Selection
The Keyboard setting allows the users to declare the keyboard type they will use, among
English (United States) or French (France).
It can be accessed by clicking [username] > Tools > Keyboard tab.
The keyboard shortcuts associated to IPWeb operations differ according to the selected
keyboard type.
10
2. User Interface
USER MANUAL IPWeb 1.1
The Keyboard tab gives the list of existing shortcuts for each keyboard type.
Note
The keyboard shortcuts mentioned in the current user manual are those for a
QWERTY keyboard.
2.5.
Elements Grid / List
2.5.1.
Introduction
The Elements grid / list represents the content of the tree branch selected in the Tree
view. It can also returns the result of a search applied with a filtering tool to the elements
of a selected branch of the Tree view.
Clips are displayed for the All Clips and the Bins branches, logs are listed for the Logs
branch.
The elements can be presented according to two views: a list or a grid. They are described
in section "Selecting the View" on page 12.
A thumbnail can be displayed for each element if this has been set by the administrator.
In the grid, elements are presented in rows and all their associated parameters and
metadata are in columns.
The total number of results found is shown at the bottom right of the Elements grid/list.
The number of results that are displayed can be adjusted through the Preferences option.
At the bottom left, a menu allows the users to select the number of results to display on
screen. At the bottom center, arrows can be used to navigate through the results pages.
2. User Interface
11
EVS Broadcast Equipment SA
2.5.2.
Issue 1.1.A - March 2014
Selecting the View
Grid View
Display
Elements are presented in rows and all their associated parameters and metadata are in
columns.
During the IPWeb configuration, the system administrator can have set the following
parameters:
•
the choice of columns to be displayed, including additional columns for each user field
of the metadata profile which would have been associated to the clip or log.
•
the display of a thumbnail for each element.
This view is activated by clicking the
button from the main toolbar.
Clips View
Logs View
The color of the lines reflects the color assigned to the logs.
12
2. User Interface
USER MANUAL IPWeb 1.1
List View
Display
The List View shows some metadata fields for each element. A thumbnail can be
displayed for each element if this has been set by the administrator.
It is activated by clicking the
button from the main toolbar.
Clips View
Logs View
The color of the lines reflects the color assigned to the logs.
2. User Interface
13
EVS Broadcast Equipment SA
2.5.3.
Issue 1.1.A - March 2014
Sorting the Elements in the Grid or List
Sorting the Elements in the Grid
At start of the application, items are sorted with most recent on top.
You can change the sort order of elements in the grid by clicking the column header for the
parameter according to which you want to sort the elements.
The column header which is used for sorting is highlighted in blue. The little triangle
indicates the sorting order. Clicking the column header again changes the sorting order
from ascending to descending or vice versa.
Sorting the Elements in the List
To sort the elements in the List view, proceed as follows:
1. Click the Order by button from the toolbar .
A menu displays all the available parameters the list can be ordered by. The lists differ
according to the selected item type. This includes fixed parameters and parameters
from metadata profiles associated to clips.
2. Select a parameter to sort the list according to it.
2.5.4.
Organizing Columns
Columns can be resized and/or re-ordered in Grid view. This new organization is
automatically saved and remembered. However, it is also possible to reset the column
organization to the default organization.
14
2. User Interface
USER MANUAL IPWeb 1.1
Resizing Columns
A column can be resized by using the mouse pointer over columns intersection and
dragging it to the right or to the left.
Ordering Columns
To change the columns order, proceed in one of the following ways:
Select a column header and drag it to the left or right to the required place:
OR
1. Right-click a column header.
A menu is displayed.
2. Select Organize Columns.
The Organize Columns window opens and the right pane shows the list of columns in
the current order.
3. Select the column name from the Selected Columns pane.
4. Click the appropriate button:
◦
: moves the item to the top of the list (to the left of the Elements grid)
◦
: moves the item before the previous one
◦
: moves the item after the next one
◦
: moves the item to the bottom of the list (to the right of the Elements grid)
5. Click OK.
Resetting the Column Organization to the Default One
Users can reset the column organization to the default one. This will be done for all types
of items at once.
To do so, proceed as follows:
1. Click the [username] button.
2. Click the Tools button from the [username] contextual menu.
The Tools window opens.
3. Go to the Other Pref tab.
4. Click the Restore button.
5. Click Save.
2. User Interface
15
EVS Broadcast Equipment SA
2.5.5.
Issue 1.1.A - March 2014
Operations Allowed from the Elements
Grid/List
The following actions are possible from the Elements grid/list:
Operation
Resulting action
Click on an element line, clip or log
Simply selects the element.
Double-click or press Enter on an
element line, clip or log
Loads the element on the Player pane.
See section "Loading Media" on page 41.
Drag-and-drop operation on the
Player pane
Loads the element on the Player pane.
See section "Loading Media" on page 41.
Drag-and-drop operation on the Bins
pane
Copies a clip into a bin.
See section "How to Copy Clip(s) from the
Elements Grid/List" on page 56.
2.6.
Advanced Search Pane
2.6.1.
Purpose
Advanced Search functions are available for detailed search operations. They allow
searches on metadata of the element type selected from the Tree view. The Advanced
Search pane is located on the bottom left part of the IPWeb window.
See section "Advanced Search" on page 31 for details on the various ways to use this
function.
16
2. User Interface
USER MANUAL IPWeb 1.1
2.6.2.
Overview of the Advanced Search Pane
Illustration
The Advanced Search pane contains the areas highlighted on the screenshot below:
Area Description
The table below describes the various parts of the Advanced Search pane:
Area
2. User Interface
Description / See also…
1.
Add Search This field gives access to the list of criteria on which users may
Criteria field perform a search. The lists differ according to the selected item type.
See section "Advanced Search Fields Display" on page 32.
2.
Search
Parameters
area
This area displays the list of search parameters selected from the
Add Search Criteria field.
Different types of search parameters exist. See section "Advanced
Search Fields Types" on page 34.
17
EVS Broadcast Equipment SA
2.7.
Player Pane
2.7.1.
Purpose
Issue 1.1.A - March 2014
The Player pane is the graphical interface used to view a recording ingest (growing clip), a
clip or the media corresponding to a log timecode. Transport functions allow to navigate
through the loaded media. Thanks to clip creation buttons, clips can be created or
trimmed, saved and send to a bin in a few clicks.
2.7.2.
Overview of the Player Pane
Illustration
The Player pane contains the areas highlighted on the below:
18
2. User Interface
USER MANUAL IPWeb 1.1
Area Description
The table below describes the various parts of the Player pane:
Area
2. User Interface
Description / See also…
1.
Loaded Media
name
This read-only field shows the name of the loaded clip or
recording ingest.
2.
Current Timecode
field
This field provides the current timecode of the loaded media.
It allows to jump to a specific timecode. See section
"Jumping to a Given Timecode within the Loaded Media" on
page 48.
3.
Video Display
This area displays the media loaded on the Player.
See section "Video Display" on page 20.
4.
Time Information
fields
Those fields provide information on the duration and the IN
and OUT points of the loaded item.
See section "Time Information Fields" on page 21.
5.
Jog bar
The jog bar allows you to move within the media at a variable
speed.
See section "Jog Bar" on page 21.
6.
Transport
commands
Those commands are used to browse in and play the loaded
media.
See section "Transport Buttons and Shortcuts" on page 46
for the list of transport functions.
The E/E function and the Ret function are described in
section "Loading a Recording Ingest" on page 42.
7.
Maximize button
This button is used to maximize the player on a second
screen.
See section "Player Full Screen Mode" on page 22.
8.
Clip Creation
commands
Those commands are used to create a clip from the loaded
media.
See section "Clip Creation Buttons and Shortcuts" on page
50 for the list of clip creation functions.
9.
Recorder Channel
Selection
commands
Those commands are used to select a recording ingest or a
clip linked to the loaded clip.
See section"How to Load a Linked Clip" on page 44.
10.
Quality Level icon
This icon gives an indication of the quality level of the
smooth streaming.
19
EVS Broadcast Equipment SA
2.7.3.
Issue 1.1.A - March 2014
Video Display
Video Display
The background of the Player pane is gray when no media is loaded or when the loaded
media contains an on-line hi-res element.
Video Display Contextual Menu
A contextual menu is accessible by right-clicking the Video Display of the Player pane
when a media is loaded. It gives access to audio parameters. See section "Audio
Configuration and Monitoring" on page 20 for more information.
2.7.4.
Audio Configuration and Monitoring
Audio Parameters
Audio parameters are accessible by right-clicking the Video Display of the Player pane
when a media is loaded.
Configure Audio Monitoring
Opens the Audio Output Channels window allowing the selection of audio channels to be
listened to. See section "Audio Configuration" on page 21.
20
2. User Interface
USER MANUAL IPWeb 1.1
Audio Configuration
To select the audio channels you want to listen to, proceed as follows:
1. Right-click the Video Display.
2. Select Configure Audio Monitoring from the contextual menu.
The Audio Output Channels window opens.
3. On the Left+Right line, click the cell corresponding to the channels you want to listen
to.
4. If required, adjust the output level and/or the audio balance.
5. Click OK.
The audio configuration is automatically applied.
2.7.5.
Time Information Fields
The following time information is displayed as follows in the Video Display.
1. IN field (bottom left): timecode of the IN point
2. Duration field (bottom center): time interval between the IN and OUT points, i.e. clip
duration
3. OUT field (bottom right): timecode of the OUT point
2.7.6.
Jog Bar
The jog bar display differs according to the loaded element.
2. User Interface
21
EVS Broadcast Equipment SA
Issue 1.1.A - March 2014
Clip
When a clip is loaded, the jog bar is a graphical representation of its duration and its
guardbands.
•
The orange sections represent the guardbands before the IN point and after the OUT
point.
•
The section between the guardbands represents the clip length, between the IN point
and the OUT point. It is blue until the current position and black after.
•
The bullet indicator shows the current relative position in the clip.
Recording Ingest
When an ingest being recorded is loaded, the bullet indicator cannot be moved further
to the right than the current timecode position being recorded.
The red segment represents the duration not yet recorded.
Log
When a log is loaded, it is actually one of its associated clip which is loaded and the bullet
indicator stands on the log timecode.
Clip being Created
When a clip is being created, the following indicators appear :
2.7.7.
•
A green position indicator is shown when the IN button has been clicked and
represents the temporary IN point position until the UPDATE CLIP button or the
SAVE CLIP button is clicked.
•
A red position indicator is shown when the OUT button has been clicked and
represents the temporary OUT point position until the UPDATE CLIP button or the
SAVE CLIP button is clicked.
Player Full Screen Mode
The Maximize button
screen mode.
, or the
keyboard shortcut, puts the Player pane in full-
Shortcuts remain usable. Controls appear at the bottom of the screen.
22
2. User Interface
USER MANUAL IPWeb 1.1
This mode can then be exited by clicking the Maximize button again or by pressing the
Escape key.
2.8.
Bins Pane
2.8.1.
Purpose
The Bins pane displays as many tabs as there are bins in the System [User] bin directory
related to the current user. So, the Bins pane contains at least one tab for the System
[User] bin automatically created by the system for the user currently logged on the
workstation. The tab name is the bin name and contains the login identification of the user.
The following [User] bins
from the Tree view…
…are reflected as follows in the Bins pane:
Each tab shows the bin content with one clip per line.
Only clips appear in bins. Would playlists and timelines be present in a bin, they will not be
visible through IPWeb.
2. User Interface
23
EVS Broadcast Equipment SA
2.8.2.
Issue 1.1.A - March 2014
Overview of the Bins Pane
Illustration
The Bins Pane contains the areas highlighted on the screenshot below:
Area Description
The table below describes the various parts of the Bins pane:
24
Area
Description
1.
Tab name
Each tab has the name of the bin.
The first tab corresponds to the System [User] bin automatically
created by the system for the current user and cannot be deleted.
Other tabs correspond to the [User] bins created by the user.
2.
Delete Bin
button
This button is used to delete a bin and its content.
See section "Bins Management" on page 54.
3.
Add Bin
button
This button is used to create a new bin.
See section "Bins Management" on page 54
2. User Interface
USER MANUAL IPWeb 1.1
Area
Description
4.
Transfer
This area gives indication on the transfer status of the requested job.
Status
According to the selected Send To mode, the information can be
Information displayed at the bottom of the pane. The icon layout may differ
according to the target selected for the transfer.
See section "Transfer Options" on page 59.
5.
Clip
thumbnail
Thumbnail grabbed for the clip. Its display is optional. It depends on
the IPWeb configuration by the administrator.
6.
Clip name
Name of the clip.
7.
Clip TC IN
Timecode of the clip IN point.
8.
Clip
duration
Duration of the clip.
9.
Bin Total
duration
Total duration of the bin content.
10. Publish
button
This button is used to publish or unpublish the bin content to a group
of users.
See section "Publishing a Bin" on page 58.
11. Auto Send
button
This button is used to select the target destination to automatically
send a clip to a target at clip creation.
See section "Auto Send Mode" on page 59.
12. Send Bin
button
This button displays a contextual menu with different options which
allow to create an EDL with the bin content or to choose the format in
which the bin content will be sent (EDL or clips). This is used to
select the target destination to send the bin content to.
See sections "Sending Bin as Clips" on page 60 and "Sending Bin as
Edit" on page 61.
13. Clear Bin
button
This button is used to clear the bin content.
See section "Bins Management" on page 54
Each tab shows the list of clips present in the bin and the total duration of the bin.
2. User Interface
25
EVS Broadcast Equipment SA
3.
Searching for Media
3.1.
Filtering Tools
Issue 1.1.A - March 2014
When the IPDirector database contains large amounts of data, it may become difficult to
find a specific element. The IPWeb offers several ways to refine the list of elements
displayed in the Element grid/list and speed up your search:
•
Branch selection in the Tree view - Select a branch in the Tree view to limit the list to
specific item types or only a subset of the Tree view.
•
Quick text search - Enter free text in the Quick Text Search field to perform a search
on a specific string.
•
Advanced search filter – Select specific criteria in the Advanced Search pane to
perform a search on specific metadata associated with the elements.
All these search tools can be combined.
An applied filter can be saved for later use. Such a saved filter can then be applied in one
click.
A search can also be facilitated by ordering the Elements grid. See section "Elements
Grid / List" on page 11 for more information.
3.2.
Branch Selection in the Tree
The Tree view allows the users to browse and perform search in the database and the
nearline, among all the clips, clips stored in bins, or logs. By browsing the tree structure, a
selection is made and displayed in the Element grid/list.
See section "Tree View" on page 6 for a description of the user interface elements of the
Tree view.
3.3.
Quick Text Search
3.3.1.
Purpose and Context of Use
The Quick Text Search function is used to perform a search based on free text entered in
the Quick Text Search field. This field is available on the top of the Elements grid/list:
The Clip/Log icon, displayed on the top left of the Elements grid/list, depends on the
selection made in the tree: Clip icon
for the All or Bins branches, Log icon
Logs branch. The search is performed on the branch selected in the Tree view.
26
for the
3. Searching for Media
USER MANUAL IPWeb 1.1
See section "Quick Text Search Associated Buttons" on page 9 for the description of the
buttons associated to the Quick Text Search field.
Users can enter a search string in one of the following ways.
3.3.2.
•
Entering the search string in full in the Quick Text Search field.
•
Starting to type a search string in the Quick Text Search field, so the Autocomplete
function displays a list of proposals, and one of them can be selected. See section
"Autocomplete Function in Quick Text Search Field" on page 28.
Search for Synonyms
Users have the possibility to perform a search for word synonyms, provided that they
have been defined in the SQL thesaurus file and that the corresponding option has been
set in the IPDirector General setting Freetext searches behavior.
Then, a search performed with a search string will return the predefined synonyms as
well. This function can be used to search for translated words.
3.3.3.
Quick Text Search Field Display
The following table shows the various displays for the Quick Text Search field, and what
they mean:
Display
Meaning
The field background is gray:
No Quick Text Search is applied nor
entered.
The field background is red:
The user is typing or has typed a search
string, but has not applied it yet, or a search
has been applied but the user has typed
another search string in the field and not
applied it yet.
The field background is green:
The user has applied the search string, by
pressing ENTER. The result of the Quick
Text Search is displayed in the grid.
3.3.4.
Quick Text Search Syntax Rules
The Quick Text Search option obeys specific rules which can be accessed via the Help
button next to the Quick Text Search field:
3. Searching for Media
.
27
EVS Broadcast Equipment SA
Issue 1.1.A - March 2014
The string that you enter in the Quick Text Search field is analyzed according to the
following set of rules:
Search
String
Search Result
Logical
Equivalent
Yellow card
Searches for the words yellow and card, even if in
two different fields (columns), for example yellow in
Name and card in Keywords.
For example a clip named "The Yellow Man" with
keywords "Red Card" will be found, since it has
yellow and card in 2 different fields.
"Yellow" AND
"card"
Yellow | card
Searches for yellow or card, even if in two different
fields (columns), for example yellow in Name or
card in Keywords.
"Yellow" OR
"card"
"Yellow card"
Searches for exact matches of Yellow card. Between the quotes, all characters are considered
as characters and not operators or wildcards.
"Yellow card"
card*
Searches for card at the beginning of a word. "card"*
*card*
Searches for all words that include card.
*"card"*
=card
Searches for a whole field that contains only card.
For example, if a field contains yellow card, the
=card condition will not return any result.
Search operators may be combined.
3.3.5.
Autocomplete Function in Quick Text
Search Field
Introduction
The Autocomplete function is a help service for the capture of the search string.
As soon as the users start typing in the Quick Text Search field, the Autocomplete
function provides a list of matching words and sentences known by the system and
containing a word beginning with the typed letters.
28
3. Searching for Media
USER MANUAL IPWeb 1.1
Result Types in the Autocomplete List
The list displayed below the Quick Text Search field is made up of different types of
results, as described in the following table.
Icon
Description:
The line displays the result corresponding to the typed letters and …
… coming from the 100 most popular searches asked to the system since its
startup, and launched from the same tree branch. Several lines can be displayed,
the most frequent are shown on the top of the list.
… coming from an index of words entered in text fields, such as item name,
item source name, item VarID, tape ID, item metadata text. Keywords are not
indexed in this list. Several lines can be displayed, sorted alphabetically.
… corresponding to a keyword from a keyword list.
… corresponding to a participant from a keyword list.
The proposals made in the Autocomplete list for the popular search and indexed words
depend on the tree branch selected at the time when a word is typed. For example, if the
Logs view is selected in the tree view, only the searches performed on the Logs view will
be proposed, as well as indexed words attached to logs.
Proposed keywords and participants are not linked to the selected tree branch.
How to Perform a Quick Text Search with the
Autocomplete Function
Search on One String of Characters
To perform a Quick Text search, proceed as follows:
1. Select the tree branch you wish to perform a quick search on.
3. Searching for Media
29
EVS Broadcast Equipment SA
Issue 1.1.A - March 2014
2. Type a search string in the Quick Text Search field.
A list of proposals is displayed as soon as you start to type and it is refined as you go
on typing.
3. Select a line by using the mouse or the
key.
4. Press ENTER.
The search is launched with the selected proposal on the selected element type.
The search results are displayed in the grid.
The search string is highlighted in the results list.
5. To clear the applied Quick Text Search, click the Clear Quick Text Search button
(white
) to the right of the search field.
6. To clear all the filters applied, from the advanced search filters and from the Quick
Text search options, click the Clear All button (red
30
).
3. Searching for Media
USER MANUAL IPWeb 1.1
Search on Two Strings of Characters
To perform a search based on two words, proceed as follows:
1. Follow steps 1 to 4 from the previous procedure.
2. Press Space bar and then start to type a second word.
A new list of proposals is displayed based on the second word.
3. Select a line by using the mouse or the
key.
4. Press ENTER.
The search is launched with the two selected proposals on the selected element type.
The search strings are highlighted in the results list.
3.4.
Advanced Search
3.4.1.
Purpose and Context of Use
The Advanced Search functions are available for more detailed search operations. They
allow searches on clips or logs metadata.
The Advanced Search pane is located on the bottom left part of the IPWeb window. Users
can choose the advanced search parameters they want to display.
3. Searching for Media
31
EVS Broadcast Equipment SA
3.4.2.
Issue 1.1.A - March 2014
Advanced Search Fields Display
Displaying Advanced Search Fields
The list of available advanced search parameters is available by clicking the arrow next to
the Select Criteria field.
Depending on the media type (clips or logs) selected in the Tree view, different lists of
advanced search parameters are proposed.
During the IPWeb configuration, the system administrator has selected the parameters to
be displayed, including additional parameters for each user field of the metadata profile
which would have been associated to the clip or log.
32
3. Searching for Media
USER MANUAL IPWeb 1.1
To display an advanced search parameter, select one of the options from the Select
Criteria menu. The selected parameter is displayed in the Advanced Search pane.
Parameters corresponding to a date or a timecode will first require users to enter the
search values in a Select Filter Condition window before being displayed. See sections
"Advanced Search Fields Types" on page 34 and "Search in Non-Free Text Fields" on
page 36.
A search parameter displayed without any filter applied is surrounded by a thin red line. As
soon as a search value is entered, the search parameter is surrounded by a thin green line:
Hiding Advanced Search Fields
To remove an advanced search field from the Advanced Search pane, click the white
cross in the upper right corner of the criterion box. Applied filters are cleared as soon as a
search field is removed.
3. Searching for Media
33
EVS Broadcast Equipment SA
3.4.3.
Issue 1.1.A - March 2014
Advanced Search Fields Types
Different types of advanced search fields exist:
3.4.4.
•
free text fields: search data can be entered directly in these fields, e.g. Name field.
•
field with an option list: an arrow giving access to a list of options is available on the
right of the field or a list of options is displayed in the area for direct selection, e.g.
Level field.
•
field with an edit button
giving access to a Select Filter Condition window to define
specific search values, e.g. Date field
How to Clear an Applied Advanced Search
Filter
To clear a filter applied on an advanced search criterion, click the X button next to the
corresponding criterion:
When filters have been applied from several search tools, all the filters can be cleared by
clicking the Clear All button next to the Quick Text Search field:
3.4.5.
Search in Free Text Fields
Autocomplete Function in Free Text Search Fields
The Autocomplete function is a help service for the capture of the search string. The
Autocomplete function, described in section "Autocomplete Function in Quick Text
Search Field" on page 28 for the Quick Text Search, is also enabled during searches in
free text search fields of the Advanced Search pane.
The Autocomplete list, displayed under free text search fields of the Advanced Search
34
3. Searching for Media
USER MANUAL IPWeb 1.1
pane, is limited compared to the one shown under the Quick Text Search field. No local
search or popular search will be proposed.
•
Only indexed words
Participants fields.
will be listed under free text fields other than Keywords or
•
Only keywords
•
Only participants keywords
will be listed under the Keywords field.
will be listed under the Participants field.
Free Text Search Syntax Rules
The string that you enter in the free text search field is analyzed according to the same
set of rules as for the Quick Text Search. See section "Quick Text Search Syntax Rules"
on page 27 for details on these rules.
Preliminary Steps
1. Select the tree branch in the Tree view.
2. In the Advanced Search pane, display the search criterion.
How to Perform a Search on Free Text
To enter search values in a free text field of the Advanced Search pane, proceed as
follows:
1. Type a search string in the field, based on the rules detailed in "Free Text Search
Syntax Rules" on page 35.
A list of proposals is displayed as soon as you start to type and it is refined as you go
on typing.
2. Select a line by using the mouse or by pressing the
key and then ENTER.
The search is launched on the selected tree branch.
The search results are displayed in the grid/list.
3. Searching for Media
35
EVS Broadcast Equipment SA
3.4.6.
Issue 1.1.A - March 2014
Search in Non-Free Text Fields
Preliminary Steps
Non-free text search fields of the Advanced Search pane give access to an option list to
select a search value or to a Select Filter Condition window to define specific search
values.
Before starting a search, do the following steps:
1. Select the tree branch in the Tree view.
2. In the Advanced Search pane, display the search criterion.
How to Perform a Search based on an Option List
To set a search criterion from an option list, proceed in one of the following ways:
When the options are displayed in the area, e.g. Level field:
•
Click the appropriate button:
When the options are displayed in a list:
1. Click the arrow next to a search field to display the option list for the corresponding
criterion
2. Select the appropriate value.
How to Perform a Search based on a Date
To set a search criterion based on a date, proceed as follows:
1. Click the Edit button if the parameter is already displayed in the Advanced Search
pane. Otherwise, the window will open as soon as the parameter is selected from the
Select Criteria field.
The Date Filter window opens, for example:
36
3. Searching for Media
USER MANUAL IPWeb 1.1
2. Enter a date condition in one of the following ways:
◦
select Single Date and choose a date from the calendar
◦
select Relative Date and select one of the options from the Last xx list
◦
select From...to and select a range of dates from the calendars.
◦
to reset the field value(s) to the current date, click Clear.
3. Click Add.
The search condition is displayed in the Conditions field.
4. Click Save.
The search is launched on the selected tree branch.
The search results are displayed in the grid/list.
How to Perform a Search based on a Duration
To set a search criterion based on a duration, proceed as follows:
1. Click the Edit button if the parameter is already displayed in the Advanced Search
pane. Otherwise, the window will open as soon as the parameter is selected from the
Select Criteria field.
The Duration Filter window opens:
3. Searching for Media
37
EVS Broadcast Equipment SA
Issue 1.1.A - March 2014
2. Enter a duration condition in one of the following ways:
◦
Select Single Value, select a logical operator and enter a value in the Timecode
field
◦
Select Interval, select the appropriate logical operators and enter a values in the
Timecode fields.
3. Click Add.
The search condition is displayed in the Conditions field.
4. Click Save.
How to Perform a Search based on a Timecode
To set a search criterion based on a timecode, proceed as follows:
1. Click the Edit button if the parameter is already displayed in the Advanced Search
pane. Otherwise, the window will open as soon as the parameter is selected from the
Select Criteria field.
The Timecode Filter window opens, for example:
2. Enter a timecode condition in one of the following ways:
◦
Select Single Timecode and enter a timecode value
◦
Select From...to and enter a range of timecodes.
3. Click Add.
The search condition is displayed in the Conditions field.
4. Click Save.
The search is launched on the selected tree branch.
The search results are displayed in the grid/list.
38
3. Searching for Media
USER MANUAL IPWeb 1.1
3.5.
Using Saved Filters
3.5.1.
Introduction
Once you have defined filters and search terms, you may want to save them for later use.
You will then be able to apply the same set of filters with a single click.
Saved filters differ between logs and clips. They are specific to the logged user.
The saved filters are not shared with the IPDirector database.
3.5.2.
How to Save Filters
To save filters, proceed as follows:
1. Define the filters you wish to save.
2. Click the Favorites button
.
A menu is displayed.
3. Select Save Current Filters.
The following window is displayed:
4. Enter a name for the applied filters set.
5. Click OK to confirm.
The new filter name is listed in the menu available from the Favorites button.
3.5.3.
How to Apply a Saved Filter
To apply a saved filter, proceed as follows:
1. Click the Favorites button.
A menu is displayed and lists the already saved filters.
2. Select the desired saved filter.
Your filter(s) are shown in the Advanced Search areas and/or Quick Text Search field
and they are applied in the grid.
3. Searching for Media
39
EVS Broadcast Equipment SA
3.5.4.
Issue 1.1.A - March 2014
How to Delete a Saved Filter
To delete a saved filter, proceed as follows:
1. Click the Favorites button.
A menu is displayed and lists the already saved filters.
2. Click the X button next to the saved filter you want to delete.
40
3. Searching for Media
USER MANUAL IPWeb 1.1
4.
Loading Media
4.1.
Introduction
The meaning of loading media is explained hereafter.
A record train, or train, corresponds to the media being recorded live from a camera and
sent to an EVS video server through a recorder channel. This type of media is not
available with IPWeb.
A recording ingest corresponds to the same media for which an IN point has been marked
at a specific timecode to start the creation of a clip. This type of media is available with
IPWeb.
To create clips on a recording ingest with IPWeb, the corresponding recording source
must be selected in the Player pane. In this manual, this action is called "loading a
recording ingest".
See section "Possible Loading Actions" on page 41 for the list of the possible ways to load
different types of media.
4.2.
Possible Loading Actions
Various element types can be loaded on the Player pane in different ways.
These actions are listed in the next table.
Action
See section…
Recording Ingest
Loading a recording ingest by selecting it from
the Player pane or the Elements grid.
"How to Load a Recording Ingest" on
page 42.
Loading the last loaded recording ingest (only in
case it was loaded just before the media
currently loaded) at its currently recording
timecode (E/E).
"How to Reload the Last Loaded
Recording Ingest" on page 42.
Loading the source media corresponding to the
loaded clip (Ret).
"How to Load the Source Media of a
Clip" on page 43.
Loading a linked recording ingest.
"How to Load a Linked Clip" on page
44.
Clip
4. Loading Media
Loading a clip from the Elements grid/list
"How to Load a Clip from the
Elements Grid/List" on page 44.
Loading a clip from the Bins pane
"How to Load a Clip from the Bins
Pane" on page 44.
41
EVS Broadcast Equipment SA
Issue 1.1.A - March 2014
Loading a clip linked to the clip currently loaded
"How to Load a Linked Clip" on page
44.
Loading a clip associated to a log, or loading a
log
"How to Load a Clip Associated to a
Log" on page 45.
4.3.
Loading a Recording Ingest
4.3.1.
How to Load a Recording Ingest
From the E/E Button
By right-clicking the E/E button a contextual menu shows the list of clips being currently
ingested identified by their name. Scheduled ingests not being recording yet are not
shown.
Selecting a recording ingest directly loads it at its currently recording position (OUT point)
and plays it on the Player pane.
From the Elements Grid
To load a recording ingest (clip currently ingested) from the Elements grid/list, do one of
the following:
•
double-click the line
•
select the line and press ENTER
•
drag the recording ingest to the Player pane.
The growing clip is loaded on its "OUT" point, currently being ingested, and played on the
Player pane.
4.3.2.
How to Reload the Last Loaded Recording
Ingest
If a clip is loaded on the Player pane, clicking the E/E button will unload it and load and
play the last loaded media (recording ingest) at its current recording position.
42
4. Loading Media
USER MANUAL IPWeb 1.1
Note
In case the previously recording ingest is finished when the E/E button is
clicked, the recorded clip is loaded on its IN point and stays in pause. If this clip
has been deleted, nothing happens.
User Interface Button
4.3.3.
Keyboard Shortcut
How to Load the Source Media of a Clip
The Ret button becomes active if a clip has been loaded on the Player pane. By clicking it,
the same frame of media will be loaded from the original record media (clip, recording
ingest). This allows the users to play beyond the original clip boundaries or to define a new
clip from the original record media.
Clip Loaded:
User Interface Button
4. Loading Media
Source Media Recalled with Ret:
Keyboard Shortcut
43
EVS Broadcast Equipment SA
Issue 1.1.A - March 2014
4.4.
Loading a Clip
4.4.1.
How to Load a Clip from the Elements
Grid/List
Once you have identified, in the Elements grid or list, the clip you wish to preview, you can
load it on the Player pane in one of the following ways:
•
Select the clip line in the Elements grid/list and press ENTER.
•
Double-click the clip line in the Elements grid/list.
•
Drag the clip line to the Player pane
The clip is loaded on its TC IN.
4.4.2.
How to Load a Clip from the Bins Pane
Once you have identified, in the Bins pane, the clip you wish to preview, you can load it on
the Player pane in one of the following ways:
•
Select the clip line in the Bins pane and press ENTER.
•
Double-click the clip line in the Bins pane.
•
Drag the clip line to the Player pane
The clip is loaded on its TC IN.
4.4.3.
How to Load a Linked Clip
Linked clips are clips created at the same time by ganged recorder channels. They
correspond to different angles of the same recorded media.
This applies also to recording ingests (or growing clips) being created from ganged
recorder channels.
When a clip already loaded on a player has linked clips, it is possible to rapidly load one of
them in one of the following ways:
•
Click the Prev or the Next button or shortcut.
Operation
User Interface Element
Keyboard Shortcut
Previous Linked Clip
Next Linked Clip
44
4. Loading Media
USER MANUAL IPWeb 1.1
•
Click the arrow next to the Recorder Channel Selection field. A menu provides the
list of recorder channels from which the linked clips have been recorded.
Select one of them to load the corresponding linked clip.
Operation
User Interface Element
Keyboard Shortcut
Select Linked Clip
4.4.4.
-
How to Load a Clip Associated to a Log
Once clips containing a log timecode have been created, the IPDirector system
automatically associates these clips to the log. From IPWeb, it is possible to load a clip
associated to a log at the log timecode. It can be seen as loading a log.
To do so, proceed as follows:
1. In the Tree view, select the Logs branch or a log directory or a log sheet.
The corresponding list of logs is displayed in the Elements grid/list.
2. In the Elements grid/list, do one of the following:
◦
Select the log line and press ENTER.
◦
Double-click the log line
◦
Drag the log line to the Player pane
The clip associated to the log is loaded on the Player pane, at the log timecode.
Note
On some occasions, a log has no associated clip, so the log cannot be
previewed.
3. If the log has been created on a ganged recorder channel, it has been associated to all
the linked clips. You can load another associated clip thanks to the Prev or Next
functions or the Recorder Channel Selection field, as described in section "How to
Load a Linked Clip" on page 44.
The linked clip is loaded on the Player pane on the log timecode.
You can then browse the clip, create a new clip and send it to a bin.
An associated clip cannot be trimmed because the IPDirector has protected it.
4. Loading Media
45
EVS Broadcast Equipment SA
Issue 1.1.A - March 2014
5.
Moving through Media
5.1.
Introduction
The Player pane provides a jog bar and more transport buttons to navigate in the loaded
element. In addition, other options allow to directly jump to a given timecode within the
media.
5.2.
Transport Functions
5.2.1.
Using the Jog Bar
The bullet indicator of the jog bar can be moved with the mouse along the jog bar to
browse the media and to play it from any position if needed.
See section "Jog Bar" on page 21 for a description of the elements of the jog bar.
5.2.2.
Transport Buttons and Shortcuts
The following table gives the meaning of each transport operation. A button and/or a
keyboard shortcut can be used to perform each action.
Note
The E/E function and the Ret function are described in section "Loading a
Recording Ingest" on page 42.
Operation
User
Interface
Button
Keyboard
Shortcut
Play
or
Pause
or
46
Description
Starts to play the loaded media at 100% for normal clips, at
33% for "SLSM clips 3x" or at 50% for "SLSM clips 2x".
The button switches to the Pause button.
The Speed field, above the Play button, indicates the playout
speed.
Stops the playout of the loaded media.
The button switches to the Play button.
The Speed field, above the Pause button, indicates at which
speed the media is played.
5. Moving through Media
USER MANUAL IPWeb 1.1
Operation
User
Interface
Button
Keyboard
Shortcut
Description
Fast
Rewind
Starts moving backwards through the media at the preset
speed.
See section "Fast Forward and Fast Rewind Speed" on page
47.
Fast
Forward
Starts moving forward through the media at preset speed.
See section "Fast Forward and Fast Rewind Speed" on page
47.
Goto IN
Moves from the current position to the IN point of a clip.
Goto OUT
Moves from the current position to the OUT point of a clip.
If a growing clip is loaded on a player and the user clicks the
Goto OUT button, the system will play near "live", i.e. at the
closest position from the live.
Goto
Previous
Frame
or
Goto Next
Frame
or
Moves from the current position to the previous frame.
Moves from the current position to the following frame.
Go 10
Frames
Backward
-
Moves 10 frames before the current position.
Go 10
Frames
Forward
-
Moves 10 frames after the current position.
5.2.3.
Fast Forward and Fast Rewind Speed
Introduction
The Fast Forward speed and the Fast Rewind speed can be adapted by means of
contextual menus.
The speed is displayed in the Speed field above the Play/Pause button.
5. Moving through Media
47
EVS Broadcast Equipment SA
Issue 1.1.A - March 2014
Contextual Menus
Right-click the Fast Rewind button or the Fast Forward button and select one of the
options from the contextual menu.
Keyboard Shortcuts
Press the Fast Rewind (J) or the Fast Forward (L) shortcut to start playing the media
backward or forward.
5.3.
Jumping to a Given Timecode within
the Loaded Media
There are several ways to jump to a given timecode within a loaded media:
48
•
Click at one position on the jog bar
•
Click on the bullet indicator and move it along the jog bar
•
Enter a new timecode value in the Current Timecode field and press ENTER.
5. Moving through Media
USER MANUAL IPWeb 1.1
6.
Creating a Clip and Sending it to
a Bin
6.1.
Introduction
As soon as a media has been loaded, users can create a new clip from this loaded media
thanks to the clip creation functions of the Player pane. A clip can be created from a
recording ingest or from an existing clip. The clip creation buttons and shortcuts can also
be used to re-trim an existing clip, if it has not been protected.
Clips are sent to a bin as soon as they are saved. So, a bin must have been selected prior
to or at clip creation. See section "Sending a Clip to a Bin" on page 52.
6.2.
Clip Settings
Introduction
Most of the settings cannot be defined from the IPWeb interface and are directly applied
from IPDirector.
The only setting that the user can configure from the IPWeb interface relate to autonaming of clip.
Defining Clip Autoname
The Define Autoname setting allows the user to define auto-naming rules for new clips.
To define a clip auto-name, proceed as follows:
1. Click the [username] button from the Toolbar.
A menu is displayed.
6. Creating a Clip and Sending it to a Bin
49
EVS Broadcast Equipment SA
Issue 1.1.A - March 2014
2. Click Tools.
The Tools window opens. It displays the Setting Autoname tab which lists the various
possible format string options with a brief explanation:
3. Select the Activate Autoname option.
4. Double-click an item to append it to the format string.
5. Click Save.
The auto-name setting is saved in the IPDirector Auto-Name settings.
6.3.
Clip Creation Buttons and Shortcuts
The following table gives the meaning of each clip creation operation. A button and/or a
keyboard shortcut can be used to perform each action.
User
Keyboard
Operation Interface
Description
Shortcut
Button
Mark IN
or
Sets a mark IN point at the timecode shown in the
Current Timecode field and corresponding to the
bullet indicator position on the jog bar.
Then, a green indicator represents the mark IN
point on the jog bar.
or
Sets a mark OUT point at the timecode shown in
the Current Timecode field and corresponding to
the bullet indicator position on the jog bar.
Then, a red indicator represents the mark OUT
point on the jog bar.
Mark
OUT
50
6. Creating a Clip and Sending it to a Bin
USER MANUAL IPWeb 1.1
User
Keyboard
Operation Interface
Description
Shortcut
Button
Clear IN
Clears the mark IN point which has just been set
and not yet saved.
When applied to a loaded clip, the IN point is set to
the Protect IN timecode, before the guardband.
Clear
OUT
Clears the mark OUT point which has just been set
and not yet saved.
When applied to a loaded clip, the OUT point is set
to the Protect OUT timecode, after the guardband.
Clear
Marks
-
Clears the mark IN and the mark OUT points which
have just been set and not yet saved.
Save Clip
and Add
to Bin
Saves the new clip after having marked an IN point
and an OUT point and sends it to the selected bin.
Update
Clip
Saves the new data of a clip after having marked a
new IN point and/or a new OUT point, or after
having updated the metadata.
Note
When the cursor is located in a text area, the
key can be pressed
together with a keyboard shortcut to perform one of the following actions: Mark
IN, Mark OUT, Save Clip, and Update Clip.
6.4.
How to Create a Clip from the Player
Pane
To create a clip from a recording ingest or to create a sub-clip from an existing clip,
proceed as follows:
1. Load a media (recording ingest, clip or a log) on the Player pane.
2. If you have loaded a clip, browse through it to select the point to be marked IN and/or
the point to be marked OUT.
3. Set an IN point at the required timecode.
4. Set an OUT point at the required timecode.
5. Click the Save Clip button
◦
or use the dedicated shortcut.
If the Autoname setting has been selected, make sure the bin tab where you
want to send the clip has been selected before clicking the Save button. See
section "Sending a Clip to a Bin" on page 52.
The procedure is finished.
6. Creating a Clip and Sending it to a Bin
51
EVS Broadcast Equipment SA
◦
Issue 1.1.A - March 2014
If the Autoname setting has not been selected, the Add Clip to Bin window
opens:
Follow the next steps.
6. Enter a name for the clip in the Name field.
7. In the Bin field, select the bin where you want to send the clip.
8. Click the Save button to save the clip.
The clip is saved in the IPDirector database and the clip is sent to the selected bin.
6.5.
How to Trim a Clip
An existing clip can be trimmed and saved with the same name, so the updated clip
replaces the previous one. A clip associated to a log cannot be trimmed because
IPDirector has protected it.
To trim a clip, proceed as follows:
1. Load a clip on the Player pane.
2. Browse the clip to mark a new IN point and/or a new OUT point.
3. Click the Mark IN button and/or the Mark OUT button respectively.
4. Click the Update button
to save the updated clip.
The clip is saved in the IPDirector database. Its duration is updated in the Elements
grid/list and in the bins where it is located.
6.6.
Sending a Clip to a Bin
When the Save Clip window is displayed at clip creation, the bin automatically selected to
receive the new clip corresponds to the bin tab open in the Bins pane. Another destination
bin can be selected from the window at that time.
52
6. Creating a Clip and Sending it to a Bin
USER MANUAL IPWeb 1.1
When the Save Clip window is not displayed at clip creation, the new clip is automatically
sent to the bin corresponding to the bin tab open in the Bins pane. So, in this case, the
destination bin must be chosen by selecting the tab before clicking the Save button
6. Creating a Clip and Sending it to a Bin
.
53
EVS Broadcast Equipment SA
Issue 1.1.A - March 2014
7.
Organizing the Bins
7.1.
Introduction
In the IPWeb workflow, users put a selection of sequences into predefined bins where
clips can be re-ordered. Then, they are able to publish the bin content to a group or to send
it to selected destination(s), such as post-production systems. As users sometimes work
on several edits at the same time, it is useful to have a bin per edit the user is working on.
7.2.
Bins Management
How to Create a Bin
The Bins pane contains at least one tab for the System [User] bin automatically created
by the system for the user currently logged on the workstation.
To create a new bin, proceed as follows:
1. Click the
button on the right of the last tab.
2. Enter a name for the bin in the window.
3. Click OK.
A new tab corresponding to the new bin is displayed. The tab name is the bin name
Created bins are sorted alphabetically on the right of the first tab, which is always the
System [User] bin created by the system for the current user.
The new bin appears in the Tree view as a [User] bin
.
How to Clear the Content of a Bin
To clear the content of a bin, proceed as follows:
1. Select the tab you want to clear.
2. Click the Clear Bin button.
A confirmation message is displayed.
3. Click Yes.
The clips not owned by the current user are removed from the bin but remain in the
database.
The clips owned by the current user are deleted from the bin and from the database.
The bin remains but it is empty.
54
7. Organizing the Bins
USER MANUAL IPWeb 1.1
How to Delete a Bin
To delete a bin and its content, proceed as follows:
1. Click the
button next to the tab you want to remove.
A confirmation message is displayed.
2. Click Yes.
The clips not owned by the current user are removed from the bin but remain in the
database.
The clips owned by the current user are deleted from the bin and from the database.
The bin is deleted.
Note
The System [User] bin is the only bin which cannot be deleted.
7.3.
Clips Management
7.3.1.
Possible Actions on Clips in a Bin
The following table lists all the actions which are possible on clips within the Bins pane
and how they can be performed. A Clip contextual menu is available when right-clicking a
clip in a bin. It gives access to some of these actions.
Action
Description / See section
Sending a clip from the Player
pane to a bin
"Sending a Clip to a Bin" on page 52.
Copying a clip from one bin to
another one
Copy option from the contextual menu.
"How to Copy Clip(s) from One Bin to Another" on
page 56.
Copying a clip from the Elements
grid/list
"How to Copy Clip(s) from the Elements Grid/List"
on page 56.
Moving a clip from one bin to
another one
Move option from the contextual menu.
"How to Move Clip(s) to Another Bin" on page 57.
Moving a clip within a bin
"How to Move Clip(s) within a Bin" on page 57.
Deleting a clip
Delete option from the contextual menu or Delete
key.
Renaming a clip
Rename option from the contextual menu.
Transferring a clip to a destination
target
Send to option from the contextual menu.
"Sending a Selection of Clips" on page 63.
7. Organizing the Bins
55
EVS Broadcast Equipment SA
7.3.2.
Issue 1.1.A - March 2014
Copying Clips
How to Copy Clip(s) from One Bin to Another
To copy clips from one bin to another bin, proceed as follows:
1. In the Bins pane, select the clip(s) you want to copy.
2. Right-click the list.
A contextual menu is displayed.
3. Select Copy.
The Copy to Bin window opens and shows the list of bins from the System [User] bin
directory, including the source bin:
4. Select the bin you want to copy your clips to.
5. Click OK.
The clips are copied to the other bin.
Note
The destination bin can be the same as the source bin. So, duplicated clips will
be present in the same bin.
How to Copy Clip(s) from the Elements Grid/List
To copy one or several clips from the Elements grid/list to a bin, proceed as follows:
1. In the Elements grid/list, select the clip(s) you want to copy.
2. Drag them to the bin's tab where you want to copy them.
The clips are copied into the bin.
56
7. Organizing the Bins
USER MANUAL IPWeb 1.1
7.3.3.
Moving Clips
How to Move Clip(s) to Another Bin
To move a clip from one bin to another one, proceed as follows:
1. In the Bins pane, select the clip(s) you want to move.
2. Right-click the list.
A contextual menu is displayed.
3. Select Move.
The Move into Bin window opens and shows the list of bins from the System [User]
bin directory, except the source bin.
4. Select the bin you want to move your clips to.
5. Click OK.
The clips are moved to the other bin.
How to Move Clip(s) within a Bin
You can move clips within a bin to put them in a selected order.
To do so, proceed as follows:
1. In the Bins pane, select the clip(s) you want to move.
2. Drag it/them to the position where you want to move. During the drag-and-drop
operation, a thick line will be displayed between the clip lines where the clip(s) will be
dropped in order to highlight the drop position.
7. Organizing the Bins
57
EVS Broadcast Equipment SA
Issue 1.1.A - March 2014
8.
Publishing and Transferring
Clips
8.1.
Introduction
With IPWeb, a bin content is made available to other users either by publishing the bin or
by transferring the bin content.
Clips can be sent to various destinations, including third party systems (i.e. NLE
systems) and storage paths. The transfer is initiated from the Bins pane. Clips may
automatically be sent to a target as soon as they are put into a bin or they can be selected
later on from the Bins pane. The transfer may concern a selection of clips or clips from an
entire bin. The choice of several targets is possible and the transfer can be monitored from
the interface.
8.2.
Publishing a Bin
Purpose and Context of Use
Rather than sending a bin content to a target destination, users may want to simply show
the clips from a bin to a group of users. They can publish the bin to a selected group.
How to Publish a Bin
To publish a bin, proceed as follows:
1. From the bin tab you want to publish, click the Publish button.
The Publish window opens.
2. Select the user group(s) to which you want to publish the bin in the Available Groups
area on the left. Keep CTRL pressed for a multiple selection.
3. Click the Right Arrow button to move the selected user groups from the Available
Groups area to the Selected Group area on the right.
4. Click the Publish button at the bottom of the Publish window.
To un-publish a bin to a group of users, repeat steps 1 to 4 and perform the opposite
operation: select the user group in the Selected Group area and click the Left Arrow
button.
58
8. Publishing and Transferring Clips
USER MANUAL IPWeb 1.1
8.3.
Transferring Clips
8.3.1.
Transfer Target Destinations
Users can select one or more of the following targets to transfer clips:
8.3.2.
•
File on shared drive
•
Final Cut Pro
•
Avid
•
CleanEdit (from the EVS Xedio Suite)
•
XT on another network
•
Target group
Transfer Options
IPWeb provides four ways to transfer clips. Users will select one way rather than another
depending on their role and the work they are doing on clips.
The options are:
8.3.3.
•
Auto send: see section "Auto Send Mode" on page 59.
•
Send bin as clips: see section "Sending Bin as Clips" on page 60.
•
Send bin as edit: see section "Sending Bin as Edit" on page 61.
•
Send a selection of clips: see section "Sending a Selection of Clips" on page 63.
Auto Send Mode
Purpose and Context of Use
The Auto Send mode is used to automatically send a clip to a predefined destination target
at the time of clip creation, without clicking any additional button or key.
This mode will be chosen, for example, when an assistant creates clips and must send
them to the editor who makes the edit on the NLE system as soon as clips are being
created.
When one or several clips are copied or moved to a bin for which the Auto Send mode is
activated, these clips are automatically sent to the predefined destination target as well.
How to Activate the Auto Send Mode on a Bin
The Auto Send mode is specific to a bin. It can be activated for some of the bins and
disabled for other ones.
8. Publishing and Transferring Clips
59
EVS Broadcast Equipment SA
Issue 1.1.A - March 2014
To activate the Auto Send mode for a bin, proceed as follows:
1. Click the tab corresponding to the bin for which you want to set the Auto Send mode.
2. Click the Auto Send button.
A window shows all the possible destinations.
3. Select one of the targets.
The target is flagged and the Auto Send button is highlighted:
4. Repeat steps 2 and 3 if you want to select an additional target.
Clips will be automatically sent to the selected target(s) as soon as they are put into the
bin.
The Auto send mode can be disabled in the same way it has been activated: follow steps
1 to 3 above. From the Select Target window, click the Clear Selection button.
8.3.4.
Sending Bin as Clips
Purpose and Context of Use
Users will choose this mode when the clips gathered for their edit are not in a defined and
final order in the bin. For example, sequences obtained at different points in time and
collected as the best moments of an event can be put in the same bin but need to be reorganized in the edit.
Transfer Limitation
If some clips from the bin do not have a hi-res element, all the clips will be transferred
except those ones.
How to Send all the Clips from a Bin Individually
All the clips from a bin can be sent to a target destination in the form of clips.
To do so, proceed as follows:
1. Click the tab corresponding to the bin for which you want to send all the clips.
2. Click the Send Bin button.
A menu is displayed.
3. Select Send Bin as Clips.
A window shows all the possible destinations.
4. Select one of the targets.
The clips transfer is initiated. In this case, individual transfer requests are sent for each
clip from the bin.
60
8. Publishing and Transferring Clips
USER MANUAL IPWeb 1.1
Transfer Status
Transfer status information is displayed for each clip individually on each clip line in the
Bins pane.
A transfer status icon represents the selected target and its color gives indication on the
transfer status.
In case transfer has been requested to several destinations, only the transfer status
information related to the first transfer is shown.
The transfer can be monitored through the Transfer Monitoring area. See section
"Monitoring the Transfer Status" on page 64.
8.3.5.
Sending Bin as Edit
Purpose and Context of Use
With this mode, the bin content is sent as an edit to the selected destination. It can be
sent to an NLE system, where it will appear as a timeline, or it can be rendered to a
storage or a server.
So, clips need to be ordered in the bin according to the same sequence they need to
appear in the final edit.
Journalists who prepare their edit themselves and thus know in which order clips must be
organized in the bin will favor this transfer mode.
Transfer Limitations
The following limitations are applicable to the Send Bin as edit option.
•
If at least one clip of the bin has no hi-res element, the edit transfer will not be initiated.
•
A bin cannot be sent as edit to an Avid Transfer Engine target.
8. Publishing and Transferring Clips
61
EVS Broadcast Equipment SA
Issue 1.1.A - March 2014
How to Send all the Clips from a Bin as an Edit
All the clips from a bin can be sent to a target destination in the form of an edit decision
list.
To do so, proceed as follows:
1. Click the tab corresponding to the bin for which you want to send the content.
2. Click the Send Bin button.
A menu is displayed.
3. Select Send Bin as Edit.
A window shows all the possible destinations.
4. Select one of the targets.
An edit is created with the content of the bin and its transfer is initiated.
Transfer Status
Transfer status information is displayed at the bottom of the bin tab. Only one transfer
status is shown for the whole bin content.
In case transfer has been requested to several destinations, there will be as many transfer
status information as selected targets.
When the transfer job is being processed, a progress bar is shown together with the
percentage of completion for the transfer of the edit.
62
8. Publishing and Transferring Clips
USER MANUAL IPWeb 1.1
8.3.6.
Sending a Selection of Clips
Purpose
If you only want to transfer some clips from a bin rather than an entire bin, you can make a
selection and select your target.
Transfer Limitation
If some clips from the selection do not have a hi-res element, all the clips will be
transferred except those ones.
How to Send a Selection of Clips
To send a selection of clips from a bin, proceed as follows:
1. From the bin tab, select the clip(s) you want to transfer.
2. Right-click the list.
A contextual menu is displayed.
3. Select Send to.
A window shows the list of targets.
4. Select the target you want to send your clips to.
The clips transfer is initiated. In this case, individual transfer requests are sent for each
clip from the selection.
Transfer Status
Transfer status information is displayed for each clip individually on each clip line in the
Bins pane. A transfer status icon represents the selected target and its color gives
indication on the transfer status.
8. Publishing and Transferring Clips
63
EVS Broadcast Equipment SA
8.3.7.
Issue 1.1.A - March 2014
Monitoring the Transfer Status
Purpose
The Transfer Monitoring pane provides detailed information on the transfers, would they
be scheduled, on-going, finished or failed.
Accessing the Transfer Status Information
Information on the transfer status is available from different areas:
•
In the Bins pane, during the transfer.
•
In the Transfer Monitoring pane located at the bottom of the window, below the
Elements grid/list. It can be shown by clicking the
the
split box or hidden by clicking
split box.
Illustration
The Transfer Monitoring view shows the transfer jobs requested by the user.
64
8. Publishing and Transferring Clips
USER MANUAL IPWeb 1.1
Area Description
The table below describes the various parts of the Transfer Monitoring pane:
Name
Description
Transfer
Jobs grid
Transfer jobs are presented in rows and all their associated parameters
and metadata are in columns.
Current
Transfer
Only
This button gives access to the list of transfers currently in progress and
scheduled. Its background is colored when it is enabled:
To go back to the list of all the transfers, click the Current Transfers
Only button again.
Clear
History
This button removes all the transfers jobs from the list.
Cancel Job
This button cancels the selected transfer job. It is available for transfers
currently in progress.
Refresh
This button allows users to manually refresh the view at a point in time.
Otherwise, the system automatically refreshes the view.
8. Publishing and Transferring Clips
65
Corporate
+32 4 361 7000
North & Latin America
+1 973 575 7811
EVS Headquarters
Liège Science Park
16, rue Bois St Jean
B-4102 Seraing
Belgium
To learn more about EVS go to www.evs.com
Asia & Pacific
+852 2914 2501
Other regional offices
www.evs.com/contact
EVS Broadcast Equipment is continuously adapting and improving its products in accordance with the ever changing
requirements of the Broadcast Industry.
The data contained herein is therefore subject to change without prior notice. Companies and product names are
trademarks or registered trademarks of their respective companies.