1
Color Controller E-810
GETTING STARTED
For use with the following color copiers:
Ricoh Aficio Color 6513
Gestetner CS213d
RexRotary CS813d
nashuatec CS513d
infotec 7513
Savin SDC413
Copyright © 2001 Electronics For Imaging, Inc. All rights reserved.
This publication is protected by copyright, and all rights are reserved. No part of it may be reproduced or transmitted in any form or by any means for any purpose
without express prior written consent from Electronics For Imaging, Inc., except as expressly permitted herein. Information in this document is subject to change
without notice and does not represent a commitment on the part of Electronics For Imaging, Inc.
The software described in this publication is furnished under license and may only be used or copied in accordance with the terms of such license.
This product may be covered by one or more of the following U.S. Patents: 4,500,919; 4,837,722; 5,212,546; 5,343,311; 5,424,754; 5,467,446;
5,506,946; 5,517,334; 5,537,516; 5,543,940; 5,553,200; 5,615,314; 5,619,624; 5,625,712; 5,666,436; 5,760,913; 5,818,645; 5,835,788; 5,866,856;
5,867,179; 5,959,867; 5,970,174; 5,982,937; 5,995,724; 6,002,795; 6,025,922; 6,041,200; 6,046,420; 6,065,041; 6,067,080; 6,112,665; 6,116,707;
6,118,205; 6,122,407; 6,134,018; 6,141,120; 6,151,014; 6,166,821; 6,184,873; 6,185,335; 6,201,614; 6,215,562; 6,219,659; 6,222,641; 6,225,974;
6,226,419; 6,238,105; 6,239,895; D406,117, D416,550, D417,864, D419,185, D426,206, D430,206, RE36,947
Trademarks
Fiery, the Fiery logo, Fiery Driven, ColorWise, EFICOLOR, and RIP-While-Print are registered trademarks of Electronics For Imaging, Inc. in the U.S. Patent
and Trademark Office and certain other foreign jurisdictions.
EFI, the Electronics For Imaging logo, eBeam, the Fiery Driven logo, Fiery LX, Fiery Si, Fiery X2, Fiery X2e, Fiery X3e, Fiery X4, Fiery XJ, Fiery XJe, Fiery XJ-W,
Fiery Z4, Fiery ZX, Fiery X4, Fiery Z5, Fiery Z18, Fiery Z16, AutoCal, ColorCal, Command WorkStation, Continuous Print, DocBuilder, DocBuilder Pro, EFI
Densitometer, Fiery Downloader, Fiery Driver, Fiery Link, Fiery Prints, Fiery Print Calibrator, Fiery Scan, Fiery ScanBuilder, Fiery Spark, Fiery Spooler, FreeForm,
Harmony, Memory Multiplier, NetWise, PowerWise, RIPChips, ScanBuilder, Splash, the Splash logo, STARR Compression, Velocity, Velocity Balance, Velocity
Build, Velocity Estimate, Velocity Scan, VisualCal, WebTools, WebSpooler, WebInstaller, and WebStatus are trademarks of Electronics For Imaging, Inc.
All other terms and product names may be trademarks or registered trademarks of their respective owners, and are hereby acknowledged.
Legal Notices
APPLE COMPUTER, INC. (“APPLE”) MAKES NO WARRANTIES, EXPRESS OR IMPLIED, INCLUDING WITHOUT LIMITATION THE
IMPLIED WARRANTIES OF MERCHANTABILITY AND FITNESS FOR A PARTICULAR PURPOSE, REGARDING THE APPLE SOFTWARE.
APPLE DOES NOT WARRANT, GUARANTEE, OR MAKE ANY REPRESENTATIONS REGARDING THE USE OR THE RESULTS OF THE USE
OF THE APPLE SOFTWARE IN TERMS OF ITS CORRECTNESS, ACCURACY, RELIABILITY, CURRENTNESS, OR OTHERWISE. THE ENTIRE
RISK AS TO THE RESULTS AND PERFORMANCE OF THE APPLE SOFTWARE IS ASSUMED BY YOU. THE EXCLUSION OF IMPLIED
WARRANTIES IS NOT PERMITTED BY SOME STATES. THE ABOVE EXCLUSION MAY NOT APPLY TO YOU.
IN NO EVENT WILL APPLE, ITS DIRECTORS, OFFICERS, EMPLOYEES OR AGENTS BE LIABLE TO YOU FOR ANY CONSEQUENTIAL,
INCIDENTAL OR INDIRECT DAMAGES (INCLUDING DAMAGES FOR LOSS OF BUSINESS PROFITS, BUSINESS INTERRUPTION, LOSS OF
BUSINESS INFORMATION, AND THE LIKE) ARISING OUT OF THE USE OR INABILITY TO USE THE APPLE SOFTWARE EVEN IF APPLE
HAS BEEN ADVISED OF THE POSSIBILITY OF SUCH DAMAGES. BECAUSE SOME STATES DO NOT ALLOW THE EXCLUSION OR
LIMITATION OF LIABILITY FOR CONSEQUENTIAL OR INCIDENTAL DAMAGES, THE ABOVE LIMITATIONS MAY NOT APPLY TO YOU.
Apple’s liability to you for actual damages from any cause whatsoever, and regardless of the form of the action (whether in contract, tort [including negligence],
product liability or otherwise), will be limited to $50.
Part Number: 45022701
FCC Information
WARNING: FCC Regulations state that any unauthorized changes or modifications to this equipment not expressly approved by the manufacturer could void
the user’s authority to operate this equipment.
Class B Declaration of Conformity
This equipment has been tested and found to comply with the limits for a class B digital device, pursuant to Part 15 of the FCC rules. These limits are designed
to provide reasonable protection against harmful interference in a residential installation. This equipment generates, uses and can radiate radio frequency energy
and if not installed and used in accordance with the instructions, may cause harmful interference to radio communications. However, there is no guarantee that
interference will not occur in a particular installation.
If this equipment does cause harmful interference to radio or television reception, which can be determined by turning the equipment off and on, the user is
encouraged to try to correct the interference by one or more of the following measures:
Reorient or relocate the receiving antenna.
Increase the separation between the equipment and receiver.
Connect the equipment into an outlet on a circuit different from that to which the receiver is connected.
Consult the dealer or an experienced radio/TV technician for help.
In order to maintain compliance with FCC regulations, shielded cables must be used with this equipment. Operation with non-approved equipment or unshielded
cables is likely to result in interference to radio and TV reception. The user is cautioned that changes and modifications made to the equipment without the
approval of manufacturer could void the user’s authority to operate this equipment.
Industry Canada Class B Notice
This Class B digital apparatus complies with Canadian ICES-003.
Avis de Conformation Classe B de l’Industrie Canada
Cet appareil numérique de la Classe B est conforme à la norme NMB-003 du Canada.
RFI Compliance Notice
This equipment has been tested concerning compliance with the relevant RFI protection requirements both individually and on system level (to simulate normal
operation conditions). However, it is possible that these RFI Requirements are not met under certain unfavorable conditions in other installations. It is the user
who is responsible for compliance of his particular installation.
Dieses Gerät wurde sowohl einzeln als auch in einer Anlage, die einen normalen Anwendungsfall nachbildet, auf die Einhaltung der Funkentstörbestimmungen
geprüft. Es ist jedoch möglich, dass die Funkentstörbestimmungen unter ungünstigen Umständen bei anderen Gerätekombinationen nicht eingehalten werden.
Für die Einhaltung der Funkentstörbestimmungen einer gesamten Anlage, in der dieses Gerät betrieben wird, ist der Betreiber verantwortlich.
Compliance with applicable regulations depends on the use of shielded cables. It is the user who is responsible for procuring the appropriate cables.
Die Einhaltung zutreffender Bestimmungen hängt davon ab, dass geschirmte Ausführungen benützt werden. Für die Beschaffung richtiger Ausführungen ist der
Betreiber verantwortlich.
Software License Agreement
YOU SHOULD CAREFULLY READ THE FOLLOWING TERMS AND CONDITIONS BEFORE USING THIS SOFTWARE. IF YOU DO NOT
AGREE TO THE TERMS AND CONDITIONS OF THIS AGREEMENT, DO NOT USE THE SOFTWARE. INSTALLING OR USING THE
SOFTWARE INDICATES THAT YOU AGREE TO AND ACCEPT THE TERMS OF THIS AGREEMENT. IF YOU DO NOT AGREE TO ACCEPT
THE TERMS OF THIS AGREEMENT YOU MAY RETURN THE UNUSED SOFTWARE FOR A FULL REFUND TO THE PLACE OF PURCHASE.
License
Electronics For Imaging, Inc. (“EFI”) grants you a non-exclusive license to use the software (“Software”) and accompanying documentation (“Documentation”)
included with the Product. The Software is licensed, not sold. You may use the Software solely for your own customary business or personal purposes. You may
not rent, lease, sublicense or lend the Software. You may, however, permanently transfer all of your rights under this Agreement to another person or legal entity
provided that: (1) you transfer to the person or entity all of the Software and Documentation (including all copies, updates, upgrades, prior versions, component
parts, the media and printed materials, and this Agreement); (2) you retain no copies of the Software and Documentation, including copies stored on a computer;
and (3) the recipient agrees to the terms and conditions of this Agreement.
You may not make or have made, or permit to be made, any copies of the Software or portions thereof, except as necessary for backup or archive purposes in
support of your use of the Software as permitted hereunder. However, under no circumstances may you make or have made, any copies of any Software included
on the ROM, the hard disk drive or any other component of the controller board or hardware You may not copy the Documentation. You may not attempt to
alter, disassemble, decompile, decrypt or reverse engineer the Software.
Proprietary Rights
You acknowledge that the Software is proprietary to EFI and its suppliers and that title and other intellectual property rights therein remain with EFI and its
suppliers. Except as stated above, this Agreement does not grant you any right to patents, copyrights, trade secrets, trademarks (whether registered or unregistered),
or any other rights, franchises or licenses in respect of the Software. You may not adopt or use any trademark or trade name which is likely to be similar to or
confusing with that of EFI or any of its suppliers or take any other action which impairs or reduces the trademark rights of EFI or its suppliers.
Confidentiality
You agree to hold the Software in confidence, disclosing the Software only to authorized users having a need to use the Software as permitted by this Agreement
and to take all reasonable precautions to prevent disclosure to other parties.
Remedies And Termination
Unauthorized use, copying or disclosure of the Software, or any breach of this Agreement will result in automatic termination of this license and will make available
to EFI other legal remedies. In the event of termination, you must destroy all copies of the Software and all of its component parts. All provisions of this Agreement
relating to disclaimers of warranties, limitation of liability, remedies, or damages, and EFI’s proprietary rights shall survive termination.
Limited Warranty And Disclaimer
EFI warrants to the original purchaser (“Customer”) for thirty (30) days from the date of original purchase from EFI or its authorized retailer that the Software
will perform in substantial conformance to the Documentation. EFI warrants the media containing the Software against failure during the above warranty period.
EFI makes no warranty or representation that the Software will meet your specific requirements, that the operation of the Software will be uninterrupted or error
free, or that all defects in the Software will be corrected.
EXCEPT FOR THE ABOVE EXPRESS LIMITED WARRANTY, EFI MAKES AND YOU RECEIVE NO WARRANTIES OR CONDITIONS ON THE
SOFTWARE, EXPRESS, IMPLIED, STATUTORY, OR IN ANY OTHER PROVISION OF THIS AGREEMENT OR COMMUNICATION WITH YOU,
AND EFI SPECIFICALLY DISCLAIMS ANY IMPLIED WARRANTY OR CONDITION OF MERCHANTABILITY OR FITNESS FOR A PARTICULAR
PURPOSE.
Limitation Of Liability
IN NO EVENT WILL EFI OR ITS SUPPLIERS BE LIABLE FOR ANY DAMAGES, INCLUDING LOSS OF DATA, LOST PROFITS, COST OF COVER
OR OTHER SPECIAL, INCIDENTAL, CONSEQUENTIAL OR INDIRECT DAMAGES ARISING FROM THE SALE, INSTALLATION,
MAINTENANCE, USE, PERFORMANCE OR FAILURE OF THE SOFTWARE, HOWEVER CAUSED AND ON ANY THEORY OF LIABILITY. THIS
LIMITATION WILL APPLY EVEN IF EFI HAS BEEN ADVISED OF THE POSSIBILITY OF SUCH DAMAGE. YOU ACKNOWLEDGE THAT THE
PRICE OF THE PRODUCT REFLECTS THIS ALLOCATION OF RISK. BECAUSE SOME JURISDICTIONS DO NOT ALLOW THE EXCLUSION
OR LIMITATION OF LIABILITY FOR CONSEQUENTIAL OR INCIDENTAL DAMAGES, THE ABOVE LIMITATION MAY NOT APPLY TO YOU.
EFI DOES NOT EXCLUDE LIABILITY IN RESPECT OF PERSONAL INJURY, DEATH, WILLFUL MISCONDUCT OR GROSS NEGLIGENCE,
EXCEPT TO THE MAXIMUM EXTENT THAT IT CAN BE EXCLUDED OR LIMITED BY LAW.
Export Controls
You agree that you will not export or re-export the Software in any form in violation of any applicable laws or regulations of the United States or the country in
which you obtained them.
U.S. Government Restricted Rights
Software provided with this Product is provided with RESTRICTED RIGHTS. Use, duplication, or disclosure by the U.S. Government is subject to restrictions
as set forth in subparagraph (c)(1)(ii) of the Rights in Technical Data and Computer Software clause at DFARS 252.227-7013 or subparagraphs (c)(1) and (2) of
the Commercial Computer Software Restricted Rights at 48 CFR 52.227-19, as applicable.
General
The laws of the State of California govern this Agreement. You agree that this Agreement shall not be subject to the United Nations Convention on Contracts for
the International Sale of Goods (1980). This Agreement is the entire agreement held between us and supersedes any other communications or advertising with
respect to the Software. If any provision of this Agreement is held invalid, the remainder of this Agreement shall continue in full force and effect.
If you have any questions, please see EFI’s web site at www.efi.com.
Contents
Introduction
Media pack
xi
About the documentation
xi
Specifications
xii
User software
xiii
System requirements
xv
Windows
xv
Mac OS
xvi
UNIX (TCP/IP)
xvii
IPX (Novell)
xvii
NDPS (Novell)
xviii
Command WorkStation
xviii
DocBuilder Pro
xix
Installing User Software on a Windows Computer
Setting up PostScript printing with Windows 9X/Me
1
Installing the PostScript printer driver for Windows 9X/Me
2
Configuring installed options
5
Updating print options settings automatically
5
Completing the Windows 9X/Me printer connection
7
Setting up SMB printing with Windows 9X/Me
10
Setting up IPP printing with Windows 9X/Me
13
Setting up PostScript printing with Windows NT 4.0 or Windows 2000
15
Updating print options settings automatically
22
Completing the Windows NT 4.0 or Windows 2000 printer connection
24
Setting up SMB printing on Windows NT 4.0 or Windows 2000
31
Setting up IPP printing with Windows 2000
33
viii
Contents
Installing Fiery utilities
35
Adobe Acrobat
36
Using the software for the first time
36
Configuring a connection for Fiery Link
36
Configuring the connection for Fiery utilities
45
Copying color files from the User Software CD
48
Copying the printer description files for Windows
49
Installing the ICM profiles on a Windows computer
50
Loading the monitor settings file
50
Installing User Software on a Mac OS Computer
Setting up the E-810 as a PostScript printer
53
Setting up the E-810 in the Chooser
54
Installing E-810 software and fonts
56
Configuring a connection for ColorWise Pro Tools
58
Configuring a connection for Fiery Spooler
61
Configuring a connection for Fiery Link
65
Configuring a connection for Fiery Downloader
76
Fonts
77
Copying color files from the User Software CD
78
Loading ICC profiles
78
Loading the monitor settings file
79
Loading the ICC copier profile
81
ix
Contents
Downloading Installers with Fiery WebTools
Setting up Fiery WebTools
83
Using the Installer WebTool
84
Troubleshooting
On a Windows computer
87
Setting up printing on Windows NT or Windows 2000 Workstations
87
Reinstalling the Adobe PostScript Printer Driver on Windows 9X/Me
87
Problems with the Fiery utilities on Windows 9X/Me, Windows NT 4.0, or Windows 2000 88
On a Mac OS computer
88
Setting up the E-810 in the Chooser
88
Index
xi
Introduction
Media pack
This manual describes how to install user software for the Color Controller E-810™
and set up printing from Microsoft Windows and Apple Mac OS computers. For
information about setting up network servers and clients to use the Color Controller
E-810, see the Configuration Guide. For general information on using the color copier,
your computer, your application software, or your network, see the manuals that
accompany those products.
N OTE : The term “E-810” is used in this manual to refer to the Color Controller E-810.
The term “Aero” is used in illustrations in this manual to refer to the E-810.
Media pack
Your E-810 includes a customer media pack containing:
• User Software CD
• System Software CD(s) (for service use only)
• Documentation (Configuration Guide, Getting Started, Printing Guide, Job
Management Guide, Color Guide, and Release Notes)
About the documentation
This manual is part of the set of E-810 documentation, which includes the following
manuals for users and system administrators:
• The Configuration Guide explains basic configuration and administration of the
E-810 for the supported platforms and network environments. It also includes
guidelines for setting up UNIX, Windows NT 4.0, and Novell NetWare servers to
provide Adobe PostScript printing services to clients.
xii
Introduction
• Getting Started guides you through the process of installing the software required for
printing to the E-810. Specifically, it describes the installation of the PostScript
printer drivers, printer description files, and other software provided on the User
Software CD. It also explains how to connect each user to the network.
• The Printing Guide describes the printing features of the E-810 for users who send
jobs via remote workstations on the network.
• The Color Guide provides information on managing the color output of your E-810.
It addresses concepts and issues associated with printing to the E-810 and outlines
key workflow scenarios. This manual explains how to take advantage of the
ColorWise® color management system and features in ColorWise Pro Tools™. In
addition, the Color Guide offers information on printing from popular Windows
and Mac OS applications.
• The Job Management Guide explains the functions of the Fiery® utilities, including
the Fiery Command WorkStation™, and how you can use the utilities to manage
jobs. This book is intended for an operator or administrator, or a user with the
necessary access privileges, who needs to monitor and manage job flow, perform
color calibration, and troubleshoot problems that may arise.
• Release Notes provide last-minute product information and workarounds for some of
the problems you may encounter.
Specifications
• Single Pentium III, 866MHz CPU processor
• 512 MB RAM
• 40 GB Hard disk drive
• An internal CD-ROM drive
• An internal 250 MB removable cartridge Iomega Zip drive
• Supports AppleTalk, TCP/IP, and IPX/SPX protocols simultaneously
• Supports Port 9100
• Supports thinnet unshielded twisted pair (Fast Ethernet 100BaseTX or Ethernet
10BaseT)
• Supports Adobe PostScript 3
xiii
User software
• Includes 136 fonts (126 Adobe Type 1 PostScript and 10 TrueType)
In addition, two Adobe Multiple Master fonts are included and are used for font
substitution in PDF files.
• Built-in ColorWise color management and NetWise™ networking management
• Fiery WebTools™
• Fiery utilities, including Fiery Downloader™, Fiery Link™, and Fiery Spooler™
(Mac OS only), and ColorWise Pro Tools
• Command WorkStation™ (Windows only) software
• Supports Token Ring networking (available as an option)
• Supports the Fiery Advanced Controller Interface kit option, which includes an
AGP Video Board monitor, a keyboard, and a mouse
N OTE : Fiery utilities can be installed on the E-810 from the User Software CD if the
Fiery Advanced Controller Interface option is installed. Other applications are not
supported and may cause system problems on the E-810.
• Supports Internet Printing Protocol (IPP)
User software
The full set of E-810 user software is provided on the User Software CD.
Adobe PostScript
Printer Driver
Enables you to print to the E-810 from Windows
9X/Me, Windows NT 4.0, and Mac OS computers;
also supports special E-810 and PostScript 3 features.
Windows 2000 users should use the Microsoft
PostScript Printer Driver provided with
Windows 2000.
PostScript Printer
Description file (PPD)
For use with the PostScript printer driver that allows
the E-810 to appear in the Print and Page Setup dialog
boxes of popular applications. The E-810 PPDs
provide information about the E-810 and your
particular copier model to the application and printer
driver you are using.
xiv
Introduction
PostScript Fonts
(Mac OS only)
PostScript screen and printer fonts that correspond to
the 136 PostScript printer fonts installed on the E-810
(126 Adobe Type 1 and 10 TrueType). See Appendix B
of the Printing Guide for a complete list of PostScript
fonts installed on the E-810.
Fiery Downloader
Enables you to print PostScript files, Encapsulated
PostScript (EPS) files, and Portable Document Format
(PDF) files directly to the E-810 without opening the
application in which they were created. Fiery
Downloader also enables you to manage the printer
fonts installed on the E-810.
Fiery Spooler (Mac OS
only)
Enables you to view the order and priority of print
jobs, customize printer settings for jobs, delete jobs,
and move jobs between queues. You can also use Fiery
Spooler to view job managing information.
ColorWise Pro Tools
ICC-open color management tools; enables you to edit
and download ICC profiles.
Fiery Scan™
Plug-in modules for Photoshop that enable you to scan
images from the copier directly into the application.
Fiery Link
Enables you to monitor the status of connected E-810
servers and the print jobs sent to them.
Command WorkStation
software
Enables the operator to control the E-810 functions
from Windows 9X/Me and Windows 2000/NT 4.0
workstations. To use the Command WorkStation, see
the Job Management Guide.
Color management files
ColorSync (MacOS) and ICM (Windows) color
management files that enable you to maintain
consistent color from your original artwork to the
colors displayed on your monitor to the printed
output.
xv
System requirements
Color reference files
Reference pages that you can print to view the range of
colors available on your E-810. For the most
predictable color results, refer to these pages when
defining colors in applications.
For more information on color management, see the
Color Guide.
MRJ (Mac OS only)
Mac OS Runtime for Java installer (MRJ) v2.2 is
required by all Java-based Fiery utilities. When
installing these utilities, if MRJ is not detected, the
MRJ installer is automatically launched.
N OTE : The Fiery Link utility and the PostScript printer drivers and printer description
files can be installed from the User Software CD or from the E-810 with the Installer
WebTool. For instructions, see“Using the Installer WebTool” on page 84.
System requirements
To install the E-810 user software on a Windows or Mac OS computer, the computer
must be equipped with a built-in or external CD-ROM drive.
Windows
To print to the E-810, you need:
• A Windows-based computer with an 80486, AMD, or Pentium processor
• Windows 9X/Me, Windows NT 4.0, or Windows 2000
• At least 32MB of RAM for Windows 9X/Me
• At least 32MB of RAM for Windows NT 4.0
• At least 64MB of RAM for Windows 2000
With Microsoft Windows 9X/Me, you also need:
• IPX/SPX or TCP/IP networking protocol installed
• Adobe PostScript Printer Driver for Windows (included with the user software)
xvi
Introduction
With Microsoft Windows NT 4.0, you also need:
• IPX/SPX, TCP/IP, or AppleTalk networking protocol installed
• Adobe PostScript Printer Driver for Windows NT 4.0 (included with the user
software)
With Microsoft Windows 2000, you also need:
• IPX/SPX, TCP/IP, or AppleTalk networking protocol installed
• Microsoft PostScript Printer Driver for Windows 2000
To use the Fiery utilities (Fiery Downloader, ColorWise Pro Tools, and Fiery Link) you
also need:
• Windows 9X/Me, Windows 2000, or Windows NT 4.0 with NT Service Pack 5 or
later
• At least 48MB of RAM; 56MB of RAM is recommended
• TCP/IP networking protocol installed
To use Fiery WebTools, you also need a Java-enabled web browser:
• Either Netscape Communicator version 4.5 (or later), or Microsoft Internet Explorer
version 4.0.1 (and Service Pack 1) or later
N OTE : Netscape and Microsoft release frequent updates to their browsers. As support
cannot be guaranteed for all versions, use the versions specified above for best results.
• A monitor, and video memory that supports 16-bit color at a minimum resolution
of 800 x 600 pixels
• A TCP/IP enabled network and the IP address or DNS name of the E-810
• Web Services enabled on the E-810
Mac OS
To print to the E-810 you need:
• A Mac OS-based computer
• At least 32MB of RAM
xvii
System requirements
• AppleTalk (EtherTalk)
• Apple System software version 8.5 or later
• Adobe PostScript Printer Driver (provided on the User Software CD)
To use the Fiery utilities, you also need:
• A Mac OS-based computer with Apple System Software version 8.5 or later
• At least 64MB of RAM
To use Fiery WebTools, you also need a Java-enabled web browser:
• Either Netscape Communicator v4.5 or later, or Internet Explorer v4.0.1 or later
N OTE : Netscape and Microsoft release frequent updates to their browsers. As support
cannot be guaranteed for all versions, use the version specified above for best results.
• A monitor and video memory that supports 16-bit color at a minimum resolution of
800 x 600 pixels
• A TCP/IP enabled network and the IP address or DNS name of the E-810
• Web Services enabled on the E-810
UNIX (TCP/IP)
To print to the E-810 with a UNIX workstation, you need:
• A workstation with standard TCP/IP connectivity (for example, Sun SPARCStation
or Silicon Graphics workstation with Solaris version 2.5 or later or SunOS version
4.1.x software)
• TCP/IP printing software that conforms to RFC1179 (Berkeley lpd protocol)
• Support for Ethernet II and Token-Ring SNAP
IPX (Novell)
To use the E-810 with an IPX (Novell) network, you need:
• A Novell server
• Novell NetWare software version 3.x, 4.x, or 5.x
xviii
Introduction
• Support for Ethernet SNAP, Ethernet II, Ethernet 802.3, Ethernet 802.2,
Token Ring SNAP, and Token Ring
NDPS (Novell)
To use the E-810 with an NDPS network, you need:
• A file server with NetWare Network Operating System version 5.x
• NetWare Client Software version 5.x
• Latest version of the Support Pack and Novell Gateway
Command WorkStation
To run the Command WorkStation application from a remote computer, you need:
• A Windows-based computer with a 200MHz Pentium processor
• Windows 9X/Me/2000 or Windows NT 4.0 with NT Service Pack 6a
• TCP/IP networking protocol installed
• A video adapter card with at least 2MB of video memory
• At least 32MB of RAM
• An 850MB (or greater) hard disk drive
• At least a 2x CD-ROM drive
• A 17" monitor that supports 16-bit color at a minimum resolution of
1024 x 768 pixels
xix
System requirements
DocBuilder Pro
To run the Command WorkStation application with Fiery DocBuilder Pro™,
you need
• A Windows-based computer with a 333MHz Pentium processor
• Windows 9X/Me or Windows NT 4.0 with NT Service Pack 4 or 5
• TCP/IP networking protocol installed
• A video adapter card with at least 2MB of video memory
• At least 64MB of RAM
• An 850MB (or larger) hard disk drive
• At least 90MB of available hard disk space
• At least a 2x CD-ROM drive
• Parallel Port with twenty-four (24) pins (for a dongle)
• A 17" monitor that supports 16-bit color at a minimum resolution of
1024 x 768 pixels
1
Installing
User Software
on a Windows
Computer
Setting up PostScript printing with Windows 9X/Me
This chapter describes the procedures for installing software and setting up printing
from a Windows-based computer running Windows 9X/Me, Windows NT 4.0, or
Windows 2000.
The general steps for installing the software are listed below:
• Install the PostScript printer driver and corresponding printer driver files, and set up
the printer driver to communicate with the E-810.
• Install Fiery utilities (Fiery Scan, Fiery Link, Fiery Downloader, ColorWise Pro
Tools, and Command WorkStation).
• Configure the connection for Fiery utilities.
• Copy additional files from the User Software CD as needed.
In addition to using the User Software CD, you can download printer drivers and
the Fiery Link installer from the E-810 with the Installer WebTool (if the site
administrator has enabled Internet access to the E-810). For instructions, see “Using
the Installer WebTool” on page 84. After you download the printer files, the
installation process is identical to installing from the User Software CD.
Setting up PostScript printing with Windows 9X/Me
To set up the E-810 as a PostScript printer, you must install the PostScript printer
driver for Windows 9X/Me and the corresponding printer description files. You must
also configure a particular type of print connection between the computer and the
E-810. If you are printing over a network, you will need to configure a network
connection.
If you are printing using SMB (Server Message Block), you can connect to the E-810
and install the printer drivers in a single procedure. For more information, see “Setting
up SMB printing with Windows 9X/Me” on page 10.
2
Installing User Software on a Windows Computer
Installing the PostScript printer driver for Windows 9X/Me
The following procedure describes installing the printer driver from the User
Software CD or from the Installer WebTool. The subsequent procedures describe
setting up the print connection.
N OTE : The following procedures use Windows 9X illustrations; any Windows Me
differences are noted.
TO
INSTALL THE
P OST S CRIPT
PRINTER DRIVER FOR
W INDOWS 9X/M E
1.
Click Start, choose Settings, and then choose Printers to display the Printers window.
2.
Double-click Add Printer, and click Next.
3.
Select the option to print to a Local printer, and click Next.
This procedure describes the installation of a local printer. You can modify the
connection later, according to your network type.
4.
In the dialog box displaying lists of manufacturers and printers, click Have Disk.
3
Setting up PostScript printing with Windows 9X/Me
The Install From Disk dialog box prompts you for the disk.
5.
If you are installing from the CD, type the name of the CD-ROM drive (for example,
D:\), and click Browse. Browse to English\Prntdrvr\Ps_drvr\Win_9x_ME.
If you are installing from the files you downloaded using the Installer, browse to
prntdrvr\Prntdrvr\Ps_drvr\Win_9x_ME.
Make sure “Oemsetup.inf ” is selected.
6.
Click OK.
The path is copied to the Install From Disk dialog box.
7.
Verify the path is correct, and click OK.
4
Installing User Software on a Windows Computer
8.
In the Printers dialog box, select the E-810 file and click Next.
9.
Select the LPT1 port and click Next.
You will configure the port later, according to your network type.
10.
Using a maximum of 31 characters, enter a name for the E-810 (or leave the default
name) in the Printer Name box.
This name will be used in the Printers and queue windows.
11.
If you want the E-810 to be the default printer select Yes; if not, select No. Then click
Next.
12.
Select No to printing the test page and click Finish.
The necessary files are installed to your hard disk.
5
Setting up PostScript printing with Windows 9X/Me
Configuring installed options
After you have completed the printer driver installation, you need to configure the
options installed on your copier. You need to configure the options manually; you
cannot use the Two-Way Communication feature to configure the options
automatically.
TO
CONFIGURE OPTIONS ON THE
E-810
MANUALLY FOR
W INDOWS 9X/M E
1.
Click the Start button, choose Settings, and then choose Printers.
2.
Click the E-810 icon and choose Properties from the File menu.
3.
Select the Configuration tab.
4.
Select an installed option from the Available Options list and click Add to move the
option to the Installed Options list.
The supported options are LCT and Sorter.
5.
Click OK.
Updating print options settings automatically
The Two-Way Communication feature updates the E-810 Expert Settings defaults.
With Two-Way Communication enabled, you can view the current settings from the
Expert Settings window in the printer driver. See the Color Guide for more
information.
You can change settings from ColorWise Pro Tools on a job-by-job basis and still
maintain the original Expert Setting values, which are stored on your computer.
You can then return to the Expert Settings window and use the Default button at any
time to print jobs with the latest E-810 settings regardless of the current Two-Way
Communication status.
N OTE : Two-Way Communication requires a TCP/IP-enabled network.
6
TO
Installing User Software on a Windows Computer
UPDATE PRINT OPTION SETTINGS AUTOMATICALLY
1.
Click Start in the Windows taskbar, choose Settings, and then choose Printers.
2.
In the Printers window, select the icon for the E-810 PostScript printer driver.
3.
Choose Properties from the File menu.
4.
Select the Configuration tab.
5.
Check Two-Way Communication.
6.
Enter the E-810 IP address or DNS name.
7.
To allow the printer driver to display the printer’s current default settings when you
open the printer driver, check Update Fiery Driver When Opened.
8.
Click Update.
9.
Click OK.
N OTE : To remove this feature, clear the Two-Way communication checkbox and click
the Defaults button.
7
Setting up PostScript printing with Windows 9X/Me
Completing the Windows 9X/Me printer connection
To print from Windows 9X/Me, you need to:
• Set up network servers (if any).
• Set up the E-810 to accept print jobs from your computer,
• Configure a port on each Windows computer for the network.
Completing the Windows 9X/Me IPX/SPX or IPX (Novell) connection
If you are printing through a Novell server, the Novell network and file server should
be set up before you begin. The file server should be configured with a print server and
print connection for the E-810. For details, see your NetWare documentation and the
Configuration Guide.
To print from Windows 9X/Me computers over IPX (Novell), you must first set up
IPX/SPX protocols, and then configure the E-810 by choosing the IPX frame type and
entering the settings for the port you use.
TO
SET UP
IPX/SPX
PRINTING FOR
W INDOWS 9X/M E
1.
Click the Start button, choose Settings, and then choose Control Panel.
2.
Double-click the Network icon.
Make sure that IPX/SPX-compatible Protocol is listed in the Installed Network
Components section.
For instructions, see your Windows 9X/Me documentation.
8
Installing User Software on a Windows Computer
3.
Double-click the IPX/SPX-compatible Protocol icon.
4.
Click the Advanced tab.
5.
In the Property list, click Frame Type.
6.
In the Value pull-down menu, select the Frame Type that corresponds to the one set in
E-810 Network Setup.
If necessary, print the Configuration page from the LCD control panel to check which
Frame Type(s) are configured.
9
Setting up PostScript printing with Windows 9X/Me
N OTE : Do not select Auto. Doing so may not select the Frame Type specified on the
E-810.
TO
7.
Click OK and close the Network Control Panel.
8.
When prompted to restart your computer, click Yes.
SET UP
IPX (N OVELL )
PRINTING WITH
W INDOWS 9X/M E
1.
Click the Start button, choose Settings, and then choose Printers.
2.
Click the E-810 printer icon, and then choose Properties from the File menu.
3.
Click the Details tab and click Add Port.
A list of connection options appears.
4.
In the Add Port dialog box, specify the network path, or click Browse for a display of
your network environment.
5.
If you are using a NetWare file server, double-click the icon for the NetWare file server
you want to use for printing to the E-810.
10
Installing User Software on a Windows Computer
6.
Click the printer icon for the NetWare print queue you will use and click OK.
7.
In the Add Port dialog box, verify that the network path is updated and click OK.
Your print jobs are transmitted to the specified print queue on the Novell file server.
The E-810 polls the file server, and if jobs are present, they are transmitted to the
E-810.
To confirm the connection, print a Windows 9X/Me test page.
8.
Click the General tab, click Apply, and click Print Test Page.
If the test page prints successfully, you are ready to print from the computer.
Setting up SMB printing with Windows 9X/Me
If you do not have a Novell network, you can print via SMB printing (also known as
Windows or WINS printing). Printing by this method allows you to install the
PostScript printer driver and printer description files, and print from your computer to
a particular connection (Hold, Print, or Direct) on the E-810. These instructions
assume you have the TCP/IP protocol and Client for Microsoft Networks installed.
To set up printing to a second or third print connection, you must install a new
printer driver and PPD file. Repeat the procedure “To set up SMB printing on
Windows 9X/Me” on page 11. If you install more than one printer, give each a
descriptive name during printer driver installation, such as Aero-Print or Aero-Hold, so
you can easily identify printers.
B EFORE
YOU BEGIN
•
Configure the E-810 for SMB printing in Network Setup>Service Setup>
Windows Setup.
SMB printing is referred to as Windows Printing in Setup, on the Control Panel Map,
and on the Configuration page. For more information, see the Configuration Guide.
11
TO
SET UP
Setting up PostScript printing with Windows 9X/Me
SMB
PRINTING ON
W INDOWS 9X/M E
1.
Double-click the Network Neighborhood icon to display your network environment.
2.
Browse for the printer you would like to print to.
The printer name you are browsing for is the name entered in Network Setup>
Service Setup>Windows Setup > Server Name. Refer to the Configuration page for
this information.
N OTE : You can also locate the printer using the Find feature on your Windows
computer. Click the Start button, choose Find, and then choose Computer. Enter the
name of the printer, and click Find Now.
If you are not able to locate your E-810, see your network administrator.
3.
Double-click the name of the printer to display enabled print connections.
12
4.
Installing User Software on a Windows Computer
Double-click the name of the connection you want to print to.
The Printers dialog box appears, asking whether you would like to set up the printer.
5.
Select Yes to install the PostScript printer driver and printer description file for
the selected connection.
The Add Printer Wizard appears.
6.
Specify whether you print from MS-DOS based programs, and then click Next.
If you choose Yes, you must capture a printer port before proceeding with the
installation. See your Windows documentation for details.
7.
Enter a name for the E-810 in the Printer name box, and choose whether you want the
E-810 to be your default printer. Click Next.
8.
You are asked if you would like to print a test page. Choose Yes and click Finish.
The necessary files are installed to your hard disk.
If the test page prints successfully, you are ready to print from the computer.
13
Setting up PostScript printing with Windows 9X/Me
Setting up IPP printing with Windows 9X/Me
With Internet Printing Protocol (IPP), print jobs are sent to the E-810 over
the Internet.
IPP printing is supported directly on Windows 2000 but can be enabled on
Windows 9X and Windows Me computers by installing the “wpnpins.exe” patch file
(available on the Windows 2000 Server Product CD). For information about
obtaining this patch, contact the Microsoft Corporation.
N OTE : The IPP setup procedures are performed after installing the appropriate printer
drivers. See “To install the PostScript printer driver for Windows 9X/Me” on page 2.
B EFORE
TO
YOU BEGIN
1.
Prepare the E-810 for TCP/IP printing.
2.
Make sure the E-810 is configured for IPP printing in Network Setup > Service
Setup > IPP Setup. For more information, see the Configuration Guide.
3.
Specify the printing destination on your computer.
SET UP
IPP
PRINTING WITH
W INDOWS 9X/M E
4.
Click the Start button, choose Settings, and then choose Printers.
5.
In the Printers windows, double-click the icon for the E-810 PostScript printer driver.
Choose Properties from the File menu.
14
6.
Installing User Software on a Windows Computer
Select the Details tab and click Add Port.
The Add Port dialog box appears.
7.
Enter a network path for the printer.
The path for the printer is “http://”, followed by the IP address, or the DNS name,
“ipp”, and then by the connection you would like to print to (print, hold, or direct.)
N OTE : You can enter, “http”, “ipp”, and “printer” in either lowercase or uppercase
letters.
8.
Click OK.
15
Setting up PostScript printing with Windows NT 4.0 or Windows 2000
Setting up PostScript printing with Windows NT 4.0 or
Windows 2000
To set up the E-810 as a PostScript printer, you must install the PostScript printer
driver for Windows NT 4.0 and/or Windows 2000 and its corresponding printer
description files. You must also configure a particular type of print connection between
the computer and the E-810. If you are printing over a network, you will need to
configure a network connection.
The instructions below describe the installation of a local printer. Adding a printer to a
local system requires that you log in to your local Windows NT 4.0 or Windows 2000
computer (not the network server domain) and that you be a member of the
Administrators group. The procedure for adding a network printer is similar to adding
a port. This procedure is described in “Completing the Windows NT 4.0 TCP/IP and
LPR connection” on page 24.
The following procedures for Windows NT 4.0 and Windows 2000 describe
installing the printer drivers from the User Software CD. The Windows NT 4.0 and
Windows 2000 procedures can also be used if you have downloaded the printer files
using the Installer WebTool. The procedures that follow describe setting up the print
connection.
If you are printing using SMB, you can connect to the E-810 and install the printer
drivers in a single procedure. To configure the E-810 for SMB printing, see “Setting up
SMB printing on Windows NT 4.0 or Windows 2000” on page 31.
TO
INSTALL THE
P OST S CRIPT
PRINTER DRIVER FOR
W INDOWS NT 4.0
1.
If you are installing from the CD, insert it into the CD-ROM drive.
2.
Click Start in the Windows NT taskbar, choose Settings, and then choose Printers.
3.
Double-click Add Printer.
16
4.
Installing User Software on a Windows Computer
To install a printer locally, select My Computer and click Next.
“My Computer” is available if you logged in to a computer on which you have
Administrator privileges. If it is not available, you can add a network printer. The
procedure is similar to adding a port (see page 25).
5.
Check LPT1: and click Next.
This is a general installation that works for the parallel port connection. You can add a
network port later, according to your network type.
17
6.
Setting up PostScript printing with Windows NT 4.0 or Windows 2000
In the dialog box displaying lists of manufacturers and printers, click Have Disk.
The Install From Disk dialog box prompts you for the disk.
7.
If you are installing from the CD, type the name of the CD-ROM drive (for example,
D:\), and click Browse.
If you are installing from files you downloaded using the Installer WebTool, type the
name of your hard disk drive (for example, C:\), and click Browse.
18
8.
Installing User Software on a Windows Computer
If you are installing from the CD, browse to the English\Prntdrvr\Ps_drvr\Win_NT4x
folder and click Open.
If you are installing from files you downloaded using the Installer WebTool, browse to
the prntdrvr\Prntdrvr\Ps_drvr\Win_NT4x folder and click Open.
Make sure “Oemsetup.inf ” or “Oemsetup” is selected.
The path is copied to the Install From Disk dialog box.
9.
10.
Verify the path is correct, and click OK.
In the Printers box, select the E-810 file and click Next.
19
Setting up PostScript printing with Windows NT 4.0 or Windows 2000
11.
Enter a name for the E-810 in the Printer name box, and choose whether you want the
E-810 to be your default printer. Click Next.
12.
Indicate whether you want the printer installed as a shared printer. Click Next.
If you select Shared, enter a Share Name for the printer and select the operating
systems used by client computers. For information on shared printers, see the
Configuration Guide.
13.
Click No in the next dialog box to postpone printing a test page, and click Finish.
When installation is complete, the Printers window appears with an icon for the newly
installed printer.
20
TO
Installing User Software on a Windows Computer
INSTALL THE
P OST S CRIPT
PRINTER DRIVER FOR
W INDOWS 2000
1.
Click Start, choose Settings, and then choose Printers to display the Printers window.
2.
Double-click the Add Printer icon, and click Next.
3.
Select the option to print to a Local printer, and click Next.
This procedure describes the installation of a local printer. You can modify the
connection later, according to your network type.
4.
Select the LPT1 port and click Next.
21
5.
Setting up PostScript printing with Windows NT 4.0 or Windows 2000
In the dialog box displaying lists of manufacturers and printers, click Have Disk.
The Install From Disk dialog box prompts you for the disk.
6.
Type the name of the CD-ROM drive (for example, D:\), and click Browse. Browse to the
English\Prntdrvr\Ps_drvr\Win_2000 folder.
Make sure “Oemsetup.inf ” or “Oemsetup” is selected and click Open.
7.
Verify the path is correct, and click OK.
The path is copied to the Install From Disk dialog box.
8.
In the Printers box, select the E-810 file and click Next.
9.
Enter a name for the E-810 in the Printer Name box.
This name will be used in the Printers and queue windows.
22
10.
Installing User Software on a Windows Computer
Follow the instructions in the remaining windows.
When asked whether to print a test page, choose No.
The necessary files are installed to your hard disk.
N OTE : The Digital Signature Not Found window indicates that the printer driver for
Windows 2000 does not have a Microsoft digital signature. However, printing to the
E-810 is processed correctly, so click Yes to continue with installation.
11.
If this is the first printer driver you are installing on the computer, you may be
prompted to install files from the Windows 2000 CD. Insert the CD-ROM, browse to the
win2000\english\i386 folder, and then click OK.
When installation is complete, the Printers window appears with an icon for the newly
installed printer. To enable Internet Protocol Printing (IPP), see “Setting up IPP
printing with Windows 2000” on page 33.
You are ready for the instructions to connect to your network type (see “Completing
the Windows NT 4.0 or Windows 2000 printer connection” on page 24).
Updating print options settings automatically
The Two-Way Communication feature updates the E-810 Expert Settings defaults.
With Two-Way Communication enabled, you can view the current settings from the
Expert Settings window in the printer driver. See the Color Guide for more
information.
23
Setting up PostScript printing with Windows NT 4.0 or Windows 2000
You can change settings from ColorWise Pro Tools on a job-by-job basis and still
maintain the original Expert Setting values, which are stored on your computer.
You can then return to the Expert Settings window and use the Default button at any
time to print jobs with the latest E-810 settings regardless of the current Two-Way
Communication status.
N OTE : Two-Way Communication requires a TCP/IP-enabled network.
TO
UPDATE PRINT OPTION SETTINGS AUTOMATICALLY
1.
Click Start in the Windows taskbar, choose Settings, and then choose Printers.
2.
In the Printers window, select the icon for the E-810 PostScript printer driver.
3.
Choose Properties from the File menu.
4.
Select the Configuration tab.
5.
Check Two-Way Communication.
This will activate the Printer IP Address or DNS Name field.
6.
Enter the E-810 IP address or DNS name.
7.
If you would like your printer driver to display the copier’s current default settings
when opened, check Update Fiery Driver When Opened.
8.
Click Update.
9.
Click OK.
N OTE : To remove this feature, uncheck the Two-Way communication checkbox and
click the Defaults button.
24
Installing User Software on a Windows Computer
Completing the Windows NT 4.0 or Windows 2000 printer
connection
To print from Windows NT 4.0 or Windows 2000 you need to:
• Set up network servers, if any.
• Set up the E-810 to accept print jobs from your computer.
• Configure a port on each Windows NT or Windows 2000 computer for the
network type.
To do this
See
Configure the TCP/IP (LPR port)
connection
“Completing the Windows NT 4.0 TCP/IP
and LPR connection” on page 24.
Configure the IPX (Novell) connection
“Completing the Windows NT 4.0 or
Windows 2000 IPX (Novell) connection” on
page 29.
Completing the Windows NT 4.0 TCP/IP and LPR connection
Once you have installed the PostScript printer driver and printer driver files, complete
the setup for the TCP/IP and LPR connection as follows:
• Prepare the E-810 to accept print jobs using TCP/IP and LPR protocols.
(For details, see the Configuration Guide.)
• Configure the computer for the TCP/IP connection.
Before you continue, ask the system administrator for the IP address assigned to the
E-810, as well as the subnet mask and the gateway address, if they are used.
The TCP/IP Protocol and Microsoft TCP/IP Printing software should already be
installed on the Windows NT computer.
25
TO
SET UP
Setting up PostScript printing with Windows NT 4.0 or Windows 2000
TCP/IP
AND
LPR
PRINTING FOR
W INDOWS NT 4.0
1.
Open the Properties dialog box for the E-810, and click the Ports tab.
2.
Click Add Port.
The available port types are displayed.
3.
Select LPR Port and click New Port.
If the LPR port is not listed, install the TCP/IP network protocol and
Microsoft TCP/IP printing software. See the Configuration Guide and your Windows
documentation.
26
4.
Installing User Software on a Windows Computer
Enter the IP address of the E-810.
If your network uses Domain Name Services (DNS), enter the DNS name assigned to
the E-810 instead of the IP address.
5.
Press Tab and type one of the following names, depending on the E-810 connection
you would like to print to.
print
hold
N OTE : This name is case-sensitive; type it exactly as shown above.
6.
Click OK.
The computer checks the address or DNS name you entered and notifies you if it
cannot resolve the address.
7.
Click Close in the Printer Ports dialog box.
The new port configuration is reflected in the Ports tab. You must now close the
Printer Properties dialog box to verify the connection.
8.
Click OK to close the Printer Properties dialog box.
9.
Reopen the Printer Properties dialog box.
10.
Click the General tab and click Print Test Page.
When you print, your PostScript files are transmitted over the LPR Port connection to
the E-810.
11.
Click OK to close the Printer Properties dialog box.
27
TO
SET UP
Setting up PostScript printing with Windows NT 4.0 or Windows 2000
TCP/IP
AND
LPR
PRINTING FOR
W INDOWS 2000
1.
Open the Properties dialog box for the E-810, and click the Ports tab.
2.
Click Add Port.
3.
Select Standard TCP/IP Port for Available port types, and click New Port.
4.
Click Next in the Add Standard TCP/IP Printer Port Wizard dialog box.
5.
Enter the IP address of the E-810.
The IP address will be entered automatically for Port Name.
6.
Click Next.
The device will be detected automatically.
7.
Click Finish to close the Add Standard TCP/IP Printer Port Wizard dialog box and Close
from the Printer Ports dialog box.
8.
Click Configure Port in the Properties dialog box.
The Configure Standard TCP/IP Port Monitor dialog box appears.
28
9.
Installing User Software on a Windows Computer
If you have LPD printing enabled at the E-810 Control Panel, select LPR for Protocol
and LPR Byte Counting Enabled under LPR Settings.
N OTE : You can also proceed without selecting LPR Byte Counting Enabled under
LPR settings.
10.
If you have Port 9100 printing enabled at the E-810 Control Panel, select Raw.
“9100” is automatically detected for Port Number under Raw Settings. You can print
to the printer connection selected for Port 9100 printing at the E-810 Control Panel.
11.
Enter the queue name.
For LPR, use print, hold, or direct.
For Port 9100, you need to manually enter the following port numbers for each print
connection under Raw Settings:
direct: 9100 (default) or 9101
print: 9102
hold: 9103
12.
Click OK to close the dialog box.
29
Setting up PostScript printing with Windows NT 4.0 or Windows 2000
Completing the Windows NT 4.0 or Windows 2000 IPX (Novell) connection
Complete the setup for the IPX (Novell) connection as follows:
• Configure the Novell network and file server for handling E-810 print jobs. The file
server should be configured with a print server and print connection for the E-810.
For details, see your NetWare documentation.
• Prepare the E-810 for IPX printing.
• Set up the IPX connection on the computer.
NetWare protocols (NWLink IPX/SPX Compatible Transport) and NetWare client
services should already be installed on the Windows NT and/or Windows 2000
computer.
T O SET UP IPX (N OVELL )
W INDOWS 2000
PRINTING FOR
W INDOWS NT 4.0
OR
1.
Double-click Network Neighborhood (Windows NT 4.0) or My Network Places
(Windows 2000).
2.
Double-click NetWare or Compatible Network.
A list of NetWare servers appears.
3.
Double-click the NetWare Tree or File Server on which the network administrator
defined a print connection for the E-810.
You may have to log in to the file server to see the print connections.
4.
Double-click the print connection defined for the E-810.
30
Installing User Software on a Windows Computer
5.
If the NetWare server does not have a suitable driver for the E-810, you may be asked
whether to set up the printer on your computer. Click Yes.
6.
Click OK to install the E-810 PostScript printer driver. (Follow the procedure that
starts with step 6 on page 17.)
When installation is complete, a new printer window appears, with the name of the
print queue on the NetWare server.
7.
Choose Properties from the File menu, and then click the Ports tab.
The NetWare queue you just connected to is listed and checked as a port for the
E-810.
31
Setting up PostScript printing with Windows NT 4.0 or Windows 2000
8.
Click the General tab and click Print Test Page.
9.
In the printer Job Notes window, enter user and job identification information, and
click OK.
The E-810 polls the NetWare server for print jobs in the print connection defined for
the E-810. When you print, your PostScript files are spooled to that connection and
transmitted over the queue port to the E-810.
The test page job is listed in the queue window until it is printed.
Setting up SMB printing on Windows NT 4.0 or Windows 2000
If you do not have a Novell network, you can print via SMB printing (also known as
Windows or WINS printing). Printing by this method allows you to install the
PostScript printer driver and printer description files, and print from your computer to
a particular print connection (Hold, Print, or Direct) on the E-810. These instructions
assume you have the TCP/IP Protocol and Microsoft TCP/IP printing software
installed on your Windows NT or Windows 2000 computer.
To set up printing to a second or third print connection, you must install a new printer
driver and PPD file. Repeat the procedure “To set up SMB printing on Windows NT
4.0 or Windows 2000” on page 32. If you install more than one printer, give each a
descriptive name during printer driver installation, such as Aero-Print or Aero-Hold, so
you can easily identify printers.
N OTE : With Windows 2000, you cannot install the driver and configure the printing
connection to the E-810 in a single procedure. Refer to your Windows documentation
for more details.
32
B EFORE
Installing User Software on a Windows Computer
YOU BEGIN
•
Configure the E-810 for SMB printing in Network Setup>Service Setup>
Windows Setup.
SMB printing is referred to as Windows Printing in Setup, on the Control Panel Map,
and on the Configuration page. For more information, see the Configuration Guide.
•
Specify whether to install the PS or PCL printer driver using Point and Print in Network
Setup>Service Setup>Windows Setup>Point and Print Drivers.
N OTE : Windows 2000 does not support Point and Print.
T O SET UP SMB PRINTING
W INDOWS 2000
ON
W INDOWS NT 4.0
OR
1.
Double-click Network Neighborhood (Windows NT 4.0) or My Network Places
(Windows 2000).
2.
Browse for the printer you would like to print to.
The printer name you are browsing for is the name entered in Network Setup>
Service Setup>Windows Setup > Server Name. Refer to the Configuration page for
this information.
The amount of network traffic determines the amount of time required for the Browse
function.
33
Setting up PostScript printing with Windows NT 4.0 or Windows 2000
N OTE : You can also locate the printer with the Find feature on your Windows
computer. Click the Start button, choose Find, and then choose Computer. Enter the
name of the printer, and click Find Now.
If you are not able to locate your E-810, see your network administrator.
3.
Double-click the name of the E-810 to display enabled print connections.
4.
Double-click the name of the connection you want to print to.
5.
The Printers dialog box appears, asking whether you would like to set up the printer.
6.
Select Yes to install the PostScript printer driver and printer description file for the
selected connection.
Setting up IPP printing with Windows 2000
With Internet Printing Protocol (IPP), print jobs are sent to the E-810 over the
Internet.
N OTE : The IPP setup procedures are performed after installing the appropriate printer
drivers (see “To install the PostScript printer driver for Windows 2000” on page 20).
N OTE : IPP printing is not supported on Windows NT.
34
B EFORE
TO
Installing User Software on a Windows Computer
YOU BEGIN
1.
Prepare the E-810 for TCP/IP printing.
2.
Make sure the E-810 is configured for IPP printing in Network Setup > Service
Setup > IPP Setup. For more information, see the Configuration Guide.
3.
Specify the printing destination on your computer.
SET UP
IPP
PRINTING WITH
W INDOWS 2000
1.
Click the Start button, choose Settings, and then choose Printers.
2.
Double-click the Add Printer icon and click Next.
3.
Select Network printer and click Next.
4.
Select “Connect to a printer on the Internet or on your intranet.” Enter an IP address
or computer name in the URL window.
The URL for the printer is the IP address, or DNS name, followed by “ipp”, then by
the connection you want to print to (print, hold, or direct).
5.
Click Next.
The Connect to Printer window appears.
35
Installing Fiery utilities
6.
Click OK.
7.
The Add Printer Wizard dialog box appears.
If you are installing the PostScript printer for Windows 2000 for the first time, follow
the procedure described on page 20.
8.
Select Yes if you want the E-810 to be the default printer; if not, select No. Click Next.
9.
Click Finish.
Installing Fiery utilities
From the User Software CD, you can install these Fiery utilities:
• Fiery Link
• ColorWise Pro Tools
• Fiery Downloader
• Fiery Scan
• Command WorkStation
This software is supported on Windows computers and must be separately installed on
each user’s computer. The installers for these individual software items are similar.
Before installing Fiery utilities, close all open applications before the installation.
The Command WorkStation software installer also installs the Java files necessary to
use Fiery Setup from the Command WorkStation.
The TWAIN Fiery Scan Module installer automatically creates a folder named
Twain_32 in the Windows folder on your hard disk, and then installs the Fiery Scan
plug-in module into the folder.
N OTE : Before installing the TWAIN Fiery Scan module, make sure the TWAIN
plug-ins (installed with Adobe Photoshop software) are located in the correct
Photoshop\Plugins subfolder. If the TWAIN plug-ins have been deleted, you must
reinstall Adobe Photoshop software in order to use Fiery Scan.
36
TO
INSTALL
Installing User Software on a Windows Computer
F IERY
UTILITIES
1.
Open the appropriate folder for the software you want to install.
2.
Double-click the Setup.exe icon.
3.
Follow the instructions in the Setup dialog boxes to complete installation.
Adobe Acrobat
In Command WorkStation, the DocBuilder Pro feature works in conjunction with
Adobe Acrobat. If you have purchased the DocBuilder Pro option, the Acrobat
application is included on the Adobe Acrobat for DocBuilder Pro CD.
N OTE : If Adobe Acrobat is installed after Command WorkStation, or you attempt to
use DocBuilder Pro while running a previously installed copy of Acrobat, you must
restart Command WorkStation in order to use DocBuilder Pro.
For more information about Adobe Acrobat for Windows, see the Readme.pdf file on
the Adobe Acrobat for DocBuilder Pro CD.
TO
INSTALL
A CROBAT
1.
Insert the Adobe Acrobat for DocBuilder Pro CD in the CD-ROM drive.
2.
Double-click the AutoPlay.exe icon on the CD and follow the instructions.
Using the software for the first time
Before you can use the newly installed software, you must properly configure the
connection to the E-810.
Configuring a connection for Fiery Link
You can use Fiery Link to monitor the status of E-810 servers and view information
about the print jobs sent to them.
To view all available E-810 servers, open Fiery Link and click the Edit Fiery List
button. All E-810 servers on the local subnet appear in the Available Fierys list of the
Edit My Fiery List dialog box. You can specify the E-810 servers to monitor from this
37
Using the software for the first time
dialog box. If the E-810 is not in your local subnet, you can use Fiery Link options to
configure a connection manually, or you can perform an advanced search to locate and
connect to E-810 servers anywhere on the network. The procedures that follow
describe locating and connecting to a E-810 server, using both manual and advanced
search methods.
For information on using Fiery Link, see the Printing Guide.
N OTE : Fiery Link is supported over TCP/IP only.
TO
CONFIGURE THE CONNECTION TO
1.
E-810
SERVERS IN A LOCAL SUBNET
Start Fiery Link. Click the Edit My Fiery List button:
The Edit My Fiery List dialog box opens, and all servers found appear in the Available
Fierys area of the dialog box.
E-810 name, device name (r7),
and IP address
N OTE : Only servers that support Fiery Link appear in the Available Fierys area.
38
2.
Installing User Software on a Windows Computer
To add a server to the My Fiery List, select it and click the arrow button.
The E-810 appears in the My Fiery List. Repeat step 2 for each server you want to add
to the My Fiery List.
3.
Click Apply to accept the changes to My Fiery List.
4.
Click OK.
39
TO
Using the software for the first time
MANUALLY CONFIGURE THE CONNECTION FOR
F IERY L INK
1.
Click the Manual tab.
2.
Enter the DNS name or IP address of the E-810 and click the arrow button.
When you click the arrow button, Fiery Link checks for the specified E-810. If the
E-810 is found, it appears in the My Fiery List. If it is not found, an error message
appears.
To add the E-810 to the My Fiery List without confirming its existence on the
network, hold down the Ctrl key while clicking the arrow button.
3.
To give the E-810 a nickname, select it in the My Fiery List and click Modify.
40
Installing User Software on a Windows Computer
4.
Select Use Nickname, and enter a nickname for the E-810.
5.
Click OK.
6.
Click Apply to accept the changes to My Fiery List.
7.
Click OK.
41
Using the software for the first time
TO
CONFIGURE THE CONNECTION FOR
ADVANCED IP SEARCH
F IERY L INK
USING AN
1.
Click the AutoSearch tab.
2.
Click the Advanced button.
3.
To find all E-810 servers within an IP address range, enter the range, and click the
arrow button.
Repeat step 3 for each IP address range you want to search. To remove an IP address
range from the list, select the range in the IP Range/Subnet Addr. window and click
the Remove button.
You can also search for the server using a range of subnet values. For more information,
see “To configure the connection for Fiery Link using an advanced subnet search” on
page 43.
4.
Click Search.
When the search is complete, all servers found appear in the Available Fierys area of the
dialog box.
If the E-810 was not found, and you would like to search again using the same
parameters, click Refresh.
42
Installing User Software on a Windows Computer
N OTE : Only servers that support Fiery Link appear in the Available Fierys area.
5.
To add a server to the My Fiery List, select it and click the arrow button.
The server appears in the My Fiery List.
Repeat step 5 for each server you would like to add to the My Fiery List.
43
Using the software for the first time
6.
Click Apply to accept the changes to My Fiery List.
7.
Click OK.
TO
CONFIGURE THE CONNECTION FOR
ADVANCED SUBNET SEARCH
F IERY L INK
USING AN
1.
Click the AutoSearch tab.
2.
Click the Advanced button and click the Subnet Addr. tab.
3.
Enter the IP address and subnet you want to search, and click the arrow button.
The IP address and subnet to be searched appear in the IP Range/Subnet Addr. list.
Repeat this procedure for each IP address and subnet you would like to search.
To remove a subnet value from the IP Range/Subnet Addr. list, select it and click the
Remove button.
4.
Click Search.
When the search is complete, all servers found appear in the Available Fierys area of the
dialog box.
44
Installing User Software on a Windows Computer
If the E-810 was not found, and you would like to search again using the same
parameters, click Refresh.
N OTE : Only servers that support Fiery Link appear in the Available Fierys area.
5.
To add the E-810 to the My Fiery List, select it and click the arrow button.
45
Using the software for the first time
The server appears in the My Fiery List. Repeat step 5 for each server you would like to
add to the My Fiery List.
6.
Click Apply to accept the changes to My Fiery List.
7.
Click OK.
Configuring the connection for Fiery utilities
The first time you launch one of the Fiery utilities, you are prompted to configure the
connection to the E-810. The same configuration is used for all Fiery utilities
(including Fiery Scan and Command WorkStation), so any change in one
configuration affects all the other connections.
N OTE : The configuration for Fiery Link is described in “Configuring a connection for
Fiery Link” on page 36.
B EFORE
YOU BEGIN
•
Print the Configuration page from the E-810 Control Panel.
This page contains information you need when configuring the connection, such as
the IP address. If you are using IPX/SPX, note the IPX address for the E-810. In
general, you should use the Ethernet IPX address. If you are connected through a
Token Ring network, use the Token Ring IPX address.
To connect using TCP/IP, note the IP Address of the E-810. If the E-810 is already
registered in a Domain Name Server (DNS) on your network, you can enter the DNS
name of the E-810 instead of the IP address. See your Windows system documentation
for information.
TO
CONFIGURE THE CONNECTION FOR
1.
F IERY
UTILITIES
Start the utility for which you want to configure a connection.
For Fiery Scan, start Photoshop, and open Fiery Scan.
For more information, see the Printing Guide.
46
Installing User Software on a Windows Computer
2.
If the No Servers Configured dialog box appears, click OK.
3.
Enter the appropriate information for the E-810.
Nickname—Enter a name for the E-810. This name can be any name you wish; it does
not have to match the actual Server Name of the E-810.
N OTE : The nickname cannot contain any of the following seven characters:
[ ] _ " ' <space> <tab>
Protocol—Choose the type of network protocol you are using from the pop-up menu.
N OTE : Fiery utilities for the E-810 are not supported over IPX/SPX. Command
WorkStation software is supported on Windows computers over TCP/IP, and on the
Fiery Advanced Controller Interface kit over PIPE.
Server Name—If you are using the TCP/IP protocol, enter the IP address (or DNS
name) of the E-810.
47
Using the software for the first time
New Device—Enter the name of the device the E-810 is connected to: r7.
For TCP/IP networks
4.
When you have entered all the information, click Add.
5.
With the device name (r7) selected in the Devices list, click OK.
The E-810 appears in the list of available servers. The first line of the entry displays the
nickname you gave the server, followed by the protocol you chose. The second line
displays the device name.
Device name of the E-810 (r7)
48
6.
Installing User Software on a Windows Computer
With the device name (r7) selected in the list of Available servers, click OK to begin
using the software.
Modifying the configuration
You should edit the configuration whenever there is any change to your E-810 server
or network, such as a server name or IP address. Change the specific E-810 Setup
information before configuring the connection.
TO
MODIFY THE CONFIGURATION
1.
To edit information for a E-810 in the list of available servers, select the E-810 by its
nickname and click Modify.
2.
Edit information in the Modify Server Settings dialog box as necessary, and click OK
when finished.
3.
To add a new E-810 to the list of available servers, click Add. Configure the Add New
Server dialog box as outlined in steps 3 through 5 in the previous procedure.
4.
To remove a E-810, select the E-810 by its nickname, and click Remove.
Copying color files from the User Software CD
You can copy additional color files from the User Software CD to your hard disk.
Many of the files are PostScript files that you can also download and print using
Fiery Downloader.
Icm folder
ICM monitor setting file and a device profile specially designed
for use with the E-810 and particular copier models. For
installation instructions, see “Installing the ICM profiles on a
Windows computer” on page 50.
49
Copying the printer description files for Windows
Calibrat folder
(inside English/
Clrfiles folder)
Four PostScript files of color patches for obtaining
measurements: Custom21.ps, Custom34.ps, Stand21.ps, and
Stand34.ps.
The numbers in the file names refer to the number of patches on
the page. The Custom files allow you to download measurement
patches that incorporate the copier’s current calibration set. The
Standard files allow you to download standard measurement
patches that ignore the copier’s current calibration set. For
information on how to use these files, see the Color Guide.
N OTE : These files are provided for expert users and should not be
used for day-to-day calibration.
Copying the printer description files for Windows
The User Software CD contains printer description files for popular Windows
applications. Pagemaker 6.5 does not support automatic installation of printer
description files from the Printers Control Panel. To make the E-810 available in the
Print and Page Setup dialog boxes of this application, copy printer description files to
the appropriate location.
TO
COPY THE PRINTER DESCRIPTION FILES
1.
On the User Software CD, open the English\Prntdrvr\Ps_drvr folder. Select the folder
that corresponds to the system that you are using.
For Windows 9X/Me, select English\Prntdrvr\Ps_drvr\Win_9x.
For Windows NT, select English\Prntdrvr\Ps_drvr\Win_NT4x.
For Windows 2000, select English\Prntdrvr\Ps_drvr\Win_2000.
2.
Copy the printer description file for your E-810 to the appropriate location.
If you use
PageMaker 5.0 or later
Copy this file
Efa28e10.ppd
To this location
For PageMaker 5.0,
\ALDUS\USENGLSH\PPD4
For PageMaker 6.0,
\PM6\RSRC\USENGLSH\PPD4
For PageMaker 6.5,
\PM65\RSRC\USENGLSH\PPD4
50
Installing User Software on a Windows Computer
Installing the ICM profiles on a Windows computer
The ICM profiles included in the Icm folder on the User Software CD are for use
with ColorWise Pro Tools. You can also use the ICM profiles with applications that
support ICC standards, such as Photoshop. For most ICC aware applications, the files
must be installed into a folder named Color in the System folder. For use with
ColorWise Pro Tools, you can copy the files to a folder of your choice.
For more information on using ICC profiles with ColorWise Pro Tools, see the Color
Guide.
TO
INSTALL THE
ICM
PROFILES ON A
W INDOWS
COMPUTER
1.
On the User Software CD, open the Icm folder.
2.
If you are using Windows 9X or Windows Me, copy the profiles to the
Windows\System\Color folder on your hard disk.
If you are using Windows NT or Windows 2000, copy the profiles to the
Winnt\System32\Color folder on your hard disk.
N OTE : If a folder named “Color” does not exist in the System32 folder, create one and
install the profiles into it.
Loading the monitor settings file
The Efirgb.icm monitor settings file can be used in Photoshop (or other applications
that support ICM profiles) to define a source color space for printing to the E-810.
These instructions assume you have installed the ICM profiles included on the
User Software CD. For more information, see the previous section.
N OTE : The internal name of an ICC profile may vary slightly from its file name.
TO
LOAD THE
RGB W ORKING S PACE
PROFILE FOR
P HOTOSHOP 5. X
1.
Launch Photoshop.
2.
From the File menu, choose Color Settings, and from the Color Settings submenu,
choose RGB Setup.
51
Copying the printer description files for Windows
3.
In the RGB Setup dialog box, click Load.
4.
For Windows 9X/Me, browse to the Windows\System\Color folder, select Efirgb.icm,
and click Load.
For Windows NT 4.0 and Windows 2000, browse to the Winnt\System32\Color folder,
select Efirgb.icm, and click Load.
The Efirgb v1f file appears as the selection in the RGB pop-up menu of the RGB Setup
dialog box.
5.
Click OK.
For more information about ICM profiles, see your application’s documentation.
53
Installing
User Software
on a Mac OS
Computer
Setting up the E-810 as a PostScript printer
The general steps for installing the E-810 user software and setting up printing on a
Mac OS computer are:
• Install the Adobe PostScript printer driver and PostScript Printer Description file
(PPD).
• Set up the E-810 in the Chooser.
• Install the Fiery utilities (ColorWise Pro Tools, Fiery Link, Fiery Downloader, and
Fiery Spooler).
• Install the printer and screen fonts.
• Install the ColorSync profiles.
• Configure the connection for Fiery utilities.
• Copy additional color-reference and application-specific files from the User Software
CD as needed.
In addition to using the User Software CD, you can download printer drivers and the
Fiery Link installer from the E-810 with the Installer WebTool (if the site
administrator has enabled Internet access to the E-810). For instructions, see “Using
the Installer WebTool” on page 84.
Once you download the printer files, the installation process is identical to installing
from the User Software CD.
Setting up the E-810 as a PostScript printer
To set up the E-810 as a PostScript printer, you must install the Adobe PostScript
printer driver and the PPD file that corresponds to your copier. The Adobe PostScript
printer driver and PPD files are provided on the User Software CD. Printer drivers
provide a way to communicate information on print jobs among your applications, the
E-810, and any other PostScript printer connected to your computer.
Use the following procedures when you are installing printer files from the User
Software CD or printer files downloaded using the Installer WebTool.
54
TO
Installing User Software on a Mac OS Computer
INSTALL THE
1.
A DOBE PS
PRINTER DRIVER AND
PPD
FILE
Quit all open applications.
After you have completed installation, restart your computer.
2.
On the User Software CD, open the English: Printer Driver folder.
If you are installing from files you downloaded using the Installer WebTool, open the
Printer Driver folder on your hard disk.
3.
Double-click the AdobePS 8.6 Installer icon.
4.
Follow the on-screen instructions.
The AdobePS Installer installs the Adobe PostScript printer driver, and the PPD file
that corresponds to the E-810.
N OTE : If you operate the E-810 in a copy shop, quick print shop, or service bureau,
you might want to provide your customers with copies of the printer driver, PPD file,
or ICC profiles you use for printing images, as well as any relevant documentation.
This ensures that jobs they create and print to files are properly formatted for printing
to the E-810.
Setting up the E-810 in the Chooser
After you install the Adobe PostScript printer driver and PPD file (see “Setting up the
E-810 as a PostScript printer” on page 53), you need to set up the E-810 in the
Chooser in order to take full advantage of its features. This section describes how to set
up the E-810 with the AdobePS printer driver.
TO
SET UP THE
1.
E-810
IN THE
C HOOSER
Select Chooser from the Apple menu.
Make sure AppleTalk is set to Active.
2.
Select the correct AppleTalk Zone, if necessary.
55
3.
Setting up the E-810 as a PostScript printer
Click the AdobePS icon.
The E-810 appears in the Select a PostScript Printer list in the form of
<server name>_<device name>_<print connection>. The device name (r7) is
the internal name of your copier.
N OTE : Only the print connections (Direct, Hold, and Print) that have been enabled
in Setup appear in the Chooser.
Device name is r7
4.
Select a E-810 connection from the “Select a PostScript Printer” list, and click Create.
The AdobePS printer driver automatically selects the correct PPD file for your E-810.
N OTE : You will need to set up each print connection separately. Repeat this step for all
enabled connections.
5.
In the Chooser list, an icon appears next to the newly installed E-810; select it and
click Setup.
56
Installing User Software on a Mac OS Computer
6.
Click Configure in the dialog box that appears.
7.
Close the Chooser.
Installing E-810 software and fonts
The Mac OS installers function essentially the same for each type of software. Before
you begin each installation, determine where you want to install each item on your
hard disk. Otherwise, the software is placed by default as described below:
• ColorSync profiles are placed in the ColorSync Profiles folder on your hard disk.
If you are using ColorSync 2.5 or later, install the profiles into the ColorSync
Profiles folder inside the System folder. If you are using an earlier version of
ColorSync, install the profiles to the ColorSync Profiles folder inside the
System:Preferences folder. The printer profile can be moved to a folder of your
choice.
• Fiery Downloader, Fiery Spooler, ColorWise Pro Tools, and Fiery Link are placed in
a folder named “Fiery f ” on the top level of your hard disk.
• Install Fonts are placed in the System folder:Fonts folder on your hard disk.
For instructions on installing Fonts, see “Fonts” on page 77.
57
TO
INSTALL
Installing E-810 software and fonts
M AC OS
SOFTWARE
1.
On the User Software CD, double-click the Installer icon of the item you would like to
install.
2.
Read the Software License Agreement, and click Accept.
3.
Click Install to copy the item to the default location, or navigate to a location in
which to install the item.
Use the table below as a guide when installing software.
If you are installing
4.
Action
To install
ColorSync Profiles
The ICC profiles are automatically installed
into the ColorSync Profiles folder. Perform
the steps in “Loading ICC profiles” on
page 78 after installation is complete.
Click Install.
Fiery Downloader
Specify a hard disk location for Fiery
Downloader software.
Click Install.
Fiery Scan
Navigate to your Photoshop:Plug-ins folder.
The Fiery Scan module and Source Manager
file is automatically installed to your System
Folder:Preferences folder.
Click OK.
Fiery Link
Specify a hard disk location for Fiery Link
software.
Click Install.
ColorWise Pro Tools
Specify a hard disk location for ColorWise
Pro Tools software.
Click Install.
Fiery Spooler
Specify a hard disk location for Fiery Spooler
software.
Click Install.
If prompted, click Quit to close the software installer.
In order to use ColorWise Pro Tools, Fiery Spooler, or Fiery Link you must have
Mac OS Runtime for Java (MRJ 2.2) installed on your computer.
If you do not have MRJ installed, the ColorWise Pro Tools, Fiery Spooler, or
Fiery Link installer automatically initiates the MRJ 2.2 installation process.
58
TO
INSTALL
Installing User Software on a Mac OS Computer
M AC OS R UNTIME
FOR
J AVA
1.
Read the Apple Computer Inc. License Agreement and click Agree to install the
software.
2.
Click Install.
Some files are installed.
3.
Click Quit.
You are now ready to configure the ColorWise Pro Tools, Fiery Spooler, and Fiery Link
connections to the E-810, as described below.
Configuring a connection for ColorWise Pro Tools
The first time you use ColorWise Pro Tools, you are prompted to configure a
connection to the E-810.
N OTE : ColorWise Pro Tools function only over TCP/IP networks.
B EFORE
YOU BEGIN
•
Print the Configuration page from the Control Panel and note the IP address of
the E-810.
59
TO
Installing E-810 software and fonts
CONFIGURE A CONNECTION FOR
1.
C OLOR W ISE P RO T OOLS
Launch the utility by double-clicking its icon.
The Choose Printer Device dialog box appears.
2.
If you have previously configured a connection to the E-810, then you are ready to use
ColorWise Pro Tools. If you have not configured a connection, click Add.
3.
Enter the appropriate information for the E-810.
Nickname—Enter a name for the E-810. This can be any name you wish; it does not
have to match the actual server name of the E-810.
N OTE : The nickname cannot contain any of the following seven characters:
[ ] _ " ' <space> <tab>
Protocol—Choose the type of network protocol you are using from the pop-up menu.
ColorWise Pro Tools is supported only with TCP/IP, so no selection is necessary.
60
Installing User Software on a Mac OS Computer
Server Name—Enter the IP address (or DNS or host name) of the E-810.
New Device—Enter the name of the device the E-810 is connected to: r7. This device
name appears in the Printer Setup section of the Configuration page.
4.
When you have added all the information, click Add.
5.
With the device name (r7) selected in the Devices list, click OK.
The E-810 appears in the list of available servers. The first line of the entry displays the
nickname you gave the server, followed by the protocol. The second line displays the
device name.
6.
With the device name (r7) selected in the list of Available Servers, click Select to
begin using ColorWise Pro Tools.
Device name of the E-810 (r7)
Modifying the configuration
You should edit the configuration whenever there is any change in your original
configuration, such as a change of IP address. Change the specific E-810 Setup
information before configuring the connection.
61
TO
Installing E-810 software and fonts
MODIFY THE CONFIGURATION
1.
To edit information for a E-810 in the list of available servers, select the E-810 by its
nickname and click Modify. Edit information in the Modify Server Settings dialog box
as necessary, and click OK when finished.
2.
To add a new E-810 to the list of available servers, click Add. Configure the Add New
Server dialog box as outlined in steps 3 through 5 in the previous procedure.
3.
To remove a E-810 from the list of available servers, select the E-810 by its nickname
and click Remove.
Configuring a connection for Fiery Spooler
B EFORE
YOU BEGIN
•
TO
Print the Configuration page from the Control Panel and note the IP address of
the E-810.
CONFIGURE A CONNECTION FOR
1.
F IERY S POOLER
Launch the utility by double-clicking its icon.
The Chooser dialog box appears.
62
Installing User Software on a Mac OS Computer
2.
Click Option.
3.
Click Add.
4.
Enter the appropriate information for the E-810.
Name—Enter the IP address (or DNS name) of the E-810.
New Device—Enter the name of the device that the E-810 is connected to: r7. This
device name appears in the Printer Setup section of the Configuration page.
63
Installing E-810 software and fonts
5.
When you have entered all the information, click Add.
6.
With the device name (r7) selected, click OK.
The E-810 appears in a list of configured servers.
64
7.
Installing User Software on a Mac OS Computer
Click OK in the Configure dialog box.
The E-810 appears in a list of available servers.
8.
With the E-810 selected in the list of available servers, click OK to begin using
Fiery Spooler.
Modifying the configuration
You should edit the configuration whenever there is any change to your E-810 or
network, such as an IP address or device change. Change the specific E-810 Setup
information before configuring the connection.
TO
MODIFY THE CONFIGURATION
1.
In the Chooser dialog box, click Option.
2.
To edit information for a E-810, select the E-810 by its IP address or DNS name and
click Modify. Edit information in the Settings dialog box as necessary, and click OK
when finished.
3.
To add a new E-810, click Add. Configure the Settings dialog box as outlined in 4
through 6 in the previous procedure.
4.
To remove a E-810, select the E-810 by its IP address or DNS name, and click Remove.
The list of available servers reflects the modifications you have made.
65
Installing E-810 software and fonts
Configuring a connection for Fiery Link
You can use Fiery Link to monitor the status of E-810 servers and view information
about the print jobs sent to them.
When you click the Edit Fiery List button, all E-810 servers on the local subnet appear
in the Available Fierys list of the My Fiery List dialog box. You can specify which
E-810 servers to connect to and monitor from this dialog box. If the E-810 is not in
your local subnet, you can use Fiery Link options to manually configure a connection,
or you can perform an advanced search to locate and connect to E-810 servers
anywhere on the network. The procedures below describe locating and connecting to a
E-810 server using both manual and advanced search methods. For information on
using Fiery Link, see the Printing Guide.
N OTE : Fiery Link is supported over TCP/IP only.
TO
CONFIGURE A CONNECTION TO
1.
E-810
SERVERS IN THE LOCAL SUBNET
Launch Fiery Link by double-clicking its icon.
The Edit My Fiery List dialog box opens, and all E-810 servers found appear in the
Available Fierys area of the dialog box.
E-810 name, device name (r7),
and IP address
N OTE : Only servers that support Fiery Link appear in the Available Fierys area.
66
2.
Installing User Software on a Mac OS Computer
To add a server to the My Fiery List, select it and click the arrow button.
The server appears in the My Fiery List.
Repeat 2 for each server you would like to add to the My Fiery List.
3.
Click Apply to accept the changes to My Fiery List.
4.
Click OK.
67
TO
Installing E-810 software and fonts
MANUALLY CONFIGURE THE CONNECTION FOR
1.
F IERY L INK
Click the Manual tab. Enter the DNS name or IP address of the E-810 and click
the arrow button.
When the arrow button is clicked, Fiery Link checks for the specified
E-810. If the server is found, it appears in the My Fiery List. If it is not found, an error
message appears.
To add the server to the My Fiery List without confirming its existence on the network,
hold down the Control key while clicking the arrow button.
2.
To give the server a nickname, select it in the My Fiery List and click Modify.
68
Installing User Software on a Mac OS Computer
3.
Select Use Nickname, and enter a nickname for the E-810.
4.
Click OK.
5.
Click Apply to accept the changes to My Fiery List.
6.
Click OK.
69
TO
Installing E-810 software and fonts
CONFIGURE THE CONNECTION FOR
ADVANCED IP SEARCH
F IERY L INK
1.
Click the AutoSearch tab.
2.
Click the Advanced button.
USING AN
70
3.
Installing User Software on a Mac OS Computer
To find all servers within a specified IP range, enter an IP Address in the From IP field
and an IP address in the To IP field, and click the arrow button.
Repeat 3 for each range of IP addresses you would like to search.
To remove an IP range from the list, select the range in the IP Range/Subnet Addr.
window and click the Remove button.
You can also search for the E-810 using a range of subnet values. For more information
see “To configure the connection for Fiery Link using an advanced subnet search” on
page 72.
4.
Click Search.
When the search is complete, all servers found appear in the Available Fierys area of the
dialog box.
71
Installing E-810 software and fonts
If the E-810 was not found, and you would like to search again using the same
parameters, click Refresh.
N OTE : Only servers that support Fiery Link appear in the Available Fierys area.
5.
To add a server to the My Fiery List, select it and click the arrow button.
72
Installing User Software on a Mac OS Computer
The server appears in the My Fiery List.
Repeat 5 for each server you would like to add to the My Fiery List.
TO
6.
Click Apply to accept the changes to My Fiery List.
7.
Click OK.
CONFIGURE THE CONNECTION FOR
F IERY L INK
USING AN
ADVANCED SUBNET SEARCH
1.
Click the AutoSearch tab and click the Advanced button.
73
Installing E-810 software and fonts
2.
Click the Subnet Addr. tab.
3.
Enter the IP address and subnet to search, and click the arrow button.
The IP address and subnet to be searched appear in the IP Range/Subnet Addr. list.
Repeat this procedure for each IP address and subnet you would like to search.
74
Installing User Software on a Mac OS Computer
To remove a subnet value from the IP Range/Subnet Addr. list, select it and click the
Remove button.
4.
Click Search.
When the search is complete, all servers found appear in the Available Fierys area of the
dialog box.
If the E-810 was not found, and you would like to search again using the same
parameters, click Refresh.
N OTE : Only servers that support Fiery Link appear in the Available Fierys area.
75
5.
Installing E-810 software and fonts
To add a E-810 server to the My Fiery List, select it and click the arrow button.
The server appears in the My Fiery List.
Repeat 5 for each server you would like to add to the My Fiery List.
6.
Click Apply to accept the changes to My Fiery List.
7.
Click OK.
76
Installing User Software on a Mac OS Computer
Configuring a connection for Fiery Downloader
When you launch Fiery Downloader, you must specify an E-810 to connect to.
B EFORE
YOU BEGIN
•
TO
Print the Configuration page from the Control Panel and note the AppleTalk zone of
the E-810.
SPECIFY AN
E-810
TO CONNECT TO
1.
Double-click the Fiery Downloader icon.
2.
Select the AppleTalk zone in which the E-810 is located from the AppleTalk Zones list.
The available servers appear in the Servers list.
3.
Select the E-810 to connect to from the Servers list.
4.
Click Connect.
77
5.
Installing E-810 software and fonts
The Fiery Downloader dialog box appears.
For information on how to use Fiery Downloader, see the Printing Guide
Fonts
The Fonts installer on the User Software CD includes screen and printer fonts that
correspond to the 136 built-in PostScript printer fonts on the E-810. The Font
installer copies both kinds of fonts to the System:Fonts folder on your hard disk. To be
available to applications, the screen fonts must remain in the System:Fonts folder. The
printer fonts can be copied to a folder of your choice.
N OTE : In the System:Fonts folder, when displayed by Kind, screen fonts appear as type
“Font Suitcase” and PostScript printer fonts appear as type “PostScript font.”
TO
INSTALL SCREEN AND
P RINTER
FONTS
1.
On the User Software CD, double click the Fonts icon to launch the Fonts installer.
2.
Click Install.
By default the fonts are installed to the System folder:Fonts folder on your hard disk.
If you have any applications open, you must quit and relaunch them before the newly
installed screen fonts are available.
78
Installing User Software on a Mac OS Computer
Copying color files from the User Software CD
You can copy additional color files from the User Software CD to your hard disk.
The User Software CD contains the following color files:
ColorSync files
(inside the
ColorSync
Folder)
If you are using ColorSync 2.5 (or later), install the profiles into
the ColorSync Profiles folder inside the System folder. If you are
using an earlier version of ColorSync, install the profiles to the
ColorSync Profiles folder inside the System:Preferences folder.
The printer profile can be moved to a folder of your choice.
Color Files
folder (inside
the English
folder)
The CMYK Color Reference.ps is an 11-page, letter-size
PostScript file to use for reference when defining CMYK colors
in applications.
The PANTONE Book.ps is a 19-page, letter-size PostScript file
that indicates the closest equivalent of PANTONE coated colors
that the E-810 and your particular copier model can produce.
The method used to print the PANTONE Book.ps file differs
depending on the Spot Color Matching setting. For more
information, see the Printing Guide and the Color Guide.
RGB page 01 is a file you can print from Microsoft Word 97 (or
later) to view available RGB colors.
RGB page 02 is file you can print from Microsoft PowerPoint
6.0 (or later) to view available RGB colors.
Loading ICC profiles
The ICC profiles installed are for use with ColorWise Pro Tools and applications that
support ICC standards.
These instructions assume that you have already installed the ICC profiles included on
the User Software CD. For more information, see “Copying color files from the
User Software CD” on page 78.
N OTE : The internal name of an ICC profile may vary slightly from its filename.
The following procedure describes installing the ICC profiles with ColorSync 4.0.
For more information about ColorSync, see your application’s documentation.
79
TO
SET THE
Copying color files from the User Software CD
C OLOR S YNC
SYSTEM PROFILE
1.
Choose Control Panels>ColorSync from the Apple Menu.
2.
Select EFIRGB v1f from the System Profile list.
When selected as the ColorSync system profile, EFIRGB v1f sets the optimal source
color space for printing to the E-810. The color space set by the EFIRGB v1f profile is
the same as that set by the EFIRGB setting of the RGB Source Profile print option.
N OTE : The RGB Source Profile print option setting overrides the ColorSync system
profile setting.
3.
Close the ColorSync window.
For more information about ICC profiles, see your application’s documentation.
Loading the monitor settings file
The EFIRGB ICC monitor settings file can be used in Photoshop, or other
applications that support ICC profiles to define a source color space for printing to the
E-810.
80
TO
Installing User Software on a Mac OS Computer
LOAD THE MONITOR SETTINGS FILE IN
P HOTOSHOP 5. X :
1.
Launch Photoshop.
2.
From the File menu, choose Color Settings, and from the Color Settings submenu,
choose RGB Setup.
3.
In the RGB Setup dialog box, click Load.
4.
Browse to the System: Preferences: ColorSync Profiles, select the EFIRGB ICC file, and
click Open.
N OTE : If you are using ColorSync 2.5 or later, the ColorSync profile is located in
System Folder:ColorSync Profiles.
The EFIRGB v1f file appears as the selection in the RGB pop-up menu of the RGB
Setup dialog box.
5.
Click OK.
81
Copying color files from the User Software CD
Loading the ICC copier profile
The ICC copier profile enables RGB-to-CMYK conversions that are specific to the
kind of copier you are using.
TO
LOAD THE
ICC
COPIER PROFILE IN
P HOTOSHOP 5. X :
1.
Launch Photoshop.
2.
From the File menu, choose Color Settings, and from the Color Settings submenu,
choose CMYK Setup.
3.
In the CMYK Setup dialog box, choose ICC as the CMYK color model.
4.
Select the profile that corresponds to the E-810 from the Profile pop-up menu.
5.
Click OK.
For more information about ICC profiles, see your application’s documentation.
83
Setting up Fiery WebTools
Fiery WebTools allow you to manage your E-810 remotely from the Internet or from
your company’s intranet. The E-810 has its own home page from which you can select
from a variety of functions, including Status, WebSpooler, WebLink, Web Scan,
Installer, and WebDownloader.
Downloading
Installers with
Fiery WebTools
For more information on using Fiery WebTools, see the Printing Guide.
Setting up Fiery WebTools
In order for network users to access and use Fiery WebTools, you need to set certain
E-810 options in Network Setup and Printer Setup. You also need to prepare each
user’s workstation to communicate with the E-810 over the Internet or intranet.
For more information about Network Setup, see the Configuration Guide.
TO
SET UP
F IERY W EB T OOLS
ON THE
E-810
1.
Set Enable Ethernet to Yes in Network Setup>Port Setup>Ethernet Port Setup.
2.
Set Enable TCP/IP for Ethernet to Yes in Network Setup>TCP/IP Ethernet Setup.
3.
Set Enable Web Services to Yes in Network Setup >Network Service Setup>
Web Services Setup.
4.
Exit Network Setup, and choose OK to Save Changes.
5.
Exit Printer Setup, and choose OK to Save Changes.
84
TO
Downloading Installers with Fiery WebTools
SET UP CLIENT WORKSTATIONS TO USE
F IERY W EB T OOLS
1.
Enable TCP/IP networking.
2.
Make sure the workstation has a valid, unique IP address.
3.
Make sure the workstation is installed with one of the following Internet browsers:
Windows 9X/Me, Windows 2000, and Windows NT 4.0—Either Netscape
Communicator v4.5 (or later), or Microsoft Internet Explorer v4.0.1 and SP1 (or
later).
Mac OS—Netscape Communicator v4.5 (or later) or Internet Explorer v4.0.1 (or later),
with Java enabled.
N OTE : Netscape and Microsoft continue to release frequent updates to their browsers.
As support cannot be guaranteed for all versions, use the versions specified above for
best results.
4.
Make sure Java is enabled in your Internet browser.
For more information on setting up the E-810 and your network, see the Configuration
Guide.
Using the Installer WebTool
The Installer WebTool allows you to easily download printer drivers or Fiery Link
directly from the E-810 to your workstation.
TO
DOWNLOAD THE PRINTER FILES OR
F IERY L INK
WITH THE
I NSTALLER W EB T OOL
1.
Launch your Internet or intranet browser and enter the DNS name or IP address of
the E-810.
2.
Select a login level, enter a password if necessary, and click OK.
No password is required to log in as Guest. You have full access to the
Installer WebTool when logged in as Guest, after it has been configured by the
Administrator.
85
Using the Installer WebTool
3.
Click the Installer button.
4.
Under the name of your operating system, click “Printer Files” or “Fiery Link.”
A dialog box appears, prompting you to save the file to the location you choose.
5.
Browse to the location where you want to save the Prntdrve.exe file or the
Fiery Link.exe file, and click Save.
86
6.
Downloading Installers with Fiery WebTools
Double-click the Prntdrve.exe file or the Fiery Link.exe file, browse to the location
where you want to install the folder, and click Next.
The folder is installed to the location you specified.
7.
Install the appropriate printer driver for your operating system.
For instructions on installing
the printer driver for
See
Windows 9X/Me
“To install the PostScript printer driver for
Windows 9X/Me” on page 2.
Windows NT 4.0
“To install the PostScript printer driver for
Windows NT 4.0” on page 15.
Windows 2000
“To install the PostScript printer driver for
Windows 2000” on page 20.
87
Troubleshooting
On a Windows computer
This chapter provides troubleshooting tips.
On a Windows computer
Setting up printing on Windows NT or Windows 2000
Workstations
If you have problems installing the E-810 with Windows NT 4.0 and/or
Windows 2000, try installing another PostScript printer (such as the Apple
LaserWriter IIg), and then install the E-810. Installing another printer ensures that all
files are properly installed and available. For instructions, see your Windows
documentation.
For additional information about problems you may encounter using the PostScript
Printer Driver for Windows NT 4.0, see the Adobe README file (readmeNT.wri)
included in English\Prntdrvr\Ps_drvr\Win_NT4x on the User Software CD. For
Windows 2000, see your Windows 2000 documentation.
Reinstalling the Adobe PostScript Printer Driver on
Windows 9X/Me
If you are reinstalling the Adobe PostScript Printer Driver, delete any previous versions
and related files before installing.
For additional information about problems you may encounter using the Adobe
Printer Driver for Windows 9X/Me, see the Adobe README file (readme9x.wri)
included in English\Prntdrvr\Ps_drvr\Win_9x on the User Software CD.
88
Troubleshooting
Problems with the Fiery utilities on Windows 9X/Me,
Windows NT 4.0, or Windows 2000
1.
If you are using Windows 9X/Me, make sure the TCP/IP networking protocol is
enabled.
2.
If you are using Windows NT or Windows 2000, make sure the TCP/IP networking
protocol is enabled.
3.
Make sure that the connection is configured correctly for your site.
To check the current configuration, launch a Fiery utility and choose Open from the
File menu. Select the E-810 and click Modify to see current settings. If the settings are
incorrect, you can change them in this dialog box.
On a Mac OS computer
Setting up the E-810 in the Chooser
If auto-setup does not work and you are prompted to select the PPD, select the
appropriate E-810 file in your System:Extensions:Printer Descriptions folder. Select
“E-810 r7 Color Server” or “E-810r7 Color Server US”.
Installing screen fonts
If you experience problems installing the PostScript screen fonts from the User
Software CD to the System folder:Fonts folder, try the following:
1.
Quit all applications and close all windows.
2.
Create a new folder and name it “Uninstalled Fonts.”
This folder must be located outside of the System folder.
3.
Move fonts that you are not using from the System folder:Fonts folder to the
Uninstalled Fonts folder.
4.
Install the fonts from the User Software CD to a folder called CD fonts. Copy the fonts
to the System folder:Fonts folder.
89
On a Mac OS computer
5.
Create an alias to the System folder:Fonts folder and to the Uninstalled Fonts folder.
6.
Place both aliases on your desktop.
7.
When necessary, use the aliases to open both folders and move fonts between them.
If you have any applications running, you must quit and relaunch them in order to
view and use the newly installed fonts.
Alternatively, you can try combining fonts from multiple suitcases into a single
suitcase.
Index
A
Berkeley lpd protocol xvii
ColorWise Pro Tools, installing for Mac
OS 56
Command WorkStation
installing for Windows 35
system requirements xviii
Windows requirements xviii
Configuration page 11, 32, 45
connecting
Windows NT 4.0 with TCP/IP 24
connection on Mac OS, configuring 58 to
77
connection on Windows, configuring 45 to
48
Custom21.ps (Windows) 49
Custom34.ps (Windows) 49
C
D
cable, color server xii
Calibrat folder, for Windows users 49
Chooser
selecting the server in 54
setting up color server in 88
CMYK Color Reference.ps 78
Color Files folder, for Macintosh users 78
color management files xiii, xiv
color reference files xv, 78
for Macintosh users 78
color server, specifications xii, xiii
ColorSync and ICM color management
files xiv
ColorSync Profiles 56
ColorSync Profiles, installing for Mac OS 57
ColorWise color management files xiii
ColorWise Pro Tools 35
configuring the connection to the Fiery
(Mac OS) 58
Configuring the connection to the Fiery
(Windows) 36
device name 47, 60, 62
Windows 2000 with TCP/IP 26
Windows NT 4.0 with TCP/IP 26
DNS name xvi, xvii, 26, 39, 45, 62, 67
Domain Name Server, see DNS
Adobe Acrobat 36
installation 36
Adobe Acrobat for DocBuilder Pro CD 36
Adobe PageMaker for Windows, see
PageMaker for Windows
Adobe PostScript 3 fonts xii
Adobe PostScript printer driver, see PostScript
printer driver
Advanced Controller Interface kit xiii
AppleTalk xvii
AppleTalk, connecting to Mac OS 54
B
E
Efirgb.icc monitor settings file for
Mac OS 79
Efirgb.icm monitor settings file for
Windows 50
EPS files xiv
Ethernet, SNAP frame type xii
Ethernet 100BaseTX cable xii
F
Fast Ethernet 100BaseTX cable xii
Fast Ethernet 10BaseT cable xii
Fiery Downloader 35
EPS files xiv
installing for Mac OS 56, 57
overview xiv
PDF files xiv
92
Index
Fiery Link 35
configuring the connection on
Mac OS 65 to 75
configuring the connection on
Windows 36 to 45
installing for Mac OS 56
Fiery Scan
installing for Mac OS 57
Fiery Spooler xiv
configuring the connection on
Mac OS 61 to 64
installing for Mac OS 57
modifying the configuration
(Mac OS) 64
overview xiv
Fiery TWAIN module
installing
TWAIN module (Mac OS) 57
Fiery utilities
configuring the connection on
Mac OS 58 to 77
configuring the connection on
Windows 45 to 48
installing for Mac OS 56
installing for Windows 35
Mac OS requirements xvii
problems on Windows 9X/Me,
Windows NT, or Windows 2000 88
Windows requirements xvi
see also Fiery Downloader, Fiery Spooler
Fiery WebTools
Installer WebTool xv, 84 to 85
setting up 83 to 84
system requirements xvi, xvii
Windows requirements xvi
fonts
Adobe PostScript 3 xii
installer for Mac OS 77
installing 77, 88
Multiple Master xiii
printer fonts 77
screen fonts 77
substituting in PDF files xiii
TrueType xiii, xiv
Fonts folder 88
Frame Type option 8
I
ICC device profile 81
ICC device profile, loading in Photoshop 4.0
(Mac OS) 81
ICC monitor settings profile, specifying in
Photoshop (Mac OS) 79
ICM and ColorSync color management
files xiv
Icm folder (Windows) 48
Installable Options
specifying, from Windows 9X/Me
printer driver 5
installers
Mac OS 56
Windows 35
installing
Adobe PostScript printer,
Windows 2000 20 to 22
Adobe PostScript printer, Windows 9X/
Me 2 to 4
Adobe PostScript printer,
Windows NT 4.0 15 to 19
Command WorkStation 35
Fiery Scan Plug-in (Mac OS) 57
Mac OS software 57
PostScript printer driver for Mac OS 54
screen and printer fonts 77
software for Mac OS 56
software for Windows 35
internal name, for Windows NT 4.0 with
TCP/IP 26
Internet Explorer, recommended browser for
WebTools xvi, 84
IP address xvi, xvii, 48
93
Index
IPP printing setup
on Windows 2000 33 to 35
on Windows 9X 13 to 14
on Windows Me 13 to 14
IPX
address 45
printing for Windows 2000 29 to 31
printing for Windows NT 4.0 29 to 31
system requirements xvii
Windows 2000 29
Windows NT 4.0 29
IPX/SPX
configuring the connection 45
Windows 2000 29
Windows NT 29
J
Java xvi, xvii, 35, 84
M
Mac OS
copying color files 78
fonts 77
Installer WebTool 53
installing Fiery utilities 53, 56
installing software 57
system requirements xvi
troubleshooting 88
Mac OS requirements
Fiery utilities xvii
Mac OS Runtime for Java, installing 58
Microsoft Internet Explorer
supported browser version for
WebTools xvi, 84
monitor settings file, Mac OS 79 to 80
N
Netscape Communicator xvii
Netscape Communicator, recommended
browser for WebTools xvi, 84
NetWare, network port with
Windows 9X/Me 9
NetWare client setup
Windows 2000 29
Windows 9X/Me 29
Windows NT 29
O
Oemsetup.inf file 3, 18, 21
P
PageMaker for Windows 49
PANTONE Book.ps 78
PDF files xiii, xiv
Photoshop 5.0
loading the ICC device settings profile
(Mac OS) 81
loading the ICC monitor settings file
(Mac OS) 80
loading the RGB working space profile
(Windows) 50
PostScript
printing with Windows 1, 15
screen fonts xiv
PostScript Level 3 xiii
PostScript printer
setting up color server as 53 to 77
PostScript Printer Description file, see PPD
PostScript printer driver
for Mac OS 54
for Windows xv
installing using WebTools 84 to 85
version included with user software xvii
Windows 2000 20 to 22
Windows 9X/Me
PostScript printer driver 2 to 4
Windows NT 4.0 15 to 19
PostScript printer driver for Mac OS
installing 54
PostScript printing
Windows 9X/Me 1
PowerPoint, RGB color reference file 78
94
Index
PPD
copying files for Windows
applications 49
overview xiii
selecting the PPD in the Chooser 88
Windows 2000 21
Windows 9X/Me 4
Windows NT 4.0 18
Printer Driver, installable options
Windows 9X/Me 5
printer drivers, seePostScript printer drivers
printing
Windows 2000 24
Windows NT 4.0 24
see also PostScript printing
Prntdrve.exe file 86
R
RAM see memory xvi
remote server management 83
RGB page 01 78
RGB page 02 78
S
screen fonts 77, 88
SMB printing setup
on Windows 2000 31 to 33
on Windows 9X/Me 10 to 12
on Windows NT 4.0 31 to 33
Solaris, supported version xvii
specifications, color server xii, xiii
Spooler, see Fiery Spooler
Stand21.ps (Windows) 49
Stand34.ps (Windows) 49
SunOS, support version xvii
System 8.0 see also Mac OS xvii
system requirements
Command WorkStation xviii
IPX xvii
Mac OS xvi
UNIX xvii
Windows xv
T
TCP/IP
printing software conforming to
RFC1179 xvii
thinnet cable xii
Token Ring, option xiii
Token Ring networking, option xiii
troubleshooting
Mac OS computers 88
Windows computers 87
U
Uninstalled Fonts folder 88
UNIX workstations, requirements for
printing to color server xvii
unshielded twisted pair (UTP) cable xii
User Software CD
contents (Mac OS) 53
contents (Windows) 35
installing from, for Mac OS 54, 78
troubleshooting fonts 88
W
WebTools, see Fiery WebTools
Windows
copying color files 48
installing Fiery utilities 35
system requirements xv
troubleshooting 87
Windows 2000
IPX 29 to 31
IPX/SPX 29
PostScript printer driver 20 to 22
printing requirements 24
setting up PostScript printing 15
troubleshooting 88
Windows 9X/Me
setting up PostScript printing 1
SMB printing 10 to 12
troubleshooting 87
95
Index
Windows NT 4.0
IPX 29 to 31
IPX/SPX 29
PostScript printer driver 15 to 19
printing requirements 24
setting up PostScript printing 15
troubleshooting 87
Windows requirements
Command WorkStation xviii
Fiery utilities xvi
Fiery WebTools xvi
WINS Name Server 11, 32
Word, RGB color reference file 78
Color Controller E-810
CONFIGURATION GUIDE
For use with the following color copiers:
Ricoh Aficio Color 6513
Gestetner CS213d
RexRotary CS813d
nashuatec CS513d
infotec 7513
Savin SDC413
Copyright © 2001 Electronics For Imaging, Inc. All rights reserved.
This publication is protected by copyright, and all rights are reserved. No part of it may be reproduced or transmitted in any form or by any means for any purpose
without express prior written consent from Electronics For Imaging, Inc., except as expressly permitted herein. Information in this document is subject to change
without notice and does not represent a commitment on the part of Electronics For Imaging, Inc.
The software described in this publication is furnished under license and may only be used or copied in accordance with the terms of such license.
This product may be covered by one or more of the following U.S. Patents: 4,500,919; 4,837,722; 5,212,546; 5,343,311; 5,424,754; 5,467,446;
5,506,946; 5,517,334; 5,537,516; 5,543,940; 5,553,200; 5,615,314; 5,619,624; 5,625,712; 5,666,436; 5,760,913; 5,818,645; 5,835,788; 5,866,856;
5,867,179; 5,959,867; 5,970,174; 5,982,937; 5,995,724; 6,002,795; 6,025,922; 6,041,200; 6,046,420; 6,065,041; 6,067,080; 6,112,665; 6,116,707;
6,118,205; 6,122,407; 6,134,018; 6,141,120; 6,151,014; 6,166,821; 6,184,873; 6,185,335; 6,201,614; 6,215,562; 6,219,659; 6,222,641; 6,225,974;
6,226,419; 6,238,105; 6,239,895; D406,117; D416,550; D417,864; D419,185; D426,206; D430,206; RE36,947
Trademarks
Fiery, the Fiery logo, Fiery Driven, ColorWise, EDOX, EFICOLOR, and RIP-While-Print are registered trademarks of Electronics For Imaging, Inc. in the U.S.
Patent and Trademark Office and certain other foreign jurisdictions.
EFI, the Electronics For Imaging logo, eBeam, the Fiery Driven logo, Fiery LX, Fiery Si, Fiery X2, Fiery X2e, Fiery X3e, Fiery X4, Fiery XJ, Fiery XJe, Fiery XJ-W,
Fiery Z4, Fiery ZX, Fiery X4, Fiery Z5, Fiery Z18, Fiery Z16, AutoCal, ColorCal, Command WorkStation, Continuous Print, DocBuilder, DocBuilder Pro, EFI
Densitometer, Fiery Downloader, Fiery Driver, Fiery Link, Fiery Prints, Fiery Print Calibrator, Fiery Scan, Fiery ScanBuilder, Fiery Spark, Fiery Spooler, FreeForm,
Harmony, Memory Multiplier, NetWise, PowerWise, RIPChips, ScanBuilder, Splash, the Splash logo, STARR Compression, Velocity, Velocity Balance, Velocity
Build, Velocity Estimate, Velocity Scan, VisualCal, WebTools, WebSpooler, WebInstaller, and WebStatus are trademarks of Electronics For Imaging, Inc.
All other terms and product names may be trademarks or registered trademarks of their respective owners, and are hereby acknowledged.
Legal Notices
APPLE COMPUTER, INC. (“APPLE”) MAKES NO WARRANTIES, EXPRESS OR IMPLIED, INCLUDING WITHOUT LIMITATION THE
IMPLIED WARRANTIES OF MERCHANTABILITY AND FITNESS FOR A PARTICULAR PURPOSE, REGARDING THE APPLE SOFTWARE.
APPLE DOES NOT WARRANT, GUARANTEE, OR MAKE ANY REPRESENTATIONS REGARDING THE USE OR THE RESULTS OF THE USE
OF THE APPLE SOFTWARE IN TERMS OF ITS CORRECTNESS, ACCURACY, RELIABILITY, CURRENTNESS, OR OTHERWISE. THE ENTIRE
RISK AS TO THE RESULTS AND PERFORMANCE OF THE APPLE SOFTWARE IS ASSUMED BY YOU. THE EXCLUSION OF IMPLIED
WARRANTIES IS NOT PERMITTED BY SOME STATES. THE ABOVE EXCLUSION MAY NOT APPLY TO YOU.
IN NO EVENT WILL APPLE, ITS DIRECTORS, OFFICERS, EMPLOYEES OR AGENTS BE LIABLE TO YOU FOR ANY CONSEQUENTIAL,
INCIDENTAL OR INDIRECT DAMAGES (INCLUDING DAMAGES FOR LOSS OF BUSINESS PROFITS, BUSINESS INTERRUPTION, LOSS OF
BUSINESS INFORMATION, AND THE LIKE) ARISING OUT OF THE USE OR INABILITY TO USE THE APPLE SOFTWARE EVEN IF APPLE
HAS BEEN ADVISED OF THE POSSIBILITY OF SUCH DAMAGES. BECAUSE SOME STATES DO NOT ALLOW THE EXCLUSION OR
LIMITATION OF LIABILITY FOR CONSEQUENTIAL OR INCIDENTAL DAMAGES, THE ABOVE LIMITATIONS MAY NOT APPLY TO YOU.
Apple’s liability to you for actual damages from any cause whatsoever, and regardless of the form of the action (whether in contract, tort [including negligence],
product liability or otherwise), will be limited to $50.
Part Number: 45022700
FCC Information
WARNING: FCC Regulations state that any unauthorized changes or modifications to this equipment not expressly approved by the manufacturer could void
the user’s authority to operate this equipment.
Class B Declaration of Conformity
This equipment has been tested and found to comply with the limits for a class B digital device, pursuant to Part 15 of the FCC rules. These limits are designed
to provide reasonable protection against harmful interference in a residential installation. This equipment generates, uses and can radiate radio frequency energy
and if not installed and used in accordance with the instructions, may cause harmful interference to radio communications. However, there is no guarantee that
interference will not occur in a particular installation.
If this equipment does cause harmful interference to radio or television reception, which can be determined by turning the equipment off and on, the user is
encouraged to try to correct the interference by one or more of the following measures:
Reorient or relocate the receiving antenna.
Increase the separation between the equipment and receiver.
Connect the equipment into an outlet on a circuit different from that to which the receiver is connected.
Consult the dealer or an experienced radio/TV technician for help.
In order to maintain compliance with FCC regulations, shielded cables must be used with this equipment. Operation with non-approved equipment or unshielded
cables is likely to result in interference to radio and TV reception. The user is cautioned that changes and modifications made to the equipment without the
approval of manufacturer could void the user’s authority to operate this equipment.
Industry Canada Class B Notice
This Class B digital apparatus complies with Canadian ICES-003.
Avis de Conformation Classe B de l’Industrie Canada
Cet appareil numérique de la Classe B est conforme à la norme NMB-003 du Canada.
RFI Compliance Notice
This equipment has been tested concerning compliance with the relevant RFI protection requirements both individually and on system level (to simulate normal
operation conditions). However, it is possible that these RFI Requirements are not met under certain unfavorable conditions in other installations. It is the user
who is responsible for compliance of his particular installation.
Dieses Gerät wurde sowohl einzeln als auch in einer Anlage, die einen normalen Anwendungsfall nachbildet, auf die Einhaltung der Funkentstörbestimmungen
geprüft. Es ist jedoch möglich, dass die Funkentstörbestimmungen unter ungünstigen Umständen bei anderen Gerätekombinationen nicht eingehalten werden.
Für die Einhaltung der Funkentstörbestimmungen einer gesamten Anlage, in der dieses Gerät betrieben wird, ist der Betreiber verantwortlich.
Compliance with applicable regulations depends on the use of shielded cables. It is the user who is responsible for procuring the appropriate cables.
Die Einhaltung zutreffender Bestimmungen hängt davon ab, dass geschirmte Ausführungen benützt werden. Für die Beschaffung richtiger Ausführungen ist der
Betreiber verantwortlich.
Software License Agreement
YOU SHOULD CAREFULLY READ THE FOLLOWING TERMS AND CONDITIONS BEFORE USING THIS SOFTWARE. IF YOU DO NOT
AGREE TO THE TERMS AND CONDITIONS OF THIS AGREEMENT, DO NOT USE THE SOFTWARE. INSTALLING OR USING THE
SOFTWARE INDICATES THAT YOU AGREE TO AND ACCEPT THE TERMS OF THIS AGREEMENT. IF YOU DO NOT AGREE TO ACCEPT
THE TERMS OF THIS AGREEMENT YOU MAY RETURN THE UNUSED SOFTWARE FOR A FULL REFUND TO THE PLACE OF PURCHASE.
License
Electronics For Imaging, Inc. (“EFI”) grants you a non-exclusive license to use the software (“Software”) and accompanying documentation (“Documentation”)
included with the Product. The Software is licensed, not sold. You may use the Software solely for your own customary business or personal purposes. You may
not rent, lease, sublicense or lend the Software. You may, however, permanently transfer all of your rights under this Agreement to another person or legal entity
provided that: (1) you transfer to the person or entity all of the Software and Documentation (including all copies, updates, upgrades, prior versions, component
parts, the media and printed materials, and this Agreement); (2) you retain no copies of the Software and Documentation, including copies stored on a computer;
and (3) the recipient agrees to the terms and conditions of this Agreement.
You may not make or have made, or permit to be made, any copies of the Software or portions thereof, except as necessary for backup or archive purposes in
support of your use of the Software as permitted hereunder. However, under no circumstances may you make or have made, any copies of any Software included
on the ROM, the hard disk drive or any other component of the controller board or hardware You may not copy the Documentation. You may not attempt to
alter, disassemble, decompile, decrypt or reverse engineer the Software.
Proprietary Rights
You acknowledge that the Software is proprietary to EFI and its suppliers and that title and other intellectual property rights therein remain with EFI and its
suppliers. Except as stated above, this Agreement does not grant you any right to patents, copyrights, trade secrets, trademarks (whether registered or unregistered),
or any other rights, franchises or licenses in respect of the Software. You may not adopt or use any trademark or trade name which is likely to be similar to or
confusing with that of EFI or any of its suppliers or take any other action which impairs or reduces the trademark rights of EFI or its suppliers.
Confidentiality
You agree to hold the Software in confidence, disclosing the Software only to authorized users having a need to use the Software as permitted by this Agreement
and to take all reasonable precautions to prevent disclosure to other parties.
Remedies And Termination
Unauthorized use, copying or disclosure of the Software, or any breach of this Agreement will result in automatic termination of this license and will make available
to EFI other legal remedies. In the event of termination, you must destroy all copies of the Software and all of its component parts. All provisions of this Agreement
relating to disclaimers of warranties, limitation of liability, remedies, or damages, and EFI’s proprietary rights shall survive termination.
Limited Warranty And Disclaimer
EFI warrants to the original purchaser (“Customer”) for thirty (30) days from the date of original purchase from EFI or its authorized retailer that the Software
will perform in substantial conformance to the Documentation. EFI warrants the media containing the Software against failure during the above warranty period.
EFI makes no warranty or representation that the Software will meet your specific requirements, that the operation of the Software will be uninterrupted or error
free, or that all defects in the Software will be corrected.
EXCEPT FOR THE ABOVE EXPRESS LIMITED WARRANTY, EFI MAKES AND YOU RECEIVE NO WARRANTIES OR CONDITIONS ON THE
SOFTWARE, EXPRESS, IMPLIED, STATUTORY, OR IN ANY OTHER PROVISION OF THIS AGREEMENT OR COMMUNICATION WITH YOU,
AND EFI SPECIFICALLY DISCLAIMS ANY IMPLIED WARRANTY OR CONDITION OF MERCHANTABILITY OR FITNESS FOR A PARTICULAR
PURPOSE.
Limitation Of Liability
IN NO EVENT WILL EFI OR ITS SUPPLIERS BE LIABLE FOR ANY DAMAGES, INCLUDING LOSS OF DATA, LOST PROFITS, COST OF COVER
OR OTHER SPECIAL, INCIDENTAL, CONSEQUENTIAL OR INDIRECT DAMAGES ARISING FROM THE SALE, INSTALLATION,
MAINTENANCE, USE, PERFORMANCE OR FAILURE OF THE SOFTWARE, HOWEVER CAUSED AND ON ANY THEORY OF LIABILITY. THIS
LIMITATION WILL APPLY EVEN IF EFI HAS BEEN ADVISED OF THE POSSIBILITY OF SUCH DAMAGE. YOU ACKNOWLEDGE THAT THE
PRICE OF THE PRODUCT REFLECTS THIS ALLOCATION OF RISK. BECAUSE SOME JURISDICTIONS DO NOT ALLOW THE EXCLUSION
OR LIMITATION OF LIABILITY FOR CONSEQUENTIAL OR INCIDENTAL DAMAGES, THE ABOVE LIMITATION MAY NOT APPLY TO YOU.
EFI DOES NOT EXCLUDE LIABILITY IN RESPECT OF PERSONAL INJURY, DEATH, WILLFUL MISCONDUCT OR GROSS NEGLIGENCE,
EXCEPT TO THE MAXIMUM EXTENT THAT IT CAN BE EXCLUDED OR LIMITED BY LAW.
Export Controls
You agree that you will not export or re-export the Software in any form in violation of any applicable laws or regulations of the United States or the country in
which you obtained them.
U.S. Government Restricted Rights
Software provided with this Product is provided with RESTRICTED RIGHTS. Use, duplication, or disclosure by the U.S. Government is subject to restrictions
as set forth in subparagraph (c)(1)(ii) of the Rights in Technical Data and Computer Software clause at DFARS 252.227-7013 or subparagraphs (c)(1) and (2) of
the Commercial Computer Software Restricted Rights at 48 CFR 52.227-19, as applicable.
General
The laws of the State of California govern this Agreement. You agree that this Agreement shall not be subject to the United Nations Convention on Contracts for
the International Sale of Goods (1980). This Agreement is the entire agreement held between us and supersedes any other communications or advertising with
respect to the Software. If any provision of this Agreement is held invalid, the remainder of this Agreement shall continue in full force and effect.
If you have any questions, please see EFI’s web site at www.efi.com.
Contents
Introduction
About this manual
xi
Organization
xii
About the documentation
xii
Chapter 1: Connecting to the Network
E-810 on the network
1-1
Stages of installation on the network
1-2
Quick path to installation
1-4
Connecting network cable to the E-810
1-10
Back view of the E-810
1-10
Ethernet connection
1-11
Chapter 2: Preparing for E-810 Setup
Levels of access and control
2-1
E-810 print connections
2-1
Passwords
2-3
Fiery WebTools
2-4
Control level scenarios
2-6
E-810 system software
2-8
About Setup
2-8
Local Setup from the E-810
2-9
Network server setup requirements
Ensuring the copier connection
2-9
2-10
viii
Contents
Chapter 3: Performing Setup from the Control Panel
About E-810 Setup
3-1
Making changes to Setup
3-1
Network server setup requirements
3-1
E-810 Setup from the Control Panel
3-2
Accessing Setup options
3-3
About the Control Panel Setup interface
3-5
Types of Setup screens
3-6
Server Setup options
3-8
Network Setup options
3-10
Port Setup options
3-13
Protocol Setup options
3-14
Service Setup options
3-22
Printer Setup options
3-35
PostScript Setup options
3-36
Color Setup options
3-39
Administrative functions in the Setup menu
3-42
Job Log Setup
3-42
Change Password
3-43
Exit Setup
3-45
Clearing the E-810
3-45
Restoring the E-810 to factory defaults
3-45
Printing a Configuration page from the Control Panel
3-46
Chapter 4: Setting up the E-810 from a Windows Computer
Accessing Setup
4-1
Local Fiery Setup
4-2
Remote Fiery Setup
4-3
General Setup options
4-4
Passwords
4-5
Job Log Setup
4-7
ix
Contents
Network Setup
4-8
Adapters/Ports
4-8
Protocols
4-10
Services
4-15
Printer Setup options
4-30
Printer Connections
4-30
PS (PostScript) Setup
4-31
Color Setup
4-32
Exiting Setup
4-34
Printing the Configuration page
4-35
Chapter 5: Setting up Network Servers
Support for Fiery utilities
5-1
E-810 on a NetWare 5.x network with NDPS
5-2
Tips for experts—NetWare 5.x networks
5-2
Configuring a NetWare 5.x server for printing
5-3
E-810 on a NetWare 3.x or 4.x network
5-5
Tips for experts—IPX networks
5-6
Overview of IPX printing to the E-810
5-6
Configuring a NetWare 3.x or 4.x server for printing
5-7
E-810 on a TCP/IP network with Windows NT 4.0
5-11
Tips for experts—Windows NT 4.0 with TCP/IP
5-11
Configuring a Windows NT 4.0 server to support the E-810
5-12
Configuring the E-810 and clients for Fiery WebTools
5-16
Setting the WebLink destination
5-17
E-810 on a network with UNIX workstations
5-18
Tips for experts—UNIX workstations
5-18
Important note about the remote printer name
5-19
Setting up the E-810 on TCP/IP networks
5-19
Managing print jobs
5-21
x
Contents
Chapter 6: Administering the E-810
Administrator functions
6-1
Maintaining optimal E-810 performance
6-3
Troubleshooting the E-810
6-4
Troubleshooting during Setup from the Control Panel
6-4
Runtime error messages
6-9
Appendix A: Token Ring Network Option
E-810 Token Ring option
A-1
Connecting Token Ring hardware
A-1
IPX/SPX installations
A-3
TCP/IP installations
A-3
Setting up Token Ring on the E-810
A-3
Setting up NetWare Windows clients
A-3
Index
xi
Introduction
About this manual
This manual is intended for anyone who is responsible for integrating the Color
Controller E-810™ into a business environment that includes networked personal
computers. After you set up the Color Controller E-810 and client workstations as
described in this manual and in Getting Started, individual users can print to the Color
Controller E-810 as a high-performance color Adobe PostScript printer.
N OTE : The term “E-810” is used in this manual to refer to the Color Controller E-810.
The name “Aero” is used in illustrations to represent the E-810.
The E-810 includes support for the Fiery WebTools™ and software for
Command WorkStation™, which enable an operator to manage all jobs sent to the
E-810. Although it may not be the case at all sites, the documentation for this product
assumes the presence of an operator who controls and manages jobs sent by users from
remote workstations.
Any connectivity or administrative features specific to the copier are described in
Getting Started, the Printing Guide, or the Release Notes.
About this manual
This manual covers the following topics:
• Basic configuration of the E-810 to support printing over AppleTalk,
TCP/IP, and IPX (Novell) networks
• Configuring Novell, Microsoft Windows NT 4.0, and Windows 2000 servers and
UNIX systems to provide E-810 printing services
• Administering network printing
• Using the E-810 in mixed network environments
• Setting up a Token Ring connection
N OTE : The network guidelines in this book are not intended to replace the services of
an experienced network engineer.
xii
Introduction
Organization
This manual is organized as follows:
• Chapter 1 illustrates the supported network configurations and shows the network
connectors on the E-810.
• Chapter 2 describes how to prepare for E-810 Setup, including planning system
security through access levels.
• Chapter 3 describes E-810 configuration (Setup) from the Control Panel.
• Chapter 4 describes E-810 Setup from a Windows computer.
• Chapter 5 provides guidelines for setting up Windows network servers and UNIX
systems for printing to the E-810 and for using the Fiery WebTools.
• Chapter 6 summarizes some administrative features of E-810 software that are
available for IPX/SPX, TCP/IP, and AppleTalk networks, and offers troubleshooting
hints.
• Appendix A describes the Token Ring option.
N OTE : Administrator features described in other manuals are summarized on page 6-1.
About the documentation
This manual is part of a set of E-810 documentation, which includes the following
manuals for users and system administrators:
• The Configuration Guide explains basic configuration and administration of the
E-810 for the supported platforms and network environments. It also includes
guidelines for setting up UNIX, Windows NT 4.0, and Novell NetWare servers to
provide printing services to clients.
• Getting Started describes how to install software to enable users to print to the
E-810. Specifically, it describes installation of printer files and other user software
provided on the User Software CD. It also explains how to connect each user to the
network.
• The Printing Guide describes the printing features of the E-810 for users who send
jobs via remote workstations on the network.
xiii
About the documentation
• The Color Guide provides information on managing the color output of your E-810.
It addresses concepts and issues associated with printing to the E-810 and outlines
key workflow scenarios. This manual explains how to calibrate your copier and take
advantage of the ColorWise® color management system as well as features in
ColorWise Pro Tools™. In addition, the Color Guide offers information on printing
from popular Windows and Mac OS applications.
• The Job Management Guide explains the functions of the Fiery® utilities, including
Command WorkStation, and how they can be used to manage jobs. This book is
intended for an operator or administrator, or a user with the necessary access
privileges, who needs to monitor and manage job flow, and troubleshoot problems
that may arise.
• Release Notes provide last-minute product information and workarounds for some of
the problems you may encounter.
1
1-1
Chapter 1:
Connecting to
the Network
E-810 on the network
This chapter summarizes the stages in setting up the E-810, and includes diagrams that
refer you to other chapters or other manuals for completing your installation. Check
those references to find the information you need quickly.
E-810 on the network
When the E-810 is connected to a network, it behaves as a networked PostScript
printer. The built-in Ethernet interface on the E-810 supports the following network
protocols:
• AppleTalk
• TCP/IP (the lpd, nbt, and http protocols)
TCP/IP stands for Transmission Control Protocol/Internet Protocol. The lpd
protocol is the standard TCP/IP printing protocol. The nbt protocol supports
Windows (SMB) printing. The http protocol is commonly used for Web pages on
the Internet and on intranets.
• IPX/SPX (Novell)
IPX/SPX stands for Internetwork Packet Exchange/Sequenced Packet Exchange.
These protocols (rules that enable computers on a network to communicate with each
other) are supported on Mac OS, Windows, and UNIX platforms and can run
concurrently on the same cable. Workstations that use other protocols can print
through a server that uses one of the protocols mentioned. A Token Ring option is also
available. This option supports the TCP/IP and IPX/SPX protocols. The E-810 is
auto-sensing, and can handle all of these connections simultaneously.
When you add the E-810 to a network, it is assumed that a network administrator has
already installed a network cabling system and connected workstations and servers.
1
1-2
Connecting to the Network
Stages of installation on the network
Installation can be performed by a network or printing administrator. The stages of a
successful installation are:
•
Physically connecting the E-810 to a functioning network
Prepare a network node for the E-810—obtain cable and route it to the location where
the E-810 will be installed (near the copier) and attach the cable to the network
interface of the E-810. See page 2-10 for details.
N OTE : If you plan to run the Command WorkStation software, you will need to install
the software and connect the Command WorkStation computer to the network along
with the E-810. See Getting Started.
•
Configuring the network server
When network servers are required, you need to configure those servers to provide
client access to the E-810 as a color PostScript printer. See Chapter 5 for information
on configuring network servers in Windows and UNIX network environments.
•
Setting up the E-810
Configure the E-810 for your particular printing and network environment. First read
Chapter 2, and then see the following chapters for details.
•
Preparing client workstations for printing
Install the files needed for printing, install additional user software, and connect the
client to the E-810 over the network. These steps are described in Getting Started, and
some information is provided in Chapter 5 of this manual.
•
Administering the E-810
Monitor and maintain system performance and troubleshoot problems that arise. See
Chapter 6 of this manual, and the Job Management Guide for details.
1
1-3
Stages of installation on the network
Summary of E-810 network installation
CONNECTION
E-810
SERVER CONFIGURATION
Prepare a network node. Connect the E-810 to the
copier and the network. If you use a computer
running the Command WorkStation software,
connect it to the network.
Network server
Configure UNIX, Windows NT 4.0, and IPX (Novell)
servers to specify E-810 print queues and E-810
users.
No special configuration of AppleShare servers is
required.
E-810 SETUP
E-810
On the E-810 Control Panel, configure, at a
minimum, the Server Setup, Network Setup, and
Printer Setup. From the Control Panel, WebSetup,
or Command WorkStation, configure the remaining
Setups. Calibrate the E-810.
CLIENT SETUP
UNIX
Mac OS
Windows
At each computer from which users print to the
E-810:
• Install the appropriate printer files and connect
to one or more queues.
• Install Fiery utilities and an Internet browser
for those computers that will use them.
• Verify the E-810 in the list of printers and run a
test print.
E-810 available on the network
1
1-4
Connecting to the Network
Quick path to installation
The diagrams on the following pages show typical systems used for printing and
running Fiery software from remote workstations. Find the page with your preferred
platform and network type, and then look up the setup procedures referenced in the
“Key to setup” at the upper left of each diagram.
The diagrams describe devices that use the supported networking protocols. They are
logical diagrams and are not intended to describe the physical arrangement (topology)
of devices on the network. A variety of physical arrangements is possible with each
logical arrangement. For example, twisted pair Ethernet networks commonly use a star
configuration around a hub, rather than a bus arrangement. The design of physical
networks is beyond the scope of this manual.
If the network uses more than one protocol or more than one type of workstation,
combine the setups listed for each component of your system. Multiple protocols
(shown in the diagrams as parallel lines) can run on the same cable. A solid connection
from the E-810 with an arrow indicates that other supported network types can be
operational at the same time.
A Token Ring card is required for connection to a Token Ring network. For more
information, see Appendix A.
N OTE : The IPX/SPX and TCP/IP functionality outlined in this section is available on
both Ethernet and Token Ring networks. AppleTalk is supported on Ethernet only.
The protocols used in these diagrams are indicated as follows:
IPX (Novell)
AppleTalk
TCP/IP (lpd,
nbt, or http)
Other
1
1-5
Quick path to installation
Mac OS environment with AppleTalk
Key to setup:
1 Mac OS computer
2 E-810 Setup
Getting Started
Chapter 3
Another supported
protocol
E-810 connected to copier
2
AppleTalk
Mac OS computer
1
Mac OS computer
1
Mac OS computers can print directly.
Mac OS computer
1
AppleTalk protocol
1
1-6
Connecting to the Network
Windows computers in a Novell environment
Key to setup:
1
2
3
4
NetWare server
E-810 Setup
NetWare client
Windows computer with SPX
page 5-5
Chapter 3
Getting Started
page 5-10
Another supported
protocol
E-810 connected to copier
2
NetWare server
1
IPX
TCP/IP (http) for Fiery WebTools
IPX
Windows computer:
NetWare client
3
Windows computer:
NetWare client
3
Windows computer:
NetWare client
running SPX
3, 4
IPX protocol
SPX protocol (TCP/IP
or AppleTalk
possible)
Printing on this network
All Windows computers can print through
the NetWare server.
For using Fiery WebTools
A Windows computer with TCP/IP (http)
loaded.
1
1-7
Quick path to installation
Windows NT 4.0 Server environment
Key to setup:
1 Windows NT 4.0 Server
2 E-810 Setup
3 Windows NT 4.0 client
page 5-12
Chapter 3
page 5-14
Another supported
protocol
E-810 connected to copier
2
Windows NT Workstation
or Windows NT Server
acting as print server
1
LAN with
NETBEUI, etc.
TCP/IP (lpd) for printing
TCP/IP (http) for Fiery WebTools
TCP/IP for Fiery utilities
Windows computer
3
Windows computer
3
Windows NT 4.0 computer
with TCP/IP loaded
1
NETBEUI or other protocol available on
the clients and the server
Printing on this network
Windows clients can print using a
protocol available on the Windows NT 4.0
print server. Windows NT 4.0 machines
can print using TCP/IP with the lpd
protocol.
For running Fiery utilities and WebTools
TCP/IP
A Windows NT 4.0 computer with TCP/IP
loaded.
1
1-8
Connecting to the Network
Windows computers using Windows printing
Key to setup:
1 Windows computer
2 E-810 Setup
Getting Started
Chapter 3
Another supported
protocol
E-810 connected to copier
2
TCP/IP (nbt)
Windows computer
1
Windows computer
1
Windows computer
1
For Windows printing
TCP/IP (nbt) protocol
Windows (SMB) printing enabled on the
E-810
Windows NetBios and TCP/IP enabled
on the computer
1
1-9
Quick path to installation
UNIX workstations and Windows NT 4.0 computers on a TCP/IP network
Key to setup:
1
2
3
4
5
UNIX server/host
E-810 Setup
UNIX workstation
TCP/IP client
Windows NT 4.0 client
page 5-18
Chapter 3
page 5-18
Getting Started, Chapter 3
page 5-14
Another supported
protocol
E-810 connected to copier
2
UNIX server or
workstation
1, 3
TCP/IP (lpd, http, and ipp)
TCP/IP client PC
4
Printing on this network
Windows NT 4.0 computer
with TCP/IP loaded
5
UNIX workstations with the TCP/IP
(lpd) protocol can print directly and
act as host for shared printing.
TCP/IP clients can print through
UNIX server or directly; requires
TCP/IP and the lpr print service
loaded.
For running Fiery utilities and
WebTools
TCP/IP (lpd) protocol
Windows computers with TCP/IP
loaded can use these applications.
1
1-10
Connecting to the Network
Connecting network cable to the E-810
In this section, the back panel of the E-810 is illustrated, followed by information for
connecting to the Ethernet board. For information about connecting to a Token Ring
network, see Appendix A.
!
Shut down the E-810 before attaching it to any network device. If the E-810 has just
finished processing, wait 5 seconds after the system reaches the Idle state before using
the power switch to turn off the E-810. See the Job Management Guide for the proper
shutdown procedure.
Back view of the E-810
10/100BaseT Ethernet (RJ-45)
Parallel port connector
Copier interface connector
1
1-11
Connecting network cable to the E-810
Ethernet connection
For connecting to Ethernet, the E-810 supports Unshielded Twisted Pair (UTP)
cabling, defined as Category 5 for use with 100BaseT; or as Category 3, Category 4, or
Category 5 for use with 10BaseT. The cable uses an 8-pin RJ-45 connector that plugs
into the RJ-45 socket on the E-810.
N OTE : The 100BaseT type supported by the E-810 is 100BaseTX, also known as Fast
Ethernet. If an Ethernet hub is used, it must be a 100BaseTX hub. The term
“100BaseT” is used to refer to 100BaseTX.
TO
CONNECT TO THE
•
E THERNET
BOARD
Connect the network cable to the RJ-45 connector on the back of the E-810.
You must use a Category 5 unshielded twisted pair cable network cable for 100BaseT.
2
2-1
Chapter 2:
Preparing for
E-810 Setup
Levels of access and control
To prepare for printing at your site, you need to do some initial E-810 configuration,
or Setup, to specify the network environment and the kind of printing you will do.
Before you perform Setup, you must decide the levels of access you will implement for
your site. Administrators and operators must also understand how E-810 system
software is structured in order to configure and use the E-810 system correctly.
Levels of access and control
When you configure the E-810 during Setup, you (as system administrator)
implement a particular level of control by enabling or not enabling print connections,
passwords, and access to Fiery WebTools. The level of control you implement can
range from strict to moderate to minimal—or none at all.
• Strictest control might be appropriate for a high-volume printing environment
where an administrator or operator controls the job flow and all printing; jobs sent
by users are spooled (stored) to the E-810 disk until the operator decides it is time to
print them. In addition, only the administrator and/or operator have access to job
management tools. This is the recommended level of control.
N OTE : The term “job management tools” is used in this manual to refer to
Command WorkStation, Fiery Spooler, and Fiery WebSpooler.
• Least control might be appropriate for a small site where anyone on the local
network can control all printing and E-810 functions. Although there may be an
administrator or operator charged with certain duties, all users have equal access to
the system and job management tools.
E-810 print connections
The E-810 supports three print connections: Hold queue, Print queue, and Direct
connection. These print connections can be enabled, or “published,” to users on the
network when you configure Printer Setup. All published connections are constantly
checked for the presence of jobs. The Print queue and the Direct connection give
remote users more direct access to the E-810 than the Hold queue. Therefore, do not
publish the Print queue and the Direct connection in environments where stricter
control is desired.
2
2-2
Preparing for E-810 Setup
In addition, you can enable the Printed queue, which is a storage area for the most
recent jobs from the Print queue. The Printed queue makes it convenient to reprint
those jobs. In Setup, you enable the Printed queue and specify the maximum number
of jobs retained in the queue (see page 3-9). Reprinting jobs in the Printed queue
requires the job management tools.
Hold queue
Jobs sent to the Hold queue are spooled to the E-810 hard disk for printing at a later
time or for repeated printing. Because the Hold queue is a storage place, jobs sent to it
cannot proceed through the printing process until the operator intervenes, using the
the job management tools (see the Job Management Guide).
Print queue
This is the standard E-810 queue. Jobs sent to the Print queue are processed and
printed in the order they are received. Jobs prioritized by an operator with the job
management tools and jobs sent via the Direct connection can take priority over jobs
sent to the Print queue.
To use the Fiery utilities and Fiery WebTools, you must enable either the Hold queue
or the Print queue.
Direct connection
The Direct connection transmits jobs directly to the E-810, but only when the E-810
is not processing another job. If the E-810 is busy, the job remains at the user
workstation until the E-810 is ready. The job is then processed as soon as the previous
job is finished and before the next queued job is processed.
Jobs sent to the Direct connection are not stored on the E-810 hard disk, and they
cannot be selected for reprinting, moving, or deletion. Therefore, the Direct
connection provides a measure of security for sensitive files. Jobs sent to the Direct
connection do appear in the Job Log, for job management purposes.
You cannot use the Direct connection for lpd printing over TCP/IP.
N OTE : To download fonts to the E-810, you must publish the Direct connection.
2
2-3
Levels of access and control
Passwords
You can implement password requirements as a means of controlling access to E-810
functions. The E-810 allows you to set the following passwords in Setup:
• Administrator—from the Control Panel, Command WorkStation, or
Fiery WebSetup
• Operator—from Command WorkStation or Fiery WebSetup
N OTE : By default, no passwords are set on the E-810. If you do not specifically set
passwords, all users will have administrator privileges, which include access to
important functions such as Setup (including setting passwords) and job control. It is
strongly recommended that you set at least an Administrator password to protect the
E-810 from random or accidental changes to Setup.
Administrator privileges
Administrator control, which confers control of Setup, is the highest level of control,
since the person who has access to Setup can control the printing and job management
environment. Administrator privileges include publishing print connections, setting
passwords, deleting fonts, clearing the E-810 of all job data, performing calibration,
and setting the WebLink™ destination.
When performing a function from the E-810 Control Panel that prompts you for the
Administrator password, you must enter it promptly. Otherwise, the E-810 Control
Panel returns to Idle, and you must start over again.
Operator privileges
Operator control includes control of print jobs from the job management tools,
including the ability to override job settings.
Guest privileges (no password)
No password is needed for a user to log in as a Guest from the job management tools.
A Guest can view the status of active jobs but cannot make changes to jobs or to the
E-810 state.
2
2-4
Preparing for E-810 Setup
Fiery WebTools
The E-810 can support Internet or intranet access with Fiery WebTools from
Windows and Mac OS computers. To enable use of Fiery WebTools, you must do the
following in Setup:
• Enable TCP/IP.
• Set an IP address, subnet mask, and gateway address for the E-810.
• Enable Web Services.
Instead of manually assigning the IP address, subnet mask, and gateway address, you
can use DHCP, RARP, or BOOTP protocols to assign some or all of these addresses
(see page 3-16).
You can set passwords to control access to Fiery WebTools features. If you do not
specifically set these passwords, all users have access to all Fiery WebTools functions
(see page 2-3). Fiery WebTools include Status, WebSpooler, WebLink, WebScan,
WebDownloader, WebSetup, and Installer.
Status
The Status WebTool provides you with current information on the jobs processing and
printing on the E-810. It is not affected by passwords. For more information, see the
Printing Guide.
WebSpooler
The WebSpooler interface is very similar to that of Command WorkStation. It allows
remote users to preview, manipulate, reorder, reprint, and delete jobs currently
spooling, processing, or printing on the E-810. It also allows the administrator and
operator to edit and merge jobs (Thumbnails A and B) and to view, print, or delete the
Job Log.
Fiery WebSpooler access can be controlled by setting an Operator password in Setup.
If you set a password, only users with that password can manipulate jobs from
Fiery WebSpooler. A user who does not have the password can still log in to
Fiery WebSpooler as a Guest with view-only access (see page 2-3). For more
information, see the Job Management Guide.
2
2-5
Levels of access and control
WebLink
WebLink provides all users with a link to a pre-set Fiery WebLink destination. To
change the WebLink destination, see page 5-17. This function requires the
Administrator password, if one has been set. See “Passwords” on page 2-3.
N OTE : If you do not set the Administrator password, any user can change the WebLink
destination, which affects all users. For this reason, it is strongly recommended that
you set an Administrator password.
WebScan
With WebScan, you can retrieve scanned documents from a computer on the Internet
or your organization’s intranet. For more information, see the Printing Guide.
WebDownloader
WebDownloader allows you to download PostScript, PDF, and ASCII files directly to
the E-810 without first opening the file in an application.
WebSetup
WebSetup allows you to view and modify E-810 Setup options from a remote
workstation. For more information, see Chapter 4.
N OTE : Fiery WebSetup is supported on Windows computers only.
Installer
The Installer WebTool allows users to download installers for printer drivers directly
from the E-810. It is not affected by passwords. For more information, see Getting
Started.
2
2-6
Preparing for E-810 Setup
Control level scenarios
Typical scenarios of access and control, ranging from least control to strictest control,
are described in this section. Choose the scenario that best matches your site
requirements, and then refer to the corresponding number in the table for guidance on
how to configure your system for those requirements.
N OTE : It is strongly recommended that you set at least an Administrator password to
prevent unauthorized changes to system settings.
1.
(Least control—not recommended) No designated administrator or operator
All users have equal access to all system functions including Setup, clearing the E-810,
deleting printer fonts, setting the WebLink destination, performing calibration,
printing to all E-810 print connections, and managing all jobs from the job
management tools.
2.
A designated administrator but no designated operator
Only an administrator can perform Setup, calibration, and other administrator
functions, but all other system functions are accessible to all users, including printing
to all E-810 print connections, and managing all jobs from the job management tools.
3.
A designated administrator and a superuser operator
Only an administrator can perform Setup, calibration, and other administrator
functions, and only an operator or administrator can control jobs from the job
management tools. Users can print to all E-810 print connections.
2
2-7
4.
Levels of access and control
A designated administrator and a designated operator, no Fiery WebTool access
Only an administrator can perform Setup, calibration, and other administrator
functions, and only an operator or administrator can control jobs from the job
management tools; users can print to the Hold queue and Print queue, but not to the
Direct connection; the operator controls all job flow, but jobs sent to the Print queue
may not require operator intervention; no access to Fiery WebTools.
5.
(Strictest control) A designated administrator and a designated operator, no Fiery
WebTool access, operator controls all jobs
Only an administrator can perform Setup, calibration, and other administrator
functions, and only an operator or administrator can control jobs from the job
management tools; users can print only to the Hold queue; the administrator and the
operator have complete control of job flow; no access to Fiery WebTools.
Use these settings
in Setup
1
(Least)
2
3
Enable Direct connection
√
√
√
Enable Print queue
√
√
√
Enable Web Services
√
√
√
√
√
√
√
√
√
√
Set an Administrator Password
(strongly recommended)
Set an Operator password
4
5
(Strictest)
√
2
2-8
Preparing for E-810 Setup
E-810 system software
The E-810 uses Windows NT Workstation system architecture to receive and process
jobs and send job data to the copier. To log in to the E-810, enter Administrator as the
user name, and enter the password.
N OTE : Configuring and monitoring the Windows NT functions from the E-810
require the Fiery Advanced Controller Interface option. For more information, contact
your authorized service/support technician.
Resident on the Windows NT Workstation is the following software unique to the
E-810:
• Server—The Server is an independent software process that is started automatically
whenever Windows NT is booted. As the central element of E-810 system software,
the Server process controls the spooling, rasterizing, and printing of jobs, as well as
job management (the Job Log), storage, and retrieval.
When the Server is not running, jobs cannot be received by the E-810, job processing cannot occur, job data cannot be transferred to the copier for printing, and
Command WorkStation cannot connect to the E-810. In the event that you need to
restart the Server process, right-click the FieryBar™ and choose Restart Fiery.
• Command WorkStation—Command WorkStation is the interface tool for the
Server. It provides a graphical means of viewing and controlling Server functions.
About Setup
Setup configures the E-810 to communicate with other devices and manage print jobs.
You must perform Setup the first time you turn on the E-810 after new system
software is loaded, or any time Server software is reinstalled. An initial Setup using
default settings is adequate for getting the E-810 to reach Idle status, but not for full
functionality. When your network or user printing environment changes, you can
change Setup options accordingly.
You must perform initial Setup at the E-810 Control Panel. Configure at least Server
Setup, Network Setup, and Printer Setup, in that order. Afterwards, you can complete
or change most Setup options from a Windows computer, using
Command WorkStation or Fiery WebSetup.
2
2-9
About Setup
Local Setup from the E-810
You can also perform Setup locally at the E-810, using Server Setup, a Windows NT
Control Panel. Some of the settings you specify in Server Setup configure the Server
process (such as print job defaults), while some configure the Windows NT
Workstation environment (such as system date and time). Depending on the settings
you change in Server Setup, you must restart Windows NT before your changes take
effect.
Setup options for local Setup are divided into three groups:
General Setup
System settings, passwords, and Job Log options
Network Setup
All the active network systems that will transmit print jobs to
the E-810
Printer Setup
E-810 print connections to be made available to users, and
color defaults for jobs
The other Setup applications (Command WorkStation or Fiery WebSetup) have
different interfaces, but allow you to set most of the same options.
Network server setup requirements
For Token Ring, Novell, and Windows NT (using TCP/IP) networks, the network
servers must be configured for printing to the E-810 before you configure E-810
network settings in Setup. Refer to the diagrams in Chapter 1 for chapter references to
information about network server setup.
To configure network settings in Setup, you need a live network connection, so that
the E-810 can query the network for zones, servers, and server-based queues.
Whenever the configuration of the E-810, the copier, or the network itself changes at
your site, you can alter individual settings to correspond to the changed environment.
Changing network or port settings may require that you make changes to other Setup
options as well.
2
2-10
Preparing for E-810 Setup
Ensuring the copier connection
Complete the following steps before you configure the E-810 and the workstations that
will print to the E-810. A service technician will have performed some initial
installation.
TO
PREPARE FOR
E-810
CONFIGURATION
1.
Print a copier test page to make sure the copier is functioning normally.
2.
Turn off the copier and connect the interface cable from the copier to the E-810.
3.
To confirm this connection, turn on the copier and the E-810, and print a Test Page
from the E-810 Control Panel.
To print a Test Page, press the Menu button on the Control Panel to display the
Functions menu. Choose Print Pages, and then Test Page.
4.
With both the copier and the E-810 turned off, connect the network cable to the
E-810, as described in Chapter 1.
The network should already be installed and operational.
5.
Turn on the copier and then the E-810.
6.
Prepare network servers to share E-810 user software and to enable networked users
to print to the E-810.
See Chapter 5 for details.
7.
Perform E-810 Setup as described in Chapter 3.
3
3-1
Chapter 3:
Performing
Setup from
the Control
Panel
About E-810 Setup
Setup is required the first time the E-810 is turned on after new system software is
loaded. In this initial Setup, you (or the service technician who loads the software)
choose the language to use for E-810 Control Panel menus and messages.
About E-810 Setup
In initial Setup, you must configure at least Server Setup, Network Setup, and Printer
Setup, in that order, from the Control Panel. If you do not configure the remaining
Setups, the E-810 uses default settings. These defaults allow the E-810 to reach the Idle
state, but might not allow users to print to the E-810. You need to make settings
appropriate for the printing environment at your site.
Making changes to Setup
After initial Setup, you can change Setup options from the Control Panel (page 3-2),
E-810 Server Setup (a Windows NT application), Fiery WebSetup, or
Command WorkStation (page 4-3). Most Setup options can be set using any of these
methods.
N OTE : Configuring and monitoring the Windows NT functions on the E-810 require
the Fiery Advanced Controller Interface option. For more information, contact your
authorized service/support technician.
Network server setup requirements
For Novell and Windows NT 4.0 (using TCP/IP) networks, the network servers must
be configured for printing to the E-810 before you configure E-810 network settings in
Setup. You need a live network connection so the E-810 can query the network for
zones, servers, and server-based queues. The diagrams on pages 1-5 through 1-9 give
chapter references for network server setup.
3
3-2
Performing Setup from the Control Panel
You must configure the E-810 with the correct Windows NT domain name. This is
especially important for Windows printing, also known as SMB printing. For E-810
systems that include the Fiery Advanced Controller option, open the Start
Menu>Settings>Control Panel>Network>Identification tab, and enter the correct
domain name. You must also select Create a Computer Account in the Domain, and
enter the user name and password of a user who can add workstations to the specified
domain. For configurations that do not include the Fiery Advanced Controller option,
you need to add the E-810 to the domain from a networked Windows NT 4.0 server,
using the Server Manager utility.
Whenever the configuration of the E-810, the copier, or the network itself changes at
your site, you can alter individual settings to correspond to the changed environment.
Likewise, if printing needs or administrative requirements change, you can alter the
corresponding settings. Changing network or port settings may require that you make
changes to other Setup options as well.
E-810 Setup from the Control Panel
Setup performed from the Control Panel configures the E-810 to communicate with
other devices and manage print jobs sent to it.
Setup provides these groups of options:
• Server Setup to specify system options
• Network Setup to specify all the active network systems that transmit print jobs to
the E-810
• Printer Setup to specify how print jobs and queues are managed
• PS Setup to specify PostScript settings
• Color Setup to specify color settings
• Job Log Setup to specify how the E-810 handles its log of printed jobs
The Change Password option in the Setup menu allows you to create and change the
Administrator password on the E-810.
3
3-3
E-810 Setup from the Control Panel
Accessing Setup options
The Control Panel on the front of the E-810 enables you to set options and view
information about jobs printed to the E-810. It comprises the following parts:
• Activity light—indicates normal or problem activity
• Line selection buttons—select a setting and proceed to the next option
• Display window—shows status information and options for setting up the E-810
• Up and down buttons—scroll menus, options, and settings
• Menu button—cancels without saving changes; also toggles to Functions menu
E-810 Control Panel
Activity light
Line selection buttons
Display window
Up button
Menu button
Down button
The Job Management Guide describes the online display screens in detail. This chapter
describes only the screens you might see when performing Setup.
3
3-4
TO
ACCESS
1.
Performing Setup from the Control Panel
S ETUP
WHEN THE
E-810
IS AT I DLE
Make sure the information screen on the Control Panel reads Idle.
If Printing or RIPping appears, the E-810 is processing, and you must wait until
the system finishes and reaches the Idle state.
2.
Press the Menu button on the Control Panel to go to the Functions menu.
3.
Scroll with the Down arrow button and press the line selection button next to Run
Setup.
If an Administrator password has been set on the E-810, you are prompted to
enter it before you can perform Setup (see page 3-43).
Exit Setup
Server Setup
Network Setup
Printer Setup
Setup
PS Setup
Color Setup
Job Log Setup
Change Password
Setup
4.
When prompted, confirm your choice to proceed to Setup.
5.
Press the line selection button to choose a Setup menu or command.
Press the down button to view the remaining screens of the main Setup menu.
6.
Perform, in order, Server Setup, Network Setup, and Printer Setup.
This is the minimum required for initial Setup. Later, you can complete the
remaining Setups either from the Control Panel or from a Windows computer.
7.
Set an Administrator password to protect your Setup from unauthorized alteration.
Review the settings described in this chapter. For more information on Control
Panel menus other than those in Setup, see the Job Management Guide.
3
3-5
E-810 Setup from the Control Panel
About the Control Panel Setup interface
When you perform Setup from the Control Panel, you select one menu after another
and enter information about your E-810 and your network and printing environment.
In each Setup screen, the last line of the display window shows the name of the current
Setup menu. Most of the menus you see are shown on the Control Panel Map, a
flowchart that can be printed from the Control Panel.
TO
PRINT THE
C ONTROL P ANEL M AP
1.
At the Control Panel, press the Menu button to access the Functions menu.
2.
Press the button next to Print Pages.
The Control Panel displays the first four types of pages you can print. To see the
remaining types of pages, press the Down arrow button.
3.
Press the button for Control Panel Map.
3
3-6
Performing Setup from the Control Panel
Types of Setup screens
There are two types of Setup options:
Multiple choice
questions
You are given choices (for example, Yes or No, or a list of
options from which to choose). Only one choice is
displayed at a time, in highlighted text. The currently
selected (or default) value appears first.
Use the Up and Down arrow buttons to scroll through the
choices, and choose OK when the correct information is
displayed.
Information
entry options
You must specify the information for your site, for
example, the printer name or IP address.
Use the Up and Down arrow buttons to scroll the
alphanumeric symbols to make your selection.
The cursor position is highlighted, and two of the line
selection buttons become left and right arrow buttons.
Arrows appear on the display window next to the
corresponding buttons. Use these buttons to move
between positions for entering information.
N OTE : When you enter text, enter it from left to right, as
the Left arrow button acts as a delete key as well as a
cursor-moving key. This is indicated in the display by the
delete symbol ( ).
The following section provides three specific examples of these types of options.
3
3-7
E-810 Setup from the Control Panel
Example: Multiple choice
Publish Print Queue
Yes
Publish Print Queue
No
OK
Printer Setup
OK
Printer Setup
Press the Up or Down arrow When the setting you want
button to display the other is displayed, press the
option or options.
button beside OK to
continue.
Example: Information entry with fields
Subnet Mask
255.0.0.0
>
<
OK
TCP/IP (Ethernet)
Subnet Mask
255.0.0.0
>
<
OK
TCP/IP (Ethernet)
From the starting position,
press the Right arrow button
to move the cursor to the
right.
Subnet Mask
255.255.0.0
>
<
OK
TCP/IP (Ethernet)
The next field is selected.
Press the Up or Down arrow
button to change the
number.
When the correct number is
displayed, press the Right arrow
button to move to the third field.
Press the Left arrow button to go
back and edit, or press OK to select
the choice and continue.
Example: Information entry with individual characters
Enter Your File
Server Password
>
x
Enter Your File
Server Password
9
From the starting position,
press the Up or Down arrow
button to enter the first
character.
x
Enter Your File
Server Password
9
OK
OK
Bindery Setup
>
Bindery Setup
When the correct character
is displayed, press the Right
arrow button to move the
cursor to the next position.
>
x
OK
Bindery Setup
Press the Up or Down arrow
button to enter a character in the
second position.
The delete button erases the
current character and moves the
cursor to the left.
Pressing OK enters what is
currently displayed.
3
3-8
Performing Setup from the Control Panel
N OTE : If you make a mistake during Setup, you can always use the Menu button to
cancel without saving changes. Pressing the Menu button cancels what you are doing
in the current screen to bring you to the next higher-level menu. You may need to press
Menu more than once to return to the top level for the particular Setup in which you
are working. Once at the top level, you can enter a Setup menu again, or exit without
making changes.
When you have entered the settings, you need to save the changes. You are usually
prompted to do so. If you choose Yes, your settings overwrite previous settings. If you
choose No, your previous settings are retained. If necessary, the E-810 reboots after
you exit from the Setup menu.
Server Setup options
The Server Setup menu lets you specify system information that pertains to the E-810
itself and all users. Accessing the menu is described on page 3-4.
Exit Setup
Server Setup
Network Setup
Printer Setup
Setup
Press button for Server Setup
When you choose Server Setup, the options appear in sequence as described below.
Default values, where applicable, appear in square brackets. Words shown in italics
indicate that a product- or site-specific value is displayed.
Server Name
Default server name
Enter a name for the E-810 (up to 14 characters). This is the name that appears in the
Chooser on an AppleTalk network.
N OTE : Do not use the device name (r7) as the server name. Also, if you have more than
one E-810, do not give them the same name. Windows NT is not designed to handle
two computers with the same name in the same workgroup or domain.
System Date
Enter the correct system date in the standard form for your usage. The date is used on
the Job Log.
3
3-9
Server Setup options
System Time
Enter the correct system time. Enter the time based on the 24-hour clock in the form
HH:MM (Hours:Minutes). The time is used on the Job Log.
Print Start Page
Yes/No [No]
Specify whether the E-810 should print a start page every time it is restarted. The start
page displays information about the E-810, including the server name, current date
and time, amount of memory installed in the E-810, network protocols enabled, and
connections published.
Use Character Set
Macintosh/DOS/Windows [Macintosh]
Specify whether the Control Panel and Command WorkStation should use the
Macintosh, DOS, or Windows character set for displaying file names. This is
important if file names include accented or composite characters (such as é or æ).
For mixed-platform networks, choose the option that gives the best overall
representation of the special characters you use.
Enable Printed Queue
Yes/No [Yes]
Specify whether to enable the Printed queue, which creates a storage location on the
E-810 disk for recent jobs that were printed from the Print queue. Users with
Administrator or Operator access to the job management tools can reprint jobs from
the Printed queue without resending them to the E-810. If you select No, jobs are
deleted from the E-810 disk immediately after they are printed.
Jobs Saved in Printed Queue
1-99 [10]
This option appears only if Enable Printed Queue is set to Yes. Specify the number of
jobs to be stored in the Printed queue. Jobs in the Printed queue take up space on the
E-810 hard disk. If disk space is low, use a smaller value for saved jobs.
Clear Each Scan Job
24 hours after scan/72 hours after scan/Manually/Now [24 hours after scan]
Specify how you want to remove scanned data from the HDD. If you select Manually,
the scanned data remains on the HDD until specifically deleted, or until all scanned
jobs are cleared by the Administrator.
3
3-10
Performing Setup from the Control Panel
Save Changes
Yes/No [Yes]
Select Yes to activate any changes made in the Server Setup; select No to return to the
main Setup menu without making any changes.
Network Setup options
Network Setup configures the E-810 to receive print jobs over the network systems
that will be used at your site.
Exit Setup
Server Setup
Network Setup
Printer Setup
Setup
Exit Network Setup
Port Setup
Protocol Setup
Service Setup
Network Setup
In the Setup menu, choose Network Setup, where you specify network addresses and
names to be used by workstations, servers, and the E-810 when they communicate
with each other.
The Network Setup menu includes three submenus that let you choose port types,
protocols, and network services. You must perform Port Setup and enable at least one
port.
For each item you enable, you are prompted to enter settings for that item. Default
values, where applicable, appear in this manual with square brackets.
You need to display and select options only for the network systems that are currently
used at your site. If your network requirements change, you can change Network
Setup at any time.
If the E-810 is configured to enable more than one protocol, it automatically switches
to the correct protocol when it receives a print job.
3
3-11
Network Setup options
The available network types, and the Setup areas that pertain to them, are summarized
in the following table.
For this Network or
Connection Type
Use this Port Setup
Use this Protocol Setup
Use this Service Setup
AppleTalk over Ethernet
Ethernet Setup
AppleTalk Setup
AppleTalk printing (PAP) is
enabled automatically
TCP/IP over Ethernet
Ethernet Setup
TCP/IP Setup: Ethernet Setup
LPD Setup
Web Services Setup
Windows Setup
Port 9100 Setup
IPP Setup
IPX/SPX over Ethernet
Ethernet Setup
IPX/SPX Setup
PServer Setup (NDS, Bindery,
or both)
If the Token Ring option is installed, you have these additional options:
For this Network or
Connection Type
Use this Port Setup
Use this Protocol Setup
Use this Service Setup
TCP/IP over Token Ring
Token Ring Setup
TCP/IP Setup: Token Ring Setup
LPD Setup
Web Services Setup
Windows Setup
Port 9100 Setup
IPP Setup
IPX/SPX over Token Ring
Token Ring Setup
IPX/SPX Setup
PServer Setup (NDS,
Bindery, or both)
3
3-12
TO
ACCESS
Performing Setup from the Control Panel
N ETWORK S ETUP
1.
OPTIONS
Confirm that the network cable is connected to the E-810.
During Network Setup, the E-810 queries the network for zones, servers, and serverbased queues. If you perform Network Setup without a connected and functioning
network, default settings are used that may not meet your needs.
2.
Choose Network Setup from the main Setup menu.
3.
Choose Port Setup from the Network Setup menu.
4.
To use Ethernet, choose Ethernet Setup from the Port Setup menu, and enter the
appropriate settings.
5.
If the Token Ring option is installed, choose Token Ring Setup and enter the
appropriate settings.
6.
When you have finished entering port settings, choose Exit Port Setup, and then
choose Protocol Setup.
7.
Enter the appropriate settings for the protocol or protocols you will use.
8.
When you have finished entering protocol settings, choose Exit Protocol Setup, and
then choose Service Setup.
9.
Enter the appropriate settings for the services you will use.
The options are described in detail in the following pages.
TO
EXIT
N ETWORK S ETUP
1.
When you have finished entering service settings, choose Exit Network Setup.
2.
Choose Yes when prompted to save changes.
3.
From the main Setup menu, choose another Setup, or choose Exit Setup.
3
3-13
Network Setup options
Port Setup options
Exit Port Setup
Ethernet Setup
Token Ring Setup
Port Setup
Network Setup
Port Setup
You can enable Ethernet and Token Ring simultaneously. To configure the E-810,
choose each port type you use and enter the settings for that port. Since network
setups are nested, the names of higher-level menus are shown in this chapter to the
left of each menu heading.
Ethernet Setup
Enable Ethernet
Yes/No [Yes]
Select Yes if you have Ethernet cabling connected to the E-810.
Ethernet Speed
Auto Detect/100 Mbps/10 Mbps [Auto Detect]
Select Auto Detect if your network environment is mixed, or if you do not know
the network speed. If you know the speed of the network to which the E-810 is
attached (10 Mbps or 100 Mbps), select it.
Network Setup
Port Setup
Token Ring Setup
Enable Token Ring
Yes/No [No]
Select Yes if the E-810 is to be connected to a Token Ring network.
Token Ring Speed
Auto Detect/16 Mbps/4 Mbps [Auto Detect]
Select Auto Detect if your network environment is mixed, or select the speed
(4 Mbps or 16 Mbps) of the network to which the E-810 is attached.
Maximum Frame Size
(bytes)
4202/2154/1130/632 [4202]
Select the maximum frame size recommended by the network administrator at your
site. If you are uncertain of the setting to use, select the default value (4202).
Enable Source Routing
Yes/No [No]
Select Yes if your network supports source routing.
3
3-14
Performing Setup from the Control Panel
Source Routing
Request All Routes
Yes/No [No]
This option appears only if you enabled Source Routing. Select Yes if you want the
Request packet to travel to its destination by all routes.
Source Routing
Respond All Routes
Yes/No [Yes]
This option appears only if you answered No to the previous option. Select Yes if you
want the Response packet to return by all routes to the originating computer.
Protocol Setup options
Exit Protocol Setup
AppleTalk Setup
TCP/IP Setup
IPX/SPX Setup
Protocol Setup
Network Setup
Protocol Setup
To configure the E-810, choose each protocol and enter the settings for that
protocol. You can enable AppleTalk, TCP/IP, and IPX/SPX communication
simultaneously.
AppleTalk Setup
Enable AppleTalk
Yes/No [Yes]
Select Yes if you have an AppleTalk network connected to the E-810. This setting enables the
E-810 to communicate over AppleTalk networks.
AppleTalk Zone
List of zones
The E-810 searches the network for AppleTalk zones in your network segment. Scroll
through the list to select the AppleTalk zone in which you want the E-810 to appear. If
your segment has only one zone, the E-810 is assigned to that zone automatically.
The message “No AppleTalk zone found” may mean your network has no zones, or the
network cable is not connected (see page 6-4). Choose OK to dismiss the message.
3
3-15
Network Setup options
TCP/IP Setup options
Exit Protocol Setup
AppleTalk Setup
TCP/IP Setup
IPX/SPX Setup
Protocol Setup
Exit TCP/IP Setup
Ethernet Setup
Token Ring Setup
TCP/IP Setup
To configure the E-810 for TCP/IP, choose TCP/IP Setup.
Choose Ethernet Setup and enter the appropriate settings. Choose each network
type you use (Ethernet and/or Token Ring) and enter the appropriate settings.
Token Ring Setup appears as an option only if you have enabled Token Ring in Port
Setup.
N OTE : If TCP/IP is running on both an Ethernet and a Token Ring network, it is
assumed that the two networks are already routed to each other. The E-810 does
not function as a router.
When you set an IP address, subnet mask, or gateway address for the E-810 during
Setup, you can allow the E-810 to get these addresses automatically from a DHCP,
BOOTP, or RARP server. First, turn on or reboot the E-810 and allow it to reach Idle.
Next, make sure the DHCP, BOOTP, or RARP server is running. Finally, perform
E-810 Setup.
TCP/IP Setup with Ethernet
Network Setup
Protocol Setup
TCP/IP Setup
Ethernet Setup
Enable TCP/IP for Ethernet
Yes/No [Yes]
Select Yes if you have a TCP/IP network connected to the E-810 over Ethernet
cabling.
If you use Token Ring, enabling TCP/IP for Token Ring is required for enabling the
Fiery WebTools.
N OTE : If you are using TCP/IP for printing from Windows computers, enabling
TCP/IP here also enables you to use Fiery utilities from Windows computers using
TCP/IP protocols.
3
3-16
Performing Setup from the Control Panel
Enable Auto IP Configuration
Yes/No [Yes]
Select Yes to allow the E-810 to obtain its Ethernet IP address by searching the
network. Depending on your network and the protocol you select in the following
option (DHCP, BOOTP, or RARP), the IP address can change. Select No to assign the
E-810 a static IP address that will not change. If you select No, you proceed to the IP
Address option, where you manually set the IP address.
Select protocol
DHCP/BOOTP/RARP [DHCP]
This option appears only if you answered Yes to Enable Auto IP Configuration. Select
the protocol over which the E-810 should search for its IP address. Both DHCP and
BOOTP allow the E-810 to obtain the Ethernet IP address and Subnet Mask
automatically. RARP obtains only the Ethernet IP address.
Depending on your network, the E-810 might be assigned a different address after you
reboot the E-810. With the DHCP setting, the E-810 can be assigned a different
address even if it is not rebooted. Make sure the network is already configured properly
for the protocol you select.
Get Gateway Address Automatically
Yes/No [Yes]
Use this option to get the gateway address automatically for printing with TCP/IP.
This option appears only if you selected DHCP or BOOTP as the protocol in the
previous option.
If you select a DHCP or BOOTP protocol and later change it to RARP, you must
return to Setup and set this option to No. You can then set the address manually. This
is because RARP does not support automatic assignment of the gateway address.
3
3-17
Network Setup options
IP Address
[127.0.0.1]
Enter the E-810 IP address for Ethernet. This IP address, unlike an IP address set
automatically, remains the same if you reboot the E-810. You must change the default
to a valid address for your network. For information about setting up printing with
TCP/IP, see Chapter 5.
Subnet Mask
[255.255.255.0]
This option lets you modify the subnet mask for printing with TCP/IP over Ethernet.
To set the subnet mask, enter one of the following values:
• 255.0.0.0 if the IP address starts with a number less than 128
• 255.255.0.0 if the IP address starts with a number from 128 through 191
• 255.255.255.0 if the IP address starts with a number greater than 191
N OTE : Confirm the subnet mask setting with your network administrator before
proceeding. In some cases, the required setting may be different from those listed.
Gateway Address
[127.0.0.1]
This option appears only if you answered No to Get Gateway Address Automatically,
or if you selected RARP as the protocol.
Use this option to set the gateway address for printing with TCP/IP. If your network
uses a gateway, you must change the default to a correct gateway address for your
network.
3
3-18
Performing Setup from the Control Panel
TCP/IP Setup with Token Ring
Enable TCP/IP for Token Ring, and enter the IP address and subnet mask. Then, if
your TCP/IP network has a gateway, and users outside the gateway plan to print to the
E-810 using TCP/IP, enter the gateway address.
Network Setup
Protocol Setup
TCP/IP Setup
Token Ring Setup
Enable TCP/IP for Token Ring
Yes/No [Yes]
Select Yes if you have a TCP/IP network connected to the E-810 over Token Ring.
If you use Token Ring, you must enable TCP/IP for Token Ring in order to enable
the Fiery WebTools.
N OTE : If you are using TCP/IP for printing from Windows computers, enabling
TCP/IP here also lets you use the Fiery utilities from Windows computers using
TCP/IP protocols.
Enable Auto IP Configuration
Yes/No [Yes]
Select Yes to allow the E-810 to obtain its Token Ring IP address. Depending on your
network and the protocol you select in the following option (DHCP, BOOTP, or
RARP), the IP address can change. Select No to assign the E-810 a static IP address
that will not change. If you select No, you proceed to the IP Address option, where
you manually set the IP address.
Select protocol
DHCP/BOOTP/RARP [DHCP]
This option appears only if you answered Yes to Enable Auto IP Configuration.
Select the protocol over which the E-810 should search for its IP address. Both DHCP
and BOOTP allow the E-810 to obtain the Token Ring IP address and Subnet Mask
automatically. RARP obtains only the Token Ring IP address.
Depending on your network, the E-810 might be assigned a different address after you
reboot the E-810. With the DHCP setting, the E-810 can be assigned a different
address even if it is not rebooted.
Make sure the network is already configured properly for the protocol you select.
3
3-19
Network Setup options
Get Gateway Address Automatically
Yes/No [Yes]
Use this option to get the gateway address automatically for printing with TCP/IP.
This option appears only if you selected DHCP or BOOTP as the protocol in the
previous option.
If you select a DHCP or BOOTP protocol and later change it to RARP, you must
return to Setup and set this option to No. You can then set the address manually. This
is because RARP does not support automatic assignment of the gateway address.
IP Address
[127.0.0.1]
Enter the E-810 IP address for Token Ring. This IP address, unlike an IP address set
automatically, remains the same if you reboot the E-810. You must change the default
to a valid address for your network. For information about setting up printing with
TCP/IP, see Chapter 5.
Subnet Mask
[255.255.255.0]
This option lets you modify the subnet mask for printing with TCP/IP over Token
Ring. To set the subnet mask, enter one of the following values:
• 255.0.0.0 if the IP address starts with a number less than 128
• 255.255.0.0 if the IP address starts with a number from 128 through 191
• 255.255.255.0 if the IP address starts with a number greater than 191
N OTE : Confirm the subnet mask setting with your network administrator before
proceeding. In some cases the required setting may be different from those listed.
Gateway Address
[127.0.0.1]
This option appears only if you answered No to Get Gateway Address Automatically,
or if you selected RARP as the protocol.
Use this option to set the gateway address for printing with TCP/IP. If your network
uses a gateway, you must change the default to a correct gateway address for your
network.
3
3-20
Performing Setup from the Control Panel
IPX/SPX Setup options
Exit Protocol Setup
AppleTalk Setup
TCP/IP Setup
IPX/SPX Setup
Protocol Setup
To specify the frame types the E-810 uses for IPX/SPX protocols, choose IPX/SPX
Setup from the Protocol Setup menu. You must choose at least one frame type to
enable IPX/SPX protocols. The E-810 supports the following frame types for
IPX/SPX:
• For Ethernet—Ethernet 802.2, Ethernet 802.3, Ethernet II, and Ethernet SNAP
• For Token Ring—Token Ring and Token Ring SNAP
For protocols other than IPX/SPX, the frame type is automatically enabled and does
not require setup, as follows:
With this protocol
And these printing services
This frame type is
automatically enabled
AppleTalk
PAP (Printer Access Protocol)
Ethernet SNAP
TCP/IP with Ethernet
LPD (Line Printer Daemon)
Ethernet II
TCP/IP with Token Ring
LPD (Line Printer Daemon)
Token Ring SNAP
3
3-21
Exit IPX/SPX Setup
Select Frame Types
Clear Frame Types
Network Setup options
Select Frame Types
Enable IPX Auto Frame Type
Yes/No [Yes]
IPX/SPX Setup
Specify whether the E-810 should try to bind to all available frame types
automatically. The E-810 does so whether or not all frame types are appropriate. To
determine the frame types that were successfully bound, save your changes, exit Setup,
allow the E-810 to reboot, and print a Configuration page. The Configuration page
lists only one of the frame types that were successfully bound.
If you answer No to this option, you can select frame types manually. You must choose
at least one frame type to enable IPX/SPX protocols.
Exit IPX/SPX Setup
Ethernet 802.2 *
Ethernet 802.3
Ethernet II
IPX/SPX Setup
The frame selection screen allows you to make multiple selections. Depending on your
Port Setup selection, only Ethernet frame types, only Token Ring frame types, or all
frame types are displayed.
Press the line selection button beside each frame type used on your IPX/SPX network.
An asterisk (*) appears beside each selected frame type. Press the line selection button
again to deselect a frame type. Use the Up and Down buttons to scroll to additional
frame types. The E-810 binds to each frame type as you select it.
When you have selected all the frame types used, choose Exit IPX/SPX Setup.
Clear Frame Types
You can clear all frame types at once by choosing Exit IPX/SPX Setup, then choosing
IPX/SPX Setup and selecting Clear Frame Types.
3
3-22
Performing Setup from the Control Panel
Service Setup options
Exit Service Setup
LPD Setup
PServer Setup
Windows Setup
Service Setup
Network Service Setup has options for TCP/IP and IPX/SPX networks.
Web Services Setup
IPP Setup
Port 9100 Setup
• Windows Setup enables the Microsoft Server Message Block (SMB) protocol, which
supports peer-to-peer printing, also known as Windows or SMB printing.
Service Setup
• Web Services Setup enables the http protocol and the use of the Fiery WebTools.
• LPD Setup enables lpd printing on TCP/IP networks.
• For IPX/SPX networks, PServer Setup allows you to enter the names of the Novell
objects that are concerned with E-810 print jobs.
• IPP Setup enables the Internet Printing Protocol.
• Port 9100 Setup allows users to download jobs to a print connection on the E-810.
PServer is a program in the E-810 that can service the Novell print queues assigned to
the Novell print servers you have set up for printing to the E-810. When you choose
PServer Setup and enable PServer, you can set up NDS (Novell Directory Services),
Bindery Services, or both. NDS is used with NetWare 4.x/5.x; Bindery Services are
used with NetWare 3.x or with NetWare 4.x/5.x in bindery emulation mode.
LPD Setup options
Network Setup
Service Setup
LPD Setup
Enable LPD
Yes/No [Yes]
Select Yes to allow lpd printing. See “Setting up the E-810 on TCP/IP networks” on
page 5-19 for more information.
3
3-23
Network Setup options
PServer Setup options
Network Setup
Service Setup
PServer Setup
Enable PServer
Yes/No [No]
Select Yes if you have a Novell network connected to the E-810.
Exit PServer Setup
NDS Setup
Bindery Setup
Polling Interval
PServer Setup
Choose NDS Setup if your network uses NetWare 4.x/5.x in native mode. Choose
Bindery Setup if your network uses NetWare 3.x or uses NetWare 4.x/5.x in
bindery emulation mode.
If your network uses both NDS and Bindery, set up NDS first. If you set up NDS
after Bindery, you will overwrite Bindery Setup.
If your network uses both NDS and Bindery, and uses NetWare 4.x/5.x servers in
bindery emulation, note that the E-810 cannot service NDS and bindery emulation
servers on the same NDS tree.
Network Setup
Service Setup
PServer Setup
NDS Setup
Before entering NDS settings, be sure the E-810 is connected to the network and
that you have configured an NDS directory tree with a Printer, a Print Server, and
one or more Print Queue objects for E-810 jobs (see page 5-7). To perform NDS
Setup, you may need permission to browse the NDS tree. If access to the Print
Server is restricted, you need a login password.
The main objective of NDS Setup is to specify the Print Server object. In addition,
you can indicate the location of the E-810 print queues.
N OTE : The terms NetWare server, Novell server, and IPX server are in common use
and are used here interchangeably to mean the server on an IPX network running
Novell NetWare networking software.
Enable NDS
Yes/No [No]
Select Yes if the NetWare servers you will use to print to the E-810 are running
NetWare 4.x/5.x in native mode.
3
3-24
Performing Setup from the Control Panel
Select NDS Tree
List of trees
Use the Up and Down buttons to browse the list of NDS trees available to the E-810.
Choose OK when you have displayed the tree that contains the Printer, Print Server,
and Print Queue objects you have previously defined for the E-810.
Your new NDS tree selection automatically overwrites any previous tree selection. If
you change the NDS tree selection and there are also current Bindery settings, you are
alerted that they will be deleted. If you continue with NDS Setup, you can replace
Bindery settings afterwards. If you do not want to continue, exit NDS Setup by
pressing the Menu button.
Is user login needed
to browse NDS tree?
Yes/No [No]
Select No if no password is required to browse the tree. You can proceed to navigate to
the Print Server object.
Select Yes if network permissions require that you log in to browse the NDS tree and
see the Print Server object you want to select. If you select Yes, you are prompted to
navigate to the User Login object.
Navigate the NDS
tree to the User
Login object.
This message is displayed if you selected Yes for the previous option. Choose OK and
browse the NDS tree as described in the following paragraphs.
NDS Tree name
Object list, “..”
Browsing to find the User Login object begins with the NDS tree that you selected
previously (with Select NDS Tree). Use the Up and Down buttons to scroll a list of
objects in the tree beneath the [Root] in the hierarchy, or use the navigation symbol
“..” to go up one level at a time.
In each subsequent browse screen, the top line represents your current location. The
second line contains:
• A list of objects in the current container directly below your current location
• The symbol “..” to go up one level
3
3-25
Network Setup options
With an object selected, choose OK to travel down the tree, or choose “..” to go up the
tree. When you select an object and choose OK, that object is displayed on the top
line, and the second line lists objects directly below it.
Continue to browse the NDS tree until the User Login object is displayed in the
second line. Choose OK.
Enter Password
Enter the login password for the NDS tree, using the Up and Down buttons to select
characters, and the Left and Right arrow buttons to move the cursor. Choose OK.
Navigate the NDS
tree to the Print
Server.
Choose OK to browse the NDS tree to the Print Server object.
Browsing to find the Print Server object begins with the NDS tree that you selected
previously (with Select NDS Tree). In each subsequent browse screen, the top line
represents your current location. The second line contains:
• A list of objects in the current container directly below your current location
• The symbol “..” to go up one level
With a container object selected, choose OK to travel down the tree, or choose “..” to
go up the tree. When you select an object and choose OK, that object is displayed on
the top line, and the second line lists objects directly below it.
When the Print Server is displayed in the second line, choose OK.
Enter Print Server
Password
Enter the Print Server password, using the up and down buttons to enter characters,
and the left and right arrow buttons to move the cursor. Choose OK. (If no password is
required, choose OK.)
3
3-26
Performing Setup from the Control Panel
Server should look
for print queues in:
Entire NDS Tree/Specified subtree [Entire NDS Tree]
By default, the E-810 searches the entire NDS tree for E-810 print connections. This
option lets you restrict the search for E-810 print jobs to a subtree (the Print Queue
root) in which the E-810 print connections have been defined. This makes the search
more efficient. Select Entire NDS Tree if the tree is small. Select Specified Subtree to
restrict the search and specify the subtree.
If you select Entire NDS Tree, choosing OK returns to PServer Setup. Proceed with
Bindery Setup (see page 3-27), set the Polling Interval (see page 3-32), or choose Exit
PServer Setup to return to the Service Setup menu.
Browse to the root
of the Print Queue
subtree.
This message is displayed if you selected Specified Subtree in the previous option.
Choose OK to browse the NDS tree to the Print Queue subtree.
Browsing to find the container object begins with the NDS tree that you selected
previously (with Select NDS Tree). In each subsequent browse screen, the top line
represents your current container. The second line contains:
• A list of objects directly below your current location
• The symbol “..” to go up one level
• The symbol “.” to select the current container object (displayed in the top line)
without traveling down the tree
With an object selected, choose OK to travel down the tree, or choose “..” to go up the
tree. When you select an object and choose OK, that object is then displayed on the
top line, and the second line lists objects contained within.
When the container that contains print queues is displayed in the second line, choose
OK. In the next screen, choose “.” and choose OK to select the object in the top line.
When the E-810 displays the container name, choose OK to return to PServer Setup.
Proceed with Bindery Setup (see page 3-27), set the Polling Interval (see page 3-32), or
choose Exit PServer Setup to return to the Service Setup menu.
3
3-27
Network Setup options
Bindery Setup options
Network Setup
Service Setup
PServer Setup
Bindery Setup
Use Bindery Setup if you have already configured one or more bindery servers (file
servers running NetWare 3.x or NetWare 4.x/5.x in bindery emulation) with a Print
Server and a Print Queue for E-810 jobs. Before entering bindery settings, be sure the
E-810 is connected to the network and the NetWare file server is running. If Guest
Login is not supported, you need a valid user name and password.
N OTE : The terms NetWare server, Novell server, and IPX file server are in common use
and are used here interchangeably to mean the server on an IPX network running
Novell NetWare networking software.
Bindery Setup menu
Exit Bindery Setup
Add File Server
View Server List
Edit Connection
Bindery Setup
Remove File Server
Bindery Setup
Because you can set up more than one Novell server to handle E-810 print jobs, an
additional menu is displayed for this purpose. The options are:
• Add File Server—creates a new file server connection to the E-810. You can set up a
maximum of eight file server connections. After you have finished adding a new
server, you return to the Bindery Setup menu, and you can set up another server if
you wish.
• View Server List—displays the list of file servers that have already been selected to
communicate with the E-810.
• Edit Connection—lets you change the NetWare Print Server that will print to the
E-810.
• Remove File Server—lets you disconnect the E-810 from a file server to which it is
currently connected. Remove a file server when you want to reduce the number of
connections to the E-810 or re-assign the connection to a different NetWare file
server.
• Exit Bindery Setup—lets you exit this menu after you have added all servers, viewed
a list of file servers, or removed a file server from the list.
N OTE : If you change your mind about any of the menus you have selected, use the
Menu button to escape and return to the main Bindery Setup menu. To cancel all
changes, you must exit Network Setup and select No to Save Changes.
3
3-28
Performing Setup from the Control Panel
.
Network Setup
Service Setup
PServer Setup
Bindery Setup
Add File Server
This option gives you two ways to add a Novell NetWare file server.
Select File Server
From List/Search by Name [From List]
You may select the file server from a scrollable list, or by a name search.
Choose From List if your network does not have a large number of file servers.
Select Search by Name if the number of file servers is so large that scrolling through
the list would take a long time.
If you selected From List:
If you selected Search by Name:
Add Server
List of all servers
Enter First Letters of Server Name
The E-810 obtains a list of NetWare file
servers by querying the IPX network. Use
the up and down buttons to select a
NetWare file server from the list. Choose
the server on which you have configured
a print server and print queue to handle
E-810 print jobs.
Use the up and down buttons to enter the
first letters of the name of the file server
you want to use, and choose OK.
Add Server
List of servers matching the search
This option is displayed if you entered
letters to search. Scroll to select the server
you want from the list.
Once you have chosen a file server, the E-810 immediately tries to log in as a guest
without a password. If it succeeds, it skips to the NetWare Print Server option.
If you try to add a file server but all E-810 connections are already in use, you are
prompted to remove a file server (see “Remove File Server” on page 3-31).
3
3-29
Network Setup options
File Server Login
administrator/supervisor/Enter Login Name [supervisor]
This option appears only if a password is required for login or if there is no guest
account or the guest account is restricted. Choose Enter Login Name to enter your
own login name and password or to log in as a guest. Choose administrator or
supervisor if you have those privileges.
Enter Your Login Name
[guest]
This option and the next appear only if you selected Enter Login Name for the File
Server Login. Enter your login name or select guest.
Enter Your File Server Password
Enter the password for logging in to your NetWare file server.
NetWare Print Server
Print Server Name
Select the name of the print server that you have configured in the NetWare utility
PCONSOLE. This is the print server that will route print jobs to the E-810 from
computers on IPX networks.
Enter Your Print Server Password
This option appears only if your NetWare print server is set up to require you to log in
with a password. Enter your print server password.
Choose Add Server again until you have connected each NetWare file server you have
configured for printing to the E-810. When you have added all the IPX file servers for
your site, choose Exit Bindery Setup.
3
3-30
Performing Setup from the Control Panel
Network Setup
Service Setup
PServer Setup
Bindery Setup
View Server List
Supported servers
This option lets you view the list of file servers currently connected to the E-810, that
is, servers you have added in Bindery Setup. You are notified if there are none. When
you choose OK, you return to the Bindery Setup menu.
Network Setup
Service Setup
PServer Setup
Bindery Setup
Edit Connection
On each connected NetWare file server, you have defined a print server to handle
E-810 print jobs. Use this option to change the print server assigned to the E-810.
Choose File Server
File server name
From the list of connected NetWare file servers, choose the file server whose print
server you wish to change.
NetWare Print Server
List of print servers on selected file server
Choose the name of the print server that you want to use. This is the print server that
will route print jobs to the E-810 from computers on IPX networks.
If you change your mind, press the Menu button to return to the Bindery Setup menu
without making a change.
Enter Your Print Server Password
This option appears only if your NetWare print server is password-protected. Enter
your print server password.
3
3-31
Network Setup options
The Bindery Setup menu is displayed again. You can edit other connections, choose
another Bindery Setup option, or choose Exit Bindery Setup.
Network Setup
Service Setup
PServer Setup
Bindery Setup
Remove File Server
Remove support for
File server name
Allows you to select a NetWare file server from a list of connected file servers and
remove the connection to it. You are notified that you have removed the connection,
and the Bindery Setup menu is displayed again. If you change your mind and do not
want to remove any of the file servers, press the Menu button.
You can choose another Bindery Setup option (such as adding another file server) or
choose Exit Bindery Setup and proceed to set the polling interval.
Network Setup
Service Setup
PServer Setup
Bindery Setup
Exit Bindery Setup
Choose Exit Bindery Setup after you have viewed a list of IPX file servers, removed a
file server from the list, or connected all the configured NetWare file servers. After you
select Exit Bindery Setup, you return to the PServer Setup menu.
3
3-32
Performing Setup from the Control Panel
Polling Interval options
Network Setup
Service Setup
PServer Setup
Polling Interval
Whether you use NDS or Bindery services, choose Polling Interval from the main
PServer Setup menu. If you do not reset the interval, the default value of 15 seconds is
used.
NetWare Server Poll Interval in Seconds
1-3600 [15]
Specify the interval, in seconds, at which the E-810 communicates with the Novell
print server to see if there are print jobs waiting.
N OTE : If you select a short interval, the amount of network traffic increases. This may
slow down other network jobs.
Windows Setup options
Network Setup
Service Setup
Windows Setup
Enable Windows Printing
Yes/No [Yes]
Enabling Windows Printing enables Server Message Block (SMB), the file and
printer sharing protocol built into Windows. Enabling SMB allows the E-810 to be
listed on the network so that Windows clients can print to a particular print
connection (Hold, Print, or Direct) on the E-810 without any other networking
software. For information on setting up a Windows computer for Windows
printing, see Getting Started. Windows printing runs via TCP/IP, so you must
configure TCP/IP on the E-810 and on all computers that use Windows printing.
3
3-33
Network Setup options
Use Automatic Configuration
Yes/No [No]
This option appears if you chose DHCP or BOOTP as the protocol for automatically
obtaining the IP address of the E-810 (see page 3-18).
Choose Yes to have the E-810 use a WINS name server and automatically obtain its
IP address. After making your choice, proceed to the Server Name option.
Choose No to proceed to the Use WINS Name Server option, where you specify
whether to use a WINS name server, and then to the WINS IP Address option, where
you specify its IP address.
Use WINS Name Server
Yes/No [No]
Broadcasts from SMB devices cannot pass across a router without a WINS name
server. Setting up the WINS name server is outside the scope of this manual. To find
out if a name server is available, contact your network administrator.
WINS IP Address
[127.0.0.1]
This option appears only if you choose Yes for WINS Name Server. Change the default
address to the correct IP address for the WINS Name Server. Obtain the correct
address from your network administrator.
Server Name
Default Name
The server name is the name that will appear on the network for accessing the E-810
via SMB. The default name is the same as the server name assigned in Server Setup (see
page 3-8).
Server Comments
Server comments (optional) can contain information about the printer. These
comments are listed in the Properties of the E-810 in Network Neighborhood and can
be up to 15 characters long.
3
3-34
Performing Setup from the Control Panel
Set Domain Name
Select from list/Enter manually [Select from list]
This option provides two ways to specify the workgroup or domain where you want
the E-810 to appear.
If you selected Select from list:
Choose Domain
List of domains
If you selected Enter manually:
Select the workgroup or domain from
the list.
Enter the name of the workgroup or
domain. For more information about
entering text and characters, see “Types of
Setup screens” on page 3-6.
Workgroup or Domain
Web Services Setup
Network Setup
Service Setup
Web Services Setup
Enable Web Services
Yes/No [Yes]
Select Yes to make the Fiery WebTools available to users (see page 5-16).
TCP/IP must be enabled on the E-810 and on user workstations. The
Fiery WebTools include WebSpooler, Status, WebLink, WebScan, WebDownloader,
WebSetup, and Installer.
A Java-enabled Web browser and a valid IP address are required for each user. See
Getting Started for details on browser choice and workstation requirements.
IPP Setup
Network Setup
Service Setup
IPP Setup
Enable IPP
Yes/No [Yes]
Select Yes to enable printing with the Internet Printing Protocol (IPP). You must
enable Web Services. For information on setting up user computers to use IPP
printing, see Getting Started.
3
3-35
Printer Setup options
Port 9100 Setup
Network Setup
Service Setup
Port 9100 Setup
Enable Port 9100
Yes/No [Yes]
This option allows applications to open a TCP/IP socket to the E-810 at Port 9100
to download a print job.
Port 9100 Queue
Direct/Print Queue/Hold Queue [Print]
Specify the E-810 print connection for downloading jobs to Port 9100. Only the
print connections you have enabled in Printer Setup are available.
Exit Service Setup
This returns you to the main Network Setup menu. Choose Exit Network Setup.
Save Changes
Yes/No [Yes]
Select Yes to activate any changes made in Network Setup; select No to return to the
main Setup menu without making any changes.
Printer Setup options
Printer Setup configures the connections and printing behavior associated with a
particular printing device. For more information on E-810 print connections, see
page 2-1.
Exit Setup
Server Setup
Network Setup
Printer Setup
Setup
1.
In the main Setup menu, choose Printer Setup.
2.
Enter the options appropriate to the printing requirements at the site.
3.
When you have finished, save changes.
In the list of options that follows, default values, where applicable, appear in brackets.
N OTE : For users to use the Fiery utilities and Fiery WebTools or print to the E-810 over
a TCP/IP network, you must publish at least the Hold queue or the Print queue.
3
3-36
Performing Setup from the Control Panel
Publish Direct Connection
Yes/No [Yes]
This option enables users to print (or download) jobs to the E-810 without spooling.
Jobs printed to the Direct connection are not saved in the Printed queue.
If you plan to download fonts to the E-810, you must publish the Direct connection.
Publish Print Queue
Yes/No [Yes]
This option enables users to print (or download) jobs to the Print queue. Jobs that are
printed to the Print queue are spooled to the E-810 disk and printed on a first-in,
first-out basis. Only queues published in the Printer Setup are available to users.
Publish Hold Queue
Yes/No [Yes]
Use this option to enable users to print (or download) jobs to the Hold queue. Jobs in
the Hold queue can only be printed by copying or moving the jobs to the Print queue
with the job management tools.
Save Changes
Yes/No [Yes]
Select Yes to activate any changes made in the Printer Setup; select No to return to the
main Setup menu without making any changes.
PostScript Setup options
PS (PostScript) Setup allows you to set defaults for the E-810. Users can override most
of these defaults on a job-by-job basis. However, users printing from UNIX or DOS
command lines cannot override defaults from their applications. Therefore, you must
set defaults in PostScript Setup. For information about these defaults, see the Printing
Guide.
3
3-37
TO
PS Setup
Color Setup
Job Log Setup
Change Password
Setup
ACCESS
PostScript Setup options
P OST S CRIPT S ETUP
OPTIONS
1.
In the main Setup menu, choose PS Setup.
2.
Enter the options appropriate to the printing requirements at the site.
3.
When you have finished, save changes.
In the list of options that follows, default values, where applicable, appear in square
brackets.
Default Paper Sizes
US/Metric [default is US in the United States, but Metric in Europe]
Specify whether to print on US paper sizes (for example, Letter, Legal, 11x17), or
Metric paper sizes (for example, A4, A3) by default. When no page size is defined
within a PostScript file, jobs are printed on Letter paper if you selected US, or A4
paper if you selected Metric.
Convert Paper Sizes
US [A4/A3->Letter/11x17], Europe [Letter/11x17->A4/A3]
Specify whether to convert paper sizes in documents automatically to the default paper
sizes specified. For example, if you select Letter/11x17->A4/A3, a letter size document
is automatically printed on A4 paper. If you select No, the E-810 prints the document
only if it finds a media source in the size specified by the file.
N OTE : This option works in conjunction with the Default Paper Sizes option. For
example, if Convert Paper Sizes is set to Letter/11x17->A4/A3, and Default Paper Sizes
is set to US, then jobs are printed A4/A3 size. This also includes E-810 system pages
such as the Start Page, Test Page, and Job Log.
Page Order
Forward/Reverse [Reverse]
Specify the page order for printed output. Forward prints pages in the order received,
so the last page is on the top of the stack and the first page is on the bottom. Reverse
prints jobs in reverse order, so that the first page is on the top of the stack and the last
page is on the bottom.
3
3-38
Performing Setup from the Control Panel
Color Mode
CMYK/Grayscale [CMYK]
Specify whether to print color (CMYK) or Grayscale images to the E-810 by default.
CMYK gives you full color prints. Select CMYK as the Color Mode before performing
calibration on the E-810. Grayscale converts all colors into shades of gray.
Print to PS Error
Yes/No [No]
Specify whether the E-810 should print the available portion of a print job when it
encounters a PostScript error. Select Yes to print the portion of the job that was
processed before the error occurred; select No to cancel the print job entirely when a
PostScript error is encountered. Leave this option at No unless you encounter printing
problems.
Allow Courier Substitution
Yes/No [Yes]
Specify whether to substitute Courier for fonts that are unavailable when you
download files to the E-810, or when you print a document for which you do not have
the corresponding printer font. If this option is set to No, jobs with fonts that are
unavailable on the E-810 hard disk generate a PostScript error and do not print. This
setting does not apply to PDF files; font substitution occurs automatically in PDF files.
Print Cover Page
Yes/No [Yes]
Specify whether the E-810 prints a cover page (job summary) at the end of each print
job. If you select Yes, each print job is followed by a page containing the name of the
user who sent the job, the document name, the server name, the time the job was
printed, the number of pages printed, and the status of the job. If a PostScript error
occurs and the Print to PS Error option is set to Yes, the cover page lists the PostScript
error message instead of the job status.
Toner Reduction
On/Off [Off]
Specify whether to minimize the effects of “blasting,” which occurs when excess
amounts of toner on certain media types “blast” beyond the color density boundaries
defined in the print job.
3
3-39
Color Setup options
Save Changes
Yes/No [Yes]
Select Yes to activate any changes made in PS Setup; select No to return to the main
Setup menu without making any changes.
Color Setup options
Color Setup allows you to set defaults the E-810 uses to control color output. Mac OS
and Windows users who use the printer drivers provided on the User Software CD can
override most of these defaults on a job-by-job basis. However, users printing from
UNIX or DOS command lines cannot override defaults from their applications.
Therefore, you must set defaults in Color Setup.
The preferred method for setting color defaults is to use Color Setup, part of the
ColorWise Pro Tools. The color options are described in this section for your
reference. For information about these defaults, see the Printing Guide and the Color
Guide.
N OTE : Besides the defaults described in this section, Mac OS and Windows users have
additional settings available from the printer drivers.
TO
PS Setup
Color Setup
Job Log Setup
Change Password
Setup
ACCESS
C OLOR S ETUP
OPTIONS
1.
In the main Setup menu, choose Color Setup.
2.
Enter the options appropriate to the printing requirements at the site.
3.
When you have finished, save changes.
In the list of options that follows, default values, where applicable, appear in square
brackets.
RGB Source Profile
EFIRGB/sRGB (PC)/Apple Standard/None [EFIRGB]
The RGB source is the color space used to control color for conversion from screen to
printed output. EFIRGB is based on the reference points used in the creation of the
E-810 software. sRGB is based on an average of a large number of PC monitors. Apple
Standard is the standard reference point for Apple’s ColorSync software.
3
3-40
Performing Setup from the Control Panel
Rendering Style
Photographic/Presentation/Abs. Colorimetric/Rel. Colorimetric [Presentation]
The color rendering dictionary (CRD) defines how colors are converted from the RGB
color space to device CMYK. Photographic, designed for images, retains the relative
balance between colors to maintain the overall appearance of the image. Presentation,
designed for bright colors, produces the saturated prints needed for most business
presentations, but handles photographic images the same way as the Photographic
CRD. Absolute Colorimetric provides the closest match to the CMYK device being
simulated, including rendering the paper color as the background. Relative
Colorimetric provides a close match to the CMYK device being simulated, regardless
of the media used.
CMYK Simulation Profile
SWOP-Coated (EFI)/DIC (EFI)/Euroscale (EFI)/None [US: SWOP-Coated (EFI)/
Europe: Euroscale (EFI)]
CMYK simulation allows color correction to simulate printed output on a commercial
press, so that the E-810 output can be used for proofing. The SWOP-Coated standard
is used in the United States, DIC in Japan, and Euroscale in Europe. Custom
simulations are user defined and named. The simulations provided with the E-810
have the designation “EFI” after their names.
If users create and load custom simulations on the E-810 with ColorWise Pro Tools,
these also appear in the list of simulations. A custom simulation can be selected as the
default simulation. See the Color Guide for more information about custom
simulations.
CMYK Simulation Method
Quick/Full [Quick]
Quick simulation assumes that the copier toners match the printer’s inks, and all
changes affect only one color (C, M, Y, or K) at a time. Full simulation allows for more
flexibility in matching toner to ink and all changes interact to maintain a better color
balance.
RGB Separation
Output/Simulation [Output]
This option defines how the E-810 processes RGB jobs. Select Output for RGB jobs
that you print to the final output device. Select Simulation to simulate an output
device that is not the device to which you are printing.
3
3-41
Color Setup options
Output Profile
Default profile
Specify the default output profile to use for printing. Additional profiles can be created
and downloaded to the E-810 with ColorWise Pro Tools.
Pure Black Text/Graphics
On/Off [On]
The Pure Black Text/Graphics option optimizes black text and line art. The option also
minimizes toner use for documents consisting of both color and black-only pages.
With this option On, black text and line art are printed with black toner only. With
the option Off, black text and line art are printed using all four colors of toner. See the
Color Guide for more information.
Black Overprint
On/Off [On]
With this option On, black text overprints on colored backgrounds. With this option
Off, black text knocks out color backgrounds. Generally this option should be On. See
the Color Guide for more information.
Spot Color Matching
On/Off [On]
With this option On, the E-810 uses an internal lookup table to print the best
equivalents of PANTONE colors. With this option Off, PANTONE colors are printed
using the CMYK values defined in the original applications. See the Color Guide for
more information.
Save Changes
Yes/No [Yes]
Select Yes to activate any changes made in Color Setup; select No to return to the main
Setup menu without making any changes.
3
3-42
Performing Setup from the Control Panel
Administrative functions in the Setup menu
The remaining choices in the Setup menu are intended to help you manage print jobs
and color output but are not required for printing.
• Job Log Setup allows you to specify whether the E-810 prints and clears its log of
printed jobs automatically.
• Change Password enables you to create or change an Administrator password on the
E-810 so that casual users cannot enter the Setup menus and change settings
without permission. The Administrator password also controls many functions
available from the job management tools.
TO
PS Setup
Color Setup
Job Log Setup
Change Password
Setup
SET
J OB L OG
OPTIONS
1.
Scroll the main Setup menu and choose Job Log Setup.
2.
Enter the options as described in the following section.
3.
When you have finished, save changes.
Job Log Setup
The Job Log is a record of all jobs processed or printed on the E-810, whether they
originate from a user workstation, a networked server, or the E-810 itself. The Job Log
can be printed from the Control Panel or from the job management tools.
The printed Job Log lists information about each job including user name, document
name, time and date printed, and number of pages. Windows 95/98/Me,
Windows NT 4.0, and Mac OS users can enter job-specific notes that appear in the
Job Log. See the Printing Guide for details.
By default, the Job Log is not printed or cleared automatically. You can change these
defaults in Job Log Setup. You can also print and clear the Job Log from the job
management tools.
Default values for the following options, where applicable, appear in square brackets.
3
3-43
Administrative functions in the Setup menu
Auto Print Job Log Every 55 Jobs
Yes/No [No]
Use this option to specify whether the E-810 prints the Job Log after every 55 jobs.
Setting the Job Log for automatic printing is useful if each printed page is important at
your site.
Auto Clear Job Log Every 55 Jobs
Yes/No [No]
Use this option to specify whether to clear the Job Log after every 55 jobs. If you do
not enable this option, and do not clear the Job Log from the E-810 or from a remote
workstation, the E-810 saves a record of all jobs.
In addition to automatic clearing or manual clearing from a remote workstation, the
Job Log (together with all queued jobs) is also cleared when you choose Clear Server
from the Functions menu, when system software is reinstalled, or when a new version
of system software is installed on the E-810.
N OTE : If Auto Print Job Log Every 55 Jobs is set to No, setting this option to Yes has no
effect.
Job Log Page Size
Tabloid/A3 Letter/A4 [Tabloid/A3]
Select the paper size for printing the Job Log. Regardless of page size, 55 jobs are listed
on a page. The paper size used depends on the Default Paper Sizes setting in PS Setup.
If the Default Paper Sizes setting is US, the Job Log is printed on Tabloid or Letter size
paper, with Tabloid the default.
Save Changes
Yes/No [Yes]
Select Yes to activate any changes made in Job Log Setup; select No to return to the
main Setup menu without making any changes.
Change Password
Change Password enables you to set or change the Administrator password for the
E-810. Anyone with the Administrator password can modify the Setup options,
and control the flow and order of print jobs with the job management tools.
3
3-44
Performing Setup from the Control Panel
When the E-810 is installed, there is no password. If you do not create an
Administrator password, users are not required to enter a password to modify the
Setup or use the administrator functions in the job management tools. If an
Administrator password has been set previously, you are required to enter it when you
run Setup. Use the up and down buttons to select the characters and the left and right
arrow buttons to move between them (see “Types of Setup screens” on page 3-6).
For more information on Administrator access privileges, see page 2-3.
For information on controlling print jobs with the job management tools, see the Job
Management Guide.
N OTE : The Operator password can be set and changed only from Fiery WebSetup or
Command WorkStation.
TO
PS Setup
Color Setup
Job Log Setup
Change Password
Setup
CHANGE THE
E-810
PASSWORD
1.
Scroll the main Setup menu and choose Change Password.
2.
Enter and confirm the password as described below.
New Password
Use the up and down buttons to select the characters and the Left and Right arrow
buttons to move between them. Enter characters from left to right, since the left arrow
line selection button is a delete key. The password can be any combination of letters
and numbers up to 19 characters. Choose OK when you are done. Be sure to keep
track of the password.
N OTE : The only way to remove a password that you cannot remember is to reinstall the
system software.
Verify New Password
Enter the new password again exactly as you entered it initially. If you make a mistake,
you are prompted to enter the password again. The new password is effective after you
save changes and reboot the E-810.
3
3-45
Clearing the E-810
Exit Setup
Exit Setup
Server Setup
Network Setup
Printer Setup
Setup
Choose Exit Setup from the first screen of the main Setup menu when you have
finished making Setup changes.
The E-810 reboots and any changes you saved during the Setup take effect.
Clearing the E-810
The Clear Server command enables you to clear all queued print jobs from the
E-810—jobs in the E-810 Print, Hold, and Printed queues. Jobs can also be deleted,
either individually or as a group, from the job management tools. Clear Server also
clears the Job Log, all jobs archived on the E-810 hard disk, the index of archived jobs,
and, finally, all FreeForm masters and the index of FreeForm masters. If you keep Job
Logs, print or export the Job Log before you choose Clear Server.
To clear the E-810, scroll the Functions menu and choose Clear Server. You are asked
to confirm your selection. If the Administrator password has been set, you are
prompted to enter it.
N OTE : To clear the E-810 without using the E-810 Administrator password, you must
log in to Windows NT as Administrator, and use the Clear Server command from
either the FieryBar menu or the Command WorkStation Server menu.
Restoring the E-810 to factory defaults
When E-810 system software is first installed, a backup copy is made automatically.
This backup includes the E-810 system software. If the Fiery Advanced Controller
Interface option was originally installed, the backup also includes the Windows NT
operating system. You can recover the system from this backup without having to
reload the software from CDs.
All job data is cleared when you restore the backup. For information about the items
that are cleared, see “Clearing the E-810” on page 3-45. You must perform Setup
again because the E-810 is restored with default settings.
3
3-46
TO
Performing Setup from the Control Panel
RESTORE THE
E-810
1.
Make sure the E-810 is Idle.
2.
Press the Menu button and choose Shut Down.
3.
Choose Reboot System.
4.
Immediately press the top line selection button and hold it down until the diagnostics
have finished.
See “E-810 Control Panel” on page 3-3 for the location of the line selection button.
During reboot, a progress bar indicates when the diagnostics have been completed.
5.
Choose Restore Backup.
Printing a Configuration page from the Control Panel
The Configuration page lists all the settings in effect from the current Setup. After you
have finished running Setup, print a Configuration page to confirm your settings. The
Configuration page can also be printed from Command WorkStation. See page 4-35
for details.
After you make changes to Setup and choose Exit Setup, the E-810 reboots. This
allows the E-810 to recognize the new settings and display them properly on the
Configuration page. Allow the E-810 to reboot and return to Idle before printing a
Configuration page. In particular, the reboot is necessary if you specified the DHCP,
BOOTP, or RARP protocol to obtain an IP address automatically for the E-810.
3
3-47
Printing a Configuration page from the Control Panel
Post the current Configuration page near the server for quick reference. Users need the
information on this page, such as the current printer default settings.
The other pages you can print from the Control Panel of the E-810 or from
Command WorkStation include the Test Page, Font List, Job Log, Control Panel
Map, and PANTONE, CMY, and RGB color charts. For information on these pages,
see the Job Management Guide.
TO
PRINT THE
C ONFIGURATION
PAGE
1.
At the Control Panel, press the Menu button to access the Functions menu.
2.
Choose Print Pages.
3.
Choose Configuration.
4
4-1
Chapter 4:
Setting up the
E-810 from
a Windows
Computer
Accessing Setup
After you have performed initial Setup (Server, Network, and Printer Setup) from the
Control Panel, you can change most Setup options from a Windows computer.
Accessing Setup
In addition to using the Control Panel, you can set up the E-810 two ways: locally and
remotely. Local Setup is for systems with the Fiery Advanced Controller Interface
option. Local Setup uses a Windows NT application, Fiery Server Setup. Remote
Setup is performed from a Windows computer using Fiery WebSetup or
Command WorkStation.
N OTE : In this chapter, illustrations for both Setup interfaces, where applicable, appear
side by side: local Setup on the left, remote Setup on the right. Some Setup options
cannot be accessed from remote Setup; use local Setup or the E-810 Control Panel
instead.
Regardless of how you access Setup, you must log in as Administrator, both at the
E-810 and within the Setup application you use. After the E-810 is rebooted, log in at
the Windows NT Logon window with Administrator as the login name and the
password, if required. This login and password are the Windows NT login and
password.
To use the Setup applications (Fiery WebSetup or Command WorkStation), you must
enter the E-810 Administrator password. This is set either from the Control Panel,
Fiery WebSetup, or Command WorkStation.
See Getting Started for system requirements and setup instructions for Fiery WebSetup
and Command WorkStation.
N OTE : Fiery WebSetup is supported for Windows computers only.
4
4-2
Setting up the E-810 from a Windows Computer
Local Fiery Setup
You can access E-810 Server Setup in these ways:
• Right-click the FieryBar on the Windows NT 4.0 desktop and choose Set Up Fiery.
• Right-click the Fiery icon in the Windows NT 4.0 taskbar and choose Set Up Fiery.
• Start Command WorkStation and choose Setup from the Server menu.
The Setup window is displayed.
You see the available settings only when you select the particular option. For example,
to view or change the setting for the Character Set option, select Character Set by
clicking it once. The available settings are displayed at the bottom of the window.
After making your selections in a window, click the Apply button if it is present. When
you have finished performing Setup, click OK to close the entire Setup window.
4
4-3
Accessing Setup
Remote Fiery Setup
You can access remote Setup from Fiery WebSetup or Command WorkStation.
TO
TO
ACCESS
F IERY W EB S ETUP
1.
Start your Internet browser application and enter the IP address of the E-810.
2.
Log in as Administrator.
3.
When the E-810 home page appears, click the WebSetup button.
ACCESS
S ETUP
FROM
C OMMAND W ORK S TATION
1.
Start the Command WorkStation application.
2.
Log in as Administrator.
3.
Choose Setup from the Server menu.
Regardless of how you access Setup remotely, the following window appears.
N OTE : The interface of remote Setup from Command WorkStation and from
Fiery WebSetup is identical. The remote Setup illustrations in this chapter are from
Command WorkStation.
4
4-4
Setting up the E-810 from a Windows Computer
General Setup options
You can specify E-810 system settings that affect all users, such as the name of the
E-810, system date and time, passwords, and Job Log printing.
Server Name—Specify a name for the E-810. This is the name that appears in the
Chooser on an AppleTalk network.
If you are using local Setup, click Modify, click Change, and then enter the Server
Name in the Computer Name field.
N OTE : Do not use the device name (r7) as the server name. Also, if you have more than
one E-810, do not give them the same name. Windows NT does not support more
than one computer with the same name in the same workgroup or domain.
Date and Time—Specify the system date and time, which are recorded on the Job Log.
4
4-5
General Setup options
Enable Printed Queue—Specify whether to enable the Printed Queue, a storage
location on the E-810 disk for recently printed jobs. You can reprint jobs from the
Printed queue without resending them to the E-810. If the Printed queue is not
enabled, jobs are deleted from the E-810 disk immediately after they are printed.
Jobs Saved in Printed Queue—Specify the number of jobs to be stored in the Printed
Queue. Jobs in the Printed queue take up space on the E-810 hard disk.
Delete Scan Jobs—Specify how often to automatically delete scan jobs from the E-810
hard disk. Select Manually to leave scan jobs on the HDD until specifically deleted
using the Delete Scan Jobs Now button.
Character Set—Specify whether the Control Panel and the job management tools
should use the Macintosh, DOS, or Windows character set for displaying file names.
This is important if a file name includes accented or composite characters (such as é
or æ). For mixed-platform networks, select the setting that gives the best overall
representation of the special characters you use.
Start Page—Specify whether the E-810 should print a start page when it is turned on
or rebooted. The Start Page displays information about the E-810, including server
name, current date and time, amount of memory installed, network protocols enabled,
and print connections published.
Support—Enter names, phone numbers, and e-mail addresses of contact people at
your organization who provide support for the E-810 and the copier. In remote Setup,
use the Support tab.
Passwords
You can set, change, and remove passwords for the E-810. These passwords, specific to
the Server process, have different uses from the Windows NT Administrator and
Operator passwords. Keep careful track of the passwords you set for each.
Administrator—Controls access to Setup; Administrator privileges also include
Operator privileges.
Operator—Controls access to job management functions via the job management
tools.
N OTE : For more information on E-810 passwords and the access privileges they allow,
see page 2-3.
4
4-6
Setting up the E-810 from a Windows Computer
By default, no passwords are set. If you do not specifically set passwords, all users will
have access to important functions such as Setup (including setting passwords) and job
control. It is strongly recommended that you set at least an Administrator password to
protect the E-810 from unauthorized changes to Setup.
TO
SET OR CHANGE A PASSWORD
1.
Select the password you want to change.
2.
Type the password in both the Enter New Password and Verify New Password fields.
Passwords are case-sensitive and can be any combination of letters and numbers up to
19 characters. You must enter the password exactly the same way both times. The new
password remains in effect until you change it again.
TO
REMOVE A PASSWORD
1.
Select the password you want to delete.
2.
Delete the asterisks (*) in both the Enter New Password and Verify New Password
fields.
4
4-7
General Setup options
If you forget the Administrator password, contact your authorized service
representative to reinstall E-810 system software. This clears the Administrator
password and allows you to set a new one.
Job Log Setup
Auto Print Job Log Every 55 Jobs—Specify whether the E-810 prints the Job Log after
every 55 jobs. The Job Log lists the last 55 jobs processed on the E-810, with
accounting information about each one, including user name, document name, time
and date printed, number of pages, and other job information.
Auto Clear Job Log Every 55 Jobs—Specify whether the E-810 clears the Job Log after
every 55 jobs. If you do not select this option, the E-810 saves a file containing a
record of all jobs ever printed. Since this file takes up space on the E-810 hard disk,
clearing the Job Log frees up additional disk space.
You can clear the Job Log manually at any time from the job management tools. The
Job Log is also cleared when you clear the E-810 with the Clear Server command.
Job Log Page Size—Select the size of paper to print the Job Log on.
4
4-8
Setting up the E-810 from a Windows Computer
Network Setup
Network Setup configures the E-810 to receive print jobs over the networks that are
used at your site. If the E-810 is configured to enable more than one protocol, it
automatically switches to the correct protocol when it receives a print job. When two
network ports are enabled, print jobs can be received over all ports at the same time.
You can view and specify the following network settings in Network Setup:
• Adapters and ports—view currently configured network adapters and port settings
• Protocols—including AppleTalk, IPX/SPX, and TCP/IP
• Print Services—including LPD printing (TCP/IP), NetWare printing (PServer),
Windows print sharing (SMB), HTTP support (WWW), and Port 9100 printing
Adapters/Ports
In local Setup only, the installed network boards are displayed. You cannot change this
information. From remote Setup, you can enable Ethernet or Token Ring. These
options are described in the next section.
4
4-9
Network Setup
Ethernet (Port Setup)
Enable Ethernet—Select if the E-810 is to be connected to an Ethernet network.
Transmission Speed—Select Auto Detect if your network environment is mixed, or
select the speed (10 Mbps or 100 Mbps) of the network to which the E-810 is
attached.
Token Ring (Port Setup)
Enable Token Ring—Select if the E-810 is connected to a Token Ring network.
Maximum Frame Size—Select the maximum frame size recommended by the network
administrator at your site. If you are uncertain of the setting to use, select the default
value (4202).
Transmission Speed—Select Auto Sense if your network environment is mixed, or
select the speed (4 Mbps or 16 Mbps) of the network to which the E-810 is attached.
Enable Source Routing—Select if your network supports source routing.
Request All Routes—This option is active only if you enabled Source Routing. Specify
whether you want the Request packet to travel to its destination by all routes.
Respond All Routes—This option is available only if the previous option is not
selected. Select if you want the Response packet to return by all routes to the
originating computer.
4
4-10
Setting up the E-810 from a Windows Computer
Protocols
You can change AppleTalk, IPX/SPX, and TCP/IP protocol settings for the E-810.
From remote Setup, you change these settings on the Protocol1 and Protocol2 tabs.
Local Setup works in conjunction with the Windows NT Network Control Panel.
When you click the Modify or Advanced button next to the setting in local Setup, the
system opens the Network Control Panel, where you complete the settings.
Unlike remote Setup, local Setup does not provide separate settings for enabling and
configuring a protocol. For example, remote Setup has two settings for AppleTalk: one
to enable AppleTalk, and the other to set the AppleTalk zone. In local Setup, there is
only the setting for AppleTalk zone. By default, the AppleTalk, IPX/SPX, and TCP/IP
protocols are installed and enabled. You can verify a protocol is enabled in the Bindings
tab of the Network Control Panel.
4
4-11
TO
Network Setup
CHANGE PROTOCOL SETTINGS IN LOCAL
1.
S ETUP
Click the Modify or Advanced button next to the setting.
The Windows NT Network Control Panel opens.
2.
Click the Protocols tab.
3.
Select the protocol to modify.
Unless you have installed additional protocols, the choices are AppleTalk, NWLink
IPX/SPX Compatible Transport, and TCP/IP.
4.
Click Properties, make your selections, and click Apply.
5.
Click OK to close the Properties dialog box.
6.
Click OK to close the Network dialog box.
If you have disabled any of the protocols in this procedure, use the Bindings tab of the
Windows NT Network Control Panel when you are ready to re-enable the protocols.
4
4-12
Setting up the E-810 from a Windows Computer
AppleTalk
The current AppleTalk zone is displayed.
4
4-13
Network Setup
IPX/SPX
Use this option to specify IPX/SPX frame types.
The E-810 supports these following Ethernet frame types for IPX/SPX:
Ethernet 802.2, Ethernet 802.3, Ethernet II, and Ethernet SNAP. For Token Ring, the
supported frame types are Token Ring and Token Ring SNAP. You can also allow the
E-810 to select the frame type automatically.
4
4-14
Setting up the E-810 from a Windows Computer
TCP/IP
Specify TCP/IP settings. The current settings for IP address, subnet mask, and default
gateway address are displayed. For information about setting up printing with TCP/IP,
see Chapter 5.
The E-810 requires a unique, valid IP address. You can set a static address yourself, or
specify that the E-810 use DHCP, BOOTP, or RARP to obtain IP addresses
automatically.
N OTE : If you specify the DHCP, BOOTP, or RARP protocol, the E-810 reboots when
you save your changes and exit Setup. Allow the E-810 to reboot and return to Idle
before printing a Configuration page or proceeding with any other operations.
To set the subnet mask, enter one of the following values:
255.0.0.0 if the IP address starts with a number less than 128
255.255.0.0 if the IP address starts with a number from 128 through 191
255.255.255.0 if the IP address starts with a number greater than 191
4
4-15
Network Setup
N OTE : Confirm the subnet mask setting with your network administrator before
proceeding. In some cases, the required setting may be different from those listed.
If your TCP/IP network has a gateway, and users outside the gateway plan to print to
the E-810 using TCP/IP, enter the gateway address.
In remote Setup, the Token Ring information appears, even if you have not enabled
Token Ring on the E-810.
N OTE : The E-810 stores assigned IP addresses, even if you later disable TCP/IP. If you
need to assign the E-810 IP address to another device, first set the E-810 address to a
null address.
Services
4
4-16
Setting up the E-810 from a Windows Computer
You can configure the following network services:
• LPD Printing (TCP/IP)—enable or disable LPD print services.
• NetWare Printing (PServer)—specify NDS and Bindery services (page 4-17).
• Windows Print Sharing (SMB)—enable or disable SMB print services.
• HTTP Support (WWW)—enable or disable support for Fiery WebTools.
• Port 9100—enable or disable support for Port 9100 printing.
LPD Printing
Enable LPD Print Services—Select to enable or disable LPD printing services.
4
4-17
Network Setup
NetWare Printing (PServer) options
The following procedures for setting up NetWare printing depict the windows from
local Setup at the E-810. If you use remote Setup, the procedures are similar.
• NDS Setup
• Bindery Setup
• Poll Interval
Setting up the E-810 for NDS printing
Only one NDS tree can be connected. To specify or change the NDS Tree, click
Modify and specify settings in the NDS Print Server dialog box as described below.
The currently selected NDS Tree and Print Server are displayed.
TO
SPECIFY THE
1.
NDS T REE
SETTING
Check Enable NDS and click Modify.
4
4-18
Setting up the E-810 from a Windows Computer
2.
In the NDS Connection window that appears, double-click an NDS tree in the first
column.
3.
Navigate to the NDS container and click OK.
If necessary, enter the password.
4
4-19
Network Setup
4.
Select a Container from the center column.
5.
Double-click a Print Server from the list on the right.
The full path to the Print Server is displayed.
Another way to change the path is to click Edit and type the path to the Print Server.
4
4-20
6.
Setting up the E-810 from a Windows Computer
Click OK.
The Network Setup window appears, displaying the path to the selected Print Server.
4
4-21
Network Setup
Bindery Setup
Enable or disable Bindery services. The currently connected servers are displayed.
A maximum of eight Bindery servers can be connected.
To add, remove, or change Bindery connections, click Modify and specify settings in
the Bindery Connections dialog box as described in the following section.
4
4-22
TO
ADD
Setting up the E-810 from a Windows Computer
B INDERY
CONNECTIONS
1.
Open the Bindery Connections dialog box by clicking Modify in the Bindery Setup
dialog box.
2.
Select a File Server from the list on the left.
If necessary, enter the appropriate user name and password in the File Server User
Name and Password dialog box to log in to the selected file server.
3.
Select a Print Server from the list in the center and click Add.
The name of the newly added server appears in the Connected Servers list.
4
4-23
Network Setup
To add another server, repeat the previous steps. Up to eight servers can be connected.
4.
When you have finished adding servers, click OK.
When you return to the Network Setup dialog box, the connected servers are displayed
in the Bindery Settings area.
4
4-24
TO
REMOVE
1.
Setting up the E-810 from a Windows Computer
B INDERY
CONNECTIONS
Click Modify in the Bindery Setup dialog box.
The Bindery Connections dialog box opens.
2.
Make your selections in the Select File Server and Select Print Server lists.
The name of the connected server appears in the Connected Servers list.
3.
With the File Server selected in the list of Connected Servers, click Remove.
4.
Click OK.
4
4-25
Network Setup
Poll Interval
Specify the polling interval (in seconds) for NetWare printing.
4
4-26
Setting up the E-810 from a Windows Computer
Windows Print Sharing (SMB)
For setting up the Windows printing service, these characters are allowed in the text
fields: uppercase letters, numerals, spaces, and the following characters:
-_.~!@#$%^&(){}\',"
N OTE : Lowercase letters are not allowed, except in the Comment field.
Enable SMB Print Services—Select to enable SMB (Server Message Block), the file and
printer sharing protocol built into Windows. Enabling SMB allows the E-810 to be
listed on the network so that Windows clients can print to a particular print
connection (Hold, Print, or Direct) on the E-810 without any other networking
software. For information on how to set up a Windows client for Windows printing,
see Getting Started.
N OTE : Windows (SMB) printing runs over TCP/IP, so you must configure TCP/IP on
the E-810 and on computers that use Windows printing.
4
4-27
Network Setup
The remaining options are found only in remote Setup. To change them with local
Setup, use the Network Control Panel in Windows NT.
Server Name—The server name is the name that appears on the network. It can, but
does not have to, be the same name as the server name assigned to the E-810 (see
page 4-4).
When entering a server name using Fiery WebSetup, you are limited to a 10-character
server name. You can enter a server name of more than 10 characters using the E-810
Control Panel or Command WorkStation.
Comment—You can enter information about the printer, up to 15 characters. These
comments are listed in the Properties of the E-810 in Network Neighborhood.
Lowercase letters are allowed in this field.
Domain or Workgroup—Enter the workgroup or domain where the E-810 should
appear.
Ethernet WINS Server—Enter the IP address of the Ethernet WINS name server.
Token Ring WINS Server—Enter the IP address of the Token Ring WINS name server.
Broadcasts from SMB devices cannot be routed beyond their original network segment
without a WINS name server. Setting up the WINS name server is outside the scope of
this manual. To find out if a name server is available, contact your network
administrator.
4
4-28
Setting up the E-810 from a Windows Computer
HTTP Connection Support (WWW)
Enable Web Services—Select to make the Fiery WebTools available to users (see
page 5-16). TCP/IP must already be enabled on the E-810 and on users’ computers.
The Fiery WebTools include Fiery WebSpooler, Status, WebLink, WebSetup,
WebDownloader, WebScan, and Installer. A Java-enabled Web browser and a valid
IP address are required for each user. See Getting Started for details on supported
browsers and workstation requirements.
Enable IPP—Select Yes to enable printing with the Internet Printing Protocol (IPP).
You must enable Web Services. For information on setting up users’ computers to use
IPP printing, see Getting Started.
4
4-29
Network Setup
Port 9100 printing
Enable Port 9100 Print Services—This option allows applications to open a TCP/IP
socket to the E-810 at Port 9100 to download a print job.
Port 9100 Queue—You can attach Port 9100 to any of the published E-810 print
connections.
4
4-30
Setting up the E-810 from a Windows Computer
Printer Setup options
You can specify the following settings in the Printer Setup tab:
• Printer Connections
• PS (PostScript) Setup
• Color Setup
N OTE : In the following illustrations, “Device name” represents the model of the copier
connected to the E-810, which is r7.
Printer Connections
Specify whether to publish the Print Queue, Hold Queue, and the Direct Connection.
4
4-31
Printer Setup options
PS (PostScript) Setup
The options in the PS Setup menu in local Setup are located on the Paper Setup tab in
remote Setup.
N OTE : In the following illustrations, “Device name” represents the model of the copier
connected to the E-810, which is r7.
Convert Paper Sizes—Specify whether to convert paper sizes automatically to the
default paper sizes specified. For example, if you select Letter/11x17->A4/A3, a letter
size job is automatically printed on A4 paper. If you select No, the E-810 prints the job
only if it finds a media source in the size specified by the job.
Color Mode—Specify whether to print color (CMYK) or Grayscale images to the E-810
by default. CMYK gives you full color prints. Select CMYK as the Color Mode before
performing calibration on the E-810. Grayscale converts all colors into shades of gray.
Toner Reduction—Specify whether to minimize the effects of “blasting,” which occurs
when excess amounts of toner on certain media types “blast” beyond the color density
boundaries defined in the print job.
4
4-32
Setting up the E-810 from a Windows Computer
Page Order—Specify the page order for printed output. Forward prints pages in the
order received, so that the last page is on the top of the stack and the first page is on the
bottom. Reverse prints jobs in reverse order, so the first page is on the top of the stack
and the last page is on the bottom.
Default Paper Sizes—Specify whether to print on US paper sizes (for example, Letter,
Legal, Tabloid), or Metric paper sizes (for example, A4 and A3) by default. When no
paper size is defined within a PostScript file, jobs are printed on Letter-size paper if you
select US, or A4 paper if you select Metric.
Print Cover Page—Specify whether the E-810 prints a cover (job summary) page at the
end of each print job. If this option is set to Yes, each print job is followed by a page
containing the name of the user who sent the job, the document name, the server
name, the time the job was printed, the number of pages printed, and the status of the
job. If a PostScript error occurs and the Print to PS Error option is set to Yes, the Cover
Page lists the PostScript error message instead of the job status.
Allow Courier Substitution—Specify whether to substitute Courier for unavailable
fonts. When this option is off, jobs requiring fonts unavailable on the E-810 hard disk
generate a PostScript error and do not print. This setting does not apply to PDF files;
font substitution occurs automatically for PDF files.
Print to PS Error—Specify whether the E-810 should print the available portion of a
print job when it encounters a PostScript error. In general, this option should be set to
No.
• When you set this option to No, printing of the entire job is canceled when a
PostScript error occurs, but the processed portion of the job and the PostScript error
information are stored on the E-810. You can view the job and the error information
from the job management tools.
• When you set this option to Yes, the portion of the job processed before the error
occurred is printed.
Color Setup
The color job defaults can be overridden on a job-by-job basis.
• A user can specify a different setting at print time from the printer driver.
• An administrator or operator can specify a different setting from the job
management tools after the job has been sent to the E-810.
4
4-33
Printer Setup options
The preferred method for setting color defaults is to use Color Setup, part of the
ColorWise Pro Tools. The color options are described in this section for your
reference. For information about these defaults, see the Printing Guide and the Color
Guide.
N OTE : In the following illustrations, “Device name” represents the model of the copier
connected to the E-810, which is r7.
RGB Source Profile—Specify the RGB source space to be applied to RGB data.
Rendering Style—Specify the Rendering Style to be applied to RGB data.
CMYK Simulation Profile—Specify the simulation to be applied to CMYK data.
CMYK Simulation Method—Specify the simulation method to be used.
RGB Separation—This option defines how the E-810 processes RGB jobs. Select
Output for RGB jobs that you print to the final output device. Select Simulation to
simulate an output device that is not the device to which you are printing.
Output Profile—Specify the output profile to use for printing. Additional profiles can
be created and downloaded to the E-810 with ColorWise Pro Tools.
4
4-34
Setting up the E-810 from a Windows Computer
Pure Black Text/Graphics—Specify whether to optimize black text and line art. This
option also minimizes toner use for documents containing both color and black-only
pages.
When this option is on, black text and line art are printed with black toner only. When
this option is off, black text and line art are printed using all four colors of toner.
Black Overprint—When this option is on, black text overprints on colored
backgrounds. With this option is off, black text knocks out color backgrounds. In
general, this option should be on.
Spot Color Matching—When this option is on, the E-810 uses an internal lookup table
to print the best equivalents of PANTONE colors. When this option is off,
PANTONE colors are printed using the CMYK values defined in the originating
applications.
Exiting Setup
When you have finished specifying Setup options, click OK and close the Setup dialog
box. You are notified that the E-810 must be restarted for the new settings to take
effect. You can reboot now or later. If Command WorkStation is running, the
connection to the E-810 is lost and you must log in again when the Server has
restarted.
If you changed the network configuration or other settings affecting Windows NT
Workstation, you must reboot Windows NT for those changes to take effect.
After you have completed Setup and rebooted the E-810 for the first time, install the
user software for printing on remote workstations as described in Getting Started. To
confirm the network connection and your Setup, print a test job from a remote
workstation.
4
4-35
Printing the Configuration page
Printing the Configuration page
The Configuration page lists the settings in effect for the current Setup. After you have
performed Setup, print a Configuration page to confirm your settings.
The other pages you can print from Command WorkStation include the test page, Job
Log, color charts, and font list. For information on these E-810 pages, see the Job
Management Guide.
TO
PRINT THE
C ONFIGURATION
PAGE
1.
In Command WorkStation, choose Print Pages from the File menu.
2.
Click Configuration.
3.
Click Print.
Post the current Configuration page near the server for quick reference. Users need the
information on this page, such as the current printer default settings.
5
5-1
Chapter 5:
Setting up
Network Servers
Support for Fiery utilities
This chapter describes environments that typically include one or more network
servers—Novell NetWare servers and Windows NT 4.0 servers—that share printing to
the E-810. It describes setting up servers that use IPX/SPX or TCP/IP protocols for
communicating with the E-810. In addition, it includes guidelines for setting up direct
communication from Windows NT 4.0 workstations or UNIX workstations, where a
network server is optional. The chapter also outlines the requirements for users to print
to the E-810 and to run the Fiery utilities and Fiery WebTools.
The E-810 can accept jobs concurrently from NetWare, Windows NT 4.0, and
AppleShare servers, as well as jobs sent directly from Windows NT 4.0 or UNIX
workstations. Because AppleShare servers require no special configuration, they are not
discussed in this chapter, except for use in a Windows NT 4.0 environment (see
“E-810 on a TCP/IP network with Windows NT 4.0” on page 5-11).
If your network is based on Windows NT 4.0, proceed to page 5-11. For information
on UNIX workstations, proceed to page 5-18.
Support for Fiery utilities
The following table describes the Fiery utilities supported over each protocol and
Windows platform. More information is provided in later sections, according to your
network type.
Windows 9X/Me/2000
IPX
Windows 9X/Me/2000
TCP/IP
Windows NT/
2000
IPX
Windows NT/
2000
TCP/IP
ColorWise Pro Tools
—
√
—
√
Command WorkStation
—
√
—
√
Fiery Downloader
√
√
√
√
Fiery Scan
—
√
—
√
Fiery utility
5
5-2
Setting up Network Servers
E-810 on a NetWare 5.x network with NDPS
The E-810 supports printing over a NetWare 5.x network running either the TCP/IP
protocols or the IPX protocol. For pure IP printing, the E-810 takes advantage of
features in NDPS (Novell Distributed Print Services). For IPX printing, the E-810
supports the PServer service in Bindery emulation or through NDS (Novell Directory
Services). For more information on IPX-based printing, see “E-810 on a NetWare 3.x
or 4.x network” on page 5-5.
N OTE : Setting up a NetWare environment correctly requires the presence and active
cooperation of the Novell network administrator. You must have administrator
privileges on the network to create new NDS or bindery objects.
NDPS is not like earlier queue-based versions of NetWare printing. Instead, you use an
NDPS Manager and a Printer Agent, which control the tasks previously handled by a
print queue, print server, and spooler. You can also make the printer driver available for
clients to download from Windows 98/Me and Windows NT 4.0/2000 computers.
The E-810 can receive print jobs from NetWare clients over Ethernet or Token Ring
network topologies. (Appendix A describes the Token Ring option.) During E-810
Setup, you select the frame type or types that will be used for communication between
the E-810 and network servers. Frame type refers to the format of a communications
packet; frame types are specified in a startup file when the NetWare server (or any
other workstation) loads its network drivers.
Tips for experts—NetWare 5.x networks
Setting up the E-810 in an NDPS environment is similar to setting up any other
PostScript printer on the network. The following information is useful for experienced
network administrators:
•
Make sure you have a valid IP address for the E-810 and for any workstations that will
print to it or run the Fiery utilities.
•
In E-810 Setup, enable TCP/IP and enter the IP address, subnet mask, and gateway
address for the E-810. You can enter these manually or use DHCP, RARP, or BOOTP
protocols to assign the addresses dynamically.
•
Bidirectional communication features in NDPS are not supported on the E-810.
5
5-3
E-810 on a NetWare 5.x network with NDPS
Configuring a NetWare 5.x server for printing
Before you begin
The following procedure assumes NDPS has been installed during NetWare 5.x
installation and that a Broker is running on the server. Unless you have manually
unloaded the Broker, it loads and runs when you install NDPS. Make sure you are
using the latest NetWare 5.x service pack and Novell gateway. Finally, create an NDPS
Manager. For more information, see your NetWare documentation.
In E-810 Setup, make sure you have enabled TCP/IP (page 3-15) and LPD printing
(page 3-22) on the E-810. You can ping the E-810 (page 5-20) to verify that TCP/IP
communication is successful.
Setting up the E-810 on a NetWare 5.x network
Depending on the security needs at your organization, you can set up the E-810 as a
Public Access printer or a Controlled Access printer. The following procedure describes
setting up a Public Access printer. You can then convert this type of printer to
Controlled Access if necessary. For more information, see your NetWare
documentation.
TO
SET UP THE
E-810
AS A
P UBLIC A CCESS
PRINTER
1.
In NetWare Administrator, double-click the NDPS Manager object you created.
2.
In the Details window for the NDPS Manager object, click the Printer Agent List
button.
The list of Printer Agents appears.
3.
Click New.
The Create Printer Agent dialog box appears.
5
5-4
Setting up Network Servers
4.
In the Printer Agent (PA) Name field, enter a name.
5.
Under Gateway Types, select Novell Printer Gateway, and click OK.
6.
In the Configure Novell PDS for Printer Agent dialog box, select “((NONE))”, and
click OK.
7.
In the Configure Port Handler dialog box, choose “Remote LPR on IP” as the
connection type, and click Next.
8.
For Host Address, enter the IP address of the E-810.
9.
For Printer Name, enter the name of the E-810 print connection you want users to
print to, and click Finish.
This name must be either print or hold.
10.
In the Select Printer Drivers dialog box, select the printer driver for Windows 9X/Me
and the driver for Windows NT 4.0/2000.
11.
Click Continue, and click OK.
5
5-5
E-810 on a NetWare 3.x or 4.x network
E-810 on a NetWare 3.x or 4.x network
The NetWise™ features built into the E-810 support the following network operating
environments:
• NetWare 4.x—NDS (Novell Directory Services)
• NetWare 3.x—Bindery services
• Servers running NetWare 4.x in bindery emulation mode
For Ethernet-based networks, the IPX/SPX protocol is supported. For Token Ringbased NetWare networks, both IPX/SPX and TCP/IP are supported.
N OTE : Setting up a NetWare environment correctly requires the presence and active
cooperation of the Novell network administrator. You must have administrator
privileges on the network to create new NDS or bindery objects.
The term “bindery server” is used to refer to a Novell file server running NetWare 3.x,
or NetWare 4.x in emulation mode. The term “NDS” is used to describe components
of a NetWare operating system running NetWare 4.x in native mode.
NetWare clients print to the E-810 through the Novell network server. Server setup
and client network setup are outlined in this chapter. Client printing setup is described
in Getting Started, and printing is described in the Printing Guide.
The E-810 can receive print jobs from NetWare clients over Ethernet or Token Ring
network topologies. (Appendix A describes the Token Ring option.) During E-810
Setup, you select the frame type or types that will be used for communication between
the E-810 and network servers. Frame type refers to the format of a communications
packet; frame types are specified in a startup file when the NetWare server (or any
other workstation) loads its network drivers.
5
5-6
Setting up Network Servers
Tips for experts—IPX networks
Setting up the E-810 is similar to setting up any other PostScript printer on the
network. The following information is useful for experienced network administrators.
The E-810 with IPX connections has these characteristics:
•
Both NetWare 3.x and NetWare 4.x are supported directly. NetWare 4.x is also
supported through bindery emulation.
•
A minimum connection to the E-810 consists of a NetWare file server, a NetWare
print server, and a NetWare queue.
•
A single directory tree (for NetWare 4.x) and up to eight bindery servers can be
configured simultaneously.
This limit is the same regardless of whether the E-810 is connected to the network via
Ethernet, via Token Ring, or both.
•
The E-810 looks for print jobs on one NetWare print server per bindery server.
•
Each print server can store jobs for any print connection on the E-810.
•
Windows computers (whether a Novell server is present or not) can use IPX/SPX
protocols for communicating with the E-810 directly to use Fiery utilities.
Overview of IPX printing to the E-810
NetWare file servers support the creation of print queues, which are storage areas for
print jobs. When a client on a remote computer decides to print, the job is directed to
a print queue on the NetWare file server and spooled to the NetWare server disk,
freeing up the client workstation.
You must give the NetWare queue names a specific extension corresponding to the
E-810 print connection, as follows:
_print
_hold
_direct
N OTE : These extension names must be in English and in all lowercase letters.
5
5-7
E-810 on a NetWare 3.x or 4.x network
You do not need to rerun Setup when you add or remove a NetWare queue; however,
you should reboot the E-810 after you create or remove a queue.
When the E-810 is configured to connect to a NetWare server, it polls the NetWare
server for jobs in each of its queues. If jobs are found, they are automatically transferred
over the network to the matching connection on the E-810. For example, jobs from
the NetWare queue with the _print extension are sent to the E-810 Print queue, and so
on. While a job is processed and printed, a record of the job is being created. You can
access the Job Log containing these records at any time.
Configuring a NetWare 3.x or 4.x server for printing
The following sections explain how to set up a NetWare file server so that networked
users can print to the E-810 from their workstations, and the E-810 can obtain print
jobs from the NetWare server.
For each NetWare file server that you configure, follow these general steps. More detail
is provided in subsequent sections and in your NetWare documentation.
• Make sure the server is connected to a functioning IPX network.
• Log in as the Supervisor on a PC connected to the NetWare file server.
• For NetWare 4.x installations, set up an NDS connection (see page 5-9).
• For NetWare 4.x in emulation mode, set the bindery context (see page 5-9).
• For NetWare 3.x and for NetWare 4.x in bindery emulation, set up a file server,
a print server, and a print queue for the E-810 (see page 5-10).
With bindery services, you can route all E-810 print jobs through the same NetWare
file server, or you can configure more than one file server to handle E-810 jobs.
The functions you perform on the Novell server, the E-810, and the client workstation
are summarized in the following tables. The first table applies to NDS connections,
and the second to bindery connections. Complete the operations in the left column,
then the center column, then the right column.
5
5-8
Setting up Network Servers
Configuring an NDS connection
Abbreviations:
FS = file server
PS = print server
PQ = print queue (on the NetWare server)
On NDS FS
In NETADMIN:
Create NDS PQs
Create NDS printer
and assign PQs
Create PS and assign
the printer
Configure users of
the PQs
In Setup from
Command WorkStation
Port Setup
Ethernet Setup
Protocol Setup
IPX/SPX Setup—select frame
types
Service Setup
PServer Setup and NDS Setup
Select Root
Browse to select PS
Specify PQ search root
(optional)
Set Polling Interval
On client workstation
Install user software.
For printing:
Connect client to PQs that
you set up on the NetWare FS
(associated with the PS
selected in NDS Setup).
For running the Fiery utilities:
Configure the connection to
the E-810.
Configuring a bindery connection
On Bindery FS
In PCONSOLE:
Select NetWare FS
(up to 8)
For each FS:
Configure PS
Configure PQ
Configure users of
the PQ
In Setup from
Command WorkStation
Port Setup
Ethernet Setup
Protocol Setup
IPX/SPX Setup—select frame
types
Service Setup
PServer Setup and Bindery Setup
Add FS (up to 8)
Set Polling Interval
On client workstation
Install user software.
For printing:
Connect client to PQs that
you set up on the NetWare FS
(associated with the PS
selected in Bindery Setup).
For running the Fiery utilities:
Configure the connection to
the E-810.
5
5-9
E-810 on a NetWare 3.x or 4.x network
Setting up an NDS connection
In NDS, all NetWare entities (objects) are organized in a hierarchical tree structure.
Objects have a name, properties, and a context that defines the location of the object in
the directory tree. For the E-810, you are mainly concerned with defining a printer,
a print server object, and one or more print queue objects. Objects are created in
NetWare administrator programs such as PCONSOLE, NETADMIN, or NetWare
Administrator.
The top-level tree object is known as the [Root] object. The name of the [Root] object
is also the name of the tree. Below the [Root] are other objects: either containers
(which consist of other objects) or leaf objects (which do not contain other objects).
Access to objects is controlled by rights that are defined as properties of each object.
Rights are established by network administrators.
Setting the NetWare 4.x bindery context
You can connect only one directory tree to the E-810. If you need to connect
additional NetWare 4.x servers, you can do so by using bindery emulation, which
causes the 4.x server to behave like and be accepted as a NetWare 3.x server.
N OTE : The file server you select must not be in the same tree as the one you selected in
NDS Setup.
You can connect up to eight bindery servers, whether in native 3.x mode or 4.x
emulation mode, to the E-810. If your server is using NetWare 3.x, proceed to “Setting
up a NetWare print queue for bindery” on page 5-10.
In order to set up the NetWare 4.x server in bindery emulation mode for printing to
the E-810, the network administrator must do the following:
• Determine the Directory Services path to the container in which the print server and
the print queue for the E-810 will be created.
The container defines the “bindery context” for your network structure.
• Edit the network startup file to set the bindery context.
• Activate the new bindery context.
5
5-10
Setting up Network Servers
Setting up a NetWare print queue for bindery
For NetWare 3.x and for 4.x in emulation mode, the NetWare print server and print
queue for E-810 are created and configured from NetWare Print Console
(PCONSOLE), a NetWare utility that is stored in the NetWare PUBLIC directory.
As with NDS, first you create several NetWare entities on a Novell server, then you
select them in Network Setup (see page 3-27).
Setting up NetWare Windows clients for printing
Before setting up client workstations for printing, make sure you perform Network
Setup (see page 3-10), and that the settings reflect the entities you created in the
NetWare administrator utilities (see page 5-7).
N OTE : For printing to the E-810, connect all Windows clients to a Novell NetWare
server and permit them to connect to the Netware print server or servers on which you
defined a NetWare print queue for the E-810.
After the Novell server and the E-810 have been set up, client setup consists of:
• Installing the networking protocol, binding it to the network adapter card, and
permitting the client to log in to the NetWare file server.
On Windows 9X/Me workstations, load both the IPX/SPX-compatible protocol
and the Client for NetWare Networks from the Network Control Panel.
On Windows NT 4.0/2000 workstations, install Client Services for NetWare. Use
the CSNW option in the Control Panel to set printing options and specify a
preferred NetWare server.
• Setting up the E-810 as a PostScript printer by installing a PostScript printer driver
and the E-810 PPD (PostScript printer description).
• Adding a network port and connecting the workstation to one or more NetWare
queues that have been defined for the E-810.
For more information, see Getting Started.
• Installing E-810 software, such as color reference files.
See Getting Started for details.
5
5-11
E-810 on a TCP/IP network with Windows NT 4.0
E-810 on a TCP/IP network with Windows NT 4.0
When a Windows NT 4.0 computer is configured to connect to the E-810 using
TCP/IP, it can print directly to the E-810. If the computer shares the printer over the
network, it is acting as a print server to Windows NT 4.0/2000 and
Windows 9X/Me/2000 clients. Client machines print to the E-810 by printing to the
Windows NT 4.0 print server. You can then monitor and control printing at the
Windows NT 4.0 server computer.
Typical system combinations are:
• Print server running Windows NT 4.0 Server; clients running
Windows NT 4.0/2000 Workstation and Windows 9X/Me
• Print server running Windows NT 4.0/2000 Workstation and clients running
Windows 9X/Me
With TCP/IP protocols loaded, you can run the Fiery utilities and Fiery WebTools
from a Windows NT 4.0/2000 or Windows 9X/Me computer.
The Windows NT 4.0 server can also use AppleTalk protocols for printing to the
E-810 as an alternative to TCP/IP. When you create a printer to share with AppleTalk
users, do not “capture” the printer. Capturing the printer forces all users to print to the
server, rather than directly to the printer. If you capture the printer, E-810 print
connections will not appear in the Mac OS Chooser.
Tips for experts—Windows NT 4.0 with TCP/IP
Setting up printing from Windows NT 4.0 using TCP/IP protocols is similar in some
respects to setting up UNIX workstations with TCP/IP. When TCP/IP network
connections are made from Windows NT 4.0 workstations, note the following:
•
Make sure you have a valid IP address for the E-810 and for any workstations that will
print to it or run the Fiery utilities.
•
In E-810 Setup, enable TCP/IP and enter the IP address, Subnet mask, and Gateway
address for the E-810.
You can enter these addresses manually or use DHCP, RARP, or BOOTP protocols to
assign them dynamically.
5
5-12
Setting up Network Servers
•
Make sure the E-810 name and address are listed in a domain name server (DNS) or
hosts name database used by your system.
•
Make sure the system host table includes the correct internal name for the E-810 as a
remote printer.
See page 5-19 for more information.
•
For Windows NT 4.0, install the appropriate printer driver files on the Windows NT 4.0
server.
For more information, see Getting Started.
•
Repeat the installation for all users who print to the E-810.
Each server and workstation running the Fiery utilities with TCP/IP also needs the
TCP/IP protocol and the Fiery utility software.
Configuring a Windows NT 4.0 server to support the E-810
To configure a Windows NT 4.0 server to communicate with the E-810, follow these
general steps. More detail is provided in subsequent sections and in your Microsoft
documentation.
• Load the TCP/IP network protocol on the server and configure it with an
IP address, subnet mask, and gateway.
• Enter the host name of the E-810 in the host database used by your system (see
page 5-13).
• Perform E-810 Setup.
• On the Windows NT 4.0 server, create a printer for each E-810 print connection,
install the appropriate printer drivers and (optionally) share the printer on the
network (see page 5-14).
• Enter the host name and remote printer name of the E-810 in the printer
connection. See page 5-19 for more information.
• If the Windows NT 4.0 server is also a workstation, install the Fiery utilities (see
Getting Started).
5
5-13
E-810 on a TCP/IP network with Windows NT 4.0
Adding the E-810 to the TCP/IP network
If your TCP/IP network consists of Windows NT 4.0, Windows NT 4.0 clients, and
Windows 2000 clients, use the directions in this section. If the network also includes
UNIX workstations, also refer to the directions on page 5-19.
TO
ADD THE
SERVER
1.
E-810
TO A
TCP/IP
NETWORK WITH A
W INDOWS NT 4.0
Register the IP address of the E-810 in the host name database used by your system.
For installations that do not have a network administrator or central host name
database, add the E-810 to the hosts file on the Windows NT 4.0 server. Also add it to
the hosts file on any workstations that have TCP/IP loaded and will use the Fiery
utilities.
The Windows NT 4.0 hosts file provides compatibility with the UNIX hosts file. The
hosts file is used as a local Domain Name Services (DNS) equivalent. It has the same
format as the /etc/hosts file on UNIX servers. The format of the hosts entry is:
IP Address<TAB>host name<TAB>#comments
where <TAB> indicates that you press the Tab key.
To determine the IP address and server name of your system, print a Configuration
page (see page 3-46).
N OTE : If the E-810 has already been defined in an /etc/hosts file or equivalent host
name database on a UNIX workstation on your network, it is recommended that you
use the same host name here as you used for the name of the remote printer in the
/etc/printcap file.
2.
Perform E-810 Setup to support TCP/IP printing.
Enter the options in Protocol Setup (IP address of the E-810, subnet mask, and
gateway address).
5
5-14
Setting up Network Servers
Installing the E-810 as a shared printer
The first step in creating a printer is installing the printer driver files, which give your
applications access to printer features. You can use the installation instructions in
Getting Started for every workstation that will print directly and independently to the
E-810. However, if you are an administrator running Windows NT 4.0 Server,
Windows NT 4.0 Workstation, or Windows 2000 Professional, you can also create a
printer and share it with clients on the network. When a printer is shared, clients who
are not able or are not given permission to establish an independent network
connection to the E-810 can still print through the server.
You can specify sharing of the printer during installation of the E-810 printer files. If
you have not yet installed the E-810 printer files on the Windows NT 4.0 print server
computer, do so now following the instructions in Getting Started. During installation,
enter the information necessary to share the E-810.
If you have already installed the E-810 printer files on the computer you are using as
an NT 4.0 print server, see your Windows documentation for information about
sharing the E-810.
If more than one E-810 print connection is published (for example, if both the Print
queue and the Hold queue are published), you may want to create a printer for each
print connection, so that you and other users can print to each connection directly.
When prompted to specify the printer name, enter a name that indicates the E-810
print connection.
Configuring clients of a Windows NT 4.0 server
Each client of a Windows NT 4.0 server is already using a network protocol to
communicate with the server. Each client can print to the E-810 if it has been shared
by a Windows NT 4.0 Server, Windows NT 4.0 Workstation, or Windows 2000
Professional computer. In that case, the client does not have to use the same network
protocol to connect to the Windows NT 4.0 server as the server uses to communicate
with the E-810.
5
5-15
TO
E-810 on a TCP/IP network with Windows NT 4.0
CONNECT AND PRINT TO THE
SERVER
•
E-810
SHARED BY A
WINDOWS NT 4.0
For Windows 9X/Me/2000 clients, before printing, double-click the Windows NT 4.0
server icon in the Network Neighborhood window, and double-click the printer name.
You will be prompted to set up the printer. When you choose to set it up, the Add
Printer Wizard dialog box appears. Follow the procedures in Getting Started.
•
For Windows NT 4.0 Workstation clients, before printing, connect to the print server
computer and select the E-810. Right-click and choose the Open command.
When prompted, click Yes to have Windows set up the printer.
After clients have selected the printer, they can choose it from the Print Setup, Page
Setup or Print dialog box of their application. Clients can change printing options for
their own job, but printer properties appear dimmed, unavailable for changing. When
a client chooses Print, the job is transmitted to the Windows NT 4.0 print server, and
from there to the selected print connection on the E-810. The job is listed in the Print
Manager on the client workstation, and the administrator can track it in the E-810
window in the Print Manager on the Windows NT 4.0 print server.
Configuring Windows computers without a Windows NT 4.0 server
If your network does not have a Windows NT 4.0 server, Windows 98/Me and
Windows NT 4.0/2000 workstations can still print to the E-810. This method of
printing is called Windows, or SMB, printing. In this type of network environment,
computers running Windows 9X/Me/2000 and Windows NT 4.0 Workstation
operate in a peer-to-peer environment and communicate directly with the E-810 when
users send print jobs.
Many of the same prerequisites for setting up printing through a Windows NT 4.0
server also apply to setting up Windows printing where a server is not present. The
prerequisites are summarized below, and you can find more detail in the E-810
documentation and your Microsoft documentation.
•
Print a Configuration page (see page 3-46).
Use the information on this page to determine the current E-810 settings.
•
Load the TCP/IP network protocol (for Windows 9X/Me/2000 only, also load Client for
Microsoft Networks) on the computer.
5
5-16
•
Setting up Network Servers
Verify the Workgroup name of the computer in the Windows Network control panel.
Make sure the Workgroup name is the same as the one listed in E-810 Setup.
•
For Windows 9X/Me/2000 only, in the Windows Network control panel, configure the
computer to allow file sharing, and then restart the computer.
•
Ping the E-810 (see page 5-20) to verify TCP/IP communication is successful.
Configuring the E-810 and clients for Fiery WebTools
The Fiery WebTools provide access to many E-810 functions via the Internet (or
intranet), providing additional flexibility in remote management. You can access the
Fiery WebTools from a Windows or Mac OS computer.
N OTE : Fiery WebSetup is supported for Windows computers only.
TO
TO
SET UP
F IERY W EB T OOLS
ON THE
E-810
1.
In E-810 Network Setup, enable TCP/IP.
2.
Set a valid, unique IP address for the E-810, and then set the subnet mask. Set a
gateway address if necessary.
3.
Enable Web Services.
4.
In E-810 Printer Setup, confirm the Print Queue is published.
SET UP
F IERY W EB T OOLS
ON A COMPUTER
1.
Enable TCP/IP networking.
2.
Assign the workstation a valid, unique IP address and subnet mask, and a gateway
address if needed.
3.
Install an Internet browser that supports the Java language and frames.
Make sure Java is enabled. See Getting Started for more information on supported
browsers and Fiery WebTools requirements.
5
5-17
TO
Configuring the E-810 and clients for Fiery WebTools
ACCESS THE
F IERY W EB T OOLS
1.
Start the Internet browser.
2.
Enter the IP address or DNS name of the E-810.
3.
Press Enter.
The E-810 home page appears. Click the name of a particular WebTool.
4.
Use the Configure button to enable only certain WebTools for users.
Setting the WebLink destination
The pre-set WebLink destination can be changed; this function requires the
Administrator password, if one has been set.
TO
CHANGE THE
W EB L INK
DESTINATION
1.
Start your Internet browser application.
2.
Enter the IP address or the DNS name of the E-810.
The E-810 home page appears.
3.
Enter the Administrator password (if required) and click OK.
4.
Press the Control key (Mac OS) or Ctrl key (Windows) as you click the WebLink button.
The Update WebLink dialog box appears.
5.
Enter the new WebLink address (URL) and click OK.
5
5-18
Setting up Network Servers
E-810 on a network with UNIX workstations
When a UNIX workstation is configured with the lpd protocol, and connected to the
E-810 over a TCP/IP network, it can print directly to the E-810.
Setting up UNIX workstations requires an administrator with root privileges. After the
initial configuration, UNIX users simply submit print jobs to a named printer.
The job management tools, along with the other Fiery utilities and Fiery WebTools,
are unavailable on the UNIX platform. A Windows or Mac OS computer on the same
network as the UNIX computer that is set up to use TCP/IP for printing to the E-810
can use the job management tools to manage print jobs that originate from all
workstations on the network.
Tips for experts—UNIX workstations
Setting up the E-810 in a UNIX environment has the same requirements as setting up
any printer or new device:
•
A distinct IP address is needed for the E-810 as well as for each workstation on the
network.
•
You select a name for the E-810 that goes with the IP address.
•
The IP address of the E-810 must be registered for the network in a host database, and
also on the E-810 itself.
•
The Print queue or the Hold queue (or both) must be published.
Lpd printing to the Direct connection is not supported.
The following information applies especially to the E-810:
•
E-810 is a printer controller that understands lpd protocols.
•
E-810 has a remote printer name you must use in order to communicate with it
successfully.
See the next section for details.
5
5-19
E-810 on a network with UNIX workstations
Important note about the remote printer name
Whichever UNIX system you use, the name used for remote printer (or rp in the
/etc/printcap file) in configuring the E-810 must be one of the following:
print
hold
The remote printer name is also used when setting up your Windows NT 4.0
Workstation, Windows NT 4.0 Server, or Windows 2000 Professional to connect to
the E-810 over TCP/IP. Enter the remote printer name when you set up your
Windows NT 4.0 printer, as the “Name of printer or print queue on that (lpd host)
server” in the Add LPR Compatible Printer dialog box (see Getting Started).
Setting up the E-810 on TCP/IP networks
Every machine (host) on a TCP/IP network, including the E-810, must have a unique
32-bit internet address (IP address). Contact your network administrator to obtain an
address for the E-810. Workstations on a TCP/IP network can print directly to the
E-810 as a remote printer, or can print to a Windows NT 4.0 server or UNIX
workstation acting as a print server. Since the E-810 spools jobs and acts as a print
server, there is no advantage in placing another print server between a workstation and
the E-810. If you choose to do so, however, there is no difference in setup except that a
client machine does not have its own spooling area.
TO
SET UP
E-810
1.
PRINTING ON
UNIX
SYSTEMS
Specify the appropriate settings in E-810 Server Setup.
To access E-810 Setup, see page 3-4.
2.
Specify the appropriate settings in E-810 Network Setup.
Enter a valid IP address, subnet mask, and gateway address for the E-810.
3.
Specify the appropriate settings in E-810 Printer Setup.
Publish the Print queue and/or the Hold queue.
5
5-20
TO
SET UP
Setting up Network Servers
TCP/IP
FOR COMMUNICATION WITH THE
E-810
1.
A superuser (with root login) must add the E-810 to the network’s IP host table or
other system database of network printers.
2.
In the file or utility used by your network, specify the remote printer name, the print
server protocol, the queue, and the spool file for the E-810 name you assigned.
3.
Make the E-810 available as a printer to other network users.
4.
To verify the TCP/IP connection, ping the IP address or the host name. From any
computer on the network, at the command prompt, type:
ping <IP address>
Type the E-810 IP address assigned in E-810 Network Setup.
After the E-810 is set up as a network printer, you can also ping the name you gave to
the E-810:
ping <hostname>
The server should respond with a message such as
Reply from <IP address> ...
Some systems will respond with a continuous display of output from the IP address. To
stop the output, type Control-C. You can use the ping command at any time.
TO
PRINT TO THE
E-810
•
On a UNIX system running SunOS 4.x or other BSD-based variant, use the lpr command
to send a job to the E-810.
•
On a UNIX system running Solaris 2.x or any System V implementation of UNIX, use
the lp command to send a job to the E-810.
•
Windows NT 4.0 users with the TCP/IP protocol loaded can send print jobs to the
E-810 from their applications or from a command prompt.
When Windows NT 4.0 users print from applications, they can set print options with
the driver, but not from the UNIX command line.
5
5-21
E-810 on a network with UNIX workstations
Managing print jobs
UNIX network administrators can use UNIX utilities for viewing the list of jobs, and
for printing and removing jobs that are spooled on UNIX servers. If the network
includes a Windows NT 4.0/2000 workstation that has TCP/IP protocols loaded, you
can use Command WorkStation or Fiery Downloader to download fonts and files.
You can also use the job management tools to manage jobs from remote workstations.
See the Job Management Guide for more information.
Even without the Fiery utilities, you can:
• Set up the E-810 to print a log of printed jobs automatically after every 55 jobs (see
Job Log Setup on page 3-42).
• Print a Job Log manually at any time from the Command WorkStation Functions
menu (see the Job Management Guide).
6
6-1
Chapter 6:
Administering
the E-810
Administrator functions
This chapter provides tips on managing E-810 printing, and includes some
troubleshooting hints.
Administrator functions
Administration features are included with the user software and are built into the
E-810 itself. The following table describes where to find information on these features
(page references refer to this manual).
For these operations
And these tasks
See
Setting up network servers
Setting up servers to manage and share printing services
This manual
Connecting and setting up the
E-810
Connecting the E-810 and performing E-810 Setup
This manual
Setting up the E-810 to allow user access to
Fiery WebTools
This manual
Getting Started
Release Notes
Setting up the printing
environment
Setting printer defaults, including modes, imaging, paper
size handling, error handling
Setting copier model-specific options
Printer Setup, page 3-35
and 4-30
PS Setup, page 3-36 and
4-31
Color Guide
Printing Guide
Setting up the job environment
Publishing the Direct connection or the Print queue or
Hold queue to end users on various platforms
Printer Setup, page 3-35
and 4-30
Chapter 5
Protecting integrity of users’ jobs,
maintaining consistency of E-810
settings
Setting the Administrator password
Passwords, page 3-43 and
4-5
Chapter 2
6
6-2
Administering the E-810
For these operations
And these tasks
See
Setting up all new users
Setting up printing, including installing PostScript printer
drivers and PPD files for the printer
Installing optional user software
Installing color reference pages (CMYK swatches,
PANTONE Reference, color sample pages)
Preparing users to access Fiery WebTools
Getting Started
Release Notes
Getting users started with printing
Printing to the E-810
Setting job-specific options
Using Fiery utilities
Printing Guide
Job Management Guide
Controlling the job flow
Using Fiery WebTools, Command WorkStation and Fiery
utilities and for managing job priorities, tracking current
jobs, canceling jobs, printing jobs in the Hold queue,
reprinting from the Printed or Hold queue
Printing Guide
Job Management Guide
Release Notes
Job management
Viewing, printing, and exporting the Job Log, user notes
Setting automatic printing and clearing for the Job Log
Job Management Guide
page 4-7
Calibration and color management
Printing with CMYK simulations
page 3-40
Printing Guide
Color Guide
Getting Started
Calibrating the E-810
Printing color samples and swatch pages
Installing color profiles
Maintaining optimal E-810
performance
Tips
Deleting jobs, clearing queues
page 6-3
Job Management Guide
Troubleshooting
Troubleshooting E-810 Setup
Printing, printer, and user software troubleshooting
page 6-4
Printing Guide
Job Management Guide
6
6-3
Maintaining optimal E-810 performance
Maintaining optimal E-810 performance
The E-810 does not require maintenance. Beyond the obvious requirements of
servicing and maintaining the copier and replenishing consumables, there are a few
things you can do to improve the overall performance of your system:
•
Make the best use of your network connections
Publish only connections that will be used; the E-810 constantly checks all published
connections, even if they are inactive. Match the NetWare polling interval and the
number of queues or connections to the demand for printing.
Review the published connections by printing a Configuration page. Eliminate the
connections that are not being used. It is easy to re-establish them when needed.
•
Leave some jobs that are less urgent to times when there is less network traffic or
printing
Recurring print jobs or jobs that are not urgent can be printed to the Hold queue. At
low-traffic times, the administrator or a user of the job management tools with
Operator privileges can move (or copy) all the Hold queue jobs to the Print queue for
printing.
•
Reduce unnecessary network communication
Large numbers of users running Fiery utilities, especially with frequent updates, may
have a significant effect on E-810 performance.
•
Make sure you have adequate disk space on the E-810
Periodically review the list of jobs in the Hold queue, and the number of jobs being
retained in the Printed queue.
An administrator can print or delete jobs that are in the Printed queue and Hold
queue. Consider printing or offloading inactive jobs. If disk space on the E-810 is
frequently low, you can disable the Printed queue (in Server Setup) and choose not to
publish the Hold queue (in Printer Setup).
To move or remove queued jobs, use the job management tools. When you free up disk
space by removing inactive jobs, new jobs are spooled and printed more quickly.
6
6-4
Administering the E-810
Troubleshooting the E-810
Startup diagnostics are described in the Installation and Service Guide for service
technicians. Contact your authorized service/support center if you see any startup error
messages on the Command WorkStation computer or if the E-810 does not reach Idle
status.
Troubleshooting during Setup from the Control Panel
The following section explains some error and alert messages that you may see during
Setup that might not be self-explanatory.
Network Setup messages
After this Setup screen
This message
Means
Enable AppleTalk
(Network Setup>Protocol
Setup>AppleTalk Setup)
No AppleTalk zone found.
The Ethernet network cable is not attached to the
connector on the E-810, or the network cable is not
plugged into the hub or network. If your AppleTalk
network has zones, and you want to specify a zone for the
E-810, you must connect the network cable to the E-810
before performing AppleTalk Setup.
Also could mean that the AppleTalk network doesn’t have
zones. Zones are not required for printing to the E-810.
Press OK to continue.
Protocol Setup or Service
Setup (Network Setup)
You must first enable
a network port.
Enable at least one network port (Ethernet or Token Ring)
in Port Setup before beginning Protocol Setup or Service
Setup.
Frame Type selection
(Network Setup>Protocol
Setup>IPX/SPX Setup)
Invalid frame size.
The network hub is not connected to a Novell machine
when the E-810 tries to bind.
Warning! IPX network
number is zero.
No other IPX machine can be found on the network, or
the network hub is not connected to the network, when
the E-810 tries to bind. When this occurs, the network
number defaults to zero.
Can’t detect Token Ring
hardware.
Token Ring hardware
not installed or
not functioning.
E-810 queries the Token Ring hardware. Error indicates
that some components are not installed, are not installed
correctly, or not installed in the correct device. An
unsupported Token Ring board may be in use. Check with
your authorized service/support center.
6
6-5
After this Setup screen
Troubleshooting the E-810
This message
Means
Token Ring Setup
Can’t autodetect the ring
speed. No device on ring.
The E-810 is trying to detect the current ring speed, but it
is the only machine on the Token Ring network. Connect
another machine to the Token Ring network first, before
connecting the E-810.
Enable NDS
(Network Setup>Service
Setup> PServer Setup > NDS
Setup)
No NDS trees found.
No NDS trees were found on the Novell network. Check
to see that the frame types on the E-810 are properly
configured.
Select NDS Tree
(Network Setup>Service
Setup>PServer Setup>
NDS Setup)
Warning! Selecting a new NDS
tree deletes Bindery setup.
You have previously connected the E-810 to a different
NDS tree. NetWise supports only a single NDS tree
connection. To avoid a potential conflict with an existing
tree connection (for example, if the connection was made
through a NetWare 4.x server in emulation mode), all
bindery settings will be deleted.
If you choose OK, and choose Yes in the following message
(Delete Bindery setup and continue?), bindery settings are
deleted and have to be re-entered in Bindery Setup.
To avoid deleting the bindery settings, press the Menu key,
or select OK and choose No in the following message
(Delete Bindery setup and continue?).
Repeat NDS Setup without changing the NDS tree, or exit
to Bindery Setup to review your current bindery settings.
Navigating NDS tree
(Network Setup>Service
Setup>PServer Setup>
NDS Setup)
___ is empty.
The chosen container contains no sub-containers or objects
relevant to the current mode of navigation.
Bindery Setup
(Network Setup>Service
Setup>PServer Setup>
Bindery Setup)
If you also plan to use NDS,
set up NDS before Bindery.
No NDS settings are present. You are reminded to perform
NDS Setup before Bindery Setup in case your network
includes both NDS and bindery servers.
6
6-6
After this Setup screen
Select File Server From List
(Network Setup>Service
Setup>PServer Setup>
Bindery Setup)
Administering the E-810
This message
Means
Error. Cannot open bindery
connection to NDS server.
Select this server through NDS setup or disable NDS and
select it through bindery.
No NetWare file
server found.
No file server was found when E-810 queried the network
to create a list of supported servers or a list of all servers.
Check cable connections and make sure the NetWare
server is turned on.
Enter First Letters
of Server Name
(Network Setup>Service
Setup>PServer Setup>
Bindery Setup)
File server name not found.
Try again?
No file server with those letters was found when E-810
queried the network. Check the name of the NetWare file
server, check cable connections, and make sure the
NetWare server is turned on.
View Server List,
Edit Connection
(Network Setup>Service
Setup>PServer Setup>
Bindery Setup)
No file server is selected.
No file server has been added in Bindery Setup.
Add File Server
(Network Setup>Service
Setup>PServer Setup>
Bindery Setup)
All connections used.
Remove server?
You have added the maximum number of bindery servers,
which is eight. You now have the option of disconnecting
one of those servers, so as to add another.
Add Server, Enter Your Login
Name, Enter Your File Server
Password
(Network Setup>Service
Setup>PServer Setup>
Bindery Setup)
No NetWare print
server found.
No print server was found when E-810 queried the file
server you selected.
You must configure a print server and a print queue for
every NetWare file server that will handle E-810 print jobs
(see page 5-7).
6
6-7
After this Setup screen
Any Bindery Setup screen
Troubleshooting the E-810
This message
Means
Novell error code, followed by
a message.
Novell NetWare has reported an error.
Command WorkStation reports the error number and
displays a brief message.
For the most common errors (listed in the following table),
a screen is displayed that enables you to retry the action
that evoked the error, such as adding a server. If that is not
possible, you are prompted to notify the Novell
administrator, who will need to troubleshoot the network.
Consult NetWare Administrator documentation for
further explanation of Novell error codes.
In Network Setup, when you configure the IPX (Novell) connection, the E-810
queries the network for Novell file servers and trees, and attaches to them temporarily.
If a guest login is enabled, it will be used. If not, you are prompted to log in from
Command WorkStation.
If the selected NetWare file server or tree does not have a guest account, or if the guest
account has expired or has been disabled by the NetWare supervisor, you will be
prompted to notify the IPX (Novell) administrator. In that case, there are two options:
• Enable a guest account on the NetWare server or tree for the purpose of setup.
• Log in with a different account. At the ENTER LOGIN NAME screen, change the default
name (guest) to supervisor or enter another valid login name. When you are
prompted for a password, enter the correct password for the account you named.
For any Novell error, make sure:
• Your IPX (Novell) network is connected to the E-810.
• The NetWare server you are trying to access is running.
• The Novell network has been configured with at least one print server and queue for
the E-810.
• You have the appropriate permissions and login information, including username
and password, if necessary.
• The E-810 is configured with the correct frame types for communication with the
desired Novell servers.
6
6-8
Administering the E-810
Novell error messages
Novell error
Cause
Suggested action or exit
220
Guest account not
available.
The guest account, which you have chosen for
initial login, has expired or has been disabled by
the NetWare supervisor.
Enable a guest account on the NetWare server
for the purpose of setup.
Alternatively, log in to a different account. In
the ENTER LOGIN NAME screen, change the
default name (guest) to supervisor or another
valid login name. When you are prompted for
a password, enter the correct password for the
account you named.
222
Unable to log in
to server.
Password has expired
for login name.
The server has connected to a file server, but is
unable to log in to the file server or print server
because the password has expired for the login
account name or the named print server.
Select a different login account or print server.
The error screen exits to the File Server Login
screen (if login to file server failed) or NetWare
Print Server screen (if login to Print Server
failed).
Pressing the Menu button returns to the
PServer Setup screen.
252
Unable to log in
to server.
Login does not
exist.
The server has connected to a file server, but is
unable to log in to the server because the selected
login account does not exist on the file server.
Select a different login account.
The error screen exits to the File Server Login
screen. Pressing the Menu button returns to the
PServer Setup screen.
255
Unable to connect to
file server.
File server is
down or out of
connections.
The Novell file server is down or out of
connections.
This error occurs while the server is trying to
connect to the requested file server.
Select a different file server (or try to get
someone else to log off ).
Pressing the Menu button returns to the
PServer Setup screen.
nnn
Notify IPX (Novell)
Administrator.
Indicates other network errors when the E-810 is
already connected to a file server. Something
unexpected has happened and the user generally
cannot recover without intervention of the
network administrator.
Error #197 indicates that you have exceeded the
number of login attempts permitted for this
account on the NetWare file server.
Error #255 usually indicates a hard failure.
Notify the Novell administrator and report the
error number.
The error screen exits to the PServer Setup
screen.
6
6-9
Troubleshooting the E-810
Runtime error messages
For error messages related to canceling jobs and printing, including the Disk Full
message and alerts to load media, see the Job Management Guide. These messages are
reported by the job management tools.
Users can turn on PostScript error reporting as a print option from Mac OS
applications.
Check power and cable
This message indicates that the interface cable between the E-810 and the copier is not
connected, or a print job is ready but the copier is not turned on.
Printer not found
Most failures to find a printer on the network are due to conflicting or missing name or
address settings for the E-810. You must enter names in specific places. The required
names are:
• TCP/IP host name (also known as the DNS name), which is defined by your
organization.
Enter the host name as the Server Name in E-810 Setup.
• Remote printer (internal machine) name. Use one of the following:
print
hold
You must reconfigure one of the Fiery utilities on each workstation if you change the
DNS name (also known as the TCP/IP host name) of the E-810.
6
6-10
Administering the E-810
Check the table below for the appropriate name to use.
In this location
IPX/SPX
networks
For this item
Server Setup
Server Name option
Windows NT hosts file
host name
Windows NT setup for TCP/IP
Administrator
defines name
TCP/IP networks
See
Administrator
defines name
page 3-8
—
DNS name
(TCP/IP host name)
page 5-11
lpd host name
—
DNS name
(TCP/IP host name)
Name of printer on lpd host
machine
—
print or hold
page 5-11
and
Getting
Started
UNIX /etc/printcap file (BSD)
rp line
—
print or hold
page 5-18
Solaris
lpadmin queuename
—
print or hold
NetWare administration utility
print queues
(must be all lowercase and
in English)
_direct
_print
_hold
Add New Server dialog box, when
configuring a Fiery utility
New Device
r7
r7
Server Name
Server name of
E-810 as specified
in Setup
DNS name
(TCP/IP host name)
—
page 5-6
Getting
Started
6
6-11
Troubleshooting the E-810
Cannot connect to E-810 with Fiery utilities
If users cannot connect to the E-810, check the following:
• E-810 Setup—the appropriate network protocol must be enabled, with the correct
parameters (for example, for TCP/IP, the IP address; for IPX/SPX, a correct frame
type setting), and you must publish either the Print queue or Hold queue.
In IPX/SPX Setup, verify that the IPX network protocol has bound to all the frame
types in use by the NetWare servers that handle E-810 print jobs.
You can check these settings quickly by printing a Configuration page.
• On the client workstation—the appropriate network protocol(s) must be loaded,
and your Windows directory should contain a configured Efinl.ini file.
Cannot connect to the E-810 with Command WorkStation
If there is a problem connecting to the E-810, an error message is displayed.
The problem can occur:
• When the E-810 is first turned on
• When the E-810 reboots
• When you have changed settings affecting the server address and have not
reconfigured the connection to the server
6
6-12
Administering the E-810
If you see this problem, try the following solutions, in order:
• A remote workstation running the Fiery utilities or Fiery WebTools may be
interfering by obtaining status information. If possible, close the remote application,
and try again to connect.
• Restart the Command WorkStation application and try again to connect.
• Check the configuration of the connection and modify it if necessary, or delete the
Efinl.ini file and start over with the process of configuring the connection as
described in Getting Started.
For Windows 9X/Me/2000, the Efinl.ini file is located in \WINDOWS.
For Windows NT 4.0, the Efinl.ini file is located in \WINNT.
• Reboot the E-810.
• See the Job Management Guide for information on other error conditions.
A
A-1
Appendix A:
Token Ring
Network Option
Token Ring Network Option
Token Ring is an alternative network architecture to Ethernet architecture. Token Ring
networks offer a high resistance to failure and are commonly used in large or
high-traffic network installations.
Token Ring networks operate by passing a network token around the electronic
equivalent of a ring. The token is a data packet that circulates from one network node
to another, controlling access to the network. In practice, each workstation is
connected to a port on one or more media attachment units (MAUs) which act as
network hubs for the ring connection.
This appendix describes the Token Ring option and cable connections, and refers you
to the remaining configuration required for printing to the E-810.
E-810 Token Ring option
The E-810 supports Token Ring networks that use IPX and TCP/IP protocols. To use
the E-810 with a Token Ring network, a Token Ring network interface card provided
by EFI must be installed in the E-810. You can use either shielded twisted pair (STP)
or unshielded twisted pair (UTP) cable.
Connecting Token Ring hardware
The service/support center that installs the E-810 typically also installs the Token Ring
option at the same time and configures the E-810 to enable printing.
A
A-2
Token Ring Network Option
Back view of the E-810 with the Token Ring option installed
Token Ring connectors
Turn off the E-810 before connecting it to any network device.
!
N OTE : Do not attach cable to both Token Ring connectors.
TO
CONNECT CABLE TO THE
E-810
1.
Turn off the E-810.
2.
Connect the cable from the Token Ring MAU to the E-810 Token Ring card.
Configure the NetWare, Windows NT, or UNIX server to print to the E-810 (see the
next two sections). Then proceed to page 3-2 for E-810 Setup.
A
A-3
Token Ring Network Option
IPX/SPX installations
If your network uses IPX/SPX protocols with Token Ring, configure at least one
printer, one E-810 Print Server, and one E-810 Print Queue on the NetWare server as
described in “Configuring a NetWare 3.x or 4.x server for printing” on page 5-7. You
can configure up to eight bindery servers and one NDS tree connection to the E-810.
This total is the same whether the E-810 is connected by Token Ring, Ethernet, or
both. For more information, see “Setting up an NDS connection” on page 5-9.
TCP/IP installations
If your network uses TCP/IP protocols with Token Ring, configure at least one printer
and one E-810 queue on a Windows NT server (see “Configuring a Windows NT 4.0
server to support the E-810” on page 5-12) or UNIX server (see “Setting up the E-810
on TCP/IP networks” on page 5-19).
Setting up Token Ring on the E-810
Token Ring Setup on the Control Panel is similar to Ethernet Setup. From Network
Setup, perform Port Setup, Protocol Setup, and Service Setup. The setups you need are
summarized in the table on page 3-11.
N OTE : Connect the Token Ring cable before doing E-810 Network Setup, so that the
Token Ring card can configure itself properly.
Setting up NetWare Windows clients
Client setup is exactly the same as for IPX clients using Ethernet. See “Setting up
NetWare Windows clients for printing” on page 5-10 for details.
Index
Numerics
100BaseT connector 1-11
10BaseT 1-11
8-pin RJ-45 connector 1-11
A
access level scenarios 2-6, 2-7
access to network and software 2-1
accessing Setup
from Control Panel 3-3
from Windows computer 4-1
Adapters/Ports information, Setup 4-8
Add File Server, Bindery
Setup 3-27, 3-28, 4-22
administrator
features of color server 3-42
functions 6-1 to 6-2
installing the color server 1-2
managing print jobs 6-1
password 3-43
Administrator password
changing from Control Panel 3-43
changing from Windows computer 4-6
for setting the WebLink
destination 2-5, 5-17
privileges 2-3
Allow Courier Substitution
option 3-38, 4-32
AppleTalk 1-5
color server name 3-8, 4-4
network diagram 1-5
protocol setup 3-14, 4-10
supported on Ethernet only 1-4
with Windows NT 5-11
AppleTalk Setup
from Control Panel 3-14
from Control Panel, summary 3-11
from Windows computer 4-12
AppleTalk zone 3-14, 4-12
Auto Clear Job Log Every 55 Jobs
option 3-43, 4-7
Auto Print Job Log Every 55 Jobs
option 3-43, 4-7
B
Bindery file servers
connecting 3-28, 4-22
defined 5-5
emulation mode 3-22, 4-16, 5-5
setting up context 5-9 to 5-10
Bindery Setup
adding Bindery connections 3-28, 4-22
on color server 3-27 to 3-31, 4-21
removing Bindery
connections 3-31, 4-24
requirements for NetWare server 3-27
Black Overprint option 3-41, 4-34
BOOTP protocol 3-15, 3-16, 3-18, 3-19
Broker, NDPS printing 5-3
C
cables, Token Ring option A-2
canceling Setup changes 3-8
changing
Administrator password 3-43, 4-6
Bindery connection 3-30
host name or DNS name 6-9
Novell print server, Bindery 3-27, 3-30
characters
allowed in remote Windows Printing
Service Setup 4-26
used on Control Panel 3-9, 4-5
Choose File Server for editing Bindery
connection 3-30
Chooser, AppleTalk 3-8, 4-4
I-2
Index
choosing a Bindery Server to
connect 3-28, 4-22
Clear Each Scan Job option 3-9
Clear Frame Types, IPX/SPX Setup 3-21
Clear Server option 3-43, 3-45
clearing the Job Log 3-43, 4-7
client setup
Fiery WebTools 5-16
network printing 5-10 to 5-15
overview 1-2
Token Ring A-3
CMYK printing by default 3-38, 4-31
CMYK Simulation Method
option 3-40, 4-33
CMYK Simulation Profile option 3-40, 4-33
Color Mode option 3-38, 4-31
color server
back view showing connectors 1-10
back view with Token Ring option A-2
Control Panel 3-3
display window 3-3
maintaining and improving
performance 6-3
naming 3-8, 4-4
network installation summary 1-3
power switch 1-10
Setup, see Setup
Color Setup 3-39, 4-32
Command WorkStation xi
problems connecting to color
server 6-11
Setup from 4-2
Comment option, Windows
printing 3-33, 4-27
Configuration page
determining IPX frame types
bound 3-21
printing 3-46, 4-35
troubleshooting connection
problems 6-11
Configure button, Fiery WebTools 5-17
configuring color server
from Control Panel 3-1 to 3-45
from Windows computer 4-1 to 4-34
preparing for 2-10
configuring network clients
NetWare 5-10
Windows NT 5-14
configuring network servers
NetWare 5-6, 5-7
UNIX 5-19
Windows NT 5-12
connected Novell servers,
Bindery 3-30, 4-23
connecting
copier interface cable 2-10
network cable 1-10
to a Bindery file server 3-28, 3-29
to multiple Bindery file servers 3-27
Token Ring cable A-2
control levels 2-7
scenarios 2-6
setting 2-1
Control Panel
accessing Setup 3-3, 3-4
Change Password option 3-42
Clear Server option 3-43, 3-45
Color Setup 3-39
help map, see Control Panel Map
illustrated 3-3
illustrated Setup examples 3-7
initial Setup from 3-1
Job Log Setup 3-42
Network Setup 3-10
Printer Setup 3-35
PS (PostScript) Setup 3-36
Server Setup 3-8
Setup interface 3-5
Control Panel Map 3-5
Convert Paper Sizes option 3-37, 4-31
Courier font, substitution with 3-38, 4-32
cover page, printing at end of job 3-38, 4-32
I-3
Index
D
date, setting 3-8, 4-4
Default Paper Sizes option 3-37, 4-32
Delete Scan Jobs option 4-5
delete symbol, in Setup display 3-6
destination, Fiery WebLink 5-17
device
name 3-8, 4-4, 4-30, 4-31, 4-33, 6-10
DHCP protocol 3-15, 3-16, 3-18, 3-19
diagrams of network setup 1-4 to 1-9
Direct connection
described 2-1, 2-2
publishing 3-36, 4-30
required for downloading fonts 2-2
disconnecting a Bindery file
server 3-27, 3-31
disk space 6-3
DNS (Domain Name
Server) 5-12, 5-13, 6-9
Domain or Workgroup option, Windows
printing 3-34, 4-27
downloading fonts, Direct connection
requirement 2-2
E
Edit Connection, Bindery Setup 3-30
explained 3-27
Enable AppleTalk option 3-14
Enable Auto IP Configuration
option 3-16, 3-18
Enable Ethernet option 3-13, 4-9
Enable IPP option 3-34, 4-28
Enable LPD option 3-22, 4-16
Enable NDS option 3-23, 4-17
Enable Port 9100 Print Services
option 3-35, 4-29
Enable Printed Queue option 3-9, 4-5
Enable PServer option 3-23
Enable Source Routing option 3-13, 4-9
Enable TCP/IP for Ethernet
option 3-15, 4-14
Enable TCP/IP for Token Ring
option 3-18, 4-14
Enable Token Ring option 3-13, 4-9
Enable Web Services option 3-34, 4-28
Enable Windows Printing option 3-32, 4-26
enabling
client utilities 3-15, 3-18
Fiery WebTools 3-34, 4-28
Enter First Letters of Server Name (search
option), Bindery Setup 3-28
Enter Your File Server Password, Bindery
Setup 3-29
Enter Your Login Name, Bindery
Setup 3-29
Enter Your Print Server Password, Bindery
Setup 3-29, 3-30
error messages 3-38, 6-4
“No AppleTalk zone found” 3-14
during Setup 6-4
during startup 6-7
NetWare 6-7
runtime 6-9
Ethernet 1-11
frame types 4-13
network 5-2, 5-5
Port Setup 3-13
protocols supported 1-4
Ethernet Setup from Control Panel 3-12
Ethernet Speed 3-13
in Port Setup 3-13
in Protocol Setup 3-15
Ethernet Setup from remote Setup
Port Setup 4-9
Ethernet Speed option 3-13, 4-9
Exit Bindery Setup 3-31
explained 3-27
exiting Setup, Control Panel 3-8, 3-45
F
Fiery WebDownloader, described 2-5
Fiery WebLink 2-5
setting the destination 5-17
I-4
Index
Fiery WebSetup, described 2-5
Fiery WebSpooler
described 2-4
reprinting jobs in Printed queue 3-9
Fiery WebTools 2-4, 5-16 to 5-17
accessing 5-17
enabling 3-34, 4-28
enabling only certain WebTools 5-17
Installer 2-5
setting up 5-16
Status 2-4
FieryBar
accessing Clear Server command 3-45
accessing Setup 4-2
restarting the server process 2-8
File Server 4-22, 4-24
File Server Login option, Bindery 3-29
File Server Password (Bindery) 3-29
File Server, Bindery 4-22, 4-24
font substitution 3-38, 4-32
frame types supported
AppleTalk 3-20
IPX/SPX, Ethernet 3-20, 4-13
IPX/SPX, Token Ring 3-20, 4-13
TCP/IP 3-20
From List option (adding a file server) 3-28
I
gateway address, setting 3-17, 3-19
General Setup options 4-4 to 4-7
guest login (Novell)
in Bindery Setup 3-28
in Network Setup 6-7
Guest privileges (no password) for
WebSpooler 2-4
improving color server performance 6-3
Installer WebTool, see Fiery WebTools
installing color server on network 1-2
Internet
accessing server with Fiery
WebTools 2-4
WebLink access 5-17
Internet Printing Protocol, enabling 3-34
IP address
assigning automatically 3-16, 3-18
for Ethernet Setup 3-17
for Token Ring Setup 3-19
required for TCP/IP printing 5-19
IPP Setup 3-34
IPX (Novell) 5-5 to 5-10
Bindery file server, connecting 3-27
client utilities 5-6
NDS (Novell Directory
Services) 3-22, 4-16, 5-9
NetWare client setup 5-10
NetWare server setup 5-7
network diagram 1-6
overview of printing 5-6
setting bindery context 5-9
setting up printing 5-7
terms used to describe 3-27
tips for experts 5-6
IPX/SPX
installing with Token Ring A-3
polling interval 4-25
protocol setup 3-20
selecting frame types 3-21
Setup 3-20
summary of Setup options 3-11
H
J
G
Hold queue 3-36, 4-30
described 2-1, 2-2
host name 5-12, 5-13, 6-9
database 5-12
Java to support Internet browser 5-16
Job Log
clearing automatically 3-43
clearing jobs from 3-45
I-5
Index
default options 3-42
defined 3-42
printing automatically 3-43
setting the page size used 3-43, 4-7
Job Log Setup
from Control Panel 3-42
from Windows computer 4-7
job management tools
defined 2-1
deleting jobs with 3-45
printing Job Log 3-42
Jobs Saved in Printed Queue option 3-9, 4-5
L
lpd (TCP/IP) 5-18
printing 2-2, 3-22, 4-16
setup summary 5-19 to 5-20
M
Mac OS computers
on AppleTalk network 1-5
with Windows NT 5-11
maintaining color server performance 6-3
Maximum Frame Size option, Token Ring
Setup 3-13, 4-9
maximum server connections, Bindery 3-27
media attachment unit (MAU) A-1
Menu button 3-8
messages, see error messages
multiple Bindery file servers,
connecting 3-27
N
naming the color server 3-8, 6-9
NDPS (Novell Distributed Print
Services) 5-2
NDPS Manager 5-2
NDS (Novell Directory
Services) 3-22, 4-16, 5-9
defined 5-5
enabling 3-23
print queue subtree 3-26
Setup on color server 3-23 to 3-26
setup requirements 3-23
NDS Print Server 4-17
NDS Setup 3-23
NDS tree
browsing 3-23, 3-24, 4-17
browsing to print queue root 3-26
browsing to Print Server 3-25
browsing to User Login object 3-24
password 3-24
NETADMIN 5-8
NETBEUI 1-7
NetWare
Bindery and NDS on the same
network 3-23
Bindery Services 3-22
Directory Services 3-22, 4-16
error messages 6-7, 6-8
NDS (Novell Directory Services) 5-9
print server poll interval 3-32
setting up network on the Control
Panel 3-23
NetWare 4.x bindery context 5-9
NetWare File Server, Bindery
connecting 3-27, 3-28
finding available servers 3-28
removing connection 3-31
selecting for editing 3-30
setting up more than one 3-27
NetWare Print Console 5-10
NetWare Print Server poll interval 3-32
NetWare Print Server, Bindery 3-29, 3-30
changing the selection 3-27, 3-30
connecting 3-29, 3-30
password 3-29
NetWare Server Poll Interval 3-32
NetWise, supported networking
environments 5-5
network
AppleTalk 1-5
boards 4-8
I-6
Index
cable 2-10
installation diagrams 1-2 to 1-9
installation summary 1-3
IPX (Novell) 1-3, 1-4, 1-6
lpd (TCP/IP) 1-3, 1-4, 1-9
protocols supported 1-1
using multiple protocols 1-4
with Windows NT 1-7
Network Setup 2-9
exiting 3-12
from Control Panel 3-10 to 3-35
from Windows computer 4-8 to 4-29
part of initial Setup 4-1
troubleshooting 6-7
with Token Ring option A-3
New Password option 3-44
Novell, see NetWare
O
Operator password 2-4, 3-44
privileges 2-3
Output Profile option 3-41, 4-33
P
Page Order option 3-37, 4-32
paper size used by default 3-37
Paper Sizes option 4-32
passwords 4-5
Administrator privileges 2-3
Administrator, changing 3-43
Bindery print server 3-29
Fiery WebTools 2-4
for WebLink destination 2-5
for WebSpooler 2-4
NDS Tree 3-24
Novell file server, Bindery 3-29
Operator privileges 2-3
Print Server 3-25
setting 2-3
PC compatibles
on IPX (Novell) network 1-6
on TCP/IP network 1-9
PCONSOLE (NetWare utility) 3-29
PDF files, font substitution in 3-38, 4-32
platforms supporting utilities 5-1
polling interval for NetWare print
jobs 3-32, 4-25
Port 9100 printing 4-29
Port 9100 Queue option 4-29
Port 9100 Setup 3-35
Port Setup from Control Panel 3-12
Ethernet Setup 3-13
Token Ring Setup 3-13
PostScript error 3-38
PostScript Setup, see PS Setup
Print Cover Page option 3-38, 4-32
Print queue 2-2, 3-9, 3-36, 4-30
described 2-1, 2-2
publishing 3-36
print queues 3-9
NDS 3-26
NetWare server (Bindery) 3-28
Print Server
adding 4-23
selecting 4-19, 4-22
Print Server password 3-25
Print Start Page option 3-9, 4-5
Print to PostScript Error option 3-38, 4-32
Printed queue 2-2, 3-9
printer
connection failure 6-9
not found 6-9
not in Chooser 6-9
Printer Agent, NDPS 5-2
Printer Setup 2-9
from Control Panel 3-35
from Windows computer 4-30
part of initial Setup 4-1
Printed queue options 4-5
printing
CMYK by default 3-38
Configuration page from Control
Panel 3-46
connections 2-1
I-7
Index
connections and queues 3-35
cover page for each job 3-38
Job Log automatically 3-43
reprinting previously printed jobs 2-2
start page at startup 3-9, 4-5
printing connections 2-1
problems, see troubleshooting
protocols
for assigning IP address
automatically 3-16, 3-18
network 1-1
setting up 3-14, 4-10
See also AppleTalk, IPX, IPX/SPX,
TCP/IP
PS (PostScript) Setup 3-36, 4-31
PServer
defined 3-22
PServer Setup 4-17
options 3-23
PServer, see NetWare
Publish Direct Connection
option 3-36, 4-30
Publish Hold Queue option 3-36, 4-30
Publish Print Queue option 3-36, 4-30
publishing connections, overview 2-1
Pure Black Text/Graphics option 3-41, 4-34
Q
queues
clearing all 3-45
publishing 3-36, 4-30
R
RARP protocol 3-15, 3-16, 3-18, 3-19
Remove File Server, Bindery Setup 3-31
explained 3-27
removing
Bindery file server connection 3-31
Rendering Style option 3-40, 4-33
reprinting jobs 2-2
Request All Routes, Token Ring source
routing 3-14, 4-9
Respond All Routes, Token Ring source
routing 3-14, 4-9
RGB Separation option 3-40, 4-33
RGB Source option 3-39, 4-33
RJ-45 connector 1-11
root login 5-20
routers 3-15
S
Save Changes
Color Setup, Control Panel 3-41
Job Log Setup, Control Panel 3-43
Network Setup, Control
Panel 3-12, 3-35
Printer Setup, Control Panel 3-36, 3-39
Setup, Control Panel 3-8, 3-10
Search Name option (adding a file
server) 3-28
Select File Server option 3-28
Select Frame Types option 3-21
Select NDS Tree option 3-24
Select protocol (Setup option) 3-16, 3-18
selecting
Bindery servers 3-30
default paper size 3-37, 4-32
Server Name option 3-8, 4-4
Server Name option, Windows
printing 3-33, 4-27
Server Setup 2-8, 2-9
exiting 4-34
from Control Panel 3-8
from Windows computer 4-4
part of initial Setup 4-1
Service Setup options 3-22, 4-15
setting up NDS connection 5-9
Setup
initial (on the Control Panel) 3-1
making changes to 3-1
screen types 3-6, 3-7
See also Server Setup, Network Setup,
Printer Setup, PS Setup, Color Setup,
Job Log Setup
I-8
Index
Setup from Control Panel
accessing 3-3
administrative functions 3-42
Color Setup 3-39
error messages 6-4
Job Log Setup 3-42
Network Setup 3-10
Port Setup 3-13
Printer Setup 3-35
Protocol Setup 3-14 to 3-20
Server Setup 3-8
Service Setup 3-22
summary 3-2
Setup menu 3-4
SMB, see Windows printing
Source Routing, Token Ring
Setup 3-13, 4-9
Spot Color Matching option 3-41, 4-34
Start Page, printing 3-9, 4-5
Status WebTool, see Fiery WebTools
STP (shielded twisted pair) cable A-1
Subnet Mask option 3-17, 3-19
superuser 5-20
Support option 4-5
Supported Servers, Bindery Setup 3-30
System Date option 3-8, 4-4
System Time option 3-9, 4-4
T
TCP/IP
adding server to network 5-13
Ethernet Setup from Control Panel 3-15
host name 6-9
http protocol 1-1
installing with Token Ring A-3
lpd printing 4-16
lpd protocol 1-1
nbt protocol 1-1
network diagram 1-9
on both Ethernet and Token Ring 3-15
protocol setup 3-15
published connections 3-35
setting up printing from
Windows NT 5-11 to 5-15
settings 4-14
Setup from Control Panel 3-15
summary 3-11
Token Ring Setup from Control
Panel 3-18
with UNIX workstations 5-18
terminology, Novell 3-27
time, setting 3-9, 4-4
Token Ring
client setup A-3
frame types 3-21, 4-13
network interface card A-1
overview A-1 to A-3
Port Setup 3-13
protocols supported 1-4
summary of Setup 3-11
summary of Setup required A-3
Token Ring Setup
in Port Setup 3-13
in TCP/IP Setup 3-18
Token Ring Speed option 3-13
Toner Reduction option 3-38, 4-31
Transmission Speed (Ethernet) option 4-9
Transmission Speed (Token Ring)
option 4-9
troubleshooting
Command WorkStation connection
problems 6-11
connection to printer fails 6-9
Printer not found in the selection list of
Fiery utilities 6-11
Printer not found—TCP/IP or IPX
networks 6-9
Setup, Control Panel 6-4
twisted pair cable 1-11
U
UNIX
managing print jobs 5-21
on TCP/IP network 1-9, 5-18
I-9
Index
printcap file 6-10
printing to color server 5-20
remote printer name 6-10
setting up printing to color server 5-19
tips for experts 5-18
Use Character Set option 3-9, 4-5
Use WINS Name Server option 3-33, 4-27
utilities
enabling protocol on the
server 3-15, 3-18
required print connections 3-35
UTP (unshielded twisted pair) cable A-1
V
View Server List, Bindery Setup 3-30
explained 3-27
W
Web Services Setup 3-34, 4-28
WebDownloader, see Fiery WebDownloader
WebLink, see Fiery WebLink
WebSetup, see Fiery WebSetup
WebSpooler, see Fiery WebSpooler
WebTools, see Fiery WebTools
Windows 95/98
printing in Windows NT
environment 5-11, 5-15
Windows computers, printing without a
Windows NT 4.0 server 5-15
Windows NT
changing network configuration 4-34
Control Panel 2-9
network environment 1-7
setting up Windows NT server 5-12
with TCP/IP 1-7, 1-9
Windows
printing 1-1, 3-32, 4-16, 4-26, 5-15
domain issues 3-2
setting domain or workgroup 3-34, 4-27
WINS IP Address option 3-33, 4-27
WINS name server 3-33
Color Controller E-810
PRINTING GUIDE
For use with the following color copiers:
Ricoh Aficio Color 6513
Gestetner CS213d
RexRotary CS813d
nashuatec CS513d
infotec 7513
Savin SDC413
Copyright © 2001 Electronics For Imaging, Inc. All rights reserved.
This publication is protected by copyright, and all rights are reserved. No part of it may be reproduced or transmitted in any form or by any means for any purpose
without express prior written consent from Electronics For Imaging, Inc., except as expressly permitted herein. Information in this document is subject to change
without notice and does not represent a commitment on the part of Electronics For Imaging, Inc.
The software described in this publication is furnished under license and may only be used or copied in accordance with the terms of such license.
This product may be covered by one or more of the following U.S. Patents: 4,500,919; 4,837,722; 5,212,546; 5,343,311; 5,424,754; 5,467,446;
5,506,946; 5,517,334; 5,537,516; 5,543,940; 5,553,200; 5,615,314; 5,619,624; 5,625,712; 5,666,436; 5,760,913; 5,818,645; 5,835,788; 5,866,856;
5,867,179; 5,959,867; 5,970,174; 5,982,937; 5,995,724; 6,002,795; 6,025,922; 6,041,200; 6,046,420; 6,065,041; 6,067,080; 6,112,665; 6,116,707;
6,118,205; 6,122,407; 6,134,018; 6,141,120; 6,151,014; 6,166,821; 6,184,873; 6,185,335; 6,201,614; 6,215,562; 6,219,659; 6,222,641; 6,225,974;
6,226,419; 6,238,105; 6,239,895; D406,117, D416,550, D417,864, D419,185, D426,206, D430,206, RE36,947
Trademarks
Fiery, the Fiery logo, Fiery Driven, ColorWise, EFICOLOR and RIP-While-Print are registered trademarks of Electronics For Imaging, Inc. in the U.S. Patent
and Trademark Office and certain other foreign jurisdictions.
EFI, the Electronics For imaging logo, eBeam, EDOX, the Fiery Driven logo, Fiery LX, Fiery SI, Fiery X2, Fiery X2e, Fiery X3e, Fiery X4, Fiery XJ, Fiery XJe,
Fiery XJ-W, Fiery Z4, Fiery ZX, AutoCal, Colorcal, Command WorkStation, Continuous Print, DocBuilder, DocBuilder Pro, EFICOLOR, EFICOLOR Works,
Fiery Downloader, Fiery Driver, Fiery Expresso, Fiery Link, Fiery Prints, Fiery Print Calibrator, Fiery Scan, Fiery Spark, Fiery Spooler, Freedom of Press, FreeForm,
Harmony, Memory Multiplier, NetWise, PowerWise, RIPChips, ScanBuilder, the SkySpool logo, Splash, STARR Compression, Velocity, VisualCal, WebTools,
WebSpooler, WebInstaller, and WebStatus, are trademarks of Electronics For Imaging, Inc.
All other terms and product names may be trademarks or registered trademarks of their respective owners, and are hereby acknowledged.
Legal Notices
APPLE COMPUTER, INC. (“APPLE”) MAKES NO WARRANTIES, EXPRESS OR IMPLIED, INCLUDING WITHOUT LIMITATION THE
IMPLIED WARRANTIES OF MERCHANTABILITY AND FITNESS FOR A PARTICULAR PURPOSE, REGARDING THE APPLE SOFTWARE.
APPLE DOES NOT WARRANT, GUARANTEE, OR MAKE ANY REPRESENTATIONS REGARDING THE USE OR THE RESULTS OF THE USE
OF THE APPLE SOFTWARE IN TERMS OF ITS CORRECTNESS, ACCURACY, RELIABILITY, CURRENTNESS, OR OTHERWISE. THE ENTIRE
RISK AS TO THE RESULTS AND PERFORMANCE OF THE APPLE SOFTWARE IS ASSUMED BY YOU. THE EXCLUSION OF IMPLIED
WARRANTIES IS NOT PERMITTED BY SOME STATES. THE ABOVE EXCLUSION MAY NOT APPLY TO YOU.
IN NO EVENT WILL APPLE, ITS DIRECTORS, OFFICERS, EMPLOYEES OR AGENTS BE LIABLE TO YOU FOR ANY CONSEQUENTIAL,
INCIDENTAL OR INDIRECT DAMAGES (INCLUDING DAMAGES FOR LOSS OF BUSINESS PROFITS, BUSINESS INTERRUPTION, LOSS OF
BUSINESS INFORMATION, AND THE LIKE) ARISING OUT OF THE USE OR INABILITY TO USE THE APPLE SOFTWARE EVEN IF APPLE
HAS BEEN ADVISED OF THE POSSIBILITY OF SUCH DAMAGES. BECAUSE SOME STATES DO NOT ALLOW THE EXCLUSION OR
LIMITATION OF LIABILITY FOR CONSEQUENTIAL OR INCIDENTAL DAMAGES, THE ABOVE LIMITATIONS MAY NOT APPLY TO YOU.
Apple’s liability to you for actual damages from any cause whatsoever, and regardless of the form of the action (whether in contract, tort [including negligence],
product liability or otherwise), will be limited to $50.
Part Number: 45022698
FCC Information
WARNING: FCC Regulations state that any unauthorized changes or modifications to this equipment not expressly approved by the manufacturer could void
the user’s authority to operate this equipment.
Class B Declaration of Conformity
This equipment has been tested and found to comply with the limits for a class B digital device, pursuant to Part 15 of the FCC rules. These limits are designed
to provide reasonable protection against harmful interference in a residential installation. This equipment generates, uses and can radiate radio frequency energy
and if not installed and used in accordance with the instructions, may cause harmful interference to radio communications. However, there is no guarantee that
interference will not occur in a particular installation.
If this equipment does cause harmful interference to radio or television reception, which can be determined by turning the equipment off and on, the user is
encouraged to try to correct the interference by one or more of the following measures:
Reorient or relocate the receiving antenna.
Increase the separation between the equipment and receiver.
Connect the equipment into an outlet on a circuit different from that to which the receiver is connected.
Consult the dealer or an experienced radio/TV technician for help.
In order to maintain compliance with FCC regulations, shielded cables must be used with this equipment. Operation with non-approved equipment or unshielded
cables is likely to result in interference to radio and TV reception. The user is cautioned that changes and modifications made to the equipment without the
approval of manufacturer could void the user’s authority to operate this equipment.
Industry Canada Class B Notice
This Class B digital apparatus complies with Canadian ICES-003.
Avis de Conformation Classe B de l’Industrie Canada
Cet appareil numérique de la Classe B est conforme à la norme NMB-003 du Canada.
RFI Compliance Notice
This equipment has been tested concerning compliance with the relevant RFI protection requirements both individually and on system level (to simulate normal
operation conditions). However, it is possible that these RFI Requirements are not met under certain unfavorable conditions in other installations. It is the user
who is responsible for compliance of his particular installation.
Dieses Gerät wurde sowohl einzeln als auch in einer Anlage, die einen normalen Anwendungsfall nachbildet, auf die Einhaltung der Funkentstörbestimmungen
geprüft. Es ist jedoch möglich, dass die Funkentstörbestimmungen unter ungünstigen Umständen bei anderen Gerätekombinationen nicht eingehalten werden.
Für die Einhaltung der Funkentstörbestimmungen einer gesamten Anlage, in der dieses Gerät betrieben wird, ist der Betreiber verantwortlich.
Compliance with applicable regulations depends on the use of shielded cables. It is the user who is responsible for procuring the appropriate cables.
Die Einhaltung zutreffender Bestimmungen hängt davon ab, dass geschirmte Ausführungen benützt werden. Für die Beschaffung richtiger Ausführungen ist der
Betreiber verantwortlich.
Software License Agreement
YOU SHOULD CAREFULLY READ THE FOLLOWING TERMS AND CONDITIONS BEFORE USING THIS SOFTWARE. IF YOU DO NOT
AGREE TO THE TERMS AND CONDITIONS OF THIS AGREEMENT, DO NOT USE THE SOFTWARE. INSTALLING OR USING THE
SOFTWARE INDICATES THAT YOU AGREE TO AND ACCEPT THE TERMS OF THIS AGREEMENT. IF YOU DO NOT AGREE TO ACCEPT
THE TERMS OF THIS AGREEMENT YOU MAY RETURN THE UNUSED SOFTWARE FOR A FULL REFUND TO THE PLACE OF PURCHASE.
License
Electronics For Imaging, Inc. (“EFI”) grants you a non-exclusive license to use the software (“Software”) and accompanying documentation (“Documentation”)
included with the Product. The Software is licensed, not sold. You may use the Software solely for your own customary business or personal purposes. You may
not rent, lease, sublicense or lend the Software. You may, however, permanently transfer all of your rights under this Agreement to another person or legal entity
provided that: (1) you transfer to the person or entity all of the Software and Documentation (including all copies, updates, upgrades, prior versions, component
parts, the media and printed materials, and this Agreement); (2) you retain no copies of the Software and Documentation, including copies stored on a computer;
and (3) the recipient agrees to the terms and conditions of this Agreement.
You may not make or have made, or permit to be made, any copies of the Software or portions thereof, except as necessary for backup or archive purposes in
support of your use of the Software as permitted hereunder. However, under no circumstances may you make or have made, any copies of any Software included
on the ROM, the hard disk drive or any other component of the controller board or hardware You may not copy the Documentation. You may not attempt to
alter, disassemble, decompile, decrypt or reverse engineer the Software.
Proprietary Rights
You acknowledge that the Software is proprietary to EFI and its suppliers and that title and other intellectual property rights therein remain with EFI and its
suppliers. Except as stated above, this Agreement does not grant you any right to patents, copyrights, trade secrets, trademarks (whether registered or unregistered),
or any other rights, franchises or licenses in respect of the Software. You may not adopt or use any trademark or trade name which is likely to be similar to or
confusing with that of EFI or any of its suppliers or take any other action which impairs or reduces the trademark rights of EFI or its suppliers.
Confidentiality
You agree to hold the Software in confidence, disclosing the Software only to authorized users having a need to use the Software as permitted by this Agreement
and to take all reasonable precautions to prevent disclosure to other parties.
Remedies And Termination
Unauthorized use, copying or disclosure of the Software, or any breach of this Agreement will result in automatic termination of this license and will make available
to EFI other legal remedies. In the event of termination, you must destroy all copies of the Software and all of its component parts. All provisions of this Agreement
relating to disclaimers of warranties, limitation of liability, remedies, or damages, and EFI’s proprietary rights shall survive termination.
Limited Warranty And Disclaimer
EFI warrants to the original purchaser (“Customer”) for thirty (30) days from the date of original purchase from EFI or its authorized retailer that the Software
will perform in substantial conformance to the Documentation. EFI warrants the media containing the Software against failure during the above warranty period.
EFI makes no warranty or representation that the Software will meet your specific requirements, that the operation of the Software will be uninterrupted or error
free, or that all defects in the Software will be corrected.
EXCEPT FOR THE ABOVE EXPRESS LIMITED WARRANTY, EFI MAKES AND YOU RECEIVE NO WARRANTIES OR CONDITIONS ON THE
SOFTWARE, EXPRESS, IMPLIED, STATUTORY, OR IN ANY OTHER PROVISION OF THIS AGREEMENT OR COMMUNICATION WITH YOU,
AND EFI SPECIFICALLY DISCLAIMS ANY IMPLIED WARRANTY OR CONDITION OF MERCHANTABILITY OR FITNESS FOR A PARTICULAR
PURPOSE.
Limitation Of Liability
IN NO EVENT WILL EFI OR ITS SUPPLIERS BE LIABLE FOR ANY DAMAGES, INCLUDING LOSS OF DATA, LOST PROFITS, COST OF COVER
OR OTHER SPECIAL, INCIDENTAL, CONSEQUENTIAL OR INDIRECT DAMAGES ARISING FROM THE SALE, INSTALLATION,
MAINTENANCE, USE, PERFORMANCE OR FAILURE OF THE SOFTWARE, HOWEVER CAUSED AND ON ANY THEORY OF LIABILITY. THIS
LIMITATION WILL APPLY EVEN IF EFI HAS BEEN ADVISED OF THE POSSIBILITY OF SUCH DAMAGE. YOU ACKNOWLEDGE THAT THE
PRICE OF THE PRODUCT REFLECTS THIS ALLOCATION OF RISK. BECAUSE SOME JURISDICTIONS DO NOT ALLOW THE EXCLUSION
OR LIMITATION OF LIABILITY FOR CONSEQUENTIAL OR INCIDENTAL DAMAGES, THE ABOVE LIMITATION MAY NOT APPLY TO YOU.
EFI DOES NOT EXCLUDE LIABILITY IN RESPECT OF PERSONAL INJURY, DEATH, WILLFUL MISCONDUCT OR GROSS NEGLIGENCE,
EXCEPT TO THE MAXIMUM EXTENT THAT IT CAN BE EXCLUDED OR LIMITED BY LAW.
Export Controls
You agree that you will not export or re-export the Software in any form in violation of any applicable laws or regulations of the United States or the country in
which you obtained them.
U.S. Government Restricted Rights
Software provided with this Product is provided with RESTRICTED RIGHTS. Use, duplication, or disclosure by the U.S. Government is subject to restrictions
as set forth in subparagraph (c)(1)(ii) of the Rights in Technical Data and Computer Software clause at DFARS 252.227-7013 or subparagraphs (c)(1) and (2) of
the Commercial Computer Software Restricted Rights at 48 CFR 52.227-19, as applicable.
General
The laws of the State of California govern this Agreement. You agree that this Agreement shall not be subject to the United Nations Convention on Contracts for
the International Sale of Goods (1980). This Agreement is the entire agreement held between us and supersedes any other communications or advertising with
respect to the Software. If any provision of this Agreement is held invalid, the remainder of this Agreement shall continue in full force and effect.
If you have any questions, please see EFI’s web site at www.efi.com.
Contents
Introduction
About this manual
xi
About the documentation
xii
How the E-810 works
xiii
About printer drivers and PPDs
xiii
Before you begin
xiv
Chapter 1: Printing from Windows Computers
Printing from applications
1-1
Setting options and printing from Windows 9x/Me
1-1
Working with custom page sizes in Windows 9x/Me
1-14
Setting options and printing from Windows NT 4.0
1-16
Working with custom page sizes in Windows NT 4.0
1-20
Setting options and printing from Windows 2000
1-23
Working with custom page sizes in Windows 2000
1-27
Saving files to print at a remote location
1-30
Printing with Fiery Downloader or Fiery WebDownloader
1-30
Chapter 2: Printing from Mac OS Computers
Printing from applications
2-1
Selecting the E-810 in the Chooser
2-1
Setting options and printing from Mac OS computers
2-3
Defining custom page sizes
2-6
Printing with Fiery Downloader or Fiery WebDownloader
2-7
Chapter 3: Printing from UNIX Workstations
Printing to the E-810
3-1
viii
Contents
Chapter 4: Special Features
Printing variable data documents with FreeForm
4-1
How FreeForm works
4-1
Creating the master-elements document
4-2
Creating the variable-elements document
4-3
Combining the FreeForm Master with the variable-elements document
4-4
Using FreeForm
4-5
Printing simulations
4-9
Printing duplex pages
Scanning from the copier
4-9
4-10
Fiery Scan color conversion settings
4-11
Using Fiery Scan
4-11
Scan to HDD
4-16
Chapter 5: Downloading Files and Fonts
Using Fiery Downloader
5-1
Printing with Fiery Downloader
5-4
Downloading and managing printer fonts
5-8
Chapter 6: Tracking and Managing Print Jobs
Fiery WebTools
6-1
Checking E-810 status with the Status WebTool
6-2
Accessing information with WebLink
6-3
Downloading files with Fiery WebDownloader
6-3
Accessing scanned jobs with WebScan
6-4
Fiery Link
6-6
Fiery Link tools
6-8
Preferences
6-9
My Fiery List
6-11
Windows taskbar menu
6-11
ix
Contents
Appendix A: Print Options
Where to set print options
A-1
Print option override hierarchy
A-2
Default settings
A-2
More about print options
A-9
Appendix B: Font List
PostScript printer fonts
B-1
Adobe Type 1 fonts
B-1
TrueType fonts
B-5
Appendix C: Troubleshooting
Maintaining optimal system performance
C-1
Troubleshooting
C-2
General printing problems
C-2
Problems with print quality
C-4
Problems with Fiery Downloader
C-5
Problems with Fiery Scan
C-6
Problems with Fiery WebTools
C-6
Index
xi
Introduction
About this manual
You can use the Color Controller E-810™ to print final documents or proof jobs you
will later print on an offset press. You send a print job to the Color Controller E-810 as
you would to any other printer—you select it from the Printers dialog box on
Microsoft Windows computers, or in the Chooser on Apple Mac OS computers and
then print from within any application.
N OTE : The term “E-810” is used in this manual to refer the Color Controller E-810.
The name “Aero” is used in illustrations to represent the E-810.
Although it may not be the case at all sites, it is assumed that an operator controls and
manages jobs sent by users from remote workstations. For information on the features
of Command WorkStation™, Fiery® WebSpooler™, and Fiery Spooler™, see the Job
Management Guide.
About this manual
This manual is intended for those remote users who send jobs via the network between
their workstation and the E-810. It covers the following topics:
• Printing from a Windows computer
• Printing from a Mac OS computer
• Printing from UNIX
• Using special features, such as printing variable data documents, press simulations,
duplex pages, and scanning images from the copier using Adobe Photoshop and the
Fiery Scan™
• Downloading files and fonts using Fiery Downloader™ and
Fiery WebDownloader™
• Monitoring jobs and accessing information using Fiery WebTools™ and Fiery
Link™
• Specifying and overriding job settings, a list of fonts installed on the E-810, and
troubleshooting information
xii
Introduction
About the documentation
This manual is part of a set of E-810 documentation that includes the following
manuals for users and system administrators:
• The Configuration Guide explains basic configuration and administration of the
E-810 for the supported platforms and network environments. It also includes
guidelines for setting up UNIX, Windows NT 4.0, and Novell NetWare servers to
provide Adobe PostScript printing services to clients.
• Getting Started describes how to install software to enable users to print to the
E-810. Specifically, it describes installation of PostScript printer drivers, printer
description files, and other user software provided on the User Software CD. It also
explains how to connect each user to the network.
• The Printing Guide describes the printing features of the E-810 for users who send
jobs via remote workstations on the network.
• The Color Guide provides information on managing the color output of your E-810.
It addresses concepts and issues associated with printing to the E-810, and outlines
key workflow scenarios. This manual explains how to calibrate your copier and take
advantage of the ColorWise® color management system, as well as features of
ColorWise Pro Tools™. In addition, the Color Guide offers information on printing
from popular Windows and Mac OS applications.
• The Job Management Guide explains the functions of the E-810 client utilities and
how they can be used to manage jobs. This book is intended for an operator or
administrator, or a user with the necessary access privileges, who needs to monitor
and manage job flow and troubleshoot problems that may arise.
• Release Notes provide last-minute product information and workarounds for some of
the problems you may encounter.
xiii
How the E-810 works
How the E-810 works
The E-810 receives files from computers on the network, processes (RIPs) those files,
and then sends them to the copier’s print engine for printing.
Windows and Mac OS computers communicate with the E-810 by means of a
PostScript printer driver and PostScript printer description (PPD) files. The driver
enables you to use special features of the E-810 from the Print dialog box.
About printer drivers and PPDs
A printer driver manages printing communication between your application software
and the printer. It interprets the instructions generated by the application software,
merges those instructions with printer-specific PPD options you specify, and translates
all that information into PostScript, a language the printer understands. In other
words, the printer driver writes a PostScript file based on your original file and the
options you set from the Print dialog box.
A PPD file contains information about the features and capabilities of a particular
device (for example, what paper sizes and media types are supported). The printer
driver reads the information in the PPD file and presents that information to you in
the form of options you can choose from the Print dialog box. The PPD for the E-810
includes information about the features of both the copier and the E-810.
For information on the PPD options, see Appendix A.
xiv
Introduction
Before you begin
Before using the E-810, follow these steps:
1.
Confirm that the system administrator has completed Setup, as described in the
Configuration Guide.
2.
Find out what printer defaults the administrator specified in Setup.
These default settings can affect the results of your print jobs. Check with your
administrator or operator for information on these default settings.
3.
Confirm that the user software is installed correctly on your workstation, as described
in Getting Started.
4.
Consult the Color Guide for information on print options and application features that
affect color output.
5.
Find out how your workstation is configured for printing on the network.
If your site has an operator who controls all printing, you may have access to the Hold
queue only. In this case, all jobs you send are spooled to the E-810 and held until the
operator sends them to their next stage of processing.
You may also have access to the Print queue. If you send jobs to this queue, jobs spool
to the E-810 and proceed to RIP and print according to your job settings—unless
someone (you, or an operator, for example) intervenes.
Lastly, you may have access to the Direct connection, which sends jobs straight to the
server without spooling.
6.
Find out whether the E-810 is set up to use Fiery WebTools and what your access
privileges are.
The administrator may or may not have enabled access to the server via the Internet
(or an intranet). If access is enabled, a password may be required to use certain
functions.
1
1-1
Chapter 1:
Printing from
Windows
Computers
Printing from applications
This chapter describes printing to the E-810 from Windows 9x/Me, Windows NT
4.0, and Windows 2000. You can print from a networked Windows computer or from
a computer using Windows (WINS) printing. If you plan to print files at another
location, you should follow the procedures described in “Saving files to print at a
remote location” on page 1-30.
Another way to print from a Windows computer is to download PostScript (PS),
Encapsulated PostScript (EPS), or Portable Document Format (PDF) files using Fiery
Downloader or Fiery WebDownloader. Basic instructions are provided at the end of
this chapter; for details on using Fiery Downloader, see Chapter 5.
N OTE : For information on setting up the Windows environment for printing with
Windows servers connected to the E-810, see the Configuration Guide. For
information on how to connect to the E-810 over the network, install printer drivers,
and install the Fiery utilities, see Getting Started.
Printing from applications
Once you have installed the E-810 printer driver and set it to the proper port as
described in Getting Started, you can print directly from most Windows applications.
Simply choose the Print command from within your application.
To achieve the best printing results from specific applications, see the Color Guide.
Setting options and printing from Windows 9x/Me
To print from Windows 9x/Me, use the Adobe PostScript printer driver for
Windows 9x/Me. The driver is included with the E-810 user software.
Once you have installed the Adobe PostScript printer driver and the PPD file, you can
specify print settings for a particular job and print it to the E-810.
1
1-2
Printing from Windows Computers
To print from Windows 9x/Me applications by connecting your computer to a print
server via the network, one of the following is required: a NetWare server, a Windows
NT server, or a UNIX server. For more information, see the Configuration Guide.
To print from Windows 9x/Me applications without connecting to a print server,
you can use Server Message Block (SMB) printing. For more information, see
Getting Started.
T O SET PRINT OPTIONS AND PRINT FROM W INDOWS
USING THE A DOBE P OST S CRIPT PRINTER DRIVER
9 X /M E
1.
Click the Start button, point to Settings, and click Printers.
2.
Select the icon for the E-810 and choose Properties from the File menu.
3.
Click the Fiery Printing tab.
Saved settings, see page 1-6
Shortcuts, see page 1-12
Print option bars, see below
Page shortcuts, see page 1-13
Click to display all print options
Click to hide all print options
The Fiery Printing tab serves as the control center for all frequently used printing
functions.
1
1-3
4.
Printing from applications
Click the Paper Source print option bar, and enter the appropriate settings.
For information on print options, see Appendix A.
To use advanced color management features, such as Rendering Style, click the
ColorWise bar, click Expert Settings and proceed to step 5; otherwise, skip to step 6.
1
1-4
5.
Printing from Windows Computers
In the Expert Color Settings dialog box, click Update to display the current E-810
settings.
Click Update
If the Update button does not appear, make sure that two-way communication is set
up, as described in Getting Started.
6.
Click the remaining print option bars to specify the appropriate settings for the print
job.
These print options are specific to the E-810 and the copier. They override settings
specified in E-810 Printer Setup, but can be overridden from Command WorkStation,
Fiery WebSpooler or Fiery Spooler. For information about these options and overrides,
see Appendix A.
If you choose Printer’s default, the job prints according to the settings specified in
Setup. See Appendix A for more information.
Some options can also be set from an application (for example, Reverse Page Order or
Collation). In these cases, use the driver option to perform the function, rather than
setting it from the application. The application may not set up the file properly for
printing on the E-810 and may also take longer to process.
N OTE : If you specify incompatible print settings, the Conflict dialog box provides
instructions to resolve the conflict.
1
1-5
Printing from applications
7.
Click the Owner Information print option bar.
8.
Enter text messages in the Notes and User ID areas.
Enter user and job identification information for managing purposes, or whatever
information is required at your site.
The information you enter in these areas can be viewed by the operator in Command
WorkStation and also appears in the Job Log. It cannot be edited or erased by the
operator.
9.
In the Instructions area, enter instructions to the operator about the job.
These instructions can be displayed in Command WorkStation, but do not appear in
the Job Log. These instructions can be edited by the operator.
10.
Click OK.
11.
From your application, choose Print.
Make sure the E-810 is selected as your current printer.
12.
Click OK.
1
1-6
Printing from Windows Computers
Using saved settings
Print option settings can be saved on your hard disk so you can easily load specifically
configured settings for a particular job.
TO
CREATE SAVED SETTINGS
1.
Make sure that Default Settings appears in the Saved Settings pop-up menu, then
configure the options from the print option bars.
As soon as you change any settings, the Saved Settings menu displays Untitled instead
of Default Settings.
1
1-7
Printing from applications
2.
Click the Disk button.
3.
Enter a Settings Name and click OK.
Click the Disk button
The name appears in the Saved Settings pop-up menu.
1
1-8
TO
Printing from Windows Computers
LOAD SAVED SETTINGS
1.
From the Fiery Printing tab, click the Saved Settings pop-up menu.
2.
Choose the settings you want to use.
The options are automatically configured with the saved settings.
TO
DELETE SAVED SETTINGS
1.
From the Fiery Printing tab, click the Settings button.
2.
Select the settings you want to delete and click Delete.
3.
Click Yes to confirm deletion, and then click OK.
Click the Settings button
1
1-9
TO
Printing from applications
MODIFY SAVED SETTINGS
1.
From the Fiery Printing tab, click the Saved Settings pop-up menu.
2.
Choose the settings you want to modify.
The options are automatically configured with the saved settings.
3.
Configure your new settings from the print option bars, then click the Disk button.
4.
Click OK to save the modified settings.
Click the Disk button
1
1-10
T O E XPORT
Printing from Windows Computers
SAVED SETTINGS
1.
From the Fiery Printing tab, click the Settings button.
2.
Select the Saved Settings you want to export, and then click Export.
3.
Browse to the location where you want to save the file, enter a file name, and then
click OK.
N OTE : The file name must include the .sav extension and can be up to eight characters
long (not including the extension). The file name does not have to match the Settings
Name.
4.
Click OK in the Settings dialog box.
1
1-11
TO
Printing from applications
IMPORT SAVED SETTINGS
1.
From the Fiery Printing tab, click the Settings button.
2.
Click the Import button.
3.
Browse to the location of the saved settings file you want to import.
4.
Select the file, and then click OK.
5.
Click OK in the Settings dialog box.
N OTE : When you import saved settings, they appear in the Saved Settings menu under
their Settings Name, not the file name. In the example above, the file present.sav (file
name) was imported, but it appears in the Saved Settings menu as Presentation
(Settings Name).
1
1-12
Printing from Windows Computers
Using Shortcuts
The Shortcuts section of the driver interface displays the current settings for some of
the most common print options. You can access and change these settings quickly and
easily using the Shortcuts. You can also access some page layout and finishing options
by right-clicking the image of the page directly below Shortcuts.
TO
SET PRINT OPTIONS USING
1.
S HORTCUTS
From the Fiery Printing tab, place your cursor over the print option you want
to set.
When your cursor is directly over the print option name, the cursor turns into a hand
and the option name is underlined; see the Orientation print option in the example
below.
Selected print option
2.
Click the selected print option and specify the appropriate settings.
Alternatively, you can right-click the print option and specify the settings directly.
3.
Click Apply to make the new settings the default.
4.
Click OK.
1
1-13
TO
Printing from applications
SET PRINT OPTIONS USING THE PAGE SHORTCUTS
1.
From the Fiery Printing tab, click the page icon, then place your cursor over the page
image and right-click.
Right-click the page image
TO
2.
Specify the appropriate settings for the print options.
3.
Click Apply to make the new settings the default.
4.
Click OK.
MODIFY THE SHORTCUTS PRINT OPTION DISPLAY
1.
From the Fiery driver, place your cursor over Shortcuts.
When your cursor is directly over Shortcuts, the cursor will turn into a hand and the
option is underlined.
2.
Click Shortcuts to open the Modify Shortcuts box.
3.
To add a print option, click the selected print option in Available Shortcuts and Add to
move to Current shortcuts.
To remove a print option, click a print option in Current Settings and Remove.
N OTE : You can add up to 6 shortcuts.
1
1-14
Printing from Windows Computers
4.
Use the Move Up or Move Down buttons to rearrange the current shortcuts in a specific
order.
5.
Click OK.
Working with custom page sizes in Windows 9x/Me
With custom page sizes, you define the page dimensions and the unprintable area of
the page. You can save three different custom page sizes for easy use any time you print.
TO
Click Custom
DEFINE A CUSTOM PAGE SIZE
1.
Click the Start button, point to Settings, and choose Printers.
2.
Right-click the E-810 icon, then choose Properties.
3.
Click the Fiery Printing tab, then click the Paper Source print option bar.
4.
Click the Custom button.
1
1-15
5.
Printing from applications
Enter the name and dimensions of the page, and then click OK.
Check Transverse to swap the width and height dimensions according to the paper feed
direction.
The new custom page name appears in the Page Size pop-up menu.
6.
To define the unprintable area of the custom page, click the Unprintable Area button,
enter the desired information, then click OK.
7.
Click Apply and then OK.
After you define a custom page size, you can use it from within an application, without
having redefine it each time you print.
TO
PRINT A CUSTOM PAGE SIZE
1.
Choose Print from your application.
2.
Make sure the E-810 is selected as the printer, then click Properties.
3.
Click the Fiery Printing tab, then click the Paper Source print option bar.
4.
Select the custom page size from the Page Size pop-up menu.
5.
Click OK and then click OK again to print the job.
1
1-16
Printing from Windows Computers
Setting options and printing from Windows NT 4.0
You can print from Windows NT 4.0 using the Adobe PostScript printer driver
included on the User Software CD.
Once you have installed the Adobe PostScript printer driver and the PPD file, you can
specify print options.
With the Fiery PS printer driver, you can set options on a job-by-job basis (see below),
or establish default settings for all jobs printed from your computer to the E-810 (see
page 1-23).
TO
SET PRINT OPTIONS FOR A SPECIFIC W INDOWS
USING THE P OST S CRIPT PRINTER DRIVER
NT 4.0
PRINT JOB
1.
Choose Print in your application.
2.
Make sure the E-810 is selected as your printer, and click Properties.
3.
Click the Fiery Printing tab.
1
1-17
4.
Printing from applications
Click the ColorWise print option bar.
In the Print Mode area, specify the color mode for the job. If you want to use any
advanced color management features, such as Rendering Style, click Expert Settings
and proceed to step 5; otherwise, skip to step 6.
5.
Specify the color settings for the print job, and then click OK.
1
1-18
6.
Printing from Windows Computers
Click the remaining print option bars to specify the appropriate settings for the print
job.
These print options are specific to the E-810 and the copier. They override settings
in E-810 Printer Setup, but can be changed from Command WorkStation,
Fiery WebSpooler, or Fiery Spooler. For information about these options and
overrides, see Appendix A.
If you choose Printer’s default, the job prints according to the settings specified in
Setup. See Appendix A for more information.
N OTE : Some options listed in the printer driver can also be set from an application (for
example, collation). In these cases, use the driver option to perform the function,
rather than setting it from the application. The application may not set up the file
properly for printing on the E-810 and may also take longer to process.
N OTE : If you specify incompatible print settings, the Conflict dialog box provides
instructions to resolve the conflict.
7.
Click the Owner Information print option bar.
8.
Enter text messages in the Notes and User ID areas.
Enter user and job identification information for managing purposes, or whatever
information is required at your site.
1
1-19
Printing from applications
The information you enter in these areas can be viewed by the operator in Command
WorkStation and also appears in the Job Log. It cannot be edited or erased by the
operator.
9.
In the Instructions area, enter instructions to the operator about the job.
These instructions can be displayed in Command WorkStation, Fiery Spooler, and
Fiery Web Spooler, but do not appear in the Job Log. These instructions can be edited
by the operator.
10.
Click OK, and then click OK in the Print dialog box.
TO
SET D EFAULT PRINT OPTIONS FOR ALL
THE P OSTSCRIPT PRINTER DRIVER
W INDOWS NT 4.0
JOBS USING
1.
Click the Start button, point to Settings, and choose Printers.
2.
Right-click to select the E-810, and choose Document Defaults.
3.
Click the Fiery Printing tab.
4.
Specify the default settings for your print job, as described on page 1-17.
1
1-20
Printing from Windows Computers
Working with custom page sizes in Windows NT 4.0
With custom page sizes, you define the page dimensions and the unprintable area of
the page.
TO
DEFINE A CUSTOM PAGE SIZE
1.
Click the Start button, point to Settings, and choose Printers.
2.
Right-click the E-810 icon and choose Document Defaults.
3.
Click the Fiery Printing tab, and click the Paper Source print option bar.
4.
Select Manual Feed from the Paper Source menu.
5.
Click the Page Setup tab, and click the Paper Size menu.
1
1-21
Printing from applications
6.
Select PostScript Custom Page Size.
7.
Enter the dimensions of the page and click OK.
8.
Click OK.
After you define a custom page size, you can use it from within an application without
having redefine it each time you print.
T O E DIT
A CUSTOM PAGE SIZE
1.
Click the Start button, point to Settings, and choose Printers.
2.
Right-click the E-810 icon and choose Document Defaults.
1
1-22
Printing from Windows Computers
3.
Click the Advanced tab and select Paper Size.
4.
Select PostScript Custom Page Size.
5.
Click the Edit Custom Page Size button.
6.
Edit the dimensions of the page and click OK.
1
1-23
TO
Printing from applications
PRINT A CUSTOM PAGE SIZE
1.
Choose Print from your application.
2.
Make sure the E-810 is selected as the printer and click Properties.
3.
Click the Fiery Printing tab.
4.
In the Paper Source tab, click Paper Source and select Manual Feed.
5.
Click the Page Setup tab.
From the Page Size menu, select PostScript Custom Page Size.
6.
Click OK and then click OK again to print the job.
Setting options and printing from Windows 2000
You can print from Windows 2000 using the Microsoft printer driver included with
your Windows 2000 system, and the PostScript PPD included on the User Software
CD.
Once you have installed the printer driver and the PPD file, you can specify print
options.
1
1-24
Printing from Windows Computers
To print from Windows 2000 applications by connecting your computer to a print
server via the network, one of the following is required: a NetWare server, a
Windows NT server, or a UNIX server. For more information, see the Configuration
Guide.
To print from Windows 2000 applications without connecting to a print server, you
can use SMB printing. For more information, see Getting Started.
TO
SET PRINT OPTIONS FOR A W INDOWS 2000 PRINT JOB
USING THE M ICROSOFT P OST S CRIPT PRINTER DRIVER
1.
Choose Print in your application.
N OTE : The dialog box that appears may vary, depending on the application you are
printing from.
2.
Make sure the E-810 is selected as your printer.
Illustration to be provided.
1
1-25
3.
Printing from applications
Select print options from the Layout and Paper/Quality tabs.
Illustration to be provided.
4.
Click the Advanced button.
Illustration to be provided.
Select a setting from the Paper Size pop-up menu.
1
1-26
5.
Printing from Windows Computers
Scroll down to Printer Features and select the appropriate settings for the print job.
Illustration to be provided.
These print options are specific to the E-810 and the copier. They override settings
in E-810 Printer Setup, but can be changed from Command WorkStation,
Fiery WebSpooler, or Fiery Spooler. For information about these options and
overrides, see Appendix A.
If you choose Printer’s default, the job prints according to the settings specified in
Setup.
N OTE : As you select print options, incompatible print settings display a caution icon
next to their names. If you specify incompatible print settings, the Incompatible Print
Settings dialog box provides instructions to resolve the conflict.
6.
Click OK to close the Advanced Options dialog box.
7.
Click OK to close the Document Properties dialog box.
8.
Click OK to print.
The job prints with the specified settings.
1
1-27
Printing from applications
Working with custom page sizes in Windows 2000
With a custom page size, you define the page dimensions and the unprintable area of
the page. You can save a custom page size for easy use any time you print.
TO
DEFINE A CUSTOM PAGE SIZE
1.
Click the Start button, point to Settings, and choose Printers.
2.
Right-click the E-810 icon, and choose Printing Preferences.
Illustration to be provided.
3.
Click the Advanced button.
1
1-28
Printing from Windows Computers
4.
Select PostScript Custom Page Size from the Paper Size pop-up menu.
5.
In the PostScript Custom Page Size Definition dialog box, specify options to define the
custom page size.
1
1-29
Printing from applications
Custom Page Size Dimensions—Specify the width and height of the print job.
Unit—Specify the unit of measurement for the print job.
Paper Feed Direction—Specify the paper feed direction of the print job.
Paper Type—Specify the type of paper for the print job.
Offsets Relative to Paper Feed Direction—Specify the offsets (margins) of the print job
relative to the paper feed direction.
6.
Click OK to close the Advanced Options dialog box.
7.
Click OK to close the Printing Preferences dialog box.
After you define a custom page size, you can specify it from within an application,
without having redefine it each time you print.
TO
PRINT A CUSTOM PAGE SIZE
1.
Choose Print from your application.
2.
Right-click the E-810 icon, and choose Printing Preferences.
3.
Click the Advanced button.
4.
Select PostScript Custom Page Size from the Paper Size pop-up menu.
5.
Verify the custom page size settings and click OK.
6.
Click OK to close the Advanced Options dialog box.
7.
Click OK to close the Printing Preferences dialog box.
8.
Click Print.
1
1-30
Printing from Windows Computers
Saving files to print at a remote location
If you do not have the E-810, and are preparing files to take to a service bureau or
other location, print the final files to the File port (as opposed to one of the local
ports). You can also print to the File port to create a file to download using
Fiery Downloader. For instructions on printing to the File port, see your Windows
documentation.
Printing with Fiery Downloader or Fiery WebDownloader
Downloading files with Fiery Downloader or Fiery WebDownloader is generally faster
than printing from application software. You can use Fiery Downloader or
Fiery WebDownloader to print PostScript, EPS, or PDF files.
TO
PRINT USING
1.
F IERY D OWNLOADER
Create a PostScript, EPS, or PDF file.
Specify the appropriate print options, and include (embed) any necessary fonts that are
not resident on the E-810. For a list of fonts resident on the E-810, see Appendix B.
2.
Launch Fiery Downloader and connect to the E-810.
For instructions on setting up Fiery Downloader, see Getting Started.
3.
Select the file(s) you want to download, and specify any necessary options.
4.
Click Download File(s).
For details, see Chapter 5.
1
1-31
TO
Printing with Fiery Downloader or Fiery WebDownloader
PRINT USING
1.
F IERY W EB D OWNLOADER
Create a PostScript, EPS, or PDF file.
Specify the appropriate print options, and include (embed) any necessary fonts that are
not resident on the E-810. For a list of fonts resident on the E-810, see Appendix B.
2.
Launch Fiery WebTools and click Fiery WebDownloader.
See “Fiery WebTools” on page 6-1 for information on how to access
Fiery WebDownloader.
3.
Select the print connection and the file you want to download.
4.
Click Download.
2
2-1
Printing from applications
You can print to the E-810 just as you would print to any other printer from any
application software. First, select the E-810 as the current printer in the Chooser, and
then print the file from within the application.
Chapter 2:
Printing
from Mac OS
Computers
Another way to print from a Mac OS computer is to download PostScript (PS),
Encapsulated PostScript (EPS), or Portable Document Format (PDF) files using Fiery
Downloader or Fiery WebDownloader. Basic instructions are provided at the end of
this chapter; for details on using Fiery Downloader and Fiery WebDownloader, see
Chapter 5.
Printing from applications
Before you can print to the E-810 from applications, you must select the E-810 in the
Chooser. Then, using the Adobe PostScript printer driver and the correct PostScript
Printer Description file (PPD), you can control many E-810 printing features by
specifying job settings from print dialog boxes.
For information on achieving the best printing results from specific applications,
see the Color Guide.
Selecting the E-810 in the Chooser
Before you print a job, make sure the E-810 is the currently selected printer.
N OTE : For information about setting up the E-810 in the Chooser, see
Getting Started.
TO
SELECT THE
E-810
AS THE CURRENT PRINTER
1.
Make sure the E-810 is connected to the network and is turned on.
2.
Choose Chooser from the Apple menu.
3.
Click the AdobePS icon to select it.
N OTE : Make sure AppleTalk is set to Active.
2
2-2
Printing from Mac OS Computers
4.
If your network is divided into zones, select the zone in which the E-810 is located.
5.
Select the E-810 by <Server Name>_<Device Name>_<Queue Name> from the “Select a
PostScript Printer” list.
The names of all supported printers in the zone are displayed in the list on the right.
N OTE : If your system administrator has not enabled the connection to the Print queue
or the Direct connection, the corresponding names will not appear in this list. For
example, if your site has an operator who controls the flow of print jobs from
Command WorkStation, you may be able to print only to the Hold queue. See the
Configuration Guide for more information on enabling print connections.
6.
Close the Chooser window.
The E-810 remains selected as the current printer until you choose a new printer in the
Chooser.
2
2-3
Printing from applications
Setting options and printing from Mac OS computers
In Mac OS applications, print options are set from both the Page Setup dialog box and
the Print dialog box. For details on specific print options, see Appendix A.
N OTE : Some default print options are set by the administrator during Setup. Contact
the administrator or the operator for information on the current server default settings.
TO
SET PRINT OPTIONS AND PRINT WITH THE
A DOBE PS
PRINTER DRIVER
1.
Open a file, and choose Page Setup from the application’s File menu.
2.
In the dialog box that appears, specify the Page Attributes settings for your print job.
Make sure to select the E-810 as your printer.
N OTE : Page Setup dialog boxes vary across applications.
3.
Click OK.
2
2-4
4.
Printing from Mac OS Computers
Choose Print from the application’s File menu.
Make sure the E-810 is selected as your printer, and specify settings for the print
options displayed.
N OTE : Print dialog boxes vary across applications.
From the Paper Source pop-up menu, choose the paper tray for the job. For example,
you can specify that the job should be printed on pages in Tray 1. The Paper Source
selection is valid for the current job only.
N OTE : If paper loaded in the selected tray is a different size, orientation, and/or media
type than that of the job you are sending, the E-810 displays an error message and the
job will not print. You should then load the correct paper in the selected tray or cancel
the job.
5.
Go to Job Notes.
Choose Job Notes from
the pop-up menu
In the Notes and User ID areas, enter user and job identification information for
managing purposes, or whatever information is required at your site. These notes will
appear in the Job Log; they can also be viewed by the operator in Command
WorkStation. These notes cannot be edited or erased by the operator.
In the Instructions area, enter instructions to the operator about the job. These
instructions can be displayed in Command WorkStation, but do not appear in the Job
Log. These instructions can be edited by the operator.
2
2-5
6.
Printing from applications
Go to Printer Specific Options and specify the appropriate settings for your print job.
Choose Printer Specific Options
from the pop-up menu
These print options are specific to the E-810 and the copier; you may need to scroll to
see all the options. They override settings in E-810 Printer Setup, but can be changed
from Command WorkStation, Fiery WebSpooler, or Fiery Spooler.
If you choose Printer’s default, the job prints according to the settings specified in
Setup.
For information about these options and overrides, see Appendix A.
Some PPD options can also be set from an application (for example, Reverse Order
printing or Collation). In these cases, use the PPD option to perform the function,
rather than setting it from the application. The application may not set up the file
properly for printing on the E-810 and may also take longer to process.
N OTE : If you specify incompatible print settings, a dialog box may appear. Follow the
on-screen instructions to resolve the conflict.
7.
To make the new settings the default settings, click Save Settings.
8.
Click Print.
2
2-6
Printing from Mac OS Computers
Defining custom page sizes
With custom page sizes, you define the page dimensions and margins. After you define
a custom page size, you can use it from within an application, without having to
redefine it each time you print.
TO
DEFINE A CUSTOM PAGE SIZE
1.
Choose Page Setup from the application’s File menu.
2.
For Paper, choose Custom.
3.
From the pull-down menu, choose Custom Page Default.
Choose Custom Page Default
Custom page names
displayed here
Limits for selected dimension
displayed here
Enter a custom
page name
4.
Enter the page dimensions and margins.
You can view the minimum and maximum sizes by using the pull-down menu under
PPD Limits.
If you enter invalid sizes, an error message appears. Click Cancel and enter sizes
specified within the PPD Limits.
2
2-7
5.
Printing with Fiery Downloader or Fiery WebDownloader
To save this custom page size, enter a name for it and click Add.
Saved custom page sizes appear in the menu of page sizes at the top right of the dialog
box. To remove a saved custom page size, select it from the menu and click Remove.
6.
TO
Click OK.
PRINT A CUSTOM PAGE SIZE
1.
Choose Page Setup from the application’s File menu.
2.
For Paper, choose Custom.
3.
Click OK.
4.
Choose Print from your application’s file menu.
Specify your printing options.
5.
Click Print.
Printing with Fiery Downloader or Fiery WebDownloader
Downloading files with Fiery Downloader or Fiery WebDownloader is generally
faster than printing from an application. You can use Fiery Downloader or
Fiery WebDownloader to print PostScript, EPS. or PDF files.
TO
PRINT USING
1.
F IERY D OWNLOADER
Create a PostScript, EPS, or PDF file. Specify the appropriate print options, and include
(embed) any necessary fonts that are not resident on the E-810.
For a list of fonts resident on the E-810, see Appendix B.
2.
Launch Fiery Downloader and connect to the E-810.
For instructions on setting up Fiery Downloader, see Getting Started.
3.
Select the file(s) you want to download, and specify any necessary options.
4.
Click Download.
For details, see Chapter 5.
2
2-8
TO
Printing from Mac OS Computers
PRINT USING
1.
F IERY W EB D OWNLOADER
Create a PostScript, EPS, or PDF file.
Specify the appropriate print options, and include (embed) any necessary fonts that are
not resident on the E-810. For a list of fonts resident on the E-810, see Appendix B.
2.
Launch Fiery WebTools and click Fiery WebDownloader.
See “Fiery WebTools” on page 6-1 for information on accessing
Fiery WebDownloader.
3.
Select the queue and the file you want to download.
4.
Click Download.
3
3-1
Chapter 3:
Printing
from UNIX
Workstations
Printing to the E-810
You can print to the E-810 directly from UNIX workstations. Jobs printed to the
E-810 are sent to the Print or Hold queue and can be manipulated from Command
WorkStation or from Windows and Mac OS computers on the network using
Fiery WebSpooler or Fiery Spooler.
N OTE : If you print to the Hold queue, an operator must intervene from Command
WorkStation, Fiery Spooler, or Fiery WebSpooler for the job to print; jobs sent to the
Hold queue are spooled to disk and held.
The queue name and E-810 printer name are determined by your system
administrator. Contact your system administrator for the names of your queues.
For information about setting up printing from TCP/IP, see your UNIX system
documentation.
Printing to the E-810
You can use UNIX commands to print PostScript and text files to the E-810. In
general, use basic print commands (lpr, lpq, lprm) to send print jobs to the E-810.
See the UNIX manual pages or other documentation for information about UNIX
commands.
N OTE : Only PostScript text files can be printed from UNIX.
3
3-2
TO
Printing from UNIX Workstations
PRINT FROM
•
UNIX
On a system running SunOS 4.1.x or another BSD-based variant, use the lpr command
to send a job to the E-810, as follows:
lpr <-Pprinter> <-#copies> <filename>
For example, if the Print queue of your E-810 is named print_Server, your file is named
Sample, and you want to print two copies, type:
lpr -Pprint_Server -#2 Sample
•
On a system running Solaris 2.x or any System V implementation of UNIX, use the lp
command to send a job to the E-810, as follows:
lp -d <printername> {-n <copies>} <filename>
For example, if the Print queue of your E-810 is named print_Server, your file is named
Sample, and you want to print two copies, type:
lp -d print_Server -n 2 Sample
3
3-3
TO
Printing to the E-810
DISPLAY A LIST OF JOBS IN THE QUEUE
•
On a system running SunOS 4.1.x or another BSD-based variant, use the lpq command
to see printer jobs in the queue, as follows:
lpq <-Pprinter>
For example, if the Print queue of your E-810 is named print_Server, type:
lpq -Pprint_Server
Your workstation displays the contents of the queue.
•
On a system running Solaris 2.x or any System V implementation of UNIX, use the
lpstat command to see printer jobs in the queue, as follows:
lpstat -o <printername>
For example, if the Print queue of your E-810 is named print_Server, type:
lpstat -o print_Server
Your workstation displays the contents of the queue.
3
3-4
TO
Printing from UNIX Workstations
REMOVE JOBS FROM THE QUEUE
N OTE : Unless you log in as the root user, you can remove only your own jobs.
•
On a system running SunOS 4.1.x or another BSD-based variant, use the lprm command
to remove jobs from the queue, as follows:
lprm <-Pprinter> <job #…>
You can use the lpq command to check the job number.
For example, to remove job number 123 from the Print queue of your E-810 named
print_Server, type:
lprm -Pprint_Server 123
The lprm command reports the names of any files it removes.
•
On a system running Solaris 2.x or any System V implementation of UNIX, use the
cancel command to remove jobs from the queue.
cancel <printername> <job ID>
For example, to remove job number 123 from the Print queue of your E-810 named
print_Server, type:
cancel print_Server 123
4
4-1
Chapter 4:
Special Features
Printing variable data documents with FreeForm
This chapter describes some of the special features supported by the E-810, including:
• Printing variable data documents using FreeForm™
• Printing simulations
• Printing duplex pages
• Scanning images from the copier using Fiery Scan
• Scanning images from the copier to the HDD with Scan to HDD
Printing variable data documents with FreeForm
Variable data printing is typically used for direct-mail advertising or other targeted
mailings. It involves combining a set of master elements that are common across copies
of a document with a set of variable elements that change from copy to copy. An
example is a brochure that greets customers by name and may include other personal
information about the customer obtained from a marketing database. Background
elements, illustrations, and text blocks that do not change across copies of the brochure
comprise the master elements. The customer’s name and other customer-specific
information comprise the variable elements.
How FreeForm works
The basic premise of FreeForm variable data printing is that the master-element data
for the job can be sent to the E-810 and rasterized separately from the variable-element
data. The master-element data is stored on the E-810 in prerasterized form as a
FreeForm Master, and can be used as often as needed with multiple sets of variableelement data. Because the FreeForm Master job is preRIPped and stored on the E-810,
the only RIP time required for variable data print jobs is the time needed to RIP the
variable-element data. In fact, FreeForm Masters can be used for any fixed-element
data that you might combine with different data from day to day. For example, a
letterhead template can be stored as a FreeForm Master and used repeatedly as the
background for different letter content (the variable-element data).
4
4-2
Special Features
FreeForm allows you to create the master-element and variable-element documents
using any application you wish. The two documents can be created using different
applications, or even different computer platforms. To create the master-elements
document, you can use a page layout or graphics application. To create the variableelements document, you can use a word processing application that has a mail merge
feature, a page layout application that supports scripting, or a database application.
FreeForm functions are controlled with two print options: Create Master and Use
Master. You can set these options in the printer driver when you send a job, or you can
instruct the operator to set them with job overrides from Command WorkStation,
Fiery Spooler, or Fiery WebSpooler.
Creating the master-elements document
Before you can use FreeForm, you must create a master-elements document and a
variable-elements document. This includes creating the layout for the combined
document, as well as the elements themselves. In a page layout or graphics program,
you arrange the master elements (text and graphics that do not change) on one or more
pages, leaving space for the variable elements.
Space for variable elements
Unchanging master elements
Master-elements document
4
4-3
Printing variable data documents with FreeForm
When you have finalized the design of the master-elements document, print it to the
E-810 and specify that a FreeForm Master is to be created from the job (see page 4-6).
N OTE : Although the E-810 can store up to 100 FreeForm Masters, the printer driver
interface, Fiery WebSpooler, and Fiery Spooler allow you to select numbers 1 through
15 only. To create a FreeForm Master with a number greater than 15, the operator
must set the Create Master and Use Master options and RIP the job from Command
WorkStation.
Creating the variable-elements document
You can create the variable-elements document with a word processing application that
provides a mail merge function, a database application, or a page layout application
that supports scripting. In all cases, information is taken from a list or database and
merged into an existing document that is set up to accept the information. Each
application has different controls for this function; see the application documentation
for detailed instructions. Before the variable elements can be added to the masterelements document, they must be formatted to conform to the layout of the masterelements document. This is done by creating a document with the correct formatting
and then adding the variable information in the appropriate places.
Variable element
Variable-elements document
4
4-4
Special Features
When you have created the variable-elements document, print it to the E-810 and
specify that it should be combined with the corresponding FreeForm Master.
Combining the FreeForm Master with the variable-elements
document
When you print the variable-elements document to the E-810, you specify the
FreeForm Master created from your master-elements document with the Use Master
print option. The E-810 combines the raster data of the variable-elements document
with the preRIPped FreeForm Master, creating a new raster data file. The merged raster
file can be soft-proofed (before it is printed) in the thumbnail windows of Command
WorkStation, Fiery Spooler, or Fiery WebSpooler.
Combined document
4
4-5
Printing variable data documents with FreeForm
Using FreeForm
This section provides some suggestions to help you print variable data jobs correctly.
• Consult your administrator or operator on how FreeForm Master numbers are
assigned at your site.
If FreeForm printing is used by a large number of users at your site, FreeForm
Master numbers, or ranges of numbers, may be assigned to specific users or groups.
Users can select only numbers 1 through 15 as print option settings. The operator
can override FreeForm Master numbers and reassign them to numbers greater
than 15 from Command WorkStation. You may want the operator to assign all
FreeForm Master numbers to avoid potential conflicts in the use of FreeForm Master
numbers.
• Use the Job Notes and Instructions fields to communicate instructions about your
job to the operator.
If you want to create or use a FreeForm Master number greater than 15, these fields
can be used to tell the operator to override the appropriate job setting (Create
Master or Use Master) and RIP the job from Command WorkStation.
• Give your jobs unique and descriptive names.
Both you and the operator need to be able to easily identify your jobs if there are
many jobs in the queues, the FreeForm Master numbers are reassigned, or you want
to refer to another job in the Job Notes or Instructions fields.
• See Appendix A for restrictions on print option settings when using FreeForm.
The following settings for the master-elements document and variable-elements
document must match:
Color Mode
Combine Separations
Duplex
Page Size
Page Order
4
4-6
Special Features
The following settings for the variable-elements document override the
corresponding settings in the master-elements document:
Media Type
Paper Source
Save Fast Reprint
Slip Sheet
Sorter Mode
Stapler Mode
TO
PRINT VARIABLE DATA DOCUMENTS
1.
Create a master-elements document.
The master-elements document can comprise multiple pages.
The example below shows one page of a master-elements document for a tri-fold
brochure that was created with a page layout application.
4
4-7
2.
Printing variable data documents with FreeForm
Print the master-elements document to the E-810 with the Create Master print option
set to one of the FreeForm Master numbers (1 through 15).
Or, set the Create Master option to None and instruct the operator to use overrides to
create a FreeForm Master from this job.
3.
Create the variable-elements document.
You can create the variable-elements document using a different file, a different
application, or a different computer platform than was used to create the masterelements document, but some print options must be the same (see page 4-5 for
details).
The example below shows one page of the variable-elements document for the tri-fold
brochure. The data in this document can be as simple as a name and address, or as
complex as multiple, full-color graphics and photographic elements.
4
4-8
4.
Special Features
Print the variable-elements document to the E-810 with the Use Master print option
set to the appropriate FreeForm Master number.
The FreeForm Master number may be one you set yourself when you sent the masterelements document, or it may be one that was assigned by the operator.
FreeForm Master numbers can be overridden from Command WorkStation,
Fiery Spooler, or Fiery WebSpooler. Check with the operator to make sure that the
FreeForm Master number you specify is the correct one for the FreeForm Master you
want to use.
If you want to check the job before it prints, instruct the operator to RIP and Hold the
job so that you can preview it from Command WorkStation, Fiery Spooler, or
Fiery WebSpooler.
The example below shows the FreeForm Master and variable-elements document
combined. The variable data is simply overlaid on the master-elements document.
4
4-9
Printing simulations
Printing simulations
You can use the E-810 to proof offset press jobs or to simulate the output of other
print devices by specifying settings for two print options: CMYK Simulation Profile
and CMYK Simulation Method. These options affect CMYK data only.
The E-810 provides CMYK Simulation targets for the major international press
standards: SWOP, DIC, and Euroscale. You can also create, save, and import custom
simulation profiles using ColorWise Pro Tools (see the Color Guide).
• When printing simulations on the E-810, choose the CMYK Simulation Profile
corresponding to the press standard for which the CMYK data was prepared, or
choose a custom simulation profile.
• To simulate the color of a copy made from the copier glass, choose the Match Copy
setting.
Printing duplex pages
You can use the E-810 to print double-sided (duplex) pages.
TO
PRINT DUPLEX PAGES
1.
When specifying print options, set Duplex to the desired setting.
Top Binding prints both sides using the same top edge; Side Binding prints the back
side upside-down. See “Duplex” on page A-14 for more information.
2.
Set other options, and then click OK.
3.
Click Print.
4
4-10
Special Features
Scanning from the copier
With Fiery Scan, you can scan an image from the copier glass directly into Photoshop
on your computer. You can also load pages into the copier’s document feeder for
scanning. In this case, one page can be fed and scanned at a time during pre-scan.
Pre-scanning and scanning are required for each page.
The following requirements and constraints apply:
• Fiery Scan must be installed as described in Getting Started.
• Fiery Scan cannot be used over the parallel port; it requires a network connection.
For information on supported networking protocols, see Getting Started.
• Photoshop 5.0’s RGB Setup should be using the EFIRGB ICC (Mac OS) or
EFIRGB.icm (Windows) settings. See Getting Started for information on loading
this file.
• The E-810 is not able to scan and copy documents at the same time. Do not run
Fiery Scan in conjunction with the E-810 during copying.
4
4-11
Scanning from the copier
Fiery Scan color conversion settings
Fiery Scan offers two color conversion choices for scanned data:
• Calibrated RGB creates an RGB scan optimized for printing with E-810 Rendering
Styles (CRDs) or ICC profiles, as well as for viewing on the monitor.
• Match Copy converts raw scan data to CMYK data with reference to the CRD or
ICC profiles.
Using Fiery Scan
With Fiery Scan, you first create a prescan of the image; then you can select part, or all,
of the prescan for final scanning.
N OTE : The Windows and Mac OS versions of Fiery Scan are fundamentally the
same; differences are noted in this section. Where both windows or dialog boxes
are illustrated, the Windows version comes first, followed by the Mac OS version.
4
4-12
TO
Special Features
PRESCAN A DOCUMENT
1.
Launch Photoshop.
2.
Place the original you want to scan on the copier glass, or, if you have multiple
originals, place them in the document feeder.
3.
In Photoshop’s File menu, point to Import and click Select TWAIN_32 Source
(Windows) or Fiery Twain Select (Mac OS).
4.
Select Fiery Scan in the window that appears and click Select (Windows) or OK
(Mac OS).
5.
In the File menu, point to Import and click TWAIN_32 (Windows) or Fiery Twain
Acquire (Mac OS).
6.
Select the E-810 in the Chooser window and click OK (Windows) or Connect (Mac OS).
If the E-810 does not appear in the Windows Chooser list, you must configure the
Chooser list to communicate with the E-810. For instructions, see Getting Started.
7.
Select the appropriate settings in the Fiery Scan dialog box.
4
4-13
Scanning from the copier
Prescan size—Choose the paper size of the original from the pop-up menu.
Resolution—Specify a value for the resolution. Changing the resolution also changes
the image size. The maximum resolution supported by the E-810 appears in the dialog
box.
Scan Mode (Full Color, Grayscale, or Black & White)—Specify the type of scan you
want.
Brightness—Use the slider, or enter a number from -100 to 100 in the text box, to
lighten or darken the image. This option is only available if Full Color or Grayscale is
selected.
4
4-14
8.
Special Features
Click Prescan.
The progress bar displays how much of the image has been processed.
The prescan image appears on the left side of the dialog box.
If you are using the document feeder, the E-810 advances and scans one page for each
Prescan request.
4
4-15
Scanning from the copier
In the Selection area, you can specify:
Units (inches, centimeters, picas, points, ciceros, or pixels)—Specify the ruler units
that appear around the preview image.
Width and Height—Enter the width and height of the area to scan; or, select an area of
the page with the selection marquee. If you use the marquee to select the scan area, the
dimensions appear in these text boxes. If you do not specify a scan area, the default is
to acquire the entire scan.
To select a portion of the image using the marquee, you can move the selection
marquee around by positioning the Hand tool inside the marquee and dragging the
marquee to a new location. You can change the size of the frame by clicking and
dragging one of the handles on the corners of the selection frame. If you want to
deselect the area you have selected, double-click anywhere.
The E-810 scans at a maximum resolution that is dependent on the size of the selected
area. When you select an area to be scanned, Fiery Scan displays the maximum
resolution possible for that area. You can enter a dpi value which is less than the
maximum resolution.
9.
Click Options to display the Fiery Options dialog box (Windows) or Scan Options
dialog box (Mac OS).
4
4-16
Special Features
Original—Select the resampling interpolation method to use. In general, you should
choose Photograph if you are scanning a continuous tone photographic image and
Offset Print or Copy if you are scanning a printed document. The Offset Print or Copy
mode takes slightly more time but reduces moiré patterns in scans.
Color Conversion—Select the color conversion to use: Calibrated RGB or Match Copy.
Use Calibrated RGB if you will print the image using the E-810 Rendering Style
(CRD). Use Match Copy to match the colors in a copy made by the copier as closely as
possible, assuming that you are going to print the image to the same copier and you do
not want to use a Rendering Style. Also see “Fiery Scan color conversion settings” on
page 4-11.
10.
Select the appropriate settings and click OK.
11.
Click Scan in the main window to acquire the scan.
The progress bar displays how much of the image has been processed. You can click Esc
(Windows) or Command-. (Mac OS) to cancel acquiring the scan.
When the scan is acquired, the scanned image is displayed in Photoshop.
Scan to HDD
With Fiery Scan’s Scan to HDD feature, you can scan an image with the Control Panel
of the E-810 from the copier glass (Platen) or Automatic Document Feeder (ADF)
into the Fiery’s memory. You can then open the image with Fiery WebScan.
Additionally, you can scan a job directly to the Hold Queue so that you can use the
many features of Command WorkStation’s DocBuilder™ Pro option. For more
information on DocBuilder Pro, see the Job Management Guide.
N OTE : DocBuilder Pro is an option that must be purchased separately.
The following steps describe scanning to the HDD using the E-810 Control Panel. For
information on how to use the Control Panel menu, see Chapter 3 of the Configuration
Guide.
N OTE : Images scanned lengthwise appear rotated 90 degrees in Command
WorkStation’s Thumbnail A window, and will be printed in landscape (lengthwise)
orientation.
4
4-17
T O S CAN
Scan to HDD
A JOB TO THE
HDD
WITH THE
E-810 C ONTROL P ANEL
1.
Place the original face down on the copier glass or face up in the ADF.
2.
Make sure the information screen on the Control Panel reads Idle.
If Printing or RIPping appears, the E-810 is processing, and you must wait until the
system finishes and reaches the Idle state.
3.
Press the Menu button on the Control Panel to go to the Functions menu.
4.
Scroll with the down arrow and press the line selection button next to Scan Job.
5.
Press the line selection button next to Source.
6.
Choose your Document Source.
Select ADF if you are scanning from the Automatic Document Feeder or choose
Platen if you are scanning from the copier’s glass.
N OTE : If ADF is selected and no paper is detected, the copier will scan from the glass.
7.
Choose the Original Size of your scan job.
Select from A3, A4, Letter, and Tabloid.
8.
Press the line selection button next to Image Options.
9.
Specify your Color Mode.
Choose either Color or Grayscale.
10.
Specify the Resolution of your scan job.
Choose 72, 100, 150, 200, 300, 400, 500, or 600.
11.
Press the line selection button next to Destination.
12.
If you want to send your job to the Hold Queue, choose Send to DocBuilder.
You are prompted if you want to send your scan to the Hold Queue. Select Yes.
The file is saved as a PDF in the Hold Queue.
4
4-18
Special Features
If you want to send your scan to a specified mailbox, select Send to Mailbox.
Specify a mailbox number from 0000-9999.
N OTE : If you do not choose a mailbox number, the default is 0000. If you reboot or
restart the E-810, mailbox numbers you have assigned are reset to the default 0000.
13.
Specify the File Format.
Choose PDF, TIFF, or JPEG.
N OTE : Selecting a particular file format does not affect the output. Multiple JPEG
images in a single file are not supported.
14.
Press the line selection button next to Exit Destination.
15.
Press the line selection button next to Start Scan.
16.
Specify a name for your job.
The default name provided, MMDDHHMM, contains 8 characters. Up to 20
characters are permitted in job names.
The job is scanned and the file is sent to the Fiery hard disk drive. To retrieve the file
with WebScan, see “Accessing scanned jobs with WebScan” on page 6-4. For
information on how to retrieve jobs sent to the Hold Queue, see the Job Management
Guide. To manage scan jobs in HDD, refer to the Configuration Guide.
4
4-19
T O D ELETE
1.
A
Scan to HDD
D ESTINATION
Make sure the information screen on the Control Panel reads Idle.
If Printing or RIPping appears, the E-810 is processing, and you must wait until the
system finishes and reaches the Idle state.
2.
Press the Menu button on the Control Panel to go to the Functions menu.
3.
Scroll with the down arrow and press the line selection button next to Scan Job.
4.
Choose Destination.
5.
Choose Delete Destination.
6.
Choose either Delete DocBuilder or Delete Mailbox.
7.
Select Yes to confirm the deletion.
5
5-1
Chapter 5:
Downloading
Files and Fonts
Using Fiery Downloader
Fiery Downloader allows you to send PostScript (PS), Encapsulated PostScript (EPS),
and Portable Document Format (PDF) files directly to the E-810 without using the
application they were created in. It also enables you to manage printer fonts on the
E-810.
You can use Fiery Downloader from a remote workstation as well as from Command
WorkStation. Fiery Downloader requires a network connection. For information on
installing and configuring Fiery Downloader and on supported networking protocols,
see Getting Started.
N OTE : The Windows and Mac OS versions of Fiery Downloader are fundamentally the
same; differences are noted in this section. Where both windows or dialog boxes are
illustrated, the Windows version comes first, followed by the Mac OS version.
You can also use Fiery WebDownloader to download a PostScript, EPS, or PDF file.
See “Downloading files with Fiery WebDownloader” on page 6-3.
Using Fiery Downloader
You can use Fiery Downloader to:
• Print PostScript, EPS, and PDF files to the E-810.
• Check the status of the E-810.
• Manage the printer fonts stored on the E-810 hard disk (this feature requires that
the Direct connection be published on the E-810).
N OTE : Fiery Downloader is designed specifically for the E-810; you cannot use it with
any other printer. You can use standard LaserWriter downloaders, such as the Adobe
Font Downloader, with the E-810.
5
5-2
TO
Downloading Files and Fonts
VIEW INFORMATION WITH
F IERY D OWNLOADER
1.
Double-click the Fiery Downloader icon or choose Fiery Downloader from the
Start>Programs menu.
2.
Select the E-810 in the Chooser window and click OK (Windows) or Connect (Mac OS).
The Fiery Downloader Status window appears and you see the Fiery Downloader
Toolbar, menus, and status bar at the bottom of the screen.
Displays server status, user, and
document name of the job
currently printing
Displays server status, user, and
document name of the job
currently processing
Dynamically displays the progress
of the job
Displays the amount of available
disk space
5
5-3
Using Fiery Downloader
Buttons for some menu functions appear in the Toolbar at the top of the window.
Open
Click to connect to a different E-810.
Download
Click to download a file or font to the E-810.
Status
If you are viewing the font list, click to display
the status window for the current E-810.
Font list
If you are viewing the status window, click to
display a list of printer fonts on the E-810
hard disk.
About Fiery
Downloader
(Windows only)
Click to view version information about Fiery
Downloader.
You can click the font list button or choose Font List from the File menu to view font
information in the window.
3.
To select a different E-810, choose Open from the File menu or click the Open button.
4.
Select the E-810 in the dialog box that appears, and click OK (Windows) or
Connect (Mac OS).
5.
To close the status window, choose Close from the File menu; to quit Fiery Downloader,
choose Exit (Windows) or Quit (Mac OS) from the File menu.
5
5-4
Downloading Files and Fonts
Printing with Fiery Downloader
Printing files with Fiery Downloader is fast—generally faster than printing from
within applications. If you regularly print large files, be sure to try printing with
Fiery Downloader.
TO
DOWNLOAD A FILE OR FONT WITH
1.
F IERY D OWNLOADER
Use your application to generate a file.
You can save a PostScript or PDF file by selecting the appropriate option in the
application’s Print dialog box. With some applications, you can also save EPSfiles.
If you experience problems printing EPS files with Fiery Downloader, you can print
the file directly from the application in which you created it.
2.
Launch Fiery Downloader.
3.
Choose Download from the File menu, or click the Download button.
5
5-5
4.
Using Fiery Downloader
Choose the file type to display from the Files of type (Windows) or Show (Mac OS)
menu.
All Known Formats lists all files in formats supported by Fiery Downloader.
You can download files and fonts in the same batch. If the fonts are used by files in the
same batch, the fonts should be downloaded first.
5.
Choose the Connection Type (Windows) or Queue (Mac OS) to which you will download
the files.
The options available to you in this menu depend on the setup at your site. The
potential selections are Print Queue (Windows) or Print (Mac OS), Hold Queue
(Windows) or Hold (Mac OS), and Direct Connection (Windows) or Direct
(Mac OS). If your administrator has not enabled one or more of these connections,
you cannot select it.
PDF files cannot be printed with the Direct connection. If you choose the Direct
connection, the job is spooled to the Print queue and then printed. If the Print queue
is not enabled, the job is spooled to the Hold queue and must be released for printing
by the operator.
N OTE : To download fonts, you must use the Direct connection (make sure that the
Direct connection is published on the E-810). If you do not have access to the Direct
connection, you must embed any special fonts used by the file in the file when you
generate it.
5
5-6
6.
Downloading Files and Fonts
Select the filename and click Add File(s) (Windows) or Add (Mac OS).
The File name field (Windows) displays the name of the selected file before you
click Add.
You can navigate to different drives and directories to select files to download. Click
Add All (Mac OS) to add all files in a folder.
To select multiple sequential files (Windows), select the first file and then Shift-click
the last file. Control-click to select multiple non-sequential files.
If you change your mind about a file, select the filename in the Files to Download list
and click Remove File(s) (Windows) or Remove (Mac OS).
Click Remove All (Mac OS) to remove all files from the Files to Download list.
7.
To change the attributes of a file to be downloaded, select it and click Options.
PostScript Options dialog box (Windows)
PDF Options dialog box (Windows)
PostScript Options dialog box (Mac OS)
PDF Options dialog box (Mac OS)
5
5-7
8.
Using Fiery Downloader
Specify the following information in the dialog box, and then click OK.
The options you set apply only to the selected file. You can set different options, or
leave the default settings, for each file.
Copies—Specify the number of copies.
Brightness (PostScript and EPS files only)—Change the Brightness setting if a file
appears to be too dark or too light. Choose 85% for a substantially lighter image,
115% for a substantially darker image, or one of the options in between.
N OTE : Some applications, including Adobe Photoshop, provide transfer functions
that let you specify density settings for an image. If the file you are printing includes
transfer functions, the Fiery Downloader Brightness option has no effect. For more
information on using transfer functions, see the documentation for your application.
‘showpage’ after EPS files (Windows) or ‘showpage’ (Mac OS) (PostScript and EPS
files only)—In most cases, you do not need to use this option. Select the ‘showpage’
option only if an EPS file fails to print without it. This option adds a ‘showpage’
PostScript language command at the end of the print job. Some applications omit this
necessary PostScript language command when they generate EPS files. Select this
option when printing EPS files generated by these applications. If you select this
option unnecessarily, extra blank pages may print.
If you experience problems printing EPS files with Fiery Downloader, you can print
the file directly from the application in which you created it.
Page range (PDF files only)—Specify the page range you want to print.
9.
10.
Click Download File(s) (Windows) or Download (Mac OS).
To cancel downloading, press Escape (Windows) or Command-. (Mac OS).
5
5-8
Downloading Files and Fonts
Downloading and managing printer fonts
The E-810 includes 136 PostScript fonts; for a complete list, see Appendix B. In
addition, two Adobe Multiple Master fonts are included and are used for font
substitution in PDF files.
Before downloading a file that uses fonts not resident on the E-810, you must
download the fonts (unless the fonts are embedded in the file). To see what fonts are
resident on the E-810, choose Font List from the File menu or click the Font List
button (see page 5-10).
You can download fonts only via the Direct connection. If you do not have access to
the Direct connection, you must embed any special fonts used by the file in the file
when you generate it.
The screen fonts that correspond to the printer fonts installed on the E-810 are not
automatically installed on your Windows system.
N OTE : Fiery Downloader cannot download Truetype fonts. If you use TrueType fonts
in Windows, convert them to Adobe Type 1 before printing. To convert to Adobe Type
1 fonts for Windows 9x/Me, click the Fonts tab in the Adobe PS printer driver and
setup the Font Substitution Table. For Windows NT 4.0, click the Postscript tab of the
E-810 Document Defaults dialog box and select TrueType Font Setting>Download as
Softfont.
Printer fonts and Mac OS screen fonts
Like all PostScript fonts, the fonts included with the E-810 come in two forms: printer
fonts and screen fonts. The printer fonts are installed permanently on the E-810 hard
disk. The screen fonts, which are included with the E-810 user software, should be
installed on your Mac OS computer. If you are using these fonts in documents you
print on a LaserWriter, they are probably already installed. If not, you will need to
install them yourself. For instructions, see Getting Started.
5
5-9
Using Fiery Downloader
Occasionally, you may want to use Adobe Type 1 (Windows) or PostScript (Mac OS)
fonts that are not included with the E-810. If so, you will need to install both the
screen fonts and the printer fonts on your computer. To do this, follow the instructions
from the font manufacturer.
Downloading printer fonts to the E-810
In general, each time you print from within a Mac OS application, the application
automatically downloads any fonts used in your document that are not already
installed on the E-810, as long as the printer fonts are installed in your System Folder.
These fonts remain in the E-810 only until your document has printed. If you print
the same document again, your application must download the fonts again.
If you regularly use one or more fonts from Windows or Mac OS applications that are
not already installed in the E-810, you can save time by downloading them to the
E-810 hard disk with Fiery Downloader. Fonts you download to the E-810 hard disk
remain installed until you remove them using Fiery Downloader, no matter how many
times the E-810 is turned off and on. You’ll probably want to download fonts you use
on a regular basis to the E-810 hard disk.
Before you download PostScript, or EPS files with Fiery Downloader, make sure that
all fonts included in your file are installed on the E-810 or embedded in your file;
otherwise the text in these fonts will not print correctly and may not print at all. For
PDF files, font substitution occurs automatically for fonts not installed on the E-810.
Two multiple master fonts (a serif font and a sans serif font) stored on the E-810 are
used exclusively for substitution with PDF files.
5
5-10
TO
Downloading Files and Fonts
VIEW FONT INFORMATION , UPDATE , PRINT , AND DELETE FONTS
•
Choose Font List from the File menu, or click the Font List button.
N OTE : If the Direct connection is not published, you cannot view the font list or
perform any of the tasks described in this procedure. See the Configuration Guide or
talk to your administrator for information on how to publish the Direct connection.
The Font List window appears with Update, Print, and Delete buttons in the title bar.
The printer fonts included with the E-810 (resident fonts) are locked. Locked fonts
appear with a lock icon next to the name and cannot be deleted.
Click to print the font list to the Print queue
Click to update the information
in the font list window
Lock icon
Select a font and click to delete it
6
6-1
Fiery WebTools
E-810 user software includes a variety of tools that allow you to track and manage
print jobs. Access to some tools is controlled by your site administrator, but other tools
are available to all users.
Chapter 6:
Tracking
and Managing
Print Jobs
• Command WorkStation, Fiery WebSpooler, and Fiery Spooler all provide the
capability to view and control the flow of print jobs to the E-810. If the
administrator has set Administrator and Operator passwords in Setup, you need one
of these passwords to perform most Command WorkStation, Fiery WebSpooler, and
Fiery Spooler functions. For information on these tools and the access privileges
needed to use them, see the Job Management Guide.
• The Status, WebLink, WebScan, and Fiery WebDownloader WebTools do not
require any special access privileges. As long as the administrator has enabled Web
Services in Setup and provided users with the IP address of the E-810, anyone can
use these WebTools.
• Fiery Link, a utility designed to give you up-to-date status on print jobs and
connected E-810 servers, is also available to all users.
Fiery WebTools
Fiery WebTools reside on the E-810’s hard disk drive but can be accessed over the
network from a variety of platforms. The E-810 has a home page that lets you view
server functions and manipulate jobs remotely. This chapter describes only the Status,
WebLink, WebScan, and Fiery WebDownloader WebTools. For information on
Fiery WebSpooler, see the Job Management Guide. For information on the Installer
WebTool, see Getting Started.
TO
ACCESS
F IERY W EB T OOLS
1.
Start up your Internet browser application.
See Getting Started for information about supported platforms and browsers.
2.
Enter the IP address or the DNS name of the E-810.
Check with the operator or administrator for this information.
6
6-2
3.
Tracking and Managing Print Jobs
If a Log In dialog box appears, select Guest and click OK.
The Log In dialog box appears only if the administrator has set a password. Guest
access is sufficient to use the Status, WebLink, WebScan, and Fiery WebDownloader
WebTools as described in this chapter.
4.
When the E-810 home page appears, click to select one of the Fiery WebTools.
Move the cursor over the buttons to display information about the selections.
Checking E-810 status with the Status WebTool
You can use the Status WebTool to see what jobs are currently processing and printing.
To access the Status WebTool, point your browser to the E-810 home page and click
the Status button. The current RIP Status and Printer Status appear in the window.
To open a new browser window for the Status display, click Float. You can then close
other browser windows and leave the Status window open to continue checking the
status of the E-810. As long as you keep the Status window open, it is dynamically
updated.
6
6-3
Fiery WebTools
To obtain more information about the status of jobs, use Fiery WebSpooler, Fiery
Spooler, or Command WorkStation, as described in the Job Management Guide. You
can also use Fiery Link, as described on page 6-6.
Accessing information with WebLink
The WebLink button on the E-810 home page provides a link to another web page
or to multiple web pages, provided you have a valid Internet connection. The
administrator at your site can set the WebLink destination. Check your E-810
WebLink for any information available there.
Downloading files with Fiery WebDownloader
Using Fiery WebDownloader, you can send PostScript, Encapsulated PostScript (EPS),
and Portable Document Format (PDF) files to the printer without first opening the file
in an application.
TO
DOWNLOAD A FILE WITH
F IERY W EB D OWNLOADER
1.
Click the WebDownloader WebTool.
2.
Select the destination.
A file can be downloaded to the Direct, Print, or Hold queues. Files sent to the Print
queue are spooled in the printer’s memory. Files sent to the Hold queue remain in
memory until they are moved to the Print queue or are deleted.
3.
Click Browse to search for the file, then select the file and click Open.
4.
Click Download.
6
6-4
Tracking and Managing Print Jobs
Accessing scanned jobs with WebScan
Once you have scanned a document to the Fiery hard drive with Fiery Scan’s Scan to
HDD feature, you can then access the documents with the WebScan WebTool.
For information on how to scan a job to the E-810 hard disk with the Scan to HDD
feature, see page 4-16.
U PLOADING
1.
SCANNED IMAGES WITH THE
W EB S CAN W EBTOOL
Click the WebScan WebTool.
The WebScan window appears.
2.
In the Mailbox field, enter the mailbox number.
N OTE : The mailbox number is the directory that you specified with the Scan to HDD
feature. For more information, see page 4-16.
3.
Click Refresh.
All documents scanned to that mailbox are displayed.
WebScan lists the following information about each scanned job: File name, Date,
Pages, File size, Page Size, Resolution X, and Resolution Y.
6
6-5
4.
Fiery WebTools
Choose the file that you want to open by clicking it.
The default name provided, MMDDHHMM, contains 8 characters. Up to 20
characters are permitted in job names.
5.
Choose a file format from the File Format menu.
Select from PDF, TIFF, or JPEG.
6.
Click Save As.
N OTE : Depending on the browser you are using, you may be asked to choose if you
would like to open the file from its current location or save the file to disk.
The scanned image is displayed in your web browser.
N OTE : You must have Adobe Acrobat installed to view the scanned PDF.
7.
To print this job, choose print from the file menu.
To delete a scanned image from the E-810 hard drive, select the file that you want to
delete from the WebScan window and click Delete.
6
6-6
Tracking and Managing Print Jobs
Fiery Link
Fiery Link is designed to provide you with up-to-date status on print jobs and
connected servers. It tracks the status of your print jobs and alerts you to errors. For
example, you can see how many print jobs are ahead of your job in the queue. Fiery
Link also provides information about paper and toner levels. For example, you can
check paper size and levels in all trays before sending a job.
N OTE : The information in the Fiery Link window is updated every 20-30 seconds.
Double-click the Fiery Link window to see updated information immediately.
For information on installing and configuring Fiery Link and on supported
networking protocols, see Getting Started.
N OTE : The Windows and Mac OS versions of Fiery Link are fundamentally the
same; differences are noted in this section. Where both windows or dialog boxes are
illustrated, the Windows version comes first, followed by the Mac OS version.
TO
BEGIN USING
1.
F IERY L INK
Double-click the Fiery Link icon, or choose Fiery Link from the Start>Programs menu.
The main Fiery Link window appears:
Click to minimize Fiery Link to
the Tool Tray on the Taskbar
(Windows only)
Click to scroll through the list
of Fiery Link tools
Displays the selected
Fiery Link tool
Click to scroll through the list
of servers and print jobs
Displays the selected
server or print job
Click to set preferences
Click to edit My Fiery List
6
6-7
Fiery Link
N OTE : To exit Fiery Link, press the Alt and F4 keys (Windows) or the Command and
Q keys (Mac OS).
2.
Click the currently selected server or print job to display the list of all connected
servers or print jobs.
3.
From this list, select the E-810 or the job about which you want information.
4.
Click the currently selected Fiery Link tool to display a list of all the tools (as shown
below), and select a tool.
6
6-8
Tracking and Managing Print Jobs
Fiery Link tools
Fiery Link includes the following tools that can be used to monitor a print job or a
connected E-810. Clicking the up and down arrows scrolls through the Tool List and
opens each tool in turn in the Fiery Link window.
Icon
Tool
If a print job is selected
If a server is selected
Status
Shows the job status and number of pages
processed.
Shows the status of the server, including any
error messages. You can make an error
message disappear by clicking the Fiery
Link window.
Queue Position
Shows the number of jobs ahead of the
selected job in the queue.
Shows the total number of active jobs
queued to print on the server.
File Info
Displays the file name, when it was sent to
the server, the target server, the number of
pages, and number of copies.
Displays the server name and connected
device, total number of queued jobs, and
the number of those jobs sent by the user.
Input Trays
(see below)
Shows paper levels in all trays of the output
device to which the job was printed.
Shows paper levels in all trays of the output
device to which the server is connected.
Toner
(see below)
Shows the toner levels of the output device
to which the job was printed.
Shows the toner levels of the output device
to which the server is connected.
Fiery Info
Shows the model name, amount of
memory, processor, and software version of
the target server.
Shows the model name, amount of
memory, processor, and software version of
the server.
Support
Lists the contact names and information for
the target server and the output device.
Lists the contact names and information for
the server and the output device.
Input Trays
Icons represent the paper level in each tray. A red icon indicates the paper tray is empty,
a yellow icon indicates the paper tray is less than half full, and a green icon indicates
the paper tray is more than half full. Up and down arrows allow you to scroll through
the available paper trays.
6
6-9
Fiery Link
Toner
You can see how much toner your copier has by clicking the Toner tool. A warning is
displayed if the copier is getting low on toner.
Preferences
Click the preferences checkbox in the main window to view the Preferences dialog box.
Setting the My Fiery List Options preferences
You can track print jobs, monitor E-810 servers, or both. If you select Track my print
jobs, then click the currently selected print job, the Active Job List window is
displayed.
6
6-10
Tracking and Managing Print Jobs
If you select Monitor my Fierys, then click the currently selected E-810 server, the
Device List is displayed.
If you select Both, then click the currently selected print job or E-810 server, both the
Active Job List and Device List are displayed.
Setting the General and Alert option preferences
You can set the following options for tracking print jobs, monitoring servers, or both:
• Show/hide tool tips
• Show/hide animations
• Enable/disable audible alerts
• Enable/disable stack alerts
• Enable/disable processing error notification
• Enable/disable printing error notification
• Enable/disable file printed notification
• Enable/disable consumable warnings notification
6
6-11
Fiery Link
My Fiery List
Click the Fiery checkbox
in the main window to access the My Fiery List. You
can use My Fiery List to specify the E-810 servers you want to monitor using Fiery
Link. For information on setting up and changing the My Fiery List, see Getting
Started.
Windows taskbar menu
You can access a menu from the Windows taskbar status area to get information about
Fiery Link, set some Fiery Link options, or exit the application.
TO
ACCESS AND USE THE TASKBAR MENU
1.
Right-click the Fiery Link icon
in the Windows taskbar status area.
2.
Choose one of the options from the pop-up menu.
Options with checkmarks are enabled.
3.
Choose About Fiery Link for version information.
4.
Choose Always on Top to enable or disable the option.
If this option is enabled, the Fiery Link window always appears on top of other open
windows. If this option is disabled, the Fiery Link window may be hidden by other
open windows.
N OTE : Fiery Link’s default setting is to have Always on Top enabled.
5.
Choose Dock Fiery Link to enable or disable the option.
If this option is enabled, the Fiery Link window is automatically repositioned to either
the far left or the far right side of your screen. If this option is disabled, you can
position the Fiery Link window anywhere on the screen.
6.
Choose Exit to exit Fiery Link.
A
A-1
Appendix A:
Print Options
Print Options
Print options give you access to all the special features of your copier and E-810.
Print options can be specified in several places—in E-810 Setup, from the printing
application, from Fiery Downloader, ColorWise Pro Tools, Command WorkStation,
Fiery WebSpooler, and Fiery Spooler. The table in this appendix briefly describes each
print option, gives its default setting, and provides information on any constraints or
requirements in effect.
Where to set print options
• During Setup
Some settings are specified during Setup by the administrator. For information on
the current default server settings, check with the administrator or the operator.
• From applications
With the Adobe PostScript printer drivers, you can specify job settings when you
print a job. See Chapters 1 and 2 for information about specifying job settings from
applications.
• From Fiery Downloader
Only a few settings—Copies, Page Range (for PDF files only), and Brightness (for
PostScript and EPS files only)—can be specified when printing jobs with Fiery
Downloader. To change options in Fiery Downloader, select a job in the Files to be
Downloaded (Windows) or Files to Download (Mac OS) list and click Options. For
more information, see Chapter 5.
• From ColorWise Pro Tools
You can set the default CMYK Simulation Profile, CMYK Simulation Method,
RGB Source Profile, RGB Separation, Output Profile, Rendering Style, Spot Color
Matching, Pure Black Text/Graphics, and Black Overprint settings. See the Color
Guide for more information on using ColorWise Pro Tools.
A
A-2
Print Options
• Overrides from Command WorkStation, Fiery WebSpooler, and Fiery Spooler
To change job settings from Command WorkStation, double-click a job to display
the Properties dialog box. To change job settings from Fiery WebSpooler and from
Fiery Spooler, double-click a job to display the Override Print Settings dialog box.
For more information, see the Job Management Guide.
Print option override hierarchy
The override hierarchy is as follows:
• A user’s printer driver settings override the E-810 Setup and ColorWise Pro Tools
settings.
• Settings made from Command WorkStation, Fiery WebSpooler, or Fiery Spooler
override the user’s printer driver settings.
Default settings
In the following table, underlined settings in the “Option and settings” column
indicate default printer driver settings (PPD defaults). In other words, if you do not
use the printer driver interface to configure a particular option, the E-810 prints the
job with the underlined setting.
For options that can be configured during Setup from the Control Panel, Command
WorkStation, or ColorWise Pro Tools choosing Printer’s default results in the E-810
printing the job with the Setup setting specified. For options that cannot be configured
during Setup, the E-810 prints the job with a pre-configured “Printer’s default” setting.
For more information, see the “Requirements, constraints, and information” column.
To find out about the current Setup defaults, print the Configuration page from
Command WorkStation or from the E-810 Control Panel.
A
A-3
Print Options
Option and settings
(Default setting is underlined)
Description
Requirements, constraints,
and information
Black Overprint
Printer’s default/Off/On
Select Off to print black text with
knockouts.
Select On to overprint black text.
The Printer’s default setting reflects the
setting specified in E-810 Setup.
For Windows, choose Expert Color as the
Color Mode to access this option.
If this option is set to On, the Combine
Separations option must be set to Off.
Setting this option to On automatically
sets the Pure Black Text/Graphics option
to On.
For more information, see page A-9 and
the Color Guide.
Brightness
85% Lightest/90% Lighter/95% Light/
100% Normal/105% Dark/
110% Darker/115% Darkest
Select 85% for a substantially lighter
image, 115% for a substantially darker
image, or use one of the settings in
between.
CMYK Simulation Profile
Printer’s default/SWOP-Coated/
DIC/Euroscale/Simulation-1/
Simulation-2/Simulation-3/
Simulation-4/Simulation-5/
Simulation-6/Simulation-7/
Simulation-8/Simulation-9/
Simulation-10/None/Match Copy
Specify the simulation goal to be used for The Printer’s default setting reflects the
the current print job.
setting specified in E-810 Setup.
For Windows, choose Expert Color as the
Color Mode to access this option.
For more information, see page A-10 and
the Color Guide.
CMYK Simulation Method
Printer’s default/Quick/Full
Select Quick to utilize one-dimensional
transfer curves to adjust density output of
individual color channels.
Select Full to utilize four-dimensional
transfer curves, which adjust for hue as
well as density of individual color
channels.
The Printer’s default setting reflects the
setting specified in E-810 Setup.
For Windows, choose Expert Color as the
Color Mode to access this option.
For more information, see the Color
Guide.
A
A-4
Print Options
Option and settings
(Default setting is underlined)
Description
Requirements, constraints,
and information
Color Mode
Printer’s default/CMYK/Grayscale
(from the Mac OS, and Windows 2000
drivers)
OR
Print Mode
Standard Color/Expert Color/Grayscale
(from the Windows 9x/Me or NT driver)
Specify the color mode for the current
print job.
Select CMYK, Standard Color, or Expert
Color for a full-color document.
Select Grayscale for a grayscale or
black-and-white document.
The Printer’s default setting reflects the
setting specified in E-810 Setup.
The options differ depending on which
driver you use.
For Windows, you must choose Expert
Color to set other color print options,
including Pure Black Text/Graphics.
Combine Separations
On/Off
When printing separations from a
desktop publishing application:
Select On to combine separations on a
single page.
Select Off to view separations as four
individual black-and-white pages each
representing one color plate.
For more information, see page A-11.
Copies
1-999
Specify the number of copies of the job to Do not enter a value greater than 999.
print.
Create Master
None/1-15
To create a FreeForm master from this
job, specify a number to assign to the
FreeForm master file.
Dithering
Letter/Photo/Auto
Select Letter if the file contains detailed
drawings and small text.
Select Photo if the file is a photograph.
Select Auto if the file is a combination of
text and photographs.
Duplex
Off/Side Binding/Top Binding
Select Off for simplex (single-sided)
printing.
Select Side Binding for duplex
(double-sided) printing with both sides
using the same top edge.
Select Top Binding for duplex printing
with the back side upside down.
Instructions
Enter instructions to the operator about
the job.
See page 4-2 for more information.
For more information, see page A-11.
If the Suspend Print command is used
during printing of a duplex job, printing
cannot be resumed—the job must be
resent.
A
A-5
Print Options
Option and settings
(Default setting is underlined)
Description
Requirements, constraints,
and information
Media Type (Paper Type)
Plain Paper/Transparency/
Thick Paper/Extra Thick Paper
Select Transparency if you will be
printing on transparencies.
For more information, see page A-12.
The Transparency setting is only
supported with the Manual Feed tray.
Slip Sheet
On/Off
Specify whether to insert a slip sheet
between copies of multiple-copy jobs.
To use this option, your Media Type
must be set to Transparency and Paper
Source must be set to Manual Feed.
Notes
Enter special information about the job.
The Notes field has a 31-character limit.
Orientation
Portrait/Landscape
Specify the orientation of the document.
Select Rotated if you want to rotate the
pages of your job 180 degrees.
(Other) Gamma
Printer’s default/1.0/1.2/1.4/1.6/
1.8/2.0/2.2/2.4/2.6/2.8/3.0
Specify a source gamma value for
printing RGB images, objects, and text.
Setting this option to Printer’s default
produces the same result as the 2.2
setting.
To enable this option, RGB Source
Profile must be set to Other.
For more information, see the
Color Guide.
(Other) Phosphors
Printer’s default/Hitachi EBU/
Hitachi-Ikegami/NTSC/
Radius Pivot/SMPTE/Trinitron
Specify a source phosphors value for
printing RGB images, objects, and text.
Setting this option to Printer’s default
produces the same result as the SMPTE
setting.
To enable this option, RGB Source
Profile must be set to Other.
For more information, see the
Color Guide.
(Other) White Point
Printer’s default/5000 K (D50)/
5500 K/6500 K (D65)/7500 K/9300 K
Specify a source white point value for
printing RGB images, objects, and text.
Setting this option to Printer’s default
produces the same result as the 5000 K
(D50) setting.
To enable this option, RGB Source
Profile must be set to Other.
For more information, see the
Color Guide.
A
A-6
Print Options
Option and settings
(Default setting is underlined)
Description
Requirements, constraints,
and information
Output Profile
Printer’s default/Output-1/Output-2/
Output-3/Output-4/Output-5/
Output-6/Output-7/Output-8/
Output-9/Output-10
Specify the output profile to be used for
the current print job.
The Printer’s default setting reflects the
setting specified in ColorWise Pro Tools.
For Windows, choose Expert Color as the
Color Mode to access this option.
See page A-13 and the Color Guide for
more information.
Page Order
Printer’s default/Forward/Reverse
Select Forward to print the pages of your The Printer’s default setting reflects the
setting specified in E-810 Setup.
job from first to last.
Select Reverse to print the pages of your
N OTE : If you set Page Order to Reverse
job from last to first.
and print a job with more than 1000
pages, or a job that is too large to be saved
to the E-810’s memory and disk (based
on currently available space), then the job
may print in sections that have to be
manually rearranged after printing.
For example, if you print a 1500-page
document in reverse order, the E-810
might divide the job into two portions,
first printing page 1000 to page 1, and
then page 1500 to page 1001.
Pager Size
Letter/A4/Legal/11x17/A3/A5/
A5 SEF/A6 SEF/Legal 13/Letter SEF/
A4 SEF/B4/B5/B5 SEF/B6 SEF/
Postcard/Double Postcard/12x18/
13x19/8.5x5.5/5.5x8.5/
Custom page 1/Custom page 2/
Custom page 3
Specify the size of the paper on which to
print the document.
Paper Source
AutoSelect/Tray 1/Tray 2/Tray 3/
Manual Feed/Manual Duplex/LCT
Specify the paper tray to use for your job. The AutoSelect setting automatically
selects the tray containing the paper size
specified for the job. See page A-13 for
more information.
If you select Manual Feed or Manual
Duplex, you must load the appropriate
paper in the Manual Feed tray and select
the correct paper size for the print job.
Otherwise a paper jam might occur.
A
A-7
Print Options
Option and settings
(Default setting is underlined)
Description
Requirements, constraints,
and information
The Printer’s default setting reflects the
setting specified in E-810 Setup.
For Windows, choose Expert Color as the
Print Mode to access this option.
This option is automatically set to On if
the Black Overprint option is set to On.
For more information, see the Color
Guide.
Pure Black Text/Graphics
Printer’s default/Off/On
Select Off to print black text and graphics
as a four color black using C, M, Y, and K
toner, and to use normal PostScript
rendering.
Select On to print black text and graphics
as a one color black, using 100% black
toner only.
Remove White PPT Background
No/Yes
Select Yes when using PowerPoint to
create variable data in conjunction with
FreeForm.
Rendering Style
Printer’s default/Photographic/
Presentation/Relative Colorimetric/
Absolute Colorimetric
Specify a default color rendering
dictionary (CRD) to be used when you
print RGB images, objects, and text.
The Printer’s default setting reflects the
setting specified in E-810 Setup.
For Windows, choose Expert Color as the
Color Mode to access this option.
For more information, see page A-13.
RGB Separation
Printer’s default/Output/Simulation
Select Output for RGB jobs which you
are printing to the final output device.
Select Simulation for RGB jobs for which
you want to simulate an output device
that is not the device to which you are
printing.
The Printer’s default setting reflects the
setting specified in E-810 Setup.
For Windows, choose Expert Color as the
Color Mode to access this option.
Specify a source color space definition for
RGB Source Profile
printing RGB images, objects, and text.
Printer’s default/EFIRGB/sRGB (PC)/
Apple Standard/Other/Source-1/
Source-2/Source-3/Source-4/Source-5/
Source-6/Source-7/Source-8/Source-9/
Source-10/None
The Printer’s default setting reflects the
setting specified in E-810 Setup.
For Windows, choose Expert Color as the
Color Mode to access this option.
See page A-14 and the Color Guide for
more information.
A
A-8
Print Options
Option and settings
(Default setting is underlined)
Description
Requirements, constraints,
and information
Rotate 180
Yes/No
Specify if you want to rotate the pages of This option is only available from
your job 180 degrees.
Mac OS, Windows NT 4.0 and
Windows 2000. For Windows 9x/Me,
use the Orientation option.
Depending on the application you are
using, your landscape job may print with
the incorrect orientation; if this occurs, or
if you select a Stapler Mode (other than
Off ) and the staple is inserted in the
wrong place, select Yes.
Save Fast Reprint
Off/On
Specify whether or not to save a job’s
raster data to disk after printing, so the
data will be available later for reprinting
(without reRIPping).
With Save Fast Reprint set to On, all
print option settings remain with the
saved raster data each time the job is
reprinted. To print the job with new print
option settings, you must remove raster
and reRIP the job.
Sorter Mode
Off/Collate/Sort/Stack
Specify how to output
multiple-page/multiple-copy jobs.
For more information, see page A-14.
Spot Color Matching
Printer’s default/Off/On
Select Off to print specified PANTONE
colors in your job using the current
CMYK Simulation and CMYK
Simulation Method.
Select On to activate the PANTONE
Lookup Table. The E-810 prints specified
PANTONE colors in your job by
matching the CMYK print blend to the
same color from the PANTONE library.
The Printer’s default setting reflects the
setting specified in E-810 Setup.
For Windows, choose Expert Color as the
Color Mode to access this option.
For more information, see the
Color Guide.
Stapler Mode
Off/Top Right/Top Left/Two Centers
Specify whether or not and how to staple
the job.
Toner Reduction
Off/On
Specify whether or not to print the
For more information, see page A-15.
current job with a maximum toner value.
A
A-9
Print Options
Option and settings
(Default setting is underlined)
Description
Requirements, constraints,
and information
Tray Alignment
Printer’s default/Enable/Disable
See the Job Management Guide for more
Specify whether or not to enable or
disable Tray Alignment. Tray Alignment information.
allows you to adjust the placement of text
and images on the page so that they are
correctly aligned on the sheet of paper or
so that both sides of a duplex sheet have
the exact same alignment.
Use Master
None/1-15
For variable data print jobs, specify a
FreeForm master number to be used for
the job.
See page 4-2 for more information.
User ID
Enter a user ID for the job.
The User ID field has an 8-character
limit.
More about print options
The following sections provide additional information about print options. See the
table above for information on the settings, requirements, and constraints in effect for
these options.
Black Overprint
When printing black text in combination with a color background or graphics, the text
can be printed in one of two ways: either as part of the color background, or on top of
the color background. Black Overprint allows you to choose a specific way to print the
black text for such a job.
Off—Prints the black text with knockouts. The E-810 first prints the color background
with the black text areas ‘knocked out’ (no color is printed in the text areas); the black
text is then printed in the knocked out area, filling in the areas not printed in color.
The result is a flatter appearance for the black text.
On—Overprint the black text. Used in combination with the Pure Black Text/Graphics
option, the E-810 first prints the full color background, then lays the black text on top
of the color background as 100% K toner. The result is a darker and glossier
appearance for the black text. Overprinting also minimizes misregistration and
‘haloing’ problems.
A
A-10
Print Options
CMYK Simulation Profile
CMYK Simulation Profile allows you to change the simulation goal for the current
print job. As the job begins processing, the simulation goal selected in CMYK
Simulation Profile is applied before printing.
N OTE : Choosing Printer’s default results in the job being printed with the simulation
goal currently set on the E-810.
SWOP-Coated—Uses the United States press standard.
DIC—Uses the Japanese press standard.
Euroscale—Uses the European press standard.
Simulation-1 (2,3,4,5...10)—Uses a custom simulation goal. Before selecting this
setting, you are required to create a new simulation goal with ColorWise Pro Tools and
link the new simulation to one of the custom simulation names, for example,
Simulation-1.
N OTE : If two-way communication is enabled, Simulation-1 through Simulation-10 do
not appear in the Windows 9x/Me or Windows NT 4.0 drivers. These drivers display
all the custom simulations saved on the E-810 by name. See Getting Started for
information on setting up two-way communication.
None—Uses no simulation goal. Select this setting when the CMYK data for your job
has already been separated for your specific printer (for example, when using the Color
Management System built into your computer to convert the CMYK data to the
printer’s color space).
Match Copy—Uses no calibration or simulation goal. Select this setting when printing
images imported with Fiery Scan (with the Color Conversion option set to
Match Copy), or when you want to bypass E-810 calibration and simulation.
For more information about simulation and calibration, see the Color Guide.
A
A-11
Print Options
Combine Separations
The Combine Separations option specifies whether to combine color separations
(created in desktop publishing applications such as QuarkXPress or Adobe PageMaker)
on a single page to simulate printing on a press from film separations. It allows you to
proof overprinting, trapping, and other four-color printing effects before having film
separations created. It also enables you to combine Desktop Color Separations (DCS)
format files to print them at full resolution instead of printing the low-resolution
master file. Selecting the appropriate color rendering dictionary (CRD) setting for the
type of image you are printing ensures optimal color output on the E-810.
Your job must have been printed as color separations or DCS format when you printed
it from your application. If you did not print the job in this manner, the Combine
Separations option has no effect.
Duplex
All duplex printing features are available only with plain paper media type.
TO
PRINT DUPLEX PAGES
1.
Choose Print in your application, and locate the Duplex print option.
The location of E-810 print options varies, depending on the printer driver you are
using.
2.
Choose one of the Duplex settings:
Side Binding—Prints the top of the image on side 1 on the same edge of the page as the
top of the image on side 2.
Top Binding—Prints the top of the image on side 1 on the opposite edge of the page
from the top of the image on side 2.
Print Options
The following table shows how the Duplex settings correspond to printed output:
Side Binding
Top Binding
1
1
2
Portrait
2
2
A
A-12
Landscape
1
2
1
Media Type
The Media Type option allows you to select the type of media for loading into the
selected tray.
Plain Paper—Standard bond paper
Transparency—Transparency sheets
Thick Paper—Heavy paper
Extra Thick Paper—Very heavy and cover paper)
N OTE : For detailed paper information, please refer to the copier’s User Manual.
A
A-13
Print Options
Output Profile
Output-1 through Output-10—Uses a custom output profile. Before selecting this
setting, you are required to download or create the output profile with ColorWise Pro
Tools, then link it with one of the custom output profile names, for example,
Output-1.
For information on output color space and color management, see the Color Guide.
Paper Source
If you choose the Auto Select setting, the copier prints from any tray containing the
paper size needed for the job. This setting also allows the copier to automatically
switch between trays, if the current tray becomes empty, while continuing to print.
Rendering Style
Use this option to select a default color rendering dictionary (CRD) to be used when
you print RGB images, objects, and text.
Photographic—Optimizes the range of colors on the E-810 to produce the best results
for photographic or bitmapped images.
Presentation—Optimizes the output of pure, saturated colors such as those used in
business presentations.
Relative Colorimetric—Provides a close match to the CMYK device being simulated,
regardless of the media being used.
Absolute Colorimetric—Provides the closest match to the CMYK device being
simulated, including rendering the paper color as the background.
A
A-14
Print Options
RGB Source Profile
This option is used to specify a source color space for RGB data.
EFIRGB—Optimal source space for printing to the E-810. This setting provides
consistent output across platforms.
sRGB (PC)—Specifies the source space of a generic Windows computer monitor.
Apple Standard—Specifies the source space of a Mac OS computer monitor.
Other—Allows you to specify a custom RGB source setting using the (Other) Gamma,
(Other) Phosphors, and (Other) White Point print options.
Source-1 through Source-10—Uses a custom source profile. Before selecting this
setting, you are required to download the source profile to the E-810 with ColorWise
Pro Tools, then link it with one of the custom source profile names, for example,
Source-1.
N OTE : If two-way communication is enabled, Source-1 through Source-10 do not
appear in the Windows 9x/Me and Windows NT 4.0 drivers. These drivers display all
the source profiles saved on the E-810 by name. See Getting Started for information on
setting up two-way communication.
For information on source color space and color management, see the Color Guide.
Sorter Mode
Sorting is supported on color copiers with a sorter/stapler unit attached.
Off—Copies of a complete job are output, uncollated, into the top tray.
Collate—Copies of a complete job are collated and output into the top tray.
Sort—Copies of a complete job are sorted and output into one of 20 bins, arranged in
page order.
N OTE : The sorter has 20 bins. If you send more than 20 sets of copies to the sorter, the
excess sets of copies (copies 21 and up) will not print. In order to print more than 20
sets of copies sets of copies to the sorter, remove the paper from the output bin and
resend the job.
Stack—Copies of a complete job are output into one of 20 bins, with all copies of the
same page grouped together in each separate bin.
A
A-15
Print Options
Toner Reduction
Color mixtures with high toner values can cause a blasting effect on the printed page.
Blasting occurs when excess amounts of toner, combined with certain types of paper
stock, results in a printed image “blasting” beyond its boundaries as defined on your
computer screen.
The Toner Reduction option minimizes this effect by reducing high toner values to a
maximum of 210%. For example, if a color image in your job calls for toner values of
C 100%, M 50%, Y 100%, and K 10% (for a total toner value of 260%), setting
Toner Reduction to On automatically adjusts those CMYK values to create the same
color with a maximum toner value of 210%. When set to Off, the E-810 prints with
the amount of toner specified.
B
B-1
Appendix B:
Font List
Font List
This appendix lists the built-in printer fonts included with your E-810.
PostScript printer fonts
Listed below are the 136 built-in PostScript printer fonts on the E-810. In addition to
the fonts listed below, two Adobe Multiple Master fonts are included and are used for
font substitution in PDF files.
N OTE : For Mac OS computers, install the corresponding screen fonts from the User
Software CD. For instructions, see Getting Started.
Adobe Type 1 fonts
The E-810 includes 126 Adobe Type 1 fonts:
• The Mac OS column lists the name as it appears on the Font menu on a Mac OS
computer. For example, in most applications, to use “Bodoni-Bold,” choose Bodoni
Bold from the Font menu.
• The Windows menu name is the name as it appears on the Font menu on a
Windows computer. The style refers to the style that must be selected in the
application to access the particular PostScript font. For example, to use
“Bodoni-Bold,” choose Bodoni from the Font menu and Bold from the Style menu.
PostScript name
AlbertusMT-Light
Mac OS menu name
Albertus MT Lt
Windows menu name, style
Albertus MT Lt
AlbertusMT
Albertus MT
Albertus MT
AlbertusMT-Italic
Albertus MT It
Albertus MT, Italic
AntiqueOlive-Roman
Antique Olive Roman
Antique Olive Roman
AntiqueOlive-Bold
Antique Olive Bold
Antique Olive Roman, Bold
AntiqueOlive-Italic
Antique Olive Italic
Antique Olive Roman, Italic
AntiqueOlive-Compact
Antique Olive Compact
Antique Olive Compact
Arial-BoldItalicMT
Arial Bold Italic
Arial, Bold Italic
Arial-BoldMT
Arial Bold
Arial, Bold
Arial-ItalicMT
Arial Italic
Arial, Italic
ArialMT
Arial
Arial
B
B-2
Font List
PostScript name
AvantGarde-Book
Mac OS menu name
Avant Garde
Windows menu name, style
AvantGarde
AvantGarde-Demi
Avant Garde Demi
AvantGarde, Bold
AvantGarde-BookOblique
Avant Garde BookOblique
AvantGarde, Italic
AvantGarde-DemiOblique
Avant Garde DemiOblique
AvantGarde, Bold Italic
Bodoni
Bodoni
Bodoni
Bodoni-Bold
Bodoni Bold
Bodoni, Bold
Bodoni-Italic
Bodoni Italic
Bodoni, Italic
Bodoni-BoldItalic
Bodoni BoldItalic
Bodoni, Bold Italic
Bodoni-Poster
Bodoni Poster
Bodoni Poster
Bodoni-PosterCompressed
Bodoni PosterCompressed
Bodoni PosterCompressed
Bookman-Light
Bookman
Bookman
Bookman-Demi
Bookman Demi
Bookman, Bold
Bookman-LightItalic
Bookman LightItalic
Bookman, Italic
Bookman-DemiItalic
Bookman DemiItalic
Bookman, Bold Italic
Carta
Carta
Carta
Clarendon-Light
Clarendon Light
Clarendon Light
Clarendon
Clarendon
Clarendon
Clarendon-Bold
Clarendon Bold
Clarendon, Bold
CooperBlack
Cooper Black
Cooper Black
CooperBlack-Italic
Cooper Black Italic
Cooper Black, Italic
Copperplate-ThirtyThreeBC
Copperplate33bc
Copperplate33bc
Copperplate-ThirtyTwoBC
Copperplate32bc
Copperplate32bc
Coronet
Coronet
Coronet
Courier
Courier
Courier
Courier-Bold
Courier Bold
Courier, Bold
Courier-Oblique
Courier Oblique
Courier, Italic
Courier-BoldOblique
Courier BoldOblique
Courier, Bold Italic
Eurostile
Eurostile
Eurostile
Eurostile-Bold
Eurostile Bold
Eurostile Bold
Eurostile-ExtendedTwo
Eurostile ExtendedTwo
Eurostile ExtendedTwo
Eurostile-BoldExtendedTwo
Eurostile BoldExtendedTwo
Eurostile ExtendedTwo, Bold
GillSans
GillSans
GillSans
GillSans-Bold
GillSans Bold
GillSans, Bold
GillSans-Italic
GillSans Italic
GillSans, Italic
B
B-3
Font List
PostScript name
GillSans-BoldItalic
Mac OS menu name
GillSans BoldItalic
Windows menu name, style
GillSans, Bold Italic
GillSans-Light
GillSans Light
GillSans Light
GillSans-LightItalic
GillSans LightItalic
GillSans Light, Italic
GillSans-Condensed
GillSans Condensed
GillSans Condensed
GillSans-BoldCondensed
GillSans BoldCondensed
GillSans Condensed, Bold
GillSans-ExtraBold
GillSans ExtraBold
GillSans ExtraBold
Goudy
Goudy
Goudy
Goudy-Bold
Goudy Bold
Goudy, Bold
Goudy-Italic
Goudy Italic
Goudy, Italic
Goudy-BoldItalic
Goudy BoldItalic
Goudy, Bold Italic
Goudy-ExtraBold
Goudy ExtraBold
Goudy ExtraBold
Helvetica
Helvetica
Helvetica
Helvetica-Bold
Helvetica Bold
Helvetica, Bold
Helvetica-Oblique
Helvetica Oblique
Helvetica, Italic
Helvetica-BoldOblique
Helvetica BoldOblique
Helvetica, Bold Italic
Helvetica-Narrow
Helvetica Narrow
Helvetica-Narrow
Helvetica-Narrow-Bold
Helvetica Narrow Bold
Helvetica-Narrow, Bold
Helvetica-Narrow-Oblique
Helvetica Narrow Oblique
Helvetica-Narrow, Italic
Helvetica-Narrow-BoldOblique
Helvetica Narrow BoldObl
Helvetica-Narrow, Bold Italic
Helvetica-Condensed
Helvetica Condensed
Helvetica Condensed
Helvetica-Condensed-Bold
Helvetica CondensedBold
Helvetica Condensed, Bold
Helvetica-Condensed-Oblique
Helvetica CondensedOblique
Helvetica Condensed, Italic
Helvetica-Condensed-BoldObl
Helvetica CondensedBoldObl
Helvetica Condensed, Bold Italic
HoeflerText-Ornaments
Hoefler Text Ornaments
Hoefler Text Ornaments
JoannaMT
Joanna MT
Joanna MT
JoannaMT-Bold
Joanna MT Bd
Joanna MT, Bold
JoannaMT-Italic
Joanna MT It
Joanna MT, Italic
JoannaMT-BoldItalic
Joanna MT Bd It
Joanna MT, Bold Italic
LetterGothic
Letter Gothic
Letter Gothic
LetterGothic-Bold
Letter Gothic Bold
Letter Gothic, Bold
LetterGothic-Slanted
Letter Gothic Slanted
Letter Gothic, Italic
LetterGothic-BoldSlanted
Letter Gothic BoldSlanted
Letter Gothic, Bold Italic
LubalinGraph-Book
Lubalin Graph
LubalinGraph
LubalinGraph-Demi
Lubalin Graph Demi
LubalinGraph, Bold
B
B-4
Font List
PostScript name
Mac OS menu name
Windows menu name, style
LubalinGraph-BookOblique
Lubalin Graph BookOblique
LubalinGraph, Italic
LubalinGraph-DemiOblique
Lubalin Graph DemiOblique
LubalinGraph, Bold Italic
Marigold
Marigold
Marigold
MonaLisa-Recut
Mona Lisa Recut
Mona Lisa Recut
NewCenturySchlbk-Roman
New Century Schlbk
NewCenturySchlbk
NewCenturySchlbk-Bold
New Century Schlbk Bold
NewCenturySchlbk, Bold
NewCenturySchlbk-Italic
New Century Schlbk Italic
NewCenturySchlbk, Italic
NewCenturySchlbk-BoldItalic
New Century Schlbk BoldIt
NewCenturySchlbk, Bold Italic
Optima
Optima
Optima
Optima-Bold
Optima Bold
Optima, Bold
Optima-Italic
Optima Italic
Optima, Italic
Optima-BoldItalic
Optima BoldItalic
Optima, Bold Italic
Oxford
Oxford
Oxford
Palatino-Roman
Palatino
Palatino
Palatino-Bold
Palatino Bold
Palatino, Bold
Palatino-Italic
Palatino Italic
Palatino, Italic
Palatino-BoldItalic
Palatino BoldItalic
Palatino, Bold Italic
StempelGaramond-Roman
StempelGaramond Roman
StempelGaramond Roman
StempelGaramond-Bold
StempelGaramond Bold
StempelGaramond Roman, Bold
StempelGaramond-Italic
StempelGaramond Italic
StempelGaramond Roman, Italic
StempelGaramond-BoldItalic
StempelGaramond BoldItalic
StempelGaramond Roman, Bold
Italic
Symbol
Symbol
Symbol
Tekton
Tekton
Tekton
Times-Roman
Times
Times
Times-Bold
Times Bold
Times, Bold
Times-Italic
Times Italic
Times, Italic
Times-BoldItalic
Times BoldItalic
Times, Bold Italic
TimesNewRomanPS-BoldMT
Times New Roman Bold
Times New Roman, Bold
TimesNewRomanPSBoldItalicMT
Times New Roman Bold Italic
Times New Roman, Bold Italic
TimesNewRomanPS-ItalicMT
Times New Roman Italic
Times New Roman, Italic
TimesNewRomanPSMT
Times New Roman
Times New Roman
Univers-Extended
Univers Extended
Univers Extended
B
B-5
Font List
PostScript name
Mac OS menu name
Windows menu name, style
Univers-BoldExt
Univers BoldExt
Univers Extended, Bold
Univers-ExtendedObl
Univers ExtendedObl
Univers Extended, Italic
Univers-BoldExtObl
Univers BoldExtObl
Univers Extended, Bold Italic
Univers-Light
Univers 45 Light
Univers 45 Light
Univers-Bold
Univers 65 Bold
Univers 45 Light, Bold
Univers-LightOblique
Univers 45 LightOblique
Univers 45 Light, Italic
Univers-BoldOblique
Univers 65 BoldOblique
Univers 45 Light, Bold Italic
Univers
Univers 55
Univers 55
Univers-Oblique
Univers 55 Oblique
Univers 55, Italic
Univers-CondensedBold
Univers 67 CondensedBold
Univers 47 CondensedLight,
Bold
Univers-CondensedBoldOblique
Univers 67 CondensedBoldObl
Univers 47 CondensedLight,
Bold Italic
Univers-Condensed
Univers 57 Condensed
Univers 57 Condensed
Univers-CondensedOblique
Univers 57 CondensedOblique
Univers 57 Condensed, Italic
ZapfChancery-MediumItalic
Zapf Chancery
ZapfChancery
ZapfDingbats
Zapf Dingbats
ZapfDingbats
TrueType fonts
The E-810 includes 10 TrueType fonts:
PostScript name
Mac OS menu name
Windows menu name, style
Apple-Chancery
Apple Chancery
Apple Chancery
Chicago
Chicago
Chicago
Geneva
Geneva
Geneva
HoeflerText-Black
Hoefler Text Black
Hoefler Text Black
HoeflerText-BlackItalic
Hoefler Text Black
Hoefler Text Black, Italic
HoeflerText-Italic
Hoefler Text
Hoefler Text, Italic
HoeflerText-Regular
Hoefler Text
Hoefler Text
Monaco
Monaco
Monaco
New York
New York
New York
Wingdings-Regular
Wingdings
Wingdings
C
C-1
Appendix C:
Troubleshooting
Troubleshooting
This appendix provides troubleshooting tips.
Maintaining optimal system performance
The E-810 does not require maintenance. Beyond the routine requirements of
servicing and maintaining the copier and replenishing consumables, there are a few
things you can do to improve the overall performance of your system:
• Schedule the printing workload by checking job ticket information before printing.
Print jobs with the same output and paper specifications together to minimize paper
changes. Also, print routine jobs while you prepare to print jobs with special
instructions or special media.
• Reduce unnecessary server connections to Command WorkStation.
If you use a second or third E-810 on an occasional basis, performance will be
improved if you log off when you are not using it.
• Avoid printing with the E-810 “Disk full” warning.
If you see this warning, delete jobs that are not likely to be needed. Avoid this
condition by deleting old jobs on a regular basis. The date associated with a job is
the original date it was sent.
C
C-2
Troubleshooting
Troubleshooting
In case of problems, and before you call for service, check the guidelines in this section.
If you are unable to resolve the problem, make a note of the error condition and
contact your authorized service/support center.
This section provides some troubleshooting guidelines should a problem arise. If you
are unable to resolve a problem after referring to this section, contact your site operator
or administrator. Also, make sure there are no applications installed on the E-810, with
the exception of theE-810 utilities from the User Software CD. Applications other
than theE-810 utilities are not supported and can cause system problems.
General printing problems
If this happens
Try this
You cannot connect to a
E-810.
•
You cannot select or view one
of the queues.
•
Have your system administrator enable the queue in Setup.
You cannot connect to the
E-810 from a Windows
computer with Command
WorkStation or Fiery utilities.
•
Make sure the connection is configured correctly.
Printing seems to take too
long.
•
Make sure the E-810 is not being calibrated from the Control Panel.
If the E-810 is being calibrated from the Control Panel, you can select it in the
Chooser, but you cannot connect to it. This ensures that only one person is calibrating
the server at any time and that print jobs do not use unexpected calibration.
For instructions, see Getting Started.
Print to a queue instead of to the Direct connection.
When you print to a queue, the job is stored on the E-810 until it can be processed and
printed; when you print to the Direct connection, the job cannot be sent to the E-810
until the previous job is finished processing, so you must wait longer to use your
computer.
C
C-3
Troubleshooting
If this happens
Try this
One or more Media Type
options are dimmed.
•
E-810 does not respond to a
Print command.
•
Select a Paper Source that supports the Media Type you are using.
For information on requirements and constraints pertaining to special papers and
transparencies, see Appendix A.
Has someone disconnected the copier by selecting Suspend Printing from the Functions
menu?
If the administrator or operator has selected Suspend Printing on the E-810 Control
Panel or Command WorkStation to interrupt printing, your print job will not resume
until someone selects Resume Printing from the Functions menu on the Control Panel
or clicks the function key in Command WorkStation.
•
Did you select the E-810 as the current copier?
Before printing, you must select the E-810 as the current printer from your Windows
computer, Mac OS computer, or UNIX workstation.
•
Make sure the copier is switched on.
Someone may have turned the copier off, or the Automatic Power-Off or Power Saver
mode function may have engaged. Even with the copier off, the E-810 appears in the
Chooser as long as the E-810 itself is turned on.
•
If you are printing over an IPX (Novell) network, verify through the PCONSOLE utility
that the job was sent to the Novell queue and that the queue is being used by the
E-810.
•
Make sure the job does not contain a PostScript error.
Check with the operator, or use Fiery WebSpooler or Fiery Spooler to check the job’s
status. In Fiery WebSpooler or Fiery Spooler, a job containing a PostScript error
appears in red.
To obtain information on the PostScript error, make sure the Print to PS Error option
is set to Yes in E-810 Setup. See the Configuration Guide for more information.
You cannot print with
QuarkXPress 3.32 using the
PSPrinter 8.5.1 driver on a
Mac OS computer.
•
Remove the file called Balloon Help from your QuarkXPress application folder and
relaunch QuarkXPress.
C
C-4
Troubleshooting
Problems with print quality
For information about printing with specific applications and optimizing color output,
see the Color Guide.
If this happens
Try this
Print settings for your job
output do not match the
settings you gave.
•
You get poor printing results.
•
Make sure you did not override the settings for the job in another place.
For information about options and overrides, see Appendix A.
Does your application require one of E-810’s printer description files?
If you print from Adobe PageMaker, make sure the E-810 PPD is installed correctly.
For information about installing this file, see Getting Started.
•
Make sure the system has been calibrated.
For instructions, see the Color Guide.
The registration or colors of
an image are not what you
expected.
•
Your printed file appears too
dark.
•
Color file prints in black and
white.
•
In the Color Matching dialog box, make sure that Color/Grayscale, or ColorSync Color
Matching or PostScript Color Matching is selected (not Black and White).
•
Make sure the Color Mode print option is set to an option other than Grayscale.
•
Make sure you selected the correct options to send separations in the application’s Print
dialog box.
•
Make sure you have the file for every layer of separation that you are printing.
•
Set the Combine Separations option to On.
Desktop Color Separations
(DCS) format images print
incorrectly.
Ask the operator to print a test page with the copier.
The problem may be with the copier. If your test page shows that the copier is working
properly, correct the problem within your application software. If the test page is
wrong, your copier may need to adjusted.
Adjust the Brightness option.
You can use the Brightness option when printing from an application or from Fiery
Downloader to lighten your image whenever you print a PostScript or Encapsulated
PostScript (EPS) file.
This combines the high-resolution files for an image and prints them. With Combine
Separations Off, the low-resolution master file will print.
QuickDraw fill patterns print
as solids.
•
Use the Adobe PostScript Printer driver (or the Apple LaserWriter 8.3 or later printer
driver).
C
C-5
Troubleshooting
Problems with Fiery Downloader
If this happens
General problems.
Try this
•
Make sure you are using the latest version.
If you are updating your E-810 to new system software, delete the previous version of
Fiery Downloader from your Windows or Mac OS computer and install the latest
version to insure full compatibility.
•
Make sure the connection is configured correctly.
For instructions, see Getting Started.
You cannot print an EPS file
using Fiery Downloader.
•
Try printing using the ‘showpage’ after EPS files (Windows) or ‘showpage’ (Mac OS)
option in the Download PostScript File dialog box.
This option adds a showpage PostScript language command at the end of the print job.
Certain applications omit this necessary command when they generate EPS files. You
need to select the Append Showpage option when printing EPS files generated by these
applications.
If you continue having difficulties printing an EPS file with Fiery Downloader, try
printing the file from the application in which it was created.
•
Make sure the EPS file was saved without a preview image header.
Preview image headers are useful when images are placed in documents with page
layout applications, but they cause problems when images are downloaded directly.
•
Make sure the job does not contain a PostScript error.
Check with the operator, or use Command WorkStation, Fiery WebSpooler, or Fiery
Spooler to check the job’s status. Jobs with a PostScript error appear with an Error icon.
You have problems
downloading a font with
Fiery Downloader.
•
An extra blank page prints
after a Fiery Downloader job.
•
Check with the administrator to make sure that the Direct connection is enabled.
The Direct connection must be used to download fonts.
Turn off the ‘showpage’ after EPS files (Windows) or ‘showpage’ (Mac OS) option.
This option adds a special PostScript command that will cause an extra blank page to
print if it is not needed.
C
C-6
Troubleshooting
Problems with Fiery Scan
If this happens
Fiery Scan main window does
not appear after launching.
Try this
•
Check to see if the TWAIN module(s) installed by Adobe Photoshop are located in the
correct folder. If not, reinstall Adobe Photoshop software.
Problems with Fiery WebTools
If this happens
General problems.
Try this
•
Clear the cache (Netscape Communicator) or history (Microsoft Internet Explorer).
Index
Numerics
2-sided printing,see Duplex option
A
Absolute Colorimetric rendering style
option A-13
Active Job List 6-9
Adobe Font Downloader, see Font
Downloader
Adobe Photoshop
scanning with 4-10
transfer functions 5-7
Adobe Type 1 fonts B-1
Always on Top 6-11
B
Black Overprint option A-3, A-9
Brightness option A-1, A-3
BSD 3-3
C
Calibrated RGB option 4-16
canceling scanning 4-16
CMYK Simulation Method option 4-9, A-3
CMYK Simulation Profile option 4-9, A-3,
A-10
Color Conversion option in Fiery Scan 4-16
Color Mode option A-4
ColorWise Pro Tools 4-9
job overrides A-1
Combine Separations option A-4, A-11
Command WorkStation
managing print jobs 6-1
overriding Printer Setup settings 1-4
using Fiery Downloader from 5-1
Control Panel, overriding printer
settings 1-18, 1-26
Create Master option 4-2
Custom Paper Sizes
defining for Mac OS 2-6
defining for Windows 2000
computers 1-27
defining for Windows computers 1-14,
1-20, 1-27
Cyan-Magenta-Yellow-Black (color model),
see CMYK
D
DCS (Desktop Color Separations) C-4
default settings, see printer default settings
Device List 6-10
DIC simulation goal 4-9, A-10
Direct connection
access xiv
downloading fonts 5-8
not in Chooser, Mac OS 2-2
required to download fonts C-5
Dock Fiery Link 6-11
Downloader, see Fiery Downloader
downloaders, LaserWriter 5-1
Duplex option 4-9, A-11
E
EFIRGB ICC file 4-10
EFIRGB.icm file 4-10
EPS (Encapsulated PostScript) files
downloading 5-1, 6-3
downloading from Mac OS 2-7
downloading from Windows 1-1, 1-30
problems downloading C-5
Euroscale simulation 4-9
Euroscale simulation goal A-10
Extra Heavy Paper option A-12
I-2
Index
F
Fiery Downloader
Brightness option 5-7
choosing a printer 5-3
Command WorkStation 5-1
Connection Type 5-5
downloading file or font 5-4 to 5-7
Download Progress bar 5-2
Hard Disk area 5-2
installing printer fonts 5-9
job overrides A-1
Mac OS 2-7
PDF files 1-1
printing from 5-4
Print Status area 5-2
problems with C-5
Queue 5-5
RIP Status area 5-2
Toolbar 5-3
using 5-1
Windows 1-30
Fiery Link 6-6
Active Job List 6-9
Always on Top 6-11
Device List 6-10
Dock Fiery Link 6-11
File Info tool 6-8
Input Trays tool 6-8
My Fiery List 6-6, 6-11
preferences 6-6, 6-9
Queue Position tool 6-8
selecting a print job 6-7
selecting a server 6-7
Status tool 6-8
Support tool 6-8
Toner tool 6-8, 6-9
Fiery Scan
problems with C-6
Fiery Spooler, overriding Printer Setup 1-4
Fiery WebTools
accessing xiv, 6-1, 6-2
home page 6-2
overview 6-3
problems with C-6
Status 6-2
WebDownloader 1-30, 2-7
WebLink 6-3
WebSpooler 1-4
File Info tool 6-8
File name entry field 5-6
File port, saving files to 1-30
Files of type menu (Windows) 5-5
Font Downloader 5-1
font list
Adobe Type 1 B-1
displaying 5-3, 5-10
PostScript B-1 to B-5
printing 5-3, 5-10
TrueType B-5
Font List button 5-3
fonts
Adobe Type 1 5-9, B-1
downloading and managing 5-1, 5-5,
5-8
installing 5-9
PostScript 5-9
printer fonts 5-8
printer fonts on server 5-10
screen fonts 5-8
substitution with PDF files 5-9
TrueType B-5
FreeForm
printing variable data documents 4-1
G
Gamma option A-5
H
Hold queue xiv, 2-2
I-3
Index
I
M
Input Trays tool 6-8
installing printer fonts 5-9
Instructions field 1-5, 1-19, 2-4
Mac OS
Paper Source menu 2-4
PostScript printer setup 2-3 to 2-5
Printer Specific Options menu 2-5
printing 2-1
screen fonts 5-8
tray selection 2-4
Mac OS 2-5
Master documents (FreeForm) 4-1
Match Copy
CMYK Simulation option 4-9, A-10
Fiery Scan option 4-16
Media Type option A-5, A-12
My Fiery List 6-6, 6-11
J
job overrides
(Other) Gamma option A-5
(Other) Phosphors option A-5
(Other) White Point option A-5
Black Overprint option A-3, A-9
Brightness option A-3
CMYK Simulation Method option A-3
CMYK Simulation Profile option A-3,
A-10
Color Mode option A-4
Combine Separations option A-4, A-11
Duplex option A-11
Media Type option A-5, A-12
Page Order option A-6
print settings A-2
Pure Black Text Graphics option A-7
Rendering Style option A-7, A-13
RGB Source option A-7
Save Fast Reprint option A-8
Slip Sheet option A-5
Sorter Mode option A-8, A-14
Spot Color Matching option A-8
Stapler Mode option A-8
Toner Reduction option A-8, A-15
L
LaserWriter printer, fonts installed on 5-8
lp command 3-2
lpq command 3-1, 3-3, 3-4
lpr command 3-1, 3-2
lprm command 3-1, 3-4
lpstat command 3-3
N
None, CMYK Simulation option A-10
Notes field
Windows 98/Me 1-5
Notes fields
Mac OS 2-4
Windows 98/Me 1-5
Windows NT 4.0 1-18
O
Orientation option A-5
Original option, in Fiery Scan 4-16
(Other) Gamma option A-5, A-14
(Other) Phosphors option A-5, A-14
(Other) White Point option A-5, A-14
Output Profile A-13
Output Profile option A-6
overrides, of job settings A-2
Owner Information 1-5
P
Page Order option A-6
Page Range option A-1
I-4
Index
Paper Source menu
Mac OS 2-4
Paper Source option A-13
PCL files, downloading 5-1
PDF files
downloading 5-1, 6-3
downloading from Mac OS 2-7
downloading from Windows 1-1
downloading from Windows,
downloading 1-30
font substitution 5-9
performance, optimizing C-1
Phosphors option A-5
Photographic rendering style option A-13
Plain Paper option A-12
Portable Document Format, see PDF files
PostScript
downloading files 5-1, 6-3
downloading files from Mac OS 2-7
downloading files from Windows 1-30
font list B-1 to B-5
PostScript printer description files, see PPDs
PostScript printer drivers
explained xiii
Mac OS 2-1
Windows 2000 1-23
Windows 98/Me 1-1
Windows NT 4.0 1-16
PPDs
defined xiii
PPDs (PostScript printer description files)
options A-2
setting print options with Mac OS 2-1
setting print options with Windows
2000 1-23
prescan 4-11
Presentation rendering style option A-13
press simulations 4-9
Print command (Windows) 1-1
printer default settings 2-5
Mac OS 2-5
specified by administrator in Setup xiv
where to set A-1
Windows 98/Me 1-4
Windows NT 4.0 1-18
printer setup
Mac OS 2-3 to 2-5
settings 1-18, 1-26
Windows 2000 1-24 to 1-26
Windows 2000 1-23 to 1-26
Windows 98/Me 1-2 to 1-16
Windows NT 4.0 1-16 to 1-30
Printer Specific Options menu 2-5
printing
duplex pages 4-9, A-11
font list 5-3
from Fiery Downloader 5-4
from WebDownloader 6-3
Mac OS 2-1
on the network xiv
to File port 1-30
troubleshooting C-2 to C-3
variable data documents 4-1
Windows 2000 1-23
Windows 98/Me 1-1
Windows NT 4.0 1-16
print options
Mac OS 2-3 to 2-5
Windows 2000 1-23 to 1-26
Windows 98/Me 1-2 to 1-16
Windows NT 4.0 1-16 to 1-30
print quality, problems with C-4
Print queue xiv
Pure Black Text Graphics option A-7
Q
Queue Position Info tool 6-8
queues, access to xiv
I-5
Index
R
T
Relative Colorimetric rendering style
option A-13
remote users xi
Rendering Style option A-7, A-13
RGB Separation option A-7
RGB Source option A-7, A-14
RIPping xiii
Rotate 180 option A-8
TCP/IP printing 3-1
Thick Paper option A-12
Toner Reduction option A-8, A-15
Toner tool 6-8, 6-9
Transparency option A-12
trays, printer A-13
tray selection
Mac OS 2-4
troubleshooting
EPS files C-5
Fiery Downloader C-5
Fiery Scan C-6
Fiery WebTools C-6
general printing problems C-2 to C-3
print quality C-4
TrueType fonts B-5
two-sided printing, see Duplex option
S
Saved Settings 1-6
Save Fast Reprint option A-8
scanning 4-16
canceling 4-16
from the copier glass 4-10
from the document feeder 4-10
Scan to HDD 4-16
setting print options
Windows 2000 1-24 to 1-26
Shortcuts 1-12
Show menu (Mac OS) 5-5
showpage after EPS files option 5-7
simulations 4-9
Slip Sheet option A-5
SMB printing 1-2, 1-24
Solaris 2.x 3-3
Sorter Mode option A-8, A-14
Spooler, see Fiery Spooler
Spot Color Matching option A-8
Stapler Mode option A-8
Status tool 6-8
Status WebTool, see Fiery WebTools
SunOS 4.1.x 3-3
Support tool 6-8
SWOP-Coated simulation A-10
SWOP-Coated simulation goal 4-9
U
UNIX
BSD (Berkeley Software Distribution)
variant of 3-4
displaying jobs in queue 3-3
printing with 3-1
removing jobs from queue 3-4
System V 3-3
Use Master option 4-2
User ID field
Windows 98/Me 1-5
V
variable data printing 4-1
W
WebDownloader, see Fiery WebTools
WebLink, see Fiery WebTools
WebSpooler, see Fiery WebTools
WebTools, see Fiery WebTools
I-6
Index
White Point option A-5
Windows 2000 1-26
printer default settings 1-26
printing with 1-23
setting print options 1-24 to 1-26
Windows 98/Me
Notes field 1-5
Notes fields 1-5
PostScript printer driver 1-1
printer default settings 1-4
printing with 1-1
setting print options 1-2 to 1-16
User ID 1-5
Windows NT 4.0
Notes fields 1-18
printer default settings 1-18
printing with 1-16
print options 1-16 to 1-30
Color Controller E-810
COLOR GUIDE
For use with the following color copiers:
Ricoh Aficio Color 6513
Gestetner CS213d
RexRotary CS813d
nashuatec CS513d
infotec 7513
Savin SDC413
Copyright © 2001 Electronics For Imaging, Inc. All rights reserved.
This publication is protected by copyright, and all rights are reserved. No part of it may be reproduced or transmitted in any form or by any means for any purpose
without express prior written consent from Electronics For Imaging, Inc., except as expressly permitted herein. Information in this document is subject to change
without notice and does not represent a commitment on the part of Electronics For Imaging, Inc.
The software described in this publication is furnished under license and may only be used or copied in accordance with the terms of such license.
This product may be covered by one or more of the following U.S. Patents: 4,500,919; 4,837,722; 5,212,546; 5,343,311; 5,424,754; 5,467,446;
5,506,946; 5,517,334; 5,537,516; 5,543,940; 5,553,200; 5,615,314; 5,619,624; 5,625,712; 5,666,436; 5,760,913; 5,818,645; 5,835,788; 5,866,856;
5,867,179; 5,959,867; 5,970,174; 5,982,937; 5,995,724; 6,002,795; 6,025,922; 6,041,200; 6,046,420; 6,065,041; 6,067,080; 6,112,665; 6,116,707;
6,118,205; 6,122,407; 6,134,018; 6,141,120; 6,151,014; 6,166,821; 6,184,873; 6,185,335; 6,201,614; 6,215,562; 6,219,659; 6,222,641; 6,225,974;
6,226,419; 6,238,105; 6,239,895; D406,117, D416,550, D417,864, D419,185, D426,206, D430,206, RE36,947
Trademarks
Fiery, the Fiery logo, Fiery Driven, Freedom of Press, ColorWise, EDOX, EFICOLOR, and RIP-While-Print are registered trademarks of Electronics For Imaging,
Inc. in the U.S. Patent and Trademark Office and certain other foreign jurisdictions.
EFI, the Electronics For Imaging logo, eBeam, the Fiery Driven logo, Fiery LX, Fiery Si, Fiery X2, Fiery X2e, Fiery X3e, Fiery X4, Fiery XJ, Fiery XJe, Fiery XJ-W,
Fiery Z4, Fiery ZX, Fiery X4, Fiery Z5, Fiery Z18, Fiery Z16, AutoCal, ColorCal, Command WorkStation, Continuous Print, DocBuilder, DocBuilder Pro, EFI
Densitometer, Fiery Downloader, Fiery Driver, Fiery Link, Fiery Prints, Fiery Print Calibrator, Fiery Scan, Fiery ScanBuilder, Fiery Spark, Fiery Spooler, FreeForm,
Harmony, Memory Multiplier, NetWise, PowerWise, RIPChips, ScanBuilder, Splash, the Splash logo, STARR Compression, Velocity, Velocity Balance, Velocity
Build, Velocity Estimate, Velocity Scan, VisualCal, WebTools, WebSpooler, WebInstaller, and WebStatus are trademarks of Electronics For Imaging, Inc.
All other terms and product names may be trademarks or registered trademarks of their respective owners, and are hereby acknowledged.
Legal Notices
APPLE COMPUTER, INC. (“APPLE”) MAKES NO WARRANTIES, EXPRESS OR IMPLIED, INCLUDING WITHOUT LIMITATION THE
IMPLIED WARRANTIES OF MERCHANTABILITY AND FITNESS FOR A PARTICULAR PURPOSE, REGARDING THE APPLE SOFTWARE.
APPLE DOES NOT WARRANT, GUARANTEE, OR MAKE ANY REPRESENTATIONS REGARDING THE USE OR THE RESULTS OF THE USE
OF THE APPLE SOFTWARE IN TERMS OF ITS CORRECTNESS, ACCURACY, RELIABILITY, CURRENTNESS, OR OTHERWISE. THE ENTIRE
RISK AS TO THE RESULTS AND PERFORMANCE OF THE APPLE SOFTWARE IS ASSUMED BY YOU. THE EXCLUSION OF IMPLIED
WARRANTIES IS NOT PERMITTED BY SOME STATES. THE ABOVE EXCLUSION MAY NOT APPLY TO YOU.
IN NO EVENT WILL APPLE, ITS DIRECTORS, OFFICERS, EMPLOYEES OR AGENTS BE LIABLE TO YOU FOR ANY CONSEQUENTIAL,
INCIDENTAL OR INDIRECT DAMAGES (INCLUDING DAMAGES FOR LOSS OF BUSINESS PROFITS, BUSINESS INTERRUPTION, LOSS OF
BUSINESS INFORMATION, AND THE LIKE) ARISING OUT OF THE USE OR INABILITY TO USE THE APPLE SOFTWARE EVEN IF APPLE
HAS BEEN ADVISED OF THE POSSIBILITY OF SUCH DAMAGES. BECAUSE SOME STATES DO NOT ALLOW THE EXCLUSION OR
LIMITATION OF LIABILITY FOR CONSEQUENTIAL OR INCIDENTAL DAMAGES, THE ABOVE LIMITATIONS MAY NOT APPLY TO YOU.
Apple’s liability to you for actual damages from any cause whatsoever, and regardless of the form of the action (whether in contract, tort [including negligence],
product liability or otherwise), will be limited to $50.
Part Number: 45022703
FCC Information
WARNING: FCC Regulations state that any unauthorized changes or modifications to this equipment not expressly approved by the manufacturer could void
the user’s authority to operate this equipment.
Class B Declaration of Conformity
This equipment has been tested and found to comply with the limits for a class B digital device, pursuant to Part 15 of the FCC rules. These limits are designed
to provide reasonable protection against harmful interference in a residential installation. This equipment generates, uses and can radiate radio frequency energy
and if not installed and used in accordance with the instructions, may cause harmful interference to radio communications. However, there is no guarantee that
interference will not occur in a particular installation.
If this equipment does cause harmful interference to radio or television reception, which can be determined by turning the equipment off and on, the user is
encouraged to try to correct the interference by one or more of the following measures:
Reorient or relocate the receiving antenna.
Increase the separation between the equipment and receiver.
Connect the equipment into an outlet on a circuit different from that to which the receiver is connected.
Consult the dealer or an experienced radio/TV technician for help.
In order to maintain compliance with FCC regulations, shielded cables must be used with this equipment. Operation with non-approved equipment or unshielded
cables is likely to result in interference to radio and TV reception. The user is cautioned that changes and modifications made to the equipment without the
approval of manufacturer could void the user’s authority to operate this equipment.
Industry Canada Class B Notice
This Class B digital apparatus complies with Canadian ICES-003.
Avis de Conformation Classe B de l’Industrie Canada
Cet appareil numérique de la Classe B est conforme à la norme NMB-003 du Canada.
RFI Compliance Notice
This equipment has been tested concerning compliance with the relevant RFI protection requirements both individually and on system level (to simulate normal
operation conditions). However, it is possible that these RFI Requirements are not met under certain unfavorable conditions in other installations. It is the user
who is responsible for compliance of his particular installation.
Dieses Gerät wurde sowohl einzeln als auch in einer Anlage, die einen normalen Anwendungsfall nachbildet, auf die Einhaltung der Funkentstörbestimmungen
geprüft. Es ist jedoch möglich, dass die Funkentstörbestimmungen unter ungünstigen Umständen bei anderen Gerätekombinationen nicht eingehalten werden.
Für die Einhaltung der Funkentstörbestimmungen einer gesamten Anlage, in der dieses Gerät betrieben wird, ist der Betreiber verantwortlich.
Compliance with applicable regulations depends on the use of shielded cables. It is the user who is responsible for procuring the appropriate cables.
Die Einhaltung zutreffender Bestimmungen hängt davon ab, dass geschirmte Ausführungen benützt werden. Für die Beschaffung richtiger Ausführungen ist der
Betreiber verantwortlich.
Software License Agreement
YOU SHOULD CAREFULLY READ THE FOLLOWING TERMS AND CONDITIONS BEFORE USING THIS SOFTWARE. IF YOU DO NOT
AGREE TO THE TERMS AND CONDITIONS OF THIS AGREEMENT, DO NOT USE THE SOFTWARE. INSTALLING OR USING THE
SOFTWARE INDICATES THAT YOU AGREE TO AND ACCEPT THE TERMS OF THIS AGREEMENT. IF YOU DO NOT AGREE TO ACCEPT
THE TERMS OF THIS AGREEMENT YOU MAY RETURN THE UNUSED SOFTWARE FOR A FULL REFUND TO THE PLACE OF PURCHASE.
License
Electronics For Imaging, Inc. (“EFI”) grants you a non-exclusive license to use the software (“Software”) and accompanying documentation (“Documentation”)
included with the Product. The Software is licensed, not sold. You may use the Software solely for your own customary business or personal purposes. You may
not rent, lease, sublicense or lend the Software. You may, however, permanently transfer all of your rights under this Agreement to another person or legal entity
provided that: (1) you transfer to the person or entity all of the Software and Documentation (including all copies, updates, upgrades, prior versions, component
parts, the media and printed materials, and this Agreement); (2) you retain no copies of the Software and Documentation, including copies stored on a computer;
and (3) the recipient agrees to the terms and conditions of this Agreement.
You may not make or have made, or permit to be made, any copies of the Software or portions thereof, except as necessary for backup or archive purposes in
support of your use of the Software as permitted hereunder. However, under no circumstances may you make or have made, any copies of any Software included
on the ROM, the hard disk drive or any other component of the controller board or hardware You may not copy the Documentation. You may not attempt to
alter, disassemble, decompile, decrypt or reverse engineer the Software.
Proprietary Rights
You acknowledge that the Software is proprietary to EFI and its suppliers and that title and other intellectual property rights therein remain with EFI and its
suppliers. Except as stated above, this Agreement does not grant you any right to patents, copyrights, trade secrets, trademarks (whether registered or unregistered),
or any other rights, franchises or licenses in respect of the Software. You may not adopt or use any trademark or trade name which is likely to be similar to or
confusing with that of EFI or any of its suppliers or take any other action which impairs or reduces the trademark rights of EFI or its suppliers.
Confidentiality
You agree to hold the Software in confidence, disclosing the Software only to authorized users having a need to use the Software as permitted by this Agreement
and to take all reasonable precautions to prevent disclosure to other parties.
Remedies And Termination
Unauthorized use, copying or disclosure of the Software, or any breach of this Agreement will result in automatic termination of this license and will make available
to EFI other legal remedies. In the event of termination, you must destroy all copies of the Software and all of its component parts. All provisions of this Agreement
relating to disclaimers of warranties, limitation of liability, remedies, or damages, and EFI’s proprietary rights shall survive termination.
Limited Warranty And Disclaimer
EFI warrants to the original purchaser (“Customer”) for thirty (30) days from the date of original purchase from EFI or its authorized retailer that the Software
will perform in substantial conformance to the Documentation. EFI warrants the media containing the Software against failure during the above warranty period.
EFI makes no warranty or representation that the Software will meet your specific requirements, that the operation of the Software will be uninterrupted or error
free, or that all defects in the Software will be corrected.
EXCEPT FOR THE ABOVE EXPRESS LIMITED WARRANTY, EFI MAKES AND YOU RECEIVE NO WARRANTIES OR CONDITIONS ON THE
SOFTWARE, EXPRESS, IMPLIED, STATUTORY, OR IN ANY OTHER PROVISION OF THIS AGREEMENT OR COMMUNICATION WITH YOU,
AND EFI SPECIFICALLY DISCLAIMS ANY IMPLIED WARRANTY OR CONDITION OF MERCHANTABILITY OR FITNESS FOR A PARTICULAR
PURPOSE.
Limitation Of Liability
IN NO EVENT WILL EFI OR ITS SUPPLIERS BE LIABLE FOR ANY DAMAGES, INCLUDING LOSS OF DATA, LOST PROFITS, COST OF COVER
OR OTHER SPECIAL, INCIDENTAL, CONSEQUENTIAL OR INDIRECT DAMAGES ARISING FROM THE SALE, INSTALLATION,
MAINTENANCE, USE, PERFORMANCE OR FAILURE OF THE SOFTWARE, HOWEVER CAUSED AND ON ANY THEORY OF LIABILITY. THIS
LIMITATION WILL APPLY EVEN IF EFI HAS BEEN ADVISED OF THE POSSIBILITY OF SUCH DAMAGE. YOU ACKNOWLEDGE THAT THE
PRICE OF THE PRODUCT REFLECTS THIS ALLOCATION OF RISK. BECAUSE SOME JURISDICTIONS DO NOT ALLOW THE EXCLUSION
OR LIMITATION OF LIABILITY FOR CONSEQUENTIAL OR INCIDENTAL DAMAGES, THE ABOVE LIMITATION MAY NOT APPLY TO YOU.
EFI DOES NOT EXCLUDE LIABILITY IN RESPECT OF PERSONAL INJURY, DEATH, WILLFUL MISCONDUCT OR GROSS NEGLIGENCE,
EXCEPT TO THE MAXIMUM EXTENT THAT IT CAN BE EXCLUDED OR LIMITED BY LAW.
Export Controls
You agree that you will not export or re-export the Software in any form in violation of any applicable laws or regulations of the United States or the country in
which you obtained them.
U.S. Government Restricted Rights
Software provided with this Product is provided with RESTRICTED RIGHTS. Use, duplication, or disclosure by the U.S. Government is subject to restrictions
as set forth in subparagraph (c)(1)(ii) of the Rights in Technical Data and Computer Software clause at DFARS 252.227-7013 or subparagraphs (c)(1) and (2) of
the Commercial Computer Software Restricted Rights at 48 CFR 52.227-19, as applicable.
General
The laws of the State of California govern this Agreement. You agree that this Agreement shall not be subject to the United Nations Convention on Contracts for
the International Sale of Goods (1980). This Agreement is the entire agreement held between us and supersedes any other communications or advertising with
respect to the Software. If any provision of this Agreement is held invalid, the remainder of this Agreement shall continue in full force and effect.
If you have any questions, please see EFI’s web site at www.efi.com.
Contents
Introduction
About the documentation
xiii
Key features of ColorWise
xiv
Chapter 1: E-810 Color Management
Managing color on the E-810
1-1
Rendering styles
1-4
RGB Source Profile
1-5
RGB Separation
1-7
CMYK Simulation Profile
1-8
CMYK Simulation Method
1-9
Output profile
1-9
Pure Black Text/Graphics
1-10
Spot Color Matching
1-11
Printer drivers and print options
1-12
What a printer driver does
1-12
PostScript printer driver for Windows 9X/Me, Windows NT 4.0, and Windows 2000
1-13
Adobe PostScript printer driver for Mac OS
1-17
Chapter 2: Simple and Advanced Workflows
Workflow concepts
2-1
Short-run printing versus color proofing
2-1
RGB, CMYK, and PANTONE colors
2-2
Desktop versus E-810 color management
2-2
Simple workflows
2-3
Select your colors wisely
2-3
Select a short workflow
2-4
Advanced workflows
2-8
Short-run printing examples
Color proofing examples
2-8
2-14
viii
Contents
Chapter 3: Color Calibration
Introduction
3-1
Understanding calibration
3-2
How calibration works
3-3
Scheduling calibration
3-4
Checking calibration status
3-5
Using a spectrophotometer
3-5
Setting up the spectrophotometer
3-5
Calibrating the spectrophotometer
3-10
Calibrating with ColorWise Pro Tools and DTP41
3-15
Using a densitometer
3-23
Setting up the densitometer
3-23
Calibrating the densitometer
3-26
Calibrating with ColorWise Pro Tools
3-27
Expert Mode
3-32
Calibrating from the Control Panel using AutoCal2
3-34
Chapter 4: ColorWise Pro Tools
Profile Manager
4-1
Setting the default profiles
4-3
Downloading profiles
4-5
Editing profiles
4-6
Managing profiles
4-7
Defining profiles
4-8
Color Editor
4-11
Editing profiles
4-11
Undoing simulation edits
4-18
Checking edited profiles
4-20
Color Setup
4-21
Setting default ColorWise options
4-21
ix
Contents
Chapter 5: Working with Color in Applications
Working with color
5-1
Color reference pages
5-2
Office applications
5-3
Choosing colors in office applications
5-4
PostScript applications
5-5
Choosing colors in PostScript applications
5-5
Default output profile
5-7
CMYK simulation
5-7
Chapter 6: Office Applications
Working with office applications
6-1
Defining colors
6-1
Working with imported files
6-1
Selecting options when printing
6-2
Output profiles
6-2
Chapter 7: Adobe Photoshop
Photoshop 5.x
7-1
Photoshop 5.x color settings
7-1
ColorSync defaults
7-6
Defining colors
7-7
Saving files for importing into other documents
7-7
Advanced tips for using PostScript color management
7-8
Selecting options when printing
7-9
Advanced tips for printing with Photoshop PostScript color management
7-11
Photoshop 4.x
7-13
Defining colors
7-13
Saving files for importing into other documents
7-13
Selecting options when printing
7-15
x
Contents
Chapter 8: Page Layout Applications
Working with page layout applications
8-1
Defining colors
8-1
Importing images
8-2
CMYK simulation
8-3
Adobe PageMaker 6.5 for Mac OS and Windows
8-3
Importing images
8-4
Selecting options when printing
8-4
Optional Color Management from PageMaker
8-6
QuarkXPress 4.x for Mac OS and Windows
8-6
Importing images
8-6
Selecting options when printing
8-7
Optional Color Management from QuarkXPress
8-8
QuarkXPress 3.32 for Mac OS and Windows
8-8
Windows version requirement
8-8
Importing images
8-8
Selecting options when printing
8-8
Chapter 9: Illustration Applications
Working with illustration applications
9-1
Defining colors
9-1
Importing images
9-2
CMYK simulation
9-2
Adobe Illustrator 8.x for Windows and Mac OS
9-3
Defining colors
9-3
Importing images
9-3
Optional Color Management in Illustrator
9-3
Selecting options when printing
9-4
Saving files for importing into other documents
9-5
xi
Contents
FreeHand 8.x for Windows and Mac OS
9-5
Defining colors
9-6
Importing images
9-6
Selecting options when printing from FreeHand
9-7
Saving files for importing into other documents
9-8
Optional Color Management in FreeHand
9-9
CorelDRAW for Windows and Mac OS
9-9
Defining colors
9-9
Importing images
Selecting options when printing
9-9
9-10
Saving files for importing into other documents
9-11
Optional Color Management in CorelDRAW
9-11
Appendix A: Desktop Color Primer
The properties of color
A-1
The physics of color
A-1
CIE color model
A-2
Hue, saturation, and brightness
A-3
Printing techniques
A-5
Halftone and continuous tone devices
A-6
Using color effectively
A-6
A few rules of thumb
A-7
Color wheel
A-7
Color and text
A-8
Raster images and vector images
Optimizing files for processing and printing
A-9
A-10
Resolution of raster images
A-10
Scaling
A-12
xii
Contents
Appendix B: Color Management
Controlling printed color
B-1
Maintaining copier consistency
B-2
Print device gamut
B-2
Basics of color management
B-3
Color conversion
B-4
Appendix C: Importing Densitometer Measurements
Simple ASCII Import File Format (SAIFF)
C-1
Example of 1D Status T density for EFI 34 patch page
C-2
Example of 1D Status T density for EFI 21 patch page
C-2
Example of 1D Status T density for an arbitrary page
C-3
Glossary
Bibliography
Index
xiii
Introduction
About the documentation
This manual introduces the concepts and issues associated with printing to the Color
Controller E-810™. It outlines key workflow scenarios, provides information on
calibration and color profiles, and contains application notes that explain how to print
to the Color Controller E-810 from popular Microsoft Windows and Apple Mac OS
applications.
This manual is part of a set of documentation that includes manuals for users and
system administrators. The other manuals should be available at your site—refer to
them for a complete description of your Color Controller E-810.
N OTE : The term “copier” is used in this manual to refer to these supported devices.
About the documentation
The Color Guide is organized to supply you with key information about managing
the color output of your E-810. Chapter 1 describes the E-810 print options and
how to get the best color results, and Chapter 2 describes several effective workflows.
Calibration is discussed in the next two chapters. Chapter 3 covers ColorWise Pro
Tools™ and other methods of calibrating the copier, and Chapter 4 takes you through
the features of Profile Manager™, used to manage color profiles on the E-810, and
Color Editor™, which lets you customize simulation and output profiles. Succeeding
chapters provide tips for printing from business and graphics applications. Finally, the
appendixes offer information about color theory and color management.
Words in bold, for example, output profile, are terms that appear in the glossary.
The bibliography at the end of this manual provides sources for further investigation
of color printing issues.
Color terms and concepts such as “RGB data,” “color space,” “spot color,” “gamut,”
and “source profile” are used throughout this manual. If you are new to desktop color,
or if any terms are unfamiliar, read Appendixes A and B or check the glossary.
xiv
Introduction
This manual is part of a set of E-810 documentation that also includes the following
manuals for users and system administrators:
• The Configuration Guide explains basic configuration and administration of the
E-810 for the supported platforms and network environments. It also includes
guidelines for setting up UNIX, Windows NT, and Novell NetWare servers to
provide Adobe PostScript printing services to clients.
• Getting Started describes the process of installing the software that enables users to
print to the E-810. Specifically, it describes installation of PostScript printer drivers,
printer description files, and other user software provided on the User Software CD.
It also explains how to connect each user to the network.
• The Printing Guide describes the printing features of the E-810 for users who send
jobs via remote workstations on the network.
• The Job Management Guide explains the functions of the E-810 client utilities,
including the Command WorkStation™, and how you use them to manage jobs.
This book is intended for an operator or administrator, or a user with the necessary
access privileges, who needs to monitor and manage job flow and troubleshoot
problems that may arise.
• Release Notes provide last-minute product information and workarounds for some
of the problems you may encounter.
Key features of ColorWise
ColorWise® is the color management system (CMS) built into the E-810 and
designed to provide both casual and expert users the best color output for a variety
of purposes. The ColorWise default settings provide great out-of-box color from many
Windows and Mac OS applications. This allows casual users to get quality output
without knowing about or changing any color settings on the E-810.
For consistent color make sure the E-810 is calibrated on a regular basis. ColorWise
Pro Tools include a simple-to-use calibrator, which allows you to calibrate using either
the scanner that comes with the copier or a densitometer (see Chapter 3).
xv
Key features of ColorWise
You can modify printing results using ColorWise features. Depending on your
particular needs, you can:
• Set the behavior of CMYK printing to emulate DIC, Euroscale, and SWOP offset
press standards
• Match PANTONE colors for the best match when printing using four-color press
conditions or when printing using presses with extra, custom plates
• Select a color rendering dictionary (CRD), also called a rendering style, for RGB
printing. CRDs allow for rich, saturated printing of presentation graphics; smooth,
accurate printing of photographs; and relative or absolute colorimetric rendering for
specialized needs
• Define the source of incoming RGB color data for better screen matching and better
color conversion of RGB data with no source information
• Define whether RGB data is converted into the full gamut of the copier or whether
it is first converted into the gamut of another device, such as a press standard. This
feature is very helpful for making one device behave like another. It is also useful for
evaluating the appearance of the RGB file under different printing conditions
without having to reprocess the RGB data each time
ColorWise offers an open color architecture, letting users customize the E-810 to meet
new printing needs as they arise. ColorWise supports ICC profiles, which are industry
standard color profiles that define the color behavior of a device. Downloading ICC
profiles to the E-810 enables it to simulate a custom press (or another copier), as well
as accurately print colors from a particular monitor or a scanner. In addition, you can
create customized ICC profiles for the copier. ColorWise also lets you use any Status T
densitometer by importing data in a standard file format (see Appendix C). In this
case, it is important to note that the quality of the instrument used will determine the
quality of the calibration.
1
1-1
Chapter 1:
E-810 Color
Management
Managing color on the E-810
The first part of this chapter describes the options available from the ColorWise color
management system and explains how to customize the color settings for your
particular needs. It provides descriptions of the preset ColorWise default settings and
covers additional options for users who need to customize ColorWise.
Beginning on page 1-12, there is a detailed explanation of what a PostScript Level 2 or
PostScript 3 printer driver does, as well as information on the capabilities of various
printer drivers and instructions for setting color options with the PostScript drivers
for Windows NT 4.0, Windows 2000, Windows 9X/Me, and Mac OS.
Managing color on the E-810
You can modify the E-810’s printing behavior in several ways:
• Select ColorWise options for an individual print job using menus that appear from
the printer driver.
• Select most ColorWise options as server defaults from the Color Setup application
in ColorWise Pro Tools (see page 4-21). Defaults can also be set from E-810 Setup
or from the Control Panel, as described in the Configuration Guide. These defaults
apply to all subsequent print jobs unless you override them.
• Select some ColorWise options, particularly default ICC profile settings and
calibration options, from ColorWise Pro Tools. These options include default
Simulation Profile (see page 1-8), Simulation Method (see page 1-9), Appear in
Driver as (see page 4-8), default Source Profile (see page 1-5), RGB Separation
(see page 1-7), and associated calibration set (see page 3-4).
Applications can generate color data for the E-810 in many different color spaces.
The most common type of color data produced from office applications is RGB, while
prepress applications generally produce CMYK data. Desktop applications can also
generate spot colors, such as PANTONE colors. To complicate matters, a single page
may contain a mix of RGB, CMYK, and spot colors. The E-810 lets users control the
printing of these mixed-color documents with features that apply specifically to RGB,
CMYK, or spot color data.
1
1-2
E-810 Color Management
E-810 color management generates CMYK data to be sent to the copier; additional
processing may then be performed before printing begins.
The table below illustrates the print options in the E-810 color management process
that affect color data conversions. You access these print options when you send a print
job to the E-810. Most of these options and settings are described in subsequent
sections of this chapter.
RGB Source Profile is the only color option that applies strictly to RGB color data.
The other options that affect RGB color also affect the more rarely used Lab, XYZ,
and other calibrated color spaces.
N OTE : For users who are familiar with PostScript 3.0 color, RGB Source Profile affects
all CIEBasedABC color spaces (if the source space is RGB). If you send CMYK data
to the E-810 in CIEBasedDEFG format, for example, by choosing PostScript Color
Management in Adobe Photoshop, the E-810 Rendering Style selection—which
normally affects only RGB data—will also affect this CMYK data.
You can specify settings for the following options via print options when you send a
job to the E-810. The administrator can also set some settings as defaults during E-810
Setup. Settings specified via print options override the defaults.
E-810 color print option
Rendering Style
Photographic/Presentation/Relative
Colorimetric/Absolute Colorimetric
(Default set at Setup)
RGB Source Profile
EFIRGB/sRGB
(PC)/Apple Standard/Other/
Source 1–10/None
(Default set at Setup or with ColorWise Pro
Tools)
(Other) Gamma
1.0/1.2/1.4/1.6/1.8/2.0/2.2/2.4/2.6/2.8/3.0
What it does
Applies a E-810 color rendering style (CRD) to RGB data (see page 1-4), or
to any incoming data with a PostScript source color space definition,
including CMYK.
Applies an RGB source space definition to RGB data (see page 1-5). If you
choose the Other setting, you can specify particular settings for Gamma,
Phosphors, and White Point. See the corresponding options in this table. This
option, along with Gamma, Phosphors, and White Point, the only ColorWise
options that affects only DeviceRGB or calibrated RGB color spaces.
Applies the specified gamma value to the RGB source space definition (see
page 1-5). To use this print option, you must choose Other as the RGB Source
setting.
1
1-3
Managing color on the E-810
E-810 color print option
(Other) Phosphors
Hitachi EBU/Hitachi-Ikegami/NTSC/
Radius Pivot/SMPTE/Trinitron
(Other) White Point
5000 K (D50)/5500 K/6500 K (D65)/
7500 K/9300 K
RGB Separation
Output/Simulation
CMYK Simulation Profile
SWOP-Coated/DIC/Euroscale/Simulation
1–10/Match Copy/None
(Default set at Setup or in ColorWise Pro
Tools)
CMYK Simulation Method
Quick/Full
(Default set at Setup or in ColorWise Pro
Tools)
Output Profile
Default output profile/Output 1–10
(Default set at Setup or in ColorWise Pro
Tools)
Pure Black Text/Graphics
On/Off
(Default set at Setup)
Spot Color Matching
On/Off
(Default set at Setup or with ColorWise Pro
Tools)
Black Print Enhancement
On/Off
What it does
Applies the specified phosphor (monitor type) information to the RGB source
space definition (see page 1-5). To use this print option, you must choose
Other as the RGB Source setting.
Applies the specified white point value to the RGB source color space
definition (see page 1-5). To use this print option, you must choose Other as
the RGB Source setting.
Determines which CMYK color space your original RGB data will be
separated into—CMYK for the copier (Output) or CMYK for a specified
simulation (Simulation) (see page 1-7). It is important to note that when RGB
Separation is set to Simulation, RGB colors are affected by CMYK Simulation
Profile and CMYK Simulation Method.
Adjusts CMYK color data to simulate an offset press standard or a custom
color gamut defined at your site. The Match Copy setting bypasses E-810
calibration to match a copy made from the copier glass. Choosing None
bypasses simulation (see page 1-8).
N OTE : Some of the Simulation settings have slightly different names depending
on the model of copier.
Quick simulation applies one-dimensional transfer curves that adjust output
density only. Full simulation applies colorimetric transformations that adjust
hue as well as output density (see page 1-9).
The Output Profile is applied to all data in the print job (see page 1-9).
User-defined output profiles can be downloaded to the E-810 using ColorWise
Pro Tools (see Chapter 4).
The On setting optimizes the quality of black text and line art output.
(see page 1-10).
The On setting enables E-810 matching of PANTONE colors; Off instructs
the E-810 to match color output to a PANTONE-specified CMYK
combination (see page 1-11).
The On setting reduces maximum black overprint to 100%.
The Off setting reduces maximum black overprint to 95%.
To use this print option, you must set the Pure Black Text/Graphics option
On.
1
1-4
E-810 Color Management
E-810 color print option
Color Text/Graphics Enhancement
Off/1/2/3/4
Image Smoothing
(Not selectable)
What it does
Settings 1 through 4 enhances the quality of color by adding color subpixels
when printing on a white background only. Settings 1 through 4 correspond to
the pixel density—1 is the minimum; 4 is the maximum.
Smoothing is activated automatically when you select Text dither and
Grayscale for printing. The On setting enhances the print quality of low
resolution images.
Detailed explanations of how these and other settings affect your print jobs are
provided in subsequent sections of this chapter.
Rendering styles
The Rendering Style option specifies a CRD for color conversions. You can modify the
Rendering Style option to control the appearance of images, such as prints from office
applications or RGB photographs from Photoshop. The E-810 lets you select from the
four rendering styles currently found in industry standard ICC profiles.
E-810 rendering style
Photographic—Typically results in
less saturated output than
presentation rendering when printing
out-of-gamut colors. It preserves
tonal relationships in images.
Presentation—Creates saturated
colors but does not match printed
colors precisely to displayed colors.
In-gamut colors such as flesh tones
are rendered well, similar to the
Photographic rendering style.
Best used for
Equivalent
ICC rendering
style
Photographs, including scans and
images from stock photography
CDs.
Image,
Contrast, and
Perceptual
Artwork and graphs in
presentations. In many cases it can
be used for mixed pages that
contain both presentation graphics
and photographs.
Saturation,
Graphics
1
1-5
Managing color on the E-810
E-810 rendering style
Best used for
Equivalent
ICC rendering
style
white-point transformation between
the source and destination white
points. For example, the bluish gray
of a monitor will map to neutral gray.
You may prefer this style to avoid
visible borders when not printing
full-bleed.
Advanced use when color
matching is important but you
prefer white colors in the
document to print as paper white.
It may also be used with PostScript
color management to affect
CMYK data for simulation
purposes.
Relative
Colorimetric
Absolute Colorimetric—Provides no
white point transformation between
the source and destination white
points. For example, the bluish gray
of a monitor will map to a bluish
gray.
Situations when exact colors are
needed and visible borders are not
distracting. It may also be used
with PostScript color management
to affect CMYK data for
simulation purposes.
Absolute
Colorimetric
Relative Colorimetric—Provides
RGB Source Profile
The RGB Source Profile setting allows you to define the characteristics of the RGB
data in your document so the appropriate color conversion can occur on the E-810.
Commonly used monitor color spaces are available from the driver and from the
ColorWise Pro Tools Profile Manager. For special needs, you can use ColorWise Pro
Tools to download custom monitor or scanner profiles.
When you specify a setting other than None for the RGB Source Profile, the E-810
overrides source color space definitions or profiles that other color management
systems may have specified. For example, if you specified a ColorSync System Profile
on your Mac OS computer, the RGB Source Profile setting overrides it. In cases where
you do not want this setting to override another specified source color space, choose
None.
1
1-6
E-810 Color Management
When you specify a setting other than None for the RGB Source Profile—since the
color space definitions are overridden—the prints from the E-810 will be consistent
across platforms. Below are the E-810 RGB Source Profile options:
• EFIRGB specifies an EFI-defined color space recommended for users who have no
detailed information about their RGB data.
• sRGB (PC) specifies the industry standard definition for a generic Windows PC
monitor.
• Apple Standard specifies the definition of all standard Mac OS computer monitors.
• Other allows you to specify custom RGB source settings. If you choose Other as the
RGB Source setting, you can choose settings for the Gamma, Phosphors, and White
Point options.
• Sources 1–10 specify the definitions you download as RGB source profiles. For more
information about downloading RGB source profiles, see Chapter 4.
If you are printing with the PostScript driver for Windows 9X/Me and have two-way
communication enabled, the name of each downloaded profile is represented in the
RGB Source Profile setting pop-up menu. If you are printing with the AdobePS driver
from a Mac OS or Windows NT computer, or the Microsoft PostScript driver from a
Windows 2000 computer, downloaded profiles appear as Source-1 through Source-10.
For more information on two-way communication, see Getting Started.
• None instructs the E-810 to allow the RGB sources you defined elsewhere, such as in
the application, to be used. When you set RGB Source to None, the appearance of
colors will not be independent of the file type. For example, RGB EPS files will look
different from RGB TIFF files.
With RGB Source set to None, PostScript RGB data that contains a source color
space definition is converted using the CRD specified by the Rendering Style option
(see page 1-4). Non-PostScript RGB data and PostScript RGB data that does not
contain a source color space definition is converted using a general undercolor
removal conversion method.
1
1-7
Managing color on the E-810
RGB Separation
The RGB Separation option determines how RGB colors (as well as Lab and XYZ
colors) are converted to CMYK. The name of this option is meant to be descriptive,
since the option defines the color spaces that will be used by the E-810 to “separate”
the RGB data into CMYK values.
The two choices available for this option determine whether RGB data is converted
into the full gamut of the copier (Output) or is first converted into the gamut of
another digital printer or press standard (Simulation). This feature is helpful for
making one device behave like another for RGB data. For example, if a high-quality
ICC profile is available for another print device, the copier can simulate the behavior
of that device.
RGB Separation is also useful for prepress applications. For example, it lets you
experiment with the appearance of an RGB scan under different press printing
conditions, without having to convert the RGB data to CMYK data for each
condition. When the desired printing condition is found, you can then convert the file
to CMYK, if using the same CMYK simulation profile you used during the
experimentation.
N OTE : Use the RGB Separation print option in conjunction with the Output Profile or
CMYK Simulation Profile print options.
• Output converts all RGB colors into the CMYK color space of your copier (when set
to the printer’s default), or a customized CMYK color space for your copier (when
set to Output 1-10).
• Simulation converts all RGB colors into the CMYK color space for a specified
simulation (make sure to select the desired simulation with the CMYK Simulation
Profile print option).
1
1-8
E-810 Color Management
CMYK Simulation Profile
The CMYK Simulation Profile print option allows you to print press proofs or
simulations. This option specifies the offset press standard or other color printing
device you want to simulate. This option affects CMYK data only.
From the printer driver, you can view up to 10 custom Full simulations created using
ColorWise Pro Tools. The number of custom simulations is limited by the disk space
on the E-810.
If you are printing with the PostScript driver for Windows 9X/Me and have two-way
communication enabled, the name of each downloaded or custom profile is
represented in the CMYK Simulation Profile setting pop-up menu. If you are printing
with the AdobePS driver from a Mac OS or Windows NT computer, or the Microsoft
PostScript driver from a Windows 2000 computer, downloaded or custom profiles
appear as Simulation-1 through Simulation-10. For more information on two-way
communication, see Getting Started.
The CMYK Simulation Profile setting you specify depends on the press standard for
which the CMYK data was separated.
• For images separated using a custom separation (such as a separation produced with
an ICC profile), choose the corresponding profile on the E-810 with the CMYK
Simulation Profile setting.
• For images separated for SWOP, choose SWOP as the CMYK Simulation Profile
setting.
N OTE : To properly simulate a printed image that was separated through the use of
an ICC profile, the same profile must be present on the E-810. For more information
about downloading ICC profiles to the E-810, see “Downloading profiles” on
page 4-5.
• The Match Copy setting bypasses E-810 calibration to simulate the color of a copy
produced by the copier. Use this setting when you print images scanned with the
Fiery Scan plug-in set to Match Copy.
1
1-9
Managing color on the E-810
CMYK Simulation Method
The CMYK Simulation Method setting specifies the quality of simulation to perform.
• Quick applies one-dimensional transfer curves that adjust output density only.
• Full provides a more complete and accurate simulation by applying colorimetric
transformations that adjust hue as well as output density. The Full Simulation
option also maintains the integrity of the black channel by adjusting it
independently. This is especially important for images separated using an optimized
black generation (UCR/GCR) setting, either from a scan or from within an
application such as Photoshop.
Output profile
The output profile is applied to all data in the print job, so make sure the selected
profile is the right one for your job. The default output profile consists of both a profile
for your copier, describing its color characteristics, and a calibration target that
describes the expected behavior of the copier.
In certain cases, you may want to customize the default output profile using the
ColorWise Pro Tools Color Editor to achieve particular color effects (see page 4-11).
If you do so, the new customized output profile is applied to all data in the print job.
Changing the output profile only does not affect its associated calibration target
(since the target is based on a copier model). You can edit D-Max values of the
calibration target separately (see page 4-6).
You can use the ColorWise Pro Tools Profile Manager to download your own output
profile to the E-810 (see page 4-5). Downloaded output profiles are at first associated
with the calibration target tied to the default output profile. You can edit calibration
target D-Max values separately.
If you are printing with the PostScript driver for Windows 9X/Me and have two-way
communication enabled, the name of each downloaded or custom profile is
represented in the Output Profile setting pop-up menu. If you are printing with the
AdobePS driver from a Mac OS or Windows NT computer, or the Microsoft
PostScript driver from a Windows 2000 computer, downloaded or custom profiles
appear as Output-1 through Output-10. For more information on two-way
communication, see Getting Started.
1
1-10
E-810 Color Management
Pure Black Text/Graphics
The Pure Black Text/Graphics option affects the printout for black text and vector
graphics on a page. Under most circumstances, you can leave this option set to On.
When Pure Black Text/Graphics is on, black colors generated by applications are
printed using 100 percent black-only toner (for example, RGB = 0, 0, 0;
CMYK = 0%, 0%, 0%, 100%; or K = 100%). This means the black text and line art
will not exhibit halftone artifacts and will not be misregistered, since there is only one
toner used. In addition, this setting eliminates blasting. This option is automatically
set to On when the Black Overprint option is set to On
For some jobs you may want to turn this option Off, for example, if the page includes
gradient fills that use black. The table below describes the behavior of the Pure Black
Text/Graphics option with black data defined in different color spaces.
N OTE : The Pure Black Text/Graphics option can be used only when printing
composites, not when printing separations.
Input
black color
Pure Black Text/Graphics
On
Off
RGB
With the default profile, prints a rich black using all
toners.
CMYK
Prints only with black toner, because CMYK
simulations preserve the black channel. The actual
amount of toner used depends on the current
simulation and the calibration state of the copier.
Prints 100% black
Spot
Prints only with black toner, because spot color
simulations preserve the black channel. The actual
amount of toner used depends on the current
simulation and the calibration state of the copier.
1
1-11
Managing color on the E-810
N OTE : PostScript applications, such as QuarkXPress, may convert elements defined
as RGB = 0, 0, 0 to four-color CMYK black before sending the job to the E-810.
These elements are not affected by the Pure Black Text/Graphics option. See the
application notes for details. Also, black text and line art defined as RGB = 0, 0, 0 in
office applications (such as Microsoft Word) are converted to single-color black
(CMYK = 0%, 0%, 0%, 100%) by the Microsoft PostScript Level 3 driver for
Windows 2000. To print this single-color black at the maximum toner density of the
copier, set the Pure Black Text/Graphics option to On.
Spot Color Matching
The Spot Color Matching option provides automatic matching of PANTONE colors
with their best CMYK equivalents.
• On—The E-810 uses a built-in table to generate the closest CMYK matches of
PANTONE colors your copier can produce. (New tables are generated when you
add new output profiles.)
N OTE : Spot colors not included in the built-in table are treated as CMYK.
• Off—The E-810 uses the CMYK equivalents defined by your application to print
PANTONE colors.
For jobs that include PANTONE spot colors, set Spot Color Matching to On unless
you are printing press simulations. In that case, set Spot Color Matching to Off and
choose the appropriate CMYK Simulation setting (see page 1-8).
N OTE : You can use the Spot Color Matching option only when printing composites,
not when printing separations.
1
1-12
E-810 Color Management
Spot Color Matching and the PANTONE Coated Color Reference
The PANTONE Coated Color Reference (described on page 5-6) prints differently
depending on the Spot Color Matching setting.
• On—The E-810 uses a built-in table to generate the best matches of the PANTONE
colors that your copier can produce. The PANTONE number is printed below each
swatch.
• Off—The E-810 prints swatches using the CMYK values recommended by
PANTONE (and used by applications that provide PANTONE color libraries). The
CMYK values used to generate the color, as well as the PANTONE number of the
color, are printed below each swatch. These CMYK values are printed through the
selected CMYK Simulation and Output Profile settings.
Printer drivers and print options
This section describes the role of the printer driver and explains how to use Windows
and Mac OS printer drivers for E-810 printing.
N OTE : The term “PostScript” by itself is used to refer to Adobe PostScript Level 2
or later.
What a printer driver does
To take full advantage of the features of the E-810, your print jobs must be sent as
PostScript data. Since most applications cannot generate PostScript data directly, it is
the function of a printer driver to interpret instructions from the application and
convert them to PostScript data.
A PostScript printer driver also allows you to select print options specific to your
copier. To do this, the printer driver must be matched with a PostScript printer
description file PPD for your E-810. The PPD contains information about the
particular features supported by the E-810 and the copier. You can think of the PPD as
the lines of PostScript code in the file that are device-specific. When you print a job,
the printer driver lets you choose among features by displaying print options.
A few PostScript applications can send PostScript data directly to the copier and
present print options within the application interface. Even these applications,
however, require that you use a PostScript printer driver.
1
1-13
Printer drivers and print options
The E-810 user software includes Adobe PostScript printer drivers for
Windows 9X/Me, Windows NT 4.0, and Mac OS and the Microsoft PostScript
printer driver for Windows 2000. These are the recommended printer drivers for
printing to the E-810. (See Getting Started for information on installing printer
drivers.)
We recommend you set the print options initially in E-810 Setup (see the
Configuration Guide). This provides you with a default configuration that is
appropriate for most E-810 print jobs.
PostScript printer driver for Windows 9X/Me, Windows NT 4.0,
and Windows 2000
You can access the printer driver options described in this section by clicking
Start\Settings\Printers, right-clicking the appropriate PPD name, and selecting
Properties (Windows 9X/Me), Document Defaults (Windows NT), or Printing
Preferences (Windows 2000) from the pop-up menu. These settings are also accessible
from the Print Setup or Page Setup dialog boxes of most applications.
For Window 9X/Me, the E-810 driver interface enables you to save combinations of
settings that you can later access. In addition, you can choose different settings for
individual jobs from the applications you use.
The printer driver writes a PostScript file containing the instructions generated by your
application and the E-810 print options you selected. The printer driver sends the
PostScript file to the E-810. The E-810 then performs PostScript processing and color
conversions and sends raster color data to the print device.
N OTE : The following illustrations and instructions do not apply to all applications.
Many applications, such as Adobe PageMaker, Adobe Photoshop, Adobe Illustrator,
QuarkXPress, and CorelDRAW, have other color management options in addition to
those presented in the printer driver. For information on specific applications, see
Chapters 6 through 9.
1
1-14
E-810 Color Management
Setting color management print options for Windows 9X/Me and Windows NT
This section explains how to set E-810 color print options with the Adobe PostScript
printer driver version 4.3.x for Windows 9X/Me and version 5.1 for Windows NT,
PostScript 3 printer drivers that take full advantage of the color features of the E-810.
Before you proceed, make sure you have completed the following procedures described
in Getting Started.
• Install the Adobe PostScript Printer Driver version 4.3.x (Windows 9X/Me) or 5.1
(Windows NT) and the E-810 PPD.
• Set up the E-810 for printing.
To set print options, open the PPD as described on page 1-13. Under the Fiery
Printing tab, click the ColorWise menu to select settings for the print options
described on page 1-2.
Click the ColorWise menu
1
1-15
Printer drivers and print options
Click the Expert Settings
button to access additional
ColorWise options
Click on the Expert Settings button on the ColorWise window (above) and click
Update to display the current E-810 settings. If the Update button does not appear,
make sure that two-way communication is set up as described in Getting Started.
This brings up the Expert Color Settings flowchart window (below), which displays
additional color settings for the E-810. Each option includes a pop-up menu from
which you can select settings for your specific job.
1
1-16
E-810 Color Management
Selecting Other for RGB Source Profile brings up the following window for specifying
custom RGB source settings (see page 1-5).
For most users, the default settings provide the right level of color control. For more
information about individual print options, see page 1-2.
Setting color management print options for Windows 2000
This section explains E-810 color print options with the Microsoft PostScript Printer
Driver for Windows 2000. This PostScript driver takes full advantage of the color
features of the E-810. Before you proceed, make sure you have completed the
following procedures described in Getting Started:
• Install the Microsoft PostScript Printer Driver and E-810 PPD.
• Set up the E-810 for printing.
To set print options, open the PPD as described on page 1-13. Click the Advanced tab
in the Printing Preferences dialog box, and then choose settings for the print options
described on page 1-2.
1
1-17
Printer drivers and print options
Adobe PostScript printer driver for Mac OS
This section explains how to set color management print options with the
AdobePS 8.6 printer driver for Mac OS, a PostScript 3 driver that takes full advantage
of the color features of the E-810 and lets you save a set of print option settings.
Before you continue, make sure you have completed the following:
• Install the AdobePS printer driver and the E-810 PPD, as described in Getting
Started.
• Select the E-810 in the Chooser and set it up with the E-810 PPD.
N OTE : The following illustrations and instructions do not apply to all applications.
Many applications, such as PageMaker, Photoshop, Illustrator, QuarkXPress, and
CorelDRAW have other color management options in addition to those presented in
the printer driver. For information on specific applications, see Chapters 6 through 9.
1
1-18
E-810 Color Management
Setting color management print options
You can choose print options from the various panes of the AdobePS driver dialog box.
To access the initial AdobePS dialog box, choose Print from the File menu of your
application.
N OTE : The word “pane” is used to describe the different pages that appear in the driver
dialog box when you make selections from the pull-down menu at the upper left. Each
pane presents a particular set of print options.
The AdobePS driver includes the following Color Matching options.
• Color/Grayscale—When this setting is used to print to the E-810, ColorWise
provides all color conversions on the E-810. Typically, you should use this option
when printing to the E-810.
• PostScript Color Matching—Can be used with PostScript devices such as the E-810.
It provides for color conversion using a color rendering dictionary (CRD) that is
downloaded with the print job. This method requires that the file be saved as an EPS
with PostScript Color Management selected.
N OTE : If you use the PostScript Color Matching option, the driver may, depending on
the application in use, attach a CMYK source definition to the CMYK data in your
document. In this case, the CMYK data in the document is reseparated using a E-810
CRD. The destination color space for the CRD is determined by the RGB Separation
print option. When RGB Separation is set to Simulation, CMYK data is printed
according to all specified CMYK Simulation Profile and CMYK Simulation Method
settings. When RGB Separation is set to Output, CMYK data is converted to the
selected output profile’s CMYK color space.
• ColorSync Color Matching—Provides for color conversion on the host computer.
This option can be used with PostScript devices such as the E-810, but it is intended
for use with PostScript Level 1 devices. If you use this option, be sure to specify the
E-810 ICC profile as the Printer Profile. ColorSync Color Matching is not a
suggested color matching method, because it does not work in conjunction with all
applications and requires that you disable features of ColorWise on the E-810.
1
1-19
Printer drivers and print options
Setting E-810 color management options
In the AdobePS Print dialog box, choose Color Matching from the pull-down menu.
Choose Color Matching from
the pull-down menu
In the Color Matching pane, choose Color/Grayscale from the Print Color
pull-down menu.
Choose Color/Grayscale
1
1-20
E-810 Color Management
In the Printer Specific Options pane, choose settings for the print options described on
page 1-2.
If these settings are ones you use regularly, click Save Settings to save them for
subsequent jobs.
2
2-1
Chapter 2:
Simple and
Advanced
Workflows
Workflow concepts
This chapter discusses color management workflows used in short-run color printing,
as well as color proofing on the E-810. It also gives examples of color management in
specific desktop applications and discusses the interaction between those applications
and ColorWise color management.
Workflow concepts
The term “workflow” is used to describe the path a job follows from its creation in a
desktop application to final printed output. It is helpful to think of the following
categories when describing workflows:
• Short-run printing versus color proofing for eventual output on an offset press
• RGB, CMYK, and PANTONE color systems
• Desktop color management within an application versus color management on the
E-810, along with the notion that different versions of desktop applications handle
color management differently. It is important to pay close attention to the version of
a particular application when considering the workflows in this chapter.
Short-run printing versus color proofing
Short-run color printing refers to those jobs for which the E-810 is the final print
device. Printing jobs to the E-810 in preparation for printing on an offset press is
referred to as color proofing. Both types of E-810 print jobs use RGB, CMYK, and
PANTONE colors.
• For short-run jobs, bright, saturated colors are often desirable. These are achieved by
using the full range of colors available, referred to as the full gamut of the copier or,
more simply, copier CMYK. See “Advanced Workflows” on page 2-8 for short-run
printing examples.
• Offset jobs proofed on the E-810 require the printed colors to match those from
another set of CMYK printing conditions. Colors specified for an offset press require
CMYK simulation optimized for proofing on the copier. See “Advanced Workflows”
on page 2-8 for color proofing examples that simulate the gamut of another digital
printer or press standard.
2
2-2
Simple and Advanced Workflows
RGB, CMYK, and PANTONE colors
Colors can be defined in several different color models, the most common being RGB,
CMYK, and the PANTONE color matching system. Each model requires a different
color conversion at the E-810. These different color conversion workflows are
explained below.
• RGB source profiles and color rendering dictionaries are used to map RGB colors
through a device-independent color space to a destination space, either the full
copier gamut in a short-run printing workflow or CMYK simulation in a color
proofing workflow.
• CMYK colors are device-dependent. In a proofing scenario, colors specified in
prepress applications are adjusted so the gamut of the E-810 copier can simulate that
of the press. In a short-run printing workflow, specifying CMYK colors according to
the calibrated copier output eliminates the need for simulation during printing.
• PANTONE spot colors are special inks manufactured to run on an offset printing
press. Spot colors can be simulated using CMYK copier toners or process color inks.
Two basic workflows exist for printing PANTONE colors to the E-810:
Spot Color Matching On instructs the E-810 to match the output of the copier to
the PANTONE spot color.
Spot Color Matching Off instructs the E-810 to match the copier output to a
PANTONE-specified process simulation. This CMYK combination is then printed
with the CMYK Simulation setting you choose, such as SWOP or DIC, and CMYK
Simulation Method set to Full.
Desktop versus E-810 color management
A desktop color management system uses ICC profiles to convert colors from one
device gamut to the next (see Appendix B). The color data is converted when it is
passed from one application to another or when the job is sent to the copier, so the
processing occurs on your computer, as opposed to the E-810.
One advantage of using ColorWise color management over desktop color management
is that your computer is spared added processing. Delaying color conversions until the
color data reaches the E-810 frees your computer so you can continue working, and
color conversions on the E-810 are, in most cases, much faster than similar conversions
on a host computer.
2
2-3
Simple workflows
Managing most or all of your color on the E-810 can also eliminate the potential for
undesirable color management-related conflicts, such as iterative color conversions and
inconsistent color. The E-810 applies global corrections to specific groups of RGB,
CMYK, and PANTONE colors to avoid such conflicts.
Finally, by sending RGB files instead of larger CMYK files from applications to the
E-810, network traffic is minimized and jobs generally print faster.
ColorWise uses ICC profiles to convert colors to the copier gamut or simulate other
devices, such as an offset printing press. ColorWise manages color conversions for all
users printing to the E-810 from Windows and Mac OS computers. It lets users follow
a simple workflow with minimal intervention using robust default settings, while
giving advanced users the control and precision they need.
The E-810 can intelligently manage the printed appearance of RGB, CMYK, and
PANTONE colors. You can let the E-810 manage color for most short-run color
printing jobs without adjusting any settings.
Simple workflows
Every time you print a document containing colors that were not chosen for your
specific copier, those colors need to be converted, which requires color management.
You can define or modify colors at any stage in the workflow. Since ColorWise is
compatible with most other color management systems, you can use the workflow
most familiar to you.
This section provides examples of color workflows that should meet the needs of
most E-810 users. For information on specific desktop applications, see Chapters 6
through 9.
Select your colors wisely
For the colors you see on your monitor to match those on your printed output, they
must go through color management, including precise calibration of your monitor and
copier. If you are not equipped or inclined to maintain accurate monitor color
management, you may opt for an easier approach. First, determine which is more
important you—printed colors or monitor displayed colors.
2
2-4
Simple and Advanced Workflows
If displayed colors are more important, trust your eyes and your monitor. Visually
select colors on your monitor, but be aware that colors will be optimized only for your
monitor. When the document is opened on other monitors, the colors may look
different. And even though printed colors may not match those displayed on your
monitor, they will still print on the E-810 with good results.
If printed colors are your priority, choose colors from printed samples. By using these
sample colors, your printed output will remain consistent regardless of how the colors
appear on different monitors. Print the palette of available colors from business
applications and then select colors from the printed samples. E-810 Color reference
files are included on the User Software CD (see page 5-2). You can also print color
charts from the Control Panel and select colors by number or name from the printed
samples. Advanced applications let you define colors in the easier-to-control
PANTONE and CMYK color spaces. See Chapter 5 for more advice on color
selection.
No matter which workflow most closely matches your own, you should calibrate your
copier regularly (see Chapter 3).
Select a short workflow
Every time colors are converted, performance and color accuracy are affected.
Therefore, a workflow with fewer steps minimizes the risk of error.
Workflow 1 using ColorWise calibration—minimal workflow
A minimal color workflow requires that you calibrate the copier. Select from printed
colors as described above, and set the CMYK Simulation option to None, since
simulation is not needed when colors are already defined using CMYK values
optimized for your calibrated copier.
N OTE : CMYK Simulation set to None is also useful when you want to prepare an
output profile of your calibrated copier or when you use less efficient color
management from the desktop (such as ColorSync or ICM).
2
2-5
Simple workflows
In this workflow, colors are modified only at the calibration stage. This is indicated by
the black box in the diagram below.
Workflow 1—Colors you define in an application
Application
CMS
File format
Colors in output from the copier
Printer driver
ColorWise
CMS
ColorWise
calibration
While this workflow lends some control over the color quality produced by the copier,
you should consider additional ColorWise color management, as described in the next
section.
Workflow 2 using ColorWise color management—standard workflow
E-810 servers are highly optimized for the specific copier they drive, and ColorWise
addresses many issues unique to your copier, including screens, individual toner
response, interactions among toners, natural smoothness of blends, and the capability
to render PANTONE and custom colors. The E-810 distinguishes text and graphic
from image elements, so the black channel information is preserved while parameters
used for CMYK color separations are maintained.
Conventional color management systems typically address only color conversions, and
they occupy your computer processor. When you use ColorWise, jobs leave your
computer faster to be processed more quickly on the E-810.
The recommended standard color workflow (indicated by the black boxes in the
diagram below) uses ColorWise calibration and color management.
Workflow 2—Colors you define in an application
Application
CMS
File format
Colors in output from the copier
Printer driver
ColorWise
CMS
ColorWise
calibration
2
2-6
Simple and Advanced Workflows
The E-810 comes into play near the end of the color workflow. To ensure the colors
you selected reach the E-810 and ColorWise in a usable form, you should bypass any
color management from applications and printer drivers. Keep in mind, however, that
color management from applications and printer drivers is fully supported by
ColorWise (see “Advanced workflows” on page 2-8).
You must print with the CMYK Simulation print option set to match the CMYK
color space in your application when you selected the colors. Any CMYK Simulation
setting (except Match Copy) applies calibration, so the response of the copier will
appear to be stable.
The recommended values for CMYK Simulation are SWOP in the US, Euroscale in
Europe, and DIC in Japan—choices that respect the color standard for each region. If
colors have been selected specifically for your calibrated copier, set CMYK Simulation
to None.
See the table on page 1-2 for a list and descriptions of ColorWise print options that
affect CMYK, RGB, PANTONE, and other colors.
Workflow 3 bypassing ColorWise—not recommended
Bypassing ColorWise color management, while an option, is not a recommended
workflow. When you bypass ColorWise, you must choose colors using only CMYK
formulas designed specifically for your copier, and you must print with the CMYK
Simulation option set to Match Copy. The E-810 still prints pages using your
PostScript files, and drives the copier and its accessories, but it does not perform
CMYK color transformation, nor does it consider the calibration of the copier.
Calibration is needed in order to get consistent output, since the color response from
your copier varies significantly depending on wear, heat, humidity, and service.
The diagram below indicates that no modifications are made to colors in this
workflow.
Workflow 3—Colors you define in an application
Application
CMS
File format
Colors in output from the copier
Printer driver
ColorWise
CMS
ColorWise
calibration
2
2-7
Simple workflows
Turn off color management in your application
Generally, when printing to the E-810, you should disable color management in the
application to ensure the E-810 receives color data properly and prints it accurately.
Save your files using color-safe settings
You can take several additional steps to ensure color accuracy.
• When saving EPS files, do not include PostScript Color Management information.
This minimizes the risk conflicting data and multiple color conversions. PostScript
Color Management causes your CMYK and RGB colors to be interpreted by the
E-810 as though they were supplied in the Lab color space and, as a result, to be
processed by CRDs rather than your simulation settings.
• Include ICC color information in files. ColorWise does not conflict with this
information, and such data is useful for identifying the specific color space used by
your files.
• Do not include halftone and transfer functions.
• Turn off color management in the printer driver.
On Windows computers, if the printer driver offers Image Color Matching options,
select Printer Image Color Matching.
On Mac OS computers, set the printer driver to include no color management
commands at print time (see page 1-17).
2
2-8
Simple and Advanced Workflows
Advanced workflows
The following sections present advanced color management workflow examples for
three short-run printing and three color proofing situations. Each workflow example
consists of a brief description, steps for creating and manipulating the files, a list of the
ColorWise settings used in the example, and a table that summarizes the workflow.
N OTE : These examples reference specific software applications to illustrate image-
editing, illustration, page layout, and business/office applications; they are Adobe
Photoshop, Adobe Illustrator, QuarkXPress, and Microsoft PowerPoint, respectively.
Short-run printing examples
The following examples illustrate short-run printing on the E-810.
Photoshop RGB workflow
This short-run workflow of printing an RGB image from Photoshop is one of the
simplest E-810 color workflows. RGB data is sent from the application, through the
printer driver, to the E-810, and the RGB-to-CMYK conversion takes place on the
E-810 using a CRD rather than the application. Use the settings illustrated in this
workflow for printing photographs and artwork.
This document could be created as follows:
• Create an RGB image in Photoshop.
• Print the file directly to the E-810.
See Chapter 7 for recommended print settings from Photoshop.
• Use ColorWise to convert the RGB image to copier CMYK, or the full copier
gamut.
2
2-9
Advanced workflows
The ColorWise settings used in this example are:
• RGB Source Profile set to EFIRGB or another RGB source definition
• Rendering Style set to Photographic
• RGB Separation set to Output
The diagram below indicates the steps for this particular workflow in black.
Photoshop RGB workflow
Photoshop
Printer driver
ColorWise
print options
Read Embedded Profiles
Define RGB Source
Embed Source Profiles
Convert RGB to CMYK
Convert CMYK to CMYK
Select RGB Mode
Select CMYK Mode
Select Destination Profile
Save as TIFF
Save as EPS
Save as JPEG
Print
(Mac OS-Only)
Black and White
Color/Grayscale
ColorSync Color Matching
PostScript Color Matching
Define RGB Source
Select RGB Source: None
Select Rendering Style (CRD)
Select RGB Separation: Output
Select RGB Separation: Simulation
Convert Press CMYK to Press Sim.
Convert Press CMYK to Custom Sim.
Select Copier CMYK Sim.: None
Turn Spot Color Matching On
Turn Spot Color Matching Off
Select Output Profile
Select Custom Output Profile
2
2-10
Simple and Advanced Workflows
Photoshop RGB with Illustrator and QuarkXPress CMYK and PANTONE colors
This workflow involves short-run printing of a complex page layout with images
saved in Photoshop, illustrations created in Illustrator, and PANTONE spot colors.
A Photoshop image is saved in an RGB color space using the EPS file format.
Illustrator artwork contains objects defined as CMYK and as PANTONE spot colors
selected from printed output, and they are saved using the Illustrator EPS file format.
After all of these individual objects are imported into QuarkXPress, additional design
elements in QuarkXPress are colored using CMYK process colors or PANTONE spot
colors. Use the settings illustrated in this workflow for printing brochures, newsletters,
and other layouts.
N OTE : Anytime you place CMYK colors in a document, select them from printed
output (see page 2-3).
This document could be created as follows:
• Create an RGB image in Photoshop and save it as Photoshop EPS.
• Create a graphic in Illustrator using CMYK and PANTONE colors and save as
Illustrator EPS.
• Use CMYK colors and a PANTONE color in a QuarkXPress document.
• Import the Illustrator EPS into QuarkXPress and place the Photoshop EPS image.
• Print the QuarkXPress document to the E-810.
• Use ColorWise to convert the RGB image to copier CMYK, to adjust the process
colors for short-run printing, and to match the PANTONE spot colors using the
full copier gamut.
2
2-11
Advanced workflows
The ColorWise settings used in this example are:
• RGB Source Profile set to EFIRGB or another RGB source definition
• Rendering Style set to Photographic
• RGB Separation set to Output
• CMYK Simulation set to None
• Spot Color Matching set to On
The diagram below indicates the steps for this particular workflow in black.
Photoshop RGB workflow with Illustrator, QuarkXPress CMYK, and PANTONE colors
Photoshop
Illustrator
QuarkXPress
Printer driver
Read Embedded Profiles
Read Embedded Profile
Read Embedded Profile
(Mac OS-Only)
Define RGB Source
Define RGB Colors
Define RGB Colors
Black and White
Embed Source Profiles
Define CMYK Colors
Define CMYK Colors
Color/Grayscale
Convert RGB to CMYK
Define PANTONE Colors
Define PANTONE Colors
ColorSync Color
Convert CMYK to CMYK
Convert RGB to CMYK
Convert RGB to CMYK
Matching
Select RGB Mode
Convert PANTONE to CMYK
Convert CMYK to CMYK
PostScript Color
Select CMYK Mode
Embed Source Profile
Convert PANTONE to CMYK
Matching
Select Destination Profile Select Destination Profile
Embed Source Profile
Save as TIFF
Export as TIFF
Select Destination Profile
Save as EPS
Save as EPS
Export as TIFF
Save as JPEG
Print
Save as EPS
Print
Print
ColorWise
print options
Define RGB Source
Select RGB Source: None
Select Rendering Style (CRD)
Select RGB Separation: Output
Select RGB Separation: Simulation
Convert Press CMYK to Press Sim.
Convert Press CMYK to Custom Sim.
Select Copier CMYK Simulation: None
Turn Spot Color Matching On
Turn Spot Color Matching Off
Select Output Profile
Select Custom Output Profile
2
2-12
Simple and Advanced Workflows
Photoshop RGB with Illustrator CMYK and PANTONE and PowerPoint RGB
This workflow involves short-run printing of a complex presentation document with
images saved in Photoshop, illustrations created in Illustrator, and PANTONE spot
colors. All elements are imported into PowerPoint for output.
This document could be created as follows:
• Create an RGB image in Photoshop and save it as Photoshop EPS.
• Create a graphic in Illustrator using CMYK colors and a PANTONE spot color and
save as Illustrator EPS.
• Create a presentation in PowerPoint using RGB colors.
• Import the Illustrator EPS graphic into the PowerPoint presentation and place the
Photoshop EPS image.
• Print the PowerPoint document to the E-810.
• Use ColorWise to convert the PowerPoint RGB colors and Photoshop RGB image
to copier CMYK, to adjust the process colors for more saturated short-run printing,
and to match the PANTONE spot colors using the full copier gamut.
2
2-13
Advanced workflows
The ColorWise settings used in this example are:
• RGB Source Profile set to EFIRGB or another RGB source definition
• Rendering Style set to Presentation
• RGB Separation set to Output
• CMYK Simulation set to None
• Spot Color Matching set to On
The diagram below indicates the steps for this particular workflow in black.
Photoshop RGB and Illustrator CMYK and PANTONE in PowerPoint RGB workflow
Photoshop
Illustrator
Read Embedded Profiles
Read Embedded Profile
Define RGB Source
Define RGB Colors
Embed Source Profiles
Define CMYK Colors
Convert RGB to CMYK
Define PANTONE colors
Convert CMYK to CMYK
Convert RGB to CMYK
Select RGB Mode
Convert PANTONE to CMYK
Select CMYK Mode
Embed Source Profile
Select Destination Profile Select Destination Profile
Save as TIFF
Export as TIFF
Save as EPS
Save as EPS
Save as JPEG
Print
Print
PowerPoint
Printer driver
Define RGB Colors
Convert CMYK to RGB
Print
(Mac OS-Only)
Black and White
Color/Grayscale
ColorSync Color
Matching
PostScript Color
Matching
ColorWise
print options
Define RGB Source
Select RGB Source: None
Select Rendering Style (CRD)
Select RGB Separation: Output
Select RGB Separation: Simulation
Convert Press CMYK to Press Sim.
Convert Press CMYK to Custom Sim.
Select Copier CMYK Simulation: None
Turn Spot Color Matching On
Turn Spot Color Matching Off
Select Output Profile
Select Custom Output Profile
2
2-14
Simple and Advanced Workflows
Color proofing examples
The following examples illustrate methods for simulating the output from another
printing system, such as an offset press. Each of the proofing examples uses an ICC
profile to describe the destination color space. While some examples use simulation
profiles built into the E-810, others use ColorWise Pro Tools (see Chapter 4) to
download custom ICC output profiles to the E-810 for use as simulation profiles.
Photoshop 5.x RGB-to-CMYK conversion using a custom ICC profile
This workflow is useful for prepress environments that have integrated ICC color
management and have profiles for the presses they use. In this example, an image in
Photoshop 5.x is converted from RGB to CMYK using the Photoshop ICC color
conversion features in the CMYK Setup option. (For more information on CMYK
Setup, see your Photoshop 5.x documentation.) Using the Simulation settings available
in ColorWise, the CMYK image is printed to the E-810, and the output is made to
appear as if it were printed on an offset press.
This document could be created as follows:
• In Photoshop 5.x, set CMYK Model in CMYK Setup to ICC.
• In the Profile menu, select an ICC profile for the desired offset press. Click OK.
• Open an RGB image. From the Image pull-down menu select Mode>CMYK Color.
• Save the image in any file format.
• Print directly to the E-810.
• Use ColorWise Pro Tools to select a simulation profile or download a custom ICC
profile to the E-810 for use as a CMYK Simulation Profile.
2
2-15
Advanced workflows
The ColorWise settings used in this example are:
• CMYK Simulation Profile set to the desired press standard or to the corresponding
custom simulation (Simulation 1-10) if you downloaded your profile with
ColorWise Pro Tools
• CMYK Simulation Method set to Full
The diagram below indicates the steps for this particular workflow in black.
Photoshop RGB-to-CMYK workflow using ICC profile
Photoshop 5.x
Printer driver
Read Embedded Profiles
Define RGB Source
Embed Source Profiles
Convert RGB to CMYK
Convert CMYK to CMYK
Select RGB Mode
Select CMYK Mode
Select Destination Profile
Save as TIFF
Save as EPS
Save as JPEG
Print
(Mac OS-Only)
Black and White
Color/Grayscale
ColorSync Color Matching
PostScript Color Matching
ColorWise
print options
Define RGB Source
Select RGB Source: None
Select Rendering Style (CRD)
Select RGB Separation: Output
Select RGB Separation: Simulation
Convert Press CMYK to Press Sim.
Convert Press CMYK to Custom Sim.
Select Copier CMYK Simulation: None
Turn Spot Color Matching On
Turn Spot Color Matching Off
Select Output Profile
Select Custom Output Profile
2
2-16
Simple and Advanced Workflows
Photoshop 5.x Built-in RGB-to-CMYK workflow
This workflow is useful for prepress environments that have not integrated ICC color
management and do not have profiles for the presses they use. In this example, an
image is converted from RGB to CMYK using the Photoshop 5.x Built-in color
conversion features in the CMYK Setup option. (For more information on CMYK
Setup, see your Photoshop 5.x documentation.) Using the Simulation settings available
in ColorWise, the CMYK image is printed to the E-810, and the output is made to
appear as if it were printed on an offset press.
This document could be created as follows:
• Select the Built-in option from CMYK Setup in Photoshop 5.x
Color Settings.
• Adjust the Ink Options and Separation Options to match your offset press.
• Select the Tables option in CMYK Setup and click Save.
This saves your settings as a CMYK ICC profile that you will later download to the
E-810 as a custom simulation profile.
• Select the Built-in option in CMYK Setup again and click OK.
• Launch ColorWise Pro Tools and download your new CMYK ICC profile to the
E-810 as a custom Simulation profile.
For the Appear in Driver as option in Profile Settings, select Simulation-1.
(For more information on downloading profiles, see page 4-5.)
• Open an RGB image in Photoshop 5.x. From the Image menu, select
Mode>CMYK Color. Save the image as Photoshop EPS.
• Print the image directly to the E-810 and choose Simulation-1 as the CMYK
Simulation Profile setting.
2
2-17
Advanced workflows
The ColorWise settings used in this example are:
• CMYK Simulation Profile set to Simulation-1
• CMYK Simulation Method set to Full
The diagram below indicates the steps for this particular workflow in black.
Photoshop5.x RGB-to-CMYK workflow
Photoshop 5.x
Printer driver
Read Embedded Profiles
Define RGB Source
Embed Source Profiles
Convert RGB to CMYK
Convert CMYK to CMYK
Select RGB Mode
Select CMYK Mode
Select Destination Profile
Save as TIFF
Save as EPS
Save as JPEG
Print
(Mac OS-Only)
Black and White
Color/Grayscale
ColorSync Color Matching
PostScript Color Matching
ColorWise
print options
Define RGB Source
Select RGB Source: None
Select Rendering Style (CRD)
Select RGB Separation: Output
Select RGB Separation: Simulation
Convert Press CMYK to Press Sim.
Convert Press CMYK to Custom Sim.
Select Copier CMYK Simulation: None
Turn Spot Color Matching On
Turn Spot Color Matching Off
Select Output Profile
Select Custom Output Profile
2
2-18
Simple and Advanced Workflows
Photoshop RGB and QuarkXPress CMYK
This workflow exemplifies the use of the RGB Separation feature of ColorWise. An
RGB image, originally saved in Photoshop, is printed to the E-810 from QuarkXPress.
To simulate how the RGB image would print on an offset press, the RGB Separation
feature of ColorWise is set to Simulation. This workflow—useful for proofing
brochures, newsletters, and other layouts—lets you maintain consistency by using the
source RGB file for multiple purposes.
This document could be created as follows:
• Create an RGB image in Photoshop and save it as Photoshop EPS.
• Place the EPS image in a QuarkXPress document.
• Create several process-colored page elements alongside the image and print.
• Use ColorWise to convert the RGB image to simulated press CMYK and to adjust
the process colors for proofing to the copier.
2
2-19
Advanced workflows
The ColorWise settings used in this example are:
• RGB Source Profile set to EFIRGB or another RGB source definition
• Rendering Style set to Photographic
• RGB Separation set to Simulation
• CMYK Simulation Profile set to SWOP
• CMYK Simulation Method set to Full
The diagram below indicates the steps for this particular workflow in black.
Photoshop RGB and QuarkXPress CMYK workflow
Photoshop
QuarkXPress
Printer driver
Read Embedded Profiles
Define RGB Source
Embed Source Profiles
Convert RGB to CMYK
Convert CMYK to CMYK
Select RGB Mode
Select CMYK Mode
Select Destination Profile
Save as TIFF
Save as EPS
Save as JPEG
Print
Read Embedded Profile
Define RGB Colors
Define CMYK Colors
Define PANTONE Colors
Convert RGB to CMYK
Convert CMYK to CMYK
Convert PANTONE to CMYK
Embed Source Profile
Select Destination Profile
Export as TIFF
Save as EPS
Print
(Mac OS-Only)
Black and White
Color/Grayscale
ColorSync Color Matching
PostScript Color Matching
ColorWise
print options
Define RGB Source
Select RGB Source: None
Select Rendering Style (CRD)
Select RGB Separation: Output
Select RGB Separation: Simulation
Convert Press CMYK to Press Sim.
Convert Press CMYK to Custom Sim.
Select Copier CMYK Simulation: None
Turn Spot Color Matching On
Turn Spot Color Matching Off
Select Output Profile
Select Custom Output Profile
3
3-1
Chapter 3:
Color Calibration
Introduction
Calibrating the E-810 ensures consistent, reliable color output. You can calibrate
the E-810 with ColorWise Pro Tools using an X-Rite DTP41 automatic scanning
spectrophotometer (page 3-5) or an X-Rite DTP32 automatic scanning densitometer
(page 3-23). Each of these must be purchased separately. By connecting the
spectrophotometer or densitometer to the serial port on your computer, you can
quickly measure color patches and download measurements to the E-810. You can also
obtain measurements from the copier’s built-in scanner and calibrate using AutoCal2,
which does not require the use of a densitometer and can be run from ColorWise Pro
Tools or from the Control Panel.
This chapter explains how calibration works and provides instructions for all
calibration procedures. Calibrating with ColorWise Pro Tools is described on
page 3-27; calibrating from the E-810 Control Panel with AutoCal2 is described on
page 3-34.
For information on advanced calibration and simulation features available with
ColorWise Pro Tools, such as editing profiles and creating custom profiles, see
Chapter 4. A format for inputting color measurements from other densitometers
is described in Appendix C.
The procedures described in Chapters 3 and 4 are fundamentally the same for
Windows 9X/Me, Windows NT 4.0, Windows 2000, and Mac OS computers,
including those running Command WorkStation software. The main differences
are the interface cable and the port used to connect to the densitometer.
N OTE : The term “computer” is used to refer to any computer using ColorWise Pro
Tools.
Introduction
Calibration generates curves that adjust for the difference between the actual toner
densities (measurements) and the response expected by the output profile.
• Measurements represent the actual color behavior of the copier.
• Calibration sets are sets of measurements.
3
3-2
Color Calibration
• A calibration target that describes the expected behavior of the copier is contained
in each output profile.
Once you have calibrated the E-810 with ColorWise Pro Tools or with AutoCal2 from
the E-810 Control Panel, a calibration set is stored on the E-810. This calibration set is
used when it is associated with an output profile. Every output profile has an associated
calibration set. If you have not specified one, the calibration set associated with the
default output profile is used.
N OTE : Changing calibration has the potential to affect all jobs for all users, so you
may want to limit the number of people authorized to perform calibration. You can set
an Administrator password from the E-810 Control Panel or in Setup from Command
WorkStation to control access to calibration.
Understanding calibration
Although most users’ needs are met by the default calibration set, the E-810 allows you
to choose a calibration set to customize calibration for specialized jobs.
Calibration allows you to:
• Maximize the color reproduction capabilities of the E-810.
• Ensure consistent color quality over time.
• Produce consistent output across E-810 servers that are connected to the same print
engine.
• Achieve better color matches when reproducing spot colors such as PANTONE
colors or other named color systems.
• Optimize the E-810 for using ColorWise rendering styles (CRDs), CMYK
simulations, and ICC profiles.
3
3-3
Understanding calibration
How calibration works
Success in obtaining satisfactory print quality from a color server, such as a E-810,
connected to a copier depends on many factors. Among the most important are
establishing and maintaining optimal toner densities. Density is a measure of the light
absorbed by a surface. By carefully regulating toner densities, you can obtain consistent
printed color.
Even with a calibrated system, toner density is affected by service settings, humidity,
and temperature; it also tends to drift over time. Regular measurement detects day-today variations in densities, and calibration corrects for them.
Calibration works by creating calibration curves on the E-810 that compensate for the
difference between actual (measured) and desired (target) density values.
Calibration curves are the graphic equivalent of transfer functions, which are
mathematical descriptions of changes that will be made to the data you start with.
Transfer functions are often graphed as input or output curves.
The E-810 generates calibration curves after comparing measured values to the final
target values for each of the four toner colors. The target values are based on the output
profile specified.
Measurements
Measurement files contain numerical values that correspond to the toner density
produced by the copier when it prints solid cyan, magenta, yellow, and black, and
graduated tints of those colors.
To create a measurement file, first print a page of color patches from ColorWise Pro
Tools. Then you measure the patches using either the X-Rite DTP41
spectrophotometer or an X-Rite DTP32 densitometer connected to a computer
on the network or the copier’s scanner. The new measurements are automatically
downloaded to the E-810.
3
3-4
Color Calibration
Output profiles and calibration sets
Output profiles and calibration sets define desired calibration results. One or more
output profiles and one or more calibration sets are provided with the E-810. When
you calibrate the E-810, you can select the calibration set that corresponds to the
typical printing jobs at your site. This same calibration set can be associated with one
or more output profiles. (For more information on output profiles, see page 1-9.)
Scheduling calibration
In general, you should calibrate the E-810 at least once a day, depending on the
volume of print jobs. If it is very important to maintain consistent color, or if the
copier is subject to wide fluctuations in temperature or humidity, calibrate every few
hours. To get the best performance, calibrate whenever there is a noticeable change in
print quality.
If you need to split a print job into two or more batches to be printed at different
times, it is especially important to calibrate before printing each batch. You should also
calibrate the E-810 after copier maintenance. However, because the copier may be less
stable immediately after maintenance, wait until you have printed approximately 50
pages before you calibrate.
N OTE : Since printed output from the copier is very sensitive to changes in temperature
and humidity, the copier should not be installed near a window, in direct sunlight, or
near a heater or air conditioner. Paper is sensitive to climate changes as well. It should
be stored in a cool, dry, stable environment, and reams should remain sealed until they
are needed.
Print color reference pages, such as the Color Charts (from the Control Panel or
Command WorkStation) and the color reference pages included with the user software
(see Getting Started ). All of these pages include fully saturated color patches and pale
tints of cyan, magenta, yellow, and black. Images with skin tones offer a very good
basis for comparison. You can save and compare pages you printed at different times. If
there is a noticeable change in appearance, you should calibrate the E-810.
3
3-5
Using a spectrophotometer
When you examine the Test Page, keep in mind that all color patches should be visible,
even though they may be very faint in the five percent and two percent range, and each
color’s patch set should show uniform gradation from patch to patch as the color
lightens from 100 percent to zero percent.
If the solid density patches (100% cyan, magenta, yellow, or black) look less saturated
with time, show the pages to your copier service technician to find out whether
adjusting the copier can improve output.
Checking calibration status
You can check whether the E-810 is calibrated, which calibration set and output profile
were used, and when the copier was last calibrated:
• Print a Configuration page or Test Page from the Control Panel or the Command
WorkStation.
• When you select a calibration set in Calibrator, the last calibration and the user who
performed it are displayed.
Using a spectrophotometer
ColorWise Pro Tools Calibrator is designed to work with the X-Rite DTP41
spectrophotometer, a device that measures density and color data. The DTP41
communicates directly with the Calibrator application in ColorWise Pro Tools,
sending measurements to the E-810 automatically.
Setting up the spectrophotometer
Before you calibrate the E-810, you need to connect, configure, and calibrate the
spectrophotometer to prepare for measuring the printed patches (see “Calibrating the
densitometer” on page 3-26). For additional information about setting up and using
the DPT41, see the Instrument Operator’s Manual that came with it.
3
3-6
TO
Color Calibration
CONNECT THE
X-R ITE DTP41
TO THE COMPUTER
1.
Turn off the computer.
2.
Unpack the X-Rite DTP41, and remove the spacer from the measurement page slot.
3.
Plug the square end of the interface cable (looks like a modular phone plug) into the
serial interface connection on the side of the X-Rite DTP41.
Instrument button
Alignment mark
LED indicator
Measurement page slot
Power input
Calibration strip
entrance
Serial interface
connection
3
3-7
4.
Using a spectrophotometer
Attach the connector to the computer.
For a Windows computer, insert the 8-pin mini-DIN end of the interface cable into
the 9-pin DB9 Connector cable adapter. Insert the 9-pin end into the COM1 or
COM2 port on the computer and tighten the screws. If the available port on your
computer is 25-pin, you must use the 8-pin-to-25-pin adapter.
Unused connector
Connect to computer
Connect to adapter
Square connector
Interface cable
3
3-8
Color Calibration
For a Mac OS computer, connect the 8-pin mini-DIN plug directly into the serial port
of the computer.
Unused connector
Connect to serial port
N OTE : For Macintosh computers with a USB port (for example, an iMac) you need an
adapter to connect the DTP41 to your computer. See the X-Rite, Inc. web site
(www.x-rite.com) for information on supported adapters.
3
3-9
5.
Using a spectrophotometer
Use the AC adapter to provide power.
Plug the small connector on the adapter cable into the power input of the X-Rite
DTP41 and plug the AC adapter into the power cord. Plug the power cord into a wall
outlet.
AC adapter
Power cord
Small connector
6.
Turn on the computer.
7.
Use ColorWise Pro Tools to calibrate the X-Rite DTP41 (see page 3-26).
8.
Use ColorWise Pro Tools and the DTP41 to calibrate the E-810 (see page 3-15).
3
3-10
Color Calibration
Calibrating the spectrophotometer
For the best color accuracy, you should calibrate the X-Rite DTP41 spectrophotometer
every time you calibrate the E-810. You can initiate the calibration sequence in
ColorWise Pro Tools Calibrator as part of the process of E-810 calibration. The
computer may also prompt you that it is necessary to calibrate the spectrophotometer.
Alternatively, you can initiate the DTP41 calibration process using the Instrument
button on the DTP41. See the Instrument Operator’s Manual that came with the
X-Rite DTP41 for more information on this method.
Multiple users connect to one E-810 server with ColorWise Pro Tools, but only one
user at a time can use the Calibrator module. An error message appears if you try to
calibrate when another user is already using ColorWise Pro Tools to calibrate.
N OTE : ColorWise Pro Tools for Windows and Mac OS computers are fundamentally
the same; differences are noted in this chapter. The screens and dialog boxes you see
illustrated here are the Windows version.
You will need the Color Reflection Reference strip included with the
spectrophotometer. Remove the strip from its protective envelope, handling it only by
the edges. Keep the strip free of dust and smudges, and always store it in the protective
envelope.
TO
CALIBRATE THE
X-R ITE DTP41
1.
Connect the spectrophotometer to the computer and turn on power (see page 3-6).
2.
Launch ColorWise Pro Tools and connect to the E-810.
For instructions on configuring the connection to the E-810, see Getting Started.
3
3-11
Calibrating the spectrophotometer
N OTE : If the connection to the E-810 from Command WorkStation that also allows for
access to ColorWise Pro Tools is not established, you can directly launch ColorWise
Pro Tools independently of Command WorkStation.
3.
Click Calibrator.
4.
Select DTP41 as the measurement method.
X-Rite DTP41 should appear as a measurement method. This information is provided
to Calibrator by the E-810. If this option does not appear, make sure you are
connected to the E-810.
5.
Under Get Measurements, click Measure.
3
3-12
Color Calibration
6.
In the Measurement Options dialog box, click Measure.
7.
Select the appropriate COM port for the DTP41 from the Available Ports menu.
The Instructions field displays instructions for selecting the port.
Instructions field
Select port for the DTP41
3
3-13
Calibrating the spectrophotometer
8.
Click Utilities.
9.
Click Calibrate DTP-41.
N OTE : To view version and serial number information, click Show DTP-41 Info.
When finished, click Done.
10.
Remove the shipping spacer from the measurement page slot, if you have not already
done so.
11.
Insert the end of the Color Reflection Reference strip with the arrow into the
calibration strip entrance on the DTP41, centering it below the alignment mark
(see the diagram on page 3-6).
Insert the strip about 3 inches, past the front idler rollers, until it rests against the rear
drive rollers.
3
3-14
12.
Color Calibration
Click Read Reference.
The DTP41 will pull the calibration strip through automatically.
13.
Click Done.
14.
Close the Utilities window.
Status field indicates DTP41
was calibrated successfully
This completes DTP41 calibration.
3
3-15
Calibrating with ColorWise Pro Tools and DTP41
When the DTP41 requires calibration, your computer prompts you.
When this dialog box appears, click Calibrate Now and follow the instructions,
starting with step 9 on page 3-13.
After calibrating the DTP41, calibrate the E-810 (see page 3-15).
Calibrating with ColorWise Pro Tools and DTP41
Using the ColorWise Pro Tools Calibrator application and the DTP41
spectrophotometer, you can quickly measure color patches generated by the copier
and automatically download these measurements to the E-810.
Changing the calibration has the potential to affect all jobs for all users, so you may
want to limit the number of people authorized to perform calibration. You can set an
Administrator password from the E-810 Control Panel to control access to calibration.
Multiple users can connect to one E-810 server with ColorWise Pro Tools, but only
one user at a time can use the Calibrator module. An error message appears if you try
to calibrate when another user is already using ColorWise Pro Tools to calibrate.
N OTE : Before using ColorWise Pro Tools and the DTP41 to calibrate the E-810, follow
the instructions on page 3-26 for calibrating the DTP41 spectrophotometer.
3
3-16
TO
Color Calibration
CALIBRATE THE
1.
E-810
USING THE
DTP41
Launch ColorWise Pro Tools and connect to the E-810.
For instructions on configuring the connection to the E-810, see Getting Started.
N OTE : If the connection to the E-810 from Command WorkStation that also allows for
access to ColorWise Pro Tools is not established, you can directly launch ColorWise
Pro Tools independently of Command WorkStation.
2.
Click Calibrator.
3.
Select DTP41 as the measurement method.
X-Rite DTP41 should appear as a measurement method. This information is provided
to Calibrator by the E-810. If this option does not appear, make sure you are
connected to the E-810.
3
3-17
4.
Calibrating with ColorWise Pro Tools and DTP41
Under Check Print Settings, choose the desired calibration set.
Choose the appropriate calibration set for the type of media you will use most often.
N OTE : For this calibration to take effect, the calibration set must be associated with one
or more output profiles. The default calibration set is already associated with the
default output profile, so there is no need to make any new associations.
5.
Under Generate Measurement Page, click Print.
6.
In the Print Options dialog box, choose the Page Type, Paper Size, and Input Tray to
use for the measurement page, and then click Print.
In the Page Type pop-up menu, select either 34 or 21 Sorted Patches.
In the Paper Size pop-up menu, the menu will automatically select LTR/A4 for 21
Sorted Patches or 11x17/A3 for 34 Sorted Patches.
In the Input Tray pop-up menu, specify the paper source.
Print Options window for
DTP41 calibration
method
7.
Retrieve the measurement page from the copier.
8.
Under Get Measurements, click Measure.
The selected Page Type and Paper Size options appear.
3
3-18
9.
10.
Color Calibration
Click Measure.
If necessary, select the appropriate COM port for the DTP41 from the Available Ports
pop-up menu.
The Instructions field displays instructions for selecting the port.
Instructions field
11.
Feed the measurement page into the DTP41, starting with the cyan strip.
Align the page in the measurement page slot of the DTP41, so the appropriate color
column is centered below the alignment mark (see the diagram on page 3-6). Insert the
page about 3 inches, past the front idler rollers, until it rests against the rear drive
rollers.
3
3-19
12.
Calibrating with ColorWise Pro Tools and DTP41
Click Read Strip.
The DTP41 pulls the measurement page through automatically.
13.
Once the measurement page is read, Calibrator instructs you to insert and align the
page again for the next color. Repeat the measurement process for the magenta,
yellow, and black strips.
Status field indicates color
was measured successfully
Previous and Next buttons
let you advance or reverse
to repeat a measurement
A check mark appears on the circle of the color just read, and the Status field indicates
that color was measured successfully.
You can use the Previous and Next buttons on the Measurements window to reverse or
advance to another step in the measurement sequence to repeat a measurement.
3
3-20
Color Calibration
14.
When the Status field indicates that all four color strips have been read successfully,
click Accept Measurements.
15.
In the Measure dialog box, click OK.
Click Accept Measurements
3
3-21
Calibrating with ColorWise Pro Tools and DTP41
16.
In the Calibrator dialog box, click Apply to implement the new calibration set.
17.
In the Information dialog box, click OK.
Click Apply
This completes the E-810 calibration process.
3
3-22
TO
Color Calibration
RESTORE DEFAULT CALIBRATION MEASUREMENTS
1.
Launch ColorWise Pro Tools and click Calibrator.
2.
Click Restore Device.
3.
Click OK to restore the preset default calibration set.
Click Restore Device
N OTE : Restore device applies only to the currently selected calibration set.
3
3-23
Using a densitometer
Using a densitometer
ColorWise Pro Tools are designed to work with the X-Rite DTP32 reflection
densitometer which feeds color measurements to the E-810 automatically.
N OTE : Measurements from other densitometers can be input using a simple ASCII file
format (see page C-1).
Setting up the densitometer
Before you calibrate the E-810 using the X-Rite DTP32, you need to connect,
configure, and calibrate the densitometer to prepare for measuring the printed patches
(see “Calibrating the densitometer” on page 3-26). For additional information about
setting up and using the DTP32, see the documentation included with it.
TO
CONNECT THE
X-R ITE DTP32
TO THE COMPUTER
1.
Turn off the computer.
2.
Plug the square end of the interface cable (looks like a modular phone plug) into the
I/O port on the side of the X-Rite DTP32.
Square connector
3
3-24
3.
Color Calibration
Attach the connector to the computer.
For a Windows computer, insert the 8-pin mini-DIN end of the interface cable into
the 9-pin DB9 Connector cable adapter. Insert the 9-pin end into the COM1 or
COM2 port on the computer and tighten the screws. If the available port on your
computer is 25-pin, you must use the 8-pin-to-25-pin adapter.
Unused connector
Square connector
Connect to computer
Connect to adapter
Interface cable
For a Mac OS computer, connect the 8-pin mini-DIN plug directly into the serial port
of the computer.
Unused connector
Connect to serial port
3
3-25
Using a densitometer
N OTE : For Macintosh computers with a USB port (for example, an iMac) you need an
adapter to connect the DTP32 to your computer. See the X-Rite, Inc. web site
(www.x-rite.com) for information on supported adapters.
4.
Use the AC adapter to provide power.
Plug the small connector on the adapter cable into the side of the X-Rite DTP32 and
plug the adapter into a wall outlet.
Small connector
AC adapter
5.
Turn on the computer.
6.
Calibrate the densitometer (see below).
7.
Use ColorWise Pro Tools to calibrate the E-810 (see page 3-27).
3
3-26
Color Calibration
Calibrating the densitometer
You will need the black-and-white X-Rite Auto-Cal Strip included with the
densitometer. Calibrating the densitometer does not require ColorWise Pro Tools.
TO
CALIBRATE THE
X-R ITE DTP32
1.
Connect the densitometer to the computer and supply power (see page 3-23).
2.
From the Main Menu on the X-Rite DTP32 display, press the p1 key once to reach p2.
3.
Press the cal key.
Calibrating motor speed is displayed, followed by the words INSERT CAL STRIP.
4.
Insert the arrow end of the X-Rite Auto-Cal Strip into the 35mm slot on the front of
the X-Rite DTP32 until it stops or the roller starts pulling the strip.
Reading appears momentarily, followed by the density values and CALIBRATION OK.
The densitometer automatically returns to the MAIN MENU.
If UNRECOGNIZABLE STRIP appears, repeat the process or try cleaning the strip (see the
X-Rite DTP32 Operating Manual).
5.
Start ColorWise Pro Tools and proceed to calibrate the E-810 (see the next section).
Recalibrate the densitometer at least once per month. For critical color, calibrate the
densitometer every time you calibrate the E-810. The densitometer may also warn
periodically that it requires calibration.
3
3-27
Calibrating with ColorWise Pro Tools
Calibrating with ColorWise Pro Tools
Using the densitometer or AutoCal2, you can quickly measure color patches and
download these measurements to the E-810 using ColorWise Pro Tools Calibrator.
N OTE : Multiple users can connect to one server with ColorWise Pro Tools, but only
one user at a time can use Calibrator. An error message appears if you try to calibrate
when another user is already using ColorWise Pro Tools to calibrate.
ColorWise Pro Tools for Windows and Mac OS computers are fundamentally the
same; differences are noted in this chapter. The windows and dialog boxes you see
illustrated are the Windows version.
N OTE : Changing the calibration has the potential to affect all jobs for all users, so
you may want to limit the number of people authorized to perform calibration.
An Administrator password can be set from the E-810 Control Panel to control access
to calibration.
TO
CALIBRATE THE COPIER USING
1.
C ALIBRATOR
Launch ColorWise Pro Tools and connect to the E-810.
For instructions on configuring the connection to the E-810, see Getting Started.
N OTE : If the connection to the E-810 from Command WorkStation that also allows
for access to ColorWise Pro Tools is not established, you can directly launch
ColorWise Pro Tools independently of Command WorkStation.
3
3-28
Color Calibration
2.
Click Calibrator.
3.
Select a measurement method.
AutoCal2, X-Rite DTP32, and X-Rite DTP41 should appear as the measurement
methods. This information is provided to Calibrator by the E-810. If none of these
options appear, make sure you are connected to the E-810.
4.
Under Check Print Settings, choose the desired calibration set.
If there is more than one option, choose the appropriate calibration set for the type of
media you use most often.
N OTE : For this calibration to take effect, the calibration set must be associated with one
or more output profiles. The default calibration set is already associated with the
default output profile, so there is no need to make any new associations.
5.
Under Generate Measurement Page, click Print.
3
3-29
6.
Calibrating with ColorWise Pro Tools
In the Print Options dialog box, choose the Page Type, Paper Size, and Input Tray to
use for the measurement page, and then click Print.
For AutoCal2, the Page Type pop-up menu states AutoCal Page. For the densitometer
method, select either 34 or 21 Sorted Patches.
In the Input Tray pop-up menu, specify the paper source.
7.
Retrieve the Measurement Page and click Cancel.
8.
Under Get Measurements, click Measure.
9.
If you chose the AutoCal2 method, follow the directions in the dialog box that appears
for placing the Gray Scale strip and measurement page on the copier glass.
3
3-30
10.
Color Calibration
If you chose the DTP32 method, select the Page Type and Paper Size options you
selected for the measurements page, and click Measure.
Follow the directions in the dialog box that appears for feeding the measurement page
through the X-Rite DTP32.
The Status field displays instructions for selecting the port and feeding the
measurement page through the DTP32 four times, once for each color strip.
3
3-31
Calibrating with ColorWise Pro Tools
11.
When the Status field indicates that the measurements were read successfully, click
Accept.
12.
In the Measure dialog box, click OK.
13.
In the Calibrator window, click Apply to implement the new calibration set.
14.
In the Information dialog box, click OK.
This completes the calibration process.
TO
RESTORE DEFAULT CALIBRATION MEASUREMENTS
1.
Launch ColorWise Pro Tools and click Calibrator.
2.
Click Restore Device.
3.
Click OK to restore the preset default calibration set.
N OTE : Restore device applies only to the currently selected calibration set.
3
3-32
Color Calibration
Expert Mode
Expert Mode offers two additional options: Print Pages and View Measurements.
With the Print Pages option, you can print a calibration Comparison Page showing the
results of the new measurements with any profile associated with the currently selected
calibration set. You can also create a custom comparison page and save it as a
PostScript or an Encapsulated PostScript (EPS) file called CALIB.PS. Then you can
print the file to the Hold Queue of the E-810 from your application or download it to
the Hold Queue with Fiery Downloader. In addition, you can create the CALIB.PS
file by renaming any job in the Hold Queue using Command WorkStation.
3
3-33
Calibrating with ColorWise Pro Tools
With the View Measurements option, you can view the current set of measurements as
a table or as a graph that shows both the measurements and the target curves.
Output profile name
appears here
When more than one profile use the same target, an additional menu called Plot
Against appears in the upper right of the window above. It lists all output profiles that
use the same calibration set. Selecting an output profile from this menu displays the
target curves associated with that profile. If each output profile contains a unique
calibration target, when you switch profiles, the curves displayed also change.
3
3-34
Color Calibration
Calibrating from the Control Panel using AutoCal2
You can calibrate the E-810 from the Control Panel using AutoCal2, which calibrates
the E-810 using the copier’s built-in scanner as a densitometer. If an Administrator
password has been set, you will need it for calibration.
For instructions on using the E-810 Control Panel, see the Configuration Guide.
For troubleshooting during the AutoCal2 procedure, see the Job Management Guide.
N OTE : To calibrate using AutoCal2, you will need the Kodak Gray Scale strip included
in the customer media pack that came with your E-810.
TO
ACCESS AND USE
A UTO C AL 2
1.
At the Idle screen, press the Menu button to enter the Functions menu.
2.
Choose Calibration, and choose Set Up Calibration.
If a password is set on the E-810, enter it and press OK.
3.
For Calibration Mode, select Standard or Expert.
Expert Mode adds the option to print a Comparison Page (see page 3-32).
4.
For Tray, choose the paper source for the patch page and press OK.
5.
Choose Calibrate.
6.
Select the calibration set.
You can choose from the list of all calibration sets on the E-810. This screen appears
only if more than one calibration set is available.
7.
When prompted, select Yes to print the measurement page.
This page is comprised of swatches of color that will be measured by the copier and
then compared to the target color values. After the page is printed, the Measure Page
screen is displayed.
8.
Select Yes in the Measure Page screen.
3
3-35
9.
Calibrating from the Control Panel using AutoCal2
When prompted on the Control Panel, place the Kodak Gray Scale strip face down along
the top of the copier glass.
Place the strip so that it is centered along the top edge of the AutoCal page.
Place grayscale strip face down
10.
Place color measurement page face
down over grayscale strip
Place the color measurement page face-down over the grayscale strip.
Place the page at the upper-left corner of the copier glass. Slide the grayscale strip to
the top center of the color measurement page. Make sure the patches on the grayscale
strip do not overlap the color patches.
11.
Close the platen glass cover, being careful not to move the grayscale strip and color
measurement page.
12.
Click OK.
Status messages display the progress of scanning and calculating measurements.
13.
When prompted to Print Comparison Page (Expert Mode only), select Yes to print a
preview of the selected calibration.
Select from a list of output profiles that use the same calibration set and press OK.
This option appears only in Expert Mode calibration.
14.
When prompted to overwrite calibration, select Yes.
15.
Select Yes to confirm.
Status messages display progress information. When calibration is complete, the LCD
screen returns to the Functions menu
4
4-1
Chapter 4:
ColorWise
Pro Tools
Profile Manager
ColorWise Pro Tools include the following color management tools that give you
flexible control of color printing:
• Calibrator (see Chapter 3)
• Color Editor
• Profile Manager
• Color Setup
ColorWise Pro Tools for Windows and Mac OS computers are fundamentally the
same; differences are noted in this chapter. The windows and dialog boxes illustrated
are the Windows version. For information on installing and configuring a connection
to ColorWise Pro Tools, see Getting Started.
N OTE : If the connection to the E-810 from Command WorkStation that also allows for
access to ColorWise Pro Tools is not established, you can directly launch
ColorWise Pro Tools independently of Command WorkStation.
Profile Manager
Profile Manager allows you to manage and edit ICC profiles. In the case of the E-810,
these profiles are divided into RGB Source, Simulation, and Output profiles.
• RGB Source contains all monitor profiles resident on the E-810. RGB Source profiles
are used to define the source color space for RGB colors processed by the E-810.
N OTE : If you use Photoshop 5.x, you can upload the profile for your selected working
space to the E-810 and choose that as your RGB Source profile.
• Simulation contains printer profiles used to simulate another device on the E-810.
4
4-2
ColorWise Pro Tools
• Output contains copier profiles that describe the attached copier.
For more information on output profiles, see page 1-9.
N OTE : Changing the E-810 default profiles affects all jobs for all users, so you might
want to limit the number of people authorized to use ColorWise Pro Tools by setting
an Administrator password.
Several profiles are provided with the E-810, and you can create additional profiles as
needed by modifying the existing ones. You can also download profiles listed below
from any workstation to the E-810.
RGB Source:
• sRGB (PC)—source color space for a generic Windows computer monitor
• Apple Standard—standard source color space for Mac OS computer monitors with
older versions of ColorSync
• EFIRGB—preset default setting for a E-810
Simulation:
• SWOP-Coated—United States press standard
• Euroscale—European press standard
• DIC—Japanese press standard
Output:
• Fiery R7—profile that describes the copier
N OTE : For more information on output profiles, see page 1-9.
4
4-3
Profile Manager
Setting the default profiles
The default profiles are applied to all print jobs sent to the E-810, unless you override
them using print options. Therefore, the defaults should be the most commonly used
profiles.
TO
SPECIFY A DEFAULT PROFILE
1.
Launch ColorWise Pro Tools and click Profile Manager.
The left side of the screen lists the ICC profiles in the default directory of your
computer. The right side lists each of the three types of profiles on the E-810.
The lock icon ( ) to the left of a profile name indicates that the profiles cannot be
deleted and can be edited only if it is saved under a new name. Only Simulation and
Output profiles can be edited.
A small icon to the left of a profile name indicates the default profile for each category
(RGB Source, Simulation, and Output). If you designate a different profile as the
default, the icon appears next to your designated profile. The icon indicating the
default RGB Source and Output profiles looks like a target ( ). The icon indicating
the default Simulation profile changes in appearance depending on whether the default
RGB Separation setting is set to Simulation ( ) or Output ( ).
4
4-4
ColorWise Pro Tools
2.
Select the profile you want as the default for a profile type, and click Profile Settings.
3.
In the Profile Settings dialog box, click Default and click Apply.
4.
Click OK.
Profile Settings dialog box
for Simulation (left) and
Output (right)
In the main Profile Manager window, the target icon appears next to the new default
profile you specified.
5.
Repeat steps 2 through 4 for each type of profile.
If no default is set for RGB Source, the RGB Source print option is set to None. If no
default profile is set for Simulation, the CMYK Simulation print option is set to None.
For more information on print options, see Chapter 1.
The Output profile always has a default profile. You can change the Output default by
selecting a preset profile you want as the default and clicking Profile Settings. Or you
can create a new default under a new name by selecting a preset profile and specifying
your choice of the calibration set in the Use Calibration Set pop-up menu and a new
name in the Profile Description menu.
4
4-5
Profile Manager
Downloading profiles
The E-810 comes with default profiles. You can download additional profiles from any
computer connected to the E-810.
TO
DOWNLOAD A PROFILE
1.
Launch ColorWise Pro Tools and click the Profile Manager.
The left side of the main Profile Manager windows lists the ICC profiles in the default
directory of your workstation.
For Windows 9X/Me, the default directory is Windows:System:Color.
For Windows NT 4.0 and Windows 2000, the default directory is Winnt:System32:
Color.
For Mac OS, the default directory is System Folder:Preferences:ColorSync Profiles
for ColorSync 2.0, and System Folder:ColorSync Profiles for ColorSync 2.5 or later.
2.
If the profile you want does not appear, click Browse to go to a different directory.
3.
Browse to the directory containing the profile you want to download and click OK.
4.
When the profile you want to download appears in the list in the main Profile Manager
window, select it.
If the profile is compatible with the E-810, a green arrow indicates that the profile is
available for download. Only output device profiles are downloadable to Simulation
and Output. Only input device profiles are downloadable to RGB Source.
4
4-6
ColorWise Pro Tools
N OTE : On Windows computers, the profiles must have an extension of .icc or .icm to
be listed. On Mac OS computers, the profiles must have a file type of profile.
All ICC profiles in the selected directory on your computer are displayed in the list in
the main Profile Manager window. However, because a profile is listed does not
necessarily mean it can be downloaded to the E-810.
Simulation profiles should be only profiles of devices for which you want the E-810 to
match in terms of color output characteristics. Output profiles should be only profiles
of the device to which your E-810 is connected. Although CMYK printer profiles can
be downloaded as Simulation or Output, consider how they will be used. If you want
the E-810 prints to look like another printer, download that profile as a Simulation.
If you have a custom profile of the copier your E-810 is connected to, download that
profile as an Output profile.
5.
Click the arrow to download the profile, and click OK when the download is complete.
The new profile now appears on the list of profiles on the right side of the Profile
Manager main window.
For Windows 2000 and Mac OS computers, this profile must be associated with one
of the predefined names (Source-1 through Source-10 for RGB Source, Simulation-1
through Simulation-10 for Simulation, or Output-1 through Ouput-10 for Output)
or set as the default before it can be used. For Windows 95/98, Windows NT, and
Windows Me, all profiles can appear in the printer driver by their profile descriptions.
See “Defining profiles” on page 4-8.
N OTE : When an output profile is downloaded, it inherits the calibration target of the
current default output profile.
Editing profiles
You can customize the profiles on the E-810 to meet your specific needs and the
characteristics of your copier using Color Editor, either directly or through Profile
Manager. See “Color Editor” on page 4-11 for more information on editing profiles.
4
4-7
Profile Manager
Managing profiles
Profile Manager lets you back up profiles to ensure that no custom profiles are lost
when the E-810 software is updated. You can also upload a copy of a built-in E-810
profile to your workstation in order to use it with an ICC-aware application, such as
Photoshop. Profile Manager also lets you delete unwanted profiles.
N OTE : You can back up and delete only those profiles that appear in the main Profile
Manager window without a lock icon next to them. Locked profiles cannot be deleted,
but most can be backed up.
TO
BACK UP PROFILES
1.
Launch ColorWise Pro Tools and click Profile Manager.
2.
Select the profile on the E-810 to upload.
The arrow in the middle of the Profile Manager window turns green and points to the
left, indicating the profile is available for upload.
3.
Click the green arrow, choose a name and location for the profile, and click Save.
The name will be the file name of the profile, but the profile description will be the
original description, or the one you entered in the Profile Settings dialog box.
N OTE : When saving the profile on a Windows computer, be sure to include the
extension .icm. If the extension is not included, additional dialog boxes appear.
4.
Click OK when you are notified that the profile was successfully uploaded.
Delete profiles to make sure no one uses the wrong profile and to free up disk space on
the E-810 (although profiles are small and do not take up much space).
TO
DELETE PROFILES FROM THE
E-810
HARD DISK
1.
Launch ColorWise Pro Tools and click Profile Manager.
2.
Select the profile you want to delete and click Delete.
A Warning dialog box asks you to confirm deletion.
N OTE : You cannot delete preset profiles, profiles that are currently set as default, or
profiles that are linked to any of the predefined custom names, for example
Simulation-1.
4
4-8
3.
ColorWise Pro Tools
Click Yes to delete the profile.
If you want to delete a profile currently set as the default or associated with a custom
name, click Profile Settings and clear the default option.
Defining profiles
For Windows 2000 and Mac OS computers, before you can apply any downloaded or
edited profile to a print job, that profile must be linked to one of the predefined
custom names, or you can set the profile as the default for all print jobs (see setting
default profiles, page 4-3). There are 10 names available for custom profiles—Source-1
through 10 for RGB Source, Simulation-1 through Simulation-10 for Simulation, or
Output-1 through Output-10 for Output. For Windows 95/98, Windows NT, and
Windows Me, all profiles appear by their actual names in the printer driver. These fixed
names are used in the PPD, so you can select profiles per job even if your driver does
not have the capability to obtain an updated list from the server.
N OTE : A custom simulation profile is used to illustrate this procedure. The same steps
apply for defining custom or downloaded output profiles.
TO
DEFINE A PROFILE
1.
Launch ColorWise Pro Tools and click Profile Manager.
Custom profile
created with
Color Editor
4
4-9
Profile Manager
For the purposes of this example, assume DIC-new is a custom simulation profile
created with Color Editor. As you can see, no information is displayed for DIC-new
under the heading “Appear in Driver as.”
2.
Select DIC-new in the Simulation list, and click Profile Settings or double-click
DIC-new.
3.
Select the “Appear in Driver as” checkbox, choose one of the predefined custom
simulation names (Simulation-1 through Simulation-10) from the pop-up menu, and
then click Apply.
Make sure to choose a name that is not already linked with another simulation. If you
try to define two profiles with the same name, you will get an error message.
For an output profile, the predefined custom names would be Output-1 through
Output-10.
N OTE : While you cannot delete a preset profile, you can use the name of a preset profile
name for your edited profile when you select the “Appear in Driver as” option. This
replaces the preset profile with your own profile.
When you choose Profile Settings for an output profile, the Use Calibration Set
option also appears. You must calibrate the E-810 with this calibration set before
this option has any effect. If you have never measured for this calibration set, default
measurements will be used. For more information about calibration sets, see page 3-2.
In Profile Settings, you can also change profile descriptions for all non-locked profiles.
4
4-10
4.
ColorWise Pro Tools
Click OK.
DIC-new will
appear in
driver as
Simulation-1
Simulation-1 now appears under the “Appear in Driver as” column for DIC-new.
Choosing Simulation-1 from the CMYK Simulation option of the printer driver
applies the DIC-new simulation to the print job.
If you do not define a custom simulation profile, your job will print with CMYK
Simulation Profile set to None. If you do not define a custom RGB Source or Output
profile, the default profile is used.
4
4-11
Color Editor
Color Editor
Color Editor allows you to customize simulation and output profiles. You can access
Color Editor directly by clicking its icon in the ColorWise Pro Tools main window, or
indirectly, through the Profile Manager.
Editing profiles
Color Editor allows you to create custom profiles by editing existing simulation or
output profiles and saving the changes as a new profile. With Color Editor, you can
fine-tune a profile on your E-810 to meet your exact specifications.
N OTE : You cannot edit source profiles; only simulation and output profiles can be
customized.
Color Editor has two Edit Modes for editing output profiles.
• Custom—Edit output profiles and save customized versions of them.
• % Density—View the calibration target, which is one component of the output
profile. You cannot make changes to the calibration target in this window, but you
can import a new target (see page 3-2).
Color Editor also has three Edit Modes for editing simulations.
• Master—Create a custom master simulation that affects all print jobs to which it is
applied, unless a linked simulation exists for the selected combination of simulation
profile, simulation method, and output profile.
• Quick or Full—Create custom linked simulations. Linked simulations affect the print
job only if the corresponding simulation profile, simulation method, and output
profile are selected. If you choose an output profile and simulation method for
which you have created a custom linked simulation, that simulation is applied
automatically to the job. If you choose a simulation method or output profile for
which there is no custom linked simulation, then the master simulation is
automatically applied.
4
4-12
ColorWise Pro Tools
Quick applies one-dimensional transfer curves that adjust output density only, while
Full provides a more complete and accurate simulation by applying colorimetric
transformations that adjust hue as well as output density (see page 1-9).
N OTE : If you made edits to a master simulation after you created a linked simulation,
the edits are not applied to the linked simulation.
TO
EDIT A SIMULATION PROFILE IN
PROFILE IN
M ASTER M ODE
OR AN OUTPUT
C USTOM M ODE
1.
Launch ColorWise Pro Tools and click Color Editor.
2.
Choose Simulation or Output from the View pop-up menu.
Simulation lists the simulation profiles resident on the E-810, and Output lists the
output profiles resident on the E-810.
3.
Choose a profile to edit and click Select.
N OTE : You can also open the Profile Manager, select a profile, and click Edit.
4
4-13
4.
Color Editor
For a simulation profile, choose Master from the Edit Mode menu. For an output
profile, choose Custom from the Edit Mode menu.
(See page 4-16 for instructions for using Quick or Full mode.)
Eye icons indicate cyan,
magenta, and yellow are
visible and can be edited
You can use this dialog box to view or edit profiles. The graph allows you to view and
manipulate color output values.
N OTE : When editing an output profile in Custom mode, the Import button at the
bottom of the Color Editor window lets you import a calibration target file (.trg)
created on another Fiery using the previous version of ColorWise. The current version
of ColorWise does not allow you to save a target separately; rather, it saves the target in
conjunction with an output profile.
4
4-14
5.
ColorWise Pro Tools
Select the colors you want to edit by turning colors off and on.
The box with the eye icon to the left of each color indicates whether that color is
visible on the graph and will be affected by changes to the curves, brightness, and dot
gain controls. You can view and edit all four colors (cyan, magenta, yellow, and black)
at once, or any combination thereof. Working with only one or two colors at a time
helps you fine-tune your adjustments. To turn off a color, click its eye icon. In the
example below, cyan and magenta are visible and can be edited.
6.
Click Dot Gain to adjust the dot gain value for simulating press output.
Choose either the North American or European standard. Then use the sliders to select
the desired Dot Gain:
• The range of values for North American at 50% input are from 0% to 50% gain on
output.
• The range of values for European at 40% input are from 0% to 59% gain on output;
the range of values for European at 80% input are from 0% to 20% gain on output.
4
4-15
Color Editor
If you use Dot Gain values, you should apply the settings first so that the curves are
deflected from their straight-line positions. Then make edits to the new curves. When
you adjust Dot Gain values, all existing points on the curve are removed. A warning
dialog box gives you the chance to cancel Dot Gain settings before they are applied.
7.
Use the plus and minus buttons to adjust brightness.
Changes to the brightness are reflected in the curve(s).
8.
You can adjust the curves directly by clicking and dragging points on the curve or by
entering numbers into the input and output boxes.
The graph maps the input percentage to the output percentage. (These percentages
refer to the size of the CMYK halftone dots.) The curve you selected appears, and
points along the curve are marked so you can adjust them.
A curve with this shape
makes a color appear
lighter by reducing
density in the midtones.
A curve with this shape
makes a color appear
darker by adding density
in the midtones.
A curve with this shape
increases contrast.
N OTE : You should adjust points in this way only after you have entered the Dot Gain
and Brightness values.
4
4-16
ColorWise Pro Tools
For greater precision, you can key in percentages in the Input and Output boxes or use
the arrow keys on the keyboard to adjust the curve. To use the arrow keys, you must
first click on the curve to establish an anchor point that serves as a reference.
9.
For an output profile, you can set maximum densities of the C, M, Y, and K channels.
You can enter the maximum densities, called D-Max values, of individual colors for
profiles that support density settings. D-Max settings are not available when editing
Simulation profiles in Master mode.
10.
When you are finished, click Save and enter a name for the new profile.
The new custom profile is saved to the E-810 with the new name. If you edit one of
the press standard targets (for example, SWOP-Coated, DIC, or Euroscale), you may
want to include the original name as part of the new target name (for example, DICnew) to help you remember the source of the new target.
N OTE : Preset default profiles are locked and must be saved with a new name.
For Windows NT 4.0, Windows 2000, and Mac OS computers, custom profiles must
be linked to one of the 10 predefined custom profile names (Simulation-1 through
Simulation-10 for Simulation or Output-1 through Output-10 for Output) in order
to be accessible from the printer driver. You can create as many custom profiles as you
want, but a maximum of 10 are available from the printer driver at any one time.
See “Defining profiles” on page 4-8 for information on linking custom profiles to
the predefined custom profile names. If you are using the printer driver for
Windows 95/98, custom profiles will appear in the driver window without being
associated with a predefined profile name.
If you set a custom profile as the default, you can access it from the printer driver
without linking it to one of the predefined custom names. Simply select “Printer’s
default” from the printer driver.
TO
EDIT A SIMULATION IN
Q UICK
OR
F ULL
MODE
1.
Launch ColorWise Pro Tools and click the Color Editor.
2.
Choose Simulation from the View pop-up menu, choose the simulation profile to edit,
and click Select.
N OTE : You can also open the Profile Manager, select a simulation profile, and click
Edit.
4
4-17
3.
Color Editor
Choose Quick or Full from the Edit Mode menu, and choose an output profile with
which your edited simulation will be linked from the Link with menu.
The edited simulation will be linked with the output profile you select from the “Link
with” menu.
N OTE : When editing a simulation profile in Quick mode, the Import button at the
bottom of the Color Editor window lets you import a custom Quick Simulation
created on another Fiery using the previous version of ColorWise. The current version
of ColorWise does not allow you to save custom Quick or Full Simulations
independently; rather, they are saved as components of the same profile.
4.
Edit and save the simulation as described in the procedure (steps 5 through 10)
starting on page 4-14.
For this new simulation to be automatically applied to a print job, the CMYK
Simulation, Simulation Method, and Output Profile settings must be the same as those
used when you edited the profile. If the Simulation Method is different or a different
output profile is selected, then the Master simulation is applied.
4
4-18
ColorWise Pro Tools
N OTE : A Simulation Profile can have a custom Master and one or more custom links—
up to two links (Quick and Full) for each output profile on the system. (For the
CMYK Simulation Profile option in the printer driver, note that if you select a custom
profile for which the output ink percentage is greater than 0 and the input ink
percentage is 0, the Use Master print option will have no effect.)
Undoing simulation edits
You can undo the changes you made to simulations (master and linked) in
several ways:
• If you have not yet saved your edits, click Done on the Color Editor menu bar,
and do not save the changes.
• If you saved your edits under a new simulation name and want to delete all edits
(in Master, Quick, and Full modes) to the simulation, see page 4-7.
• If you saved your edits under a new simulation name and want to undo the edits to
one or more linked simulation, use the following procedure.
TO
UNDO EDITS MADE TO A CUSTOM LINKED SIMULATION
1.
Launch ColorWise Pro Tools and click either Color Editor or Profile Manager.
2.
Choose Simulation from the View pop-up menu, choose the simulation for which you
want to undo edits, and click Select (Color Editor) or Edit (Profile Manager).
4
4-19
Color Editor
3.
Choose Quick or Full from the Edit Mode menu and choose the output profile with
which your unwanted edits are linked from the Link with menu.
4.
Click Revert to Master.
N OTE : Revert to Master makes the curves for one or more linked simulations match the
last saved master simulation. If you have edited and saved changes to a master
simulation, your linked simulations will revert to the changed master, not the original.
5.
Indicate whether you want to revert the currently selected linked simulation only, or
revert all links of this simulation profile, and click OK.
4
4-20
6.
ColorWise Pro Tools
If you choose “For all Edit Modes and all Profile Links,” a warning dialog box appears.
Click OK.
The curves for the linked simulation(s) now match the last saved master simulation
exactly.
Checking edited profiles
You can view a printed sample of a profile before you save it to the E-810. To do so,
print one of the following:
• Comparison Page provided with ColorWise Pro Tools, which shows a comparison of
images and colored patches with and without edits
• User-defined CALIB.PS in the Hold Queue
You can create a custom comparison page and save it as a PostScript or Encapsulated
PostScript (EPS) file called CALIB.PS and then print the file to the Hold Queue of
the E-810 from your application or download it to the Hold Queue with Fiery
Downloader (see page 3-32).
4
4-21
TO
Color Setup
CHECK A PROFILE
1.
Click Test Print from the Color Editor window.
2.
Select a page to print, specify the paper size and input tray (Comparison Page only),
and click Print.
For Comparison Page, specify the paper size (LTR/A4 or 11 x 17/A3) in the Paper Size
pop-up menu. In the Input Tray pop-up menu, specify the paper source.
Color Setup
Color Setup is used to set the default ColorWise settings for the E-810. To access
Color Setup, click its icon in the ColorWise Pro Tools main window.
Setting default ColorWise options
Color Setup allows you to configure the default color management settings for the
E-810. These settings are applied to all print jobs sent to the E-810, unless a user
overrides them for an individual job by changing settings in the printer driver.
These default settings can also be overridden using Command WorkStation or Fiery
WebSpooler. Color Setup maintains a connection to the E-810, so changes made in
Profile Manager appear automatically. In addition, the defaults set in Color Setup are
automatically reflected in other E-810 tools that list default settings.
You can also reset the E-810 to its factory default settings by clicking the Factory
Default button in the lower-left corner of the Color Setup window.
4
4-22
ColorWise Pro Tools
The options in Color Setup are arranged in a pattern representing the flow of color
processing that takes place on the E-810.
For those color options that offer multiple choices, click the down arrow and make
your selection from the pop-up menu that appears. For RGB Separation and CMYK
Simulation Method, make your selection by selecting the appropriate radio button.
Other options are selected simply by selecting a checkbox next to the option name.
Once you have made your changes, you must click OK or Apply for the changes to
take effect. Clicking OK sets the new defaults and closes the Color Setup window.
Clicking Apply sets the new defaults and keeps the Color Setup window open.
Clicking Cancel closes the Color Setup window without applying any changes to
the default settings.
For most users, the factory defaults result in optimal color output.
5
5-1
Chapter 5:
Working with
Color in
Applications
Working with color
This chapter provides guidelines for defining colors in your documents to produce the
results you want. The following topics are covered:
• Factors affecting how you work with color
• Choosing colors in applications that rely on GDI or QuickDraw to communicate
data to the printer driver, such as presentation and word processing applications
• Choosing colors in applications that have the ability to write their own PostScript,
such as some page-layout, illustration, and pixel-editing applications
Working with color
The two main factors that influence how you work with color in the creation of
documents are the application you use and the final print device. Applications vary in
the methods they provide for choosing colors and in the way they transmit color data
to the print device.
• Office applications, such as presentation software, spreadsheets, and word processing
programs, use the RGB color model. They typically transmit only RGB data to the
print device.
• Illustration applications use both the RGB and CMYK color models but typically
transmit only CMYK data to the print device.
• Pixel-editing applications use both the RGB and CMYK color models. They also
transmit both RGB and CMYK data to the print device.
The type of printing you plan for the document—short-run color printing on the
E-810 versus color proofing for eventual printing on an offset press—determines the
way you define colors in addition to the print option settings you choose.
• For short-run color printing on the E-810, use any application and define colors in
either RGB or CMYK. If your application supports it, you can also choose colors
from the PANTONE color library. Placed images may be limited to the RGB color
space. Choose the appropriate settings for print options affecting color output (see
page 1-1).
5
5-2
Working with Color in Applications
• For color proofing, use an application that writes its own PostScript and define
colors in RGB, CMYK, or choose colors from the PANTONE color library. Placed
images can also be defined in RGB or CMYK. Choose the appropriate settings for
print options affecting color output (see page 1-1).
N OTE : The E-810 allows you to use RGB or CMYK data when printing proofs for
an offset press run. However, sending data to an imagesetter most often requires
CMYK data.
Color reference pages
E-810 user software includes several types of color reference pages that let you see the
range of colors that can be printed on your copier. For predictable color, use the color
reference pages when defining the colors in your document.
• RGB Color Reference—a Microsoft Word file and a Microsoft PowerPoint file that
let you view the colors available in the standard palettes of office applications and see
how those colors print on the E-810 (see page 5-4).
• CMYK Color Reference—an 11-page downloadable PostScript file of CMYK color
patches (see page 5-6).
• PANTONE Coated Color Reference—a 19-page downloadable PostScript file of
color patches showing CMYK equivalents of PANTONE Coated colors. This file
prints differently depending on the setting of the Spot Color Matching option
(see page 5-6).
In addition, you can print RGB, CMY, and PANTONE color charts from the E-810
Control Panel.
5
5-3
Office applications
Office applications
The E-810 must receive PostScript instructions to print an image or a document.
Many applications do not create these PostScript instructions, relying on the printer
driver to create them. Included in this category are most word processors, spreadsheets,
and presentation applications. These applications use Windows Graphics Device
Interface GDI to display and print when running Windows, and Apple QuickDraw to
display and print when running Mac OS. We refer to these GDI and QuickDraw
applications as “office applications.”
All office applications handle color similarly, using the same RGB color model used for
the color monitor display. Most office applications allow you to choose colors from a
palette of preselected colors; some allow you to add new colors to the palette using a
color picker. Although some applications allow you to specify color using the CMY,
HSL, and HSV color models, these applications always send RGB color data to the
E-810. (An exception to this is a CMYK EPS file placed in the document, which is
sent as CMYK data.)
When working with color in office applications, keep in mind that:
• The range of colors that can be displayed in RGB on your monitor is much larger
than the range of colors that can be printed on your copier. When you print the
document, out-of-gamut RGB colors are mapped to colors your copier can produce.
• Office applications send only RGB data to the E-810. You control the rendering
style of the color conversion with your selection of a CRD.
Each CRD uses a different color rendering style, and therefore has a different way of
mapping unprintable colors to the color gamut of your copier. E-810 color
rendering styles are described on page 1-4.
5
5-4
Working with Color in Applications
Choosing colors in office applications
Two RGB color reference pages, a Microsoft Word file and a Microsoft PowerPoint file,
are provided with your E-810 user software. Print these files using different CRDs to
see how the colors appear when printed to the E-810. For best results, print the color
reference page using the same print options you plan to use for your final document.
Select the colors you want to use from the printed version of the RGB color reference
page, and then use those colors in your document.
RGB Color Reference (Microsoft PowerPoint)
5
5-5
PostScript applications
PostScript applications
Most applications used for illustration, pixel editing, and page layout can create the
PostScript information they send to PostScript copier or save in PostScript files.
Illustrator, Photoshop, PageMaker, QuarkXPress, and Macromedia FreeHand are all
PostScript applications.
PostScript applications work with color in many different ways. Most allow you to
choose process colors (by entering percentages for cyan, magenta, yellow, and black),
in addition to named colors from a custom color system, such as PANTONE. When
you print composites, these applications send process-color equivalents for named spot
colors to the copier. In some applications, you can also choose colors using the RGB,
HSB, HSL, or other color models.
Generally, PostScript applications send color information to the E-810 as CMYK data.
An exception to this is an RGB image placed in the document, which is sent directly to
the E-810 (unless you specify special color management settings in the application.) In
addition, some PostScript applications that allow you to define colors in RGB or other
color models can also send data to the E-810 in those color spaces.
Color controls in PostScript applications are typically designed for printing on an
offset press, and some adjustments are required for printing to the E-810. Displayed
versions of colors you choose in these applications may not match E-810 output
exactly, and named colors may not print accurately on the E-810, since these colors
typically require custom inks.
Choosing colors in PostScript applications
With PostScript applications, you can create colors using any of the color models
supported by the application. All PostScript applications support CMYK; some also
support RGB and other color models based on monitor display values. PostScript
applications also allow you to choose named colors using one or more color libraries,
such as PANTONE (see page 5-6).
You should use swatch color matching to ensure predictable color printing results with
the E-810 or to match the E-810 color output to colors produced by other print
devices.
Working with Color in Applications
Swatch color matching
E-810 user software includes several color reference pages (see page 5-2). By choosing
colors from these reference pages, you can ensure that you get the same color from
your copier. For best results, calibrate the E-810 before printing the reference pages.
N OTE : Swatch color matching does not match monitor colors to printed colors. For
this, you must use a color management system and calibrate your monitor.
Using the CMYK Color Reference
The CMYK Color Reference included with your E-810 user software lets you see
how various cyan, magenta, yellow, and black combinations look when printed on
your copier.
Yellow: 0
Black
0
25 50 75
Magenta
0
0
10
10
20
20
30
30
40
40
50
50
60
60
70
70
80
80
90
90
100
100
10
10
20
20
30
30
40
40
Cyan
5
5-6
50
50
60
60
70
70
80
80
90
90
100
100
page 1
CMYK Color Reference
To print the CMYK Color Reference, download the file to the E-810. The printed
pages display groups of color patches in graduated combinations of yellow, magenta,
and cyan, and smaller patches that include 25%, 50%, and 75% black. Refer to these
pages to pick colors and specify process color values in your application. For the
location of the file on the User Software CD, see Getting Started.
PANTONE Coated Color Reference
The PANTONE Coated Color Reference included with your E-810 user software can
help ensure predictable results with colors chosen from the PANTONE color library.
5
5-7
PostScript applications
The information printed by the PANTONE Coated Color Reference depends on the
setting of the Spot Color Matching setting.
• On—Prints swatches of the closest equivalents of PANTONE colors your copier
can produce. The equivalent PANTONE color name/number is printed below each
swatch.
• Off—Prints swatches of the CMYK equivalents of PANTONE colors as defined
by PANTONE. (These are the same CMYK values defined in applications that
include PANTONE libraries.) The CMYK values used to produce the color, as well
as the PANTONE color name/number, are printed below each swatch.
To print the PANTONE Coated Color Reference, download the file to the E-810.
(For the location of the file on the User Software CD, see Getting Started.) If the
default Spot Color Matching setting on the E-810 is not the setting you want to use
for printing the PANTONE colors, download the file to the Hold queue. Then use
Fiery WebSpooler, Fiery Spooler, or Command WorkStation to override the Spot
Color Matching setting.
Default output profile
The default output profile consists of both a profile for your copier, describing its color
characteristics, and a calibration target that describes the expected behavior of the
copier. For more information on output profiles, see page 1-9.
In certain cases, you may want to customize the default output profile to achieve
particular color effects (see page 4-11). When you do so, the new customized output
profile is applied to all data in the print job. You can also use ColorWise Pro Tools to
download your own output profile to the E-810 (see page 4-5). Downloaded output
profiles are at first associated with the default calibration target.
CMYK simulation
If you use the E-810 to print proofs for an offset press job or simulate another print
device, choose the appropriate CMYK Simulation Profile and CMYK Simulation
Method print option settings (see page 1-8).
6
6-1
Chapter 6:
Office
Applications
Working with office applications
The E-810 ColorWise color management system provides complete color
management for jobs printed from office applications. This chapter provides
instructions for printing color documents from GDI and QuickDraw applications
such as presentation, spreadsheet, and word processing programs. You can use these
instructions with the Microsoft Office applications.
Working with office applications
Before printing from these applications, make sure the appropriate printer driver and
the E-810 PPD are installed on your computer, as described in Getting Started.
Defining colors
Office applications use the RGB color model. For instructions on defining colors, see
“Choosing colors in office applications” on page 5-4.
The only way to use CMYK or PANTONE colors is to define them in EPS files with
an illustration or page layout application, and then place these files into office
documents. Colors in EPS files are preserved until they reach the E-810 (assuming
no PostScript Color Management information was included.)
Office applications lack finesse when displaying EPS files, so use these files only if RGB
colors are not practical in your specific workflow. EPS files are also useful when using
large or complex images that need to be printed at full resolution or cannot fit some
Microsoft Office configurations with limited memory.
Working with imported files
Although your application may allow you to import a variety of file formats, EPS files
are recommended for all raster images you want to import; some applications have
printing problems when using file formats such as TIFF and PICT.
N OTE : You may have to perform a “custom install” of your office application if you are
unable to import EPS elements.
6
6-2
Office Applications
Although there are no color management options within office applications, color
conversions do occur when you import images or page elements that were not defined
in RGB. To avoid such conversions with imported files, use the EPS file format for
artwork that is to be imported into office applications.
All RGB images placed in a document are affected by RGB Source and Rendering
Style settings.
Tip for advanced users
If you place multiple RGB images, mixed non-photographic and photographic, a
single CRD may not be suitable for all the images. In this case, you may want the
photographic images to bypass the CRD altogether. To accomplish this, save the image
in CMYK mode with a pixel-editing application such, as Photoshop, and perform
color correction. Save the image as a Photoshop EPS and import it into the document.
Selecting options when printing
There are few differences among office applications with regard to E-810 printing.
The instructions in this chapter apply to all office applications. Use the instructions in
Chapter 1 to specify print options and color management settings. To specify these
options, you must use a PostScript Level 2 (or later) printer driver, such as an Adobe
PostScript Printer Driver.
Because office applications send RGB data to the E-810, your choices of RGB Source
and Rendering Style settings are important. Be sure to specify the appropriate CRD for
the color effect you want (see “Rendering styles” on page 1-4).
Output profiles
All color data in the job is affected by the output profile on the E-810. This profile may
be the one designed for your copier and shipped with the E-810, or it may be a custom
profile created at your site (see page 1-9). If necessary, print the Test Page to see which
profile is currently resident on the E-810.
7
7-1
Chapter 7:
Adobe
Photoshop
Photoshop 5.x
This chapter covers features of Adobe Photoshop versions 6.x and 5.x for Windows
and Mac OS. The illustrations show only Mac OS dialog boxes, but the information
and instructions apply equally to the Windows version of Photoshop.
Photoshop 5.x
Because Photoshop 5.x uses a sophisticated color management system, there are several
setup steps you should take before you begin working. These steps include:
• Calibrating your monitor
• Adjusting Photoshop color settings
• Setting ColorSync defaults (Mac OS only)
For information on monitor calibration and color setup in Photoshop (version 5.02
or later), open the Adobe Color Management Assistant (Mac OS) or Adobe Color
Management Wizard (Windows) by choosing Help>Color Management. (See your
Adobe Photoshop 5.x documentation or the Adobe Technical Guidelines for
Photoshop at www.adobe.com.)
Photoshop 5.x color settings
The settings you select in the Photoshop 5.x control panel and three setup dialog boxes
control how color is managed when you open and save RGB and CMYK images. You
should calibrate your monitor using the Adobe Gamma control panel and specify
settings in the Photoshop’s Profile Setup, RGB Setup, and CMYK Setup dialog boxes
before you begin working with images in Photoshop.
N OTE : The Adobe Gamma control panel performs similar functions on both Windows
and Mac OS computers.
7
7-2
Adobe Photoshop
Adobe Gamma control panel
You can use the Adobe Gamma control panel to create and customize ICC profiles for
your monitor. Photoshop properly displays images on your monitor by compensating
between your chosen working space (see the following section on RGB Setup) and the
description of your monitor defined by its profile. If you do not create a profile in the
Adobe Gamma control panel that corresponds to your monitor, you may encounter
poor monitor-to-print matching.
N OTE : If a profile for your particular monitor is not available, use the Adobe Gamma
control panel setup Assistant (Wizard on Windows) to customize an available profile
that at least has the same type of phosphors as your monitor.
Display the Adobe Gamma control panel by double-clicking its icon in either the
Windows or Mac OS Control Panel. If you have not yet selected your monitor profile
or want to customize your current profile, click the Assistant (Wizard on Windows)
button.
7
7-3
Photoshop 5.x
Profile Setup
From the Photoshop 5.x File menu, choose Color Settings>Profile Setup.
In the Embed Profiles area, select all boxes to embed the appropriate ICC profile when
saving a file. By embedding a profile during the saving process, Photoshop can link a
color space (working space) definition with that file for future use. When you open an
image that already contains a profile, Photoshop can alert you as to which color space
the file was saved in. Be aware that you should avoid conversions between color spaces
as much as possible (each conversion results in loss of color information).
In the Assumed Profiles area, choose Ask When Opening from the RGB and CMYK
menus. When you open files that do not contain an ICC profile, you can convert the
file to your current Photoshop working space setting or leave the file unconverted—the
preferred choice, but make sure the current Photoshop working space setting matches
the intended color space of the image.
In the Profile Mismatch Handling area, choose Ask When Opening from the RGB and
CMYK menus. When you open a file containing an ICC profile that does not match
your current Photoshop working space setting, you have the choice to convert from the
embedded profile or not. If you want to preserve the color integrity of the source
image, do not convert. When you open the image, immediately go to RGB or CMYK
Setup to specify the working space for the image. If your working space is set to your
output device, you may want to convert.
7
7-4
Adobe Photoshop
RGB Setup
Photoshop 5.x allows you to simultaneously use two RGB spaces, one for the monitor
and one for the Photoshop RGB working space. The monitor RGB space setting does
not affect the image data in the file; it affects only the way the image is displayed on
the monitor. Even if an RGB image has been prepared with different monitor settings,
it is still correctly displayed on your monitor, without changes to the original values in
the file.
From the Photoshop 5.x File menu, choose Color Settings>RGB Setup.
Check this option
Check this option
From the RGB menu, choose your current Photoshop RGB color space, which should
reflect the color space of most RGB files you will be opening. If you create new RGB
files or you want to standardize your RGB files, choose EFIRGB.
Click Load if the file is not visible in the RGB pop-up menu. You can load the
Calibrated RGB setup file, EFIRGB ICC ColorSync file, or EFIRGB.ICM file.
All describe the same RGB space and automatically set the Gamma, White Point,
and Primaries. You may consider sRGB if you usually view images on a generic PC
monitor, or if you rely on a Windows operating system to manage color on your
monitor. If you choose sRGB as a working space, make sure to print with the E-810
RGB Source option set to sRGB.
N OTE : EFIRGB is set as the default RGB Source color space on the E-810. No matter
what RGB space you select, make sure it is available on the E-810. For more
information on downloading RGB Source profiles to the E-810, see Chapter 4.
The Monitor area shows the currently selected profile in the Adobe Gamma control
panel. Select both the Display Using Monitor Compensation and Preview options.
7
7-5
Photoshop 5.x
CMYK Setup
From the Photoshop 5.x File menu, choose Color Settings > CMYK Setup.
Check this option
Select the Preview option. For CMYK Model, select ICC. Previous versions of
Photoshop used Photoshop Separation Tables, and you can load them for Photoshop
5.x. However, you will get better results using ICC profiles and the built-in color
management system.
In the ICC Options area, choose from the Profile, Engine, and Intent menus.
• For Profile, choose your final output copier ICC profile. Prepress users should
choose an ICC describing their target press, such as SWOP. Office users should
choose the ICC profile describing the copier connected to the E-810. In this case,
we recommend you leave images in RGB and allow the E-810 to convert them to
CMYK. However, if you want to use Photoshop to convert RGB images to the
CMYK color space of the E-810, you must first upload one of the output profiles
from the E-810 to your computer (see page 4-7), and then select it in Photoshop
CMYK Setup. The output profile for the E-810 is also available on the User
Software CD (see Getting Started).
N OTE : With the RGB Separation feature of the E-810, you can preview (print) your
conversions from RGB to any simulated CMYK space by downloading the desired
target profile to the E-810. For more information about downloading profiles, see
Chapter 4.
• For Engine, choose Built-in so the Photoshop engine will be used.
• From Intent, choose Perceptual (Images), which is appropriate for photographs
normally edited in Photoshop. The Intent setting is used only when you convert
between color spaces.
7
7-6
Adobe Photoshop
It is often better to select the Black Point Compensation option. With many ICC
profiles, this check box has no effect. However, when it does, it has a dramatic effect on
the dark areas of your image. If you want this effect, leave Black Point Compensation;
if not, clear the selection.
ColorSync defaults
You should have ColorSync 2.5.x or later installed on your Mac OS computer. The
ICC profiles used by ColorSync are saved in System Folder:ColorSync Profiles. From
the Apple menu, choose Control Panel>ColorSync.
Use the following settings:
• System Profile—choose the customized ICC profile for your monitor. Set up the
Adobe Gamma profile to ensure that your monitor profile is present (Mac OS only).
• RGB default—choose the same RGB working color space you set in Photoshop 5.x.
N OTE : The System Profile is the same one used in your monitor calibration and your
Monitors and Sounds control panel.
• CMYK default—choose the same CMYK color space you set in Photoshop 5.x.
• Preferred CMM—choose LinoColor CMM (both ColorSync 2.0 and Microsoft
ICM 2.0 are based on this color management module).
7
7-7
Photoshop 5.x
Defining colors
You can choose colors in Photoshop with various color models, including HSB, CIE
Lab, RGB, and CMYK. You can also choose named colors from the PANTONE
Coated color library. For best results, use the color definition methods described in
Chapter 5.
Saving files for importing into other documents
Before saving a file, perform any rotating, cropping, and resizing needed. This speeds
processing when printing from the application in which the image is placed.
We recommend you use EPS or TIFF file formats to save RGB images that will be
imported into other documents and printed to the E-810. You can import EPS and
TIFF files into virtually all page layout applications.
N OTE : Although TIFF files display better when imported into other applications, their
color and resolution characteristics may be altered by the application into which they
are imported. EPS files are unaffected.
Choose Photoshop EPS or TIFF
7
7-8
Adobe Photoshop
In the EPS Options dialog box, choose binary encoding and do not select PostScript
Color Management (see the following section for more information on PostScript
Color Management). Do not include transfer functions or halftone screens. A TIFF
preview is compatible with both Windows and Mac OS computers.
Do not select these options
N OTE : If you choose JPEG encoding, save a backup of the original image saved with
binary encoding until you see the printed results of the JPEG file. Occasionally, the
compression used for JPEG encoding produces unwanted artifacts. If you see
unexpected results in the printed output of a JPEG file, revert to a binary version.
If you experience problems printing the document in which you place the image,
substitute an ASCII version of the same image, and print the document again. Binary
encoding is much more compact than ASCII encoding, but occasionally causes
printing problems with some system configurations.
Advanced tips for using PostScript color management
Use the following information to implement alternate, more complex, color workflows
with Photoshop.
Saving EPS Documents with PostScript Color Management
Selecting the PostScript Color Management option when saving either a CMYK or
RGB EPS file prompts Photoshop to embed PostScript color information—which is
independent of ICC profiles—in the resulting document. This information is intended
for PostScript devices like the E-810.
7
7-9
Photoshop 5.x
Printing RGB EPS Files Saved with PostScript Color Management
When you print an RGB EPS file that contains an embedded profile to the E-810, the
working space information from the embedded RGB profile can be used as an RGB
source definition for E-810 CRDs. To use the source color space information from the
embedded profile with E-810 CRDs, choose None as the E-810 RGB Source when
you print. This applies when you print directly from Photoshop, or when the same
RGB EPS file is output from another application.
To override the embedded profile in an EPS file using an RGB Source definition made
available by the E-810, choose anything except None as the E-810 RGB Source Profile.
Printing CMYK EPS files saved with PostScript Color Management
If you select the Photoshop PostScript Color Management option when you save a
CMYK EPS image, Photoshop embeds PostScript color information that defines the
CMYK source color space of the image. When you print a CMYK EPS file that
contains PostScript color information to the E-810, CRDs are used instead of
ColorWise CMYK Simulation and Simulation Method settings. Make sure to choose
the appropriate setting for the Rendering Style option.
Selecting options when printing
You can print RGB or CMYK images from Photoshop.
• When you print an RGB image, you choose whether the conversion to CMYK is
performed by the E-810 (using a CRD), by PostScript (using PostScript Color
Management), or by the Photoshop built-in color management engine (by choosing
an Output profile from the Space menu).
• When you print a CMYK image, you can print composites or color separations.
N OTE : You cannot use the Combine Separations feature of the E-810 to recombine
separations printed from Photoshop.
7
7-10
Adobe Photoshop
Printing RGB images
Use the following instructions to print RGB images.
Choose RGB Color
as the color space
Choose an encoding method
Do not select PostScript
Color Management
Choose RGB Color from the Space pop-up menu. Any other setting causes Photoshop
to convert image data to that color space before sending it to the E-810. With the
AdobePS 8.6 printer driver for Mac OS, these options appear in the Adobe Photoshop
pane of the Print dialog box.
Printing CMYK images
Use the following instructions to print CMYK images.
Choose an encoding method
Choose CMYK Color
as the color space
7
7-11
Photoshop 5.x
Choose CMYK Color from the Space pop-up menu. Any other setting causes
Photoshop to convert image data to that color space before sending it to the E-810.
(With the AdobePS 8.6 printer driver for Mac OS, these options appear in the Adobe
Photoshop pane of the Print dialog box.)
N OTE : If you choose JPEG encoding, save a backup of the original image with binary
encoding until you see the printed results of the JPEG file. Occasionally, the
compression used for JPEG encoding produces unwanted artifacts. If you see
unexpected results in the printed output of a JPEG file, revert to the binary
version.g\Printing tips for advanced users
Advanced tips for printing with Photoshop PostScript
color management
Use the following information to implement alternate, more complex, color workflows
with Photoshop.
Printing RGB images with Photoshop PostScript Color Management
If you select an RGB color space and decide to use PostScript Color Management from
the Photoshop pane of the printer driver, Photoshop sends RGB data to the E-810
along with PostScript color information defining this RGB color space. Remember
that when you select PostScript Color Management, a CRD will be used to perform
color conversions to CMYK.
N OTE : The included RGB source color space information is overridden by the E-810
RGB Source option unless it is set to None. With Photoshop 5.x, the E-810 Rendering
Style option specified will take effect if the E-810 RGB Source Profile option is set
to None.
For fastest print times, choose JPEG encoding, but check printed output carefully
for unwanted artifacts that can appear as a result of JPEG compression. If you
see unexpected results in the printed output, print the job again using Binary or
ASCII encoding.
Choose other print options you want to use (see Chapter 1).
7
7-12
Adobe Photoshop
Printing CMYK images with Photoshop PostScript Color Management
If you select a CMYK color space and decide to use PostScript Color Management
from the Photoshop pane of the printer driver, Photoshop sends CMYK data to the
E-810 along with PostScript color information defining this CMYK color space.
Remember that when you select PostScript Color Management, a CRD will be used to
perform color conversions to the CMYK color space of the E-810.
The destination color space for the CRDs is determined by the RGB Separation print
option. If RGB Separation is set to Simulation, the CMYK image is printed according
to all specified CMYK Simulation Profile and CMYK Simulation Method settings. If
RGB Separation is set to Output, the CMYK image is converted to the CMYK color
space of the selected output profile.
The Spot Color Matching setting has no effect because Photoshop converts
PANTONE colors to CMYK values when you work in CMYK mode.
• If the image was separated for an offset press standard, apply the corresponding
CMYK Simulation setting. For example, if the image is separated for SWOP, choose
SWOP as the CMYK Simulation setting.
• If Photoshop is configured for a custom separation using ICC profiles, select the
corresponding profile from the CMYK Simulation print option for the E-810.
N OTE : The above custom simulation setting requires that the same profile used for
separation in Photoshop also resides on the E-810. For more information on
downloading CMYK Simulation profiles to the E-810 with ColorWise Pro Tools,
see page 4-5.
7
7-13
Photoshop 4.x
Photoshop 4.x
A special feature of Photoshop allows you to save RGB EPS (PostScript) images that
include independent source color space information. This feature is sometimes referred
to as “PostScript Level 2 tagging” or “RGB tagging.”
You define the source color space to apply to RGB EPS images by specifying a Monitor
Setup in Photoshop. However, this Photoshop-specific source color space definition is
overridden by the RGB Source print option setting located in the Print dialog box
under Printer Specific Options, unless you set the latter to Off (see page 1-5).
Defining colors
You can choose colors in Photoshop with various color models, including HSB, CIE
Lab, RGB, and CMYK. You can also choose named colors from the PANTONE color
library in Photoshop. For best results, use the color definition methods described in
Chapter 5.
Saving files for importing into other documents
Before saving an RGB EPS file, check the Photoshop Monitor Setup. This setting
defines the RGB source color space information that will be included in the RGB EPS
image. You can override this source color space with the RGB Source setting in the
Print dialog box under Printer Specific Options (see page 1-5).
Before saving a file, perform any rotating, cropping, and resizing needed. This speeds
processing when printing from the application in which the image is placed.
7
7-14
Adobe Photoshop
We recommend you use the EPS or TIFF file formats to save RGB images that will be
imported into other documents and printed to the E-810. EPS and TIFF files can be
imported into virtually all page layout applications.
Choose Photoshop EPS or TIFF
In the EPS Format dialog box, choose binary encoding and do not include transfer
functions or halftone screens. A TIFF preview is compatible with both Mac OS and
Windows computers.
N OTE : If you experience problems printing the document in which you place the
image, substitute an ASCII-encoded version of the same image, and print the
document again. Binary encoding is much more compact than ASCII encoding, but
can cause printing problems with some system configurations. If you choose JPEG
encoding, save a backup of the original image with binary encoding until you have
seen the printed results of the JPEG-encoded file. Although not often, at times the
compression used for JPEG encoding may produce unwanted artifacts in the file. If
you see unexpected results in the printed output of a JPEG-encoded file, use a binaryencoded version instead.
7
7-15
Photoshop 4.x
Selecting options when printing
You can print RGB or CMYK images from Photoshop.
• When you print RGB images, you choose whether the conversion to CMYK data is
performed by the E-810 (using a CRD), by PostScript (using PS Color
Management), or by Photoshop (using Photoshop separation settings).
• When you print RGB images, you can choose whether a color conversion is
performed by the E-810 using a CRD or by Photoshop using Photoshop’s separation
settings.
• When you print CMYK images, you can print composites or color separations.
N OTE : You can not use the Combine Separations feature of the E-810 to recombine
separations printed from Photoshop.
Printing RGB images
Use the following instructions to print RGB images.
Select to print using
the E-810 CRD
Select to print using
Photoshop separation settings
Choose whether to print in RGB or CMYK. (With the AdobePS 8.665.1 printer
driver for Mac OS, these options appear in the Adobe Photoshop pane of the Print
dialog box.)
• If you select Print in RGB, Photoshop sends RGB data to the E-810 and a CRD
performs color conversion. Choose the appropriate print option settings for RGB
data (see Chapter 1).
7
7-16
Adobe Photoshop
N OTE : The E-810 Rendering Style option specified will take effect if the E-810 RGB
Source Profile option is set to None.
• If you select Print in CMYK, Photoshop performs a color conversion and sends
CMYK data to the E-810. With this setting, RGB Source, Rendering Style, and
Spot Color Matching settings have no effect.
For printing in CMYK, consider these Photoshop separation settings:
• If Photoshop is configured for separating to an offset press standard, apply the
corresponding CMYK Simulation setting. For example, if Photoshop is configured
for separating to SWOP, choose SWOP as the CMYK setting. If you apply a CMYK
Simulation setting (other than None) to the job, choose Color Proofing (Photo) or
Color Proofing (Solid) for the Rendering Style setting (see page 1-4).
• If Photoshop is configured for a custom separation (not a press standard), choose
None as the CMYK Simulation setting, or choose the corresponding custom
simulation profile on the E-810 if one has been downloaded with the Profile
Manager. For more information on the Profile Manager and ColorWise Pro Tools,
see Chapter 4.
N OTE : If you choose JPEG encoding, save a backup of the original image with binary
encoding until you see the printed results of the JPEG-encoded file. At times, the
compression used for JPEG encoding may produce unwanted artifacts in the file. If
you see unexpected results in the printed output of a JPEG-encoded file, revert to the a
binary-encoded version.
7
7-17
Photoshop 4.x
Printing CMYK images
Choose an encoding method. (With the AdobePS 8.665.1 printer driver for Mac OS,
these options appear in the Adobe Photoshop pane of the Print dialog box.) For fastest
print times, select JPEG encoding.
N OTE : Check the printed output carefully for unwanted artifacts that can appear as a
result of JPEG compression. If you see unexpected results in the printed output when
printing with JPEG encoding, print the job again using binary encoding.
RGB Source and Rendering Style settings have no effect on CMYK images. The Spot
Color Matching setting is also irrelevant because Photoshop converts PANTONE
colors to CMYK values when you work in CMYK mode.
• If the image was separated for an offset press standard, apply the corresponding
CMYK Simulation setting. For example, if the image is separated for SWOP, choose
SWOP as the CMYK Simulation setting. If you apply a CMYK Simulation setting
(other than None) to the job, choose Color Proofing (Photo) or Color Proofing
(Solid) for the Rendering Style setting (see page 1-4).
• If the image was separated using a custom separation (not a press standard), choose
None as the CMYK Simulation setting, or choose the corresponding custom
simulation profile on the E-810 if one has been downloaded with the Profile
Manager. For more information on the Profile Manager and ColorWise Pro Tools,
see Chapter 4.
8
8-1
Chapter 8:
Page Layout
Applications
Working with page layout applications
This chapter provides instructions for printing color documents from Adobe
PageMaker 6.5, QuarkXPress 4.02, and QuarkXPress 3.32.
Before printing from these applications, make sure the appropriate printer driver
and the E-810 PPD are installed on your computer, as described in Getting Started.
Working with page layout applications
The following sections apply to all page layout applications.
Defining colors
Page layout applications generally use the CMYK color model. Some allow you to
define colors with other color models and may be able to send that data to the E-810
in those other color models. However, CRDs (which affect only RGB data) usually
do not affect colors defined in page layout applications. For predictable results with
CMYK colors, use the CMYK Color Reference when defining colors in page layout
applications. See “Choosing colors in PostScript applications” on page 5-5.
N OTE : If the application allows you to define colors in RGB, you should determine
whether it converts the RGB data to CMYK before sending it to the E-810. If it does,
this will determine which E-810 print options affect your job. For example, if the
application converts RGB black (defined in the document as R0%, G0%, B0%) to
four-color CMYK black when it sends the job to the E-810, the Pure Black Text/
Graphics option will have no effect when you print the job.
You can also choose named colors from the PANTONE color library. See “PANTONE
Coated Color Reference” on page 5-6.
8
8-2
Page Layout Applications
Importing images
EPS and TIFF are the recommended formats for images imported into page layout
documents. Support for importing other file formats may be provided by individual
applications.
All RGB images placed in a document are affected by the RGB Source and
Rendering Style settings. The E-810 color management system applies the specified
RGB Source setting to all RGB data and then uses the specified Rendering Style
(CRD) to perform a color conversion. An exception to this occurs if you assign ICC
profiles to RGB images using the application’s color management tools (see “Tips for
advanced users” below). In this case, the application performs the color conversion of
the image and sends CMYK data to the E-810.
N OTE : To take advantage of RGB Source and Rendering Style settings for images
imported into QuarkXPress 4.02, either save images in the EPS format, or use the
Quark PrintRGB XTension, which outputs RGB TIFF image files without converting
them to CMYK.
Tips for advanced users
If you place multiple RGB images, some non-photographic and some photographic, a
single CRD may not be suitable for all the images. In this case, you may want the
photographic images to bypass the CRD altogether. To accomplish this, separate the
image to CMYK data with a pixel-editing application, such as Photoshop, and perform
color correction. Save the file as EPS or TIFF and import it into the document.
If your application supports this feature, you can save the RGB image in TIFF format
and assign it an ICC profile and rendering intent when you import it into the
document.
8
8-3
Working with page layout applications
CMYK simulation
You can specify a CMYK Simulation profile and a CMYK simulation method for the
job using the CMYK Simulation Profile and CMYK Simulation Method print options
(see page 1-8). The CMYK Simulation setting affects all CMYK color data sent by
the page layout application. It can also affect RGB data if RGB Separation is set to
Simulation.
• If the document contains CMYK images that were separated for an offset press
standard, apply the corresponding CMYK Simulation setting. For example, for
images separated for SWOP, choose SWOP as the CMYK Simulation setting.
If you print separations to the E-810 and choose to use the Combine Separations
feature in conjunction with Full Simulation, the result may not match that of the
same page printed as composite.
• If the document contains CMYK images that were separated according to the color
characteristics of a custom ICC profile (not a press standard profile), choose the
corresponding profile as the CMYK Simulation Profile print option on the E-810.
N OTE : To achieve the workflow described above, the profile used for the separation
of CMYK images in the document should also reside on the E-810. For more
information on downloading CMYK Simulation profiles to the E-810 with
ColorWise Pro Tools, see Chapter 4.
Adobe PageMaker 6.5 for Mac OS and Windows
The Mac OS and Windows versions of PageMaker 6.5 are essentially the same.
The illustrations in this section show only the Windows version, except where
differences exist between the two versions.
Windows version requirement
For the Windows version of PageMaker 6.5, make sure a copy of the E-810 PPD file
is in the following folders:
• PM65\RSRC\USENGLSH\PPD4
• Windows\System
8
8-4
Page Layout Applications
Importing images
All RGB images placed in a document are affected by your RGB Source and Rendering
Style settings. For best results with placed images, use the instructions in “Importing
images” on page 8-2 and “CMYK simulation” on page 8-3.
N OTE : We recommend you use ColorWise Color Management rather than the CMS
options built into PageMaker. It is important that you do not use both systems for the
same print job. To turn off PageMaker 6.5 color management features, choose
File>Preferences>General, click the CMS Setup button, and then choose Off from the
Color Management pop-up menu. Click OK. Color management can be disabled for a
specific bitmapped image by selecting the image and choosing Element >Image>CMS
Source, and then choosing None from the This Item Uses pop-up menu.
Selecting options when printing
All print settings are specified from the various Print dialog boxes in PageMaker 6.5.
The printer driver interface described in Chapter 1 is not used.
In the Print Document dialog box, choose the E-810 PPD from the PPD menu.
Choose the E-810 PPD
Click Options
8
8-5
Working with page layout applications
In the Print Options dialog box, choose Normal (not the Optimized Subsampling
default) from the “Send image data” menu to ensure that TIFF images print at their
full resolution.
Choose Normal
Click Features
If a document contains RGB placed images or colors defined in RGB that will not be
separated to process colors, choose RGB Source and Rendering Style settings in the
Print Features dialog box. If the document contains PANTONE colors, choose the
appropriate Spot Color Matching setting.
When you click Print from any of the PageMaker 6.5 dialog boxes, the job is sent
to the E-810.
N OTE : The printer driver dialog boxes described in Chapter 1 do not appear.
8
8-6
Page Layout Applications
Optional Color Management from PageMaker
If you have additional color management requirements not offered by ColorWise,
such as managing color on non-E-810 devices, consider using the PageMaker color
management features. For more information, see your PageMaker documentation.
QuarkXPress 4.x for Mac OS and Windows
If you have additional color management requirements not offered by ColorWise,
consider using Quark CMS XTension for QuarkXPress 4.02. These features allow
advanced users to control RGB to CMYK color conversions. If you plan to use these
features, make sure the Quark CMS XTension is installed before starting QuarkXPress.
If it is not, use the Quark XTensions Manager to install it. Refer to your QuarkXPress
documentation for instructions.
N OTE : Quark CMS converts RGB TIFF, JPEG, and PICT images to CMYK before
sending color data to the E-810. RGB Source and Rendering Style settings have no
effect on this data unless you use Quark PrintRGB XTension, which outputs RGB
TIFF image files without converting them to CMYK.
Importing images
With the exception of RGB images that are saved in EPS format or use Quark
PrintRGB XTension, QuarkXPress 4.02 converts all RGB data into CMYK, even
when Quark CMS XTension is disabled.
Only RGB images saved in EPS format are affected by RGB Source and Rendering
Style settings. For best results with placed images, use the instructions in “Importing
images” on page 8-2 and “CMYK simulation” on page 8-3.
8
8-7
QuarkXPress 4.x for Mac OS and Windows
Selecting options when printing
You can select different print options depending on your print needs.
Choose the E-810 PPD from the Printer Description menu in the Print dialog box.
Mac OS
Choose the E-810 PPD
Choose an output paper size
Click to specify printer settings
Windows
Choose the E-810 copier
Click to specify copier settings
Choose the E-810 PPD
If the document contains PANTONE colors, choose the appropriate Spot Color
Matching setting. For instructions on specifying print options, see Chapter 1.
8
8-8
Page Layout Applications
Optional Color Management from QuarkXPress
If you have additional color management requirements not offered by ColorWise, such
as managing color on non-E-810 devices, consider using the QuarkXPress color
management features. For more information, see your QuarkXPress documentation.
QuarkXPress 3.32 for Mac OS and Windows
Before starting QuarkXPress 3.32, make sure the EfiColor XTension is not loaded in
the XTensions folder. EFICOLOR profiles are not currently provided with E-810
products. Without the correct EFICOLOR profile, the EfiColor XTension cannot
perform color conversions on placed images.
Windows version requirement
For the Windows version of QuarkXPress, make sure a copy of the E-810 PPD file is in
the \XPRESS\PDF folder.
Importing images
All RGB images placed in a document are affected by your RGB Source and Rendering
Style settings. For best results with placed images, use the instructions in “Importing
images” on page 8-2 and “CMYK simulation” on page 8-3.
Selecting options when printing
Select the E-810 PPD from the Printer Type menu in the Page Setup (Mac OS) or
Printer Setup (Windows) dialog box.
8
8-9
QuarkXPress 3.32 for Mac OS and Windows
Mac OS
Choose the E-810 PPD
Choose an output paper size
Choose Binary
Windows
Choose an output
paper size
Choose the E-810 PPD
Choose Binary
If a document contains RGB-placed images or RGB colors that QuarkXPress will print
without converting to CMYK, choose RGB Source and Rendering Style settings. If the
document contains PANTONE colors, choose the appropriate Spot Color Matching
setting. For instructions on specifying print options, see Chapter 1.
9
9-1
Chapter 9:
Illustration
Applications
Working with illustration applications
This chapter provides instructions for using Illustrator for Windows and Mac OS,
FreeHand for Windows and Mac OS, and CorelDRAW for Windows and Mac OS.
Before printing from these applications, make sure the appropriate PostScript
printer driver and the E-810 PPD are installed on your computer, as described in
Getting Started.
Working with illustration applications
You can print directly from an illustration application or use it to create and save files
that will be imported into a page layout document. To print from an illustration
application, use the printer driver and the print settings recommended in Chapter 1.
N OTE : These application notes provide instructions for printing composites only.
For instructions on printing color separations, refer to the documentation for
your application.
As a general rule, use the EPS file format when saving files with an illustration
application.
Defining colors
All illustration applications use the CMYK color model. While some also allow you
to define colors using other color models, they all send CMYK data to the E-810.
Consequently, the RGB Source and Rendering Style settings in the PPD do not affect
all colors printed from illustration applications. For predictable results with CMYK
colors, use the CMYK Color Reference pages when defining colors (see “Choosing
colors in PostScript applications” on page 5-5).
N OTE : If you define colors in RGB and print directly from the application, the
application converts the RGB data to CMYK before sending it to the E-810. This
conversion by the application will determine which E-810 print options affect your
job. For example, if the application converts RGB black (defined in your document
as R0%, G0%, B0%) to four-color CMYK black when it sends the job to the E-810,
the Pure Black Text/Graphics option in the PPD will have no effect when you print
the job.
You can also choose named colors from the PANTONE color library. See page 5-6.
9
9-2
Illustration Applications
Importing images
In general, all images placed into illustration applications should be in EPS file format.
All RGB images placed in a document are affected by the RGB Source and
Rendering Style settings in the PPD. The E-810 color management system applies the
specified RGB Source setting to all RGB data and then uses the specified Rendering
Style (CRD) to perform a color conversion to CMYK. An exception to this occurs if
you assign ICC profiles to RGB images using the application’s color management tools
(see “Tips for advanced users” below). In this case, the application performs the color
conversion of the image and sends CMYK data to the E-810.
Tips for advanced users
If you place multiple RGB images, some non-photographic and some photographic,
a single CRD may not be suitable for all the images. In this case, you may want the
photographic images to bypass the CRD altogether. To accomplish this, separate the
image to CMYK data with a pixel-editing application, such as Photoshop, and perform
color correction. Save the image as an EPS or TIFF file and import it into the
document. Or save the RGB image in TIFF format and assign it an ICC profile and
rendering intent when you import it into the document (see the individual application
notes in this chapter).
CMYK simulation
You can specify a press simulation target and a press simulation method for the job
with print options (see Chapter 1). The CMYK Simulation setting affects all CMYK
color data sent by the illustration application.
• If the document contains CMYK images that were separated for an offset press
standard, apply the corresponding CMYK Simulation setting. For example, for
images separated for SWOP, choose SWOP-Coated as the CMYK Simulation
setting.
• If the document contains CMYK images that were separated according to the
color characteristics of a custom ICC profile (not a press standard profile), select
the corresponding profile from the CMYK Simulation Profile print option on
the E-810.
9
9-3
Adobe Illustrator 8.x for Windows and Mac OS
N OTE : The workflow described above requires that the profile used for the separation
of CMYK images in the document also resides on the E-810. For more information on
downloading CMYK Simulation profiles to the E-810 with ColorWise Pro Tools, see
Chapter 4.
Adobe Illustrator 8.x for Windows and Mac OS
If you are using ColorWise color management, disable the Illustrator color
management system by removing the Color Conversion and Color Conversion
Utilities files from the Adobe Illustrator >Plug-ins>Extensions folder.
Defining colors
Any colors defined in Illustrator are sent to the printer in CMYK—even those defined
using other color models. For best results, use the color definition methods described
on page 5-5.
Importing images
All RGB images placed in a document are affected by the RGB Source and Rendering
Style settings you select in the PPD. For best results with placed images, use the
instructions in “Importing images” on page 9-2 and “CMYK simulation” on page 9-2.
Optional Color Management in Illustrator
If you have additional color management requirements not offered by ColorWise, such
as managing color on non-E-810 devices, consider using the Illustrator color
management features. For more information, see your Illustrator documentation.
9
9-4
Illustration Applications
Selecting options when printing
For the Windows version of Illustrator, select the appropriate copier from the Name
pop-up menu and select PostScript Level 2 or 3.
Windows
Select the copier name
Click Properties
to set print options
Choose Composite
Choose PostScript Level 2 or 3
For the Mac OS version of Illustrator, choose Composite output and PostScript
Level 3.
Mac OS
Choose Composite
Choose PostScript
Level 3
9
9-5
FreeHand 8.x for Windows and Mac OS
If a document contains placed RGB images, click Properties (Windows) or select
Printer Specific Options from the pop-up menu (Mac OS) and choose RGB Source
and Rendering Style settings for the E-810. With the exception of placed RGB images,
these settings have no effect on colors printed with Illustrator 8.x. If the document
contains named PANTONE named colors, choose the appropriate Spot Color
Matching setting.
For instructions on setting print options, see Chapter 1.
Saving files for importing into other documents
When saving files in Illustrator 8.x for importing into other types of documents, use
the EPS file format. Illustrator can save color information in both RGB and CMYK.
The E-810 RGB Source and Rendering Style settings affect color output of RGB
artwork saved in Illustrator EPS and imported into other kinds of documents (even
when both RGB and CMYK artwork exists in the same file). In the case of Illustrator
files imported into Photoshop, however, vector data from the Illustrator file is
rasterized into bitmaps in Photoshop, and the final color space of the bitmap data is
determined by the color mode you set in Photoshop.
FreeHand 8.x for Windows and Mac OS
The information in this section applies to both the Windows and Mac OS versions
of FreeHand 8.x. Only Mac OS dialog boxes are shown, but the information and
instructions are identical for the Windows version.
N OTE : If you are using ColorWise color management, turn off FreeHand 8.x color
management features by choosing None from the Colors >Color Management >Type
pop-up menu.
9
9-6
Illustration Applications
Defining colors
Any colors defined in FreeHand are sent to the copier in CMYK—even those defined
using other color models. For best results, use the color definition methods described
on page 5-5.
You can control the conversion of RGB colors defined in FreeHand by specifying
settings in the Preferences dialog box under the Colors category, or by clicking the
Color Management button in the FreeHand pop-up menu on the Print dialog box.
Click Colors to access the color
management settings
Importing images
A number of file types can be imported into FreeHand 8.x, but once imported, all are
treated as either EPS images, TIFF images, or editable paths. For details, see your
FreeHand documentation.
When you import an EPS image into your document, FreeHand inserts a link to the
image rather than embedding the original file, resulting in a smaller file size. If the
image is a CMYK EPS file, the colors print just as they would from the originating
application.
9
9-7
FreeHand 8.x for Windows and Mac OS
N OTE : Before placing a CMYK EPS file, be sure the file was saved with Desktop Color
Separation (DCS) set to Off. If the file was saved with DCS activated, FreeHand prints
composites of the image at the low resolution used for screen viewing.
All RGB images placed in a document are affected by your RGB Source and Rendering
Style settings in the PPD. For best results with placed images, use the instructions in
“Importing images” on page 9-2 and “CMYK simulation” on page 9-2.
Selecting options when printing from FreeHand
When printing, refer to the following illustrations to select options.
Choose Normal
Click to access
FreeHand Print Setup
Click to select a PPD
In the Print dialog box, make sure the Use PPD option is selected. From the Print
setting menu, choose Normal.
• If the Use PPD option is on, a plus sign (+) appears in front of the word “Normal.”
• If the PPD name for your E-810 is not displayed next to the PPD button, click the
button labeled “…” and choose the appropriate PPD from the menu that appears.
9
9-8
Illustration Applications
To use E-810 color management features, clear the “Convert RGB to process” check
box in the File>Output Options dialog box. If this option is selected, FreeHand color
management settings are used to convert RGB colors and RGB TIFF, PICT, and JPEG
images to CMYK.
Do not select to use E-810
color management
If a document contains placed RGB images, choose RGB Source and Rendering Style
settings in the PPD. With the exception of placed RGB images, these settings have no
effect on colors printed with FreeHand. If the document contains PANTONE named
colors, choose the appropriate Spot Color Matching setting in the PPD.
Refer to your FreeHand documentation for information about other FreeHand
print options.
Saving files for importing into other documents
When saving files in FreeHand 8.x for importing into other types of documents, use
the EPS file format. FreeHand saves all color information in CMYK. The RGB Source
and Rendering Style print options have no effect on the color output of RGB artwork
saved in FreeHand 8.x and imported into other kinds of documents. In the case of
FreeHand files imported into Photoshop, however, vector data from the FreeHand file
is rasterized into bitmaps in Photoshop, and the final color space of the bitmap data is
determined by the color mode you set in Photoshop.
9
9-9
CorelDRAW for Windows and Mac OS
Optional Color Management in FreeHand
If you have additional color management requirements not offered by ColorWise, such
as managing color on non-E-810 devices, consider using the FreeHand color
management features. For more information, see your FreeHand documentation.
CorelDRAW for Windows and Mac OS
Defining colors
Any colors defined in CorelDRAW 9.x for Windows or CorelDRAW 8.x for Mac OS
are sent to the copier in CMYK—even those defined using other color models. For the
best results, use the color definition methods described in “Choosing colors in
PostScript applications” on page 5-5.
You can control the conversion of RGB colors defined in CorelDRAW by specifying
settings in the Color Management dialog boxes. On Windows machines, the Color
Management dialog boxes are located in Tools>Color Management. On Mac OS
computers, the Color Management functions are located in Edit:Preferences:Global.
N OTE : If you do not want to use color management in CorelDraw, do not select
options under Color Management and Color Management General, and select None
from the Composite Printer pop-up menu under Color Management/Profiles.
Importing images
All RGB images placed in a document are affected by your RGB Source and Rendering
Style settings in the PPD. For best results with placed images, use the instructions in
“Importing images” on page 9-2 and “CMYK simulation” on page 9-2.
9
9-10
Illustration Applications
Selecting options when printing
On Windows computers, in the Print dialog box under the General tab, make sure the
correct copier and PPD are selected and select the Use PPD check box. Click
Properties to specify E-810 print options.
Print device name appears here
Click Properties to access E-810
print options
Printer driver/PPD name appears
here
On Mac OS computers, click the Printer button in the General Print dialog box to
select the copier and print options.
To use E-810 color management, make sure the “Use color profile” option in the Misc
tab of the Print dialog box is not selected. If this option is selected, CorelDRAW color
management settings are used to convert RGB colors and images to CMYK.
9
9-11
CorelDRAW for Windows and Mac OS
Do not select to use
E-810 Color Management.
If a document contains placed RGB images, choose RGB Source and Rendering Style
settings for your copier. With the exception of placed RGB images, these settings have
no effect on colors printed with CorelDRAW. If the document contains PANTONE
named colors, choose the appropriate Spot Color Matching setting.
Saving files for importing into other documents
When saving files in CorelDRAW for importing into other types of documents,
use the EPS file format. CorelDRAW saves all color information in CMYK, so RGB
Source and Rendering Style print options have no effect on color output of artwork
saved with CorelDRAW and imported into other kinds of documents. In the case
of CorelDRAW files imported into Photoshop, however, vector data from the
CorelDRAW file is rasterized into bitmaps in Photoshop, and the final color space
of the bitmap data is determined by the color mode you set in Photoshop.
Optional Color Management in CorelDRAW
If you have additional color management requirements not offered by ColorWise, such
as managing color on non-E-810 devices, consider using the CorelDRAW color
management features. For more information, see your documentation.
A
A-1
Appendix A:
Desktop
Color Primer
Desktop Color Primer
This appendix covers concepts basic to printing in color, including:
• Properties of color
• Printing techniques
• Using color effectively
• Raster images and vector images
• Optimizing files for processing and printing
If you are already familiar with color theory and digital color printing, refer to the last
section (“Optimizing files for processing and printing” on page A-10) for tips on
optimizing files for printing.
The properties of color
This section introduces concepts that are basic to color theory. You will encounter
some of these concepts (such as hue, saturation, and brightness) when you work with
color in applications; others provide useful background information. Color is a complex
topic, so consider this a starting point for experimentation and further research.
The physics of color
The human eye can see electromagnetic radiation at wavelengths between 400
nanometers (purplish blue) and 700 nanometers (red). This range is called the visible
spectrum of light. We see pure spectral light as intensely saturated or pure colors.
Sunlight at midday, which we perceive as white or neutral light, is composed of light
from across the visible spectrum in more or less equal proportions. Shining sunlight
through a prism separates it into its spectral components, resulting in the familiar
rainbow of colors (color example 1).
A
A-2
Desktop Color Primer
Like the sun, most light sources we encounter in our daily environment emit a mixture
of light wavelengths, although the particular distribution of wavelengths can vary
considerably. Light from a tungsten light bulb, for example, contains much less blue
light than sunlight. Tungsten light appears white to the human eye, which, up to a
point, can adjust to the different light sources. However, color objects appear different
under tungsten light than they do in sunlight because of the different spectral makeup
of the two light sources.
The mixture of light wavelengths emitted by a light source is reflected selectively by
different objects. Different mixtures of reflected light appear as different colors. Some
of these mixtures appear as relatively saturated colors, but most appear to us as grays or
impure hues of a color.
CIE color model
In the 1930s, the Commission Internationale de l’Eclairage (CIE) defined a
standard color space, a way of defining colors in mathematical terms, to help in
the communication of color information. This color space is based on research on
the nature of color perception. The CIE chromaticity diagram (color example 2) is a
two-dimensional model of color vision. The arc around the top of the horseshoe
encompasses the pure, or spectral, colors from blue-violet to red. Although the CIE
chromaticity diagram is not perceptually uniform—some areas of the diagram seem
to compress color differences relative to others—it is a good tool for illustrating some
interesting aspects of color vision.
By mixing any two spectral colors in different proportions, we can create all the colors
found on the straight line drawn between them in the diagram. It is possible to create
the same gray by mixing blue-green and red light or by mixing yellow-green and blueviolet light. This is possible because of a phenomenon peculiar to color vision called
metamerism. The eye does not distinguish individual wavelengths of light. Therefore,
different combinations of spectral light can produce the same perceived color.
Purple colors, which do not exist in the spectrum of pure light, are found at the
bottom of the diagram. Purples are mixtures of red and blue light—the opposite ends
of the spectrum.
A
A-3
Desktop Color Primer
Hue, saturation, and brightness
A color can be described in terms of three varying characteristics, called the HSB color
model:
• Hue—tint (the qualitative aspect of a color—red, green, or orange)
• Saturation—the purity of the color
• Brightness—relative position between white and black
While the CIE chromaticity diagram (color example 2) conveys hue and saturation, a
three-dimensional color model is required to add the brightness component (color
example 3).
Many computer applications include dialog boxes in which you choose colors by
manipulating hue, saturation, and brightness. For example, some applications use a
color picker (color example 4) which can be reconfigured according to your preference.
Additive and subtractive color systems
Color devices used in desktop publishing and printing simulate the range of visible
colors using a set of primary colors that are combined to create other colors. There are
two methods for creating a range of colors from a set of primary colors. Computer
monitors and scanners are based on the additive color model. Printing technologies,
including the E-810and offset presses, are based on the subtractive color model.
Additive (RGB) color
Color devices that use the additive color model make a range of colors by combining
varying amounts of red, green, and blue light. These colors are called the additive
primaries (color example 5). White is created by adding the maximum amount of red,
green, and blue light available. Black occurs wherever all three colors are absent. Grays
are created by adding equal amounts of all three color together. Combining varying
amounts of any two of the additive primaries creates a third, saturated hue.
A familiar device based on this color model is the computer monitor (color example 6).
Monitors have red, green, and blue phosphors that emit varying amounts of light to
display a given color. Scanners create digital representations of colors by measuring
their red, green, and blue components through colored filters.
A
A-4
Desktop Color Primer
Subtractive (CMY and CMYK) color
The subtractive color model is the basis for color printing and for color photographic
prints and transparencies. While the additive color model simulates the visible
spectrum of color by adding light of three primary hues, the subtractive color model
starts with a “white” or neutral light source containing light of many wavelengths.
Inks, toners, or other colorants are used to selectively absorb (subtract) certain
wavelengths of light that otherwise would be reflected or transmitted by the media
in use.
The subtractive primaries are cyan, magenta, and yellow; they absorb red, green, and
blue light, respectively (color example 7). Combining any two subtractive primaries
creates a new color that is relatively pure or saturated. For example, you can make red
by combining magenta and yellow, which absorb green and blue light, respectively.
White occurs when no colorant is applied. Combining all three subtractive primaries
in theory yields black, but due to deficiencies of cyan, magenta, and yellow colorants,
combining these three primaries actually yields a muddy brown. Black colorant is
added to compensate for the deficiencies of cyan, magenta, and yellow colorants.
Consequently, color printing uses four process colors: Cyan, Magenta, Yellow, and
blacK (CMYK). The use of black toner helps in producing rich, solid blacks and allows
for improved rendering of black text.
The CMYK colorants used in offset printing and by your copier toner are to some
degree transparent. When one layer of colorant is applied on top of another, you see
the effect of both. To create a range of intermediary colors, a method is required for
varying the amount of each colorant that is applied. A technique called halftoning is
used in offset printing, while color print devices typically use a proprietary system for
applying ink or toner colors that is similar to halftoning.
A
A-5
Desktop Color Primer
Printing techniques
Until recently, most color printing was done on printing presses using one of several
printing techniques—offset lithography, flexography, and gravure, to name a few.
All traditional printing techniques require lengthy preparation before a print run can
take place. Short-run color printing, including E-810 printing, eliminates most of this
preparation. By streamlining the process of color printing, the E-810 makes short print
runs economically feasible.
In contemporary offset lithographic printing, digital files from desktop computers are
output to an imagesetter, which creates film separations. The film is used to make a
prepress proof, which is an accurate predictor of the final print job and allows you to
make corrections before going to press. Once the proof is approved, the printer makes
plates from the film and runs the print job on the press.
Desktop
computer
Desktop
computer
Imagesetter
Film
Print device
Proof
Press
Print run
Color prints
With a E-810, you simply print the file. The E-810 processes the PostScript
information in the file and sends four bitmaps (one each for cyan, magenta, yellow,
and black) to the print engine. The ease of E-810 printing makes possible
experimentation that would be too costly on press, allowing unlimited fine-tuning of
color and design elements.
A
A-6
Desktop Color Primer
Halftone and continuous tone devices
Halftoning is used in offset printing to print each process color at a different intensity,
allowing millions of different colors to be reproduced using only the four process
colors. Depending on the required intensity of a given color, toner is placed on paper
in dots of different size. The grid of dots used for each toner color is called a screen.
Halftone screens are aligned to unique angles designed to eliminate interference
patterns called moiré that can arise with halftoning.
Some color print devices are commonly referred to as continuous tone (or “contone”)
devices. They do not use traditional halftone screen patterns and angles. Contone
devices are capable of varying the intensity of individual dots.
Even if your color printing is done exclusively on the E-810, you will encounter
concepts from offset printing if you use high-end graphics applications. For example,
color controls in illustration applications, such as Illustrator, are geared toward
specifying color for offset printing using process and spot colors. Many applications
allow you to specify the screening used for each printing plate.
Using color effectively
The ability to print in color can greatly increase the effectiveness of your message,
whether you are printing a presentation or a newsletter, or proofing an ad concept that
will later be printed on press. Some potential benefits of using color include:
• Conveying information rapidly by using color cues
• Making use of the emotive aspects of different colors
• Increasing impact and message retention
Color can also be a source of distraction and discord if it is used poorly. This section
outlines some tips and concepts that will prove useful as you approach designing
color materials.
A
A-7
Desktop Color Primer
A few rules of thumb
Try some of the following strategies for creating successful color materials:
• Rather than applying colors indiscriminately, use color to aid comprehension.
In presentations, graphs, and charts, use color to highlight patterns and emphasize
differences.
• In general, fewer colors work better than many colors.
• Use red as an accent color. Red is particularly effective when used in otherwise
monochromatic materials.
• Consider the tastes of your target audience when choosing colors.
• Keep a file of printed color pieces that appeal to you or strike you as effective.
Refer to it for ideas when designing your own documents.
Color wheel
A color wheel (color example 8) is a helpful tool for understanding the interrelation of
colors. The colors on one side of the color wheel, from magenta to yellow, appear to
most people to be warm colors, while those on the other side, from green to blue,
appear to be cool. The distance between two colors on the color wheel can help predict
how they will appear when seen side by side.
Colors opposite one another on the wheel are called complements (color example 9a),
and create a striking contrast side by side. This can be the basis for a bold graphical
design, but it is an effect you should use with discretion since it can be visually
fatiguing. Other bold combinations to consider are split complements (a color and the
two colors adjacent to its complement; color example 9b) and triads (three colors
evenly spaced on the color wheel; color example 9c). Colors adjacent to one another on
the color wheel result in subtle harmonies.
The color wheel simplifies color relationships for the purpose of clarity, showing only
saturated or pure colors. Adding the myriad variations of each hue to the palette (more
or less saturated, darker or lighter) creates a wealth of possibilities. Taking a pair of
complements from the color wheel and varying the saturation and brightness of one or
both colors produces a very different result from the pure complements. Combining a
light tint of a warm color with a darker shade of its cooler complement often gives
pleasing results. Combining a darker shade of a warm color with a light tint of its
cooler complement produces an unusual effect you may like.
A
A-8
Desktop Color Primer
Once you have mastered the concept of the color wheel, you have a good framework
for experimenting with color combinations. Many books targeted at graphic designers
show groups of preselected color combinations. Some are organized by themes or
moods, and some are based on a custom color system, such as PANTONE. The more
you develop a critical facility for judging color combinations, the more you will be able
to trust your own eye for color. The bibliography at the back of this manual includes
books on design.
Color and text
It is not a coincidence that the overwhelming majority of text you see is printed in
black on white paper. Text in black on white is highly legible and is not fatiguing to
read for extended periods. For many color materials, using black text on a white
background and confining color to graphic elements and headings is a good choice.
Color text can add flair to documents printed on paper when used skillfully. This
technique is widely used in presentations. When using color text, avoid dazzling text
and background combinations created from primary complements, especially red and
cyan or red and blue; they are visually fatiguing and hard to read. Color text is more
legible when distinguished from its background by a difference in lightness—for
example, dark blue text on a light beige background. In addition, using many different
colors in a string of text makes for a confused appearance and is hard to read. However,
using a single highlight color is an effective way to draw the reader’s eye to selected
words. See color example 10 for color text samples.
When using color text, keep in mind that small font sizes typically do not print in
color with the same sharpness as in black. In most applications, black text prints
exclusively in black toner, while color text usually prints with two or more toners.
Any misregistration between the different toners on paper causes color text to lose
definition. You can make test prints to find the smallest point size at which color text
prints clearly. When using high-end graphics applications that allow you to specify
color as percentages of cyan, magenta, yellow, and black, you can create pure cyan or
pure magenta text that prints with the same sharpness as black text. (Pure yellow text is
extremely hard to read on anything but a dark or complementary background.)
A
A-9
Desktop Color Primer
Raster images and vector images
Two broad categories of artwork can be printed from a personal computer to a color
printer: raster and vector images.
A raster image, also referred to as a bitmap, is composed of a grid of pixels, each
assigned a particular color value (color example 11a). The grid, when sufficiently
enlarged, resembles a mosaic made from square tiles. Examples of raster images include
scans and images created in painting or pixel-editing applications, such as Photoshop
and Painter.
The amount of data found in a raster image depends on its resolution and bit depth.
The resolution of a raster describes the compactness of the pixels and is specified in
pixels per inch (ppi). The bit depth is the number of bits of information assigned to
each pixel. Black and white raster images require only one bit of information per pixel.
Grayscale images require 8 bits per pixel. For photographic quality color, 24 bits of
RGB color information are required per pixel, yielding 256 levels of red, green, and
blue. For CMYK images, 32 bits per pixel are required.
When printing raster artwork, the quality of the output depends on the resolution of
the source raster. If the raster resolution is too low, individual pixels become visible in
the printed output as small squares. This effect is sometimes called “pixelation.”
In vector images, picture objects are defined mathematically as lines or curves between
points—hence the term “vector” (color example 11b). Picture elements can have solid,
gradient, or patterned color fills. Vector artwork is created in illustration and drawing
applications, such as Illustrator and CorelDRAW. Page layout applications, such as
QuarkXPress, also allow you to create simple vector artwork with their drawing tools.
PostScript fonts are vector-based as well.
Vector artwork is resolution-independent; it can be scaled to any size and resolution
without danger of pixels becoming visible in printed output.
A
A-10
Desktop Color Primer
Optimizing files for processing and printing
The following sections provide tips on how to create image files that produce the
highest possible print quality while minimizing the processing time and disk space
they require.
Resolution of raster images
While a 72-ppi raster image appears sharp on a monitor, the same image would likely
appear pixelated when printed to the E-810. Color print devices are capable of much
greater detail than monitors, and require correspondingly higher resolution image files.
However, high-resolution files can be large, and therefore cumbersome to transmit over
a network, process for printing, store on disk, and edit.
Beyond a certain threshold, a higher image resolution greatly increases file size while
having a minimal effect on output quality. The optimal image resolution depends on
the resolution of the final print device. Aim for the resolution that optimizes both file
size and output quality.
The resolution of a raster image, along with its bit depth and physical dimensions,
determine its file size. The following table shows the file sizes of color raster images at
different dimensions and resolutions.
File size at
Image size
(inches)
100 ppi
150 ppi
200 ppi
400 ppi
600 ppi
RGB/CMYK
RGB/CMYK
RGB/CMYK
RGB/CMYK
RGB/CMYK
3" x 4"
0.4/0.5 MB
0.8/1.0 MB
1.4/1.8 MB
5.5/7.3 MB
12.4/16.5 MB
5" x 7"
1.0/1.3 MB
2.3/3.0 MB
4.0/5.3 MB
16.0/21.4 MB
36.1/48.1 MB
8.5" x 11"
2.7/3.6 MB
6.0/8.0 MB
10.7/14.3 MB
42.8/57.1 MB
96.4/128.5 MB
11" x 17"
5.4/7.1 MB
12.0/16.1 MB
21.4/28.5 MB
85.6/114.1 MB
192.7/256.9 MB
A
A-11
Desktop Color Primer
In this table, the shaded areas indicate that 200 ppi is typically the best trade-off
between image quality and file size. However, higher resolutions (for example, 250 to
300 ppi) may be needed for offset printing, when quality is of the utmost importance,
or for images containing sharp diagonal lines.
To find the best image resolution for your purposes, make test prints of some raster
artwork at different resolutions. Start with a high-resolution image (400 ppi) and save
versions at progressively lower resolutions, down to 100 ppi, using a pixel-editing
application such as Photoshop. Always save a copy of the original high-resolution
version in case you need to revert to it. The high-resolution data cannot be recreated
from a lower resolution version.
Print the files and examine the output. You will likely begin to see a marked
deterioration in output quality at resolutions below 200 ppi, while above 200 ppi the
improvement may be very subtle.
Image quality
100 ppi
200 ppi
300 ppi
400 ppi
500 ppi
600 ppi
Image resolution
Raster images prepared for offset printing may need to be at higher resolutions than
needed for proofing on your E-810.
A
A-12
Desktop Color Primer
Scaling
Ideally, each raster image should be saved at the actual size, and it will be placed into
the document at the optimal resolution for the print device. If the image resolution is
correct for the print device, there is no quality advantage to be gained by scaling an
image down to a percentage of its actual size. If you scale a large image down to a
percentage of its actual size, you incur unnecessary file transfer time because the image
data for the entire large image is sent to the printer. If an image is placed multiple times
at markedly different sizes in a document, save a separate version of the image at the
correct size for each placement.
If you need to place an image at greater than 100% in a document, remember that the
output image resolution is affected. For example, if you scale a 200 ppi image to
200%, the image is printed at 100 ppi.
B
B-1
Appendix B:
Color
Management
Color Management
This appendix provides information on controlling and managing color output in
order to achieve predictable color results. It also discusses the basics of color
management.
Controlling printed color
When working with color materials, whether they be presentations, illustrations, or
complicated page designs, you make aesthetic decisions about the colors you use. Once
you have decided on your goal, you then need to realize it in print. Your color printing
system becomes an ally in this creative process to the extent that results are predictable.
• If you designed a poster to print on the E-810, you want the printed colors to match
the design specification.
• If you are printing presentations on the E-810, you want to preserve the vivid colors
you see on your monitor.
• If you are working with color that will be printed on an offset press, you want the
E-810 output to match other prepress proofs or PANTONE color swatch books.
The type of print job and the final print device, E-810 or offset press, determine the
methodology you use to achieve the best results.
No matter what your goals are, two factors always impact color print output: print
device consistency and the range of colors the device can print, known as its gamut.
These concepts are covered briefly in this chapter. Creating successful color documents
and presentations also requires an understanding of color management software as it is
implemented by the E-810 and on your desktop computer. Most of this chapter is
devoted to discussing the various elements of color management that contribute to
predictable color results.
B
B-2
Color Management
Maintaining copier consistency
The factors described below affect print device consistency, as well as color fidelity and
overall output quality.
Paper stock and toner
The paper and toner used by your copier can affect printed color. For best results, use
the supplies recommended by the manufacturer of the copier.
Maintenance
Problems, such as streaking and insufficient or excessive amounts of one or more
toners, arise when a copier does not receive periodic maintenance or needs major
repairs. In addition to having it serviced regularly, monitor the condition of your
copier by making standard test prints at regular intervals. You can do this easily by
printing the E-810 Test Page. Save the prints and show them to the service technician
whenever output densities vary from the norm or other problems appear.
Print device gamut
Different color reproduction techniques have different color capabilities or gamuts.
Color transparency films have comparatively large gamuts, as do color monitors. The
color gamut that can be produced using process inks or CMYK toners on paper is
smaller. This is why some colors that can be displayed on a color monitor, especially
bright saturated colors, cannot be reproduced exactly by your E-810 copier, nor can
they be reproduced on a press using process colors. Moreover, different print devices
have different gamuts—some colors your copier can produce cannot be reproduced on
an offset press, and vice versa. The following illustration provides a graphical
representation of this concept.
Color transparency film
RGB monitor
Offset press (white)
Other print device
B
B-3
Color Management
You need to account for the gamut of your print device when designing on a color
monitor. When printed, colors that fall outside the print device gamut are “mapped” to
printable colors. This process, referred to as gamut mapping, takes place when color
data is converted or adjusted to meet the gamut requirements of a print device.
The E-810 is specially designed to perform gamut mapping at high speed with high
quality results. It provides these color management features automatically, using either
built-in default settings or settings you specify for a particular print job. For added
flexibility, the E-810 color management system can also be used in combination with
color management systems on Windows and Mac OS computers.
Basics of color management
The past several years have seen progress toward standardization in the field of digital
color management systems. Both the Windows and Mac OS operating systems now
support a standard format developed by the International Color Consortium (ICC).
This ICC format is implemented on Windows 98/Me, Windows NT 4.0, and
Windows 2000 computers in Image Color Matching (ICM) and on Mac OS
computers in ColorSync. More and more software developers are also incorporating
color management systems into high-end applications. The E-810 color management
system, ColorWise, supports this industry standard profile format.
A color management system, or CMS, is a “translator” between the color space of the
source image (the monitor, or a scanner, for example) and the color space of the output
device. The CMS uses a device-independent color space, such as CIELAB, as its
intermediate color space. To perform its translation, the CMS needs information about
the color space of the source image and the gamut of the print device. This
information is provided in the form of profiles, often created by the makers of the
monitor or print device. The end product of a CMS conversion is a printed document
or an image file in the gamut of a particular device.
N OTE : If color matching between computer display and printed output is critical, you
should calibrate your monitor as well as your printer. For most users, predictability of
printed color output is adequate and monitor calibration is not necessary. For
information on monitor calibration, see your Photoshop or Illustrator documentation.
B
B-4
Color Management
Color conversion
Before a color document can be printed, the color data in it must be converted to the
gamut of the print device. Whether performed by the E-810 or by a host-based CMS,
the process of converting color data for a print device is the same: the CMS interprets
RGB image data according to a specified source profile and adjusts both RGB and
CMYK data according to a specified output profile, also called a destination profile by
some color management systems.
Color management system
Source
profile
Output
profile
Device-independent
color space
Input data
Printed data or file
The source profile defines the RGB color space of the image’s source—characteristics
such as the white point, gamma, and type of phosphors used. The output profile
defines the gamut of the output device. The E-810 (or the host-based CMS) uses a
device-independent color space to translate between the source color space and the
color space of the output device.
The E-810 allows you to specify default and override settings for the source color space
information and the output profile information (see page 1-1). When you use these
settings, you do not need to use the features of other color management systems. Your
E-810 software includes ICC profiles for use with other color management systems, if
you choose to use them, although conflicts may arise when the E-810 CMS is used in
conjunction with a host CMS.
Color management systems can also be used to adjust color data to the gamut of a
print device other than the one to which you are printing. This process of simulating
another print device is commonly used for proofing jobs that will print on an offset
press. The E-810 simulation feature is described on page 1-8.
C
C-1
Appendix C:
Importing
Densitometer
Measurements
Importing Densitometer Measurements
This appendix describes Simple ASCII File Format, which can be used to import
density measurements from measurement devices. To use your own measurement data
from an alternate densitometer, record your individual readings in a text file and
structure it as described below.
Simple ASCII Import File Format (SAIFF)
This format describes Status T measurement data and is for import into the
ColorWise Pro Tools Calibrator. There are three possible file formats:
• 1D Status T density for EFI 34 patch page
• 1D Status T density for EFI 21 patch page
• 1D Status T density for other pages (maximum of 256 patches per ink)
The file format is ASCII and has no tabs. A single space or multiple spaces are used
as delimiters. Blank lines are not allowed. Each line in the file represents four patches
(C, M, Y, K) of a specific ink value. Comments may be on any line in the file, and
these lines start with a pound sign (#) followed by a space. A line with a pound sign
followed by any character other than a space has been reserved. Comments must be
on an entire line by themselves.
Each line of data contains five values. The first number is the sequential patch number
(for EFI 34 and EFI 21 pages) or the ink value percentage (for other pages). The
following four values are the density values of C, M, Y, and K of the corresponding
patch. Lines are ordered either by increasing sequential patch numbers or by increasing
the ink percentage.
For Windows computers, the file extension must be .cm1. For Mac OS computers, the
file type must be ‘TEXT’.
Measurement data in EFI 34 and EFI 21 are paper-relative. For other pages, if the first
line corresponds to zero ink value, the Calibrator assumes that the measurement data is
absolute and adjusts it to become paper-relative by subtracting the density values of the
first line from the remaining patches.
C
C-2
Importing Densitometer Measurements
Example of 1D Status T density for EFI 34 patch page
This file format is used to specify the Status T density measurements of the EFI 34
patch page. The value in the first column is the patch number. The first patch must be
1 and the last must be 34.
#!EFI 3
# EFI ColorWise 2.0 Data
type: 1DST34
# Cyan
Magent Yellow Black
1 0.0300 0.0400 0.0200 0.0400
2 0.0600 0.0700 0.0800 0.0700
3 0.1000 0.1000 0.1000 0.1000
(…more data…)
33 1.6700 1.3400 0.8900 1.6700
34 1.7200 1.4300 0.9300 1.7500
Example of 1D Status T density for EFI 21 patch page
This file format is used to specify the Status T density measurements of the EFI 21
patch page. The value in the first column is the patch number. The first patch must be
1 and the last must be 21.
#!EFI 3
# EFI ColorWise 2.0 Data
type: 1DST21
# Cyan
Magent Yellow Black
1 0.0300 0.0400 0.0200 0.0400
2 0.0600 0.0700 0.0800 0.0700
3 0.1000 0.1000 0.1000 0.1000
(…more data…)
20 1.6700 1.3400 0.8900 1.6700
21 1.7200 1.4300 0.9300 1.7500
C
C-3
Importing Densitometer Measurements
Example of 1D Status T density for an arbitrary page
This file format is used to specify the Status T density measurements of a user-defined
patch page. The value in the first column is the ink/toner percentage of the patch. The
first percentage must be 0 and the last percentage must be 100. The percentages must
increase in between.
#!EFI 3
# EFI ColorWise 2.0 Data
type: 1DST
# percnt Cyan Magent Yellow Black
0.0000 0.0300 0.0400 0.0200 0.0400
0.3922 0.0600 0.0700 0.0800 0.0700
1.1765 0.1000 0.1000 0.1000 0.1000
(…more data…)
98.0000 1.6700 1.3400 0.8900 1.6700
100.0000 1.7200 1.4300 0.9300 1.7500
Glossary
additive color model
blasting
A system in which colors are produced
by combining red, green, and blue light
(the additive primaries). An RGB video
monitor is based on an additive color
model.
An undesirable effect that occurs when
excess amounts of toner, possibly
combined with certain types of paper
stock, cause objects in an image to
spread beyond its boundaries as defined
in the file.
additive primaries
Red, green, and blue light that is used in
additive color systems. When added
together in proper amounts, these colors
of light produce white.
BMP
artifact
calibration
A visible defect in an image, usually
caused by limitations in the input or
output process (hardware or software);
a blemish or error.
The process of ensuring that a device
behaves consistently with respect to a set
of specifications.
banding
See color management system.
Visible steps between shades in a color
gradient.
CMYK
bit depth
Amount of information used for each
pixel in a raster image. Black and white
images require only one bit per pixel.
Grayscale images with 256 shades of gray
require 8 bits (or 1 byte) per pixel.
Photographic quality color images can
require 24 bits per pixel (RGB images)
or 32 bits per pixel (CMYK images).
bitmap
An image comprised of small squares
arranged in a grid. Each square in the
grid is a pixel. The number of pixels per
inch defines the resolution of a bitmap.
A graphics file format established by
Microsoft and native to the Windows
operating system.
CMS
A subtractive color model that uses cyan,
magenta, yellow, and black, or process
colors, used in color printing; a color
model used in the printing of colors in
four-color process printing.
color channel
A single-color image that can be edited
separately from the other color channels
comprising a color space—for example,
the red channel of an RGB image.
color gamut
See gamut.
G-2
Glossary
color management system (CMS)
composite printer
System used to match color across
different input, display, and output
devices.
Any output device that can print directly
in color without first creating color
separations. A composite print can be
used as an early proof of an offset print
job.
color rendering dictionary
See CRD (color rendering dictionary).
color separation
The process of separating a color image
into the color components for
printing—cyan, magenta, yellow, and
black. Also used to refer to the four
sheets of film that result from the process
of separating a color image.
color space
A model for representing color in terms
of measurable values, such as the amount
of red, green, and blue in an image. RGB
and CMYK color spaces correspond to
color devices—monitors and copiers
respectively. Other color spaces, such as
CIE Lab, are based on mathematical
models and are device-independent.
They are not based on the color response
of a particular device. See gamut.
colorant
An ink, dye, toner, paint, or other
pigment that modifies the color of media
to which it is applied.
ColorWise color management
E-810 ICC-open color management
solution, which is an easy-to-use system
that addresses the needs of both casual
and experienced color management
users.
continuous tone (contone)
Describes a photographic image that
contains gradient tones from black to
white (such as a 35mm transparency or a
photograph). Continuous tones cannot
be reproduced in that form for printing,
but must be screened to translate the
image into dots.
continuous tone (contone) image
An image containing fine gradations of
tones, such as a photographic image.
CRD (Color Rendering Dictionary)
A feature of color management systems
and PostScript Level 2 and PostScript 3
color copiers that maintains the best
possible translation of color from one
color device to another. A color
rendering dictionary (CRD) is used by
the color management system or the
copier’s PostScript interpreter when
converting data between color spaces.
The E-810 includes several CRDs, each
of which provides a different color
rendering style.
custom color system
A system of named color swatches that
can be matched on press using process or
spot colors. PANTONE and TruMatch
are examples of custom color systems.
G-3
Glossary
DCS (Desktop Color Separation)
flexography
A data file standard defined by Quark,
Inc., to assist in making color separations
with desktop publishing system; five files
are created, four color files (one each for
C, M, Y, and K) and a composite color
preview file of the color image. It allows
an image-editing application to perform
color separation and pass it through to
final output with its integrity intact.
A printing technology that uses flexible
raised-image plates. Flexography can be
used to print on non-flat materials, such
as cans.
densitometer
An instrument commonly used in the
graphic arts industry to measure density
according to a specified standard.
density
A measurement of the light-absorbing
quality of a photographic or printed
image.
desktop color separation
See DCS.
DIC
A Japanese standard of specifications for
separations, proofs, and color printing.
EPS or EPSF (Encapsulated PostScript)
A PostScript file format designed to be
embedded in another PostScript stream.
Euroscale
A European standard of specifications
for separations, proofs, and color
printing.
four-color printer
A printing device that uses cyan,
magenta, yellow, and black ink or toner.
gamma
A numeric value representing the
relationship (gamma curve) between the
input and output values of a color
device. If gamma equals 1, input values
are mapped exactly to output values.
gamut
A range of colors. A device gamut is the
range of colors that a device, such as a
copier, can produce. An image gamut is
the range of colors in a particular image.
gamut mapping
The conversion of color coordinates
from one device’s gamut to another—
usually accomplished with algorithms or
look-up tables.
GDI (Graphics Device Interface)
Graphics and display technology used by
computers running Windows. GDI
applications rely on GDI (rather than
the PostScript language) to send text and
pictures to copiers.
G-4
Glossary
GIF (Graphics Interchange Format)
ICC profile
A standard developed by CompuServe
for bitmap graphics of up to 256 colors
and used for posting photographic
images on the Internet or intranet pages;
rarely used for professional printing.
An industry standard color profile
format developed by the International
Color Consortium (ICC) that describes
the color capabilities, including the
gamut, of a color device based on the
differences between an ideal and the
current device. The ideal is often
provided by the manufacturer as a color
reference file. ICC profiles are
implemented on Mac OS computers in
ColorSync and on Windows 95/98,
Windows NT 4.0, and Windows 2000
computers in Image Color Matching
(ICM). The E-810 color management
system, ColorWise, supports ICC
profiles.
gradient
A smooth transition between two
different colors or between two shades of
a color.
Graphics Device Interface
See GDI.
Graphics Interchange Format
See GIF.
gravure
A printing technology that uses an
etched cylinder that has been immersed
in ink. The ink that remains in the
etched areas is applied to the paper. The
non-etched surfaces of the cylinder are
non-printing areas.
imagesetter
Raster-based film output device; a highresolution laser output device that writes
bitmapped data onto photosensitive
paper or film.
JPEG
halftoning
A method for representing an original
continuous tone image using a pattern of
dots, lines or other patterns.
HSB
A color model where each color is
represented by its hue, saturation, and
brightness components; supported by
most color applications.
A graphics file format defined by the
Joint Photographic Experts Group
committee of International Standards
Organization (ISO); a standard for
digital compression of still image
graphic data.
metamerism
Phenomenon in which two colors
composed of different combinations of
light wavelengths appear identical under
a specific light source, but may look
different under other light sources. The
colors are called “metamers.”
G-5
Glossary
moiré
photographic rendering
An undesirable pattern in images made
using halftone screens. Moiré can be
caused by the improper line frequency of
the screens, improper screen angles,
improper alignment of halftone screens,
or by the combination of a halftone
screen with patterns in the image itself.
A color rendering style that preserves
tonal relationships in images.
Unprintable colors are mapped to
printable colors in a way that retains
differences in lightness, sacrificing color
accuracy as necessary.
named color
The smallest distinct element of a raster
image. The term is a combination of the
words “picture” and “element.”
A color that is defined according to a
custom color system. For example,
PANTONE 107 C is a named color.
office applications
Software applications commonly used
for business purposes, including
presentation applications, spreadsheets,
and word processing programs.
offset lithography
Printing in which ink is transferred from
printing plates to a rubber blanket and
then from the blanket to paper.
output profile
The output profile describes the color
characteristics of a printing device. It
consists of both a profile for your copier
and a calibration target that defines the
expected density response of the copier.
phosphor
Material used in making computer
monitors; phosphors glow and emit red,
green, and blue light when struck by an
electron beam, thus creating an image.
pixel
PostScript
A device-independent page description
language developed by Adobe, which is
used to print and display pictures and
text. PostScript 3 includes many
enhancements to older versions of PostScript, including improved image quality
and color with Enhanced Image Technology, faster performance with
Advanced Page Processing, and ease of
use and setup with NetWorks System.
PPD (PostScript Printer Description
file)
A file containing information about a
particular PostScript print device’s
capabilities and restrictions. The
information in the PPD is presented via
the printer driver.
prepress proof
A print made from a set of film
separations or other file to simulate the
results of printing. A prepress proof is
the last opportunity to catch problems
before the print job goes to press.
G-6
Glossary
presentation graphics rendering
RGB
A color rendering style that creates
saturated colors but does not match
printed colors precisely to displayed
colors. It is appropriate for bright
saturated colors used in illustrations and
graphs.
An additive color model that makes a
range of colors by combining red, green,
and blue light, called the additive
primaries. Commonly used to refer to
the color space, mixing system, or
monitor in color computer graphics.
process colors
simulation profile
The four colors used in printing to
simulate full-spectrum color images:
Cyan, Magenta, Yellow, blacK (CMYK).
The simulation profile describes the
color characteristics of another print
device, such as a printing press, that you
want the E-810 to simulate.
QuickDraw
Graphics and display technology built
into Mac OS computers. QuickDraw
applications rely on QuickDraw (rather
than the PostScript language) to send
text and pictures to copiers.
raster image
Electronic representation of a page or
image using a grid of points called pixels.
rendering intent
The style of color rendering, or gamut
mapping, designed for a particular type
of color job. An example of a rendering
intent is Photographic rendering—also
referred to as Image rendering or
Contrast rendering—which is designed
for photographic images.
solid color rendering
A color rendering style intended for use
when color accuracy is crucial.
Unprintable colors are mapped to the
closest printable colors. Solid color
rendering does the best job of preserving
the saturation of displayed colors.
source color space
The color environment of the
originating source of an image, including
scanners and color monitors.
source profile
A profile used by the color management
system to determine the characteristics of
the color values specified in a source
digital image.
resolution
spectral light
The number of pixels per inch (ppi) in a
bitmap image or the number of dots per
inch (dpi) that a device can render.
The wavelengths of electromagnetic
radiation emitted by a given light source
that can be seen by the human eye.
G-7
Glossary
spot color
substrate
A color that is printed on its own
separation plate when separations are
specified. A spot color is printed using a
custom ink for that color, in contrast to
process colors that are printed using
combinations of cyan, magenta, yellow,
and black.
In printing, the material upon which the
job is printed.
Status T
A spectral response for graphic arts
reflection densitometers defined by
ANSI (the American National Standards
Institute).
subtractive color model
A system in which color is produced by
combining colorants such as paint, inks,
or dyes on media such as paper or
transparent film or acetate. All printing
devices use the subtractive color model.
subtractive primaries
Cyan, magenta, and yellow colorants
used in subtractive color systems for
color printing. Combining the
subtractive primaries produces darker
colors. Black is added to the subtractive
primaries to compensate for deficiencies
of the toners or inks, and for more
efficient black printing.
SWOP
The abbreviation for Specifications for
Web Offset Publications. A standard of
specifications for separations, proofs, and
color printing on a web offset press (not a
sheet fed press).
undercolor removal
In areas where all three process colors (C,
M, Y) overprint, the amounts of those
colors are reduced and replaced by black.
This improves wet ink trapping and
reduces ink costs in process color
printing.
vector image
Graphic illustration created on
computers where picture objects are
defined mathematically as lines or curves
between points. These mathematical
definitions are interpreted by an image
language such as PostScript. Vector
images include artwork created with
illustration applications (such as
Illustrator or FreeHand) and page layout
applications (such as PageMaker).
G-8
Glossary
white point
workflow
The color temperature of any white light
source, typically expressed in degrees
Kelvin (for example, 6500 K, typical for
the white of a monitor).
The path a print job follows from
creation to destination. A workflow may
originate with an RGB scan imported to
the client workstation and opened on the
desktop in an image processing
application, such as Photoshop. After
adjustments are made to the scanned
image, it is evaluated on a color proofing
device for eventual color printing on the
same device or on press.
Bibliography
Books
Adobe Print Publishing Guide. Adobe Systems Incorporated, 1995. (Comes as part of the
documentation for Adobe products such as Adobe Photoshop and Adobe Illustrator,
P/N 0397 0719.)
Blatner, David and Fraser, Bruce. Real World Photoshop 3: Industrial Strength Production
Techniques. Berkeley: Peachpit Press, 1996.
Bruno, Michael H., ed. Pocket Pal ®: A Graphic Arts Production Handbook. Seventeenth
Edition. Memphis: International Paper, 1997.
Hunt, R.W.G. The Reproduction of Colour. Fifth Edition. Surrey: Fountain Press, 1996.
Kieran, Michael. The Color Scanning Success Handbook. Toronto: DPA Communications
Corp., 1997.
Kieran, Michael. Understanding Desktop Color, Second Edition. Berkeley: Peachpit Press,
1994.
Margulis, Dan. Professional Photoshop: Color Correction, Retouching, and Image
Manipulation with Adobe Photoshop. John Wiley & Sons, 1995.
Miller, Marc D. and Zaucha, Randy. The Color Mac. Second Edition. Hayden Books,
1995.
X-Rite Color Guide and Glossary: Communication, Measurement, and Control for Digital
Imaging and Graphic Arts. X-Rite Incorporated, 1996. (Provided as part of the
documentation for X-Rite densitometers, P/N XRC-550.)
World Wide Web sites
International Color Consortium: www.color.org
Graphic Arts Technical Foundation: www.gatf.org
Seybold Seminars Online: www.seyboldseminars.com
Adobe Systems Incorporated: www.adobe.com
Magazines
Adobe Magazine. Seattle: Adobe Systems Incorporated
Publish!. San Francisco: Integrated Media Inc.
Index
Numerics
8-pin DIN plug 3-8, 3-24
A
Absolute Colorimetric 1-5
accent color A-7
additive color model A-3
additive primaries A-3
Adobe Illustrator, see Illustrator
Adobe PageMaker, see PageMaker
Adobe Photoshop, see Photoshop
Adobe PostScript Printer Driver
Mac OS 1-17
Apple Standard setting, RGB Source
option 1-6
AutoCal2 calibration 3-34
B
bit depth, of raster images A-9, A-10
bitmaps A-5
see also raster images
Black Print Enhancement option 1-3
black text
line art 1-10
brightness A-1, A-3
C
CALIB.PS file 4-20
calibration
bypassing 1-3, 1-8
checking status 3-5
COM1 and COM2 port 3-7, 3-24
densitometer 3-5 to 3-9, 3-23 to 3-26
from ColorWise Pro Tools 3-2
from the Control Panel 3-2, 3-15, 3-27,
3-34
importing measurements C-1
measurements 3-1, 3-2, 3-3, 3-32
overview 3-1 to 3-5
scheduling 3-4
targets 3-1, 3-2, 3-3
see also densitometer, ColorWise Pro
Tools
see also spectrophotometer, ColorWise
Pro Tools
calibration patch page 3-3
charts, using color in A-7
CIE
chromaticity diagram A-2, A-3
color model A-2
CIELAB color space B-3
CMY color model 5-3
CMYK Color Reference 5-2, 5-6
CMYK Simulation Method option 1-3, 1-9
CMYK Simulation Profile option 1-3, 1-8
color
accent color A-7
additive model A-3
choosing in applications 5-1
CMY model 5-3
complements A-7
controlling printing results B-1
conversion by color management
systems B-4
custom color systems 5-5
defining in applications 5-1
HSB model 5-5, A-3
HSL model 5-3, 5-5
HSV model 5-3
illustration applications 9-1
physics of A-1
process colors A-6
proofing examples 2-14
properties of A-1
reference pages 5-2
RGB model 5-3, 5-5
I-2
Index
setting default print options 4-21
split complements A-7
spot colors 5-5, A-6
subtractive model A-3, A-4
subtractive primaries A-4
swatch color matching 5-6
text A-8
theory A-1
triads A-7
using effectively A-6 to A-8
wheel A-7
working with 5-1
colorants A-4
Color Charts 3-4
Colorimetric ICC rendering style 1-5
color management
basics B-3 to B-4
ColorWise 1-1 to 1-12, 2-2
color management print options for
Windows 98/Me 1-14
color management system (CMS) xiv, B-3
color matching systems, see custom color
systems
color monitors, see monitors
Color Reference pages 3-4
color rendering styles, see rendering styles
color space 1-1, A-2
ColorSync B-3
Color Text/Graphics Enhancement
option 1-4
color theory A-1
color wheel A-7
ColorWise B-3
key features xiv, 4-21
ColorWise Pro Tools
calibration from 3-2
checking calibration status 3-5
overview 3-15, 3-27 to 3-33
Commission Internationale de l’Eclairage, see
CIE
Comparison Page 3-32
complements, color A-7
compression, JPEG 7-8, 7-11, 7-14, 7-16,
7-17
computer monitors, see monitors
Configuration page
calibration status 3-5
continuous tone devices A-6
Contrast ICC rendering style 1-4
Control Panel
calibration from 3-2, 3-15, 3-27
CorelDRAW 9-9
CRDs
bypassing 6-2, 8-2, 9-2
PostScript color matching 1-18
rendering intent 5-3
custom color systems 5-5, A-8
custom simulations 1-8
D
default color controls set in Setup 1-2
densitometer
calibrating 3-26
DTP32 3-23 to 3-26
DTP41 3-1, 3-5 to 3-9,3-10
density patches 3-5
device profiles B-3
drivers, see printer drivers
E
EFICOLOR
profiles 8-8
XTension 8-8
EPS (Encapsulated PostScript)
color conversion of RGB EPS
images 1-6
recommended for imported images 6-1,
7-7, 7-14, 8-2, 9-1, 9-2, 9-5, 9-8, 9-11
RGB images saved with Photoshop 7-8,
7-13, 7-14
Excel, see Microsoft Office
I-3
Index
F
Fiery Scan 1-8
file size, of raster images 2-3, A-10
flexography A-5
font size, for color text A-8
FreeHand 5-5, 9-5
Full simulation 1-8
Image Color Matching, see ICM
Image ICC rendering style 1-4
Image Smoothing option 1-4
ink B-2
International Color Consortium, see ICC
J
JPEG 7-8, 7-11, 7-14, 7-16, 7-17
G
gamma B-4
Gamma option 1-2
gamut
of monitors B-2
of photographic transparencies B-2
of print devices B-1
gamut mapping B-3
GDI applications, using color in 5-3 to 5-5
Graphics Device Interface, see GDI
Graphics ICC rendering style 1-4
graphs, using color in A-7
gravure A-5
H
halftoning A-4, A-6
HSB color model 5-5, A-3
HSL color model 5-3, 5-5
HSV color model 5-3
hue, saturation, and brightness A-1, A-3
I
ICC profiles
assigning to RGB images 9-2
included with user software B-4
rendering styles 1-4
workflow 2-14
ICC standard for color management
systems B-3
ICM
profiles, applied to RGB images 9-2
illustration applications 9-1
Illustrator 5-5, 9-3
L
light A-1 to A-2
line art, see vector images
M
Macintosh interface cable 3-8, 3-24
Mac OS
printer driver 1-17
Macromedia FreeHand, see FreeHand
maintenance of print devices B-2
Match Copy setting of CMYK Simulation
option 1-3, 1-8
measurements file 3-3, 3-32
metamerism A-2
Microsoft Excel, see Microsoft Office
Microsoft Office 6-1 to 6-2
Microsoft PowerPoint, see Microsoft Office
Microsoft Printer Driver
Windows 2000 1-16
Microsoft Word, see Microsoft Office
misregistration of colors A-8
moiré A-6
monitors
calibration B-3
color model A-3
gamut of B-2
phosphors A-3
N
named colors 5-5
None setting, RGB Source option 1-6
I-4
Index
O
office applications 5-1, 5-3 to 5-5, 6-1 to 6-2
offset lithographic printing A-5
offset press printing A-5 to A-6
offset press print jobs, workflow issues 5-2
Other setting, RGB Source option 1-6
output profile
color conversion B-4
Output Profile option 1-3
P
page layout applications 8-1
PageMaker 5-5, 8-3
painting applications A-9
PANTONE
color system 5-5
PANTONE Coated Color Reference 1-12,
5-2
paper stock B-2
passwords
for calibration 3-2, 3-15, 3-27
Perceptual ICC rendering style 1-4
phosphors A-3, B-4
Phosphors option 1-3
photographic prints A-4
Photographic rendering style 1-4
photographic transparencies A-4, B-2
Photoshop 5-5, 7-1 to 7-17
physics of color A-1
pixel-editing applications A-9, A-11
pixels in raster images A-9
PostScript and non-PostScript RGB
data 7-13
PostScript applications
color handling 5-5
using color in 5-5 to 5-7
PostScript printer description file, see PPD
PostScript Printer Driver
Windows 98/Me 1-13
PostScript printer drivers 6-2
PowerPoint, see Microsoft Office
PPD 1-12, 1-14, 1-16, 1-17, G-5
prepress proof A-5, B-1
presentation print jobs
rendering styles appropriate for 1-4
using color in A-7
Presentation rendering style 1-4
press simulation, see CMYK Simulation
option
print devices
consistency B-1
gamut B-1
maintenance B-2
printing test prints B-2
printer drivers
Mac OS 1-17
Windows 1-13 to 1-16
printing
raster images A-9
techniques A-5
prism A-1
process colors 5-6, A-4, A-6
profiles, device B-3
proofing
prepress A-5, B-1
Pure Black Text/Graphics option 1-3, 1-10
Q
QuarkXPress 5-5, 8-6
QuickDraw applications, using color in 5-3
to 5-5
R
raster images A-9 to A-11
bit depth A-9, A-10
file size A-10
for offset press printing A-11
printing A-9
resolution A-10 to A-11
scaling of A-12
registration of colors A-8
Relative Colorimetric 1-5
Rendering Style option 1-2
rendering styles 1-4, 5-3
RGB color model 5-3, 5-5
RGB Color Reference 5-2, 5-4
I-5
Index
RGB images
EPS, color conversion 1-6
PostScript and non-PostScript 1-6
RGB Separation option 1-3, 1-7
RGB source color space, see source color
space
RGB Source option 1-2, 1-5
S
saturation A-1, A-3
Saturation ICC rendering style 1-4
scaling of raster images A-12
scanners A-3
screens, used in halftoning A-6
Server Status option 3-5
Setup, default color controls set in 1-2
short-run color jobs, workflow issues 5-1
short-run color printing 2-1
simulation, see CMYK Simulation option
simulations, custom 1-8
Source 1–10 option 1-6
source color space B-4
source color space profile
color conversion B-4
spectral colors A-2
spectral components of light A-1, A-2
spectrophotometer
calibrating 3-10
split complements A-7
Spot Color Matching option 1-3, 1-11, 5-7
spot colors 5-5, A-6
Status T C-1
subtractive color model A-3, A-4
subtractive primaries A-4
sunlight A-1
swatch color matching 5-6
T
targets 3-3
Test Page
calibration status 3-5
examining 3-5
test prints B-2
text
font size A-8
using color with A-8
TIFF images
assigning ICC profiles to 8-2
preview 7-8, 7-14
printing at full resolution 8-5
recommended for imported images 7-7,
7-14, 8-2
RGB 9-2
tint A-3
toner B-2
transfer functions 3-3
transparencies (photographic) A-4, B-2
triads A-7
V
vector images A-9
visible spectrum of light A-1
W
white point B-4
White Point option 1-3
Windows 2000 printer driver 1-16
Windows 98/Me
color management print options 1-14
Windows 98/Me printer driver 1-13
Windows Graphics Device Interface, see GDI
applications
Word, see Microsoft Office
workflow
advanced 2-8
color proofing 2-1
ICC profiles 2-14
short-run jobs 2-1
simple 2-3
with Illustrator 2-10
with Photoshop 2-8, 2-16
Color Controller E-810
JOB MANAGEMENT GUIDE
For use with the following color copiers:
Ricoh Aficio Color 6513
Gestetner CS213d
RexRotary CS813d
nashuatec CS513d
infotec 7513
Savin SDC413
Copyright © 2001 Electronics For Imaging, Inc. All rights reserved.
This publication is protected by copyright, and all rights are reserved. No part of it may be reproduced or transmitted in any form or by any means for any purpose
without express prior written consent from Electronics For Imaging, Inc., except as expressly permitted herein. Information in this document is subject to change
without notice and does not represent a commitment on the part of Electronics For Imaging, Inc.
The software described in this publication is furnished under license and may only be used or copied in accordance with the terms of such license.
This product may be covered by one or more of the following U.S. Patents: 4,500,919; 4,837,722; 5,212,546; 5,343,311; 5,424,754; 5,467,446;
5,506,946; 5,517,334; 5,537,516; 5,543,940; 5,553,200; 5,615,314; 5,619,624; 5,625,712; 5,666,436; 5,760,913; 5,818,645; 5,835,788; 5,866,856;
5,867,179; 5,959,867; 5,970,174; 5,982,937; 5,995,724; 6,002,795; 6,025,922; 6,041,200; 6,046,420; 6,065,041; 6,067,080; 6,112,665; 6,116,707;
6,118,205; 6,122,407; 6,134,018; 6,141,120; 6,151,014; 6,166,821; 6,184,873; 6,185,335; 6,201,614; 6,215,562; 6,219,659; 6,222,641; 6,225,974;
6,226,419; 6,238,105; 6,239,895; D406,117, D416,550, D417,864, D419,185, D426,206, D430,206, RE36,947
Trademarks
Fiery, the Fiery logo, Fiery Driven, Freedom of Press, ColorWise, EDOX, EFICOLOR, and RIP-While-Print are registered trademarks of Electronics For Imaging,
Inc. in the U.S. Patent and Trademark Office and certain other foreign jurisdictions.
EFI, the Electronics For Imaging logo, eBeam, the Fiery Driven logo, Fiery LX, Fiery Si, Fiery X2, Fiery X2e, Fiery X3e, Fiery X4, Fiery XJ, Fiery XJe, Fiery XJ-W,
Fiery Z4, Fiery ZX, Fiery X4, Fiery Z5, Fiery Z18, Fiery Z16, AutoCal, ColorCal, Command WorkStation, Continuous Print, DocBuilder, DocBuilder Pro, EFI
Densitometer, Fiery Downloader, Fiery Driver, Fiery Link, Fiery Prints, Fiery Print Calibrator, Fiery Scan, Fiery ScanBuilder, Fiery Spark, Fiery Spooler, FreeForm,
Harmony, Memory Multiplier, NetWise, PowerWise, RIPChips, ScanBuilder, Splash, the Splash logo, STARR Compression, Velocity, Velocity Balance, Velocity
Build, Velocity Estimate, Velocity Scan, VisualCal, WebTools, WebSpooler, WebInstaller, and WebStatus are trademarks of Electronics For Imaging, Inc.
All other terms and product names may be trademarks or registered trademarks of their respective owners, and are hereby acknowledged.
Legal Notices
APPLE COMPUTER, INC. (“APPLE”) MAKES NO WARRANTIES, EXPRESS OR IMPLIED, INCLUDING WITHOUT LIMITATION THE
IMPLIED WARRANTIES OF MERCHANTABILITY AND FITNESS FOR A PARTICULAR PURPOSE, REGARDING THE APPLE SOFTWARE.
APPLE DOES NOT WARRANT, GUARANTEE, OR MAKE ANY REPRESENTATIONS REGARDING THE USE OR THE RESULTS OF THE USE
OF THE APPLE SOFTWARE IN TERMS OF ITS CORRECTNESS, ACCURACY, RELIABILITY, CURRENTNESS, OR OTHERWISE. THE ENTIRE
RISK AS TO THE RESULTS AND PERFORMANCE OF THE APPLE SOFTWARE IS ASSUMED BY YOU. THE EXCLUSION OF IMPLIED
WARRANTIES IS NOT PERMITTED BY SOME STATES. THE ABOVE EXCLUSION MAY NOT APPLY TO YOU.
IN NO EVENT WILL APPLE, ITS DIRECTORS, OFFICERS, EMPLOYEES OR AGENTS BE LIABLE TO YOU FOR ANY CONSEQUENTIAL,
INCIDENTAL OR INDIRECT DAMAGES (INCLUDING DAMAGES FOR LOSS OF BUSINESS PROFITS, BUSINESS INTERRUPTION, LOSS OF
BUSINESS INFORMATION, AND THE LIKE) ARISING OUT OF THE USE OR INABILITY TO USE THE APPLE SOFTWARE EVEN IF APPLE
HAS BEEN ADVISED OF THE POSSIBILITY OF SUCH DAMAGES. BECAUSE SOME STATES DO NOT ALLOW THE EXCLUSION OR
LIMITATION OF LIABILITY FOR CONSEQUENTIAL OR INCIDENTAL DAMAGES, THE ABOVE LIMITATIONS MAY NOT APPLY TO YOU.
Apple’s liability to you for actual damages from any cause whatsoever, and regardless of the form of the action (whether in contract, tort [including negligence],
product liability or otherwise), will be limited to $50.
Part Number: 45022702
FCC Information
WARNING: FCC Regulations state that any unauthorized changes or modifications to this equipment not expressly approved by the manufacturer could void
the user’s authority to operate this equipment.
Class B Declaration of Conformity
This equipment has been tested and found to comply with the limits for a class B digital device, pursuant to Part 15 of the FCC rules. These limits are designed
to provide reasonable protection against harmful interference in a residential installation. This equipment generates, uses and can radiate radio frequency energy
and if not installed and used in accordance with the instructions, may cause harmful interference to radio communications. However, there is no guarantee that
interference will not occur in a particular installation.
If this equipment does cause harmful interference to radio or television reception, which can be determined by turning the equipment off and on, the user is
encouraged to try to correct the interference by one or more of the following measures:
Reorient or relocate the receiving antenna.
Increase the separation between the equipment and receiver.
Connect the equipment into an outlet on a circuit different from that to which the receiver is connected.
Consult the dealer or an experienced radio/TV technician for help.
In order to maintain compliance with FCC regulations, shielded cables must be used with this equipment. Operation with non-approved equipment or unshielded
cables is likely to result in interference to radio and TV reception. The user is cautioned that changes and modifications made to the equipment without the
approval of manufacturer could void the user’s authority to operate this equipment.
Industry Canada Class B Notice
This Class B digital apparatus complies with Canadian ICES-003.
Avis de Conformation Classe B de l’Industrie Canada
Cet appareil numérique de la Classe B est conforme à la norme NMB-003 du Canada.
RFI Compliance Notice
This equipment has been tested concerning compliance with the relevant RFI protection requirements both individually and on system level (to simulate normal
operation conditions). However, it is possible that these RFI Requirements are not met under certain unfavorable conditions in other installations. It is the user
who is responsible for compliance of his particular installation.
Dieses Gerät wurde sowohl einzeln als auch in einer Anlage, die einen normalen Anwendungsfall nachbildet, auf die Einhaltung der Funkentstörbestimmungen
geprüft. Es ist jedoch möglich, dass die Funkentstörbestimmungen unter ungünstigen Umständen bei anderen Gerätekombinationen nicht eingehalten werden.
Für die Einhaltung der Funkentstörbestimmungen einer gesamten Anlage, in der dieses Gerät betrieben wird, ist der Betreiber verantwortlich.
Compliance with applicable regulations depends on the use of shielded cables. It is the user who is responsible for procuring the appropriate cables.
Die Einhaltung zutreffender Bestimmungen hängt davon ab, dass geschirmte Ausführungen benützt werden. Für die Beschaffung richtiger Ausführungen ist der
Betreiber verantwortlich.
Software License Agreement
YOU SHOULD CAREFULLY READ THE FOLLOWING TERMS AND CONDITIONS BEFORE USING THIS SOFTWARE. IF YOU DO NOT
AGREE TO THE TERMS AND CONDITIONS OF THIS AGREEMENT, DO NOT USE THE SOFTWARE. INSTALLING OR USING THE
SOFTWARE INDICATES THAT YOU AGREE TO AND ACCEPT THE TERMS OF THIS AGREEMENT. IF YOU DO NOT AGREE TO ACCEPT
THE TERMS OF THIS AGREEMENT YOU MAY RETURN THE UNUSED SOFTWARE FOR A FULL REFUND TO THE PLACE OF PURCHASE.
License
Electronics For Imaging, Inc. (“EFI”) grants you a non-exclusive license to use the software (“Software”) and accompanying documentation (“Documentation”)
included with the Product. The Software is licensed, not sold. You may use the Software solely for your own customary business or personal purposes. You may
not rent, lease, sublicense or lend the Software. You may, however, permanently transfer all of your rights under this Agreement to another person or legal entity
provided that: (1) you transfer to the person or entity all of the Software and Documentation (including all copies, updates, upgrades, prior versions, component
parts, the media and printed materials, and this Agreement); (2) you retain no copies of the Software and Documentation, including copies stored on a computer;
and (3) the recipient agrees to the terms and conditions of this Agreement.
You may not make or have made, or permit to be made, any copies of the Software or portions thereof, except as necessary for backup or archive purposes in
support of your use of the Software as permitted hereunder. However, under no circumstances may you make or have made, any copies of any Software included
on the ROM, the hard disk drive or any other component of the controller board or hardware You may not copy the Documentation. You may not attempt to
alter, disassemble, decompile, decrypt or reverse engineer the Software.
Proprietary Rights
You acknowledge that the Software is proprietary to EFI and its suppliers and that title and other intellectual property rights therein remain with EFI and its
suppliers. Except as stated above, this Agreement does not grant you any right to patents, copyrights, trade secrets, trademarks (whether registered or unregistered),
or any other rights, franchises or licenses in respect of the Software. You may not adopt or use any trademark or trade name which is likely to be similar to or
confusing with that of EFI or any of its suppliers or take any other action which impairs or reduces the trademark rights of EFI or its suppliers.
Confidentiality
You agree to hold the Software in confidence, disclosing the Software only to authorized users having a need to use the Software as permitted by this Agreement
and to take all reasonable precautions to prevent disclosure to other parties.
Remedies And Termination
Unauthorized use, copying or disclosure of the Software, or any breach of this Agreement will result in automatic termination of this license and will make available
to EFI other legal remedies. In the event of termination, you must destroy all copies of the Software and all of its component parts. All provisions of this Agreement
relating to disclaimers of warranties, limitation of liability, remedies, or damages, and EFI’s proprietary rights shall survive termination.
Limited Warranty And Disclaimer
EFI warrants to the original purchaser (“Customer”) for thirty (30) days from the date of original purchase from EFI or its authorized retailer that the Software
will perform in substantial conformance to the Documentation. EFI warrants the media containing the Software against failure during the above warranty period.
EFI makes no warranty or representation that the Software will meet your specific requirements, that the operation of the Software will be uninterrupted or error
free, or that all defects in the Software will be corrected.
EXCEPT FOR THE ABOVE EXPRESS LIMITED WARRANTY, EFI MAKES AND YOU RECEIVE NO WARRANTIES OR CONDITIONS ON THE
SOFTWARE, EXPRESS, IMPLIED, STATUTORY, OR IN ANY OTHER PROVISION OF THIS AGREEMENT OR COMMUNICATION WITH YOU,
AND EFI SPECIFICALLY DISCLAIMS ANY IMPLIED WARRANTY OR CONDITION OF MERCHANTABILITY OR FITNESS FOR A PARTICULAR
PURPOSE.
Limitation Of Liability
IN NO EVENT WILL EFI OR ITS SUPPLIERS BE LIABLE FOR ANY DAMAGES, INCLUDING LOSS OF DATA, LOST PROFITS, COST OF COVER
OR OTHER SPECIAL, INCIDENTAL, CONSEQUENTIAL OR INDIRECT DAMAGES ARISING FROM THE SALE, INSTALLATION,
MAINTENANCE, USE, PERFORMANCE OR FAILURE OF THE SOFTWARE, HOWEVER CAUSED AND ON ANY THEORY OF LIABILITY. THIS
LIMITATION WILL APPLY EVEN IF EFI HAS BEEN ADVISED OF THE POSSIBILITY OF SUCH DAMAGE. YOU ACKNOWLEDGE THAT THE
PRICE OF THE PRODUCT REFLECTS THIS ALLOCATION OF RISK. BECAUSE SOME JURISDICTIONS DO NOT ALLOW THE EXCLUSION
OR LIMITATION OF LIABILITY FOR CONSEQUENTIAL OR INCIDENTAL DAMAGES, THE ABOVE LIMITATION MAY NOT APPLY TO YOU.
EFI DOES NOT EXCLUDE LIABILITY IN RESPECT OF PERSONAL INJURY, DEATH, WILLFUL MISCONDUCT OR GROSS NEGLIGENCE,
EXCEPT TO THE MAXIMUM EXTENT THAT IT CAN BE EXCLUDED OR LIMITED BY LAW.
Export Controls
You agree that you will not export or re-export the Software in any form in violation of any applicable laws or regulations of the United States or the country in
which you obtained them.
U.S. Government Restricted Rights
Software provided with this Product is provided with RESTRICTED RIGHTS. Use, duplication, or disclosure by the U.S. Government is subject to restrictions
as set forth in subparagraph (c)(1)(ii) of the Rights in Technical Data and Computer Software clause at DFARS 252.227-7013 or subparagraphs (c)(1) and (2) of
the Commercial Computer Software Restricted Rights at 48 CFR 52.227-19, as applicable.
General
The laws of the State of California govern this Agreement. You agree that this Agreement shall not be subject to the United Nations Convention on Contracts for
the International Sale of Goods (1980). This Agreement is the entire agreement held between us and supersedes any other communications or advertising with
respect to the Software. If any provision of this Agreement is held invalid, the remainder of this Agreement shall continue in full force and effect.
If you have any questions, please see EFI’s web site at www.efi.com.
Contents
Preface
About this manual
Terminology
xiii
xv
About the documentation
xvi
E-810 job environments
xvii
Permissions
xvii
Safety warnings
xviii
Cleaning the E-810
xviii
Chapter 1: Using the Control Panel
Introduction to the E-810 Control Panel
1-1
Activity light
1-2
Buttons
1-2
Display window
1-3
Functions menu
1-5
Control Panel E-810 status messages
1-7
Starting and shutting down the E-810
1-8
Restarting the E-810
1-9
Shutting down the E-810
1-10
Chapter 2: Using FieryBar
Introduction to FieryBar
2-1
Status
2-1
Activity light
2-2
Commands
2-3
Starting and shutting down the E-810
2-5
Restarting the E-810
2-6
Shutting down the E-810
2-7
viii
Contents
Chapter 3: Introduction to Command WorkStation
About Command WorkStation
3-1
Starting up and logging in
3-4
Connecting to the server
3-5
Logging in
3-6
Logging out
3-7
Command WorkStation interface
3-8
Window area (Queues, Archive, FreeForm, Job Log)
3-9
Menu bar
3-10
Server selection tabs
3-13
Sliders
3-14
Job ticket information
3-15
Window selection tabs
3-16
Queues window
3-16
Status bars
3-17
Job icons
3-20
Spool area
3-20
RIP area
3-22
Print area
3-23
Job commands
3-24
Archive window
3-27
FreeForm window
3-29
About FreeForm printing
3-29
Using the FreeForm window
3-30
Job commands for FreeForm master jobs
3-32
Filtering jobs in the FreeForm window
3-32
Assigning and monitoring FreeForm Masters
3-33
Job Log window
3-35
Filtering jobs
3-37
ix
Contents
Job properties
3-41
Viewing and editing job properties
3-41
Thumbnails and full-screen previews
3-42
Editing and merging files with DocBuilder Pro
3-43
Full-screen previews
3-46
Chapter 4: Managing Print Jobs
Communicating with users
4-1
What the user needs to know
4-1
How users communicate print requirements
4-3
Customizing the Command WorkStation window
4-4
Setting Command WorkStation Preferences
4-5
Printing server information pages
4-6
Workflow scenarios
4-8
Using the copier
4-10
Canceling jobs
4-11
Page-level operations of Command WorkStation
4-12
Previewing print jobs
4-12
Merging PostScript and raster files with DocBuilder Pro
4-15
Viewing and overriding print settings
4-22
Printing variable data documents (FreeForm)
4-24
Downloading files and fonts
4-25
Managing server fonts
4-28
Managing jobs with multiple color servers
4-30
Archiving jobs
4-31
Importing archived jobs from external media
4-34
Using the Job Log
4-35
Align Paper Trays
4-37
Other server management commands
4-39
x
Contents
Chapter 5: Using Imposition
Main window
5-1
Job previews
5-3
Navigating in the main window
5-4
Switching between page view and layout view
5-5
Setting magnification levels
5-6
Viewing the sheets
5-7
Using templates
5-8
Template pop-up menu
Saving your work
5-9
5-10
Chapter 6: Advanced Features of DocBuilder Pro
Imposition settings
6-1
Sheet area
6-2
Layout area
6-4
Scaling area
6-6
Finishing area
6-8
Modifying the layout manually
6-11
Reordering pages in Layout mode
6-11
Rotating pages
6-12
Setting gutter sizes
6-13
Managing templates
6-14
Tips for using the Imposition feature of DocBuilder Pro
6-15
DocBuilder Pro and Acrobat technology
6-15
File management
6-16
Saving imposed jobs
6-17
xi
Contents
Chapter 7: Overview of Fiery WebTools
Fiery WebTools
7-1
Access privileges
7-1
Using Fiery WebTools
7-2
Chapter 8: Fiery WebSpooler and Fiery Spooler
Tracking and managing jobs with Fiery WebSpooler
8-1
About the Fiery WebSpooler window
8-3
Manipulating job options and job flow
8-4
Overriding job option settings
8-7
Thumbnails and full-screen previews (DocBuilder)
8-8
Using the Job Log
8-9
Fiery Spooler for Mac OS computers
8-11
Differences between Fiery Spooler for Mac OS and Fiery WebSpooler
8-13
Appendix A: Basics of Imposition
Printing books with the Imposition feature of DocBuilder Pro
A-1
Basics of imposition layout
A-1
Printer’s marks
A-4
Additional sheets
A-5
Binding methods
A-6
Gang-up printing
A-8
xii
Contents
Appendix B: Templates
1-Up Full Bleed
B-1
2-Up Perfect
B-2
2-Up Saddle
B-4
3-Up Trifold Brochure
B-6
4-Up Gate Fold
B-8
4-Up Head to Head
B-10
4-Up Z-Fold
B-12
Appendix C: Troubleshooting
Error messages
C-1
Maintaining optimal system performance
C-5
Troubleshooting
C-6
Command WorkStation hangs
C-6
Command WorkStation fails to connect to a E-810
C-7
Unexpected printing results
C-8
Clearing the server
C-9
Users are unable to connect to the copier
Setup error messages
Index
C-9
C-10
xiii
Preface
About this manual
This manual is intended for Color Controller E-810™ operators or administrators, or
users with the necessary access privileges, who monitor and manage job flow, perform
color calibration, and troubleshoot problems that may arise. It describes the functions
and features of Fiery® utilities and Fiery WebTools™ for the purposes of print job
management.
N OTE : The term “E-810” is used in this manual to refer to the Color Controller E-810.
The E-810 includes Fiery Command WorkStation™ software, which enables an
operator to manage all jobs sent to the E-810. Although it may not be the case at all
sites, the documentation for this product assumes the presence of an operator who
controls and manages jobs sent by users from remote workstations.
Client utilities can be installed onto the E-810 from the User Software CD if the
Fiery Advanced Controller Interface option is installed. Do not install any other
applications onto the E-810. Other applications are not supported and can cause
system problems.
About this manual
This manual is organized as follows:
• Chapter 1 describes the E-810 Control Panel. It explains the various messages and
icons you might see on the Control Panel and describes how to print system
information pages from the Control Panel. It also explains how to start up and shut
down the E-810.
• Chapter 2 describes FieryBar™. It explains the various messages and icons you might
see and explains how to start up and shut down the E-810 if you have the Advanced
Controller Interface option installed.
xiv
Preface
• Chapters 3 and 4 describe the Command WorkStation interface. Command
WorkStation software can be installed on networked Windows 9x/Me or
Windows NT 4.0/2000 computers and is used to view and manage virtually all
aspects of E-810 activity. In addition to providing a graphic display of the job flow,
Command WorkStation allows you to reprint or hold jobs, view and override print
option settings, download files, manage printer fonts, preview print jobs, merge
rasterized jobs, calibrate the E-810, and perform Setup (server configuration). This
chapter also provides information on archiving jobs, moving jobs between E-810
color servers, and printing variable data documents.
• Chapter 5 describes how to use the Imposition feature of Fiery DocBuilder Pro to
arrange the pages of your print job in special layouts for folding, binding, or cutting
after printing. The Imposition feature is only available if you have the DocBuilder
Pro option for Command WorkStation installed.
• Chapter 6 provides instructions on using the advanced aspects of the Imposition
feature of DocBuilder Pro to create custom layouts and get the most from the
Imposition feature.
• Chapter 7 introduces Fiery WebTools, explains how to access them, and directs you
to sources of more information (in this manual or in other manuals in the
documentation set).
• Chapter 8 describes Fiery WebSpooler and Fiery Spooler™, which can be used to
view and manage E-810 job activity. The interface and features of Fiery WebSpooler
have identical counterparts in Command WorkStation; therefore, this chapter refers
you to Chapters 3 and 4 for details about many Fiery WebSpooler functions.
• Appendix A provides an overview of the terms and concepts of Imposition,
including various folding, binding, and cutting methods.
• Appendix B includes descriptions of the built-in templates available from the
Imposition feature of DocBuilder Pro.
• Appendix C lists error messages that you might see on the E-810 Control Panel,
FieryBar, Command WorkStation, Fiery WebSpooler, Fiery Spooler, or the copier,
and contains some troubleshooting information.
xv
About this manual
N OTE : The Advanced Controller Interface is available as an option. For more
information, contact your authorized service/support technician.
Terminology
Specific terms are explained as they are introduced. However, the following general
terms are used throughout:
• PostScript (PS)—A computer language designed as a page description language. The
E-810 uses this language for imaging the page and for communication with
applications and with the print engine.
The term “PostScript” can also be used to refer to PDF (Portable Document
Format) data jobs. PDF is a structured form of Adobe PostScript that provides the
ability to preview, scale, and reorder pages. Where applicable, the term “PDF” is
specifically used to refer to PDF data or jobs.
• Job—A file consisting of PostScript commands and comments that describe the
graphics, sampled images, and text that should appear on each page of a document,
and the printer options that should be used in printing, such as media or color
rendering style.
• Spool—Write to a disk. Usually used in this manual to refer to a PostScript print job
being saved to the E-810 hard disk in preparation for processing and printing.
• RIP—Acronym for raster image processing, which changes text and graphics
commands into descriptions of each mark on a page. In common use as a noun, a
RIP (raster image processor) is the computer processor that performs this function.
• Print—The process of rendering, or imaging, a page or a job on a printer.
These concepts explain how the E-810 and the copier work together as a powerful
printing system. The E-810 RIP changes text and graphics commands in PostScript
into color specifications for each dot of toner deposited on a page by the copier.
xvi
Preface
About the documentation
This manual is part of the set of E-810 documentation, which includes the following
manuals for users and system administrators:
• The Configuration Guide explains basic configuration and administration of the
E-810 for the supported platforms and network environments. It also includes
guidelines for setting up UNIX, Windows NT 4.0, and Novell NetWare servers to
provide PostScript printing services to clients.
• Getting Started describes how to install software to enable users to print to the
E-810. Specifically, it describes installation of PostScript printer drivers, printer
description files, and other user software provided on the User Software CD. It also
explains how to connect each user to the network.
• The Printing Guide describes the printing features of the E-810 for users who send
jobs via remote workstations on the network.
• The Color Guide provides information on managing the color output of your
Color Controller E-810. It addresses concepts and issues associated with printing
to the E-810 and outlines key workflow scenarios. This manual explains how to
calibrate your copier and take advantage of the ColorWise® color management
system, as well as features in Fiery ColorWise Pro Tools™. In addition, the
Color Guide offers information on printing from popular Windows and
Mac OS applications.
• The Job Management Guide explains the functions of the E-810 client utilities,
including Command WorkStation, and how they are used to manage jobs. This
manual is intended for an operator or administrator, or a user with the necessary
access privileges, who needs to monitor and manage job flow, perform color
calibration, and troubleshoot problems that may arise.
• Release Notes provide last-minute product information and workarounds for some of
the problems you may encounter.
xvii
E-810 job environments
E-810 job environments
The E-810 supports several levels of control of printing, job management, and setup,
and offers you the flexibility to choose the configuration that corresponds to the
requirements of your site. Your situation may correspond to one of the descriptions
outlined below, or you may prefer an intermediate level of control.
At one extreme, an administrator or operator in a high-volume printing environment
controls the entire job flow and all printing. Print jobs arriving from remote users are
spooled to the server disk and stored until the operator decides it is time to print them.
Additional functions (job overrides, prioritizing, font management) are reserved for the
administrator or operator.
At the other extreme, anyone on the local network can control all printing and server
functions; operator intervention is not necessary. Users can print from their
workstations to any of the published print connections. Anyone can use Command
WorkStation, Fiery WebSpooler, or Fiery Spooler to control any print job.
The spectrum of control that an administrator can implement is described fully in
the Configuration Guide.
Permissions
Support for these job environments is achieved by a combination of E-810 Setup
options. By default, anyone can access Setup, but the administrator can limit access to
Setup by specifying an Administrator password for the E-810 (see the Configuration
Guide).
Also by default, anyone can log in to Command WorkStation, Fiery WebSpooler, or
Fiery Spooler and control job flow, but an administrator can restrict access to these
functions by specifying an Operator password.
xviii
Preface
The three security levels, from greatest to least control, are:
• Administrator—confers control of Setup and is the highest level of control. The
person who has access to Setup can control the printing and job management
environment by choosing which queues are enabled, and by electing to set
passwords. The Administrator can also manage the fonts on the server, clear the
server disk when necessary, and set a common web link for all users who log in to the
E-810 using their web browser.
• Operator—includes control of print jobs that arrive at the server and the ability to
reboot the server.
• Guest—allows users to view the status of active jobs and the list of stored jobs. They
cannot make changes to jobs or change their printing instructions. A password is not
needed to log in as Guest and view jobs from Command WorkStation, Fiery
WebSpooler, or Fiery Spooler windows.
This manual describes the features of the Fiery client utilities, including Command
WorkStation, and all operator privileges, whether those privileges are available to
everyone or are exclusive to only certain people. It also includes descriptions of
administrator functions, sometimes referring you to other manuals for more
information.
Safety warnings
The E-810 display window is a liquid crystal display (LCD) that is made of glass and
can break. Do not subject it to strong shocks.
If the display window breaks and the liquid crystal material leaks out, do not inhale,
ingest, or touch it. If the material gets on your skin or clothing, wash it off with soap
and water immediately.
Do not touch or put pressure on the panel. This will change the color of the panel.
Cleaning the E-810
Clean the E-810 with a soft cloth moistened with isopropyl alcohol or ethyl alcohol.
Never use water or ketone, as these may permanently alter the display.
1
1-1
Chapter 1:
Using the
Control Panel
Introduction to the E-810 Control Panel
You can use the E-810 Control Panel to view status information, print special pages,
and set up printing. While most elements in the Control Panel display have
counterparts in Command WorkStation, you can view current functions on the
Control Panel even when Command WorkStation is not connected to the server or is
not running.
Introduction to the E-810 Control Panel
The Control Panel shown below is located on the front of the E-810.
Line selection buttons
Display window
Up button
Down button
Menu button
1
1-2
Using the Control Panel
Activity light
The activity light indicates the current E-810 activity. If the light is:
Solid red
An error occurred, causing the E-810 to be disabled.
Flashing red
An error occurred, causing printing to be disabled, but the
E-810 is capable of processing.
Solid green
The E-810 is idle.
Flashing green
The E-810 is processing or printing a job, or communicating
with a remote computer.
No light
The E-810 is turned off or starting up.
Buttons
Line selection
buttons
Use the four line selection buttons on the right side of the
Control Panel to select the command displayed on the
corresponding line of the display window. When a button is
active, a special character (>) appears in the display window
next to it.
Up and Down
buttons
Use these buttons to scroll to different screens in multiscreen lists, to select Setup options from a list of available
options, and to scroll alphanumeric characters.
Menu button
Press this button to view other screens. Under normal
operation, the Control Panel displays the Info, RIP, or Print
Status screen with information about the status of the E-810.
If you press the Menu button, the Functions menu appears,
and you can perform additional operations (see page 1-5).
If a job is processing or printing, press the Menu button to
cycle through the active screens.
Power button
Press this button to turn the E-810 on and off.
Reset button
Use this button to restart the E-810 after you have selected
Shut Down System from the Shut Down menu.
1
1-3
Introduction to the E-810 Control Panel
Display window
The display window provides information about the status of the E-810, displays
menu information, and enables you to view and edit information in the Setup menus.
The status area at the bottom of the display window displays text that tells you what
screen you are looking at and highlights one of the icons to indicate what the E-810 is
doing. Only the icons for the screens that are currently available appear. The menu
button cycles among the active screens.
The screens are:
Alert Status
If there is a problem with processing a job or with printing functions, an error
message appears on the Control Panel. For information on error messages,
see Appendix C.
Print Status
When the E-810 is printing a job, the Print Status screen appears. This screen
displays the following:
Cancel Job—Press the top line selection button to cancel the job currently
printing.
User name—The name of the user who sent the job currently processing.
Pages/Total—The number of copies of the current job printed and the total
number of copies of the job requested.
RIP Status
When the E-810 is processing a job, the RIP Status screen appears. This screen
displays the following:
Cancel Job—Press the top line selection button to cancel the job currently
processing. The E-810 cancels the job before printing begins.
Document name—The name of the document currently processing.
User name—The name of the user who sent the job currently processing.
Kilobytes—The size (in kilobytes) of the job processed so far.
N OTE : This number is always displayed in kilobytes; for example, 10MB is
displayed as 10000KB.
1
1-4
Info Status
Using the Control Panel
When the E-810 is not processing or printing a job, it displays information about
the current server and software. It displays the following information:
Server Name—The E-810 name, as it is configured in Setup.
Status—The current status of the E-810. The E-810 status can be: Idle,
Initializing, Busy, Processing, or Printing.
Megabytes—The space (in megabytes) available on the E-810 hard disk, for
example, 756MB.
Version—The system software version running on the E-810.
Functions
You can press the Menu button to display the Functions menu. Use the up and
down buttons to scroll through the list. Press the line selection button to the right
of a command to select that command. For more information, see page 1-5.
Network
The Network icon appears at the lower left of any of the other screens when a job
is being sent to the E-810 over the network. The Network icon also appears,
together with a flashing green activity light, when a remote utility is running.
1
1-5
Introduction to the E-810 Control Panel
Functions menu
The Functions menu provides many of the options available from Command
WorkStation. You can choose the following commands from this menu:
Print Pages
Print special pages from the E-810. You can print the following pages from the
submenu that appears:
Test Page—A Test Page enables you to confirm that the E-810 is properly
connected to the copier, and provides color and grayscale samples to troubleshoot
problems with the copier or the E-810. The following settings are among those
listed on the Test Page: Server Name, Printer Model, color settings, calibration
information, and date and time the Test Page was printed.
Configuration—Prints the Configuration page, which gives the current server and
device configuration. This page lists general information about the hardware and
software configuration of the E-810, the current options for all Setup settings,
information about the current calibration, and the Ethernet and Token Ring
addresses of the E-810.
Job Log—Prints a log of the last 55 jobs. For information on the fields in the Job
Log and on printing it in other forms, see “Job Log window” on page 3-35.
Control Panel Map—Prints the Control Panel Map, which is an overview of the
screens you can access from the Control Panel. For information about using these
screens to set up the E-810, see the Configuration Guide.
Color Charts—Prints samples of the RGB, CMY, and PANTONE colors available
from the E-810.
Font List—Prints a list of all fonts currently on the E-810 hard disk.
Suspend Printing
Suspend communication between the E-810 and the copier. You must suspend
printing if you want to interrupt the current E-810 job so that you can use the
copier to make copies or print another job first. Jobs continue to process on the
E-810. The activity light is turned off when this command is executed. After you
make the copies, select Resume Printing to continue printing jobs from the
E-810.
1
1-6
Using the Control Panel
Resume Printing
Resume communication between the copier and the E-810 after you have finished
making copies or printing other jobs.
Shut Down
Shut down all E-810 activity in the correct manner and then restart. Choose this
option instead of using the power switch on the back of the E-810. The following
options are available from the submenu that appears:
Restart Server—Restarts the server without shutting down the E-810 hard disk.
Shut Down System—Shuts down the E-810 hard disk.
Reboot System—Restarts the system after shutting down the E-810 hard disk.
Clear Server
Clear all jobs in all server queues as well as all jobs archived on the E-810 hard disk,
the index of archived jobs (in the Archive window), all FreeForm masters, the index
of FreeForm masters (in the FreeForm window), and the Job Log. Check with your
administrator or operator before choosing Clear Server. If an Administrator password
has been set, you must enter it to access Clear Server.
Run Setup
Enter the Setup menu and change Setup option settings. For more details, see the
Configuration Guide.
Run Diagnostics
This function is provided for service representatives only. Contact your authorized
service/support technician for information about running diagnostics.
Calibration
Calibrate the E-810 using AutoCal. For more information, see the Color Guide. If an
Administrator password has been set, you must enter it to access Calibration.
1
1-7
Introduction to the E-810 Control Panel
Control Panel E-810 status messages
When the E-810 has control of the Control Panel, the LCD provides information
about the current status of the E-810.
Control Panel E-810 status messages are:
Please Wait
Appears when the copier is initially turned on.
Loading...
Appears when E-810 system software is being loaded.
Info
<Server Name>
Appears when the E-810 is idle.
Info
Idle
Appears when the E-810 is idle and the Down arrow is
pressed once.
Info
#MB
#v
Appears when the E-810 is idle and the Down arrow is
pressed twice. #MB indicates the amount of free space on
the E-810 hard disk; #v indicates the version of system
software currently running on the E-810.
<Server Name>
Processing
Appears when the E-810 is processing a job. The activity
light flashes green.
<Job Name>
Busy
#K
Appears when the E-810 is processing a job. The #K value
increases to indicate the amount of the job that has been
processed. The activity light flashes green.
Sending
<Job Name>
Appears when a special page from the
Functions>Print Pages menu is printing. Job Name
indicates the type of special page. The activity light flashes
green.
<Server Name>
Printing
Appears when the E-810 is printing a job. The activity light
flashes green.
<User Name>
Copies: #C/#T
Appears when the E-810 is printing a job. #C indicates the
copy currently printing; #T indicates the total number of
copies in the job. The activity light flashes green.
Canceling
Print job
Appears when the Cancel button has been pressed and the
currently printing or processing job is being canceled.
1
1-8
Using the Control Panel
Starting and shutting down the E-810
Generally, you can leave the E-810 running all the time. This section describes how to
shut down and restart the E-810 when necessary.
TO
START THE
•
E-810
Move the power switch on the back of the E-810 to the On position. If the copier is
also turned off, turn it on before turning on the E-810.
Power switch
Diagnostic messages appear on the E-810 Control Panel. If any diagnostics fail, more
information and instructions appear. Contact your service representative if the E-810
encounters problems while running the diagnostics. The E-810 continues starting up
and displays the message Idle when it is ready to receive data.
N OTE : If an Administrator password has been set, you are required to enter it to
access Setup.
1
1-9
Starting and shutting down the E-810
If you press a button, the following options appear. For information about the Setup
menus and options, see the Configuration Guide.
Choose
To do this
Exit Setup
Exit the Setup menus; the E-810 reboots.
Server Setup
Enter the Server Setup menus.
Network Setup
Enter the Network Setup menus.
Printer Setup
Enter the Printer Setup menus.
PS Setup
Enter the PostScript Setup menu.
Color Setup
Enter the Color Setup menu.
Job Log Setup
Enter the Job Log Setup menu.
Change Password
Change the Administrator password.
Restarting the E-810
Follow the procedure below to restart the E-810, rather than using the power switch
on the back of the E-810.
TO
RESTART THE
1.
E-810
Make sure the E-810 is not receiving, processing, or printing a job.
The status message on the Control Panel should read Idle.
N OTE : If a job from the Print queue is processing, it will continue processing and print
after the E-810 is restarted; if a job sent to the Direct connection is processing, it will
not finish processing or printing.
2.
Press the Menu button to display the Functions menu.
3.
Use the Down button to scroll to the last screen, and choose Shut Down.
4.
Use the line selection button to choose Restart Server.
1
1-10
Using the Control Panel
Shutting down the E-810
You may need to shut down the E-810 for service. When you do so, fonts that have
been downloaded to the hard disk drive are not deleted. Print jobs in the Hold and
Printed queues and jobs that have been processed but not printed are not deleted and
are available for printing when you restart the E-810.
TO
SHUT DOWN THE
1.
E-810
Make sure the E-810 is not receiving, processing, or printing a job.
The status message on the Control Panel should read Idle. If a job has just finished
processing or printing, wait at least 5 seconds after the Control Panel status message
changes to Idle before proceeding.
N OTE : If a job from the Print queue is processing, it will continue processing and print
after the E-810 is restarted; if a job to the Direct connection is processing, it will not
finish processing or printing.
2.
Press the Menu button to display the Functions menu.
3.
Use the Down button to scroll to the last screen, and choose Shut Down.
4.
Use the line selection button to choose Shut Down System.
Proceed to the next step when the screen displays the message, “It is now safe to power
off the system.”
5.
Turn off the E-810 by moving the power switch on the back to the Off position.
N OTE : After turning off the E-810, make sure to also turn off the copier. Leaving the
copier turned on while the E-810 is turned off can lead to excessive drain on the E-810
motherboard battery.
2
2-1
Introduction to FieryBar
If you have the Fiery Advanced Controller Interface (option) installed, you can use
FieryBar to view E-810 status information, launch software, set up and restart the
E-810, delete stored jobs, cancel active jobs, and log off Windows. While most
elements in FieryBar have counterparts in Command WorkStation, you can view
current functions on FieryBar even when Command WorkStation is not running.
Chapter 2:
Using FieryBar
Introduction to FieryBar
FieryBar, located at the top of the monitor screen, comprises the following parts:
RIPping area
Click to expand or collapse FieryBar
Printing area
RIP status area
Activity light
Message area
Status
FieryBar displays information about the status of the E-810:
RIPping area
Displays the name of the job currently processing.
RIP status area
Displays the amount of the job that has processed.
Printing area
Displays the name of the job currently printing.
Message area
Displays error messages and other E-810 information.
2
2-2
Using FieryBar
Activity light
The activity light on the rightmost edge of FieryBar indicates current E-810 activity.
If the light is:
Solid red
An error occurred, causing the E-810 to be disabled.
Check the message area for details of the error.
Flashing red
An error occurred, causing printing to be disabled, but the
E-810 is capable of processing. Check the message area for
details of the error.
Solid green
The E-810 is idle.
Flashing green
The E-810 is processing or printing a job, or communicating
with a remote computer. Check the RIPping area, the RIP
status area, and the printing area for details.
No light
The E-810 is starting up.
2
2-3
Introduction to FieryBar
Commands
Right-clicking FieryBar or the Fiery icon on the right side of the Windows taskbar
enables you to access many E-810 features. Choose the following commands from the
menu that appears:
Command WorkStation
Launches Command WorkStation. For more
information on connecting to and using the features of
Command WorkStation, see Chapters 3 and 4.
ColorWise Pro Tools
Launches ColorWise Pro Tools. For more information
on connecting to and using the features of ColorWise
Pro Tools, see the Color Guide.
Set Up Fiery
Opens the E-810 Setup dialog box. For more
information about Setup options, see the Configuration
Guide.
Restart Fiery
Shuts down all E-810 activity in the correct manner
before restarting. Use this option instead of the power
switch on the back of the E-810 (see “Starting and
shutting down the E-810” on page 2-5).
Clear Server
Clears all jobs in all server queues, as well as all jobs
archived on the E-810 hard disk, the index of archived
jobs (in the Archive window), all FreeForm masters,
the index of FreeForm masters (in the FreeForm
window), and the Job Log. Check with your
administrator before choosing Clear Server. After
choosing this option from FieryBar, a warning message
appears; click OK to clear the server and restart the
E-810.
Cancel RIP
Cancels the job currently processing on the E-810.
Cancel Print
Cancels the job currently printing on the E-810.
2
2-4
Using FieryBar
Suspend Print
Suspends communication between the E-810 and the
copier. You must suspend printing to interrupt the
current E-810 job so that you can use the copier to
make copies, or to print another job first. Jobs
continue to process on the E-810. After you make the
copies, select Resume Print to continue printing jobs
from the E-810.
Resume Print
Resumes communication between the copier and the
E-810 after you have finished making copies or
printing other jobs.
Log Off Windows
Closes all open programs, enabling you to log on as a
different user. After choosing this option from
FieryBar, a warning message appears; click OK to
log off.
Hide FieryBar
Hides FieryBar. To show FieryBar after hiding it,
right-click the Fiery icon on the right side of the
Windows taskbar and choose Show FieryBar from the
menu that appears.
2
2-5
Starting and shutting down the E-810
Starting and shutting down the E-810
Generally, you can leave the E-810 running all the time. This section describes how to
shut down and restart the E-810 when necessary.
TO
START THE
•
E-810
Move the power switch on the back of the E-810 to the On position (see page 1-8).
If the copier is also turned off, turn it on before turning on the E-810.
When FieryBar displays Idle, enter E-810 Setup by right-clicking FieryBar and
choosing Set Up Fiery from the menu that appears.
In the Fiery Setup dialog box, there are three tabs:
Click
To do this
General Setup
Configure the General Setup options.
Network Setup
Configure the Network Setup options.
Printer Setup
Configure the Printer Setup options.
For information about the Setup options, see the Configuration Guide.
2
2-6
Using FieryBar
Restarting the E-810
Follow the procedure below to restart the E-810, rather than using the power switch
on the back of the E-810.
TO
RESTART THE
1.
E-810
Make sure the E-810 is not receiving, processing, or printing a job.
Make sure the RIPping and Printing areas on FieryBar both read Idle.
N OTE : If a job from the Print queue is processing, it will continue processing and print
after the E-810 is restarted; if a job sent to the Direct connection is processing, it will
not finish processing or printing.
2.
Right-click FieryBar, and choose Restart Fiery from the menu that appears.
A Warning dialog box appears.
3.
Click OK to restart the E-810.
2
2-7
Starting and shutting down the E-810
Shutting down the E-810
You may need to shut down the E-810 for service. When you do so, fonts that have
been downloaded to the hard disk drive are not deleted. Print jobs in the Hold and
Printed queues and jobs that have been processed but not printed are not deleted and
are available for printing when you restart the E-810.
TO
SHUT DOWN THE
1.
E-810
Make sure the E-810 is not receiving, processing, or printing a job.
Make sure the RIPping and Printing areas on FieryBar both read Idle. If a job has just
finished processing or printing, wait at least 5 seconds after the RIPping and Printing
areas switch to Idle before proceeding to step 2.
N OTE : If a job from the Print queue is processing, it will continue processing and print
after the E-810 is restarted; if a job to the Direct connection is processing, it will not
finish processing or printing.
2.
Click the Windows Start button, and choose Shut Down.
3.
Select “Shut down the computer?” and click Yes.
A message appears, informing you it is safe to shut down the computer.
4.
Turn off the system by moving the power switch on the back of the E-810 to the
Off position.
3
3-1
Chapter 3:
Introduction
to Command
WorkStation
About Command WorkStation
This chapter introduces you to the graphical user interface of Command WorkStation.
First, you select a user level and log in to the E-810. Once you have logged in, you can
tour the Command WorkStation windows. Your exploration will be more complete if
you have some jobs in the Spool area (jobs printed to the Hold queue) and have the
ability to send more jobs from a nearby computer.
Chapter 4 builds on the information in this chapter and describes job monitoring and
control in more depth.
About Command WorkStation
Command WorkStation provides a window on E-810 and copier functions, and an
interface from which you can control those functions. The Command WorkStation
software can be installed on a Windows 9x/Me or Windows NT 4.0/2000 computer
with a TCP/IP network connection to the E-810.
By default, no passwords are set on the E-810—in this default state, anyone can
perform Setup and use all Command WorkStation functions. Until an Administrator
password is defined in E-810 Setup, you can log in to Command WorkStation as an
Administrator without entering a password, and you are given full privileges.
After the Administrator has performed Setup and specified passwords, Command
WorkStation user options depend on your login level. See the table below for a list of
which privileges are available for each level of access.
Privilege
A view of current printing
jobs and jobs stored on the
E-810
Control of printing jobs
Guest
Operator
Administrator
X
X
X
X
X
3
3-2
Introduction to Command WorkStation
Privilege
Use of the functions and
features of DocBuilder Pro
Access to Setup, management
of resident fonts, performing
calibration and clearing of the
E-810 disk and the Job Log
Guest
Operator
Administrator
X
X
X
For information about Setup and specifying passwords, see the Configuration Guide.
After you connect to a E-810 and log in, your first view of Command WorkStation is
the Queues window (as indicated by the tab at the bottom), which is divided into three
regions by Spool, RIP, and Print status bars. The Queues window is surrounded by a
frame that includes slider buttons and menus.
Once the E-810 receives print jobs, the Queues window becomes a dynamic display,
filled with the names of jobs and their characteristics. Status bars animate in real time
as new jobs are processed and printed, and jobs move to different display areas. An
operator, who has complete job control, sets the process in motion for each job.
3
3-3
About Command WorkStation
Menu bar
Spool status bar
Spooled jobs
RIP status bar
Rasterized (RIPped) jobs
Print status bar
Printed jobs
The Spool, RIP, and Print areas of the Queues window represent the stages of printing
a job. Jobs come in at the top level (Spool) and drop down to the Print level, unless
they are held along the way.
• Spooled jobs—Jobs listed below the Spool status bar area are PostScript files stored
on the E-810 disk. These jobs were sent to either the Print queue (white printer
icons) or Hold queue (yellow icons).
N OTE : The term “PostScript” is used in this manual to refer to both PostScript and
PDF data jobs. PDF is a structured form of PostScript that provides the ability to
preview, scale, and reorder pages. Where applicable, the term “PDF” is specifically used
to refer to PDF data or jobs.
3
3-4
Introduction to Command WorkStation
• RIPped jobs—Jobs listed below the RIP status bar are ready to print. They have
already been rasterized (RIPped, or processed for printing) and are waiting, in order,
for access to the printer. Rasterized jobs can also be held; held jobs appear on a
yellow background.
• Printed jobs—Jobs listed below the Print status bar have already been printed.
Printed jobs can be stored on the E-810 disk. The number of jobs that can be stored
(from 1 to 99) is defined in Setup.
You can interact with jobs in the window by selecting them and choosing from Job
menu commands or right-mouse menu commands, or by double-clicking them.
(However, if passwords have been set and you log in as Guest, you can only view jobs;
you cannot change or route them.) This chapter and the next explain the Command
WorkStation interface in detail.
Starting up and logging in
To start Command WorkStation, click the Windows Start button and choose
Command WorkStation from the Programs menu. If you have created a shortcut for
the Command WorkStation application, double-click the Command WorkStation
icon.
3
3-5
Starting up and logging in
Connecting to the server
If Command WorkStation was previously connected to a server, you are prompted to
choose a E-810 from the list of servers.
N OTE : If Command WorkStation has never been connected to a E-810, you are
prompted to configure an entry for the server. Click OK. For detailed instructions on
configuring a new connection, see Getting Started.
With the E-810 device name (r7) selected, click OK. If the device name is not
displayed, click the plus sign (+) to expand the E-810 entry.
Command WorkStation connects to the server and you are prompted to choose a login
level and enter a password to log in (see the next section). If you have any difficulties
connecting to the server, see Appendix C for error messages and troubleshooting
information.
3
3-6
Introduction to Command WorkStation
Logging in
When Command WorkStation has connected to a server, the Log in/out slider appears,
prompting you to select a login level and enter a password. Before you log in, the
Administrator key is in the vertical position, and the Operator and Guest keys are in
the flat (horizontal) position. When you click your login level, the corresponding key
turns to the vertical position.
Log in/out slider
For Administrator or Operator access to the E-810, click the corresponding key,
enter the password, and click Log in or press Enter. For Guest access only, click the
Guest key and then click Log in. No password is required for Guest access.
If you change your mind about logging in, or do not have the password you need,
click Cancel.
When you have entered the appropriate password and logged in, the Log in/out slider
retracts and the full Command WorkStation display appears. The color of the key in
the lock indicates your login level. If the E-810 is handling a large number of jobs, it
may take a few moments to display the entire job list.
When you reopen the slider after you have logged in, the Log in button will have
changed to the Log out button.
3
3-7
Starting up and logging in
Access levels
The three possible levels of access to Command WorkStation functions are
Administrator, Operator, and Guest. To enable maximum password protection,
Administrator and Operator passwords must be specified in Setup (see the
Configuration Guide).
When both Administrator and Operator passwords have been specified, the access
levels are as follows:
Access level
Privileges and password requirements
Administrator
Has full access to all Command WorkStation and E-810 Control Panel
functions; Administrator password required.
Operator
Has access to all Command WorkStation functions except Setup,
calibration, clearing the server disk, clearing the Job Log, and font
management; Operator password required.
Guest
Can view job status, but cannot make changes to jobs or Setup, and can
view the Queues window only; no password required.
N OTE : Access privileges alone do not confer control of print jobs. If the operator is
going to manage all print jobs, the Administrator must route all user jobs to the Hold
queue (that is, all jobs are spooled and held on the server). To accomplish this, only the
Hold queue, and not the Direct connection or the Print queue, should be enabled in
Setup. For more information, see the Configuration Guide.
Logging out
Log out from the server in one of the following ways:
• From the Server menu, choose Log out.
• Open the Log in/out slider (click the key icon just below the Fiery logo) and
click Log out.
3
3-8
Introduction to Command WorkStation
Command WorkStation interface
The illustration below shows the default Command WorkStation display in the middle
of job processing. You can access three other windows—Archive, FreeForm, and Job
Log—via tabs at the bottom of the display (3). Elements 1 through 4 are common to
all Command WorkStation displays; 5 through 7 appear only in the Queues window;
and 8 is common to the Queues, Archive, and FreeForm windows.
1
4
5
2
6
8
7
3
1 Server selection tabs
2 Sliders and system information
3 Window selection tabs
4 Job ticket information
5–7 Queues window display
8 Thumbnail tabs
3
3-9
Command WorkStation interface
Command WorkStation provides access to a great deal of information and many
features that are accessed in various ways—buttons, menus, double-clicking, and
right-mouse commands. It is a powerful interface that allows for a great deal of
interaction and flexibility in the production process. Descriptions of each of the
elements that compose the Command WorkStation display follow.
Window area (Queues, Archive, FreeForm, Job Log)
This area can display one of four windows: the Queues window (shown below), the
Archive window, the FreeForm window, or the Job Log window (only the Queues
window is available if you logged in as Guest). The Queues window is the default
window; it shows spooled, processing, and printing jobs in a display that changes
dynamically.
3
3-10
Introduction to Command WorkStation
For information on
See
Queues area
“Queues window” on page 3-16
Archive area
“Archive window” on page 3-27
FreeForm area
“FreeForm window” on page 3-29
Job Log area
“Job Log window” on page 3-35
Menu bar
The menu bar has six menus. When an action is not available in the current context,
the command appears dimmed.
Menu
File
Job
(For more
information on
these commands,
see page 3-24)
Choose this
To do this
Preferences
Set Command WorkStation preferences; see page 4-5.
Print Pages
Print any or all of the following pages to the E-810: Configuration
page, PS Test Page, Control Panel Map, PS Font List, Color Charts,
Job Log. You can also print the Configuration page to any printer
you specify; see page 4-6.
Exit
Log out from the server, exit Command WorkStation, and return to
the Windows desktop.
Delete
Delete one or more selected jobs.
Duplicate
Duplicate one or more selected PostScript data jobs in the Spool or
Print areas; see page 3-20, page 3-23, and page 3-24.
Rename
Rename a selected job.
Hold
Hold the selected job(s); see page 3-19.
RIP and Hold
RIP and then hold the selected job(s); see page 3-19.
Print
Print the selected job(s); see page 3-23.
3
3-11
Menu
Job
(cont.)
Command WorkStation interface
Choose this
To do this
Print and Hold
Print the selected job(s) and then hold it in the RIP area; see
page 3-19.
Process Next
Give top priority to this job (Spool area only).
Remove Raster
Remove the raster information from the selected job(s); see
page 3-25.
Properties
View and edit print option settings for the selected job(s) and print
job(s) with new settings; see page 3-41.
Thumbnail A
Open a selected held job in the Thumbnail A window where you
can view a full-screen preview of the job, edit the job, or merge it
with like data from other jobs. In order to merge jobs, they must be
of the same data type (that is, PostScript jobs cannot be merged
with raster jobs). Held jobs in the Spool area are automatically
converted to PDF files, but are not saved as PDF files unless you
assign the job a new name or overwrite the existing job; see
page 3-42.
Thumbnail B
Open a selected job in the Thumbnail B window for viewing a fullscreen preview of the job, or for copying pages into a job in the
Thumbnail A window. In order to merge jobs, they must be of the
same data type (that is, PostScript jobs cannot be merged with
raster jobs). Held jobs in the Spool area are automatically converted
to PDF files, but are not saved as PDF files unless you assign the job
a new name or overwrite the existing job; see page 3-43.
Impose
Open a selected held PostScript job in the Imposition window; for
more information, see Chapter 5.
Download
Download files and fonts to the E-810; see page 4-25. You can also
choose this command by right-clicking the Spool status bar.
Archive
Archive one or more selected jobs; see page 3-27 and page 4-31.
Import
Retrieve one or more archived jobs from an external device; see
page 4-34. You can also choose this command by right-clicking the
Spool status bar.
Send to<Nickname_Devicename>
Send the selected job(s) to another connected E-810; see page 4-30.
(This option is only visible when you are connected to more than
one E-810 at once.)
3
3-12
Menu
Page
(DocBuilder Pro
commands for
Thumbnail A)
Server
Introduction to Command WorkStation
Choose this
To do this
Delete
Delete the selected page(s).
Duplicate
Duplicate the selected page(s).
Preview
View a full-screen preview of the selected page; see page 3-46.
Undo
Undo previous Page menu commands (multiple undos available).
Cancel RIPping
Stop RIPping the current job. You can also choose this command
by right-clicking the RIP status bar.
Cancel Printing
Stop printing the current job. You can also choose this command by
right-clicking the Print status bar.
Suspend Printing
Temporarily halt printing. You can also choose this command by
right-clicking the Print status bar.
Resume Printing
Restart printing (after a Suspend Printing command). You can also
choose this command by right-clicking the Print status bar.
Manage Fonts
View the fonts currently installed on the E-810 disk, download
additional fonts, or delete fonts (requires Administrator privileges);
see “Other server management commands” on page 4-39.
Manage Color
Start ColorWise Pro Tools; see the Color Guide.
Printing Groups
Define members of printing groups and their passwords (requires
Administrator privileges. For details, see the Configuration Guide.
Align Paper Trays
Adjust the placement of text and images on the page for duplexing;
see “Align Paper Trays” on page 4-37.
Clear Job Log
Clear all jobs from the Job Log (requires Administrator privileges);
see “Other server management commands” on page 4-39.
Reboot
Perform a soft reboot of the E-810 (requires Operator or
Administrator privileges); see “Other server management
commands” on page 4-39.
Clear
Clear all jobs in all queues as well as all jobs archived on the E-810
hard disk, the index of archived jobs, all FreeForm masters, the
index of FreeForm masters, and the Job Log (requires Administrator
privileges); see “Other server management commands” on
page 4-39.
3
3-13
Menu
Server
(con’t)
Window
Help
Command WorkStation interface
Choose this
To do this
Setup
Start the Fiery Setup program (requires Administrator privileges);
see “Other server management commands” on page 4-39, and the
Configuration Guide.
Log out
Log out of the server.
Filter
Open the Filter dialog box for the active window; see page 3-37.
Export
Save the information in the active window as a tab-delimited text
file; see page 3-29, page 3-31, and page 3-36.
Print
Print the active window.
View in Helper App
Open the active window in a particular application you specify; see
page 4-5.
Refresh
Update the Job Log window with the latest information.
Revert to Default Settings
Restore default settings for the status areas, the column headings,
and the column widths.
About
View the Command WorkStation information screen.
Server selection tabs
Use the Server selection tabs, just below the menu bar at the top of the display, to log
in to additional E-810 servers (if your site has more than one), and to switch between
E-810 servers currently connected to Command WorkStation.
If you click a blank tab, you are prompted to connect to a server in the list or configure
a new server entry (see “Connecting to the server” on page 3-5). A limit of five E-810
servers can be connected to a single Command WorkStation.
You can access the Server selection tabs from all Command WorkStation windows
(Queues, Archive, FreeForm, and Job Log).
3
3-14
Introduction to Command WorkStation
Sliders
Along the left side of the display are buttons you click to activate function sliders.
Click to view server information
Click to open the Log in/out slider
Click to start a Fiery utility
Click to view disk space and
RAM availability
To retract any slider, click the icon at the far right of the slider.
Server information slider
The Server information slider displays name and version information about the
currently connected server and Command WorkStation. To retract the slider, click the
Fiery logo at the far right of the bar.
3
3-15
Command WorkStation interface
Log in/out slider
This slider is described in “Logging in” on page 3-6 and “Logging out” on page 3-7.
To retract the slider, click the Lock icon at the far right of the bar.
Utilities shortcut slider
This slider can be used to access Fiery Downloader and ColorWise Pro Tools. These
utilities can also be accessed from the Job menu and Server menu, respectively. To
retract the slider, click the icon at the far right of the bar.
RAM and disk space slider
Disk space
used
RAM currently in use
Total hard disk space
Total RAM
The System information indicators show the current availability of RAM and hard disk
space on the currently selected E-810 server. To retract the slider, click the icon at the
far right of the bar.
Job ticket information
All the jobs listed by name in the Queues, Archive, and FreeForm windows can display
the job ticket information specified by the person who originated the print job.
Command WorkStation can display this information because it parses the PostScript
file before it is RIPped.
3
3-16
Introduction to Command WorkStation
You have considerable flexibility in arranging this information in the display. For
example, you can add Media Type to the display if you want to see which jobs call for
special paper or other media.
You can choose not to display headers for options that are not used at your site, or you
can display all possible options and scroll to see the ones that are less important to you.
If you just want to experiment, when you are finished you can choose Revert to
Default Settings from the Window menu.
For instructions on customizing the display in the Queues, Archive, and FreeForm
windows, see page 4-4.
Window selection tabs
Command WorkStation always starts out by displaying the Queues window, from
which you view current job processes and control job flow and file storage. To go
to another window, click the corresponding tab at the bottom of the Command
WorkStation display.
Queues window
RIPping
The Queues window is a dynamic display of the job staging area: jobs are lined up for
processing and printing, some of them are being held waiting for directions, some are
moving from one stage or queue to another and are finally dropped from the list, some
are held for processing by the operator, and some are held in a different queue in case
you need to reprint them.
Printing
One approach to understanding the dynamic display is to imagine the three parts of
the Queues window corresponding to the three stages of printing, illustrated as a
downhill flow.
Spooling
3
3-17
Queues window
Spooling—a PostScript file is saved on the server’s hard disk. The file can come in
packets from the network, or from another place on the server hard disk. Jobs are
added to a queue in the order in which they arrive, and they generally move to another
queue in the same order unless an operator has intervened to change the order.
Rasterizing (RIPping)—PostScript commands are interpreted in the E-810 to allow
the copier to print the file the way its originator intended. The result of this
interpretation is a raster file associated with the original PostScript file. In this raster file
(raster image), color data is associated with each dot that can be rendered by the print
engine. The color data tells the print engine whether or not to apply cyan, magenta,
yellow, or black toner to each position on the page.
Printing— the raster image is transferred from the server to the print engine at high
speed, freeing up RAM for the next job. While the PostScript file is usually saved to
disk, raster images are held in RAM during and after each print job. However, both
users and operators can request that the E-810 save the raster image to disk along with
the PostScript file.
Saving the raster image to disk offers some advantages—raster files are already
processed so they print quickly, and each part of the raster file is still identified with a
page in the original document, which means that individual pages of a saved raster file
can be accessed.
Status bars
Jobs actively involved in the three processes (spooling, rasterizing, and printing) are
listed in the status bars that span the Queues window.
Status bars show the file name and user name for the active process, and an indication
of its progress. Each status bar heads the list of jobs that have completed the process.
Thus, beneath the Spool status bar, you see a list of spooled files; beneath the RIP
status bar, you see a list of rasterized (RIPped) files; beneath the Print status bar, you
see a list of jobs that have already been printed.
3
3-18
Introduction to Command WorkStation
N OTE : In the Spool status bar, the file name and user information always appear as
“Unknown” (as shown below). This information is not available until the job has
finished spooling to the E-810 disk.
Spooled jobs on Hold (yellow)
Active spooled jobs (white)
RIPped jobs on Hold (yellow)
Active RIPped jobs (white)
Printed jobs (white); some include
raster data stored in RAM
When a job is being processed, provided animation is enabled (see page 4-5), the
corresponding status bar is animated, indicating that the process is active.
If an error occurs, the Print status bar alerts you by displaying a message on a red
background, instead of the normal blue background.
Enlarging the status bars Click the small arrows at the left of the status bar to
expand the status bar display. Click the arrows again to collapse the status bar to its
original size. To expand all the status bars at the same time, press Ctrl-E. Click the
arrows or press Ctrl-E again to collapse them to their original size.
Changing proportions By default, the status bars divide the window area into three
equal parts. You can drag the RIP and Print status bars up or down to change the
proportion of the window devoted to each job area. For example, drag the RIP status
bar down if you have a long list of spooled jobs that you want to see without scrolling.
3
3-19
Queues window
Making space If your workflow includes holding many jobs, and you don’t want to
view the held jobs all the time, consider moving some of them to the Archive window.
You can move jobs back and forth between the Queues window and the Archive
window with a single right-mouse command (see page 3-26).
Active jobs and held jobs
In the description that follows, assume that the operator has full control of jobs; that is,
the administrator has disabled the Direct connection and the Print queue, and all user
jobs come to the Hold queue. For more information about print connections, see the
Configuration Guide.
The operator’s job management functions permit holding a job at any stage of the
process we have described, as illustrated below. In the figure, boxes indicate types of job
icons you would see in the Queues window.
Spool
Spooled and held
PostScript data
Spooled for printing
RIP
Preview, edit, and impose
RIPped and held
PostScript and
raster data
Print*
RIPped for printing
Print
Preview and edit
Print and hold
Printed
*A copy of the held job is printed; the held job remains in the RIP area.
Deleted
3
3-20
Introduction to Command WorkStation
Jobs that are held are shown with a yellow icon in a yellow row, just beneath the Spool
or RIP status bar. Jobs that are held must be activated with a command in order to
print.
Active jobs are shown in white with white icons; new jobs are added above older jobs.
Job icons
Three types of icons are used for both active jobs and jobs on hold.
Active jobs
(white icons and rows)
Icon
Jobs on Hold
(yellow icons and rows)
PostScript or raster data
headed for printing (top)
or after printing (bottom)
PostScript data headed for Print
and Hold or job on Hold after
printing (Hold)
PostScript and raster data
after printing, ready for
fast reprint
PostScript data already rasterized
and held
Printer icons
Raster icon
Spool area
The job icons in the Spool area are described below.
Spool area icon
1
Yellow printer icon
Yellow job row
What it indicates
PostScript data from a user on
the network; no destination
is defined
How long you see the job
Until a destination is chosen
3
3-21
Queues window
Spool area icon
What it indicates
PostScript data headed for
Print
2
How long you see the job
Until the RIP is free
White printer icon
White job row
PostScript data headed for
RIP and Hold
3
Yellow raster icon
White job row
PostScript data headed for
Print and Hold
4
Yellow printer icon
White job row
The Spool area is both the receiving area for jobs from users on the network (Hold
queue) and the waiting area for jobs that will be RIPped.
Hold queue jobs When printing requires an operator (because the Print queue and
Direct connection are disabled), the operator must assign a destination to all jobs
received from users on the network (icon 1 in the table above). Once assigned, jobs
(icons 2, 3, and 4) move down the Spool queue for processing. All jobs printed to the
Hold queue require routing by an operator. The Hold queue also enables you to use all
workflow features of Command WorkStation with PDF files, including DocBuilder
Pro and the Imposition feature.
Print queue jobs When printing does not require an operator, network jobs sent to
the Print queue appear in the Spool area, where they are shown with a white printer
icon (icon 2). When they reach the head of the queue, they are RIPped and printed
without operator intervention.
Direct connection jobs Jobs printed to the Direct connection are not displayed in
Command WorkStation job lists. They appear briefly in the status bars (where they
cannot be selected) and are included in the Job Log.
3
3-22
Introduction to Command WorkStation
RIP area
The job icons in the RIP area are described below.
RIP area icon
1
Yellow raster icon
Yellow job row
2
What it indicates
How long you see the job
Raster data, no destination
defined; may have been
printed before and held
Until it is deleted, moved to
the Archive window, or
stripped of its raster data and
sent to the Spool area
Raster data headed for Print
in its turn; no hold defined
Until copier is free to print
the job
White printer icon
White job row
After a job is rasterized, it goes into the RIP area. The RIP area holds only raster data
(that is, jobs that have been rasterized). Jobs in the RIP area are either waiting for the
copier to be free (Print queue jobs, icon 2 in the above table), or they are being held.
Held jobs in the RIP area have already been rasterized (RIP and Hold) or they have
been printed and their raster data has been routed back to the RIP area (Print and
Hold), where they are shown in yellow rows (icon 1).
N OTE : Raster jobs in the RIP area that are waiting to print (icon 2 in the table above)
cannot be manipulated by job commands.
Jobs held in the RIP area remain there until the operator moves them to the Archive
window or deletes them. Printing these jobs does not remove them from the RIP area.
Instead, a copy of the job is created and printed.
N OTE : For all rasterized jobs, the print option settings, in addition to the current
calibration state of the E-810, remain with the saved raster data each time the job is
reprinted. To print the job with new print option settings and with new calibration
data, you must remove the raster data and reRIP the job.
3
3-23
Queues window
Print area
The job icons in the Print area are described below.
Print area icon
1
What it indicates
How long you see the job
PostScript data only—raster
data has been deleted
Until the job limit is reached
Raster and PostScript data
Until the job is reprinted or
the job limit is reached
White printer icon
White job row
2
White raster icon
White job row
If RAM is needed to RIP an
active job, the raster data is
deleted and the job gets the
PS icon (icon 1, above)
The Print area, also referred to as the Printed queue, contains jobs that have already
been printed. These jobs were assigned the Print destination (white printer icon in the
Spool or RIP areas) without any Hold instructions; therefore, they all have white icons
and rows.
N OTE : A job row that appears in light red indicates that an error occurred while
printing the job. To see the error, double-click anywhere in the row.
Newly printed jobs are added to the Printed queue, and are shown at the top of the list.
Jobs are saved in the Printed queue until the job limit is reached. When the first job
over the limit is printed, the oldest job is deleted from the disk. The default job limit
can be changed in Setup by the administrator.
N OTE : If you reprint a job in the Printed queue, the job returns to its original position
in the Printed queue after it is printed.
While it is printing, a job consists of PostScript and raster data. The raster data in
RAM is not cleared until memory is needed to rasterize the next job. As long as the
raster data is intact, the job can be reprinted from the Printed queue. Printed jobs that
still have their raster data are represented by a white raster icon in the Printed queue
(icon 2 in the previous table); jobs with only PostScript data remaining are represented
3
3-24
Introduction to Command WorkStation
by a white PS icon (icon 1). If the job was printed from a held raster job (in the RIP
area), the raster data in the RIP area remains and can be used to reprint the job after
the raster data has been cleared from the Printed queue.
Job commands
Job commands are used to assign a selected job to a new destination or process. These
commands are available from the Job menu (see page 3-10). Many are also available as
right-mouse commands (described following the list of commands below). The job
commands available at a given time depend on the context; unavailable commands are
dimmed. Job commands are available in the Queues, Archive, and FreeForm windows.
The job commands available for selected jobs in the Queues, Archive, and FreeForm
windows are listed in the following table. The table also describes the effect of each
command on raster data associated with the affected job(s).
Choose this
To do this
Raster data is
Delete
Delete the job(s).
Deleted
Duplicate
Duplicate one or more selected PostScript or
PDF data jobs in the Spool or Print areas. You
can use the duplicate job(s) for different print
options or a different destination. (The Duplicate
command actually creates a reference to the
original job, with the same name.)
n/a
(The Duplicate command is not available
for raster jobs.)
Rename
Rename the job (PostScript or PDF file with or
without raster).
Unaffected, but associated with the new
name
Hold
Hold the job in the current place (except for a job
in the Print area, which is moved to the Spool or
RIP area, depending on whether it still has raster
data associated with it.)
Held in RIP area, if included with job
RIP and Hold
RIP the job and hold it in the RIP area.
Held in RIP area indefinitely
Print
Print the job in its turn (RIP it first if it does not
have raster data).
After printing, keep the printed job in the Print
area until the job limit is reached.
Temporarily held in RAM after printing
until memory is needed for another job
(If the job was printed from a held job in
the RIP area, the raster data in the RIP
area is kept indefinitely.)
3
3-25
Choose this
Queues window
To do this
Raster data is
Print and Hold
(Like the user print
option Save Fast
Reprint)
Print the job in its turn (RIP it first if it does not
have raster data).
After printing, hold the PostScript data and the
raster in the RIP area.
Held in RIP area indefinitely (saved
to disk)
Process Next
Give top priority to this job.
RIP (and then print) it as soon as the processor is
free, before other waiting jobs.
Option is dimmed if there are no other
waiting jobs.
n/a
Remove Raster
Remove the raster data from a job that has raster
data (indicated by a raster icon); leave the
PostScript data unaffected.
N OTE : This command is available only
for jobs in the Spool area that are not
currently held.
Deleted
N OTE : If you remove raster from a job in
the RIP area, the job is sent to the Spool
area.
Properties
View, override print option settings, and print a
selected job or a group of selected jobs.
Possibly deleted and regenerated,
depending on whether you change any
settings that require re-RIPping
Thumbnail A
Open a selected held job in the Thumbnail A
window, where you can view a full-screen preview
of the job, edit the job, or merge it with like data
from other jobs. In order to merge jobs, they
must be of the same data type (that is, PostScript
jobs cannot be merged with raster jobs).
Changed if job is edited, unaffected if job
is only viewed
Thumbnail B
Open a selected job in the Thumbnail B window
for viewing a full-screen preview of the job, or for
copying pages into a job in the Thumbnail A
window. In order to merge jobs, they must be of
the same data type (that is, PostScript jobs cannot
be merged with raster jobs).
Unchanged
Impose
Open a selected held PostScript or PDF job in
the Imposition window; for more information,
see Chapter 5.
Unchanged
Download
Download files and fonts to the E-810 with
Fiery Downloader; see page 4-25.
n/a
3
3-26
Choose this
Introduction to Command WorkStation
To do this
Raster data is
Archive
Archive the selected held job(s) to the E-810
hard disk, the E-810 internal ZIP drive, the local
Command WorkStation hard disk, or to a device
on the network, and move the job icon to the
Archive window; see page 3-27.
Archived with the job, if archiving of
raster data is specified
Import
Import PostScript or raster data jobs previously
archived to external volumes; see page 4-34.
Imported with the job, if it is available
Send to
<Nickname_
Devicename>
Transfer the selected job(s) to another currently
connected E-810; see page 4-30.
Transferred with the job
Using right-mouse commands
Use the following instructions to activate job commands with a single
right-mouse click.
TO
ROUTE JOBS WITH RIGHT-MOUSE COMMANDS
1.
To route a single job in the job list, right-click the job.
2.
Select one of the commands or destinations and release the mouse button.
The command is carried out or the job is routed to the destination you chose.
Depending on your choice, the job line may reappear in a different part of the window
or a different window, or the job line may be deleted.
3.
To route multiple jobs at the same time, select the jobs first.
Click the job line to select the first job. Shift-click to select adjacent jobs.
Ctrl-click to select nonadjacent jobs.
N OTE : Select jobs with the same job icon; otherwise, the destination options may not
be the same. For example, select multiple jobs in the Spool area, and choose Print.
4.
With the cursor still in one of the selected job lines, press the right-mouse button.
5.
Select one of the commands or destinations and release the mouse button.
The command is carried out or the jobs are routed to the destination you chose.
3
3-27
Queues window
Archive window
If you want to store jobs before or after printing them, you can archive them.
The E-810 can archive jobs internally (on the E-810 hard disk) and externally,
on the Command WorkStation hard drive, the ZIP disk, or on network drives.
For instructions on archiving jobs, see page 4-31.
N OTE : The Archive window is not available if you logged in as Guest.
PostScript and raster data jobs can be archived, but jobs must first be held in the Spool
or RIP areas of the Queues window.
When you archive a job, the job is moved, not copied, to the archive destination
(the E-810 archive area or the external device). The Archive window shows a
cumulative list of all archived jobs. You can clear this list (along with all jobs on the
server) by choosing Clear Server on the E-810 Control Panel (see page 1-6) or
choosing Clear from Command WorkStation (see page 3-12).
The job icons in the Archive window are described below,
Archive icon
What it indicates
PostScript data only—raster data not present or deleted
Job was archived from the Spool area
Printer icon
Raster and PostScript data
Raster icon
Job was archived from the RIP area
The job commands described on page 3-24 can also be used with jobs in the
Archive window.
3
3-28
Introduction to Command WorkStation
The icons that appear in the Archive window are always white, since they have no
destination (as long as they are in the Archive window).
Sort order indicator
External volume
By default, the Archive window displays all archived jobs. Until they are deleted,
archived jobs remain in the Archive window indefinitely. You can display a subset of
archived jobs based on various selection criteria by using the Filter command (see
page 3-37).
For jobs archived to external devices (such as the ZIP drive), the Volume column shows
the volume and path of the device. For jobs that were archived to the E-810 hard disk,
the Volume column is blank.
As with the Queues window, you can select the headings for the display and use Job
menu or right-mouse commands; you can also sort jobs.
To
Do this
Sort jobs in a category, such
as by Date.
Double-click the Date/Time heading. A small arrow indicates whether jobs are sorted in
ascending or descending order. Double-click again to sort in the reverse order.
Route a job to a destination in
the Queues window.
Use job commands from the Job menu or the right-mouse menu. For example, to print a
job, choose Print or Print and Hold. You can also select and route multiple jobs. For details,
see page 3-26.
The other options, RIP and Hold or Hold, send a copy of the job to the Queues window
(to the RIP and Spool areas, respectively) without printing it. Remove Raster, which applies
only to jobs with the raster icon, leaves only the PostScript data for the job in the
Archive window.
View only particular jobs.
Choose Filter from the Window menu, and make entries in the Filter dialog box
(see page 3-37).
Delete a job.
Select the job(s) and choose Delete from the Job menu or right-mouse menu.
3
3-29
FreeForm window
To
Do this
Display or move job ticket
information headers in the
Archive window
Right-click the appropriate column head; choose Add from the pop-up menu to list the
columns you can add to the display. The categories are the same as in the Queues window
(see page 3-15), but you can arrange them differently. The column head arrangements you
set in the Archive window are independent of those you set in the Queues window.
Adjust the width of a column
Click the column border in the heading and drag left or right.
Export the currently displayed
list of archived jobs to a
tab-delimited text file
Choose Export from the Window menu. Specify a file name (the default name is archive.log)
and location for the file, and click Save. You can then open the exported file with a
spreadsheet, database, or word processing application.
FreeForm window
The E-810 FreeForm printing feature provides a flexible and efficient method for
printing variable data jobs (such as direct-mail advertising pieces). FreeForm allows
users to preRIP and store the master elements of their variable data jobs on the E-810,
and then use that master data as needed, for multiple variable data jobs. The
preRIPped master-element jobs are stored on the E-810 as FreeForm Masters, and
appear in the FreeForm window.
About FreeForm printing
FreeForm printing involves combining a preRIPped FreeForm Master with a variableelements job to create the final variable data job. This final job can be soft-proofed
before printing using the thumbnail windows and the full-screen preview display.
To create a FreeForm Master, the job comprising the master elements must be RIPped
with the Create Master print option set to a value from 1 to 100 (that is, a setting other
than None). Users can set this option to a value from 1 to 15 when they send a job, but
the printer driver interface prevents them from choosing numbers greater than 15. To
create a FreeForm Master with a number greater than 15, you must override the Create
Master job setting from the Properties dialog box and RIP (or reRIP) the job.
To combine a variable-elements job with a FreeForm Master, the variable-elements job
must be RIPped with the Use Master print option set to the number of the
corresponding FreeForm Master. As with the Create Master print option setting, users
3
3-30
Introduction to Command WorkStation
can set this option to a value from 1 to 15 only. To specify a number greater than 15,
you must override the Use Master job setting from the Properties dialog box and RIP
(or reRIP) the job.
Using the FreeForm window
The FreeForm window displays up to 100 FreeForm masters that can be used for
variable data jobs. However, users on the network can specify Create Master job setting
values of 1 through 15 only, due to limitations of the printer driver interface.
The Create Master job setting values can range from 1 to 100, but values from
16 to 100 can be assigned only with job overrides from the Properties dialog box.
When assigning new FreeForm Master numbers, it is very important to not choose a
number already in use; doing so may result in the original FreeForm Master being
overwritten.
Only white raster data icons appear in the FreeForm window, as all FreeForm Masters
have already been rasterized. Their raster data is kept indefinitely until the FreeForm
Master is deleted.
N OTE : For all rasterized jobs, the print option settings, in addition to the current
calibration state of the E-810, remain with the saved raster data each time the job is
reprinted. To print the job with new print option settings and with new calibration
data, you must remove the raster data and reRIP the job.
By default, the FreeForm window displays all FreeForm Masters, which remain in the
window until they are deleted. FreeForm Masters (along with all other jobs on the
server) and the index of FreeForm Masters are deleted by choosing Clear Server on the
E-810 Control Panel (see page 1-6) or choosing Clear from Command WorkStation
(see page 3-12).
3
3-31
FreeForm window
You can display a subset of FreeForm Masters based on various selection criteria by
using the Filter command (see page 3-32).
As with the Queues window, you can select the headings for the display and use the
Job menu or right-mouse menu; you can also sort jobs.
To
Do this
Sort jobs in a category, such
as by Date.
Double-click the Date/Time heading. A small arrow indicates whether jobs are sorted in
ascending or descending order. Double-click again to sort in the reverse order.
View only particular jobs.
Choose Filter from the Window menu, and make entries in the Filter dialog box (see
page 3-37).
Delete a job.
Select the job(s) and choose Delete from the Job menu or right-mouse command menu.
Display or move job ticket
information headers in the
FreeForm window.
Right-click the appropriate column head; choose Add from the pop-up menu to list the
columns you can add to the display. The categories are the same as in the Queues window
(see page 3-15), but you can arrange them differently. The column head arrangements you
set in the FreeForm window are independent of those you set in other windows.
View a thumbnail of a
FreeForm Master.
Right-click the job and choose Thumbnail A or Thumbnail B from the menu that appears,
or left-click the job and choose Thumbnail A or Thumbnail B from the Job menu.
View the print option settings
of a Free Form Master.
Right-click the job and choose Properties from the menu that appears, or left-click the job
and choose Properties from the Job menu.
N OTE : Print option settings for FreeForm Masters can be viewed only; they cannot
be changed.
Display all variable element
documents associated with a
FreeForm Master.
Right-click the job and choose Associated variables from the menu that appears.
Adjust the width of a column.
Click the column border in the heading and drag left or right.
Export the currently
displayed list of FreeForm
jobs to a tab-delimited
text file.
Choose Export from the Window menu. Specify a file name (the default name is
freeform.log) and a location for the file and click Save. You can then open the exported file
with a spreadsheet, database, or word processing application.
3
3-32
Introduction to Command WorkStation
Job commands for FreeForm master jobs
The following job commands, described on page 3-24, can be used with jobs in the
FreeForm window:
• Delete
• Associated variables
• Properties
• Thumbnail A
• Thumbnail B
N OTE : The Associated variables command is available only by right-clicking a
FreeForm Master job. Selecting this command displays all jobs that have used that
specific FreeForm Master as a master document.
Filtering jobs in the FreeForm window
The FreeForm window displays a cumulative list of all FreeForm Masters. If the
window contains a large number of FreeForm Masters, you may want to display only a
specified subset of these jobs. You can do this by filtering jobs in the FreeForm window.
The Filter command for the FreeForm window works exactly the same way as the
Filter command for the Archive window. For instructions on using this feature, see the
description given in “Filtering jobs” on page 3-37.
3
3-33
FreeForm window
Assigning and monitoring FreeForm Masters
Users can assign FreeForm Master numbers from 1 to 15 using the Create Master
print option when they send a job. These numbers can be changed to a number from
1 to 100 with job overrides from the Properties dialog box.
N OTE : As with all job overrides that have a reRIP icon, in order for any new settings to
take effect (including Create Master and Use Master), the job must be reRIPped. For
information on using the Properties dialog box to change job settings, see “Viewing
and overriding print settings” on page 4-22.
When the first 15 FreeForm Master numbers have been used, users may inadvertently
overwrite existing FreeForm Masters by assigning what they think are new, unused
FreeForm Master numbers. When users choose a master number from the Create
Master print option, an existing job using that master number will be overwritten (the
user will receive a message warning them that they are about to replace an existing job).
For this reason, the operator may bear the responsibility of deleting existing master
jobs or reassigning master numbers 1 through 15 in order to avoid any overwriting
problems. Since the operator is the only person who can assign numbers from 16 to
100, he or she can maintain a high level of control over the FreeForm Master numbers
in use.
Tips for using FreeForm
At sites where a small number of users print FreeForm jobs, the operator may want to
assign specific FreeForm Master numbers to specific users. In this way, users bear the
responsibility of monitoring their own master numbers. Users can then use the Create
Master print option to assign new masters or to overwrite existing masters. Users can
also instruct the operator to reassign master numbers (to a number greater than 15) for
FreeForm Masters they want to keep available on the E-810.
At sites where a large number of users print FreeForm jobs, the operator may want to
instruct users not to use the Create Master print option at all, but rather to RIP and
Hold all their jobs. In this way, the operator can decide which FreeForm Master
numbers to assign before printing.
3
3-34
Introduction to Command WorkStation
For all jobs sent to the E-810, it is a good practice for users to specify information to
the operator with the Notes and Instructions fields in the Printer Job Notes dialog box.
It is then very important for the operator to check the Notes and Instructions columns
for such information.
For example, the user could send a variable-elements job named “Variable1.ps” to the
E-810 with the instruction “Use Master5.ps as master.” The operator then:
• Locates “Master5.ps” in the FreeForm window.
• Notes the number in the Create Master column.
• Double-clicks “Variable1.ps” to view the Properties dialog box.
• Chooses the matching FreeForm Master number with the Use Master print option.
The job “Variable1.ps” then prints with the master data (“Master5.ps”), as specified by
the user.
FreeForm restrictions
When printing FreeForm jobs, the following print option settings must match for both
the FreeForm Master and the variable-elements job:
• Color Mode
• Combine Separations
• Page Order
• Page Size
• Duplex
3
3-35
Job Log window
The following settings for the variable-elements job override the corresponding settings
in the FreeForm Master job:
• Media Type
• Paper Source
• Save Fast Reprint
• Sorter Mode
• Collation
• Slip Sheet
• Stapler Mode
For more information on using FreeForm features, see the Printing Guide or
“Printing variable data documents (FreeForm)” on page 4-24.
Job Log window
The Job Log is a list of processed and printed jobs, the date and time they were
processed or printed, and the characteristics of the job. It includes downloaded files
and fonts and RIP and Hold jobs.
N OTE : The Job Log window is not available if you logged in as Guest.
At any given time, the Job Log includes only those jobs processed or printed since the
Job Log was last cleared. You can clear the Job Log manually by choosing “Clear Job
Log” from the Server menu or automatically if the administrator has enabled
autoclearing of the Job Log in Setup. The Job Log is also cleared by choosing Clear
Server on the E-810 Control Panel (see page 1-6) or by choosing Clear from
Command WorkStation (see page 3-12).
3
3-36
Introduction to Command WorkStation
To adjust the column widths in the Job Log display, click the column border in the
heading, and drag left or right. For more information, see Chapter 4.
When you open the Job Log, you can choose to display all jobs in the current Job Log
or only the jobs in a specified date range. By default, all jobs are displayed. To specify a
date range, choose Filter from the Window menu, click Range, and enter dates in the
From and To fields; or click the calendar icons next to the From and To fields and click
dates in the calendar to select them. Use the arrows in the upper-right and upper-left
corners of the calendar to display different months.
N OTE : In the Job Log, “Start Time” reflects the time that the job began RIPping,
“End Time” reflects the time that the job printed, and “Process Time” reflects the total
RIP time for the job. These times do not correspond to the Date/Time values
displayed in the Queues window.
Updating the Job Log display To update the Job Log window display after specifying
a date range (or at any other time), choose Refresh from the Window menu.
Exporting the Job Log From the Job Log window, you can export the Job Log to a
tab-delimited text file (the default name is job.log) by choosing Export from the
Window menu. The exported file can be opened with a spreadsheet, database, or word
processing application. The exported Job Log contains the jobs for the date range
you specified.
3
3-37
Job Log window
Clearing the Job Log The Job Log is stored on the server disk. When logged in as
Administrator, you can clear the Job Log by choosing Clear Job Log from the Server
menu. The Job Log is cleared whenever an Administrator clears the server or installs
new software. In addition, the Job Log can be cleared automatically after every 55 jobs.
Printing the Job Log To print the Job Log, choose Print Pages from the File menu,
select Job Log, click Print, and click OK. The Job Log is sent to the Print queue and
then prints to the E-810. You can use Job menu commands to manipulate the Job Log
print job as you would any other job. The printed Job Log contains the jobs for the
date range you specified. See “Using the Job Log” on page 4-35 for more information.
Printing and clearing the Job Log automatically You can decide how you want to
handle the Job Log. If you have Administrator privileges, you can choose Setup from
the Server menu and enter your preferences in the Job Log Setup. You can choose to
print the Job Log automatically every 55 jobs, or both print and clear the Job Log
automatically every 55 jobs. You can also choose the Job Log page size.
Filtering jobs
The Queues, Archive, FreeForm, and Job Log windows display a cumulative list of all
jobs. If a large number of jobs are listed, it may be difficult to locate a particular job or
a particular group of jobs. You can display a specified subset of jobs by filtering jobs in
the Queues, Archive, FreeForm, and Job Log windows.
3
3-38
Introduction to Command WorkStation
To open the Filter dialog box, choose Filter from the Window menu.
In the Queues window you can filter jobs according to any or all of the
following criteria:
• Job title
• User name
• Date created (or a date range)
• Notes 1 or Notes 2
• Instructions
• Device
3
3-39
Job Log window
In the Archive and FreeForm windows you can filter jobs according to any or all of the
following criteria:
• Job title
• User name
• Date created (or a date range)
• Notes 1 or Notes 2
• Instructions
• Volume
• Device
In the Job Log window, you can filter jobs by date only.
The Filter command lets you perform a search based on any and all values you specify
in the Filter dialog box. Enter values in all fields relevant to your filtering criteria. If
you enter values in more than one field, only jobs that meet all the criteria are
displayed. For example, if you enter 10 in the Job Title field and <UserName> in the
User field, only those jobs whose titles somewhere contain “10” and whose User name
somewhere contains “<UserName>” will be displayed.
3
3-40
Introduction to Command WorkStation
To filter by date, select Range in the Date created area and enter dates in the From and
To fields; or click the arrows next to the From and To fields and click dates to select
them in the calendar. Click the arrows at the upper-right and upper-left corners of the
calendar to display different months. The range of dates available for filtering is
01/01/1980 to 12/31/2099.
Creating Filter templates
If you often filter jobs according to specific criteria, you can create a filter template. In
this way, you can filter jobs easily in one step and avoid the need to enter specific
information each time you want to filter jobs.
TO
CREATE A FILTER TEMPLATE
1.
Open the Filter dialog box by choosing Filter from the Window menu.
2.
Enter specific job filter criteria in the appropriate fields.
3.
Click Save As.
4.
Enter a name for the new template and click OK.
The new template is saved in the Templates pop-up menu in the Filter dialog box.
To view jobs in the Queues, Archive, FreeForm, and Job Log windows according to a
filter template, open the Filter dialog box, choose the template by name from the
Templates pop-up menu, and click OK.
To delete an existing template, open the Filter dialog box, choose the template by name
from the Templates pop-up menu, and click Delete. Click OK to confirm that you
want to delete the template.
3
3-41
Job properties
Job properties
When logged in as Operator or Administrator at Command WorkStation, you can use
the Properties command to check and override the print option settings (properties) of
all jobs.
You can use this command to do any of the following:
• Check a user’s job settings, including notes and instructions.
• Override a setting based on printed output or other print device conditions.
• Change settings for a duplicate of the original job.
• Print a single copy of a job before printing the number of copies requested by
the user.
Viewing and editing job properties
The Properties command lets you view, edit the print option settings of, and print
multiple jobs simultaneously.
You can use this feature to compare the properties of several jobs and thereby group
together jobs with similar settings, if it is beneficial for throughput or efficiency.
3
3-42
Introduction to Command WorkStation
To view the properties of one or more jobs, select the job(s) and choose Properties from
the Job menu or the right-mouse menu.
For information on using the Properties dialog box to change job settings, see
“Viewing and overriding print settings” on page 4-22.
N OTE : Some print options that are available in the printer driver are not displayed in
the Properties dialog box. For information on specific print options and settings, and
where you set them, see Appendix A of the Printing Guide.
Thumbnails and full-screen previews
Command WorkStation includes a powerful DocBuilder Pro tool that allows you to
preview and edit PostScript and raster data. (For information on how to identify a
raster data job, see page 3-20.) DocBuilder consists of two thumbnail windows and
several page-manipulation commands (listed in the Page menu).
N OTE : DocBuilder Pro is an option that must be purchased separately.
3
3-43
Thumbnails and full-screen previews
You can use the DocBuilder Pro tool in the following ways:
• In the Thumbnail A window, you can see thumbnails of the currently RIPping job,
as it is processed, or of any PostScript or raster data job (see “Previewing print jobs”
on page 4-12).
• From the Thumbnail A and Thumbnail B windows you can open a full-screen
preview of a PostScript or raster file (see “Full-screen previews” on page 3-46).
• Using the Thumbnail A and Thumbnail B windows together, you can merge
PostScript or raster data from more than one file, even if the files were printed from
different applications on different computer platforms (see the next section and
“Merging PostScript and raster files with DocBuilder Pro” on page 4-15).
DocBuilder Pro’s merge features eliminate the limitations of particular software
applications. You can merge PostScript or raster pages of documents of different types,
even different computer operating systems. You can merge color pages from graphics
programs with text pages from a word processor. An outline of DocBuilder Pro’s
features follows; for more information and applications, see page 4-15.
Editing and merging files with DocBuilder Pro
When you select a PostScript or raster data job and choose Thumbnail A or
Thumbnail B from the Job menu or the right-mouse menu, the corresponding
thumbnail slider opens automatically, displaying thumbnails of the file. To close the
thumbnail slider, click anywhere in the tab along the right edge of the thumbnail
window. When the thumbnail window is open, the arrows in the tab point to the right,
indicating that clicking the tab retracts the slider.
N OTE : The thumbnail windows will open automatically for jobs held in the RIP area.
In order to open the thumbnail windows for jobs in the Spool area, the jobs must first
be converted to PDF files. In addition, the Adobe Acrobat application and a dongle
(included with the DocBuilder Pro option for Command WorkStation) are required to
view the job. If the dongle is not attached, you will see an error message. When you
select a job in the Spool area and choose Thumbnail A or Thumbnail B, the Acrobat
Distiller application launches and the conversion process occurs automatically; wait a
few moments as Command WorkStation prepares and then opens the job for viewing.
3
3-44
Introduction to Command WorkStation
Using the Thumbnail A window, you can see thumbnail views of any PostScript, PDF,
or raster data job—that is, any file that is currently RIPping, or any file that has been
RIPped and held to disk. You can also use the Thumbnail A window to edit a
PostScript, PDF, or raster file—you can change the sequence of pages, delete pages,
duplicate pages, insert blank pages, and copy pages from other PostScript, PDF, or
raster files into the Thumbnail A window. You can save the edited PostScript or raster
file as a new printable document.
The Thumbnail B window can also display thumbnails of a PostScript, PDF, or raster
job, and the document displayed in Thumbnail B can be used as a source for editing
the document shown in Thumbnail A.
In order to copy or merge jobs using the Thumbnail A and B windows, they must be
jobs of the same data type. In other words, both jobs must be PostScript, PDF, or raster
jobs—you cannot merge a PostScript job from Thumbnail B with a raster job in
Thumbnail A.
N OTE : Be careful not to delete all pages of a job in Thumbnail A without first saving a
copy of the job.
3
3-45
Thumbnails and full-screen previews
Click to expand or retract
the Thumbnail B window
Click here to close the Thumbnail B window
Thumbnail B (source)
Click to expand or retract
the Thumbnail A window
Click here to close the Thumbnail A window
Thumbnail A (target)
You can merge documents by dragging (copying) one or more entire pages from
Thumbnail B to Thumbnail A. This creates a new document in the Thumbnail A
window. If you select one or more pages in the Thumbnail A window, the commands
in the Page menu give you additional editing possibilities. (Most of the Page menu
commands are also made available by right-clicking pages in Thumbnail A.) Multiple
undos of Page menu commands are possible.
You can merge pages from multiple documents into the Thumbnail A document by
opening documents one after another in the Thumbnail B window. Documents in the
Thumbnail B window are view-only, and while you can copy pages from Thumbnail B
to Thumbnail A, you cannot edit the Thumbnail B document. A merged document
that you create in Thumbnail A can be saved (with a different name) as a new
PostScript, PDF, or raster data file.
For more information, see page 4-15.
3
3-46
Introduction to Command WorkStation
Full-screen previews
Double-clicking any page in the Thumbnail A or Thumbnail B window opens a
full-screen preview of the page. The full-screen preview is a view-only display, and it
takes time to retrieve the data.
N OTE : If you have edited a PostScript, PDF, or raster job with DocBuilder Pro, you
must save the edited file before you can view full-screen previews of all its pages.
Depending on which area the job comes from (Spool or RIP), you can use the icons in
the full-screen preview to display adjacent pages, rotate the page, pan around the page,
zoom, or close the preview. The first illustration below shows a job from the Spool area;
the second illustration shows a job from the RIP area.
Job from the Spool area
Click to view adjacent pages
Click to close the
full-screen preview
Click to pan around the page
Click to zoom
If scroll bar appears,
click on arrows, in empty
spaces, or move bar to
scroll up or down
If scroll bar appears, click on
arrows, in empty spaces, or
move bar to scroll left or right
3
3-47
Thumbnails and full-screen previews
Job from the RIP area
Click to view adjacent pages
Click to close the
full-screen preview
Click to rotate 90, 180,
or 270 degrees
If scroll bar appears,
click on arrows, in empty
spaces, or move bar to
scroll up or down
If scroll bar appears, click on
arrows, in empty spaces, or
move bar to scroll left or right
4
4-1
Chapter 4:
Managing
Print Jobs
Communicating with users
This chapter provides some general information about managing printing with
the E-810 and the copier, and gives you some hints on using the Command
WorkStation windows to monitor and manage print jobs. It suggests ways to guide
users so that their jobs are more likely to print correctly the first time. The chapter also
follows the course of a print job and shows possible ways to expedite jobs and take
advantage of the special capabilities provided by Command WorkStation.
Communicating with users
The Command WorkStation interface facilitates communication between users and
operators. All the same, users who originate print jobs may need to become better
informed about the E-810 and the copier so they can choose the appropriate options
for their jobs.
What the user needs to know
You or the network administrator should consider supplying some of the following
information to your users:
• The name of the copier on the network and the names of servers sharing the copier
• User’s access status
If jobs do not require operator intervention because they go to the Hold queue,
which connections are published—Direct connection and/or Print queue?
• How long you will hold jobs on the server before you delete them
• List of default printer settings and other settings (from the Configuration page)
• List of installed fonts
If users’ applications do not download fonts automatically, can users download fonts
to the E-810? Should they embed them in documents or should they supply them to
you so you can download them?
4
4-2
Managing Print Jobs
• Requirements for Notes fields (information which appears in the Job Log)
For example, department name, account code, phone number or extension. Is some
information mandatory at your site?
• Resident calibration target and date of current measurements
• Custom simulations
Are custom simulations are available, what type of targets do they represent?
Although users see these print options (CMYK Simulation), they should not select
them if there are no custom targets on the server.
• IP address or DNS name of server so users can access Fiery WebTools, at least to see
if their jobs have printed
• Installed options
• Available media, alternative choices, standard tray/media configurations
• Suggestions for the Instructions field
• Information users might find in the WebLink web site
• Instructions for setting up the printer on client computers
• Sources of PostScript printer drivers, PPDs, color reference files, and additional
information
• Recommended PPD settings
• FreeForm information regarding usage of master and variable data
• Conflicting settings and common PostScript errors
4
4-3
Communicating with users
How users communicate print requirements
Explain to remote users the information you check and what you need to know in
order to print the jobs they send. The Instructions field is suited for communicating
job requirements.
Users can provide you information with the print job, for example:
• Information entered in the Instructions field or the Notes fields—special
requirements at your site (see below)
• Job ticket information provided by PPD option settings (job properties)
Instructions and Notes fields
• User name and phone number
• Priority, due date, request for notification
• Number of copies needed
• Request that operator do color check
• Request that job be held job for future printing or future reprinting
• Instructions for merging job with another job
• Quantity of paper required
• FreeForm information regarding use of master and variable data
• Imposition instructions
For more information, see Chapter 5.
• Future requirements for the job
4
4-4
Managing Print Jobs
Customizing the Command WorkStation window
You can customize the display of job ticket information in the Queues window by
rearranging the column headings. You can tighten the columns, add new column
headings, move columns, and delete column headings.
N OTE : The Job Title and User columns are always at the left and cannot be moved or
deleted. You can only add column headings to the right of the User column.
TO
CUSTOMIZE THE
1.
Q UEUES
WINDOW DISPLAY
Right-click the column heading.
A menu appears. The Add submenu lists the headings that are not already displayed.
2.
Choose the options you want to display, and the sequence in which you prefer to
view them.
Add, delete, or move a column by holding down the right mouse button on the name
of the appropriate column heading; release the button after choosing one of the menu
options:
Add one of the listed columns to the display at your mouse position.
Move Left, Move Right—move the selected column left or right.
Delete the selected column.
The Job Title and User columns are required—all others are optional.
3.
Adjust the column widths.
Adjust the width of a column by clicking the column border in the heading and
dragging to the left or right. You can change the column widths at any time.
If you display the Instructions column, which shows information typed into the
Instructions field by the user, you can reduce the width of the column so you can just
see whether or not there are instructions in it.
4.
With a narrow Instructions column, if you want to read detailed instructions,
double-click the job and choose Notes from the Job Properties dialog box.
This also allows you to read the notes. You can edit or annotate the information in the
Instructions field if you wish. It remains with the job as long as the job is on the server.
The operator cannot edit the Notes fields.
4
4-5
Communicating with users
Setting Command WorkStation Preferences
Choose Preferences from the File menu to access the Preferences dialog box.
Menu
Preferences\
General
Choose this
To do this
Enable Animation
Turn on or turn off animation of the status bars.
Enable Popup Help
Turn on or turn off short captions that appear when
you pause the mouse over window elements; the
captions identify the main parts of the
Command WorkStation window.
Units
Specify the type of unit (Points, Inches, or
Millimeters) to use in the display for custom
page sizes and Imposition settings.
Temporary path
Specify a location for temporary files created by
the Command WorkStation software.
4
4-6
Managing Print Jobs
Menu
Preferences\
Filter
Preferences\
Imposition
Choose this
To do this
Helper Application
Specify the path to a helper application from which
to view data in the active window; this application
opens automatically when you choose “View in
Helper App” from the Window menu.
Template path
Specify the path to the location where Filter
template files are saved; for more information on
Filter templates, see page 3-40.
Template path
Specify the path to the location where Imposition
template files are saved.
Printing server information pages
Using the Print Pages command, you can print various special pages of information
stored on the E-810.
TO
PRINT SERVER INFORMATION PAGES
1.
Choose Print Pages from the File menu.
2.
In the Select Printer area, specify where you want to print the pages.
Server—The pages you specify are printed to the E-810.
Local Printer—Enables you to print the Configuration page, Archive Log, and Queues
to any printer installed on your Windows computer.
4
4-7
3.
Printing server information pages
In the Select Pages area, specify the pages you want to print:
Configuration—Prints the Configuration page, which gives the current server and
device configuration. This page lists general information about the hardware and
software configuration of the E-810, the current settings for all Setup options,
information about the current calibration, and the Ethernet and Token Ring addresses
of the E-810.
Test Page—A Test Page enables you to confirm that the E-810 is properly connected to
the copier, and provides color and grayscale samples to troubleshoot problems with the
copier or the E-810. The following settings are among those listed on the Test Page:
Server Name, Printer Model, color settings, calibration information, and date and time
the Test Page was printed.
Control Panel Map—Prints the Control Panel Map, which is an overview of the screens
you can access from the Control Panel. For information about using these screens to
set up the E-810, see the Configuration Guide.
Font List—Prints a list of all fonts currently resident on the E-810 hard disk.
Color Charts—Prints samples of the RGB, CMY, and PANTONE colors available from
the E-810.
Job Log—Prints a log of the last 55 jobs processed or printed. For information on the
fields in the Job Log and on printing it in other forms, see “Using the Job Log” on
page 4-35.
4.
Click Print.
5.
If you selected Server in step 2, specify the number of copies to print and click OK.
The page(s) are printed to the E-810.
If you selected Local Printer in step 2, choose the desired printer in the Print dialog
box, specify the number of copies to print, and click OK.
The Configuration page is printed to the printer you specified.
Server information pages printed with the Print Pages command appear in the E-810
Job Log with a User Name of “Operator” even if you logged in as Administrator.
4
4-8
Managing Print Jobs
Workflow scenarios
The workflow at your site will depend on the number and complexity of jobs and the
amount of responsibility given to the operator. This section suggests some ways you
might interact with a job.
Scenario 1 At this site, the Print queue is enabled, and anyone at Command
WorkStation can view the progress of jobs. A small job is sent to a server and copier
that are not busy. You watch the job progress from the top to the bottom of the Queues
window.
The green light on the E-810 flashes, the network icon blinks; on Command
WorkStation the Spool status bar is animated and the job title appears. As soon as
spooling has finished, the Spool status bar is cleared and the RIP status bar animates.
Almost immediately thereafter, the RIP status bar is cleared and the Print status bar
animates. The printed job is listed below the Print status bar and the job pages emerge
from the copier.
Scenario 2 At this site, all jobs come to the Hold queue and therefore require
operator intervention to proceed.
Again, the green light on the E-810 flashes, the network icon blinks, the Spool status
bar is animated, and now in the Spool area (below the status bar) the job title comes
into view. In a few moments the job is on the list, and you have time to scan the
headings for the job ticket information—media type, special instructions, copies, and
pages.
Are you ready for this job to print? Do other jobs have priority? What is the job for—
is it final output or a test print? The first choice is whether to put the job in the print
queue or hold it before processing it further. If you do nothing, the job remains in the
Spool area, and the file remains on the server disk.
4
4-9
Printing server information pages
Perhaps this is a routine job and does not call for special handling. You right-click the
job and choose Print. You notice the RIP status bar animate, and almost immediately,
the Print status bar animates. The printed job is listed below the Print status bar and
the job pages emerge from the copier.
The next job is a large job that you have not seen before. The Instructions field
indicates the originator of the job wants to check one printout of the job before you
print another 50 copies. You make sure the Copies field is set to 1, right-click the job,
and choose Print and Hold.
The RIP status bar animates and displays the job title, the Print status bar animates,
and Copy 1 of the job emerges from the copier. You call the sender of the job for
approval. When the job is approved, you set the number of copies to 50, right-click
the job now being held in the RIP area, and choose Print.
Scenario 3 Everyone has discovered the copier on the network and jobs are coming in
rapidly. You right-click several routine jobs in the Spool area and choose Print to let the
server print them one after the other. You choose Print and Hold if you know you will
be reprinting the job soon. You remove printed jobs from the output trays and
replenish media.
While some jobs are flowing through the queues and printing, you are preparing for
jobs that require more attention, such as obtaining special paper, using DocBuilder Pro
to merge two documents, or notifying the originator of a job that a PostScript error
occurred.
Before you load special paper, you make sure all pending jobs are in holding areas.
When an especially important job is spooled for RIPping, you right-click Process Next.
N OTE : If a job that contains different page sizes is printed, be sure to restart the E-810
using the Reboot command from the Control Panel.
4
4-10
Managing Print Jobs
Using the copier
If you have a copier job that has priority over the spooled incoming print jobs you can
temporarily close the E-810 connection to the copier and then reopen it when you
have finished copying.
When there are no active printing jobs competing for the copier engine (no white job
lines in the Spool or RIP area), you do not need to suspend printing to make copies.
TO
ASSIGN THE COPIER TOP PRIORITY AND LATER RESTORE
1.
E-810
PRIORITY
From the Server menu, choose Suspend Printing, press the F5 key, or right-click the
Print status bar and choose Suspend Printing.
This suspends printing temporarily. Jobs continue to spool and RIP on the server as
long as disk space and RAM are available.
2.
When you have finished with the copier job, choose Resume Printing from the Server
menu, press the F6 key, or right-click the Print status bar and choose Resume Printing.
The printing connection between the E-810 and the copier is reopened and printing
resumes.
4
4-11
Canceling jobs
Canceling jobs
You may need to cancel a job after it has been routed for processing or printing. You
can cancel a job only while it is being RIPped or while it is being printed. You cannot
cancel a waiting job (white job row) that is routed for RIPping or printing.
• Canceling jobs during processing—While a job is being RIPped, and its name
appears in the RIP status bar, choose the Cancel RIPping command from the Server
menu, press the F7 key, or right-click on the RIP status bar and choose Cancel
RIPping.
When the RIP job is canceled, the Canceling message appears on the E-810 Control
Panel. The name of the canceled job appears in the Job Log.
• Canceling jobs during printing—While a job is printing, and its name appears in
the Print status bar, choose the Cancel Printing command from the Server menu,
press the F8 key, or right-click on the Print status bar and choose Cancel Printing.
When the print job is canceled, Canceling appears on the E-810 Control Panel.The
name of the canceled job appears in the Job Log.
N OTE : Canceled jobs may be partially printed, and may include pages with one or more
missing color planes, or pages that are completely blank.
• Canceling at the Control Panel—If you are at the E-810, the most direct way to
cancel a job is to press the top button on the server Control Panel while you can read
the name of the job that is processing or printing. For more information on the
Control Panel, see Chapter 1.
4
4-12
Managing Print Jobs
Page-level operations of Command WorkStation
Page-level operations include generating thumbnail images, adding pages, deleting
pages, duplicating pages, reordering pages, and adding blank pages.
Previewing print jobs
You can use the Thumbnail A window to preview pages of the currently RIPping job.
You can also use Thumbnail A, as well as Thumbnail B, to preview any held PostScript
or PDF job in the Spool area; or any held PostScript or raster data job in the RIP area.
The thumbnail windows also allow you to open an thumbnail view of a held PostScript
or PDF job in the Spool area, or any held PostScript or raster data job in the RIP area
and perform electronic collation or document merging. This feature, called
DocBuilder Pro, is described on page 4-15.
N OTE : In order to open the thumbnail windows for jobs in the Spool area, the jobs
must first be converted to PDF files. In addition, the Adobe Acrobat application
(included with DocBuilder Pro) is required to view the job. When you select a job in
the Spool area and choose Thumbnail A or Thumbnail B, the Adobe Acrobat Distiller
application starts, and the conversion process occurs automatically; wait a few
moments as Command WorkStation prepares and then opens the job for viewing.
Thumbnail generation
If your held PDF job in the Spool area already holds thumbnail data, you can open it
in the Thumbnail A or B windows without modifying the temporary file; otherwise,
DocBuilder Pro generates thumbnail images and adds them to the temporary file.
Because the generation of thumbnails may take a few moments, DocBuilder Pro
prompts you to permit or deny this action.
When you close the window, you are prompted to save or discard thumbnail data. To
avoid modifying your original PostScript or PDF data, you can discard newly
generated thumbnail data. However, in most cases, thumbnail data is worth keeping as
it takes up very little space and saves you the time required to generate it again.
4
4-13
Page-level operations of Command WorkStation
Another way to maintain an unmodified copy of the original spool file is to save the
job under a new name immediately upon opening it in Command WorkStation;
this action discards any newly generated thumbnail data.
Previewing the currently rasterizing job
To see the progress of jobs as they are RIPped, you can leave the Thumbnail A
window open in RIP Preview mode.
TO
VIEW THUMBNAILS OF THE CURRENTLY
RIP PING
FILE
1.
Click the Thumbnail A tab at the right of the Queues window to open the slider.
2.
Click the RIP preview icon at the left side of the window.
In this mode, Thumbnail A displays each page of the currently processing job after it
has been RIPped.
Click to display the
currently rasterizing job
Click to close the
thumbnail window
3.
Choose a PostScript file in the Spool or Print area and select RIP and Hold, Print,
or Print and Hold.
As pages are RIPped, they are displayed in the Thumbnail A window.
4.
When you have finished viewing, click the Thumbnail A tab to close the
thumbnail window.
4
4-14
TO
Managing Print Jobs
VIEW THUMBNAILS OF ANY
DATA FILE
P OST S CRIPT , PDF,
OR RASTER
1.
Select any PostScript or PDF job in the Spool area, or select any PostScript, PDF, or
raster data job in the RIP area.
2.
Choose Thumbnail A or Thumbnail B from the Job menu.
If you choose Thumbnail A, make sure the raster data preview icon (at the left side of
the window) is selected.
If you choose a job in the Spool area, Adobe Acrobat automatically starts in the
background, enabling you to view the job.
N OTE : Wait until all pages have been displayed before opening another PostScript,
PDF, or raster file with Thumbnail A. If the job contains many pages, it may take some
time for the entire job to be displayed.
Raster data preview icon
Click to close the
thumbnail window
3.
When you have finished viewing, click the Thumbnail A or Thumbnail B tab to
close the thumbnail window.
4
4-15
Page-level operations of Command WorkStation
Merging PostScript and raster files with DocBuilder Pro
The ability to work with PostScript and raster files gives you new opportunities to
combine documents from different sources into a single file. For example, you can
combine full color covers and chapter head pages created in a page layout application
with two-color text pages created in a document processing application. You can also
customize a slide presentation by inserting slides from a different presentation.
You can display two PostScript or raster files at once: a source file and a target file. The
target file is displayed in the Thumbnail A window, the source in Thumbnail B. Both
files must be of the same data type, that is, held PostScript or raster data jobs, and both
must be located in the same area (Spool or RIP). You cannot merge a PostScript job
from Thumbnail B with a raster job in Thumbnail A.
N OTE : You cannot create a new PostScript file in this process; you must print the
merged file, which has references to the original PostScript files. Before editing or
merging raster files with DocBuilder Pro, make sure the source files were RIPped using
the print option settings and the resident calibration you want for the final output.
Raster files edited with DocBuilder Pro cannot be reRIPped, and only the number of
copies may be changed.
Page manipulations
Page-level manipulations in the Thumbnail A window (adding pages, deleting pages,
reordering pages, or inserting blank pages) modify the temporary PDF file. If you do
not want to modify the original PDF spool file, you must save the job under a different
name or discard the changes. The Thumbnail B window is read-only—you cannot
make content changes to it.
4
4-16
TO
Managing Print Jobs
VIEW AND EDIT
DATA JOBS
1.
P OST S CRIPT , PDF,
OR RASTER
Select a PostScript, PDF, or raster data job and choose Thumbnail A from the
Job menu.
The file must be a held PostScript or PDF job in the Spool area, or a held PostScript,
PDF, or raster data job in the RIP area.
2.
In the Thumbnail A window, right-click a thumbnail image to see the commands
available for pages in Thumbnail A.
These commands can also be accessed from the Page menu (see page 3-12), as well as
from buttons along the left side of the Thumbnail A window (see illustrations below).
To scroll through the pages in Thumbnail A, drag the slider bar at the bottom of the
screen, click the empty area to the left or right of the slider bar, or click the arrows.
The illustration below shows a job from the Spool area.
Click to open a full-screen
preview of the page
Click to duplicate a page
Click to delete a page
Preview—Opens a full-screen preview of the currently selected page
(see “Full-screen previews” on page 3-46).
Duplicate—Duplicates the currently selected page(s).
4
4-17
Page-level operations of Command WorkStation
Delete—Deletes the currently selected page(s).
Insert blank page—Inserts a blank page after the currently selected page(s).
The illustration below shows a job from the RIP area.
Click to open a full-screen
preview of the page
Click to duplicate a page
Click to delete a page
Delete—Deletes the currently selected page(s).
Duplicate—Duplicates the currently selected page(s).
Preview—Opens a full-screen preview of the currently selected page
(see “Full-screen previews” on page 3-46).
3.
To move pages within Thumbnail A, left-click to select the page(s) and hold down the
mouse button as you drag the selected page(s) to the new location.
Shift-click to select multiple, sequential pages; Ctrl-click to select multiple,
non-sequential pages.
If you move the page(s) on top of existing page(s), the page(s) will be overwritten.
4
4-18
Managing Print Jobs
If the icon does not have an arrow, the page(s) will be replaced; if the icon has an arrow,
the page(s) will be inserted.
…
Replace single page
Replace multiple pages
…
Move single page
between two pages
Move multiple pages
between two pages
…
Move single page
before first page
Move multiple pages
before first page
…
Move single page
after last page
4.
Move multiple pages
after last page
When you are finished editing, click the Thumbnail A tab.
If you have edited the job, you are prompted to save the job. Click Yes and enter a
new name.
5.
Enter a new name and click OK.
Depending on the location of the original files, the new file is now located in the Spool
or the RIP area, ready to print. If you saved the edited file with a new name, the
original source file remains held in the Spool or the RIP area.
4
4-19
TO
Page-level operations of Command WorkStation
MERGE TWO
1.
P OST S CRIPT , PDF,
OR RASTER DATA JOBS
In the Thumbnail A window, display the document you want to edit.
The file must be a held PostScript or PDF job in the Spool area, or a held PostScript,
PDF, or raster data job in the RIP area.
2.
Right-click another like-data source document file from the same area (a held job with
a raster icon) and select Thumbnail B.
The Thumbnail B tab opens a second thumbnail view which cannot be edited but can
be a source for pages added to the document in Thumbnail A.
N OTE : To merge documents, the page sizes of the source document and the target
document must be the same, the jobs must both be located in the same area (Spool or
RIP), and the jobs must be of like data type (that is, both are PostScript, or both are
raster jobs).
3.
In the Thumbnail B window, left-click to select the page(s) and hold down the mouse
button as you drag the selected page(s) to the new location in Thumbnail A.
Shift-click to select multiple, sequential pages; Ctrl-click to select multiple,
non-sequential pages.
To scroll through the pages in Thumbnail A and Thumbnail B, you can drag the slider
bar at the bottom of the screen, click in the empty area to the left or right of the slider
bar, or click on the arrows.
4
4-20
Managing Print Jobs
To replace page(s), drag Thumbnail B page(s) on top of page(s) in Thumbnail A; to
add page(s), drag the page(s) to a new position between pages, before the first page, or
after the last page in Thumbnail A.
+
+…+
Replace single page
Replace multiple pages
+
+…+
Move single page
between two pages
Move multiple pages
between two pages
+
+…+
Move single page
before first page
Move multiple pages
before first page
+
+…+
Move single page
after last page
Move multiple pages
after last page
N OTE : To insert a Thumbnail B page directly after the last Thumbnail A page, drag the
Thumbnail B page so that it is just to the right of the last Thumbnail A page and
shows an arrow pointing to the right. If the Thumbnail B page is placed too far to the
right of the last Thumbnail A page, the Thumbnail B page will replace the last
Thumbnail A page.
4
4-21
Page-level operations of Command WorkStation
Thumbnail B
Page 4 copied from the
document in Thumbnail B
Multiple undos are available; use Ctrl-Z or the Undo command to undo all the way
back to your first edit. There is no Redo function.
N OTE : Make sure to save the merged job before deleting any of the jobs you used to
create the merged job.
Thumbnail B pages moved into Thumbnail A adopt some specific attributes of the
Thumbnail A job, such as the document and user name. However, many color-related
print options that are set in the Thumbnail B page, such as CMYK Simulation and
Rendering Style, remain with the specific page. This could result in a merged job being
made up of pages with different attributes.
4
4-22
Managing Print Jobs
Generally, the print option settings specified for the Thumbnail A job that are adopted
by the pages copied from Thumbnail B do not require reRIPping to take effect. The
one exception is the setting specified for the Save Fast Reprint option, which requires
reRIPping if you want to change it.
The print option settings that remain with the pages copied from Thumbnail B into
Thumbnail A are generally those that do require reRIPing to take effect.
Attributes that do not require reRIPping can be changed for the newly merged job
without having to reRIP any original PostScript files. Attributes that require reRIPping
result in reRIPping of the original PostScript file(s) associated with Thumbnail A.
4.
To close the Thumbnail view, click once on the same tab you used to open it
(Thumbnail A or Thumbnail B tab).
5.
If you have edited Thumbnail A, you are prompted to save the job (click Yes) and
enter a new name. Enter a new name and click OK.
Depending on the location of the original files, the new PostScript or raster file is now
in the Spool or the RIP area, ready to print, together with the original source and
target files.
Since you cannot create a new PostScript file by merging two jobs, you must print the
merged file, which has references to the original PostScript files. If a merged job is
reRIPped and printed, then only the pages of the original PostScript job in Thumbnail
A will be processed and printed.
N OTE : In cases where multiple users are connected to the E-810 via Command
WorkStation, Fiery WebSpooler, or Fiery Spooler, and one user makes changes to a
Thumbnail A job, not all users may see the results of those changes. If you are unable
to view changes in a job, or if selecting a Thumbnail window results in a message
indicating zero pages, then close and relaunch Command WorkStation, Fiery
WebSpooler, or Fiery Spooler.
Viewing and overriding print settings
When logged in as Operator or Administrator at Command WorkStation, you can
view, override user job settings of, and print any job in the Queues window and view
job settings for jobs in the Archive and FreeForm windows. Using the Properties dialog
box, you can view and override job settings for a single job or for multiple jobs at once.
When viewing multiple jobs, you can override settings for each job independently or
override a setting for all the jobs at once.
4
4-23
Viewing and overriding print settings
• To view the properties for a single job, double-click the job line or select the job and
choose Properties from the Job menu or right-mouse menu.
• To view the properties for multiple jobs at once, Shift-click to select contiguous jobs,
or Ctrl-click to select non-contiguous jobs, and choose Properties from the Job
menu or right mouse menu.
N OTE : To retain a copy of the job with its original settings, duplicate the job and
rename the duplicate before you change any settings (see “Job commands” on
page 3-24).
To override a setting for a single job, right-click the current setting and choose the
override setting from the pop-up list.
N OTE : For some options, changing the setting requires that the job be reRIPped;
these options show an icon to the left of the option name.
To override settings for all jobs listed in the Properties dialog box, right-click the name
of the print option (the row header) at the left of the dialog box and choose the
override setting from the pop-up menu.
Re-RIP icon
4
4-24
Managing Print Jobs
The Properties dialog box displays all the job settings encoded by the PostScript printer
driver that can be decoded by the E-810. If you (as operator) have not changed
anything, these are the settings a user entered before sending the job. There is one
exception to this: Page Range.
For jobs from the Spool area that have been viewed and edited in the Thumbnail
windows or PDF files printed using Fiery Downloader, you cannot override the
following print options:
• Remove White PPT Background
• Spot Color Matching
N OTE : Some print options that are available in the printer driver are not displayed in
the Properties dialog box. For information on specific print options and settings, and
where they can be set, see Appendix A of the Printing Guide.
When the Properties dialog box opens, the page range is always shown as All pages and
the scale is always shown as 100%. All pages denotes all the pages specified by the user
in printing the job; it may not include all the pages in the original document on the
user’s disk. Similarly, 100% scale indicates 100% of the magnification specified by the
user.
The Properties dialog box does display all the remaining user settings, including user
Instructions and Notes fields.
• Instructions fields are intended to be viewed and annotated by the operator, but
their contents are associated with the job and are deleted when the job is deleted
after printing.
• Notes fields can be viewed but cannot be changed by the operator; their contents are
transcribed to the Job Log just as the user sent them.
Printing variable data documents (FreeForm)
The ability to override job settings is especially important for variable data printing
with FreeForm. As described on page 3-33, the E-810 can store up to 100 FreeForm
Masters; however, users are limited to a range of 1 to 15 as values they can specify for
the Create Master and Use Master print options. In order to make use of all 100
available FreeForm Masters, the operator must override the Create Master and Use
Master job settings from the Properties dialog box on Command WorkStation.
4
4-25
TO
Downloading files and fonts
PRINT A VARIABLE DATA DOCUMENT
1.
Right-click to select the job comprising the variable elements of the document and
choose Properties.
See page 4-22 for details.
2.
Scroll to find the FreeForm section in the Properties dialog box and right-click the Use
Master print option.
3.
Choose the number of the FreeForm master job that you want to use as the master
document.
See page 3-33 for information on FreeForm masters.
4.
Click OK.
5.
Assign the job a destination of RIP and Hold, Print, or Print and Hold.
Particularly with a variable data job, you may want to RIP and Hold the job so that
you can preview it before printing.
For more information on using FreeForm features, see the Printing Guide.
Downloading files and fonts
From Command WorkStation, you can download a variety of file types, as well as
fonts, to the E-810. These files and fonts can be located anywhere on the network or
on an external device connected to the Command WorkStation computer. You browse
to locate the files and fonts, select them, and add them to a list of items to be
downloaded. You can specify a limited number of print option settings for files that
you download (see page 4-27).
To download fonts, you must use the Direct connection. If the Direct connection is
not currently published in Setup, see the Configuration Guide for instructions on how
to publish it.
N OTE : You cannot download TrueType fonts. If you use TrueType fonts in Windows,
you can print them by converting them to Adobe Type 1 fonts. To do this with
the PostScript printer driver on Windows 98/Me, click the Fonts tab in the
Properties dialog box and set up the Font Substitution Table, as necessary. For
Windows NT 4.0, click the PostScript tab of the E-810 Properties dialog box and
4
4-26
Managing Print Jobs
select TrueType fonts>TrueType fonts setting>Download Softfont. For Windows
2000, click the Advanced tab of the E-810 Printing Preferences dialog box and select
Graphic>TrueType Font>Download as Softfont.
Manage Fonts in the Server menu provides another way to download fonts to the
E-810 (see page 4-28).
TO
DOWNLOAD FILES OR FONTS
1.
Choose Download from the Job menu, or right-click on the Spool status bar and
select Download.
The main Fiery Downloader window appears.
For fonts, choose
Direct connection
2.
In the Files of type pop-up menu, choose the file types to display.
You can leave this at the default All Known Formats or choose All Files.
All Known Formats lists all files in supported formats; All Files lists all files.
4
4-27
3.
Downloading files and fonts
In the Queue pop-up menu, choose the queue to which you will download the files.
The options available in this menu depend on the print connections currently enabled
in Setup. The potential choices are Direct Connection, Hold Queue, or Print Queue.
If your administrator has not enabled one or more of these connections, you cannot
choose it.
To download fonts, you must choose Direct Connection.
PDF files are always spooled to the E-810 hard disk before being printed. PDF files
must be sent to the Print queue (or to the Hold queue if the Print queue is not
enabled). Do not choose Direct Connection to download PDF files.
4.
In the Look in pop-up menu, browse to the file(s) you want to download.
5.
Select the filename and click Add.
The Filename field displays the name of the selected file before you click Add.
You can navigate to different drives and folders to select files and fonts to download.
To select multiple sequential files, select the first file and then Shift-click the last file.
Ctrl-click to select multiple non-sequential files.
If you change your mind about a file, select the filename in the Files to be downloaded
list and click Remove.
6.
To change the attributes of a file, select it from the “Files to be Downloaded” list
and click Options.
The Options dialog box for PostScript and EPS files is different from that for PDF
files, as explained below.
PostScript options
7.
PDF options
Specify the following information in the dialog box and click OK.
4
4-28
Managing Print Jobs
The options you set apply only to the selected file. You can set different options, or
leave the default settings, for each file.
Copies—Specify the number of copies.
Brightness (PostScript and EPS files only)—Change the Brightness setting if a file
appears to be too dark or too light. Choose 85% for a substantially lighter image,
115% for a substantially darker image, or one of the options in between.
N OTE : Some applications, including Adobe Photoshop, provide transfer functions that
let you specify density settings for an image. If the file you are printing includes
transfer functions, the Brightness option has no effect. For more information on using
transfer functions, see the documentation for your application.
‘showpage’ (after EPS files)—In most cases, you do not need to use this option. Select
the ‘showpage’ (after EPS files) option only if an EPS file fails to print without it. This
option adds a ‘showpage’ PostScript language command at the end of the print job.
Some applications omit this necessary PostScript language command when they
generate EPS files. Select this option when printing EPS files generated by these
applications. If you select this option unnecessarily, extra blank pages may print.
If you experience problems downloading EPS files, you can print the file directly from
the application in which you created it.
Page Range (PDF files only)—Specify the page range you want to print.
8.
Click Download.
To cancel downloading, click Cancel or press the <Esc> key.
Managing server fonts
The E-810 includes a number of built-in printer fonts. You can download additional
fonts to the E-810 by choosing Manage Fonts in the Server menu (see below), or the
Download command (see page 4-25). Users on the network can also download fonts
to the server using Fiery Downloader (see the Printing Guide). Downloading fonts,
from either Command WorkStation or Fiery Downloader requires that you publish the
Direct connection in Setup (see the Configuration Guide).
N OTE : Manage Fonts is available only if you logged in as Administrator.
4
4-29
Downloading files and fonts
Although no special privileges are necessary to download fonts, Administrator
privileges are required to remove fonts from the server. The built-in printer fonts are
locked and cannot be removed by anyone.
To print a list of fonts currently resident on the E-810, use the Print Pages command
(see page 4-6).
TO
MANAGE FONTS
1.
Choose Manage Fonts from the Server menu.
The Server Fonts window displays Add, Delete, Update, and Print buttons.
Click to update the font list display
Locked fonts
Click to download additional fonts
Click to delete font(s)
Downloaded fonts
Click to print the font list
2.
To download additional fonts to the E-810, click Add and follow the instructions on
page 4-25.
3.
To delete a font, select it in the font list and click Delete. Shift-click or Ctrl-click to
select multiple fonts.
N OTE : The printer fonts included with the E-810 (built-in fonts) are locked. These
fonts appear with a lock icon next to the name and cannot be deleted.
4.
To refresh the font list display, click Update.
5.
To print the font list, click Print.
4
4-30
Managing Print Jobs
Managing jobs with multiple color servers
You can connect to up to five E-810 color servers simultaneously from Command
WorkStation. This allows you to view and manage jobs being processed by multiple
servers from a single location, and also to balance the job load between servers of
similar capabilities.
• If you connect to multiple servers from Command WorkStation, you can easily
switch between them by clicking the server selection tabs (see page 3-13).
• With E-810 color servers that support the feature, you can use the Send
to <Nickname_Devicename> command to transfer jobs between color servers (see
page 3-26).
TO
VIEW AND MANAGE JOBS ON MORE THAN ONE COLOR SERVER
1.
Configure the connection to the first server and log in.
For information on configuring the connection to the server, see Getting Started.
2.
Click a blank server selection tab.
3.
Configure the connection to the next server and log in.
The Command WorkStation windows show the job lists for the additional server. You
can route and manage the jobs processed by this server as long as you are logged in.
4.
To switch servers, simply click the other server selection tab.
Once you have logged in, you do not need to log in again unless you have logged out.
If the servers are extremely busy with continuous jobs, you may see some delay in
updating the Command WorkStation window when you switch between servers. Job
lists may be blank for some seconds until updating is complete.
4
4-31
TO
Archiving jobs
TRANSFER JOBS BETWEEN COLOR SERVERS
1.
Log in to more than one color server, as described above.
To transfer jobs between color servers, both color servers must support the Send
to <Nickname_Devicename> command.
2.
In the Queues window of the source color server, select the job(s) you want to
transfer.
You can select any held jobs in the Spool or RIP areas.
3.
Choose the Send to <Nickname_Devicename> command from the Job menu.
The actual command contains the name of the other color server currently connected
to Command WorkStation; for example, Send to Aero_r7. If two or more additional
color servers (in addition to the originating server) are connected to Command
WorkStation, multiple Send to <Nickname_Devicename> commands appear in the
Job menu.
Jobs are transferred from the source server to the same area on the target server (from
Spool to Spool, from RIP to RIP).
N OTE : You cannot perform any other Command WorkStation functions while files are
being transferred between servers.
4.
After verifying that the jobs were successfully transferred, you can delete them from
the originating server, if you wish.
Archiving jobs
PostScript and raster data jobs can be archived internally to the E-810 hard disk or the
ZIP drive, or externally to the Command WorkStation hard disk or network drives.
TO
ARCHIVE A
P OST S CRIPT
OR RASTER JOB
1.
In the Queues window, select any held job in the Spool or RIP areas.
2.
Choose Archive from the Job menu.
4
4-32
3.
Managing Print Jobs
To archive the job(s) internally to the E-810 hard disk or to the ZIP drive, click OK.
The job(s) are archived internally.
4.
To archive the job(s) externally to the Command WorkStation hard disk or to a device
on the network, click Add.
Click to add a device
5.
Browse to the device and folder to which you want to archive the job(s) and click OK.
The Archive Options dialog box shows external devices as available archive volumes.
4
4-33
6.
Archiving jobs
If applicable, select Archive rasters.
The Archive rasters option is dimmed for PostScript data jobs and for jobs being
archived to Server Internal.
N OTE : Raster data files may be large and therefore may take considerable time to
archive.
7.
Select an archive volume and click OK.
To retrieve jobs archived to external devices, use the Import command.
You can copy or move the archived job to your choice of destinations by right-clicking
the selected job in the Archive window and selecting Move To or Copy To.
N OTE : You cannot select the E-810 as the archive destination. Additionally, if you
archived the job by selecting Server Internal, you cannot copy or move the archived
job.
4
4-34
Managing Print Jobs
Importing archived jobs from external media
You can use Import to find and retrieve jobs previously archived to external devices.
This command can be used to retrieve files archived from the current E-810 or from
another E-810 that supports external archiving.
TO
IMPORT AN ARCHIVED JOB FROM AN EXTERNAL DEVICE
1.
Choose Import from the Job menu in the Queues window, or right-click the
Spool status bar and choose Import.
2.
Select the device containing the job(s) you want to import.
Click Add to import files from other archived volumes.
3.
Click OK.
The job is imported to the same area in the Queues window (Spool or RIP) from
which it was archived.
4
4-35
Archiving jobs
Using the Job Log
Chapter 3 introduced the Job Log, which is the list of all processed and printed jobs,
including the date and time they were printed, and all the characteristics of the job. It
explained that the Administrator can set Job Log preferences for clearing and printing
the Job Log automatically, and for Job Log page size (page 3-35).
If you want to view the Job Log in a specific application, you can specify one in the
Preferences dialog box (see page 4-5); then select View in Helper App from the
Window menu.
After displaying the Job Log you can print it (use the Print Pages dialog box or choose
Print from the Window menu), or export it to a tab-delimited text file (choose Export
from the Window menu). The exported Job Log file can be imported into a
spreadsheet, database, or word processing application for job management purposes. If
you used the Filter command to display only a portion of the Job Log (such as jobs for
the current day), only that portion of the Job Log is printed or exported.
To update the Job Log, choose Refresh from the Window menu.
After printing or exporting the entire Job Log, you may want to clear it; choose Clear
Job Log from the Server menu.
The Job Log window displays a list of all the jobs and the following information about
them: status, document name, user, date, start time, end time, process time, page
description language, size, device, page size, media, number of originals, number of
color pages, number of black-and-white pages, and total number of pages. Information
in the Notes 1 and Notes 2 fields is displayed if users entered this information when
they printed.
4
4-36
Managing Print Jobs
N OTE : The Notes fields are supported only for jobs printed with the Adobe PostScript
printer drivers provided on the User Software CD. They are not supported for jobs
printed from Windows 2000.
N OTE : If a PostScript or raster job was saved in DocBuilder Pro with a new name and
then printed, it appears in the Job Log with the name of the original job, not the new
name you specified for the edited job.
The text in the Status column provides information about the job:
OK
The job printed normally.
Cancel
The job was canceled before printing was completed.
Error
An error occurred during processing or printing.
Use the scroll bar at the bottom of the window to view all the fields in the
Job Log window.
4
4-37
Align Paper Trays
Align Paper Trays
The Align Paper Trays command allows you to adjust the placement of text and images
on the page so that they are correctly aligned on the sheet of paper or so that both sides
of a duplex sheet have the exact same alignment.
N OTE : You can also perform tray alignment from the Functions menu on the E-810
Control Panel.
TO
ALIGN TEXT AND IMAGES FOR PRINTING :
1.
Select a job in the Command WorkStation window.
2.
Right-click the job and select Properties from the right-mouse menu.
3.
Set the Tray Alignment option to Enable.
4.
Choose Align Paper Trays from the Server menu.
5.
Select the tray you want to align from the Tray pull-down menu.
4
4-38
6.
Managing Print Jobs
Select the paper size that is loaded in the selected tray from the Paper Size
pop-up menu.
N OTE : The Align Paper Trays option is specific to the combination of tray and paper
size selected. If you align Tray 1 with Letter paper, then load Legal paper in Tray 1, the
alignment will be invalid. You must perform tray alignment for each combination of
tray and paper size.
7.
In the Print alignment page section, select the Print Duplex option to print a
duplex page or clear the option to print a simplex page.
8.
Click the Print button to print the alignment page.
9.
Once the page has printed, follow the instructions on the alignment page.
10.
Fold the page in half horizontally, unfold it, and fold it in half vertically. When you
unfold the sheet again, you will see that the fold lines cross three scales on three
sides of the page. Determine the number where the fold line crosses each scale.
11.
In the Enter alignment values fields, type in the value where the fold crosses each of
the three scales, marked A, B, and C, for Side 1. If you choose to align for duplex
printing, enter the values for the three scales on Side 2 of the page, as well.
N OTE : If you enter different values in A and C, the image will rotate, leading to
obvious, jagged (rough, uneven edges) areas on printed output. If this occurs, enter the
same value in A and C.
4
4-39
Other server management commands
Other server management commands
These additional Server menu commands are used to manage server performance,
configuration, and status. Some of these commands are available only when logged in
as Administrator:
• Manage Fonts—Allows you to delete fonts from, as well as add fonts to,
the E-810 (see page 4-28).
• Manage Color—Starts ColorWise Pro Tools (see the Color Guide).
• Clear Job Log—Clears the Job Log only.
• Reboot—Restarts the E-810, just as if you had selected Restart Server from the
Shut Down menu on the Control Panel (see page 1-6).
• Clear—Clears all jobs in all server queues as well as all jobs archived on the E-810
hard disk, the index of archived jobs (in the Archive window), all FreeForm masters,
the index of FreeForm masters (in the FreeForm windows), and the Job Log
• Setup—Invokes Fiery Setup (see the Configuration Guide).
• Log out—Closes the connection to the E-810.
5
5-1
Main window
Imposition is a special feature of DocBuilder Pro. This chapter describes the graphical
user interface for imposition functions. For background information on imposition
and its uses, see Appendix A.
Chapter 5:
Using
Imposition
Main window
From the Imposition main window, you can impose the pages of a document in an
order and positioning suitable for printing and binding. If you are connected to more
than one E-810 at once, you can access the Imposition feature from one E-810 only.
N OTE : The Imposition main window is referred to as the “main window” from now on.
TO
OPEN A JOB IN THE MAIN WINDOW
•
Send the job you want impose to the Hold queue or move it to the Spool area using
Command WorkStation.
For more information on sending jobs to the E-810, see the Printing Guide.
For information on using the Command WorkStation, see Chapter 3.
•
Before imposing a job, make sure to have the Adobe Type Manager installed on your
computer.
After installation, copy the Type_1 folder and the TrueType folder from the Adobe
Type Manager CD to the Psfonts folder installed on your Windows computer, and
then specify the PSfonts folder in the Font Locations window of Adobe Acrobat
Distiller. Choose Font Locations from the Settings Menu and select the folder.
•
We recommend you set the following print options to the settings below before you
impose any job:
• Page Order set to Reverse
• Rotate 180 set to No
•
Select any held job in the Spool area and choose Impose from the Job menu. Or you
can right-click the job and choose Impose from the right-mouse menu.
You can open a PostScript or PDF file, but it must be held in the Spool area.
5
5-2
Using Imposition
N OTE : If you have installed DocBuilder Pro as an optional kit, you will also need to
install a dongle on your workstation. If the dongle is not attached, you will see an error
message. For more information, contact your authorized service/support technician.
When you choose the Impose command, a page-imaging process is invoked that
generates a PDF version of the job on which DocBuilder Pro will perform imposition.
A status window is displayed while the job is imaged for the main window.
5
5-3
Job previews
When it opens, the main window displays the job imposed using a default layout, or
the layout that was last associated with the job (if the job has been previously
imposed). Templates for common layouts are provided and can be invoked from the
main window, as described in “Using templates” on page 5-8.
Job previews
The main window provides a preview of a job’s pages before the job is RIPped,
allowing you to manipulate the source PDF before rasterizing the job.
Pages appear as a printer’s spread; that is, they appear in the order in which they are
printed as an imposed job. In contrast, a reader’s spread shows pages in the order they
are intended to be read. You are already familiar with such a view—the Thumbnail A
and Thumbnail B windows image jobs as reader’s spreads.
Printer’s spread
Reader’s spread
5
5-4
Using Imposition
Navigating in the main window
You can use the icons and menus at the top and bottom of the main window to:
• Switch from Preview mode (thumbnails of actual content) to Layout mode
(page numbers only).
• Zoom in and out.
• Drag the job preview around to make a particular page or sheet visible.
• Go directly to a particular page or sheet.
The Zoom tool, Pan tool, Preview mode and Layout mode buttons are located in
the upper-right corner of the window.
Pan tool
Zoom tool
Preview mode
Layout mode
Sheet menu
View menu
5
5-5
Job previews
When you position the cursor over the Pan or Zoom tool, a 3-D border surrounds it to
provide the appearance of a raised button. Click once to select the tool. The 3D border
inverts, as if the button has been pressed, indicating that the tool is selected.
When you select the Pan tool or Zoom tool, the appearance of the cursor changes to
indicate that you can now use that tool to manipulate the preview. When you choose
the preview or the Layout mode, a blue border appears around the selected view and
the appearance of the job in the main window changes immediately.
The sheet menu, magnification menu, and scroll bar (shown above) appear at the
bottom of the window. These menus and controls affect the display in the main
window immediately.
Switching between page view and layout view
Use the View mode buttons to switch between a page view and a layout view of
the job.
• Preview mode approximates the appearance of the final printed output very
closely; for this reason, it is sometimes called a WYSIWYG (“what you see is
what you get”) preview.
• Layout mode displays numbered, generic pages that allow you to determine the
location of source document pages in the imposed job; and you can rotate individual
pages or signatures in a layout view.
Different viewing modes may display different sets of printers marks; for more
information, see the table below.
N OTE : The graphically-rich Preview mode puts more stress on your system’s processor
than the relatively lightweight Layout mode. You can improve performance on slower
systems by doing most of your work in Layout mode, switching to Preview mode only
when you actually need to see content.
In Layout mode, you can rotate individual pages on the sheet; for more information,
see “Rotating pages” on page 6-12.
5
5-6
Using Imposition
The following table summarizes the characteristics of the layout and Preview modes:
Feature
Layout mode
Preview mode
Shows page content
No
WYSIWYG content view
Quick redraw on slower computers
Yes
No
Shows printer’s marks
Yes
Yes
Reorder pages
Yes
No
Rotate pages
Yes
No
Define gutter
Yes
No
Setting magnification levels
You can use the Zoom tool to increase or decrease the level of magnification in the
main window from 12% to 800%.
TO
ZOOM IN AND OUT
1.
Click the Zoom tool to select it.
The cursor changes to a magnifying glass when in the preview area of the main
window.
2.
Position the magnifying glass cursor over a page and click to zoom in.
The magnifying glass cursor displays a plus sign (+) to indicate that it increases the
magnification of page views. Each time you click, the current magnification doubles,
up to a maximum of 800%.
3.
Hold the Ctrl key and click with the left-mouse button to zoom out.
Each time you click, the current magnification halves, down to a minimum of 12%.
4.
Click the right-mouse button with either the Zoom tool or the Pan tool to see the
Zoom pop-up menu.
Select Zoom In or Zoom Out from the pop-up menu. Zoom In doubles the current
magnification; Zoom Out halves the current magnification.
5
5-7
Job previews
The View menu at the bottom of the window provides several ways to set the level of
magnification at which DocBuilder Pro displays the contents of the window. The View
menu allows you to choose preset zoom values ranging from 50% to 800%. You can
also choose to make the current preview fit in the window.
• To choose a zoom value, click the View menu and choose a zoom percent.
• To preview the entire sheet, click the View menu and choose Fit Page.
N OTE : The View menu changes only the appearance of pages, not their actual content.
To change the scaling of pages in finished output, change Scaling area settings, as
described on page 6-6.
In addition to preset zoom percents, you can specify a custom zoom value.
TO
SPECIFY A CUSTOM ZOOM VALUE
1.
Click the View menu at the bottom of the main window.
The current zoom value is displayed in the box.
2.
Specify a new zoom value.
You can type a new zoom value in the box or you can select a value from the pop-up
menu.
3.
Click OK or press Enter to confirm the new value.
The window reflects the change immediately.
Viewing the sheets
Use the Pan tool to drag the entire preview around in the window. For example, if you
are working with many pages on a large sheet, you can use this tool to drag a particular
portion of the sheet into view.
5
5-8
TO
Using Imposition
MOVE THE PREVIEW AROUND
1.
Click the Pan tool to select it.
The cursor changes to a hand when in the preview area of the window.
2.
With the Pan tool cursor positioned over a sheet, press and hold the left-mouse button
while moving the mouse.
The page preview moves in the same direction as the cursor. You can repeat this step as
necessary to make a particular portion of the preview visible.
At the bottom of the window, you can manipulate the content view using a standard
scroll bar or the sheet menu. The sheet menu provides the Go To Sheet dialog box,
which allows you to specify numerically the sheet to display in the preview area.
TO
GO DIRECTLY TO A SHEET BY NUMBER
1.
Click the Sheet menu at the bottom of the window.
When the Go To Sheet dialog box appears, the entry box displays the number of the
sheet currently displayed.
2.
Enter the number of the sheet to display.
3.
Click OK or press Enter to go to the specified sheet.
Using templates
A saved group of imposition settings is known as a template. A template saves all
current imposition settings except custom rotations of individual pages on a finished
sheet. You can apply any template to any job, making it easy to apply imposition
settings quickly and efficiently.
5
5-9
Using templates
DocBuilder Pro supplies built-in templates that define settings for commonly-used
layouts, such as 2-up saddle, 3-up trifold brochure, 4-up gatefold, and so on. You can
also create your own templates. For a complete listing of built-in templates, see
Appendix B. For information on creating your own templates, see “Imposition
settings” on page 6-1.
Both built-in templates and your own templates appear in the Template pop-up menu,
which always contains at least one item, the Default Settings template. DocBuilder Pro
applies this template when no other template is saved with a job; for example, the
default template is always applied the first time a job is opened in the main window.
Template pop-up menu
You can apply a template by choosing its name from the Template pop-up menu, in
the top-left corner of the main window. The new settings take effect immediately.
Save template
Delete template
Name of current template
TO
SAVE THE CURRENT SETTINGS AS A TEMPLATE
You can save the current combination of Sheet, Layout, Scaling, and Finishing settings
as a template.
N OTE : The Size setting of the Sheet menu cannot be saved.
1.
Click the save template icon to the right of the Template pop-up menu.
2.
In the dialog box that appears, type a name for the template and click OK or
press Enter.
For more information on creating templates, see “Managing templates” on page 6-14.
5
5-10
Using Imposition
Saving your work
To close the Imposition window, click the close box in the upper-right corner.
TO
SAVE THE IMPOSED JOB
1.
Click the Close box in the upper-right corner of the main window.
Close box
If the job has changed since it was opened in the main window, you are prompted to
save it.
2.
In the Save As dialog box, type a name for the job and its settings.
3.
Click Yes.
N OTE : In the Save As dialog box, the name of the original spooled source file appears
with a new extension (.dbp) as the suggested name. If you mistakenly close the main
window when you intend to keep working, click Cancel in the Save As dialog box. The
original PostScript or PDF remains intact even after the converted file has been edited
and saved in the Imposition window.
For more information on how files are saved to the E-810, see “File management” on
page 6-16.
6
6-1
Chapter 6:
Advanced
Features of
DocBuilder Pro
Imposition settings
This chapter provides information about the advanced features of DocBuilder Pro.
You can use Imposition settings to alter various aspects of a job and to create
custom templates.
Imposition settings
Imposition settings apply only to the job currently displayed in the main window.
Because these settings usually affect the job’s printed layout, they are saved with the job
and used whenever the job is opened. For example, as you open jobs that were saved
with different layouts, you see the display change accordingly. Changes to imposition
settings are applied to the current job immediately, but are not saved permanently until
you save the job itself.
You can specify imposition settings using controls in the settings panel on the left side
of the main window. The settings panel appears the first time you open the main
window, but can also be hidden to make additional space for viewing an imposed job.
To display or hide the settings panel, click the triangle next to the Template pop-up
menu in the upper-left corner of the window.
Click to view or hide
the settings panel
The icons to the right of the Template pop-up menu are also related to imposition
settings; however these icons are always visible in the main window, even if you hide
the settings panel. For information on these icons, see “Managing templates” on
page 6-14.
6
6-2
Advanced Features of DocBuilder Pro
N OTE : You can change the default unit of measure for all input fields in the Preferences
dialog box of Command WorkStation. You can also specify any unit of measure in any
field that accepts input by suffixing one of the following abbreviations to the new
value:
“i”, “in,” or the inch symbol (") specifies inches, for example: 8.5 i, 8.5 in, 8.5"
“mm” specifies millimeters, for example: 8.5 mm
“pt” or “pts” specifies points, for example: 8.5 pts
Sheet area
Sheet settings allow you to specify characteristics of the paper on which the job is to be
printed, such as its dimensions, thickness, orientation, and whether it will be printed
on one or both sides.
Because these settings affect virtually every other aspect of the imposition process, you
should specify sheet settings immediately after opening a job in the main window. If
necessary, you can change the settings later; the job is revised accordingly.
In general, experimentation with job settings does not cause permanent changes (or,
potentially, loss of original job data) until the job is RIPped or saved with the new
settings.
Size
You can select an item in the Size menu to specify the dimensions of the sheet and see
the change reflected in the main window preview immediately. The Size popup menu
includes items representing all page sizes defined by the currently selected print
engine’s PostScript printer description (PPD) file. To choose a custom size, enter the
width and height of the custom page.
6
6-3
Imposition settings
The sheet size setting also defines a sheet orientation; for example, a paper size of
8" x 10" indicates a portrait sheet orientation, while a paper size of 10" x 8" indicates a
landscape sheet orientation. It is not necessary, however, to choose a sheet size based on
the sheet orientation it determines. You can rotate the sheet display in the main
window with the Orientation setting (described below).
N OTE : Sizes with an SEF prefix (for “short edge feed”) also specify a landscape
orientation for the sheet.
Creep Adjustment
You can choose either Plain or Thick from the Creep Adjustment menu to specify the
thickness of the sheet. When saddle stitch binding is specified, DocBuilder Pro uses
this value to compensate automatically for binder’s creep (see “Shingling and creep” on
page A-7).
N OTE : Even if you select Thick from the Creep Adjustment menu, your job will still
print on Plain paper unless you have specified Thick paper in the job properties.
For more information on changing the job properties from Command WorkStation,
see Chapter 3.
Orientation
Choose an item from this menu to specify the orientation of the sheet displayed in the
main window. This setting does not affect the orientation of pages on the sheet (which
is determined by the layout you specify) or the way in which sheets are fed through the
copier. It affects only the angle at which you view sheets in the main window, allowing
for optimal viewing regardless of the sheet size you specify. You can also perform
custom rotations on any page in the main window. For more information, see
“Rotating pages” on page 6-12.
Duplex
You can use the Duplex menu to specify the relationship of content areas on opposing
sides of a sheet. Specify On for duplex (two-sided) printing, Off for simplex (onesided) printing, or Manual for duplex printing using the Manual Feed tray (Bypass
tray). When you choose On, the job is printed as duplex using a Top-Top setting,
meaning that the tops of pages on opposing sides of a sheet are located on the same
edge (usually the preferred choice for imposed book layouts).
6
6-4
Advanced Features of DocBuilder Pro
N OTE : Specifying Manual will automatically switch the Paper Source print option to
Bypass if Bypass size Set at Copier was selected for the original pre-imposed file.
Layout area
A layout is a plan that specifies the number, ordering, and rotation of page images on
the sheet. DocBuilder Pro supports layouts of up to 25 pages per sheet, in a matrix of
up to 5 rows by 5 columns (50 pages duplex). All combinations of rows and columns
allow gang printing; however, only certain layouts in the 5 x 5 matrix support
imposition.
N OTE : If the number of pages in your job does not divide evenly into the number of
rows and columns in the layout you select, you may see some sheets with blank spaces.
The layout you select should correspond to the number of pages in your job.
Rows
Use the Up and Down arrow buttons to the right of the Rows field to specify the
number of rows in a layout. You can also specify the number of rows by typing a value
in the Rows field. Changes to the Rows value are reflected immediately in the main
window, whether you are in Layout or Preview mode.
The Rows value interacts with the Columns and Scaling values. When you choose a
value that causes content to extend beyond the edge of the sheet, DocBuilder Pro
provides a visual warning. For more information, see “Clipping indicators” on
page 6-7.
6
6-5
Imposition settings
Columns
Use the Up and Down Columns arrow buttons to specify the number of columns in a
layout. You can also specify the number of columns in the layout by typing a value in
the Columns field. Changes to the Columns value are reflected immediately in the
main window, whether you are in Layout or Preview mode.
The Columns value interacts with the Rows and Scaling values. When you choose a
value that causes content to extend beyond the edge of the sheet, DocBuilder Pro
provides a visual warning. For more information, see “Clipping indicators” on
page 6-7.
Printer’s marks
Select Printer’s Marks to add trim, fold, and job information to all sheets in a job.
Because the set of marks required varies according to the job, DocBuilder Pro allows
you to define the set of printer’s marks displayed. For example, ganged up business
cards do not require fold marks, while a 4 x 4 book layout requires them. To specify
which marks are shown, choose options in the dialog box that the Define button
displays.
You can enable or disable trim marks, fold marks, and the individual elements of the
job label. The job label stores descriptive text used for the job name, sheet information,
and date and time.
6
6-6
Advanced Features of DocBuilder Pro
Job label
Trim marks
Fold mark
N OTE : Not all layouts will display all of the Printer’s Marks. For example, if the layout
you select does not require that the sheet be folded, fold marks will not be displayed
even if you selected them in the Define Marks dialog box.
Bleeds
Select Bleeds in the Layout area.When bleeds are enabled, marks are repositioned by
the specified bleed amount. Because the bleed amounts required for each job vary,
DocBuilder Pro allows you to specify both the horizontal and vertical bleeds in the
Define Bleeds dialog box.
N OTE : The value entered for bleeds should be greater than 0.02 pt.
Scaling area
You can use the controls in the Scaling area to enlarge or shrink the page by a specified
amount. The values in this area interact with each other based on the specified layout
and page size. When you specify one or more values in the Scaling area, DocBuilder
Pro calculates the others for you.
6
6-7
Imposition settings
For example, when you specify a scaling percentage, DocBuilder Pro calculates the
resulting finished page size and supplies appropriate height and width values in the
Finished area. Conversely, if you specify the height and width of the finished page,
DocBuilder Pro supplies the percentage by which the original page must be scaled to
achieve that result.
Clipping indicators
If you supply scaling values that would cause the page to print past the edge of the
sheet, DocBuilder Pro provides a visual warning. When the window is in Layout
mode, any clipped page edge is highlighted in yellow. When the window is in
Preview mode, the clipping icon appears in the upper-left corner of the Scaling area.
In addition, the appearance of the page preview itself makes scaling problems
obvious—content truncates at the edge of the preview sheet, just as it would on a
printed sheet.
Clipping icon
Clipped page edge
6
6-8
Advanced Features of DocBuilder Pro
Finished height and width
The Finished Height and Width fields display current values for the height and width
of a scaled page. When you enter values for the height or width of the scaled page,
DocBuilder Pro supplies calculated values for scaling, finished height, and finished
width.
Scale to fit
When you select Scale to fit, DocBuilder Pro calculates the page size that fills the sheet
without printing past its edge. DocBuilder Pro fills in the values for scaling, finished
height, and finished width.
Finishing area
In the Finishing area, you can specify the binding method and compensate
automatically for creep according to the grouping of signatures in the job and the way
in which the job is to be bound.
Binding
To enable binding settings and disable gang printing, select Binding. When binding
settings are enabled, you can click the Binding menu to specify Saddle, Perfect, or
Nested Saddle as the binding method. DocBuilder Pro compensates automatically for
binder’s creep according to the specified binding method, the number of sheets in a
group, the layout in use, and the size of the job.
Saddle—a group of folded sheets stitched or stapled on a common, centered fold line.
Saddle-stitched binding is the most common type of binding, and is usually used for
booklets.
Perfect—signatures folded and stacked for binding. The spine edges are trimmed and
glued together.
6
6-9
Imposition settings
Nested Saddle—combination of saddle and perfect binding methods. As with saddle
stitch, pages are grouped together and stapled or stitched across a common center fold.
The saddle groups are then stacked one on top of another and glued as with perfect
binding. When imposing a book for nested saddle binding, you specify the number of
sheets in each saddle; this number is called a group.
N OTE : If you have selected a layout with more than two columns or rows, the Binding
selection will be unavailable. A layout with three or more columns or rows cannot be
bound as a book or booklet because the pages must be cut from the sheet, not simply
folded over.
Groups
You can type a whole number into the “Groups of ” box to specify the number of
signatures gathered together in each saddle when the book is bound. As the number of
signatures in a saddle increases, the effect known as binder’s creep becomes more
prevalent. DocBuilder Pro shifts images on the page to compensate for creep
automatically according to the value in the groups field, the value in the paper
thickness field, the specified binding type and the ordering and orientation of pages
specified by the current layout.
Gang Up
To enable gang printing and disable binding settings, select Gang Up. In gang printing
mode, you place pages on the sheet in an arbitrary order for “collate and cut” finishing,
rather than having DocBuilder Pro impose them in the order required by a particular
binding method.
A collate and cut layout reorders pages in a manner that causes them to fall into easilycollated stacks when the sheets in the job are cut into individual pages. The use of such
a layout may allow multiple small jobs to be printed on a single sheet; thus, gang
printing is commonly used as a means of saving paper when printing small jobs on
imaging devices that use large sheets.
When gang printing is enabled, choose Repeat from the Gang Up menu to repeat the
image of a page until the sheet is filled; for example, when printing both sides of a
sheet, the front side of the first sheet is filled with images of page one, and the back side
6
6-10
Advanced Features of DocBuilder Pro
is filled with images of page two; the front side of the second sheet is filled with images
of page three, and the back side is filled with images of page four; and so on, until all
pages in the job are imaged.
Documents laid out this way may tend to be collated more easily than when printed in
another order. The Repeat option in this menu enables what is commonly known as
“step-and-repeat” printing. Step-and-repeat is most often useful when printing
multiple copies of a single document; for example, when printing business cards, you
would print multiple copies of the same image to fill a larger sheet.
Conversely, Gang Up Unique is often more appropriate for printing single copies of a
document. This option does not fully collate itself (collate and cut is necessary), but it
optimizes the sheet size while limiting the run to a single copy.
6
6-11
Modifying the layout manually
To disable gang printing and enable binding settings, select the Binding setting. When
gang printing is disabled, DocBuilder Pro imposes pages in the order defined by the
current layout.
Modifying the layout manually
Whether you apply a predefined layout or specify custom settings, you can manually
modify the job’s layout by:
• Reordering pages
• Rotating pages
• Setting gutter sizes
To make any of these modifications, you must first select Layout mode (see page 5-5).
N OTE : Specify the Duplex setting before reordering or rotating pages.
Reordering pages in Layout mode
When you impose a job, its pages are automatically arranged in a particular order
according to the specified layout. Each page number in layout view represents the page
from the source document that DocBuilder Pro images in a designated position on the
finished sheet. However, if you want to reorder individual pages manually, you can do
so in the main window. Use the following procedure to assign a different page to a
particular location in the layout.
TO
REORDER PAGES
1.
Verify that Layout mode is currently selected.
2.
Select the location’s current page number, type the new value, and press Enter, or
press Tab to move to the next page in the layout.
You can add a blank cover page by typing 0 (zero) for any page number. Page 0 will be
printed as a blank page if Duplex is set to On. If Duplex is set to Off or Manual,
Page 0 will not be printed.
Advanced Features of DocBuilder Pro
N OTE : When you use the procedure above to reorder pages, the page number which
you type overwrites the original. For example, if you typed Page 3 in place of Page 5,
you will now have two of Page 3 and none of Page 5. Also, you cannot type in a page
number that does not already exist in your job. For example, if your job has 10 pages,
you cannot type in 12.
Rotating pages
You can manually rotate individual pages or sets of pages in the job. To do this, the job
must be displayed in Layout mode. Rotation is performed in 90° clockwise increments
when you click the rotate icon in the upper-right corner of a page.
Rotate icon
• To rotate a single page, click the rotate icon on that page.
• To rotate all pages in the job, press the Shift and Ctrl keys and click the rotate icon
on any page.
7
10
11
6
8
9
Sheet 1,
front side
1
2
15
14
3
Sheet 1,
back side
Sheet 2,
front side
5
16
4
Sheet 2,
back side
12
6
6-12
13
6
6-13
Modifying the layout manually
• To rotate all pages in a certain location on the front side of each duplex sheet, press
the Shift key and click the Rotate icon on any page in that location on any sheet.
For example, in the graphic above, if you press the Shift key and click the Rotate
icon on Page 8, Page 6 rotates, as well, because they are both in the same location on
the front side on the sheet.
• To rotate all pages in a certain location on the front and back sides of each duplex
sheet, press the Ctrl key and click the Rotate icon on any page in that location on
any sheet. For example, in the graphic above, if you press the Ctrl key and click the
Rotate icon on Page 1, Pages 2, 3, and 4 also rotate, because they are in the same
location on the front and back sides of the sheet.
Setting gutter sizes
DocBuilder Pro defines the locations of gutters for you according to the layout and
sheet size governing the imposition of the job. In layout view, you can specify the size
of a gutter by entering a value in its gutter size field and pressing Enter. For example,
perfect-bound jobs typically require larger gutters than saddle stitch ones, in order to
provide room for grinding off the spines and gluing signatures together when the book
is bound.
Vertical gutter size field
Margin
Horizontal gutter size field
N OTE : The size and location of the margin (the area between the outside edge of a
group of imposed pages and the edge of the sheet) is a function of layout and sheet
settings. You cannot define custom margins.
6
6-14
Advanced Features of DocBuilder Pro
Managing templates
You can name and save the current combination of Sheet, Layout, Scaling, and
Finishing settings as a template.
N OTE : The Size setting of the Sheet menu cannot be saved. You can use the Preferences
item in the File menu to set the folder or directory in which Command WorkStation
saves templates. For more information, see Chapter 4.
Save template
Delete template
Name of current template
TO
SAVE IMPOSITION SETTINGS AS A TEMPLATE
1.
Click the Save template icon—the disk icon on the right side of the Template
pop-up menu.
2.
In the Save Template As dialog box, type a name for the settings file.
When saving a template, choose a descriptive name, such as “4-Up Nested Saddle”
rather than something that will not provide as much information, like “My Settings.”
If you plan to use the same template for a particular document, name the template
after the document type, for example, “Status Report.”
3.
Click OK or press Enter.
6
6-15
TO
Tips for using the Imposition feature of DocBuilder Pro
DELETE A SAVED TEMPLATE
1.
Click the Delete template icon—the trash can icon on the right side of the Template
pop-up menu.
2.
In the dialog box that appears, select the template to delete.
3.
Click OK or press Enter to delete the specified template.
Tips for using the Imposition feature of DocBuilder Pro
This section provides information that will help you get the most out of the
Imposition feature of DocBuilder Pro.
DocBuilder Pro and Acrobat technology
DocBuilder Pro makes use of Adobe Acrobat technology to perform certain page-level
operations. Keep the following tips in mind to ensure success:
•
Avoid the Touch-Up tool in Acrobat
If you need to use this tool on a source document, do so before opening the document
in DocBuilder Pro. Do not use this tool on PDF files created by DocBuilder Pro, such
as saved impositions, RIPped and held jobs, or printed jobs, because the changes will
not be saved to the server or reflected in the printed output.
•
Adding a binding offset
You can set gutters on each page independently to allow extra room for binding. For
more information, see “Setting gutter sizes” on page 6-13.
6
6-16
Advanced Features of DocBuilder Pro
File management
An awareness of how DocBuilder Pro structures data can help you maintain the
integrity of source documents and create interim copies of work in progress. This
section describes the temporary files that DocBuilder Pro creates at various stages in
the process of imposing a document, and suggests file-management techniques you can
use to preserve your work.
When a workstation on the network prints a source document to the E-810, the server
creates a spool file containing the same kind of data (PostScript or PDF) that the
workstation sent. The spool file simply records (for subsequent “playback” to a print
engine) the image of every page in the print job, in the order the pages are to be
printed. Unlike the source document, a spool file is quite literal in its record of the
print job—if there are duplicate pages in the print job, the associated data is duplicated
in the spool file, as well. Thus, spool files tend to be significantly larger than the source
documents they represent.
To maximize efficient use of server disk space, it is strongly recommended that spool
files not be kept on the E-810 any longer than necessary. The Command WorkStation
operator must delete spool files explicitly.
When you open a spool file in DocBuilder Pro, a temporary file in PDF format is
created on the Command WorkStation hard disk. A PDF spool file is simply copied to
the temporary file; however, when you open a PostScript spool file, DocBuilder Pro
writes a PDF version of the PostScript data to the temporary file. The temporary PDF
file resides on the Command WorkStation hard disk until you close or save the job.
When you close the job, the name of the original spooled source file appears with a
new extension (.dbp) as the suggested name in the Save As dialog box. The original
PostScript or PDF remains intact even after the converted file has been edited and
saved in the Imposition window.
All operations that modify a job’s data are performed on its temporary file or on
associated imposition data. Page-level operations modify the temporary PDF file.
DocBuilder Pro functions modify the imposition data associated with the temporary
PDF file.
6
6-17
Tips for using the Imposition feature of DocBuilder Pro
Saving imposed jobs
When you save an imposed job, DocBuilder Pro does two things:
•
If new data has been added to the temporary PDF file, it is written back to the E-810
under the name you specify in the Save As dialog box.
The default name that appears in the Save As dialog box is that of the original spool file
with a new extension (.dbp). The original PostScript or PDF remains intact even after
the converted file has been edited and saved in the Imposition window.
•
If imposition data has changed, the data is written back to the E-810 and associated
with the new PDF.
Maintaining associated imposition data separately from the job’s PDF data allows
DocBuilder Pro to impose in-RIP without modifying the PDF data, and allows you to
reuse PDF data that has been modified in the imposition process.
7
7-1
Chapter 7:
Overview of
Fiery WebTools
Fiery WebTools
This chapter introduces Fiery WebTools and provides instructions on their use. For
more information on specific Fiery WebTools you are referred to other chapters in this
book and to other manuals in the documentation set.
Fiery WebTools
Fiery WebTools reside on the E-810 but can be accessed over the network from a
variety of platforms. The E-810 home page lets remote users view server functions and
manipulate jobs.
N OTE : If the connection to the E-810 is not established, you cannot access
Fiery WebTools.
You can use Fiery WebTools on Windows 9x/Me or Windows NT 4.0/2000 client
computers with certain Internet browsers that support the Java language. For specific
information on the browsers supported with Fiery WebTools, see Getting Started.
N OTE : Fiery WebTools are not supported on Mac OS computers.
Access privileges
The E-810 system allows the site administrator to choose and implement a level of
access and control appropriate for your particular site. A wide spectrum of control can
be implemented; the levels of access allowed to remote users depend on whether the
administrator has enabled use of Fiery WebTools, and whether or not a password is
required to use the job management features of Fiery WebTools.
If you have been given the Operator password, you can manage job flow and override
print settings of your jobs with Fiery WebSpooler. If not, you can still track the status
of your jobs with the Status tool, and with Fiery WebSpooler as a Guest. Check with
your site administrator for information on your Fiery WebTools access privileges.
7
7-2
Overview of Fiery WebTools
Using Fiery WebTools
Access Fiery WebTools from the E-810 home page.
WebTool
Summary
For more information
Status
Shows you the jobs currently processing
and printing.
See the Printing Guide.
WebSpooler
Allows you to view, manipulate, reorder,
reprint, and delete jobs currently
spooling, processing, or printing on the
E-810. It also allows you to view, print,
and delete the Job Log.
See “Tracking and managing
jobs with Fiery WebSpooler”
on page 8-1.
WebLink
Provides a link to another web page,
provided you have a valid Internet
connection. The WebLink destination
can be changed; this function requires
the Administrator password, if one has
been set.
See the Printing Guide and
the Configuration Guide.
Installer
Allows you to download the Fiery Link
installer and E-810 printer file installers
directly from the server.
See Getting Started.
WebDownloader
Allows you to download PostScript,
EPS, and PDF files to the E-810.
See the Printing Guide.
WebSetup
Allows you to modify the E-810
configuration (Setup) remotely. This
function requires the Administrator
password, if one has been set.
See the Configuration Guide.
WebScan
Allows you to download TIFF, JPEG,
and PDF files to the E-810.
See the Printing Guide and
the Configuration Guide.
7
7-3
TO
ACCESS
Using Fiery WebTools
F IERY W EB T OOLS
1.
Start your Internet browser.
2.
Enter the IP address or the DNS name of the E-810.
Check with the operator or administrator for this information.
The E-810 home page appears.
3.
Click one of the buttons at the left to select one of the Fiery WebTools.
Move the cursor over the buttons to display information about the selections.
8
8-1
Chapter 8:
Fiery WebSpooler
and Fiery Spooler
Tracking and managing jobs with Fiery WebSpooler
Fiery WebSpooler and Fiery Spooler duplicate many of the functions and features of
Command WorkStation. Each provides additional flexibility by allowing job tracking
and management from multiple platforms over the Internet or an intranet.
N OTE : Fiery Spooler is available for Mac OS computers only.
• Fiery WebSpooler, one of the Fiery WebTools, is accessed with an Internet browser
and the E-810 home page (see Chapter 7).
• Fiery Spooler is installed from the User Software CD. To use Fiery Spooler, users
need only a network connection to the E-810.
The Fiery Spooler interface for Mac OS computers is virtually identical to that of
Fiery WebSpooler. Moreover, the interfaces of these tools are so similar to that of the
Command WorkStation that this chapter often refers you to Chapters 3 and 4 (on
Command WorkStation) for information about icons and commands that are
common to all three tools.
Tracking and managing jobs with Fiery WebSpooler
You can use Fiery WebSpooler (and Fiery Spooler for Mac OS) to perform the
following functions from your workstation:
• Override current job option settings.
• Delete jobs and cancel processing.
• Duplicate or rename jobs.
• RIP a job and hold the raster data.
• Hold jobs in the spooled area or the RIPped area.
• Remove raster data from RIPped files.
• Change the priority of jobs.
• Edit and merge raster data jobs (DocBuilder).
• Display, print, or delete the Job Log.
8
8-2
Fiery WebSpooler and Fiery Spooler
Most of these functions require the Administrator or Operator password. However,
even without a password, you can log in to Fiery WebSpooler as Guest with view-only
privileges.
N OTE : Most Fiery WebSpooler commands function identically to those of Command
WorkStation. For more information on specific commands, see Chapters 3 and 4.
TO
ACCESS THE
1.
F IERY W EB S POOLER
WINDOW
From the E-810 home page window, click WebSpooler.
For instructions on how to access the E-810 home page window, see page 7-3.
2.
To log in as Administrator, enter the Administrator password and click OK.
To log in as Operator, enter the Operator password and click OK.
To log in as Guest, click OK, without entering any password.
The Fiery WebSpooler window appears in a new browser window.
8
8-3
Tracking and managing jobs with Fiery WebSpooler
About the Fiery WebSpooler window
Like Command WorkStation, Fiery WebSpooler is a window from which you can
view E-810 and copier functions, and an interface from which you can control
those functions.
The Fiery WebSpooler window is divided into three areas by Spool, RIP, and Print
status bars. When the E-810 receives print jobs, the Fiery WebSpooler window
becomes a dynamic display, filled with the names of jobs and their characteristics.
The Spool, RIP, and Print areas of the Fiery WebSpooler window represent the stages
of printing a job. Jobs come in at the top level (Spool) and drop down to the Print
level, unless they are held along the way.
The job icons displayed in the Fiery WebSpooler window are explained in “Job icons”
on page 3-20.
N OTE : In the Fiery WebSpooler window, the background color for the yellow and white
printer icons is the same.
Spooled jobs—Jobs listed in the area below the Spool status bar are PostScript files
stored on the E-810 disk. These jobs were sent to either the Print queue (white icons)
or the Hold queue (yellow icons).
RIPped jobs—Jobs listed in the area below the RIP status bar are ready to print. They
have already been rasterized (RIPped, or processed for printing) and are waiting, in
order, for access to the printer. Rasterized jobs can also be held; held jobs are shown
with a yellow icon.
Printed jobs—Jobs listed in the area below the Print status bar have already been
printed. Printed jobs can be stored on the E-810 disk. The number of jobs that can be
stored (from 1 to 99) is defined in Setup.
8
8-4
Fiery WebSpooler and Fiery Spooler
If you are logged in as Administrator or Operator, you can interact with a job wherever
it appears in the window by selecting it and choosing a command from the Job menu,
or by double-clicking the job and setting override options. For more information, see
“Manipulating job options and job flow” on page 8-4.
Errors—Jobs with an error are shown in red. To display the error, double-click the job
line. Note that you cannot check the job properties or hold a job with an error.
N OTE : If your job does not appear anywhere in the Fiery WebSpooler window, it may
have already been printed; if so, it will appear in the Job Log. To view the Job Log,
choose Show Job Log from the Window menu. For more information on the Job Log,
see page 8-9.
If the job does not appear in the Job Log, it may have been moved to the Archive
window by the operator. The Archive window cannot be viewed with Fiery
WebSpooler; you must contact the operator or to to the Command WorkStation
display to check this.
Manipulating job options and job flow
Using the commands in the Job menu, you can alter the destinations, priorities and
other characteristics of jobs that appear in the Fiery WebSpooler window.
To understand the effect each of these commands has on a job, you need to understand
the way the E-810 handles PostScript and raster data, and how jobs are activated or
held in the various stages of processing. See Chapter 3 for this background information
8
8-5
Tracking and managing jobs with Fiery WebSpooler
before manipulating jobs with Fiery WebSpooler. Also, the commands in the
Fiery WebSpooler Job menu have identical counterparts on Command WorkStation.
For background and information about these commands, see Chapters 3 and 4.
Choose this command
from the Job menu
To do this
Raster data is
Delete Job(s)
Delete the job(s) from the list.
Deleted
Cancel Printing
Cancel the currently printing job.
Deleted
Cancel RIPping
Cancel the currently processing job.
Deleted
Duplicate Job(s)
Duplicate one or more selected PostScript data
jobs in the Spool or Print areas (creates a
reference to the original job, with the same
name).
n/a
(The Duplicate command is not available for
raster jobs)
Rename
Rename the job (PostScript file with or without
raster).
Unaffected, but associated with the new name
N OTE : If the renamed job is printed, the Job
Log reflects the job’s original name.
Hold
Hold the job in the current place (except for a
printed job, which is moved to the Spool or
RIP area).
Held in RIP area indefinitely, if included with
job
RIP and Hold
RIP the job and hold it in the RIP area.
Held in RIP area indefinitely
Print
Print the job in its turn (RIP it first if it does
not have raster data). Keep the printed job in
the Print area until the job limit is reached.
Temporarily held in RAM until memory is
needed for another job
Print and Hold
(like the PPD option
Save Fast Reprint)
Print the job in its turn (RIP it first if it does
not have raster data).
After printing, hold the PostScript data and the
raster in the RIP area.
Held in the RIP area indefinitely (saved to
disk)
Process Next
Give top priority to this job.
Print the job (or RIP and print) as soon as the
processor and copier are free, before other
waiting jobs.
Held in RAM after printing (can be selected in
the Print area while it remains there), or Held
in RIP area (saved to disk) if destination was
RIP and Hold
Remove Raster
Remove the raster from a job that has raster
data; leave the PostScript job in place.
Deleted
8
8-6
Choose this command
from the Job menu
Fiery WebSpooler and Fiery Spooler
To do this
Raster data is
Override Print Settings
Change the print options for the job
(see page 8-7).
Deleted and regenerated, if the newly selected
options require reRIPping, or reprinted with
the new settings, if none require reRIPping
Thumbnail A
Open the selected held raster data job in the
Thumbnail A window where you can view a
full-screen preview of the job, edit the job, or
merge it with raster data from other jobs.
Changed if job is edited, unaffected if job is
only viewed
Thumbnail B
Open the selected raster data job (not
necessarily a held job) in the Thumbnail B
window for viewing or for merging into a job
in the Thumbnail A window.
Unchanged
8
8-7
Tracking and managing jobs with Fiery WebSpooler
Overriding job option settings
To change the job options of a job, double-click the job line or select the job and
choose Override Print Settings from the Job menu. If necessary, scroll down to see all
the various job options.
For PostScript files, you cannot override the Orientation option.
For PDF files printed using Fiery Downloader, you cannot override these options:
• Orientation
• Remove White PPT Background
• Spot Color Matching
N OTE : For some options, changing the setting requires that the job be reRIPped; these
options show an icon to the left of the option name.
The options you set here are the same ones you set from the Print dialog box when you
print from an application. For information about setting and overriding these print
options, see the Printing Guide.
8
8-8
Fiery WebSpooler and Fiery Spooler
Thumbnails and full-screen previews (DocBuilder)
Like the Command WorkStation, Fiery WebSpooler includes a powerful DocBuilder
tool that allows you to preview and edit raster data. DocBuilder consists of two
thumbnail windows and several page-manipulation commands (see the Page menu).
You can use the DocBuilder tool in the following ways:
• In the Thumbnail A window, you can see thumbnails of the currently printing job,
as it is processed, or of any raster data job.
• From the Thumbnail A window you can open a full-screen preview of a raster file.
• Using the Thumbnail A and Thumbnail B windows together, you can merge raster
data from more than one file, even if the files were printed from different
applications on different computer platforms.
DocBuilder’s merge features eliminate the limitations of particular software
applications. You can merge raster pages of documents of different types, and even
different computer operating systems. You can merge color pages from graphics
programs with text pages from a word processor.
N OTE : In cases where multiple users are connected to the E-810 via Fiery WebSpooler
and/or the Command WorkStation, and one user makes changes to a Thumbnail A
job, not all users may see the results of those changes. If you are unable to view changes
in a job, or if selecting a thumbnail window results in a message indicating zero pages,
close and restart Fiery WebSpooler or Command WorkStation.
DocBuilder differences in Fiery WebSpooler
The DocBuilder tool in Fiery WebSpooler functions almost identically to that in
Command WorkStation. For detailed information on using DocBuilder, see Chapters
3 and 4 (for instructions on editing and merging raster files, see “Merging PostScript
and raster files with DocBuilder Pro” on page 4-15). Though the interfaces are almost
identical, there are some feature differences:
• You cannot scroll through the pages in Thumbnail A or Thumbnail B by dragging
the slider bar at the bottom of the screen.
• Thumbnail A right-click commands are not available; instead click on a page to
select it, and either click the appropriate button in the Thumbnail A window or
choose the appropriate command from the Page menu.
8
8-9
Tracking and managing jobs with Fiery WebSpooler
• Page icons and arrows do not appear when moving page(s) from Thumbnail B to
Thumbnail A. Instead, a blue outline appears around a Thumbnail A page that is to
be replaced; and a blue bar appears adjacent to or between Thumbnail A page(s) to
indicate where the Thumbnail B page(s) are to be inserted.
• The full-screen preview window has a status bar (Command WorkStation does not),
the “X” button used to close the full-screen preview is in a different location, there
are no page advance arrows, and there is no rotate button.
• The Ctrl-Z keyboard shortcut for the Undo command is not available. To undo one
or more DocBuilder commands, choose Undo from the Page menu.
Using the Job Log
From Fiery WebSpooler, you can view and print a log of all jobs printed by the E-810,
including jobs downloaded with Fiery Downloader.
N OTE : If you logged in as Administrator, you can delete the Job Log from
Fiery WebSpooler (see page 8-11). The Job Log is not available if you logged in
as Guest.
TO
DISPLAY , UPDATE , PRINT , DELETE , AND SAVE THE
J OB L OG
1.
Choose Show Job Log from the Fiery WebSpooler Window menu.
2.
Click All or specify a date range.
3.
Click OK.
The Job Log appears in a new browser window.
8
8-10
Fiery WebSpooler and Fiery Spooler
N OTE : The Delete button appears only if you logged in as Administrator.
Update
Print
Delete
Export
The Job Log displays each job and the following information: status, document name,
user name, date, start time, end time, process time, page description language, file size,
device, paper size, media, number of originals, number of color pages, number of
black-and-white pages, total number of pages, and Notes.
The Status column provides the following information about jobs:
OK
The job printed normally.
ERROR
An error occurred during processing or printing.
CANCEL
The job was canceled before printing was completed.
4.
To update the Job Log, click Update.
5.
To print the Job Log, choose Print Job Log from the File menu or click Print.
The information displayed in the Job Log window prints to the current E-810.
When you print the Job Log, totals are printed for all appropriate columns.
8
8-11
6.
Fiery Spooler for Mac OS computers
If you logged in as Administrator, you can choose Delete Job Log from the File menu
or click Delete to clear the Job Log.
The system administrator can also print and clear the Job Log from the Control Panel.
7.
To save the Job Log, choose Export Job Log from the File menu or click Export.
8.
In the File name area, enter a name for the Job Log file (the default name is
Fiery Job Log.txt).
9.
Browse to the location where you want to save the file, and click Save.
The Job Log is saved as a text file, and the Job Log window reappears.
You can view the information in any application that can read a text file. Items are
separated by tabs.
To return to the job list, choose Show Job List from the Window menu.
Fiery Spooler for Mac OS computers
For Mac OS, the Fiery Spooler interface is almost identical to that of
Fiery WebSpooler (see “Differences between Fiery Spooler for Mac OS and
Fiery WebSpooler” on page 8-13), and both interfaces are very similar to the job
management interface of Command WorkStation. For details on the icons and
commands in Fiery Spooler and Fiery WebSpooler, see Chapters 3 and 4.
TO
LAUNCH
1.
F IERY S POOLER
ON A
M AC OS
COMPUTER
Double-click the Fiery Spooler icon.
The Chooser dialog box appears.
2.
Select the E-810.
For information on setting up the connection to the server, see Getting Started.
8
8-12
3.
Fiery WebSpooler and Fiery Spooler
Click OK.
The Fiery Spooler main window appears.
For information on using Fiery Spooler for Mac OS computers, see Chapters 3 and 4,
and “Tracking and managing jobs with Fiery WebSpooler” on page 8-1.
8
8-13
Fiery Spooler for Mac OS computers
Differences between Fiery Spooler for Mac OS and
Fiery WebSpooler
Though the interfaces for both Fiery Spooler for Mac OS and Fiery WebSpooler are
almost identical, there are some feature differences.
Connecting to a different E-810
With Fiery Spooler, you can connect to a different E-810 from within the application
using the following procedure.
TO
CONNECT TO A DIFFERENT
E-810
1.
Choose Open Fiery from the File menu.
2.
Select the E-810 in the Chooser window that appears.
For information on setting up the connection to the server, see Getting Started.
3.
Click OK.
The Fiery Spooler main window appears.
A
A-1
Appendix A:
Basics of
Imposition
Basics of Imposition
This chapter introduces the basic concepts of imposition and can be used as an
introductory tutorial for imposing a document that will be printed as a book or
booklet. For more detailed information on the Imposition main window and its
components, see Chapter 5, “Using Imposition.”
Printing books with the Imposition feature of
DocBuilder Pro
This section describes the process of transforming an application-specific file into a
bound book; along the way, concepts and terminology are introduced to help you take
advantage of all the features of DocBuilder Pro.
Print engines that image documents on standard letter- or legal-sized paper at high
speeds are common in office environments. Although the image quality and output
efficiency of such devices is adequate for correspondence and office memos, they
cannot image jobs with complex document layouts, or those that require higher
resolution or a large number of copies.
Until recently, the only way around these limitations was to use traditional printing
systems to impose your document—that is, to arrange its pages in the correct order
and orientation for printing and a variety of binding styles. You might have used a
service bureau to access high-volume, high-resolution color printers. Today Fiery
technology teamed up with digital color print engines makes it cost-effective to
produce short-run, fully-imposed (also called “ganged-up”) documents.
Basics of imposition layout
Commercial offset printers and web presses use wide rolls of paper and large printing
plates capable of imaging numerous pages on a single sheet. For example, it is common
for such printers to image up to 32 full-size pages on a single press sheet, a process
inherently faster than printing a single page at a time. DocBuilder Pro lets you image
multiple pages on a single sheet, but the output devices it supports are digital color
print engines, rather than traditional printing presses; in this manual the paper on
which a job is imaged is referred to as the sheet.
A
A-2
Basics of Imposition
The printed sheet is subsequently folded into something resembling a booklet having
connected pages. The folded sheet is called a signature, which is then trimmed to the
finished size.
For pages to appear in normal reading order and position in the final booklet, their
ordering and positioning on the sheet must differ from the normal book-reading order.
You can demonstrate this for yourself using an ordinary sheet of paper.
M ODELING
AN EIGHT - PAGE BOOKLET
1.
Fold the paper in half horizontally.
Fold the top edge of the sheet down to meet the bottom edge.
2.
Fold the paper again vertically.
Fold the left edge of the sheet over to the right edge. Now you have a miniature version
of a signature.
A
A-3
3.
Basics of Imposition
Position the signature with the vertically folded edge to the left and the horizontally
folded edges across the top.
The paper should now resemble a small eight-page booklet (with the tops of pages
joined at the fold).
Page through the booklet as if you were reading it, and number each page
sequentially.
Don’t forget to number the front and back of each page—in general books have
content on both sides of each page. The front cover of the booklet should be page 1
and the back cover of the booklet should be page 8. You can also underline each
number to highlight the page orientation.
N OTE : Printing on both sides of the sheet is called duplex printing; printing on only
one side of the sheet is called simplex printing. Not all print engines support duplex
printing; and of those that do, variations in implementation exist. DocBuilder Pro
supports duplex printing that corresponds to the print options of the output device.
When you unfold the signature, the page numbering should look something like the
following illustration.
7
8
1
4
5
Front
2
4.
6
3
Back
A
A-4
Basics of Imposition
Notice that:
• The folds subdivide the sheet into areas representing pages in the final booklet.
• Page numbers do not appear in book-reading order.
• Some page numbers are upside down.
Some pages must be printed upside down on the sheet in order for them to appear
right-side up in the final booklet, and pages must also be printed out of numerical
sequence on the sheet in order for them to appear in numerical sequence in the final
booklet.
This process of folding paper and numbering pages to approximate the finished piece
is called making a folding model, and it’s a common first step in planning a print job.
The folding model provides valuable information about page placement, which you
can use to create a plan, or sketch, of how pages are placed on the sheet. This plan is
called a layout.
DocBuilder Pro frees you from the tedious and error-prone process of creating accurate
physical models of the imposed book in order to lay out pages. With DocBuilder Pro,
you simply open the source file to be imposed and specify how many rows and
columns of pages to image on a sheet. DocBuilder Pro simplifies this process even
further by providing predefined layouts for common impositions such as booklets and
brochures. You can also save your own custom layouts for easy reuse.
Printer’s marks
In addition to specifying the placement of pages on a sheet, the layout also specifies
how the finished sheet will be cut and folded. For example, the layout specifies whether
the large finished sheet is folded and cut to create a booklet, or simply folded (and not
cut) like a map.
A DocBuilder Pro layout designates the location of folds, cuts, and other special
elements by means of special markings called printer’s marks, which appear on the
printed sheet outside the main content area of the job.
• The job label comprises descriptive text such as the name of the job, a sheet
identifier, and the date and time the sheet was printed.
A
A-5
Basics of Imposition
• The location of a fold is defined by a dotted line called a fold mark; similarly, the
location of a cut is defined by a solid line called a trim mark.
• Specialized marks also define the size and locations of margins (space surrounding
the page’s content area), gutters (space between pages), and bleeds (extensions of
content beyond a trim mark; used to ensure that printed area extends to the very
edge of a trimmed page).
DocBuilder Pro makes it easy to set up gutters and specify a set of printer’s marks to
image on the finished sheet as illustrated below.
Job label
Trim marks
Fold mark
Gutter
Margin
Additional sheets
A book layout must also adjust the placement of pages according to the total number
of pages in the job. For example, a book is often composed of more pages than can be
printed on a single sheet. When the number of pages in the book is a multiple of the
number of pages on a sheet, the same layout plan is used to place pages on additional
sheets until all of the pages in the book are printed. However, if the total page count is
not an even multiple of the number of pages in the layout, one signature may be laid
out to accommodate the discrepancy.
A
A-6
Basics of Imposition
For example, if your layout places 8 pages on a sheet and the total page count in the
book is 12, one of its signatures holds only 4 content pages, with the rest of the space
on the sheet blank. If you do not want blank pages in the middle of the finished book,
insert blank pages intentionally, for example after cover page, after table of contents, or
between chapters. To insert blank pages, open the job in the Thumbnail A window,
right click the page you want to add blank to (or pull down on Page menu) and select
insert blank page.
DocBuilder Pro lets you add blank pages or add, delete, and rearrange pages from
multiple source documents easily, so you can quickly preview the results of page
manipulations.
Binding methods
A book layout also specifies the means by which sheets are gathered and bound.
Stitching or stapling finished pages across a common center fold, or spine, is called
saddle stitch binding and the stitched pages are called a saddle. Multiple folded sheets
can be stitched into the same saddle as a group. Stacking signatures, grinding the
spines off, and then gluing them together is called perfect binding. You can combine
saddle stitch and perfect binding methods by stacking two or more groups one on top
of another on a common fold line and gluing them together; this is called a nested
saddle.
Saddle
Perfect
Nested Saddle
The binding method to be used affects the order in which pages are placed on the
sheet; for example, the page ordering used to perfect bind a book must be different
from that used to saddle stitch the same job. Thus, the layout must also specify the
method by which the finished job will be bound.
A
A-7
Basics of Imposition
The choice of a binding method is determined by the job’s size, complexity, and
budget. Saddle stitch binding is very cost-efficient, but is more suitable for small
booklets than for large jobs. (A rule of thumb says that saddle stitch binding works best
for booklets or brochures with a maximum of 88 pages.) Conversely, perfect binding is
more expensive but more suitable for larger jobs.
DocBuilder Pro reorders imposed pages automatically according to your choice of
binding method, which can save a significant amount of time and effort. Consider, for
example, what must be done when a book that was to be saddle stitched exceeds the
bindery’s maximum page count and must be reimposed as a perfect-bound book. To
redo the imposition by traditional means would be labor-intensive; with DocBuilder
Pro, it takes only moments.
Shingling and creep
All books and brochures use a sheet that is folded to create separate page areas. Because
the sheet itself has some thickness, each fold causes a very small incremental shift in the
location of the edge of each page relative to the others. The result is that the edges of
pages furthest from the saddle’s innermost fold seem to move away from the edges of
pages closest to the innermost fold. As the number of pages in the saddle increases, so
does the amount of this shift, which is known as shingling. To counteract the effects of
shingling (illustrated in an exaggerated manner below), the bindery trims the edges of
the finished book to a common edge.
Shingling
Trimming the bound pages resolves only half of the problem, however—as the edges of
pages move, so do the content areas imaged on them. The apparent shift of content
area caused by folding a sheet multiple times is known as creep or binder’s creep. The
effect of creep is that the content area of pages closer to the innermost fold in a saddle
appear to move towards the outer margins of the page.
A
A-8
Basics of Imposition
Creep becomes more noticeable as the number of groups in a saddle increases, and its
effect is most noticeable on pages farthest from the center fold of the saddle.
Consequently, a book layout must also specify the number of groups in each saddle
because the number of groups in each saddle affects the amount of creep needs to be
accounted for.
Creep
Compensating for creep is tedious, exacting work which DocBuilder Pro does for you
automatically when you change any aspect of the imposed job that is affected by creep.
Gang-up printing
It is clear that a layout is essential to define the elements of complex print jobs such as
booklets and books, but it can also be useful for smaller jobs. Consider, for example,
how you might approach the task of printing business cards. It is slow, wasteful, and
expensive to print a single business card per sheet, when you can repeat the image of
the business card until the entire sheet is filled. This printing technique is known as
Gang Up Repeat because the image is repeated in each page area, or step, on the sheet.
After printing, the sheet is cut apart to produce individual cards.
Gang Up Repeat layout
A
A-9
Basics of Imposition
This job can be made even more efficient by eliminating the gutters between cards,
allowing you to reduce significantly the number of cuts required to separate each card
from its neighbor. Defining zero-width gutters on a shared cut line in this manner is
called using a common blade for those cuts.
If you need to print business cards for several different clients, you could perform a
Gang Up Repeat printing job for each, but you might still wind up wasting paper
and time if the jobs don’t fit easily into a simple multiple of sheets. A more efficient
approach is to print several jobs on a single sheet, and then print that sheet as many
times as required. The technique of printing multiple jobs on the same sheet is known
as Gang Up Unique. DocBuilder Pro provides both Gang Up Repeat and Gang Up
Unique.
Gang Up Unique layout
B
B-1
Appendix B:
Templates
Templates
This appendix gives descriptions of the built-in templates DocBuilder Pro provides.
1-Up Full Bleed
The 1-Up Full Bleed layout is used to print one page per sheet. The printer’s marks
show where to cut the paper so that the color content extends to the edge of the paper.
The following settings are applied for this layout:
• Bleeds
• Printer’s Marks (trim marks and job label only)
• Scale to Fit
• Gang Up Unique
There are no page number restrictions for the 1-Up Full Bleed layout.
B
B-2
Templates
2-Up Perfect
The 2-Up Perfect layout is used to create signatures for a perfect bound book. Each
sheet is folded once and stacked on top of one another. For more information on
binding methods, see page A-6.
The following settings are applied for this layout:
• Duplex
• Bleeds
• Printer’s Marks (fold marks, trim marks, and job label)
• Scale to Fit
• Binding Perfect
B
B-3
Templates
The 2-Up Perfect layout should be used with jobs that have multiples of four pages,
but it can be used with jobs that have any number of pages. Additional blank pages will
be added if necessary. Pages will be ordered in groups of four so that when folded each
sheet will have four sequential pages. For example:
• 4 pages
4
1
Sheet 1,
front side
2
3
Sheet 1,
back side
• 8 pages
4
Sheet 1,
front side
1
2
Sheet 1,
back side
3
8
Sheet 2,
front side
5
6
Sheet 2,
back side
N OTE : The Creep Adjustment option has no effect on this template.
7
B
B-4
Templates
2-Up Saddle
The 2-Up Saddle layout is used to create signatures for a saddle bound book. All of the
sheets are folded together, one inside the other. For more information on binding
methods, see page A-6.
The following settings are applied for this layout:
• Duplex
• Bleeds
• Printer’s Marks (fold marks, trim marks, and job label)
• Scale to Fit
• Binding Saddle
B
B-5
Templates
The 2-Up Saddle layout should be used with jobs that have multiples of four pages,
but it can be used with jobs that have any number of pages. Additional blank pages will
be added if necessary. Pages will be ordered so that when sheets are folded and stitched
together into signatures, the pages will be sequential. For example:
• 4 pages
4
1
Sheet 1,
front side
2
3
Sheet 1,
back side
• 8 pages
8
Sheet 1,
front side
1
2
Sheet 1,
back side
7
6
Sheet 2,
front side
3
4
Sheet 2,
back side
5
B
B-6
Templates
3-Up Trifold Brochure
The 3-Up Trifold Brochure layout consists of a single sheet folded into three sections.
Although the three sections are the same width, the space between each section varies
so that the leftmost panel can be folded over the other two panels.
The following settings are applied for this layout:
• Duplex
• Printer’s Marks (trim marks and job label only)
• Scale to Fit
• Gang Up Unique
B
B-7
Templates
The 3-Up Trifold Brochure layout can be used only with jobs that have six pages. If the
job contains more or less than six pages, an error message will appear. The pages will be
ordered as follows:
3
Sheet 1,
front side
6
1
2
4
5
Sheet 1,
back side
The 3 Up Trifold Brochure is usually folded as illustrated below.
B
B-8
Templates
4-Up Gate Fold
The 4-Up Gate Fold layout is used most often in the case of a four panel brochure. The
finished brochure unfolds to double and then four times the original size.
The following settings are applied for this layout:
• Duplex
• Printer’s Marks (trim marks and job label only)
• Scale to Fit
• Gang Up Unique
B
B-9
Templates
The 4-Up Gate Fold layout can be used only with jobs that have eight pages. If the job
contains more or less than eight pages, an error message will appear. The pages will be
ordered as follows:
3
Sheet 1,
front side
8
1
2
4
5
6
Sheet 1,
back side
The 4-Up Gate Fold is usually folded as illustrated below.
7
B
B-10
Templates
4-Up Head to Head
The 4-Up Head to Head layout is used to create booklets from a layout of four pages
on each side of the printed sheet. By rotating the two topmost pages, the signature can
be folded both horizontally and vertically, and trimmed. The finished booklet will have
all pages in the correct order and rotation.
The following settings are applied for this layout:
• Duplex
• Bleeds
• Printer’s Marks (fold marks, trim marks, and job label)
• Scale to Fit
• Binding Saddle
Templates
The 4-Up Head to Head layout should be used with jobs that have multiples of eight
pages, but it can be used with jobs that have any number of pages. Additional blank
pages will be added if necessary. Pages will be ordered so that when sheets are folded
with two folds at ninety degrees, trimmed, and stitched together into signatures, the
pages will be sequential. Note that although this layout requires two folds, the template
applies a fold mark on the spine fold only. For example:
• 8 pages
5
4
3
6
8
1
2
7
Sheet 1,
front side
Sheet 1,
back side
• 16 pages
7
10
11
6
8
9
Sheet 1,
front side
1
2
15
14
3
Sheet 1,
back side
Sheet 2,
front side
5
16
4
Sheet 2,
back side
The 4-Up Head to Head is usually folded as illustrated below.
12
B
B-11
13
B
B-12
Templates
4-Up Z-Fold
The 4-Up Z-Fold layout allows many panels to be folded on top of one another
without stressing the folded spine. The most common example is a road map.
The following settings are applied for this layout:
• Duplex
• Printer’s Marks (trim marks and job label only)
• Scale to Fit
• Gang Up Unique
B
B-13
Templates
The 4-Up Z-Fold layout can be used only with jobs that have eight pages. If the job
contains more or less than eight pages, an error message will appear. The pages will be
ordered as follows:
2
Sheet 1,
front side
3
4
5
6
7
8
Sheet 1,
back side
The 4-Up Z-Fold is usually folded as illustrated below.
1
C
C-1
Appendix C:
Troubleshooting
Troubleshooting
This section lists error messages you might see, and provides some troubleshooting
guidelines should a problem arise with the E-810 or Command WorkStation. If you
are unable to resolve a problem after referring to this chapter, contact your authorized
service/support center.
Error messages
Error messages can result from problems with the print job, the E-810, the Command
WorkStation, or the copier. Some of the most common error conditions are listed here.
A copier error message sometimes remains displayed on Command WorkStation even
after you have resolved the error. A time lag in communicating the resolution of the
error to the Command WorkStation may lead you to believe the error has not been
resolved. However, printing will resume and the Command WorkStation display will
be updated after a short delay.
When an error interferes with printing, you will see a message on Command
WorkStation. The status bar that displays the message indicates the process where the
error occurred. Following are the messages (listed in alphabetical order), with the
appropriate corrective action for each one. You can cancel the pending print job while
you attend to the error condition. A few normal status messages are included in this list
in case they cause concern.
E-810 message
Corrective action/additional information
Black toner low
Add Black toner.
Busy
The E-810 has received a print job, but the copier is busy. The job
will print when the copier resumes printing.
Check duplex tray
The copier’s duplex tray is not in place. The E-810 will print when
the duplex tray is in place.
C
C-2
Troubleshooting
E-810 message
Corrective action/additional information
Check power & cable
There is a problem with the print engine power or cable
connection. First check to make sure the print engine is turned on.
There may also be a problem with the cable connection between
the E-810 and the print engine. Make sure the cable has not come
loose. The E-810 will resume printing when the cable is securely
connected to both the E-810 and the print engine.
Close back door
The back door on the copier is open. Close the door to resume
printing.
Close DF cover
The DF cover on the copier is open. Close the cover to resume
printing.
Close front door
The front door on the copier is open. Close the door to resume
printing.
Close LCT cover
The LCT cover on the copier is open. Close the cover to resume
printing.
Close left door
The left door on the copier is open. Close the door to resume
printing.
Close manual feed
The manual feed tray on the copier is open. Close the tray to
resume printing.
Close right door
The right door on the copier is open. Close the door to resume
printing.
Close sorter cover
The sorter cover on the copier is open. Close the cover to resume
printing.
Communication error
An error occurred with the copier. See the copier message panel for
information.
Copier error
An error occurred with the print engine.
Copier is offline
The Suspend Printing option has been selected from the Functions
menu. Press Resume Printing in the Functions menu to reconnect
the E-810 to the copier.
Cyan toner low
Add Cyan toner.
Door open
One of the doors on the copier is open. Close the door to resume
printing.
C
C-3
Troubleshooting
E-810 message
Corrective action/additional information
Error: check panel
An error occurred with the copier. See the copier message panel for
information.
Ld ___ in LCT
The copier’s LCT is not loaded with the paper size or type
specified. The E-810 will print when the LCT is loaded with the
required media.
Ld ___ in
manual feed
The copier’s manual feed tray is not loaded with the paper size or
type specified. The E-810 will print when the manual feed tray is
loaded with the required media.
Ld ___ trans in
manual feed
The copier’s manual feed tray is not loaded with the transparency
size or type specified. The E-810 will print when the manual feed
tray is loaded with the required media.
Load ___ in any tray
The copier is not loaded with the paper size specified. The E-810
will print when the required paper is loaded into any tray.
Load ___ in tray ___
The copier’s specified tray (1 through 4) is not loaded with the
paper size specified. The E-810 will print when the named tray is
loaded with the required paper. You may also select Cancel if the
required paper is unavailable.
Load ___ thick2
in manual feed
The copier’s manual feed tray is not loaded with the thick paper
size specified. The E-810 will print when the manual feed tray is
loaded with the required thick paper.
Load ___ thick
in manual feed
The copier’s manual feed tray is not loaded with the thick paper
size specified. The E-810 will print when the manual feed tray is
loaded with the required thick paper.
Magenta toner low
Add Magenta toner.
No black toner
The black toner has run out. Add more toner to resume printing.
No cyan toner
The cyan toner has run out. Add more toner to resume printing.
No fuser oil
The fuser oil bottle in the fixing assembly is empty. To replace the
fuser oil, call your service representative. The E-710 will resume
printing when the oil has been replaced.
No LCT
The copier’s LCT is unavailable. The E-810 will print when the
LCT is in place.
C
C-4
Troubleshooting
E-810 message
Corrective action/additional information
No magenta toner
The magenta toner has run out. Add more toner to resume
printing.
No sorter
The copier’s sorter is unavailable. See the copier console for
instructions.
No staples
The copier is out of staples. The E-810 will resume printing when
staples have been added.
No yellow toner
The yellow toner has run out. Add more toner to resume printing.
Paper jam
There is a paper jam in the copier. Open the copier doors and
check the locations indicated on the copier display. The E-810 will
resume printing when you have cleared the paper jam and closed
the copier doors.
Energy Save Mode
The copier is in Energy Save Mode. You must wait for the copier
to warm up before you can print.
Remove copies
from duplex tray
The duplex tray is full. You must remove the paper in the duplex
tray before continuing the job.
Remove copies
from sorter
The sorter is full. You must remove the paper in the sorter before
continuing the job.
Service code error
The system has detected an error that requires a service call. Before
calling for service, power cycle the copier and the E-810. If that
does not resolve the error, call your authorized service
representative and provide them with the error number that is
displayed. Only the service representative can clear this type of
error.
Sorter Limit: ___
The sorter holds the specified number of copies. Once the limit is
reached, you must remove the paper in the sorter before
continuing the job.
Toner low
The toner for one of the colors is low. Add toner soon for best
print quality.
Unknown error
An error occurred with the print engine.
C
C-5
Troubleshooting
E-810 message
Corrective action/additional information
Warming Up . . .
This is a normal status message. The copier is powering up. It will
be ready for printing in a few minutes.
Waste toner full
The copier's used toner tank is full. Call your service
representative. Printing will resume after the copier returns to
ready status.
Yellow toner low
Add Yellow toner.
Maintaining optimal system performance
The E-810 does not require maintenance. Beyond the routine requirements of
servicing and maintaining the print engine and replenishing consumables there are a
few things you can do to improve the overall performance of your system:
• Reduce unnecessary connections to the E-810.
If users notice that the server is frequently too busy to receive jobs, it may be because
several users are running utilities that are updated often. Large numbers of remote
users running Fiery Downloader or Fiery WebTools may have a significant effect on
E-810 performance.
• Schedule the printing workload by checking job ticket information before printing.
Print jobs with the same output and paper specifications together to minimize paper
changes. Also, print routine jobs while you prepare to print jobs with special
instructions or special media.
• Reduce unnecessary server connections at Command WorkStation. If you use a
second or third E-810 server on an occasional basis, performance will be improved if
you log off when you are not using it.
• Avoid printing with the server Disk full warning.
If you see this warning, delete jobs from the Queues or Archive windows that have
been held for a long time and are not likely to be needed. Avoid this condition by
deleting old jobs on a regular basis. The date associated with a job is the original date
it was sent. As a last resort, you can choose either Clear Server or Clear.
C
C-6
Troubleshooting
Troubleshooting
In case of problems, and before you call for service, check the guidelines in this section.
If you are unable to resolve the problem, make a note of the error condition and
contact your authorized service/support center.
Command WorkStation hangs
If the Command WorkStation windows do not update, click the Log in/out slider and
log out, then exit Command WorkStation. Restart Command WorkStation or restart
the computer.
If the Command WorkStation windows do not update, or no jobs are displayed, and
the mouse has no effect (you cannot select a job or a window, use a right-mouse
command, or select a menu item) the E-810 is down or communication over the
network has failed.
To force an exit from Command WorkStation, press Ctrl-Alt-Delete, and with
Command WorkStation selected, click End Task. At the E-810, disconnect and
reconnect the network cable, and try printing a Test Page or Configuration page. If
that fails, restart the server.
If the E-810 Control Panel does not respond to the Menu button, press Reset, turn off
the server, and turn it on again. When it reaches Idle, restart Command WorkStation.
C
C-7
Troubleshooting
Command WorkStation fails to connect to a E-810
If a remote Command WorkStation cannot connect to a server that was connected
previously, you may need to reconfigure the connection.
1.
If you can, choose Exit from the Command WorkStation File menu.
2.
In the C:\Windows folder, find the Efinl.ini file and move it out of the C:\Windows
folder to another folder.
If the Efinl.ini file contains a limited amount of configuration information that is easily
recreated (i.e., information for only one or two servers), you can delete the file
altogether. A new Efinl.ini file will be created in the C:\Windows folder when you
reconfigure the connection.
If the Efinl.ini file contains configuration information for several servers, or
information that is not readily recreated, keep the Efinl.ini file as a backup.
3.
Print a Configuration page.
You will use the information on this page to configure the connection to the server.
4.
Start Command WorkStation.
5.
When you are prompted to configure a server connection, click OK.
Follow the instructions in Getting Started to configure the connection.
6.
If you still cannot connect to the E-810, the administrator should reinstall the
Command WorkStation software.
For details, see Getting Started.
C
C-8
Troubleshooting
Unexpected printing results
If this happens
This is the problem
A cover page is not printed
when you reprint a saved
raster job.
The cover page identifies the originator of the job and the
time the job was sent. Time stamp and user information on
the cover page of a reprinted job are not meaningful.
The job settings are not
carried out as you expected.
If the user printed from Mac OS, there may be two
conflicting print settings. To check the job properties,
double-click the job. For a table of job properties and
conflicting properties, see the Printing Guide. Notify users
of these conflicts so they can avoid them in the future. If you
expected the settings you see in the Properties dialog box, be
aware that the Copies field does not currently reflect user
settings, and that Page Range and Scale percent are All and
100%, respectively, unless they were changed after being sent
for printing.
The job doesn’t print.
Some printing errors may be displayed in the Print status bar.
When the job is in the Printed queue, jobs that had a
PostScript error are displayed in a light red job row.
Double-click anywhere in the row to see the error message.
There are font errors.
If user-specified fonts that are not resident on the E-810 are
not printing correctly in PostScript files that are downloaded
by users, request that the user embed the fonts in the
PostScript file or print directly from their application. When
users print from their applications, if special fonts are not
downloaded automatically, they should download directly to
the E-810 with Fiery Downloader. This can be done by the
user or by the operator, provided the Direct connection is
enabled. For information about Fiery Downloader, see the
Printing Guide.
C
C-9
Troubleshooting
Clearing the server
Clearing the server is an Administrator option that can be used as a last resort if a job
persists in the system and prevents printing despite attempts to cancel or delete it.
Clearing the server deletes all jobs currently saved on the server in any queue, all locally
archived jobs, and all FreeForm master jobs. It also clears the Job Log, the index of
archived jobs, and the index of FreeForm masters.
Before clearing the server, export the Job Log if you haven’t recorded the information
in it. If you can, notify users that you will clear their jobs from the server so they can
back them up and resend them when the server is back in operation.
You can clear the server from the Control Panel (see page 1-6) or by choosing Clear
from Command WorkStation (see page 3-12).
Users are unable to connect to the copier
If users are unable to connect to the copier, or are unable to find the copier from their
workstations, the network administrator may need to troubleshoot their network
connections, and check settings on the servers they use for printing. If settings have
changed, it may be necessary to reconfigure the E-810.
For example, if print servers or print queues on a Novell server are renamed or deleted,
or if accounts or permissions are changed, the E-810 administrator may have to edit
settings or enter new settings in IPX (Novell) Setup to reflect the new configuration.
If users cannot connect to the copier with Fiery Downloader from Windows 95/98/Me
or Windows NT 4.0/2000, you may need to reconfigure the utility’s connection to the
server. For details, see Getting Started.
Mac OS users may fail to see the copier if a network administrator has assigned it to a
different zone, or has added zones where previously there were none.
If you have configured the E-810 and set up client computers and network servers
according to guidelines in the Configuration Guide and Getting Started, try printing a
Test Page (at Command WorkStation, choose Print Pages from the File menu).
C
C-10
Troubleshooting
If you are able to print the test page but still cannot print a file from a remote
computer, contact the system administrator to troubleshoot the network connection.
If you are unable to connect, and you cannot print the Test Page, check the copier’s
touch panel display.
If this happens
Try this
It displays a diagnostic or
error message.
Take the appropriate corrective action, as described in the
copier manual or in “Error messages” on page C-1.
The display is completely
blank.
If the copier is in Energy Saver mode, press the Energy Saver
mode key to see any messages on the display.
The copier is not in
Energy Saver mode.
The copier’s Automatic Power-Off function may have shut
down the copier. Turn the copier on, and then try printing a
Test Page again when the copier has warmed up.
You still cannot print a
Test Page.
Make a copy. If you can make a copy, restart the E-810, and
when you see Idle on the status line of the E-810 display, try
printing a Test Page again. If the Test Page still fails to print,
contact your authorized service/support center.
Setup error messages
For information on Setup error messages, see the Configuration Guide.
Index
A
About command 3-13
access
levels xviii, 3-7
restricting xvii
Acrobat, touch-up tool problems 6-15
active jobs 3-20
activity light
Control Panel 1-2
FieryBar 2-2
adjusting columns (Queues window) 3-16
Administrator password xviii, 1-8, 3-1, 3-7
Adobe Photoshop, see Photoshop
Alert Status screen 1-3
Align Paper Trays 3-12
animation, see status bars
applying templates 5-9
Archive command 3-11, 3-26, 4-31
archived jobs, filtering 3-28
Archive window
adjusting column width 3-29, 3-31
changing displayed headers 3-28
deleting held jobs C-5
exporting job list 3-29
features 3-28, 3-29
Filter 3-37
job icons 3-27
routing jobs 3-28
sorting jobs 3-28
archiving a job 3-19, 3-26
B
binder’s creep
compensating for automatically 6-8
effects A-7
groups 6-9
sheet thickness 6-3
binding offset 6-15
binding options 6-8
binding styles
nested saddle 6-9, A-6
perfect 6-8, A-6
saddle stitch 6-8, A-6
bleeds 6-6, A-5
broken LCD xviii
buttons, Control Panel 1-2
C
calibration from the
Control Panel 1-6
Cancel Job
from the Control Panel
during printing 1-3
from the Control Panel
during RIPping 1-3
Cancel Print command,
on FieryBar 2-3
Cancel Printing command
from Command WorkStation
3-12, 4-11
from Fiery WebSpooler 8-5
Cancel RIP command,
on FieryBar 2-3
Cancel RIPping command
from Command WorkStation
3-12, 4-11
from Fiery WebSpooler 8-5
Change (Administrator) Password
option 1-9
Clear command
archived jobs 3-27, C-9
FreeForm master jobs 3-30
from Command WorkStation
3-12, 4-39
Job Log 3-35
Clear Job Log command 3-12
I-2
Index
Clear Server command
archived jobs 3-27
FreeForm master jobs 3-30
from Control Panel 1-6
Job Log 3-35
on FieryBar 2-3
clipping icon 6-4, 6-7
clipping indicators
layout mode 6-7
preview mode 6-7
clipping views 6-7
collate and cut finishing 6-9
Color Charts 1-5, 4-7
Color Setup option 1-9
ColorWise Pro Tools command,
on FieryBar 2-3
column width, adjusting 3-15
Command WorkStation
Archive window 3-27
command on FieryBar 2-3
display, described 3-8
FreeForm window 3-29
introduction to 3-1
Job Log window 3-35
logging in to server 3-6
main window, parts of 3-8
menus 3-10
starting 3-4
troubleshooting C-7
Configuration page
printing from the Command
WorkStation 4-7
printing from the
Control Panel 1-5
connection to server,
configuring 3-5
Control Panel
activity light 1-2, 1-4
buttons 1-2
down button 1-2
Functions menu 1-5
line selection buttons 1-2
Menu button 1-2
status screens 1-3
up button 1-2
Control Panel map
printing from the
Command WorkStation 4-7
printing from the Control Panel 1-5
Create Master option 4-24
creep
compensating for
automatically 6-8
effects A-7
groups 6-9
sheet thickness 6-3
customizing printer settings 3-10
custom templates 6-14
D
date 6-5
Default Settings template 5-9
Define Marks dialog box 6-5
Delete (job) command 3-10
Delete (page) command 3-12
Delete command 3-24, 4-17
Delete Job command (Fiery
WebSpooler) 8-5
Delete Template icon 6-15
deleting print jobs 3-10
differences
between DocBuilder for Fiery
WebSpooler and for the
CommandWorkStation 8-8
between Fiery Spooler
for Mac OS and Fiery
WebSpooler 8-13
Direct connection 3-21, 4-28, C-8
disk space used 3-15
display window 1-3
I-3
Index
DocBuilder
Delete command 4-17
Duplicate command 4-16, 4-17
editing options 4-17
Imposition feature 5-1
Insert blank page command 4-17
merging two files 4-19
Open Preview command 4-17
page manipulations 4-15
Preview command 4-16
DocBuilder differences 8-8
down button 1-2
Download command 3-11,
3-25, 4-28
downloading files and fonts 4-25
duplexing 6-3
Duplex menu 6-3
duplex printing
defined A-3
enabling 6-3
print engines A-3
print options A-3
Duplicate (job) command 3-10
Duplicate (page) command
3-12, 4-16, 4-17
Duplicate Job command (Fiery
WebSpooler) 8-5
E
Efinl.ini file C-7
Enable Animation 4-5
Enable Popup Help 4-5
error display 3-18
error messages
during Setup C-10
general C-1 to C-5
Exit command 3-10
Exit Setup option 1-9
Export command 3-13
exporting archived job list 3-29
exporting FreeForm job list 3-31
F
F7 key 4-11
F8 key 4-11
FieryBar
activity light 2-2
commands 2-3
status 2-1
Fiery Spooler for Mac OS
differences from Fiery WebSpooler 8-13
interface 8-1
Fiery WebSpooler
accessing 8-2
Cancel Printing command 8-5
Cancel RIPping command 8-5
Delete Job(s) command 8-5
functions available with 8-2
Guest (view-only) privileges 8-2
Hold command 8-5
Job menu 8-4, 8-5
Operator password 8-2
overview 7-2
Print and Hold command 8-5
Print command 8-5
Process Next command 8-5
raster data 8-5
Remove Raster command 8-5
Rename command 8-5
RIP and Hold command 8-5
RIPped jobs 8-3
status bars 8-3
window 8-3
Fiery WebTools
accessing home page 7-3
Installer 7-2
overview 7-1
passwords 7-1
Status 7-2
WebDownloader 7-2
WebLink 7-2
WebSetup 7-2
WebSpooler 7-2
I-4
Index
File management tips 6-16
File menu commands 3-10
files, temporary 6-16, 6-17
Filter 3-37
Filter command
Archive window 3-28
FreeForm window 3-31
from Command WorkStation 3-13
Finished Height field 6-8
finished page size 6-7
Finished Width field 6-8
Finishing area 6-8
Fit Page command 5-7
folding model
creating A-2
defined A-4
Fold Marks 6-5, A-5
fonts
Adobe Type 1 4-25
deleting 4-29
displaying font list 4-29
downloading 4-25, 4-29, C-8
managing 4-28 to 4-29
printer fonts on server 1-5, 4-29
printing font list 1-5, 4-7, 4-29
TrueType 4-25
Font Substitution Table 4-25
FreeForm
master jobs, filtering 3-31
master jobs, job commands for 3-32
overview 3-29
printing variable data documents 4-24
FreeForm window
changing displayed headers 3-31
exporting job list 3-31
features 3-31
Filter 3-31, 3-37
sorting jobs 3-31
Functions menu, Control Panel 1-4, 1-5
G
gang printing
enabling 6-9
Repeat option 6-9
suggested uses 6-9
Unique option 6-10
Gang Up 6-9
Gang Up Repeat 6-9, A-8
Gang Up Unique 6-10, A-9
General Setup option 2-5
Go To Sheet dialog box 5-8
group
binder’s creep 6-9
defined 6-9, A-6
Groups field 6-9
Guest access xviii, 3-7
gutters
defined A-5
defining size 6-13
location of 6-13
perfect binding 6-13
saddle-stitched binding 6-13
H
headers
Job Log window 3-36
Queues window 3-15, 4-4
held jobs 3-20, 3-22
Help
Command WorkStation
information 3-13
Command WorkStation
preferences 4-5
menu commands 3-13
Hide FieryBar command,
on FieryBar 2-4
Hold command
3-10, 3-24, 8-5
I-5
Index
I
icons
Archive window 3-27
clipping 6-4, 6-7
Delete Template 6-15
FreeForm window 3-30
Job Log window 3-36
Print area 3-23
RIP area 3-22
Save Template 6-14
Spool area 3-20
Import command 3-11, 3-26, 4-34
Impose command 3-11, 3-25
imposing jobs 5-1
imposition
page reordering 6-11
saving settings as template 6-14
imposition data and temporary files 6-17
imposition settings 6-14
imposition window
Binding 6-8
clipping indicator 6-7
Columns menu 6-5
controls 6-1
Creep Adjustment menu 6-3
Finishing area 6-8
layout mode 5-5
navigating 5-4
opening 5-1
Orientation menu 6-3
preview mode 5-5
Printer’s Marks 6-5
printer’s spread 5-3
reader’s spread 5-3
reordering pages 6-11
rows menu 6-4
Scaling area 6-6
settings panel, displaying 6-1
size menu 6-2
template menu 5-9
view modes 5-5, 5-6
inches, abbreviation and keyboard
shortcut 6-2
Info Status screen 1-4
Insert blank page command 4-17
Installer WebTool, see Fiery WebTools
Instructions field 4-3, 4-4, 4-24
J
job
active 3-20
areas 3-3
canceling 4-11
defined xv
deleting 3-24
environment xvii
flow 3-16
flow diagram 3-20
flow scenarios 4-8
held 3-20
imposing 5-1
imposition data 6-17
limit 3-23
order of display 3-20
overrides 4-23, 8-7
previewing 4-16, 4-17
remove raster and reRIP 3-22, 3-30
saving imposed 5-10
temporary files 6-17
job icons
Archive window 3-27
Fiery WebSpooler 8-3
FreeForm window 3-30
Print area 3-23
RIP area 3-22
Spool area 3-20
Job Label
date 6-5
defined 6-5, A-4
job name 6-5
sheet information 6-5
time 6-5
I-6
Index
Job Log
clearing 3-37, 4-35
deleting 3-37, 4-35
described 3-35
displaying 4-35, 8-9
exporting to a file 3-36, 4-35
Filter 3-37
printing automatically 3-37
printing from the Command
WorkStation 4-7, 4-35
printing from the Control Panel
1-5, 4-7
specifying a date range 3-36
updating the display 3-36, 4-35
using (from Fiery WebSpooler) 8-9
viewing printed jobs 8-4
Job Log Setup option 1-9
Job menu commands 3-10, 8-4
job name 6-5
Jobs Saved in Printed Queue 3-23
job ticket information 3-15, 4-4, C-5
L
landscape sheet orientation 6-3
layout
bleeds 6-6
defined 6-4, A-4
maximum number of pages 6-4
rows in 6-4, 6-5
layout mode
characteristics 5-6
clipping indicators 6-7
defined 5-5
reordering pages 6-11
Zoom tool disabled 5-6
layout view 6-11
LCD xviii
line selection buttons 1-2
load balancing between servers 4-30
logging in to a server 3-6
Log in/out slider 3-6, 3-15, C-6
Log Off Windows command,
on FieryBar 2-4
Log out command 3-13, 4-39
M
Magnification menu 5-5
Manage Color option 3-12
Manage Fonts command
3-12, 4-28, 4-39
margins 6-13, A-5
masters for variable data jobs 3-29
memory
in use 3-15
total 3-15
Menu button 1-2
menus
Columns 6-5
Command WorkStation 3-10
Creep Adjustment 6-3
Duplex 6-3
File 3-10
Help 3-13
Job 3-10, 5-1
Magnification 5-5
Orientation 6-3
Rows 6-4, 6-5
Server 3-12
Sheet 5-5
Size 6-2
Template 5-9
View 5-7
Window 3-13
millimeters 6-2
multiple servers, balancing load
between 4-30
N
nested saddle 6-9, A-6
Network Setup
option 1-9, 2-5
Notes fields 4-2, 4-4, 4-24
I-7
Index
O
Operator password xviii, 3-7, 7-1, 8-2
Orientation menu 6-3
original page size 6-7
Override Print Settings command 8-6
P
page
finished size 6-7
interaction of scaling values 6-8
maximum number in layout 6-4
numbers in layout view 6-11
original size 6-7
reordering automatically A-7
reordering on sheet 6-11
rotating 6-12
viewing individual 5-6
page numbers 6-11
PANTONE 1-5, 4-7
Paper Trays, align 3-12
passwords
Administrator xviii, 3-7
Change (Administrator)
Password option 1-9
for Command WorkStation
access 3-1
Operator xviii, 3-7, 7-1, 8-2
PDF data xv, 3-3
PDF files, downloading 4-27
perfect binding
defined 6-8, A-6
groups in 6-9
gutters 6-13
performance, optimizing C-5
permissions xvii, 3-1
Photoshop, transfer functions 4-28
points 6-2
PostScript
defined xv
icon 3-20
RIP xv, 3-17
PostScript data xv, 3-3
PostScript Setup option, see PS Setup option
Preferences dialog box, commands 3-10, 4-5
Preview command 3-12, 4-16, 4-17
previewing print jobs 4-14
preview mode
characteristics 5-6
clipping icon 6-7
defined 5-5
Print and Hold command 3-11, 3-25, 8-5
Print area 3-3, 3-23
Print command 3-10, 3-13, 3-24, 8-5
Printed queue 3-4, 3-23, 8-3
print engines and duplex printing A-3
printer (job) icon 3-20
printer fonts, see fonts
printer settings, overriding 3-10
Printer Setup option 1-9, 2-5
printer’s marks
bleeds A-5
date 6-5
defining 6-5
disabling 6-5
enabling 6-5
Fold Marks 6-5, A-5
gutters A-5
Job Label 6-5
job label A-4
job name 6-5
margins A-5
overview A-4
sheet information 6-5
time 6-5
Trim Marks 6-5, A-5
printer’s spread 5-3
printing
Configuration page 1-5, 4-7
defined xv, 3-17
error 3-23
font list 1-5, 4-7
server information pages 1-5, 4-6
I-8
Index
printing duplex 6-3, A-3
print jobs
deleting from queue 3-10
previewing 4-13, 4-14
routing 3-24 to 3-26
Print Pages command
Command WorkStation 3-10, 4-6
Control Panel 1-5
Print status bar 3-18
Print Status screen 1-3
problems, see troubleshooting
Process Next command 3-11, 3-25, 8-5
Properties command 3-11, 3-25, 4-23
Properties dialog box 4-22
PS Setup option 1-9
Q
queues 3-17
Queues window
changing the proportions 3-18
deleting held jobs C-5
described 3-16
elements 3-8
spooled jobs 3-17
update 4-30
R
raster
data 3-22, 3-24, 8-5
icon 3-20
image 3-17
raster files
editing 4-15
previewing 4-13
saving 3-17
saving an edited document 4-18, 4-22
rasterizing, see RIPping
reader’s spread 5-3
Reboot (server) command 3-12, 4-39
Refresh command 3-13
Remove Raster command 3-11, 3-25, 8-5
Rename command 3-10, 3-24, 8-5
reordering pages
automatically A-7
layout mode 6-11
Repeat option 6-9
Restart Fiery command, on FieryBar 2-3
restricting access to server xvii
Resume Print command, on FieryBar 2-4
Resume Printing command
Command WorkStation 3-12
Control Panel 1-6
Revert to Default Settings command 3-13
right mouse button commands 3-24 to 3-26
RIP, defined xv
RIP and Hold command 3-10, 3-24, 8-5
RIP area 3-3, 3-22
RIPped jobs 3-4, 8-3
RIPping 3-17
RIP Status screen 1-3
rotating pages 6-12
rows
clipping of content area 6-4
selecting number in layout 6-4, 6-5
Rows menu 6-4, 6-5
Run Diagnostics command
from Control Panel 1-6
Run Setup command 1-6
S
saddle
defined 6-8, A-6
groups in 6-9
saddle stitch binding
characteristics of 6-8
creep 6-3
defined A-6
groups A-6
gutters 6-13
safety xviii
Save As dialog box 5-10
Save Template icon 6-14
I-9
Index
saving imposition settings 5-9
Scale To Fit 6-8
Scaling area
Finished Height field 6-8
Finished Width field 6-8
interaction of controls 6-6
percentage 6-7
SEF prefix 6-3
Send to Server command 3-11, 3-26, 4-30
server
cleaning xviii
clearing C-9
configuring 3-5
connecting from Command
WorkStation 3-5, 3-13, 4-30
display window xviii
managing multiple color servers 4-30
restarting 1-9, 2-6
selecting another 3-13, 4-30
shutting down 1-10, 2-7
working with more than one 4-30
server fonts, see fonts
Server Information slider 3-14
Server menu commands 3-12
Server Selection tabs 3-13
Server Setup option 1-9
Setup command 3-13, 4-39
Set Up Fiery command, on FieryBar 2-3
sheet
defined A-1
magnifying 5-5
navigating to selected 5-5
number of columns 6-5
number of rows 6-4
orientation 6-3
reordering pages 6-11
short-edge feed (SEF) 6-3
size 6-2
thickness 6-3
viewing by number 5-8
viewing entire 5-7
Sheet area 6-2
sheet information 6-5
Sheet menu 5-5
shingling A-7
short-edge feed sheet size 6-3
‘showpage’ after EPS files option 4-28
Shut Down command 1-6
signature A-2
simplex printing A-3
Size menu 6-2
sliders 3-14
sorting jobs 3-28, 3-31
source file 4-15
spine A-6
spool, defined xv
Spool area 3-3, 3-20
spooled jobs
displayed in Fiery WebSpooler 8-4
icons 3-20
in Queues window 3-3
spool file
managing 6-16
PDF, PostScript formats 6-16
starting the server 2-5
status, FieryBar 2-1
status bars
animation 3-18
in Queues window 3-2, 3-17
Print, RIP, Spool 8-3
status messages, Touch Panel Display 1-7
status screens, Control Panel 1-3
Status WebTool, see Fiery WebTools
step-and-repeat printing 6-9
Suspend Print command, on FieryBar 2-4
Suspend Printing command
from Command WorkStation 3-12
from Control Panel 1-5
switching servers 3-13, 4-30
system information 3-14
system performance C-5
I-10
Index
T
target file 4-15
template
applying 5-9
creating 5-9
Default Settings 5-9
defined 5-8
deleting 6-15
saving 6-14
saving imposition settings 6-14
selecting 5-9
Template menu 5-9
temporary files 6-16, 6-17
Test Page
printing C-10
printing from
Command WorkStation 4-7
printing from Control Panel 1-5
problem printing C-10
Thumbnail A
editing options 4-17
page commands 4-15, 4-16
page display 4-13
window 4-15
Thumbnail A command 3-11, 3-25, 8-6
Thumbnail B 4-15
Thumbnail B command 3-11, 3-25, 8-6
time 6-5
Touch Panel Display
status messages 1-7
Trim Marks 6-5, A-5
troubleshooting
Command WorkStation cannot
connect to server C-7
Command WorkStation hangs C-6
file management tips 6-16
general guidelines C-6
slow redraw 5-5
touch-up tool problems 6-15
unexpected printing results C-8
users are unable to connect to
the printer C-9
U
undo, in editing thumbnail views 3-45, 4-21
Undo command 3-12
Unique option 6-10
up button 1-2
Use Master option 4-24
V
variable data printing 3-29, 4-24
View in Helper App command 3-13
View menu 5-7
view modes
compared 5-6
layout 5-5
preview 5-5
Volume column, in Archive window 3-28
W
warning
"Disk full" C-5
display window breakage xviii
WebDownloader WebTool, see Fiery
WebTools
WebLink WebTool, see Fiery WebTools
WebSetup WebTool, see Fiery WebTools
WebSpooler, see Fiery WebSpooler
WebTools, see Fiery WebTools
Window menu commands 3-13
window selection tabs 3-8, 3-16
workflow scenarios 4-8
working with more than one server 4-30
Z
Zoom tool 5-6
USING THE DOCBUILDER PRO KIT
Part Number: 45023375
Copyright © 2001 Electronics For Imaging. All rights reserved.
This publication is protected by copyright, and all rights are reserved. No part of it may be
reproduced or transmitted in any form or by any means for any purpose without express prior
written consent from Electronics For Imaging except as expressly permitted herein.
Information in this document is subject to change without notice and does not represent a
commitment on the part of Electronics For Imaging.
The software described in this publication is furnished under license and may only be used or
copied in accordance with the terms of such license.
Patents: 5,867,179; 5,835,788; 5,666,436; 5,553,200; 5,543,940; 5,537,516; 5,517,334;
5,506,946; 5,424,754; 5,343,311; 5,212,546; 4,941,038; 4,837,722; 4,500,919, D406,117
Printed in the United States of America on recycled paper.
Restricted Rights Legends
For defense agencies: Restricted Rights Legend. Use, reproduction, or disclosure is subject to
restrictions set forth in subparagraph (c)(1)(ii) of the Rights in Technical Data and Computer
Software clause at 252.227.7013.
For civilian agencies: Restricted Rights Legend. Use, reproduction, or disclosure is subject to
restrictions set forth in subparagraph (a) through (d) of the commercial Computer Software
Restricted Rights clause at 52.227-19 and the limitations set forth in Electronics For Imaging
standard commercial agreement for this software. Unpublished rights reserved under the
copyright laws of the United States.
Proprietary Rights
You acknowledge that the Software, Coded Font Programs, Typefaces, Trademarks and
accompanying documentation are proprietary to Electronics For Imaging and its suppliers and
that title and other intellectual property rights therein remain with Electronics For Imaging
and its suppliers. Except as stated above, this Agreement does not grant you any right to
patents, copyrights, trade secrets, trademarks (whether registered or unregistered), or any other
rights, franchises or licenses in respect of the Software, Coded Font Programs, Typefaces,
Trademarks or accompanying documentation. You may not adapt or use any trademark or
trade name which is likely to be similar to or confusing with that of Electronics For Imaging
or any of its suppliers or take any other action which impairs or reduces the trademark rights
of Electronics For Imaging or its suppliers. The trademarks may only be used to identify
printed output produced by the Coded Font Programs. At the reasonable request of Electronics
For Imaging, you must supply samples of any Typeface identified with a trademark.
Confidentiality
You agree to hold the Software and Coded Font Programs in confidence, disclosing the
Software and Coded Font Programs only to authorized users having a need to use the Software
and Coded Font Programs as permitted by this Agreement and to take all reasonable
precautions to prevent disclosure to other parties.
Remedies
Unauthorized use, copying or disclosure of the Software, Coded Font Programs, Typefaces,
Trademarks or accompanying documentation will result in automatic termination of this
license and will make available to Electronics For Imaging other legal remedies.
Limited Warranty And Disclaimer
Electronics For Imaging warrants that, for a period of ninety (90) days from the date of delivery
to you, the Software under normal use will perform without significant errors that make it
unusable. Electronics For Imaging’s entire liability and your exclusive remedy under this
warranty (which is subject to you returning the print server to Electronics For Imaging or an
authorized dealer) will be, at Electronics For Imaging’s option, to use reasonable commercial
efforts to attempt to correct or work around errors, to replace the Software with functionally
equivalent software, or to refund the purchase price and terminate this Agreement. Some states
do not allow limitations on duration of implied warranty, so the above limitation may not
apply to you.
Except for the above express limited warranty, Electronics For Imaging makes and you receive
no warranties or conditions on the Products, express, implied, or statutory, and Electronics For
Imaging specifically disclaims any implied warranty or condition of merchantability or fitness
for a particular purpose.
For warranty service, please contact your authorized service/support center.
EXCEPT FOR THE ABOVE EXPRESS LIMITED WARRANTY, ELECTRONICS FOR
IMAGING MAKES AND YOU RECEIVE NO WARRANTIES OR CONDITIONS ON
THE SOFTWARE OR CODED FONT PROGRAMS, EXPRESS, IMPLIED,
STATUTORY, OR IN ANY OTHER PROVISION OF THIS AGREEMENT OR
COMMUNICATION WITH YOU, AND ELECTRONICS FOR IMAGING
SPECIFICALLY DISCLAIMS ANY IMPLIED WARRANTY OR CONDITION OF
MERCHANTABILITY OR FITNESS FOR A PARTICULAR PURPOSE.
Electronics For Imaging does not warrant that the operation of the software will be uninterrupted
or error free or that the Software will meet your specific requirements.
Limits Of Liability
IN NO EVENT WILL ELECTRONICS FOR IMAGING OR ITS SUPPLIERS BE LIABLE
FOR ANY DAMAGES, INCLUDING LOSS OF DATA, LOST PROFITS, COST OF COVER
OR OTHER SPECIAL, INCIDENTAL, CONSEQUENTIAL OR INDIRECT DAMAGES
ARISING FROM THE USE OF THE SOFTWARE, CODED FONT PROGRAMS OR
ACCOMPANYING DOCUMENTATION, HOWEVER CAUSED AND ON ANY THEORY
OF LIABILITY. THIS LIMITATION WILL APPLY EVEN IF ELECTRONICS FOR
IMAGING OR ANY AUTHORIZED DEALER HAS BEEN ADVISED OF THE
POSSIBILITY OF SUCH DAMAGE. YOU ACKNOWLEDGE THAT THE PRICE OF THE
UNIT REFLECTS THIS ALLOCATION OF RISK. BECAUSE SOME STATES/
JURISDICTIONS DO NOT ALLOW THE EXCLUSION OR LIMITATION OF LIABILITY
FOR CONSEQUENTIAL OR INCIDENTAL DAMAGES, THE ABOVE LIMITATION
MAY NOT APPLY TO YOU.
Export Controls
You agree that you will not export or re-export the Software or Coded Font Programs in any form
without the appropriate United States and foreign government licenses. Your failure to comply
with this provision is a material breach of this Agreement.
Government Use
Use, duplication or disclosure of the Software by the United States Government is subject to
restrictions as set forth in subdivision (c) (1) (ii) of the Rights in Technical Data and Computer
Software clause at DFARS 252.227-7013 or in subparagraphs (c) (1) and (2) of the Commercial
Computer Software—Restricted Right Clause at 48 CFR 52.227-19, as applicable.
Third Party Beneficiary
You are hereby notified that Adobe Systems Incorporated, a California corporation located at 345
Park Avenue, San Jose, CA 95110-2704 (“Adobe”) is a third-party beneficiary to this Agreement
to the extent that this Agreement contains provisions which relate to your use of the Fonts, the
Coded Font Programs, the Typefaces and the Trademarks licensed hereby. Such provisions are
made expressly for the benefit of Adobe and are enforceable by Adobe in addition to Electronics
For Imaging.
General
This Agreement will be governed by the laws of the State of California.
This Agreement is the entire agreement held between us and supersedes any other
communications or advertising with respect to the Software, Coded Font Programs and
accompanying documentation.
If any provision of this Agreement is held invalid, the remainder of this Agreement shall continue
in full force and effect.
If you have any questions concerning this Agreement, please write to Electronics For Imaging,
Attn: Licensing Dept. or see Electronics For Imaging’s web site at www.efi.com.
Electronics For Imaging
303 Velocity Way
Foster City, CA 94404
Using the DocBuilder Pro Kit
Introduction
This document explains how to enable DocBuilder Pro, a dongle-protected feature of
Command WorkStation that works in conjunction with Adobe Acrobat. In addition to
this document, this kit includes:
• Adobe Acrobat Installers for DocBuilder Pro CD
• Dongle (included in this kit or as a separate item in a box of Accessories)
Each workstation that will be running DocBuilder Pro requires a dongle.
Command WorkStation software (not included in this kit) is located on the User
Software CD for the print server.
Requirements for a DocBuilder Pro workstation
• Pentium-based PC
(333MHz recommended)
• Win 95/98/2000/Me or
Win NT 4.0 with Service Pack 5 or 6a
• 32MB RAM
(64MB recommended)
• 850MB hard disk drive
with 90MB free space
• CD-ROM drive (2x)
• Video adapter card
with 2MB of video memory
• 17" monitor: 16-bit color; 1024x768
resolution
• 10BaseT, 100BaseTX, or Token Ring
network connection using TCP/IP
The print server can be used as the workstation if it is equipped with a monitor,
keyboard, and mouse.
For more information on system requirements for the workstation, see the user
documentation provided with the print server.
Enabling DocBuilder Pro
To enable DocBuilder Pro on a client workstation (or the print server if it is equipped
with a monitor, keyboard, and mouse):
• Install Adobe Acrobat 4.05 from the Adobe Acrobat Installers for DocBuilder Pro CD
• Install Command WorkStation if it is not already installed.
• Install a DocBuilder Pro dongle directly on the parallel port. One dongle is required
per client.
1
Using the DocBuilder Pro Kit
TO
ENABLE
1.
D OC B UILDER P RO
Uninstall all versions of Adobe Acrobat that may be installed on the workstation.
NOTE : If Acrobat version 5.0 is already installed on the workstation, 4.05 will be installed
in a separate folder. Therefore you do not need to uninstall version 5.0.
Close all open applications then use the Windows Control Panel for removing programs:
Start menu>Settings>Control Panel>Add/Remove Programs
Then, restart the computer: Start menu>Shutdown>Restart computer
If a message appears similar to “Unable to locate log file c\program”, your uninstaller
program no longer works due to a missing or corrupted file. In this case, you must
manually remove each application’s files. To remove Adobe Acrobat, delete the Acrobat
directory (default location: c:\Program Files\Adobe).
2.
Insert the Adobe Acrobat Installers for DocBuilder Pro CD in the CD-ROM drive.
NOTE : If Adobe Acrobat is not installed properly an error will be displayed: The selected
function requires Adobe Acrobat 4.0.
3.
Follow the instructions in the Setup dialog boxes to complete installation of Acrobat.
Use the table below as a guide. For specific instructions, read the information in each
dialog box.
NOTE : If you have the printer driver already installed on your computer, a prompt may be
displayed asking you whether to overwrite some files. Choose Yes when the message
appears and proceed with the installation.
Name of dialog box:
Action:
Welcome
Read the Setup program introduction.
Select Country
Choose the country in which you purchased the software.
Software License Agreement
Read the license agreement.
Type of Setup
(This screen appears only if you
install Adobe Acrobat 4.05
from a source other than the
CD provided in this kit.)
Choose Destination Location
Specify a hard disk location for the installed Adobe Acrobat 4.05 for
DocBuilder Pro software.
Adobe Acrobat 4.05 Setup
Go back if desired
Setup Complete
Remove the CD from the drive then click Finish to restart the
computer.
4.
2
Choose Custom and select the following components: Acrobat
Program Files; Acrobat Distiller Files; Acrobat PDFWriter Files;
Acrobat Catalog Files; Accessories
When finished:
Click Next.
Click Next.
Click Accept.
Click Next.
Click Next.
Click Next.
Click Finish.
If Command WorkStation is already installed, skip to step 7; otherwise, insert the User
Software CD (not provided in this kit) into the workstation.
Enabling DocBuilder Pro
5.
If auto-install is not a feature of your version of Command WorkStation, navigate to the
CStation directory of the CD-ROM and double-click Setup.exe.
6.
Follow the instructions in the Setup dialog boxes to complete installation of the
Command WorkStation software.
Use the following table as a guide when installing the Command WorkStation software.
For specific instructions, read the information in each dialog box.
Name of dialog box:
Action:
Welcome
Read the Setup program introduction.
When finished:
Click Next.
Software License Agreement
Read the license agreement.
Click Yes.
Choose Destination Location
Specify a hard disk location for the installed Command WorkStation
software.
Click Next.
Select Program Folder
Specify a folder name for the Command WorkStation software located
in the Programs menu.
Click Next.
Question
Indicate if you want to place a shortcut to the Command WorkStation
application in your StartUp folder.
Click Yes or No.
Setup Complete
If the latest Java files are not on your computer, click Finish to install
them. After they are installed, restart the computer.
Click Finish and
restart the
computer.
If the latest Java files are already installed, click Finish to complete
Setup and restart the computer. Select Yes if prompted to restart the
computer now; if not prompted, restart the computer using Start
menu > Shutdown > Restart Windows.
7.
Configure the connection to the print server if no print server user software has ever
been installed, configured, and used on this workstation (see page 4).
8.
Unpack the dongle and install it directly on the workstation’s parallel port (LPT1).
Tighten the two screws on the dongle to secure it. If the workstation’s parallel port must
accommodate dongles for other dongle-protected applications, make sure that the
DocBuilder Pro dongle is first in the chain.
NOTE : The dongle is required in order to use all the features of DocBuilder Pro. If the
dongle is not installed or if it is removed while using DocBuilder Pro, an error message
will be displayed: Cannot proceed because DocBuilder Pro dongle was not found. All
unsaved work may be lost. Work already saved can be printed but not changed.
3
Using the DocBuilder Pro Kit
Configuring the Command WorkStation connection
After installing the Command WorkStation software, you must properly configure the
Chooser list in order to connect to the print server.
TO
CONFIGURE THE CONNECTION FOR THE
C OMMAND W ORK S TATION
1.
Launch the Command WorkStation by double-clicking its icon or by choosing it from the
Start > Programs > Command WorkStation menu.
2.
Click OK.
3.
Enter the appropriate information for the print server.
Nickname—Enter a name for the print server. This name can be any name you wish; it
does not have to match the actual Server Name of the print server.
NOTE : The nickname cannot contain any of these seven characters: [ ] _ " ' <space> <tab>
Protocol—Choose the TCP/IP network protocol from the pop-up menu.
NOTE : Setup for the print server from the Command WorkStation is supported over
TCP/IP only.
Server Name —Enter the IP address (or DNS name) of the print server. The DNS name
is case-sensitive. Ask the network administrator for this information.
New Device—Enter the unique device name exactly. For this information, print the
current Configuration page and use the first term listed under the “Printer Setup” line.
You can also find it in the user documentation provided with the print server.
4
Configuring the Command WorkStation connection
4.
When you have entered all the information, click Add.
The device name now appears in the Devices list.
5.
In the Add New Server window click OK.
The print server appears in the Choose Printer Device list of available servers as shown
below.
6.
With the device name selected in the Choose Printer Device list, click OK to connect to
the print server and begin using the Command WorkStation.
5
Release Notes
Color Controller E-810, version 1.0
This document contains information about Color Controller E-810™ version 1.0.
Before using the Color Controller E-810, make a copy of these Release Notes and distribute
them to all users.
N OTE : This document uses the term “E-810” to refer to the Color Controller E-810.
Before printing to the E-810:
• Make sure system software version 1.0 is installed on the E-810.
• Install user software version 1.0 onto client computers. For instructions, see
Getting Started.
Windows OS version support
The E-810 supports Windows 95/98SE/Me and Windows NT/2000.
Although the E-810 supports Windows 95, descriptions of Windows 95 and illustrations
of Windows 95 dialog boxes are not provided in the documentation. Consider all
Windows 9x/Me descriptions in the User manuals as Windows 95/98/Me.
N OTE : The E-810 supports Windows 95 (OSR2 or later).
Available disk space
The available disk space is displayed on the E-810 LCD.
Printer driver
installation
AdobePS Readme file
After installing the AdobePS driver, read the README.doc file located on the User
Software CD, in the same directory as the other printer files. This file contains information
about potential conflicts between the Adobe driver and other software applications.
Configuring installable options on Windows NT 4.0/2000
Use the Device Settings tab to add and remove Installable Options. For detailed
information see Getting Started.
Setup
Fiery Setup
To run Fiery Setup from the Control Panel, you must log in with Administrator privileges.
Wait until printing is completed before entering Setup. Entering Setup during printing may
result in missing colors in the final print.
Fiery Server Setup
If a connection to the E-810 fails after you change settings in the General or Printer Setup
tab in Fiery Server Setup, the Workgroup name and the Domain name may be the same.
To resolve this problem, use different names.0
2001 Electronics For Imaging, Inc.
Part number:
45022699
Page 2
Remote Setup for Bindery and NDS
When configuring Bindery or NDS in Network Setup using WebSetup or the Command
WorkStation from a client computer, enter a password in order to make changes. For
Bindery Setup, log in as Administrator, Supervisor, or Guest with the appropriate password.
For NDS, select the appropriate login and password.
IPX Auto Frame Type
If you select Yes to enable IPX Auto Frame Type in Setup, the E-810 will bind only to the
first frame type it finds, which is typically 802.2. To ensure that all available frame types are
bound, select each one individually. After the Fiery reboots upon exiting Setup, print the
Configuration page to verify that all selected frame types were successfully bound.
TCP/IP and DHCP servers
In some cases, Mac OS computers may crash when attempting to obtain an IP address from
a DHCP server while loading the TCP/IP driver. Verify the TCP/IP Control Panel has a
valid IP address, and the router and DNS server addresses are valid before running
applications such as ColorWise Pro Tools.
Windows Setup (WINS Printing) from the E-810 Control Panel
Depending on your selections for setting a domain for WINS printing, the E-810 prompts
you that it will reboot. Choose OK when prompted. This allows the E-810 to retrieve a
current list of domains. Allow the E-810 to reboot and return to Setup to finish making the
settings.
E-810 passwords
The E-810 password used to access Setup, as well as the password required to log in to the
E-810, are case-sensitive and must be entered exactly.
Maximum number of users for SMB
Windows NT 4.0 supports a total of 10 simultaneous SMB connections, including the
Direct, Print, and Hold queues.
UNIX printing
There may be incompatibility problems with some UNIX environments.
System
Reboot System
If you reboot the system while the E-810 is printing, you may experience unexpected
results. Wait until the display reads Idle before rebooting the system.
Printing
Setting
Driver
Print Options
Booklet option
If the Booklet option available in the Adobe 8.6 Printer driver for Mac OS is used,
unexpected results may occur.
Page 3
Custom paper size
When you set custom paper sizes (Custom page 1 through Custom page 3) in the
Windows 95/98/Me printer driver, the maximum value is 13.00" (330.2mm) for Width
and 19.00" (482.6mm) for Length, regardless of the default maximum values indicated in
the input box.
Printing custom paper sizes on the Mac OS requires that you enter Width and Height
values in the printer driver. Refer to the following definitions when specifying these values:
Width is defined as the length between the left edge and right edge of the paper.
Height is defined as the length between the top edge and bottom edge of the paper.
Sorter and Duplex options are not supported for custom paper sizes. Although you can
select these options in the PageMaker 6.5 PPD for a custom paper size job, the job is
automatically canceled.
When you specify a custom paper size in the printer driver for Windows 95/98/Me, check
the page size specified in your application, so that both page sizes match. If the page sizes do
not match, you may get unexpected printing results, and the custom paper size may not
print correctly. The E-810 does not support mixed paper size jobs that contain a custom
paper size.
Default settings
After you install the printer driver, the default page size is Letter or A4. When you select
Default Settings from the Saved Settings menu, the default page size may change.
Editing device settings
To change printer defaults in a driver that was downloaded from the E-810 using Point and
Print, the permissions for the Print queue on the E-810 server must be set to Full Control
for the user “Everyone.” Once you are logged in with Administrator privileges, you can
allow a user or all users to change print defaults in the driver by enabling Full Control in
the Properties\Security\Permission tab.
New driver install
Installing the Windows 2000 printer driver with Point and Print is not supported. See
Getting Started for installation instructions for the Windows 2000 printer driver.
Scale option
On Windows 2000, settings for the Scale option range from 1% to 1000%; however, the
E-810 supports only settings that range from 25% to 1000%. On Windows 95/98/Me,
settings for the Scale option range from 25% to 322% for A3 and 11 x 17 paper.
Setting paper sizes in applications
When sending a job from an application (such as Microsoft Word) that allows you to
specify paper size in the Print dialog box, select the same paper size in both the application’s
Page Setup dialog box and the printer’s Properties dialog box.
Tabloid and Statement paper sizes
On Windows NT and Windows 2000, the Tabloid and Statement paper sizes in the printer
driver appear twice with different names. To print these sizes correctly, choose 11 x 17 for
Tabloid and 5.5 x 8.5 for Statement.
Page 4
Transparencies
On Mac OS, you can select the Slip sheet option without selecting Transparency in the
PPD. The print job will then print as Plain paper from Tray 2 or Tray 3 with Slip sheet from
Manual Feed. For the correct use of Slip sheets, set Manual Feed for transparency with slip
sheet mode.
Unprintable Area
The Unprintable Area option is not supported for Windows NT/2000.
With some software application such as Photoshop and Illustrator, the Unprintable Area
option may not function correctly.
With Microsoft Word, if any of the margin settings on the Page Setting tab is larger than
the number specified for the Unprintable Area specified in the printer driver, then the
Unprintable Area setting will be ignored.
Driver
Printing
Alert messages
If error messages occur during a print job on Windows 95/98/Me and cause you to power
off the copier, a duplicate print job may begin printing when the copier is powered on
again.
Binding
Certain application/operating system combinations cause the E-810 to misinterpret
binding instructions, delivering top-bound instead of side-bound output. Known instances
include PageMaker 6.5 on any OS, and Acrobat on Windows 2000.
Combine Separations
Combine Separations will only function with properly separated QuarkXpress, Pagemaker,
and Illustrator files.
Control Panel Settings
From the copier’s operation panel, set “control panel OFF timer” for a longer period of
time than the “system reset timer.” Without these settings, you may get an incorrect
print result or experience a paper jam. These settings are located in System Setting from the
User Tools key. See the copier’s guide for more information.
Default paper size for LCT (Large Capacity Tray) on Windows NT 4.0
If LCT is set to On in the Device Settings of the Windows NT 4.0 Print Properties, make
sure the default paper size appears as Tabloid (11 x 17) on Form to Tray Assignment. If you
change the paper size and re-open the Form to Tray Assignment, the change will have no
effect on printing. Supported Letter and A4 sizes printed from the LCT print normally.
Disk full error message
When the hard disk drive on the E-810 is full, any print job sent to the E-810 will not print
until the current job is finished. You can remove completed jobs from the printed queue to
free up more disk space.
Page 5
Duplex
The Adobe printer drivers provided on the User Software CD do not properly support
2-up and 6-up printing.
You may experience incorrect stapling results when you attempt to print a duplex job
with Staple Mode set to Two Centers, depending on the side/top binding and
Portrait/Landscape setting combinations.
Duplex printing is not supported with thick media.
The copier does not support printing with Thick Paper from the Duplex Tray. If you want
to print duplex jobs on thick paper, choose Manual Duplex.
Duplexing and paper jams
If you experience a paper jam when you send a print job in the middle of a larger duplex
job, remove the paper from the duplex tray so that the printer can restart.
Duplex for Landscape documents
When you print landscape jobs with the Duplex option selected, the final output may be
inverted. When you select Top Binding, the result may be Side Binding, and vice versa.
To get the correct duplex result, select the opposite setting.
Font substitution
When you substitute Times New Roman for Arial in the Font Substitution Table, the
substitution will not occur.
Hagaki or Double Postcard
When you print multiple pages on Hagaki or Double Postcard sizes, you may not be alerted
to remove copies from the sorter.
Job Notes
Save Settings may not save job notes information on the Mac OS. To avoid this problem,
set job notes for every print job.
Paper jams at the Automatic Document Feeder (ADF) during printing
Paper jams at the ADF may stop printing until the paper jam is removed. Once the jam
is removed, printing will resume; however, the printed output may not print correctly.
To prevent this from happening, avoid using the ADF when printing to the E-810.
Paper size and paper jams
Paper jams may occur without warning when paper size settings do not match the actual
size of paper in the paper tray. This problem occurs with manual feed and manual duplex
trays. Be sure to adjust paper size selection to match physical paper size before printing.
Paper Source
When printing with the media type Transparency, Thick paper, or Extra Thick paper, do
not use Auto Select unless a tray has been configured for these media types. See the Printing
Guide for more information.
Page 6
Printing from UNIX workstations
Only PostScript files can be printed from Unix workstations. Only one file can be printed
at a time.
Pure Black Text
On the Mac OS, the Pure Black Text option works for RGB Graphics/Text objects. In the
Mac printer driver, select Color Matching, then select PostScript Color Matching for Print
Color and Printer’s Default for Printer’s Profile.
Scaling
When you use the Scaling option, the image may not center correctly. Documents that have
been scaled may result in cropped print jobs.
Solaris 8 print failure
Command WorkStation and controller stall after printing three of four jobs sent together to
the E-810. To recover, reboot the server and cancel the job, then clear and reboot the server
again. To avoid this problem, always send one print job with one print command.
Thick media or OHP from Manual Feed
When the sorter option is installed on the copier, printing from the manual feed tray may
take extra time when Thick, Extra Thick or OHP is selected on the copier operation panel.
Clearing the paper type settings for the manual feed tray on the copier operation panel may
reduce this waiting time.
Sorter Mode
On Windows 2000, you may experience unexpected printing results if you print multiple
copies with Sorter Mode. To avoid this problem, in Printing Preferences, set the Copy
count for 2, clear the check in the Collated check-box, and then re-enter 1 for the Copy
count for each print.
When printing from an application, you need to set the number of copies for printing and
clear the check in the Collate check-box of application.
See the Printing Guide for information on accessing Printing Preferences from the
Windows 2000 printer driver.
The maximum number of copies that can be produced using Stack depends on the paper
size and paper type you use. Refer to your copier manual for detailed specifications on the
maximum number of copies in Sorter Mode and Stack Mode.
Stapling
Check the staple supply before sending a Print with Staple job. An alert message may not
appear indicating that the copier is low on staples for Fiery Downloader, Command
WorkStation, Fiery WebTools, Fiery Link, or Smart Net Monitor.
Watermarks
Certain marks, such as commas, may not appear in printed custom watermarks.
Windows icon
A Windows icon may appear in the window, if printer properties is opened from an
application.
Page 7
ColorWise Pro
Tools
Defining profiles
The “Appear in Driver as” profile option for editing preset profiles or defining new profiles
is not supported in the printer driver.
Color Sync Profiles
To use Color Sync Profiles, copy the Color Sync Profile files to your computer. The Color
Sync Profiles are in the “Color Sync” (for Mac) or “ICM” (for Windows) folder on the User
Software CD.
Fiery Downloader
TCP/IP protocols
Fiery Downloader is supported over TCP/IP only. IPX is not supported.
Arrange Icon
The Arrange Icon feature is not functional.
Downloading PDF files
Downloading PDF files to the Direct connection is not supported. Instead, use either the
Print queue or the Hold queue.
When you download a large PDF file, the job may not appear in the Job Log. If the job
does appear, the Job Log may display 0 for the number of pages printed and no information
for paper size and media type. However, the file RIPs and prints correctly.
Fiery Spooler
Connecting to the E-810
You can connect to only one E-810 at a time.
Command
WorkStation
TCP/IP protocols
Command WorkStation is supported over TCP/IP only. IPX is not supported.
Copier Configuration
Default configuration settings displayed in Command WorkStation may not correctly
reflect the copier’s actual configuration settings. These settings do not effect print quality.
Job ticket information
In Command WorkStation, a job’s page size may not display correctly in the job ticket
information bar. To view the correct page size for the job, view the job’s information in the
Job Log, or double-click the job to display its Properties dialog box. The correct page size
for the job is listed in the Page Size field.
In Command WorkStation and Fiery Spooler, Paper Size and Media Type values appear as
Unknown when a previously printed job is RIPped and held for further printing.
Jobs printed from the RIP area in Command WorkStation, WebSpooler and Fiery Spooler
appear with incorrect sizing information in the Job Log.
In some Command WorkStation windows, User ID field title appears as Note 2.
Page 8
Override settings
Selecting Command WorkStation override settings may cause a print job to process
incorrectly. If you override a specific setting for an option from the Command WorkStation
and then open the job settings again to replace that setting with Printer’s Default, you may
get unexpected printing results. To avoid this, do not choose Printer’s Default when you
override print settings from the Command WorkStation, or remove the original raster file
before you override the print settings again.
Notes and User ID
The Notes and User ID print options appear as override settings in Command WorkStation
however, you cannot override these settings. The Notes and User ID print options also
appear in the Job Log window.
Cancel Printing
If you choose Cancel Printing from the Server menu and restart the E-810 before the cancel
function has been completed, you will lose the connection to the E-810 and errors may be
displayed.
When jobs are cancelled during the RIP or print process, no message appears in the RIP or
print bar to indicate that the job is being cancelled.
If you select cancel RIPping during the RIPping process, the job goes directly to the Print
queue; however, information about the job may not appear in the Job Log.
Restart
If you select Restart from the Server menu, there may be a delay in shutting down and
restarting the Command WorkStation. Command WorkStation may appear to be
connected when in fact it is shutting down.
DocBuilder Pro (option)
DocBuilder Pro (option) may not function correctly with Acrobat 5.x.
Make sure to install the Acrobat 4.05 which is included in the CD for the Doc Builder Pro.
If Acrobat 5.x is already installed in the PC, then install the Acrobat 4.05 to another
directory.
Connection lost
If the message “Connection to the E-810 lost” is displayed in the Command WorkStation
window, click OK for this alert message and reboot the E-810, using Reboot System from
the Functions menu on the Control Panel. You can then launch the Command
WorkStation to re-establish the connection.
Similarly, if a print job is sent to the E-810 when the hard disk is full, an alert message
displays on your computer and the Command WorkStation freezes. Reboot the E-810 to
re-establish connection between Command WorkStation and the E-810.
RAM reading
The Command WorkStation RAM availability slider shows the utilizable value, not the
installed RAM size. Check Fiery Link to see the total size of the installed RAM.
Page 9
Fiery Link
Status
Status information displayed in Fiery Link may require additional time to update. For this
reason, the status displayed in Fiery Link may not match the status displayed in the
Command WorkStation.
Fiery Link may not correctly display information about Thick paper used in the Input tray.
Status message
Fiery Link updates the status message of printed documents after clicking inside the main
Fiery Link window.
Edit My Fiery List
When the Edit My Fiery List window is open, and you click the Advanced or Refresh
button, the Edit My Fiery List window may obscure new dialog boxes. To prevent this,
move the Edit My Fiery List window off to one side before you click either the Advanced
button or the Refresh button.
The Refresh command may not properly display connected servers.
Fiery Scan
Scanning while a print job is processing
Using the copier to scan while a job is printing is not recommended.
If scanning is attempted during a print job, Fiery Scan displays incorrect feedback
information. Although prescan status progresses to 100% and concludes with a timeout
error, no scanning actually takes place while the engine is printing or scanning.
Scanning while a print job is processing may result in a copier timeout, an incorrect color
change in the printed page, or unexpected errors. If you experience incorrect scans, restart
Fiery Scan and rescan the image.
Scanning in Energy saver mode (including Power off mode)
Scanning sometimes fails when the copier begins in Energy saver mode. Reset the Energy
saver mode then warm up the copier completely prior to re-scanning if this problem occurs.
Prescanning while toner cartridge is empty
The E-810 and copier will not prescan while the black toner cartridge is empty. Install a
new black toner cartridge before you scan.
TCP/IP protocols
Fiery Scan is supported over TCP/IP protocols.
Adobe Photoshop 4.x/5.x/6.x
Fiery Scan supports only Adobe Photoshop 4.x, 5.x and 6.x.
TextBridge Pro 9.0/Pagis 3.0
Fiery Scan does not support TextBridge Pro 9.0 or Pagis 3.0.
Timeout error message
When a timeout error occurs during prescan, you must close and then re-open the Fiery
Scan interface in order to continue scanning properly.
Page 10
Fiery Scan color conversion
Fiery Scan color is improved with the automatic conversion of the copier RGB to EFIRGB.
White border
After you scan an image using TWAIN scan, a white border appears at the top of the page.
Depending on the page size you scan, a white border may also appear at the right-hand side
of the page when scanning from the LCD.
Color adjustment
In some TWAIN scans, the white area of the original may appear pink, which may be
printed as gray. To print the image without gray in the white area, adjust the color in Adobe
Photoshop. For more information, see the Help menu in Adobe Photoshop.
Scan to HDD
Scan to HDD supports PhotoShop 5.5 or later with a minimum 256MB of RAM.
Scanning in Energy Save Mode (including Power off mode)—Scanning sometimes fails
when the copier begins in Energy Save Mode. Reset the Energy Save Mode then warm up
the copier completely prior to scanning.
ADF Jam—When an ADF jam happens while you attempt to scan an image, the copier may
freeze and not recover even after you have removed the misfed original.
In such case, turn the main switch of the copier Off and On after you have removed the
misfed original from the ADF, and then scan the image again.
WebSetup
Network Setup
The ability to specify multiple IPX frame types in the Protocol2 tab of Network Setup does
not function correctly. As a workaround, specify IPX/SPX Setup options in Network Setup
from the copier Control Panel.
Rebooting the server
On Windows 2000, after rebooting the server from WebSetup, the message “IDLE”
appears in the copier LCD, however the message “Waiting for server” appears in the
WebSetup screen. This message is incorrect; it should appear as “IDLE”. To resolve this
problem, close your browser and relaunch WebTools.
Page 11
WebScan
TIFF files
When saving a scanned image on Fiery WebScan, the file compression method for TIFF
format differs as follows:
• When the image was scanned in Grayscale mode: TIFF (Packbits)
• When the image was scanned in CMYK mode: TIFF (JPEG compressed)
Therefore, scanning in Grayscale mode may create a larger TIFF file than one that was
scanned in CMYK mode.
To open a JPEG compressed TIFF file, you may need an application such as PhotoShop 5.5
or later. However, PhotoShop is only able to dispay the first page.
To open a multi-page JPEG compressed TIFF file, you may need an application such as
PhotoShop 5.5 or later. However, PhotoShop is only able to display the first page.
WebSpooler
Override Print Settings dialog box
In the Override Print Settings dialog box, the text in the Image Quality tab may not be fully
displayed.
The Notes tab in the Override Print Settings dialog box may not display User ID
information.
Job processing time
The job processing time displayed from WebSpooler is different from the actual time to
process the job.
Overriding print settings
If you use Override Print Settings to change a standard, non-custom page size to a custom
page size, no change will occur. The job prints as the standard page size.
Copier Scanning
Energy Save Mode
Set the AOF to over five minutes when the copier is in Energy Save Mode.
Do not use the scanner when the copier is in Energy Save Mode.
Applications
All
When you print a black-and-white duplex job, set the Color Mode to


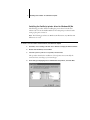
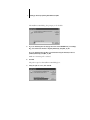
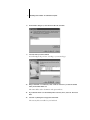
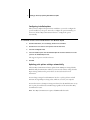

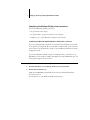
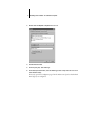
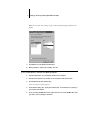
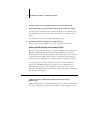
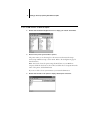
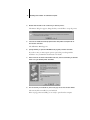
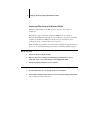

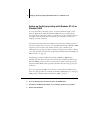
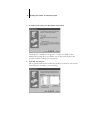
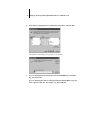

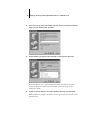
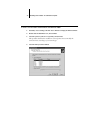
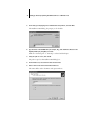
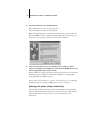
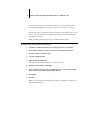


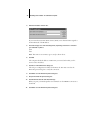

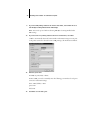
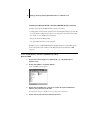
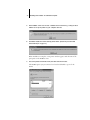


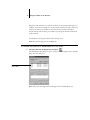
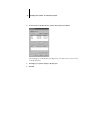
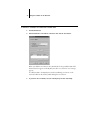
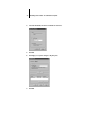


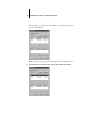
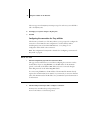


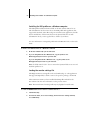


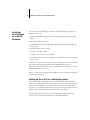


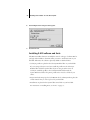
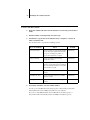
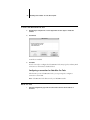


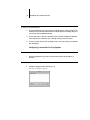
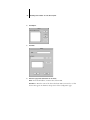

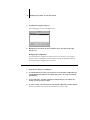

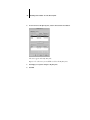
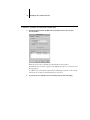

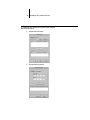
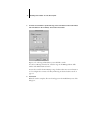
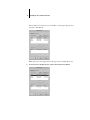
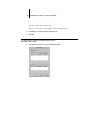

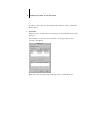
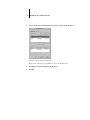

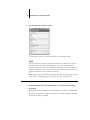
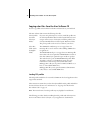
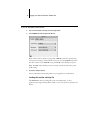


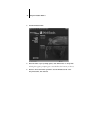
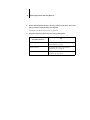


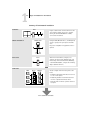


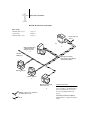
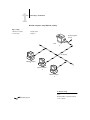
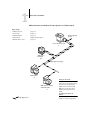
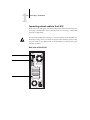


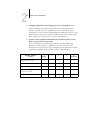


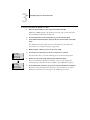

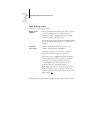

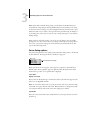

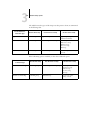


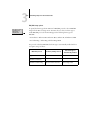


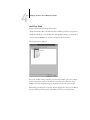
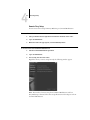
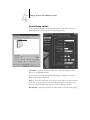


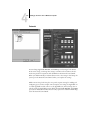


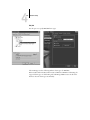

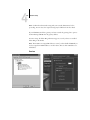
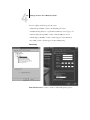
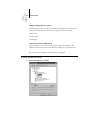


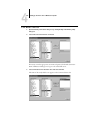

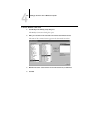
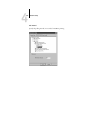


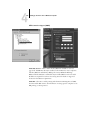
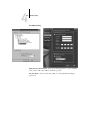
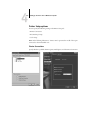
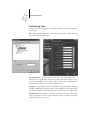


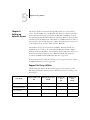


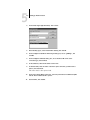


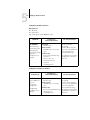


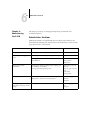
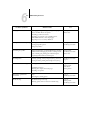

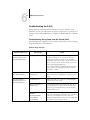


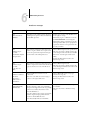


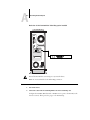


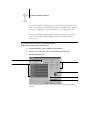


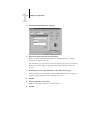

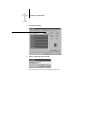
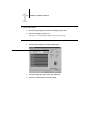
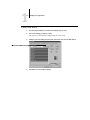
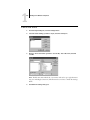
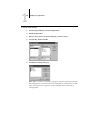

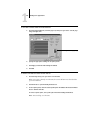
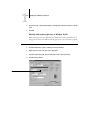

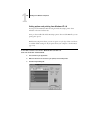
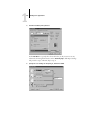

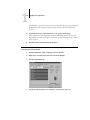
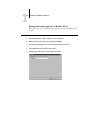

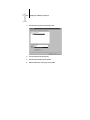

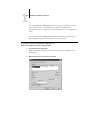
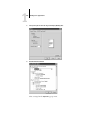

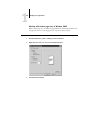
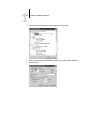


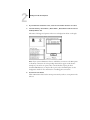


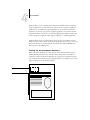


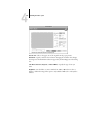

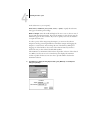
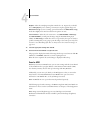


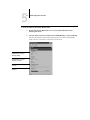

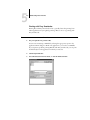


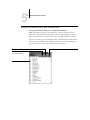


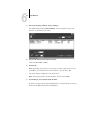
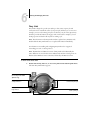
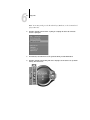
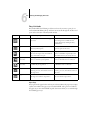


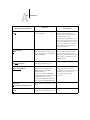
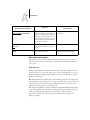

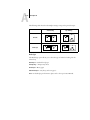


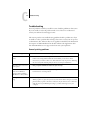
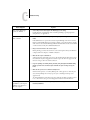
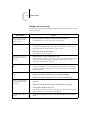


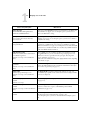
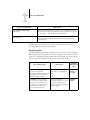


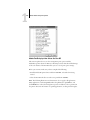


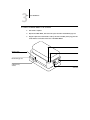
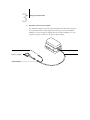
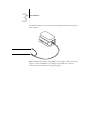


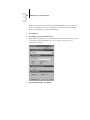

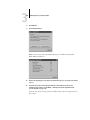


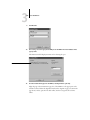

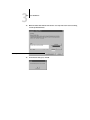
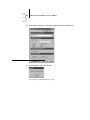
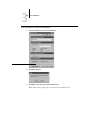
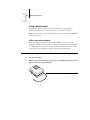
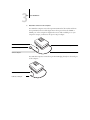
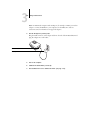

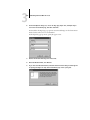
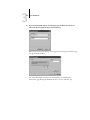
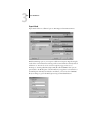

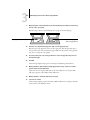


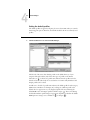
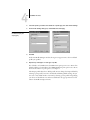
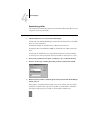


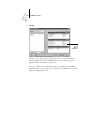


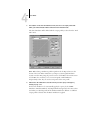


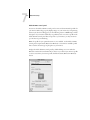
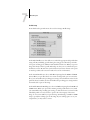

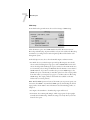
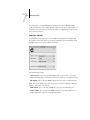
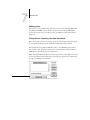

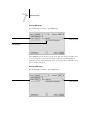


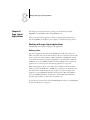


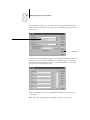
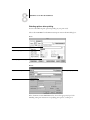
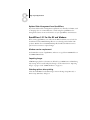
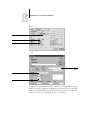

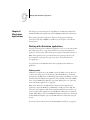


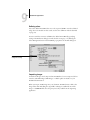
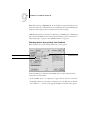

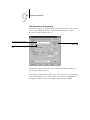


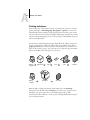


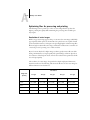


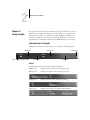

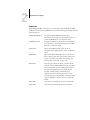


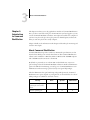
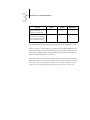


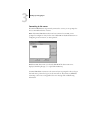

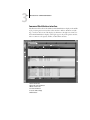
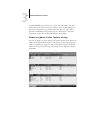


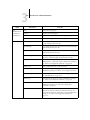
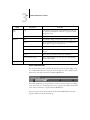
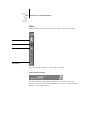


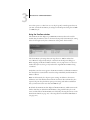

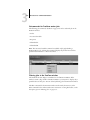


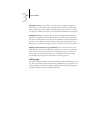


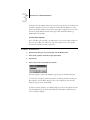

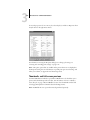
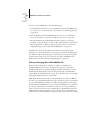

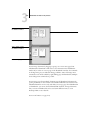


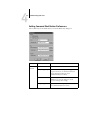


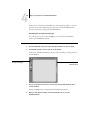
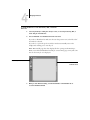


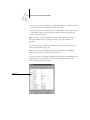
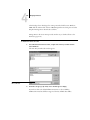
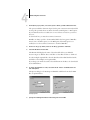

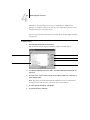

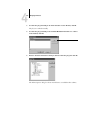
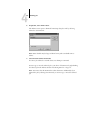


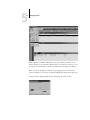


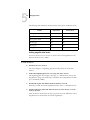

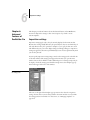
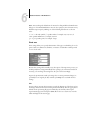
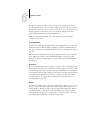


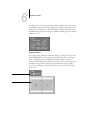
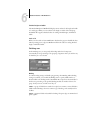
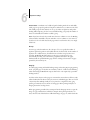


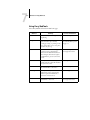
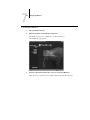


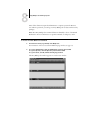


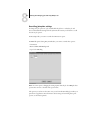


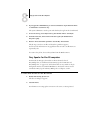


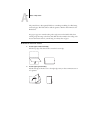


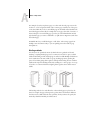

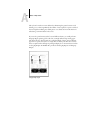

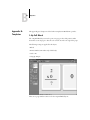


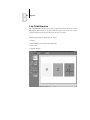
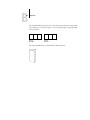

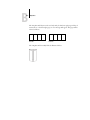


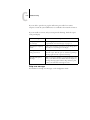


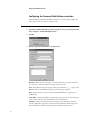


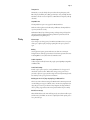


![4 Click [OK] - Toshiba America Business Solutions](http://vs1.manualzilla.com/store/data/005818130_1-6da0751aebf4d6c87686321c2c4e7e3a-150x150.png)