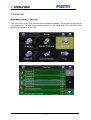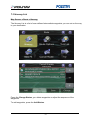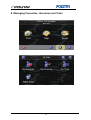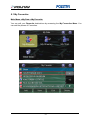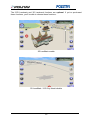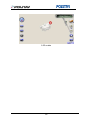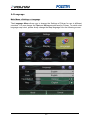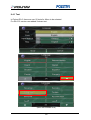
1
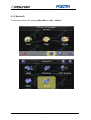
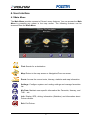
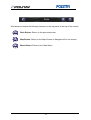
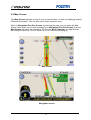
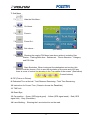
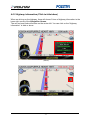
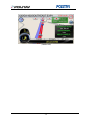
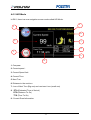
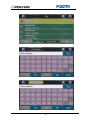
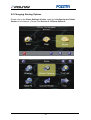
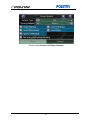
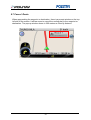
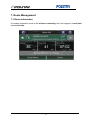
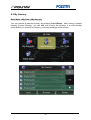
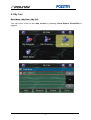
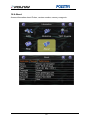
Polnav Navigation Software User’s Manual Version 2012 R6.0.30 For use with PC/PDA/Personal Navigators Polstar Technologies, Inc. http://www.polstargps.com Tel: +886-3-552-5279 Fax: +886-3-552-5269 Address: 5F-1 No.28 Taiyuan St, Jhubei City, Hsinchu County 30288, Taiwan © Copyright 2005 Polstar Technologies, Inc. All rights reserved. Polstar™, The RoadMentor™ Series, Polnav™, The Polstar™ Logo are registered trademarks of Polstar Technologies, Inc. in Taiwan and/or other countries. All other trademarks, registered trademarks, trade names and service marks are properties of their respective owners No part of this user manual may be reproduced or transmitted by any means, for any purpose other than for the user’s own use, without the prior written consent of Polstar Technologies, Inc. This document is subject to change without notice. You must read the warnings and the disclaimer at the back of this manual prior to using Polnav. ii Contents 1. INTRODUCTION ..............................................................................................................................1 2. INSTALLATION AND HARDWARE SETUP ...............................................................................2 2.1 SOFTWARE INSTALLATION ..............................................................................................................2 2.1.1 Map code................................................................................................................................2 2.1.2 Registration............................................................................................................................3 2.1.3 Device ID ...............................................................................................................................5 2.2 HARDWARE CONFIGURATION (PC/PDA ONLY) .............................................................................7 3. GETTING STARTED WITH GPS NAVIGATION AND POLNAV ............................................8 4. USER INTERFACE .........................................................................................................................17 4.1 MAIN MENU .................................................................................................................................17 4.2 MAP SCREEN ................................................................................................................................19 4.2.1 Functions..............................................................................................................................20 4.2.2 Map Displays .......................................................................................................................21 4.3 ZOOM IN/ZOOM OUT ....................................................................................................................22 4.4 PANNING (BROWSING THE MAP) ...................................................................................................23 4.5 LOCATION MENU ..........................................................................................................................24 4.5.1 Functions in the Location Menu ..........................................................................................25 4.6 NAVIGATION SCREEN ...................................................................................................................30 4.6.1 JUNCTION VIEW .........................................................................................................................32 4.6.2 HIGHWAY INFORMATION (CLICK TO HIDE/SHOW) ......................................................................33 4.6.3 HID MODE ................................................................................................................................35 4.7 FREE RUN SCREEN ........................................................................................................................36 4.8 USER ADDED SPEED CAMERA ......................................................................................................37 5.FINDING DESTINATIONS ..................................................................................................................39 5.1 BY ADDRESS-CITY/POSTAL CODE FIRST ......................................................................................39 5.1.1 Main Menu ->Find ->Address ->City/Postcode .................................................................39 5.1.2 Main Menu ->Find ->Address (Current city shortcut in Address menu) ............................45 5.2 BY POINTS-OF-INTEREST (POI) ....................................................................................................52 5.2.1 Main Menu ->Find ->POI ...................................................................................................52 5.2.2 Main Menu ->Find ->POI -> Around City .........................................................................55 5.2.3 Main Menu ->Find ->POI ->Near Car...............................................................................60 5.3 BY KEYWORD ...............................................................................................................................63 5.4 BY FAVORITE ...............................................................................................................................66 5.5 BY RECENT DESTINATIONS ..........................................................................................................68 5.6 BY CURRENT POSITION.................................................................................................................70 5.7 BY GPS COORDINATES.................................................................................................................72 5.8 BY PHOTO.....................................................................................................................................74 5.9 BY POI CATEGORY.......................................................................................................................75 5.10 ENTERING INFORMATION ............................................................................................................77 5.11 SEARCHING IN DIFFERENT COUNTRIES .......................................................................................78 6. ADVANCED ROUTING FEATURES ...........................................................................................79 6.1 MAKING DETOURS........................................................................................................................79 6.2 ADDING INTERMEDIATE WAYPOINTS ...........................................................................................81 6.3 CHANGING THE END DESTINATION...............................................................................................82 6.4 SETTING STARTING LOCATIONS/CLEARING ROUTES/SETTING SIMULATED STARTING LOCATIONS ...........................................................................................................................................................83 6.5 ROUTE SIMULATION .....................................................................................................................86 6.6 CHANGING ROUTING OPTIONS......................................................................................................88 6.7 CANCEL ROUTE ...........................................................................................................................90 7. ROUTE MANAGEMENT...............................................................................................................91 7.1 ROUTE INFORMATION ...................................................................................................................91 iii 7.2 TURN LIST ....................................................................................................................................92 7.3 ITINERARY LIST ............................................................................................................................93 8. MANAGING FAVOURITES, ITINERARIES AND TRAILS ....................................................94 8.1 MY FAVOURITES...........................................................................................................................95 8.2 MY ITINERARY .............................................................................................................................96 8.3 MY TRAIL .....................................................................................................................................97 8.4 CLEAR DATA ................................................................................................................................99 9. CONFIGURING THE POLNAV..................................................................................................100 9.1 GENERAL ....................................................................................................................................100 9.2 VOLUME .....................................................................................................................................102 9.3 DISPLAY OPTIONS.......................................................................................................................104 9.4 LANGUAGE .................................................................................................................................107 9.4.1 Text.....................................................................................................................................108 9.4.2 Voice ..................................................................................................................................109 9.4.3 Input Method.....................................................................................................................110 9.4.4 Map ...................................................................................................................................116 9.5 UNIT ...........................................................................................................................................118 9.6 GUIDANCE ..................................................................................................................................119 9.7 TIME ZONE .................................................................................................................................120 9.8 SAFE MODE ................................................................................................................................121 9.9 SPEED ALERT..............................................................................................................................122 9.9.1 Over Speed Alert ................................................................................................................122 9.9.1 Speed Camera Alert ...........................................................................................................126 9.10 POI ICON ..................................................................................................................................129 9.11 FACTORY DEFAULT ..................................................................................................................130 9.12 ROUTE OPTIONS .......................................................................................................................131 10. INFORMATION ..........................................................................................................................133 10.1 GPS ..........................................................................................................................................134 10.2 STATISTICS ...............................................................................................................................135 10.3 MAP ..........................................................................................................................................136 10.4 ABOUT ......................................................................................................................................138 10.5 TMC EVENTS ...........................................................................................................................139 11. GPS SETTINGS ............................................................................................................................140 12. DISCLAIMER ..............................................................................................................................143 13. IMPORTANT MESSAGES.........................................................................................................143 iv 1. Introduction Congratulations on purchasing the Polstar Polnav Navigation Software. Polnav is a state of the art navigation software designed to make your journey more efficient and productive. Polnav offers the following features to make travelling and navigating through your neighbourhood easier: • • • • • • • • • • Dynamic route calculation Set and manage multiple waypoints en route to your destination with ease Powerful and convenient address search (Postal code/street search) Accurate moving map display Turn-by-turn voice instructions and mini maps Voice output engine Comprehensive and detailed map and Points-of-Interest (POI) database Easy to use and intuitive interface Space efficient Compatible with PC, PDA and Personal Navigator Packages. Polstar would like to thank you again for purchasing Polnav, and hope that it will assist you in your travels in the many years to come. For the latest news and updates, product support, and information regarding Polstar’s range of GPS products, please visit Polstar’s website at http://www.polstargps.com. 1 2. Installation and Hardware Setup 2.1 Software Installation To run the software legally, the user has to get a license key by registration process. The license key is encrypted by the combination of the device ID, which could be your SD card ID, and a map code. Also, please note that the license key is per map region. Each map region has its own map code, and thus you should have different license key for each map region. E.g. the map codes for BeNeLux, Germany and Taiwan could be BeNeLux@2011H2, Germany@2011H2 and Taiwan@2011H2, respectively. If the software you have is not equipped with legal map licenses, the security warning pages will pop up to remind you of finishing the process to have legal licenses at the beginning of running Polnav. 2.1.1 Map code As explained above, the license key is encrypted by the combination of the device ID and the map code. To know your map code, enter Main Menu, choose Info ->Map. As shown above, each entry has an icon, indicating if the corresponding map is legal or not, a map code and the date code. As an example, the first two illustrates the region Australia has a map code Australia@2009H2 and the region Austria/Switzerland has a map code AustriaSwitzerland @2011H2. 2 2.1.2 Registration The software may not run with full functionalities and successfully if the map data is not with legal license. The license key is calculated based on map code and device ID. If you have not a legal license of map data, you will be warned by the message “Unregistered map(s) found!” at the moment you run the software as below. Press OK to check the illegal map data you use, where a forbidden icon are shown below. To get a license key, you need to send the Device ID and the map code to the original distributor to request a legal license key to that map data once you have paid for it. 3 It would be strongly recommended to register your personal information to the server of the original distributor once you have the license key in case you need to retrieve the map data due to the SD card corrupted. After having the license key for that map region, simply save the *.key file under \Polnav\Map folder finish the activation process. 4 2.1.3 Device ID To know your Device ID, entering Main Menu →Info →About 5 6 2.2 Hardware Configuration (PC/PDA Only) After installing Polnav on your PC/PDA, please ensure your GPS hardware has been correctly setup. For instructions on GPS hardware setup, please refer to your GPS hardware manual. You will only need to do this once. Once the GPS hardware has been setup, please take note of the Port Settings for your GPS. You will need this to configure the settings in Polnav. Press the Settings in the Main Menu and then press GPS Port. Now change the COM Port and Baud Rate to the given values. 7 3. Getting Started With GPS Navigation and Polnav This tutorial will get you started on using Polnav for navigation. Before you start, you should ensure that the software has been installed and the necessary hardware configured. Instructions for installation and configuration can be found in the Hardware Configuration Section of this manual. Step 1 Start Polnav and wait for your GPS receiver to obtain a position fix. Press the center area on the touch screen to obtain the Main Menu, and press the Find Button in the Menu. If you do not have a GPS fix, or want to simulate a route, select a starting location first using this tutorial up to Step 5, then select a destination using this tutorial a second time. 8 Step 2 Press the Address Button in the Find Menu, Press the Region Name Tab to Select / switch the country. 9 10 Step 3 Enter City on the onscreen keyboard. 11 12 Step 4 Then enter the Street info and House Number info. Or, click City Center. 13 Location Menu then press the Go To Button in the Location Menu to begin navigation. Polnav will calculate a route to the destination from your current location. After calculating the route, you could also see the simulation of the route by clicking on the sub menu icon of the map on the top right side. 14 15 Step 5 You can begin using your GPS system if you have a GPS fix. If you do not have a GPS fix, you can use the Demo feature to simulate the route to your destination using. You can now drive to your destination, and you will be guided by voice commands at every turn and the Navigation Screen. For more information about advanced functions, please read the rest of this manual. 16 4. User Interface 4.1 Main Menu The Main Menu provides access to Polnav’s many features. You can access the Main Menu by pressing any where in the map screen. The following features can be accessed from the Main Menu. Find: Search for a destination. Map: Return to the map screen or Navigation/Free run screen. Route: Access the current route, itinerary, statistics and map information. Settings: Configure system and routing settings and manage favourites list. My Data: Maintain user specific information like Favourite, Itinerary, and Trail …etc. Info: Display GPS, driving information (Statistics) and information about Polnav version. Exit: Exit Polnav. 17 All submenus contain the following features on the top panel at the top of the screen: Back Button: Return to the previous screen. Map Button: Return to the Map Screen or Navigation/Free run screen. Menu Button: Return to the Main Menu. 18 4.2 Map Screen The Map Screen displays a map of your current location, as well as displaying nearby POIs and information. You can also use it as an electronic map. When in Navigation/Free Run Screen, by panning the map, you can enter the Map Screen. Note that if you’re using Heading-up in Navigation/Free Run Screen, then the Map Screen will follow the orientation. By click the North Indicator, the Map Screen will change to North-up. Once in North-up, it can’t return to Heading-up. Map screen Navigation screen 19 The following features can also be accessed from the Map Screen. 4.2.1 Functions Information panel about the selected location Access to Main Menu Return to Car Position Compass (Click to change the Orient of map) Volume Adjustment Zoom in Nearby POI Zoom out Play Demo Go Home 2D/3D mode switch Rotate Scale Ruler Selected location (road or POI) will be Highlighted 20 4.2.2 Map Displays : Starting Point : Waypoint : Destination : Next Turn : Turn : Selected Point of Interest : Point of Interest : Selected Location : Selected Street : Current Location/GPS Fix Location 21 4.3 Zoom In/Zoom Out You can change the scale of the electronic map by pressing the Zoom In/Zoom Out buttons. If you have a position fix, it will zoom in/out on your current location. If you are in panning mode, it will zoom in/out on the selected location marked by the red dot. (Zoom In) (Zoom Out) Note: Local streets will not be displayed at large map scales. At large map scales, only the main roads and freeways will be displayed. To view them you must increase the map scale by zooming in. 22 4.4 Panning (Browsing the map) You can browse different areas of the map in the map screen by dragging the map. Simply hold your finger down on the screen and drag it in the opposite direction. ( Pan to the left ) 23 4.5 Location Menu You can select locations (POI Icons) or streets on the map by pressing the icon or location and pressing the Street/Place Information Panel. The Location Menu will then appear. The Location Menu will also appear when you select a location from the Find Menu. ( Location Menu ) 24 4.5.1 Functions in the Location Menu Nearby: Displays a list of nearby POIs or streets. 25 Save As: Save the location as your Favorite. 26 Info: Information about the selected location, including Region, City, Longitude, Latitude, Street, House number…etc. 27 Go To: Set the destination for route planning. 28 Advanced: Add intermediate waypoint in route to your destination. Or, set the location as the start point to simulate the route. 29 4.6 Navigation Screen The Navigation Screen will appear whenever a route has been set. It is basically a Map Screen with additional information about the route, such as distance until next turn, travel time, and estimated time at arrival. The screen will be centred on your current location (when you have a GPS fix, or else simulation will move at a constant velocity). To exit the Guidance Screen, simply pan the map. To return to the Guidance Screen, press the Car Position. 5 1 6 2 7 11 12 3 8 9 4 14 13 10 1: Showing the current street info or current city info. (Click to switch) 2: Guidance symbol: Switch between 2D North-up, 2D Heading-up, 3D Head-up views 3: Showing the Distance to Next Turn, Maneuver at Next Turn and serial Turn. (Click on the icon to repeat voice instructions) 4: On the periphery of the Next Turn symbol, there are two dots : the Red Dot showing the direction of destination, and the Yellow Dot showing the Special Location. The special location will show only when you set in My Favorite. 5: Showing the current speed or current time. (Click to switch) 6: Speed Limit:Showing the Road Speed limit info. 30 7: Sub Menu 7.1 Hide the Sub Menu。 7.2 Go Home。 7.3 Zoom in。 7.4 Zoom Out。 7.5 Set volume。 7.6 7.7 (POI Menu) Showing the nearby POI Menu.(see above picture) including Gas Station、Parking/Rest Area、Restaurant、Tourist Attraction、Category and POI Hide Start Simulation. When having set the destination and routing, this bottom could be chosen. Click to see the simulation of the route and you’ll see there is a row of control line showing in the Top middle of the screen (See bellow) (Control buttons) 8. PIP (Picture in Picture). 9: Estimated Time at Arrival / Total Distance Remaining / Total Time Remaining. 10: Instruction for Current Turn. (Press to Access the Turn List ) 11. TMC info. 12. Road Sign. 13. Car position: Green (GPS signal good)、Yellow (GPS signal weak)、Red (GPS signal lost)、Gray (Simulation) 14. Lane Marking: Showing the Lane instruction on the road. 31 4.6.1 Junction View Driving on the highway exit or complex intersection, Navigation Screen will show the real view of the intersection in the lower right corner, it is called “Junction View”. When we drive close to the intersection, the junction view will fit all screens. 32 4.6.2 Highway information (Click to hide/show) When we driving on the highway, there will shows 3 lines of highway information in the lower right corner of the Navigation Screen. The car and road links will shows on the center left. You can click on the “Highway information” to hide or show. (Show) (Hide) 33 (center left) 34 4.6.3 HID Mode In R6.0, there is a new navigation screen mode called HID Mode. 5 1 6 2 7 8 3 9 4 1. Compass 2. Current speed。 3. Current Speed limit 4. Current Time 5. Next Turn 6. Distance to the next turn 7.: Icon of Next Turn (Big one) and next next turn (small one) 8. ETA (Estimated Time of Arrival ) DTG (Distance To Go) TTG (Time To Go) 9.: Current Road information 35 4.7 Free Run Screen The Free Run Screen will appear whenever a route has NOT been set. It is basically a Map Screen with additional information about the current road/city you’re driving on, and driving speed. The screen will be centred on your current location (when you have a GPS fix). To exit the Free Run Screen, simply pan the map. To return to the Free Run Screen, press the Car Position. 36 4.8 (Option) User Added Speed Camera In the Map Screen, user can Added Speed Camera point whenever you want. You can select streets on the map by pressing the icon and the Add Speed Camera Icon on the pop-up Street/Place Information Panel right down, your screen will go to Speed Camera Panel. Then press Add (+) icon, the Map Screen will appear Speed Camera icon. Street/Place Information Panel Add (+) icon (Speed Camera Panel) 37 Speed Camera icon When you click Speed Camera icon, it will pop-up Speed Camera Infromation Penal, on the right down will show remove speed camera icon. Speed Camera Information Panel Remove Speed Camera icon 38 5.Finding Destinations Polnav offers many methods to search for a particular destination. This is useful as you can pinpoint the search locations and minimising your search time. Once a destination has been found, the Location Menu will appear, and Polnav will calculate a route to the chosen destination when you press the Go To Button or the Add Via Button. You can also use the Find Menu to set a Starting Point for route simulation, as explained in the Getting Started Tutorial. 5.1 By Address-City/Postal Code First 5.1.1 Main Menu ->Find ->Address ->City/Postcode Enter the city name of postal code using the onscreen keyboard. You can also enter a key word if you are unsure of the location as Polnav will list all possible locations with that key word. Once you have found the destination, Polnav will load the Location Menu. 39 40 41 42 43 44 5.1.2 Main Menu ->Find ->Address (Current city shortcut in Address menu) You can search for Address within a country. Points of Interest are local landmarks or interesting places, and are represented by icons on the Map Screen. To simplify searches, POI has been categorized. Once you have found the destination, Polnav will load the Location Menu and record the current city shortcut n Address menu. 45 46 47 48 49 (Press Stop button) (Press Main Menu button) 50 (Current city shortcut in Address menu) 51 5.2 By Points-of-Interest (POI) 5.2.1 Main Menu ->Find ->POI You can search for POIs within a country. Points of Interest are local landmarks or interesting places, and are represented by icons on the Map Screen. To simplify searches, POI has been categorized. Once you have found the destination, Polnav will load the Location Menu. 52 53 54 5.2.2 Main Menu ->Find ->POI -> Around City You can search for any POI in a city or region. Once you have found the destination, Polnav will load the Location Menu. 55 56 57 58 59 5.2.3 Main Menu ->Find ->POI ->Near Car List maximum 300 POIs within 50 kilometers from your current location. Once you have found the destination, Polnav will load the Location Menu. 60 61 Or, you could choose the Sub Menu on the map to see the Nearby POI. 62 5.3 By Keyword Main Menu ->Find ->Keyword Polnav allows users to find a POI by entering the Keyword. When entering the keyword, user can enter some of the characters of the POI name as well as space, numbers…etc. The sequence of the result list is sorted by the distance. The maximum searching distance is 2,000 kilometers and maximum lists the 300 POIs that were previously in sequential order for convenience should you decide to revisit the same place in the future. 63 64 65 5.4 By Favorite Main Menu ->Find ->Recent Polnav stores and lists the 50 destinations that were previously in sequential order for convenience should you decide to revisit the same place in the future. 66 67 5.5 By Recent Destinations Main Menu ->Find ->Recent Polnav stores and lists the 50 destinations that were previously in sequential order for convenience should you decide to revisit the same place in the future. 68 69 5.6 By Current Position Main Menu ->Find ->Current Position Polnav stores and lists the 50 destinations that were previously in sequential order for convenience should you decide to revisit the same place in the future. 70 71 5.7 By GPS Coordinates Main Menu ->Find ->Coordinates You can enter GPS coordinates of a location if it is known. The following notation is used to input latitude and longitude coordinates in Degree: E 100.491821 ° ’ and N 13.7524104°°. The format when entering the coordinates could also in sexagesimal system. For example, E 1211°0’5.2’’ and N 24°°47’30.1’’. 72 73 5.8 By Photo Main Menu ->Find ->Photo Polnav could use JPEG/EXIF file to get the location. EXIF (EXchangeable Image File) data could save the information in the JPEG file when taking the picture by digital camera. If the JPEG photo does not include the coordinate data, Polnav will not adapt it and the “OK” button will not be allowed to press. PS. The default folder for the picture is in the \Photo folder, you could press the “.. “ (at the top left) and go to upper directory. 74 5.9 By POI Category Main Menu ->Find ->Category Polnav allows user to search a destination by POI Category. 75 76 5.10 Entering Information When performing searches, you will be prompted with the onscreen keyboard to enter keywords for the search. You can alternate between alphabetical letters (ABC) and numbers/symbols (123) by pressing the Switch Button. 77 5.11 Searching in Different Countries If you want to change the country you are searching, press the Country Name Tab when in one of the Submenus of the Find Menu: Note: Before you can search for places in a country, you must have the map of the region. Polnav lists all the maps you have installed in the Country List, so if the country is not listed, it means that you either don’t have the map for that country, or that the map for that country has not been installed. Note: You can perform international searches and calculate international routes if you have the maps of the relevant countries. 78 6. Advanced Routing Features 6.1 Making Detours Route ->Turn List ->Select the street or location ->Detour The route is recalculated to take a detour around the location or street. 79 80 6.2 Adding Intermediate Waypoints Map Screen ->Select a location ->Location Menu -> Advanced -> Add Via Or Main Menu ->Find ->Find a destination ->Location Menu -> Advanced ->Add Via You can add additional waypoints en route to your destination by using the Add Via Button. Simply find a destination using the Find Menu or by selecting it from the Map Screen. Once in the Location Menu, press the Add Via Button. This location will be placed between your starting/current and final destination. For multiple waypoints, they are added in sequential order for convenience. You can manage the list of intermediate waypoints using the Itinerary List. 81 6.3 Changing the End Destination Map Screen ->Select a location ->Location Menu ->Go To ->Extend Or Main Menu ->Find ->Find a destination ->Location Menu ->Go To ->Extend You can add a new destination to the end of your route list using this method. Map Screen ->Select a location ->Location Menu ->Go To ->Replace Or Main Menu ->Find ->Find a destination ->Location Menu ->Go To ->Replace The Replace button replaces the end destination with the one you have just selected. All waypoints between the starting/current location and the end location will remain the same. 82 6.4 Setting Starting Locations/Clearing Routes/Setting Simulated Starting Locations By either selecting a location in the map screen or from Find menu, Polnav will enter Location menu, in which you can set a start point for simulation purpose. If you would like to plan a new route to a destination, you can use the Reset function to delete the current route from memory. This works for both simulation and actual GPS navigation. You can also use this function to select a new starting location for simulation. If you are clearing a route then setting a new starting point, you need to do this twice. 83 84 85 6.5 Route Simulation Polnav allows you to simulate the route to your destination without the need for GPS fixes. Simply set a destination point and intermediate waypoints if needed. Press the “Go To”, to calculate the route. After calculating the route, please press “Demo” button in the sub menu to start Route Simulation. 86 87 6.6 Changing Routing Options Please refer to the Route Settings Section, under the Configuring the Polnav Section of this Manual. (Please refer Section 9.12 Route Options) 88 (Please refer Section 9.12 Route Options) 89 6.7 Cancel Route When approaching the waypoint or destination, there is a prompt window on the top left side of the screen. It allows users to cancel the routing plan to the waypoint or destination. The pop-up window shows in 300 meters as crow-fly distance. 90 7. Route Management 7.1 Route information It includes information such as the distance remaining until next waypoint, travel time and arrival time. 91 7.2 Turn List Main Menu ->Route ->Turn List The Turn List is a list of all corners and roundabouts (turns) you will pass on the way to your destination. To view a turn, press its panel on the Turn List. This will load a map showing the location of the turn. 92 7.3 Itinerary List Map Screen ->Route ->Itinerary The Itinerary List is a list of user defined intermediate waypoints you can set on the way to your destination. Press the Change Button, you delete waypoints or adjust the sequence of the waypoints. To add waypoints, press the Add Button. 93 8. Managing Favourites, Itineraries and Trails 94 8.1 My Favourites Main Menu ->My Data ->My Favourite You can edit your Favourite destinations by accessing the My Favourites Menu. You can add the places of Favourites. 95 8.2 My Itinerary Main Menu ->My Data ->My Itinerary You can retrieve a planned itinerary by pressing Load Button. After having a loaded itinerary (current itinerary), you can add, edit or save the itinerary. If a route already exists before you retrieve an itinerary, a warning message will be shown. 96 8.3 My Trail Main Menu ->My Data ->My Trail You can show a trail on the map screen by pressing Show Button. Show/Hide is toggled. 97 Trail settings allow you to record and name the travel tracks/routes you have taken to your destination when you have a valid GPS fix for future reference. You can save these and load (display) them at a later date. This is particular useful for off-road situations where no route can be calculated to your destination. Only one trail can be displayed at any time. 98 8.4 Clear Data Main Menu ->My Data ->Clear Data You can clear the data you have saved here. 99 9. Configuring the Polnav To change the software settings, press the Settings button on the Main Menu. Polnav offers a high degree of personalisation settings, as well as normal system settings. You can access these settings from the Main Menu ->Settings Menu. 9.1 General Main Menu ->Settings 100 101 9.2 Volume Main Menu →Settings →Sound You can adjust the volume of the voice prompts and sound effects here, as well as enabling sound/disabling sound. 102 Or in Map Screen at left function bar to select volume setting. 103 9.3 Display Options Main Menu ->Settings ->Display The Display Menu allows you to change the display features used by Polnav. You can adjust the colour scheme to suit your current lighting conditions for ease of visibility, the 3D view angle and font size. The Automatic Colour Scheme Mode changes the colour scheme automatically at sunrise and sunset each day. 104 The 2.5D Landmark and 3D Landmark functions are optional. If you’ve purchased these functions, you’ll be able to choose these functions: 3D LandMark enable 3D LandMark / 2.5D City Model disable 105 2.5D enable 106 9.4 Language Main Menu ->Settings ->Language The Language Menu allows you to change the Settings of Polnav for use in different countries. You can change the Text and Voice prompts used by Polnav. To switch dual language map’s text, please kindly change the Map language from the following screen. 107 9.4.1 Text In Polnav R6.0, there are over 20 texts for Menu to be selected. For R6.0.30 version new added Vietnam text. (New add Vietnam text) 108 9.4.2 Voice In Polnav R6.0, there are over 30 prompt voices to be selected. You could change the language and apply it. For R6.0.30 version new added Hindi and Vietnamese voice. (New added Hindi voice) (New added Vietnamese voice) 109 9.4.3 Input Method In Polnav R6.0, users could choose the input method to be the default keyboard when enter the key words. (English Query Keyboard) (Chinese BPM Keyboard) 110 (Arabic Keyboard) (Persian Keyboard) 111 (Russian Keyboard) (Greek Keyboard) 112 (Thai Keyboard) (Thai Keyboard) 113 (Turkish Keyboard) (Vietnam Keyboard) 114 (Map Language) 115 9.4.4 Map For dual language map, this selection could be selected to show default map’s language. For example, the Arabic map or English map for Middle countries; Thai language map or English map for Thailand. After applying, the map will be loaded when restarting Polnav in the next time . 116 117 9.5 Unit Main Menu ->Settings ->Unit The Unit Menu allows you to change Unit Settings of Polnav for use in different countries. You can change the measuring units (distance) and time (12 hours / 24 hours format) settings. 118 9.6 Guidance Main Menu ->Settings ->Guidance The Guidance Menu allows you to adjust the Map Orientation, Auto Zoom, Approaching View, Turn PIP 119 9.7 Time Zone Main Menu ->Settings ->Time Zone The Time Zone Menu allows you to adjust the time displayed by Polnav for the area or country you are currently in. This is useful if you are in a country that adopts daylight saving. 120 9.8 Safe Mode Main Menu ->Settings ->Advanced ->Safe Mode By enabling “Safe mode”, the touch screen function will be disabled when the vehicle speed is above 40km/hr. This is to prevent drivers from operation of navigation devices. The touch screen function will be normal once the vehicle speed is below 40km/hr. 121 9.9 Speed Alert Main Menu ->Settings ->Advanced ->Speed Alert You can enable speed alerts, which will warn you when you exceed the speed alert velocity. 9.9.1 Over Speed Alert (Auto Type uses the Default Road Speed Limit value) 122 (Fixed Type allows user to set the Speed Limit value) 123 Other than the above Auto and Fixed Types: there are also three types: Auto(+5) Auto(+10) 124 Auto(+20) 125 9.9.1 Speed Camera Alert 126 127 Note: The speed cameras sign will show when there are speed cameras in front of the car. The speed camera alert will warn you when the speed camera is approaching along the road. You will hear “Speed Camera Ahead” sound when it is approaching; then you will hear one “Don” sound when you deviate from the speed camera. If you are over speed limit, you’ll read the red speed in the bottom right corner and will keep hearing “Drive Slowly” sound. This function could be enable or disabled. 128 9.10 POI Icon Main Menu ->Settings ->Advanced ->POI Icon You can reveal, hide all or just some POI icons for ease of visibility on the Map Screen. Select the icons you wish to have displayed or hidden on the Map Screen, then press the Done Button. 129 9.11 Factory Default Main Menu ->Settings ->Advanced ->Factory Default If you would like to change the settings you have set, you could restore the Factory Default Settings and restart again. 130 9.12 Route Options Main Menu -> Route ->Route Options Route options take your preferences into account when calculating the route to your destination. It is affected by the following parameters, which you can set: · Vehicle Type: Car, Bicycle, Walker can be selected. · Routing Method: Shorter (distance), Faster (time), Economic (heuristic) routing algorithm can be applied. 131 · Avoid Highway: Highway won’t be considered as route solutions. · Avoid Minor Road: Minor roads in communities or paved for walker won’t be considered as route solutions. · Ignore Traffic Rule: one-way or manoeuvre traffic rules won’t be considered as route solutions. · Avoid Toll Roads: the route won’t take roads with tollbooth as solutions. · Avoid Ferry: ferry won’t be considered as route solutions. · Ask every before planning: enable this function will let user to set the Route Option every time he plan a route. To select or deselect a parameter, press the relevant panel on the screen. Once selected, it will be highlighted by a check. 132 10. Information Main Menu -> Info The Information Menu gives you information about your route, itineraries, destinations, locations and maps. 133 10.1 GPS Access information about satellite coverage, current time, longitude, latitude, altitude, quality of the signals received and the status. 134 10.2 Statistics Access information about your current location, heading, velocity, time, etc. 135 10.3 Map Access information about the maps your Polnav is using, and what maps you have available. Maps are required before you can navigate the area. Note you should have the license key to use the map data. 136 137 10.4 About Access information about Polnav, version number, memory usage etc. 138 10.5 TMC Events Access information about TMC information if your GPS device has TMC function. 139 11. GPS Settings The GPS screen contains information about the current satellite coverage, current time, longitude, latitude, altitude, quality of the signals received and the status of the GPS receiver. To access the GPS Information page, press the Main Menu ->Info -> . GPS Button (Please refer Section 10.1) For the setting of the GPS Port and Baud Rate, please go to the Main Menu ->Setting ->GPS Port to set the GPS Port and Baud Rate. Choose Auto to auto-detect the COM Port and Baud Rate. 140 141 When you run Polnav for the first time on your machine, you need to configure your GPS settings. For more information, please read your GPS hardware instructions, and the Hardware Setup section from this manual. Normally, you will only need to configure your GPS hardware once. 142 12. Disclaimer Polstar Technologies, Inc. takes no responsibility for any use of this product that may result in law violation and/or accidents leading to personal injuries and/or property damage. It is the user’s own responsibility to operate the product in a prudent manner that will comply with the law. Polstar will take no responsibility for the consequences caused by inaccurate satellite transmissions. The Government of the United States of America is solely responsible for the accuracy and maintenance of the GPS system. 13. Important Messages • Warning: Do not operate Polnav and a vehicle simultaneously as this is very dangerous. The vehicle must be parked prior to operating Polnav. It is your sole responsibility to operate Polnav and the vehicle in a prudent manner. Misusing Polnav may result in accidents and may lead to injuries and/or property damage. Only a passenger should operate Polnav while the vehicle is in motion. • Caution: Do not use Polnav as a medium to generate precise readings of altitude, direction, distance, location or topography. Polnav must only be used as a navigational aid. Any information generated from Polnav must only be used as reference. • Caution: Although every attempt has been made to ensure the accuracy of the maps and the data used by Polnav, the location of points of interest, transportation networks, etc may change over time without notice therefore rendering the data obsolete. Therefore it is essential that you check the actual surroundings with Polnav’s maps in order to confirm that you are at the exact destination. • Caution: Polnav cannot guarantee that any parts of the planned route will be dangerous, closed to traffic, or restricted to certain types of vehicles or is congested. Therefore it is your responsibility to determine the safety of the suggested route and to ignore any illegal or unsafe routes. 143