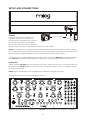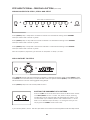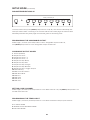
1
“What artists need is an endless
resource, full of rough edges and
dimly-lit nooks and crannies that
one can explore as one sees fit.
- Dr. Robert Moog -
3
IMPORTANT SAFETY INSTRUCTIONS
WARNING - WHEN USING ELECTRIC PRODUCTS, THESE BASIC PRECAUTIONS SHOULD ALWAYS
BE FOLLOWED.
1. Read all the instructions before using the product.
2. Do not use this product near water - for example, near a bathtub, washbowl, kitchen sink, in a wet basement, or
near a swimming pool or the like.
3. This product, in combination with an amplifier and headphones or speakers, may be capable of producing sound
levels that could cause permanent hearing loss. Do not operate for a long period of time at a high volume level or
at a level that is uncomfortable.
4. The product should be located so that its location does not interfere with its proper ventilation.
5. The product should be located away from heat sources such as radiators, heat registers, or other products that
produce heat. No naked flame sources (such as candles, lighters, etc.) should be placed near this product. Do not
operate in direct sunlight.
6. The product should be connected to a power supply only of the type described in the operating instructions or
as marked on the product.
7. The power supply cord of the product should be unplugged from the outlet when left unused for a long period
of time or during lightning storms.
8. Care should be taken so that objects do not fall and liquids are not spilled into the enclosure through openings.
There are no user serviceable parts inside. Refer all servicing to qualified personnel only.
NOTE: This equipment has been tested and found to comply with the limits for a class B digital device, pursuant to
part 15 of the FCC rules. These limits are designed to provide reasonable protection against harmful interference in a
residential installation. This equipment generates, uses and can radiate radio frequency energy and, if not installed
and used in accordance with the instructions, may cause harmful interference to radio communications. However,
there is no guarantee that interference will not occur in a particular installation. If this equipment does cause
harmful interference to radio or television reception, which can be determined by turning the equipment off and
on, the user is encouraged to try to correct the interference by one or more of the following measures:
—Reorient or relocate the receiving antenna.
—Increase the separation between the equipment and receiver.
—Connect the equipment to an outlet on a circuit different from that to which the receiver is connected.
—Consult the dealer or an experienced radio/TV technician for help.
CAUTION: Please note that any changes or modifications made to this product not expressly approved
by Moog Music Inc. could void the user’s authority granted by the FCC to operate the equipment.
TABLE OF CONTENTS
06
UNPACKING & INSPECTION
07
SETUP & CONNECTIONS
08
08
08
08
MOTHER-32 OVERVIEW
Analog Synthesizer Signal Path
Sound Sources
Sound Modifiers
09
09
10
11
11
12
13
13
14
15
15
17
17
17
PANEL CONTROLS AND FUNCTIONS
VCO (Voltage Controlled Oscillator)
VCO Modulation
LFO (Low Frequency Oscillator)
MIX (Voltage Controlled Mixer)
VCF (Voltage Controlled Filter)
VCF Modulation
EG (Envelope Generator)
VCA (Voltage Controlled Amplifier)
Keyboard Overview
Sequencer Overview & Panel Control
MIDI Input
VC Mix (Voltage Controlled Mixer/Attenuator)
Patchbay Overview
18
18
18
19
23
24
25
26
27
27
31
UNDERSTANDING AND USING THE MOTHER-32 SEQUENCER
Basic Concepts
Sequencer Modes
Tutorial - Creating a Pattern in Keyboard Mode
Play a Pattern
Sequencer Performance Functions
Editing a Pattern
Saving & Restoring a Pattern
Initializing a Pattern
Tutorial - Creating a Pattern in Step Mode
Playing & Editing a Pattern in Step Mode
32
32
33
33
34
36
SEQUENCER PANEL FUNCTION QUICK REFERENCE
Sequencer Memory & Loading a Pattern
Mode Selection
Sequencer Controls
KB Mode Panel Functions
Step Mode Panel Functions
38
CONTROL VOLTAGE OVERVIEW
39
39
39
39
40
40
40
41
PATCHBAY INPUTS AND OUTPUTS
External Audio Input
Mix CV Input
VCA
Noise
VCF
VCO
LFO
42
43
44
45
45
46
PATCHBAY INPUTS AND OUTPUTS (Continued)
VC Mix
Multiple
Assignable Output
Envelope Generator
Keyboard
Clock/Tempo Input
48
MIDI FUNCTIONS AND IMPLEMENTATION
49
SETUP MODE
51
VCO CALIBRATION
52
USING MOTHER-32 AS A EURORACK MODULE
53
PRESETS
56
BLANK PATCH SHEETS
58
SPECIFICATIONS
58
ACCESSORIES
59
SERVICE AND SUPPORT
UNPACKING AND INSPECTION
Check the contents of the shipping carton.
Be careful when unpacking your new Mother-32 so that nothing is lost or damaged. Moog recommends
saving the carton and all packing materials in case you ever need to ship the instrument for any reason.
The Moog Mother-32 ships with the following items:
1. Mother-32 Analog Synthesizer
2. Power Supply
3. Owner’s Manual
4. Quick Start Guide
5. Patch Cables
6. Registration Card
What you will need:
1. A table or flat surface to set your Mother-32.
2. A 1/4” instrument cable and amplified speaker or headphones with a 1/4” plug.
3. A properly wired AC outlet.
REMEMBER: Experimentation and learning will reward you with a lifetime of rich synthesizer experiences.
6
SETUP AND CONNECTIONS
POWER
Amplifier Or Headphones
Plug the included power adapter into
the 12VDC power jack on the back of
your Mother-32. The Mother-32’s universal
power supply will operate with a power
source from 100 to 240 Volts AC, 50/60Hz.
Plug the other end of the included power adapter into an AC outlet.
Power Supply
NOTE: Your Mother-32 is an analog instrument and should be allowed 10-15 minutes to warm up before
use. In cases where it has been left in a cold car overnight, for example, it may take as long as 25 minutes
before oscillator tuning has stabilized. Do not operate the Mother-32 in direct sunlight.
If you are using a 5-pin MIDI cable for external control or sync, connect the MIDI OUT of your MIDI controller
to the MIDI IN on your Mother-32. By default, the Mother-32 is set to receive MIDI data on MIDI Channel 1.
AUDIO OUT
With the Master VOLUME control turned all the way down, plug one end of a 1/4” instrument cable into
the Mother-32’s AUDIO OUT jack on the rear panel. Then plug the other end into an amplified speaker
or mixing console input.
NOTE: You can also connect a pair of headphones to this jack to monitor the output.
Set the Panel controls to the following default settings:
7.b
Adjust the level by slowly turning the master VOLUME control clockwise while playing the keyboard.
7
MOTHER-32 OVERVIEW
The Mother-32 is a semi-modular analog synthesizer. Each function has been designed as a module,
and useful parts of each module are “pre-wired” on the internal circuit board for making sound. This
means that your Mother-32 will produce sound at its output without any patch cables in use. Extended
synthesis capabilities are easily accessible via the 32-point, 3.5mm patchbay.
ANALOG SYNTHESIZER SIGNAL PATH
NOISE
EXT
AUD IN
LFO
MIXER
VCO
KB/
SEQ
VCF
VCA
EG
SOUND SOURCES
In an analog synthesizer, circuits that generate small electrical vibrations can be used as sound
sources. The Mother-32 contains one Voltage Controlled Oscillator (VCO) and one White Noise
generator, which are internally wired as sound sources. A VCO is a circuit capable of producing
a steady tone, which can be made to go up or down in pitch by applying a Control Voltage (CV)
to its circuit. A White Noise circuit amplifies naturally occurring electronic noise to make the
same type of sound you might hear on a radio tuned in between stations.
The outputs of the VCO and Noise source are routed to a Mixer (MIX) so the two signals can be
blended. Note that the NOISE output is “normalled” to the EXT. AUDIO input jack. This means that,
with nothing plugged into this jack, White Noise is the signal blended with the VCO. By plugging
an external sound source into the EXT. AUDIO input, the White Noise signal is replaced with the
external signal. This allows you to blend the VCO with any sound source you like on the Mother-32.
The output of the Mixer then goes to the input of the Voltage Controlled Filter (VCF).
SOUND MODIFIERS
Mother-32 operates on the principle of subtractive synthesis. To make a musical electronic sound,
you start with a bright, harmonically-rich signal, then circuits called filters and amplifiers are used to
transform the original signal into the desired sound. The Mother-32 contains both a Voltage Controlled
Filter (VCF) and a Voltage Controlled Amplifier (VCA).
In an analog synthesizer, a filter is a circuit used to modify a sound source by making it darker,
brighter, or even thinner based on its type, frequency response and filter cutoff frequency. The
Mother-32 features the classic Moog Ladder Filter topology, with both Low Pass and High Pass
frequency responses available. Low Pass means that the Filter removes high frequencies above the
Cutoff frequency from the input signal, while High Pass means the Filter removes low frequencies
below the Cutoff frequency. In both cases, the CUTOFF control sets the specific frequency for the
Filter circuit to start working. In LOW PASS mode, the RESONANCE control is used to feed the
VCF output signal back to its input, creating a peak in the frequency response at the Filter Cutoff
frequency. This can be used to emphasize the harmonics in a sound source by sweeping the Filter
Cutoff frequency. The output of the VCF then goes to the input of the VCA.
In an analog synthesizer, an amplifier is a circuit that can change the loudness of a signal. The
Mother-32 VCA can be set to ON, continuously passing the output of the VCF straight through
to the instrument’s output, or it can be controlled musically from a circuit called an Envelope
Generator (EG), which creates a control shape (contour) from a trigger source such as a key
being played on a keyboard or a MIDI Note.
The output of the VCA passes to the VOLUME control, which attenuates the output signal at
both the VCA output and the HEADPHONE/AUDIO output.
8
PANEL CONTROLS & FUNCTIONS
VCO (VOLTAGE CONTROLLED OSCILLATOR)
FREQUENCY
This control is used to tune the oscillator’s pitch up or down one octave
from its center position. This is useful for ensuring that Mother-32 is in tune
with other instruments, or can also be used as a live performance control.
NOTE: This is an analog control and is calibrated at the factory to provide
slightly more than +/-1 octave from center. The maximum and minimum
positions will have some variation in the tuning amount over an octave.
VCO WAVE
The VCO WAVE switch allows you to select between two oscillator
waveforms: Sawtooth and Pulse. The selected waveform is then routed
to the counterclockwise position of the panel MIX control. Both Sawtooth
and Pulse waveforms have dedicated output jacks on the patchbay.
SAW
Sawtooth waves are useful for synthesizing bass, simulating brass instruments and creating lead sounds. An unfiltered sawtooth wave is bright and buzzy
before filtering, and contains both even and odd numbered harmonics.
PULSE
A pulse wave is a bright waveform that switches between two steady levels. The timbre and harmonics of
a pulse wave can be changed by altering the “pulse width” of the wave. Pulse width is the proportion of
the wave that is “On” to the proportion that is “Off”, and is usually expressed as a percentage. The thinner
the wave, the more the upper harmonics are accentuated. A square wave, for example, is simply a pulse
wave with a 50% pulse width. This means that in a single cycle it is on half the time and off half the time.
PULSE WIDTH
Use this control to adjust the width of the VCO Pulse wave. This varies from
about 2% at full counterclockwise position to about 98% at full clockwise
position. At mid position a Square wave is output.
The pulse width, or duty cycle of a pulse wave determines its harmonic
content. Every pulse width has its own characteristic sound, because each
width has a unique harmonic structure. This makes a wide variety of basic
timbres possible.
NOTE: It is possible to modulate the Pulse wave to 0% or 100% pulse width, which will cause the
sound to cut out. This is by design and can be very useful when creating dynamic sounds.
TIP: You can listen to both waveforms at the same time by patching the VCO PULSE output into
the EXT. AUDIO input. The MIX control now blends between the Saw and Pulse waves. SAW must
be selected as the VCO WAVE on the panel for this to work.
9
VCO MODULATION
VCO MOD SOURCE
This switch is used to determine whether the LFO, EG or an external
modulation source is being sent to the VCO MOD AMOUNT control.
NOTE: If an external modulation source is patched into the VCO MOD input
patch point, and EG/VCO MOD is selected as your VCO MOD SOURCE, only the
external modulation signal will be applied to the VCO MOD AMOUNT control.
VCO MOD AMOUNT
This variable control determines how much modulation is applied to the
selected VCO Mod Destination. Low settings allow for subtle vibrato when
applied to Frequency, while medium settings allow for chorus-like effects
when applied to Pulse Width.
VCO MOD DESTINATION
This switch quickly determines whether your modulation source is applied to
the Frequency (pitch) of the Oscillator, or to the Pulse Width of the Pulse wave.
FREQUENCY
Subtle LFO pitch modulation of the Oscillator is useful for vibrato or adding
motion to a sound, while more extreme pitch modulation can be useful for
creating octave jumps or pitched drum sounds.
PULSE WIDTH
Slower and subtler use of LFO pulse width modulation can create large, chorus-like bass sounds, while faster
rates can be used to create sounds that your ear perceives as two oscillators beating against each other.
NOTE: It is possible to modulate the Pulse wave to 0% or 100% pulse width. This can result in sound
cutting in and out, which can be used in a variety of musical ways.
10
LFO (LOW FREQUENCY OSCILLATOR)
Essentially, an LFO allows you to move a parameter’s value up and down automatically. LFOs generate
repeating waveforms in the sub-audio range, which are useful for creating repeating effects like pitch
vibrato, filter sweeps or pulse width modulation. The Mother-32’s LFO is also capable of audio-rate
modulation, which can be used to add harmonic complexity to any selected destination.
LFO RATE
This control is used to determine the LFO’s modulation frequency, which ranges
from about 0.1Hz to approximately 350Hz. The LFO can reach up to 600Hz if an
external control voltage is applied to the LFO RATE patch-point.
LFO WAVE
The LFO has two available modulation shapes: Square and Triangle. The
selected LFO waveshape is automatically transmitted to the VCO MOD
SOURCE and VCF MOD SOURCE selector switches with no patching required.
TRIANGLE
Triangle waves are useful for creating smooth up and down changes in
pitch or pulse width. They are ideal for musical pitch vibrato and pulse
width modulation, but can also be used at audio rates for FM sounds.
SQUARE
Square waves are useful for crafting trills, multi-octave pitch jumps, mimicking the behavior of
a slap delay, or for simply adding an additional rhythmic element to a sequence or held note.
NOTE: The LFO Triangle and Square waveforms both have dedicated output jacks on the
patchbay: LFO TRI and LFO SQ.
TIP: By patching the KB CV output to the LFO RATE CV input, you are able to increase and
decrease the LFO Rate based on the pitch of each note played.
MIX (VOLTAGE CONTROLLED)
MIX
Your Mother-32 has a voltage controlled mixer in the audio path. It is internally
routed and AC coupled to receive sound sources; mix them together and pass
them to the Filter. The MIX control blends between the selected VCO waveform
(counterclockwise) and an onboard White Noise generator, or signal plugged
into the EXT. AUDIO input jack (clockwise). The blend can be set manually, or
can be dynamically modulated via the MIX CV input on the patchbay.
NOTE: If a patch cable is plugged into the EXT. AUDIO input on the patchbay,
it will override the normalization of White Noise to the clockwise position of this mixer. The External
Audio input is designed to receive a +/-5V signal. A line level signal will be very weak in volume when
compared with the internal VCO.
11
VCF (VOLTAGE CONTROLLED FILTER)
The Filter is selectable between a classic Moog 24dB/Octave Low Pass Filter with Resonance and
a classic Moog 24dB/Octave High Pass Filter.
CUTOFF
Use this control to change the Filter’s Cutoff frequency from 20Hz to 20kHz.
In LOW PASS mode, only frequencies below the selected Cutoff frequency are
allowed to pass through. Turning the CUTOFF control to the right will open the
Filter, creating a brighter sound. Turning the CUTOFF control to the left will
close the Filter, creating a darker and thicker sound.
In HIGH PASS mode, only the frequencies above the selected Cutoff frequency are
allowed to pass. Turning the CUTOFF control to the right will remove low frequency information, creating a
bright and cutting sound. Turning the CUTOFF control to the left allows low frequency information to pass
through, creating an extremely bright, aggressive and full sound.
VCF MODE
This switch selects between LOW PASS and HIGH PASS Filter modes.
LOW PASS
The Low Pass Filter is a traditional Moog 24dB/Octave resonant Ladder Filter.
This is the heart of the Moog sound and is ideal for bass sounds and other
sounds that mimic melodic acoustic instruments.
HIGH PASS
The High Pass Filter is a classic Moog 24dB/Octave non-resonant Ladder Filter. This is useful for
bright sounds that cut through a mix, or dynamically removing bass frequencies to thin the sound.
NOTE: In HIGH PASS mode, if the RESONANCE control is turned up at all, the High Pass Filter will
NOT function fully as this will reintroduce bottom end into a sound, which may or may not be desired.
TIP: You can provide resonance in HIGH PASS mode by patching the VCF output into the EXT. AUDIO
input. The MIX control then becomes the resonance control for the High Pass Filter, even increasing to
self-oscillation. For this to work, keep the RESONANCE panel control turned fully counterclockwise.
TIP: With the CUTOFF control at minimum in HIGH PASS mode, you are basically bypassing the Ladder
Filter and passing the output of the mixer straight to the VCA. If you are looking for the pure sound of
the VCO, this is a way to get it without patch cords.
RESONANCE
The RESONANCE control determines how much signal is routed from
the Filter’s output back to its input. Turning it clockwise causes a peak in
amplitude at the Cutoff frequency. Settings above 3 o’clock will cause the
Filter to self-oscillate allowing the Filter to be used as a sound source.
TIP: In LOW PASS mode, with the RESONANCE and MIX controls at maximum,
the VCF can be used as a Sine wave sound source. Simply patch the KB output
to the VCF CUTOFF input, and patch the VCF output to the EXT. AUDIO input. Now adjust the Filter CUTOFF control to fine-tune your new oscillator.
12
VCF MODULATION
VCF MOD SOURCE
This switch is used to determine whether the LFO or EG is being sent to
the VCF MOD AMOUNT control.
VCF MOD AMOUNT
This variable control determines how much the modulation source changes
the Filter Cutoff frequency.
VCF MOD POLARITY
This switch is used to determine whether the VCF modulation has a positive or
negative effect on the Filter Cutoff frequency. For example, instead of using
the Attack portion of the EG to boost the Filter Cutoff frequency, inverting the
polarity will allow the Attack portion to lower the Filter Cutoff frequency.
TIP: When modulating the Filter Cutoff with the EG and the Polarity switch set
to (+), turn the CUTOFF control down to the minimum desired frequency. In this
case, modulation from the EG adds to this setting. When modulating the Filter
Cutoff with the EG and the Polarity switch is set to (-), turn the CUTOFF control up to the maximum
desired frequency. In this case, modulation from the EG subtracts from this setting.
EG (ENVELOPE GENERATOR)
Envelope Generators (EGs) create a signal that adds motion to a sound after a note is played. The EG
is started by a Gate or MIDI Note On message. Once started, their shape in time is determined by the
ATTACK, DECAY, and SUSTAIN controls.
ATTACK
The ATTACK control is used to specify the time it takes for the Envelope signal
to ascend from zero to its maximum level. Fast attacks are useful for creating
plucked sounds, while slow attacks are more useful for creating bowed string
sounds and swells.
Turn the ATTACK control to the left for faster attack times, and to the right for
slower attack times.
13
EG (ENVELOPE GENERATOR) (continued)
SUSTAIN
When ON, the Envelope signal will hold at its maximum level for the duration
a note is held, similar to an organ. When OFF, the Attack stage immediately
moves to the Decay stage when complete, or when a note is released
depending on which occurs first.
NOTE: When the Sustain switch is set to ON, overlapping notes from the
Keyboard or MIDI notes do not retrigger the EG, allowing legato phrasing.
When the Sustain switch is set to OFF, each note played on the Keyboard
or MIDI note retriggers the EG.
DECAY
7.c
The DECAY control specifies the time it takes for the Envelope to descend
from its current or maximum level to zero. Fast decay times are useful for
creating punchy staccato notes, while longer decay times allow a note to
ring out or fade away slowly.
Turn the DECAY control to the left for faster decay times, and to the right
for longer decay times.
VCA (VOLTAGE CONTROLLED AMPLIFIER)
A VCA is used to dynamically control the volume of your Mother-32. It either follows a volume curve
determined by your EG settings or is set to ON, which causes the VCA to remain fixed at its maximum value.
VCA MODE
This switch determines whether the VCA is modulated by the Envelope or is
simply held at its maximum level.
EG
The EG setting is ideal in most applications. This uses the curve of the Envelope
Generator to add dynamic characteristics to a sound, which can be used for
everything from slow volume swells to snappy plucked sounds.
ON
When set to ON, Mother-32’s audio signal is allowed to pass without the need for a Gate or note ON message
to occur. This is ideal for drones and continuously evolving modulated sounds, but is also useful for eliciting
new behavior and sounds from an existing sequence.
VOLUME
Adjusts the main output level for both the patchbay VCA output, and 1/4”
AUDIO/HEADPHONE output on the back of the Mother-32. Rotating the
control fully clockwise produces the maximum output. Rotating the control
fully counterclockwise silences the instrument.
14
KEYBOARD OVERVIEW
KEYBOARD
The Mother-32 has a single-octave 13-note keyboard with LEFT/RIGHT arrow buttons used
for selecting the octave of the keyboard. There are 8 available octave settings, indicated by
8 OCTAVE / LOCATION LEDs lit red. The keyboard is also used to access a number sequencer functions.
NOTE: There are two performance modes for the keyboard and octave buttons: Keyboard mode and Step
mode. They determine how these buttons interact with the Sequencer. Details of these operational modes
can be found in the Sequencer section of this manual. The default mode on power up is Keyboard Mode.
GLIDE
Glide, also called portamento or glissando, is used to generate smooth changes
between notes. Glide is applied to notes generated from the Keyboard, MIDI notes,
or the Sequencer. The GLIDE control determines the amount of time it takes for
the VCO to transition from one pitch to the next.
SEQUENCER OVERVIEW AND PANEL CONTROL
The Mother-32 contains a monophonic step sequencer. The Sequencer stores a list of single notes
and expression information called a pattern that can be played back in a loop. As a pattern plays back,
the Sequencer advances through each step and outputs a new note every time a step is reached. Each
pattern can contain up to 32 Steps, and is easily stored in one of 64 available pattern locations. Patterns
are arranged in 8 Banks of 8 patterns each.
The Sequencer directly controls the pitch of the VCO and triggers the EG. Control outputs driven by the
sequencer are the KB CV output, the GATE output and the EG output. Accent signals are routed internally
to the VCF and VCA at a fixed level.
SEQUENCER PANEL CONTROLS
The following is an overview of the Mother-32 Sequencer Panel controls. For full details of their
operation, please refer to the “Understanding and Using the Mother-32 Sequencer” section of this manual.
TEMPO/GATE LENGTH
The TEMPO control determines the tempo of the Sequencer. Tempo is
indicated by the Tempo LED located directly above the (SHIFT) button. When
programming Steps in a pattern, this control is used to set the Gate Length for
each Step. Gate Length determines how long each note is held in reference to
the entire duration of its Step.
15
SEQUENCER PANEL CONTROLS (continued)
PATTERN (BANK)
This button is used to view the currently active pattern location, or select a
new pattern. While holding the (SHIFT) button, it is used to view the current
Bank containing 8 patterns, or select a new Bank.
RUN/STOP (REC)
This button is used to start the Sequencer, and to stop it. While holding the
(SHIFT) button, this is used in Keyboard mode to initiate the Record function.
NOTE: Holding (SHIFT)+(REC) for over a second will start the saving process.
(SHIFT)
When pressed and held, this button is used in conjunction with other buttons
to perform various functions.
RESET/ACCENT
When the Sequencer is running, this button is used for resetting the step
location of a pattern to Step 1. When editing a step it is used to enable or
disable an Accent output.
HOLD/REST
When the Sequencer is running, this button is used for repeating the current
step at the current tempo as long as it is held down. When editing a step it is
used for enabling or disabling a Rest.
SHIFT FUNCTIONS: SWING AND RATCHET
Sequencer functions Swing and Ratchet are accessed by pressing (SHIFT)+ rotating the TEMPO
control for varying Swing, or by pressing (SHIFT)+ rotating the GLIDE control for setting Ratchet
values. Swing sets a percentage that the off beats are ahead or behind the beat. Ratchet specifies
a number (1-4) of note-repeats occurring during the length of a single step.
NOTE: When (SHIFT) is released after modifying Swing or Ratchet values, the position of the GLIDE and
TEMPO controls may not match their actual current values. As these controls are moved, the actual value
chases the current position of the control until it catches up.
16
MIDI INPUT
MIDI IN
The Mother-32 has a 5-pin DIN MIDI input that allows for external MIDI control,
MIDI clock sync and MIDI to CV conversion. When MIDI information is being
received, the MIDI IN LED will flash red. Details of the MIDI implementation are
contained in the “MIDI Functions and Implementation” section of this manual.
VC MIX (VOLTAGE CONTROLLED MIXER/ATTENUATOR)
VC MIX
This is a DC-coupled, patchable, voltage-controlled mixer/attenuator that allows
two different CV or audio signals to be blended together, modulated, and then
patched to a new location. The VC Mixer is directly connected to the MIX 1,
MIX 2, VC MIX CONTROL and VC MIX inputs. Mix 1 is normalled to 0V and
Mix 2 is normalled to a +5V source. This enables the use of this module as a
voltage source, an attenuator, a VCA, or a Mixer. It is not internally connected
to Mother-32 synthesizer functions, and requires patch cables for use.
PATCHBAY OVERVIEW
PATCHBAY
The patchbay contains 32 x 3.5mm patch points, which allow for
extended synthesis capabilities and modular interconnectivity.
AVAILABLE INPUTS
External Audio, Mix CV, VCA CV, VCF Cutoff, VCF Resonance,
VCO 1V/Octave, VCO Linear FM, VCO Modulation, LFO Rate,
Mix 1, Mix 2, VC Mix Control, Multiple, Gate, Tempo, Run/Stop,
Reset and Hold.
AVAILABLE OUTPUTS
VCA, Noise, VCF, VCO Saw, VCO Pulse, LFO Triangle, LFO
Square, VC Mix, Multiple 1, Multiple 2, Assign, EG, KB, Gate.
ASSIGNABLE OUTPUT
The output labeled “ASSIGN” is a multipurpose control output
for selecting from a number of available functions. The default
output is the Accent signal from the Sequencer.
To learn more about the capabilities of the Assignable output
jack, go to Page 44.
17
UNDERSTANDING & USING THE MOTHER-32 SEQUENCER
BASIC CONCEPTS
A sequencer is used to play notes or rests on a synthesizer from a pattern in memory, typically
at a steady tempo. Each note or rest in the pattern is called a “step”.
On each step, the sequencer outputs a CV signal to control the VCO, a Gate signal to trigger the EG,
and if desired, an Accent signal which modulates the VCF and VCA for emphasizing notes. Other than
that, the sound you hear from the Mother-32 when using the sequencer is determined by the front
panel controls and any patch cables in use on the patchbay.
Each pattern can be up to 32 Steps in length, and up to 64 patterns can be stored in memory.
SEQUENCER MODES
The Mother-32 sequencer has two modes of operation: KB (Keyboard) and STEP (Step Edit).
KB MODE (DEFAULT)
+
KB mode is for playing directly from the panel,
entering/editing notes in a pattern using the
Record function, and transposing patterns
during Sequencer playback.
Press (SHIFT)+(KB) to select KB mode.
STEP MODE
+
Step mode is for interacting with a pattern by enabling,
muting and editing steps, even during playback.
Press (SHIFT)+(STEP) to select Step mode.
Both modes work with any pattern, and modes can be changed at any time.
NOTE: If you are new to sequencers, use KB mode and its Record function to get started.
18
TUTORIAL - CREATING A PATTERN IN KEYBOARD MODE
This is a tutorial that will walk you through the sequencing capabilities of your Mother-32 in
KB mode. Keyboard mode is the best place to start when learning to use the Sequencer. Before
starting, disconnect any patch cables and set all controls to the default positions found on Page 7.
INITIALIZE THE CURRENT PATTERN
+
Press (SHIFT)+RESET+PATTERN
simultaneously to initialize the
current pattern.
+
NOW ENTER KEYBOARD MODE
Press (SHIFT)+KB to enter Keyboard mode.
+
ACTIVATE THE RECORD FUNCTION
+
Press (SHIFT)+(REC). The Tempo LED will change to solid
yellow indicating the Record function is active and the internal
clock is paused. Octave/Location LED 1 is lit green,
indicating you are on Page 1 of the pattern. Step LED 1 is blinking
(Step LEDs are located directly below Step buttons 1-8). During
the Record function, the current step being edited blinks.
ENTER A NOTE
Select an octave by pressing the LEFT/RIGHT arrows. Now play just one note on the Keyboard.
Step LED 1 will continue to blink, meaning you are still editing the first step.
While the Step LED is blinking, you can modify any of the other parameters for that step
including Gate Length (note duration), Accent, Rest, Tie, Glide On/Off and Ratchet count.
NOTE: Octave/Location LEDs 5-8 indicate respectively, Glide On/Off, Ratchet, Accent and
Rest parameters, all of which are defined per-step.
19
KB MODE TUTORIAL - CREATING A PATTERN
(continued)
SET THE GATE LENGTH
Set the GATE LENGTH control to minimum.
The Octave/Location LEDs temporarily light
red to indicate the current Gate Length.
=
Gate Length is set per-step and determines the
duration that a note is held relative to the length
of its step (from 1/8 - 8/8). Short durations
(counterclockwise) can be used to create
staccato notes, while the longest duration (clockwise) acts as a “Tie”. This means that a note is held
through to the next step.
Indicates Gate Length
(Red LED)
IMPORTANT: Make sure the SUSTAIN switch is set to ON for different Gate Lengths to sound correctly.
ADD AN ACCENT TO STEP 1
Press the ACCENT button to add a brief volume
and brightness emphasis to any step. In this case
it is on Step 1. Octave/Location LED 7 will light
green to indicate that an Accent has been added
to this step.
=
Indicates Accent
(Green LED)
PATTERN STEP 2
Select a new octave by pressing the LEFT/RIGHT arrows. Now play just one note on the Keyboard.
Step LED 2 is now flashing, indicating that it is being edited. Step LED 1 is now lit solid, indicating that
its values have been entered into the active pattern. This is called “Step-Write” behavior and means that
any time you play a note or enter a Rest, the step is automatically advanced.
TIE STEP 2 TO STEP 3
Rotate the GATE LENGTH control fully clockwise.
All 8 Octave/Location LEDs light red indicating
maximum Gate Length or a “Tie”. If the note value
of Step 3 is the same as Step 2, then the note is
held through the step transition. If the note value
of Step 3 is different, the note is still held through
the transition, but the effect is a legato phrase.
=
Indicates A “Tie”
(Red LED)
TIP: A Tie to a new note may also be created by entering the next note while holding the current
note, as if playing legato.
PATTERN STEP 3
Enter a new note that is different from Step 2. Step LED 3 is blinking, and the previous Step LEDs are lit solid.
Now rotate the GATE LENGTH control counterclockwise for minimum note duration.
20
KB MODE TUTORIAL - CREATING A PATTERN (continued)
TURNING GLIDE ON/OFF
To turn Glide ON for a step, simply turn the
GLIDE control to the right. Octave/Location LED
5 is lit green indicating Glide is turned ON for the
current step. To turn Glide OFF for a step, simply
turn the GLIDE control all the way down.
=
Indicates Glide Is On
(Green LED)
NOTE: Glide rate is not set per-step and is always
determined by the front panel GLIDE control.
ADDING A SLIDE TO STEP 3
To set up a slide, the starting step must be set to maximum Gate Length, or a “Tie” (you already did
this on Step 2).
Now turn Glide ON. Step 3 is the target of the slide in this case.
PATTERN STEP 4
Play any note on the keyboard. Step LED 4 is blinking, and the previous Step LEDs are lit solid.
NOTE: When you enter a note, the Gate Length is updated from the previous step. This is useful if you
are entering a pattern with steps that all have the same Gate Length. In that case you would only need
to set the Gate Length when first entering a pattern.
PATTERN STEP 5
Do not play a new note.
ENTER A REST FOR STEP 5
Press REST. Step LED 5 is blinking, and the
previous Step LEDs are lit solid. The Octave/
Location LED 8 is also lit green, indicating that
a Rest has been entered on this step.
=
Indicates Rest
(Green LED)
PATTERN STEP 6
Select a new octave by pressing the LEFT/RIGHT arrows. Now play just one note on the keyboard.
Step LED 6 is blinking and the previous Step LEDs are lit solid.
21
KB MODE TUTORIAL - CREATING A PATTERN (continued)
ADD A RATCHET TO STEP 6
=
+
Yellow LEDS Green LED
Hold (SHIFT) while turning the GLIDE control. Octave/Location LEDs 1-4 will temporarily light yellow,
indicating the number of Ratchets (repeats) in the current step. Select a value of 2, which will produce
2 notes during the step (up to 4 can be selected). Octave/Location LED 6 is lit green to indicate a
Ratchet value greater than 1.
NOTE: Ratcheted steps are easier to hear if their Gate Length is set to a lower value.
TIE PATTERN STEPS 7 & 8
Play one note on the keyboard. Step LED 7 is blinking and the previous Step LEDs are lit solid.
Turn the GATE LENGTH control to its maximum value.
Play the same note you entered for Step 7 again. By tying from the previous step, this will create
a note of longer duration than a single step.
Now turn the GATE LENGTH control to select a value of 4, so that the 8th step is not tied to the
following step.
You can stop here or enter up to 32 steps into a pattern. If you enter more steps, Octave/Location LED 2
will light green, indicating you are on Page 2, while the Step LEDs indicate Steps 9 to 16. Octave/Location
LED 3 indicates Page 3 and Steps 17-24. Octave/Location LED 4 indicates Page 4 and Steps 25-32.
NOTE: If the red Octave/Location LED and the green Page LED are on the same LED, it will blink
between green and red to indicate both the page and octave.
DE-ACTIVATE THE RECORD FUNCTION
When you have completed your pattern, press RUN/STOP to exit the Record
function. The Tempo LED will blink red indicating the internal clock is running again.
22
PLAY A PATTERN
RUN THE PATTERN
Adjust the TEMPO control to the speed you want,
and press RUN/STOP.
The Sequencer will advance through each step in the
pattern. When it reaches the end, it loops around to
Step 1. The current step being played is indicated by
the corresponding Step LED being lit.
PAUSE A PATTERN
To pause a pattern at the last step played, press RUN/STOP. Pressing
RUN/STOP again will resume playback from the next step in the pattern.
RETURNING A PATTERN TO STEP ONE
To return a pattern to Step 1 at any time, simply press RESET.
HOLD A NOTE
Press HOLD during sequencer playback to pause the advance of a pattern. The
current step will be repeated at the current tempo for as long as this button is held.
SWING
+
While holding (SHIFT), rotate the TEMPO (SWING)
control to add a Swing value to a current pattern.
The range is from -100% to 100%.
When SWING is set to a value between -100% and 0, it
will move the off-beats earlier in time. At -100% swing,
only the off-beats will play. When SWING is set to a value
between 0 and 100%, it will move the on-beats later in time.
At 100% swing, only the on-beats will play. When SWING is set to 0 (center position), no Swing is
applied and all notes are played with equal timing.
NOTE: The Swing amount is stored per pattern.
23
SEQUENCER PERFORMANCE FUNCTIONS
LIVE ACCENT
+
Press (SHIFT)+ACCENT during playback to temporarily add
an Accent to each step in a pattern. Live Accent overrides
stored Accent data and is only active when both buttons are
held. Live Accent data is not stored in memory.
+
Press (SHIFT)+REST during playback to temporarily Mute
the output of the sequencer as it continues to advance. Live
Mute is only active as long as these buttons are held and is
not stored in memory.
LIVE MUTE
LIVE RATCHET
+
While holding (SHIFT), rotate the GLIDE control to add 1-4
Ratchets to each step in a pattern. Live Ratchets will override
stored Ratchet data and are only active as long as (SHIFT) is
held. Live Ratchet data is not stored in memory.
LIVE PATTERN TRANSPOSE
Press the LEFT/RIGHT arrows to select an octave and use the Keyboard to transpose a pattern during
playback. The default octave setting is 4 and the default reference note is low C. Live transposition data
is not stored in memory.
24
KB MODE PATTERN EDITING
To make changes to an existing pattern using the Record
function with step write behavior, press (SHIFT)+(REC)
when the pattern is paused.
+
Steps with data entered will be lit. Octave/Location LED 1 will
be lit green to indicate Page 1 of the pattern. Step LED 1 will
blink at the current tempo, indicating that it can be edited.
You can enter notes and step data using the “Step-Write”
behavior, where notes or Rests advance through the pattern,
or you can select a step in the current pattern for editing.
EDITING A PATTERN STEP
Select Pattern Page
Set End Step
+
Select Step For Editing
Press (SHIFT) and any Step 1-8. The corresponding Step LED blinks to indicate it is being edited. If
the sequencer is stopped, the note value of the selected step is heard. This allows steps to be edited
in any order. When a step is selected in this way, any of the step parameters (Notes, Gate Length, Ties,
Accents, Rests, Glide On/Off and Ratchet count) can be edited without advancing through the steps
of the pattern.
To select a new step for editing, press (SHIFT) and the desired step button.
Press (SHIFT) and the currently selected step to exit editing that step.
To change Pattern Pages, press (SHIFT) and one of the four Page Selector buttons: 1-8, 9-16,
17-24, or 25-32.
The End Step of a pattern can be changed by pressing (SHIFT)+SET END.
Press (SHIFT) and the desired Page Selector button 1-8, 9-16, 17-24, or 25-32 to select the last page
of the pattern.
Then press (SHIFT) and Step 1-8 to select the last step of the pattern. The selected step will begin
blinking at half the rate of the current tempo.
25
SAVING A PATTERN
Any changes to the current pattern are
discarded when changing to a new pattern
unless they are saved.
Blinking Green LED
Indicates Save Destination
+
To Save a pattern, hold (SHIFT)+RUN/STOP
for one second. An Octave/Location LED
will rapidly blink green indicating the current
destination for saving.
Select Pattern Location
To Save in the current location, simply press
(SHIFT)+RUN/STOP.
To Save in a new location within the current bank, use the LEFT/RIGHT arrows to select Pattern location 1-8.
NOTE: You can also hold (SHIFT) and press one of the eight corresponding pattern location buttons.
SELECT BANK
Green LED Indicates
Save Destination Bank
To Save a pattern in a different bank (1-8), press
and hold (BANK). The current bank will be lit green.
While holding (BANK), use the LEFT/RIGHT arrows
to select a new bank. When (BANK) is released,
the current pattern location will be indicated with a
green blinking LED.
Select Bank Location
NOTE: You can also hold (BANK) and press one
of the eight corresponding pattern location buttons.
+
COMPLETE OR CANCEL SAVE
To complete the saving process press (SHIFT)+RUN/STOP.
+
To exit the saving process at any time, simply press RUN/STOP.
RESTORE A PATTERN FROM MEMORY
+
Once a pattern has been modified, it can be returned to its
original state by pressing PATTERN+RESET. This will restore
the current pattern from memory and any unsaved changes
will be discarded.
26
INITIALIZING A PATTERN
+
Press (SHIFT)+RESET+PATTERN to initialize
the current pattern. This does not affect any
data stored in memory, but it will discard any
unsaved changes to a pattern.
+
CURRENT BANK AND PATTERN LOCATION
+
=
Indicates Current Bank
(Green LED)
=
To check the bank of a
pattern currently in use, press
(SHIFT)+(BANK). One of eight
green Octave/Location LEDs will
be lit showing the current bank.
To check the location of a pattern currently
in use, press PATTERN. One of eight green
Octave/Location LEDs will be lit showing
the active pattern in the current bank.
Indicates Current Pattern
(Green LED)
NOTE: There is always one active pattern
when the Mother-32 is in normal operation.
TUTORIAL - CREATING A PATTERN IN STEP MODE
This is a tutorial that will walk you through the sequencing capabilities of your Mother-32 in Step mode.
Before starting, disconnect any patch cables, set all controls to the default position found on Page 7, and
ensure the current pattern is initialized by pressing (SHIFT)+RESET+PATTERN.
NOTE: In Step mode the 13-note Keyboard and LEFT/RIGHT arrows have different functions.
ENTER STEP MODE
+
Press (SHIFT)+(STEP). Octave/Location LED 1 is lit yellow
and there is no red Octave/Location LED indicating the
current octave setting. Step LED 1 is lit solid red.
SET THE TEMPO
Use the TEMPO control to set the desired tempo. Then
press RUN/STOP. A repeating note will be heard and Step
LED 1 will flash at the selected tempo.
27
STEP MODE TUTORIAL - CREATING A PATTERN (continued)
SETTING PATTERN LENGTH
Set End Step
Select End Step
You can create a pattern with up to 32 steps, however, in this case we are going to set the pattern
length to be eight steps.
Press SET END and then press Step 8. All eight Step LEDs are now lit solid and blink only when the
pattern advances through them. All notes are currently the same, so you need to edit each step to
make the pattern more interesting.
ENTERING RESTS ON STEP 5 & 8
Enter Rest
Enter Rest
Press the Step 5 and Step 8 buttons. Step LEDs 5 and 8 are now turned OFF, and there are Rests when
the sequencer advances through these steps.
EDITING STEP 2
Select Step To Edit
+
LED Will Blink Rapidly To Indicate Step Is Selected For Editing
Press (SHIFT)+Step 2. The Tempo LED blinks alternating yellow and red at the clock rate to indicate
that a step is being edited. Step LED 2 will blink rapidly indicating that it is selected for editing. A red
Octave/Location LED is lit, indicating the current Keyboard octave and that the Keyboard is now ready
to change the current step’s note value.
28
STEP MODE TUTORIAL - CREATING A PATTERN (continued)
EDITING NOTES
Play A New Note For The Selected Step
Select Octave
Select octave 4 with the LEFT/RIGHT arrows and play the “G” key (located above Step LED 5).
As the pattern continues to play back, you will hear the new note on Step 2. Now rotate the GATE
LENGTH control fully clockwise so that the maximum Gate Length (Tie) is selected. Now the note
will be held during the transition to the next step.
EDITING STEP 3
Press (SHIFT)+Step 3. Step LED 3 will blink rapidly indicating it is being edited. The changes made
to Step 2 are still active in the pattern.
Rotate the GLIDE control to the right so that Glide is turned ON. Octave LED 5 will turn yellow
indicating Glide is active on Step 3. Now you should hear a slide from the G in Step 2, to the C in Step 3.
EXIT THE STEP EDIT FUNCTION
Press Currently Selected Step To Exit Step Edit Function
+
Press (SHIFT)+Step 3 to exit the Step Edit function. You can now adjust the GLIDE control to
change how fast the G slides to the C.
29
STEP MODE TUTORIAL - CREATING A PATTERN (continued)
ADDING ACCENTS TO STEP 1, STEP 4 AND STEP 7
Select Step To Add Accent To
+
+
Press (SHIFT)+Step 1. Step LED 1 will blink to indicate it is selected for editing. Press ACCENT.
Octave/Location LED 7 will be lit yellow.
Press (SHIFT)+Step 4. Step LED 4 will blink to indicate it is selected for editing. Press ACCENT.
Octave/Location LED 7 will be lit yellow.
Press (SHIFT)+Step 7. Step LED 7 will blink to indicate it is selected for editing. Press ACCENT.
Octave/Location LED 7 will be lit yellow.
Now as the pattern plays back, you will hear an emphasis on Steps 1, 4 and 7.
ADD A RATCHET TO STEP 6
+
=
Yellow LEDS Yellow LED
Press (SHIFT)+Step 6. Step LED 6 will blink to indicate it is selected for editing. While holding (SHIFT), rotate
the GLIDE control until OCTAVE / LOCATION LEDs 1 and 2 are yellow. Release (SHIFT). This divides Step 6 in
half and there are now two notes triggered during Step 6.
Press (SHIFT)+Step 6 to exit the Step Edit function.
SHIFTING THE DOWNBEAT OF A PATTERN
Rotate The Pattern Steps
Press the LEFT arrow three times and notice the Rests have moved.
The LEFT/RIGHT arrows “rotate” the pattern steps, allowing
modification of the rhythmic feel and downbeat of a pattern. This
can be useful if you create a pattern and it feels like the “1” of the
beat is on a different step than Step 1. To change it back you can
simply press the RIGHT arrow three times.
If you like this pattern, save it. The Save procedure is the same for both Keyboard mode and Step mode.
30
PLAYING AND EDITING A PATTERN IN STEP MODE
Pattern Page Selectors
Rotate Controls
Set End Step
Turning ON or OFF Individual Steps Or Selecting Steps To Edit
The Mother-32 Step mode repurposes the 13-note Keyboard and LEFT/RIGHT arrows to be performance
controls for modifying patterns during playback. The eight buttons directly above the Step LEDs are
the Step buttons. They are used for turning On or Off individual steps or for selecting steps for editing.
The 4 buttons labeled 1-8, 9-16, 17-24, and 25-32 are the pattern page selectors, while the 5th button
labeled SET END is used to specify the last step of a pattern.
The LEFT/RIGHT Arrows become “Rotate” controls, nudging all of the steps of a pattern forward or
backward by one location to modify the downbeat of a pattern.
ENTER STEP MODE
To enter Step mode from KB mode, press (SHIFT)+(STEP).
+
The red Octave LED will disappear, and the Octave/Location
indicators for the pattern page (Glide, Ratchet, Accent, and
Rest) will be yellow on the steps where those functions are
active. The eight Step LEDs will indicate the rest status of all
eight steps in the current pattern page.
Glide On/Off
Ratchet
Accent
Indicates Rest Status
Rest
The performance functions in Step mode (Run/Stop, Tempo, Reset and Hold) and the Shift functions
during playback (Accents, Rests, and Ratchets) are all the same as in KB mode.
There is not a Record function in Step mode. To modify a step in Step mode, with the sequencer
running or not, press (SHIFT) and the desired Step button in the current pattern page. The Step
LEDs will stop advancing with the pattern and the selected Step LED will blink to indicate that it is
being edited. At this point, the red Octave/Location LED will appear, indicating that the keyboard
can be used to modify the note value of the current step being edited.
At this time all values in the step (Note, Gate Length, Accent, Rest, Glide On/Off and Ratchet value)
can be modified.
Once the desired changes to the current step are made, a new step can be selected for editing or
the Step Edit function can be exited by pressing (SHIFT) and the currently selected Step button.
31
SEQUENCER PANEL FUNCTION QUICK REFERENCE
SEQUENCER MEMORY AND LOADING A PATTERN
SELECT BANK
+
+
Or
While holding (SHIFT)+PATTERN, use Step buttons 1-8, or the LEFT/RIGHT arrows to select a new bank.
SELECT PATTERN
+
Or
While holding PATTERN, use Step buttons 1-8, or the LEFT/RIGHT arrows to select a new pattern.
NOTE: Unsaved changes to a pattern will be lost when a pattern location is changed, initialized,
or restored during normal operation.
SAVING A PATTERN
Hold (SHIFT)+RUN/STOP for 1 second. When the green
OCTAVE /LOCATION LED blinks, select a bank by pressing
(BANK)+Step button 1-8 or (BANK)+LEFT/RIGHT arrows.
+
Use the LEFT/RIGHT arrows to select pattern location 1-8.
Press (SHIFT)+RUN/STOP to complete the saving process.
Press RUN/STOP to exit without saving.
RESTORE A SAVED PATTERN
Press PATTERN+RESET.
+
INITIALIZE CURRENT PATTERN
Press (SHIFT)+RESET+PATTERN.
+
+
32
SEQUENCER PANEL FUNCTION QUICK REFERENCE (continued)
MODE SELECTION
KB (KEYBOARD)
Press (SHIFT)+(KB).
+
STEP
Press (SHIFT)+(STEP).
+
SEQUENCER CONTROLS
SET INTERNAL CLOCK TEMPO
Rotate the TEMPO control.
START/PAUSE PATTERN PLAYBACK
Press RUN/STOP.
RETURN TO STEP 1
Press RESET.
REPEAT CURRENT STEP DURING PLAYBACK
Press HOLD while the sequencer is running. Normal playback resumes on release.
MOMENTARY ACCENT DURING PLAYBACK
Hold (SHIFT)+ACCENT. Normal playback resumes on release.
+
33
SEQUENCER PANEL FUNCTION QUICK REFERENCE (continued)
SEQUENCER CONTROLS
(continued)
MOMENTARY MUTE DURING PLAYBACK
Hold (SHIFT)+REST. Normal playback resumes on release.
+
MOMENTARY RATCHETS DURING PLAYBACK
Hold (SHIFT) and rotate the GLIDE Control. Normal playback
resumes on release.
+
MODIFY SWING
Press (SHIFT) and rotate the TEMPO Control.
+
KB MODE PANEL FUNCTIONS
LIVE PLAY
With The Sequencer Off
Playing Octave
13 Note Keyboard
TRANSPOSE A
SEQUENCE
With The Sequencer Running
Octave Select
With the Sequencer
Off, the LEFT/RIGHT
arrows determine
the playing octave,
and the sequencer
controls become a
13-note Keyboard.
Transpose Sequence
With the Sequencer
running, select an
octave with the
LEFT/RIGHT arrows,
and notes with the
13-note keyboard.
NOTE: The transposition will not take effect until a note is pressed.
KB RECORD MODE
+
Press (SHIFT)+(REC). The Record function is now ready for Step-Write
pattern entry. The first note or Rest advances to Step 1, the second to
Step 2 and so on. To exit, press RUN/STOP or you can enter Step mode.
34
SEQUENCER PANEL FUNCTION QUICK REFERENCE (continued)
KB MODE PANEL FUNCTIONS (continued)
GATE LENGTH | STEP MODE
Rotate the GATE LENGTH control to modify the Gate Length of a currently
selected step. Maximum Gate Length ties the selected step to the next step.
ACCENT | KB MODE
Press ACCENT to add an Accent to the current step.
Octave/Location LED 7 is green when Accent is On.
REST | KB MODE
Press REST to add a Rest to the current step and advance to edit the next step.
Octave/Location LED 8 is green when Rest is On.
GLIDE ON/OFF | KB MODE
Rotate the GLIDE control right to turn Glide ON for a step. Rotate the
GLIDE control fully counterclockwise to turn Glide OFF for that step.
Octave/Location LED 5 is green when Glide is On.
RATCHET | KB MODE
+
While holding (SHIFT), rotate the GLIDE control to select a value of 1-4.
The Ratchet value is shown in yellow on the Octave/Location LEDs
1-4, indicating the number of notes per step. Octave/Location LED 6 is
green when a Ratchet value is set from 2 to 4.
PATTERN PAGE SELECT | KB MODE
Press (SHIFT)+Page button 1-8, 9-16, 17-24 or 2532. If the sequencer is running, this will pause the
page chasing behavior. Press (SHIFT)+ the currently
selected Page button to resume page chasing.
Select Pattern Page
+
STEP SELECT AND
EDIT | KB MODE
Select Step For Editing
+
Press (SHIFT)+Step button
1-8. If in the Record function,
this stops the Step-Write
behavior so that any step
can be selected for editing. When a step is selected and the sequencer is stopped, the current note
value is played so its pitch can be monitored prior to editing.
35
SEQUENCER PANEL FUNCTION QUICK REFERENCE (continued)
KB MODE PANEL FUNCTIONS (continued)
Select Page Of End Step
SET END STEP | KB MODE
Set End Step
Press (SHIFT)+SET END.
If the desired end step is
on a different page, press
(SHIFT)+Page button 1-8,
9-16, 17-24 or 25-32. To
specify the last step in
the current pattern, press
(SHIFT)+Step button 1-8.
+
Specify Last Step In Current Pattern
If the new end step is after the previous end step, the notes are filled as follows: If the steps after the
previous end step have never been edited and stored in memory, or if the pattern was initialized, then
all steps get the default note value (-1V) and gate length (50%). If the steps were previously edited,
then they are restored.
STEP MODE PANEL FUNCTIONS
PATTERN PAGE SELECT | STEP MODE
Select Pattern Page / Activate LED Chasing
+
Press Pattern Page button 1-8, 9-16, 17-24, or 25-32. If the
sequencer is running, selecting a page pauses the chasing
behavior of OCTAVE / LOCATION LEDs 1-4, and the Step buttons
address only steps on the selected page. To resume the LED
chasing behavior, press the currently selected Page button again.
ENABLE/DISABLE STEPS | STEP MODE
Enable/Disable Steps
Press any Step button 1-8 to toggle
steps On/Off. The state of each step is
indicated by Step LEDs 1-8. If a step is
Off, Octave/Location LED 8 will be lit
yellow to indicate the step contains a Rest.
SET END | STEP MODE
+
Press SET END followed by
a Step button corresponding
to the desired last step.
Specify Last Step In Current Pattern
If the new end step is after
the previous end step, the notes are filled as follows: If the steps after the previous end step have never
been edited and stored in memory, or if the pattern was initialized, then all steps get the default note
value (-1V) and gate length (50%). If the steps were previously edited then they are restored.
ROTATE SEQUENCE | STEP MODE
Press the RIGHT arrow to move all steps right by one step.
Press the LEFT arrow to move all the steps left by one step.
Rotate The Pattern Steps
36
SEQUENCER PANEL FUNCTION QUICK REFERENCE (continued)
STEP MODE PANEL FUNCTIONS (continued)
STEP EDIT | STEP MODE
+
Press (SHIFT)+Step button
1-8 to select it for editing
whether the sequencer is
Specify Step For Editing
running or stopped. The
currently selected Step LED
will blink and all other Step LEDs are turned off to indicate the step being edited. The Tempo LED also
blinks yellow alternating with the clock to indicate a step is being edited. A red Octave/Location LED
indicates the current keyboard octave. While a step is being edited the keyboard buttons function to
select the note for that step. Press (SHIFT) and the selected Step button to exit Step Edit.
NOTE VALUE |
STEP MODE
Enter Note
Select Octave
Use the LEFT/
RIGHT arrows to
select an octave,
and press one of the
13 Keyboard buttons
to enter the note for a currently selected step.
GATE LENGTH | STEP MODE
Rotate the GATE LENGTH control to modify the Gate Length of a currently selected step.
Maximum Gate Length ties the selected step to the next step.
ACCENT | STEP MODE
REST | STEP MODE
Press ACCENT to add an
Accent to the current step.
Octave/Location LED 7 is
green when On.
Press REST to toggle Rest
On/Off for a currently
selected step.
GLIDE ON/OFF | STEP MODE
Rotate the GLIDE control right to turn Glide ON for a currently selected step.
Rotate the GLIDE control fully counterclockwise to turn Glide OFF for that step.
Octave/Location LED 5 is green when glide is On.
+
RATCHET | STEP MODE
Hold (SHIFT) while turning the GLIDE control. Octave/Location LEDs
1-4 will temporarily light up as long as the GLIDE control is being moved,
indicating the number of ratchets (repeats) in the current step. Octave/
Location LED 6 is lit when the ratchet value is set from 2 to 4.
37
CONTROL VOLTAGE OVERVIEW
Control voltages are signals used to modify circuits in an analog synthesizer. They can affect the
pitch of a VCO, the timbre produced at the output of a VCF, or the loudness at the output of a VCA.
A simple example is the VCO FREQUENCY control. It generates a voltage based on its rotation that is
connected to the control input of the VCO. When you turn it counterclockwise, the voltage and VCO
pitch are reduced. When you turn it clockwise, the voltage and VCO pitch are increased. In a fixed
position, the voltage and VCO pitch remain steady.
Another example is using an LFO to modulate the pitch of a VCO. The LFO produces a control voltage
that is applied to the VCO control input. This causes the VCO pitch to go up and down at the rate of
the LFO.
In terms of analog synthesizers, audio signals are used to generate sound, typically in the audible
range of 20Hz to 20kHz. Control signals are used to modify the audio signals. NOTE: In analog
synthesizers, audio signals can also be used as control signals. Timing signals are signals that change
rapidly in time, such as a gate signal. Frequently they have only two levels that represent On and Off.
A Gate signal in the Mother-32 for instance, is off at 0 Volts and on at +5 Volts. A Gate signal can be
used to trigger events, such as starting an Envelope Generator, or starting the sequencer running.
In a fully modular synthesizer, all connections must be made with patch cables. The Mother-32 is a
semi-modular synthesizer. This means that some connections have been made internally so that patch
cables are not required to produce sound at the output or to perform basic useful modulation. For
each synthesizer function there are control inputs and outputs that appear on the patchbay.
MOTHER-32 PATCHBAY
The Mother-32 Patchbay contains 32 x 3.5mm patch points,
which allow for extended synthesis capabilities and modular
interconnectivity.
The Mother-32 Patchbay is designed to work with 3.5mm
patch cables only. A pack of 5 is included with your Mother-32.
If you should need more, 6” and 12” packs of Moog cables are
available for purchase at authorized dealers.
Patch points whose labels are written in standard text are inputs,
while patch points whose labels are reversed are outputs.
Patch points with circles around them are Gate inputs.
NOTE: When patching, it is OK to split an output signal with a
“Mult”, a “y” cable, or with cables with stackable plugs. When
connecting to inputs, only connect one output signal to a single
input to prevent over-voltages.
38
PATCHBAY INPUTS AND OUTPUTS
EXTERNAL AUDIO INPUT
EXTERNAL AUDIO INPUT
This is a unity gain input that allows other sound sources to be processed
by Mother-32’s onboard Filter. Because this is a unity gain input designed to
Eurorack level standards, an external audio source applied to this input should
be 10V peak to peak. Signals lower than this (an MP3 player for instance) will
need to be amplified prior to being input to the EXT. AUDIO jack for proper
volume performance levels.
NOTE: When a cable is plugged into this jack, it overrides the normalization of
noise to the clockwise position of Mother-32’s main mixer. This means that the
MIX control becomes a level balancing control for the onboard oscillator and
any sound source plugged into the EXT. AUDIO jack.
MIX CONTROL VOLTAGE INPUT
MIX CV INPUT
This input is summed with the MIX panel control. With the MIX control at center
position, a -5V to +5V CV applied to this input will crossfade between the
selected VCO waveform and the EXT. AUDIO input (normalled to White Noise).
VOLTAGE CONTROLLED AMPLIFIER
VCA CV INPUT
This input allows a control voltage to be applied to Mother-32’s output VCA.
Patching an LFO to this input will allow you to create Tremolo effects (0 to +8V
in EG mode and +/-5V in ON mode, summed with signals from ON/EG switch).
VCA OUPUT
This is the output from the VCA after the Volume attenuator (+/-5V, typical).
39
PATCHBAY INPUTS AND OUTPUTS (continued)
NOISE
NOISE OUTPUT
This is the output for the Mother-32’s White Noise generator. Noise is useful for
creating percussion and wind sounds, as well as for random noise modulations
(+/-5V, typical).
NOTE: Noise is also normalled to the clockwise position of the main MIX control.
VOLTAGE CONTROLLED FILTER
VCF CUTOFF INPUT
This input is summed with the Filter CUTOFF control and the VCF Modulation
signal. If the CUTOFF control is at center position, and the VCF MOD AMOUNT
control is fully Off, a -5V to +5V control voltage at this input will sweep the
Filter from 20Hz to 20kHz.
VCF RES INPUT
This input is summed with the RESONANCE control. If the RESONANCE control
is at center position, a -5V to +5V control voltage at this input will sweep the
Resonance from minimum to maximum.
VCF OUTPUT
This the output of the Moog Ladder Filter. Its level depends greatly on the
signals at the Filter input and the Filter Cutoff frequency (Maximum output
is approximately +/-5V).
VOLTAGE CONTROLLED OSCILLATOR
VCO 1V/OCT INPUT
This is a 1V/Octave Exponential frequency modulation input that is summed
internally with the VCO FREQUENCY control, the Keyboard CV and any VCO
frequency modulation. With all internal control signals at 0V, a -5 to +5V control
voltage at this input will sweep the VCO frequency from 8Hz to 8kHz (10 Octaves).
NOTE: When using an external CV controller, use this input for proper 1V/Octave
tracking. If the tracking is off, please see Page 51.
40
PATCHBAY INPUTS AND OUTPUTS (continued)
VOLTAGE CONTROLLED OSCILLATOR (continued)
VCO LIN FM INPUT
This is a Linear Frequency Modulation input, which is useful for modulating
the VCO with audio rate waveforms to achieve very harmonically rich sounds.
(Accepts a -5 to +5V signal).
VCO MOD INPUT
This input is routed to the UP position of the VCO MOD SOURCE selector
switch (EG/VCO MOD).
NOTE: When a cable is plugged into the VCO MOD input, it overrides the normalization
of the EG to the UP position of the VCO MOD SOURCE switch. This allows the VCO
MOD AMOUNT control to function as an attenuator for anything plugged into the
VCO MOD input prior to being sent to a selected VCO Mod Destination.
VCO SAW OUTPUT
This output is the VCO Sawtooth waveform (+/-5V).
VCO PULSE OUTPUT
This output is the VCO Pulse waveform (+/-5V).
LOW FREQUENCY OSCILLATOR
LFO RATE INPUT
This input is summed with the LFO RATE panel control. With the RATE control
at center position, a -5V to +5V control voltage at this input will sweep the LFO
Rate from roughly .18Hz to 190Hz. Maximum LFO rate is about 600Hz.
41
PATCHBAY INPUTS AND OUTPUTS (continued)
LOW FREQUENCY OSCILLATOR (continued)
LFO SQ OUTPUT
This output is the LFO Square waveform (+/-5V).
LFO TRI OUTPUT
This output is the LFO Triangle waveform (+/-5V).
VC MIX - VOLTAGE CONTROLLED, DC COUPLED MIXER
MIX 1 INPUT
This input is normalized to 0V and routed to the counterclockwise position
of the VC MIX control. This is a DC coupled input and accepts a -5 to +5V CV.
MIX 2 INPUT
This input is normalized to a nominal +5V signal and routed to the clockwise
position the VC MIX control. This is a DC coupled input and accepts a -5 to +5V CV.
VC MIX CTRL INPUT
This input is summed with the VC MIX control position. With the VC MIX
control at center position, a -5V to +5V control voltage at this input crossfades
between the MIX 1 and MIX 2 inputs.
42
PATCHBAY INPUTS AND OUTPUTS (continued)
VC MIX - VOLTAGE CONTROLLED, DC COUPLED MIXER
(continued)
VC MIX OUTPUT
This is the output of the VC Mixer which is a blend of the MIX 1 and MIX 2 input
signals set by the VC MIX panel control and VC MIX CTRL CV input. (+/-5V).
VC MIX ALTERNATE USES:
FIXED VOLTAGE SOURCE
With nothing plugged into the MIX 1 or MIX 2 inputs, the VC MIX control
allows the VC MIX output to transmit a variable fixed voltage from 0 to +5V.
ATTENUATOR
Apply a CV signal to be attenuated to the MIX 2 input. With the VC MIX control at full counterclockwise
position, the signal is fully attenuated. Turn the VC MIX control clockwise to increase the amount of
MIX 2 input signal passed to the VC MIX output.
VCA
Apply a CV signal to the MIX 2 input. With the VC MIX control at a fully counterclockwise position,
apply a 0V to positive CV signal to the VC MIX CTRL input (EG for example). This will dynamically
determine the amplitude of the signal at the MIX 2 input that is passed to the VC MIX output.
MULTIPLE
The MULT section of the patchbay is a signal splitter that allows you to take a single voltage source
and send it to two independent locations.
MULT INPUT
Buffered signal input.
MULT 1 OUTPUT
Buffered Output 1 of the MULT input.
MULT 2 OUTPUT
Buffered Output 2 of the MULT input.
WARNING: Do not use the Mult to mix two signals together. It is designed to
be used ONLY as a CV signal splitter.
43
PATCHBAY INPUTS AND OUTPUTS (continued)
ASSIGNABLE OUTPUT
ASSIGN OUTPUT
This is the output for the assignable jack. Its source is programmed in
Setup mode. To learn more about Setup mode, go to Page 49.
The following output sources are available:
1: ACCENT (Default) This outputs a 0 to +5V filtered pulse signal from Accented pattern steps only.
2: CLOCK This outputs a 0 to +5V Clock signal at the internal clock tempo, one pulse per step.
3: CLOCK/2 This outputs a 0 to +5V Clock signal at half the clock rate of the internal clock tempo.
4: CLOCK/4 This outputs a 0 to +5V Clock signal at one quarter of the clock rate of the internal clock tempo.
5: STEP RAMP This outputs a -5 to +5V Ramp wave that increases in value equally across the number
of steps in the current pattern. The wave is reset at minimum when the sequencer cycles to step 1.
6: STEP SAW This outputs a -5 to +5V Saw wave that decreases in value equally across the number of
steps in the current pattern. The wave is reset at maximum when the sequencer cycles to step 1.
7: STEP TRIANGLE This outputs a -5 to +5V Triangle wave that alternates every pattern run between
an increase in value equally across the number of steps in the current pattern, and a decrease in value
equally across the number of steps in the current pattern.
8: STEP RANDOM This outputs a random voltage between -5V and +5V per step while the sequencer
is running.
9: STEP 1 TRIGGER This outputs a 0 to +5V pulse output only on step 1 of the current pattern.
10: MIDI VELOCITY This outputs a -5V to +5V signal from MIDI Note On Velocity values 0 to 127.
11: MIDI CHANNEL PRESSURE This outputs a -5V to +5V signal from MIDI Channel Aftertouch values 0 to 127.
12: MIDI PITCH BEND This outputs a -5V to +5V signal from MIDI Pitch Bend values 0 to 127.
13: MIDI CC 1 This outputs a -5V to +5V signal from MIDI CC 1 values 0 to 127.
14: MIDI CC 2 This outputs a -5V to +5V signal from MIDI CC 2 values 0 to 127.
15: MIDI CC 4 This outputs a -5V to +5V signal from MIDI CC 4 values 0 to 127.
16: MIDI CC 7 This outputs a -5V to +5V signal from MIDI CC 7 values 0 to 127.
44
PATCHBAY INPUTS AND OUTPUTS (continued)
ENVELOPE GENERATOR
GATE INPUT
This input accepts a 0 to +5V gate signal to trigger the EG. Tolerant of 10V gates.
EG OUTPUT
This is the output of Mother-32’s onboard Envelope Generator. Its behavior is
directly related to the panel Envelope settings for Attack, Decay and Sustain.
(0 to +7.5V)
KEYBOARD
The Mother-32 has a 13-note keyboard that is also used to program the sequencer. When a note is
played manually, via the sequencer, or by an external MIDI input, a control voltage and gate signal
are generated. The control voltage is routed internally to VCO Pitch, while the Gate signal is routed
internally to trigger the EG. These signals are also available on the patchbay.
KB OUTPUT
Each time a new note is played via the keyboard, sequencer, or MIDI controller,
a control voltage (-5V to +5V) is output both to Mother-32’s onboard oscillator
and to the KB output jack. This CV output is also affected by the Glide settings
and MIDI Pitch Bend messages. The default MIDI Pitch Bend depth is +/- 1
Octave, which is +/-1V at this output.
GATE OUTPUT
Each time a new note is played via the keyboard, sequencer, or MIDI controller,
a +5V Gate signal is output both to Mother-32’s Envelope Generator and to the
GATE output jack.
45
PATCHBAY INPUTS AND OUTPUTS (continued)
CLOCK/TEMPO OVERVIEW
The steps of an analog sequencer are advanced by a signal called a “clock”, which is an equally
spaced series of pulses. During playback, each clock pulse advances the pattern by one step.
Your Mother-32 has an internal clock that is used to advance through the steps of an active pattern.
The tempo of this clock signal is indicated by the Tempo LED located above the (SHIFT) button.
When this LED flashes red, the pattern is advanced by the internal clock. When synced to a MIDI
clock source, this LED flashes green at the rate of the MIDI Clock Source.
The Mother-32 can also be configured to receive clock signals at the TEMPO input jack. When the
sequencer is driven from an external clock source at the TEMPO input, the Tempo LED flashes green.
The internal Clock Tempo is set by the panel TEMPO control. If the internal clock source is being used,
then the TEMPO control can vary the clock from approximately 40 BPM to 750 BPM.
When the Mother-32 is receiving MIDI Clock Messages, the Tempo control becomes a “clock divider”
with 8 possible clock division values: 1/32 note, 1/16 note, 1/8 note, quarter note, dotted quarter note,
half note, dotted half note and whole note.
TEMPO INPUT
TEMPO is a configurable input for modulating the internal clock tempo, or for
replacing the internal clock signal. By default, the TEMPO input accepts a -5V
to +5V signal that is added to the panel TEMPO control value.
The TEMPO input has 3 available modes, which are assigned in SETUP mode:
CV (default), Single Clock Advance and DIN Sync.
See Page 49 for details on programming this input.
TEMPO CV INPUT MODE
The input is summed with the position of the TEMPO panel control. With the TEMPO control at center
position, a -5V to +5V control voltage changes the tempo from minimum to maximum (40 BPM to 750
BPM). If the Mother-32 sequencer is synced to a MIDI clock signal, then this input can be used to select
clock divisions.
TEMPO SINGLE CLOCK ADVANCE MODE
When the input of a clock’s rising edge is detected, the internal clock is suppressed, and the Tempo
LED is lit green. The pattern is advanced one step for each rising edge detected. If the clock applied
is at a steady tempo, then any Ratchets will be performed in synchronization with the incoming clock
pulses. A rising edge must be faster than 1V/msec to be detected as an edge, so slowly changing
signals will be ignored. In this mode, the TEMPO panel control is ignored. If clock pulses to this input
stop, the Mother-32 internal clock may be restarted by pressing RUN/STOP.
TEMPO DIN SYNC MODE
When a 24 ppqn (pulses per quarter note) signal is detected, the internal clock is suppressed, and the
Tempo LED blinks green at the detected tempo. The pattern will advance one step per 24 clock pulses,
or at a clock divided tempo set by the front panel TEMPO control. External sequencer transport can be
performed in conjunction with the RUN/STOP and RESET inputs. When DIN Sync clock pulses to this
input stop, the Mother-32 internal clock may be restarted by pressing RUN/STOP.
46
PATCHBAY INPUTS AND OUTPUTS (continued)
CLOCK/TEMPO
(continued)
RUN/STOP
When a +5V signal is applied to this input, the sequencer will play from its
current pattern location for the duration that the voltage is applied. When a
0V signal is applied to this input, the sequencer will stop at its current pattern
location. The sequencer responds to the last action of either the RUN/STOP
button or this input.
NOTE: An external clock signal applied here will advance the steps of the
pattern in the same way repeatedly pressing the RUN/STOP button does,
but the internal clock is NOT synchronized.
NOTE II: It is safe to use larger logic levels up to +15V. The minimum level for triggering these inputs is
approximately +3.2V.
RESET
When a +5V signal is applied to this input, the pattern will be reset from its
current location and begin playing from step 1. Step 1 will be repeated as long
as +5V is applied to this input. When the voltage drops to 0V, the sequencer
will begin to advance from step 1.
NOTE: It is safe to use larger logic levels up to +15V. The minimum level for
triggering these inputs is approximately +3.2V.
HOLD
If a +5V signal is applied to this input while the sequencer is running, the
current step in the pattern will be repeated at the current tempo. When
the voltage drops to 0V, the pattern will begin to advance again.
NOTE: It is safe to use larger logic levels up to +15V. The minimum level for
triggering these inputs is approximately +3.2V.
47
MIDI FUNCTIONS AND IMPLEMENTATION
MIDI CHANNEL
The Default MIDI Channel is 1. The MIDI Channel can be programmed in Setup Mode. See Page 49 for
details on selecting a MIDI Channel.
MIDI NOTE ON
The Mother-32 responds to MIDI Note On messages on the current MIDI Channel (default Channel 1).
MIDI Note values received are converted into a 1V/Octave Keyboard CV, and then routed to the VCO
and KB CV output jack. MIDI Note 0 corresponds to -5V, and MIDI Note 120 corresponds to +5V. MIDI
Note values 121 to 127 will generate the same output as MIDI Note values 109 to 115.
When a MIDI Note is received, a Gate signal is generated at the GATE output for the duration of
the MIDI Note On event. When the sequencer is running, MIDI Note On messages will transpose
the pattern in both Keyboard and Step mode. In the KB mode Record function and the Step mode
Step Edit function, MIDI Notes received will enter note values into the step currently being edited.
MIDI NOTE ON VELOCITY
Each MIDI Note On message contains a Velocity value. MIDI Note On Velocity values from 0 to 127
can be output from the Assignable output as a -5V to +5V CV signal. This is programmed in Setup
mode. In the KB mode Record function and the Step mode Step Edit function, MIDI Note On Velocity
values 96 or greater or will turn Accent ON for the currently edited step. Velocity values less than
96 will turn the Accent OFF for the current step. See Page 50 for details on assigning Velocity to the
Assignable output jack.
MIDI PITCH BEND
MIDI pitch bend messages are added to, or subtracted from the Keyboard CV signal. The Mother-32
default Pitch Bend amount is +/-1 Octave. MIDI Pitch Bend can be output as a -5V to +5V signal on the
Assignable output. This is programmed in Setup mode. See Page 50 for details on assigning Pitch Bend
to the Assignable output jack. MIDI Pitch Bend amount can be set from +/-0 to +/-12 semitones using
MIDI Pitch Bend Depth RPN (CC101 value 0, CC100 value 0, CC6 values 0 to 12).
MIDI CONTROL CHANGE (CC) MESSAGES
The following MIDI CC messages are received by the Mother-32:
CC
CC
CC
CC
5: Portamento Time
65: Portamento On/Off
64: Sustain
1,2,4,7: Used to generate CVs at the ASSIGNABLE OUTPUT
MIDI PROGRAM CHANGE MESSAGES
MIDI program changes 1 to 64 select the current sequencer pattern location.
MIDI Program changes 71 to 86 select one of the 16 Assignable output modes.
MIDI Channel Aftertouch can be output as a -5V to +5V signal on the assignable output.
48
MIDI FUNCTIONS AND IMPLEMENTATION (continued)
MIDI SYSTEM REAL TIME MESSAGES
MIDI CLOCK MESSAGES: When the Mother-32 detects a MIDI Clock signal, the Tempo LED blinks
green at the detected tempo and the panel TEMPO control becomes a clock divider. After MIDI clock
messages cease to be received, the internal clock can be restarted by pressing the RUN/STOP button.
MIDI START: A MIDI Start message runs the pattern from Step 1.
MIDI STOP: A MIDI Stop message stops the pattern on the last active step.
MIDI CONTINUE: A MIDI Continue message will start the pattern on the next active step.
SETUP MODE
Setup mode is a non-performance mode that uses the Keyboard and sequencer buttons to program
the Mother-32 features, MIDI Channel, Assignable Output and Tempo Input mode.
ENTER SETUP MODE
+
+
+
Press (SHIFT)+RESET+SET
END+STEP 8 buttons. The
Tempo LED will flash yellow,
Octave/Location LED 1 will
alternate yellow and green
(unless the MIDI channel has
been changed from default).
NOTE: The same button combo will exit Setup mode.
CHANGE PAGES
Use the LEFT/RIGHT arrows to select page 1-3. Yellow
Octave/Location LEDs indicate the current Setup mode page.
Page 1
Page 2
Page 3
PAGE 1: Assignable output mode
PAGE 2: MIDI channel selection
PAGE 3: Tempo input mode
Select Setup Mode Page
(Indicated by Yellow LED)
NOTE: Settings made in Setup Mode are remembered on
power down.
PARAMETER SELECTION 1-8
Select Values 1-8
Step buttons 1-8 select values 1-8. The value is indicated by green Octave/Location LEDs.
49
SETUP MODE
(continued)
PARAMETER SELECTION 9-16
Select Values 9-16
+
To access values 9-16, press (SHIFT)+Step buttons 1-8 (9-16). The value is indicated by red
Octave/Location LEDs. If a setting is on the same LED as the current page, the LED will flash
alternately between the yellow page color and the green or red setting color.
PROGRAMMING THE ASSIGNABLE OUTPUT
Select Page 1, and then press Step buttons 1-8 for Assignable output modes 1-8,
and (SHIFT)+Step buttons 1-8 for Assignable output modes 9-16.
ASSIGNABLE OUTPUT MODES
1: Accent (Default)
2: Sequencer Clock
3: Sequencer Clock / 2
4: Sequencer Clock / 4
5: Sequencer Step Ramp
6: Sequencer Step Saw
7: Sequencer Step Triangle
8: Sequencer Step Random
9: Sequencer Step 1 Trigger Output
10: MIDI Velocity
11: MIDI Channel Pressure
12: MIDI Pitch Bend
13: MIDI CC 1
14: MIDI CC 2
15: MIDI CC 4
16: MIDI CC 7
SETTING A MIDI CHANNEL
Select Page 2, and then press Step buttons 1-8 for MIDI Channels 1-8, and (SHIFT)+Step buttons 1-8
for MIDI Channels 9-16.
PROGRAMMING THE TEMPO INPUT
Select Page 3, and then press Step buttons 1-3 to select the desired Tempo input behavior.
1: CV INPUT MODE
2: SINGLE CLOCK ADVANCE MODE
3: DIN SYNC MODE
50
VCO CALIBRATION
Your Mother-32 is fully calibrated at the factory before packaging and shipping. Because it is designed to
play with external analog gear, which may or may not be well-calibrated, provisions have been made for
tuning the VCO without opening the unit.
There are 4 small holes in the front panel to access the most important calibrations for the VCO: VCO Offset,
Frequency Control Gain, External 1V/Oct Gain, and KB CV Gain.
Frequency Control Gain
VCO Offset
External 1V/Oct Gain
KB CV Gain
A calibration tool has been
included with your Mother-32
in the event that you need
to tune the instrument to
the analog or modular gear
in your setup. Keep in mind
that the internal tuning
trimpots are not designed for
unlimited use. ONLY calibrate
your Mother-32 when it is
absolutely necessary.
NOTE: If you have a lot of
analog gear, you may want
to look into obtaining a
precision voltmeter for
voltage measurements.
WHAT YOU WILL NEED
1. A wide ranging and accurate tuner.
2. The included calibration tool.
3. A 1 V/Octave source (One that is confirmed to be well calibrated - no more than 1 mV error per octave).
CALIBRATION
1. Make sure your Mother-32 has been powered on for at least 15 minutes, and that it is in a place
where the temperature will not change drastically while performing the calibration.
2. Remove all patch cables from the patchbay.
3. Set the panel settings to a basic sawtooth sound (Page 07).
4. Connect the AUDIO OUT to an accurate, high-quality tuner.
5. Set the VCA MODE to ON.
6. Ensure you are in KB mode with the Record function Off.
7. Set the FREQUENCY control precisely to center position.
8. Make sure the VCO MOD AMOUNT control is turned completely Off.
9. Set the Keyboard Octave to “5” and press low C (Step 1) on the keyboard (KB CV outputs 0V).
10. Verify that the pitch is Middle C (C4 - 261.6Hz). Adjust the VCO Offset trimpot ONLY if necessary.
11. Set the Mother-32 Octave to 7 and play the lowest C (Step 1).
51
CALIBRATION (continued)
12. Verify that the pitch is 2 octaves higher (C6 - 1046.5Hz). Note that a pitch within 2 to 3 cents of
the target frequency should be fine. Adjust the KB CV Gain trimpot ONLY if necessary.
13. Repeat steps 9 to 12 to recheck the tuning and make adjustments ONLY if necessary.
14. Now set the Keyboard Octave to “5” and press the low C on the keyboard (KB CV outputs 0V).
15. Connect a properly calibrated, 1V/Octave source outputting 0V (C4) to the VCO 1V/OCT input jack.
16. Verify that the pitch remains the same. A large offset may indicate an issue with a cable, a
connector, or with the calibration of your CV source.
17. Change the 1V/Octave CV source to output +2V (C6).
18. Verify the pitch is 2 octaves higher (C6 - 1046.5Hz). Note that a pitch within 2 to 3 cents of the target
frequency should be fine. Adjust the External 1 V/Oct Gain trimpot ONLY if necessary.
19. Repeat steps 15-18 to recheck the tuning.
USING MOTHER-32 AS A EURORACK MODULE
The Mother-32 can be removed from its case, and easily installed into a Eurorack system as a 60HP module.
Before doing this, it is important to note that the Mother-32 draws a maximum of 230mA from a +12V supply.
It does not use the -12V supply at all.
Make sure there is enough headroom on the +12V supply in your system to power the Mother-32. You will
need to know the current rating of the system’s +12VDC supply, and the current draw of the +12VDC supply
for all modules in the system combined. The sum of all current draw at +12VDC should never exceed the
power supply rating. Note that it is good practice to leave some headroom to reduce stress on the supply.
Moog accepts NO responsibility or liability for improperly installed modules.
TO INSTALL THE MOTHER-32 IN A EURORACK SYSTEM
1. Disconnect external power from the unit.
2. Remove the eight black M3 screws on the front panel and keep them somewhere safe.
3. Lift the panel slowly from the bottom so you can see the two cables going to the Front Panel module.
4. Disconnect the two cables from the front panel. Now the module is free from its enclosure.
5. Look at the back of your Mother-32 module. There is a
10-pin power header on the back of the PCB that accepts a
10-pin Eurorack power ribbon cable.
10
+12V
GND
-12V(N/C)
1
PIN 1 STRIPE
P2
6. Connect PIN-1 (-12V) of the power ribbon cable to PIN-1
of the Mother-32 Eurorack power header. The darkened wire
(typically red) on the ribbon cable indicates the PIN-1 (-12V)
side of the cable.
7. After power is connected, your Mother-32 may be installed into the rails of the Eurorack system case with
the eight black M3 screws.
8. Once fully installed, you may power up your Eurorack system.
52
PRESETS
NOTE: Additional presets and blank patch sheets can be downloaded at www.moogmusic.com
OCTAVE BOUNCE BACK (Adjust VC MIX to control tuning)
7.b
NOISE TRANSIENT
7.b
METAL SNARE
7.b
53
SEQUENCER BASS
7.b
RESONANT HIGH PASS FILTER
7.b
8-BIT PERCUSSION
54
‘80S TOMS
7.b
SHORT BRASS
7.b
FILTER KICK
55
PRESET NAME:
7.b
NOTES:
PRESET NAME:
7.b
NOTES:
56
PRESET NAME:
7.b
NOTES:
PRESET NAME:
7.b
NOTES:
57
SPECIFICATIONS
SOUND ENGINE: 100% Analog
KEYS: 13 Momentary Pads
POLYPHONY: Monophonic
DIMENSIONS: 12.57“W x 4.21“H (with knobs) x 5.24“D
WEIGHT: 3.5 lbs.
POWER CONSUMPTION: 2.8W
INCLUDED POWER SUPPLY: 100-250VAC, 50-60Hz, +12VDC 1A
PATCHBAY: 32 x 3.5mm jacks
REAR PANEL AUDIO OUT: 1/4” Headphone / Audio
EURORACK SPECS
CURRENT DRAW: 230mA (maximum) from +12VDC (10-pin header)
MOUNTING DIMS: 60HP (.69” 26mm Module Depth)
Specifications Subject To Change Without Notice
ACCESSORIES
The following accessories are available at authorized Moog dealers.
2 UNIT VERTICAL RACK KIT
3 UNIT VERTICAL RACK KIT
HIGH QUALITY GIG BAG
6” CABLE PACK (QTY 5)
12” CABLE PACK (QTY 5)
EMPTY 60HP CASE
BACKUP POWER SUPPLY
58
SERVICE AND SUPPORT INFORMATION
MOOG’S STANDARD WARRANTY
Moog warrants its products to be free of defects in materials or workmanship and conforming to
specifications at the time of shipment. The Warranty Period is one year from the date of purchase. If, in
Moog’s determination, it has been more than five years since the product shipped from our factory, it will
be at Moog’s discretion whether or not to honor the warranty without regard to the date of the purchase.
During the Warranty Period, any defective products will be repaired or replaced, at Moog’s option, on a
return-to-factory basis. This warranty covers defects that Moog determines are no fault of the user.
The Moog Limited Warranty applies to USA purchasers only. Outside the USA the warranty policy and
associated service is determined by the laws of the country of purchase and supported by our local
authorized distributor. A listing of our authorized distributors is available on moogmusic.com.
If you purchase outside of your country, you can expect to be charged for warranty as well as
non-warranty service by the service center in your country.
RETURNING YOUR PRODUCT TO MOOG MUSIC
You must obtain prior approval in the form of an RMA (Return Material Authorization) number from
Moog before returning any product. Email [email protected] for the RMA # via email or
call us at (828) 251-0090. All products must be packed carefully and shipped with the Moog supplied
power adapter. The Mother-32 must be returned in the original inner packing including the cardboard
inserts. Sorry, the warranty will not be honored if the product is not properly packed. Once you
have received the RMA# and carefully packed your Moog, ship the product to Moog Music Inc. with
transportation and insurance charges paid, and include your return shipping address.
MOOG MUSIC
160 Broadway St.
Asheville NC, 28801
WHAT WE WILL DO
Once received, we will examine the product for any obvious signs of user abuse or damage as a result
of transport. If the product abused, damaged in transit, or is out of warranty, we will contact you with
an estimate of the repair cost. Warranty work will be performed and Moog will ship and insure your
product to your United States address free of charge.
HOW TO INITIATE YOUR WARRANTY
Please initiate your warranty online at www.moogmusic.com/register. If you do not have web access,
please call (828) 251-0090 to register your product.
CARING FOR THE MOTHER-32
Clean the Mother-32 with a soft, dry cloth only – do not use solvents or abrasive detergents. Heed the
safety warnings at the beginning of the manual. Don’t drop the unit.
AN IMPORTANT NOTE ABOUT SAFETY: There are no user serviceable parts in the Mother-32.
Refer all servicing to qualified personnel only.
©2015 MOOG MUSIC INC. | 160 Broadway St. Asheville, NC 28801
Moog is a registered trademark of Moog Music Inc.
The Moog Wordmark is a registered trademark of Moog Music Inc.
The Moog Icon is a registered trademark of Moog Music Inc.
All rights reserved to Moog Music Inc. on all text & graphics here within.
Phone: 828.251.0090
Email: [email protected]
Website: www.moogmusic.com
59
Mother-32 Is Handcrafted With Care By Employee-Owners In Asheville, NC
60