1
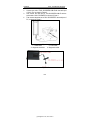
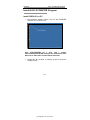
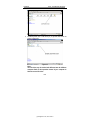
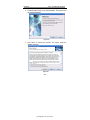
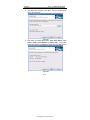
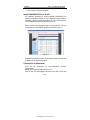
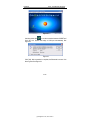
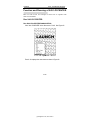
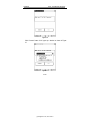
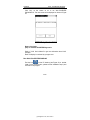
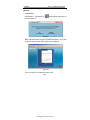
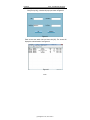
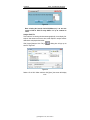
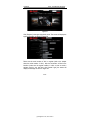
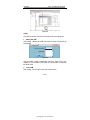
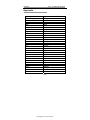
LAUNCH
X431- PCCENTER Program
Trademark Information
LAUNCH is a registered trademark of LAUNCH TECH. CO.,
LTD. (LAUNCH for short) in China and other countries. All other
LAUNCH trademarks, service marks, domain names, logos, and
company names referred to in this manual are either trademarks,
registered trademarks, service marks, domain names, logos, company
names of or are otherwise the property of LAUNCH or its affiliates. In
countries where any of the LAUNCH trademarks, service marks,
domain names, logos and company names are not registered,
LAUNCH claims other rights associated with unregistered trademarks,
service marks, domain names, logos, and company names. Other
products or company names referred to in this manual may be
trademarks of their respective owners. You may not use any trademark,
service mark, domain name, logo, or company name of LAUNCH or
any third party without permission from the owner of the applicable
trademark, service mark, domain name, logo, or company name. You
may contact LAUNCH by visiting Launch at http:// www. x431. com, or
writing to Customer Service Department, LAUNCH TECH. CO., LTD.,
Launch Industrial Park,North of Wuhe Avenue, Xuegang, Bantian,
Longgang, Shenzhen, Guangdong, P.R.China, to request written
permission to use Materials on this manual for purposes or for all other
questions relating to this manual.
Copyright Information
Copyright © 2008 by LAUNCH TECH. CO., LTD. All rights reserved. No
part of this publication may be reproduced, stored in a retrieval system,
or transmitted in any form or by any means, electronic, mechanical,
photocopying, recording or otherwise, without the prior written
permission of LAUNCH. The information contained herein is designed
only for the use of this unit. LAUNCH is not responsible for any use of
this information as applied to other units.
Neither LAUNCH nor its affiliates shall be liable to the purchaser of this
unit or third parties for damages, losses, costs, or expenses incurred by
purchaser or third parties as a result of: accident, misuse, or abuse of
B-i
(c) Diagtools LTD, www.x431.lv
LAUNCH
X431- PCCENTER Program
this unit, or unauthorized modifications, repairs, or alterations to this
unit, or failure to strictly comply with LAUNCH operating and
maintenance instructions.
LAUNCH shall not be liable for any damages or problems arising from
the use of any options or any consumable products other than those
designated as Original LAUNCH Products or LAUNCH Approved
Products by LAUNCH.
General Notice
z
z
Other product names used herein are for identification purposes
only and may be trademarks of their respective owners. LAUNCH
disclaims any and all rights in those marks.
There is a possibility that this unit is inapplicable to some of the
vehicle models or systems listed in the diagnosis section due to
different countries, areas, and/or years. Do not hesitate to contact
LAUNCH if you come across such questions. We are to help you
solve the problem as soon as possible.
Disclaimer
z
z
To take full advantage of X-431, you should be familiar with the
engine.
All information, illustrations, and specifications contained in this
manual are based on the latest information available at the time of
publication. The right is reserved to make change at any time
without notice.
B-ii
(c) Diagtools LTD, www.x431.lv
LAUNCH
X431- PCCENTER Program
Contents
BRIEF INTRODUCTION.............................................................. B-4
PRECONDITIONS FOR SYNCHRONOUS DIAGNOSTICS . B-4
Hardware and Other Requirements ............................................. B-4
Configuration............................................................................... B-5
How to Connect ........................................................................... B-5
X-431 connecttion ................................................................. B-5
X431 Tool connecttion .......................................................... B-5
INSTALL X431-PCCENTER PROGRAM ................................. B-7
Install DISPLAY on PC ............................................................... B-7
Install DIAGNOSTICS on X-431 ............................................. B-13
Connection of Bluetooth............................................................ B-13
Set of Bluetooth COM ............................................................... B-14
FUNCTION AND RUNNING OF X431-PCCENTER ............. B-18
Run X431-PCCENTER ............................................................. B-18
Run X431-PCCENTER DIAGNOSTICS ......................... B-18
Run X431-PCCENTER DISPLAY .................................... B-20
Function of the Program ............................................................ B-21
Monitor ................................................................................. B-22
Diagnose .............................................................................. B-23
Import ................................................................................... B-31
Update .................................................................................. B-35
Net service ........................................................................... B-36
Autobase .............................................................................. B-40
Config ..................................................................................... B-43
Help ........................................................................................ B-44
Function Menu of X431-PCCENTER DISPLAY ............. B-45
APPENDIX ................................................................................... B-46
B-3
(c) Diagtools LTD, www.x431.lv
LAUNCH
X431- PCCENTER Program
Brief Introduction
X431-PCCENTER is a program that makes it possible for PC
(desktop/laptop computer) to join vehicle diagnostics with X-431
synchronously via Bluetooth. User can also record data,
playback/analyze data, import file, update X-431 program, get internet
service, get autobase, etc. with diagnostics. It provides convenient to
save, analyze and manage data. The synchronous diagnostics can be
performed easily and conveniently. The program consists of two parts:
Display and Diagnostics. Display is the program running on PC while
Diagnostics running on X-431. When using X-431 to diagnose a vehicle,
run Bluetooth program to communicate X-431 and PC, and run the
programs -- Display and Diagnostics respectively. The synchronous
diagnostics can be performed easily and conveniently, X431pccenter
must be used with X-431 product family, including: X-431 X-431Tool
X-431Heavy duty AutoBook and so on.
Fundamental steps for realizing the synchronous diagnostics:
z Install X431-PCCENTER program;
z Run Bluetooth program to connect PC to X-431;
z Connect X-431 to vehicle diagnostic socket;
z Perform synchronous diagnostics.
Preconditions for Synchronous
Diagnostics
Hardware and Other Requirements
1. PC hardware/software requirement:
Operating system: Windows 98/2000/NT/XP
CPU: Pentium200 or up
Monitor: resolution 1024*768 or up
RAM: at least 256MB
2. Complete X-431 hardware (refer to “X-431 User’s Manual”).
3. X-431 Operating System V10.83 or later
B-4
(c) Diagtools LTD, www.x431.lv
LAUNCH
X431- PCCENTER Program
4. X-431 Display Program V14.03 or later
5. X-431 works in normal condition (refer to “Conditions for Test” in
“X-431 User’s Manual”).
Configuration
X431-PCCENTER product includes
a. USB BT
b. X-431 BT box
c. TOOL-PCCENTER-CABLE
d. X431-PCCENTER serial cable
e. Three disks(installation software and Bluetooth driver program)
f. User’s Manual
How to Connect
Here we will show how to connect the product with X431-PCCENTER,
vehicle and PC. The connection of X-431 Tool is different from others,
such as X-431, AutoBook, and X-431Heavy-Duty. Here we take X-431
and X-431 Tool for example.
X-431 connecttion
1. Connect X-431 to vehicle diagnostic socket. (refer to “X-431 User’s
Manual”)
2. Connect Serial Port adaptor of X-431 BT box to the serial port of
X-431, and connect male power adaptor of X-431 BT box to the
female power adaptor of X-431 main cable (If the power supply on
vehicle diagnostic socket is insufficient or the power pin is
damaged, connect the female power adaptor of X-431 BT box to
cigarette lighter for power supply).
3. Connect the USB BT to PC USB port.
X-431 Tool connecttion
1.
Connect X-431 Tool to DLC on board. The wireless link is shown in
Figure 1 (Refer to “X-431Tool User’s Manual”).
B-5
(c) Diagtools LTD, www.x431.lv
LAUNCH
2.
3.
4.
X431- PCCENTER Program
Connect one end of TOOL-PCCENTER-CABLE with the serial port
of X-431 Tool, as shown in Figure 2.
And connect the other end of TOO-PCCENTER-CABLE with the
serial cable of X431-PCCENTER, as shown in Figure 2.
Then connect the other end of X431-PCCENTER to the serial port of
PC, as shown in Figure 2.
Figure 1
1—DIAGInfinite
2—main cable
3—diagnostic connector
4—diagnostic socket
Figure 2
B-6
(c) Diagtools LTD, www.x431.lv
LAUNCH
X431- PCCENTER Program
Install X431-PCCENTER Program
Install DISPLAY on PC
1. Start Windows operating system and put X431-PCCENTER
CD-ROM 1 into CD driver of PC.
Figure 01
Note: X431-PCCENTER has 3 disks. Disk 1 includes
X431-PCCENTER SETUP.EXE installation file and Bluetooth driver
Bluesoleil.rar. Other disks include autobase information.
2. Double click “My computer” on Desktop so that PC shows the
following screen:
B-7
(c) Diagtools LTD, www.x431.lv
LAUNCH
X431- PCCENTER Program
Figure 02
3. Double click the icon of CD driver (G:) to get the next screen as
shown in Figure 03.
Figure 03
Note:
The CD driver may be marked with different letter for different
computer. Refer to the operation manual of your computer to
find the correct CD driver.
B-8
(c) Diagtools LTD, www.x431.lv
LAUNCH
X431- PCCENTER Program
4. Double click the “Setup” icon to start installation. The screen shows
the following message:
Figure 04
5. Click “Next” to continue the process, The screen shows the
following message:
Figure 05
B-9
(c) Diagtools LTD, www.x431.lv
LAUNCH
X431- PCCENTER Program
6. Select “I agree to the terms of this license agreement”, then
click ”Next:”:
Figure 06
7. Input the serial number (Every set of device has different serial
number which is put in the code envelop.) and click “Next”. The
screen shows the following message:
Figure 07
B-10
(c) Diagtools LTD, www.x431.lv
LAUNCH
X431- PCCENTER Program
8. Input Name and Company, click “Next”. The next screen will be
shown as in Figure 08.
Figure 08
9. Click “Next” to continue the process. (Note: Click “Back” if you
want to make some alteration in above steps.) The screen
shows the progress of installation as shown in Figure 09&Figure 10
.
Figure 09
B-11
(c) Diagtools LTD, www.x431.lv
LAUNCH
X431- PCCENTER Program
Figure 10
10. When the installation is complete, the screen will shown the
following message:
Figure 11
B-12
(c) Diagtools LTD, www.x431.lv
LAUNCH
X431- PCCENTER Program
11. Click “Finish” to finish the installation.
Install DIAGNOSTICS on X-431
The installation procedure for X431-PCCENTER DIAGNOSTICS is
similar to the update procedure of X-431 diagnostic program. Refer to
the chapter “Update of Diagnostic Software” in X-431 User’s Manual or
“X-431 Upgrade Instruction” on http://www.x431.com.
When you get into the “Download Center” on http://www.x431.com, you
can find the “X431-PCCENTER” program as shown in Figure 12.
Figure 12
Download and install the program by the same procedure as that used
in update of X-431 diagnostic program.
Connection of Bluetooth
There are two accessories for X431-PCCENTER Bluetooth
communication:
USB BT (For connecting USB interface on PC)
X-431 BT box (For connecting the interface on the side of X-431 and
B-13
(c) Diagtools LTD, www.x431.lv
LAUNCH
X431- PCCENTER Program
for power)
Set of Bluetooth COM
After the two connect well, you can select drivers below to set
Bluetooth COM:
1.IVT driver program
If you want to use the Bluesoleil driver program packed in
X431-PCCENTER program, firstly find the compress folder in the install
DISC1. Decompress the Bluesoleil compress folder, install the
Bluesoleil program. After installation is complete, a Bluetooth icon will
occur on the desktop. See Figure 19:
Bluetooth Icon
Figure 19
Double click
, and a window will pop up as shown in Figure 20:
B-14
(c) Diagtools LTD, www.x431.lv
LAUNCH
X431- PCCENTER Program
Figure 20
Double click
Figure 21:
, and the screen will display the interface as shown in
Figure 21
Double click “Launch AD” icon, and the screen will display the interface
as shown in Figure 22:
B-15
(c) Diagtools LTD, www.x431.lv
LAUNCH
X431- PCCENTER Program
Figure 22
to set the connection between USB BT and
And then double click
X-431 BT box. System will assign a COM port automatically. See
Figure 23:
Figure 23
Click [Yes]. After connection is complete, the Bluetooth icon turns from
blue to green. See Figure 24.
B-16
(c) Diagtools LTD, www.x431.lv
LAUNCH
X431- PCCENTER Program
Figure 24
Now, Bluetooth communication has been founded. You can
communicate via Bluetooth.
B-17
(c) Diagtools LTD, www.x431.lv
LAUNCH
X431- PCCENTER Program
Function and Running of X431-PCCENTER
Here we take X-431 for example to show how to operate with
X431-PCCENTER
Run X431-PCCENTER
Run X431-PCCENTER DIAGNOSTICS
Click “X431-PCCENTER” in the Start menu of X-431. See Figure 25.
Figure 25
Then X-431 displays the next screen as shown in Figure 26.
B-18
(c) Diagtools LTD, www.x431.lv
LAUNCH
X431- PCCENTER Program
Figure 26
Click “Connect” button. X-431 pops up a window as shown in Figure
27.
Figure 27
B-19
(c) Diagtools LTD, www.x431.lv
LAUNCH
X431- PCCENTER Program
Click “Yes” on the screen so as to run X431-PCCENTER
DIAGNOSTICS. The next screen will be displayed as shown in Figure
28.
Figure 28
Button description:
[Exit]: to exit X431-PCCENTER Diagnostics.
Refer to “X-431 User’s Manual” to get more information about X-431
operation.
Note! The display is monitored by a program now.
Run X431-PCCENTER DISPLAY
on the PC desktop (see Figure 29) or another
Find the icon
folder (for the actual location, please see the installation step 8) and
click it to run the program.
B-20
(c) Diagtools LTD, www.x431.lv
LAUNCH
X431- PCCENTER Program
Figure 29
Function of the Program
The PC will show the following screen when X431-PCCENTER
DISPLAY is run:
Figure 30
B-21
(c) Diagtools LTD, www.x431.lv
LAUNCH
X431- PCCENTER Program
Monitor
Link monitor
Click [Monitor]-[Link monitor] or
shown in Figure 31:
, the prompt box will pop up as
Figure 31
Make sure that perform the X431-PCCENTER program in X-431 and
connect PC well, then click [OK] to enter the next interface:
Figure 32
This is for using PC to monitor and control X-431.
B-22
(c) Diagtools LTD, www.x431.lv
LAUNCH
X431- PCCENTER Program
The PC will display the same screen as that on X-431. See Figure 33.
Click the X-431 function button displayed on PC screen by mouse to
operate X-431.
If the screen is black or freezing, please click [refresh] button that can
help with the problem.
Figure 33
Refresh
to refresh PC screen when it is
Click [Monitor]-[Refresh] or
not synchronous with X-431.
Screen capture
to capture and save the
Click [Monitor]-[Screen capture] or
screen displayed on X-431 for later demonstration or feedback to
Launch for getting solutions to the problem.
Diagnose
When PC is linked with X-431, it also can be operated on PC for
diagnostics.
B-23
(c) Diagtools LTD, www.x431.lv
LAUNCH
X431- PCCENTER Program
The synchronous diagnostics includes the following functions:
Link diagnose
Click [Diagnose]-[Link diagnose] or
the interface as shown in Figure 34.
, the screen will display
Figure 34
Note: Please enter this interface above before X-431 enters read
data stream or read DTCs interface. And then read data stream or
, the screen will
DTCs with X-431, click[ Link diagnose] or
display the interface as shown in Figure 37, showing the same
data stream or DTCs in display of X-431.
B-24
(c) Diagtools LTD, www.x431.lv
LAUNCH
X431- PCCENTER Program
Figure 35
Flash Save
This function is for saving the data stream or trouble codes for later
analysis or comparison with newly appeared one.
Note:
Only the data stream at the moment of occurrence can be saved.
For saving the data stream in a specified period, use [Record]
button. The function will be described later.
When performing vehicle diagnostics, for example, reading trouble
code or data stream, the PC screen will display the test results as
shown in Figure 35.
Click [Diagnose]-[Flash save] in Figure 35, a window will pop up as
shown in Figure 36.
B-25
(c) Diagtools LTD, www.x431.lv
LAUNCH
X431- PCCENTER Program
Figure36
Enter the necessary information in the box and click [OK], a window will
pop up as shown in Figure 37.
Figure 37
Click [OK] to save data successfully.
Note:
Items marked with an “*” are required, e.g. VIN and SMARTBOX
No.
If the required information is not entered, a prompt box will pop up. See
Figure 38.
B-26
(c) Diagtools LTD, www.x431.lv
LAUNCH
X431- PCCENTER Program
Figure 38
Data Record
This function is for recording the data stream in a period of time and
establishing a service databank for later reference.
Click[Data Record]-[Start Record] button to get into the interface as
shown in Figure 39.
Figure 39
Note: selecting the interval of write DS (200ms,ect), is to save one
stream of data to .X-431 file every 200ms. It is up to customer to
select.
After selecting the unit, it starts to save data stream. Click [Data Record]
-[Stop Record] or
Figure 40.
, the PC will display the screen as shown in
B-27
(c) Diagtools LTD, www.x431.lv
LAUNCH
X431- PCCENTER Program
Figure 40
Note: the data will be saved in the X-431 folder under the
installation folder of X431-PCCECTER. It will be
automatically-generated when system is saving data stream.
Search Data
This function is for searching the fault data stored before. It may be
helpful for checking and analyzing current fault.
Note: the operations of datastream, DTC and user information are
the same. Let’s take the operation of datastream as an example for
illustration.
Click [Search Data]-[DataStream]-[Find All]. A window will pop up.
See Figure 41.
Figure 41
B-28
(c) Diagtools LTD, www.x431.lv
LAUNCH
X431- PCCENTER Program
Click [Find by Key], a window will pop up as shown in Figure 42.
Figure 42
Enter at least one search item and then click [OK]. The screen will
display the matched results. See Figure 43.
Figure 43
B-29
(c) Diagtools LTD, www.x431.lv
LAUNCH
X431- PCCENTER Program
If any search item wasn’t entered, the screen will show the window as
Figure 44.
Figure 44
If you want to delete one stream of data, click it with right button of
mouse, and a window will pop up:
Figure 45
If you want to delete, click [OK]; if you want to cancel, click [Cancel].
After clicking [OK], a window will pop up.
Figure 46
Print
This function is for printing current data. (Make sure the printer is in
normal condition.)
B-30
(c) Diagtools LTD, www.x431.lv
LAUNCH
X431- PCCENTER Program
Import
Import CF Card File
The datastream is saved in CF card if use X-431 separately. User can
import the saved datastream through CF card writer/reader for analysis.
For the X431 record function, please refer to the “X-431 Use’s Manual” or
“Function of X431 Data Record” on www.x431.com.
Click [Import CF Card File], and a dialogue box will pop up as shown in
Figure 47. Select an .ini file and click [Open] (The path:/Removable Disk
(F:) /GAG/SMARTBOX/SAVE), the file will be automatically converted
to .X431 file and saved in X431 folder.
Note: X431 folder will be automatically-generated under the
installation folder of X431-PCCENTER when system is converting
files.
Figure 47
Select an .ini file and click [Open], a dialogue box will pop up as shown in
Figure 48.
B-31
(c) Diagtools LTD, www.x431.lv
LAUNCH
X431- PCCENTER Program
Figure 48
Note: selecting the interval of write DS(200ms,ect), is to save one
stream of data to .X431 file every 200ms. It is up to customer to
select.
Analyze .X431 File
This function is for showing the data stream graphically. It can display four
strips of data stream at the same time, which helpful to analyse relative
data stream and pinpoint the trouble.
Click [Import]-[Analyze .X431 File] or
shown in Figure 49.
, a dialog box will pop up as
Figure 49
Select a file in X431 folder and then click [Open], the screen will display
B-32
(c) Diagtools LTD, www.x431.lv
LAUNCH
X431- PCCENTER Program
the message as shown in Figure 50.
Figure 50
Double click the name of data stream; the screen will display the message
as shown in Figure 51.
Figure 51
Select different data stream in pop-down menus, and tick behind them.
The color below the data stream indicates that the color of waveform in
B-33
(c) Diagtools LTD, www.x431.lv
LAUNCH
X431- PCCENTER Program
below graph. See Figure 52.
Figure 52
or
And then click
display, click
53.
or
, it starts to display waveforms. During
to stop the display at any time. See Figure
Figure 53
B-34
(c) Diagtools LTD, www.x431.lv
LAUNCH
X431- PCCENTER Program
Update
1. X431 Update Info
This function is to update software version.
Click [Update]-[X431 Update Info], the screen will display the message as
shown in Figure 54:
Figure 54
Make sure connect well, and click [OK], the screen will display the
message as shown in Figure 55:
Figure 55
Double click the vehicle type on the left to view the detailed information
about the update. See Figure 56:
B-35
(c) Diagtools LTD, www.x431.lv
LAUNCH
X431- PCCENTER Program
Figure 56
2. X431 Update Tool
Please refer to Update Tool Chapter of “X-431 User’s Manual”.
Net service
User can upload the recorded .X431 file to website for professional
analysis. The function is described below:
User must register on www.crecorder.com first, and then he can get the
service.
Firstly, login to www.crecorder.com. See Figure 57.
B-36
(c) Diagtools LTD, www.x431.lv
LAUNCH
X431- PCCENTER Program
Figure 57
Click [Register] in the upper right-hand corner. The screen will display the
register information as shown in Figure 58:
Figure 58
Please use the serial number of X431 to register (refer to the chapter
about the serial number of X431). After the information is filled in the
interface (make sure the register mailbox is valid, so that we send a
activate e-mail to your mail box), click [Create Login], the screen will
display the message as shown in Figure 59:
B-37
(c) Diagtools LTD, www.x431.lv
LAUNCH
X431- PCCENTER Program
Figure 59
Now you may login your register mailbox to click the activate e-mail for
activating your account.
After activate, you can upload .X431 file for professional analysis.
How to upload .X431 file:
Click [Net Service]-[Upload .X431file], a window will pop up as shown in
Figure 60:
Figure 60
B-38
(c) Diagtools LTD, www.x431.lv
LAUNCH
X431- PCCENTER Program
Note: the serial number to fill must be the register serial number.
Otherwise, it will fail to upload.
After filling the information in the interface, click [OK], a window will pop up
as shown in Figure 61:
Figure 61
Now the recorded .X431 file is uploaded to website. User can get
professional diagnostic report.
Login to www.crecorder.com with the register name and password, and
then click [Vehicle Data Base], the screen will display the message as
shown in Figure 62.
Figure 62
Click [View Report] behind the question to view the professional analysis,
B-39
(c) Diagtools LTD, www.x431.lv
LAUNCH
X431- PCCENTER Program
or click [Download] to download the report.
Autobase
You need register before viewing vehicle autobase. The register
procedures are listed as below:
1. Enter Vehicle Autobase menu. If you have not registered, it will
display “Not register”.
2. Click “HELP” button, and then click “Get machine ID” in the right
bottom of “HELP” window.
3. It will display machine ID in the pop-up menu. Click “Copy machine
ID”, and set up a new file on hard disk to save the ID.
4. Send the ID file to Launch ([email protected]) by e-mail.
And then Launch will send you a register program.
5. After receiving register program, double click it to run, and register
procedure is completed.
This function provides the system circuit diagram of normal model. Click
“Autobase” to enter Figure 63.
Figure 63
Click “+” on the left index to expand it. Select the circuit diagram to view.
The circuit diagram of the system will be displayed at right (See Figure
64).
B-40
(c) Diagtools LTD, www.x431.lv
LAUNCH
X431- PCCENTER Program
Figure 64
Move the mouse to one module (See Figure 65) or select one module on
the drop-down menu (See Figure 66), and then click to expand the circuit
diagram. The red part is the selected module. See Figure 67.
Figure 65
B-41
(c) Diagtools LTD, www.x431.lv
LAUNCH
X431- PCCENTER Program
Figure 66
Figure 67
Click “help” to acquire the help about the circuit diagram. See Figure 68.
Click “exit” to leave the interface.
B-42
(c) Diagtools LTD, www.x431.lv
LAUNCH
X431- PCCENTER Program
Figure 68
Config
The functions include: manual set COM, close COM, set language, etc.
1. Manual Set COM
Click [Config] - [Manual Set COM], the screen as shown in Figure 69 will
be displayed:
Figure 69
User can select a serial communication port here. There are 32 ports
available on PC. Baudrate is the speed for communication. Usually use
the default value.
2. Close COM
Click [Config] - [Close COM] to close port communication.
B-43
(c) Diagtools LTD, www.x431.lv
LAUNCH
X431- PCCENTER Program
3. Language Selection
Users in different areas can select their languages in the menu. Click
[Config] – [Set language] as shown in Figure 70 will be displayed.
Figure 70
Help
Click [Help] and a dialogue box will pop up. See Figure 70.
Figure 71
B-44
(c) Diagtools LTD, www.x431.lv
LAUNCH
X431- PCCENTER Program
Function Menu of X431-PCCENTER DISPLAY
Monitor
Link Monitor
Refresh Screen
Screen Capture
Diagnose
Link Diagnose
Flash Save
Start
Data Record
Stop
Search Data
Datastream
DTC
User Info
X-431
PCCENTER
Display
Import
Import CF Card File
Analyze.X431 File
Update
X431 Update Info
X431 Update Tool
Netservice
Upload .X431 File
Autobase
Config
Language Selection
Manual Set COM
Close COM
Help
B-45
(c) Diagtools LTD, www.x431.lv
LAUNCH
X431- PCCENTER Program
Appendix
Vehicle Make/Model
OBD II, EOBD
Australian HOLDEN
Australian Ford
BMW
PROTON
Mercedes-Benz
Honda
Peugeot
Daihatsu
Daewoo
Volkswagen
Fiat
Toyota
Ford
Volvo
Chrysler
Renault
Suzuki
Perodua
Mazda
Opel
Kia
Nissan
Mitsubishi
SAIC Chery
Subaru
GM
Isuzu
Hyundai
Car Name/Macro Definition
EOBD2
HOLDEN
FORD
BMW
PROTON
BENZ
HONDA
PEUGEOT
DAIHASU
DAEWOO
AUDI
FIAT
TOYOTA
USAFORD
VOLVO
CHRYSLER
RENAULT
SUZUKI
PERODUA
MAZDA
OPEL
KIA
NISSAN
MITSUBISHI
QIRUI
SUBARU
GM
JPISUZU
HYUNDAI
B-46
(c) Diagtools LTD, www.x431.lv
LAUNCH
X431- PCCENTER Program
Citroen
ALFAROMEO
Lancia
Gaz
Vaz
Tata
HM
Maruti Suzuki
Mahendra
Jinbei Special
Zhonghua Special
Changcheng Special
Chevy
SPARK
LAND ROVER
CITROEN
ROMEO
LANCIA
GAZ
VAZ
TATA
HM
MARUTI
MAHENDRA
JINBEIEN
ZHONGHUAEN
changchengzy
chevy
SPARK
LANDROVER
B-47
(c) Diagtools LTD, www.x431.lv
LAUNCH
X431- PCCENTER Program
Warranty
THIS WARRANTY IS EXPRESSLY LIMITED TO PERSONS WHO
PURCHASE LAUNCH PRODUCTS FOR PURPOSES OF RESALE
OR USE IN THE ORDINARY COURSE OF THE BUYER’S BUSINESS.
LAUNCH electronic product is warranted against defects in materials
and workmanship for one year (12 months) from date of delivery to the
user.
This warranty does not cover any part that has been abused, altered,
used for a purpose other than for which it was intended, or used in a
manner inconsistent with instructions regarding use. The exclusive
remedy for any automotive meter found to be defective is repair or
replacement, and LAUNCH shall not be liable for any consequential or
incidental damages.
Final determination of defects shall be made by LAUNCH in
accordance with procedures established by LAUNCH. No agent,
employee, or representative of LAUNCH has any authority to bind
LAUNCH to any affirmation, representation, or warranty concerning
LAUNCH automotive meters, except as stated herein.
Disclaimer
THE ABOVE WARRANTY IS IN LIEU OF ANY OTHER WARRANTY,
EXPRESSED OR IMPLIED, INCLUDING ANY WARRANTY OF
MERCHANTABILITY OR FITNESS FOR A PARTICULAR PURPOSE.
Order Information
Replaceable and optional parts can be ordered directly from your
LAUNCH authorized tool supplier. Your order should include the
following information:
(c) Diagtools LTD, www.x431.lv
LAUNCH
1.
2.
3.
X431- PCCENTER Program
Quantity
Part number
Item description
Customer Service
If you have any questions on the operation of the unit, please contact
us:
Tel: 86-755-84528431/84528822
Hotline: 400 830 5166
E-mail: X431@ cnlaunch.com
If your unit requires repair service, return it to the manufacturer with a
copy of the sales receipt and a note describing the problem. If the unit
is determined to be in warranty, it will be repaired or replaced at no
charge. If the unit is determined to be out of warranty, it will be repaired
for a nominal service charge plus return freight. Send the unit pre-paid
to:
Attn: Customer Service Department
LAUNCH TECH. CO., LTD.
Launch Industrial Park,
North of Wuhe Avenue,
Banxuegang, Bantian,
Longgang, Shenzhen,
Guangdong
P.R.China, 518112
(c) Diagtools LTD, www.x431.lv