1
Calibration Software
Version 3.8
User's Manual
Medivisor for i2 Series
Contents
Software License Agreement.................................................................................3
1. Introduction..........................................................................................................8
1.1 Overview........................................................................................................8
1.2 Package contents..........................................................................................8
1.3 Operating environment..................................................................................8
2. Installation...........................................................................................................9
2.1 Connecting cables.........................................................................................9
2.2 Installing the calibration sensor driver..........................................................10
2.3 Installing Medivisor for i2 Series..................................................................11
3. Setup — Medivisor Agent Services.................................................................16
3.1 Workstation...................................................................................................16
3.2 Display..........................................................................................................16
3.3 Display Model...............................................................................................19
3.4 Sensor..........................................................................................................19
3.5 Management Station....................................................................................19
4. Auto Adjustment................................................................................................20
4.1 Calibration/Front Sensor Calibration............................................................21
4.2 Uniformity adjustment..................................................................................26
5. Useful Functions...............................................................................................29
5.1 Test Patterns................................................................................................30
5.2 Manual Adjustment......................................................................................30
5.3 Display Inspection........................................................................................31
5.4 Display Configuration...................................................................................34
5.5 Clearing the uniformity adjustment settings ................................................35
5.6 Calibration History . .....................................................................................36
6. Uninstallation.....................................................................................................38
7. Troubleshooting................................................................................................38
8. Appendix............................................................................................................39
8.1 How to attach the calibration sensor............................................................39
8.2 Gamma........................................................................................................40
8.3 Test Patterns................................................................................................40
8.4 SMPTE Pattern............................................................................................44
8.5 How to read the graphs................................................................................45
http://www.totoku.com/display/
Copyright (C) 2000-2008 TOTOKU Electric Co., Ltd. All rights reserved.
TOTOKU ELECTRIC CO., LTD.
-2-
Medivisor for i2 Series
― Make sure to read this Software License Agreement before use. ―
Software License Agreement
Please read this Software License Agreement ("Agreement") thoroughly before using or
installing Medivisor for i2 Series. By installing this software, you are agreeing to be bound
by the terms of this Agreement. If you do not agree to this Agreement, return the entire
package with all of its contents along with the purchase receipt to the place of purchase
for a full refund.
Article 1 – Definition
1. Software identified above (hereinafter called "Software"), includes documents such as
manual and specifications, etc, media, any software and such products delivered by
TOTOKU from time to time under this Agreement.
2. Individual Contract means the agreement to be concluded in the form of purchase
order, which shall set forth terms and conditions including, but not limited to, (a)
identification of Products including model numbers (b) quantity (c) requested shipping
date from Japanese port (d) price (e) payment (f) shipping instructions and shipping
address.
Article 2 – Order of Precedence
The terms and conditions of this Agreement shall govern Individual Agreement. In case
that terms and conditions of Individual Agreement is inconsistent or conflict with the
provisions of this Agreement, the provisions of this Agreement shall prevail.
Article 3. – Grant of License
1. TOTOKU hereby grants to User and User accepts non-exclusive and non-transferable
license to use, install and copy Software under this Agreement.
2.User shall use Software solely on its computer of the same number as the number of
licenses. User shall not sublicense, rent or lease Software or use Software for
third-party training, commercial time-sharing or service bureau use.
3.The aforesaid license granted is solely for User’s operations on the designated system.
Article 4 – Limitations on License
1.User shall not cause or permit to any third party the reverse engineering, discovering
the source code, disassembly, modification, update, customization or recompilation of
Software.
2.User shall not use or cause to be used, license granted herein and for any purpose
whatsoever other than for the purpose specified in this Agreement.
3.TOTOKU shall retain all title, copyright and other proprietary rights in Software. User
shall not acquire any right, express or implied, in Software, other than those specified
in this Agreement.
Article 5 – Management of Software
1.Subject to the terms and conditions hereunder, User may copy Software for archival
and backup purposes and agree to label all such copies with the copyright notice
designated by TOTOKU. User shall manage the copy of Software with the duty of care
and diligence of a good manager and, upon TOTOKU’s request, shall make a written
report to TOTOKU in respect of Software copied.
TOTOKU ELECTRIC CO., LTD.
-3-
Medivisor for i2 Series
2.At TOTOKU’s written request, User shall furnish TOTOKU with a signed certification
verifying that Software are being used pursuant to the provisions of this Agreement.
TOTOKU reserves the right at any time to inspect Software at the business premises
of User during the term of this Agreement to insure and maintain the quality and
efficient management of Software. In case the aforesaid inspection reveals that User
has underpaid fees to TOTOKU, User shall be invoiced for such underpaid fees with
penalty.
3.User may change its computer where Software is to be installed in subject to prior
written consent of TOTOKU.
Article 6 – After Sales Service
After sales service such as reply to inquiry, technical support, training and consulting
service for Software shall be provided by TOTOKU or TOTOKU's distributor under the
after sales agreement between User and TOTOKU or TOTOKU's distributor.
Article 7 – Warranty
1. Program Warranty
(1) TOTOKU warrants that Software will perform the functions described in its manual
and/or specifications during the term of this Agreement unless (a) Software is
modified, disassembled or customized by the parties other than TOTOKU (b)
Software is operated in combinations other than as specified in its manual and/or
specifications. In addition, TOTOKU shall make its best efforts to make Software
free from program error. Provided, however, that TOTOKU shall not warrant that
Software is error free and uninterrupted.
(2) In the case of breach of the foregoing warranty, TOTOKU shall make its best
efforts to correct the defect or program errors by providing updated or amended
version of Software. In case TOTOKU cannot correct the defect or program errors,
TOTOKU may, at its option, terminate this Agreement and any payment previously
made to User by TOTOKU will be refunded, less the reasonable value received by
User of the use of Software to the date of the aforesaid termination.
2.Media Warranty
(1) TOTOKU warrants that CD-ROM or other media for Software is free from defects
in materials and workmanship under normal use for fourteen (14) days from the
date of delivery.
(2) In the case of breach of the foregoing warranty, TOTOKU shall replace or repair
the defective media accordingly. Notwithstanding the aforesaid warranty, in case
that any software made by the third party is included in Software, the provisions of
the user software license agreement between User and the third party shall be
applied in respect of such software.
3.TOTOKU DOES NOT MAKE AND HEREBY DISCLAIMS ANY WARRANTY IN
RESPECT OF SOFTWARE OTHER THAN AS PROVIDED ABOVE IN THIS ARTICLE,
WHETHER EXPRESS OR IMPLIED, INCLUDING WITHOUT LIMITATION, ANY
IMPLIED WARRANTY OF MERCHANTABILITY OR FITNESS FOR ANY PURPOSE.
Article 8 – Intellectual Property Right
1.User acknowledge that all patents, designs, copyrights, know how and other
intellectual property rights used or embodied in connection with Software are the
exclusive properties of TOTOKU, and shall not dispute them for any reason
whatsoever. User shall not apply for or register any intellectual property right in
connection with Software.
TOTOKU ELECTRIC CO., LTD.
-4-
Medivisor for i2 Series
2.User hereby agree to advise TOTOKU immediately after User becomes aware that
any intellectual property right in connection with Software is attacked or infringed upon
by any third party. In the case of aforesaid attack or infringement, User shall
cooperate with and aid TOTOKU for the defense proceedings at its own cost, and
TOTOKU shall retain all rights to control the direction of any action thereof.
3.To the best knowledge of TOTOKU, Software will not infringe upon any intellectual
property right of any third party. Notwithstanding the foregoing, in the case of any
claim of infringement or alleged infringement of intellectual property rights brought by
third parties in relation to Software, User shall advise, cooperate with and aid TOTOKU
for the defense proceedings at its own cost, and TOTOKU shall retain all rights to
control the direction of any action thereof.
4.In case that Software is held or believed by TOTOKU or any court of competent
jurisdiction to infringe any intellectual property right of any third party, TOTOKU shall
have the option, at its expense, to (a) modify Software to be non infringing; or (b)
obtain a license for User to continue the deal of Software. If it is not commercially
reasonable to perform either of the above options, then TOTOKU may terminate the
license for the infringing Software and refund the license fees paid for Software to
User, less the reasonable value received by User to the date of the aforesaid
termination.
Article 9 – Confidential Information
1.User shall not disclose to third parties any information, which is confidential and
proprietary in nature of TOTOKU in respect of Software. Such confidential and
proprietary information (hereinafter called as "Confidential Information") includes, but
not limited to trade secrets, know-how, inventions, patents, techniques, processes,
programs, schematics, data. User agree that Confidential Information shall be kept
confidential and shall not be disclosed to any other party without the written consent of
TOTOKU.
2.User shall exercise the sole and proper control and supervision over any of their
employees and hereby assumes full liability and responsibility of all obligations in
connection with any party’s employees and any activity of such employees in
connection with Confidential Information.
Article 10 – Limitation of Liability
1.To the maximum extent permitted by applicable law, in no event shall TOTOKU or its
distributor be liable for any special, incidental, indirect or consequential damages
whatsoever including, without limitation, damages for loss of business profits, business
interruption, loss of business information or any other pecuniary loss arising out of the
use of or inability to use, Software or failure to provide after sales services, even if
TOTOKU has been advised the possibility of such damages. In any case, TOTOKU's
entire liability under any provision of this Agreement or Individual Contract shall be
limited to the amount paid by User for the purchase of Software.
2.Software is not fault-tolerant and is not designed, intended, or licensed for use in
hazardous environments requiring fail-safe performance, such as in the operation of
nuclear facilities, aircraft navigation or communication systems, air traffic control, and
life support or weapons systems, in which the failure of Software could lead directly to
death, personal injury, or severe physical or environmental damage (hereinafter called
as "High Risk Activities"). Without limiting the generality of the foregoing, TOTOKU
specifically disclaim any express or implied warranty of fitness for High Risk Activities.
TOTOKU ELECTRIC CO., LTD.
-5-
Medivisor for i2 Series
Article 11 – Export Regulations
User may take Software outside of its own country subject to the prior written consent of
TOTOKU. In the case of foregoing, User shall, at its own cost and responsibility, comply
with all relevant export laws and regulations of its own country (hereinafter called as
"Export Laws") to assure that neither Software nor any related program thereof are (1)
exported, directly or indirectly, in violation of Export Laws; or (2) are intended to be used
for any purposes prohibited by Export Laws, including, without limitation, nuclear,
chemical or biological weapons proliferation.
Article 12 – Taxes
User shall be solely responsible for and shall pay or reimburse TOTOKU for, all taxes,
duties, assessments and other governmental charges which are now or hereafter
imposed by governmental authority associated with the performance of TOTOKU's
obligations under this Agreement.
Article 13 – Duration
1.This Agreement comes into force on the date first written and, unless sooner
terminated, shall continue in effect for a period of one (1) year. Provided, however, that
in case the parties hereto agreed to the terms and conditions in respect of the renewal
or extension of this Agreement in writing prior to the expiration of the term hereof, this
Agreement shall be renewed or extended for the term agreed upon.
2.In the event of expiration of this Agreement, the parties hereto shall have no claim
against the other party for the loss of good will or future profit.
Article 14 – Termination
TOTOKU may, without prejudice to any other rights or remedies, terminate this
Agreement or Individual Contract, if the User fails to perform any provision of this
Agreement or Individual Contract.
Article 15 – Effect of termination
If this Agreement is expired or terminated under the terms and conditions herein, the
parties hereto shall comply with the followings:
(1) The license granted hereunder shall terminate.
(2) User shall return to TOTOKU Software, together with all copies, in all forms and
whether partial or complete, on all types of media and computer memory, and
whether or not modified or merged into other material.
(3) User shall delete or remove Software and any such source code from all
workstation and/or terminal pursuant to TOTOKU's directions.
Article 16 – Damages
If TOTOKU was damaged or injured due to User’s breach or default of any provision
hereof or by the termination specified at the subparagraph from (1) to (5) in Article 14,
TOTOKU may claim User damages thereof.
Article 17 – Survival
Article 8 (Intellectual Property Right) and 9 (Confidential Information) of this Agreement
shall survive the termination or expiration hereof.
Article 18. – Severability
If any provision of this Agreement is held by a court of competent jurisdiction to be illegal
or invalid, the remaining provisions hereof shall remain effect.
TOTOKU ELECTRIC CO., LTD.
-6-
Medivisor for i2 Series
Article 19 – Force Majeure
Neither parties hereto shall be liable for any delay or failure to perform any of its
obligations hereunder, other than the obligation to make any payment which is due, if
such delay or failure is due to fire, flood, earthquake, epidemic, unusually severe
weather, strike, act of God, or public enemy, public disorder, restriction by civil or military
authority in their sovereign or contractual capacities, transportation failure or any other
cause beyond the reasonable control of the parties.
Article 20 – Assignment and Delegation
Neither whole of this Agreement nor any part hereof shall be assignable or delegable by
any party hereto without other parties’ prior written consent, which shall not be
unreasonably withheld. In the event of such assignment or delegation, the assigning or
delegating party shall remain liable to the other parties and shall not be relieved of any
obligation under this Agreement.
Article 21 – Waiver
Failure by any party to require performance by the other parties or to claim a breach of
any provision of this Agreement shall in no manner be deemed to be a waiver of such
provision or right on any other occasion.
Article 22 – Arbitration
All disputes, controversies or differences that may arise between the parties hereto, out
of or in relation to or in connection with this Agreement or the breach hereof which have
not been settled by mutual consultation, shall be finally settled by the arbitration. The
arbitration shall be held in Tokyo, Japan in accordance with the Commercial Arbitration
Rules of The Japan Commercial Arbitration Association. The award to be rendered shall
be final and binding upon the parties hereto. Judgment upon such award may be entered
in any court having jurisdiction thereof.
Article 23 – Governing Law
This Agreement shall be governed and construed in accordance with the laws of Japan.
Article 24 – Entire Agreement
This Agreement constitutes the entire and only agreement between the parties hereto
and supersedes all previous negotiations, agreements and communications with respect
hereto, and shall not be released, discharged, changed or modified in any manner,
except by instruments signed by duly authorized officers or representatives of each of
the parties hereto.
TOTOKU ELECTRIC CO., LTD.
-7-
Introduction
1 Introduction
1.1 Overview
Medivisor for i2 Series is a calibration software designed to calibrate TOTOKU i2 Series
displays. The functions include:
• Calibration:
Calibration to DICOM GSDF or other gamma curves, and color settings (for color
models only)
• Display Inspection:
Verification of current maximum luminance and gamma
• Manual Adjustment: Manual adjustment of luminance
• Display Configuration:
Switching display configurations ― up to three sets of luminance, gamma, and color
settings saved within the display
• Test Pattern: Visual examination of display characteristics
1.2 Package contents
This product package contains the following items. If anything is missing, please contact
your dealer.
Item
Qty.
1
Medivisor CD-ROM
2
2
Calibration Sensor Chroma5
1
1.3 Operating environment
Computer
IBM PC/AT compatible machines equipped with
processors equivalent to or exceeding Intel
Pentium 4 or AMD Athlon 64
System memory
512MB or above
Operating System
Microsoft Windows Vista
Microsoft Windows XP Professional SP2 / SP3
Microsoft Windows 2000 Professional SP4
Language
English
Japanese
ME253i2, ME355i2, ME551i2, ME551i2 s, MS51i2,
Supported TOTOKU Display MS21i2, CCL252i2, CCL352i2, CCL254i2,
CCL354i2
Connectable Displays
TOTOKU ELECTRIC CO., LTD.
8
-8-
Installation
2 Installation
This chapter explains how to connect cables and install the hardware and software. Make
sure to log in as a user with administrative privileges registered with a local computer
before starting installation.
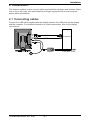
2.1 Connecting cables
Connect the USB cable supplied with the display between the USB ports on the display
and the computer. For detailed information on cable connections, refer to the display
user manual.
ńŰŮűŶŵŦų
USB cable
To the wall outlet
TOTOKU ELECTRIC CO., LTD.
-9-
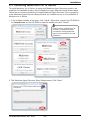
2.2 Installing the calibration sensor driver
Installation
1.Connect the supplied calibration sensor Chroma5 to the computer's USB port directly
or via a USB hub. It will be detected as new hardware and the Found New Hardware
Wizard starts up.
2. Insert the supplied CD-ROM Disk 1 in the CD drive on the computer. Though the
software installer starts up automatically, go back to the Found New Hardware Wizard
and select "Locate and install driver software (recommended)."
Figures used in this manual are of
Windows Vista. Screens on your
display may appear different
according to the operating system.
The software installer can be closed
or left open.
3. The following screen may appear. Click "Install."
4. Click "Close" to complete installation.
TOTOKU ELECTRIC CO., LTD.
- 10 -
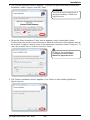
2.3 Installing Medivisor for i2 Series
Installation
To install Medivisor for i2 Series, its setup tool Medivisor Agent Services needs to be
installed. As installation begins, first the Medivisor Agent Services Setup Wizard starts.
Follow the on-screen instructions to install Medivisor Agent Services. Upon completion
of the Medivisor Agent Services Setup Wizard, the installer moves on to installation of
Medivisor for i2 Series.
1.If the software installer is left open, click "Install." Otherwise, reinsert the CD-ROM or
run launcher.exe on the CD-ROM to start the installer and click "Install."
If older version of Medivisor for
i2 Series is installed already,
uninstall the exiting Medivisor
Agent Services before the new
installation.
2. The Medivisor Agent Services Setup Wizard starts. Click "Next."
TOTOKU ELECTRIC CO., LTD.
- 11 -
Installation
3.The License Agreement screen appears. To accept the agreement and proceed with
installation, select "I Agree" and click "Next."
Important
You must accept the agreement to
complete installation of Medivisor
Agent Services.
4.When the Select Installation Folder screen appears, select a destination folder.
Further down the screen is the setting as to where the shortcut to this software should
be created. To share it with all users of the destination computer, select "Everyone." To
use it by yourself, select "Just me" and click "Next."
By default, the destination is
C:\Program Files\TOTOKU
Medivisor Agent Services.
5.The Confirm Installation screen appears. Click "Next" to start installing Medivisor
Agent Services.
TOTOKU ELECTRIC CO., LTD.
- 12 -
Installation
6.The Installation Complete screen appears. Click "Close" to complete installation of
Medivisor Agent Services.
7. Upon completion of installation of Medivisor Agent Services, the Medivisor for i2 Series
version information appears. Click "Next" to start installing Medivisor for i2 Series.
8. When the Setup Wizard appears, click "Next."
TOTOKU ELECTRIC CO., LTD.
- 13 -
Installation
9. The License Agreement screen appears. To accept the agreement and proceed with
installation, select "I Agree" and click "Next."
Important
You must accept the agreement to
complete installation of Medivisor for
i2 Series.
10. When the Select Installation Folder screen appears, select a destination folder.
Further down the screen is the setting as to where the shortcut to this software should
be created. To share it with all users of the destination computer, select "Everyone." To
use it by yourself, select "Just me" and click "Next."
By default, the destination is
C:\ProgramFiles\TOTOKU
Medivisor for i2 Series\.
11. When the Confirmation Installation screen appears, click "Next" to start installation.
TOTOKU ELECTRIC CO., LTD.
- 14 -
Installation
12. When the Installation Complete screen appears, click "Close" to complete installation.
Remove the CD-ROM from the CD drive.
13. A message prompting restart of the computer appears. Click "Yes" and restart the
computer.
TOTOKU ELECTRIC CO., LTD.
- 15 -
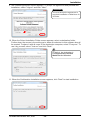
3 Setup — Medivisor Agent Services
Initial Setup
To use Medivisor for i2 Series, a program called Medivisor Agent Services needs to be
set up. Medivisor Agent Services consists of five tabs: Workstation, Display, Display
Model, Sensor, and Management Station. Setup of the Display tab is required, however,
if optional software such as QA Medivisor is not used, the rest of the tabs do not need to
be set up. Follow the instructions given in the following sections to set up the tabs.
Select TOTOKU Medivisor Agent Services>Agent Settings from the Start menu, and
the Agent Settings dialog box starts.
3.1 Workstation
There is no setup required in using Medivisor for i2 Series.
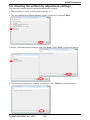
3.2 Display
Select the Display tab to set up the display configuration and select a quality control (QA) testing standard(s) to apply for respective displays connected to the workstation, using the
Display Configuration wizard.
Click "Display Configuration," and the display configuration wizard appears. Follow the
on-screen instructions.
TOTOKU ELECTRIC CO., LTD.
- 16 -
Initial Setup
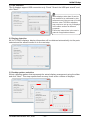
1) Port selection
The i2 displays support USB connection only. Check "Search the USB port as well" and
click "Next."
While displays other than i2 serries
are unabale to be calibrated by this
software even if they are set up in this
section, other TOTOKU softoware
may require to set up non-i2 displays
in the same section for different
purposes.
Follow the instructions in the user's
manual of applicable software.
2) Display detection
As for TOTOKU displays, display information will be obtained automatically via the ports
selected and the wizard moves on to the next step.
3) Desktop pattern selection
Select a desktop pattern that represents the actual display arrangement using the slider
and click "Next." This step repeats itself as many times as the number of displays.
TOTOKU ELECTRIC CO., LTD.
- 17 -
Initial Setup
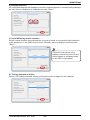
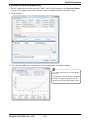
4) Display selection
All connected displays are displayed, and the numbers appear on corresponding displays
as well. Select a display(s) to calibrate and click "Next."
5) Serial #/Display model selection
Select a serial number that matches the one that is found on the product label attached
to the display or on the OSD control panel. Likewise, select a display model and click
"Next."
Follow the instructions in the
display’s manual on how to find a
serial number or a display model
on the OSD control panel.
6) Testing standard selection
Select a QA testing standard and its performance class to apply for each display.
TOTOKU ELECTRIC CO., LTD.
- 18 -
Initial Setup
7) Testing standard selection
The display configuration is complete. Click "Save" to save the configuration and end the
wizard.
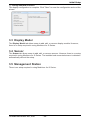
3.3 Display Model
The Display Model tab allows users to add, edit, or remove display models. However,
there is no setup required in using Medivisor for i2 Series.
3.4 Sensor
The Sensor tab allows users to add, edit, or remove sensors. However, there is no setup
required in using Medivisor for i2 Series. The installed and connected sensor is detected
automatically without the setup.
3.5 Management Station
There is no setup required in using Medivisor for i2 Series.
TOTOKU ELECTRIC CO., LTD.
- 19 -
Auto Adjustment
4 Auto Adjustment
There are functions that become available only after initial calibration. Make sure to
calibrate displays according to the recommended settings immediately following the initial
setup. Before starting to use this software, please close all other applications. Calibrate
displays at least after an hour warm-up time, excluding the time during which the screen
is blacked-out because of the power save function or the screen saver.
Select TOTOKU Medivisor for i2 Series>Calibration from the Start menu to start this
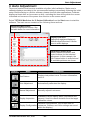
software. The main screen consists of the following three sections.
Adjustment Menu Area
Contains adjustment buttons. See
the table below for more information.
Display Icon Area
Displays all registered displays in
Madivisor Agent Services. Use the
icons to select displays.
Adjustment Status Area
Shows related information and
control buttons for the selected
adjustment. In this example, the
Test Pattern button is selected and
all available patterns are shown.
Button
Name
Explanation
Test Pattern
Displays test pattern icons. For more information,
see 8.4.
Auto Adjustment
Automatically calibrates the display.
Manual Adjustment
Manually adjusts luminance.
Display Inspection
Evaluates current display status (luminance and
gamma). Useful to check deviation from the target
calibration values.
Switches configurations. (Up to three sets of
Display Configuration luminance, Gamma, and color settings are saved
within the display.)
TOTOKU ELECTRIC CO., LTD.
- 20 -
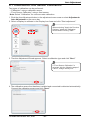
4.1 Calibration/Front Sensor Calibration
Auto Adjustment
Two types of calibration can be performed:
• “Calibration” using a calibration sensor
• “Front Sensor Calibration” using a front sensor
Note: Select “Calibration“ for more accurate calibration.
1. Click the Auto Adjustment button in the adjustment menu area or select Adjustment>
Auto Adjustment on the menu bar.
2.Select a display to calibrate in the Display Icon Area and click "Start adjustment."
When selecting "Apply the Previous
Settings," attach the calibration
sensor before clicking "Start."
3. The Auto Adjustment Wizard appears. Select a calibration type and click "Next."
If "Front Sensor Calibration" is
selected, skip the following steps of
4 and 5, and go directly to 6.
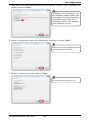
4. The calibration sensor that has been installed and connected is detected automatically.
Connect the calibration sensor and click "Next."
TOTOKU ELECTRIC CO., LTD.
- 21 -
Auto Adjustment
5. Information on the detected calibration sensor appears. Perform "Zero Calibration" as
needed, and click "Next."
To perform “Zero Calibration,” lay
the calibration sensor down on an
even surface so that no light leaks
into sensitive area Click "Zero
Calibration”. When "OK" appears,
zero calibration is done.
6. Select a configuration, name this configuration if desired, and click "Next."
Maximum of three configurations can
be saved within the display.
7. Select an adjustment setting, and click "Next."
Previous settings appear if any.
TOTOKU ELECTRIC CO., LTD.
- 22 -
Auto Adjustment
8.Refer to the table below and set maximum luminance, minimum luminance, and
ambient light (optional) by directly entering values or using the up/down buttons, and
click "Next." Use the following table as a rough guide in determining the input values.
Important
If the measured illuminance is over
60 Lux, an alert message to improve
the ambient light appears.
Setting
Explanation
The target brightest luminance. Use the default value unless
otherwise required.
Maximum Luminance Important: Maximum luminance is settable within the
range specified on the wizard. However, due to luminance
degradation caused by deterioration of the backlight, the result
may fall short of the target luminance.
Minimum Luminance
The target darkest black. Use the default value unless
otherwise required.
Ambient Light
(Optional)
Ambient light at the installation location. The current ambient
light can be measured by clicking the Measure button. If the
effect of ambient light does not need to be taken into account,
use the default value of 0.0 cd/m2.
Hint:
• Some standards or regulations may require a measured
value. To manage displays according to certain standards,
refer to respective relevant standards.
• When ambient light is set, the ambient light value will be
added to the resulting maximum and minimum luminance. For
example, when the ambient light is 0.6 cd/m2 and maximum
luminance is set to 410 cd/m2, though the display is actually
calibrated to 410 cd/m2, the resulting maximum luminance
will be 410.6 cd/m2. Also for minimum luminance, if the
minimum luminance is set to 0.8 cd/m2, the resulting minimum
luminance will be 1.4 cd/m2.
• If the ambient light is too high, an alert message appears. In
that case, lower the ambient light level.
• The measuring method used in this software only applies to
the i2 Series displays. To measure ambient light according to
certain standards, refer to respective relevant standards.
TOTOKU ELECTRIC CO., LTD.
- 23 -
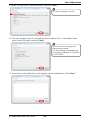
9. Select "DICOM GSDF (Recommended)" and click "Next."
Auto Adjustment
For more information, see 8.2.
10. For color models, select a color setting. Check “Native Color” to set by the native
color of the LCD panel, and click "Next."
This screen does not appear for
monochrome models.
The color setting is unavailable for
front sensor calibration in CCL252i2
and CCL352i2.
11. Comments on this calibration or the settings can be entered here. Click "Next."
TOTOKU ELECTRIC CO., LTD.
- 24 -
Auto Adjustment
12. Follow the on-screen instructions; attach the calibration sensor to the center of the
screen and click "Start."
Important
To stop calibration, press the ESC
key on the keyboard or click "Cancel"
on the wizard. Otherwise, do not
touch the keyboard or use the
mouse. Accurate results may not be
obtained otherwise.
Check “Start the adjustment when
60 minutes...” to start the calibration
automatically 60 minutes after the
display is turned on.
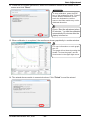
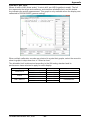
13. When calibration is completed, the results are shown graphically in another window.
For more information on each graph,
see 8.5.
The graph will not close by ending the
wizard. To close the graph, use the
close button in the upper right corner.
14. The wizard shows results in numerical values. Click "Finish" to end the wizard.
TOTOKU ELECTRIC CO., LTD.
- 25 -
4.2 Uniformity adjustment
Auto Adjustment
1. Perform Steps 1 and 2 in the previous section, 4.1.
2. The Auto Adjustment Wizard appears. Select "Uniformity" and click "Next."
3. Select “Adjust Uniformity” and click “Next.”
4. The calibration sensor that has been installed and connected is detected automatically.
Connect the calibration sensor and click "Next."
TOTOKU ELECTRIC CO., LTD.
- 26 -
Auto Adjustment
5. Information on the detected calibration sensor appears. Perform "Zero Calibration" as
needed, and click "Next."
To perform “Zero Calibration,” lay
the calibration sensor down on an
even surface so that no light leaks
into sensitive area and click "Zero
Calibration.” When "OK" appears,
zero calibration is done.
6. Attach the calibration sensor in the center of the white patch and press the Enter key.
Important
Attach the sensor right-side up as shown above. To stop uniformity
adjustment, press the ESC key on the keyboard or click "Cancel" on the
wizard. Otherwise, do not touch the keyboard or use the mouse. Accurate
results may not be obtained otherwise.
TOTOKU ELECTRIC CO., LTD.
- 27 -
Auto Adjustment
The white patch appears in 9 places on the screen in the order
as shown below. Attach the calibration sensor in the center
of the white patch, and press the enter key according to the
instructions each time to complete the uniformity adjustment.
7.The uniformity adjustment is complete. Click "Finish" to end the wizard.
TOTOKU ELECTRIC CO., LTD.
- 28 -
Useful Functions
5 Useful Functions
This software is capable of various other functions. Refer to the table below and make
adjustments as necessary.
Button
I want to
Corresponding Section
Display test patterns on the screen to
check display characteristics.
See 5.1, 8.3, and 8.4.
Calibrate the display using the same
settings.
See 4.1. Follow the instructions
without changing the settings.
Calibrate the display with different settings:
See 4.1. Select an appropriate
• Change luminance
adjustment type and follow the
• Change gamma
instructions on screen.
• Change color
Adjust luminance uniformity.
See 4.2.
Manually change luminance while
watching it change.
See 5.2.
Visually check the current status of
a display that has previously been
calibrated against the target calibration
values.
See 5.3.
Change display configurations.
See 5.4.
See the latest and/or past detailed
calibration information.
See 5.6: Seeing the detailed
calibration information.
Tools>
Calibration See the latest and/or past calibration
results graphically.
History
Compare multiple calibration records.
TOTOKU ELECTRIC CO., LTD.
- 29 -
See 5.6: Seeing the results
graphically.
Useful Functions
5.1 Test Patterns
1. Click the Test Pattern button in the adjustment menu area or select Adjustment>Test
Patterns on the menu bar, and all available test patterns are listed.
2. Select a display and a test pattern, and the pattern is displayed on the selected display
in full-screen. For more information on each pattern, see 8.3.
5.2 Manual Adjustment
This function lets you adjust luminance quickly without performing regular calibration.
1. Click the Manual Adjustment button in the adjustment menu area or select
Adjustment>Manual Adjustment on the menu bar.
2. Select a display to adjust and attach the calibration sensor.
3.Click "Search the Calibration Sensor," and the current luminance will be measured
and displayed.
4. Adjust the luminance using the scrollbar handle and click "Save the Adjusted Value" to
save and apply the adjusted luminance.
Important
Gamma changes in concert with
luminance, and other values adjusted
by calibration will be invalid.
Calibrate again to restore the values.
2
1
4
-1
3
TOTOKU ELECTRIC CO., LTD.
4-2
- 30 -
Useful Functions
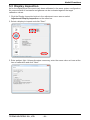
5.3 Display Inspection
As for the displays that have previously been calibrated in the same system configuration,
the current status of luminance and gamma can be evaluated against the target
calibration values.
1. Click the Display Inspection button in the adjustment menu area or select
Adjustment>Display Inspection on the menu bar.
2. Select a display to inspect and click "Start."
3. Enter ambient light. Unless otherwise necessary, enter the same value as it was at the
time of calibration and click "Next."
TOTOKU ELECTRIC CO., LTD.
- 31 -
Useful Functions
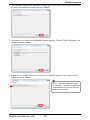
4. The calibration sensor that has been installed and connected is detected automatically.
Connect the calibration sensor and click "Next."
5. Information on the detected calibration sensor appears. Perform "Zero Calibration" as
needed, and click "Next."
6. Follow the on-screen instructions; attach the calibration sensor to the center of the
screen and click "Start."
Check “Start the inspection when
60 minutes...” to start the inspection
automatically 60 minutes after the
display is turned on.
TOTOKU ELECTRIC CO., LTD.
- 32 -
Useful Functions
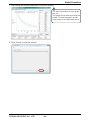
7.The results are shown graphically in another window.
For more information on each graph,
see 8.5.
The graph will not close by ending the
wizard. To close the graph, use the
close button in the upper right corner.
8.Click "Finish" to end the wizard.
TOTOKU ELECTRIC CO., LTD.
- 33 -
Useful Functions
5.4 Display Configuration
The supported i2 Series displays can save up to three pairs of luminance-Gammacolor settings as configuration data within the display upon calibration and they can be
switched very easily.
1.Click the Display Configuration button in the adjustment menu area or select
Adjustment>Display Configuration on the menu bar.
2.Select a display and a configuration in the Number drop-down menu.
3.Click "Apply" to apply the configuration settings to the display.
2-1
• The Number drop-down menu lists
all available configurations.
• To change configuration name,
rename it and click "Change."
1
2-2
• To see calibration settings, click
"Show details."
3
TOTOKU ELECTRIC CO., LTD.
- 34 -
Useful Functions
5.5 Clearing the uniformity adjustment settings
This function restores default uniformity adjustment settings.
1. Perform Steps 1 and 2 in the previous section, 4.1.
2. The Auto Adjustment Wizard appears. Select "Uniformity" and click "Next."
3. Select “Clear adjustment settings” and click “Next.” Click “Clear” on the next screen.
4.The uniformity adjustment clearing is complete. Click "Finish" to end the wizard.
TOTOKU ELECTRIC CO., LTD.
- 35 -
Useful Functions
5.6 Calibration History
This function presents past calibration records both graphically and numerically for
browsing and comparison.
● Seeing the detailed calibration information
1.Select Tools>Calibration History on the menu bar.
2.Select a display in the Calibration History section, and the calibration records for the
display appear below.
3.Select a record, and the detailed settings information appears in the Calibration
Settings section.
2
3
TOTOKU ELECTRIC CO., LTD.
- 36 -
Useful Functions
● Seeing the results graphically
1. Select a calibration record and click "Add," and it will be added to the Selected Items
section. To compare with other records, select multiple records in the same way.
2. Click "Create."
1
2
3.The selected calibration record(s) is shown graphically in another window.
For more information on each graph,
see 8.5.
The graph will not close by ending the
wizard. To close the graph, use the
close button in the upper right corner.
TOTOKU ELECTRIC CO., LTD.
- 37 -
Uninstallation & Troubleshooting
6 Uninstallation
To uninstall Medivisor for i2 Series, select Control Panel>Uninstall a program from
the Start menu and remove TOTOKU Medivisor for i2 Series. After uninstallation,
the TOTOKU Medivisor for i2 Series folder may remain in the redirected folder or the
installed folder. Delete the folder manually.
In addition, uninstall Medivisor Agent Service in the same way if necessary.
7 Troubleshooting
Problem: A communication error occurs upon startup of this software or during
calibration.
Solution: The communication cable may not be connected properly. Check the
connection (see 2.1). Also, make sure to shut down other applications to avoid the error
before starting up this software.
Note: When PM Medivisor is used together with this software, a communication error
may occur. In that case, shutdown this software once and wait for a little while before
restarting.
Problem: The calibration sensor Chroma5 does not get recognized or an error message
to this effect, such as "Cannot found the photometer," appears.
Solution: Depending on the computer, Chroma5 does not get recognized when the
computer is turned on with Chroma5 being connected.
How to find out whether or not the calibration sensor is recognized:
1. Right-click My Computer on the desktop and select "Properties."
2. When the System Properties screen appears, click "Device Manager."
3. The Device Manager screen appears. Click the + mark next to "X-Rite Devices" to
expand it. If Chroma5 is recognized, "Chroma Calibrator" should be listed; if it is not
recognized, it says either "Other Devices" or "USB Device."
How to get Chroma5 recognized:
If Chroma5 does not get recognized, reconnect Chroma5 after the operating system
started.
TOTOKU ELECTRIC CO., LTD.
- 38 -
Appendix
8 Appendix
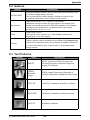
8.1 Attaching the calibration sensor
1. Peel the paper off the adhesive pad.
2. Attach the calibration sensor to the center of the measuring area by adjusting the
position of the counterweight on the cord. Be careful not to damage the panel surface
with either the calibration sensor or the counterweight.
Calibration sensor
Counterweight
LCD panel
(Side view)
Front view
Note:
Keep the LCD panel at the same tilt angle as it is in use. Do not further tilt or straighten
the panel for calibration.
About the adhesive pad
When adhesion is lost, exchange it with the supplied replacement part according to
the following procedure:
Replacement part
(Upper side)
Replacement part
(Reverse)
• Give the exchange part of the sensor a turn to the left, set the supplied replacement
part, and give the part a turn to the right to secure it.
TOTOKU ELECTRIC CO., LTD.
- 39 -
Appendix
8.2 Gamma
Gamma
Explanation
DICOM GSDF
Grayscale display function that DICOM sets and commonly used
for medical image display devices.
This is developed to match display luminance output to the
perceptual capabilities of the human visual system.
Exponential
Exponential curve of y=xn, where n is a variable.
Calibration setting to make an input signal to the display and
display luminance exponential. After the calibration, the display
luminance is proportional to n-th power of the input signal,
generally where n is 2.2 or 2.4.
Linear
Linear curve of y=x.
Exponential curve, where n is 1. The display luminance is
proportional to the input signal.
Custom
User-defined curve.
Custom gamma can be created and modified using Sample.usg
located in the directory where this software is installed (Medivisor
for i2 Series\var\Sample.usg). Open the file in a text editor and
change values.
8.3 Test Patterns
Pattern
Name
Explanation
SMPTE
SMPTE (Society of Motion Picture and
Television Engineers) Medical Diagnostic
Imaging Test Pattern
JESRAStandard
Image
JESRA (Japan Engineering Standard of
Radiation Apparatus) standard clinical image
TG18-QC
Resolution, luminance, distortion, artifacts
TG18-PQC
Resolution, luminance, contrast for prints
TG18-CT
Luminance response
TOTOKU ELECTRIC CO., LTD.
- 40 -
Appendix
Pattern
Name
Explanation
TG18-LN8-01
Luminance response. The pixel value of the
central region is 0.
TG18-LN8-18
Luminance response. The pixel value of the
central region is 255.
TG18-UN10
Luminance and color uniformity
TG18-UN80
Luminance and color uniformity
TG18-UNL10
Luminance and color uniformity
TG18-UNL80
Luminance and color uniformity
TG18-AD
Contrast threshold at low luminance for
evaluating diffuse reflection
TG18-MP
Luminance response (bit-depth resolution)
TG18-RH
5 horizontal lines at 3 luminance levels for
LSF evaluation
TG18-RV
5 vertical lines at 3 luminance levels for LSF
evaluation
TOTOKU ELECTRIC CO., LTD.
- 41 -
Appendix
Pattern
Name
Explanation
TG18-PX
Array of single pixels for spot size
TG18-CX
Array of Cx patterns and a scoring reference
for resolution uniformity
TG18-LPH
Horizontal bars with 1 pixel width and 1/16
modulations at 3 luminance levels
TG18-LPV
Vertical bars with 1 pixel width and 1/16
modulations at 3 luminance levels
TG18-AFC
Display noise
TG18-NS
Similar to RV/RH, for noise evaluation
TG18-GV
Veiling glare (for visual evaluation)
TG18-GVN
Veiling glare (for visual evaluation)
TG18-GQ
Dark-spot pattern for glare ratio measurement
TG18-CH
Anatomical chest pattern
TOTOKU ELECTRIC CO., LTD.
- 42 -
Appendix
Pattern
Name
Explanation
TG18-KN
Anatomical knee pattern
TG18-MM
Anatomical mammogram pattern
TG18-MM2
Anatomical mammogram pattern
DINGEOMETRY
For evaluations on geometric properties
such as distortion, line structure, artifact, and
instability
DINGRAYSCALE
Grayscale reproduction evaluation
DINResolution evaluation
RESOLUTION
DINLUMINANCEDEVIATION
TOTOKU ELECTRIC CO., LTD.
Luminance deviation between the center and
four corners (for quantitative evaluation)
- 43 -
Appendix
8.4 SMPTE Pattern
5% black
95% white
Grayscale:
The middle section of the pattern contains gray levels from 0% to 100% in increments of
10%. You can check the smoothness or continuity of grayscale. Check to see if there is:
• Clear distinction between 100% and 95% whites (The small 95% square within the
100% white square should be visible.), and
• Clear distinction between 0% and 5% blacks (The small square within the 0% black
square should be visible.).
Resolution:
Each line in vertical and horizontal stripes in the squares in the center and four corners
should be distinguishable.
Linearity:
Check for distortion using the grids across the screen.
Video Characteristics:
Check for streaking in and around the white and the black rectangles.
TOTOKU ELECTRIC CO., LTD.
- 44 -
8.5 How to read the graphs
Appendix
DDL-L
Where X-axis is DDL, Y-axis is luminance. You can choose the scale of the axis between
linear (default) and logarithmic. The full line represents the target and the dotted line
indicates the actual measurement.
JND-L
Where X-axis is JND, Y-axis is luminance. You can choose the scale of the axis between
linear (default) and logarithmic. The full line represents the target and the dotted line
indicates the actual measurement. This graph is only available when the display was
calibrated to DICOM GSDF (gamma setting).
TOTOKU ELECTRIC CO., LTD.
- 45 -
Appendix
JND-dL/L per JND
Where X-axis is JND (linear scale), Y-axis is dL/L per JND (logarithmic scale). The full
line represents the target and maximum and minimum allowable limit, and the dotted
line indicates the actual measurement. This graph is only available when the display was
calibrated to DICOM GSDF (gamma setting).
When multiple calibration records are selected to create their graphs, select the record to
show its graph in drop-down box of “Select a chart.”
The allowable limit is determined according to the QA testing standard and its
performance class selected to apply for each display.
QA testing standard
AAPM TG18
JESRA
DIN V 6868-57
Performance class
Primary
Secondary
Grade A
Grade B
Class A
Class B
TOTOKU ELECTRIC CO., LTD.
- 46 -
Allowable limit
±10%
±15%
±15%
±30%
±10%
±15%
Note
These alllowable limits are
unstanderdized.
TOTOKU
Medivisor for i2 Series Ver. 3.8 User's Manual
January 2009 Edition
PZZ11-1718A
Notes for the User's Manual
• No part of this manual, whether partly or wholly, may be reproduced or copied without authorization.
• The content of this manual is subject to change without notice.
• Although this manual has been prepared carefully, please let us know if you find any errors,
omissions, or ambiguous explanations.
TOTOKU ELECTRIC CO., LTD.
1-3-21 OKUBO, SHINJUKU-KU,
TOKYO 169-8543 JAPAN
TEL: +81-3-5273-2005
FAX: +81-3-5273-2091
URL: http://www.totoku.com/display/
PZZ11-1718A
Medivisor for i2 Series
090107