1
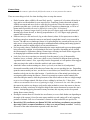
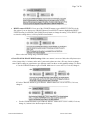
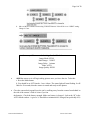
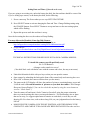
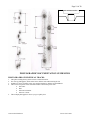
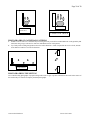
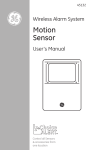
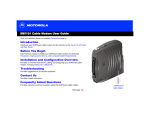
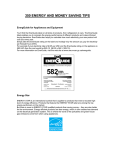
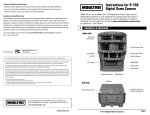
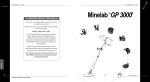
Page 1 of 20 Cascades Citizen Wildlife Monitoring Project Survey Protocol for Remote Camera Checks – 2011 Season Field Preparation 1. Coordinate with your team leader before conducting your camera check to make sure you receive any important updates 2. Gather the supplies needed for your check and schedule the pick-up either from the nearest Conservation Northwest office or your team leader/members. Conservation Northwest contacts: Seattle office: Jen Watkins (Project Director) 206.675.9747 x 203 or Kit McGurn (Volunteer Coordinator) 206.675.9747 ext 201 , Bellingham office: Julia Spencer 360.671.9950 ext 10 Resources such as data sheets and protocols are available for download from our website at: http://www.conservationnw.org/northcascades/ccwmp-volunteer-page/ 3. Before going into the field, make sure you/your team members have a copy of this document as well as everything else needed on the equipment checklist. Most important: keys for cable locks on cameras, fresh camera batteries and memory cards, lure, blank data sheet, pencil, maps, a GPS to find your camera/document wildlife sign, and a digital camera to document wildlife sign. 4. Research the target species for your camera, including its habitat preferences, tracks and signs, and previous sightings in the area you are going. (The Background Guide to Species in the I-90 Corridor, along with a track ID field guide, are good resources for this. We also have track ID documents for specific species in the office that we can provide) 5. Review this protocol the night before your check if possible. Getting to Camera Site 1. Use the site write-up, maps, directions and/or GPS coordinates if needed. It might be helpful to take a copy of the data sheet from the installation and/or previous visit, which may have useful notes on it. Take digital photos of the site when you get there (or bring them if already available) to help you/others find and identify the camera location on future visits and to send to our office as a pictorial record of the camera location and site setup. 2. Be on the lookout for tracks, scat, or other wildlife sign on the way to the camera and if encountered, document per Wildlife Sign Documentation Protocol section (below). 3. Look for flagging along the route and near the actual camera location if your team has elected to place it, but don’t rely on it because it can disappear and there may be flagging out there unrelated to our project. *Be careful about placing flagging that could give away our camera locations for security reasons. Use your judgment as to whether flagging is necessary and where and how much to use.* 4. For the next team, note on the back of your data sheet any landmarks or unique characteristics of the site to make it easier for them to find the camera. Conservation Northwest Last revised 3-2011 Page 2 of 20 Camera Setup For the first time the camera is placed in the field for the season, or in case you move the camera These are some things to look for when deciding where to setup the camera: Find a location where wildlife will most likely pass by – a game trail, a location with tracks or sign, and/or excellent habitat for your target species. Landscape features that tend to funnel wildlife movement and areas close to water may be good sites. Place the camera so that it is pointed toward this area. Avoid sites within 500 m of campsites or human sign, or 250 m of human trails if possible (this may be difficult for some of the I-90 locations). If setting up a camera to target a trail, try to aim it at a 45-degree angle to the trail (instead of shooting up or down the trail, or directly perpendicular to it). A 45-degree angle generally captures the best images. Find two trees (or a tree and a rock, log or other feature), about 10 feet apart; one tree that is both large enough to mount the camera on and sturdy enough that it won’t sway too much in breezes. The other tree or landscape feature is for spreading the lure on and can be any size, but make sure it is large/sturdy enough though to withstand animals rubbing and leaning against it and that the camera is angled properly to aim toward that area. For best results, choose a shaded location and point camera north/south to prevent photographs being affected by sunlight. Avoid pointing it east/west if possible, depending on how shaded the environment is. (Sometimes aiming a camera into a clearing can result in false triggers due to changing light conditions and the open nature of the area.) Look for a clear site or one that you can easily clear the camera’s view if obstructed by branches, leaves, or brush – plan to use a knife or saw if needed. Be diligent about removing vegetation in the camera’s view, especially from the foreground, as it can produce false triggers when swaying in the wind or when the sun hits it and creates shadows. Attach the camera to the mounting tree, above eye level (or at chest level) and pointed downward toward the trunk of the other tree/feature that you are spreading lure on. Depending upon the camera model you have, use the laser or test feature (see details below) and other team members to help aim it at the right location. Consider the size of the animal species that you are targeting while aiming the camera. Point it low enough to capture smaller animals like wolverine and pine marten, while the placement of the actual camera on the tree is high enough to get a view of larger animals, like deer or bear, walking by in front of it. * Most often, cameras are mounted with an error of pointing too high, so aim on the low side. Once you have the camera in position, use bungee cords and/or other methods to secure the camera to the tree. Branches or nearby wood may be helpful to help tilt the camera downward to ensure the aim is correct. Anticipating spring snowmelt in many locations, this step may need to be repeated during future camera checks. Placing the camera about 10' from the lure tree/feature (or even a little farther out depending on the angle of the camera) is best for most camera models to avoid cutting off or only capturing portions of animals. Full view of an animal’s features is often needed for sure species ID. Record the GPS coordinates (use Datum WGS 84, and lat/long coordinates) on your data sheet only if this is a camera install/move or they were not previously recorded. Carefully fill out all of the other information requested on the data sheet Conservation Northwest Last revised 3-2011 Page 3 of 20 Basic Overview of Camera Check Upon arriving, walk in front of the camera and trigger the motion sensor. This picture will verify that the camera is working and also serve as a reference if the date/time is incorrect. (make sure to record the actual date and time of the check on your data sheet so that we can match against the date/time on the photos when we download them in the office in case there is any malfunction with the camera date/time) Unlock the cable lock with your keys to access the camera Use the technical instructions (below) for the appropriate camera model to replace the batteries and memory card, check/set up all of the camera settings Spread lure (if being used at this site). Please remember that a very little amount of lure goes a long ways, and that too much long can deter animals. Their noses are much more powerful than ours. Make sure to spread the scent in the area the camera is aimed at so that wildlife spend time sniffing in the focus of the camera. Also, spread some lure higher on the tree so that the scent is better picked up in the wind. Use branches to help in spreading the lures into the cracks of the trees, and expect that some will run down to the soil at the base of the tree. Make sure to record the exact names of all lures applied by your team on your data sheet. This information will be entered into our database to track the wildlife response to different lures o With fish oil, fish fertilizer, or oil from a sardine can, you can apply the scent more liberally by pouring some with the aid of a branch lower on the tree and also higher, creating an oil slick that will remain on the tree through rain events. o With professional scent lures (like those in small bottles) remember a little goes a long ways. Simply use a branch dipped into the bottle for application, and drop a few drops at the base of the tree. You can apply some to the bark of the tree as well and hang the “lure twig” there or insert it in the bark, but do remember moderation. o If no lure trees are available in the desired location where you would like to place the camera (game trail, etc), you can always scent a large downed log, large boulder, or pile of rocks located in the view of the camera. We have had great success with this in the past as a substitute for trees. Carefully fill out the data sheet with all requested information Arm the camera to take pictures before leaving the site Conservation Northwest Last revised 3-2011 Page 4 of 20 TECHNICAL INSTRUCTIONS FOR CUDDEBACK NO FLASH CAMERA MODEL: To install this camera you will specifically need: Four D-Cell Batteries #25 Torx screwdriver ( if you want to attach it to a tree using the supplied screw) Bungee cord (s) to further secure camera to tree. This camera model can sometimes be flipped upside down when only secured with the screw, so it’s best to use a bungee as well. Unlock the lock on the camera and Open camera by unscrewing the gold screw on the front of the camera body and pulling off the face plate. MAKE SURE THE CAMERA IS IN THE OFF POSITION FIRST, AND THEN REMOVE THE COMPACT FLASH CARD IF IT HAS ALREADY BEEN INSTALLED. (If so, place the card in a case or Ziploc and clearly label to return the card with images to the CNW office). Unscrew the other gold screw near the bottom inside of the camera (the battery plate screw) to and remove the battery plate (this can be a little tricky – pull up and out). Insert four D-cell batteries if needed, using proper orientation (an icon right next to the battery plate screw depicts battery orientation) and replace the battery plate. *For backcountry sites or those that are far away, we suggest replacement of batteries at each check, even if they are still showing life. For closer sites, such as those along I-90, use your judgment based on the battery life left (see below) INSTALL THE COMPACT FLASH CARD YOU BROUGHT THAT IS CLEAN OF IMAGES – MAKE SURE THE CAMERA IS STILL OFF - THE CF CARD SHOULD ONLY BE REMOVED OR INSERTED WHEN THE CAMERA IS OFF. Orient the CF card so that the side with the small lip on it is pointed down toward the batteries and slide it in firmly. Turn camera on and use the keys and LCD screen to confirm all settings (listed below). Buttons: M = Mode - to view information or go between menus S = Settings – to set date, time, delays, etc… C = General Purpose key TURN ON YOUR CUDDEBACK CAMERA AND CHECK/SET SETTINGS: 1) 2) 3) 4) 5) If it asks you “EZ Mode Change?” … do nothing until the question goes away. The display will then read “Please Wait…” Next, it will display the battery life remaining and the date and time. Confirm that the date and time are correct (within a minute or two) Press the “S” key and scroll through the settings. Make sure “Camera Delay” is 1 minute IF either THE TIME OR CAMERA DELAY NEEDS TO BE RESET: Use the “S” (Settings) key to scroll through “Set Date” “Set Year” and “Set Time” and “Camera Delay” and use the yellow up and down arrow buttons to change if needed Conservation Northwest Last revised 3-2011 Page 5 of 20 6) When you see “Utilities” C=Yes, press the red “C” button. Confirm that Sensitivity is “High”. If not, use the yellow arrow keys to scroll through and select “High”. 7) Cycle through the utilities by pressing S until it says “Format Card?” and press “C” for Yes. 8) Press M to display how many images have been recorded onto the card. (Record this on your data sheet unless this is the Install, in which case Images should be 0). 9) Pressing M again will display the MODE (Either Standby, Test, or Live Mode) – next step… Summary of Recommended Settings for the Cuddeback in EZ Mode: Camera Delay: 1 Minute* *Note: this camera does not have “rapidfire” capabilities and this is the shortest option for delay unless you choose to use video mode. (Video Mode is set in the Advanced Mode settings, which are not detailed in this protocol . Refer to the Cuddeback user manual for instructions.) Set Date: (Current) Sensitivity Level: HIGH Format Card: YES when inserting a fresh, replacement card. THIS ERASES ALL IMAGES ON THE CARD – do not format a card that you are retrieving from the field!!! CHECK THE CAMERA’S AIM USING THE TEST FEATURE: 1) Press M until it displays what MODE it is in (either Live Mode, Test Mode, or Standby) 2) Press either yellow key until it says “TEST MODE.” This feature will allow you to walk in front of the camera and when you are in the center of the detection area, the red LED will illuminate without triggering the camera. The camera needs a "warm-up period" for this to work properly; this may take up to 3 minutes. During the "warmup", the LED will flash every few seconds and eventually quit flashing, indicating the TEST mode is ready for operation. *You can also use STANDBY MODE to play around with the camera without it triggering This is a good time to do the following: If you have one, affix Zorb-it (moisture absorbing) packet inside camera body Wipe lens with cleaning cloth or soft cloth and a windex product if needed Apply any lures that need to be applied to the tree after most or all camera handling has been completed orr have separate team members handling the camera and lure. This keeps the camera clean and free of lure. ARM THE CAMERA TO TAKE PICTURES: 1) Press M until it displays what MODE it is in (either Live Mode, Test Mode, or Standby) 2) Press either yellow key until it says “LIVE MODE MOTION.” 3) Screw the face plate back on, relock the camera to the tree, and secure with bungees if needed THE CAMERA IS NOW ARMED AND READY TO TAKE PICTURES. Conservation Northwest Last revised 3-2011 Page 6 of 20 For more info on the Cuddeback No Flash camera: Use the printed instruction manual provided, which is also available online at: http://www.cuddebackdigital.com/images/pdfs/NoFlash_7_11_07.PDF FAQ's and tips: http://app.cuddebackdigital.com/faq.aspx TECHNICAL INSTRUCTIONS FOR MOULTRIE CAMERA MODEL: To install this camera you will specifically need: Charged 6-volt battery (charges overnight with chargers in our office) SD Memory Card (different size than the CF cards - the ones we have are 512 MB) Straps and/or bungees to secure the camera body to the tree If the camera has already been set up and taking photos, record the number of picture events on the data sheet under “No. of Images shown on Camera Display” o This # will be visible on the readout when you approach camera, immediately to the right word “Auto” after the “P” (for pictures). The far right number on the display is the total no. of pictures taken by the camera since it was purchased – you don’t need to write this down. Open the camera by flipping the clips on the right side of the camera body and swinging open the door Power off camera– use the slider button on upper left corner of face of camera to turn off Remove memory card (push card in to remove it), place in Ziploc bag, mark camera name/location and date on bag Insert the fresh memory card you brought with you into the camera Replace battery in unit with newly-charged battery brought with you. Black lead for negative, red lead for positive (try to keep the battery leads from touching each other. This can sometimes “fry” the batteries. Check the battery strength. Make sure battery is charged – look at the “B” in the AUTO Mode readout – it gives a %. Should be at minimum 60% charged, but preferably 90%. *If it isn’t, it could be that the battery wasn’t connected to the charger properly, wasn’t charged long enough, or the battery is bad. Let us know please! Check the camera’s aim by using the “AIM” switch. Note where the beam is pointing; adjust as needed (CAUTION: Do not look directly into laser beam for eyesight safety) Check the stability of the camera (re-secure if necessary) and make sure there are no branches or objects obscuring the camera’s ability to take clear photographs Turn camera back on. (Make sure date and time are correct when it comes back up, if not see section below on setting date/time.) ERASE IMAGES on the card you just put in the camera; it should be blank, but to make sure: Press the “up” CHANGE (arrow) button to get to ERASE IMAGES in menu, press SELECT, then use the CHANGE buttons to scroll between menu settings. Press SELECT again to select the setting choice YES. It will say “Formatting” and then you’re done with this step. Conservation Northwest Last revised 3-2011 Page 7 of 20 RESET camera EVENTS. Press one of the CHANGE buttons to get to RESET EVENTS (it is the first option if you use the top (up) CHANGE button). Press SELECT button to highlight the RESET EVENTS setting (it will blink), and CHANGE arrow button to change the setting. Press SELECT again to select the setting choice, it will say DONE when finished. Move to the next setting using CHANGE buttons. Check FLASH & IMAGE MODE settings. Make sure camera is set to use flash, take still pictures (not video), image delay is 1 minute, and to take 3 consecutive photos at a time. (We may choose to change some of these settings or experiment to get different results, but these are the standard settings) To do this: a. Use the CHANGE buttons to get to FLASH. Make sure it is set to AUTO; if it is not, change it. b.Use the CHANGE buttons to get to IMAGE MODE. Make sure it is set to STILL; if it is not, change it. c. Use the CHANGE buttons to get to IMAGE DELAY. Make sure it is set to 1 MIN; if it is not, change it (1 minute is the shortest option for delay). Conservation Northwest Last revised 3-2011 Page 8 of 20 d. Move to MULTI-IMAGE menu using CHANGE buttons. It should be set to 3-SHOT setting. Change it if not. Summary of Recommended settings for the Moultrie: Image Mode: STILL Multi Image: 3 SHOT Image Delay: 1 minute Flash: AUTO Image Quality: HIGH ARM the camera so it will begin taking pictures once you leave the site. To do this: a. Press the Mode button b. You should be at AUTO mode – leave it there. The status light will start flashing. It will flash for 30 seconds, then the camera is armed and ready to take photos. Close the camera back up and leave the site by walking away from the camera from behind/ to the side of the camera’s field of vision if you can the batteries. Check the battery strength. Make sure battery is charged – look at the “B” in the AUTO Mode readout – it gives a %. Should be at minimum 60% charged, but preferably 90%. Conservation Northwest Last revised 3-2011 Page 9 of 20 Setting Date and Time: (if it needs to be reset) If you are going to an existing site, unless the battery has died, the date and time should be correct. But if you’re setting up a camera, or the battery has died, do the following: 1. Power camera up. The first readout you see says SETUP DATE/TIME. 2. Press SELECT button to activate changing the Date and Time. Change flashing setting using the CHANGE buttons. Press SELECT button to accept and move to the next setting option, which will be flashing. 3. Repeat this process until date and time is set up. Once the last setting has been set, the readout will stop flashing. For more info on the Moultrie (Game Spy 200) Camera: Use the printed instruction manual or information online at: http://images.ebsco.com/pob/moultrie/catalog/DGS-200Instructions.pdf FAQ's and tips: http://www.moultriefeeders.com/FAQ/DigitalGameCameraFAQs.htm#motionsensor TECHNICAL INSTRUCTIONS FOR RECONYX RC55 & RC60 CAMERA MODELS: To install this camera you will specifically need: Six C-Cell Batteries A bungee cord to attach it to a tree* (*the thick black cord with hooks came with the camera and is best, but may want extras) Unlock the Masterlock cable with your keys so that you can open the camera Open camera by unhooking the latch on the front of the camera body and removing the cover Press “OK” to disarm (the camera will then show you the status) The status on the LCD display will show the number of pictures, remaining battery power and % full the card is. Record the number of pictures on your data sheet under “No of Images Shown on Camera Display” (You can also check this anytime by using the arrow buttons to scroll to “Check Status”) Turn the camera off and insert 6 fresh C batteries if needed* using the proper orientation – there are icons depicting this where you insert the batteries. *For backcountry sites or those that are far away, we suggest replacement of batteries at each check, even if they are still showing life. For closer sites, such as those along I-90, use your judgment based on the battery life left. MAKE SURE THE CAMERA IS IN THE OFF POSITION, AND THEN REMOVE THE COMPACT FLASH CARD IF IT HAS ALREADY BEEN INSTALLED. Place the card in a Conservation Northwest Last revised 3-2011 Page 10 of 20 case or Ziploc and clearly label to return with its images and your data sheet to the CNW office (The card slot is located below the arrow buttons). Install the compact flash card you brought that is clean of images – MAKE SURE THE CAMERA IS STILL OFF - THE CF CARD SHOULD ONLY BE REMOVED OR INSERTED WHEN THE CAMERA IS OFF. Orient the CF card face up so that the side with the small lip is facing away from you and slide it in firmly. Turn camera on and check the time and date which will come up on the LCD display. If needed, reset or set the date and time. To do this, select “Change Setup” from the Main Menu by hitting the “OK” button on Change Setup, and then select “Advanced” (by again using the OK button) and using the arrow keys to scroll to “Date/Time”. Use the arrow keys and LCD screen to program or confirm other basic settings (listed below). This camera model is quite easy to use – use the arrow keys scroll through the menus and the “OK” button to select various menus and options. Recommended Settings for Reconyx: Set from “Trigger” Menu, which is under “Advanced” Menu: Motion Sensor: ON Sensitivity: HIGH (the camera may miss images of animals passing by quickly with any setting lower than this) Pics per Trigger: 3 Picture Interval: 1 SEC Quiet Period: NO DELAY * These are the same settings as using the “QuickSet Trail” option Recommended mounting height for this camera is about chest level and angled slightly downward (using branches/wood blocks, etc…). Alternatively, it can be mounted a little higher and angled down a little more. The camera has a 40 degree field of view. To ensure proper aim, use the Walktest mode (from the main menu) and use the red light to determine when the camera is detecting you in the field of view – the red light will flash when it detects you. The camera will self-arm from Walktest mode after a 2 minute delay. If your camera is already setup and mounted and the Walktest is not needed on this site visit, just scroll to “Arm Camera” on the Main Menu once you have spread lure and are completed and select “OK”. The camera will arm in 10 seconds. This will give you time to put the cover back on, relock the camera to the tree, and walk away. For more info on the Reconyx Cameras: Use the printed instruction manual provided, which is also available online at: http://www.trailcampro.com/miscfiles/rapidfire_instruction_manual.pdf Technical tips: http://www.reconyx.com/page.php?id=58 Conservation Northwest Last revised 3-2011 Page 11 of 20 TECHNICAL INSTRUCTIONS FOR BUSHNELL TROPHY CAM XLT: To install this camera you will specifically need: Eight-AA batteries Python Cable Master lock / Small Keyed Master lock* (*used to lock access panel shut) To mount this camera, use a Python Cable Master lock to lock the camera to a tree, and use the small brass Master lock to lock the access panel shut. Read the above info about placing a camera. The below info is in regard to installing as well as checking cameras throughout the season. Unlock the small brass Master lock so that you can get into the access panel. Open camera by unhooking the latches on the right side of the camera and swinging door open. Turn switch from ‘ON’ to ‘SETUP,’ in order to view pictures and battery life. This info will be shown at the top of the screen. For a camera check, record the number of pictures on your data sheet under “No. of Images Shown on Camera Display.” If batteries are at less than 50% full, turn camera switch to the ‘OFF’ position, remove old batteries, and replace with 8 new AA batteries (make sure and note orientation of positive/negative ends). If you are checking the camera, MAKE SURE THE CAMERA SWITCH IS IN THE OFF POSITION AND REMOVE THE SD (SECURE DIGITAL) CARD. Place the card in a case or Ziploc, CLEARLY LABEL IT ACCORDING TO WHICH CAMERA IT WAS IN, and return it with your data sheet to Conservation NW either via mail or email if there aren’t too many photos. Install the SD card you brought that is clean of images – MAKE SURE THE CAMERA IS STILL OFF - THE SD CARD SHOULD ONLY BE REMOVED OR INSERTED WHEN THE CAMERA IS OFF. Orient the SD card face up so that the side with the cut corner is facing away from you and slide it in firmly. It will click into place. Turn camera on and check the time and date by clicking the menu button, and using the arrow button to scroll right or left until you reach ‘Set Clock’. If needed, reset or set the date and time. Use the arrow keys and LCD screen to program or confirm other basic settings (listed below). This camera model is quite easy to use – use the arrow keys scroll through the menus and the “OK” button to select various menus and options. Conservation Northwest Last revised 3-2011 Page 12 of 20 Recommended Settings for Bushnell XLT: Mode: Camera Image Size: 5M Capture Number: 3 (disregard video settings unless we specifically ask you for video) Sensor Level: Normal Set Field Scan: OFF After your Camera Check 1. Email a brief report of your visit to your team leader. If there are any important news/findings, such as signs of a Level 1 species, problems with the camera or location, etc…contact your team leader immediately upon return and cc: Conservation Northwest – [email protected] and [email protected]. If not critical, still please pass on any information about the site to your team leader. The next team will greatly benefit from a brief report, including site conditions, what you learned about animals in the area, topography, hazards, and any outstanding questions. Team leaders will be the communication point between your team and Conservation Northwest. 2. Return the memory card(s) and data sheet(s) to your team leader or the nearest Conservation Northwest office asap, so that we can get the photos from your camera downloaded and reviewed and store the camera check information into our database. Mark on your data sheet how data is being returned, in case the images become separated from it. Options for Data Return*: In-person Bring in a data sheet for each camera along with a clearly labeled memory card containing all photos, or a CD with all photos downloaded and saved onto it, and folders properly labeled with camera location Postal Mail - Be sure to save a copy of all images until you are sure they have reached our office, especially if you have chosen this option Mail a data sheet for each camera along with a clearly labeled memory card containing all photos, or a CD with all photos downloaded and saved onto it, and folders properly labeled with camera location Email to [email protected] – Only if 10 photos or less. Data sheet must be scanned and emailed as well or sent to our office in some other way. Conservation Northwest Last revised 3-2011 Page 13 of 20 Cameras should ideally be checked roughly each month throughout the season, depending on the camera location and accessibility. Your team leader will schedule checks to ensure that cameras are being checked regularly and lure refreshed at the camera location. CCWMP Communications Protocol Due to the potential social and political sensitivity of some species and the importance of this work being shared in a scientific and thoughtful manner, the Cascades Citizen Wildlife Monitoring Project has a Communications Protocol for all volunteers and staff of the effort. All photos taken by cameras owned by the CCWMP are owned by the non-profit organizations sponsoring this effort, and we strongly encourage that any cameras not owned by our effort but participating in it please follow this protocol as well. All photos taken by cameras and retrieved by teams are only released to people outside the program by one of the three program sponsor organizations or by an agency affiliated with our Advisory Council. Volunteers are not to share their results with anyone outside the program directly. Photos gathered off of a camera are sent either directly to the team leader or to the Seattle Conservation Northwest and I-90 Wildlife Bridges Coalition office for review and decisions about communicating. Photos can be emailed to [email protected] or mailed directly to Conservation Northwest (CCWMP) 3600 15th Ave W #101, Seattle, WA 98119 Selected photos are shared on our website, and results reported monthly in our volunteer enewsletter. Requests for any photographs can be made through our program to [email protected] Photos that need further identification or discussion are taken to our Advisory Council prior to any wider release. Any interaction with the media based on the results of a camera is decided upon by the host non-profit organizations, and shared with the Advisory Council. An annual report is prepared at the close of each season that will report on all results, and at that time all results, with the exception of details of camera locations, are public knowledge. If your team has photographed a Level 1 species, please notify our office right away and send in a photograph for confirmation to [email protected] Conservation Northwest Last revised 3-2011 Page 14 of 20 If any member of the press approaches you about the program, please re-direct them to our offices and staff. CCWMP Contacts for Remote Camera Work for 2011 Project Director: Jen Watkins, [email protected] or 206.675.9747 ext 203 Data Coordinator: Kit McGurn, [email protected] or 206-637-9747 ext 201 Data Processor and Project Intern: Ben Silver, [email protected] Wildlife Sign Documentation Protocol If you observe tracks, scat or other signs (dens, claw marks, diggings, etc...) of wildlife that are Species Priority Level 1 (and secondarily Level 2) on your way to the camera or at the camera site, use these procedures for documentation and/or trailing if you choose to and have time. (See below for a list of Species Priority Levels). However… NOTE: TRAILING SHOULD BE DONE ONLY IF YOU ARE WELL-TRAINED IN OFFTRAIL NAVIGATION AND WON’T GET LOST ON THE WAY BACK TO YOUR CAMERA CHECK/THE TRAIL CAUTION SHOULD BE USED IN BOTH TRAILING AND DOCUMENTING SIGNS SUCH AS BEAR DENS, FRESH SCAT ETC... If you feel unsafe, please skip this! Procedure for Tracks: How to Document (this will be difficult unless there is snow, mud or sand) 1. Stop your companion(s) and bring tracks to their attention. Stop walking to prevent destroying tracks. 2. Record data carefully by filling out the track information detailed here thoroughly on the Target Species Data Sheet. *Make sure to record the GPS coordinates. 3. For Level 1 species, or ambiguous tracks that may be a Level 1 animal, document tracks with measurements, sketches, and photographs. 4. Determine whether the animal is a trailing priority species (See list, Levels 1 and 2 below). If so, clearly mark trailable tracks if you plan to trail them on your return leg. 5. Mark the tracks as ‘done’ so a later team will know they have been recorded by your team. Draw an obvious circle around one or more tracks and leave a large footprint next to them with your boot or snowshoes, or hang some flagging. Procedure for Trailing: How to Document Note: Trailing may be much more difficult or not possible during spring/summer months when there is no snow, but if you are able to trail an animal, this is the protocol to use. Conservation Northwest Last revised 3-2011 Page 15 of 20 Trailing can be done for Level 1 and 2 species as you see them, before or after the camera check. Level 1 species should be trailed wherever possible. In the case of the top 4 species (wolverine, fisher, lynx, wolf), these can be trailed as you see them, as they are critical rare species. Level 2 species should be trailed in the absence of Level 1 species, after completing your camera check and where time is available. Level 3 species are not to be trailed until all other work is complete, as they are of low priority for this study. 1. When you identify a Level 1 or Level 2 species (on the way to your camera), mark its trail for easy identification on your return leg with flagging if needed, and note the trail in your field notes on a list of trailing possibilities. Record the GPS coordinates on your data sheet. 2. When your team completes the camera check, you should review trailing possibilities from the outward leg and decide which are of highest priority. Level 1 or 2 species are highest priority. Level 3 are great if you have time. 3. On the return leg, follow the selected trails towards the highway (if you are on an I-90 camera or a camera placed close to a highway). Record all discernable behaviors on your Trailing Record Data Sheet, especially with reference to the highway. For example, if you are able to follow/see tracks this far, how close does the animal approach the highway? Does it attempt to cross it? Does it walk along it for some distance? Does it make a lay close to the highway? Does it remain in cover or in full view? See data sheet and attached notes for how to record these observations. 4. Record the path of the animal by documenting frequent GPS coordinates (with associated commentary in notes, where appropriate)—especially for Level 1 species. This may be of particular value if the tracks suggest an attempted highway crossing, as GPS records for tracks found on opposite sides may help determine whether the tracks probably belong to the same individual, which crossed successfully. 5. Trail Level 1 species as far as possible to gather as much information about the animal as you can. For Level 2 species, the energy expended trailing should depend on your judgment, safety considerations, and whether the camera check has been completed. 6. If you have found a Level 1 species, contact Jen Watkins at Conservation Northwest ASAP at 206940-7914 (cell), or secondly the Conservation Northwest office at 206-675-9747 x 203 Jen so that we can quickly alert local biologists. Procedure for Sign other than Tracks Follow the procedures outlined above for dealing with track evidence. In addition, take samples of hair and scat if the animal is or may be a Level 1 species. These samples should be placed in sealed bags and immediately labeled with camera location/name, date, team-leader’s name and an observation number (match up with the observation # you use on your data sheet.) Make sure to record the GPS coordinates. Procedure for Ambiguous or Unclear Tracks or Sign 1. When ambiguous or unidentifiable tracks are found, the first step is to search the area for better tracks of the same animal. If there is a trail you can follow, this is one way you may discover Conservation Northwest Last revised 3-2011 Page 16 of 20 2. 3. 4. 5. clearer tracks for that individual. In general, look for where the creature has entered more sheltered areas. If the animal can then be positively identified, record species on data sheets as usual. If clearer identifiable tracks cannot be found, then ambiguous or unidentifiable tracks should be treated with care, especially if they might indicate a Level 1 Species. If the tracks are possibly Level 1, document them in detail. Follow the usual procedure for documenting tracks, and ensure good sketches, photos and measurements are taken. Unclear tracks that are clearly NOT a Level 1 species should simply be recorded as “unidentified species”. In the attached notes, list possible species if appropriate. If you have found a Level 1 species, contact Jen Watkins at Conservation Northwest ASAP at 206940-7914 (cell), or secondly the Conservation Northwest office at 206-675-9747 x 203 Jen so that we can quickly alert local biologists. Photographic Documentation Procedure Key points for photo documentation of single tracks: Take photo looking directly down on track to reduce distortion. Include two scales, preferably rulers, one running lengthwise, the second widthwise. Take at least one picture of the track that includes a card in the picture with Camera Name/Location, Date and Observation Number and Team Leader’s name. Take multiple photographs to ensure you get a quality shot. Key points for photographing gait patterns and trails: Include a scale of some sort. Often this may be leaving the scale you used for an individual track on the ground by that track (thus also giving a reference for where the individual track sits in the pattern). Try to take picture looking straight down on trail to reduce distortion. If this is impossible due to size of trail, include scales both near and far to account for distortion. Sketches and Measurements Fill out the Target species data sheet to record this information for Level 1 species. Attempt to make all drawings either life size or to scale (note what scale is). Conservation Northwest Last revised 3-2011 Page 17 of 20 SPECIES PRIORITY LIST Tracking priority for this study in descending order Level 1 Wolverine Fisher Lynx Wolf Grizzly Bear Level 2 Cougar* Marten Mountain Goat Elk Mule Deer Mountain Red Fox/Cascades Red Fox Level 3 Black bear Bobcat Coyote Raccoon Snowshoe hare and smaller animals—do not record KEY Level 1 species are rare or threatened and endangered species in the Cascades and/or Washington. Evidence, sightings or photographs of any of these species should be immediately reported to Conservation Northwest per the Communications Protocol. Conservation Northwest Last revised 3-2011 Page 18 of 20 Level 2 species, although not T&E, these species are rare or sensitive in some locations or of special interest to the project. Please report sightings of these animals (except deer and elk, which are categorized as Level 2 due to their abundance and interest to the I-90 project) *Cougar although not Level 1 are noteworthy in the I-90 corridor due to relation to other projects Level 3 species are more common throughout the project areas, and thus lower priority in terms of communication of their presence . CASCADES CITIZEN WILDLIFE MONITORING PROJECT WILDLIFE SIGN INTERPRETATION AND DOCUMENTATION GUIDELINES (From Wilderness Awareness School) TRACK MEASUREMENT GUIDELINES Length and Width: Use track minimum outline. Group length: measured from the back of the track furthest back in a set of 4 tracks to the front of the track furthest forward. NOT USED FOR walking or trotting gaits (groups of 2). Stride: measured from a place on one foot (such as the “center of the front left”) to the same place on the same foot the next time it appears in the trail. Straddle: distance from the outside of the leftmost track in a trail to the outside of the rightmost (using minimum outline). Also called trail width. Center Straddle: distance from the center of the leftmost track in a trail to the center of the rightmost. Trough: width of the entire disturbance created by an animal’s trail (greater then the minimum outline of the tracks which may be indecipherable in some instances). Conservation Northwest Last revised 3-2011 Page 19 of 20 track minimum outline PHOTOGRAPHIC DOCUMENTATION GUIDELINES PHOTOGRAPHS OF INDIVIDUAL TRACKS: 1. 2. 3. 4. 5. Take photo looking directly down on track to reduce distortion. For close up photographs, fill the entire frame with the track and measuring devises Include two scales, preferably rulers, one running lengthwise, and the second widthwise. Take at least one picture of the track that includes a card in the picture with: Site Name Date Observation Number Observer’s Name. Take multiple photographs to ensure you get a quality shot. Conservation Northwest Last revised 3-2011 Page 20 of 20 Card with info noted above CLOSE UP OF TRACK PHOTOGRAPHS OF GAITS/TRAIL PATTERNS 1. 2. Include a scale of some sort. Often this may be leaving the scale you used for an individual track on the ground by that track (thus also giving a reference for where the individual track sits in the pattern). Try to take picture looking straight down on trail to reduce distortion. If this is impossible due to size of trail, include scales both near and far to account for distortion. Tape measure PHOTOGRAPHING THE SETTING Also consider taking photographs of people looking at the tracks or sign, or pictures which show the tracks in the context of the location they are found to accompany the detail photographs. Conservation Northwest Last revised 3-2011