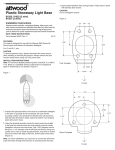
1
Index
BoxCar Pro 4.3
User’s Guide
76
BoxCar Pro User’s Guide
Chapter 4: Other Functions
Thank you for purchasing Onset products. Our loggers and software are
designed to be easy to use.
For a quick start, please refer to the Launching a Logger section in Chapter 1 on
page 4. Consult the other sections of this manual or the online help for a more
detailed description of software capabilities.
Title, 16
View, 15
Plot window, 4
Port. See Communications port
Preferences
Application settings, 69
Printing, 26
R
Contact Information
For support, please contact the company that you bought the products from: Onset
Computer Corporation or an Onset Authorized Dealer.
Onset Computer Corporation
470 MacArthur Blvd.
Bourne, MA 02532
Mailing Address:
P.O. Box 3450
Pocasset, MA 02559-3450
Phone: 1-800-LOGGERS (1-800-564-4377) or 508-759-9500
Fax: 508-759-9100
Hours of Operation: 8AM and 5PM ET
E-mail: [email protected]
Main Onset Web site: www.onsetcomp.com
FTP site: ftp.onsetcomp.com
Reading out
General steps, 5
HOBO LCD Temp/RH logger, 43
HOBO Water Temp Pro, 49
HOBO Weather Station, 58
Reading out with HandCar, 65
Reading out with HOBO Shuttle, 66
Reading out with Optic Shuttle, 67
Readout Log, 4, 17
Changing, 71
Exporting, 24
How to use, 22
Sorting, 23
S
Onset, HOBO, StowAway, TidbiT, Optic Shuttle, Optic Base Station, Optic Coupler,
TidbiT Coupler, and BoxCar are registered trademarks or trademarks of Onset Computer
Corporation. Microsoft and Windows are registered trademarks of Microsoft
Corporation. Palm is trademark of Palm, Inc. Lotus and 1-2-3 are registered trademarks
of IBM-Lotus. All other trademarks are the property of their respective companies.
Select Series to Show in View, 10
Serial port. See Communications port
Series
Displaying in plot, 10
Filtering, 24
Inserting on a plot, 10
Series Properties, 16
Smart Scale, 13
Sorting Datafiles in Readout Log, 23
Spreadsheet. See Excel Spreadsheet
Square-box StowAway Loggers, 60
Starting a logger. See Launching
Starting the software, 2
State Logger Filter, 25
Status Bar, 17
Status, checking
ii
BoxCar Pro User’s Guide
If you purchased the products through an Onset Authorized Dealer, you can also refer to
www.hobohelp.com for support information.
© 1995–2002 Onset Computer Corporation, all rights reserved.
Printed in the USA.
Part #: MAN-BCP4, Doc #: 7130-A
BoxCar Pro User’s Guide
HOBO LCD Temp/RH, 45
HOBO Water Temp Pro, 50
HOBO Weather Station, 59
StowAway TidbiT and TidbiT XT
Loggers, 64
System Requirements, 1
T
Tile Horizontal, 16
Tile Vertical, 16
Title Properties, 16
Toolbar, 3, 17
Tools menu
Crosshair, 14
Hand, 12
Zoom, 11
U
Unplug confirmation message, 70
V
View Details, 17
Description of window, 17
Exporting, 18
View Properties, 15
W
Window menu, 16
Windows operating system. See System
Requirements
Z
Zoom, 11
Arcade zoom, 12
Axis Zoom, 12
75
Index
HOBO Weather Station Loggers, 53
I
Installation, 1
Interface cable, 2
IR Basestation, 2
L
Launching
General steps, 4
HOBO 2K, 28
HOBO Event, 32
HOBO H6, 30
HOBO H8, 34
HOBO H8 Pro, 37
HOBO LCD Temp/RH, 39
HOBO Water Temp Pro, 46
HOBO Weather Station, 53
Multiple loggers, 71
Optic StowAway, 63
Square-box StowAway, 60
StowAway TidbiT and TidbiT XT
Loggers, 64
Legend Properties, 16
Lock Axis Bounds, 12, 13, 15
Logger menu
Get Status, 59
HOBO LCD Temp/RH, 39
HOBO Shuttle Readout, 66
HOBO Water Temp Pro, 46
Launch, 4
Multiple Launch, 71
Optic Shuttle Readout, 67
Read HOBO Pro Archives, 38
Readout, 5
Readout HandCar, 65
Loggers
HOBO 2K, 28
HOBO Event, 32
HOBO H6 State, 30
HOBO H8, 34
HOBO H8 Pro, 37
HOBO LCD Temp/RH, 39
Checking Status, 45
Launching, 39
Reading out, 43
HOBO Water Temp Pro, 46
74
Checking Status, 50
Launching, 46
Reading out, 49
HOBO Weather Station, 53
Checking Status, 59
Launching, 53
Reading out, 58
Launching, 4
Optic StowAway, 63
Square-box StowAway, 60
StowAwayTidbiT and TidbiT XT
Loggers, 64
Lotus 1-2-3, Exporting to, 19
Software License Agreement
IMPORTANT, PLEASE READ CAREFULLY: THIS IS A LEGAL AGREEMENT
BETWEEN YOU AND ONSET COMPUTER CORPORATION. BY INSTALLING,
COPYING, OR OTHERWISE USING THE SOFTWARE PRODUCT, YOU ARE
AGREEING UNCONDITIONALLY TO BE BOUND BY THE TERMS OF THIS
LICENSE AGREEMENT, EVEN IF THIS LICENSE AGREEMENT IS DEEMED A
MODIFICATION OF ANY PREVIOUS ARRANGEMENT OR CONTRACT. IF YOU
DO NOT AGREE TO THE TERMS OF THIS LICENSE AGREEMENT, DO NOT
INSTALL OR USE THE SOFTWARE PRODUCT AND PROMPTLY RETURN THE
SOFTWARE PRODUCT TO THE PLACE YOU PURCHASED IT FOR A FULL
REFUND.
1.
M
Mark All Points, 14
Maximum, Minimum, or Average
Filter, 25
Menu Bar, 3
Messages, general confirmation, 70
Microsoft Excel Spreadsheet, 19
Microsoft Excel Text Export, 19
Multiple File Export, 22
Multiple Launch, 71
The Software Product is owned by Onset Computer Corporation and is protected by
United States copyright laws, international copyright treaties, and all other
applicable national laws. Title, ownership rights, and intellectual property rights in
and to the software shall remain with Onset Computer Corporation. The Software
Product is licensed, not sold. There is no transfer to you of any title to or ownership
of the Software, and this license shall not be construed as a sale of any right in the
Software. You may not make additional copies of the software, except as provided
for in paragraph number 2 below.
2.
Grant of License. This Onset license agreement grants you to install and use one
copy of the enclosed version Software Product on a single computer. The primary
user of the computer on which the Software Product is installed may make a second
copy for his or her exclusive use on a portable computer and/or home computer.
3.
Other Restrictions. You may not reverse engineer, decompile, or disassemble the
Software Product or make any attempt to discover the source code to the Software
Product. Except as expressly permitted in this License Agreement or with written
permission from Onset Computer Corporation, the Software may not be used,
copied, redistributed, retransmitted, published, sold, rented, leased, marketed,
sublicensed, assigned, transferred, altered, or modified.
O
Offloading a logger. See Reading out
Optic Shuttle, 67
Optic StowAway Loggers, 63
Original plot, 11
P
Plot
Adjusting the view, 11
Customizing, 14
Displaying, 10
Printing, 26
Plot menu
Axis, 15
Connect All Points, 14
Legend, 16
Mark All Points, 14
Original Plot, 11
Series, 16
Series, Filter, 24
Smart Scale, 13
BoxCar Pro User’s Guide
For the purposes of this License Agreement, “Software” or “Software Product”
refers to the computer software and associated media, printed materials, and
“online” or electronic documentation, including any and all executable files,
tutorials, help files, utilities, and other files that accompany this product.
The Software Product is licensed as a single product and its component parts may
not be separated for use on more than one computer.
4.
Support. Support for the Software Product is provided by the company from which
you purchased it.
5.
Liability. Other than as permitted by applicable law, in no event shall Onset
Computer Corp. or its suppliers be liable for any direct or indirect damages
whatsoever, arising out of the use, or inability to use this Software Product. In any
case, Onset Computer Corporation and its supplier’s entire liability is limited to the
amount actually paid by you for the Software Product.
BoxCar Pro User’s Guide
iii
Chapter 4: Other Functions
Table of Contents
Index
Chapter 1 BoxCar Pro Fundamentals .......................................................... 1
Installing and Running BoxCar Pro....................................................... 1
BoxCar Pro Main Window .................................................................... 3
Launching a Logger............................................................................... 4
Reading Out Data from a Logger .......................................................... 5
Chapter 2 Plotting, Exporting, and Printing ................................................ 9
Many Ways to View Your Data ............................................................ 9
Displaying a Plot ................................................................................. 10
Adjusting the View.............................................................................. 11
Line Tools............................................................................................ 14
Customizing the View ......................................................................... 14
Window Management.......................................................................... 16
View Details ........................................................................................ 17
Exporting Plot Data ............................................................................. 18
Keeping Track of Your Datafiles ........................................................ 22
Data Analysis with Filters ................................................................... 24
Printing ................................................................................................ 26
Chapter 3 Details of Individual Loggers and Shuttles................................ 27
HOBO 2K Loggers.............................................................................. 28
HOBO H6 State loggers ...................................................................... 30
HOBO Event Logger ........................................................................... 32
HOBO H8 Loggers.............................................................................. 34
The HOBO H8 Pro Series Loggers...................................................... 37
HOBO LCD Temp/RH Logger ........................................................... 39
HOBO Water Temp Pro Logger.......................................................... 46
HOBO Weather Station Logger........................................................... 53
Square-box StowAway Loggers .......................................................... 60
Optic StowAway Logger ..................................................................... 63
StowAway TidbiT and TidbiT XT Loggers ........................................ 64
HandCar............................................................................................... 65
HOBO Shuttle ..................................................................................... 66
The Optic Shuttle................................................................................. 67
Chapter 4 Other Functions ......................................................................... 69
Copy and Application Preferences ...................................................... 69
Multiple Launch .................................................................................. 71
Index ........................................................................................................... 73
iv
BoxCar Pro User’s Guide
A
Application Preferences, 69
Arrange Icons, 17
Axis Properties
Data, 15
Time, 15
C
Cascade Windows, 16
Close All, 17
Communications port, 69
Connect to logger, 2
Testing, 3
Confirmation messages, 70
Connect All Points, 14
Connecting logger to PC, 2
Crosshair, 14
Custom Export, 20
D
Data
Exporting, 18
Filtering, 24
Overlaying from different time
periods, 11
Printing, 26
Shown in View Details, 17
Data series. See Series
Datafiles
Definition of, 6
Managing, 22
Opening, 10
Sorting in readout log, 23
Dialogs, confirmation, 70
Dragging, 12
E
Edit menu
Copy, 69
Preferences, 69
BoxCar Pro User’s Guide
Event Logger Filter, 24
Excel Spreadsheet, Exporting to, 19
Excel Text, Exporting to, 19
Exporting, 18
Custom, 20
Excel, 19
Excel Text and Lotus 1-2-3, 19
Multiple File, 22
Preferences, 20
Readout Log, 24
F
File menu
Insert Series from Datafile, 10
Open, 10
Print Data, 26
Print Graph, 26
Print Info, 26
Print Preview, 26
Print Setup, 26
Files. See Datafiles
Filters, 24
Calculating time, 25
Event logger, 24
Maximum, Minimum, or Average
Filter, 25
State logger, 25
G
Graph. See Plot
H
Hand tool, 12
HandCar, 65
HOBO 2K Loggers, 28
HOBO Event Loggers, 32
HOBO H6 State Loggers, 30
HOBO H8 Loggers, 34
HOBO H8 Pro Loggers, 37
HOBO LCD Temp/RH Loggers, 39
HOBO Shuttle, 66
HOBO Water Temp Pro Loggers, 2, 46
73
Chapter 4: Other Functions
Chapter 1: BoxCar Pro Fundamentals
launch interval (and delayed start time interval) and other settings will be
preloaded into the dialog for the new logger. If BoxCar Pro discovers a change
of logger type during multiple launch, it displays the New Logger Type alert,
warning you to check the launch parameters. To expedite the process during
multiple launching, you should group loggers by type.
Chapter 1
BoxCar Pro Fundamentals
This chapter explains the primary functions of BoxCar® Pro including:
When you have finished launching all the loggers, click Close on the Multiple
Launch dialog.
•
Installing and running BoxCar Pro
•
The BoxCar Pro main window
•
Starting your logger
•
Reading Data from your logger
Installing and Running BoxCar Pro
System Requirements
BoxCar Pro 4.3 requires Windows® XP Professional or Home Edition,
Windows® 2000 Professional Edition, Windows® Me, or Windows® 98 and a
computer with resources appropriate for your listed version of the Windows®
operating system. The computer must have at least one free COM port for serial
communications. Refer to the Connecting to your PC section on page 2 for more
details about the COM port and possible usage of USB-to-serial converters.
Installation
To install BoxCar Pro:
1.
Load the BoxCar Pro CD into the CD drive of your computer. The
installation program should start automatically. If it does not, navigate to
the CD drive from My Computer or Explorer and double-click the BoxCar
Pro 4.3 setup.exe. If you are installing BoxCar Pro from a website, click the
appropriate BoxCar Pro 4.3 link and follow the download instructions on
the screen.
2.
Once the BoxCar Pro installation program begins, follow the instructions on
the screen. The setup program prompts you for an installation directory
(C:\Program Files\Onset Computer Corporation\BoxCar Pro 4.3 is the
default), and installs BoxCar Pro and other components into that directory.
The setup program installs a shortcut for BoxCar Pro 4.3 on your desktop
and in the Start menu (under Onset Applications if you accepted the default
installation).
See the BCReadme file for additional notes on installation and the software.
72
BoxCar Pro User’s Guide
BoxCar Pro User’s Guide
1
Chapter 1: BoxCar Pro Fundamentals
Chapter 4: Other Functions
Connecting to your PC
A PC-3.5 interface cable is required to connect all loggers to the PC except for
the HOBO Water Temp Pro, which requires an IR Basestation instead (see
below). The interface cable is designed to connect directly between the PC’s 9pin COM port (serial) and the data logger. The interface cable must be
connected to a working serial port. Test it using the communications port tester
(explained below) to be sure the serial cable and port work correctly. If you
don’t have an open COM port, an alternative may be to use a USB-to-serial
converter, which allows you to expand the number of open ports available. For
the latest recommendations on COM port expansion solutions, refer to the main
Onset website at www.onsetcomp.com, or see www.hobohelp.com if you
purchased the software through an Onset Authorized Dealer.
The HOBO Water Temp Pro requires an IR Basestation for optical
communication instead of the interface cable. The IR Basestation requires a
direct connection to a standard 9-pin serial port. A 25-pin serial port can be
used, but requires a 25-pin to 9-pin adapter. The IR Basestation may not work if
connected to currently available USB-to-serial converters. Also note that
accessory IR ports on laptops and PCs are not compatible. We are continuing to
test new devices; these exclusions may be removed in the future. Call your
HOBO supplier for details.
To set the COM port for all loggers except the HOBO LCD Temp/RH and
Water Temp Pro, select Preferences from the Edit menu in BoxCar Pro and
change the Logger Serial Port setting. For the HOBO LCD Temp/RH and Water
Temp Pro loggers, click the Launch menu, select the logger name, and select
Port from that logger’s submenu.
Note: If you are frequently switching the PC interface cable with an IR
Basestation or a Palm interface cable (for use with HandCar software), consider
purchasing a serial port extension cable or switch box, which moves the serial
port closer to you. This way you don’t need to reach behind the computer every
time you need to switch the cable.
Start BoxCar Pro
Before starting BoxCar Pro, set your computer’s clock to the correct time in the
correct time zone because the logger uses your computer’s clock to set its own
internal clock. Note: The HOBO LCD Temp/RH and HOBO Water Temp Pro
loggers also have an option to launch without using the computer’s clock.
Details about logger time for these two loggers and the HOBO Weather Station
Loggers are explained in Chapter 3 on page 27.
To start BoxCar Pro, double-click the BoxCar Pro shortcut icon on the desktop,
or click Start, Programs, Onset Applications, BoxCar Pro (if you changed
the program group icon location during the installation, your path will be
different). Note: It is not recommended that you start BoxCar Pro by double2
BoxCar Pro User’s Guide
•
Decimal Settings. Click this button to change the default decimal
settings used by the Windows Control Panel, which is a global change
that may affect other programs.
•
Use HandCar Datafile Display Dialog. Click this box to toggle the
Datafile Display message when uploading from HandCar to BoxCar.
•
Readout Log File. The readout log file text box displays the name of
the text file holding the current readout log. To change the file used for
the readout log, click the button at the right of the text box to browse to
a new file. For more information about the readout log, see the section
Keeping Track of Your Datafiles on page 22.
Multiple Launch
To launch multiple loggers, click the Logger menu and choose Multiple Launch
(Ctrl+M). Multiple Launch is useful when a study requires a number of loggers
to start logging at the same time. Note: The HOBO LCD Temp/RH and Water
Temp Pro loggers do not support the general Multiple Launch command. To
launch multiple HOBO LCD Temp/RH or Water Temp Pro loggers with the
same setting, launch one as normal. Then upon successful launch, click Launch
Another instead of Done. The HOBO Weather Station logger is not supported
by multiple launch.
Multiple Launch Dialog
The Multiple Launch dialog displays two options: Use Existing Logger
Description or Enter a Description. If you want the description in each logger to
hold unique identifying information such as logger location, click the “Use
Existing Logger Descriptions” option. This defaults to the description already
entered for each logger, which can be edited. The other option (Enter a
Description) allows you to enter a common description field for all loggers
launched.
Connect a Logger and Click Start
Click Start to display a dialog indicating a new logger type has been found (as
the first logger in this multiple launch it is considered new). Multiple Launch
then downloads parameters from the current logger and displays a launch dialog.
When the launch dialog displays, fill in parameters and click Start. The Multiple
Launch Dialog displays again. Attach another logger and click Start again. The
BoxCar Pro User’s Guide
71
Chapter 4: Other Functions
•
Chapter 1: BoxCar Pro Fundamentals
Confirmation. Click the Confirmation button to enable and disable
confirmation dialogs.
clicking the program executable. BoxCar Pro contains a built-in Windows
installer feature that automatically searches and replaces any missing files. This
feature is only enabled when you start BoxCar via the desktop icon or Start
menu.
Testing the Communications Port
You need a paper clip to perform this test. To test the communications port
and/or serial port:
The Launch Confirmation warns you that you will erase all data when
launching.
The Control-Panel Edit Confirmation warns that you are making a
global Windows Control Panel change (such as changing the
Date/Time Format), which may affect other programs.
The Readout Log warnings alert you when you might be loading
potentially invalid data and when you are removing a log entry.
The Enable/Disable Channels message informs you that you can
change the types of measurements being recorded.
1.
From the Help menu, select Test Port.
2.
Select the port you want to test and a baud rate, and follow the
instructions on the dialog.
3.
Watch the Status line for the progress of the test. Once you are finished,
click Cancel or the close button (the x in the upper right corner).
BoxCar Pro Main Window
BoxCar Pro’s main window consists of a menu bar, toolbar, and an application
area containing a plot window and readout log. The following example shows
the main window with two data series in the plot window and the readout log
below the plot. Some BoxCar Pro window features are summarized below.
The Shuttle Off-load AutoSave Confirmation prompts you for the
autosave option during shuttle readout.
The logger serial unplug confirmation informs you when to unplug the
serial cable from some loggers. This is important because some laptops
employ power conservation features that shut off the communications
port within seconds after launch, causing the logger to stop logging.
This message keeps the port open while you unplug the logger ensuring
that the logger will continue logging.
•
70
Export. Click the Export button to change File Export preferences.
These are the same settings available when selecting Preferences from
the Export window. See the Exporting Plot Data section on page 18 for
details on Export Preferences.
•
Set All Preferences to Defaults. Click this button to return all
customizable preferences to their original settings.
•
Default Print Mode. Choose either Landscape or Portrait default
printing.
•
Date/Time Format. This area shows the currently selected date and
time format. To modify date and time settings, click Change.
BoxCar Pro User’s Guide
Menu Bar
The menu bar contains the following submenus: File, Edit, Logger, Plot, Tools,
Window, and Help. The Plot and Tools menu are only available when a plot is
open.
Toolbar
The toolbar (below the menu) contains shortcut icons for features such as
opening a datafile, exporting and printing, launching and reading out, adjusting
the view, and help. Place the mouse pointer over an icon to view its function.
BoxCar Pro User’s Guide
3
Chapter 1: BoxCar Pro Fundamentals
Chapter 4: Other Functions
Plot Window
Select Open from the File menu or read out data from a data logger to display
one or more data series in the plot window. You can open more than one plot
window, compare data, and drag and drop a data series from one window to
another. See Chapter 2: Plotting, Exporting, and Printing on page 9 for an
introduction to plotting.
Readout Log
At the bottom of the main window, the readout log displays the datafile names
when you read out loggers. The readout log window can also be resized or
hidden. See Keeping Track of your Datafiles on page 22 for more information.
Launching a Logger
For a quick demonstration of launching and collecting data with a logger, follow
these instructions.
1.
Connect the interface cable to an open COM port on the back of the
computer. If you are using the HOBO Water Temp Pro, connect the IR
Basestation to the COM port instead of the interface cable.
2.
Connect the other end of the interface cable to the
logger. Make sure the plug is firmly seated in the
jack (twist the plug if it does not connect properly
on the first try). If you are using the HOBO Water
Temp Pro, point the communications window of the
logger at the IR Basestation, making sure they are
no more than 4 or 5 inches apart.
3.
Start BoxCar Pro. From the Logger menu, select either Launch or the
name of your logger and then Launch from that logger’s submenu (the
HOBO LCD and
HOBO Water Temp Pro
loggers are listed
separately in the
Launch menu). This
displays the launch
dialog (an example is
shown with step 4). If it
does not, check the
COM port.
4
BoxCar Pro User’s Guide
Chapter 4
Other Functions
This section explains additional features available in BoxCar Pro.
Copy and Application Preferences
Copying pictures
To copy your graph as a bitmap to the Windows Clipboard,
click the Edit Menu and select Copy.
Changing the Application Preferences
Click the Edit menu and choose Preferences to customize aspects of the
BoxCar Pro program.
•
Communications. Use the Logger Serial Port box to choose the default
communications port that BoxCar Pro will use when reading out and
launching most loggers. For the HOBO LCD Temp/RH and Water
Temp Pro loggers, do not use this preferences window for port
configuration. Instead, click the Logger menu, select the Logger name,
and then click Port. Use the HandCar Serial Port to choose the default
port that HandCar will use.
BoxCar Pro User’s Guide
69
Chapter 3: Details of Individual Loggers
Chapter 1: BoxCar Pro Fundamentals
4.
Change selections as you like. Select a short interval (for example, 1 or 2
seconds) so you will have data to look at. Once finished entering selections,
click Start or Launch.
Some loggers may also
display other messages.
(Note: Clicking Start will
stop the logger if it is
logging and will
overwrite any recorded
data. Click Cancel to
cancel the launch; the
logger will not be started).
For details about setting
the features of a particular
logger, see Chapter 3:
Details of Individual
Loggers and Shuttles on page 27.
5.
Watch the launch progress bar until it has
completed (only displayed on some
loggers). The logger is now launched and
recording data.
6.
Disconnect the logger after the launch
progress bar has finished. Some loggers
display a Disconnect Logger dialog like
the one shown to the right; click OK after
you’ve disconnected the logger. (For more
information on this message, refer to page
70.) If the logger records temperature, hold
the logger in your hand during the test to
get a change in temperature and varied
data.
Reading Out Data from a Logger
When you read out (off-load) data from most loggers, BoxCar Pro stops the
logger from logging. To restart logging, you will need to launch again from the
Logger menu. Some loggers, however, can continue logging while reading out
data, such as the HOBO LCD Temp/RH, HOBO Water Temp Pro, and HOBO
Weather Station. If your logger has this feature and the logger is not full when
you read it out, you will see a message prompting you to either stop the logger
or continue logging.
To read out data from the logger, follow these steps.
68
BoxCar Pro User’s Guide
BoxCar Pro User’s Guide
5
Chapter 1: BoxCar Pro Fundamentals
1.
2.
3.
4.
6
Chapter 3: Details of Individual Loggers
Connect the logger to the interface cable. If reading out the HOBO Water
Temp Pro, make sure the IR Basestation is connected to the computer
instead of the interface cable. Point the HOBO Water Temp Pro
communications window at the IR Basestation.
Start BoxCar Pro. Click the Logger menu and select either Readout or the
name of your logger and then Readout from that logger’s submenu (the
HOBO LCD and HOBO Water Temp Pro loggers are listed separately in
the Launch menu). Some loggers can continue logging during readout. If
the logger supports
this feature and is
still logging, a
message prompts you
to either stop the
logger and off-load,
or continue logging
while off-loading.
Choose one. All
loggers will display a
progress bar until the readout is complete.
Name the datafile and click Save. (A datafile refers to the data returned
from a deployment of a specific logger.) The default datafile name is the
description entered when you launched the logger. Use unique datafile
names so you don’t overwrite data (a warning message is displayed if you
are about to overwrite a file). Unless you specify a different directory, the
datafile is saved in the directory where BoxCar was installed. If you do
select a different directory to save the datafile, your specified directory will
be used by default for all subsequent readouts until you choose another one.
Select the series you want to view. (A series is the data that can be shown as
a single line on a plot. A series is often one channel, but may be a
composite channel such as the dew
point channel in a logger that measures
both temperature and relative humidity.
You can select multiple series or all
series. However, displaying too many
series may result in a plot that is
difficult to read.) Note: The HOBO
LCD Temp/RH, HOBO Water Temp
Pro, and HOBO Weather Station
loggers also have an option to modify
the display time used in the graph. See
the sections for each individual logger in Chapter 3 for more details.
BoxCar Pro User’s Guide
The Optic Shuttle
The Optic Shuttle can be used to offload Optic StowAways, StowAway
TidbiTs, and TidbiT XTs in the field. The Optic Shuttle is then brought back and
read out by BoxCar Pro. The picture shows an Optic Coupler attached to the
shuttle. (Use the TidbiT Coupler to connect to a TidbiT.)
Off-loading Data from the Shuttle
Connect the Optic Shuttle to the Optic Base Station
using the Optic Coupler (the coupler’s orientation
doesn’t matter), and select Optic Shuttle Readout
from the Logger menu. The program prompts you to
connect the Optic Shuttle to the displayed port number and then to press the
button on the Optic Shuttle to off-load. Note: If you select Optic Shuttle
Readout when the optic shuttle is not connected to the computer, BoxCar may
close. Reopen BoxCar and make sure the Optic Shuttle is connected properly
before selecting Optic Shuttle Readout.
The Optic Shuttle’s orange light will blink
indicating that it is attempting to communicate.
After it makes contact with BoxCar Pro, it
starts off-loading datafiles.
Once the data has been off-loaded, BoxCar Pro will prompt you to save each
datafile. (Choose AutoSave to save all files at once.) After the files have been
saved, BoxCar Pro sets the Optic Shuttle’s current time to the host computer’s
current time. It reports the difference between the Optic Shuttle’s current time
and the computer’s clock, and synchronizes the Optic Shuttle’s clock to your
computer’s clock. Note this time difference to help interpret your data later.
BoxCar Pro will prompt you to individually save each of the data files from the
Optic Shuttle.
It’s a good idea to re-synchronize the Optic Shuttle’s clock before reading out
loggers. To do this, read out the shuttle again. After any data has been read out,
BoxCar Pro synchronizes the clock to the PC’s clock. Be sure your PC clock is
set to the correct time before doing this readout. If the data from the Optic
Shuttle has already been saved, you do not need to save it again (select Cancel in
the Save As dialog).
BoxCar Pro User’s Guide
67
Chapter 3: Details of Individual Loggers
Chapter 1: BoxCar Pro Fundamentals
5.
HOBO Shuttle
The data displays in a plot window. Use the zoom, crosshair, and other plot
tools to navigate. See Adjusting the View on page 11 for more details.
The HOBO Shuttle allows retrieval of data without the
necessity of either bringing the loggers back from the field or
taking a computer into the field. The HOBO Shuttle’s small
size and water-resistant case make it convenient to use.
Off-loading Data from the Shuttle
To off-load data from the HOBO Shuttle, select HOBO Shuttle Readout from
the Logger menu. BoxCar Pro will connect to the HOBO Shuttle and begin to
off-load the data files. By default, BoxCar
Pro displays the File Info box for each file
in sequence and prompts you to save
datafiles individually. Turn on AutoSave by
clicking yes when Boxcar Pro displays the
AutoSave dialog. BoxCar Pro will then
save the files for you and append a numeral to the end of each file name.
After the files have been saved, BoxCar Pro will relaunch the Shuttle. It
compares the HOBO Shuttle’s current time to the host computer’s clock and
tells you what the difference was. You may want to note this time difference to
help interpret your data later. It then synchronizes the HOBO Shuttle’s clock to
your computer’s clock. BoxCar Pro also checks the HOBO Shuttle’s battery and
gives you the battery level percentage. When the battery voltage is low, a
warning is displayed indicating that you should change the battery. Make sure
you change the battery as advised to avoid data loss or corruption. For the latest
recommendations for battery replacement, refer to the main Onset website at
www.onsetcomp.com, or see www.hobohelp.com if you purchased the software
through an Onset Authorized Dealer.
Synchronize the Shuttle’s Clock Before Reading Loggers
You can synchronize the shuttle’s clock by selecting Launch from the Logger
menu. BoxCar Pro connects to the HOBO Shuttle, synchronizes the HOBO
Shuttle’s clock to the PC’s clock, and displays the battery’s percentage level. Be
sure your PC clock is set to the correct time before launching your shuttle.
66
BoxCar Pro User’s Guide
BoxCar Pro User’s Guide
7
Chapter 1: BoxCar Pro Fundamentals
Chapter 3: Details of Individual Loggers
HandCar
HandCar is software for Palm™ handheld computers that
allows you to launch and readout HOBO and StowAway
loggers in the field, and then upload the datafiles from the
Palm handheld to BoxCar.
Off-loading Data from HandCar
To upload data files to BoxCar Pro:
1.
Place the Palm handheld into the communications
cradle or connect it to the Palm-to-PC cable, then
connect the cradle or cable to your computer (see
the HandCar user’s manual for the computer
interface requirements for your version of HandCar).
2.
Disable the HotSync Manager. If the HotSync Manager icon is on your
system tray (on the taskbar), right-click the icon and select Exit.
BoxCar Pro and HotSync Manager cannot use the same COM port at
the same time.
3.
Turn the Palm handheld computer on and start HandCar.
4.
Start BoxCar Pro.
5.
From the HandCar Data menu, select Upload Datafiles.
6.
Watch HandCar Status until it displays “Waiting for host…” and then
click the Logger menu in BoxCar Pro and select Readout HandCar.
7.
The file transfer begins. During the transfer, both HandCar and BoxCar
Pro display status information. When the transfer is done, HandCar
displays “Upload Complete” in the Status field and BoxCar Pro opens
the AutoSave dialog. Click Yes to save all data files with a numeral
appended to the file name to either the directory where BoxCar was
installed or the last directory where a datafile was saved. Click No to
save each data file individually, which allows you to choose the file
name.
After upload, BoxCar Pro does not reset the internal clock of the Palm handheld
to the PC clock (BoxCar Pro does reset the clocks of the HOBO Shuttle and
Optic Shuttle).
For more details on launching and reading out with HandCar, refer to the
HandCar manual.
8
BoxCar Pro User’s Guide
BoxCar Pro User’s Guide
65
Chapter 3: Details of Individual Loggers
Chapter 2: Plotting, Exporting, and Printing
StowAway TidbiT and
TidbiT XT Loggers
TidbiTs are another variation of the
StowAway design. Two versions
are available. One has an internal
sensor, and the other has a sensor
in its external probe. Both loggers
are compatible with the Optic
Shuttle.
The StowAway Tidbit uses the
same Base Station as the Optic
StowAway but with a special
TidbiT coupler.
Chapter 2
Plotting, Exporting, and Printing
Many Ways to View Your Data
BoxCar Pro provides methods for showing multiple datafiles on a single plot,
and for zooming and manipulating plots in many ways. You can also print data
on a printer or export it to a text file or Excel spreadsheet. These features are
explained in the sections listed below.
Feature
Description
Note about Coupler Orientation
The orientation of the coupler is
important. The coupler contains a
magnet (the bulge on the side),
that enables communication with
the logger. Be sure to orient the
logger so that the loop on the side of the StowAway TidbiT fits through the pin
on the coupler. When using the StowAway TidbiT XT, align the arrow on the
side of the logger with the pin.
Displaying a Plot
Displaying data in a plot window
10
Adjusting the View
Using zoom, arcade zoom, drag, and
smart scale
11
Line Tools
Connecting points, marking points
14
Customizing the View
Changing the axis, title, legend colors,
locations
14
Window Management
Using Tile, Cascade, Close all
16
Do not leave the logger in the coupler for extended periods of time because the
logger’s current drain is higher while it is in the coupler.
View Details
Displaying information about the plot
17
Exporting Plot Data
Saving data for Excel, Lotus 1-2-3, and
Custom text files
18
Keeping Track of Your
Datafiles
Working with the readout log
22
Data Analysis with
Filters
Creating a new filtered series
24
Printing
Printing plots and data
26
Bright Sunlight Can Affect Communication
If communications with the TidbiT are attempted in bright sunlight, the
communications with the TidbiT may be compromised. This problem is
eliminated by shading the TidbiT and coupler.
Same Launch Dialog as Square-box StowAway
Connect the logger to your computer and select Launch from the Logger menu.
The Square-box StowAway launch dialog is displayed. See the Square Box
StowAway Loggers section on page 60 for more information on this launch
dialog.
64
BoxCar Pro User’s Guide
BoxCar Pro User’s Guide
Page
9
Chapter 2: Plotting, Exporting, and Printing
Chapter 3: Details of Individual Loggers
Displaying a Plot
Optic StowAway Logger
BoxCar Pro provides three ways to get data from a datafile into a plot window.
•
Open a File from the File Menu. From the File menu, select Open.
Choose the datafile containing the data you are interested in viewing.
The Optic StowAway uses
optical communication and
requires an Optic Base
Station for direct readout with BoxCar Pro.
•
Open a File from the Readout Log. Double-click a datafile in the
readout log.
The Optic StowAway logger uses the same launch dialog as the Square-box
StowAway.
•
Off-load a Logger. When you off-load data from a logger, you can
display a plot of the data you just off-loaded.
Select Series to Show in View
When you open a datafile, the Select Series
to Show in View dialog opens first, letting
you pick one or more series to display in a
new plot window. Selecting several series
may result in a plot that is difficult to read.
When you select the series you want to see,
click OK to display the plot.
Connecting an Optic StowAway for Readout
To read out or launch an Optic StowAway, you must first insert the logger into
the Optic Coupler and connect it to the interface cable.
Important Note about Coupler Orientation
The orientation of the coupler is important. The bulge on the side of the coupler
is a magnet that enables communication with the Optic StowAway. The bulge
must be on the end the logger is connected to!
Also, do not leave the logger in the coupler for extended periods of time because
the logger’s current drain is higher while it is in the coupler.
Note: The HOBO LCD Temp/RH, HOBO
Water Temp Pro, and HOBO Weather
Station loggers also have an option to modify the display time used in the graph.
For more details, see the sections for the individual logger in Chapter 3, page 27.
Same Launch Dialog as Square-box StowAway
To launch the Optic StowAway, connect the logger to your computer, click the
Logger menu and select Launch. BoxCar Pro displays the same launch dialog as
the Square-box StowAway.
Inserting a Series on a Plot
You can add series from multiple datafiles to one plot. This is helpful if you
want to show data taken from multiple deployments of a logger in a single
location, or compare data taken at the same time by different loggers. You can
insert a series using the File menu or by drag and drop. Note: You cannot save
the plot view once you have inserted a series, zoomed, or used the other plotting
tools. You can, however, export multiple series to a text file. See the section
Exporting Plot Data on page 18 for information on exporting.
To insert a series with the File menu:
1.
Click the File menu, select Insert Series from Datafile.
2.
Select the datafile, and click Open. The new series is added to the
current plot window. The plot axes expand to include the new data.
To insert a series using drag and drop:
10
1.
Open two plot windows containing the series you wish to merge.
2.
Click the arrow tool on the toolbar.
BoxCar Pro User’s Guide
BoxCar Pro User’s Guide
63
Chapter 3: Details of Individual Loggers
Chapter 2: Plotting, Exporting, and Printing
Alarm conditions. Read the individual logger’s manual for details. The
Alarm data can be seen on the graph after readout. The section
Customizing the View shows how you can display alarm lines for all
loggers.
•
•
Multiple Sampling. Multiple Sampling causes the
logger to make multiple measurements during an
interval and store only the minimum, maximum, or
average of the readings. In Multiple Sampling
mode, the logger takes about 100 measurements, evenly spaced in each
interval unless the interval is less than one minute. For shorter intervals,
the logger will measure once every half second during the interval.
Multiple Sampling increases the average current drain of the logger. To
minimize current drain, this feature should not be used unless needed.
Start. Click Start when you are satisfied with the settings. Do not
unplug the logger from the interface cable until BoxCar Pro indicates
the launch is complete. Launching your logger will overwrite the
previously recorded data. Confirm a successful launch by watching for
the logger’s LED to blink. Consult the logger’s User’s Manual for more
information on the LED status signals.
3.
Click the series you wish to drag, hold down the mouse button, and
drag the series to the other plot window. A different cursor displays
while dragging. You can only insert one series at a time with this
method.
Overlaying data from different time periods
A key benefit to inserting a series is the ability to overlay data from different
time periods. This allows you to compare data before and after an event or
change (for example, compare the temperature in a room before and after a
change to the HVAC control system). To do this, you must create separate time
axes for each series.
1.
Right-click the series you wish to overlay and select Properties.
2.
Click the time axis drop-down arrow and select New Time Axis.
3.
Type a name for the axis and click OK.
4.
Two time axes should appear on the graph. You can then further adjust
the time axis properties to set each axis to a different period of time.
For example, set one axis to show the data from May through August
of 2000 and the other to show May through August of 2002. For more
details on adjusting the time axis, see Time Axis Properties on page 15.
Adjusting the View
There are several ways to adjust the view, including zoom, arcade zoom, drag,
and smart scale. You can also custom set the data range of an axis, which is
described in Customizing the View. Note: There is no way to save the view as a
BoxCar Pro file once you have adjusted the view using the zooming or dragging
tools. You can, however, print a hard copy of a zoomed or altered view (see the
Printing section on page 26).
Original Plot
No matter what adjustments you make to the view, or how far afield your
zooming gets, you can always get back to the original view by selecting
Original Plot from the Plot menu. You can also click the original plot
icon on the toolbar or press F9.
Zoom
To focus on one area of the display, pick the zoom selection tool
(magnifying glass) from the toolbar (or from the Tools menu, select
Zoom). Place the tool in one corner of the area you choose to expand,
then click and hold down the left mouse button. Drag to the opposite corner of
the area and release the mouse button. The selected area is outlined by a
rectangle. If you click inside the rectangle, the area within the rectangle expands
62
BoxCar Pro User’s Guide
BoxCar Pro User’s Guide
11
Chapter 2: Plotting, Exporting, and Printing
Chapter 3: Details of Individual Loggers
to fill the whole plot. Click outside the rectangle to cancel the selection. Note:
Zooming will not work on an axis that is locked. To unlock an axis, right-click
the axis, select the axis properties from the menu, and remove the checkmark
from Lock Axis Bounds.
Arcade Zoom and Single-Axis Arcade Zoom
Arcade zoom is continuous zoom. Using the magnifying glass tool, click and
hold down the left mouse button on the section of the plot you want to expand.
After about a second, a plus sign appears in the middle of the tool and the plot
expands around the location you have selected. As you move the zoom tool, the
center of the expanded area moves with it.
To zoom out, hold down the Ctrl key, or the right mouse button, while you hold
down the left mouse button. When a minus sign appears in the tool, the plot
zooms out. Hold down the X key while zooming to restrict motion horizontally.
Hold down the Z key while zooming to restrict motion vertically. You can also
arcade zoom on a single axis by clicking and holding the zoom tool on an axis.
Single-Click Zoom and Single-Click Axis Zoom
A single click and release with the zoom tool causes the plot to zoom in about a
factor of two. The plot is centered on the location where the click was made.
Hold the Ctrl key down while single-clicking to zoom out about a factor of two.
Click an axis with the zoom tool to expand the curves corresponding only to that
axis. Hold the Ctrl key down while you click the axis to zoom out.
Hand Tool
Click the hand tool on the toolbar (or from the Tools menu, select Hand)
to pan the curves within the plot. Move the hand cursor on the plot and
click and hold down the left mouse button to drag a different section of the plot
into view. The plot follows the movement of the mouse, and the axes are
continuously updated in response to the movement. To stop dragging, release
12
BoxCar Pro User’s Guide
•
Measurement Unit. The Measurement Unit box allows you to choose
the units displayed in the Reading. This also sets the default units at
readout. For example, you can view a temperature graph in either
degrees Fahrenheit or degrees Celsius. BoxCar allows you to change
the units after reading out data.
•
Wrap around when full. This allows the logger to record
continuously, overwriting the oldest points when it becomes full. The
logger will continue logging until interrupted by a readout or launch.
On readout, the most recent points will be read out. If this box is not
checked, the logger will stop once its memory is full.
•
Delayed Start. By entering a specific start date and time, Delayed Start
will allow you to postpone logging for up to three months after
launching your logger. The format for entering dates may change
depending on the date and time formats that you have set within
BoxCar Pro. Enter this time in the format currently specified in the
Date/Time Preferences. Once launched, the logger will flash dimly
every four seconds until the start time has been reached and then start
logging.
•
Triggered Start. Selecting Triggered Start will allow you to postpone
the launch time of your StowAway until triggered. After the logger has
been launched, the StowAway will flash its LED dimly every six
seconds until triggered. Once triggered, the LED will flash brightly
four times and then continue to flash brightly every time a
measurement is taken.
•
Delayed Start after
Triggered Start. Selecting
both Triggered Start and Delayed Start causes the StowAway to delay
for a specified amount of time after the trigger has been activated but
before it starts logging. The time format is displayed in the format
currently specified in the Date/Time Preferences.
•
Alarm. Alarm, when selected, allows you
to see if the StowAway has recorded a
reading outside of a pre-selected range. The
Alarm reads in the units shown in the Measurement Unit box. To set
the Alarm, slide the tabs to the desired High and Low values. The
Alarms are off when the High tab is slid all the way to the right and the
Low tab is slid all the way to the left (the word ‘off’ will replace the
numeric value).
You can turn the Alarms off independently of each other. For example,
if you only want a High alarm, turn off the Low and keep the High on.
The various StowAway loggers have different ways of representing
BoxCar Pro User’s Guide
61
Chapter 3: Details of Individual Loggers
Chapter 2: Plotting, Exporting, and Printing
Square-box StowAway Loggers
StowAway loggers have memory sizes up to 32K,
alarms, and multiple measurements per sample period.
The most popular version of this logger, the StowAway
XTI, is shown here.
The Square-box StowAway Launch Dialog
To display the launch dialog, connect a logger to your computer, click the
Logger menu, and select Launch.
60
•
Launch Dialog Information. On the launch dialog, the first line of
information identifies the type of logger and its serial number. The date
field displays your computer’s current date and time. If this is incorrect,
consult your Windows manual on how to change your computer’s date
or time.
•
Reading. This field displays what the logger is currently reading in the
selected Measurement Unit.
•
Description. The text in the Description box is displayed above the
plot on the readout graph. Up to forty characters can be typed in this
area.
•
Interval (Duration). The Interval (time between measurements) and
the Duration (amount of time the logger will collect data) are selected
here.
•
Add Custom Interval. To create your own custom interval, select
“Add Custom Interval” at the bottom of the interval scroll box. You can
designate as many custom intervals as you require (between 0.5
seconds and 9 hours). Custom Intervals are saved for the current
session, but disappear when you exit BoxCar Pro.
BoxCar Pro User’s Guide
the mouse. Note: Dragging will not work on an axis that is locked. To unlock an
axis, right-click the axis, select the axis properties from the menu, and remove
the checkmark from Lock Axis Bounds. Hold down the X key while dragging to
restrict motion horizontally. Hold down the Z key while dragging to restrict
motion vertically. To drag one series at a time, click and hold the axis associated
with the series. Only the curve connected with the associated axis moves.
Smart Scale
When adjusting the view with the zoom and dragging tools, the numerical
bounds of the axes may no longer be on ‘round’ numbers. Select Smart Scale
from the Plot menu (F5) to adjust the axes to end on major tick marks. The
following two views show a plot that has been left on minor ticks after zooming,
and the same view cleaned up with Smart Scale.
BoxCar Pro User’s Guide
13
Chapter 2: Plotting, Exporting, and Printing
Chapter 3: Details of Individual Loggers
Crosshair Tool
Use the crosshair tool to zero in on a specific value in the plot. Select the
crosshair tool from the toolbar or from the Tools menu, select
Crosshair. On the plot, click and drag to draw a crosshair, which shows
the points nearest to the mouse click. If the legend is displayed next to the plot,
the point values for each series are updated to reflect the crosshair location. The
data selected with the crosshair is also highlighted in the view details window if
open. Remove the crosshair tool by clicking the crosshair toolbar icon again, or
click the Tools menu and select Remove Crosshair Indicator.
Line Tools
This section describes tools for modifying how data is
shown on the plot. The Line Tools are accessible from the
Plot menu.
Connect All Points
When Connect All Points (F4) is selected (the default), the plot is drawn
with lines connecting each measured data point, giving a continuous line
for each series in the plot window. Note: Series can be hidden by deselecting
both Connect All Points and Mark All Points.
Mark All Points
When Mark All Points (F6) is selected, each data point is displayed
with a small geometric shape drawn around the point. (Use the series
properties to change the shape of the marked point. See Customizing the View on
page 14 for more information.) For sparse data sets, this option adds visibility to
the individual data points.
•
The time based on the value entered in the “Select time offset from
UTC (GMT)” field. This is the time that will be used in the plot.
•
The time zone setting used to launch the logger.
•
UTC (GMT).
Note: The first time the datafile opens after readout may take a couple of
minutes depending on the number of sensors used and the size of the file.
Checking the Weather Station Logger Status
You can check the status of the logger during launch. From the Logger menu,
select Get Status. The Status window shows what state the logger is in:
launched, waiting for button start, waiting for a delayed start, or not launched. It
also lists:
•
Current battery capacity and type
•
Description
•
Deployment number
•
Memory available and whether Wrap Around When Full was selected
•
The time for the launch, first sample, and current logger time in both
GMT and the time zone used at launch
•
Each sensor and its serial number, location description (if any), and
current reading
Original Plot and Smart Scale
The Original Plot and Smart Scale options are discussed in Adjusting the View
on page 11.
Customizing the View
Further customize the plot window with the properties options for View, Axis,
Series, Title, and Legends, which lets you change the plot title, axis and title
locations, and the extent and color of the axis. Choose the arrow tool (not the
zoom or hand tools) to access the property dialogs with the mouse. These tools
are also accessible from the Plot menu.
14
BoxCar Pro User’s Guide
BoxCar Pro User’s Guide
59
Chapter 3: Details of Individual Loggers
Chapter 2: Plotting, Exporting, and Printing
and check the Deployment Notes folder for the notes you entered. If you did not
enter any notes, the Deployment Notes folder will not display.
Reading out the HOBO Weather Station Logger
To read out the HOBO Weather Station logger, connect a logger to your
computer, click the Logger menu, and select Readout. If the logger is still
collecting data, the following screen appears:
If you want the logger to stop recording data before reading out (off-loading),
click Yes. If you want the logger to continue recording data in the current
deployment while reading out (off-loading), click No.
After saving the file, you will be prompted to select the data series you wish to
view in a plot. Series selection is the same for all loggers. However, the HOBO
Weather Station logger also gives
you the option of changing the time
displayed in the plot. This does not
change the actual time saved in the
datafile; it only changes the time
used in the presentation of the plot
and when exporting data.
Time is shown in hours offset from
Universal Coordinated Time (UTC),
also known as Greenwich Mean
Time (GMT). The time offset listed
by default matches the time zone
setting used to launch the logger. In
this example, the logger was
launched in Eastern Standard Time.
Therefore, -5 is filled in by default because Eastern Standard Time is five hours
behind UTC (GMT) (when daylight savings time is not in effect).
To change the default time offset, enter the number of hours the new time differs
from UTC (GMT). For example, to change the time offset in the example above
to Pacific Standard Time, enter -8 because Pacific Standard is 8 hours behind
UTC (GMT) (when daylight savings time is not in effect). To help make sure
you are entering the correct time offset, this screen displays the date and time for
the logger’s first measurement, or data point, in three ways:
58
BoxCar Pro User’s Guide
View Properties
Using the arrow tool, double-click anywhere inside
the plot window to open the View Properties dialog.
(Note: If you double-click too close to a particular
series, the series dialog opens.) Show or hide the
legend and title. Select Show Border to draw a
border around the view area. Select Show Filled to
display the background in a solid color.
Time Axis Properties
To modify the display of the
time axis, double-click below
the time axis with the arrow
tool. The Axis Properties
dialog lets you modify the
start and end times of the
axis (click Min or Max).
Select Show Gridlines to
toggle vertical gridlines on or
off, or click Custom Tick Marks to customize the axis labeling. You can also
change the axis color and location. Select Lock Axis Bounds to lock the axis,
which then cannot be affected by zooming or dragging (it is usually
recommended that you lock the data axis rather than the time axis, particularly
for data from state loggers).
Data Axis Properties
To adjust the properties of the
data axis, double-click near the
data axis. The Axis Properties
dialog shown lets you modify
the minimum and maximum
values represented by the data
axis. You can also toggle
horizontal gridlines on or off,
choose custom tick marks, and change the color and location of the data axis.
Select Lock Axis Bounds to lock the axis, which then cannot be affected by
zooming or dragging. Note: When viewing a plot from an H6 State logger, the
data axis is locked by the default.
BoxCar Pro User’s Guide
15
Chapter 2: Plotting, Exporting, and Printing
Chapter 3: Details of Individual Loggers
(such as the temperature/RH sensor), both parameters will be displayed. It is not
possible to deselect one of the two parameters.
Series Properties
Double-click a series with the
arrow tool to display the Series
Properties dialog, which lets you
change the name and color of the
selected series. The new name
displays in the legend box. You
can also specify whether you want
to connect points and set ranges
for alarm lines. Note: Changes to
the series name will not be displayed in View Details.
The following details are displayed for each sensor:
•
Serial #. This column displays the serial number for each sensor, which
is a useful way of identifying sensors, particularly if you are using
multiple sensors measuring the same property (for example, two
sensors both measuring temperature). The serial number is located
under the plastic tubing on the sensor cable or on the PVC housing
found on some cables. Note that dual sensors (sensors that take more
than one type of measurement, such as temperature/RH) have the same
serial number, but have a suffix to distinguish between the two
properties.
•
Legend Properties
Double-click the legend box to display the
Legend Properties dialog, which lets you
change the location, name, and color of the
legend. Select Show Border to draw a border
around the Legend box. If you select Use
Series Color(s), the name of each series in the
legend box is displayed in the same color as its associated series on the plot.
Location. This is a descriptive field you can use to help differentiate
between sensors and record where a sensor was placed. For example,
type “soil” and “air” to distinguish between two temperature sensors.
Edit the field by clicking on it. This opens the Sensor Location dialog
box, which lists specific
information about the
sensor and a field you can
use to describe the location.
To change the location,
type over <edit> with a
description of the sensor
location (maximum 30
characters), such as air, soil, or 2m height, and then click OK. The
description you entered will then appear in the Sensor Information list.
•
Property. This column lists the type of measurement the sensor is
monitoring.
Window Management
•
Value. This column shows the current reading. Current values are
updated every second.
•
Unit. This column shows the type of unit for the weather property
being measured. Note: Auxiliary units/properties such as dew point are
not shown.
Title Properties
Double-click the title with the arrow tool to
display the Title Properties dialog, which
lets you change the title text, color, font, and
location. The original title comes from the
description you provided when you
launched the logger.
Cascade Windows
Select Cascade Windows to align each open window so that titles
are displayed. This arrangement allows you to read the file names
and still be able to see large plots of the data. Switch between plots
by clicking the title bar of the window you want to view.
Tile Horizontal and Tile Vertical
Select Tile Horizontal or Tile Vertical to display each open plot window in
equal size. You can read all tiled windows at the same time, however the more
windows you display this way, the smaller they are. For four windows or more,
the Horizontal and Vertical commands have identical results. If the open
Deployment Notes
Use the Deployment Notes section of the Launch screen to enter information
about the system setup at the time of launch, or any other specific notes you
want to record. There is a 2000 character maximum (about one page of text).
Deployment notes are stored in the logger and can be viewed with the data file
when you readout (off-load) data from the logger. Open the View Details screen
16
BoxCar Pro User’s Guide
BoxCar Pro User’s Guide
57
Chapter 3: Details of Individual Loggers
•
•
•
•
Chapter 2: Plotting, Exporting, and Printing
Delayed Start. Select this option if you wish to postpone the launch
until a specific date and time. Type the desired date and start time in the
specified fields. This start mode is useful for synchronizing multiple
loggers, or when it is important to start the launch at an exact time. It is
also useful if you plan on setting up the logger in the field and do not
have a laptop to bring with you. You can add sensors to the logger any
time before the specified start time.
Button Start. This option is ideal for launching the logger in the field
without a laptop. Configure the logger in the lab or office, transport it
to the field and set it up, and then simply press the Start Logging button
on the logger itself for 1 second. With this mode selected, you can add
a sensor any time before the start button is pressed. This start mode is
also useful if you want to trigger the start of a launch on an event.
Save Settings in Logger for Later Launch. Select this option when
you simply want to save the current launch settings for a future launch,
but not start the launch now. Any customizations, such as descriptions
and deployment notes, will also be saved.
Wrap around when full. If this box is checked, new data will
overwrite the oldest data sequentially one sample at a time when the
memory is full. The logger will continue logging indefinitely until the
logger is either off-loaded and stopped or the battery fails. If this box is
not checked, the logger will stop logging when the memory is full and
preserve the acquired data.
Sensor Information
Use the Sensor Information section to verify the correct sensors are connected
and measuring properly. Select either English or Metric to change the current
unit display in the software. Off-loaded data can be viewed in either Metric or
English units, regardless of what is selected before launch.
The Sensor Information section
lists the sensors currently
connected to the logger. The list is
automatically updated whenever a
sensor is added or removed. Note:
If a sensor is removed and then
immediately re-inserted, it may
not be auto-detected. Click the
Reset button to refresh the list of
sensors. This works during
configuration only; if the logger is
recording data, new sensors will
not be identified. Also note that for sensors with two measurement parameters
56
BoxCar Pro User’s Guide
windows are very small, only the series will be displayed until you resize the
window.
Arrange Icons
Select Arrange Icons to order minimized windows in the workspace.
Close All
Select Close All to quickly close all open plot windows.
Status Bar, Tool Bar, View Details
These options show and hide the corresponding features.
Readout Log
The readout log provides a simple way to track the location of datafiles on your
disk. For more information about the readout log, see the section Keeping Track
of your Datafiles on page 22.
The Open Window List
This feature displays the file names of all open plots in a list below a menu
separator in the Window menu. Bring any plot window to the front by selecting
it from the list or by typing Alt+W and the corresponding window number. The
list holds approximately nine windows.
View Details
To get point-by-point
information about the
currently displayed
datafile, use View Details,
which shows information for
the entire datafile. The
information does not change
with a zoom.
To open View Details, click the
Window menu and select View
Details, or click the icon on the
toolbar. View Details is divided
into two parts: the upper section
describes the source of the data and the lower shows the actual data points.
BoxCar Pro User’s Guide
17
Chapter 2: Plotting, Exporting, and Printing
Chapter 3: Details of Individual Loggers
Upper Section
The upper section of View
Details lists all available
information about the logger
used to create the particular
series data. For each series in
the plot window, there are four
categories: Logger Info, Series
Info, Stats, and Launch
Parameters. Click the node
(plus sign) at the left of a line
to expand that block and
display specific details of the category.
•
Duration. This field displays approximately how long the logger will
collect data based on the memory size, the logging interval, and the
number of sensors currently connected. The duration is listed in number
of days, hours, minutes, and seconds. Note: Battery life may limit the
duration before memory is full. Check the HOBO Weather Station
User’s Guide for more information.
•
Sampling interval. The sampling interval is valid only for sensors that
support measurement averaging. See the Sensor Manual to determine if
your sensor supports measurement averaging. At the time of printing,
the following sensors support data averaging: solar radiation,
photosynthetic light (PAR) and barometric pressure. The sampling
interval sets how often the sensors will take measurements. When the
logging interval is reached and a sampling interval has been selected,
all the sampled measurements for the sensor are averaged together and
the average is then recorded as one data point. Note that the individual
data points that comprise the average are not saved; only the final,
averaged data point is saved. If you have at least one sensor that
supports measurement averaging, set the sampling interval to one of the
pre-defined settings. Valid sampling intervals are between 1 second and
4 minutes, 15 seconds. The sampling interval must be less than or equal
to the logging interval. Sampling rates shorter than 1 minute will
reduce the logger’s battery life. Important: If you do not have any
sensors that support data averaging, set the sampling interval to “Off”
as there will be no benefit and it will reduce the battery consumption.
•
Start Logging Now. Select this option when you are finished
configuring the logger and want to start recording measurements right
away. With this option selected, the system will begin logging data
from all sensors on the network once you click the Start button on the
Launch screen. This start mode is ideal if you launch the logger in the
field with a laptop, or if you want to test the logger and its sensors on
the bench.
•
Date/time. The software displays the date and time according to the
computer. Upon launch, the logger’s clock is set in Coordinated
Universal Time (UTC), which is determined from your computer’s
time, the time zone, and daylight savings time settings. UTC,
colloquially known as Greenwich Mean Time (GMT), is the time based
on atomic clocks that is broadcast by government radio stations. The
www.time.gov web site is one resource for accurate time settings based
on UTC. Before launching the logger, make sure your computer’s clock
is set to the correct date and time, and the time zone and daylight
savings time preferences are correct in the Date/Time Control Panel.
Lower Section
The lower section of View Details shows each data point along with the date and
time of each measurement.
Exporting View Details
You can also export the information in the View Details window. For further
details, see the next section Exporting Plot Data on page 18.
Exporting Plot Data
The Export feature allows you to save data from BoxCar Pro as a Microsoft®
Excel spreadsheet or as a text file to import into other applications. With Export,
you can save data from one or more series in the currently selected plot. All data
is saved using the time displayed in the plot. To use the Export feature, click the
File menu, select Export, and then select Microsoft Excel Text, Microsoft
Excel Spreadsheet, Lotus 1-2-3, or Custom. Each option is explained below.
Note: Exported files cannot be read back into BoxCar Pro.
18
BoxCar Pro User’s Guide
BoxCar Pro User’s Guide
55
Chapter 3: Details of Individual Loggers
Chapter 2: Plotting, Exporting, and Printing
Logger Information
The Logger Information section of the Launch screen displays the type of
logger, the logger serial number, part number, and memory capacity. It also
displays:
•
Deployment. This shows how many times the logger has been
launched, including current deployment, and is unalterable. Every time
the logger is launched the number increases by one.
•
Description. This field displays the launch description used in the last
launch. Type up to 40 characters of text to describe the deployment.
The description will be the default prefix for the data file name upon
readout, and is displayed above the plot on the readout graph.
•
Battery. The Battery gauge shows the remaining battery capacity. For
lithium batteries, the gauge displays a status of either good or empty.
Lithium batteries have a relatively flat discharge curve, which means
the voltage does not vary much with use until they fail. Lithium battery
voltage is either “good,” which represents anywhere from 25 to 100%
of capacity remaining, or “empty,” which represents 0 to 25% of
capacity remaining. Because of the uncertainty in capacity, it is
recommended that you begin new deployments with new lithium
batteries that you know are at 100% rather than relying on old ones. For
alkaline batteries, the gauge displays the percentage of capacity
remaining.
The logger also has a Battery Low status light, which will blink when
the battery has 25% or less capacity remaining. Replace the batteries in
the logger with new ones when the Battery Low status light blinks.
Be sure to select the appropriate battery type (lithium or alkaline) when
launching the logger. Otherwise, the current battery status will not be
accurately reflected in the software and the battery low light may not
flash at the appropriate time. For more information, see the HOBO
Weather Station User’s Guide.
Microsoft Excel Spreadsheet Export
If you are using Excel, the
easiest way to export your data
is to choose Microsoft Excel
Spreadsheet. This option saves
the data in a format that can be
opened directly as an Excel
spreadsheet. Select the series
you wish to export (to choose
more than one series, press the
Ctrl key while selecting each
series, or click the All Series
checkbox to export all the
series). Click Export, and then
open the file in Excel. In
addition to data recorded by the logger, the spreadsheet includes series
information, which is the information about the launch displayed in the upper
half of the View Details window. You also have the option of including the
serial number for the logger or sensor above the series information. Select the
Include Serial Number in Data Export checkbox to add the serial number to the
top of the series information list in the spreadsheet. Note: Regardless of whether
you select the Include Serial Number option, the spreadsheet will always include
the series information along with the data. To remove this information from the
spreadsheet, delete the appropriate columns in Excel.
Microsoft Excel Text and Lotus 1-2-3 Export
Select Microsoft Excel Text or Lotus 1-2-3 to save the data in a pre-defined text
format (if you need to change the text format, use Custom Export instead).
Select the series you wish to export (to choose more than one series, press the
Ctrl key while selecting each series, or click the All Series checkbox if you want
to export all the series). Select the Include Serial Number in Data Export
checkbox to add the serial number at the top of the .txt file. Note: The Microsoft
Excel Text and Lotus 1-2-3 options do not export series information; they only
export data. If you wish to export the series information contained in the upper
half of the View Details window, use Custom Export instead.
Launch Parameters
The Launch Parameters section of the Launch Dialog displays the following
fields:
• Logging interval. This indicates how often the logger will record data
(for example, every five seconds, 30 minutes, hour, etc.) for all
attached sensors. The minimum logging interval is 1 second and the
maximum is 17 hours, 59 minutes, 59 seconds. Use either the predefined logging intervals or select “Custom” and define your own
interval in the following format: HH:MM:SS.
After you’ve selected the series you wish to export, click the Export button to
create a single file with all data, or click Multi-File to split up the data into
multiple text files. Enter the number of data points you wish to include in each
file and then click OK. The data will be exported into several files numbered
sequentially (the number will be appended to the end of the filename, for
example, junedata0000.txt, junedata0001.txt, junedata0002.txt, etc). Once saved,
you can import the .txt file into Excel or Lotus 1-2-3.
54
BoxCar Pro User’s Guide
BoxCar Pro User’s Guide
19
Chapter 2: Plotting, Exporting, and Printing
Chapter 3: Details of Individual Loggers
Custom Export
Like the Microsoft Excel Text
and Lotus 1-2-3 export options,
the Custom option saves data in a
text format. However, this option
gives you more control over how
the data is formatted in the .txt
file (for example, the date and
time format and use of data
separators).
HOBO Weather Station Logger
The HOBO Weather Station logger records
numerous properties, including temperature,
relative humidity, rainfall, wind speed and
direction, and barometric pressure. Smart sensors
plug into the data logger and are automatically
recognized without complicated wiring,
programming, or calibration requirements.
Select the series you wish to
export (to choose more than one
series, press the Ctrl key while
clicking each series or click the All Series checkbox to export all the series) and
then click the Preferences button to set up the custom format for the text file.
Preferences
The following options can be set with the Export Preferences box during a
custom export.
The HOBO Weather Station Logger Launch Dialog
To display the launch dialog, connect a logger to your computer, click the
Logger menu, and select Launch.
This screen contains four sections:
•
Logger Information
•
Sensor Information
•
Launch Parameters
•
Deployment Notes
Each section is described below.
20
•
Date Style. Choose the format to display the date. For most spreadsheet
programs, the default option of Month Day Year suffices. However, for
compatibility’s sake, there are two other options: Day Number (day of
year, 0 to 365) and Old Lotus/Excel (for versions of Lotus 1-2-3 prior
to version 5 or Microsoft Excel prior to 4.0). You can also choose to
have no date included in the export.
•
Date/Time Separator. Select the character to separate the date and
time in the spreadsheet. If you wish to have both date and time in a
single column, set this option to ‘Space.’ To separate the columns, you
BoxCar Pro User’s Guide
BoxCar Pro User’s Guide
53
Chapter 3: Details of Individual Loggers
Chapter 2: Plotting, Exporting, and Printing
Other HOBO Water Temp Pro menu options
In addition to the Launch, Readout, and Status commands, the following
commands are available from the HOBO Water Temp Pro submenu:
• Options. Select Options to specify what is included with the default
datafile name upon readout. The name can include the logger serial
number, deployment number, and time of readout in addition to the
description you entered in the launch parameters screen. You can also
disable the “Launching will erase data” warning that displays each time
you launch the logger.
52
•
Port. Use this command to change the port number for the IR
Basestation. Do not change the port number with Logger Serial Port
setting in the Application Preferences window.
•
About. This command displays the copyright and version information
for HOBO Water Temp Pro component of BoxCar Pro software.
BoxCar Pro User’s Guide
may choose any of the other options available in this box (comma,
semicolon, or tab).
•
Time Style. Choose the format in which the time is displayed in the
exported data. For most spreadsheets, the default value of
Hour:Minute:Second (with half seconds) is acceptable. For
compatibility’s sake, there are several other options, including the old
Lotus and Excel formats.
•
Export Date/Time Preferences. Click
the Change Export Date/Time
Preferences button to change how the
date and time are displayed. Select the
order the month, day, and year are
listed in, and choose the character used
to separate them. Select either 24-hour
(military time) or 12-hour time formats
and the character used to separate the
hours, minutes, and seconds.
•
Data Separator. Choose how to separate the columns of data points.
Select comma, semicolon, tab, or space.
•
Show Data After Export. Click this checkbox if you want the text
files to open automatically after the export is finished.
•
Include Series Information in Export. Select this option to create a
separate file showing all available information about the logger(s) used
to create the series. This is the same information displayed in the upper
half of the View Details window. This second file uses the file name
you select for the data, with “_info”
appended to the name. If you select
this option, you can also click
Change Info Export Preferences
to choose the formatting of the
exported Series Information file to
either easy-to-read tabbed format or in a form accessible to spreadsheet
programs.
•
Change Decimal Settings. Click this
button to change the decimal point
from a period to a comma. Normally
you will use the default setting in the
control panel.
•
Sample. This line displays a sample of what the exported data will look
like. Inspect this line before exporting to make sure it looks correct.
BoxCar Pro User’s Guide
21
Chapter 2: Plotting, Exporting, and Printing
Chapter 3: Details of Individual Loggers
Export and Multiple File Export
Once you’ve set the Custom Export Preferences, click the Export button to
create a single file with all data, or click Multi-File to split up the data into
multiple text files. If you choose Multi-File,
enter the number of data points you wish to
include in each file and then click OK in the
Multiple File Export dialog box. The data
will be exported into several files numbered
sequentially (the number will be appended to
the end of the filename, for example, junedata0000.txt, junedata0001.txt,
junedata0002.txt, etc).
Note: If you choose Export instead of Multi-File and the data file contains more
than 16,000 points, you will be automatically prompted to export to multiple
files (some spreadsheets are unable to import files with more than 16,000
points).
Keeping Track of Your Datafiles
A single data logger can produce many datafiles quickly if it’s used often.
Without some organization, these datafiles can become scattered on your disk,
and you may soon forget their names and locations.
Use the readout log to help you keep track of datafiles. The readout log is a
window attached to the main window. It lists datafiles by name and location,
showing information such as serial number, description, start/end dates, and
number of points.
•
Current battery level
•
Available memory and whether Wrap Around When Full is enabled
•
Whether stealth mode is enabled
•
The current date and time according to the both the logger and the
computer currently connected to the logger
•
The time logging began
•
The NIST information (see the HOBO Water Temp Pro User’s Manual
for details)
You can also change the display of the temperature units and the time format.
This will only affect the status display; it will not affect the launch.
Note: The difference in time between the logger and the host computer may
fluctuate by a few seconds if the status window remains open for more than a
minute. This difference may be even greater if you elected to not set the logger
clock with the host time upon launch.
Multiple Logger Detection
Every time you launch, read out, or check status, the software will search for all
HOBO Water Temp Pros pointed at the IR Basestation and compile them in a
list. You can then select the appropriate logger and continue on with the launch,
readout, or status check. Once compiled, the list will be remembered throughout
the current BoxCar session. Click Refresh to update the list if you have added or
removed loggers. If you are only working with one logger and do not need
BoxCar to complete a full search for loggers, you can stop the search and click
OK to continue with your task. Whether you stop the search or wait for it to
complete, the Stop Search button changes to a button listing the task you
selected. In the following example, the Stop Search changed to a Launch button
once the search was complete. Click the Launch, Readout, or Status button as
appropriate to continue with the task.
Using the Readout Log
As you off-load data from loggers, datafiles are added to the readout log window
automatically. To see the readout log in action:
1.
From the Logger menu, select Readout and off-load a data logger (or if
off-loading a HOBO LCD Temp/RH or HOBO Water Temp Pro logger,
select the logger name from the bottom of the Logger menu and then
Readout).
2.
Save the datafile using the Save As dialog.
3.
Select a series in “Select Series to Show in View.”
22
BoxCar Pro User’s Guide
BoxCar Pro User’s Guide
51
Chapter 3: Details of Individual Loggers
Chapter 2: Plotting, Exporting, and Printing
Logging, which means the logger will continue to record data in the current
deployment while off-loading takes place.
After saving the file, you will be prompted to select the data series you wish to
view in a plot. Series selection is the same for all loggers. However, the HOBO
Water Temp Pro logger also gives
you the option of changing the time
displayed in the plot. This does not
change the actual time saved in the
datafile; it only changes the time
used in the presentation of the plot
and when exporting data.
Time is shown in hours offset from
Universal Coordinated Time
(UTC), also known as Greenwich
Mean Time (GMT). The time offset
listed by default matches the time
zone setting used to launch the
logger. In this example, the logger
was launched in Eastern Standard
Time. Therefore, -5 is filled in by
default because Eastern Standard Time is five hours behind UTC (GMT) (when
daylight savings time is not in effect).
To change the default time offset, enter the number of hours the new time differs
from UTC (GMT). For example, to change the time offset in the example above
to Pacific Standard Time, enter -8 because Pacific Standard is 8 hours behind
UTC (GMT) (when daylight savings time is not in effect). To help make sure
you are entering the correct time offset, this screen displays the date and time for
the logger’s first measurement, or data point, in three ways:
The file name you’ve chosen appears in the readout log
along with other information about the file. To open a
datafile, double-click on any datafile name in the log.
To display the readout log menu, right-click anywhere
inside the readout log window.
The readout log menu lets you open, insert and delete files, show or hide the
readout log, and export the log to text. To open more than one file at a time from
the readout log, hold down the Ctrl key and click to select the files, then choose
Open Selected Items from the pop-up menu. You can also access the readout
log menu from the Window menu.
You can also switch between logs or create a new log. To create an entirely new
log, choose Open Readout Log and enter a new log name in the Open dialog
box. (Log files are saved to disk with the .log extension.)
Note: If you move datafiles around on your disk, the readout log will not be able
to find them. To fix this, use the readout log menu to delete the outdated entry
and add a new one. The shuttle serial number (if applicable) cannot be carried
over to the new entry. To permanently change the default location of the readout
log, select Preferences from the Edit menu and enter a new location.
Sorting Datafiles
Click one of the buttons at the top of the readout log to sort the log by a specific
category. Each button is resizable so you can display the fields that are most
important. The sort categories in the readout log are:
•
Filename. Name given to the file, includes all directory information.
•
Model. Logger model number.
•
S/N. Logger serial number.
The time based on the value entered in the “Select time offset from
UTC (GMT)” field. This is the time that will be used in the plot.
•
Deployment. Logger deployment number (if available).
•
Description. Logger description string (typed in at deployment).
•
The time zone setting used to launch the logger.
•
Start Date. Start time and date.
•
UTC (GMT).
•
End Date. Time and date of last data point.
•
Points. Number of data points.
•
Shuttle S/N. S/N of shuttle used to off-load (not available if added).
•
Save Date. Save date (date off-loaded or date added to Log).
•
Checking the HOBO Water Temp Pro Logger Status
To check the status of the HOBO Water Temp Pro logger, point the logger’s
communication window at the IR Basestation window, click the Logger menu,
select HOBO Water Temp Pro, and then select Status. (The general Get Status
command available from the Logger menu does not work with this logger.) The
Logger Status screen shows the current launch status (logging, not launched,
waiting for delayed start) and current readings. It also lists other launch
parameters including:
50
4.
BoxCar Pro User’s Guide
The Shuttle S/N is not applicable (and is not displayed) unless a Shuttle was
used to off-load the data.
BoxCar Pro User’s Guide
23
Chapter 2: Plotting, Exporting, and Printing
Chapter 3: Details of Individual Loggers
Export Readout Log to a Text File
To export the readout log to a text file, right click the readout log and click
Export Readout Log. Each exported entry takes two lines: the first line is the file
name and path. The second line displays the rest of the log information. (The
Save Date is not displayed in the exported log.)
Data Analysis with Filters
There are several filter options that let you modify the contents of a data series
and create a new data series. Only one series can be filtered at a time, and the
new filtered series is displayed in the plot window. To access filters, use one of
the methods below:
•
Right-click a series, then select Filter Series.
•
From the Plot menu, select Series, <Series Name>, then Filter.
•
Right click in the plot window, and select Series, <Series Name>, then
Filter from the shortcut menu that appears.
There are different filters for different types of loggers. Each filter, however, lets
you use period options in Day(s), Hour(s), Minute(s), or Second(s). The
different sets of filters are explained in the following sections.
Note: You cannot save filtered series within BoxCar Pro. You can, however,
export these series to a text file. See the section Exporting Plot Data on page 18
for information on exporting.
Event Logger Filter
When viewing data from an Event logger, the
available filters are Event Sum and # of
Events. Event sum is defined as the number
of events in the interval multiplied by the
event value. (You specify the event value
when launching.) For a logger used with a
rain gauge, the event sum can be used to
show rainfall per interval. Note: The HOBO
Weather Station rain gauge sensor is not
supported by the event logger filter.
field to attract attention. For more information about the LED, consult
your logger’s manual.
Sensor Information
In the Sensor Information section of the Launch screen, select either Celsius or
Fahrenheit to change the current units displayed. Off-loaded data can be viewed
in either Celsius or Fahrenheit, regardless of what was selected before launch.
The system displays the current logger reading, which is updated approximately
once per second.
Launching Multiple HOBO Water Temp Pro Loggers
After you launch a HOBO Water Temp Pro logger, a launch confirmation
message appears. Click the Launch Another
button if you wish to launch more than one
HOBO Water Temp Pro logger. The launch
settings you specified in the previous launch will
be repeated in the next Launch screen. This
makes it easy to configure multiple launches
with the same parameters. Note: The Multiple Launch option on the Logger
menu does not work for the HOBO Water Temp Pro logger. Use the Launch
Another button instead.
Reading out the HOBO Water Temp Pro Logger
To read out the HOBO Water Temp Pro logger, point the logger’s
communication window at the IR Basestation window. Click the Logger menu,
select HOBO Water Temp Pro, and then select Readout. The software
searches for the all loggers within the IR Basestation’s view and lists them as
detected. If you only are working with one logger, you can stop the search and
continue to the readout screens. For more information on using the search
feature, see Multiple Logger Detection.
If the logger is still collecting data, the following screen appears:
To off-load data, click either Stop Logging and Off-Load Data, which means
the logger will stop recording data before off-loading, or Off-load Data While
24
BoxCar Pro User’s Guide
BoxCar Pro User’s Guide
49
Chapter 3: Details of Individual Loggers
Chapter 2: Plotting, Exporting, and Printing
duration is listed in number of days, hours, minutes, and seconds, and is
based on the selected logging interval.
48
•
Start logging immediately. If this button is selected, logging will start
once you click the Launch Immediately button.
•
Delayed start. Delayed Start allows you to start a logger at some time
in the future (for example, at the top of the hour or tomorrow at noon).
This is useful if you do not have a laptop or handheld device to bring to
the deployment site. The Delayed Start mode is also helpful for
synchronizing start times for multiple loggers. Select the date and time
you want to start the launch.
•
Hold for later launch. Use this option to save the launch settings
you’ve specified for a future launch. It does not launch the logger.
•
Time format. Switch between local time and GMT (UTC). GMT is
Greenwich Mean Time, which is also known as Coordinated Universal
Time (UTC). UTC is the time based on atomic clocks that is broadcast
by government radio stations. Both local time and GMT (UTC) are
determined from your computer’s date, time, and time zone settings.
Note: The www.time.gov web site is one resource for accurate time
settings based on UTC.
•
Logger date/time and host date/time. These fields display the date
and time according to the logger and computer respectively. Note:
These times may differ if you disabled “set logger clock with host time
on launch.”
•
Set logger clock with host time on launch. This option determines
whether the logger’s internal clock will be reset to match the host
computer clock upon launch. When this setting is enabled (which is the
default), it is important to make sure the computer’ clock is set to the
correct date, time, and time zone before launching the logger. Also
check that daylight savings time preferences are correct in the
Date/Time Control Panel (if applicable). When this setting is disabled,
the logger clock will not be updated.
•
Wrap around when full. If this box is checked, new data will
overwrite the oldest data sequentially one sample at a time when the
memory is full. The logger will continue logging indefinitely until the
logger is either off-loaded and stopped or the battery fails. If this box is
not checked, the logger will stop logging when the memory is full and
no data will be overwritten.
•
Stealth mode. This feature disables the LED blink while collecting
data. This feature is useful if you do not want a logger deployed in the
BoxCar Pro User’s Guide
State Logger Filter
These filters work with data from State
loggers (Closed/Open or ON/OFF). The
filters are described in terms of Closed (1) or
Open (0). OFF is equivalent to Open and ON
is equivalent to Closed (for ON/OFF
loggers).
Maximum, Minimum, or Average Filter
This filter is available for loggers that sample
values; it is not available for loggers that
sample states or events. Select maximum,
minimum, and average on the left of the
dialog. For example, selecting Average Data
Point and Minute(s) creates a new series
containing the average of all values for each
minute of the original series.
The plot window displays a new series with the filtered data. For example, the
plot window below is a result of running a “# of Events per minute” filter on a
series taken from an Event logger.
How Data Filters Calculate Time
Data filters calculate time by using the closest time that is divisible by the
sampling interval. If the actual sampled time is not evenly divisible by the
sampling interval, the first filtered point rounds down to the closest time and the
last filtered point rounds up to the closest time. For example, if you selected a
sampling interval of 5 minutes and the first sampled point is at 5:17 PM and the
last is at 5:27 PM, the filter will round down to 5:15 PM for the first point and
round up to 5:30 for the last point.
BoxCar Pro User’s Guide
25
Chapter 2: Plotting, Exporting, and Printing
Chapter 3: Details of Individual Loggers
Filters place their values at the start of each sampling interval. Because of this, if
the last point doesn’t fall on the sampling interval, the filter will repeat the nextto-last point in the filtered series so all intervals on the plot will match the
selected filter interval. For example, if the filter interval is 5 minutes, the value
displayed at 5:15 PM represents a filter of every value in the original series
sampled between 5:15 and up to but not including 5:20. If the last point in the
series was at 5:18, a filtered point at 5:20 is drawn so the step line will pass
through 5:18 but not end on 5:18 (since 5:18 is not divisible by the sampling
interval).
Printing
BoxCar Pro has several printing options in the File menu.
Print Graph
Click the File menu and select Print Graph to print a graph. The graph is
always blown up to fit a full page, regardless of its size on the screen. The page
orientation, portrait or landscape, can be modified (see Print Setup).
Print Info
Click the File menu and select Print Info to print just the information about the
data. This information is the same as that displayed in the View Details dialog.
Note: This option sends the information directly to the printer without an
additional prompt.
Print Data
Click the File menu and select Print Data to print the values from the series in
the current plot window. BoxCar Pro displays the number of pages it will print
in a dialog, then sends data from the open series to the printer. Note: The Print
Data option can send a large number of pages to the printer; click Cancel on the
dialog to end printing.
Print Preview
To see what the graph will look like when printed, click the File menu and select
Print Preview. You can magnify the view by clicking Zoom In and Zoom Out.
Print Setup
To display the Print Setup dialog, click the File menu and select Print Setup.
From here you can choose paper size, paper orientation, your preferred printer,
and the printer’s properties. Additional options, such as resolution, scaling, and
print quality, may be available depending on the attached printer.
26
BoxCar Pro User’s Guide
Logger Information
The Logger Information section of the Launch dialog displays the type of
logger, the logger part number, serial number, and memory capacity. It also
displays:
•
Deployment. This shows how many times the logger has been
launched, including current deployment, and is unalterable. Every time
the logger is launched the number increases by one.
•
Description. This field displays the launch description used in the last
launch. Type up to 40 characters of text to describe the deployment.
The description will be used as the default prefix for the data file name
upon readout, and is displayed above the plot on the readout graph
•
Battery status. The Battery gauge shows the percentage of the
battery’s capacity left.
Launch Parameters
The Launch Parameters section of the Launch Dialog displays the following
fields:
• Logging interval. Type the frequency between logger readings in the
following format: H:MM:SS. The minimum logging interval is 1
second and the maximum is 9 hours.
•
With this interval, the duration is/logger wraps at. This field
displays how long the logger will collect data before the logger
memory is full (if wrap around when full is not selected) or old data is
overwritten with new data (if wrap around when full is selected). The
BoxCar Pro User’s Guide
47
Chapter 3: Details of Individual Loggers
Chapter 3: Details of Individual Loggers
HOBO Water Temp Pro Logger
The HOBO Water Temp Pro provides accurate
temperature measurement in underwater and
condensing environments. This logger features a
durable streamlined case suitable for extended
deployment in water up to 50°C and is equipped with
an infrared interface for data off-load.
The HOBO Water Temp Pro logger is accessed
by its own submenu in the Logger menu. The
general Launch, Readout, and Get Status
commands available from the Logger menu do
not work for this logger. Instead, select the
Logger menu, then select HOBO Water Temp
Pro and then the appropriate command from the
submenu. Each of these commands is described
in this section.
Chapter 3
Details of Individual Loggers and
Shuttles
This chapter describes the loggers available in the HOBO and StowAway lines
and how they are handled by BoxCar Pro.
BoxCar Pro will launch and read out data from all of these loggers/shuttles. For
general launch and readout procedures, see Chapter 1. This chapter describes the
variations in launch and readout for individual loggers.
Loggers and Shuttles
Page
HOBO 2K Loggers
28
The HOBO Water Temp Pro Dialog
To display the launch dialog, point the logger’s communication window at the
IR Basestation window, making sure they are no further than 4 or 5 inches away.
From BoxCar Pro, click the Logger menu, select HOBO Water Temp Pro, and
then select Launch.
HOBO H6 State Loggers
30
HOBO Event Logger
32
HOBO H8 Loggers
34
HOBO H8 Pro Series Loggers
37
The software searches for the all loggers within the IR Basestation’s view and
lists them as detected. If you only are working with one logger, you can stop the
search and continue to the launch screen. For more information on using the
search feature, see Multiple Logger Detection.
HOBO LCD Temp/RH Logger
39
HOBO Water Temp Pro Logger
46
HOBO Weather Station Logger
53
Note: If the logger is already launched, the system
displays the following window instead. Click
Continue With Launch to set launch parameters
and launch the logger. If you do proceed to launch,
you will lose any data already recorded. Click
View Status Only to identify the logger and verify
its operation without launching.
Square-box StowAway Loggers
60
Optic StowAway Logger
63
StowAway TidbiT & TidbiT XT Loggers
64
HandCar
65
HOBO Shuttle
66
The launch dialog contains three sections:
Optic Shuttle
67
•
Logger Information
•
Launch Parameters
•
Sensor Information
Each section is described below.
46
BoxCar Pro User’s Guide
BoxCar Pro User’s Guide
27
Chapter 3: Details of Individual Loggers
Chapter 3: Details of Individual Loggers
•
HOBO 2K Loggers
The HOBO 2K is the first logger in the HOBO/StowAway
series, and has only 2K of memory. The most popular
version of this logger, the H01-001-01, is shown here. Note
that this product is not the same as the H08-001-02, which
has an almost identical case and markings.
The HOBO 2K Launch Dialog
To display the launch dialog (shown below), connect a logger to your computer,
click the Logger menu, and select Launch.
UTC (GMT).
Checking HOBO LCD Temp/RH Status
To check the status of the HOBO LCD Temp/RH logger, connect the logger to
your computer, click the Logger menu, select HOBO LCD Temp/RH, and then
select Status. (The general Get Status command available from the Logger
menu does not work with this logger.) The Logger Status screen shows the
current launch status (logging, not launched, waiting for delayed start) and
current readings. It also lists other launch parameters including:
•
Current battery level
•
Available memory and whether Wrap Around When Full is enabled
•
The current date and time according to both the logger and the
computer currently connected to the logger
•
The time logging began
•
Alert settings
You can also change the display of the temperature units and the time format.
This will only affect the status display; it does not affect the launch.
•
Launch Dialog Information. The first line of information identifies
the type of logger and its serial number (S/N). The date field displays
your computer’s current date and time. If it is incorrect, consult your
Windows manual on how to change your computer’s date or time.
•
Reading. This field displays what the logger is currently reading in the
selected Measurement Unit.
•
Description. The text in the Description box is displayed above the
time axis on the readout graph. Up to forty characters can be typed in
this area.
•
Interval (Duration). Use this field to select the Interval (time between
measurements) and the Duration (amount of time the logger will collect
data).
To create your own
custom interval, select
“Add Custom Interval”
at the bottom of the
Interval scroll box. You
can designate as many
custom intervals as you require (between 0.5 seconds and 9 hours).
28
BoxCar Pro User’s Guide
Note: The difference in time between the logger and the host computer may
fluctuate by a few seconds if the status window remains open for more than a
minute. This difference may be even greater if you elected to not set the logger
clock with the host time upon launch.
Other HOBO LCD Temp/RH menu options
In addition to the Launch, Readout, and Status commands, the following
commands are available from the HOBO LCD Temp/RH submenu:
•
Options. Select Options to specify what is included with the default
datafile name upon readout. The name can include the logger serial
number, deployment number, and time of readout in addition to the
description you entered in the launch parameters screen. You can also
disable the “Launching will erase data” warning that displays each time
you launch the logger.
•
Port. Use this command to change the port number or test the COM
port with the LCD. Do not change the port number with Logger Serial
Port setting in the Application Preferences window.
•
About. This command displays the copyright and version information
for the HOBO LCD Temp/RH component of BoxCar Pro software.
BoxCar Pro User’s Guide
45
Chapter 3: Details of Individual Loggers
Chapter 3: Details of Individual Loggers
Custom Intervals are saved for the current session, but disappear when
you exit BoxCar Pro.
To off-load data, click either Stop Logging and Off-Load Data, which means
the logger will stop recording data before off-loading, or Off-load Data While
Logging, which means the logger will continue to record data in the current
deployment while off-loading takes place.
After saving the file, you will be prompted to select the data series you wish to
view in a plot. Series selection is the same for all loggers. However, the HOBO
LCD Temp/RH logger also gives
you the option of changing the time
displayed in the plot. This does not
change the actual time saved in the
datafile; it only changes the time
used in the presentation of the plot
and when exporting data.
•
Measurement Unit. The Measurement Unit box allows you to choose
the units displayed in the Reading. This also sets the default units at
readout. For example, you can view a temperature graph in either
degrees Fahrenheit or degrees Celsius. BoxCar Pro allows you to
change the units after reading out data.
•
Wrap around when full. This allows the logger to record
continuously, overwriting the oldest points when it becomes full. The
logger will continue logging until interrupted by a readout or launch.
On readout, the most recent points will be read out. If this box is not
checked, the logger will stop once its memory is full.
•
Start. Click the Start button when you are satisfied with the settings.
Do not unplug the logger from the interface cable until BoxCar Pro has
indicated the launch has been completed. Launching your logger will
overwrite the previously recorded data. Confirm a successful launch by
watching for the logger’s LED to blink.
Time is shown in hours offset from
Universal Coordinated Time (UTC),
also known as Greenwich Mean
Time (GMT). The time offset listed
by default matches the time zone
setting used to launch the logger. In
this example, the logger was
launched in Eastern Standard Time.
Therefore, -5 is filled in by default because Eastern Standard Time is five hours
behind UTC (GMT) (when daylight savings time is not in effect).
To change the default time offset, enter the number of hours the new time differs
from UTC (GMT). For example, to change the time offset in the example above
to Pacific Standard Time, enter -8 because Pacific Standard is 8 hours behind
UTC (GMT) (when daylight savings time is not in effect). To help make sure
you are entering the correct time offset, this screen displays the date and time for
the logger’s first measurement, or data point, in three ways:
44
•
The time based on the value entered in the “Select time offset from
UTC (GMT)” field. This is the time that will be used in the plot.
•
The time zone setting used to launch the logger.
BoxCar Pro User’s Guide
BoxCar Pro User’s Guide
29
Chapter 3: Details of Individual Loggers
Chapter 3: Details of Individual Loggers
Alert Limit set at 48˚F. When the refrigerator door is opened, the
temperature goes above 48˚F, which causes the Alert Delay to flash
indicating that the High Temperature Alert Limit has been exceeded.
This Alert Limit will remain flashing until the temperature drops back
below the set point of 48˚F. If the temperature does not drop back
below the set point within the specified time delay, the alarm will trip.
HOBO H6 State loggers
The HOBO H6 State loggers record the time and date
when devices change between on and off, or open and
closed. One popular version is the light on/off model,
shown in the picture here.
The HOBO H6 Launch Dialog
To display the launch dialog (shown below), connect a logger to your computer,
click the Logger menu, and select Launch.
•
30
Launch Dialog Information. The first line of information identifies
the type of logger and its serial number (S/N). The date field gives your
computer’s current date and time. If this is incorrect, consult your
Windows manual on how to change your computer’s date or time. Use
the Open Text(0) and Close Text(1) fields to describe your state
information with text.
•
Deployment. This field shows how many times the logger has been
launched, including current deployment, and is unalterable. Every time
the logger is launched the number increases by one.
•
Current State. This feature displays the logger’s current state while it
is connected. The text matches either Close Text or Open Text.
•
Description. The text in the description box is displayed above the
time axis on the readout graph. Up to forty characters can be typed in
this area.
•
Close Text. The text entered in the Close Text box (up to twenty
characters) will be stored with the timestamp for each closing and
displayed on the axis label of the graph. A closed state is plotted as one
BoxCar Pro User’s Guide
•
Contacts: Normally open. Click this button to set alert output contacts
as normally open (closed in alarm condition).
•
Contacts: Normally closed. Click this button to set alert output
contacts as normally closed (open in alarm condition).
•
Set Alert. Click the Set Alert button to set the alert output contacts to
the alarm condition as a way to test for proper operation. The alert
output contacts will revert to their normal state when the logger is
launched.
•
Maintain alert until: Host has contacted logger. Select this button to
maintain the alert until the logger is contacted by a host computer.
•
Maintain alert until: Sensor readings within limits. Select this
button to turn off the alert as soon as conditions return to normal.
•
Set alert on low battery. Check this button to activate the alert output
contacts when the battery is very low and the unit is about to stop
logging. Low battery level is indicated on the LCD display before
reaching this point.
Launching multiple HOBO LCD Temp/RH loggers
After you launch a HOBO LCD Temp/RH logger, a
launch confirmation message appears. Click the
Launch Another button if you wish to launch more
than one HOBO LCD Temp/RH logger. The launch
settings you specified in the previous launch will be
repeated in the next Launch screen. This makes it
easy to configure multiple launches with the same parameters. Note: The
Multiple Launch option on the Logger menu does not work for this logger. Use
the Launch Another button instead.
Reading out the HOBO LCD Temp/RH Logger
To read out the HOBO LCD Temp/RH logger, connect the logger to your
computer, click the Logger menu, select HOBO LCD Temp/RH, and then
select Readout. If the logger is still collecting data, the following screen
appears:
BoxCar Pro User’s Guide
43
Chapter 3: Details of Individual Loggers
Chapter 3: Details of Individual Loggers
no data will be overwritten. Note: If using the HOBO LCD Temp/RH
logger with an alarm, it is recommended that you set the logger to wrap
around when full (make sure the box is checked) because alarm
functionality is only activated while logging is taking place.
Sensor Information
Use the Sensor Information section to:
• Select units of measurement. Select either English or Metric to
change the current unit display in the software and on the LCD. Offloaded data can be viewed in either Metric or English units, regardless
of what was selected before launch.
•
Enable one or both sensors. Select the sensors you want to display
and record during deployment. You can check either temperature,
humidity, or both sensors. Current readings for both are also displayed.
The logger memory will be divided between the number of sensors
selected.
Alert Limits
Use the Alert Limits section of the Launch dialog to set the limits at which the
alert display and alarm output will be activated. If the measurement for an
enabled sensor goes outside the limits you set, an alert will flash on the LCD.
Drag the vertical bars or click the up and down arrows to set upper and lower
limits for the alert indicator. Alert limits are shown in the plot as alarm lines (red
lines for upper limits and blue lines for lower limits). Click the Advanced
Options button for the following additional alert settings:
42
•
No delay. Click this button if you want immediate notification when
the temperature and humidity measurements are out of range.
•
Time delay (hour:min:sec). Click this button and specify a time delay
in this field to avoid nuisance tripping. This delay works in conjunction
with the Alert Limits set in the Launch screen. For example, let’s say
you are logging a refrigerator’s temperature and the High Temperature
BoxCar Pro User’s Guide
(1) on the plot. When using an ON/OFF logger, closed is equivalent to
ON.
•
Open Text. The text entered in the Open Text box (up to twenty
characters) will be stored with the timestamp for each opening, and
displayed on the axis label of the graph. An open state is plotted as zero
(0) on the plot. When using an ON/OFF logger, open is equivalent to
OFF.
•
Battery. This field shows the state of the battery. It displays ‘Good’ if
the battery has more than 20 percent of its capacity remaining,
otherwise it displays ‘Bad.’
•
Wrap around when full. This option allows the logger to record
continuously, overwriting the oldest points when it becomes full. The
logger continues logging until interrupted by a readout or launch. On
readout, the most recent points will be read out. If this box is not
checked, the logger stops once its memory is full.
•
Stealth Mode. The logger will not blink its LED while logging when
this option is enabled.
•
Delayed Start. By entering a specific start date and time, Delayed Start
allows you to postpone logging for up to three months after launching
your logger. The format for entering dates may change depending on
the date and time formats that you set within BoxCar Pro. Enter this
time in the format currently specified in the Date/Time Preferences.
After launch, the logger flashes dimly every four seconds until the start
time has been reached, then starts logging.
•
Start. Click Start when you are satisfied with the settings. Do not
unplug the logger from the interface cable until BoxCar Pro has
indicated that the launch has been completed. Launching your logger
will overwrite the previously recorded data. Confirm a successful
launch by watching for the logger’s LED to blink (unless the logger
was launched in stealth mode). Consult the logger’s User’s Manual for
more information on the LED status signals.
BoxCar Pro User’s Guide
31
Chapter 3: Details of Individual Loggers
Chapter 3: Details of Individual Loggers
duration is listed in number of days, hours, minutes, and seconds, and is
based on the selected logging interval and the number of sensors in use.
HOBO Event Logger
The HOBO Event logger records when momentary
contact-closure events happen, storing the date and time
of each event. Event loggers are most commonly used
with tipping-bucket rain gauges where each tip of the
bucket represents 1/100'' of rain.
•
Start logging immediately. If this button is selected, logging will start
once you click the Launch Immediately button.
•
Delayed start. Delayed Start allows you to start a logger at a future
date or time (for example, at the top of the hour or tomorrow at noon).
This is useful if you do not have a laptop or handheld device to bring to
the deployment site or if you want to synchronize start times for
multiple loggers. You can also set up delayed start when you need to
allow time for current alert conditions to settle before launch. To
configure the logger with a delayed start, select the date and time you
want to start the launch. Once you click the Launch with Delayed Start
button, the logger will display “DLY” until the launch begins at the
date and time you selected.
•
Hold for later launch. Use this option to save the launch settings
you’ve specified for a future launch. It does not launch the logger.
•
Time format. Switch between local time and GMT (UTC). GMT is
Greenwich Mean Time, which is also known as Coordinated Universal
Time (UTC). UTC is the time based on atomic clocks that is broadcast
by government radio stations. Both local time and GMT (UTC) are
determined from your computer’s date, time, and time zone settings.
Note: The www.time.gov web site is one resource for accurate time
settings based on UTC.
•
Logger date/time and host date/time. These fields display the date
and time according to the logger and computer respectively. Note:
These times may differ if you disabled “set logger clock with host time
on launch.”
•
Set logger clock with host time on launch. This option determines
whether the logger’s internal clock will be reset to match the host
computer clock upon launch. When this setting is enabled (which is the
default), it is important to make sure the computer’ clock is set to the
correct date, time, and time zone before launching the logger. Also
check that daylight savings time preferences are correct in the
Date/Time Control Panel (if applicable). When this setting is disabled,
the logger clock will not be updated.
•
Wrap around when full. If this box is checked, new data will
overwrite the oldest data sequentially one sample at a time when the
memory is full. The logger will continue logging indefinitely until the
logger is either off-loaded and stopped, or the battery fails. If this box is
not checked, the logger will stop logging when the memory is full and
The HOBO Event Launch Dialog
To display the launch dialog (shown below), connect a logger to your computer,
click the Logger menu, and select Launch.
•
32
Launch Dialog Information. The first line of information identifies
the type of logger and its serial number (S/N). The date field gives your
computer’s current date and time. If this is incorrect, consult your
Windows manual.
•
Deployment. This field shows how many times the logger has been
launched, including current deployment, and is unalterable. Every time
the logger is launched the number increases by one.
•
Last Event At. While the Launch dialog box is open, this field displays
the time of the last event. If an event occurs while the launch screen is
shown, it will display the time.
•
Description. The text in the description box is displayed above the
time axis on the readout graph. Up to forty characters can be typed in
this area.
BoxCar Pro User’s Guide
BoxCar Pro User’s Guide
41
Chapter 3: Details of Individual Loggers
Chapter 3: Details of Individual Loggers
Logger Information
The Logger Information section of the Launch dialog displays the type of
logger, the logger part number, serial number, and memory capacity. It also
displays:
•
Deployment. This shows how many times the logger has been
launched, including current deployment, and is unalterable. Every time
the logger is launched the number increases by one.
•
Description. This field displays the launch description used in the last
launch. Type up to 40 characters of text to describe the deployment.
The description will be used as the default prefix for the data file name
upon readout and is displayed above the plot on the readout graph.
•
Battery status. The Battery gauge shows the percentage of the
battery’s capacity left. When the gauge indicates 20% or less, it is
recommended that you change the battery for longer deployments.
Launch Parameters
The Launch Parameters section of the Launch Dialog displays the following
fields:
• Logging interval. Type the frequency between logger readings in the
following format: H:MM:SS. The minimum logging interval is 1
second and the maximum is 9 hours. The specified logging interval
applies to both the temperature and RH sensors.
•
40
•
Event Name. Use the Event Name text box to describe the type of
event being monitored. This name will be displayed on the Y-axis at
readout.
•
Event Value. Use Event Value to specify the quantity associated with
one event.
•
Battery State. This field shows the state of the battery. It displays
‘Good’ if battery has more than 20 percent of its capacity remaining,
otherwise it displays ‘Bad.’
•
Wrap around when full. This feature causes the logger to record
continuously, overwriting the oldest points when it is full. The logger
continues logging until interrupted by a readout or launch. On readout,
the most recent points are read out. If this box is not checked, the
logger stops once its memory is full.
•
Stealth Mode. When this option is enabled, the logger does not blink
its LED while logging.
•
Delayed Start. By entering a specific start date and time, Delayed Start
allows you to postpone logging for up to three months after launching
your logger. The format for entering dates may change depending on
the date and time formats that you set within BoxCar Pro. Enter the
time in the format currently specified in the Date/Time Preferences.
When launched, the logger flashes dimly every four seconds until the
start time is reached, and then starts logging.
•
Lockout after event. When selected, this option tells the logger to
ignore events for a programmable period after an event is recorded.
This can be set for as short as one second to as long as nine hours. With
tipping-bucket rain gauges, we recommend setting the lockout to one
second to eliminate switch bounce.
•
Start. Click Start when you are satisfied with the settings. Do not
unplug the logger from the interface cable until BoxCar Pro has
indicated that the launch is complete. Launching your logger will
overwrite the previously recorded data. Confirm a successful launch by
watching for the logger’s LED to blink (unless the logger was launched
in stealth mode). Consult the logger’s User’s Manual for more
information on the LED status signals.
With this interval, the duration is/logger wraps at. This field
displays how long the logger will collect data before the logger
memory is full (if wrap around when full is not selected) or old data is
overwritten with new data (if wrap around when full is selected). The
BoxCar Pro User’s Guide
BoxCar Pro User’s Guide
33
Chapter 3: Details of Individual Loggers
Chapter 3: Details of Individual Loggers
HOBO H8 Loggers
HOBO LCD Temp/RH Logger
The HOBO H8 family of loggers features multi-channel
logging. The logger pictured here has four channels:
temperature, relative humidity, light intensity and an
external channel that can be connected to a variety of
external sensors.
The HOBO LCD logger records and displays temperature
and humidity conditions in manufacturing, processing,
and storage environments where reliable monitoring and
documentation of specific temp/RH conditions are
critical. This logger includes an alarm display and builtin relay for use with Remote Alarm/Autodialer
accessories.
The HOBO H8 Launch Dialog
To display the launch dialog (shown below), connect a logger to your computer,
click the Logger menu, and select Launch.
The HOBO LCD Temp/RH logger is accessed
by its own submenu in the Logger menu. The
general Launch, Readout, and Get Status
commands available from the Logger menu do
not work for this logger. Instead, select the
Logger menu, then select HOBO LCD
Temp/RH, and then the appropriate command
from the submenu. Each of these commands is
described in this section.
The HOBO LCD Temp/RH Launch Dialog
To display the launch dialog, connect a logger to your computer, click the
Logger menu, select HOBO LCD Temp/RH, and then select Launch.
•
Launch Dialog Information. The first line of information identifies
the type of logger and its serial number (S/N). The date field gives your
computer’s current date and time. If it is incorrect, consult your
Windows manual on how to change your computer’s date or time.
•
Deployment. This shows how many times the logger has been
launched, including current deployment, and is unalterable. Every time
the logger is launched the number increases by one.
•
34
Description. The text in the Description box is displayed above the
time axis on the readout graph. Up to forty characters can be typed in
this area.
•
Interval (Duration). The Interval (time between measurements) and
the Duration (amount of time the logger will collect data) are selected
here.
•
Add Custom Interval. To create your own custom interval, select
“Add Custom Interval” at the bottom of the interval scroll box. You can
BoxCar Pro User’s Guide
Note: If the logger is already launched, the system
displays the following window instead. Click
Continue With Launch to set launch parameters
and launch the logger. If you do proceed to launch,
you will lose any data already recorded. Click
View Status Only to identify the logger and verify
its operation.
The launch dialog contains four sections:
•
Logger Information
•
Launch Parameters
•
Sensor Information
•
Alert Limits
Each section is described below.
BoxCar Pro User’s Guide
39
Chapter 3: Details of Individual Loggers
Chapter 3: Details of Individual Loggers
the deployment time for each interval setting, but dramatically improving the
temperature resolution and accuracy. The high-resolution mode is not available
for the RH channel. For high-resolution mode, select the sensor and “Added
Resolution” on the channel that follows it. For standard-resolution, select only
the temperature channel. “Added Resolution” should not be enabled unless the
corresponding temperature channel is enabled, otherwise the data will be
invalid. If you are using the Temp/Ext Temp version, the internal temperature
sensor is Channel 1 and the external temperature probe is Channel 3.
designate as many custom intervals as you require (between 0.5
seconds and 9 hours). Custom Intervals are saved for the current
session, but disappear when you exit BoxCar Pro.
•
Measurement, Channels, and
Reading. The Measurement
column shows the units available
based on the sensors chosen
from the Enable/Disable Channels button. In the example below, the
HOBO RH/Temp/Light/External with all Channels enabled will
measure Temperature (C and F), RH (%), Dew Point (C and F), Abs
Humidity (gm/M3), Uncomp RH (%), Intensity (Lumens), and Voltage.
Retrieving Archived Data
HOBO Pro Series loggers preserve the data
from up to seven deployments preceding the
current deployment. To retrieve archived
data from the HOBO Pro, click the Logger
menu and select Read HOBO Pro Archives.
BoxCar Pro reads the last eight
deployments, displays information such as the deployment number, start time,
end time, number of points and the description, and then allows you to select
which file(s) you would like to
save.
•
When you select a file, BoxCar
Pro displays View Details for that
file, and opens a dialog box for
you to save the file.
Battery Level. The Battery Level gauge shows
a percentage of the battery’s capacity left.
When the gauge reaches one quarter remaining, it is suggested that the
battery be changed for longer deployments.
•
Wrap around when full. This feature allows the logger to record
continuously, overwriting the oldest points when it becomes full. The
logger will continue logging until interrupted by a readout or launch.
On readout, the most recent points will be read out. If this box is not
checked, the logger will stop once its memory is full. Note: The HOBO
H8 Pro Series loggers do not support “Wrap Around When Full.” See
the section HOBO H8 Pro Series Loggers on page 37 for more
information.
•
Delayed Start. By entering a specific start date and time, Delayed Start
will allow you to postpone logging for up to three months after
launching your logger. The format for entering dates may change
depending on the date and time formats that you have set within
BoxCar Pro. Enter this time in the format currently specified in the
Date/Time Preferences. Once launched, the logger will flash dimly
every four seconds until the start time has been reached and then start
logging.
•
Enable/Disable Channels. To enable or disable channels, click
Enable/Disable Channels. The dialog box shown below appears. Check
the box next to a sensor to enable/disable that channel. If your logger
Battery Indication
The battery level is displayed on the host computer during Launch. For the
HOBO Pro, this will show one of two states: 98% or 20%. If the level is 20%,
the battery should be replaced.
38
BoxCar Pro User’s Guide
The Channels column shows which sensors are used to calculate the
measurement. For example, Dew Point uses the temperature channel
plus the humidity channel to calculate Dew Point, as there is not really
a dew point sensor connected.
The Reading column gives the current reading of the connected logger.
This value is updated every second.
BoxCar Pro User’s Guide
35
Chapter 3: Details of Individual Loggers
Chapter 3: Details of Individual Loggers
has more than one channel, you will be able to enable or disable each
channel every time you launch the logger. Max points per deployment
relates directly to the data memory size divided by the number of
channels. To select resolution for HOBO Pro Series loggers, see the
section HOBO H8 Pro Series Loggers on page 37.
The HOBO H8 Pro Series Loggers
The HOBO H8 Pro Series introduces 12-bit resolution
for temperature measurements, 64K datafiles and data
archiving. These features along with its weatherproof
case make it ideal for outdoor and industrial use. The
HOBO Pro logger shown here measures both
temperature and relative humidity.
The HOBO Pro Launch Dialog
To display the launch dialog, connect a logger to your computer, click the
Logger menu, and select Launch.
Note: If your logger has one or more external sensor jacks, you must
specify what type of sensor is connected to each jack or data will not be
displayed correctly.
•
Start. Click Start when you are satisfied with the settings. Do not
unplug the logger from the interface cable until BoxCar Pro indicates
the launch is complete. Launching your logger will overwrite the
previously recorded data. Confirm a successful launch by watching for
the logger’s LED to blink. Consult the logger’s User’s Manual for more
information on the LED status signals.
Launch Dialog Information
The first line of information identifies the type of logger and its serial number.
The date field gives your computer’s current date and time. At the bottom of the
dialog, you will see the delayed start option. The HOBO Pro logger is similar to
the HOBO H8, so only the features unique to the HOBO Pro are explained here.
No Wrap Around
The wrap around when full feature is not available on the HOBO Pro Series.
The launch dialog does not support this feature.
Selecting Channels and Resolutions
HOBO Pro Series loggers offer the choice
of standard-resolution (8-bit) or highresolution (12-bit) operation for their
temperature channel(s). High-resolution
mode doubles the amount of memory
required by each measurement, reducing
36
BoxCar Pro User’s Guide
BoxCar Pro User’s Guide
37