1
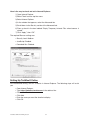
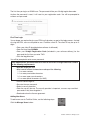
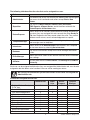
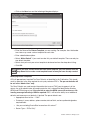
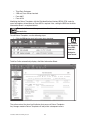
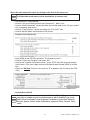
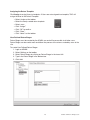
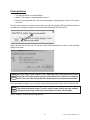
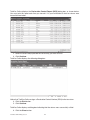
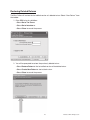
Communication Speed for TaxWise Online (TWO)
Anyone using TWO should run the speed test using the link below:
http://speedtest.taxwise.com
Run speed test at the time of day you expect the site to be open.
• Select your internet source, e.g., Cable, DSL, etc.
• Select your region.
• Enter your EFIN.
(If you do not have an EFIN assigned to you, enter the generic EFIN 070743.)
• Click “Start a test” button.
This test should be performed on each computer planning to use TWO. If the results of the speed
test indicate the communication speed is less than 800 kb per second, TWO may not be the best
product choice. Communication speed has direct impact on the user’s satisfaction level. Slow
communication speeds represent slow response time. Slow response time could increase the
amount of time required to prepare a return. CCH recommends communication speed of 800 kb
or greater when using TWO.
Browser Settings for TWO
TWO Printing Security Requirements:
Microsoft Internet Explorer stores files created in Adobe in a “Temporary Internet Files” folder.
TWO creates returns in Adobe. If the default setting in Microsoft Internet Explorer is not set to
delete the temporary internet files when the browser is closed these returns will be stored in
this temporary internet file folder. It is critical that TWO users check and set this default in
Microsoft Internet Explorer.
93
TaxWise Online Pre-Filing Season
Here is the way to check and set in Internet Explorer:
1) Open Internet Explorer.
2) Select Tools from the top line menu.
3) Select Internet Options.
4) In the window that appears, select the Advanced tab.
5) Scroll down to the Security section of the Advanced tab.
6) Place a check in the box labeled “Empty Temporary Internet Files when browser is
closed”.
7) Click “Apply”, then “OK”.
The required Browser settings are:
• Security Level: Medium.
• JavaScript: Enabled.
• Download files: Enabled.
Setting Up TaxWise® Online
We recommend setting TWO as a favorite in Internet Explorer. The following steps will assist
you.
• Open Internet Explorer.
• Type https://twonline.taxwise.com in the address line.
• Click on the Favorites icon.
• Click Add.
• Enter the name you want the favorite to display.
• Click OK.
TaxWise Online Pre-Filing Season
94
The first time you log in as ADMIN user. The password will be your 20-digit registration code.
Anytime the password is reset, it will reset to your registration code. You will be prompted to
create a new password.
First Time Login
You no longer are required to give your EFIN to all volunteers as part of the login process. Instead
of using the EFIN, users are required to use a TaxWise® client ID. The client ID may be up to 9digits.
• Enter your client ID (provided when software is delivered).
• Enter the User Name ADMIN.
• Enter your 20-digit Registration Code (included in your software delivery) for the
password the first time you enter TWO.
• Click the Log In button.
You will be prompted to enter a new password.
Your Administrator password must be at least 8 characters in length and must conform
to the following requirements:
• Must be unique per user
• Must contain at least 8 characters made up of the following:
1. 1 or more numbers
2. 1 or more punctuation characters
3. 1 or more upper case characters
4. 1 or more special characters (ie, @&*$)
• Can not contain login ID.
• Re-enter the new password.
• Select a security question.
• Enter the security answer. The security question is important, so users may reset their
passwords if they have forgotten it.
• Read and review the license agreement.
Adding New Users
To add a new user to TaxWise Online, use the following steps:
Click the Manage Users button.
95
TaxWise Online Pre-Filing Season
TaxWise Online displays the User Manager window:
1. Click the Create a New User link.
• Enter a unique user name.
• Enter the first and last name of the preparer.
• Enter an e-mail address – required (can be the volunteer’s or Administrator’s).
• Assign the appropriate role by clicking on the item in the “Possible Roles” column and
then clicking on the right arrows to add it to the “Assigned Roles”.
• Click the Save button.
User names are case-sensitive! When users log on to TWO the first time,
their password is the username. Users will then be prompted to change the
password.
Use the lowest level “ROLE” that is necessary for a particular user.
TaxWise Online Pre-Filing Season
96
The following table describes the roles that can be assigned to a user:
Role
Description
Administrator
The ADMIN user or any user that has the Administrator role assigned
has access to all commands and actions except Start a New
Return.
SuperUser
Has access to Move Returns, Submit E-files, View Acks,
TWO Reports, & Report Server, and all functions related to the
ReturnPreparer & Interviewer roles.
ReturnPreparer
Allows access to all functions associated with creating and editing a
tax return. Any user assigned this role can mark the return Ready to
File from Diagnostics but they cannot submit the e-file. They cannot
delete or move returns, access acknowledgements or reports.
Template Manager
Can create new return templates, edit existing templates, assign,
and unassign users to templates.
Interviewer
Allows access to all ReturnPreparer role functions, but is required
to start new returns by selecting Go to Interview.
Reviewer
Has access to all actions except for the User Manager and Submit
e-files.
E-file Manager
Allows the user to submit e-files and will also have access to limited
user settings.
All Roles
All users have access to Print Checks, user Settings and TaxWise
University.
Each user can be assigned multiple roles. Any user assigned the Administrator role, must also be
assigned a role that allows return creation if the user will be creating tax returns.
We strongly recommend that you limit the number of users who are assigned the
Administrator role.
Permissions assigned to each User
Administrator
Enables “Mark as Ready to
E-File” box
Submit E-Files
View Acknowledgements
Move returns between users
Delete returns
Open existing returns
Print returns
Return Query
Return Templates
Manage users
Reset Users passwords
Create new return
X
X
X
X
X
X
X
X
X
X
X
Super
User
X
Return
Preparer
X
Template
Manager
X
X
97
X
X
X
X
X
X
X
X
X
X
TaxWise Online Pre-Filing Season
Modifying Users
• Click on the Manage Users Icon.
• Click Reset to reset the password back to the username.
• Click Edit to modify the Username information. You can:
– Modify the Real Name,
– Modify assigned roles,
– Deactivate Users.
The ADMIN user cannot be modified.
Passwords for Users
Passwords must conform to the following requirements:
• Must be unique per user
• Must contain at least 8 characters made up of
1. 1 or more numbers
2. 1 or more punctuation characters
3. 1 or more upper case characters
4. 1 or more special characters
• Cannot contain login ID
• Cannot be a previous password for a given user
• Cannot change a password more often than every 5 days
• Account will be locked after 3 unsuccessful login attempts per session
• Will expire every 45 days
TWO will prompt users to change passwords every 45 days.
Creating Return Templates
You should set the defaults before you add new user names so that settings can
be applied to the new users when you add them.
Return Templates are used to enter information on forms that you want to appear in all tax
returns such as preparer name, site address, SIDN, EFIN, etc. The administrator should log into
TaxWise online to change the return template. You should set the defaults after you add new
user names so that settings can be applied to the new users when you add them.
Return templates allow any user with Return Template rights to complete common information
that will apply to all subsequent tax returns they create.
Any user assigned the Administrator role has access to Return Templates. Also, users assigned
the Super User and Return Template role have access to Return Templates.
Creating a new return template:
• Click on the Return Templates icon
TaxWise Online Pre-Filing Season
98
• Click on the New Icon and the following dialog box displays:
• Enter the Name of the Return Template you are creating. For example, sites that border
two states may create a return template for each state.
• Enter a detailed description.
• Select “Make Default” if you want to make this your default template. There can only be
one default template.
• Select what you want your return template to be based on from the drop down listing.
• Click OK.
Once you have created more than one return template, you can choose from the
drop down list to create a new template based on one you have already created.
Modifying Return Templates
CCH will pre-set most required Tax Form Defaults as identified in this Publication. This should
result in reduction in the time required for set-up by volunteer ERO’s. The pre-set defaults will
be set in the “Admin User” only.
Tax Form Defaults are used to enter information that users of TWO want to appear in all tax
returns; the e-file administrator will need to enter the site’s unique Site Identification Number
(SIDN) and EFIN during set-up. If the site fails to enter the SIDN, users will receive an e-file
warning message indicating a SIDN is required. ERO’s will have the ability to set additional
defaults and remove pre-set defaults, if desired. The preset defaults are:
• Appropriate form to Use – “1040”.
• Customers’ name, address, phone number, date of birth, and occupation designed as
required fields.
• “Are you excluding Puerto Rico income from this return?”
• Return Type – “E-File Only”.
99
TaxWise Online Pre-Filing Season
•
•
•
•
Third Party Designee.
“IRS only” box will be checked.
Form 8867.
Form 8158.
Modifying the Return Templates with the Site Identification Number (SIDN), EFIN, and site
name and address information on Form 8879 is required. Also, setting the SIDN on the Main
Information Sheet is a required default.
These defaults can not be pre-set since the information and numbers are unique
for each site.
To edit Return Templates, use the following steps:
1. Click the Edit button next to the new return template.
First create
the template,
then Edit,
and last...
Assign to
new users!
TaxWise Online automatically displays the Main Information Sheet:
The yellow color of the form itself indicates that you are in Return Templates.
Any changes made to Return Templates will only affect subsequent returns.
TaxWise Online Pre-Filing Season
100
Select the main information sheet by clicking on the form in the ‘forms tree’.
(Ctrl+Spacebar marks space red for required info or removes red).
• Red comment is a required field.
• Scroll to “Are you excluding income from Puerto Rico?” Select “No”.
• Scroll to “State Information” section and enter the two digit code in the “full year resident”
box, if preparing state returns.
• Scroll to “Type of Return” section and select the “E-file ONLY” box.
• Scroll to the Self-Select and Practitioner PIN section:
• Enter 98765 for the ERO PIN and select “The income tax return”.
• Scroll to “Third Party Designee” and select “No”.
• Scroll to the “Preparer Information section.” In the “PTIN” field. (Do not put anything in
the first box.) Enter your 8-digit numerical Site Identification Number (SIDN) in the next
box.
• Select the “IRS only” field; this will cause the “S” to appear in the first box by the PTIN
field.)
• Refresh/Save (Crtl+R)
TaxWise® added two new questions to the Main Info Sheet: 1) Do you consider
yourself or a member of your household a person with a disability? (yes or no),
and 2) Other than English, what languages are spoken in your home? (Spanish,
Chinese, Korean, French, Italian, Vietnamese, Japanese, Polish, Russian, Other,
none).
101
TaxWise Online Pre-Filing Season
Form 8879 Required Fields
• EFIN (at the top of the form).
• SIDN in the PTIN field (the S should appear after the page if refreshed).
• Check Print Signature box (This box will be defaulted in TaxWise this year. This will
automatically print the site’s SIDN and name in the preparer signature field.).
• Check the IRS only box.
• Enter site name in Firm’s name.
• Enter site address in Firm’s address.
• Enter phone number for site.
• Enter Zip Code – click the save icon to populate the city and state.
• Ctrl + spacebar to remove the red in the SSN and EIN fields.
It is crucial the correct SIDN number is shown on Form 8879.
Form 8867 Paid Preparers Earned Income Credit Checklist
This form is not required to be completed. Add this form to your Template and Check the box
after (Check if you do not want to use this form). This will stop the form from loading when a
customer qualifies for EITC.
Adding Additional Forms
• Click the Add A Form button to load any additional forms.
• Refresh/Save (Crtl+R).
• Click Close on the tool bar.
Now you are ready to assign this Return Template to your users.
TaxWise Online Pre-Filing Season
102
Assigning the Return Template
Click Assign to assign Users to templates. If Users are not assigned to a template, TWO will
assign the User to the Default Template.
•
•
•
•
•
•
•
Select Assign on the toolbar.
Select the newly created return template.
Select users.
Click “Assign”.
Click “OK” to confirm.
Click “Close”.
Click “Home” on the toolbar.
User Defined Return Stages
Return Stages must be created by the ADMIN user and will be accessible to all other users.
Return Stages can be used to mark and follow the process of the returns created by users at the
site.
To create User Defined Return Stages:
1. Login as ADMIN.
2. Select Settings on the toolbar.
3. Select Return Stages by clicking on Return Stages in the tree at left.
4. Type in the Return Stage in the bottom box.
5. Click Add.
103
TaxWise Online Pre-Filing Season
Once all the return stages for your site are entered. Select the Save and Close button. Below is
a list of possible return stages:
• Ready to Review
• Ready to Transmit
• Waiting on Signature
• Waiting on Tax Information
• Paper Return
Returns can be sorted by the Return Stage by clicking on the Stage header, in ascending or
descending order.
User Defined History List
User Define History list for the Preparer Use Fields on the Main Information Sheet in
TaxWise® Online will be available for new and existing returns once it has been created by the
administrator.
1. Login as the ADMIN user.
2. Select the Settings button.
3. Select Custom Fields from the User Settings Tree.
4. Select the appropriate Preparer Use Field from the drop down box.
5. Enter up to 25 entries in the blank entry column. Once a history list has been created, it is
considered a locked list. The preparer will only be able to use entries that are contained
in the list.
TaxWise Online Pre-Filing Season
104
Once you complete the entries for the specified Preparer Use Field, you can select another
Preparer Use Field from the drop down box and repeat steps.
If you want to make the Prep Use Field required for all returns, select the “Required” box on
each Preparer Use Field that is formatted. Once you have made all necessary additions and/or
changes, click on the “Save and Close” button.
If the dialog box does not close after selecting the Save and Close button,
review your entries to make sure they do not exceed the maximum number of
characters.
105
TaxWise Online Pre-Filing Season
106
• TaxWise Online Homepage
• Using the Carry Forward Function
• Password Reset
• Quality Review
• Running Diagnostics and Creating an e-file
• Setting the Return Stage
• Submitting Returns
• Print Sets
• Viewing Acknowledgements
• Rejects
• Fixing Rejects
• Deleting Returns
• Restoring Deleted Returns
• Scheduling Reports
• Support and Resources
TAXWISE ONLINE FILING SEASON
• Printing Returns
TaxWise Online Homepage
The following illustration depicts the TWO Homepage while logged under the ADMIN/Return
Preparer user.
The ADMIN user has all privileges except return preparer. This ADMIN user has Return Preparer
added to the roles of the user.
• The “Reports” button will take you directly to the report section of the TaxWise
Support site.
• A Web Resources link has been added to the assistance box. This will allow you
to open the Web Resources page in a different window while you are working on
a return.
Using the Carry Forward Function
In TWO there are no preliminary steps needed to perform carry forward. Click on the “New Return”
button and enter the SSN for the taxpayer whose information you want to carry forward. You will
receive the message below with the option to use carry forward, create a new return or close this
window.
107
TaxWise Online Filing Season
If you select “Use Carry Forward” the return will open with the prior year information showing. If
there are no further steps to take, simply verify the information, note any changes and complete
the return as normal.
Password Reset
If you enter the password incorrectly you will get the message “Login failed”. You have the option
to Click here link at the top or click the “Need Help” link at the bottom.
You have three attempts to enter the password and then the account will be locked.
This is not per session, it is a continuous count.
If the ADMIN user or any created user account becomes locked, you now have the ability to unlock
your own account.
If you click the Need Help link from the Log In Failed screen it will open the Frequently Ask Questions
page. Select the link for “I forgot my password or it expired, how do I reset it?”
• Click the “Reset” button.
• Enter your Client ID and User Name.
• Click the Next button.
TaxWise Online Filing Season
108
• Enter the answer to the Secret Question that you selected when creating your password.
• Click the “Next button”.
You will see a message letting you know that the password has been reset. Your password was
reset to the original password.
• As an “ADMIN” user, the password will be reset to the 20-digit registration code.
• For other users, the password is reset to the User Name.
Each time the ADMIN password is reset you will be required to accept the TaxWise
Online License Agreement.
In addition, as the administrator, other users can be reset by selecting the “Manage Users” button,
then
• Click the Reset link at the end of the username. This will reset the password back
to the username.
State Help
There are three options for State tax help in TaxWise® Online:
1. Located at the bottom of the home page is a drop down menu with the State
Tax sites listed.
2. Use the “Search Knowledge Base” box located at the top to find the State help files that are
maintained in the TaxWise® Knowledge Base. In the “Search for” field shown below, GA is
entered, replace GA with any state abbreviation to locate the state you need and click Go,
as shown in the example below.
Once the appropriate information is located, click on the PDF link to open the file.
3. State help is also linked to the TWO homepage. This link will take you directly to the
appropriate state’s website.
109
TaxWise Online Filing Season
Quality Review
Accuracy of the returns prepared by volunteers is imperative. As the ERO, you can provide
assistance and support to the volunteer site coordinator in several ways to ensure the accuracy of
the returns. Please refer to the Guidelines section “e-file Quality Review”.
Running Diagnostics and Creating an e-file
After you enter all the data in a tax return, review all the forms, and ensure that each form is
complete, you are then ready to run Diagnostics.
For returns that you do not e-file, Diagnostics reviews the federal and state returns for tax
inconsistencies, omissions, overridden, and estimated entries. For returns that you e-file,
Diagnostics also looks for electronic filing errors in both federal and state returns, if applicable.
To run Diagnostics, click the “Run Diagnostics” button on the toolbar.
TaxWise reviews the return and displays the Diagnostics Report in a separate window at the top
of the Workspace. You can scroll through the report and review the information.
The Diagnostics screen is divided into five sections:
1. Electronic Filing Errors
2. SSN Warnings
3. Warnings
4. Overridden Entries
5. Estimated Entries
TaxWise Online may not display all five sections on every Diagnostics Report.
TaxWise Online Filing Season
110
Setting the Return Stage
Return stage helps to manage the returns. While a return is open the Return Stage
can be set by selecting the Return Summary icon on the toolbar.
The following return box will open in a second window:
The return stage can also be set when the return is closed from the Return list. Simply select the
stage in the Stage column from the dropdown list. Keep in mind, the return stages must be set, as
discussed in the TWO Pre-Filing Season section of this publication.
Submitting Returns
Submitting returns is almost effortless. Returns can be submitted one-by-one or by batch from
any computer.
To select the e-files you want to submit, use the following steps:
1. From the Homepage, select ”Submit e-Files” button.
2. Click in the “select” box to select a return to be transmitted or “select all”.
3. Click “Continue”.
111
TaxWise Online Filing Season
Print Sets
Select from 3 different types of print sets. You have the ability to choose 1 print set of multiple print
sets to be printed with each return:
1. Login as ADMIN
2. Select the User Settings icon
3. Select Print Sets
Choose the applicable sets you want printed with each return:
• Primary Forms: Prints completed Federal and State forms excluding the Main Information
Sheet, the Interview Sheet, completed worksheets and income detail sheets such as W-2
detail and 1099 detail.
• Completed Forms: Prints all completed Federal and State forms.
• Signature Forms: Prints 2 copies of Federal Form 8879 required for electronic filing.
• Select the Close and Save button at the bottom of the screen.
TaxWise Online Filing Season
112
Printing Returns
• The pop-up blocker must be disabled.
• Adobe 7.0 or higher is required to print returns.
• Returns can be printed from the User Homepage by selecting print returns in the return
tasks link.
To print a return while you have the return open you can click the Print Return button on the task
bar and a box will pop up where you will click on the Download PDF Return link.
When you click on this link you will see the same File Download box as below, click the Open
button on this box.
Be sure to select “open” and not “save”. Selecting “save” will install the PDF on the
computer which has sensitive taxpayer information that is difficult to completely
erase. Also, see TWO Printing Security Requirements for important information.
Once the Adobe file opens you can select to print by clicking on the Printer icon on the task bar.
This will print the entire return. To print a specific page, identify the page number,
change the print range, and increase the number of copies for that page.
Select “cancel” to cancel the printing process.
113
TaxWise Online Filing Season
TaxWise Online displays the Declaration Control Report (DCR) dialog box, as shown below.
You must print this report each time you transmit. It is your verification of what tax returns were
transmitted and when.
2. Select the check box(es) beside the tax return(s) you want to e-file.
3. Click Continue.
TaxWise Online displays the following dialog box:
Notice that TaxWise Online assigns a Declaration Control Number (DCN) to the tax return.
4. Click the Print button.
5. Click Continue.
TaxWise Online displays a dialog box indicating that the returns were successfully e-filed.
6. Click the Close button.
TaxWise Online Filing Season
114
Viewing Acknowledgments
The acknowledgment is available as soon as the IRS or state acknowledges the return. This
could take up to 48 hours.
To view acknowledgments, use the following steps:
1. Click the View Acks button on the toolbar.
TaxWise Online displays the Acknowledgments dialog box:
2. Click the Print button to print the acknowledgment.
3. Click Close.
The acknowledgment displays the following information:
• Date – date of acknowledgment
• TIN – taxpayer’s social security number
• Name – taxpayer’s name
• Ack Type – federal or state acknowledgment
• Refund – displays the refund or balance due
• Status – displays Accepted or Rejected
• e-file State – displays the state associated with the Ack Type
• Sig Doc – For sites that use both the Practitioner PIN and Self-Select PIN, the IRS ACK
Report has been modified to distinguish which method was used to file the return. Under
the column entitled SIG DOC you will find the following:
• 8453 - If attachments are to be mailed using Form 8453
• SO - If the return was sent as a State-Only return to IRS
• SSP - Indicating the return was filed with a Self-Select PIN signature alternative
• PP - Indicating the return was filed with a Practitioner PIN signature alternative
115
TaxWise Online Filing Season
• EIC Ind – If the EIC Indicator displays Y, then the EIC portion of the refund is held until
the certification documents are submitted to the IRS for approval.
• SVC Center – Displays the IRS Service Center that accepted or rejected the return.
• DCN – Declaration Control Number assigned by TaxWise® Online.
You can sort the acknowledgments by clicking the column titles.
Federal and state acknowledgements will be displayed on separate pages.
Rejects
There are several methods of identifying rejected returns.
(1) The rejects are listed on the Acknowledgement report.
(2) Run the reject report from the TaxWise Return Query.
• Click on the Return Query icon.
• Click the Rejected Returns link.
• The list will display the returns rejected within the past 72 hours.
• Click the link next to the SSN view the record.
• Click on the Reject History link. The reject history for the Social Security Number entered
in return query will be displayed.
• Click the Reject Code link to display the IRS reject code details.
• Click the Sequence # link to display the associated TaxWise location.
The following illustration displays the return query:
TaxWise Online Filing Season
116
Fixing Rejects
When a return is rejected, an attempt should be made to correct it and then re-transmit. The return
will retain its original DCN if the e-file is recreated and later re-transmitted.
• Open the rejected return.
• Click the Run Diagnostics icon.
• The rejected entries will become red hyperlinks under the Electronic Filing Errors section:
The majority of errors that cause rejections are due to (a) incorrect SSN(s), (b) not spelling names
correctly or (c) incorrect EINs or employer or payer names. For each rejected return the IRS reject
code, an explanation, and suggestions for fixing the return is provided. See Exhibit 4 for the list of
the most common rejects.
• Fix all e-file errors.
• Run diagnostics.
• Select the “Mark as Ready to e-file” when all errors have been corrected.
If the return does not involve a change in name or SSN of the customer or the dollar amounts are
less than the amounts listed below, the return may be re-transmitted without further contact with
the customer.
Rejected returns can be corrected and re-transmitted without new signatures on the Form
8879 or a new Self-Select PIN if changes are not more than:
• $50 to “Total Income” or “AGI” or
• $14 to “Total Tax,” “Federal Income Tax Withheld,” “Refund” or “Amount You Owe.”
If the changes are more than the amounts listed above, the customer must be
contacted and must sign a new Form 8879, or enter a new Self-Select PIN, before
the return is re-transmitted.
Some errors causing a rejected return cannot be fixed without contacting the customer. If the IRS
rejects the electronic portion of the taxpayer’s individual income tax return for processing and the
reason for the rejection cannot be rectified, the site coordinator or designee must take reasonable
steps to inform the taxpayer of the rejection within 24 hours. If the taxpayer chooses not to have
the electronic portion of the return corrected and transmitted to the IRS or if it cannot be accepted
for processing by the IRS, the taxpayer must file a paper return.
In order to be filed timely, the paper return must be filed by the later of the due date of the return
or ten calendar days after the date the IRS gives notification that the electronic portion of the
return is rejected or that it cannot be accepted for processing. The paper return should include
an explanation of why the return is being filed after the due date. (See Exhibit 6 Sample Reject
Letter.)
Administrator, e-filer, or Super User has rights to have access to Mark as Ready
to e-file.
117
TaxWise Online Filing Season
Deleting Returns
From the Homepage or the Return page as shown below, click on the “Delete Returns” link.
The following page will be displayed showing the available returns for deletion. Select the return
for deletion and click the “Delete” button.
A warning will be displayed, select “OK”. The “Delete Returns Results” box will display to confirm
the deleted return(s). Click “Close” and the return(s) will be deleted from your list of returns on the
Return page.
TaxWise Online Filing Season
118
Restoring Deleted Returns
TaxWise Online will restore the last edited version of a deleted return. Select “New Return” from
the toolbar.
1. Enter SSN twice for validation:
• Select Go to Tax Forms
• Select Go to Interview or
• Select Close to cancel the process
2. You will be prompted to restore the previously deleted return:
• Select Restore Return to the last edited version of the deleted return
• Select Create New Return to start a blank return
• Select Close to cancel the process
119
TaxWise Online Filing Season
Scheduling Reports
TWO reports will run from the Report Sever on the customer support site. Or you may click on the
“reports” button located on the toolbar.
Use the following URL to access the support site: https://support.taxwise.com.
• To login to the support site, you will need your Client ID provided with your TWO software
shipment.
• Select “My Information” from the support homepage.
• Select “Reports”.
The Customer Support site provides a variety of reports. CCH runs the reports you have subscribed
to after business hours and makes them available to you to download the next day.
By using the “My Reports” feature, you can:
• Download reports to Excel or another application that imports or opens CSV
(comma-separated value) files.
• Print only the reports you need.
• Run reports using the CCH databases, which ensures the completeness of your report.
For detailed instructions, click on the “How do I schedule a report” link.
Suggested reports:
• Client List
• IRS Electronic Filing Summary
• IRS Summary Report (acceptance)
• Preparer Summary Report
• Returns by Tax Forms with Schedules
• All reports designed as TWO reports
Support and Resources
• TaxWise Online User Manual
• TaxWise Customer Support: 1-800-411-6391
Tips for getting the most efficient Customer Service:
• Before contacting TaxWise
– Know your EFIN.
– Be at your computer.
– Write down the exact error message.
– Describe the exact function you were performing when you received the error.
– Know the SSN of the primary taxpayer, when checking the status of a return.
TaxWise Online Filing Season
120
• TWO End of Season Procedures
• TWO Security
TAXWISE ONLINE POST-FILING SEASON
TWO End of Season Procedures
Reports
Consult your local SPEC, as per local guidance, to determine the TaxWise reports they want.
Select and print the requested reports and forward them to your local IRS SPEC office.
A wide variety of printable reports are available through the TWO Report Server. Typically the DCN
and a new Subscriber ID Report may be the only TWO reports required.
• Login to TWO.
• Click the Report Server button on the Tool Bar.
• Select the Reports you want.
• Generate and Print these reports.
Forward these reports to your local IRS SPEC office.
TWO Security
For off-season security all users, other than Admin, should be made inactive. Alternatively, the
user’s role can be changed to Return Preparer, and all tax returns removed from these user’s
accounts. This will allow the user to access the TWO Training website to practice during the offseason without accessing any taxpayer data. You may also want to keep a very limited number of
supervisory users in a role that allows them access to returns that may require amending during
the off-season.
To make a user inactive or change their role:
• Click on the Manage Users button on the Tool Bar to select the report you want
• Select Edit for each user that needs to be deactivated or their role changed.
It’s easier to move all of the returns to ADMIN or a User that will still be active as a Super User
rather than selecting individual returns and moving them from a specific user. To move all the
returns to a user:
• From the TWO Home screen in click on Move Returns on the left side.
• Select the User to move the return to in the drop-down box at the top of the screen.
• Select All Returns and click on Move at the bottom of the screen.
• A new screen will confirm that the returns have been moved.
121
TaxWise Online Post-Filing Season