1
User Manual
10 December 2007
CrossCurrent Incorporated
1200 NW Naito Parkway, Suite 200
Portland, OR 97209
PN 4104
Release A
10 Dec 2007
INCISIVE™ is a trademark of CrossCurrent, Inc
Copyright © 2007, CrossCurrent, Incorporated. All Rights Reserved.
This reference manual (”Manual”) has been created by CrossCurrent, Incorporated (”CrossCurrent”)
for use with the INCISIVE PM software and/or database (”Software”) described in this manual. The
Software is subject to the terms of the End User License Agreement (”EULA”) accompanying the
Software and may be used or copied only in accordance with the EULA. Federal law prohibits the
copy of the Software or this manual except as specifically allowed in the EULA. No part of the
Software or this Manual may be reproduced or transmitted in any forms or by any means, electronic
or mechanical, except as provided in the EULA or with the express written permission of
CrossCurrent.
Microsoft® Windows® are registered trademarks of the Microsoft Corporation. Copyright ©1998
Microsoft Corporate. All Rights Reserved.
CPT copyright ©2006 American Medical Association. All rights reserved. CPT is a registered
trademark of the American Medical Association.
Applicable FARS/DFARS Restrictions Apply to Government Use.
All other trade and brandmarks are the respective property of their owners.
INCISIVE PM User Manual
Contents
Section
Registration ......................................................... 1
Insurance Topics ................................................ 2
Diagnosis and Procedure Code Lookup ......... 3
Charge Entry....................................................... 4
Claims Processing ............................................. 5
Payment Entry ................................................... 6
Day End – Month End ........................................ 7
Attachments ....................................................... 8
Table Reference ................................................. 9
Notes Section .................................................... 10
PN 4104-A
© 2007 CrossCurrent, Inc.
Page i
INCISIVE PM User Manual
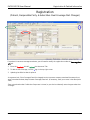
Registration & Related Information
Registration & Related Information
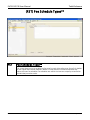
RI
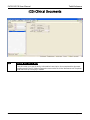
Before registering a new patient, we recommend confirming whether or not that person is already in the
system.
This can be done via the Lookup tab on the RI screen, or by clicking F3 to prompt the Lookup screen, where you
can verify whether or not the patient is already in the system.
If the patient is not yet entered in the system, follow the instructions outlined in the following pages.
PN 4104-A
© 2007 CrossCurrent, Inc.
Page 1
INCISIVE PM User Manual
Registration & Related Information
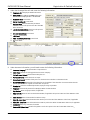
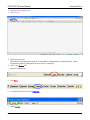
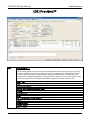
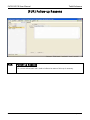
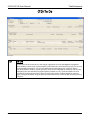
(RI) Registration & Related Information
(Patient, Responsible Party & Subscriber/Insured)
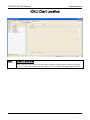
What do I do if the person is not registered?
1.
Click Data Entry to initiate the Registration process
2. Click the # or F2 to assign the Permanent ID (this is an internal # used by INCISIVE PM which has no affect
on the patient record #s assigned by your clinic). NOTE: INCISIVE PM defaults the permanent ID number,
but you have the option to change it.
3. Depending on the classification of the person (Responsible Party, Patient, Subscriber/Insured), certain
fields are required (fields that are not required will be grayed out).
4. Reg Status – Patient: Check if the person you are registering is seeing the physician.
5. R/Party: Check if the person you are registering is responsible for the account.
Subscriber/Insured: Check if the person you are registering is a subscriber of an insurance plan that is
billed for services. NOTE: If there are multiple subscribers, you will need to register each subscriber
separately.
6. Continue until you have finished entering all the data:
a) Name – Last*: Enter the person’s last name.
b) First: Enter the person’s first name.
c) Address: Enter the person’s address (Per Medicare EDI Department: NO commas, periods or # symbols.)
d) Date of Birth/Age: Enter the person’s date of birth, age and gender.
e) Social Security No: Enter the person’s social security number.
f)
Primary Ph Number: Enter the person’s primary phone number and any additional contact information.
PN 4104-A
© 2007 CrossCurrent, Inc.
Page 2
INCISIVE PM User Manual
Registration & Related Information
g) R/P Default Payee: Automatically fills in
h) R/P Def Fee Sch: Choose if Default, Medicare, Medi-Cal, etc.
i)
R/P Classification: This allows you to group R/P for statement processing purposes.
j)
HIPAA Notice Dte: The date the paperwork was sign in office.
k) Pt Classification: You can identify the insurance/account type (e.g. HMO, PPO, etc.).
1.
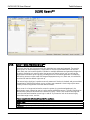
Click “Page Down” to go to the Coverage Case Info tab to fill in the following information:
a) Cov/Case Title: Enter the Insurance Name Code.
b) Description: Enter a description of the insurance, if necessary.
c) C/C – Eff Date: Coverage Case Effective Date provides the opportunity to enter coverage Effective
Date.
d) Trm: Coverage Case Termination Date, enter the termination date of coverage, if applicable.
e) Resp Party: Defaults if the person is checked as the responsible party on the General Tab.
f)
Financial Class: Click on the ellipsis, the majority of the classes are pre-entered. Just pick and select.
g) Billing Provider: Click on the ellipsis and select the Billing Provider.
h) Facility: Click on the ellipsis, and select the Facility.
i)
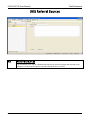
Ref Doctor – Id: Click on the ellipsis and select a Referring Physician, if applicable .
j)
Pt Lst Seen: Date patient last seen by referring physician, if applicable.
k) Supervising Doc: Supervising Physician, if applicable.
l)
PCP Doctor: Primary Care Physician, if applicable.
m) Employer – ID: ID of employer, if applicable.
n) Employer Name: If an Employer Id is selected, the Employer Name is automatically populated.
o) Work Status: Click on the ellipsis and choose a work status, if applicable.
p) Marital Sts: Marital Status, if applicable.
q) Symptoms Date: Enter a symptom date, if applicable. This prints in box 14 of the CMS 1500 claim form.
r)
Similar Condition Dt: Enter a similar condition date, if applicable. This prints in box 14 of the CMS 1500
claim form.
s) Accident Date: Enter an accident date, if applicable. This prints in box 14 of the CMS1500 claim form.
PN 4104-A
© 2007 CrossCurrent, Inc.
Page 3
INCISIVE PM User Manual
t)
Registration & Related Information
Job Related (Check Box): Check box if accident is job related. This prints in box 10a of the CMS 1500
claim form.
u) Oth Acdt (Check Box): Check box if the accident is not job related. This prints in box 10c of the CMS1500
claim form.
v) LMP Date: Enter Last Menstrual Period Date, if applicable. This prints in box 14 of the CMS 1500 claim
form.
w) Auto – Accident (Check Box): Check box if accident is auto related, if applicable. This prints in box 10b of
the CMS 1500 claim form.
x) Pl: Enter the state the auto accident occurred, if applicable. This prints in box 10b of a CMS 1500 claim
form.
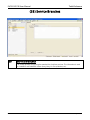
2. Click “Page Down” to go to the Additional Information tab to fill in the following information:
a) Initial Trmt Dte: Enter an initial treatment date, if applicable.
b) Last Xray Date: Enter the last x-ray date, if applicable.
c) Work – Last Date: Enter last date worked, if applicable. This prints in box 16 of the CMS 1500 claim form.
d) Return Dte: Enter date authorized to return to work, if applicable.
e) Disability Status: Enter disability status code, if applicable.
f)
Hosp-Frm and To Date: Enter hospitalization from and to date, if applicable. This prints in box 18 of the
CMS 1500 claim form.
g) Disability-Frm and To Date: Enter disability from and to date, if applicable.
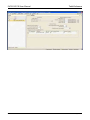
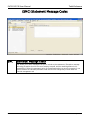
3. Click “Page Down” to go to the Insurance Information tab to fill in the following information:
a) Insurance Company: Enter the Insurance Company, or click on the ellipsis to select Insurance Company.
b) Claim Type: Defaults accordingly with the insurance company.
c) P/Clm(Process Claims): Should almost always be “Yes” .
d) Form(Claim Form): Select Electronic or Paper.
e) Subscriber/Insured: Defaults if this person is checked as the subscriber on the General Tab.
f)
R’ltn(Relationship): Relationship of the subscriber to the patient. If the subscriber is someone other
than the patient, you will need to register the subscriber as a person.
g) Member No: Enter the membership number, employer and group number.
h) Employer: Automatically entered when an Employer Name is entered above.
i)
Grp Number: Enter the group number, if applicable.
j)
Prior Auth No: Enter the Prior Authorization Number, if applicable. This prints in box 23 of the CMS
1500 claim form.
k) Claim Number: Enter claim number for worker comp, if applicable.
l)
Block 19 – Local Use: Enter information that needs to print in box 19 of the CMS 1500 claim form, if
applicable.
m) Block 10d – Local Use: Enter information that needs to print in box 10d of the CMS 1500 claim form, if
applicable.
n) Comments: Enter any comments, if needed.
o) Release SOF (Check Box): Release of Signature on File. This prints in box 12 of the CMS 1500 claim form.
p) Payment SOF (Check Box): Payment of Signature on File. This prints in box 13 of the CMS 1500 claim
form.
q) Patient Co-Pay: Enter patient co-pay, if applicable.
PN 4104-A
© 2007 CrossCurrent, Inc.
Page 4
INCISIVE PM User Manual
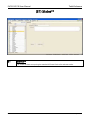
r)
Registration & Related Information
Medically Unnecessary (Check Box): Leave blank.
s) Patient Status – Other(Check Box): Leave Blank.
4. Click the Save button in the lower right corner of the screen.
PN 4104-A
© 2007 CrossCurrent, Inc.
Page 5
INCISIVE PM User Manual
Registration & Related Information
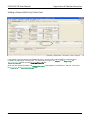
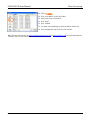
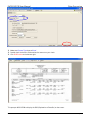
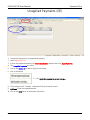
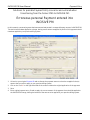
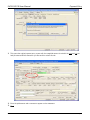
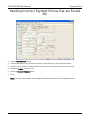
Registration
Patient, Responsible Party & Subscriber–Single Insurance
In the example shown here, the patient has a single Insurance Company (Pacific Care).
PN 4104-A
© 2007 CrossCurrent, Inc.
Page 6
INCISIVE PM User Manual
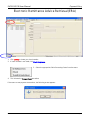
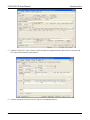
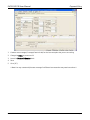
Registration & Related Information
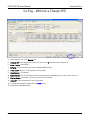
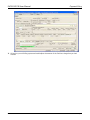
Registration
Patient, Responsible Party & Subscriber—Dual Insurance
In the example shown here, the patient has dual insurance coverage. When the patient has insurance through
more than one carrier, you will need to verify two pieces of information:
1.
Will the primary insurance company forward information to the secondary insurance company?
2. Do you need to produce a secondary claim?
The answers to these questions determines whether to send out a claim to the secondary insurance. For
example, Medicare can forward the claim directly to the secondary after they have paid their portion. If the
secondary carrier is unable to forward the claim, you will need to generate the second claim.
Under Insurance Information P/Clm would be set to Y if you want generate the second claim. Select N if
you do not require the second claim.
PN 4104-A
© 2007 CrossCurrent, Inc.
Page 7
INCISIVE PM User Manual
Registration & Related Information
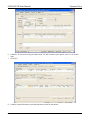
Registration
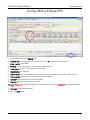
(Patient Different than Responsible Party/Subscriber)
In some cases (e.g. child & parent), the registered patient is not the responsible party. When this is the case,
you will need to register additional individuals (responsible party/subscriber) in order to complete the patient
registration. This is accomplished by “drilling down” in the R/ Parties and Subscriber/Insured fields.
The name of the responsible party appears under Responsible Parties By Registrant on the patient’s “General”
tab.
PN 4104-A
© 2007 CrossCurrent, Inc.
Page 8
INCISIVE PM User Manual
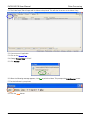
Registration & Related Information
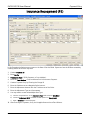
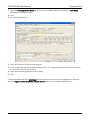
Adding a Responsible Party/Subscriber
If the patient is not the same as the Responsible Party, you will need to add an additional registration to
complete the registration of the patient. This is done by clicking on the ellipsis in the Resp Party and
Subscriber/Insured fields unerthe Coverage/Case Info tab.
After you have entered the data, the Responsible Party name appears on the Patient’s “General” tab in both
the Resp Party and Subscriber/Insured fields
PN 4104-A
© 2007 CrossCurrent, Inc.
Page 9
INCISIVE PM User Manual
Registration & Related Information
Registration
(Patient, Responsible Party & Subscriber–Dual Coverage that Changes)
If a patient’s insurance coverage terminates, you will need to modify the registration under the Coverage/Case
Info tab.
1.
Enter the Trm Date; this will italicize that Insurance Tab.
2. To add the new coverage, click the + sign in the top right corner.
3. Updating the effective date is optional.
As a general rule, if the Coverage/Case Info changed, but the insurance company remained the same, do not
enter a termination date; keep the same Coverage/Case Info. (If necessary, enter your notes in the description
field.)
Enter a termination date if a Workers Comp case is closed, so you don’t accidentally enter charges under that
coverage.
PN 4104-A
© 2007 CrossCurrent, Inc.
Page 10
INCISIVE PM User Manual
Registration & Related Information
Registration
Workers Compensation
1.
When registering a Workmens Comp patient, confirm that you are on the General tab and select “WC –
Workmens Comp” (R/P Def Fee Sch:).
2. Enter the following information.
a)
C/C – Eff Date: Enter the Coverage/Case Effective
Date
b)
Trm: Enter the Termination Date, if applicable
c)
Financial Class: Select Workers Comp
d)
Billing Provider: Name of Physician
e)
Facility: Enter location where patient was treated
f)
Ref Doctor ID: Name of referring physician if
applicable
PN 4104-A
© 2007 CrossCurrent, Inc.
Page 11
INCISIVE PM User Manual
Registration & Related Information
3. Under the Coverage/Case Info tab, enter the following information.
a)
b)
Employer –ID: An Employer ID MUST be entere.
Work Status (AT TIME OF ACCIDENT): The work
status of the employee MUST be entered.
c)
Symptoms Date: Leave blank.
g)
Similar Condition Dt: Leave blank.
h)
Accident Date: Enter the date the job related
incident occurred. This prints in box 14 of the CMS
1500 claim form.
d)
Job Related (Check Box): Check box. This prints in
box 10a of a CMS 1500 claim form.
e)
Oth Acdt (Check Box): Leave blank.
f)
LMP Date: Leave blank.
g)
Auto – Accident (Check Box): Leave blank.
h)
Pl: Leave blank.
4. Under Insurance Information, you will need to enter the following information:
a)
Insurance Company: Enter the Workers Comp Insurance.
b)
Claim Type: Defaults accordingly with the insurance company.
c)
P/Clm(Process Claims): Should almost always be Yes .
d)
Form(Claim Form): Select Electronic or Paper.
e)
Subscriber/Insured: Defaults if this person is checked as the subscriber on the General Tab.
f)
R’ltn(Relationship): Relationship of the subscriber to the patient. If the subscriber is someone other than the
patient, you will need to register the subscriber as a person.
g)
Member No: Enter the membership number, employer and group number.
h)
Employer: Automatically entered if an Employer Name is entered above.
i)
Grp Number: Enter the group number, if applicable.
j)
Prior Auth No: Enter the Prior Authorization Number, if applicable. This prints in Box 23 of the CMS 1500 claim
form.
k)
Claim Number: Enter claim number for Workers Comp.
l)
Block 19 – Local Use: Enter information that needs to print in box 19 of the CMS 1500 claim form, if applicable.
m) Block 10d – Local Use: Enter information that needs to print in box 10d of the CMS 1500 claim form, if applicable.
n)
Comments: Enter any comments, if needed.
o)
Release SOF (Check Box): Release of Signature on File. This prints in box 12 of a CMS 1500 claim form .
PN 4104-A
© 2007 CrossCurrent, Inc.
Page 12
INCISIVE PM User Manual
Registration & Related Information
p)
Payment SOF (Check Box): Payment of Signature on File. This prints in box 13 of the CMS 1500 claim form.
q)
Patient Co-Pay: Enter patient co-pay, if applicable.
r)
Medically Unnecessary (Check Box): Leave blank.
s)
Patient Status – Other(Check Box): Leave Blank.
5. Click the Save button in the lower right corner of the screen.
PN 4104-A
© 2007 CrossCurrent, Inc.
Page 13
INCISIVE PM User Manual
Insurance Topics
Insurance topics
CE/PE/RI
When working with patients and insurance carriers, a number of variables come into play. In the following
pages, we will cover the following topics:
What to I do when the secondary insurance allowable is higher than the primary insurance allowable?
How do I handle non-participating insurance carriers?
How do I manage AIPO (Accept Insurance Payment Only) patients?
Please note that the screen you use will depend on the task at hand. The Charge Entry (CE), Payment Entry (PE)
and Registration and Related Information (RI) screens are all used in the following examples.
PN 4104-A
© 2007 CrossCurrent, Inc.
Page 14
INCISIVE PM User Manual
Insurance Topics
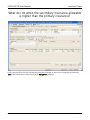
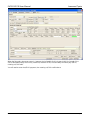
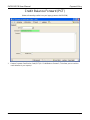
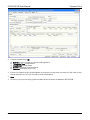
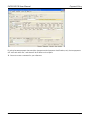
What do I do when the secondary insurance allowable
is higher than the primary insurance?
In this case the office visit was filed with dual insurance coverage, as seen on the Charge Entry/Information
(CE) screen shown above. Please note that the Charge Amt. is $65.00
PN 4104-A
© 2007 CrossCurrent, Inc.
Page 15
INCISIVE PM User Manual
Insurance Topics
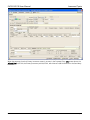
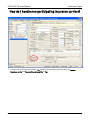
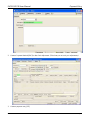
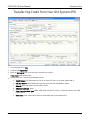
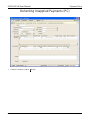
When the payment from the Primary Insurance comes in, as seen in the Payment Entry (PE) screen above, the
Allowed Amt is $35.00; the Primary Insurance paid is $25.00, which leaves a $10.00 balance for the Secondary
Insurance.
PN 4104-A
© 2007 CrossCurrent, Inc.
Page 16
INCISIVE PM User Manual
Insurance Topics
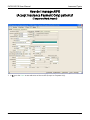
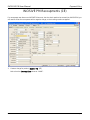
When the Secondary Insurance comes in, however, their allowable for this charge is $40.00 (instead of the
$35.00 allowable paid by the Primary Insurance). Because of this, the Secondary Insurance pays $15.00,
creating a $5.00 credit.
You will need to enter the $15.00 payment, thus creating a $5.00 credit balance.
PN 4104-A
© 2007 CrossCurrent, Inc.
Page 17
INCISIVE PM User Manual
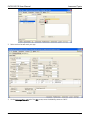
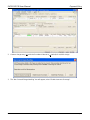
1.
Insurance Topics
On the (PE) screen, create a Payment Entry that reflects the Secondary Insurance.
a) Transaction Type: Adjustment Only.
b) Check No./Reference: no Check-adj. only.
c) Amount: enter overpayment as a negative “-“ amount, reflecting the credit balance (5.00).
d) Charge ID—Enter.
e) Adjustment Amt—enter overpayment as a negative “-“ amount, reflecting the credit balance.
f)
Adjustment Type—select “SEC Secondary allowable is higher than the Primary Ins.”
2. Go to (AA)to verify that the adjustment has been done properly.
PN 4104-A
© 2007 CrossCurrent, Inc.
Page 18
INCISIVE PM User Manual
Insurance Topics
How do I handle non-participating insurance carriers?
1.
In Registration and Related Information [RI], INCISIVE PM automatically defaults both the Release
Signature on File and Payment Signature on File to ‘Yes’.
PN 4104-A
© 2007 CrossCurrent, Inc.
Page 19
INCISIVE PM User Manual
Insurance Topics
2. In Charge Entry [CE] Ins Coverage/Service Detail tab, this information is defaulted if this coverage case is
selected. Thus the charge is sitting at the Fin Resp Lvl (Financial Responsible Level) of Insurance.
3. Deselect the Payment SOF, and the Financial Responsible Level drops to the patient.
NOTE: If you forget to deselect the “Payment SOF” and have already entered a line of service, go back and
deselect the Payment SOF. The Fin Resp Lvl does not change until you Save the charge.
If you are entering the VSP information for the first time in the RI (Registration/Related Information) screen,
you may want to deselect the Payment SOF at that time.
PN 4104-A
© 2007 CrossCurrent, Inc.
Page 20
INCISIVE PM User Manual
Insurance Topics
How do I manage AIPO
(Accept Insurance Payment Only) patients?
(Temporary Work Around)
1.
In RI, go to the Alerts screen and enter an Alert as AIP (Accept. Ins. Payment Only).
PN 4104-A
© 2007 CrossCurrent, Inc.
Page 21
INCISIVE PM User Manual
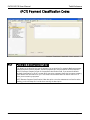
Insurance Topics
2. Select a color that will catch your eye.
3. On the Coverage/Case Info tab of the (RI) screen, enter the disability status as “AIPO”.
PN 4104-A
© 2007 CrossCurrent, Inc.
Page 22
INCISIVE PM User Manual
Insurance Topics
4. On the CE (Charge Entry) screen, Disability Status should show the AIPO.
PN 4104-A
© 2007 CrossCurrent, Inc.
Page 23
INCISIVE PM User Manual
Insurance Topics
5. When entering the charge, be sure to check the 100% box.
PN 4104-A
© 2007 CrossCurrent, Inc.
Page 24
INCISIVE PM User Manual
Insurance Topics
6. When entering the payment, the Allowed Amt automatically defaults.
7. Change the Paid Amt to the correct amount.
8. The difference between the original Paid Amt (prior to updating this entry) and the adjustment you just
made to the Paid Amt is entered in the “Adjust Amt” field.
9. Change Adjustment Type to reflect the reason for this change (WO Courtesy write off).
PN 4104-A
© 2007 CrossCurrent, Inc.
Page 25
INCISIVE PM User Manual
Diagnosis & Procedure Code Lookup & Entry
Diagnosis & Procedure Code Lookup & Entry
DC/PC/CE
Two fundamental activities involve the ability to lookup and enter both diagnosis and procedure codes. In the
following pages, we will cover the following topics:
How do I find a diagnosis code (Diagnosis Code Lookup & Entry)?
How do I find and enter a Procedure Code (Procedure code Lookup & Entry?
As you probably suspected, information on diagnosis codes is accessed through the DC (Diagnosis Codes)
screen, while procedure codes can be found on the PC (Procedure Codes) screen. When entering these codes,
you will use the CE (Charge Entry) screen.
PN 4104-A
© 2007 CrossCurrent, Inc.
Page 26
INCISIVE PM User Manual
Diagnosis & Procedure Code Lookup & Entry
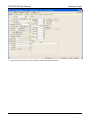
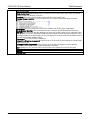
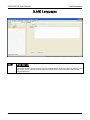
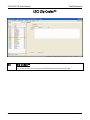
How do I find a diagnosis code?
(DC) Diagnosis Codes
A Diagnosis Codes search can be initiated in two ways.
1.
Select from the Diagnosis Codes Lookup table.
a) Use the DC shortcut (F12 + DC), which prompts the DC screen (seen above).
b) Confirm that the Lookup screen is active (left column of the DC screen).
2. Starting at the Diagnosis Code entry, click on the Ellipsis to prompt the DC Lookup screen.
PN 4104-A
© 2007 CrossCurrent, Inc.
Page 27
INCISIVE PM User Manual
Diagnosis & Procedure Code Lookup & Entry
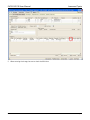
3. Once you’ve confirmed that the Lookup screen is active, you may select your own search criteria.
a) To search for a Diagnosis Code by Description, right
click on Has to prompt the search criteria menu.
c) The search narrows as you enter additional data.
d) If you enter “hand” in the Description entry box, the
search will narrow to include only those diagnosis
codes with descriptions containing the word(s)
entered.
e) If you want to search Diagnosis Codes by Id, begin
typing in the Id box (e.g. if you type in 428, the
search will narrow down to all ID’s beginning with
428.)
f)
Make your selection from the list.
b) When you are finished, having selected the desired Diagnosis Code, click Select, found in the bottom
left corner of the screen.
PN 4104-A
© 2007 CrossCurrent, Inc.
Page 28
INCISIVE PM User Manual
Diagnosis & Procedure Code Lookup & Entry
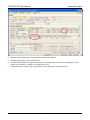
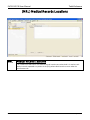
How do I find and enter a Procedure Code?
(PC) Procedure Code Lookup & Entry
After selecting the appropriate Diagnostic code, you may proceed to Procedure Code entry. A Procedure Codes
search can be initiated in two ways.
1.
Use the PC shortcut (F12 + PC), which prompts the PC screen (seen above). Confirm that the Lookup screen
is active (left column of the PC screen).
a) Starting at the Procedure Codes entry ..
b) Click on the Ellipsis to prompt the DC Lookup screen
PN 4104-A
© 2007 CrossCurrent, Inc.
Page 29
INCISIVE PM User Manual
Diagnosis & Procedure Code Lookup & Entry
2. To search for a Procedure Code by Description, right click on Has to prompt the search criteria menu.
a) The search narrows as you enter additional data.
b) If you enter “stenosis” in the Description entry box, the
search will narrow to include only those diagnosis codes with
descriptions containing the word(s) entered.
c) If you want to search Procedure Codes by Id, begin typing
in the Id box (e.g. if you type in 630, the search will narrow
down to all ID’s beginning with 630.)
d) Make your selection from the list.
3. When you are finished, having selected the desired Diagnosis Code, click Select, found in the bottom left
corner of the screen.
PN 4104-A
© 2007 CrossCurrent, Inc.
Page 30
INCISIVE PM User Manual
Diagnosis & Procedure Code Lookup & Entry
Considerations before clicking you Save your entry:
INCISIVE PM pulls data from various locations within the system to auto-populate this screen:
1.
Once a Procedure Code is entered, the POS (Place of Service) defaults accordingly.
2. Start Date defaults from the “Account Transaction Date” (entered on the General Tab).
3. If the patient needs to be billed prior to entering the insurance payments, that amount should be entered in
the Patient Amt (Patient Amounts). Most offices, however, leave this blank.
You may change the Procedure Code on the charge only if:
1.
If Charge is not posted (posted in stone)
2. No payment is entered on the charge.
PN 4104-A
© 2007 CrossCurrent, Inc.
Page 31
INCISIVE PM User Manual
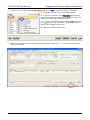
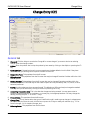
Charge Entry
Charge Entry
PN 4104-A
CE
© 2007 CrossCurrent, Inc.
Page 32
INCISIVE PM User Manual
Charge Entry
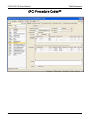
Charge Entry (CE)
General tab
1.
Charge ID: Click the # sign to receive the Charge Id for a new charge. If you want to look at an existing
charge, enter that charge number.
2. Patient: Enter the patient # or look up the patient by last name by clicking on the ellipsis or pressing the F2
key.
3. Coverage/Case: If the patient has only one coverage/case, the data defaults into this field. If they have
more than one, you will be given the option to select from the list.
4. Responsible Party: This populates from the RI screen.
5. Billing Provider: This populates from the RI screen but may be changed if another Provider within the clinic
saw the patient.
6. Service Provider: This populates from the RI screen but may be changed if another provider within the
clinic saw the patient. This field may be also used to report services provided by a NP, PA, nurse, or other
technical personnel.
7. Facility: Location where services were performed. This defaults to Office and may be changed as needed.
You may look up the facilities by clicking on the box or pressing the F2 key.
8. Accounting Transaction Date: This is the date the charges are being entered. You may press enter to
accept the date that appears in the display, or you may key in the appropriate date. You may change the
date by pressing the plus “+” or minus “-“ keys.
9. Financial Class: This populates from the RI screen.
10. Charge Class: This is used to select the type of classification and is used to group charges in a department
for report analysis. Enter the code, click the box or press the F2 key to make your selection (e.g. “D” for
Doctors charges, “H” for Hospital charges, etc.).
11. Referring Doctor: This populates from the RI screen.
PN 4104-A
© 2007 CrossCurrent, Inc.
Page 33
INCISIVE PM User Manual
Charge Entry
12. Date Patient Last Seen: This populates from the RI screen. It may be changed if the date is incorrect.
13. Hospitalized From Date: The beginning hospitalization date must be entered on hospital charges.
14. Hospitalized “To “Date: The ending hospitalization date must be entered on hospital charges, if known.
15. Supervising Doctor: This populates from the RI screen.
16. Employer: This populates from the RI screen.
17. Work Status: This populates from the RI screen.
18. Marital Status: This populates from the RI screen.
19. Symptoms Date: This populates with today’s date.
20. Accident Date: This populates from the RI screen.
21. Last Menstrual Period: This populates from the RI screen.
22. Similar Condition Date: This populates from the RI screen.
23. Job Related; Other Accident ; Auto Accident; Place: These populates from the RI screen.
24. Patient Copay: This populates from RI screen.
25. Initial Treatment Date: This populates from the RI screen. You may also manually enter the date.
26. Last X-ray Date: This populates from the RI screen. You may also manually enter the date.
27. Work Last Date: This populates from the RI screen. You may also manually enter the date.
28. Return to work Date: This populates from the RI screen. You have the option to enter the date the patient is
advised he/she is able to resume work.
29. Disability from Date and to Date: This populates from the RI screen. You may also manually enter the date.
30. Disability Status: This populates from the RI screen. You have the option to click on the box to look up the
status options.
31. Active Recalls; Patient Alerts: Responsible Party Alerts: These populate from the RI screen though you may
enter new ones at this time.
PN 4104-A
© 2007 CrossCurrent, Inc.
Page 34
INCISIVE PM User Manual
1.
Charge Entry
Click the # symbol or F2 to auto assign a Charge ID.
2. Click on the ellipsis or F2; this prompts the (RI) Registration and Related Information screen.
PN 4104-A
© 2007 CrossCurrent, Inc.
Page 35
INCISIVE PM User Manual
1.
Charge Entry
Enter the patient’s Last Name; the list shortens as the name becomes more specific. Once you find the
patient; select the correct Name, and the patient information populates the charge entry.
2. If a patient has more than one Coverage/Case, you will need to select the appropriate file for this visit.
3. Please note: your Acct Trans Dte (Account Transaction Date) is, in essence, your INCISIVE PM Posting Date.
4. Once a Coverage/Case is selected, the information for Coverage/Case, Description, Resp Party, Billing
Provider, Serv Provider, Facility, and Financial Class populate from the RI–Registration screen.
5. For Charge Class (Charge Classification Codes), click on the ellipsis or F2.
PN 4104-A
© 2007 CrossCurrent, Inc.
Page 36
INCISIVE PM User Manual
Charge Entry
Charge Classification Codes (CCC)
1.
The CCCs (Charge Classification Codes) are setup on an individual office-by-office basis and are used for
reporting purposes and charge breakdowns. Most offices track Hospital charges vs. Office charges.
2. After making your selection, click Select.
PN 4104-A
© 2007 CrossCurrent, Inc.
Page 37
INCISIVE PM User Manual
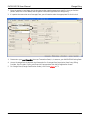
Charge Entry
Insurance Coverage Service Detail tab (CE)
After locating the patient, you may want to access the insurance information. This can be done directly from
the CE (Charge Entry) screen.
Click on the Ins Coverage/Service Detail tab.
Insurance Coverage/Service Detail
1.
Insurance Company Information: This populates from the RI screen and from the Coverage/Case you
choose on the General tab of the charge. You should check all of the boxes for accuracy.
2. Release signature on file; payment signature on file; Medically Unnecessary; Patient Status–Other;
Champus–Branch; Duty Status These populate from the RI screen and may be changed if needed.
3. Insurance Payment Waiting Period: This populates from the CO settings screen.
4. Medicare Secondary Payor Type: This requires you to choose from the pull-down box if Medicare is the
secondary insurance.
5. Diagnosis Code: This populates from the RI screen. You may enter a new diagnosis code, delete or change
the existing codes. Enter the code or look up by clicking on the box or pressing the F2 key.
6. Procedure Code: Enter each procedure code by the number or look up by clicking on the box or pressing
the F2 key. Enter as many procedures codes as you need. If you need to add a modifier, you may enter up
to two modifiers with a dash between them. The place of service populates from the facility; in the case of a
hospital, you will need to choose from the list (e.g. select 21 for inpatient hospital, 22 for outpatient hospital,
23 for emergency room, etc.). The fee schedule populates from the Insurance Screen.
PN 4104-A
© 2007 CrossCurrent, Inc.
Page 38
INCISIVE PM User Manual
Charge Entry
Dual Insurance Coverage
Click on the Ins Coverage/Service Detail tab.
If the patient has dual insurance coverage, you may need to check P/Clm (Process Claim Status).
The secondary insurance can be set to Hold, indicating you will wait until the primary insurance has been
processed.
PN 4104-A
© 2007 CrossCurrent, Inc.
Page 39
INCISIVE PM User Manual
Charge Entry
Charge/Payments for Miscellaneous Accounts
Capitation Payment and/or Adjustments (CE)
1.
Enter the charge for the patient.
2. Create a payment PE from the payment screen for the patient co pay (if any).
3. Apply the payment as an adjustment to the charge as if the insurance company paid.
4. When you receive the cap check, you will need to set up the Capitation Insurance Company in the RI–
Registration screen (e.g. Capitation St Mary’s Choice).
5. You will also need to create a procedure code for capitation with a $0.00 amount for the charge.
PN 4104-A
© 2007 CrossCurrent, Inc.
Page 40
INCISIVE PM User Manual
Charge Entry
6. Add your $0.00 charge. Then go to the payment screen PE–Payment Entry.
7. Put the payment in as an Adjustment (the -$0.00 amount) and then the “PE” for the -$0.00 amount.
8. Click Save when done.
PN 4104-A
© 2007 CrossCurrent, Inc.
Page 41
INCISIVE PM User Manual
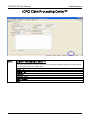
Claim Processing
Claims Processing
PN 4104-A
CP
© 2007 CrossCurrent, Inc.
Page 42
INCISIVE PM User Manual
Claim Processing
(CP) Claim Processing—Electronic
1.
The # symbol generates the next Claim ID.
2. Process Type: Proof (This will check the claims for errors but not process them).
3. Claim Form: Electronic.
4. Proc Center: Click on the ellipsis and choose NHS or Office Ally from the list of Claim Processing Centers.
5. Acct Start Date: Should be left blank.
6. Acct End Date: Should be left blank.
7. Posted Charges: Needs to be checked 9.
8. Unposted: Needs to be checked 9.
9. Claim Process: Yes.
10. Process Claim Types: Leave blank for ALL.
11. Process Charges: Leave blank for ALL.
12. Billing Providers: Leave blank for ALL.
13. Insurance Companies: Leave blank for ALL.
14. Insurance Groups: Leave blank for ALL.
15. To process claims click on Process.
PN 4104-A
© 2007 CrossCurrent, Inc.
Page 43
INCISIVE PM User Manual
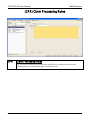
Claim Processing
Once electronic claims are processed, you will see the detail of all claims and errors, if any. Claims containing
errors will be listed under Error Message. From this screen you can go directly to the charge and make your
corrections.
16. Having completed your corrections, click the General Tab to Process the claims.
PN 4104-A
© 2007 CrossCurrent, Inc.
Page 44
INCISIVE PM User Manual
Claim Processing
17.
18. Change the Process Type from Proof to Final.
19. Click on Process at the bottom of the screen.
20. To transfer the file to the processing center click Yes.
21. Click OK.
22. Minimize INCISIVE PM and go to your Windows Desktop.
23. Double click on your internet browser (e.g. Firefox, Netscape, or Internet Explorer).
24. Go to www.nethealthclaimservices.com or www.officeally.com
25. Login with your User Id and Password.
26. Click on “Upload Batch” for NHS or “Upload Claims” for Office Ally.
27. Upload HCFA for Office Ally.
PN 4104-A
© 2007 CrossCurrent, Inc.
Page 45
INCISIVE PM User Manual
Claim Processing
28. Click on Desktop.
29. Click on the NHS or Office Ally Folder.
30. Select your most recent batch.
31. Click “Open”.
32. Click “Upload”.
33. You have now uploaded your claims to NHS or Office Ally.
34. Print the page with the File ID for your records.
Wait 24 hours and log back into www.nethealthclaimservices.com or www.officeally.com and click Download File
Summary. Print or view your File Summary Report for any errors.
PN 4104-A
© 2007 CrossCurrent, Inc.
Page 46
INCISIVE PM User Manual
Claim Processing
Claim Processing – Paper (CP)
35. The # symbol generates the next Claim ID.
36. Process Type: Proof (This will check the claims for errors but not process them).
37. Claim Form: Paper.
38. Proc Center: Should be left blank.
39. Paper Form: You have a choice between Old CMS 1500 (12/90) or New CMS 1500 (08/05).
40. Acct Start Date: Should be left blank.
41. Acct End Date: Should be left blank.
42. Posted Charges: Needs to be checked 9.
43. Unposted: Needs to be checked 9.
44. Claim Process: Yes.
45. Process Claim Types: Leave blank for ALL.
46. Process Charges: Leave blank for ALL.
47. Billing Providers: Leave blank for ALL.
48. Insurance Companies: Leave blank for ALL.
49. Insurance Groups: Leave blank for ALL.
50. To process claims click Process.
PN 4104-A
© 2007 CrossCurrent, Inc.
Page 47
INCISIVE PM User Manual
Claim Processing
51. The Claim Detail Tab will open and list claims to be printed. This will also list errors on the claims if any.
52. Correct errors if applicable.
53. Click on the General Tab.
54. Change Process Type to “Final”.
55. Click Process.
56. When the following message appears, click Yes to print the claims. This prompts the Print Preview screen.
57. Put claim forms in your printer
58. Click the Print button.
PN 4104-A
© 2007 CrossCurrent, Inc.
Page 48
INCISIVE PM User Manual
Claim Processing
Print claims to a disk
1.
Click on the Print Setup button BEFORE clicking the Print button.
2. Change the printer to Microsoft Office Document
Image Writer.
3. Click OK.
4. Insert your CD or floppy.
5. Click the Print button.
6. When the “Save As” screen appears, select the
appropriate format (e.g. 3 ½ Floppy) in the Save In field.
7. Assign a name to your document in the File Name field
(e.g. HCMG, CPMG, St Mary, etc.).
8. Click Save.
9. This prompts Microsoft Office Document Image Writer.
10. This shows you your claims without the CMS 1500 red boxes.
11. You may now exit out of that screen, remove your storage device (e.g. floppy, CD) and submit to the IPA.
PN 4104-A
© 2007 CrossCurrent, Inc.
Page 49
INCISIVE PM User Manual
Claim Processing
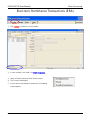
Electronic Remittance Transactions (ERA)
1.
Click Lookup to locate your check number.
2. If check number is not listed, click Check Responses.
3. Select a Claim Processing Center from the menu.
4. The Process Check begins.
5. If there are no new payment transactions, the following
screen appears.
PN 4104-A
© 2007 CrossCurrent, Inc.
Page 50
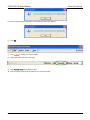
INCISIVE PM User Manual
Claim Processing
If there is a new payment transaction, the following information appears.
6. Click OK.
7. Click Lookup to locate your check number.
8. Select the check you wish to process
9. Click Process Batch at the bottom right.
10. After processing, INCISIVE PM takes you to a second screen.
PN 4104-A
© 2007 CrossCurrent, Inc.
Page 51
INCISIVE PM User Manual
Claim Processing
11. Make sure Process Type is set to Proof.
12. Double check the Amount Paid matches the amount on your check.
13. Click EOB Preview at the bottom right.
This prompts INCISIVE PM to display the EOB (Explanation of Benefits) on the screen.
PN 4104-A
© 2007 CrossCurrent, Inc.
Page 52
INCISIVE PM User Manual
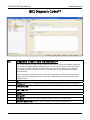
Payment Entry
Payment Entry
PN 4104-A
PE
© 2007 CrossCurrent, Inc.
Page 53
INCISIVE PM User Manual
Payment Entry
Payment Entry for Insurance
When entering an insurance payment, go to [PE] Payment Adjustment Entry Insurance screen.
1.
Payment Id:* is highlighted; click F2 or the ellipse to create a new Payment Id.
2. From –Ins Co: You may click F2, which prompts INCISVE PM to open the IC—Insurance Companies screen
OR
you can click the ellipsis, which prompts the following screen.
3. Select Insurance Company Selection via Charge Lookup:, which opens the Select Charge window.
4. Enter Charge: Enter the Charge ID from the EOB & click OK.
OR
5. Click the ellipsis to Lookup a charge; select the Patient from the list and click Select and OK to return to the
PE screen.
PN 4104-A
© 2007 CrossCurrent, Inc.
Page 54
INCISIVE PM User Manual
1.
Payment Entry
The Trans Date:*, Dep:, and Classification:* load automatically.
2. Trans Type*: Click on the ellipsis, and choose P (EOB, Payment, or Pay w/Adj) or A (Adjustment Only) if you
are making an adjustment, and click Select.
3. Payment Method: e.g. Cash, Check, MasterCard, Refund, Capitation Payment, etc.
4. Chk No./Refer: If payment is by check, enter the check number.
5. Enter the amount of the entire check.
6. Charge*: Enter the Charge ID from the EOB.
7. Allowed Amt: Enter the allowed amount.
8. Paid Amt: Enter the amount that was paid.
9. R/P Adj Amt: Enter the amount adjusted, if any.
10. Adjustment Type: Click on the ellipsis or enter the type of adjustment.
11. Fin Resp Lvl: If the responsible party needs to pay their portion, change the Financial Responsible Level to
8–Responsible Party.
12. Stmt Msg: Payment Statement Message.
13. Stmt – Cmnt: Payment Statement Comment.
Important NOTE: If there is more than one patient on the EOB, DO NOT Save after applying the first payment.
Instead, click on the blue plus symbol + (shown above, far right), which opens a new tab.
1.
Patient: You will need to enter the Patient ID (for the subsequent patient(s) from the EOB).
2. Repeat the steps outlined above.
3. When all charges from the EOB have been applied and the amount is zero click the Save button.
PN 4104-A
© 2007 CrossCurrent, Inc.
Page 55
INCISIVE PM User Manual
Payment Entry
Co-Pay – Without a Charge (PE)
4. Verify that you are on the General Tab.
5. Payment Id:* will be highlighted, Press F2 or click on the # to create a new Payment Id.
6. From – Ins Co: Leave Blank.
7. R/Party: Click on the ellipsis or enter the Responsible Party ID.
8. Trans Type*: Select P – EOB, Payment, or Pay w/Adj.
9. Classification: Co-Payment.
10. Pymt Method: Click on the ellipsis and choose your payment method type (e.g. cash, check, visa, etc.).
11. Chk No./Refer: If payment is by check, enter the check number.
12. Amount*: Enter the amount of the Co-Pay made.
13. If Charge has not been created, click the Save button.
This creates an Unapplied Amount.
PN 4104-A
© 2007 CrossCurrent, Inc.
Page 56
INCISIVE PM User Manual
Payment Entry
Co-Pay–With a Charge (PE)
1.
Verify that you are on the General Tab.
2. Payment Id:* will be highlighted, Press F2 or click on the # to create a new Payment Id.
3. From – Ins Co: Leave Blank.
4. R/Party: Click on the ellipsis or enter the Responsible Party ID.
5. Trans Type*: Select P – EOB, Payment, or Pay w/Adj.
6. Classification: Co-Payment.
7. Pymt Method: Click on the ellipsis and choose your payment method type (e.g. cash, check, visa, etc.).
8. Chk No./Refer: If payment is by check, enter the check number.
9. Amount*: Enter the amount of the Co-Pay made.
10. Charge*: Enter the Charge ID for the Co-Pay.
Tip: Open Charge Tab lists open charges for the patient; double click on the Charge ID and it will populate the
fields.
11. Paid Amt: Enter the paid amount.
12. Click the Save button.
PN 4104-A
© 2007 CrossCurrent, Inc.
Page 57
INCISIVE PM User Manual
Payment Entry
Insurance Recoupment (PE)
In this Example, the Patient was not seen on the Date of Service Billed. Payments from the EOB are entered by
creating a New Tab for Each Payment.
1.
Create a Payment Id.
2. Enter Ins Co.
3. Transaction Type: P (EOB, Payment, or Pay w/Adjust).
4. Enter the Pmnt Method, Ck No. and Amount of the Insurance Payment.
5. Create a Payment Entry by Entering the Charge ID.
6. Enter the Paid Amount as a Negative Dollar Amount.
7. Enter the Adjustment Amount with the Total Amount of the Claim.
8. Enter the Adjustment Type as a Recoupment.
9. You may need to create a New Adjustment Type.
a)
Click the “drop down box” in the Adjustment Type Field and select Data Entry.
b)
Create an Adjustment ID (R), and Enter the Description as a Recoupment.
c)
Enter a Comment for the Adjustment.
10. After Entering All Payments, verify the Unapplied Amount has a Zero Balance.
PN 4104-A
© 2007 CrossCurrent, Inc.
Page 58
INCISIVE PM User Manual
Payment Entry
Unapplied Payments (CE)
1.
Lookup the Charge Id for the Unapplied Payment(s).
2. Select Apply Pymt Tab.
3. If there are unapplied payments, the Information Bubble appears next to the Apply Pymt Tab.
4. The Unapplied Payments are listed.
5. Click on the Pymnt Id you wish to apply to this Charge.
6. Click on the ellipsis.
7. Click Apply this payment to current charge…
8. This prompts the PE – Payment – Adjustment Entry/Information screen.
9. Paid Amt: Enter the unapplied amount.
10. Click on the Save button at the bottom right corner.
PN 4104-A
© 2007 CrossCurrent, Inc.
Page 59
INCISIVE PM User Manual
Payment Entry
Electronic Remittance Advice Retrieval (ERA)
1.
Click Lookup to locate your check number.
2. If check number is not listed, click Check Responses.
3. Select the appropriate Claim Processing Center from the menu.
4. This initiates the Process Check procedure.
If there are no new payment transactions, the following screen appears:
PN 4104-A
© 2007 CrossCurrent, Inc.
Page 60
INCISIVE PM User Manual
Payment Entry
If there is a new payment transaction, the following information appears:
5. Click OK.
6. Click on Lookup to try to locate your check number
7. Select the check you wish to process.
8. Click on Process Batch at the bottom right.
PN 4104-A
© 2007 CrossCurrent, Inc.
Page 61
INCISIVE PM User Manual
Payment Entry
When processing is complete, INCISIVE PM takes you to the ERAP—Electronic Remittance Processing screen.
9. Make sure Process Type is set to Proof.
10. Double check that the Amount Paid matches the amount on your check.
11. At this time you may set the Payment Act Date; this date is reflected in the PE – Payment-Adjustment
Entry/Information screen for “Trans Date” and “Dep Date”.
12. Click EOB Preview at the bottom right.
PN 4104-A
© 2007 CrossCurrent, Inc.
Page 62
INCISIVE PM User Manual
Payment Entry
This prompts INCISIVE PM to display the EOB (Explanation of Benefits) on the screen.
1.
You have the option to Print this for your records.
2. Click Close when you are finished.
This returns you to ERAP—Electronic Remittance Advice Processing screen.
PN 4104-A
© 2007 CrossCurrent, Inc.
Page 63
INCISIVE PM User Manual
1.
Payment Entry
Change Process Type to Final.
2. Click Process.
3. Select the Details tab.
INCISIVE PM now displays the Charge ID, Charge Amount, Allowed Amount, Adjusted Amount, Patient
Responsibility Amount, Paid Amount and Any errors or messages
4. Click on the General Tab.
Note the “Payment ID”.
5. Click Save.
6. At the top of the screen, click on Payments.
7. Select Lookup.
PN 4104-A
© 2007 CrossCurrent, Inc.
Page 64
INCISIVE PM User Manual
Payment Entry
Search for payment by Check Number, Acct Trans Date or Payment Id.
8. Press Enter two times.
9. Pymt Method: Enter the payment type (e.g. check).
10. Paid Amt: Verify the amount.
11. Click on the Save button.
PN 4104-A
© 2007 CrossCurrent, Inc.
Page 65
INCISIVE PM User Manual
Payment Entry
Solutions for possible Payment Entry scenarios encountered when
transitioning from the former PMS to INCISIVE PM:
Erroneous personal Payment entered into
INCISIVE PM
In this scenario, a personal payment has been entered and posted in a responsible party account in INCISIVE PM.
The total check has been applied to a charge, leaving a zero amount unapplied. A portion of this payment should
have been applied to your previous billing system.
1.
Go back to your original Payment ID and re-allocate the payment amount so that the unapplied is the $$
amount that you wish to apply to your previous billing system.
2. Click on the “red X” on the right hand side of the screen to delete the original application of the payment.
3. Save.
4. Enter original payment entry ID and re-apply the correct amount of the payment that should be applied to
the INCISIVE PM charge, leaving the balance of the amount to be applied in your previous billing system.
PN 4104-A
© 2007 CrossCurrent, Inc.
Page 66
INCISIVE PM User Manual
Payment Entry
5. Create a fictitious CPT code, in which you will allocate the unapplied amount. (Be careful not to use a real
CPT code as this will distort your reports.)
6. Create a charge with the fictitious CPT code for the unapplied amount.
PN 4104-A
© 2007 CrossCurrent, Inc.
Page 67
INCISIVE PM User Manual
Payment Entry
7. On the third tab of the Charge Entry screen Apply Pymt, you should see the information symbol alerting
you that there is an unapplied payment.
8. Click on the Apply Pymt tab.
9. Drill down on the payment ID, and select “Apply this payment to current charge…”
10. A pop-up message will appear, select “Disable Insurance Coverage”
PN 4104-A
© 2007 CrossCurrent, Inc.
Page 68
INCISIVE PM User Manual
Payment Entry
11. This opens the original payment entry screen with the unapplied amount. A tab with the DOS and CE you
had just entered will be created for you. Be careful to select this tab.
12. Enter the paid amount and a comment to appear on the statement.
13. Save.
PN 4104-A
© 2007 CrossCurrent, Inc.
Page 69
INCISIVE PM User Manual
Payment Entry
14. Go back to your old billing system and credit adjust the amount of the fictitious charge that you had
created.
PN 4104-A
© 2007 CrossCurrent, Inc.
Page 70
INCISIVE PM User Manual
Payment Entry
Credit Balance Forward (PCT)
(Balance forwarding credits from your legacy system to INCISIVE PM)
1.
Create a Payment Classification Code [PCT] for “Credit Balance Forward” (This allows you to track the
credit balances in your reports).
PN 4104-A
© 2007 CrossCurrent, Inc.
Page 71
INCISIVE PM User Manual
Payment Entry
2. Create a Payment Method [PMC] for Non-Cash Adjustment (This allows you to track your adjustments).
3. Create a payment entry [PE].
PN 4104-A
© 2007 CrossCurrent, Inc.
Page 72
INCISIVE PM User Manual
Payment Entry
4. Payment ID- assign an ID.
5. Enter the Responsible Party ID (financial information in APM is based on the responsible party).
6. Trans Type—P for ‘EOB, Payment or Pay w/ Adj.’
7. Classification—the payment classification code that you had created.
8. Pymt Method—the payment method code that you had created.
9. Chk no./Refer—enter a description of the credit balance.
10. Amount—enter the amount of the credit.
If there are no outstanding charges in the system that you need to apply this credit to, this will remain
unapplied.
11. Save the transaction.
If you need to apply the credit to a charge, continue to the middle of the screen, enter the Charge ID and apply
the credit accordingly.
PN 4104-A
© 2007 CrossCurrent, Inc.
Page 73
INCISIVE PM User Manual
Payment Entry
Balance Forwarding Credit into INCISIVE PM (ATC)
In this scenario, a credit exists in your previous billing system that could be applied towards an existing charge
in INCISIVE PM or left unapplied for future use.
1.
Create an “Adjustment Type Code” (ATC).
PN 4104-A
© 2007 CrossCurrent, Inc.
Page 74
INCISIVE PM User Manual
Payment Entry
2. Create a Payment Entry (PE):
a)
b)
c)
d)
e)
1.
R/party: Account you wish to have the credit applied to
Transaction Type: A-Adjustment
Classification: A-Adjustment
Amount: $$ amount to be transferred
Comment: Reference note for you
If there is a charge that this could be applied to, bring up the charge, enter the amount of the credit on that
charge and enter your [ATC] as the code you had created above.
2. Save.
3. Go back to your previous billing system and debit adjust the balance forwarded to INCISIVE PM.
PN 4104-A
© 2007 CrossCurrent, Inc.
Page 75
INCISIVE PM User Manual
Payment Entry
Transferring Credit from Your Old System (PE)
1.
Go to Payment Entry (PE).
2. Create a new Payment ID.
3. Enter the R/Party ID that you would like to transfer the credit to.
Trans Type—A-Adjustment Only
4. Double check your Transaction and Deposit Dates.
a.
Classification—ADJ-Adjustment (If you do not have this code in your table, please add it)
b.
Chk No./ Refer—Credit transferred from your other practice management system
c.
Amount—Enter the amount of the credit transfer
d. Adjustment Amount—Enter.
e.
Enter the Adjustment Type—MIBS –MIBS credit transfer (If you do not have this code in your table,
please add it).
f.
Stmt Cmnt—Enter a description that the responsible party would understand.
PN 4104-A
© 2007 CrossCurrent, Inc.
Page 76
INCISIVE PM User Manual
Payment Entry
INCISIVE PM Recoupments (CE)
If a recoupment was done on an INCISIVE PM account, but the check needs to be entered into INCISIVE PM, you
will need to offset the recoupment with a negative charge, so that nothing remains unapplied.
1.
Create a charge for patient “INCISIVE PM” [CE]
Notice that the Coverage/Case shows as “NONE”.
PN 4104-A
© 2007 CrossCurrent, Inc.
Page 77
INCISIVE PM User Manual
Payment Entry
2. Insurance Information: Select the insurance company that is doing the recoupment.
3. Do a balance forward charge, and enter the deposit date into the Start Date and End Date fields.
4. The charge amount will be a negative recoupment amount.
5. Save the charge
6. Enter your payments.
7. Enter a negative recoupment amount on the INCISIVE PM account (This will create a positive payment
amount offsetting the negative charge.).
PN 4104-A
© 2007 CrossCurrent, Inc.
Page 78
INCISIVE PM User Manual
Payment Entry
Handling Incorrect Payment Entries that are Posted
(RI)
1.
Create a Miscellaneous account.
2. This Miscellaneous account should be the patient, responsible party and subscriber/insured
3. Create a case coverage (Coverage/Case Info tab) for the insurance plan that you are correcting.
4. Change the P/Clm to process as ‘N’.
5. Leave the Member ID Number blank.
6. Save.
NOTE: You may create multiple case coverage for different insurances that may need corrections.
PN 4104-A
© 2007 CrossCurrent, Inc.
Page 79
INCISIVE PM User Manual
1.
Payment Entry
Create a case coverage (Coverage/Case Info tab) for the insurance plan that you are correcting.
2. Change the P/Clm to process as ‘N’.
3. Leave the Member ID Number blank.
4. Save.
5. Go to [PC].
**Note-You may create multiple case coverage for different insurances that may need corrections**
PN 4104-A
© 2007 CrossCurrent, Inc.
Page 80
INCISIVE PM User Manual
Payment Entry
6. Create an “IE” (incorrect entry) procedure code. This will not distort your reports, since it is not a valid
code.
7. Go to [CE].
8. Create a Charge ID and enter your Miscellaneous Account as the patient.
PN 4104-A
© 2007 CrossCurrent, Inc.
Page 81
INCISIVE PM User Manual
Payment Entry
9. Select the Coverage/Service Detail tab. Enter the “IE” procedure code you created with a zero charge.
Write down the Charge ID number.
10. Save.
11. Go to [PE] Payment Entry.
12. Enter the Payment ID of the incorrect payment.
13. In the Charge field, enter the Charge ID number of your “IE” charge you created (or press CTRL and Down
Arrow to pull up the last Charge entry).
14. Apply the erroneous payment to the zero charge.
15. Save.
Create a new payment with the exact same payment characteristics as the incorrect payment, but make the
amount a negative in both the amount and paid amount fields to correct previous payment entry.
PN 4104-A
© 2007 CrossCurrent, Inc.
Page 82
INCISIVE PM User Manual
Payment Entry
By using the same payment characteristics (payment method, payment classifications, etc), the two payments
will “zero each other out”, and there will be no effect on the reports.
16. Be sure to enter a comment for your reference.
PN 4104-A
© 2007 CrossCurrent, Inc.
Page 83
INCISIVE PM User Manual
Payment Entry
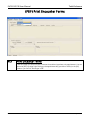
Refunding Unapplied Payments (PC)
1.
Create a Procedure Code for Refunds.
PN 4104-A
© 2007 CrossCurrent, Inc.
Page 84
INCISIVE PM User Manual
Payment Entry
2. Create a charge entry (CE) with the Procedure Code set to R (refund) for a $0.00 charge.
3. The “Non-Covered Charge Handling” box will appear, select “Disable Insurance Coverage”.
PN 4104-A
© 2007 CrossCurrent, Inc.
Page 85
INCISIVE PM User Manual
Payment Entry
4. Go to the next tab “Apply Pymt”
5. Go to the Unapplied payment ID and drill down on the ellipse.
6. Select “Apply this payment to current charge…”
PN 4104-A
© 2007 CrossCurrent, Inc.
Page 86
INCISIVE PM User Manual
Payment Entry
7. This takes you to the original payment entry that was unapplied. Enter the payment amount to the $0.00
charge, which will create a credit balance.
8. Save the entry and save the charge.
9. Go to the [PE] screen.
10. Create a new payment entry.
a)
b)
c)
d)
e)
f)
g)
Assign a Payment ID.
Bring up the patient.
Trans Type—Payment.
Classification—Refund
Amount—the amount of the refund.
Comment—Enter the reason for the refund.
Charge—Enter the charge ID of the $0.00 payment.
11. Enter the Adjustment Amt.
12. Enter the Adjustment Type (Create an adjustment type that reflects the reason for the refund).
13. Save the payment.
PN 4104-A
© 2007 CrossCurrent, Inc.
Page 87
INCISIVE PM User Manual
Day End/Month End
Day End / Month End
CREP/CO/PREP/PRA/PRAR/AR/CE
Recognizing that no two practices work alike, INCISIVE PM was designed to allow a greater degree of flexibility.
With this flexibility, however, comes the need to evaluate current workflows, thus ensuring INCISIVE PM can
work as effectively as possible for your practice.
Before running your first series of reports, we recommend you take a moment to briefly review the information
in the following pages. You will be asked to consider how your office is currently set up; this will allow you to
balance needs that sometimes seem to be in conflict (e.g. security vs. flexibility).
A number of screens will be accessed in order to provide the reports you may need to run. Please note which
screen is being used (found in the upper left corner of the screen) for which report.
PN 4104-A
© 2007 CrossCurrent, Inc.
Page 88
INCISIVE PM User Manual
Day End / Month End
How do I Lock the Day for Posting Charges?
When you are running CREP or PREP, INCISIVE PM ask you to provide the following information:
1.
Transaction CutOff: you can only post changes for the date entered here if you enter a name in the User(s)
– Leave blank for all box.
2. User(s) – Leave blank for all: If you enter a User Name with a Transaction CutOff Date, you can Post
Charges again for that same transaction date. If you leave the User Name blank, this LOCKs the date, and
you will be unable to post for this transaction date.
PN 4104-A
© 2007 CrossCurrent, Inc.
Page 89
INCISIVE PM User Manual
Day End / Month End
In the following example, the screen shows that you cannot Post any services or payments with a transaction
date prior to 8/31/05.
Note – If you have the rights and change these dates, any change you make to the Transaction ‘Post Dates’ do
not affect what you have already posted. It simply “opens” the date, allowing you to continue using this
transaction date.
PN 4104-A
© 2007 CrossCurrent, Inc.
Page 90
INCISIVE PM User Manual
Day End / Month End
How do I Lock the Month for Payment Entries?
This prevents the user from entering charges and payments prior to your selected Transaction CutOff Date.
Locking the month for Payment entries
1.
Select the [PREP] Payment Register Edit/Post.
2. Process Format: Preview. Verify that there are no Payments to be Posted and set Process Format to “Post
Payments”.
3. Select the date for the Transaction Cutoff Date.
4. Set User: to “Blank”. Leaving the User name blank “locks” the date for all users in the provider’s database.
Payments cannot be posted using a transaction date before the cutoff date entered.
PN 4104-A
© 2007 CrossCurrent, Inc.
Page 91
INCISIVE PM User Manual
Day End / Month End
How do I Lock the Month for Charge Entries?
Locking the month for Charge Entries
1.
Select the [CREP] Charge Register Edit/Post.
2. Process Format: Preview. Verify that there are no Charges to be Posted and set Process Format to “Post
Charges”.
3. Select the date for the Transaction Cutoff Date.
4. Set User: to “Blank”. Leaving the User name blank “locks” the date for all users in the provider’s database.
Payments cannot be posted using a transaction date before the cutoff date entered.
PN 4104-A
© 2007 CrossCurrent, Inc.
Page 92
INCISIVE PM User Manual
Day End / Month End
End of Month Reports
Because INCISIVE PM does not require a “Month End”, the user has the flexibility to run any report at any time.
There are a couple of reports that we suggest you print once all payments and charges (transaction dates) are
entered.
PN 4104-A
© 2007 CrossCurrent, Inc.
Page 93
INCISIVE PM User Manual
Day End / Month End
(PRA) Charge Entry
The Provider Revenue Analysis (PRA) is equivalent to a Production Report.
For Report Format, please select By Company - Detail.
This provides a break-down by Classification and by CPT codes.
PN 4104-A
© 2007 CrossCurrent, Inc.
Page 94
INCISIVE PM User Manual
PN 4104-A
Day End / Month End
© 2007 CrossCurrent, Inc.
Page 95
INCISIVE PM User Manual
Day End / Month End
(PRAR) Charge Entry
The Payment Classification Summary is similar to your collection report.
For Report Format, please select “Payments by Classification—Summary”.
This report provides a breakdown by Insurance companies, showing whether or not their payments were
applied.
The Accounts Receivable Analysis is equivalent to your aged receivables summary. Your report format should
be “Total AR Aging by Billing Provider by Financial Classification-Summary”.
PN 4104-A
© 2007 CrossCurrent, Inc.
Page 96
INCISIVE PM User Manual
Day End / Month End
Outstanding Claims
1.
Run the Accounts Receivable Analysis [AR] (Reports>Accounts Receivable>Accounts Receivable Analysis)
2. Select the report that you would like to run, along with the criteria that you filtering for.
3. Select Preview (lower left corner) to view the report prior to printing.
4. If, after the Preview, this is not the criteria that you wanted in the report, click “Close” and reselect the
criteria on the “General” screen.
5. Print the report.
PN 4104-A
© 2007 CrossCurrent, Inc.
Page 97
INCISIVE PM User Manual
Day End / Month End
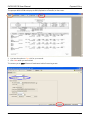
Understanding the Report
The A/R report contains pertinent information that is useful in following up on claims.
•
•
•
•
•
The Patient’s ID and Name makes it easy to locate the account in Patient Administration.
The Transaction ID and DOS makes it easy to look up the Charge Entry.
The total charge amount is listed under the “Gross Amount” column. Each insurance company will have
a grand total following the claims that are listed.
The report will also show any payments that have been applied towards the charge or unapplied payments
that are sitting on the responsible party account.
HINT- If there is a CWO (contractual write off) listed, this claim is a secondary or tertiary claim.
PN 4104-A
© 2007 CrossCurrent, Inc.
Page 98
INCISIVE PM User Manual
•
•
•
•
•
•
Day End / Month End
The Outstanding Balance shows the amount that is still owed, either by the insurance company or the
responsible party. (Total = R/P Portion + Ins Portion)
column indicates whether or not the Insurance has been filed.
Insurance has been filed.
% Insurance has not been filed.
The Ins Paid/Count column shows the date that the primary insurance payment was entered
(transaction date). It also displays the total number of outstanding claims per insurance company.
The last portion of the report shows the actual aging of the claims. “Current”, “Over 30” (days), “Over
60” (days), “Over 90” (days) and “Over 120” (days). This is based on the transaction date, not the date
of service.
PN 4104-A
© 2007 CrossCurrent, Inc.
Page 99
INCISIVE PM User Manual
Day End / Month End
Claim History Report
This report helps determine if a claim has been filed for the charge. It also includes the submission date and
Insurance Company.
1.
Pull up the charge by the ID.
2. Go to the Claim/Stmts History tab.
a) Batch: Shows which Claim Processing Batch ID this claim was filed.
b) Submit Date: The date the claim was processed.
c) Insurance Company: the company that the claim was filed.
d) Form: How the claim was processed (electronic vs. paper).
e) Claim Total: The total amount of the claim.
f)
Insured: The subscriber for the plan.
g) R’ltn: Relationship to the insured.
h) Member number: The membership number the claim was filed under.
i)
Employer: The employer of the insured.
j)
Group Number: The group number of the insurance plan
k) A/A: Accept Assignment, if payment should be coming to the office.
l)
Prior Auth No: Prior Authorization Number.
m) Claim Number:Claim number.
3. If the claim has been filed, but you have not received a response, contact the insurance company.
4. Enter your notes in the F/U Notes tab.
PN 4104-A
© 2007 CrossCurrent, Inc.
Page 100
INCISIVE PM User Manual
•
Day End / Month End
The notes will automatically be date stamped. You will need to enter who you spoke with and the status
of the claim. Also enter any follow-up action that may have taken place.
PN 4104-A
© 2007 CrossCurrent, Inc.
Page 101
INCISIVE PM User Manual
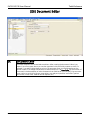
Attachments
RI
ATTACHMENTS
The Attachments feature is used when you have physical documents (e.g. insurance cards) that need to be
included with the patient’s files. Together with your scanner, you can simply and easily scan your documents
for inclusion in the patient’s file.
PN 4104-A
© 2007 CrossCurrent, Inc.
Page 102
INCISIVE PM User Manual
Attachments
Insurance cards or other ID
1.
Lookup patient/responsible party/subscriber/insured
2. Click on Attachments Tab
3. Place front side of Insurance Card, Drivers License, or other document on scanner.
4. Single-click on Attachment; single click on the ellipsis
5. Click on Scan Image
6. Click Preview.
PN 4104-A
© 2007 CrossCurrent, Inc.
Page 103
INCISIVE PM User Manual
Attachments
7. Click on Scan.
8. Select a Type, (e.g. Insurance Card – Back, Insurance Card – Front, Picture, Picture2)
9. Follow the same instructions for the back side of the Insurance card
10. Click Save.
PN 4104-A
© 2007 CrossCurrent, Inc.
Page 104
INCISIVE PM User Manual
Table Reference
Using Shortcuts
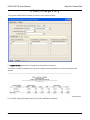
F12
INCISIVE PM was designed to allow you to use shortcuts, which provide quick access to the various screens you
will be utilizing. In the following pages, we have provided explanations of how and where the information is
used. In some cases, you will find task based descriptions in this section.
When you strike the “F12” key, this action prompts INCISIVE PM to display the Menu Shortcut box:
Type the Menu ID that you for the screen you would like (e.g. “DC” takes you to the Diagnosis Codes screen).
Strike “Run” or the <ENTER> key.
INCISIVE PM takes you to directly to the screen you requested.
PN 4104-A
© 2007 CrossCurrent, Inc.
Appendix 1
INCISIVE PM User Manual
Table Reference
(AD) Administrative Documents
AD
Administrative Documents
From this screen you can send collection letters, correspondence or any other type of letter that
you want to keep track. Once the document has been set up in [DE] you can have the information
needed on the document merged in automatically. Once completed the document would be saved
in the administrative documents tab that is seen in the [RI], [AA] and [PA] screens.
PN 4104-A
© 2007 CrossCurrent, Inc.
Appendix 2
INCISIVE PM User Manual
Table Reference
(AL) Alerts
AL
Alerts
This is a user defined field which is used for internal purposes only and can be used by the billing,
collections and the clinical side of the office. The information appears on several screens
including: (RI) registration, (AE) appointment entry, (AA) account management, (PA) patient
administration and (CI) clinical information. You can also view account alerts on the (ADS)
appointment day sheets.
PN 4104-A
© 2007 CrossCurrent, Inc.
Appendix 3
INCISIVE PM User Manual
Table Reference
(ATC) Adjustment Type Codes**
ATC
Adjustment Type Codes**
Allows you to create different types of adjustments. NOT to be used for your insurance
adjustments/contractual write-offs. This is a user defined code that is utilized in the payment
entry screen. For example: if you have already received payments from both the insurance
company and the responsible party, and you have a small balance remaining, you can create a
small balance adjustment code. Enter the amount you want to write off in the adjustment amount
column and select small balance adjustment as your adjustment type.
PN 4104-A
© 2007 CrossCurrent, Inc.
Appendix 4
INCISIVE PM User Manual
Table Reference
(CC) Claim Categories
CC
Claim Categories
This information is generally used to determine which box is checked off in Box 1 of the CMS-1500.
It is also used to determine “claim type” on electronic claims. This information is entered in the
Claim Type Screen (CCT) for the insurance company.
PN 4104-A
© 2007 CrossCurrent, Inc.
Appendix 5
INCISIVE PM User Manual
Table Reference
(CCC) Charge Classification Codes**
CCC
Charge Classification Codes table maintenance**
This is a user defined code used to specify the type of service performed, such as doctor billings,
hospital charges, radiology, laboratory charges, balance forwards, NSF’s or Debit Memos. The
description of these codes is also separated by classification on some reports.
PN 4104-A
© 2007 CrossCurrent, Inc.
Appendix 6
INCISIVE PM User Manual
Table Reference
(CCT) Claim Coding Types
CCT
Claim Coding Types
This tells the system what information to put on the claim. When used in the (PC) screen, it
defines what CPT code to use or if the claim needs a TOS. At a minimum, most providers
create “D” for default and MC for Medicare in the Claim Coding schedules. Example: you may
use CPT code 36415 for your default, but Medicare wants G0001 on their claims. This means
that you would enter G0001 under the procedure code for the claim coding type Medicare.
In the (IC) screen, it also dictates what to put on the various claims. It pulls the information
from the (DR) screen, Example: Insurance #1 wants the Dr's tax id and group number, but
Insurance #2 wants the Dr’s provider number and UPIN # printed in box 33.
PN 4104-A
© 2007 CrossCurrent, Inc.
Appendix 7
INCISIVE PM User Manual
Table Reference
(CD) Clinical Documents
CD
Clinical Documents
From this screen you have the ability to do medical transcription. Once completed the document
would be saved in the [CI] Clinical Information screen under the clinical documents tab. Templates
could also be set up in the [DE] if needed.
PN 4104-A
© 2007 CrossCurrent, Inc.
Appendix 8
INCISIVE PM User Manual
Table Reference
(CHL) Chart Location
CHL
Chart Locations
Chart Locations allows a practice to track where a patient’s physical chart is located. (e.g. Chart
Room, Dr’s Office, Registration Desk, Nurse Station, etc. from within the Appointment Scheduler.)
PN 4104-A
© 2007 CrossCurrent, Inc.
Appendix 9
INCISIVE PM User Manual
Table Reference
(CNT) Contacts
CNT
Contacts
This is our version of an “electronic address book” you can store you phone numbers and
addresses of frequently used contacts. Ex: your medical supply co, restaurants, employees,
facilities, etc.
PN 4104-A
© 2007 CrossCurrent, Inc.
Appendix 10
INCISIVE PM User Manual
Table Reference
(CO) Company**
CO
Company Table maintenance**
General Tab
The clinic name appears on the blue title bar and on the heading of reports. The CO screen also
displays the most current posted date for charges and payments. If you decide to go back and add
transactions for prior dates, you can change the date here and run edit/post again to close.
This is also where the default statement message is managed for your statements. (see the
statement processing section for more information.)
Please complete the following for each practice or database:
Co Name: Name of the doctor or group
Address: Address of the doctor or group
Zip Code: Zip code of the doctor or group
City, State: City and State of doctor or group
Main Phone Number and extension: Main phone number and extension of the doctor or group
Fax Number: Fax number of the doctor or group
T/Id: Tax ID
Default Global Statement Message: This is where the default statement message is managed for
your statements.
Transaction “Post Dates”: This displays the most current posted date for charges and payments.
Note: If you have made a posting error and need to correct it, you must either make adjusting
entries or contact your support personnel to un-post the charge or payment for you.
PN 4104-A
© 2007 CrossCurrent, Inc.
Appendix 11
INCISIVE PM User Manual
PN 4104-A
Table Reference
© 2007 CrossCurrent, Inc.
Appendix 12
INCISIVE PM User Manual
CO
Table Reference
Company Table Maintenance**
Settings Tab
Enable tax setting: This is utilized by another region and is for taxing medical services.
Claim error check at charge: This checks each charge entered at the time of entry to confirm
there are no errors. This is the same as doing a “proof” in the (CP) claims processing screen.
Insurance payment waiting period: The number of days since the original filing date to wait for the
insurance to pay before forcing the balance to the responsible party.
Deposit Future date: max days are the maximum number of calendar days the “deposit date” can
be set into the future based on the current date. The allowable range is 0-7 days.
Close recall reminder: If you have set a recall for the patient, this is where you determine the
number of days past and number of days future for the system to alert you. (e.g. If you have a
recall set on a patient, and the recall is within your date range, the system alerts you when making
an appointment, so you can close the recall.)
Discretionary Allowance (DA): Used to allow for the auto discounting of R/P balances. In order to
utilize this tool, it must first be activated in this screen. Once activated, an additional field on the
(RI) screen called D/A% appears; you need to enter the percentage amount for the “courtesy
adjustment”. The amount entered must be a whole number, not to exceed 100.
This only applies when setting up the DA. When setting up the classification, statement message
and adjustment type defaults, we suggest that you select a unique code for your automatic
allowances. This is so they can be differentiated from your manually entered adjustments.
PN 4104-A
© 2007 CrossCurrent, Inc.
Appendix 13
INCISIVE PM User Manual
Table Reference
(CPC) Claim Processing Center**
CPC
Claim Processing Center**
This table dictates which claim processing center to use when submitting electronic claims. Below
are the required fields that require data.
Sender – ID: Provider, Group or Facility Tax ID
Password: Leave Blank
Receiver – ID: Leave Blank
Password: Leave Blank
Submitter Name: Provider, Group or Facility Name
Sub Contact Name: Provider or person doing the submission of the claims
Sub Ph Number: Provider Telephone Number
Save: When all required fields are complete
PN 4104-A
© 2007 CrossCurrent, Inc.
Appendix 14
INCISIVE PM User Manual
Table Reference
(CPR) Claim Processing Rules
CPR
Claim Processing Rules
This is a view only screen that is maintained by INCISIVE PM. It contains the various claim
formatting options for the different types of companies listed.
PN 4104-A
© 2007 CrossCurrent, Inc.
Appendix 15
INCISIVE PM User Manual
Table Reference
(CT) Claim Types
CT
Claim Types
Information in this screen determines the processing format of the claim. The claim type is used in
the insurance company screen. Some of the most common types are Medicare, Medicaid,
commercial (group & other), BC/BS, Workers Comp and Federal Workers Comp and Default.
PN 4104-A
© 2007 CrossCurrent, Inc.
Appendix 16
INCISIVE PM User Manual
Table Reference
(CTY) Counties
CTY
Counties
This screen has been set up using the standard US Census Bureau counties list.
PN 4104-A
© 2007 CrossCurrent, Inc.
Appendix 17
INCISIVE PM User Manual
Table Reference
(DC) Diagnosis Codes**
DC
Diagnosis Codes Table Maintenance**
This screen allows you to add or modify diagnosis codes (ICD-9). Within the diagnosis code setup
you can also limit age and gender as appropriate. You also have the ability to mark the code as
“non-specific; this alerts the user, during charge entry, that a more specific code is required.
These codes may also be marked “inactive” or “disallow use” if they change the next year or
become invalid.
Default diagnosis can also be set up thru the case coverage tab in the RI screen, automatically
appearing on the charge entry screen. It is the user's responsibility to keep up to date with all
diagnosis codes.
ID: Diagnosis Code
Description: Description of diagnosis code. ICD-9 code descriptions are limited to 51 characters.
Description Long: Extended description of diagnosis code. ICD-9 “Long” descriptions may use up
to 251 characters.
Age – From – To: Ability to enter an age limit for specific diagnosis codes
Gender: Ability to be gender specific for diagnosis codes
Not Specific:
Comments: For Internal Use, does not populate data on electronic or paper claims.
Inactive or Disallow Use: Ability to make a diagnosis code inactive and disallow use.
PN 4104-A
© 2007 CrossCurrent, Inc.
Appendix 18
INCISIVE PM User Manual
Table Reference
(DE) Document Editor
DE
Document Editor
Document templates are created and stored here. After creating the document in Word, you
import it into the system, where you can then populate it with the fields you want to show. For
example, if you want Patient Name to print on the encounter form, you would need to put the
patient’s name in the merge field where the name should print. The Description list (left column of
the screen) includes examples of other documents that could be set up in the [DE] (e.g. encounter
forms, return to work/school forms, prescriptions, pre and post operative instructions, patient
phone calls, nurses notes, medical records request, etc.)
PN 4104-A
© 2007 CrossCurrent, Inc.
Appendix 19
INCISIVE PM User Manual
Table Reference
(DR) Providers**
DR
Providers**
The DR screen enables users to enter practice identification data for each Physician, Physicians
Assistant, and Nurse Practitioner in your practice. This includes practice identification numbers
for each claim coding type including: Medicare, Medicaid, BC/BS, Worker’s Compensation, etc.
Include the NPI number and qualifiers for each provider number. This screen is also used to setup
the Provider’s appointment schedule and schedule exceptions (holidays, vacations, etc).
Name – Last: Last name of provider
First: First name of provider
Address, City, St, Zip: Address information of provider
Phone Number, Cell Phone and Email: Information of provider
Prof Lic Type (Professional License Type): e.g. DO, MD, NP or PA
Lic Num: State license number of provider
Social Security: Social Security number of provider
Tax Id: Tax Id of provider
UPIN: UPIN number of provider
Nat’l P/Id (National Provider Number): NPI number of provider
Payee: Click on ellipsis to choose from the Payee Table
Specialty: Click on the ellipsis to choose from the Specialty Table
Taxonomy Code: Enter the CORRECT taxonomy code for provider
Provider Group: Attach to a group if applicable.
Appt Provider: Check box if appointment will be scheduled for provider
PN 4104-A
© 2007 CrossCurrent, Inc.
Appendix 20
INCISIVE PM User Manual
Table Reference
Non-person Entity: Not implemented, leave blank
Claim Coding Schedule Grid Box
Claim Coding Type: Click on the ellipsis to choose from the Claim Coding Type Table, e.g. Default,
Medicare, Medi-Cal, Workers Comp, etc.
Prov Num: Enter the provider number for the specific Claim Coding Type.
Provider Number Qualifier: Click on the down arrow to choose from the following drop down
menu.
Group Num: Enter the group number for the individual Claim Coding Type, if applicable.
Group Number Qualifier: Click on the down arrow to choose from the above drop down menu.
GRP NPI: Check box when provider belongs to a group with an NPI number for the individual Claim
Coding Type, e.g. you are a group with Medicare but not with any other insurance company. If you
have a group NPI but no group legacy ID, you will need to fill in the Provider Group Number (Grp #)
field with the Provider Number (PIN #).
Credentials: Enter the provider crendentials.
P/Agmt (Participating Agreement): Check this box if the provider is participating for the individual
Claim Coding Type.
A/Assign (Accept Assignment): Check this box if the provider has signed a contract with the
individual Claim Coding Type to accept assignment of payment.
SOF: Signature on File, check this box if the provider has a signature on file with the payer.
Comments: For Internal Use, does not populate data on electronic or paper claims
Inactive: Check box if the provider is inactive.
Disallow Use: Check box to disallow use of the provider.
PN 4104-A
© 2007 CrossCurrent, Inc.
Appendix 21
INCISIVE PM User Manual
Table Reference
(DSC) Disability Status Code
DSC
Disability Status Code
This screen allows you to add the disability status code of a Worker’s Comp patient.
PN 4104-A
© 2007 CrossCurrent, Inc.
Appendix 22
INCISIVE PM User Manual
Table Reference
(EM) Employers
EM
Employers
This screen allows you to set up an employer information file. Once it is set up in the database, the
information is available for you the next time you are working in the system. This is especially
helpful when you have several patients from one employer.
PN 4104-A
© 2007 CrossCurrent, Inc.
Appendix 23
INCISIVE PM User Manual
Table Reference
(FC) Financial Classes**
FC
Financial Class Table Maintenance**
This is referenced when in the RI – Registration and Related Information screen.
The financial class set up allows you to separate the financial responsibility type such as private
pay, Medicare, Medicaid, HMO, PPO, Commercial, Cash Basis or Worker’s comp for internal
reporting purposes.
PN 4104-A
© 2007 CrossCurrent, Inc.
Appendix 24
INCISIVE PM User Manual
Table Reference
(FG) Financial Groups
FG
Financial Group Table Maintenance
This allows you to group the financial classes together.
PN 4104-A
© 2007 CrossCurrent, Inc.
Appendix 25
INCISIVE PM User Manual
Table Reference
(FST) Fee Schedule Types**
FST
Fee Schedules Types**
This screen allows you to set up different fee rates for each claim coding type. Set up D for default
as your regular fee schedule; Medicare, Worker’s Comp and other insurance companies may
require their own fee schedules. Fee schedules are used in the insurance company screen and on
the individual procedure codes.
PN 4104-A
© 2007 CrossCurrent, Inc.
Appendix 26
INCISIVE PM User Manual
Table Reference
(FT) Facility Types**
FT
Facility Type Table Maintenance**
This is where you classify the place of service for the facility. For example your ID could be H for
hospital, the description would then be hospital and your place of services would be 21 - IP
Hospital, 22 - OP Hospital and 23 - ER.
If your hospitals have different NPI numbers for each area of the hospital, you will need to set up a
facility for each one (e.g. Providence Hospital inpatient and Providence Hospital outpatient). This
is only needed if there are separate NPI numbers within one location.
Overrides - You also have the ability to override. Example say the insurance wants you to start
using something different for this place of service on June 1, 2006.
PN 4104-A
© 2007 CrossCurrent, Inc.
Appendix 27
INCISIVE PM User Manual
Table Reference
(FUR) Follow-up Reasons
FUR
Follow-up Reasons
This is a user defined table and is used to indicate the reason a follow-up is necessary.
PN 4104-A
© 2007 CrossCurrent, Inc.
Appendix 28
INCISIVE PM User Manual
Table Reference
(FY) Facilities**
FY
Facilities Table Maintenance**
This is where you set up each facility that the doctor performs services such as offices, hospitals
or other locations. This information is utilized by the appointment scheduler and also printed in
box 32 of the CMS-1500. In order to have the facility show on the appointment scheduler, the
“appt location” check box must be checked.
Nat’l P/ID: Enter your Facility NPI Number here
Tax ID: Enter your Primary Legacy Number here
Entries in the Claim Coding Schedules grid override the Tax Id value based on the Claim Coding
Type. The override value and id qualifier is taken from the corresponding Secdry Id and Secondary
Number Type columns. The HCFA Id Code column, while it continues to be visible, is for reference
purposes only and is no longer utilized by any claim processing.
Claim Coding Type: Co-Pay, Default, Medi-Cal, Medicare, Workers Comp
HCFA ID Code: No Longer Used
Secdry ID: The specific number for facility prints in box 32b of a claim form
Secondary Number Type: From the drop down menu select the type of number you have entered
in the Secdry ID field.
PN 4104-A
© 2007 CrossCurrent, Inc.
Appendix 29
INCISIVE PM User Manual
Table Reference
(IC) Insurance Companies**
IC
Insurance Companies Table Maintenance**
The IC screen is used to set up or modify the insurance company’s information, name, address,
phone number, claims processing center, control ID and other related information. It is also
used for specifying which paper form to use and to record the NPI or legacy numbers for
specific carriers. When using paper forms, Processing center and the payer id are not required.
To print claims that are transmitted to THIN, the control ID should be Print instead of Paper.
ID: A numeric or alphabetic character, to be determined by office
Co Name: Insurance Name
Address, Zip Code, City, State: Address information of insurance company
Main Phone Number: Telephone number of insurance company
Verif Phone Number:
Fax Number: Fax number of insurance company
Email: Email address of insurance company
Website: Website of insurance company
Insurance Group:
Def’lt Pymt Class (Default Payment Class): Payment Type, e.g. if Aetna is the insurance
company the Aetna payment would be the Default Payment Class.
Remit Pymt Class (Remit Payment Class): Remittance Type, e.g. if Aetna is the insurance
company the Aetna payment would be the Remit Payment Class.
Processing Center: Leave blank when sending on paper claims to the insurance company.
Medigap Code: Medigap number for insurance. Medigap numbers can be obtained from
www.nhicmedicare.com
PN 4104-A
© 2007 CrossCurrent, Inc.
Appendix 30
INCISIVE PM User Manual
Table Reference
Nat’l Payer Id: Not implemented, leave blank
Paper – Clm Form: Choice between the old CMS 1500 and the new CMS 1500 form
NPI St (Paper NPI Status): Choice between No Supported, Legacy Number & NPI, or NPI Only.
Per CMS guidelines, submissions should contain both legacy number and NPI until further
notice.
Elect NPI Status: Choice between Not Supported, Legacy number & NPI, or NPI only. Per CMS
guidelines, submissions should contain both legacy number and NPI until further notice.
Payer Ids Grid Box:
Processing Center: NHS or OAX
Submission Id: Payer id from Processing Center published payer list.
Remittance Id: The number 1 and tax id from the payer, e.g. 19505876717
Payment Only: Leave box blank. Indicates that this insurance company is to be used only for
the entry of payments.
Claim Type Schedules Grid Box:
Claim Type: If the Insurance Company has not assigned PIN/GRP numbers you will want to use
the default (“D”) which should use the Tax ID as the provider number, e.g. Aetna insurance
falls under your Default. If insurance is Medicare, Medi-Cal or Worker Comp, choose the
appropriate Claim Type.
Fee Schedule Type: Choose the appropriate Fee Schedule, e.g. Cash Basis, Co-Pay, Default,
Medicare, Medi-Cal, etc.
Claim Coding Type: Choose the appropriate Claim Coding Type, e.g. Co-Pay, Default, Medicare,
Medi-Cal, etc.
P/Clm (Process Claims): Choice of Yes, No and Hold.
Form (Claim Form): Choice of Electronic or Paper CMS 1500
NDC Req (National Drug Code Required):
Box 24K: Check box if Provider ID is required in box 24K(Old CMS 1500 Form) 24J(New CMS
Form)
Times 24: Check box to show 24K(Old CMS 1500 Form) 24J(New CMS Form)
Write-Off Setting: Not implemented, leave blank
Comments: Local Use does not populate data on electronic or paper claims.
Inactive: Check box if the insurance company is now inactive.
Disallow Use: Check box to disallow use of insurance company.
PN 4104-A
© 2007 CrossCurrent, Inc.
Appendix 31
INCISIVE PM User Manual
Table Reference
(IG) Insurance Groups**
IG
Insurance Group Table Maintenance**
This screen allows you to group insurance companies together. For example: if you have several
Aetna insurance companies, you can put them in the same group. It is helpful when running
reports or doing various other tasks within the application, where a group can be entered as
opposed to an individual insurance company. Also, in the payment screen you may post a payment
to one of the companies within the group, regardless whether or not that is the billing insurance,
and INCISIVE PM will not give you an insurance company mismatch error. The system
automatically posts the payment to the appropriate insurance on the charge.
PN 4104-A
© 2007 CrossCurrent, Inc.
Appendix 32
INCISIVE PM User Manual
Table Reference
(LAN) Languages
LAN
Languages
This screen has been set up using the ISO 639 language tables. When you pull up the patient in the
[RI] screen, you can identify which language he/she speaks using the information that has been
pre-populated here.
PN 4104-A
© 2007 CrossCurrent, Inc.
Appendix 33
INCISIVE PM User Manual
Table Reference
(LT) License Types**
LT
License Types**
This screen has been set up using the standard list of provider credentials and licensing types.This
is used when setting up [DR] and [RD] screens. It identifies the provider’s credentials (e.g. MD, DO,
NP, and PA).
PN 4104-A
© 2007 CrossCurrent, Inc.
Appendix 34
INCISIVE PM User Manual
Table Reference
(MED) Medications
MED
Medications
This screen allows you to set up a medications file.
PN 4104-A
© 2007 CrossCurrent, Inc.
Appendix 35
INCISIVE PM User Manual
Table Reference
(MRL) Medical Records Locations
MRL
Medical Records Locations
This is where the code files for the medical records locations are maintained. It is used to track
medical records requested on a patient in the {PA} patient administration screen under the
miscellaneous tab.
PN 4104-A
© 2007 CrossCurrent, Inc.
Appendix 36
INCISIVE PM User Manual
Table Reference
(PC) Procedure Codes**
PN 4104-A
© 2007 CrossCurrent, Inc.
Appendix 37
INCISIVE PM User Manual
PC
Table Reference
Procedure Codes Table Maintenance**
General Tab
This is one of the most important screens. It not only has an impact on financial settings but on
the reporting of productivity as well.
In addition to entering basic procedure codes, you will need to enter procedure codes with a
modifier, too. (Example: After entering procedure code 93320, you will want to enter 93320-26,
to include occasions when the modifier is used).
Id: Procedure Code
Description: Description of procedure code
Classification: This is hard coded by INCISIVE PM. Click on the ellipsis to make your selection. The
user must make the appropriate selection (e.g. 1=Immunization, 2= Laboratory—in order for the
CLIA# to print on claims that have lab work, you must select “laboratory” for all CPT codes
relating to lab work, etc).
Department: Once the department is set up you can assign procedure codes to appropriate
departments such as office visit, x-ray, or laboratory, for reporting purpose.
Recall – Reason: Why the patient would need to come back for follow up after specific procedure.
Relative Value Units: Not implemented at this time.
National Drug Code: this is the NDC for medication.
Lag Days: How many days in between the time the initial procedure is done and the time the
recall is sent out.
Age – From – To: Ability to enter an age limit for specific procedure codes
Gender Limit: Ability to enter an select Male or Female only for specific procedure codes
Claim Coding Schedules Grid: This grid is used when specific insurance companies require unique
information. Also see CCT – Claim Coding Schedules Table Maintenance.
Claim Coding Type: e.g. Default, Medi-Cal, Medicare, Triwes, etc.
Procedure Code: Procedure code specific for insurance
Type of Service: NO LONGER USED – view only
Prt Description (Print Description): If box is checked, description will print out on the claim form
P/Only (Paper Only): If box is checked, claim must be filed on paper only
S/Unit (Single Units): If box is checked, can only be filed as single units. The contract settings in
INCISIVE MD should match for single units.
Block 19 – Local Use: Information to print in box 19 on a CMS 1500 claim form.
Fee Schedules Grid: Also FST – Fee Schedule Types Table Maintenance.
Fee Schedule Type: Type of fee (e.g. cash basis, default, Medi-Cal, Medicare, etc).
Co-Pay: Leave blank
Charge Amount: What you charge for the procedure. To be determined by your office.
Profile Amount: What the insurance company pays for the procedure.
Patient Amount: What the patient is expected to pay. Generally used for cash patients.
Patient %: Leave blank
PN 4104-A
© 2007 CrossCurrent, Inc.
Appendix 38
INCISIVE PM User Manual
Table Reference
Sec O/R (Secondary Override): Let default to a checked box.
G/Days (Global Days): Days allowed between procedures. Generates error at charge entry if
within global days.
100%: This box MUST be checked if you DO NOT want any patients to get a statement (e.g.
Medicaid and workers comp patients), the 100% box must be checked off on the individual fee
schedule for the procedure code.
Non-Cov (Not Covered): No insurance coverage.
Comments: For Internal Use, does not populate data on electronic or paper claims.
For Claim Coding Schedules, see CCT.
For Fee Schedules, see FST.
Cash Patients
General Tab
If the amount that you charge the patient is different from the amount you charge the carrier,
you will need to set up a Fee Schedule Type for Cash. Enter the charge Amt, Profile Amt and
Patient Amt. If you check Non-Covered Charge (by checking the box), the claim will not print.
PC
Procedure Group Codes tab
This tab is used when grouping the procedure codes together. (e.g. suppose you want to group
procedure code 99213 with 93325, 93307. After setting up procedure 99213, go to Procedure
Group Codes and enter the corresponding codes.)
PN 4104-A
© 2007 CrossCurrent, Inc.
Appendix 39
INCISIVE PM User Manual
Table Reference
(PCD) Procedure Code Departments
PCD
Procedure Code Department Table Maintenance
This is where you can set department for each area of the practice such as pediatrics, cardiology,
x-rays, laboratory and others. It allows you to get procedure analysis by department.
PN 4104-A
© 2007 CrossCurrent, Inc.
Appendix 40
INCISIVE PM User Manual
Table Reference
(PCT) Payment Classification Codes
PCT
Payment Classification Codes
This allows you to describe the type of payment you are entering. For example Medicare payment,
Medicaid payment, patient payment, insurance payment etc. the information can be entered on
the (IC) insurance company screen in the payment classification field. If you entered a default
payment classification in the (IC) screen, when you enter a payment from that insurance company,
it will default that information for you. This saves time and eliminates the need to search for it
when you are entering a payment.
NOTE: Because Payment Classification Codes also print out on the statements to allow for easier
reading, you should keep this in mind when entering the description.
PN 4104-A
© 2007 CrossCurrent, Inc.
Appendix 41
INCISIVE PM User Manual
Table Reference
(PEF) Print Encounter Forms
PEF
Print Encounter Forms
From this screen you can print your encounter forms either by patient or by appointment. You can
get to the [PEF] by either right clicking on the appointment day, provider or facility in the [AS]
screen or you can hit F12 and type in PEF.
PN 4104-A
© 2007 CrossCurrent, Inc.
Appendix 42
INCISIVE PM User Manual
Table Reference
(PG) Provider Groups
PG
Provider Groups
In a large clinic setting you may wish to group your providers together by specialty (e.g. general
ortho, spinal, neuro, etc.).
PN 4104-A
© 2007 CrossCurrent, Inc.
Appendix 43
INCISIVE PM User Manual
Table Reference
(PH) Pharmacies
PH
Pharmacies
This screen allows you to set up a pharmacy database file with the pharmacies name, location,
phone number and other relevant information.
PN 4104-A
© 2007 CrossCurrent, Inc.
Appendix 44
INCISIVE PM User Manual
Table Reference
(PIR) Primary Insurance Reflag
PIR
Primary Insurance Reflag
This function, when run, goes through your system and resets all claim flags to “yes” for
claims not paid in the specified period of time specified. The next time you process claims,
it picks up those claims.
PN 4104-A
© 2007 CrossCurrent, Inc.
Appendix 45
INCISIVE PM User Manual
Table Reference
(PMC) Payment Methods**
PMC
Payment Methods Table Maintenance**
PMC allows you to set up the different codes describing how the payment was made. It is part of
the payment screen (PE) and identifies the method of payment--cash, check, non-cash
adjustments, credit cards, etc.
You also have the ability to decide whether or not the method prints on the daily deposit slip, by
checking the “include in deposit” box. For example: if you do a non-cash adjustment, you may not
want it to print on your deposit slip.
PN 4104-A
© 2007 CrossCurrent, Inc.
Appendix 46
INCISIVE PM User Manual
Table Reference
(POS) Place of Service Codes**
POS
Place of Service Codes**
This screen has been set up using the standard HIPAA Place of Service codes.
PN 4104-A
© 2007 CrossCurrent, Inc.
Appendix 47
INCISIVE PM User Manual
Table Reference
(PRP) Print Registration Profiles
PRP
Print Registration Profiles
From this screen you can print your registration summaries either by patient or by appointment.
You can get to the (PRP) by either right clicking on the appointment day, provider or facility in the
(AS) screen or you can hit F12 and type in PRP
PN 4104-A
© 2007 CrossCurrent, Inc.
Appendix 48
INCISIVE PM User Manual
Table Reference
(PTC) Patient Classifications
PTC
Patient Classifications
This is a user defined field. It can be utilized for anything that the client wants to note on a
patients [RI] screen. Some offices that have multiple locations use it to identify which location the
patient is seen at quickly, while others use it to identify the insurance/account type they may
have.
PN 4104-A
© 2007 CrossCurrent, Inc.
Appendix 49
INCISIVE PM User Manual
Table Reference
(PY) Payees**
PY
Payee Table Maintenance**
PY allows you to set up the name and address of the doctor, clinic or organization to direct
payment. This information will print out on box 33 of the CMS-1500 form. It is also where the
electronic statement’s customer code and password are stored. Statements also pull the “pay to”
and return address from the (PY) screen. If you have a multi physician office and you want the
patient to receive only one statement from your office, even though they have seen different
doctors at you facility, the payee id #’s must be the same on the (DR) screen for all the physicians
involved.
The group NPI number goes on this screen.
Un-applied payments use the Payee in the Registration screen. All others use the Payee in the
Provider screen.
PN 4104-A
© 2007 CrossCurrent, Inc.
Appendix 50
INCISIVE PM User Manual
Table Reference
(RD) Referring Doctors**
RD
Referring Doctors**
The RD screen is used to record providers who refer patients. This information populates in the
referring doctor field on both printed and electronic claim forms. You need to include the UPIN #.
Name – Last and First: Last and first name of referring physician
Address, City, State, and Zip: Address information of referring physician
Phone, Fax, and Cell Phone Number: Telephone, Fax and Cell phone number of referring physician
Pro Lic Type (Professional License Type): Click on the ellipsis to choose from the License Type
Table, e.g. MD, DO, NP, etc.
Lic Number: State License Number of referring physician
Social Security: Social Security of referring physician
Tax Id: Tax id of referring physician
UPIN: UPIN number of referring doctor. This field is used as the Primary Legacy Identifier
Nat’l P/ID: NPI number of referring doctor
UPIN Override Schedule Grid:
The override values and ID qualifiers are taken from the corresponding Ovr Num and Override
Number Identification columns.
PN 4104-A
© 2007 CrossCurrent, Inc.
Appendix 51
INCISIVE PM User Manual
Table Reference
(RPC) Responsible Party Classification
RPC
Responsible Party Classification
This allows you to group responsible parties for statement processing purposes. For example: You
could create a classification for people in Collections. Then when processing statements you could
exclude these people from the normal statement run and review/run them differently. If you do
employee physicals you could classify employers as different responsible parties than people.
PN 4104-A
© 2007 CrossCurrent, Inc.
Appendix 52
INCISIVE PM User Manual
Table Reference
(RR) Recall Reason Codes
RR
Recall Reason Codes
RR is designed to record and track the reasons you want the patients to return. If you save your
reasons in the database, they will be more readily available to you the next time.
PN 4104-A
© 2007 CrossCurrent, Inc.
Appendix 53
INCISIVE PM User Manual
Table Reference
(RS) Referral Sources
RS
Referral Sources
This field allows you to set up a database file that tells you how this patient was referred to you.
Examples include: physician referral, provider referral service or a friend.
PN 4104-A
© 2007 CrossCurrent, Inc.
Appendix 54
INCISIVE PM User Manual
Table Reference
(SAM) Statement Aging Messages
SAM
Statement Aging Messages
SAM messages appear on the statements, if you choose to print your statements with the aging
detail. You will need to change the statement message prior to sending your statements for the
first time, since they are set with generic messages. The messages can be changed anytime; you
just can’t change the ID#. If you still want the aging to print but do not want a message, delete the
description.
PN 4104-A
© 2007 CrossCurrent, Inc.
Appendix 55
INCISIVE PM User Manual
Table Reference
(SB) Service Branches
SB
Service Branches
This screen has been set up using the standard list of uniform services. This information is used
for CHAMPUS and CHAMPVA claims. (Army, Navy, Air Force, Marines, etc).
PN 4104-A
© 2007 CrossCurrent, Inc.
Appendix 56
INCISIVE PM User Manual
Table Reference
(SMC) Statement Message Codes
SMC
Statement Message Codes
SMC allows you to enter messages that you to include on the statements. (Example: a message
informing the patient that his insurance company has paid, and the remaining balance is his
responsibility.) Select this message to print on the statement when you post the payment. It can
also be used for the individual procedure code lines thru the charge entry screen under the
financial management tab.
PN 4104-A
© 2007 CrossCurrent, Inc.
Appendix 57
INCISIVE PM User Manual
Table Reference
(SP) Specialties
SP
Specialties
This screen has been set up using the standard list of specialists and is accessed from the [DR]
Providers screen & the [RD] Referring Doctors screen.
PN 4104-A
© 2007 CrossCurrent, Inc.
Appendix 58
INCISIVE PM User Manual
Table Reference
(ST) States**
ST
States**
This screen has been set up using the standard US Postal Service list and state codes.
PN 4104-A
© 2007 CrossCurrent, Inc.
Appendix 59
INCISIVE PM User Manual
Table Reference
(TC) Taxonomy Codes**
TC
Taxonomy Codes**
This screen has been set up using the standard HIPAA Taxonomy codes (also known as Specialty
Codes), these 9-digit numbers are assigned under the HIPAA provisions to health care providers,
digitally encoding their specialty, thus facilitating electronic billing.
PN 4104-A
© 2007 CrossCurrent, Inc.
Appendix 60
INCISIVE PM User Manual
Table Reference
(TD) To Do
TD
To Do
Follow up activities can be set thru the charge, registration, account management and patient
administration screens they can be assigned to individual users and tracked from here if they have
a follow-up date assigned to it. If you have administrative documents (e.g. collection letters,
clinical documents, recalls or follow up letters), they can be integrated from here by right clicking,
highlighting the row, and selecting the document you want to print. These documents are then
recorded in the appropriate history listing. There are also generic fields available for selection
when creating a document using the [DE] Document Editor form to allow proper merging from the
[TD] form.
PN 4104-A
© 2007 CrossCurrent, Inc.
Appendix 61
INCISIVE PM User Manual
Table Reference
(TRT) Treatment Referral Types
TRT
Treatment Referral Types
Used in [PA] patient administration to determine what type of referral is being issued. Examples
would be consults, evaluation and treatment, follow-up care, etc.
PN 4104-A
© 2007 CrossCurrent, Inc.
Appendix 62
INCISIVE PM User Manual
Table Reference
(USR) Users**
USR
User Table Maintenance**
Each user must log into the system with their individual user name and password. The practice
administrator or authorized person is responsible for the set-up and maintenance of the User
Table. Each user can be authorized for individual or multiple databases and granted privileges for
all tasks or limited to only specific tasks. User groups can also be set up. (e.g. you can set the
appointment schedulers up as a group, providing access to information pertinent to scheduling
and limiting access to other areas like charge and payment entry, etc.) Each user, at a minimum,
must have at least the default rights set up.
The restore login check box is used as a security measure. If the box is checked, and you maximize
the application, INCISIVE PM will ask you to re-enter your password. It then brings up the same
screen you were using before the screen was minimized.
When a user is no longer authorized to access the system (e.g. terminated employee), the
administrator must change the user to inactive status and disallow access. The user should not be
deleted from system as this affects the transaction history. There is also a user access log that
tracks the date and time when a user logs on and off. If you want to look at the access log by
either date range or user, use UAL.
Please complete the following information for each user.
ID: Generally, the first and last initials of the individual’s name
Name – Last: Last name of the individual
First: First name of the individual
Password: Unique password for each individual
FF Background Color: Background color for data entry fields.
PN 4104-A
© 2007 CrossCurrent, Inc.
Appendix 63
INCISIVE PM User Manual
Table Reference
Default Rights: To be determined on an individual bases. Each user at a minimum must have at
least the default rights set up.
Restore Login: Checked. This box can be used as a security measure. If the box is checked and the
application is minimized and then maximized, you will be asked to re-enter your password. It will
then bring up the same screen you were at before you minimized it.
Authorized Databases: Each user can be authorized for individual or multiple databases and
granted privileges for all tasks or limited to only specific tasks.
Comments: For Internal Use
Menu exception(s) to default rights: e.g. you want a user to only have View Only rights on
everything but be able to have Administrator Rights to the RI – Registrations and Related
Information screen.
User Group exception(s) to default rights: e.g. a user groups can be set up for appointment
schedulers, so that they can only have access to information pertinent to scheduling and not have
or have limited access to other areas like charge and payment entry, etc.
Inactive and Disallow Use Check Boxes: When a user is no longer authorized to access the system
(e.g. terminated employee), the administrator needs to change the user to inactive status and
disallow use. The user should not be deleted from system as this affects the transaction history.
There is also a user access log that tracks the date and time the user access the application. For a
specific date use the (UAL)
PN 4104-A
© 2007 CrossCurrent, Inc.
Appendix 64
INCISIVE PM User Manual
Table Reference
(ZC) Zip Codes**
ZC
Zip Codes**
This screen has been set up using the standard US Postal Service list of zip codes.
PN 4104-A
© 2007 CrossCurrent, Inc.
Appendix 65