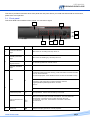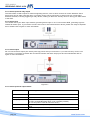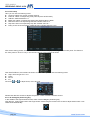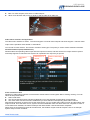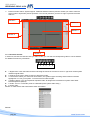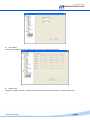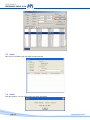
1
DIGITAL VIDEO RECORDER
USER MANUAL
HRVR0404S
HRVR0804S
HRVR1604S
HR0905/ver.1.0
www.hrcctv.com
USER MANUAL
HRVR0404S-0804S-1604S
NORME GENERALI DI SICUREZZA - General safety recommendations
Sicurezza delle persone - Safety warnings
Leggere e seguire le istruzioni - Tutte le istruzioni per la sicurezza e per l'operatività devono essere lette e seguite
prima che il prodotto sia messo in funzione.
Precauzioni particolari - Rispettare tassativamente l'ordine delle istruzioni di installazione e collegamento descritte nel
manuale. Verificare le indicazioni riportate sulla targa di identificazione: esse devono corrispondere alla vostra rete
elettrica di alimentazione ed al consumo elettrico. Conservate le istruzioni per una consulta futura.
Read and follow the instructions - Read the installation instructions before connecting the system to its power source.
Follow these guidelines to ensure general safety.
In order to prevent injury, burns or electrical shock to yourself and others, follow the connection instruction plan carefully.
Sicurezza del prodotto - Product Safety
Non posizionare in prossimità di liquidi oppure in un ambiente ad umidità eccessiva.
Non lasciare penetrare del liquido o corpi estranei all'interno dell'apparecchiatura.
Non ostruire le griglie di aerazione.
Non sottoporre all'esposizione dei raggi solari oppure in prossimità di fonti di calore.
Do not use the product in a wet location.
Never push a foreign object through an opening inside the product.
Slots and openings are provided for ventilation and should never be covered.
Do not place under direct sunlight or heat sources.
INFORMAZIONI SULL’AMBIENTE - ENVIRONMENT INFORMATION
Note per lo smaltimento del prodotto valide per la Comunità Europea
Questo prodotto è stato progettato e assemblato con materiali e componenti di alta qualità che possono
essere riciclati e riutilizzati. Non smaltire il prodotto come rifiuto solido urbano ma smaltirlo negli appositi
centri di raccolta. E’ possibile smaltire il prodotto direttamente dal distributore dietro l’acquisto di uno
nuovo, equivalente a quello da smaltire. Abbandonando il prodotto nell’ambiente si potrebbero creare gravi
danni all’ambiente stesso. Nel caso il prodotto contenga delle batterie è necessario rimuoverle prima di
procedere allo smaltimento. Queste ultime debbono essere smaltite separatamente in altri contenitori in
quanto contenenti sostanze altamente tossiche.
Il simbolo rappresentato in figura rappresenta il bidone dei rifiuti urbani ed è tassativamente vietato riporre
l’apparecchio in questi contenitori.
L’immissione sul mercato dopo il 1° luglio 2006 di prodotti non conformi al DLgs 151 del 25-07-05 (Direttiva
RoHS RAEE) è amministrativamente sanzionato.
Disposal of waste products for European Union
This products was designed to minimize their impact on the environment by reducing or eliminating hazardous materials and
designing for recyclables.
This product should be handed over to a designated collection point, e.g., on an authorized one -for-one basis when you buy a
new similar product or to an authorized collection site for recycling waste electrical and electronic equipment. Improper
handling of this kind of waste could have a possible negative impact on the environment and human health due to potentially
hazardous substances.
This symbol indicates that this product has not to be disposed of with your household waste, according to the WEEE Directive.
For more information about where you can drop off your waste equipment for recycling, please contact your local city waste
authority, or your household waste disposal service.
GARANZIA - Warranty
Questa garanzia ha validità di 2 anni a partire dalla data di acquisto assicurata solo dietro presentazione della fattura o
scontrino rilasciati al cliente dal rivenditore.
L’assistenza gratuita non è prevista per i guasti causati da:
-Uso improprio del prodotto, immagazzinamento inadeguato, cadute o urti, usura, sporcizia, acqua, sabbia, manomissione da
personale non autorizzato del prodotto rispetto a quanto previsto nei manuali d’uso inclusi.
-Riparazioni, modifiche o pulizia effettuate da centri assistenza non autorizzati da HR EUROPE.
-Danni o incidenti le cui cause non possono essere attribuite alla HR EUROPE, comprendenti e non limitati a fulmini, eventi
naturali, alimentazione e ventilazione inadeguata.
This warranty is valid for 2 years from the date of purchase obtained only against presentation of the original invoice/
cash ticket issued to the customer by the retailer.
Warranty repair service is excluded if damage or defects have been caused by:
-Improper use, incorrect storage, dropping or shocks, corrosion, dirt, water, handing or operation of the product as referred to
in the users’ manuals.
pag.2
www.hrcctv.com
USER MANUAL
HRVR0404S-0804S-1604S
SUMMARY
1.
Introduction ..........................................................................................................................6
1.1
1.2
1.3
1.4
2.
Warnings and cautions ....................................................................................6
Package contents ...........................................................................................6
CD-ROM software ...........................................................................................6
Features and specifications ..............................................................................7
Overview and controls.........................................................................................................8
2.1
2.2
2.2.1
2.2.2
2.3
2.4
2.5
2.5.1
2.5.2
3.
Front panel ..................................................................................................9
Rear panel ...................................................................................................11
Overview.............................................................................................................................. 11
Connection sample .................................................................................................................. 11
Remote control .............................................................................................12
Mouse control ...............................................................................................13
Virtual keyboard and front panel .......................................................................15
Virtual keyboard ..................................................................................................................... 15
Front panel ........................................................................................................................... 15
Installation and connections.............................................................................................15
3.1
3.2
Check unpacked DVR ......................................................................................15
HDD installation.............................................................................................15
3.3
3.4
Connecting power supply .................................................................................16
Connecting video input and output devices ..........................................................16
3.5
Connecting audio input and output,looping video, matrix ........................................17
3.2.1
3.2.2
3.2.3
3.4.1
3.4.2
3.5.1
3.5.2
3.5.3
3.5.4
3.5.5
3.5.6
3.5.7
3.6
3.7
3.8
4.
Choose HDDs ......................................................................................................................... 15
Calculate HDD size .................................................................................................................. 15
HDD installation ..................................................................................................................... 15
Connecting video input ............................................................................................................. 16
Connecting video output ........................................................................................................... 16
Audio input/one audio output..................................................................................................... 17
Matrix video output/ video looping............................................................................................... 17
Alarm input and relay output...................................................................................................... 18
Alarm input........................................................................................................................... 18
Alarm output ......................................................................................................................... 18
Alarm input and output details.................................................................................................... 18
Relay output description ........................................................................................................... 19
RS232 .........................................................................................................20
RS485 .........................................................................................................20
Other interfaces ............................................................................................20
Overview of navigation and controls ...............................................................................21
4.1
Login, main menu and logout ............................................................................21
4.2
Recording operation .......................................................................................22
4.3
Search and playback .......................................................................................22
4.1.1
4.1.2
4.1.3
4.1.4
4.1.5
4.2.1
4.2.2
4.3.1
4.3.2
4.4
4.4.1
4.4.2
Login................................................................................................................................... 21
Main menu ............................................................................................................................ 21
Logout ................................................................................................................................. 21
Auto resume after power failure.................................................................................................. 22
Replace button battery............................................................................................................. 22
Live viewing .......................................................................................................................... 22
Manual record........................................................................................................................ 22
Search menu ......................................................................................................................... 22
Basic operation ...................................................................................................................... 23
Record setup(schedule) ...................................................................................25
Schedule menu....................................................................................................................... 25
Basic operation ...................................................................................................................... 25
4.5
Detect.........................................................................................................26
4.6
Alarm setup and alarm activation.......................................................................29
4.5.1
4.5.2
4.5.3
4.5.4
4.6.1
Go to detect motion ................................................................................................................ 26
Motion detect ........................................................................................................................ 26
Video loss ............................................................................................................................. 28
Camera masking ..................................................................................................................... 29
Go to alarm setup interface ....................................................................................................... 29
www.hrcctv.com
pag.3
USER MANUAL
HRVR0404S-0804S-1604S
4.6.2
Alarm setup .......................................................................................................................... 29
4.7
Backup ........................................................................................................31
4.8
PTZ Control and color setup .............................................................................31
4.7.1
4.7.2
Detect device ........................................................................................................................ 31
Backup ................................................................................................................................ 31
4.8.1
4.8.2
4.8.3
4.9
4.9.1
4.9.2
4.9.3
4.9.4
4.9.5
4.9.6
5.
Cable connection .................................................................................................................... 31
PTZ setup ............................................................................................................................. 32
3D intelligent positioning key ..................................................................................................... 32
Preset/Patrol/Pattern/Scan...............................................................................33
Preset setup .......................................................................................................................... 33
Activate preset ...................................................................................................................... 33
Pattern setup ........................................................................................................................ 33
Activate pattern function .......................................................................................................... 34
Auto scan setup...................................................................................................................... 34
Activate auto scan .................................................................................................................. 34
Understanding of menu operations and controls ...........................................................34
5.1
5.2
Main menu ...................................................................................................34
Setting ........................................................................................................34
5.3
5.4
Search ........................................................................................................41
Advanced.....................................................................................................41
5.5
Information ..................................................................................................46
5.6
Exit ............................................................................................................48
5.2.1
5.2.2
5.2.3
5.2.4
5.2.5
5.2.6
5.2.7
5.2.8
5.2.9
5.2.10
5.4.1
5.4.2
5.4.3
5.4.4
5.4.5
5.4.6
5.4.7
5.4.8
5.5.1
5.5.2
5.5.3
5.5.4
5.5.5
6.
General ............................................................................................................................... 35
Encode ................................................................................................................................ 36
Schedule .............................................................................................................................. 37
RS232 .................................................................................................................................. 37
Network ............................................................................................................................... 37
Alarm .................................................................................................................................. 39
Detect ................................................................................................................................. 39
Pan/Tilt/zoom ....................................................................................................................... 39
Display ................................................................................................................................ 39
Default ............................................................................................................................ 40
HDD management ................................................................................................................... 41
Abnormity ............................................................................................................................ 42
Alarm output ......................................................................................................................... 42
Manual record........................................................................................................................ 43
Account ............................................................................................................................... 43
Auto maintain ........................................................................................................................ 43
TV adjust ............................................................................................................................. 44
Video matrix ......................................................................................................................... 44
HDD information ..................................................................................................................... 47
BPS..................................................................................................................................... 47
Log ..................................................................................................................................... 47
Version ................................................................................................................................ 48
Online users .......................................................................................................................... 48
About auxiliary menu.........................................................................................................49
6.1
7.
Go to pan/tilt/zoom menu ................................................................................49
Web client operation ..........................................................................................................50
7.1
7.2
Network connection .......................................................................................50
Login ..........................................................................................................50
7.2.1
Real-time monitor ................................................................................................................... 52
7.2.2 Start Dialogue............................................................................................................................ 53
7.2.3
PTZ .................................................................................................................................... 53
7.2.4
Color................................................................................................................................... 55
7.2.5
Picture path and record path...................................................................................................... 55
7.3
7.3.1
7.3.2
7.4
7.5
7.6
7.7
7.8
7.9
Configure.....................................................................................................56
System information ................................................................................................................. 56
Setting ................................................................................................................................ 57
Search ........................................................................................................70
Alarm..........................................................................................................72
About .........................................................................................................72
Log out........................................................................................................73
Un-install web control .....................................................................................73
Enterprise professional surveillance system..........................................................73
pag.4
www.hrcctv.com
USER MANUAL
HRVR0404S-0804S-1604S
7.10
SMART PHONE vision....................................................................................73
8.
Faq .......................................................................................................................................73
9.
Appendix Compatible SATA HDD List ............................................................................78
www.hrcctv.com
pag.5
USER MANUAL
HRVR0404S-0804S-1604S
1.
Introduction
1.1 Warnings and cautions
Do not expose this product to rain or moisture
Take away from clammy
Put in horizontal position
Skip out to the violent vibration
Do not rest up on another electric device
Exposition at light air,,do not cooling off the rear of DVR.
Package contents
1.2
Control the next accessory:
1. one power cable of 230 Vac.
2 .one power adequate 12Vdc.
3. one user manual
4. one CD software put in
5. one remote control of piloting to distant (with two battery powered 1.5V).
6. one set of screw
1.3 CD-ROM software
The content of the CD dowry
•
•
•
software conversion to AVI files and playes standard
software for remote management and centralize multiple DVR
User manual
pag.6
www.hrcctv.com
USER MANUAL
HRVR0404S-0804S-1604S
1.4 Features and specifications
HRVR0404S
Model
HRVR0804S
HRVR1604S
Sistema
Operating system
Embedded Linux
PENTAPLEX Funtion
Live, recording, Playback, Backup, remoto access
User interface
GUI, on-screen menu tips.
Control device
Front panel, USB mouse, HRKB001, HRKB001NET, remote control
Video
Video input(PAL) BNC_1.0VP- P_ 75
8
16
4
2 Channel PAL,( BNC_1.0VP- P _ 75 ) 1 Channel VGA (1024x768)
Video output
Loop OUT
Matrix
Video resolution
4
8
16
1
1
1
Real time display: PAL 704576
Recording : D1: 704 * 576, CIF 352288
Video compression
H.264 VBR e CBR
Video display
1 o 4 screen
Video standard
Image quality
PAL
6 level(1 – 6, best = 6)
Privacy Mask
Self-defined four-sided zone for privacy masking for each camera
Tour display
Support
Camera lock
Camera locked for users
Camera adjustment
Adjust color accordino to different time periods
1,4,8o9 screen 1,4,8, 9 o 16 screen
Video information
Camera title, time, Video Loss, camera lock, Motion, recording
TV output adjustment
Adjust TV output color e display zone
Audio
Audio output
1 Channel audio output 200-3000mv 5K (BNC)
Audio Input
4 Channel audio input 200-2500mv 30K (BNC)
Audio compression
ADPCM
Motion detection
Zones sensitivity: 396detection zone (22x18);
Level: 6 livelli (1-6; level max 6)
Trigger recording, tour, Alarm out, PTZ movement
Video Loss
Trigger recording, tour, Alarm out, PTZ movement
Camera masking
Alarm input
Trigger recording, tour, Alarm out, PTZ movement
16 channel programmable, manual NA/NC
Trigger recording, tour, Alarm out, PTZ movement
Alarm output
6 output, 30VDC,1°, NC/NA
Hard disk
8 SATA HDD port (max 8 HDDs support)
Space occupation
Audio: 14.4MB/H Video: 56250MB/H
HHD
Hard disk hibernation technology, HDD fault alarm e raid(redundancy)
Record- playback - Backup
Recording mode
Manual, Continuous, Motion, Alarm
Priority
Manual, Motion/Alarm, Continuous
Recording interval
1 to 120 minutes (default 60 min)
Overwrite mode
Support
Search mode
playback
Time/date, Alarm, Motion, exact search
4 channel playback simultaneously,Pause, Stop, Fast Play, Slow Play,
Digital Zoom
Selected zone can zoom into full screen durino playback
Motion e Alarm
Hard Disk
www.hrcctv.com
pag.7
USER MANUAL
HRVR0404S-0804S-1604S
Backup mode
USB-HDD, HRX001GB, HRX004GB, Network download, DVD built-in SATA
burner
Interface
Web server
RJ-45 10/100Mb
internet explorer
Functions
TCP/IP, DHCP, DDNS, PPPoE, FTP
Remote operation
playback, PTZ Control, file download, system setting, Log info.
Auxiliary interface
USB
2 USB 2.0
RS232
Keyboard HRKB001, HRKB001NET
RS485
PTZ control
Working temperatura
-10°C - + 55°C
Humidity
10% - 90%
weight
2,5 – 3,5 Kg
Dimension
44046089mm
Power supply
230V 50Hz
Power consumption
25W (HD escluso)
Mounting
Desktop / Rack 2U
Rete
Environmental
2.
30W
escluso)
(HD 40W (HD escluso)
Overview and controls
pag.8
www.hrcctv.com
USER MANUAL
HRVR0404S-0804S-1604S
This section provides information about front panel and rear panel. When you install this series DVR for the first time,
please refer to this part first.
2.1 Front panel
This series DVR has two different front panels. You can refer to figure
1
2
7
8
3
5
6
S/N
Name
1
Channel indication
light
When DVR is recording this lamp turns on.
Standby indication
light
When DVR is standing by, this lamp turns on.
Remote control
signal receiver
To receive signals from remote control
2
Icon
4
Function
Function indication
light
In preview interface(no other menu), press this button for three seconds,
you can switch between
TV/VGA output(HD1 series DVR has three modesLTV/VGA/60Hz LCD)
Shift
In textbox, click this button to switch between numeral,
English(Small/Capitalized),donation, Chinese
and etc.
3
Open/close tour
numeral keys 0-9
Input numeral more
than10
4
Slow play
www.hrcctv.com
0-9
Input password, switch channel and input numeral.
When you need to input numeral more than 9. You can follow the
steps below: click the first key number and then the next.
For example, input 123, click numeral 1 and then 2 and click
3(continuousl
y).
Multiple slow play speeds or normal playback
pag.9
USER MANUAL
HRVR0404S-0804S-1604S
Fast play
Play previous
Reverse/Pause
Play Next
Play/Pause
Various fast speeds and normal playback.
In playback mode, playback the previous video
In menu setup, go to upper ward of the dropdown list.
In normal playback or pause mode, click this button to reverse
playback
In reverse playback, click this button to pause playback.
In playback mode, playback the next video
In menu setup, go to down ward of the dropdown list.
Reverse playback or paused mode, click this button to realize
normal playback
In normal playback click this button to pause playback
In pause mode, click this button to resume playback
In real-time monitor mode, click this button to enter video search menu
Up/down
Activate current control, modify setup, increase/decrease numeral,
assistant function such as PTZ menu.
Left/right
shift current activated control,
When playback, click these buttons to control playback bar.
Cancel
ESC
Close upper interface or controls.
confirm operation
Enter
ENTER
Go to default button
Go to main menu
Record
Manually stop/start recording, working with direction keys
or numeral keys.
Window switch
MULT
Switch between one-window and multiple-window display modes.
5
One-window monitor mode, click this button to display assistant function:
PTZ control and image color.
In PTZ menu, shift PTZ control menu.
Backspace function: in numeral control or text control, it can delete the
previous character before the cursor.
Assistant
Fn
In motion detection setup, working with Fn and direction keys to realize
setup.
In HDD information menu, switch between HDD record time or
other information(Menu prompt)
Realize other special functions
6
USB port
pag.10
. To connect USB storage device, USB mouse or USB CD-ROM
www.hrcctv.com
USER MANUAL
HRVR0404S-0804S-1604S
In real-time monitor mode it works as left/right direction key.
Playback mode, counter clockwise to forward and clock wise to backward
Shuttle(outer ring)
7
Up/down direction key.
Playback mode, turn the inner dial to realized frame by frame playback.
(only applies to some version.)
Jog(inner dial)
Power button
8
Power indication
light
POWER
Power button, press this button for three seconds to shut down DVR.
Power indication light
2.2 Rear panel
2.2.1 Overview
Please refer to figure for real panel information
2.2.2 Connection sample
Here we take 16-ch DVR as a connection sample for your reference. See figure.
www.hrcctv.com
pag.11
USER MANUAL
HRVR0404S-0804S-1604S
2.3 Remote control
The remote control interface is shown as in figure
Serial Number
pag.12
Function
www.hrcctv.com
USER MANUAL
HRVR0404S-0804S-1604S
1
remote switch
2
Multiple-window switch
3
0-9 number key
4
Record
5
Auxiliary key
6
Confirm /menu key
7
Cancel
8
Direction key
9
forward
10
Previous
11
Back
12
Next
13
Slow play
14
Stop
15
Fast play
16
Play/Pause
2.4 Mouse control
Left click
System pops up password input dialogue box if you have not logged in.
mouse
In real-time monitor mode, you can go to the main menu.
When you have selected one menu item, left click mouse to view menu
content.
Implement the control operation.
Modify checkbox or motion detection status.
Click combo box to pop up drop down list
www.hrcctv.com
pag.13
USER MANUAL
HRVR0404S-0804S-1604S
In input box, you can select input methods. Left click the corresponding button
on the panel you can input numeral/English character (small/capitalized). Here
stands for backspace button.
stands for space button.
In English input mode: stands for input a backspace icon
and stands for deleting the previous character.
In numeral input mode: _ stands for clear and stands for deleting the
previous numeral.When input special sign, you can click corresponding
numeral in the front panel to input. For example, click numeral 1 you can
input“/” , or you can click the numeral in the on-screen keyboard directly.
Double left
Implement special control operation such as double click one item in the file list
click mouse
to playback the video.
In multiple-window mode, double left click one channel to view in full-window.
Double left click current video again to go back to previous multiple-window
Right click
mouse
mode.
In real-time monitor mode, pops up shortcut menu: one-window, four-window,
nine-window and sixteen-window, Pan/Tilt/Zoom, color setting, search, record,
alarm input, alarm output, main menu Among which, Pan/Tilt/Zoom and color
setting applies for current selected channel.If you are in multiple-window mode,
system automatically switches to the corresponding channel.
Exit current menu without saving the modification.
Press
In numeral input box: Increase or decrease numeral value.
middle
Switch the items in the check box.
button
Page up or page down
Move mouse
Select current control or move control
Drag mouse
Select motion detection zone
Select privacy mask zone.
pag.14
www.hrcctv.com
USER MANUAL
HRVR0404S-0804S-1604S
2.5 Virtual keyboard and front panel
2.5.1 Virtual keyboard
The system supports two input methods: numeral input and English character (small and capitalized) input. Move the
cursor to the text column, the text is shown as blue, input button pops up on the right. Click that button to switch
between numeral input and English input (capitalized and small), Use > or < to shift between small character and
capitalized character.
2.5.2 Front panel
Move the cursor to the text column. Click Fn key and use direction keys to select number you wanted. Please click
enter button to input.
3.
Installation and connections
Note: All the installation and operations here should conform to your local electric safety rules.
3.1 Check unpacked DVR
When you receive the DVR from the shipping agency, please check whether there is any visible damage to the DVR
appearance. The protective materials used for the package of the DVR can protect most accidental clashes during
transportation. Then you can open the box to check the accessories.
Please check the items in accordance with the list on the warranty card. Finally you can remove the protective film of
the DVR.
3.2 HDD installation
3.2.1 Choose HDDs
At the right working of the device ,used HD Seagate IDE 7200 RPM to get out side security and reliability used HD
Seagate set SV35; code HRX160SV – HRX250SV – HRX500SV IDE version HRX160SVS – HRX250SVS SATA
version .
3.2.2 Calculate HDD size
This series have no limit to HDD capacity. You can use 120G-750G HDD to guarantee higher stability.The formula of
total HDD size is:Total Capacity (MB) = Camera Amount * Recording Hours * HDD Usage Per Hour (M/h)H.264
compression is ideal for standalone DVRs. It can save more than 30% HDD capacity than MPEG4. When you
calculate the total HD capacity, you should estimate the average HDD capacity per hour for each channel. For
example, for a 4-ch DVR, the average capacity of HDD usage per hour per channel is 200M/h. Now if you hope the
DVR can record the video 12 hours each day for 30 days, the total capacity of HDDs needed is: 4 channels * 30 days *
12 hours * 200 M/h = 288G. So you need to install one 300G HDD or 2 160G HDDs.
3.2.3 HDD installation
Data ribbons, fastening screws and smart HDD shelf design are already provided in the accessories bag.Please follow
the instructions below to install hard disk.
1. Loosen the screws of the upper cover.
3. Screw the two bracket parts together.
www.hrcctv.com
2. Remove the HDD bracket from internal unit.
4. Put HDD bracket back and then fix firmly.
pag.15
USER MANUAL
HRVR0404S-0804S-1604S
8
5.Loosen the power cable
6 place the upper cover back and screw firmly
.
3.3 Connecting power supply
Please check input voltage and device power button match or not.We recommend you use UPS to guarantee steady
operation, DVR life span, and other peripheral equipments operation such as cameras.
3.4 Connecting video input and output devices
3.4.1 Connecting video input
The DVR automatically detects the video standard (PAL or NTSC) whenever you connect a video input. It accepts
both color and black-and-white and analog video.
1. Connect a coaxial cable to the camera or other analog video source.
2. Connect the coaxial cable to the video in connector on the rear panel.
Please refer to figure for more information.
3.4.2 Connecting video output
This section provides information about physically connecting video display devices to the DVR. See figure.If you
connect the DVR with a TV monitor or VGA monitor, the DVR can automatically detects the monitor type. And
without any output device, by default, the DVR is configured to use a TV monitor. In this case, if your application
requires a VGA monitor, you have to press the button “FN” or Shift on the front panel.
pag.16
www.hrcctv.com
USER MANUAL
HRVR0404S-0804S-1604S
3.5 Connecting audio input and output,looping video, matrix
For the 25-pin or 37-pin interface, different models include different functions.
For example, DVR1604S has 16 audio inputs, 1 audio output, I bidirectional audio input. See figure
3.5.1 Audio input/one audio output
DVR1604S has 16 looping video inputs, 1 matrix video outputs, 4 audio inputs, I bidirectional audio input, 1 audio
output. Audio input, bidirectional audio input and audio output The DVR encodes audio and video signals
simultaneously, which lets you control audio at the monitored location. To set up audio:
3.5.2 Matrix video output/ video looping
Use video matrix output connector during installation to display video sequentially from each video input. The unit
displays each channel for selected seconds. You can use this feature to verify camera installation.To display video
from each connected video source:
1. Connect a video monitor to the video matrix output connector.
2. Turn the DVR on, the monitor, and each video matrix output source.
3. Verify the video from each source and troubleshoot as necessary.
Please refer to figure.
www.hrcctv.com
pag.17
USER MANUAL
HRVR0404S-0804S-1604S
3.5.3 Alarm input and relay output
The DVR offers 16 alarm inputs for external signaling devices, such as door contacts or motion detectors. Each
alarm input can be either normally open or normally closed. Once configured, an alarm input can invoke many
different activities, including triggering a relay device, sending an alert to a security office or storing pre-alarm video
to the DVR.
3.5.4 Alarm input
You should check your alarm input mode is grounding alarm input or not. For this series DVR, grounding signal is
needed for alarm input. If you need to connect two units or one DVR and other device, please use relay to separate
them. Please refer to figure for more information.
3.5.5 Alarm output
Do not connect alarm output port directly with high power load (no more than 1 A) in case of heavy current. You
can use the co-contactor to realize the connection between the alarm output port and the load.Please refer to
figure for more information.
Figure 3-1
3.5.6 Alarm input and output details
Parameter
Grounding Alarm
Ground
Ground line
Alarm Input
Relay Output
1, 2, …, 16
1,2,3,4: NO and C(Normally Open and Com)
5: NO,C and NC(Normally Open, Com, Normally Closed)
6: Ctrl 12V(This is used for reset the senor)
485 communication port. They are used to control devices such as
PTZ.
This should input an external power input.
485 AB
+12C
pag.18
www.hrcctv.com
USER MANUAL
HRVR0404S-0804S-1604S
16-ch grounding alarm inputs. (Normal open or Normal close type)
6-alarm output .
3.5.7 Relay output description
6 ways relay alarm output. Provide external power to external alarm device. To avoid over loading, please read the
following relay parameters sheet carefully. (See below table) The controllable +12v can be used to restore the
smoke detector. Please refer to Figure for alarm input module information.
Relay Specification
Model:
JRC-27F
Material of the
touch
Silver
Ratingresistance
load
Rated switch capacity
30VDC 2A, 125VAC 1A
Maximum switch power
125VA 160W
Maximum switch voltage
250VAC, 220VDC
Maximum switch currency
between touches with same
polarity
1A
between touches with different
polarity
1000VAC 1minute 50/60Hz
between touch and winding
between touches with same
polarity
3ms max
1000VAC 1minute 50/60Hz
Insulation
Surge voltage
Length of open
time
1000VAC 1minute 50/60Hz
1500V (10160us)
Length of close
time
3ms max
Longevity
Mechanical
50106 times (3Hz)
Electrical
200103 times (0.5Hz)
Temperature
www.hrcctv.com
-40
~+70
pag.19
USER MANUAL
HRVR0404S-0804S-1604S
3.6 RS232
You can connect the DVR with POS or Keyboard(HRKB001 e HRKB001NET) through RS232.With POS system,
the DVR can communicate through RS232 and network. For the POS system, the DVR can integrate the text
content and even search the record through the info
RS232
3.7 RS485
RS-485
A
B
When the DVR receives a camera control command, it transmits that command up the coaxial cable to the PTZ
device. RS485 is a single-direction protocol; the PTZdevice can’t return any data to the unit. To enable the
operation, connect the PTZ device to the RS485(A,B) input on the DVR. Since RS485 is disabled by default for
each camera, you must enable the PTZ settings first. This series DVRs support multiple protocols such as Pelco-D,
Pelco-P. To connect PTZ devices to the DVR:
1. Connect RS485 A,B on the DVR rear panel.
2. Connect the other end of the cable to the proper pins in the connector on the camera.
3. Follow the instructions for configuring a camera to enable each PTZ device on the DVR.
3.8 Other interfaces
There are still other interfaces on the DVR, such as USB ports. You can refer to the Errore. L'origine
riferimento non è stata trovata.11 for more information.
323H
pag.20
www.hrcctv.com
USER MANUAL
HRVR0404S-0804S-1604S
4.
Overview of navigation and controls
Before operation, please make sure you have properly installed HDDs and all the cable connections.
4.1 Login, main menu and logout
4.1.1 Login
When the system boots up, default video display is in multiple-window mode. Click Enter or left click mouse, you
can see the login interface. System consists of four accounts:
Username: admin. Password: admin. (administrator, local and network)
Username: 888888. Password: 888888. (administrator, local only)
Username: 666666. Passwords: 666666(Lower authority user who can only monitor, playback, backup and
etc.)
Username: default. Password: default(hidden user)
For your system security, please modify you password after first login.You can use USB mouse, front panel, remote
controller or keyboard to input. About input method: Click
to switch between numeral, English character
(small/capitalized) and denotation.
Note: Three times login failure in 10 minutes will result in system alarm and five times login failure will result in
account lock!
4.1.2 Main menu
After you logged in, the system main menu is shown as below. There are total six icons: search, information,
setting, backup, advanced and shutdown. You can move the cursor to highlight the icon, and then double click
mouse to enter the sub-menu.
4.1.3 Logout
There are two ways for you to log out.One is from menu option: In the main menu, click shutdown button, you can
see an interface is shown as below.
www.hrcctv.com
pag.21
USER MANUAL
HRVR0404S-0804S-1604S
There are several options for you.
The other ways is to press power button on the front panel for at least 3 seconds, system will stop all operations.
Then you can click the power button in the rear panel to turn off the DVR.
4.1.4 Auto resume after power failure
The system can automatically backup video and resume previous working status after power failure.
4.1.5 Replace button battery
Please make sure to use the same battery model if possible. We recommend replace battery regularly (such as
one-year) to guarantee system time accuracy.
4.2 Recording operation
4.2.1 Live viewing
When you login, the system is in live viewing mode. You can see system date, time and channel name. If you
want to change system date and time, you can refer to general settings (Main Menu->Setting->General). If you
want to modify the channel name, please refer to the display settings (Main Menu->Setting->Display)
Recording status
Motion detection Video loss Camera lock
4.2.2 Manual record
Manual record menu
There are two ways for you to go to manual record menu.
Right click mouse or in the main menu, Advanced->Manual Record.
In live viewing mode, click record button in the front panel or record button in the remote control.
Manual record menu is shown.
Basic operation
There are three statuses: schedule/manual/stop. Highlight icon“ ” to select corresponding channel.
Manual: the highest priority. After manual setup, all selected channels will begin ordinary recording.
Schedule: channel records as you have set in recording setup (Main Menu->Setting->Schedule)
Stop: all channels stop recording.
4.3 Search and playback
4.3.1 Search menu
There are two ways for you to go to search menu.
Click Pause/Play button in the remote control.
Click search in the main menu.
Search interface is shown as below. Usually there are three file types:
R: regular recording file.
A: external alarm recording file.
M: motion detection recording file
pag.22
www.hrcctv.com
USER MANUAL
HRVR0404S-0804S-1604S
C: card and pos test overlay recording file(For some special series only)There are several playback windows.
System supports 1/2/4-ch playback.
Serial
Number
1
2
3
4
5
6
7
8
9
10
11
12
13
14
Function
Play
Backward
Stop
Slow play
Fast play
Previous frame
Next frame
Volume
Previous file
Next channel
Next file
Previous channel
Search
Backup
4.3.2 Basic operation
Playback
There are various search modes: video type, channel number or time. The system can max display 32 files in one
screen. You can use page up/down button to view if there are more than one page. Select the file name and
double click mouse (or click enter button), you can view file content.
Synchronized playback function when playback
During playback process, click numeral key, system can switch to the corresponding channel video of the same
time.
Digital zoom
When the system is in full-screen playback mode, drag your mouse in the screen to select a section and then left
click mouse to realize digital zoom. You can right click mouse to exit.
www.hrcctv.com
pag.23
USER MANUAL
HRVR0404S-0804S-1604S
File backup
System supports backup operation during search. You can draw a before file name (multiple choices). Then
click backup button .
click the backup button and it will open the following screen
completed the backup procedure by clicking on the backup button
Calendar
Click calendar icon
, system pops up calendar for your reference. Highlighted date means that there are
record files in that day. You can click blue date to view file list., there are video files in March 13th and 14th.
Double click the date to view file list.
pag.24
www.hrcctv.com
USER MANUAL
HRVR0404S-0804S-1604S
4.4 Record setup(schedule)
When the system boots up, it is in default 24-hour regular mode. You can set record type and time in schedule
interface.
4.4.1 Schedule menu
In the main menu, from setting to schedule, you can go to schedule menu. There are three record types:
R-Regular, MD-Motion detection, A- Alarm.
4.4.2 Basic operation
There are total six periods:
Channel: Please select the channel number first. You can select “all” if you want to set for the whole channels.
Week day: There are eight options: ranges from Saturday to Sunday and all.
Redundancy: System supports redundancy backup function. You can highlight Redundancy button to activate
this function. Please note, before enable this function, please set at least one HDD as redundant.(Main menu>Advanced->HDD Management)
Record types: There are three types: regular, motion detection (MD) and Alarm.
Please highlight icon
to select the corresponding function. After all the setups please click save button,
system goes back to the previous menu. At the bottom of the menu, there are color bars for your reference.
Green stands for regular recording, yellow stands for motion detection and red stands for alarm recording.
Quick setup
This function allows you to copy one channel setup to another. After setting in channel 1, you can click paste
button and turn to channel 2 and then click copy button. You can finish setting for one channel and then click
save button or you can finish all setup and then click save button to memorize all the settings.
Redundancy
Redundancy function allows you to memorize record file in several disks. These files are created, packaged and
closed simultaneously. When there is file damage occurred in one disk, there is a spare one in the other disk.
You can use this function to maintain data reliability and safety. In the main menu, from Setting to Schedule, you
can highlight redundancy button to enable this function. In the main menu, from Advanced to HDD management,
you can set one or more disk(s) as redundant. You can select from the dropdown list. System auto overwrites old
www.hrcctv.com
pag.25
USER MANUAL
HRVR0404S-0804S-1604S
files once hard disk is full. Please note only read/write disk or read-only disk can backup file and support file
search function, so you need to set at least one read-write disk otherwise you can not record video.
Note About redundancy setup:
If current channel is not recording, current setup gets activated when the channel begin recording the next
time.
If current channel is recording now, current setup will get activated right away, the current file will be packet
and form a file, then system begins recording as you have just set.
After all the setups please click save button, system goes back to the previous menu.
Playback or search in the redundant disk.There are two ways for you to playback or search in the redundant disk.
Set redundant disk(s) as read-only disk or read-write disk (Main menu->Advanced->HDD management). See
System needs to reboot to get setup activated. Now you can search or playback file in redundant disk.
Dismantle the disk and play it in another PC.
4.5 Detect
4.5.1 Go to detect motion
In the main menu, from Setting to Detect, you can see motion detect interface. There are three detection types:
motion detection, video loss, camera masking.
4.5.2 Motion detect
Detection menu is shown as below.
Channel: select the channel you want to implement motion detection.
Event type: from the dropdown list you can select motion detection type.
Channel: select the channel to activate recording function once alarm occurred. Please make sure you have
set MD record in encode interface(Main Menu->Setting->Schedule) and schedule record in manual record
interface(Main Menu->Advanced->Manual Record)
Latch: when motion detection complete, system auto delays detecting for a specified time. The value ranges
from 10-300(Unit: second)
Region: Click select button, the interface is shown.Here you can set motion detection zone. There are
396(PAL)/330(NTSC) small zones.
Sensitivity: System supports 6 levels. The sixth level has the highest sensitivity.
Show message: System can pop up a message to alarm you in the local host screen if you enabled this
function.
Send email: System can send out email to alert you when alarm occurs.
PTZ activation: Here you can set PTZ movement when alarm occurs. Such as go to preset, tour &pattern when
there is an alarm. Click “select” button, you can see an interface is shown.
Period: Click set button, you can see an interface is shown. Here you can set for business day and nonbusiness day, click set button, you can see an interface is shown. Here you can set your own setup for
business day and non-business day.
Anti-dither: Here you can set anti-dither time.
Sensitivity: there are six levels. The sixth level has the highest sensitivity.
Alarm output: when alarm occurred, system enables peripheral alarm devices.
pag.26
www.hrcctv.com
USER MANUAL
HRVR0404S-0804S-1604S
Tour: Here you can enable tour function when alarm occurs. It is a one-window tour. Please go to chapter
5.3.9 Display for tour interval setup.
Please highlight icon
to select the corresponding function. After all the setups please click save button, system
goes back to the previous menu.
www.hrcctv.com
pag.27
USER MANUAL
HRVR0404S-0804S-1604S
4.5.3 Video loss
Select video loss from the type list. You can see the interface is shown .This function allows you to be informed
when video loss phenomenon occurred. You can enable alarm output channel and then enable show message
function.
Channel: select the channel you want to enable lens shading alarm.
Event type: please select video loss.
Channel: select the channel to record when video loss occurred.
Alarm output: activate peripheral alarm device when video loss occurred.
Latch: when motion detection complete, system auto delays detecting for a specified time. The value ranges
from 10-300(Unit: second)
Show message: System can pop up a message to alarm you in the local host screen if you enabled this
function.
Send email: System can send out email to alert you when alarm occurs.
PTZ activation: Here you can set PTZ movement when alarm occurs. Such as go to preset, tour & pattern
when there is an alarm. Click “select” button, you can see an interface is shown.
Period: Click set button, you can see an interface is shown. Here you can set for business day and nonbusiness day., click set button, you can see an interface is shown. Here you can set your own setup for
business day and non-business day.
Sensitivity: there are six levels. The sixth level has the highest sensitivity.
Alarm output: when alarm occurred, system enables peripheral alarm devices.
Tour; Here you can enable tour function when alarm occurs. It is a one-window tour. Please go to chapter
5.3.9 Display for tour interval setup.
pag.28
www.hrcctv.com
USER MANUAL
HRVR0404S-0804S-1604S
4.5.4 Camera masking
When someone viciously masks lens, the system can alert you to guarantee video continuity. Camera masking
interface is shown a.
Channel: select the channel you want to enable camera mask detection function.
Event type: please select camera mask detect from the dropdown list.
Channel: select the channel to record when camera mask occurred.
Alarm output: activate peripheral alarm device when camera mask occurred.
Enable tour: Here is for you to activate tour between different cameras.
Latch: when motion detection complete, system auto delays detecting for a specified time. The value ranges
from 10-300(Unit: second)
Show message: System can pop up a message to alarm you in the local host screen if you enabled this
function.
Send email: System can send out email to alert you when alarm occurs.
PTZ activation: Here you can set PTZ movement when alarm occurs. Such as go to preset, tour &pattern when
there is an alarm. Click “select” button, you can see an interface is shown .
Period: Click set button, you can see an interface is shown . Here you can set for business day and nonbusiness day., click set button, you can see an interface is shown. Here you can set your own setup for
business day and non-business day.
Sensitivity: there are six levels. The six-level has the highest sensitivity.
Alarm output: when alarm occurred, system enables peripheral alarm devices.
Tour: Here you can enable tour function when alarm occurs. It is a one-window tour: Please go to chapter
5.3.9 Display for tour interval setup.
4.6 Alarm setup and alarm activation
Before operation, please make sure you have properly connected alarm devices such as buzzer.
4.6.1 Go to alarm setup interface
In the main menu, from Setting to Alarm, you can see alarm setup interface.
4.6.2 Alarm setup
Alarm interface is shown as below.
Alarm in: here is for you to select channel number.
Event type: there are two types. One is local input and the other is network input.
Type: normal open or normal close.
PTZ activation: Here you can set PTZ movement when alarm occurs. Such as go to preset, tour& pattern when
there is an alarm. Click “select” button, you can see an interface is shown.
Period: Click set button, you can see an interface is shown . Here you can set for business day and nonbusiness day, click set button, you can see an interface is shown. Here you can set your own setup for
business day and non-business day.
Anti-dither: Here you can set anti-dither time.
Show message: System can pop up a message to alarm you in the local host screen if you enabled this
function.
Send email: System can send out email to alert you when alarm occurs.
www.hrcctv.com
pag.29
USER MANUAL
HRVR0404S-0804S-1604S
Record channel: you can select proper channel to record alarm video (Multiple choices). At the same time you
need to set alarm record in schedule interface (Main Menu->Setting->Schedule) and select schedule record in
manual record interface (Main Menu->Advance->Manual Record).
Latch: Here is for you to set proper delay duration. Value ranges from 10 to 300 seconds. System
automatically delays specified seconds in turning off alarm and activated output after external alarm cancelled.
Tour: Here you can enable tour function when alarm occurs. It is a one-window tour: Please go to chapter
5.3.9 Display for tour interval setup.
Please highlight icon
to select the corresponding function. After all the setups please click save button,
system goes back to the previous menu.
pag.30
www.hrcctv.com
USER MANUAL
HRVR0404S-0804S-1604S
4.7 Backup
4.7.1 Detect device
Click backup button, you can see an interface is shown.Here is for you to view devices information.
4.7.2 Backup
Select backup device and then channel, file start time and end time. Click add button, system begins search. All
matched files are listed below. System automatically calculates the capacity needed and remained.system only
backup files with a before channel name. You can use Fn or cancel button to delete after file serial
number.Click backup button, you can backup selected files. There is a process bar for you reference. When the
system completes backup, you can see a dialogue box prompting successful backup.
Click backup button, system begins burning. At the same time, the backup button becomes stop button. You can
view the remaining time and process bar at the left bottom..
During backup process, you can click ESC to exit current interface; but the system will not terminate backup
process.
Note: When you click stop button during the burning process, there are two conditions for different devices:
For CD/DVD burner device, the stop function becomes activated immediately and there is no data in the
burner.
For USB device, system can backup the data before you click stop button. For example, if there is a file of 10
minutes, when you click stop after five minutes backup, system only save the previous 5-minute data in the
device.The file name format usually is: SN_CH+channel number+time Y+M+D+H+M+S. In the file name, the
YDM format is the same as you set in general interface. (Main Menu ->Setting ->General).You can visit our
website to view listed CD-ROM type.
4.8 PTZ Control and color setup
4.8.1 Cable connection
Please follow the procedures below to go on cable connection
Connect the dome RS485 port to DVR 485 port.
Connect dome video output cable to DVR video input port.
Connect power adapter to the dome.
www.hrcctv.com
pag.31
USER MANUAL
HRVR0404S-0804S-1604S
4.8.2 PTZ setup
Here you can set the following items:
Channel: select the current camera channel.
Protocol: select corresponding PTZ protocol(such as PELCOD)
Address: default address is 1.
Baud rate: select corresponding baud rate. Default value is 9600.
Data bits: select corresponding data bits. Default value is 8.
Stop bits: select corresponding stop bits. Default value is 1.
Parity: there are three options: odd/even/none. Default setup is none.
After all the setting please click save button. In one window display mode, right click mouse (click “Fn” Button in
the front panel or click “Fn” key in the remote control). The interface is shown
Click Pan/Tilt/Zoom, the interface is shown as below.Here you can set the following items:
Step: value ranges fro 1 to 8.
Zoom
Focus
Iris
Click icon
and
to adjust zoom, focus and iris.
Please click direction arrows to adjust PTZ position. There are total 8 direction arrows.
4.8.3 3D intelligent positioning key
In the middle of the eight direction arrows, there is a 3D intelligent positioning key.
Click this key, system goes back to the single screen mode. Drag the mouse in the screen to adjust section size. It can
realize PTZ automatically.
pag.32
www.hrcctv.com
USER MANUAL
HRVR0404S-0804S-1604S
4.9 Preset/Patrol/Pattern/Scan
Click the “set” button. The interface is shown as below. Here you can set the following items:
Preset
Tour
Pattern
Border
Click page switch button, the interface is shown.Here you can activate the following functions:
Preset
Tour
Pattern
Auto scan
Auto pan
Flip
Reset
Page switch
4.9.1 Preset setup
Use eight direction arrows to adjust camera to the proper position.
Click preset button and input preset number. The interface is shown.
Now you can add this preset to one tour.
4.9.2 Activate preset
Please input preset number in the No. blank, and click preset button.
4.9.3 Pattern setup
Click pattern button and then click “begin” button. The interface is shown.Then you can go to modify zoom, focus, and
iris.Go back and click “end” button. You can memorize all these operations as pattern 1.
www.hrcctv.com
pag.33
USER MANUAL
HRVR0404S-0804S-1604S
4.9.4 Activate pattern function
Input mode value in the No. blank, and click pattern button.
4.9.5 Auto scan setup
Click border button. The interface is shown.Use direction arrows to select camera left limit Then please go to
398HErrore. L'origine riferimento non è stata trovata. and click left limit button Repeat the above procedures to set
right limit.
4.9.6 Activate auto scan
In 399HErrore. L'origine riferimento non è stata trovata., click “Auto Scan” button, the system begins auto scan.
Correspondingly, the auto scan button becomes to stop button. Click stop button to terminate scan operation.
5.
Understanding of menu operations and controls
5.1 Main menu
After you logged in, the system main menu is shown as below. There are total six icons: search, Information, setting,
backup, advanced and shutdown. Move the cursor to highlight the icon, then double click mouse to enter the submenu.
5.2 Setting
In main menu, highlight setting icon and double click mouse. System setting interface is shown as below.
pag.34
www.hrcctv.com
USER MANUAL
HRVR0404S-0804S-1604S
5.2.1 General
General setting includes the following items.
System time: here is for you to set system time
Date format: there are three types: YYYYY-MM-DD: MM-DD-YYYYY or DD-MM-YYYY.
Date separator: there are three denotations to separate date: dot, beeline and solidus.
DST: Here you can set DST time and date. Please enable DST function and then click set button. You can see
an interface is shown. Here you can set start time and end time by setting corresponding week setup, enable
date button, you can see an interface is shown Here you can set start time and end time by setting
corresponding date setup.
Time format: there are two types: 24-hour mode or 12-hour mode.
Language: system supports various languages: Chinese (simplified), Chinese (Traditional), English, Italian,
Japanese, French, Spanish (All languages listed here are optional. Slight difference maybe found in various
series.)
HDD full: Here is for you to select working mode when hard disk is full. There are two options: stop recording
or rewrite.
Pack duration: Here is for you to specify record duration. Default value is 60 minutes.
DVR No: when you are using one remote control to control several DVRs, you can give a name to each DVR
for your management.
Video standard: There are two formats: NTSC and PAL.
Auto logout: Here is for you to set auto logout interval once login user remains inactive for a specified time.
Value ranges from 0 to 60 minutes.
www.hrcctv.com
pag.35
USER MANUAL
HRVR0404S-0804S-1604S
5.2.2 Encode
Encode setting includes the following items.Please note some series do not support extra stream.
Channel: Select the channel you want.
Compression: system supports H.264. Or you can select from the dropdown list.
Resolution: System supports various resolutions, you can select from the dropdown list. For this model, we
can support D1/CIF.
Bit rate: system supports two types: CBR and VBR. In VBR mode, you can set video quality.
Quality: There are six levels ranging from 1 to 6. The sixth level has the highest image quality.
Frame rate: there are six levels: 1 f/s,2f/s,3f/s, 6f/s,12f/s,25f/s. (Some series DVRs only support PAL 25f/s )
Video/audio: you can enable or disable the video/audio.
Overlay: click overlay button, you can see an interface is shown.
Cover area (Privacy mask): Here is for you to set window blanking section. You can drag you mouse to set
proper section size.
Preview/monitor: privacy mask has two types. Preview means the privacy mask zone can not be viewed by
user when system is in preview status. Monitor means the privacy mask zone can not be view by the user
when system is in monitor status.
Time display: You can select system displays time or not when you playback.
Channel display: You can select system displays channel number or not when you playback.
System default setup is:
Channel:1
Compression:H.264
Resolution: CIF/D1
Bit rate: CBR
Quality: 4
Frame rate: 25f/s
pag.36
www.hrcctv.com
USER MANUAL
HRVR0404S-0804S-1604S
5.2.3 Schedule
Please refer to chapter 4.4 schedule.
5.2.4 RS232
RS232 interface is shown as below. Here are five items.
Function: There are various devices for you to select. Console is for serial port or min-end platform to upgrade
program. Keyboard is for you to use special keyboard to control current device.
Baud rate: You can select proper baud rate.
Data bit: You can select proper data bit.
Stop bit: There are three values: 1/1.5/2.
Parity: there are three choices: none/odd/even.
After completing all the setups please click save button, system goes back to the previous menu.
5.2.5 Network
Here is for you to input network information
IP address: Here you can input IP address.
DHCP: It is auto search IP function. When enable DHCP function, you can not modify IP/Subnet mask
/Gateway. These values are from DHCP function. If you have not enabled DHCP function, IP/Subnet
mask/Gateway display as o. You need to disable DHCP function to view current IP information. Besides, when
PPPoE is operating, you can not modify IP/Subnet mask /Gateway.
TCP port: Default value is 37777. (System server port 37778 is reserved for network UDP use.)
UDP port: Default value is 37778.
HTTP port: Default value is 80.
Max connection: system support maximal 10 users. 0 means there is no connection limit.
Transfer mode: Here you can select the priority between fluency/video qualities.
Network download: System can process the downloaded data first if you enable this function.
After completing all the setups please click save button, system goes back to the previous menu.
Advanced setup
Advanced setup interface is shown. Please draw a circle to enable corresponding function and then double click
current item to go to setup interface.
www.hrcctv.com
pag.37
USER MANUAL
HRVR0404S-0804S-1604S
IP Filter
IP filter interface is shown as in 414HErrore. L'origine riferimento non è stata trovata.. You can add IP in the
following list. The list supports max 64 IP addresses. Please note after you enabled this function, only the IP listed
below can access current DVR.
If you disable this function, all IP addresses can access current DVR.
NTP setup
You need to install SNTP server (Such as Absolute Time Server) in your PC first. In Windows XP OS, you can use
command “net start w32time” to boot up NTP service. NTP setup interface is shown.
Host IP: Input your PC address.
Port: This series DVR supports TCP transmission only. Port default value is 123.
Update interval: minimum value is 15(Unit: minute)
Time zone: select your corresponding time zone here.
Here is a sheet for your time zone setup.
City /Region Name
Time Zone
London
GMT+0
Berlin
GMT+1
Cairo
GMT+2
Moscow
GMT+3
New Deli
GMT+5
Bangkok
GMT+7
Beijing (Hong Kong)
GMT+8
Tokyo
GMT+9
Sydney
GMT+10
Hawaii
GMT-10
Alaska
GMT-9
Pacific Time(P.T)
GMT-8
American Mountain Time(M.T)
GMT-7
American Central Time(C.T)
GMT-6
American Eastern Time(E.T)
GMT-5
Atlantic Time
GMT-4
Brazil
GMT-3
Middle Atlantic Time
GMT-2
pag.38
www.hrcctv.com
USER MANUAL
HRVR0404S-0804S-1604S
DDNS setup
DDNS setup interface is shown.
You need a PC of fixed IP in the internet and there is the DDNS software running in this PC. In other words, this PC is
a DNS (domain name server).In network DDNS, input your PPPoE name you get from you IPS and server IP (PC with
DDNS ) . Click save button and then reboot system.Click save button, system prompts for rebooting to get all setup
activated.After rebooting, open IE and input as below: http //(DDNS server IP)/(virtual directory name)/webtest.htm
e.g.: http //10.6.2.85/DVR _DDNS/webtest.htm.) Now you can open DDNSServer web search page.
5.2.6 Alarm
Please refer to chapter 4.6 Alarm Setup and Activation
5.2.7 Detect
Please refer to chapter 4.5 Detect
5.2.8 Pan/Tilt/zoom
After completing all the setups please click save button, system goes back to the previous menu.For detailed
setup, please refer to chapter 4.8 preset/patrol/pattern/scan.
5.2.9 Display
Display setup interface is shown as below..
Transparency: Here is for you to adjust transparency. The value ranges from 128 to 255.
Channel name: Here is for you to modify channel name. Please note all your modification here only applies to
DVR local end. You need to open web or client end to refresh channel name.
Time display: You can select to display time or not when system is playback.
Channel display: You can select to channel name or not when system is playback.
Overlay information: System displays some information in the screen for your reference.
Display mode: you can select from the dropdown list: self-adaptive/VGA/TV.
Enable tour: activate tour function.
Interval: Input proper interval value here. The value ranges from 5-200 seconds. In tour process, you can use
mouse or click Shift to turn on window switch function.
closing switch function.
Motion tour type: System support 1/8 window tour.
Alarm tour type: System support 1/8 window tour.
www.hrcctv.com
Stands for opening switch function,
stands for
pag.39
USER MANUAL
HRVR0404S-0804S-1604S
Click modify button after channel. You can see an interface is shown. Please note all your modification here applies to
local end only. You need to refresh web or client-end to get the latest channel name. System max support 25-digital
character.
In tour mode, you can see the following interface. On the right corner, right click mouse or click shift button, you can
control the tour. There are two icons:
stands for enabling window switch and
stands for enabling window
function.
5.2.10 Default
Click default icon, system pops up a dialogue box. You can highlight
Select all
General
Encode
Schedule
RS232
Network
Alarm
Detect
Pan/tilt/zoom
Display
pag.40
to restore default factory setup.
www.hrcctv.com
USER MANUAL
HRVR0404S-0804S-1604S
Channel name
Please highlight icon
to select the corresponding function.
After all the setups please click save button, system goes back to the previous menu.Warning!
System menu color, language, time display mode, video format, IP address, user account will not maintain previous
setup after default operation!
5.3 Search
Please refer to chapter Search.
5.4 Advanced
Double click advanced icon in the main window, the interface is shown as below. There are total seven function keys:
HDD management, alarm output, abnormity, manual record, account, auto maintain, and TV adjust.
5.4.1 HDD management
Here is for you to view and implement hard disk management.You can set proper mode for each hard disk from the
dropdown list.When you use redundant backup function, you can set one or more redundant HDD(s).Please note
you need to set at least one read-write disk, otherwise system will not record video. For detailed information you
can refer to chapter 4.4 Schedule.After all the setups please click save button, system needs to reboot to get all
the modification activated.
www.hrcctv.com
pag.41
USER MANUAL
HRVR0404S-0804S-1604S
Click alarm set button, the interface is shown as below. (This interface is just like the abnormity setup).Please
to select the corresponding function.
highlight icon
You can enable one or more alarm setups. The lower limit ranges from 1% to 99%. Alarm channel number ranges
from 1 to 6. Delay value is from 0 to 240 seconds. Please note when HDD capacity is not full system only alarms
once !After all the setups please click OK button, system goes back to the previous menu
5.4.2 Abnormity
Abnormity interface is shown
Event type: There are several options for you such as disk error, no disk and etc.
Alarm output: alarm activation output port (multiple choices), among which is controllable 12V output.
Latch: here you can set corresponding delaying time. The value ranges from 10s-300s. System automatically
delays specified seconds in turning off alarm and activated output after external alarm cancelled.
Show message: system can pop up the message in the local screen to alert you when alarm occurs.
Send email: System can send out email to alert you when alarm occurs.
5.4.3 Alarm output
Here is for you to set proper alarm output.
to select the corresponding alarm output.After all the setups please click OK button,
Please highlight icon
system goes back to the previous menu.
pag.42
www.hrcctv.com
USER MANUAL
HRVR0404S-0804S-1604S
5.4.4 Manual record
Please refer to chapter manual record.
5.4.5 Account
Here is for you to implement account management. Here you can:
Add new user
Modify user
Add group
Modify group
Modify password.
For account management please note:
System account adopts two-level management: group and user. No limit to group or user amount.
For group or user management, there are two levels: admin and user.
The user name and group name can consist of eight bytes. One name can only be used once. There are four
default users: admin/888888/666666 and hidden user “default”. Except user 6666, other users have administrator
right.
Hidden user “default” is for system interior use only and can not be deleted. When there is no login user, hidden
user “default” automatically login. You can set some rights such as monitor for this user so that you can view
some channel view without login.
One user should belong to one group. User right can not exceed group right.
About reusable function: this function allows multiple users use the same account to login.
After all the setups please click save button, system goes back to the previous menu.
5.4.6 Auto maintain
Here you can set auto-reboot time and auto-delete old files setup.You can select proper setup from dropdown
list.After all the setups please click save button, system goes back to the previous menu.
www.hrcctv.com
pag.43
USER MANUAL
HRVR0404S-0804S-1604S
5.4.7 TV adjust
Here is for you to adjust TV output setup..Please drag slide bar to adjust each item.After all the setups please click
OK button, system goes back to the previous menu.
5.4.8 Video matrix
Some series DVR have the matrix and loop outputs.
Loop outputs
They are just the same with video distributors. There are 4/8/16-ch video loop outputs from our DVR. The DVR video
output can connect with other devices such as TV walls, analog matrix and so on.
Matrix outputs
They are like the small-scale matrix. You can select any camera from our DVR to switch. And the output can also tour
between the cameras. So the matrix outputs can be used to build TV walls and tour and display the cameras one by
one.
Rear panel connection
The rear panel is shown as below. See 440HErrore. L'origine riferimento non è stata trovata..
37-pin cable introduction
There are three colors cable..
Black: for loop outputs, there are 16-ch loop outputs
pag.44
www.hrcctv.com
USER MANUAL
HRVR0404S-0804S-1604S
Blue: for matrix outputs, there are 4-ch matrix outputs
White: for bi-direction talk, one is for audio in and the other is for audio out.
Video matrix interface and application
The video matrix interface is shown . This series support 4-channel matrix outputs and series support 1 channel matrix
output. All the operation below based on series DVR.
You can set for each channel. The function consists of three types. The priority is: alarm>motion detection>schedule.
Scheduled video output(scheduled tour)
Please enable corresponding video output item and input tour interval, and then set the tour output channel. System
maximally supports 16 channels. Now system can implement tour output as you just set.
Highlighted
here
Select ALL or
cancel
Select channel(s)
here
Input interval here
Alarm activation matrix
Please go to alarm setup interface to set the alarm activate matrix function ((Main Menu->Setting->Alarm)). You can
follow the steps listed below:
Select local alarm
The record channel function has been enabled and you have selected corresponding record channel.
The video matrix function has been enabled and you have selected corresponding video matrix channel.
After selecting activation channel in the record channel item, you can enable video matrix function and then select vide
output channel. Once the alarm occurs, system continues scheduled matrix tour after alarm tour completes. If there is
no scheduled tour available, the matrix will stop at the last activation channel after alarm completes.
When there are several alarm inputs at the same time, the situation maybe a little bit complex. Here is an example.
System setup is shown as below:
www.hrcctv.com
pag.45
USER MANUAL
HRVR0404S-0804S-1604S
Alarm input 1 can activate channel1/2/3/4/5/6
Alarm input 2 can activate channel 2/3/4/5/6/7/8
Alarm input 1 and alarm input 2 activate video output 1.
So, when there is alarm from channel 1, video output 1 becomes valid. If there is no alarm from alarm input 2 during
the same period, then video output 1 can tour between channel1/2/3/4/5/6.
When video output 1 goes to channel 3 and there is alarm form channel2, then video output 1 tour between /5/6/7/8/2.
The general principles are:
When alarm activate, each valid channel alarm input can activate a complete tour between activation channels.
When there are several alarm inputs in the same video matrix output, system video matrix can activate all the
channels in the setup.
If system has toured some activation channels, then corresponding alarm activation channels are null.
Highlighted here
Select alarm input channel
here
Corresponding to video out put in
Highlighted here
Motion detection(including video loss and camera masking)
Motion detection principle is the same as alarm. You can set in motion detection interface (Main menu->Setting>Detect).In detect interface, you can set the activation channel. You can enable video matrix function if you want to set
matrix function, and then set video matrix output channel. Once the activation occurs, system continues scheduled
matrix tour after motion detection tour completes. If there is no scheduled tour available, the matrix will stop at the last
activation channel after alarm completes
5.5 Information
Here is for you to view system information. There are total five items: HDD (hard disk information), BPS (data stream
statistics), Log and version, and online user..
pag.46
www.hrcctv.com
USER MANUAL
HRVR0404S-0804S-1604S
5.5.1 HDD information
Here is to list hard disk type, total space, free space, video start time and status.
Note: Please remove the broken hard disk before you add a new one.Once there is a hard disk confliction, please
check hard disk time and system time is the same or not. Please go to setting then general to modify system time. At
last, reboot the system to solve this problem. If disk is damaged, system shows as “?”
5.5.2 BPS
Here is for you to view current video data stream (KB/s) and occupied hard disk storage (MB/h).
5.5.3 Log
Here is for you to view system log file. System lists the following information.
Log types include system operation, configuration operation, data management, alarm event, record operation, log
clear and etc. Pleased select start time and end time, then click search button. You can view the log files. Please page
up/down button to view if there are more than ten files.
www.hrcctv.com
pag.47
USER MANUAL
HRVR0404S-0804S-1604S
5.5.4 Version
Here is for you to view some version information..
Channel
Alarm in
Alarm out
System version:
Build Date
5.5.5 Online users
Here is for you manage online users. You can disconnect one user or block one user if you have proper system right.
5.6 Exit
Double click exit button, system pop up a dialogue box for you to select.
Logout menu user: log out menu. You need to input password when you login the next time.
Restart application: reboot DVR.
Shutdown: system shuts down and turns off power.
Restart system: system begins rebooting.
Switch user: you can use another account to log in.
pag.48
www.hrcctv.com
USER MANUAL
HRVR0404S-0804S-1604S
6.
About auxiliary menu
6.1 Go to pan/tilt/zoom menu
In the one-window surveillance mode, right click mouse (click “fn” Button in the front panel or click AUX key in the
remote control). The interface is shown as below.
Click Pan/Tilt/Zoom, the interface is shown.Here you can set the following items:
Zoom
Focus
Iris
Click icon
and
to adjust zoom, focus and Iris.
Please click direction arrows to adjust PTZ position. There are totally eight direction arrows. (Please note there are
only four direction arrows in DVR front panel.)
3D intelligent positioning key
In the middle of the eight direction arrows, there is a 3D intelligent positioning key. Click this button, system goes back
to the single screen mode. Drag the mouse in the screen to adjust section size.
www.hrcctv.com
pag.49
USER MANUAL
HRVR0404S-0804S-1604S
Here is a sheet for you reference.
Name
Function
function
key
7.
Shortcut
key
Function
function
key
Shortcut
key
Zoom
Near
Far
Focus
Near
Far
Iris
close
Open
Web client operation
Please note, all the operation here is taking 16-ch DVR as an example. There might be slightly difference in the
interface due to different series.
7.1 Network connection
Before web client operation, please check the following items:
Network connection is right
DVR and PC network setup is right. Please refer to network setup(main menu->setting->network)
Use order ping ***.***.***.***(* DVR IP address) to check connection is OK or not.
System is compatible with WIN VISTA web control right now. But you need to disable user account control
function. Double click user account and then disable user account control. After completing setup, please reboot
the PC.
System can automatically download latest web control and the new version can overwrite the previous one.
If you want to un-install the web control, please run uninstall web.bat. Please note, before you un-install, please
close all web pages, otherwise the un-installation might result in error.
7.2 Login
Open IE and input DVR address in the address column. For example, if your DVR IP is 10.10.3.16, then please input
http:// 10.10.3.16 in IE address column.
Input your IP
address here.
System pops up warning information to ask you whether install webrec.cab control or not. Please click yes button.
If you can’t download the ActiveX file, please modify your settings as follows.
pag.50
www.hrcctv.com
USER MANUAL
HRVR0404S-0804S-1604S
After installation, the interface is shown as below. See 487HErrore. L'origine riferimento non è stata
trovata..Please input your user name and password. Default factory name is admin and password is admin.
Note: For security reasons, please modify your password after you first login.
After you logged in, you can see the main window This main window can be divided into the following sections.
Section 1: there are five function buttons: configuration (chapter ), search (chapter ), alarm (chapter ), about
(chapter ), log out (chapter).
Section 2: there are channel number and three function buttons: start dialog and local play, refresh.
Section3: there are PTZ (chapter ), color (chapter) button and you can also select picture path and record path.
Section 4:real-time monitor window. Please note current preview window is circled by a green rectangle zone.
Section 5: Here you can view window switch button. You can also select video priority between fluency or realtime.
System monitor window switch supports full screen/1-window/4-window/6-window/8-window/9-window/13window/16-window/20-window/25-window/36-window.
www.hrcctv.com
pag.51
USER MANUAL
HRVR0404S-0804S-1604S
Preview window switch. System support 1/4/8/9/16-window real-time preview. Please you need to have the
proper rights to implement preview operation. You can not preview if you have no right to preview the either
channel.
Section1
Section 3
Section 4
Section 2
Section 5
7.2.1 Real-time monitor
In section 2, left click the channel name you want to view, you can see the corresponding video in current window.
For detailed function key information..
1 2
3 4
5
6
1: Digital zoom: Click this button and then left drag the mouse in the zone to zoom in. right click mouse system
restores original status.
2: Change show mode: resize or switch to full screen mode.
3: Local record. When you click local record button, the system begins recording and this button becomes
highlighted. You can go to system -.local record to set video file path.
4: Capture picture. You can snapshoot important video. All images are memorized in system client folder
\download\picture (default).
5: Audio :Turn on or off audio.(It has no relationship with system audio setup )
6: Close video.
Please for main stream and extra stream switch information.
Refresh
pag.52
www.hrcctv.com
USER MANUAL
HRVR0404S-0804S-1604S
You can use button to refresh camera list.
7.2.2 Start Dialogue
You can click this button to enable audio talk. Local Play
Click local play button, system pops up the following interface for you to select local play file.
7.2.3 PTZ
Before PTZ operation, please make sure you have properly set PTZ protocol. (Please refer to chapter Setting->
Pan/Tilt/Zoom).Click PTZ button, the interface is shown .
You can click this icon to
display or hide the PTZ
control platform.
Direction key and 3D positioning key
There are eight direction keys.In the middle of the eight direction keys, there is a 3D intelligent positioning key. Click
SIT button, system goes back to the single screen mode. Drag the mouse in the screen to adjust section size. It can
realize PTZ automatically.
Speed
System supports eight-level speed. You can select from the dropdown list. Speed 2 is faster than speed 1.
Zoom/focus/iris
Here is a sheet for you reference.
Name
Function
Function
Function
Function
key
key
Zoom
Far
Near
Focus
Near
Far
Iris
close
Open
Then click triangle icon, you can see the following interface.
www.hrcctv.com
pag.53
USER MANUAL
HRVR0404S-0804S-1604S
In 498HErrore. L'origine riferimento non è stata trovata., click PTZ setup button you can see the following
interface.
Preset
Move the camera to your desired location and then input preset value. Click add button, you have set one preset.
Auto scan
Move the camera to you desired location and then click left limit button. Then move the camera again and then click
right limit button to set a right limit.
Input auto tour value and preset value. Click add button, you have added one preset in the tour.Repeat the above
procedures you can add more presets in one tour.
Pattern
You can input pattern value and then click start record button to begin PTZ movement. Please go back to implement
camera operation. Then you can click stop record button. Now you have set one pattern.
Assistant
You can select the assistant item from the dropdown list.
pag.54
www.hrcctv.com
USER MANUAL
HRVR0404S-0804S-1604S
7.2.4 Color
Click color button in section 3, the interface is shown as 506HErrore. L'origine riferimento non è stata trovata..
Here you can select one channel and then adjust its brightness, contrast, hue and saturation. (Current channel border
becomes green). Or you can click default button to use system default setup.
7.2.5 Picture path and record path
Click more button, you can see an interface is shown.
Click picture path button, you can see an interface is shown
Click record path button, you can see an interface is shown
www.hrcctv.com
pag.55
USER MANUAL
HRVR0404S-0804S-1604S
7.3
Configure
In the main window, click config button, you can see an interface is shown
7.3.1 System information
Version
Click version button, you can see corresponding HDD information for your reference.
HDD Information
Here you can view HDD amount, HDD status, total volume and free space.
pag.56
www.hrcctv.com
USER MANUAL
HRVR0404S-0804S-1604S
Log
Click log button, you can see an interface is shown as in 518HErrore. L'origine riferimento non è stata trovata..
Here you can view current device log information.
7.3.2 Setting
Setting includes the following items:
General
Encode setup
Schedule
RS232
Network
FTP
Alarm setup
www.hrcctv.com
pag.57
USER MANUAL
HRVR0404S-0804S-1604S
Detect
Pan/Tilt/Zoom
Tool
Please note: setups for different device series may vary. Please refer to the corresponding user’s manual.
General
General interface is shown .
System time: Here is for you to modify system time. Please click Save after your modification
Data format: Here you can select data format from the dropdown list.
Data separator: Please select separator such as – or /.
Time format: there are two options: 24-H and 12-H.
HDD full: there are two options: stop recording or overwrite the previous files when HDD is full.
Pack duration: Here you can select file size. Default setup is 60 minutes.
Device No.: when you are using one remote control to manage multiple DVRs, you can give these DVRs serial
numbers respectively. Click address button in your remote control and then input the correct device number, now
you can control the DVR now.
Video standard: PAL. (for your reference only)
Encode
Encode setup includes the following items..Here you can select
Channel: Here is for you to select a channel.
Channel name: Modify channel name.
Data stream: Regular and extra data stream.
AV enable: Video/Audio. System only displays video by default. You need to manually enable audio function.
Bit rate: There are two options: CBR and VBR. You can only set video quality in VBR mode.
Frame rate: The value ranges from 1f/s to 25f/s (PAL) and 1f/s to 30f/s (NTSC).
Compression: There are two options: H.264 and MPEG 4.
Resolution: D1/HD1/DCIF/CIF
Quality: The value ranges from 1 to 6. The level 6 is the best video quality.
pag.58
www.hrcctv.com
USER MANUAL
HRVR0404S-0804S-1604S
Schedule
Schedule includes the following interface.When DVR boots up, it is in 24-hour continuous record. In this interface you
can set record type, record time and period. Record type includes regular record(R), motion detection record (M) and
alarm record (A).
Channel: select the channel number you desire.
Week: you can select from the dropdown list. Or you can select at the bottom of the interface.
Prerecord: system can record the three to five seconds video before activating the record operation into the
file.(Depends on data size)
Period: There are six periods for you to set. Please click set button of the corresponding period. .Please note all
the setup here shall be in one day. E.g. 00.00 to 24.00.
www.hrcctv.com
pag.59
USER MANUAL
HRVR0404S-0804S-1604S
Network
Network interface is shown. This interface includes the following items: Max: Here you can set max connection
amount. The value ranges from 0 to 10. 0 means no network connection is allowed. TCP port: default setup is 37777.
Please note port 37778 is for network UDP port use only. HTTP port: default setup is 80.
Transfer: here you can select the priority between fluency/video quality.
Enable PPPoE
In remote item, enable PPPoE function and then input “PPPoE name” and “PPPoE password” you get from your ISP
(Internet service provider).
Click save button, you need to restart to activate your configuration.
After rebooting, DVR will connect to internet automatically. The IP displayed in the IP address item is the dynamic
value. You can use client-end software to visit current IP now.
Enable DDNS
You need a PC of fixed IP in the internet and there is the DDNS software running in this PC. In other words, this PC is
a DNS (domain name server).
Please enable DDNS function and then input PC IP. Click save button and then reboot device. Now you can login via
DDNS. Please open IE and then input http //(DDNS server IP)/ DDNServer / default.htm. for example, input
http //10.5.2.149/DDNServer/default.htm, you open a DDNS server web page.
pag.60
www.hrcctv.com
USER MANUAL
HRVR0404S-0804S-1604S
RS232
RS232 includes the following items..
Function: There are various devices for you to select. Console is for serial port or min-end platform to upgrade
program. Keyboard is for you to use special keyboard to control current device.
Baud rate: Please select as you desire.
Data bit: The value ranges from 5 to 8.
Stop bit: There are three options: 1/1.5/2.
Parity: There are three options: none/odd /even.
FTP
After you completed setup here, system upload scheduled data to the specified FTP server regularly. Need device
supported.
You need to input FTP server address, port, log in user name and password. Then you need to specify the destination
directory to save files.
File: here you can input uploaded file length (Unit: MB) if the file is smaller than the setup value here, system
upload the whole file. If the file is larger than the setup value, system only uploads the setup value data and
ignores the rest data.
Interval: for one channel of the same record type if there is more than one alarm, system only uploads the first
file. For example, if the interval is five minutes, then system only uploads the first alarm or motion detection file
even though there are several alarms in these five minutes. If the setup is 0, then system upload all files.
www.hrcctv.com
pag.61
USER MANUAL
HRVR0404S-0804S-1604S
Time period: Click set button, you can an interface . You can check the box to select the file type. System
supports multiple choices.
Alarm
Please note before alarm setup, you need to properly connect alarm input and output device, send address and
receive address. Click save button confirm current setup. Alarm setup includes the following items..
Event Type: you can select event type from the drop down list: Local alarm/Net alarm.
Alarm in: Select corresponding alarm in channel
Type: There are two options: normal open and normal close.
Record channel: select record channel when alarm occurs. Please note you need to select alarm record in DVR
schedule interface and enable schedule function in manual record interface.
Alarm output: select alarm activation channel when alarm occurs. Please note channel 3 is to control +12V
output.
Show message: System can pop up a message to alarm you in the local host screen if you enabled this
function.
PTZ activation: Here you can set PTZ movement when alarm occurs. Such as go to preset x when there is an
alarm. Click set button, the interface is shown
Tour: Here you can enable tour function when alarm occurs. System supports multiple-window tour. Please go
to chapter Display for tour interval setup.
pag.62
www.hrcctv.com
USER MANUAL
HRVR0404S-0804S-1604S
Detect
Detect interface is shown Here includes the following items:
Channel: Select channel name from the dropdown list.
Type: There are three types: motion detection/Video loss/Camera mask detection.
Record channel: Here you can select record channel (Multiple choices). Please make sure you have set MD
record in encode interface(Main Menu->Setting->Schedule) and schedule record in manual record
interface(Main Menu->Advanced->Manual Record)
Period: Here is for you to set record period. Click set button, you can see an interface is shown ,click time set
button, you can see an interface is shown. Here you can set time period.
Sensitivity: There are six levels. The sixth level has the highest sensitivity.
Region: If you select motion detection type, you can click this button to set motion detection zone. The interface
is shown. There are 192 zones (16*12). Right click mouse you can go to full-screen display mode. Do remember
clicking OK button to save your motion detection zone setup.
Alarm output: Here you can select activated external peripheral device when alarm occurs.
Show message. System can alert you on the local screen if you enabled this function.
Mail: system can send out email to alert you when alarm occurs.
Tour: Here you can enable tour function when alarm occurs in corresponding channel. System supports multiplewindow tour. Please go to chapter Display for tour interval setup.
PTZ activation: Click set button, you can see an interface is shown. System can go to corresponding preset when
alarm occurs.
www.hrcctv.com
pag.63
USER MANUAL
HRVR0404S-0804S-1604S
pag.64
www.hrcctv.com
USER MANUAL
HRVR0404S-0804S-1604S
Pan/Tilt/Zoom
Pan/Tilt/Zoom interface is shown
Please note you have properly set dome address and all connections are right.
Decoder: Select the dome connected channel.
Protocol: select the corresponding dome protocol.(such as Pelco)
Address: Set corresponding dome address. Default value is 1. Please note your setup here shall comply with your
dome address; otherwise you can not control the speed dome.
Baud rate: Select the dome baud rate. Default setup is 9600.
Data bit: Default setup is 8.
Stop bit: Default setup is 1.
Parity: Default setup is none.
Tool
www.hrcctv.com
pag.65
USER MANUAL
HRVR0404S-0804S-1604S
Here you can export or import configuration information. .Save configuration data: Click export config button to save
current setup as a file. Extension name is CFG.Load configuration data: Click import config button, you can load a
setup file.
Advanced
Advanced includes the following items. See 543HErrore. L'origine riferimento non è stata trovata..
Account
HDD management
Alarm output
Auto maintain
Video matrix
Snapshoot (For special series only)
Account
Account interface is shown . Here you can add/delete user, add/delete group, modify user or group right, modify user
password.
Click add group button, you can see the following interface.Here you can add one new group, and then select
corresponding rights for the whole group accounts.
pag.66
www.hrcctv.com
USER MANUAL
HRVR0404S-0804S-1604S
Click add user button, you can see the following interface..Here you can input a new user and then select
corresponding rights.Please note one user must belong to one group and user right shall not exceed group rights limit.
Record Control
Record control interface is shown .Record control: Here you can enable record status for corresponding channel.Alarm
output channel: Here you can select alarm output channel. DVR output channel can not support large overload. (It
shall be less than 1A). Too heavy current may result in relay damage. Please use contactor if necessary.
www.hrcctv.com
pag.67
USER MANUAL
HRVR0404S-0804S-1604S
HDD management
This function needs DVR device supported. Please select the HDD first and then you can see the items on your right
become valid. You can check the corresponding item here.
After you completed setup, please click control HDD button, you can see the DVR begins restarting.
Auto maintenance
Auto maintenance interface is shown. Here you can enable auto reboot or auto delete old files function. (Need DVR
supported)
pag.68
www.hrcctv.com
USER MANUAL
HRVR0404S-0804S-1604S
Video Matrix
Video matrix interface is shown. Please note this function needs DVR supported.
Snap Picture
Snapshoot interface is shown . Please note this function needs DVR supported. (For special series only)
www.hrcctv.com
pag.69
USER MANUAL
HRVR0404S-0804S-1604S
F
7.4 Search
Here you can select video type, channel number and time to search the file you want.Click search button, the interface
is shown as below.Please use page up/down key to view the search results.
Double click file name, you can view the file and system will automatically backup the image in you installation
directory.
In the search result interface, you can select one or more files to download to your local PC. The playback bar is
shown as below.
1: Play
2: Pause
3: Stop
4: Slow play
5: Fast play
pag.70
www.hrcctv.com
USER MANUAL
HRVR0404S-0804S-1604S
Download
You can select one or more files you want to download and then click down load button. System pops up a dialogue
box asking you specify directory.
Then you can input file name and click save to backup file in your local pc.
During the download process, there is a process bar for you reference and you can see download button becomes
stop button.
www.hrcctv.com
pag.71
USER MANUAL
HRVR0404S-0804S-1604S
7.5 Alarm
Here you can set alarm type and alarm prompt audio file.
7.6 About
Click about button, you can view current web client information.
pag.72
www.hrcctv.com
USER MANUAL
HRVR0404S-0804S-1604S
7.7 Log out
Click log out button, system goes back to log in interface.
7.8 Un-install web control
You can use web un-install tool “uninstall web. bat” to un-install web control. Please note, before you un-installation,
please close all web pages, otherwise the un-installation might result in error.
Enterprise professional surveillance system
7.9
In this chapter, we introduce how to add devices and how to enable monitor function. For detailed operation, please
refer to enterprise professional surveillance system user’s manual.
7.10 SMART PHONE vision
Using the relative software present in the package contents, you can display live from a mobile SMART PHONE or
PDA palmera:
• Operating system: windows mobile or higher.
• Connection: GPRS, EDGE, UMTS.
• Display: TFT 2,8”.
• ADSL and IP static public press oil DVR.
8.
Faq
DVR can not boot up properly
There are following possibilities:
Input power is not correct.
Power connection is not correct.
Power switch button is damaged.
Program upgrade is wrong.
HDD malfunction or something wrong with HDD ribbon.
www.hrcctv.com
pag.73
USER MANUAL
HRVR0404S-0804S-1604S
Seagate DB35.1 DB35.2 SV35 or Maxtor 17-g has compatibility problem. Please upgrade to the latest
version to solve this problem.
Front panel error.
Main board is damaged.
DVR often automatically shuts down or stop running
There are following possibilities:
Input voltage is not stable or it is too low.
HDD malfunction or something wrong wit the ribbon.
Button power is not enough.
Front video signal is not stable.
Working environment is too harsh, too much dust.
Hardware malfunction.
System can not detect hard disk
There are following possibilities:
HDD is broken.
HDD ribbon is damaged.
HDD cable connection is loose.
There is no video output whether it is one channel ,multiple channel or all channel output
There are following possibilities:
Program is not compatible. Please upgrade to the latest version.
Brightness is 0. Please restore factory default setup.
There is no video input signal or it is too weak.
Check privacy mask setup or your screen saver.
DVR hardware malfunctions.
Real time video color is distorted
There are following possibilities:
When using BNC output, NTSC and PAL setup is not correct. The real-time video becomes black and white.
DVR and monitor resistance is not compatible.
Video transmission is too long or degrading is too huge.
DVR color or brightness setup is not correct.
Can not search local records
There are following possibilities:
HDD ribbon is damaged.
HDD is broken.
Upgraded program is not compatible.
The recorded file has been overwritten.
Record function has been disabled.
Video is distorted when searching local records
There are following possibilities:
Video quality setup is too low.
pag.74
www.hrcctv.com
USER MANUAL
HRVR0404S-0804S-1604S
Program read error, bit data is too small. There is mosaic in the full screen. Please restart the DVR to solve
this problem.
HDD data ribbon error.
HDD malfunction.
DVR hardware malfunctions.
There is no audio when monitor
There are following possibilities:
It is not a power picker.
It is not a power acoustics.
Audio cable is damaged.
DVR hardware malfunctions.
There is audio when monitor but there is no audio when system playback
There are following possibilities:
Setup is not correct. Please enable audio function
Corresponding channel has no video input. Playback is not continuous when the screen is blue.
Time display is not correct
There are following possibilities:
Setup is not correct
Battery contact is not correct or voltage is too low.
Crystal is not broken.
DVR can not control ptz
There are following possibilities:
Front panel PTZ error
PTZ decoder setup, connection or installation is not correct.
Cable connection is not correct.
PTZ setup is not correct.
PTZ decoder and DVR protocol is not compatible.
PTZ decoder and DVR address is not compatible.
When there are several decoders, please add 120 Ohm between the PTZ decoder A/B cables furthest end to
delete the reverberation or impedance matching. Otherwise the PTZ control is not stable.
The distance is too far.
Motion detection function does not work
There are following possibilities:
Period setup is not correct.
Motion detection zone setup is not correct.
Sensitivity is too low.
For some versions, there is hardware limit.
Can not log in client end or web
There are following possibilities:
www.hrcctv.com
pag.75
USER MANUAL
HRVR0404S-0804S-1604S
For Windows 98 or Windows ME user, please update your system to Windows 2000 sp4. Or you can install
client-end software of lower version. Please note right now, our DVR is not compatible with Windows VISTA
control.
ActiveX control has been disabled.
No dx8.1 or higher. Please upgrade display card driver.
Network connection error.
Network setup error.
Password or user name is invalid.
Client-end is not compatible with DVR program.
There is only mosaic no video when preview or playback video file remotely
There are following possibilities:
Network fluency is not good.
Client-end resources are limit.
There is multiple-cast group setup in DVR. This mode can result in mosaic. Usually we do not recommend
this mode.
There is privacy mask or channel protection setup.
Current user has no right to monitor.
DVR local video output quality is not good.
Network connection is not stable
There are following possibilities:
Network is not stable.
IP address conflict.
MAC address conflict.
PC or DVR network card is not good.
Burn error/ USB back error
There are following possibilities:
Burner and DVR are in the same data cable.
System uses too much CPU resources. Please stop record first and then begin backup.
Data amount exceeds backup device capacity. It may result in burner error.
Backup device is not compatible.
Backup device is damaged.
Keyboard can not control DVR
There are following possibilities:
DVR serial port setup is not correct
Address is not correct
When there are several switchers, power supply is not enough.
Transmission distance is too far.
Alarm signal can not been disarmed
There are following possibilities:
Alarm setup is not correct.
pag.76
www.hrcctv.com
USER MANUAL
HRVR0404S-0804S-1604S
Alarm output has been open manually.
Input device error or connection is not correct.
Some program versions may have this problem. Please upgrade your system.
Alarm function is null
There are following possibilities:
Alarm setup is not correct.
Alarm cable connection is not correct.
Alarm input signal is not correct.
There are two loops connect to one alarm device.
Remote control does not work
There are following possibilities:
Remote control address is not correct.
Distance is too far or control angle is too small.
Remote control battery power is low.
Remote control is damaged or DVR front panel is damaged.
Record storage period is not enough
There are following possibilities:
Camera quality is too low. Lens is dirty. Camera is installed against the light. Camera aperture setup is not
correct.
HDD capacity is not enough.
HDD is damaged.
Can not playback the downloaded file
There are following possibilities:
There is no media player.
No DXB8.1 or higher graphic acceleration software.
There is no DivX503Bundle.exe control when you play the file transformed to AVI via media player.
No DivX503Bundle.exe or ffdshow-2004 1012 .exe in Windows XP OS.
Forget local menu operation passwork or network passwork
Please contact your local service engineer or our sales person for help. We can guide you to solve this problem.
Slight difference may be found in user interface.
All the designs and software here are subject to change without prior written notice.
Please visit our website for more information.
www.hrcctv.com
pag.77
USER MANUAL
HRVR0404S-0804S-1604S
9.
Appendix
Compatible SATA HDD List
Manufacturer
Series
Model
Capacity
Type
Seagate
SV.35
SV.35.2
160
SATA
Seagate
SV.35
SV.35.3
250
SATA
Seagate
SV.35
SV.35.3
500
SATA
Seagate
Barracuda.10
ST3750640AS
750G
SATA
Seagate
Barracuda.10
ST3500630AS
500G
SATA
Seagate
Barracuda.10
ST3400620AS
400G
SATA
Seagate
Barracuda.10
ST3320620AS
320G
SATA
Seagate
Barracuda.10
ST3250620AS
250G
SATA
Seagate
Barracuda.10
ST3250820AS
250G
SATA
Seagate
Barracuda.10
ST3160815AS
160G
SATA
Seagate
Barracuda.10
ST380815AS
80G
SATA
Seagate
Barracuda.9
ST3160811AS2
160G
SATA
Seagate
Barracuda.9
ST3120811AS2
120G
SATA
Seagate
Barracuda.9
ST380811AS2
80
SATA
Seagate
Barracuda.9
ST380211AS2
80G
SATA
Seagate
Barracuda.11
ST3750330AS
750G
SATA
Seagate
Barracuda.11
ST3500320AS
500G
SATA
Maxtor
DiamondMax 20
STM3320820AS
320G
SATA
Maxtor
DiamondMax 20
STM3250820AS
250G
SATA
Maxtor
DiamondMax 21
STM3160211AS
160G
SATA
Maxtor
DiamondMax 21
STM380211AS
80G
SATA
Maxtor
DiamondMax 21
STM340211AS
40G
SATA
Western Digital
Cariar SE
WD3200JD
320G
SATA
Western Digital
Cariar SE
WD3000JD
300G
SATA
Western Digital
Cariar SE
WD2500JS
250G
SATA
Western Digital
Cariar SE
WD2000JD
200G
SATA
Western Digital
Cariar SE
WD1600JD
160G
SATA
Western Digital
Cariar SE
WD1600JS
160G
SATA
Western Digital
Cariar SE
WD1200JS
120G
SATA
Western Digital
Cariar SE
WD800JD
80G
SATA
Western Digital
Cariar
WD1600AABS2
160G
SATA
Western Digital
Cariar
WD800BD
80G
SATA
Western Digital
Cariar SE16
WD7500KS2
750G
SATA
Western Digital
Cariar SE16
WD5000KS2
500G
SATA
Western Digital
Cariar SE16
WD4000KD2
400G
SATA
Western Digital
Cariar SE16
WD3200KS2
320G
SATA
Western Digital
Cariar SE16
WD2500KS2
250G
SATA
pag.78
www.hrcctv.com
USER MANUAL
HRVR0404S-0804S-1604S
Technical specifications can be modified without notice.
www.hrcctv.com
pag.79
USER MANUAL
HRVR0404S-0804S-1604S
HR EUROPE s.r.l.
ROMA: sede legale e amministrativa; Via Giulianello, 1-7 – 00178 Roma, ITALIA – Tel +39 06 7612912 Fax +39 06 7612601
TORINO: sede operativa; Via G.B.Feroggio, 10 – 10151 Torino, ITALIA – Tel +39 011 453 53 23 Fax +39 011 453 70 49
SHANGHAI: ufficio di rappresentanza; Minhang Residence, Room 506, N°50 Jinzhu Road 200336 Shanghai, CHINA
Tel(Fax):+86 21 62086781 – e-mail: [email protected]
e-mail: [email protected] web: www.hrcctv.com – Codice Fiscale e Partita IVA 06397551000 – Iscrizione R.E.A. 966880
pag.80
www.hrcctv.com