
1
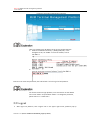
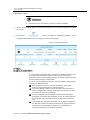
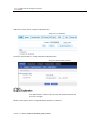
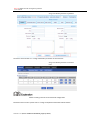
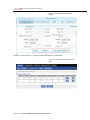
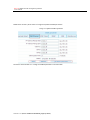
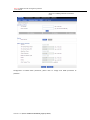
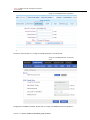
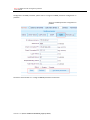
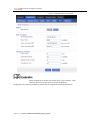
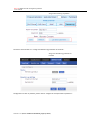
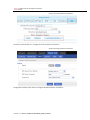
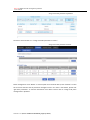
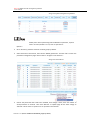
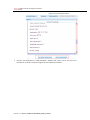
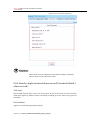
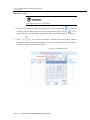
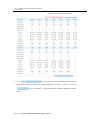
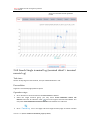
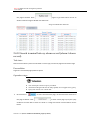
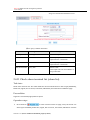
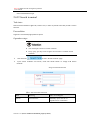
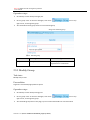
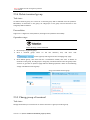
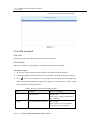
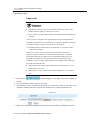
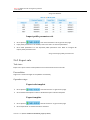
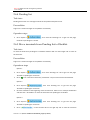
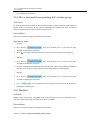
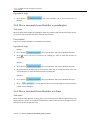
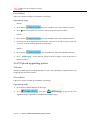
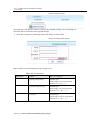
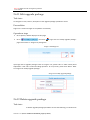
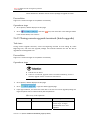
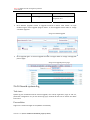
User Manual RICON M2M terminal management platform V1.0.0 RICON M2M terminal management platform User manual RICON company provide customers with comprehensive technical support, users can directly contact with the company headquarters。 RICON company Address: Web site: Technical Hotline: Service: Fax: Postal Code: Copy right ©2011 RICON company all right reserved This manual contains all the contents are subject to copyright laws, without the written authorization of Shenzhen RICON, any organization or individual in any form or by any means part of the specification and Reproduction. Trademark Notice is RICON company's trademarks, mentioned in this manual to other trademarks owned the trademark by other agency, RICON company has no rights on other trademark. Note As the product version upgrades or other reasons, this document is subject to change without notice. Unless otherwise agreed, the document used as guidance only, all statements in this document, information, and recommendations do not constitute any express or implied. Version 1.0.0 (Error! Unknown document property name.) RICON M2M terminal management platform User manual Introduction Outline This user manual helps user/technical/R&D learn how the RICON M2M terminal management platform works and how to operate it. The platform works with RICON S9921 3G router and S9931 DSL router, for the purpose of monitoring the connectivity of network, and also controlling devices remotely. In this manual, it introduced all features of platform. To show feature of platform, it has three main sections for each feature. Task intro: By setting up a task, it tells user what feature is going to be introduced and how the feature works. Precondition: It indicates what necessary step is before you can test the feature. Operation steps: explain detail steps to use the feature. Version of manual Product name Version Date User manual of RICON M2M terminal management platform V1.0.0 12/28/2011 Readers This document applies to the following readers: R & D engineers Technical Support Engineer Customers Symbol agreement In this article the following signs may appear, they are defined as follows. ‐ 1 ‐ RICON M2M terminal management platform User manual Symbol Description Indicates text that has a high degree of risk, which if not avoided, could result in casualties or serious injury. Indicates text that has moderate or low level of risk, if not avoided, could result in minor or moderate injury. Indicates a text representation of the potential risks, if not avoided, may result in equipment damage, data loss, performance degradation, or unexpected results. Indicates a text can help you solve a problem or save you time. Indicates a body of the text is additional information, is the body's stress and additions. Format Description “” Quotation marks "" indicate button names and data types of interface table, such as clicking "OK." > Multi-level menus separated by ">". If you select "File> New> Folder", it means to find "Folders" menu under the "New" submenu which is under the "File" menu item. Revision history is accumulated for each document update. The latest version of the document contains all previous versions of the updated document. ‐ 2 ‐ RICON M2M terminal management platform User manual Catalogue Outline............................................................................................................................................................... - 1 - Version of manual ............................................................................................................................................. - 1 - Readers............................................................................................................................................................ - 1 - ............................................................................................................................................... - 2 - 1 Overview ............................................................................................................................................................. 1-1 Outline................................................................................................................................................................. 1-1 1.1 Product Introduction...................................................................................................................................... 1-1 1.2 Feature summary ........................................................................................................................................... 1-1 1.3 User role ........................................................................................................................................................ 1-1 2 Operation instructions............................................................................................................................................. 2 Outline.................................................................................................................................................................... 2 2.1 Login to platform ............................................................................................................................................. 2 2.2 Logout .............................................................................................................................................................. 3 2.3 Auto install setup .............................................................................................................................................. 4 2.3.1 Rule import ............................................................................................................................................. 4 2.3.2 SLA setting ............................................................................................................................................. 6 2.3.3 Group (Separate terminals by Group) ..................................................................................................... 6 2.4 Terminal section ............................................................................................................................................... 6 2.4.1 Terminal list ............................................................................................................................................ 7 2.4.2 Terminal detail ........................................................................................................................................ 8 2.4.3 Reboot terminal(terminal detail > reboot) ......................................................................................... 9 2.4.4 Set parameter terminal(terminal detail > Edit parameters) ................................................................ 9 2.4.5 Setting advanced parameters on single terminal(terminal detail > advanced parameters) .............. 24 2.4.6 Search single terminal alarm record(terminal detail > alarm record) .............................................. 26 2.4.7 Search Single terminal daily report (terminal detail > daily report)...................................................... 27 2.4.8 Search Single terminal log (terminal detail > terminal remote log) ...................................................... 30 2.4.9 Check Terminal realtime alarm (alarm->realtime alarm) ...................................................................... 31 2.4.10 Search terminal history alarm record (alarm->alarm record) .............................................................. 32 2.4.11 Check alarm terminal list (alarm list) .................................................................................................. 33 2.4.12 Search terminal ................................................................................................................................... 34 2.4.13 Search terminal network parameter report (daily report) .................................................................... 35 2.4.14 Terminal alarm statistic (Statistic)....................................................................................................... 36 2.4.15 Remote upgrade terminal (terminal list drop down list) ..................................................................... 37 ‐ 3 ‐ RICON M2M terminal management platform User manual 2.4.16 Check remote upgrade status (terminal list drop down list) ................................................................ 38 2.4.17 Restart terminal (terminal list drop down list) .................................................................................... 38 2.4.18 Modify parameters (terminal list drop down list) ............................................................................... 39 2.5 Group section ................................................................................................................................................. 39 2.5.2 Add new terminal group ........................................................................................................................ 39 2.5.3 Modify Group ....................................................................................................................................... 40 2.5.4 Delete terminal group ........................................................................................................................... 41 2.5.5 Chang group of terminal ....................................................................................................................... 41 2.5.6 Edit terminal ......................................................................................................................................... 43 2.5.7 Delete terminal ...................................................................................................................................... 44 2.6 System section ................................................................................................................................................ 44 2.6.1 Warning threshold setting (Set SLA) .................................................................................................... 44 2.6.2 Import rule ............................................................................................................................................ 46 2.6.3 Export rule ............................................................................................................................................ 48 2.6.4 Pending list ........................................................................................................................................... 49 2.6.5 Move terminals from Pending list to Blacklist...................................................................................... 49 2.6.6 Move terminals from pending list to home group ................................................................................. 50 2.6.7 blacklist ................................................................................................................................................. 50 2.6.8 Move terminals from blacklist to pendinglist ....................................................................................... 51 2.6.9 Move terminals from blacklist to Home ............................................................................................... 51 2.6.10 Upload upgrading packet .................................................................................................................... 52 2.6.11 Edit upgrade package .......................................................................................................................... 54 2.6.12 Delete upgrade package ...................................................................................................................... 54 2.6.13 Timing remote upgrade terminals (batch upgrade) ............................................................................. 55 2.6.14 Search system log ............................................................................................................................... 56 2.7 User section .................................................................................................................................................... 58 2.7.2 Add user ................................................................................................................................................ 58 2.7.3 Edit user ................................................................................................................................................ 59 2.7.4 Delete user ............................................................................................................................................ 60 3 FAQ ....................................................................................................................... Error! Bookmark not defined. ‐ 4 ‐ RICON M2M terminal management platform User manual Tables Table 2-1 Rule introduction.................................................................................................................................... 5 Table 2-2 Query condition instruction .................................................................................................................. 33 Table 2-3 Search terminal instruction................................................................................................................... 34 Table 2-4 Search condition instruction. ................................................................................................................ 35 Table 2-5 Search condition instruction ................................................................................................................. 36 Table 2-6 Add sub group ...................................................................................................................................... 40 Table 2-7 input info requirement for editing terminal .......................................................................................... 43 Table 2-8 Set warning threshold value ................................................................................................................. 45 Table 2-9 Key item explanation ........................................................................................................................... 53 Table 2-10 key word explanation ......................................................................................................................... 55 Table 2-11 Searching condition explanation ........................................................................................................ 57 Table 2-12 user basic info input explanation ........................................................................................................ 59 5 RICON M2M terminal management platform User manual 1 Outline Chapter Brief instruction Error! Reference source not found.Product Introduction Brief instruction of product Error! Reference source not found.Error! Reference source not found. Summarize feature of platform Error! Reference source not found.User role Introduce user role 1.1 Product Introduction 1.2 Feature summary 1.3 User role Version 1.0.0 (Error! Unknown document property name.) Overview RICON M2M terminal management platform User manual 2 Operation instructions Outline Chapter Brief instruction Error! Reference source not found. Login Introduce steps to login platform and the precautions. Error! Reference source not found. Log out Introduce the steps to exit platform. 2.3 Initial of platform Introduce initial of platform after installation 2.4 Terminal Section Error! Reference source not found. Group section 2.6 System section Error! Reference source not found. User section Introduction The main function of the Terminal section, operating procedures and precautions. Introduction The main function of the Group section, operating procedures and precautions. Introduction The main function of the System section, operating procedures and precautions. Introduction The main function of the User section, operating procedures and precautions. 2.1 Login to platform Open the computer IE (Internet Explorer) browser in computer, type in http://192.168.8.1/ into the address bar so as to enter the user login authentication interface as shown in "Image 2‐1 User login authentication interface" Version 1.0.0 (Error! Unknown document property name.) RICON M2M terminal management platform User manual Image 2‐1 User login authentication interface Users can modify server IP address in the server configuration file. 1) Under the installation directory”.\ M2M_SVR\conf”, in the Configure.txt file, set “SVRIP” to server IP address, such as 192.168.8.1. 2) Under the installation directory “.\M2M_SVR\UI\config”, in file svrip.cfg, set the IP to server IP address, such as 192.168.8.1. Enter the user name and password, click "OK" button. You can log on to the platform. For the first time user login platform, user will need to use the default user name "admin" and password "admin". To change the password, please refer to "2.7.2 Edit user." 2.2 Logout After login into platform, click "Logout" link in the upper right corner, platform pop‐up Version 1.0.0 (Error! Unknown document property name.) RICON M2M terminal management platform User manual confirmation prompt, click "OK" button to Logout platform, click "Cancel" button to stay. Please refer to "Image 2‐2Logout button" below. Image 2‐2 Logout button 2.3 Auto install setup Task intro Import rule to platform. When terminal registers to platform, the platform will send configuration in imported rule to terminal according to terminal serial number. Terminal will be rebooted automatically after it gets parameters, then with new parameters, it will register to platform again and star to work properly. Precondition User login to platform successfully. 2.3.1 Rule import Task intro Download template rule as excel file. Setup rule according to your needs, then upload rule to platform. Precondition 1) Use template in platform 2) Setup proper rule according to user’s needs. 3) Login to platform as admin successfully. Version 1.0.0 (Error! Unknown document property name.) RICON M2M terminal management platform User manual Operation steps Please note if parameter on terminal has been pre-set and no need to be changed. Don’t setup rule with all parameters like APN, Username, Password, etc. Otherwise parameter in terminal will be modified by auto install feature. A rule excel file should not being used when need to be imported. Current platform support at most 20,000 rules. Click “system > Edit template according to user’s needs. Import rule file according to instruction of each parameters in rule in “table 2‐1 instruction of rule parameters”: ”。 表2-1 Rule introduction Parameter Description Configure Last 16 characters of serial number For example: 32R201111ZH12001 WMMP-IP Platform public IP address for registration Public IP WMMP-PORT Platform service port for registration Could be 0~65535, default value: 9991 SIM-1 SIM card number of SIM1 Normal SIM cards issued by ISP APN-1 Access Point Name of SIM1 Provided by ISP Username-1 Username of SIM1 Provided by ISP Password-1 Username of SIM1 Provided by ISP SIM-2 SIM card number of SIM2 Normal SIM cards issued by ISP APN-2 Access Point Name of SIM2 Provided by ISP Username-2 Username of SIM2 Provided by ISP Password-2 Password of SIM2 Provided by ISP Router ID Import rule file, according to instruction “2.6.2 Import rules”. Version 1.0.0 (Error! Unknown document property name.) RICON M2M terminal management platform User manual 2.3.2 SLA setting Task intro Users can set a proper threshold of alarm, when any value of terminal state exceeds the threshold, alarm will be triggered and alarm record will be shown in platform. Precondition 1) Legal terminal register to the platform. 2) Admin user login to platform. Operation steps Click the "System> ", edit the threshold. Click "OK" button to complete the threshold settings. Click the "Reset" button to reset the input data. Specific methods of operation, please refer to "2.6.1 alarm threshold settings (Set SLA)" 2.3.3 Group (Separate terminals by Group) Task intro Initially, there is only one group in platform. It is Home group. All of the legal unities of the terminal are assigned to home groups by default. According to use's needs, new group can be created and terminals can be moved among all groups. Precondition 1) Legal terminal has registered to platform. 2) Legal user login to platform successfully. Operation steps Create new group under Home group, please refer to "2.5.1 new terminal group" for specific instruction. Assign terminals to different new created group under Home group. Please refer to "2.5.4 new terminal group" for specific instruction. 2.4 Terminal section Task intro Terminal section, monitors terminal operation, alarm, and generate statistic report of terminals. Version 1.0.0 (Error! Unknown document property name.) RICON M2M terminal management platform User manual Precondition Legal user of platform login to platform successfully. 2.4.1 Terminal list Task intro Terminal list is a list of all terminals in platform. In the list, it shows current state and some information of terminals including agent id, terminal id, IP, and operational information: signal strength, network type, terminal SIM card, the total flow, the firmware version, the installation location, which brings users convenience to know states of terminals. Precondition Legal user of platform login to platform successfully. Operation steps Click the "Terminal", terminals in home group will be listed. Move the cursor to “ ” on the left side of web site, a window with group tree will be shown. Keep the cursor inside the window, click name of terminal group, terminal list will show terminals under the specific group. Please refer to "Image 2‐3 Select terminal group" for specific instruction. Version 1.0.0 (Error! Unknown document property name.) RICON M2M terminal management platform User manual Image 2-3 Select terminal group 2.4.2 Terminal detail Task intro Terminal details, show basic information of terminal and state of network connectivity including (IP, current session time, total online time, current flow, total flow, sim1 total flow, sim2 total flow, signal strength, packet loss rate, out of service, SIM switch, SIM type, network switch, net type, current cell, cell switch) and some links to other pages related to terminal monitoring. Precondition Legal user of platform login to platform successfully. Operation steps Click the "Terminal", move the cursor to “ ” on the left side of web site, a window with group tree will be shown. Click name of terminal group, terminal list will show terminals under the specific group. Please refer to "Image 2‐3 Select terminal group" for specific instruction. Click Agent ID, terminal ID or “ ” icon, the detail information of terminal will be shown. Please refer to “Image 2‐4 Access to terminal detail page” Version 1.0.0 (Error! Unknown document property name.) RICON M2M terminal management platform User manual Image 2-4 Access to terminal detail page 2.4.3 Reboot terminal(terminal detail > reboot) Task intro Restart a specific terminal, the terminal can remotely be rebooted through the "terminal detail" page, so as for some special service update in router to take effect and also for a fast reboot of terminal when necessary. Precondition Legal user of platform login to platform successfully. Operation steps Terminal must be online before they can be restarted through platform. Access terminal detail page of terminal. Please refer to “2.4.2 terminal detail” for specific instruction. Click “ ”, a window pop‐up confirming whether to continue or not. Click “OK” to continue, click “Cancel” to abort. 2.4.4 Set parameter terminal(terminal detail > Edit parameters) Task intro Configure parameter of terminal remotely; Check latest parameter of terminal to confirm if parameter has been modified. Precondition Legal user of platform login to platform successfully. Version 1.0.0 (Error! Unknown document property name.) RICON M2M terminal management platform User manual Operation steps Terminal has to be online before parameter could be modified. Access terminal detail page of terminal. Please refer to “2.4.2 Terminal detail” for specific instruction. Click button “ ”, access the page for modifying parameter of the specific terminal. Please refer to “Image 2‐5 Terminal detail page”. Image 2-5 Terminal detail page 1)In the same terminal list page, parameters of multiple terminals can be selected to be updated at a time. In this case, when try to get parameters from terminal; system will reply parameter of terminal which has the smallest number in terminal list. 2)There are several different sections in the parameter configure page according to different feature. After parameter are set on the page of platform, click “SAVE” button to send configuration to remote terminal. Then click “Refresh” button to view the state of the operation. If state is changed from “Sending configuration” to normal, it means parameter has been set successfully. If state is changed to be “Get failed” It means system didn’t get parameter successfully after parameter is sent. So system does not know whether the parameter has been configured successful or not. Then please click “get latest parameter” till the state is changed to be “Normal” And then check the parameters on page and confirm whether it is the parameter you have sent. The following are contrast of parameters on platform and device. Version 1.0.0 (Error! Unknown document property name.) RICON M2M terminal management platform User manual LAN section, please refer to “Image 2‐6 LAN parameter”: Image 2-6 LAN parameter Contrast to terminal GUI as in “Image 2‐6 platform LAN parameter”. Image 2-6 platform LAN parameter IP of LAN interface is used for access of router GUI, please remember the IP once it is changed. Modem section: please refer to “Image 2‐8 Modem parameter in platform”. Version 1.0.0 (Error! Unknown document property name.) RICON M2M terminal management platform User manual Image 2-8 Modem parameter in platform Contrast to terminal GUI as in “Image 2‐9 Modem parameter in terminal GUI”. Image 2-9 Modem parameter in terminal GUI Advance setting could set some advanced configuration Parameter Select section: please refer to “Image 2‐10 platform Parameter Select feature” Version 1.0.0 (Error! Unknown document property name.) RICON M2M terminal management platform User manual Image 2-10 platform Parameter Select feature Contrast to terminal GUI as in “Image 2‐11 Parameter Select in terminal GUI”. Image 2-11 Parameter Select in terminal GUI Version 1.0.0 (Error! Unknown document property name.) RICON M2M terminal management platform User manual DHCP Server section: please refer to “Image 2‐12 platform DHCP parameter” Image 2-12 platform DHCP parameter Contrast to terminal GUI as in “Image 2‐13 DHCP parameter in terminal GUI”. Version 1.0.0 (Error! Unknown document property name.) RICON M2M terminal management platform User manual Image 2-13 DHCP parameter in terminal GUI Configuration of ICMP Check parameter, please refer to “Image 2‐14 ICMP parameter of platform”: Version 1.0.0 (Error! Unknown document property name.) RICON M2M terminal management platform User manual Image 2-14 ICMP parameter of platform Contrast to terminal GUI as in “Image 2‐15 ICMP parameter in terminal GUI”. Image 2-15 ICMP parameter in terminal GUI Configuration of SNMP parameter, please refer to “Image 2‐16 SNMP parameter of platform”: Version 1.0.0 (Error! Unknown document property name.) RICON M2M terminal management platform User manual Image 2-16 SNMP parameter of platform Contrast to terminal GUI as in “Image2‐17 SNMP parameter of terminal”: Image2-17 SNMP parameter of terminal Version 1.0.0 (Error! Unknown document property name.) RICON M2M terminal management platform User manual Configuration of M2M parameter, please refer to “Image 2‐18 M2M parameter configuration in platform”: Image 2-18 M2M parameter configuration in platform Contrast to terminal GUI as in “Image 2‐19M2M parameter of terminal”: Version 1.0.0 (Error! Unknown document property name.) RICON M2M terminal management platform User manual Image 2-19M2M parameter of terminal Please carefully fill out IP and port number here. If any erroneous, it will cause the device not be able to connected to the platform。 Configuration of remote log of platform, please refer to “Image2‐20 remote log of platform”: Version 1.0.0 (Error! Unknown document property name.) RICON M2M terminal management platform User manual Image2-20 remote log of platform Contrast to terminal GUI as in “Image 2‐21 Remote log parameter of terminal”: Image 2-21 Remote log parameter of terminal Configuration of clock in platform, please refer to “Image2‐22 clock parameter of platform”: Version 1.0.0 (Error! Unknown document property name.) RICON M2M terminal management platform User manual Image2-22 clock parameter of platform Contrast to terminal GUI as in “Image2‐23 clock parameter of terminal”: Image2-23 clock parameter of terminal Configuration of NAT, please refer to “Image 2‐24 NAT parameter of platform”: Version 1.0.0 (Error! Unknown document property name.) RICON M2M terminal management platform User manual Image 2-24 NAT parameter of platform Contrast to terminal GUI as in “Image 2‐25 NAT parameter of router”: Image 2-25 NAT parameter of router Patch management: Click “Delete” to remote patch from terminal device; Click “Refresh” to view the record to view the state of parameter Configure section. If it state is “Get failed”, please click “get latest parameter” to retrieve information from device. Please refer to “Image 2‐26 patch management in platform” Version 1.0.0 (Error! Unknown document property name.) RICON M2M terminal management platform User manual Image 2-26 patch management in platform Delete patch: when performing bulk modification operations, if patch exits in terminal, delete it. If not, then no operations.。 Option 2 Click “Terminal”, platform show list of Home group by default. Select terminal in terminal list, then choose “Modify parameter” and click “OK” to enter the parameter configuration page. Please refer to “Image 2‐27 terminal list”: Image 2-27 terminal list Choose the parameter that need to be modified, then change it value, then click “SAVE” to send parameter to terminal. Then click “Refresh” to update page till the state change to “Normal”. Please refer to “option one” for operation introduction. Version 1.0.0 (Error! Unknown document property name.) RICON M2M terminal management platform User manual 2.4.5 Setting advanced parameters on single terminal (terminal detail > advanced parameters) Task intro Set parameter of single terminal by text edit. Precondition Legal users successfully login platform system. Operation steps Click “Terminal” to enter terminal list of HOME GROUP as default. Select the target Terminal group, you may check “Error! Reference source not found.Terminal list” for reference. Click “ ” icon on the right to check terminal details. You may check “Error! Reference source not found.Terminal details” for reference. Click “ ” on current window to enter advance setting page of single terminal. Click “get latest parameter” icon to get latest parameters. Click “view parameters” to show current terminal latest parameters. As shown below in “Image 2‐28 advanced parameters”: Version 1.0.0 (Error! Unknown document property name.) RICON M2M terminal management platform User manual Image 2-28 advanced parameters Set your new parameters in “New Parameter” window, click “Save” icon to save your new parameters. As shown in below “Image 2‐29 save advance parameters” Version 1.0.0 (Error! Unknown document property name.) RICON M2M terminal management platform User manual Image 2-29 save advance parameters Please check current Configuration status before modify it, especially when it shows normal and works normal. 2.4.6 Search single terminal alarm record(terminal detail > alarm record) Task intro Search single terminal alarm record. You could check all the alarm record of current terminal made after register to platform system successfully, including IP, version, alarm time, type and description. Precondition Legal users successfully login platform system. Version 1.0.0 (Error! Unknown document property name.) RICON M2M terminal management platform User manual Operation steps Click “Terminal” button on right top, then move the cursor to left middle “ ” icon. Select a terminal group you want search from. After select terminal group, click the icon at right end to enter “terminal details” page. Please check “2.4.2 Terminal details” for details. ” icon of “Terminal Operation”, the window will show all the alarm Click “ record of current terminal made after register to platform system successfully, including IP, version, alarm time, type and description, as shown in below “Image 2‐30 Alarm record”: Image 2-30 Alarm record 2.4.7 Search Single terminal daily report (terminal detail > daily report) Task intro Search Single terminal daily report, you could check terminal network parameter record, including Signal(dBm), Online time(s), Out of service, Network switch, SIM switch, TX flow, RX flow, sim1 flow, sim2 flow, Packet loss, Avg latency, Cell switch. Precondition 1) Legal users successfully login platform system. 2) Platform system has set an alarm SLA; please check 2.6.1 Set SLA for details. Version 1.0.0 (Error! Unknown document property name.) RICON M2M terminal management platform User manual Operation steps Search date cannot over current data. Click “Terminal” button on right top, then move the cursor to left middle “ ” icon. Select a terminal group you want search from. After select terminal group, click the “ ” icon at right end to enter “terminal details” page. Please check “2.4.2 Terminal details” for details. Click “ ” icon “Terminal Operation”, window will show terminal network parameter record of current time as default. You could input a data and click “OK” to inquire. As shown in “Image 2‐31 search daily report” Image 2-31 search daily report Version 1.0.0 (Error! Unknown document property name.) RICON M2M terminal management platform User manual Image 2-32 daily report search result Click “ ” icon under this sheet. A window will pop up and show above sheet in Graph. You could download the sheet in Excel by click the “ ” icon. As shown in “Image 2‐33 terminal network parameter record” below: Version 1.0.0 (Error! Unknown document property name.) RICON M2M terminal management platform User manual Image 2-33 terminal network parameter record 2.4.8 Search Single terminal log (terminal detail > terminal remote log) Task intro Get the 15 days log of certain terminal, and you could download it in TXT. Precondition Legal users successfully login platform system. Operation steps Click “Terminal” to enter terminal list of HOME GROUP as default. Select the target Terminal group, you may check “Error! Reference source not found.Terminal list” for reference. Click “ ” icon on the right to check terminal details. You may check “Error! Reference source not found.Terminal details” for reference. Click “ ” icon in this page and enter Single terminal page. As shown in below Version 1.0.0 (Error! Unknown document property name.) RICON M2M terminal management platform User manual “2‐34Remote log”: 2-34Remote log Click “ ” icon to refresh current page. Click “ ” icon to get log manually. (Terminal will send latest log to platform). Click Download link to download the log in TXT file, as show below “Image 2‐35 Get log”: Image 2-35 Get log 2.4.9 Check Terminal realtime alarm (alarm->realtime alarm) Task intro Check latest terminal real‐time alarm, including terminal IP, version, time, alarm type and reason, Precondition Legal users successfully login platform system. Operation steps Click Terminal > to enter terminal alarm page, all terminal alarm will show in Version 1.0.0 (Error! Unknown document property name.) RICON M2M terminal management platform User manual this page as default. Click “ ” again to get latest alarm record. As shown in follow “Image 2‐36 Real‐time Alarm list” Image 2-36 Real-time Alarm list 2.4.10 Search terminal history alarm record (alarm->alarm record) Task intro Search terminal history alarm record based on alarm type, terminal ID, Agent ID and date range. Precondition Legal users successfully login platform system. Operation steps You need input at least one query condition. Terminal ID & Agent ID must be fully spelled, do not support fuzzy query. Query date cannot over current date. Click Terminal > this page as default. Click “ to enter terminal alarm page, all terminal alarm will show in ” to enter search page. Input your query conditions and click OK to search. As shown in “Image 2‐37 Search terminal Alarm record” below: Version 1.0.0 (Error! Unknown document property name.) RICON M2M terminal management platform User manual Image 2-37 Search terminal Alarm record 表2-2 Query condition instruction Item Meaning How to Configure Alarm Type Alarm type Select in dropdown list Terminal ID Terminal ID Manually input, must be 16 Alphanumeric combination Agent ID Terminal name Manually input, must be 16 Alphanumeric combination Start and end date Query date Select a data. Need input both start and end date or keep both blank. 2.4.11 Check alarm terminal list (alarm list) Task intro Check alarm terminal list. You could divide the alarm terminal based on alarm type (Availability, Packet loss, Signal, Out of service, Cell switch, SIM switch) and check them in different page. Precondition Legal users successfully login platform system. Operation steps Click Terminal > to enter terminal alarm list page, every tab shows one alarm type: Availability, Packet loss, Signal, Out of service, Cell switch, SIM switch. Click the Version 1.0.0 (Error! Unknown document property name.) RICON M2M terminal management platform User manual tab to switch different type. 2.4.12 Search terminal Task intro Search terminal based on Agent ID, Location or IP, in order to provide a fast way to find a certain terminal. Precondition Legal users successfully login platform system. Operation steps You need input at least one search condition. Fuzzy query, part key words of agent id or location is available search condition. Click Terminal > Input search condition and search, result will shown below as “Image 2‐38 Search terminal” to enter “Search Terminal” page. Image 2-38 Search terminal 表2-3 Search terminal instruction Item Meaning How to Configure Agent ID Terminal name Manually input, must be 16 Alphanumeric combination Version 1.0.0 (Error! Unknown document property name.) RICON M2M terminal management platform User manual Item Meaning How to Configure Location Terminal install location Manually input, must be 16 Alphanumeric combination IP Terminal IP Manually input Value range: [0.0.0.1, 255.255.255.254] 2.4.13 Search terminal network parameter report (daily report) Task intro Search terminal network parameter report (daily report), search condition could be date, Terminal ID, Agent ID, Terminal version. And network parameters include (Signal(dBm), Online time(s), Out of service, Network switch, SIM switch, TX flow, RX flow, sim1 flow, sim2 flow, Packet loss, Avg latency, Cell switch). Precondition Legal users successfully login platform system. Operation steps Search date is necessary. Search condition need at least one of Terminal ID, Agent ID or Terminal version Click Terminal > Input search conditions and click OK to search. to enter “Daily report” page. 表2-4 Search condition instruction. Item Meaning How to Configure Search date Search date Select a date and this condition is necessary. Terminal ID Terminal ID Manually input, must be 16 Alphanumeric combination Agent ID Terminal name Manually input, must be 16 Version 1.0.0 (Error! Unknown document property name.) RICON M2M terminal management platform User manual Item Meaning How to Configure Alphanumeric combination Version Terminal version Select from a dropdown list Click “ ” icon on the line end. Parameter record will display, includes (Signal(dBm), Online time(s), Out of service, Network switch, SIM switch, TX flow, RX flow, sim1 flow, sim2 flow, Packet loss, Avg latency, Cell switch). Click “ ” icon under this sheet. A window will pop up and show above sheet in Graph. You could download the sheet in Excel by click the “ ” icon. 2.4.14 Terminal alarm statistic (Statistic) Task intro According to Terminal ID, IP, Version and date, searching the Alarm statistic, result includes (Terminal ID, IP, Version, Availability, Signal, Out of service, Network switch, and SIM switch). Precondition Legal users successfully login platform system. Operation steps Click Terminal > Input searching conditions, and click OK icon. Search result will be shown. to enter Statistic searching page. 表2-5 Search condition instruction Item Meaning How to Configure Terminal ID Terminal ID Manually input, must be 16 Alphanumeric combination Agent ID Terminal name Manually input, must be 16 Alphanumeric combination Version Terminal version Select from drop down list Version 1.0.0 (Error! Unknown document property name.) RICON M2M terminal management platform User manual Item Meaning How to Configure Start and end date Searching between these date. Select a data. Need input both start and end date or keep both blank. 2.4.15 Remote upgrade terminal (terminal list drop down list) Task intro Remote upgrade terminal, send the upgrade packet to terminal and updating terminal to latest version. Precondition 1) Legal users successfully login platform system. 2) Terminal online. Operation steps Only online terminal could be upgraded. Click “Terminal” to enter terminal list of HOME GROUP as default. Click in the check box of terminals which need upgrade. Then select “Remote upgrade” at the bottom drop down list of this page and click OK. Select an upgrade package and click “ ” to start your upgrade. A progress bar window will pop up as shown below in “Image 2‐39 Select a upgrade packet”. Image 2-39 Select a upgrade packet Terminals which upgrade failed, you could click “Upgrade again” icon to upgrade again as shown in “Image 2‐40 upgrade progress page”. Version 1.0.0 (Error! Unknown document property name.) RICON M2M terminal management platform User manual Image 2-40 upgrade progress page 2.4.16 Check remote upgrade status (terminal list drop down list) Task intro Check remote upgrade status and select the failed terminal to upgrade again. Precondition 1) Legal users successfully login platform system. 2) Terminal online Operation steps Click “Terminal” to enter terminal list of HOME GROUP as default. Click in the check box of terminals which need upgrade. Then select “Upgrade progress status” at the bottom dropdown list of this page and click OK. Click Upgrade again to upgrade. 2.4.17 Restart terminal (terminal list drop down list) Task intro Restart terminal, in order to make the new parameters effective and start new service. Precondition 1) Legal users successfully login platform system. 2) Terminal online Version 1.0.0 (Error! Unknown document property name.) RICON M2M terminal management platform User manual Operation steps Terminal must online Click “Terminal” to enter terminal list of HOME GROUP as default. Click in the check box of terminals which need upgrade. Then select “Restart terminal” at the bottom dropdown list of this page and click OK. Then selected terminal will be rebooted. 2.4.18 Modify parameters (terminal list drop down list) Task intro Please refer to 2.4.4 Set parameter terminal Precondition Please refer to 2.4.4 Set parameter terminal Operation steps Please refer to 2.4.4 Set parameter terminal 2.5 Group section About this function After terminals registered to platform system, you could divide them into groups to convenient your management. You could create, edit, delete group. Precondition Legal users successfully login platform system. 2.5.2 Add new terminal group Task intro Add new group in home contents, in order to manage all terminals in group. Precondition Legal users successfully login platform system. Version 1.0.0 (Error! Unknown document property name.) RICON M2M terminal management platform User manual Operation steps Click Group to enter Group manages part. Click a group name in left tree catalogue, then click “ right corner, to manage this group You could add new sub group under current selected group. ” icon at top Image 2-41 Add sub group 表2-6 Add sub group Item Meaning How to Configure group name Group name Manually input, must be 4-63 Alphanumeric combination 2.5.3 Modify Group Task intro Modify Group name. Precondition Legal users successfully login platform system. Operation steps Click Group to enter Group manage part. Click a group name in left tree catalogue, then click “ right corner, to manage this group You could edit group name in this page, input a name and click OK icon as shown below. Version 1.0.0 (Error! Unknown document property name.) ” icon at top RICON M2M terminal management platform User manual 2.5.4 Delete terminal group Task intro To delete terminal group, the record of a terminal group will be deleted from the platform. Meanwhile, all terminals in this group, all sub‐groups in this group and all terminals in the sub‐groups will be deleted. Precondition Login user is a legal user of the platform, and login on the platform successfully. Operation steps Home directory cannot be deleted. Click “Group” to get into group Click a terminal group name on the left directory tree, and then click “ ” on the right top side to get into the “manage group” page. Click “Delete group”, then there will be a confirmation widow, click “OK” to delete all terminals in this group, all sub‐groups in this group, and all terminals in the sub‐groups. Click “Cancel” to get back to previous page without deleting operation. Refer to the following “Image 2‐42 delete terminal group”. Image 2-42 Delete terminal group 2.5.5 Chang group of terminal Task intro Change the directory of a terminal or to move a terminal in a group to another group. Version 1.0.0 (Error! Unknown document property name.) RICON M2M terminal management platform User manual Precondition 1) Login user is a legal user of the platform, and login on the platform successfully. 2) There is terminal in the group Operation steps Click “group” to get into group Click a terminal group name on the left directory tree, and then click “ ” on the right top side to get into the “manage group” page. Click “Change terminal's group of xxx(group name)” to get into “change group of terminal”. Select terminal 1) Select a terminal: click the terminal 2) Select multiple terminals: press “ctrl” meanwhile select multiple terminals. 3) Select multiple terminals from beginning to end: click a terminal, then keep pressing “shift”, meanwhile, press another terminal. Thus all terminals from beginning to end are selected. Press “ Also terminals in the blank area in right side can be selected and then press “ ” to move terminals from left side to the blank area in right side. ” to move them to left side to cancel change operation. Refer to the following “Image 2‐43 change group of terminal‐select terminal” Image 2-43 Change group of terminal-select terminal Click “next”, select a group to which the terminals will be moved, then click “OK” to move the terminal to a new group. Refer to “Image 2‐44 Select new group for terminal”. Version 1.0.0 (Error! Unknown document property name.) RICON M2M terminal management platform User manual Image 2-44 Select new group for terminal 2.5.6 Edit terminal Task intro To edit terminal is to edit the agent ID, Location info of a terminal. Precondition Login user is a legal user of the platform, and login on the platform successfully. Operation steps Click “group” to get into group, default display is terminal list of Home directory. Click terminal group in the tree directory on the left side to show all terminals in the group. Click “ ” at the end of the terminal, and edit agent ID and Location info in this page. Click “OK” to finish editing. Whether the input info is legal or not, please refer to “table 2‐7 input info requirement for editing terminal”. 表2-7 input info requirement for editing terminal Item Content How to Configure Agent ID Terminal name Manual input. Value range: 16 digits combination of No. or alphabet Location Terminal installation location Manual input. Value range: No. 0~255, alphabet, exclusive of specific character. Version 1.0.0 (Error! Unknown document property name.) RICON M2M terminal management platform User manual 2.5.7 Delete terminal Task intro To delete terminals in a group in two ways: to delete single terminal, to delete all terminals in a group. Precondition Login user is a legal user of the platform, and login on the platform successfully. Operation steps Click “Group” to get into the group. The default display of the page shows the terminal list of Home. Click terminal name in the directory tree on the left side to shall terminal list in this group. Click “ ” icon at the end of terminal line, then click “OK” in the new window to delete this terminal. Click “Cancel” to get back to the previous page without deleting. Click “ ” of the terminal list at the top right side, then click “OK” to delete all terminals in this group. Click “Cancel” to back to the previous page without deleting. 2.6 System section Function intro To manage all parameters of the platform including: warning threshold setting, import and export rule, blacklist management, add and delete update packet, update terminals in batch, check system log. Precondition Login user is admin and login on the platform successfully. 2.6.1 Warning threshold setting (Set SLA) Task intro To set threshold of terminal online rate, packet loss rate, signal strength, restart times, cell switchover times, and SIM card switchover times. If the above values exceed the threshold value, warning will be triggered and a warning message will come out. Warning messages records can be refer ton in warning list. Version 1.0.0 (Error! Unknown document property name.) RICON M2M terminal management platform User manual Precondition Login user is admin and login on the platform successfully. Operation steps Click “System > ” to get into “Set SLA”, default warning threshold is displayed. Refer to “Image 2‐45 set warning threshold value”. Image 2-45 Set warning threshold value Input legal threshold value, click “OK” to set threshold value. For threshold value, please refer to “table 2‐8 set warning threshold value”. 表2-8 Set warning threshold value Parameter name Description How to Configure Availability Terminal online rate threshold Manual input. Value range: integral No. within [1,100] Packet loss Signal Out of service Terminal packet loss rate threshold Manual input. Terminal signal strength threshold Manual input. Terminal threshold restart Value range: integral No. within [1,100] Value range: integral No. within [-113,-51] times Version 1.0.0 (Error! Unknown document property name.) Manual input. Value range: integral No. within [1,10] RICON M2M terminal management platform User manual Parameter name Description How to Configure Cell switch Cell switchover times threshold Manual input. SIM card switchover times threshold Manual input. SIM switch Value range: integral No. within [1,10] Value range: integral No. within [1,10] 2.6.2 Import rule Task intro Import rule: setup legal terminal list (judge by last 16 number of terminal serial number), platform will judge the legality of a terminal as per the import rule and will move terminals, which don’t fit import rule, into the group of “pending”. Precondition Login user is admin and login on the platform successfully. Version 1.0.0 (Error! Unknown document property name.) RICON M2M terminal management platform User manual Operation steps Import rule This feature is use the same “terminal serial number list” as the “Auto install” feature in platform. There are two cases: (1) User need to use “auto install” feature to send parameter from platform to terminal. In this case, user setup rules with all parameters that are needed, like APN, Username, and Password. If a terminal tries to register to platform, according to the serial number, parameters will be sent to the terminal. (2) Terminal already contains the pre-set parameter, so no need to use the “Auto install” feature. In this case, user have to note, if the rule contains APN, Username or password, wmmp IP, etc the auto install feature still will act as designed, which means parameters will be sent to terminal and modify the pre-set parameters in terminal. So user must pay attention to this feature. And remember, if don’t want pre-set parameters to be changed, when setup rules. Leave the “terminal ID” only. Before importing rule file, please assure that no other program is in use and this file is not in use. When import .xls doc, please refer to export templates in “2.6.3 export rule”. Click “system > content. Click “Import Rule” button to get into the page. Click “Browse” button, a dialog box will come out to select doc. Select an excel doc to be imported, and then click “OK” to import rule. Please refer to “Image 2‐46 import rule”. ”. Default display is “rule” page. Click tabs to display its Import rule After rule is imported, the page will show imported rule list. Refer to “Image 2‐47 rule list”. Version 1.0.0 (Error! Unknown document property name.) RICON M2M terminal management platform User manual Image 2-47 Rule list Import public parameter rule Click “System > Input public parameter in the textbox, then click “Save” to save the parameters. Click “View parameters” to visit imported public parameter rules. Refer to “Image 2‐48 import public parameter rule”. ”, then click “Parameter” tab to get into the page. Image 2-48 Import public parameter rule 2.6.3 Export rule Task intro Export rule: export rule list of the platform into an excel file and save in local PC. Precondition Login user is admin and login on the platform successfully. Operation steps Export rule template Click “System > Click “Download Template” button to download import rule Excel template. ”, click tab “Rule List” to get into the page. Export template Click “System > Click “Export Rule” to download rule list excel doc. ” click tab “Rule List” to get into the page. Version 1.0.0 (Error! Unknown document property name.) RICON M2M terminal management platform User manual 2.6.4 Pending list Task intro Pending list function is to manage terminals of the platform beyond rule list. Precondition Login user is admin and login on the platform successfully. Operation steps Click “System > ”, then click tab “Pending List” to get into the page, terminals of pending list is shown. 2.6.5 Move terminals from Pending list to Blacklist Task intro To move terminals from pending list to blacklist. Platform will not record login info or status of the terminals. Precondition Login user is admin and login on the platform successfully. Operations steps Option 1 Click “System > ”, then click “Pending List” tab to get into the page. Terminals of pending list are shown. Click “ ” icon in the line of terminal (“To blacklist” row) to move terminal into blacklist. Option 2 Click “System > ”, then click “Pending List” to get into the page. Terminals of pending list are shown. Click the checkbox at the beginning of the terminal line. Select one or multiple checkboxes and then click “To blacklist” to move the terminals from pending list to blacklist. Option 3 Click “System > ”, then click “Pending List” to get into the page. Terminals of pending list are shown. Click “ ” of the terminal list on the right top side to move all terminals Version 1.0.0 (Error! Unknown document property name.) RICON M2M terminal management platform User manual from pending list to black list. 2.6.6 Move terminals from pending list to home group Task intro To move terminals from pending list to home group and the moved terminals will be legal and will be shown in the rule list of the platform. Meanwhile the platform will treat the moved terminals as legal terminals and record their operation info. Precondition Login user is admin and login on the platform successfully. Operations steps Option 1 Click “System > ”, then click “Pending List” to get into the page. Terminals of pending list are shown Click “ ” in the line of terminal (“To Home” row) to move the terminal to Home group. Option 2 Click “System > ”, then click “Pending List” to get into the page. Terminals of pending list are shown Click the checkbox at the beginning of the terminal line. Select one or multiple checkboxes and then click “To home” to move the terminals from pending list to Home group. Option 3 Click “System > ”, then click “Pending List” to get into the page. Terminals of pending list are shown. Click “ ” of the terminal list on the right top side to move all terminals from pending list to Home group. 2.6.7 blacklist task intro Blacklist: black terminals list. The platform will record the basic info in first registration of the terminal and will not provide any service to terminals in blacklist. Precondition Login user is admin and login on the platform successfully. Version 1.0.0 (Error! Unknown document property name.) RICON M2M terminal management platform User manual Operations steps Click “System > ”, then click “blacklist” tab to show terminal list in blacklist. 2.6.8 Move terminals from blacklist to pendinglist Task intro Move terminals from blacklist to pending list. After this, platform will provide basic online service to terminals and will update the online status of the terminals. Precondition Login user is admin and login on the platform successfully. Operations steps Option 1 Click “System > Click “ ” icon in the line to terminal (“To pending list” row) to move the terminal to pending list. Option 2 Click “System > Click check box at the beginning of the terminals, select one or multiple terminals, then click “To pending list” to move selected terminals to pending list. Options 3 Click “System > Click “ ”, then click “Blacklist” tab to show blacklist terminals. ”, then click “Blacklist” tab to show blacklist terminals. ”, then click “Blacklist” tab to show blacklist terminals. ” on the right top side of terminal list page to move all terminals in black list to pending list. 2.6.9 Move terminals from blacklist to Home Task intro Move terminals from blacklist to home group. The moved terminals will be legal and their info will be added in rule list of the platform. Meanwhile, platform will treat them as legal terminals and will record their all operation info. Version 1.0.0 (Error! Unknown document property name.) RICON M2M terminal management platform User manual Precondition Login user is admin and login on the platform successfully. Operations steps Option 1 Click “System > Click “ ” on the terminal line (“To home” row) to move the terminal to Home. Option 2 Click “System > Click check box at the beginning of the terminals, select one or multiple terminals, then click “To home” to move selected terminals to Home group. Option 3 Click “System > Click “ ” then click “Blacklist” tab to show blacklist terminals. ” then click “Blacklist” tab to show blacklist terminals. ”, then click “Blacklist” tab to show blacklist terminals. ” on the right top side of terminal list page to move all terminals in black list to Home 2.6.10 Upload upgrading packet Task intro Upload the updating packet of designated path to server, after uploading, the packet can be used to upgrade the terminals remotely. Precondition Login user is admin and login on the platform successfully. Operations steps Click “System”, default display is Set SLA page. Click “ ”, then click “ upgrade package" page. Refer to “Image 2‐49 package list page”. Version 1.0.0 (Error! Unknown document property name.) ” to get into the "add RICON M2M terminal management platform User manual Image 2-49 Page list page Input legal info, click “Browse” button, and then select upgrade package in the new dialog box. Then click “OK” to set the path of the upgrade package. Click “OK” to upload. For reselecting, please click “Reset” as shown below. Image 2-50 Add upgrade package Refer to table 2‐9 to check whether the input is legal or not. 表2-9 Key item explanation Item name content How to configure Name Upgrade package name Manual input Value range: 4-63, no such special character as <,>,&,’,”,?,= Version Upgrade package version Manual input Value range: 4-63, no such special character as <,>, &, ’, ”, ?, = Description Description Manual input Value range: 0-255, no such special character as <,>, &,’, ”, ?, = Version 1.0.0 (Error! Unknown document property name.) RICON M2M terminal management platform User manual 2.6.11 Edit upgrade package Task intro To change the name, version, description of the upgrade package uploaded to server. Precondition Login user is admin and login on the platform successfully. Operations steps Click “System”, default display is Set SLA page. Click “ ”, then click “ ” to get into the “modify upgrade package” page. Please refer to “Image 2‐51 package list”. Image 2-51Package list Input legal info of upgrade package. Check if is legal or not, please refer to “table 2‐9 key word explanation”. Click “OK” to execute editing operation. To re‐input info, please click “Reset”. Refer to “Image 2‐52 modify upgrade package”. Image 2-52 modify upgrade package 2.6.12 Delete upgrade package Task intro To delete upgrade package uploaded to server. After deleting, its relevant info Version 1.0.0 (Error! Unknown document property name.) RICON M2M terminal management platform User manual will be deleted too. Platform cannot use this package to upgrade terminal. Precondition Login user is admin and login on the platform successfully. Operations steps Click “System”, default display is Set SLA page. Click “ ” and click “ ” icon, then click “OK” in the dialog to delete. If not need to delete, click “Cancel”. 2.6.13 Timing remote upgrade terminals (batch upgrade) Task intro Timing remote upgrade terminals, select the beginning terminal ID and ending ID, select beginning time, end time and upgrade package. All terminals between the two IDs will be upgraded in the designated time. Precondition Login user is admin and login on the platform successfully. Operations steps End ID must be filled. If time is not selected, upgrade will be executed immediately; if time is selected, upgrade will be executed in selected time. Click “System”, default display is Set SLA page. Click “ Input legal condition, and select the check box in the first row of the upgrade package list. Legal info please refer to “table 2‐10 key word explanation”. ” to get into batch upgrade page. 表2-10 key word explanation Item name content How to input Terminal Terminal id Manual input. ID Value range: 16 digits combination of No. and alphabet. Version 1.0.0 (Error! Unknown document property name.) RICON M2M terminal management platform User manual Item name content How to input Time frame to select upgrade time To select time manually dropdown box. Click “Remote upgrade” button to upgrade terminals in batch. Click “Reset” to input condition again. Click “Upgrade progress status” to check upgrade status. Refer to “Image 2‐53 batch upgrade”. Image 2-53 Batch upgrade Click “Upgrade again” to execute upgrade terminal once again. Refer to “Image 2‐54 upgrade process page”. Image 2-54 Upgrade process page 2.6.14 Search system log Task intro System log has recorded terminals remote upgrade, auto install, registration, login in and out, parameter configuration. As per the above log type, terminal ID and time to search the above info record. Precondition Login user is admin and login on the platform successfully. Version 1.0.0 (Error! Unknown document property name.) RICON M2M terminal management platform User manual Operations steps If all search conditions can be blank, all system logs will be searched. Support fuzzy search, key words can be input to search. Click “System”, default display is Set SLA page. Click “ Input legal searching condition. Please refer to “Image 2‐11 search condition explanation” as below. ” on the right top side of the page to get into the system log page. 表2-11 Searching condition explanation Item name content How to input Log type Log type Select from the pull-down box. Terminal ID Terminal ID No. Manual input. Value range: 16 digits combination of No. and alphabet. Time frame Time range Select from the pull-down box. Click “Search” button to search terminal log info. Click “Reset” button to input search condition again. Refer to “Image 2‐55 system log”. Version 1.0.0 (Error! Unknown document property name.) RICON M2M terminal management platform User manual Image 2-55 System log 2.7 User section Function intro User module will manage user info, including adding a new common user, edit user info, delete a common user. Admin has been authorized to manage all users, while a common user can edit his own info. 2.7.2 Add user Task intro To add a new user in platform, a common user can visit terminal and group module, but cannot visit system module and cannot add new user, edit other users’ info, delete use in user module. Precondition Login user is admin and login on the platform successfully. Operations steps User name in the platform cannot be repeated. Click “User > Input legal user name, password, description, then click “OK” to add a new user. Refer to “table 2‐12 user basic info input explanation”. ” to get into “add user” page. Version 1.0.0 (Error! Unknown document property name.) RICON M2M terminal management platform User manual 表2-12 user basic info input explanation Item name content How to input Username Use name Manual input. Value range: 4-15 digits No., alphabet, exclusive specific cymbal. Password User password Manual input. Value range: 4-15 digits No., alphabet, exclusive specific cymbal. Confirm pass Confirm password Manual input. Value range: 4-15 digits No., alphabet, exclusive specific cymbal. Description User info description Manual input. Value range: 0-255 digits No., alphabet, exclusive specific cymbal. 2.7.3 Edit user Task intro To edit the user’s basic info (password, description), admin can edit all users info, while common user can edit his own info. Precondition Login user is a legal user of the platform, and login on the platform successfully. Operations steps Admin user Click “User” to get into user list page. Click “ Input new password, description, click “OK” to finish editing. How to input, please refer to “table 2‐12 user basic info input explanation”. ” at the end of user line to get into “edit user” page. Common user Click “user” to get into user list page. Version 1.0.0 (Error! Unknown document property name.) RICON M2M terminal management platform User manual Click “ Input new password and description, click “OK” button to finish editing. For how to input, please refer to “table 2‐12 user basic info input explanation”. ” on the right top side of the page to get into edit user page. 2.7.4 Delete user Task intro Delete legal common users in the platform. Precondition 1) Login user is a legal user of the platform, and login on the platform successfully. 2) Login user is admin. Operation steps Click “User” to get into user list page. Click “ ” at the end of user line, then click “OK” button in the new dialog to finish deleting. Click “Cancel” button not to delete and get back to previous page. Version 1.0.0 (Error! Unknown document property name.)


![[ENG] – User Manual – Hammer 2](http://vs1.manualzilla.com/store/data/005660577_1-e32ef60d54b8720b57dfb511ee785652-150x150.png)