1
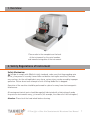
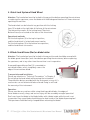
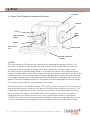
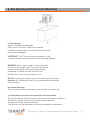
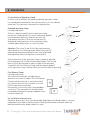
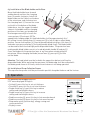
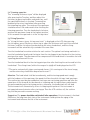
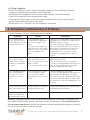
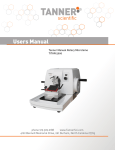
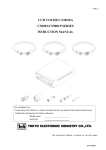
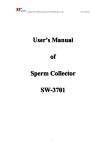
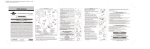
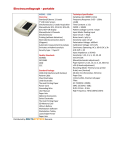
Users Manual
Tanner Ultra-Thin Semiautomatic Microtome
E-TITAN 5500
phone 919.309.0188
www.TannerSci.com
4122 Bennett Memorial Drive, 201 Durham, North Carolina 27705
Contents
Section
Page
1 Overview
1
2 Safety Regulations of Instrument
1
3 Technical Parameters
3
4 Brief
4
4.1 Tanner Titan E-5500 Semi-automatic Microtome
4
4.2 Brief
4
5 Box Opening and Instrument Mounting
5
5.1 Box Opening
5
5.2 Requirements on Instrument Mounting
5
6 Installation
6
6.1 Installation of Specimen Clamp
6
6.2 Installation of Accessories
6
6.3 Installation of Blade holder and its base
7
6.4 Installation of Scrap Collection Groove
7
7 Operation
7
7.1 Operation and Usage of LCD
8
7.2 Trimming Operation
8
7.3 Slicing Operation
8
7.4 Slicing Completion
9
8 Recognition and Elimination of Problems
9
9 Cleaning
10
10 Maintenance
10
11 Appendix
11
E-Titan 5500 • Ultra-thin Semiautomatic Microtome User Manual
1. Overview
Please refer to the nameplate on the back
of the instrument for the serial number
and manufacturing date of the instrument.
2. Safety Regulations of Instrument
Safety Mechanism
! In order to comply with GB9706.1-1995 standards, make sure that the grounding wire
of the 3-line power is securely connected or not before starting the machine, Please be
very cautious, for the cutting blade is very sharp, serious injury can be caused by improper
operation. Please do not ever attempt to catch a falling blade that is dropped.
Operation of the machine should be performed in a place far away from electromagnetic
interference.
All moving mechanical parts should be regularly lubricated with a lubricating oil made
for precision instruments every 3-12 months (for example, the slide rail of the locking bar).
Attention: Please lock the hand wheel before cleaning.
E-Titan 5500 • Ultra-thin Semiautomatic Microtome User Manual
1
2.1 Quick Lock System of Hand Wheel
Attention: The hand wheel must be locked in the up position before operating the microtome
or replacing the specimen, cover the blade with the blade guard sleeve at all times when not
operating the machine.
The hand wheel can be locked at any position with the locking
lever (1) located on the right side of the base of the microtome.
The two position marks of the locking lever (Top=Lock;
Bottom=Loose) are located on the base of the microtome.
Operational methods:
Put the locking lever (1) to the top lock position,
and the hand wheel is locked and cannot revolve.
Put the locking lever (1) to the bottom loose position,
and the hand wheel can revolve.
2.2 Blade Guard Frame (Bar) on blade holder
Attention: The hand wheel must be locked in the up position and should be covered with
the blade guard frame (bar) each time before operating the microtome, before replacing
the specimen, and at any other time the machine is not in operation.
1 A removable guard frame (bar) (1) is mounted on
each blade holder, which completely covers the
edge of the microtome blade.
Transportation and Installation
Please pay attention to “Technical Parameters” in Chapter 4!
Do not grasp the hand wheel while moving the instrument!
The protection devices provided with the instrument, or any of it’s
accessories can not be uninstalled or altered. Doing so will void
the warranty of the instrument.
Operation:
Please must be very cautious while using the disposable blades, the edges of
these blades are very sharp, and serious injury will be caused by wrongful operation!
Don’t ever leave the blade in the blade holder with a blade inside while the unit is not
in operation! Any spare blade should always be kept inside of the blade dispensing box!
The specimen should be firmly clamped before mounting the blade!
2
E-Titan 5500 • Ultra-thin Semiautomatic Microtome User Manual
Attention: The hand wheel must be in the locked position and the blade should be
covered with the blade guard frame (bar) each time before operating the microtome,
before replacing the specimen, and at any other time the microtome is not being operated.
Liquid should not be allowed to flow into the instrument at any time. Any liquid spilled on the
instrument, especially during operation can damage the machine and void the warranty.
Cleaning:
Please lock the hand wheel in the up position before cleaning the instrument!
The instrument cannot be cleaned with solvents, acetone, or benzene.
Any detergent should never be allowed to flow into the instrument while cleaning!
The safety regulations from the manufacturer and all relevant regulations from the
laboratory shall be followed while using any detergent or cleaning fluids.
Repairing:
The instrument can only be dismantled by maintenance technician authorized by
our company, and only when deemed necessary.
3. Technical Parameters
Model: Tanner Titan E-5500 Ultra-thin Semiautomatic Microtome
• Range of Slice thickness: 0.25-60 μm
• Range of Trim thickness: 0.25-60 μm
• Slice thickness adjustment:
0.25-1μm, increment 0.25 μm
1-10μm, increment 1 μm
10-20 μm, increment 2μm
20-60 μm, increment 5 μm
• Specimen Horizontal feeding: 26 mm
• Stroke Length: 56 mm
• Specimen adjustment direction: left and right/up and down, at any angle
• Maximum section of slice: 50 x 50 mm
• Disposable Blade Index: Both high and low profile blades.
• Retractable specimen clamp, auto feed cutoff: with alarm; Lateral blade holder
• Dimension and weight:
Titan E-5500 Microtome: Length x Width x Height: 420 x 600x 305 mm, 29kg.
• Electric Voltage: 110 V, 60 Hz.
E-Titan 5500 • Ultra-thin Semiautomatic Microtome User Manual
3
4. Brief
Encloser 4.1 Tanner Titan E-5500 Semi-automatic Microtome
Handle
LCD
Fast Release
Clamp
Hand
wheel
Blade
holder
Blade holder base Locking lever
Scrap collection
groove
4.2 Brief
This semi-automatic Microtome uses internationally advanced design specifications. The
main parts of the Microtome are imported from internationally recognized manufacturers
around the world, resulting in a design that is more suitable for an entire range of users.
No matter what the programming setting, or if the operator chooses the rocking method of
cutting, the hand wheel is always easy to operate, and user fatigue is reduced as a result of the
cutting operation. The specimen clamp is uniquely designed by our company can be adjusted
at any angle, and permanent lubrication has been utilized within the design of the cross roller
guide rail and microfeeding mechanism. The product has been designed with rational design,
firm structure, good stability, and convenient use in mind.
The main functions of the product include: CPU control, tactile control panel, fast forward, fast
backward, and automatic memory of the previous slicing thickness before each new cut. The
cutting and cutting modification with a thickness 0.25~60μm, can be adjusted freely, and the
motor automatically stops running and alarms if the range goes out of limit. Automatic
sleeping protection activates when the user stops using the microtome for five minutes
at which time. The screen will become darker and enter into power saving mode. You can see
a circle at the bottom line of keypad, the user should press this key to wake up the screen.
4
E-Titan 5500 • Ultra-thin Semiautomatic Microtome User Manual
5. Box Opening and Instrument Mounting
5.1 Box Opening
Open the wooden packaging box.
Take out all accessories and the user manual.
Hold the instrument base, and take out the instrument
from the packaging box.
IMPORTANT – The Titan microtome is packed in a safe
crate designed to limit movement of the unit during shipping.
WARNING- A hex screw is used to secure the unit to
the base of the wooden crate. Care must be taken to
remove the hex head screw from the base before
attempting to remove the unit from the crate.
Hold the base of instrument and take it out.
DO NOT try lifting the unit by any part of the enclosure at any time,
Attention: Do not grasp the lever on the hand wheel while moving
the instrument!
Instrument Mounting
The instrument shall be mounted on a secure desk or counter top.
5.2 Requirements on the place of operation of the Instrument
The mounting place of the instrument shall meet the following conditions:
The desk or counter shall be secure and free from vibration.
The ground shall be free from vibration.
The machine shall be mounted far from electromagnetic interference.
E-Titan 5500 • Ultra-thin Semiautomatic Microtome User Manual
5
6. Installation
6.1 Installation of Specimen clamp
In either case of whether the properly adjusted specimen clamp
has already been mounted on the main machine or it is an ordered
spare part, the specimen clamp must be adjusted first.
Standard specimen clamp
Locking hand wheel
There is a dovetail guide(1) on the specimen clamp,
loosen the clamping lever (4), insert the dovetail guide(1)
5 into the dovetail groove (3) and lock the lever (4)
after putting into place. Turn the locking lever (7)
downward, and the position of the specimen clamp
could be adjusted by means of screw (5 and 6).
Attention: The screw (5 and 6) shall be simultaneously
adjusted within the revolving range. Adjust the screw (5)
upward and downward and adjust the screw (6) leftward
and rightward, while locking lever is loosened (7).
Once the position of the specimen clamp is properly adjusted,
the locking lever (7) shall be locked upward again. The locking
lever (4) shall be loosened in order to replace the specimen
clamp with the Fast Release Clamp, and the dovetail guide(1)
of the specimen clamp shall be taken out from the dovetail groove(3).
Fast Release Clamp
Locking hand wheel
The installation methods and adjustment
directions are same as above. The Fast Release
Clamp could horizontally or vertically hold all
the common specimen boxes available on market.
Push the bar lever forward (2)
Horizontally or vertically insert the embedded
cassette in. The specimen box should then be
clamped by allowing the spring loaded bar-lever
to move forward (2)
6.2 Installation of Accessories
Attention: please don’t insert the disposable blade before the Blade holder is securely
and properly installed on the Microtome! The disposable blade should be taken out
before dismantling the blade holder for safety.
6
E-Titan 5500 • Ultra-thin Semiautomatic Microtome User Manual
4 3 6 7 2 1 2 1 6.3 Installation of the Blade holder and its Base
4 Move the blade holder base forward
1 3 2 and backward, and turn the clamping
lever (1) counter clockwise. Install the
5 blade holder on the V-block on the base
of the microtome, and clockwise turn
the clamping lever (1). Loosen the screw
on the left of the bottom of the blade
holder base, turn the copper threaded
sleeve in the middle and the clamping
positions of the lever can be adjusted.
8 6 Use hexagon wrench(9) to loosen the
7 screw, put part (7) onto part (8).The
appropriate clamping angle for the blade holder shall be approximately 8~10°
for cutting. Loosen locking lever (4), mover part (7) to left of right to adjust blade
position. Loosen locking lever (2), insert disposable blade into place, lock lever (2)
and make sure pressure plate (3) fix the disposable blade firmly. The blade holder
can be used for both low and high profile disposable blades. The protection lever
on disposable blade holder consists of a red adjustable handle (6) and pin (5).
Cover the blade with the protection lever at any time when not operating the
microtome. When changing the blade, loosen lever (4), press pin (5) to take
out the blade.
9 Attention: The hand wheel must be locked in the up position before installing the
disposable blade. While replacing the specimen, the blade edge shall be covered with
the blade guard sleeve at all times, when the microtome is not being operated.
6.4 Installation of Scrap Collection Groove
The cap collection groove shall be positioned in parallel alongside the base and the horizon.
7. Operation
7.1 Operation and Usage of the LCD
LCD: menu displayed in English
• Cut key(1): press this key to set cut thickness
• Trim key(2): press this key to set trim thickness
• Single arrow key (3): press this key to reduce
cutting and trimming thickness
• Single arrow key (4): press this key to increase
cutting and trimming thickness
• Double arrow key (5): press this key to fast move backward
• Double arrow key (6): press this key to fast move forward
• Sleep wake up key (confirm key): energy-saving and
screen protection
• Display screen
8 1 2 3
5 4 6 7 E-Titan 5500 • Ultra-thin Semiautomatic Microtome User Manual
7
7.2 Trimming operation
The “trimming thickness 00μm” will be displayed
after pressing the Trim key, and then adjust the
thickness by pressing the plus and minus key, until
the specified thickness is reached. Trimming can
be done by the rotary hand wheel after pressing
the trimming key again. The surface of the specimen
should be mirror-like and smooth after finishing the
trimming operation. Turn the hand wheel clockwise,
position the specimen clamp at the highest position,
at this moment the specimen is at the slicing status.
7.3 Slicing Operation
As “slicing thickness 03μm, slicing count 0000” is displayed on the LCD after pressing
the slicing key, press the plus or minus key to adjust the thickness until up to the satisfied
thickness, and the slicing can then be done by the rotary hand wheel, and the slicing
increments will be automatically counted at the same time.
Turn the hand wheel an entire rotation for each section. The optimal sectioning method is to
turn the hand wheel evenly and clockwise from the starting point position back to the starting
point position again. The specimen will be compressed if the hand wheel is turned too fast and
a peeling phenomena will occur.
Turn the hand wheel back to the starting point position after finishing the section and lock the
hand wheel. The slicing times (within the range of 0~9999) will be displayed on the LCD.
**The motor automatically stops running and alarms if it’s running out of the travel range,
and the return key should then be pressed to reset.**
Attention: The hand wheel shall be turned evenly, and the turning speed must comply
with the hardness of the specimen, the speed shall be slow while slicing a hard specimen.
The confirm key must be pressed before starting a new sectioning operation and after the
operations of fast forward, fast backward, or trimming and slicing thickness adjustments
are performed during the sectioning process, otherwise, the hand wheel will not feed.
The instrument will automatically access to sleeping alert pattern if the instrument is
not operated several minutes after starting up. Then the LCD switches off, the confirm
key shall be pressed to resume working.
Suggestion: The power should be switched off after operation of the instrument is finished.
Otherwise, the long time alert state of the instrument could quicken the aging of the
instrument and influence the life of the instrument.
8
E-Titan 5500 • Ultra-thin Semiautomatic Microtome User Manual
7.4 Slicing Completion
• Switch off the power switch, take out the power plug, turn the hand wheel specimen
clamp to the highest position and lock the hand wheel.
• Dismantle the slicing blade from the blade holder and put it into the blade box.
• Take out the specimen from the specimen clamp.
• Clean up the slicing scraps on the instrument, dismantle the waste scrap collection
groove and remove the waste slicing scraps.
• Please refer to (10 “Cleaning”) for the cleaning of instrument.
8. Recognition and Elimination of Problems
Possible Problems, Causes, and Elimination of Problems
Problems
Causes
Elimination
The slicing thickness is
uneven. Slicing thickness
variety, and sometimes the
instrument doesn’t slice
1. The tilting angle of the
slicing blade isn’t appropriate,
that is the rear angle is too
small.
2. The specimen clamp or the
tightening screws of the blade
holder are not securely locked.
3. The slicing blade is too
blunt.
1. Adjust the rear angle bigger. Test the slicing
by gradually increasing the rear angle until an
appropriate angle is reached.
2. Check the specimen clamping system and
all the screws of blade holder to see if they are
tightened or not. Change the other side of the
slicing edge or replace with the new one.
Gradually reduce the rear angle to test the
slicing until to an appropriate rear angle is
reached.
The slicing is compressed.
The slicing is seriously
compressed, the slicing is
wrinkled or extruded with
each other.
1. The blade is blunt.
2. The specimen is too hot.
3. The rear angle of the slicing
blade is too big.
4. The slicing speed is too fast.
1. Change the other side of the slicing edge or
replace with the new one.
2. Freeze the specimen for several minutes.
3. Test the slicing by gradually reducing the rear
angle until up to an appropriate rear angle.
4. Turn the hand wheel more slowly.
The slicing blade squeaks
while slicing hard specimen. There are scars or
vibration traces on the
slices.
1. The slicing speed is too fast
2. The rear angle is to big.
3. The specimen clamp or
blade holder are not securely
locked.
1. Turn the hand wheel more slowly.
2. Test the slicing by gradually reducing the rear
angle until up to an appropriate rear angle.
3. Check the specimen clamping system and all
the screws on the blade holder are tightened or
not. Tighten the screws and clamping lever if it’s
necessary.
The specimen doesn’t feed
and of course doesn’t slice.
The specimen has reached the
limit position in the front.
Press the key to draw back the specimen and
the alarming system will alarm.
The LCD doesn’t switch on
and doesn’t display after
opening the power switch
The fuse is burnt.
Replace the fuse.
Warning: a good grounding socket should be available before connecting to the power, this
instrument should only be used for specimen slicing. The distance of 15 cm from the back of
the instrument and the wall shall be maintained to maintain good heat dissipation, otherwise
the life of the instrument can be influenced.
E-Titan 5500 • Ultra-thin Semiautomatic Microtome User Manual
9
9. Cleaning
Attention: please lock the hand wheel in the up position before cleaning.
Clean the slicing scraps with a cleaning brush.
Dismantling the blade holder and its base to clean.
Attention: Only moderate common household detergent or liquid soap are
acceptable for instrument cleaning!
The surface of the paint is not resistant to acetone and benzene!
Liquid should not be allowed to flow into the instrument while cleaning!
Clean the instrument with a piece of soft cloth. Cleaning the various parts of the Microtome
after using, such as removable blade holder and slide guide of the base, refilling with clean
lubricating oil, and good maintenance of the Microtome could prolong its shelf life.
10. Maintenance
Routine Maintenance
This Microtome is designed work for an extended time without maintenance. However,
we suggest the following to ensure the smooth running of the instrument over a long period.
1. Have the instrument checked annually by an authorized service technician.
2. Sign a maintenance contract upon expiration of the warranty period. You can
contact Tanner customer service department for further details.
3. Clean the instrument every day.
4. Please don’t repair the instrument by yourself, otherwise, you will lose your rights of
warranty. The instrument can only be repaired by technicians authorized by our company.
11. Appendix
Terms of warranty; one year from the time of purchase
Warranty terms are not applicable for the damage caused by misuse or improper
operations of instrument for which our company can not be responsible
Discard and Disposal
The discarded instrument or parts of instrument shall be disposed according to the
existing relevant and effective laws and regulations.
We are pleased to offer you an environment-friendly disposal plan when you need to
dispose the discarded Tanner Microtome.
10
E-Titan 5500 • Ultra-thin Semiautomatic Microtome User Manual
User’s Service Information
Please contact the sales representative of Tanner Scientific or the sales agent who sold
the instrument to you if you require any service or parts during the warranty period. Please
have the instrument model, serial number and supply time ready when calling. Tanner
doesn’t accept any rejection of goods without any formal permission for rejection of goods
accompanied by an RWA.
Please pay attention to the following items if you will deliver the instrument back to Tanner:
1. The instrument or parts shall be disinfected or have radioactive elimination treatment
before sending back if viruses or radioactive substances have been in contact with the
instrument or the parts. Our user’s service technician will be assigned for verification.
2. If you are sure that the instrument or parts are free from any radioactive or dangerous
contamination, please provide the methods for disinfection and radioactive elimination to your
Tanner representative. The instrument or parts will be directly sent back to the customer at
the customer’s expense if possible infection dangers are still existing on the instrument or
parts upon the arrival.
Please tell us the following information if you require technical services:
Model # _____________________________________
Serial # _____________________________________
The place where the instrument is located and the contact person.
Contact Name _________________________________
Address ______________________________________
____________________________________________
Contact Phone/E-mail ___________________________
____________________________________________
E-Titan 5500 • Ultra-thin Semiautomatic Microtome User Manual
11