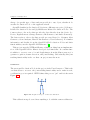
1
MSc Thesis VIBOT
Sign Language Translator using Microsoft
Kinect XBOX 360TM
Daniel Martı́nez Capilla ([email protected])
www.dani89mc.com
Supervisor : Dr. Hairong Qi, Dr. Fabrice Meriaudeau
Department of Electrical Engineering and Computer Science
Computer Vision Lab
University of Tennessee (Knoxville - USA)
A Thesis Submitted for the Degree of
MSc Erasmus Mundus in Vision and Robotics (VIBOT)
· 2012 ·
Abstract
Sign language is the basic alternative communication method between deaf people
and several dictionaries of words have been defined to make this communication
possible. The goal of the project consists of developing an automatic sign language translator so that a computer will output the correspondent word to a
sign executed by a deaf user in front of a camera. Several works have been
proposed previously and they mostly make use of probabilistic models such as
Hidden Markov Models or Artificial Neural Networks classifiers. In this thesis,
the Microsoft Kinect XBOX 360TM is proposed to solve the problem of sign
language translation. By using the tracking capability of this RGB-D camera, a
meaningful 8-dimensional descriptor for every frame is introduced here. In addition, an efficient Nearest Neighbor DTW and Nearest Group DTW is developed
for fast comparison between signs. With the proposed descriptors and classifiers
combined with the use of the Microsoft Kinect XBOX 360 TM , the system has
the potential to provide a computationally efficient design without sacrificing the
recognition accuracy compared to other similar projects. The project does not
focus on a particular official dictionary of signs because the objective consists
of evaluating the efficiency of the approach for sign recognition purpose. For a
dictionary of 14 homemade signs, the introduced system achieves an accuracy of
95.238%.
Learn from others what you will never learn by yourself. . . .
Daniel Martı́nez Capilla
Contents
Acknowledgments
vi
1 Introduction
1
1.1
Thesis proposal . . . . . . . . . . . . . . . . . . . . . . . . . . . .
2
1.2
Overview of the thesis . . . . . . . . . . . . . . . . . . . . . . . .
5
2 Background
6
2.1
Related work . . . . . . . . . . . . . . . . . . . . . . . . . . . . .
6
2.2
Sign languages
. . . . . . . . . . . . . . . . . . . . . . . . . . . .
9
2.2.1
Origin . . . . . . . . . . . . . . . . . . . . . . . . . . . . .
9
2.2.2
Phonology . . . . . . . . . . . . . . . . . . . . . . . . . . .
11
2.2.3
Morphology . . . . . . . . . . . . . . . . . . . . . . . . . .
12
2.2.4
Syntax . . . . . . . . . . . . . . . . . . . . . . . . . . . . .
13
2.2.5
Conclusions . . . . . . . . . . . . . . . . . . . . . . . . . .
14
Microsoft Kinect XBOX 360TM . . . . . . . . . . . . . . . . . . .
15
2.3.1
Components and characteristics . . . . . . . . . . . . . . .
15
2.3.2
Open Source Drivers and SDKs . . . . . . . . . . . . . . .
16
2.3
i
3 Methodology
23
3.1
Joints of interest (JoI) . . . . . . . . . . . . . . . . . . . . . . . .
24
3.2
File-based implementation . . . . . . . . . . . . . . . . . . . . . .
25
3.3
Normalization of the data . . . . . . . . . . . . . . . . . . . . . .
26
3.3.1
Invariant to the user’s position . . . . . . . . . . . . . . . .
27
3.3.2
Invariant to user’s size . . . . . . . . . . . . . . . . . . . .
29
3.4
Sign descriptor . . . . . . . . . . . . . . . . . . . . . . . . . . . .
30
3.5
Classifier . . . . . . . . . . . . . . . . . . . . . . . . . . . . . . . .
31
3.5.1
NN-DTW classifier . . . . . . . . . . . . . . . . . . . . . .
32
3.5.2
NG-DTW classifier . . . . . . . . . . . . . . . . . . . . . .
32
3.5.3
Dynamic Time Warping algorithm (DTW) . . . . . . . . .
33
4 Experiments and results
4.1
40
Discussions . . . . . . . . . . . . . . . . . . . . . . . . . . . . . .
5 Conclusions
5.1
42
50
Future work . . . . . . . . . . . . . . . . . . . . . . . . . . . . . .
51
A Dictionary of used signs
53
B User manual - Quick guide
55
C How to make Microsoft Kinect XBOX 360 work with your system
60
Bibliography
67
ii
List of Figures
1.1
Goal of the system . . . . . . . . . . . . . . . . . . . . . . . . . .
2
2.1
Manual alphabet by Juan Pablo Bonet [25]. . . . . . . . . . . . .
10
2.2
Distribution of the Microsoft Kinect sensors. . . . . . . . . . . . .
15
2.3
FoV of the camera, depth range and motorized tilt range. . . . . .
17
2.4
Output of the Palm-detection using the Hand Point Generator
OpenNI production node. [3] . . . . . . . . . . . . . . . . . . . . .
18
2.5
Abstract Layered View of the OpenNI Concept [3]. . . . . . . . .
19
2.6
Required ”Psi pose” for the user calibration. . . . . . . . . . . . .
20
2.7
Depth and RGB data alginment. . . . . . . . . . . . . . . . . . .
21
2.8
Available joint positions using the NITE implementation [14]. . .
22
3.1
Flux diagram of the system . . . . . . . . . . . . . . . . . . . . .
24
3.2
Used joints. . . . . . . . . . . . . . . . . . . . . . . . . . . . . . .
25
3.3
Start recording initial pose . . . . . . . . . . . . . . . . . . . . . .
27
3.4
Normalization required for the position of the user. . . . . . . . .
27
3.5
Use of the spherical coordinates. . . . . . . . . . . . . . . . . . . .
28
3.6
Normalization required for the user sizes. . . . . . . . . . . . . . .
30
iii
3.7
Sign descriptor based on the spherical coordinates values for every
joint. . . . . . . . . . . . . . . . . . . . . . . . . . . . . . . . . . .
31
3.8
NG-DTW Classification example for a given test sign . . . . . . .
33
3.9
Values of d, θ, and ϕ along the frames for each joint and for a given
sign. . . . . . . . . . . . . . . . . . . . . . . . . . . . . . . . . . .
38
3.10 Need of angle adjustment when computing the difference between
two angles. . . . . . . . . . . . . . . . . . . . . . . . . . . . . . . .
39
4.1
Different users used to test the system. . . . . . . . . . . . . . . .
41
4.2
Range of used positions x and y.
. . . . . . . . . . . . . . . . . .
44
4.3
Behavior of d, θ, and ϕ for two different signs. . . . . . . . . . . .
45
4.4
Hungry VS Phone behaviors of d, θ, and ϕ. . . . . . . . . . . . . .
49
A.1 Default dictionary of signs . . . . . . . . . . . . . . . . . . . . . .
54
B.1 Main window description. . . . . . . . . . . . . . . . . . . . . . .
55
B.2 Output window. . . . . . . . . . . . . . . . . . . . . . . . . . . . .
56
B.3 Output window. . . . . . . . . . . . . . . . . . . . . . . . . . . . .
57
B.4 Rec button modes. . . . . . . . . . . . . . . . . . . . . . . . . . .
57
B.5 Current mode displays. . . . . . . . . . . . . . . . . . . . . . . . .
57
B.6 Reset button. . . . . . . . . . . . . . . . . . . . . . . . . . . . . .
58
B.7 Range warnings. . . . . . . . . . . . . . . . . . . . . . . . . . . . .
58
B.8 Initial position required to start a recording. . . . . . . . . . . . .
59
C.1 Demo’s output . . . . . . . . . . . . . . . . . . . . . . . . . . . .
64
iv
List of Tables
1.1
Dictionary of default signs of the system. . . . . . . . . . . . . . .
3
1.2
Default sentences of the system. . . . . . . . . . . . . . . . . . . .
4
2.1
Open Sources Kinect Drivers comparison [14]. . . . . . . . . . . .
17
3.1
Dynamic Time Warping distance between words ”cat” and ”hello”. 36
3.2
Dynamic Time Warping distance between words ”cat” and ”bad”.
36
4.1
System accuracies for the different configurations . . . . . . . . .
42
4.2
System accuracies by signs. . . . . . . . . . . . . . . . . . . . . .
43
v
Acknowledgments
Many thanks to my family and friends for the support they have always given
me, to all the VIBOT/MsCV family for giving me the opportunity of being part
of their family, to all the friends for life that I have met during the last two years
of my Master’s degree, and to my supervisor Dr.Qi because since the beginning
of my time in the States, she made me feel like at home at her lab. I love you all.
vi
Chapter 1
Introduction
Unlike other animals, humans have been endowed by nature with the voice capability that allows them to interact and communicate with each other. Hence,
the spoken language becomes one of the main attributes of humanity. Unfortunately, not everybody possesses this capability due to the lack of one sense, i.e.
hearing. Sign language is the basic alternative communication method between
deaf people and several dictionaries of words or single letters have been defined
to make this communication possible.
The goal of the thesis consists of developing an automatic Sign Language
Translator using the data provided by the Microsoft Kinect XBOX 360TM camera.
An input sign done by a deaf person is recorded by the camera and after processing the raw image, the translator provides the corresponding word/letter in the
spoken language as output. You can easily understand the goal by seeing Figure
1.1. Doing so, the interaction between an ordinary and a deaf person becomes
possible and more convenient. This fact makes the project helpful socially speaking. Ideally, this research is beneficial for society and this is the main personal
motivation for working on a project like this.
1
Chapter 1: Introduction
2
Figure 1.1: Goal of the system. A deaf user is making a sign and the system outputs the corresponding
word over the screen of the computer so that the ordinary user will understand him.
1.1
Thesis proposal
Several works about Sign Language Translators have been introduced before and
Gesture Recognition has always been an active research area (see Section 2.1Related Work ). A wide number of authors have tried to find new ways to solve
this problem and almost all the time they end up using complex implementations
based on statistical descriptors that increase the complexity of computation.
In a project such as this with a time frame of only 3 months, the constraints
are an issue. That issue is further compounded by the fact that others are working on similar projects elsewhere. This required the setting up of a suitable and
feasible goal of the project from the beginning. The aim of the project is to make
the Sign Language Translator work in the simplest possible way and leave it open
for future improvements. Starting from a basic implementation and improve it
as much as possible until the best possible accuracy of system will be reached.
As introduced in Section 2.2, the Sign Language Translation task is highly
influenced by its linguistics. The syntax and morphology of the Sign Language
play a very important role and the order of the words or the non-manual com-
3
1.1 Thesis proposal
ponents (i.e. lip movements, facial expression, etc.) can drastically change the
meaning of a sign. These facts make the translation process even more complex.
The Sign Language Translator proposed here will be capable of satisfying the
following goals:
• Use data provided by the Microsoft Kinect XBOX 360TM camera.
• Recognize a list of basic signs. This list will contain key words such as the
ones from Table 1.1. Using these words, the deaf user will be able to transmit
what he/she needs and the communication between deaf and ordinary users
will become possible (see again Figure 1.1). Considering the data that the
Microsoft Kinect XBOX 360TM provides, the signs are homemade rather than
belonging to an official sign language because the main goal of this project
is to make a system capable of working with a wide number of meaningful
words. If the work is focused on a specific official sign language, the selection
of these basic meaningful words will be hard since sometimes the difference
between them resides in characteristics that this project is not taking into
account (i.e: finger positions, lip movements,etc.).
am/are
have
hot
I
phone
question
want
Dictionary of Signs
doctor
hello
hungry
love
play
sick
you
Table 1.1: Dictionary of default signs of the system.
• Default defined sentences: By executing a combination of several signs in a
row, the user will be able to construct some basic sentences that will make
the communication more suitable. This option tries to somehow emulate
what a lot of official sign languages use to construct sentences or formulate
Chapter 1: Introduction
4
a question. Hence, Table 1.2 summarizes a default list of sentences (it can
be easily extended):
Default sentences
Hello, I have a question
hello + I + have + question
I want to see a doctor
I + want + doctor
I am sick
I + am/are + sick
I am hot
I + am/are + hot
I am hungry
I + am/are + hungry
I love you
I + love + you
Do you have a question?
want + you + play
What is your phone number?
you + phone
Are you hungry?
am/are + you + hungry
Am I sick?
am/are + I + sick
Table 1.2: Default sentences of the system.
• Design an interactive user interface so that the user will be able to run the
application without any previous knowledge.
• The system must work on real time and give an instantaneous output once
the sign is executed.
• Allow the user to auto-train the dictionary (training dataset) by adding as
many new words as wanted.
These are the main goals of the project, but it is interesting to list the hidden
tasks that are behind them.
• Research about Microsoft Kinect XBOX 360TM and become familiar with
the use of depth information.
• Research about Gesture Recognition and how to define a model of a gesture
using depth information.
• Download and install the required programs and tools to be able to work
with Microsoft Kinect XBOX 360TM in Ubuntu.
5
1.2 Overview of the thesis
• Use of several libraries/developing platforms such as OpenCV, OpenNI, and
Qt, which are based on C++.
• Work on different feature descriptors to describe the signs.
• Work on several classifiers to classify the previous signs.
• Learn about Qt GUI to design the final Sign Language Translator user interface.
• Evaluate the efficiency of the implemented system.
The main contribution of the thesis will be to show the efficiency of the Microsoft Kinect XBOX 360TM with the combination of a basic descriptor and
classifier for the Sign Language Translation task. The system must be able to
detect a wide number of signs done by users of different sizes. It does not matter
if the signs belong to a true dictionary or to a homemade dictionary because the
contribution here is to make the system work with the best possible accuracy in
real time and leave it open for future improvements or modifications.
1.2
Overview of the thesis
The thesis is split into four different sections. In Section 2: Background, the
state of the art is reviewed and the necessary knowledge to better understand the
project is provided. Basic knowledge about Sign Languages and the Microsoft
Kinect XBOX 360TM is introduced in that section. In Section 3: Methodology, the
methodology of the system is introduced. The followed steps during the development of the project are shown. Section 4: Results contains the results and the
discussion about which of the implementations provides the best accuracy of the
system. In Section 5: Conclusions, the thesis is summarized and the satisfaction
of the initial goals is checked. To wrap up the thesis, in the Appendix Section can
be found the description of how to execute the words from the default dictionary
of signs, a user’s manual/quick guide to easily understand the functionalities of
the user interface, and a useful tutorial that contains all the necessary steps to
make the Kinect work on Ubuntu 10.10.
Chapter 2
Background
First of all, the related work is overview. Then, the basic knowledge about Sign
Language and the Microsoft Kinect XBOX 360TM is given.
2.1
Related work
Previous works have been focused on sign language recognition systems. They can
be arranged into the gesture/action recognition field, which is a complex task that
involves many aspects such as motion modeling, motion analysis, pattern recognition, machine learning, and even sometimes psycholinguistic studies. Several
reviews on Human Gesture Recognition have been presented before in [16], [27],
and [10]. They mostly utilized 2D information and only a minority of them
worked with depth data (3D).
Yang Quan et al. defined in [18] a Basic Sign Language Recognition system
that is able to translate a sequence of signs into the commonly used speech language and vice versa. The system was thought to be installed in public places such
as airports and hospitals and the dictionary of words contains specific signs that
allow the deaf user to transmit what he/she needs. This sign language/speech
bidirectional translation (from signs to speech and from speech to signs) focused
on the Chinese Manual Alphabet where every single sign belongs to a single letter
from the alphabet. The system was composed of a camera, a video display ter6
7
2.1 Related work
minal (VDT), a speaker, a microphone, and a keyboard. Two kinds of data were
used: vector of hand gestures and vector of lip actions. In order to characterize
these vectors, they used the Normalized Moment of Inertia (NMI) [13] algorithm
and Hu moments [17]. The former attempts to solve translation invariability, size
invariability, anti-gradation distortion, and so on. The latter is a set of algebraic
invariants that combines regular moments and is useful to describe the shape
information of the image. They are invariant under change of size, translation,
and rotation and have been widely used in Pattern Recognition and successfully
proven in sign language letter recognition. As said before, they combined the
hand gestures recognition with the lips movement reader in order to make the
system more robust. By using a multi-futures SVMs classifier trained with a
linear kernel, the 30 letters from the Chinese manual alphabet were recognized
with an average accuracy of 95.55%.
Starner et al. [20] used a view-based approach with a single camera to extract
2D features as the input of HMM for continuous American SLR. They got a word
accuracy of 92% or in recognizing the sentences with 40 different signs.
Other projects such as [4] made use of custom-made gloves, where every finger
contained a different color. In [4], Akmeliawati et al. introduced a sign language
translation using Colour Segmentation as feature extraction and a Neural Network as a classifier. They either could detect numbers (1-9), letters (A-Z) and
up to 11 words (e.g. beautiful, close, driving, he, his, etc). In the case of the
numbers and letters, they defined a 10-array vector that contains x and y offsets
that belonged to the distance between each finger and the centroid of the hand.
For the dictionary of words, they avoided the details (position of the fingers)
and they focused only on the tracking of the centroid of the hand. Hence, the
sequence that belonged to the position of the centroid at the different frames
defined the model of the sign. Finally, three different Neural Networks were used
as classifiers, each one of them previously trained with each dictionary (numbers,
alphabet, or words respectively). The average accuracy obtained was 96.668%
and the specific accuracy for the dictionary of words was 95%.
Gao et al. [8] used a dynamic programming method to obtain the context-
Chapter 2: Background
8
dependent models for recognizing continuous Chinese Sign Language (CSL). Also
in that case, datagloves were used as input devices and state-tying HMM as recognition method. The system was able to recognize up to 5,177 CSL isolated signs
with 94.8% accuracy in real time and up to 200 sentences with 91.4% word accuracy.
The Center for Accessible Technology in Sign (CATS) is a joint project between
the Atlanta Area School for the Deaf and the Georgia Institute of Technology.
They developed a system called CopyCat [28] as a practice tool for deaf children
to help them to improve their working memory and sign language skills. The
system required an ASL phrase verification to enable interaction. The important
citation here is the project that they are developing today. They are working on a
Kinect-based ASL recognition system. In fact, it was after being in contact with
this company when the brake on my project’s goal was put. Although they did
not provide the details of their implementation, they are using the GT2K gesture
recognition toolkit and they also use Hidden Markov Models. They are trying to
build a system capable to recognize the whole ASL dictionary.
In [11] Jonathan C. Hall also demonstrated how HMM-based gesture recognition was a good solution when dealing with 3D data (i.e. joint coordinates).
A physical gesture can be understood as a Markov chain where the true states
of the model cannot be directly observed. This type o Markov model is called
a Hidden Markov Model (HMM). In order to reduce the real gesture data to a
workable number, K-means was used to cluster the coordinates of every sign.
In [23], Vogler et al. introduced the parallel Hidden Markov Model-based
method. American Sign Language recognition systems have the limitation of size
of vocabulary due to the fact that the modeling process of the signs becomes complex because of the number of possible combinations of phonemes (approximately
1.5 ≈ 109 ). They used 3D data as the input of the recognition framework. These
data was either collected with 3D computer vision methods or with a magnetic
tracking system such as the Ascenion Technologies Motion Star system. They
showed how to apply this framework in practice with successful results using a
22-sign-vocabulary. The reported best accuracy is 95.83%.
9
2.2
2.2 Sign languages
Sign languages
Nowadays, one can find a wide number of sign languages all over the world
(more than 50) and almost every spoken language has its respective sign language. American Sign Language (ASL), Mexican Sign Language (LSM), French
Sign Language (LSF), Italian Sign Language (LIS), Irish Sign Language (IRSL),
British Sign Language (BSL), Australian Sign Language (Auslan), German Sign
Language (DGS), Israeli Sign Language (ISL), and Spanish Sign Language (LSE)
are just a few of them. Among all this large list, American Sign Language is currently the best studied of any sign language and its grammar has been successfully
applied to several other sign languages such as British Sign Language, which is
not closely related to ASL.
The goal is to provide the reader with a basic knowledge about the sign languages. This section is not going to get into details of a single sign language
because each one has its own rules. The following section will attempt to give
a general description of the shared characteristics among the different sign languages: origin, phonology, and syntax (for the last two, [24] contains a easy-tounderstand description). By doing so, people who are not familiar with them
will realize how complex it would be to design a whole Sign Language Translator
and why the decision to simplify the system without taking into account these
characteristics was made in the version of the system introduced here. Regarding
Sections 2.2.3 and 2.2.4, the examples are based on the ASL.
2.2.1
Origin
Sign language is mainly taught to deaf people, but its origin dates from the beginning history. In fact, gestures are the native way that kids have to express their
feelings until they learn spoken language. Moreover, several hearing communities have used sign languages to communicate with other ethnic groups that use
completely different phonologies (e.g. American Indians from the Great Plains).
Chapter 2: Background
10
In 1620, Juan Pablo Bonet published his book Reducción de las letras y Arte
para enseñar a hablar los Mudos [6] (Reduction of letters and art for teaching
mute people to speak) in Madrid. This is considered as the first modern treatise
of phonetics and logopedia, setting out a method of oral education for deaf people
by means of the use of manual signs in form of manual alphabet (Figure 2.1) to
improve their communication. However, this kind of alphabet was just a way to
make communication possible. The efficiency of it was not good at all due to the
fact that every single sign belonged to a single letter of the alphabet.
Figure 2.1: Manual alphabet by Juan Pablo Bonet [25].
The first real study of sign languages is relatively younger compared to spoken
languages. It dates from 1960, but today there is not a complete definition of their
grammar. There is not yet a tradition in the use of a common transcription system
that let us guess how young these disciplines are. There is an obvious qualitative
and quantitative advance since the beginning of sign language linguistics, but
there are still some methodological problems such as the definition of a tool to
transcript any kind of sign language.
Dr. William C. Stokoe, together with the help of some of his deaf students
from the University of Gallaudet, published in 1960 the monograph Sign Language
Structure (a reduced version can be found [21]), where he proposed that signs
can be analyzed as the composition of three different elements without meaning:
shape of the hand, motion of the hand, and position occupied by the hand. This
assumption permitted him to consider sign language as a natural language.
Although at the beginning his affirmations were seen with some repulsion
by some of his colleagues due to the innovation of the ideas, they eventually
started to pay attention to him. This fact played an important role in motivating
11
2.2 Sign languages
him to publish the first American Sign Language dictionary based on linguistic
principles [22]. In this first dictionary, Stokoe organized the signs depending on
its shapes (position of the hand, shape, motion, etc.) and not depending on its
English translation. This publication was the beginning of research about the
Sign Language linguistics, which has been already cultivated in more than 90
countries.
2.2.2
Phonology
In spoken language, the phonology refers to the study of physical sounds present
in human speech (known as phonemes). Similarly, the phonology of sign language
can be defined. Instead of sounds, the phonemes are considered as the different
signs present in a row of hand signs. They are analyzed taking into account the
following parameters:
1. Configuration: Hand shape when doing the sign.
2. Orientation of the hand: Where the palm is pointing to.
3. Position: Where the sign is done (mouth, forehead, chest, shoulder).
4. Motion: Movement of the hand when doing the sign (straightly, swaying,
circularly).
5. Contact point: Dominant part of the hand that is touching the body (palm,
fingertip, back of the fingers).
6. Plane: Where the sign is done, depending on the distance with respect to
the body (first plane being the one with contact to the body and fourth
plane the most remote one).
7. Non-manual components: Refers to the information provided by the body
(facial expression, lip movements, or movements of the shoulders). For example, when the body leans front, it expresses future tense. When it is leaned
Chapter 2: Background
12
back, expresses past tense. Also, non-manual signs show grammatical information such as question markers, negation or affirmation, localization,
conditional clauses, and relative clauses.
2.2.3
Morphology
Spoken languages have both inflectional and derivational morphology. The former refers to the modification of words to express different grammatical categories
such as tense, grammatical mood, grammatical voice, aspect, person, number,
gender, and case. The latter is the process of forming a new word on the basis of
an existing word (e.g. happi-ness and un-happy from happy). Sign languages have
only derivational morphology because there are no inflections for tense, number
or person.
Hereafter the main parameters that deal with the morphology are summarized:
1. Degree: Known also as mouthing, it is the action to make what appear to
be speech sounds to emphasize a word. For example, the sign "man tall"
expresses ”the man is tall”. If this sign comes with the syllable "cha", the
phrase becomes ”that man is enormous”.
2. Reduplication: Repeating the same sign several times. By doing so, the sign
"chair" is formed by repeating the verb "sit".
3. Compounds: When one word is expressed as the fusion of two different
words. For example, the verb "agree" is composed by the verbs "think"
and "alike" (one sign is executed right after the other).
4. Verbal aspect: Verbs can be expressed in different ways aspects so that
we can say ”to be sick”, ”to get sick”, ”to be sickly”, ”to be often sick”,
”to be continuously sick”, ”to be very sick”, etc. Several of these involve
reduplication. Check [21] and [22] for more detailed information.
13
2.2 Sign languages
5. Verbal number: To express plural or singular verbs. Reduplication is also
used to express it.
2.2.4
Syntax
As with spoken language, syntax takes importance in sign languages. It is primarily conveyed through a combination of word order and non-manual features.
It is described by:
1. Word order: For instance, a full structure in ASL is [topic] [subject] [verb]
[object] [subject-pronoun-tag]. Topics and tags are both indicated with nonmanual features, and both give a great deal of flexibility to ASL word order.
Within a noun phrase, the word order is noun-number and noun-adjective.
2. Topic and main clauses: Sets off background information that will be discussed in the following main clause. The eyebrows are raised during the
production of a topic. People tend to want to set up the object of their
concern first and then discuss what happened to it. In English, we do this
with passive clauses: ”my cat was chased by the dog”. In ASL, topics are
used with similar effect ”[my cat]T OP IC dog chase”.
3. Negation: Negated clauses may be signaled by shaking the head during the
entire clause. Another way to negate a clause is to put the manual sign
”not” or ”none” at the end of a sentence. For example, in English: ”I don’t
have any dogs”, in ASL: ”DOG I HAVE NONE”.
4. Questions: The questions are signaled by lowering the eyebrows. The questioner leans forward slightly and extends the duration of the last sign.
5. Conjunctions: There is no separate sign in ASL for the conjunction ”and”.
Instead, multiple sentences or phrases are combined with a short pause between.
Chapter 2: Background
2.2.5
14
Conclusions
Once the basic knowledge about sign languages has been introduced, it is interesting to discuss what the designed system takes into account and reason why
the other characteristics are not feasible for the project.
The main linguistic characteristics used by the system are part of the Phonology section. The joint positions are tracked, which means that the following
parameters are considered:
1. Position: Where the sign is done (mouth, forehead, chest, shoulder). For
every frame, we know the position of the joints.
2. Motion: Movement of the hand when doing the sign (straightly, swaying,
circularly). The position of the joints is tracked along the frames.
3. Plane: Where the sign is done, depending on the distance with respect to
the body.
The different basic signs from the dictionary (see Table 1.1 and check how to
execute them in Appendix A) have been carefully studied and the use of these
parameters is enough to distinguish between one sign and another.
To make usage of the other parameters from the phonology, the system will
also need to track the position of the fingers or to recognize non-manual information such as lips movement. This is considered as one of the main future
improvements of the project because it will make the list of possible recognized
signs wider.
In terms of morphology or syntax, the system does not consider any kind of
linguistic characteristics such as word order to express different verb aspects, persons, or tenses. However, some sentences are defined which are the result after
executing a row of signs with a specific order (see Table 1.2).
2.3 Microsoft Kinect XBOX 360TM
15
2.3
Microsoft Kinect XBOX 360TM
Microsoft launched in 2010 a new set of sensors that marked a watershed in the
way RGBD cameras are understood. Microsoft Kinect was initially developed
as a peripheral device for use with the XBOX 360TM gaming console. Its three
sensors, i.e. RGB, audio, and depth (Figure 2.2), enable it to detect movements,
to identify user faces/speeches, and allow the players to play games using only
their own body as the controller. In contrast to previous attempts at gesture
or movement-based controls, there is no need of wearing accessories in order for
the device to track the users. Although its initial goal was for gaming-purpose,
Microsoft Kinect opened the door to a wide number of useful applications in
the field of Computer Vision, such as Action Recognition, Gesture Recognition,
Virtual Reality, and Robotics.
2.3.1
Components and characteristics
Figure 2.2 shows how the sensors are distributed over the device:
Figure 2.2: Distribution of the Microsoft Kinect sensors.
• Label A is the depth/3D sensor. It consists of an infrared laser projector (A1)
combined with a monochrome CMOS sensor (A2) and allows the Kinect sensor to process 3D scenes in any ambient light condition. The projector shines
Chapter 2: Background
16
a grid of infrared light on the field of view and a depth map is created based
on the rays that the sensor receives from reflections of objects in the scene.
The depth map specifies the distance of object surfaces from the viewpoint
of the camera. This technology was developed by Israeli PrimeSense and
interprets the 3D scene information from a continuously-projected infrared
structured light. The resolution is 320x240 with 16 bits of depth and a frame
rate of 30fps. This kind of sensing system is considered as a Time of Flight
(ToF) system because it determines the depth map of the scene based on
the time the light takes to return to the source after bouncing off objects in
the sensor’s view. The optimal depth sensor range is from 1.2 to 3.5 meters.
(Figure 2.3 (a) and (c))
• Label B refers to the RGB camera, which has a 32-bit high-color resolution
of 640x480 with a frame rate of 30fps. It gets a 2-dimensional color video of
the scene.
• Label C is the motorized tilt (Figure 2.3). It deals with the field of view
which is defined as follows:
– Horizontal FoV: 57 degrees.
– Vertical FoV: 43 degrees.
– Motor Tilt Range: ±27 degrees.
– Depth range: 1.2 − 3.5 meters.
• Label D is an array of four microphones located along the bottom of the horizontal bar. It enables speech recognition with acoustic source localization,
ambient noise suppression, and echo cancellation. The data stream in that
case is 16-bit at 16kHz.
2.3.2
Open Source Drivers and SDKs
Although at the beginning Microsoft did not release any drivers to enable the
Kinect to be used with a personal computer, its statement was later modified
2.3 Microsoft Kinect XBOX 360TM
17
(a) Horizontal FoV
(b) Motor tilt Range
(c) Vertical FoV
Figure 2.3: FoV of the camera, depth range and motorized tilt range.
and they said that the USB port used to connect the device to the XBOX was
left ”intentionally open”. Since then, a few Open Source Drivers, SDKs, and
APIs have arisen. Table 2.1 was presented in [14], and compares the main Open
Source Drivers available today.
Name
OpenKinect /
libfreenect [1]
Languages
C, Python, actionscript, C#, C++,
Java JNI and JNA,
Javascript, CommonLisp
Plataforms
Linux,
Windows,
Mac OS X
CL
NUI
SDK
and
Driver [15]
Robot Operating System
(ROS) [19]
OpenNI/NITE
Middleware [3]
C,
WPF/C#
Windows
C++,
Python, C++
UNIX
C, C++
Windows,
Linux,
Ubuntu
Features
Color and Depth images.
Accelerometer data.
Motor and LED control.
Fakenect Kinect Simulator.
Record color, depth and accelerometer data in a file.
Color and Depth images.
Accelerometer data.
Motor and LED control.
Color and Depth images.
Motor and LED control.
User identification
Feature detection.
Gesture recognition.
Joint tracking.
Color and Depth images.
Record color and depth data in file.
Table 2.1: Open Sources Kinect Drivers comparison [14].
The Sign Language Translator that is introduced in this report is based on
the tracking of the joints. Taking into account this fact and adding the con-
Chapter 2: Background
18
straint of using Ubuntu as OS, OpenNI/Nite Middleware seems to be the most
suitable choice from the options above. This library contains useful tools that
are convenient for the system.
Open NI/NITE Middleware:
OpenNI (Open Natural Interaction) [3] is a multi-language, cross-platform framework that defines APIs for writing applications utilizing Natural Interaction. It
was developed by the OpenNI organization, which is a non-profit organization
founded by PrimeSense (the company that licensed its hardware to Microsoft to
build the Kinect). The main purpose of OpenNI is to form a standard API that
enables communication with both:
• Vision and audio sensors (the devices that see and hear the figures and their
surroundings). In the case of this project, the device is the Microsoft Kinect
XBOX 360TM .
• Vision and audio perception middleware (the software components that analyze the audio and visual data that is recorded from the scene, and comprehend it). For example, software that receives visual data, such as an image,
returns the location of the palm of a hand detected within the image (See
Figure 2.4).
Figure 2.4: Output of the Palm-detection using the Hand Point Generator OpenNI production node.
[3]
The OpenNI standard API enables natural-interaction application developers
to track real-life (3D) scenes by utilizing data types that are calculated from the
19
2.3 Microsoft Kinect XBOX 360TM
input of a sensor (for example, representation of a full body, representation of a
hand location, an array of the pixels in a depth map and so on). Applications
can be written regardless of the sensor or middleware providers.
The Open NI can be described in a three-layered view (Figure 2.5), where each
layer represents an integral element. The bottom layer contains the hardware
or the devices that collect the data from the real world (i.e. visual and audio
elements of the scene). The second layer contains the Middleware components
that interpret and analyze the data from the sensor. Finally, the top layer contains
the software that implements natural interaction applications (such as the Sign
Language Translator).
Figure 2.5: Abstract Layered View of the OpenNI Concept [3].
The way that OpenNI works is defined by what is called ”Production Nodes”.
A Production Node is a set of components that has a productive role in the data
creation process required for NI-based applications. Each Production Node is on
Chapter 2: Background
20
charge of a specific type of data and can provide it to any object, whether it be
another Production Node or the application itself.
OpenNI classifies its Production Nodes in two different categories: (1) SensorRelated Production Nodes and (2) Middleware-Related Production Nodes. The
former refers to the nodes that provide the data directly from the device (i.e.
Device, Depth Generator, Image Generator, IR Generator, and Audio Generator).
The latter refers to the nodes that provide processed data (i.e. Gestures Alert
Generator, Scene Analyzer, Hand Point Generator, User Generator). For further
information and details about the OpenNI API’s Production Nodes and their
functionalities, use the OpenNI API Reference [2].
This project uses the NITE middleware, which is nothing but an implementation of the OpenNI API for Kinect developed by PrimeSense. It contains functionalities to access to raw color and depth images from the Kinect sensors, for
gesture recognition, feature detection, and joint tracking. Undoubtedly, this joint
tracking functionality is the one that our project uses the most.
Calibration
The most used Production Node in the project is the User Generator. This is the
one that allows to access to the joint tracking functionality and to make it work,
a calibration pose is required. NITE defines this pose as ”psi” and it is shown in
Figure 2.6.
Figure 2.6: Required ”Psi pose” for the user calibration.
This calibration step does not have anything to do with the camera calibration.
2.3 Microsoft Kinect XBOX 360TM
21
Usually, the projects that use data from the Microsoft Kinect XBOX 360TM camera cannot be understood without a camera calibration step before doing anything
else. With so, the data of the two cameras (depth and color) are aligned so that
every single pixel of the scene will have the corresponding RGB-D values. Although the implemented algorithms for the system only need to deal with depth
data, the skeleton has to be overlapped with the RGB image for the user interface.
In other words, an alignment between the data of the two sensors is necessary.
Three different ways to calibrate the Kinect are introduced by D. Herrera et
al. in [12], Nicolas Burrus in [7] and the one provided by OpenNI in [3]. Since
the calibration for the project is purely for visualization purpose, the OpenNI
approach seems to satisfy the necessities. The effect of this alignment is shown
in Figure 2.7.
(a) Before alignment
(b) After alignment
Figure 2.7: Depth and RGB data alginment.
Joint positions
Among the functionalities that the User Generator Production Node provides,
the joint tracking is the one that is most used in this project. The NITE implementation allows to get the position of the 15 joints shown in Figure 3.2. Each
joint is identified with its name and X,Y,Z position coordinates are given in millimeters from the device, where the origin of the axes is at the device’s depth
sensor. Consider X-axis to be on the horizontal plane, the Y-axis to be on the
Chapter 2: Background
Figure 2.8: Available joint positions using the NITE implementation [14].
vertical plane and Z-axis to be normal to the depth sensor.
22
Chapter 3
Methodology
In this section, the methodology and the steps followed during the development
of the project are explained. Firstly, a general overview of the system is given
and then each block of the framework is detailed.
Consider the block diagram from Figure 3.1 . The deaf user is in front of the
camera doing a sign or getting ready to do so. With a frame rate of 20fps, a
new frame is obtained and the video stream is updated with the skeleton of the
user overlapped onto it. At that point, if the user wants to record a sequence
(otherwise, the system asks the camera to get the next frame), three main blocks
are executed: the first block consists of obtaining the data of the joints of interest (JoI) required for the frame descriptor (see more details in Section 3.1),
the second block consists of normalizing these data, and the third one consists
of building the frame descriptor. Then, if the working mode is set to TRAINING
(meaning that the user is adding a new sign to the training set), the frame descriptor is added to the corresponding file of the dictionary (check Section 3.2 to
see how the files are created). Otherwise, if the mode is set to TESTING (meaning
that the user wants to translate the sign that is been done), the frame descriptor
is added to the ”test.data” file. Then, the system checks if the current frame is
the last frame of the sign (also Section 3.2 explains how the system knows when
a sign is finished). After a sign is finished and if the working mode is TESTING,
the test sign is compared using a classifier with the signs from the dictionary and
23
Chapter 3: Methodology
24
Figure 3.1: Flux diagram of the system. Blocks executed when a new frame is captured.
the corresponding output is displayed so that the ordinary user will know the
corresponding word in the spoken language. After that, the system keeps going
with the next frame and the flow of the block diagram is repeated again.
In the following sections, the different parts of the system are analyzed and
explained more in depth.
3.1
Joints of interest (JoI)
OpenNI/NITE can track up to 15 joint positions (see Section 2.3.2). This is too
many points for the Sign Language purpose and only those that are significant
for the description task have to be selected.
25
3.2 File-based implementation
After carefully studying the signs of the proposed default dictionary for the
system, only four joints out of the 15 result to be significant for the description of
a sign: both hands and both elbows. There is no point in tracking others joints
such as the shoulders, the knees, the feet, etc. because they remain almost static
during the execution of the sign. Adding these joints to the sign descriptor will
be the same as adding redundant information.
Even though the description step can be done using the four previously mentioned joints, some other joints are also required for the normalization and the
sign modeling steps. These are the HEAD and TORSO joints. More details about
how these joints are dealt with are given in Section 3.3: Normalization and Section 3.4: Sign descriptor respectively. By doing so, the list of tracked joints at
every frame is reduced from 15 to six (see the corresponding position of the joints
and the notation that will be used from now on in Figure 3.2).
Figure 3.2: Used joints.
3.2
File-based implementation
The system is built following a file-based implementation. This means that the
data of each sign is stored in an independent data file no matter if the sign belongs to a training or to a test sample. Although the OpenNI/NITE also allows
raw depth and image videos from the Kinect to be saved to ”.oni” files, I decided
Chapter 3: Methodology
26
to implement my own file recorder to make the process faster. There is only the
need to store the position of the JoI, the description of the file (i.e. username,
sign, number of frames) and the values that are useful for the normalization step.
The signs from the dictionary are stored in a folder called ”training”.
The user is the one that decides the working mode at every moment. By the
side of the system, there are three possible working modes:
1. MAIN MENU: There are not signs that have to be recorded. The video image
is displayed together with the skeleton of the user but the data is not stored
anywhere.
2. RECORDING A TRAINING SAMPLE: The sign is added to the dictionary (folder
”training”)
3. RECORDING A TEST SAMPLE: The sign is stored into a file called ”test.data”
and once the sign is completed, the system outputs the corresponding word.
By default, the working mode is set as MAIN MENU. In order to start a recording,
an initial position is established. The user must join hands at some position
lower than the hips (like Figure 3.3). The recording will be finished when the
user remains with a static position for a given number of consecutive frames. If
before the recording the user introduces a Sign Name and a User Name in the user
interface, the working mode changes to RECORDING A TRAINING SAMPLE. If the
user does not provide any information, the working mode changes to RECORDING
A TEST SAMPLE.
3.3
Normalization of the data
The system must be robust to size and position of the deaf user. Hence, the
normalization becomes one of the most indispensable steps of the implementation
and hereafter the details of how to deal with both size invariance and position
invariance are given.
27
3.3 Normalization of the data
Figure 3.3: Start recording initial pose. The user must join both hands in a position lower than the
hips.
3.3.1
Invariant to the user’s position
The normalization must take into account the position of the user. The deaf
user can be at different positions of the room and consequently the data must be
stored accordingly to that position. As shown in Figure 3.4, a slight variation in
depth can cause a considerable variation of the X and Y values. The distances
between one joint and another one can drastically vary depending on the position
of the user.
Figure 3.4: Normalization required for the position of the user.
Instead of directly storing the Cartesian coordinates X,Y, and Z (which can
be obtained using OpenNI/NITE), the proposal consists in normalizing all the
joint coordinates with respect to the position of the TORSO. This position remains
Chapter 3: Methodology
28
always constant along the sign frames and is the right one to be used to make the
system position-invariant. Instead of using the Cartesian coordinates X,Y, and
Z, the spherical coordinates considering TORSO as the origin are stored.
In mathematics, a spherical coordinate system is a coordinate system for threedimensional space where the position of a point is specified by three numbers: the
radial distance of that point from a fixed origin, its polar angle measured from
a fixed zenith direction, and the azimuth angle of its orthogonal projection on a
reference plane that passes through the origin and is orthogonal to the zenith,
measured from a fixed reference direction on that plane. Figure 3.5(a) shows
these three numbers or values and Figure 3.5(b) shows the correspondence of
these three values in the system.
(a) Definition of (r, θ, ϕ) as commonly used in physics: radial distance r, polar angle θ, and azimuthal angle ϕ. [26]
(b) Equivalence of these values in the system. Example
case of the LH joint
Figure 3.5: Use of the spherical coordinates.
The radial distance r will be expressed by d and defines a vector between the
TORSO and the corresponding joint. (θ and ϕ) are the angles that describe the
direction of this 3D vector.
Given the set of joints J = {LE, RE, LH, RH} and considering T as the
TORSO, the set of distances D = {dLE , dRE , dLH , dRH }, and the sets of orientations
29
3.3 Normalization of the data
Θ = {θLE , θRE , θLH , θRH } and Φ = {ϕLE , ϕRE , ϕLH , ϕRH } are defined as follows:
n
X
q
D(i) = (J(i)x − Tx )2 + (J(i)y − Ty )2 + (Tz − J(i)z )2
(3.1)
i=1
n
X
q
2
2
(J(i)x − Tx ) + (J(i)y − Ty ) , (Tz − J(i)z )
Θ(i) = atan2
(3.2)
i=1
n
X
Φ(i) = atan2 (J(i)y − Ty ) , (J(i)x − Tx )
(3.3)
i=1
where n is the number of joints from J.
The impact of this normalization in the system can be checked in Table 4.1 in
the results section.
3.3.2
Invariant to user’s size
Given a sign, its description must be the same no matter if the user is tall or
short and the translator must be able to output the right word in every case.
Although the way that the dictionary is built allows to have several samples for
the same sign (meaning that we can have the same sign described for different
user’s sizes), there is no way to add the samples for all the possible user’s sizes to
the dictionary. Otherwise the classification process will become slower and less
accurate.
The user’s size problem is shown in Figure 3.6 (a). The distance from one joint
to another changes significantly depending on the user’s size (the distances for
the users in the middle are smaller than the distances for the users at the sides).
After the normalization of the user’s position, every joint is expressed by its
relative distance d to the TORSO joint and the two angles θ and ϕ that describe
the orientation of this distance.
The proposal shown in Figure 3.6(b) consists of normalizing all the relative
distances d by the factor that is defined by the distance between the HEAD and
the TORSO joints (dHT ). This factor tells about the size of the user and all the
Chapter 3: Methodology
30
(a) Different user sizes
(b) Set of distances D
Figure 3.6: Normalization required for the user sizes.
distances D can be normalized accordingly to this value.
Given the set of distances D = {dLE , dRE , dLH , dRH }, the normalized set of
distances Dnorm is obtained as follows:
n
X
i=1
Dnorm (i) =
D(i)
dHT
(3.4)
where n is the number of distances from D and dHT is the HEAD-TORSO distance
(the green segment from image image 3.6(b)).
There is no need to normalize the angles θ and ϕ since they are expressing the
direction and the direction remains the same after the normalization.
The positive effect of this second normalization regarding the accuracy of the
system can be seen in Table 4.1 in the results section.
3.4
Sign descriptor
Once the JoI data are obtained and normalized, the next step is building a descriptor for each sign. The descriptor must be able to describe a sign in a way
that this descriptor will be unique and sufficiently different from the other de-
31
3.5 Classifier
scriptors of the dictionary.
The used sign descriptor looks like Figure 3.7 . It contains as many rows as
frames the sign contains. For every frame, the spherical coordinates for each of
the four joints are stored in the corresponding layer (d, θ or ϕ).
Figure 3.7: Sign descriptor based on the spherical coordinates values for every joint.
Since C++ libraries are used, the std::vector class will allow to implement this
descriptor using a vector of vectors of vectors.
3.5
Classifier
The classifier is the function that will output the corresponding word of the
spoken language once the deaf user inputs a sign. Based on the philosophy of
the project, the simplest classifier that will better satisfy the requirements will
be found. The following points must be taken into account:
• The test sign that is described in the same way as the training signs of the
dictionary.
• The descriptors (both test and training) do not share the same length which
means that, for instance, a sample A can have 100 frames and a sample B
can have 120.
• The classifier must be able to compare data that can have a different length
such as A and B. Sometimes, the same sign done by the same user can be
slightly different in length.
Chapter 3: Methodology
32
• The classifier must compare the test sign with every sign from the dictionary
and output the similarity coefficient between both.
The following Sections 3.5.1 and 3.5.2 introduce the two implemented classifiers. Both make use of the Dynamic Time Warping algorithm described in
Section 3.5.3.
3.5.1
NN-DTW classifier
The first proposal consists of using a modified version of the well-known Nearest
Neighbor classifier with the Dynamic Time Warping (DTW) algorithm as a cost
function. Given a test sign, the classifier matches it with the closest sign from
the dictionary (or training set). In order to find the similarity between the test
sign and each of the signs from the training set, the DTW algorithm described
in Section 3.5.3 is used. See the pseudo code of this first approach in Algorithm
3.1.
Algorithm 3.1 Nearest Neighbor classifier using Dynamic Time Warping cost function
function NN-DTW (sample test, vector < sample > dictionary [1..n])
declare double min,dist
for i := 1 to n do
dist ← DT W distance (test, dictionary[i])
if dist ≤ min then
min ← dist
end if
end for
return return min
end function
3.5.2
NG-DTW classifier
The second proposal is named as Nearest-Group classifier with the Dynamic
Time Warping (DTW) algorithm as a cost function. It is a modified version of
the first approach, but instead of matching the test sign with the most similar
sign sample from the dictionary, the test is matched with the most similar group
of sign samples from the dictionary. The most similar group is the one with the
33
3.5 Classifier
smallest mean similarity coefficient after averaging the DTW distances of the
samples that belong to a same group. Algorithm 3.2 contains the pseudocode
of this approach and an example is given in Figure 3.8. In that case, the DTW
similarity coefficients are carried out for a given test. Then, the mean value
for every group is found. As can be seen, the average similarity for the group
”doctor” is lower than the others and that is why the test sample is matched with
the class ”doctor”.
Figure 3.8: NG-DTW Classification example for a given test sign. The input sign is classfied as
”doctor” because it is the group that contains the smallest mean similarity coefficient.
3.5.3
Dynamic Time Warping algorithm (DTW)
Dynamic time warping (DTW) was introduced in 60s [5] and it is an algorithm for
measuring similarity between two sequences which may vary in time or speed. For
instance, similarities in walking patterns would be detected, even if in one video
the person is walking slowly and if in another video he or she is walking more
quickly, or even if there are accelerations and decelerations during the course of
one observation. DTW has been used in video, audio, and graphics applications.
In fact, any data which can be turned into a linear representation can be analyzed
with DTW (a well-known application has been automatic speech recognition). In
Chapter 3: Methodology
34
Algorithm 3.2 Nearest Group classifier using Dynamic Time Warping distance
function NG-DTW (sample test, vector < sample > dictionary [1..n])
declare double min, dist
declare vector < double > meanDT W ;
declare vector < int > meanDT Wcount ;
// Compute the similarity coefficients between the test sample and the training samples.
for i := 1 to n do
dist ← DT W distance (test, dictionary[i])
// Add the value to the corresponding group.
meanDT W (getGroupIndex(i)) ← meanDT W (getGroupIndex(i)) + dist
// Increment the number of samples for the group.
meanDT Wcount (getGroupIndex(i)) + +
end for
min ← ∞
// Find the group that has the smallest mean similarity coefficient. (m=number of groups)
for j := 1 to m do
// Compute the average.
meanDT W (j) ← meanDT W (j)/meanDT Wcount (j); // Find if the mean value is the
minimum up to now
if meanDT W (j) ≤ min then
min ← j;
end if
end for
return return min
end function
35
3.5 Classifier
this report, DTW is satisfactory used for gesture/sign recognition purposes, coping in that way with sign execution speeds.
By using DTW, a computer will be able to find an optimal match between two
given sequences (i.e. signs) with certain restrictions. The sequences are ”warped”
non-linearly in the time dimension to determine a measure of their similarity independent of certain non-linear variations in the time dimension.
Algorithm 3.3 contains the pseudo code of the Dynamic Time Warping distance.
Algorithm 3.3 Dynamic Time Warping algorithm
function DTWDistance (char s[1..n], char t[1..m])
declare int DT W [0..n, 0..m]
declare int i, j, cost
for i := 1 to m do
DT W [0, i] ← ∞
end for
for i := 1 to n do
DT W [i, 0] ← ∞
end for
DT W [0, 0] ← 0
for i := 1 to n do
for i := 1 to m do
cost ← d(s[i], t[j])
DT W [i, j] ← cost+ minimum(DT W [i − 1, j], // insertion
DT W [i, j − 1], // deletion
DT W [i − 1, j − 1]) // match
end for
end for
return return DT W [n, m]
end function
Tables 3.1 and 3.2, contain the example of two Dynamic Time Warping distances to show the idea of the algorithm. To make it easy, the sequences of data
consist of words (string of characters) where every character is represented by the
number of its alphabetic position in an ascending order (being A=1,B=2,...,Z=26).
One should consider that the distance between two characters is defined as its
relative distance in the alphabet (i.e. distance between ”A” and ”C” is 2). The
output of the algorithm tells that the word ”cat” is more similar to ”bad” (simi-
Chapter 3: Methodology
36
larity 17) than to ”hello” (similarity 30).
H(8)
E(5)
L(12)
L(12)
0
∞
∞
∞
∞
O(15)
∞
C(3)
∞
5+0=5
2+5=7
9 + 7 = 16
9 + 16 = 25
12+25 = 37
A(1)
∞
7 + 5 = 12
4+5=9
11 + 7 = 18
11+16 = 27
14+25 = 39
T(20)
∞
12+12 = 24
15 + 9 = 24
8 + 9 = 17
8 + 17 = 25
5 + 25 = 30
Table 3.1: Dynamic Time Warping distance between words ”cat” and ”hello”.
B(2)
A(1)
D(4)
0
∞
∞
∞
C(3)
∞
1+0=1
2+1=3
1+3=4
A(1)
∞
1+1=2
0+1=1
3+1=4
T(20)
∞
18 + 2 = 20
19 + 1 = 20
16 + 1 = 17
Table 3.2: Dynamic Time Warping distance between words ”cat” and ”bad”.
In the case of the implemented system, instead of having a sequence of characters, there is a sequence of frame descriptors. In other words, instead of having
the character ”A”, each position of the sequence contains something like Equation
3.5. Consider that the results’ section shows that the best configuration of the
system do not consider the angles θ. Hence, the Equation 3.5 must be reduced
to 8 dimensions)
[LHd1 , LHθ1 , LHϕ1 , LEd1 , LEθ1 , LEϕ1 , RHd1 , RHθ1 , RHϕ1 , REd1 , REθ1 , REϕ1 ]
(3.5)
Although the introduced DTW algorithm can only work with 1D data (which
does not fit with the system since the data is 12D), hereafter is shown the way that
DTW is applied to find the similarity between two sequences of n-dimensional
data.
The modification resides at the point that the cost between two n-dimensional
data is computed. Given a n-dimensional data M 1 and M 2, the cost value between both can be generalized as follows:
37
3.5 Classifier
v
u n
uX
(M 1i − M 2i )2
cost = t
(3.6)
i=1
Other considerations
Two considerations must be taken into account here. The first one refers to
the weight of each joint. The system deals with the movements of both hands
and both elbows, but it is possible that some of these joints provide more useful
information than others. It is interesting to apply a weight for each joint so that
the best configuration of the system will be achieved. This weight is applied
when computing the cost between two n-dimensional data M 1 and M 2. Hence,
the Equation 3.6 is modified as follows:
v
u n
uX
cost = t
weighti · (M 1i − M 2i )2
(3.7)
i=1
where weighti is the weight of every dimension considering that all the dimenP
sions of the same joint will have the same weight and ni=1 weighti = 1. Check
the obtained system accuracy with each one of the weight configurations in Table
4.1 from Section 4:Results.
The second consideration to be taken into account refers to the distance between two angles and how to compute it (e.g. difference between the angles θ
of the LH joints of two different signs at a given frame). With the angles, this
computation is not as straightforward as with the distances d.
The graphs from Figure 3.9 represent the values of d, θ, and ϕ along the frames
for each joint and for a given gesture. In that case, these graphs are representing
the behavior of the values for the sign phone. As can be seen in Figure 3.9, there
are some suspicious jumps with points p1, p2, p3, and p4. This does not mean
Chapter 3: Methodology
38
that the data is wrong but, there is a concept that must be taken into account
when computing the difference between two points. See the example shown in
Figure 3.10. A given joint at a given frame has a ϕ value of π/6. The same angle
for the same joint at a different frame has changed 11π/6. It is obvious that the
difference/variation between both angles is the angle α from Figure 3.10, but for
the computer it is not the case. It considers that the difference between π/6 and
11π/6 is |π/6 − 11π/6| = 5π/3 (angle β).
Figure 3.9: Values of d, θ, and ϕ along the frames for each joint and for a given sign.
To solve this, an adjustment after computing the distance must be done. Considering that the difference between two angles must be always lower or equal
39
3.5 Classifier
Figure 3.10: Need of angle adjustment when computing the difference between two angles.
than π, for all the differences bigger than π the right difference will be:
dif f erence(angleA, angleB) = π − dif f erence(angleA, angleB)
(3.8)
Chapter 4
Experiments and results
In this section, the accuracy of the system for the different implemented approaches and configuration of parameters is analyzed. The default training set
contains a total of 70 different samples, which is the result after adding five different samples for each of the 14 signs from the dictionary of words listed in Table
1.1 (also the description of how to execute them is shown in Appendix A). All
these training samples belongs to the same user and are executed at the same
position. In order to test the system, a set of test samples is collected. This
set contains signs done by four different users that differ in size (see Figure 4.1).
One out of these four users (left user from Figure 4.1) is the same user from
the training samples, but in that case the signs are executed in different extreme
positions in order to evaluate the efficiency of the implemented position normalization method. For every user, three different samples for each sign are added
to the set of test samples. This results in a total of 168 testing samples that will
be used to find the accuracy of the system.
Three different approaches are evaluated:
1. Cartesian + NN-DTW: The descriptor contains the Cartesian coordinates (X,Y, and Z) of the four used joints and where the user’s size normalization is not taken into account (only position normalization is considered).
The classifier used is the NearestNeighbor-DTW.
40
41
Figure 4.1: Different users used to test the system.
2. Spherical + NN-DTW: The descriptor contains the spherical coordinates
of the joints. The user’s size and position normalization are taken into
account here. The classifier used is also the NearestNeighbor-DTW.
3. Spherical + NG-DTW: The difference of this approach with respect to
the second one resides in the classifier. Instead of using the NearestNeighborDTW, the NearestGroup-DTW is used.
For each of the approaches, different configurations are analyzed. These configurations can be split into two categories:
1. Weight for each one of the joints: Several combinations of weighting
values are applied to the HAND and ELBOW joints thereby evaluating the importance of each one of the joints.
2. Features used to describe a joint: The best features will be found (which
are the features that are more suitable for the description of a joint).
The accuracy of the system is carried out in two ways. The first one (the top
value from every cell of the table), tells about the general accuracy of the system.
It is obtained after applying the formula from Equation 4.1. The second one (the
bottom value from every cell of the table) tells about the accuracy of the system
considering the individual accuracies for each one of the signs. It is obtained after
applying the formula from Equation 4.2.
Accuracy1 =
positives
· 100
positives + negatives
(4.1)
Chapter 4: Experiments and results
42
where positives are the number of test samples that have been rightly classified
and negatives the ones that have been wrongly classified.
Pk
Accuracy2 =
positivesi
i=1 positivesi +negativesi
· 100
(4.2)
k
where k is the number of signs (14), and [positives, negatives]i are the samples
for a given sign i that have been rightly and wrongly classified respectively.
Table 4.1 gathers the accuracy values for each of the previous approaches and
configurations. Table 4.2 collects the accuracies by groups of signs of the three
approaches that perform better from Table 4.1 (shown in bold). Section 4.1
contains the discussions and interpretations for these results.
Cartesian + NN-DTW
x / d
y / θ
z / ϕ
x,y /
d, θ
x,z /
d, ϕ
y,z
/
θ, ϕ
x,y,z /
d, θ, ϕ
Spherical + NN-DTW
Spherical + NG-DTW
H=0.8,
E=0.2
H=0.5,
E=0.5
H=0.2,
E=0.8
H=0.8,
E=0.2
H=0.5,
E=0.5
H=0.2,
E=0.8
H=0.8,
E=0.2
H=0.5,
E=0.5
H=0.2,
E=0.8
77.381%
77.421%
4.762%
4.762%
71.429%
71.429%
58.928%
57.857%
85.119%
85.119%
71.429%
71.429%
85.119%
85.119%
80.350%
80.396%
7.143%
7.024%
70.833%
70.952%
72.619%
72.5794%
80.357%
80.357%
70.833%
70.833%
82.738%
82.738%
77.381%
77.381%
8.330%
8.214%
68.452%
68.810%
75.5952%
75.754%
74.405%
74.524%
69.048%
69.405%
75%
75.119%
73.810%
73.8095%
5.357%
5.2381%
94.048%
94.405%
57.143%
57.143%
95.238%
95.238%
75.595%
75.952%
94.643%
94.643%
78.5714%
78.5714%
8.928%
9.008%
91.660%
92.143%
59.524%
59.524%
93.452%
93.452%
70.238%
70.516%
91.660%
91.660%
77.381%
77.500%
10.714%
10.794%
88.690%
88.166%
51.191%
51.310%
86.905%
86.905%
60.714%
61.071%
80.952%
81.071%
71.429%
71.429%
4.762%
4.643%
91.071%
91.4286%
64.286%
64.286%
92.262%
92.262%
70.238%
70.595%
94.643%
94.643%
75.000%
75.000%
5.952%
6.032%
87.500%
87.980%
58.929%
58.929%
91.071%
91.071%
66.670%
67.024%
91.666%
91.666%
72.619%
72.7381%
8.330%
8.413%
82.143%
82.739%
44.643%
44.881%
83.929%
83.929%
54.762%
55.952%
80.952%
81.071%
Table 4.1: System accuracies for the different configurations. The left column tells about which
feature is used. Consider x,y,z for the Cartesian approach and d, θ, ϕ for the Spherical approach. In the
first row, the title indicates the evaluated approach and the second row expresses the applied weight
to each one of the joints (being H=hands and E=elbows). The top value from each cell refers to the
Accuracy 1 and the value from the bottom refers to the Accuracy 2.
4.1
Discussions
The first variable analyzed is the weight that is applied to each joint. Seeing
Table 4.1, the joint HANDS appears to have more importance than the ELBOWS.
43
4.1 Discussions
Sign
Spherical + NN-DTW
(d,θ,ϕ, H=0.8, E=0.2)
Pos
Neg
Accu
am/are
12
0
doctor
12
0
have
12
0
hello
12
0
hot
12
0
hungry
6
6
I
12
12
love
3
0
phone
12
0
play
12
0
question
11
1
sick
12
0
want
12
0
you
11
1
Accuracies by signs:
100%
100%
100%
100%
100%
50%
100%
100%
100%
100%
91.67%
100%
100%
91.67%
94.643%
Spherical + NG-DTW
(d,θ,ϕ, H=0.8, E=0.2)
Pos
Neg
Accu
12
12
12
12
12
9
11
12
12
12
11
12
12
8
0
0
0
0
0
3
1
0
0
0
1
0
0
4
100%
100%
100%
100%
100%
75%
91.67%
100%
100%
100%
91.67%
100%
100%
66.67%
94.643%
Spherical + NN-DTW
(d,ϕ, H=0.8, E=0.2)
Pos
Neg
Accu
12
12
12
12
12
6
11
12
12
12
11
12
12
12
0
0
0
0
0
6
1
0
0
0
1
0
0
0
100%
100%
100%
100%
100%
50%
91.67%
100%
100%
100%
91.67%
100%
100%
100%
95.238%
Table 4.2: System accuracies by signs. The configurations that better perform from Table 4.1 are
here analyzed.
From the three possible configurations of weighting ({HANDS=0.8, ELBOWS=0.2},
{HANDS=0.5, ELBOWS=0.5}, or {HANDS=0.2, ELBOWS=0.8}), the one that better
performs is {HANDS=0.8, ELBOWS=0.2}, where the HANDS have more weight than
the ELBOWS. The reason for this is because the hands remain more separated
with respect to the TORSO than the elbows during the execution of the sign and
consequently are the joints that contain the coordinates that vary more. This
means that the HANDS are more meaningful for the description of the sign, but
this does not mean that the ELBOWS do not provide useful information. If only the
HAND position is considered (i.e. zero weight for the ELBOWS), the system accuracy
becomes lower (not shown here).
The second evaluation consists of checking which is/are the more meaningful
feature/s (i.e. x, y, z, d, θ, ϕ). To do so, the configurations where only one of
these features is used will be analyzed. In the case of the Cartesian approach, the
system achieves an average accuracy higher than 70% with both features x and z
used independently. Opposite to this, the accuracy when using only the y feature
is lower than 10%, which means that y is not a meaningful feature for the system.
The explanation for that can be that the feature y refers to the displacement of
the joint along the vertical axis of the image. Figure 4.2 shows the range of
Chapter 4: Experiments and results
44
positions that the human arms can reach from a static position considering the
signs from the dictionary. As can be seen in Figure 4.2, the range of values for
y is much smaller than the range of values for x, which means that all the signs
share similar values for y. That is why if only the y coordinate is used, the system
is not able to classify the test signs correctly.
Figure 4.2: Range of used positions x and y.
Regarding the Spherical approaches, a similar phenomenon occurs. If only the
features d and ϕ are independently used, the accuracies that the system achieves
are higher than 70% ( 90% in the case of ϕ). On the other hand, the accuracy
becomes smaller than 10% with the use of only the feature θ. See again Figure 3.5
to refer to the equivalence of the angles θ and ϕ for every joint. The reason why
the angle θ is not meaningful is not as easy to understand visually as it was with
the y feature from the Cartesian approach. However, the graphs from Figure 4.3
can demonstrate the insignificance of this feature. As can be seen, the behavior
of the feature θ remains the same along the frames and also for all the joints.
When comparing two different signs that have considerably different executions,
the difference in θ is almost the same for all the signs and this is why the feature θ
is not significant for the description process. That is why the optimal descriptor
will be 8D (d and ϕ for the four joints) instead of 12D (d, θ, and ϕ for the four
joints).
Regarding the evaluation of the different approaches, the one that differs more
from the rest is the Cartesian, whose accuracies are significantly lower than the
Spherical approaches. In that case, only the normalization of the user position
45
4.1 Discussions
(a) Question sign
(b) Hot sign
Figure 4.3: Behavior of d, θ, and ϕ (left, center, and right column respectively) for two different
signs. See how θ almost does not change between two different signs and consequently becomes not
meaningful.
Chapter 4: Experiments and results
46
is taken into account. This means that if the test samples contain data from
different user sizes, the system will not be able to match them with the right sign
samples from the dictionary (dictionary where the samples belong to the same
user).
It is interesting to check how the user’s size normalization is properly working
by comparing the accuracies from the Cartesian approaches with respect to the
Spherical ones. In the first case, the best accuracy is 85%, where in the second
case, the best one reaches 95.238%. This substantial change tells about the efficiency of the implemented normalizations considering that the test set contains
signs done by the four users from Figure 4.1 and that the classifier is only misclassifying eight out of 168 test samples.
By its side, the differences between the accuracies when using the Nearest
Neighbor-DTW classifier and the NearestGroup-DTW classifier do not seem to
be that important, although the former unexpectedly performs better than the
second one (95.238% and 94.643% respectively). Indeed, the second approach
was intended to make the classification process more robust, but the results are
showing that this guess was not true for the current test samples. In the case
of the NearestGroup-DTW classifier, the test sample is matched with the group
of signs whose average DTW-distances with the test sample are smaller. This
means that if for some unexpected reason one of these DTW-distances is totally
different compared with the rest from the same group (e.g. due to some error
when collecting the data), the average value will be consequently affected and
the classifier will be more prone to misclassification. If the training samples were
taken by different users, the NearestGroup-DTW would probably perform better
than the NearestNeigbor-DTW.
Finally, after evaluating the possible configurations and approaches independently, it is time to consider all of them together and see which is the one that
gives the best system accuracy. This configuration is:
{ weights:{HANDS=0.8, ELBOWS=0.2}, used features: {d, ϕ}, approach:NN-DTW classifier }
This will be the approach used by default by the system since it is the one
providing the best results (95.238%). However, the comparison with two different
47
4.1 Discussions
configurations that have almost the same accuracy is hereafter shown to discuss
the difference between them.
Table 4.2 specifies the single accuracies by signs from the approaches/ configurations that perform better from Table 4.1 (in bold). From the 14 words, only
four do not have 100% accuracy, where in three out of these four (I, question,
and you), only one of the test signs is misclassified. These mis-classifications are
not significantly but an explanation for them can be presented here. The system
is based on the data that is collected by the Kinect Camera. The accuracy of
the skeleton tracking Production Node from the OpenNi is not perfect and sometimes the user skeleton tracking is lost when the user executes a sign. In order to
control this problem, the skeleton is overlapped with the screen so that the user
will know if the tracking is working when he/she is doing the sign. The other
reason for these misclassified samples can be the way the user does the sign. The
execution of every sign is defined by a pattern, and the sensitivity of the system
is good enough to be able to recognize signs that belong to the same word, but
have a variation of position. It is easier to understand this second reason with
the following extreme example. To execute the sign play, the user must draw a
circle with both hands in front of his/her body. The approximate diameter of this
circle has to be around 1 meter. If for some reason the user tries to do a circle
of 10 centimeters in diameter, there is no way by which the system can recognize
the sign since it is totally different.
What can be assured is that if the user executes the sign as it is defined, the
system will output the right word for all the signs except for the hungry sign. For
the latter, the sensitivity is much higher and sometimes even the classification
is not working. The reason for that is because the sign hungry takes place in
the center of the body close to the TORSO (see Appendix A to check the exact
definition). Since all the joints are described with respect to the TORSO, a slight
variation in the vertical or horizontal axes will end with a big variation for the
angles θ and ϕ. ϕ is in fact the most prone to this fact and it was supposed to
be the most meaningful joint. This variation in angles can drive the description
for that sign to be close to a totally different sign. The graphs from Figure 4.4
Chapter 4: Experiments and results
48
describe this problem. The DTW-algorithm is used to compare two signs no
matter their length. By doing so, the system is able to deal with different speeds
during the execution of two different samples for the same sign, but sometimes
the algorithm can wrongly output a positive similarity coefficient. This is the
case of what is shown in the graphs from Figure 4.4. The sign phone (in red)
has a length of 60 frames while the sign hungry (in blue) has a length of 110
frames. If the DTW-algorithm is applied here to compare them, the similarity
coefficient output will determine that these sequences are quite similar since they
share almost the same behavior along the duration of the sign (stretch the phone
curve until the end of the hungry one). Indeed the signs are quite different. To
solve this problem, new features will need to be considered by the sign descriptor
or in the case that the aim will be to make the default dictionary with 100%
accuracy, a new sign must be defined for the same word.
The data that this project and the ones from the literature review are using is
not the same because is provided by different devices (the Kinect in the case of
this project and mainly 2D cameras in the case of the related works). The dictionary of defined signs is totally different because contains signs from different
languages and also the number of signs included in these dictionaries is different.
This is why there is not too much point to make a comparison with the state
of the art. However, it is interesting to mention here the pros an cons of this
approach in front of other projects.
In [4], Akmeliawati et al. made use of custom-made gloves that allowed to
detect the position of the hand based in a color segmentation. This is maybe
the closest approach to this project since they are only using the joint position
(and not the fingers information). For a list of 11 words from the CSL, and
by using Artificial Neural Networks as classifier, they got an accuracy of 95%
(slightly lower than this project). With the approach that is here presented, the
use of the Kinect allows the detection of the joints to be easier and without the
need of external devices. In [23], Vogler et al. showed how to apply the parallel
Hidden Markov Model-based method in a 22-sign-vocabulary in order to achieve
an accuracy of 95.83%. Yang Quan et al. defined in [18] a bidirectional Chinese
49
4.1 Discussions
Figure 4.4: Hungry (blue) VS Phone (red) behaviors of d, θ, and ϕ (left, center, and right column
respectively). See how that if the sequences of both signs are compared (without considering the
number of frames), the descriptor for both signs will be almost the same (stretch the phone curves until
the end of the hungry ones).
Sign Language capable to recognize 30 letters from the Chinese manual alphabet
with an average accuracy of 95.55%. Others such as the big project presented
by Gao et al. in [8] used a dynamic programming method to obtain the contextdependent models for recognizing continuous Chinese Sign Language (CSL). Over
a large dictionary of 5,177 CSL isolated signs they got an accuracy of 94.8%. Altought the accuracy of the introduced approach in this thesis is higher than the
latter project, it is not fair to say that the approach is better since the number
of signs that they are using is much higher than the ones that are used here.
To summarize everything, it is interesting to see how with a basic implementation, the accuracies from the similar projects from the state of the art are reached
(do not consider the approach from Gao et al. [8]) .
Chapter 5
Conclusions
The initial goal of the project was to design a Sign Language Translator by using
the Microsoft Kinect XBOX 360TM . Once the related work about this specific
topic of the Computer Vision field was checked, it became clear that, generally
speaking, all the approaches make use of complex descriptors and classifiers such
as Hidden Markov Models or Artificial Neural Networks. It was thought that in
order to describe and recognize a sign, much more simple descriptors and classifiers could be used.
The thesis proposal clearly summarized the aim of the project: to design and
implement a system capable of recognizing a list of 14 basic signs. For these signs
the only data used will be the joint positions, which means that the signs from
the default dictionary must be carefully selected considering the data that is used
to describe them. In other words, if two signs are executed in the same way and
they only differ in the hand shape or position of the fingers, the proposed system
will not be able to discern between them.
The system is working since the best configuration achieves 95.2381% accuracy. From the 168 test samples, only eight signs were misclassified, where six of
these eight signs belonged to the same conflictive sign hungry (see Section 4.1:
Discussions for details). By combining the 14 signs from the default dictionary,
a total of 12 basic sentences have been defined (the list can be easily increased).
These sentences consist of basic sentences such as ”I want to see a doctor”, ”I
50
51
5.1 Future work
am sick”, ”I am hungry”, ”What is your phone number?”, etc. If the system is
incorporated in business meetings, hospitals, supermarkets, etc, by using these
sentences, the communication between a deaf user and an ordinary user will become possible. Despite the fact that the defined signs do not belong to a specific
official Sign Language, the idea of the project was to show that with basic descriptors and classifiers and the use of the Kinect, a wide number of signs could
be recognized and the system has the potential to provide a computationally efficient design without sacrificing the recognition accuracy.
Another initial goal was to make the system easily trainable. Here, a total of 14
signs are presented, but the list can be increased by using the useful auto-training
option from the user interface (check Appendix B for further information). The
only constraint is that the user must take into account which kind of features the
implementation is using when adding a new sign so that the system will be able
to recognize it. One of the reasons why this project considers 14 signs and not
more is because of the data collection. The lack of a general dataset with signs
data from the Kinect required the creation of a homemade training and testing
set. 168 test samples can properly tell about the accuracy of the system when
evaluating these 14 signs, and adding more signs to the dictionary will make this
data collection process even more tedious.
Other secondary goals have been also satisfied. While using the Qt environment for C++ as a programming language, the knowledge about powerful libraries
in the Computer Vision field such as OpenCV, OpenNI, Qt GUI, and Qt have been
developed. The installation of the Kinect in Ubuntu was not that straightforward
but this fact also helped to improve the knowledge about this operative system
and how to set up an external device with its respective libraries.
5.1
Future work
Although the final approach satisfies the initial goal of the project, it is always
interesting to list some possible future improvements.
To make this system work with a real Sign Language (American Sing Lan-
Chapter 5: Conclusions
52
guage, Spanish Sign Language, etc.), some other features such as the finger position or shape of the hand will have to be considered. Since the time limitation
for the thesis made it impossible to consider these features, this would probably
be the most appropriate first future improvement. As shown in Section 2.2: Sign
Languages, a sign is not just a combination of hand gestures. Also other components come into play, with the lip movement possibly being one of the most
important. Considering these other components will allow the project to develop
into a more true Sign Language Translator.
Another future development will be to implement a dynamic algorithm to
detect whether the user is doing something that seems to be a sign from the dictionary. Right now, the user has to start a sign with a specific pose so that the
record of a test will start. It will be interesting to make the gesture recognition
task more automatic without the need of an initial position.
The last future improvement mentioned here is regarding the computational
cost of the system. Today’s computers will not have problems running the system
in real time and, indeed, the output word is displayed in the screen right after
the sign is executed. In any case, for every sign a 2 x 4 x numFrames (where
2 refers to the two used features d and ϕ, and 4 is the number of used joints)
matrix is defined and this can definitely be reduced. Despite the fact that the
Kinect can run at 30fps, right now the data from the device is being collected at
10fps in order to reduce the data size by a factor of three. The future work will
be to further reduce the number of dimensions for the data of every sign to those
that are most meaningful. There are a few algorithms that can deal with that,
but the Principal Component Analysis might be a sufficient solution. This future
work probably will not improve the accuracy of the system for the current signs,
but it might improve the speed and also the accuracy if more signs are added to
the default dictionary.
Appendix A
Dictionary of used signs
The executions of the default signs of the dictionary are detailed in this first
appendix.
(a) Am / are
(b) Doctor
(c) Have
(d) Hello
53
Chapter A: Dictionary of used signs
54
(a) Hot
(b) Hungry
(c) I
(d) Love
(e) Phone
(f ) Play
(g) Question
(h) Sick
(i) Want
(j) You
Figure A.1: Default dictionary of signs
Appendix B
User manual - Quick guide
This quick guide defines the structure, concepts and basic information of the software’s interface so that the user will be able to understand all the functionalities
and run the program in an effective manner. All the comments are followed by
some snapshots of the application in order to make the explanation easier.
Figure B.1: Main window description.
55
Chapter B: User manual - Quick guide
56
Main window
Once the Qt project is compiled and run, a user’s interface such as the one from
Figure B.1 will appear in the middle of the screen. The specification of the main
functionalities and options from this window are listed below:
• 1-INITIALIZE BUTTON: Press this button in order to initialize the
video stream.
• 2-MAIN MENU: Contains two tabs:
– MENU: Contains two text browsers that will need to be filled out in
order to add a new word to the dictionary (training mode).
– ADVANCED: This option is only available for the administrator, and
contains functionalities that have been used for the evaluation of the
system during the development of the project.
• 3-CONSOLE: Displays useful information such as errors or status of the
application.
• 4-OUTPUT DISPLAY: Displays the correspondent output word once a
test sign is done. If the word is displayed in white (Figure B.2 (a)) means
that a single sing has been matched. If the output is displayed in red (Figure
B.2 (b)) means that a combination of sings that compose a sentence has been
done.
(a) Word
(b) Sentence
Figure B.2: Output window.
• 5-RGB VIDEO: Contains the displays from Figure B.3:
– a. Rec button: When it is transparent (Figure B.4 (a)), means that
there is no sequence that is being recorded. If it is displayed in black
(Figure B.5 (b)), means that a sequence is being recorded.
57
Figure B.3: Output window.
(a) Not recording
(b) Recording
Figure B.4: Rec button modes.
– b. Frame number: Displays the current number of frame.
– c. Current mode: Shows the current status. When the system is recording a test, the display is the one from Figure B.5 (a) is shown. When
the system is recoding a training, the one from B.5 (b).
(a) Testing
(b) Training
Figure B.5: Current mode displays.
– d. Reset: This button deals with the record of signs executed in a row.
When the user wants to built a sentence by a combination of sings, this
button must be clicked in order to clean the record of previous signs. In
order to press the button, the user must overlay his left hand (showed
Chapter B: User manual - Quick guide
58
in blue) over the button as shown in Figure B.6.
Figure B.6: Reset button.
– Range warnings: These information panels (Figure B.7), are indicating
whether the user is in the right range of precision of the camera or not.
(a) Too far
(b) Too close
Figure B.7: Range warnings.
Testing VS Training modes
The system is designed to work in two modes:
• TESTING: This is by default the mode that the system will run if the user
does not ask for the training mode. In order to start to record a test sign, the
59
user must do the initial pose from Figure B.8 (joint both hands lower than
the hips for a given number of consecutive frames). Once the system is ready
to start a recording, the display from Figure B.5 (a) will be overlapped in the
bottom right corner of the video window. The user should start executing
the sign and in order to finish a recording he/she must keep a static position
with the hands lower than the hips for a few consecutive frames. Then, the
system will output the correspondent word in the output window.
• TRAINING: This is the mode that should be run if the user wants to add a
new sign to the default dictionary. To run this mode, the user must enter
the gesture name and the user name in the Menu Window. The name of the
gesture/sign must be rightly written since is the word that will be displayed
in the output window once a sign will be matched to this one. The way
the program has to interpret that the user wants to run the training mode
is when the both text browsers contain a text and the user does the initial
pose from Figure B.8. Once the recording is finished, the new sign is added
to the dictionary.
Figure B.8: Initial pose required to start a recording.
Appendix C
How to make Microsoft Kinect
XBOX 360 work with your
system
Tutorial by Daniel Martı́nez Capilla - [email protected] - www.dani89mc.com
This appendix tries to make your life easier when trying to set up the Kinect on
your laptop. It took me for a while to make it work and I think it is interesting to
share my experience with you. In that case, I am using the following configuration:
• Sony Vaio VPCEB1M1E
R
• Processor IntelCore
i3.
• Graphics card ATI Mobility RadeonTM HD 5650.
• Ubuntu 10.10 (64 bits).
• QtCreator as IDE.
• Usage of the following libraries: OpenCV, PCL, OpenNI.
If you want to use another configuration, you might need to find the way to
modify the guideline provided hereafter. You might need to type some of the
commands on your own due to the Latex characters.
60
61
1. Download Ubuntu 10.10 Desktop for 64 bits from
http://releases.ubuntu.com/10.10/.
2. Install it in a flash drive (if you are in Windows you can do so using Universal
USB-Installer ).
3. Reboot your laptop after plugging your flash drive into a USB port. Your
previously installed Ubuntu installer from your flash drive will start running.
Follow the instructions to install it properly (you can find a lot of tutorials online to help you on that). I made four different partitions. One for
(/home,/, /boot and /swap).
4. Once the installation is done, reboot and run your Ubuntu 10.10.
5. You might need to install some programs to set up your Ubuntu:
(a) sudo apt-get install aptitude
(b) sudo apt-get install git
(c) sudo apt-get install g++
(d) Install Java7 using the following tutorial (section Java 7 , Sun/Oracle)
http://brunoreis.com/tech/intalling-java-ubuntu-natty/
6. Go to Ubuntu Software Center and install QtCreator4.
7. Installation of OpenCV (http://opencv.willowgarage.com/wiki/):
(a) sudo apt-get install build-essential libgtk2.0-dev
libjpeg62-dev libtiff4-dev libjasper-dev libopenexr-dev
cmake python-dev python-numpy libtbb-dev libeigen2-dev
yasm libfaac-dev libopencore-amrnb-dev libopencore-amrwb-dev
libtheora-dev libvorbis-dev libxvidcore-dev
(b) wget http://ffmpeg.org/releases/ffmpeg-0.7-rc1.tar.gz
(c) tar -xvzf ffmpeg-0.7-rc1.tar.gz
(d) cd ffmpeg-0.7-rc1
Chapter C: How to make Microsoft Kinect XBOX 360 work with your system
62
(e) ./configure --enable-gpl --enable-version3
--enable-nonfree --enable-postproc --enable-libfaac
--enable-libopencore-amrnb --enable-libopencore-amrwb
--enable-libtheora --enable-libvorbis --enable-libxvid
--enable-x11grab --enable-swscale --enable-shared
(f) make
(g) sudo make install
(h) cd ∼
(i) wget downloads.sourceforge.net/project/opencvlibrary/
opencv-unix/2.3.1/OpenCV-2.3.1a.tar.bz2
(j) tar -xvf OpenCV-2.3.1a.tar.bz2
(k) cd OpenCV-2.3.1/
(l) mkdir build
(m) cd build
(n) cmake -D WITH EIGEN=ON -D WITH TBB=ON -D
BUILD NEW PYTHON SUPPORT=ON -D WITH V4L=OFF -D
INSTALL C EXAMPLES=ON -D INSTALL PYTHON EXAMPLES=ON
-D WITH OPENNI=ON -D BUILD EXAMPLES=ON ..
(o) make -j4
(p) sudo make install
8. Installation of Point Cloud Library
(http://www.pointclouds.org/downloads/linux.html):
(a) sudo add-apt-repository ppa:v-launchpad-jochen-sprickerhof-de/pcl
(b) sudo apt-get update
(c) sudo apt-get install libpcl-all
9. Installation of Kinect (OpenNI, NITE and AVIN2 )
(http://igorbarbosa.com/articles/how-to-install-kin-in-linux-mint-12-ubuntu/):
63
(a) sudo apt-get install libusb-1.0-0-dev freeglut3-dev
(b) cd ∼
(c) mkdir kinect
(d) Download OpenNI stable build for Ubuntu 10.10 v1.5.2.23 from
http://www.openni.org/Downloads/OpenNIModules.aspx
(e) Download PrimeSense NITE stable build for Ubuntu 10.10 v1.5.2.21
from
http://www.openni.org/Downloads/OpenNIModules.aspx
(f) Download PrimeSense NITE stable build for Ubuntu 10.10 v1.5.2.21
from
https://github.com/avin2/SensorKinect/zipball/unstable
(g) Extract and rename the downloaded folders. Rename the OpenNI folder
as ’openni’, the Nite folder as ’nite’ and the Avin2 folder as ’sensorkin’.
Add the 3 folders into the previously created kinect folder from your
home.
(h) Installation of OpenNI:
i. cd ∼/kinect/openni/
ii. chmod a+x install.sh
iii. sudo ./install.sh
(i) Installation of AVIN2:
i. cd ∼/kinect/sensorkin/Platform/Linux/CreateRedist/
ii. chmod a+x RedistMaker
iii. sudo ./RedistMaker
iv. cd ../Redist/Sensor-Bin-Linux-x64-v5.1.0.2
v. sudo chmod a+x install.sh
vi. sudo ./install.sh
(j) Installation of NITE:
i. cd ∼/kinect/nite/
Chapter C: How to make Microsoft Kinect XBOX 360 work with your system
64
ii. chmod a+x install.sh
iii. sudo ./install.sh
10. At this point, you must be able to run your Kinect. Plug your device into a
USB port and run the following test:
(a) cd ∼/kinect/openni/Samples/Bin/x64-Release/
(b) ./Sample-NiUserTracker
(c) You can also run the NiViewer by typing ./NiViewer
(d) You should get something similar as what it is shown in Figures A.1(a)
and A.1(b).
(a) ./Sample-NiUserTracker
(b) ./NiViewer
Figure C.1: Demo’s output
Bibliography
[1] Open Kinect Project. http://openkinect.org/wiki/Main_Page.
[2] Open NI API Reference. http://openni.org/Documentation/Reference/
index.html.
[3] Open NI Project. http://www.openni.org/.
[4] R. Akmeliawati, M.P.-L. Ooi, and Ye Chow Kuang. Real-time malaysian
sign language translation using colour segmentation and neural network. In
Instrumentation and Measurement Technology Conference Proceedings, 2007.
IMTC 2007. IEEE, pages 1 –6, may 2007.
[5] R. Bellman and R. Kalaba. On adaptive control processes. Automatic Control, IRE Transactions on, 4(2):1 – 9, nov 1959.
[6] J.P. Bonet. Reducción de las letras y arte para enseñar a hablar a los mudos.
Colección Clásicos Pepe. C.E.P.E., 1992.
[7] Nicolas Burrus. Kinect Calibration, Nicolas Burrus Homepage. http://
nicolas.burrus.name/index.php/Research/KinectCalibration.
[8] W. Gao, J. Ma, J. Wu, and C. Wang. Sign language recognition based on
HMM/ANN/DP. International Journal of Pattern Recognition and Artificial
Intelligence, 14(5):587–602+, 2000.
[9] Wen Gao, Gaolin Fang, Debin Zhao, and Yiqiang Chen. Transition movement models for large vocabulary continuous sign language recognition. In
65
BIBLIOGRAPHY
66
Automatic Face and Gesture Recognition, 2004. Proceedings. Sixth IEEE International Conference on, pages 553 – 558, may 2004.
[10] D. M. Gavrila. The visual analysis of human movement: A survey. Computer
Vision and Image Understanding, 73:82–98, 1999.
[11] Jonathan C. Hall.
Gesture recognition with kinect using hidden
markov models (hmms). http://www.creativedistraction.com/demos/
gesture-recognition-kinect-with-hidden-markov-models-hmms/.
[12] C. Daniel Herrera, Juho Kannala, and Janne Heikkilä. Accurate and practical calibration of a depth and color camera pair. In Proceedings of the
14th international conference on Computer analysis of images and patterns Volume Part II, CAIP’11, pages 437–445, Berlin, Heidelberg, 2011. SpringerVerlag.
[13] Dai Jun. Gesture recognition reach based on high-order nmi. Master Dissertation, ShanHai Maritime University, May 2004.
[14] Kathryn LaBelle. Kinect Rehabilitation Project. http://netscale.cse.
nd.edu/twiki/bin/view/Edu/KinectRehabilitation, June 2009.
[15] Code Laboratories. CL NUI Plataform. http://codelaboratories.com/
kb/nui.
[16] V.I. Pavlovic, R. Sharma, and T.S. Huang. Visual interpretation of hand
gestures for human-computer interaction: a review. Pattern Analysis and
Machine Intelligence, IEEE Transactions on, 19(7):677 –695, jul 1997.
[17] Yang Quan. Sign language letter recognition algorithm based on 7hu invariant moments. Master Dissertation, Xi’ans University of Architecture and
Technology, July 2007.
[18] Yang Quan and Peng Jinye. Application of improved sign language recognition and synthesis technology in ib. In Industrial Electronics and Applications, 2008. ICIEA 2008. 3rd IEEE Conference on, pages 1629 –1634, june
2008.
67
BIBLIOGRAPHY
[19] Patrick Milhelich Melonee Wise. Radu Bogdan Rusu, Tully Foote. ROS.
http://www.ros.org/wiki/kinect.
[20] Thad Starner, Joshua Weaver, and Alex Pentland. Real-time american sign
language recognition using desk and wearable computer based video. IEEE
Transactions on Pattern Analysis and Machine Intelligence, 20:1371–1375,
1998.
[21] William C. Stokoe. Sign Language Structure [microform] / William C.
Stokoe. Distributed by ERIC Clearinghouse, [Washington, D.C.] :, 1978.
[22] William C. Stokoe, Dorothy C Casterline, and Carl G Croneberg. A dictionary of American sign language on linguistic principles / by William C.
Stokoe, Dorothy C. Casterline, Carl G. Croneberg. Linstok Press, [Silver
Spring, Md.] :, new ed. edition, 1976.
[23] Christian Vogler and Dimitris Metaxas. A framework for recognizing the
simultaneous aspects of american sign language. Computer Vision and Image
Understanding, 81:358–384, 2001.
[24] Wikipedia. American sign language grammar. http://en.wikipedia.org/
wiki/American_Sign_Language_grammar.
[25] Wikipedia. Lengua de seas. http://es.wikipedia.org/wiki/Lenguaje_
de_signos.
[26] Wikipedia. Spherical coordinate system.
[27] Ying Wu and Thomas S. Huang. Vision-based gesture recognition: A review. In Proceedings of the International Gesture Workshop on GestureBased Communication in Human-Computer Interaction, GW ’99, pages 103–
115, London, UK, UK, 1999. Springer-Verlag.
[28] Z. Zafrulla, H. Brashear, H. Hamilton, and T. Starner. A novel approach
to american sign language (asl) phrase verification using reversed signing.
In Computer Vision and Pattern Recognition Workshops (CVPRW), 2010
IEEE Computer Society Conference on, pages 48 –55, june 2010.