1
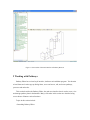
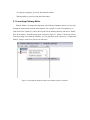
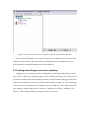
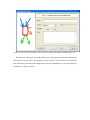
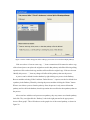
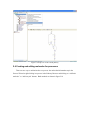
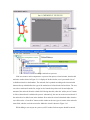
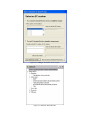
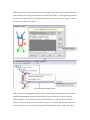
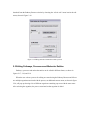
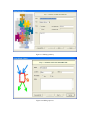
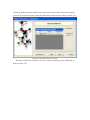
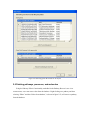
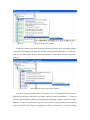
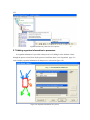
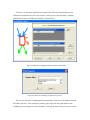
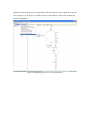
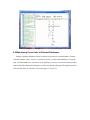
Version 2.0
Pathway Editor Tool
Creating and Editing Biological Pathways Data
User Manual
Center for Computational Genomics
Division of Computer Science
EECS Department
Case Western Reserve University
Cleveland, OH 44106
1 Introduction
The Pathways System project, which is being developed at the Center for Computational
Genomics, Case Western Reserve University, is a set of tools for biologists to interact with
pathways and processes, the fundamental building blocks of biology. In order to better understand
the chemical interactions taking place in nature, biologists need a mechanism to visualize these
pathways and processes. The overall goal of the project is to facilitate this discovery by providing
a robust collection of biological information along with applications that provide interfaces to the
data and allow visual interaction with it.
This report describes the pathway editor tool, designed to create and edit pathways for the
Pathways Database.
1.1 Biological Terminology
In order to understand the technical aspects of the pathway editor tool, it is necessary to first
explain some biological terminology employed in this paper. A "molecular entity" is defined here
to be any molecule involved in a reaction, and these entities are the lowest level of abstraction that
biologists analyze. A "process" is a reaction involving a number of molecular entities. Processes,
in general, have substrates that can be considered as main inputs to the reaction, and products,
which are the main outputs of the reaction. In addition, there are cofactors, which either assist in
the reaction (cofactors in) or are released as byproducts of the reaction (cofactors out). To control
the rate of the reaction, there are inhibitors and activators. A "pathway" is a group of processes that
join together (for instance, the products of one process might be substrates of another process) to
produce an overall effect, or metabolism.
There are three general classes of biological pathways: 1) metabolic and biochemical, 2)
transcription, regulation and protein synthesis, and 3) signal transduction. Metabolic pathways are
responsible for carrying out the chemical reactions that provide basic biological functions such as
DNA, RNA and protein synthesis and degradation, energy metabolism, fatty acid synthesis, and
many others. Transcription and protein synthesis are responsible for converting genetic
information into proteins (gene products). Signal transduction pathways are responsible for
coordinating metabolic processes with transcription and protein synthesis. Each of these three
kinds of pathways has distinct attributes, to be kept and managed in the pathways database.
1.2 Overview
The pathway editing tool provides a user interface for the end users to access and edit data
residing in the database. This section gives an overview of the design, implementation and features
of Pathway Editor.
Pathway Editor has the following features:
• Familiar user interface. As Pathway Editor is a component of the pathway database system,
it has a user interface similar to other components, like Pathway Browser, which has
Windows explorer’s look-and-feel design model. Consistent UI reduces the study curve for
end users.
• Minimum effort to create and edit pathway data. Both data gathering and editing can be time
consuming and error-prone. Pathway Editor is designed to ease the workload by utilizing
existing data.
• Extensible and flexible. Pathway Editor interacts with pathway database. As new needs arise,
more information should be included and additional tools should be integrated. This may
lead to changes in the database schema. As a client-side tool, Pathway Editor is extensible
and flexible enough for changes.
• Hide internal logic behind the interface. Users interact with the data through the user
interface of Pathway Editor, browse and edit data by simply clicking the mouse button. The
interaction between the pathway database server and Pathway Editor, whether through
stored procedures or ad-hoc queries, is transparent to users.
• Integrity enforcement. As users perform various operations, such as inserting a process into a
pathway, the integrity is checked and enforced. For instance, if the inserted process already
exists in that pathway, then the new copy will be redundant. Also, when the users delete the
last remaining substrate (or product) from a process, the pathway editor makes sure that they
add relevant molecules to make the process complete.
Pathway Editor now is an integrated component of the Pathway Browser. This gives users a
more consistent look-and-feel. A screen shot of the Pathway Browser is shown in figure 1.1.
In the Pathway Browser, the left pane has a hierarchical tree view of existing pathways,
processes and molecular entities on both the database server. Users can do operations like
uploading pathways to or downloading pathways from database server. The right pane contains a
tabbed control. It shows details of the pathway selected from the left pane. Currently, it shows the
details in the form of both a hierarchical tree view and a HTML file. To modify a pathway, users
can do simple edit operations through the tree view interface or perform some more complex
operations through the forms provided by the editor component. Each operation will call a stored
procedure in the database server or use ad-hoc query to accomplish the task.
The key features of Pathway Editor are:
•
Creating new pathways, processes, molecular entities and storing them in the database
server
•
Editing pathways by adding or removing processes
•
Editing processes by adding or removing molecular entities
•
Changing a molecular entity’s name
•
Changing a molecular entity’s role in a process
•
Adding or editing external links to local pathways, processes or molecular entities
•
Verifying pathways
•
Deleting pathways, processes, and molecules
Figure 1.1 Screen-shot of the main interface of Pathway Browser
2 Working with Pathways
Pathway Editor has a wizard style interface, similar to an installation program. Via the main
wizard forms and various pop-up dialog forms, users can browse, edit, and create pathways,
processes and molecules.
This section describes the Pathway Editor, the main user interface that is used to create, view
and manage pathway data in the database. Many of the tasks in this section are described using
screen shots to illustrate various functions.
Topics in this section include:
• Launching Pathway Editor
• Creating new pathways, processes and molecular entities
• Editing pathways, processes and molecular entities
2.1 Launching Pathway Editor
Pathway Editor is an integrated component of the Pathways Database System. It is invoked
through the context menu from the main interface. For example, to create a new pathway, we
right-click on the “Pathways” node in the left panel of the Pathway Browser and choose “Editor”,
then “New pathway” from the popup menu, as shown in figure 2.1. Figure 2.2 shows the wizard
form for creating a new pathway. Similarly, you can right-click on the “Processes” or “Molecular
Entities” nodes to create new processes or molecules.
Figure 2.1 Launching the Pathway Editor from the Pathway Browser interface
Figure 2.2 Pathway Wizard form for creating a new pathway
2.2 Creating New Pathways
Using Pathway Editor to create a new pathway is quite easy. As shown in Figure 2.1, we can
create a new pathway by right-clicking the “Pathways” node and choosing “Editor” and then “New
pathway..” in the popup context menu. The screen shot of pathway wizard is shown in figure 2.2
Figure 2.2 shows the main form for creating a new pathway. The only information that users
need to enter at this time is the pathway’s name. Other information can be entered now or later. This
feature allows users to create pathway incrementally. Now let’s type in the name and click the
“Save and Exit” button then we get the screen in figure 2.3.
From figure 2.3, we can see that in the right pane, the pathway with the name we just entered is
listed as the only child node of topmost node, “Pathways”. Expanding this node, we see an empty
“Processes” node because we have not added any processes to this pathway yet. Because of the
constraints in the database, any operations, like adding processes, adding external links, can only be
performed after the pathway is created.
Figure 2.3 Screen-shot after creating a new pathway with name “Biosynthesis of histidine”
Also, instead of clicking the “Save and Exit” button, the next button can be clicked and more
information can be filled out about the pathway, including the process information. The next
section discusses creating and adding processes into a pathway.
2.3 Creating and editing processes for a pathway
Adding processes to existing or newly created pathway is done through the pathway wizard
form. There is a “Processes” page in the pathway form. Switching to this page, a list of processes (if
any) that are involved in the selected pathway is shown. Using the buttons on this page, add, edit or
delete process operations are allowed, as shown in the first image in figure 2.4. The second image
in figure 2.4 shows an alternative way of adding a process to a pathway. In the Pathway Browser,
open a pathway, and then right click on “Processes”, and then select “Editor” and finally “New
Process.” This will open the Process Wizard to create a new process.
(a)
(b)
Figure 2.4 Screen shot for adding a process to a pathway
Figure 2.5 List of available processes is shown to the user before a new process is created
As this pathway is just created, there is no process in it yet. If we click the “Add” button in the
“processes” page of the pathway wizard, we get the screen in figure 2.5. From the “Add process”
form, users can choose an existing process from the processes list or create a new process. The
process list has all the available processes in the database server and the processes are listed by their
names and ids. Clicking one process in the list, we can get some detailed information for that
process and this information is shown in the right pane. This could help users determine whether it
is the right process they are looking for. Now let’s just select one of the processes and then click the
“OK” button.
Figure 2.6 Screen shot after adding a process to a pathway
Adding a process to a pathway is done in one transaction. If the transaction is successfully
committed, we get the screen in figure 2.6. Figure 2.6 shows the “Process” page after adding a
process to the newly created pathway.
Users can choose to create a new process by selecting the “Create new process” radio button
and clicking the “OK” button on the form shown in figure 2.5. Figure 2.7 shows the Process Wizard
form that allows users to enter the new process’s information. After the users enter all the required
information, the process will be added to the pathway automatically.
Figure 2.7 Screen shot after selecting “create new process” option in the add process dialog (figure 2.5)
When the user edits a process from the pathway form, the program will first check whether the
selected process is used also by other pathways. If this is the case, it will alert the users and ask the
users whether they want to keep the changes to the process in that pathway or expose the changes to
all pathways, as figure 2.8 shows.
Figure 2.8 Alert window that appears before editing a process that is involved in multiple pathways
If the user selects “Create an extra copy …”, then a transaction will be started to make a copy
of the selected process to replace the original one used in that pathway and all the following editing
operations will be on that local copy and thus will not affect the original copy. If the user chooses
“Modify this process …”, then any change will affect all the pathways that use the process.
A process can be deleted from the database by right clicking on a process in the Pathway
Browser and then selecting “Editor” and then “Delete Process.” A process can also be deleted from
a pathway in the Pathway Wizard by selecting the process and then clicking the “Delete” button.
When a user deletes a process from the pathway form, the process is only removed from that
pathway and it is still in the database, thus this operation does not affect the other pathways that use
the process.
After users have added several processes to a pathway, they may want to see what the pathway
looks like. They can right-click the “Pathway” node in the right pane and in the pop-up menu
choose “Show graph”. This will lead users to the graph view of the created pathway, as shown in
figure 2.9.
Figure 2.9 Graph view of the created pathway
2.4 Creating and editing molecules for processes
There are two ways to add molecules to a process: the molecular information step in the
Process Wizard or right clicking in a process in the Pathway Browser and clicking on “Add basic
molecule” or “Add enzyme” buttons. Both methods are shown in figure 2.10
OR
2.10 Adding a molecule to a process
If the user wants to add a component to a process from process wizard window, then the add
molecule window shown in Figure 2.11 is displayed. In this window, user is presented a list of
available molecules in the database. The molecule list is updated according to the selected radio
button at the top which defines the type of the molecules to be listed in the list box below. The user
can select a molecule from the list, assign its role from the drop-down role list and adjust the
amount of the molecule from the related field. Having done this, when the “add to process” button
is clicked, the molecule is added to the process. Alternatively, the user can create a new molecule if
the molecule to be added is not in the database. New molecule wizard is launched either when the
user clicks on the “Create New” button on this window or the user types in a name in the molecule
name field, which is not in the current list. Molecule wizard is shown in Figure 2.19
While adding a new enzyme to a process, an EC number for that enzyme should be entered.
This window pops up automatically after adding an enzyme. It is shown in figure 2.12. Users can
also see the details of any molecule in the molecule list in add molecule window by firstly selecting
a molecule in the list and then clicking on the “show details” button. Molecule detail window is
shown in Figure 2.13.
Figure 2.11 Add Molecule Window
Figure 2.12 Adding an EC number for an enzyme
Figure 2.13 Molecule Detail Window
Molecules can also be edited in the process wizard window. When the user clicks on the edit button
on the control panel, a popup menu asks the user whether s/he wants to edit the global properties of
the molecule or those properties of the molecule that are specific to this process. Figure 2.14 shows
the edit menu in the process window.
OR
Figure 2.14 Molecule Editing Menu
If the user chooses editing global properties of the molecule then the molecule wizard window is
launched and through the molecule wizard which is shown in Figure 2.19, the user can edit
different properties of the molecule. On the other hand if the user wants to edit the molecule
properties related to this process, the window in Figure 2.15 is shown. Through this window the
user can change the role, amount and (if applicable) EC information. This window can also be
launched from the Pathway Browser window by choosing the “edit its role” menu item in the edit
menu, shown in Figure 2.14
Figure 2.15 Editing molecule information within a process
2.5 Editing Pathways, Processes and Molecular Entities
Pathways, processes and molecular entities can be edited in different forms, as shown in
figures 2.17, 2.18, and 2.19.
When the user selects a process for editing or removal using the Pathway Browser and if there
are multiple organisms associated with the process, an additional context menu, as shown in figure
2.20, will pop up showing a list of different organisms containing a process with the same name.
After selecting the organism, the process associated to that organism is edited.
Figure 2.17 Editing a pathway
Figure 2.18 Editing a process
Figure 2.19 Editing a molecule
Figure 2.20 Selecting an organism
The forms shown in figure 2.17, 2.18, 2.19 have a consistent look-and-feel design. Because of
the hierarchies existing between pathways, processes and molecules, when editing a molecule or
process, the process checks the occurrence of that molecule or process in other processes or
pathways. If there are multiple occurrences, the program will alert the users that their operations
will affect all of them. It gives users the choice to see those processes or pathways before making
those changes.
One aspect of the Molecule Wizard that differs from the other two wizards is that when
creating or editing an enzyme within a process, the genes which encode for the enzyme must be
provided. The step showing the current genes that encode for the enzyme is shown in figure 2.21.
Figure 2.21 Genes that encode an enzyme
When the “Edit Gene List” button is clicked, a window to add more genes is displayed, as
shown in figure 2.22.
Figure 2.22 Selecting genes that encode for an enzyme
2.6 Deleting pathways, processes, and molecules
Using the Pathway Editor’s functionality embedded in the Pathway Browser’s tree view
context menu, a user can remove data from the database. Right clicking on a pathway and then
selecting “Editor” and then “Delete from database,” as shown in figure 2.23, will remove a pathway
from the database.
Figure 2.23 Deleting a pathway
Collapsing a pathway node down, and then opening the processes node, then right clicking a
selected process, and then selecting Editor and then “Delete process from pathway,” as shown in
figure 2.24, will not remove the process from the database, but will remove the process from the
pathway.
Figure 2.24 Removing a process from a pathway
To remove a process from the database, select the “Process” root and find the correct process.
Right click on the process and then select “Editor” and then “Delete from database.” To remove a
molecule from the database, follow the same technique as deleting a pathway or process from the
database. To remove a molecule from a process, select a process, select a molecule listed under the
process, right click, select “Editor” and finally select “Remove from process”, as shown in figure
2.25.
Figure 2.25 Removing a molecule from a process
2.7 Adding organism information to processes
As organism information is provided at the process level, adding it to the database is done
through the process wizard form. In the process wizard form, there is an “Organisms” page. It is
used to display organism information for that process, as shown in figure 2.26.
Figure 2.26 Organism information for a process
If a process is enzymatic, organism information will be filled out automatically from the
information contained in the genes of the enzyme. If the process is non-enzymatic, organism
information will have to be filled out manually, as shown below.
Figure 2.27 Buttons for adding and deleting organism information
Figure 2.28 Form for associating an organism to a process
We can view the effect of adding organism information to processes on the pathway through
the Pathway Browser. After drawing the pathway graph, right click the graph and then click
“highlight processes happen in selected organism” in the pop up menu. Figure 2.29 shows a list of
organisms related to the processes in that pathway. After selecting one of the organisms, we get the
screen in figure 2.30. In Figure 2.30 all the processes of this pathway, which exist in plants and
yeasts are highlighted.
Figure 2.29 Highlighting processes for a specified organism
Figure 2.30 Highlighted processes for a specified organism
2.8 Maintaining Cross Links to External Databases
Pathways database maintains records for linking local entries to external databases. In table
“external_database_links,” each row records a local entry’s id, the external database’s id and the
entry’s id in that database. Local entries can be pathways, processes or molecules. Pathway Editor
captures this link information and displays it to the users through a data grid. Through the interface,
users can add, delete or edit links, as shown in figure 2.31 and 2.32.
Figure 2.31 External link window in pathway wizard
Figure 2.32 Adding an external link to a local pathway
If the user wants to exit a wizard window by clicking on the “cancel” button, the transactions that
are committed in that session are not rolled back. The user has to manually roll back those changes.
In order to help the user see what changes have been made in that session a log window is displayed
whenever the user wants to exit through the “cancel” button. The log window is shown in Figure
2.33. Logs concerning the changes are also saved to a file on the hard drive for the user to check
later.
2.33 Log Window